esun易森TM会计循环实验室使用说明书——学生篇
E-CELL操作说明书

操作手册FOR THE120 GPM, 27.3 m3/hE-CELL SYSTEM TM注意:本手册含有对 E-Cell 公司所提供的水处理系统的操作和维护指导。
在操作和维修该系统时,必须始终遵守手册中的程序。
此中文文本的内容与英语版本的用户手册有分歧时,以英文版本为准。
1. 人身安全注意事项E-CELL MK-2 STACK™1.1 电气1. 定期检查接线端子是否接触良好。
2. 如发现有损坏的电气元件,在修复或更换前要先隔离该元件。
3. 检查电器箱密封良好以防进水。
4. 只允许有资格的电气技术人员进行检修工作。
5. 整流器处于工作状态时不可切断E-Cell MK-2模块上的电源线。
1.2 机械E-Cell MK-2 模块含有电器元件,可能造成触电危险,故请勿将工具、螺丝等放置在E-Cell 模块上。
除专业人员外,不要调整E-Cell MK-2 模块上的螺丝。
模块端板间的距离在出厂前已经精确调节,过度调整可能造成永久损害。
1.2.1 泄漏MK-2 模块的最大操作压力是 100 psi (6.8 bar) ,在正常压力下模块不应泄漏。
如发现模块漏水,应停机检查泄漏位置和模块端板间距。
若漏水无法解决,请立即联系E-Cell 公司。
1.2.2 离心泵1. 严禁在运转的离心泵上工作。
如需维护必须停机并在泵上加标识。
2. 确保水泵电机风扇的通风畅通。
1.2.3 水力E-Cell™ 系统通过不同管径的管道输送大量的水,如非正常的操作可能引起设备损坏、高压水泄漏以致人身伤害。
1. 确认所有的管道都有足够的固定和支撑。
2. 在开启系统进水阀门前,保证出口阀门已经开启。
1.3 停机必须遵守停机程序来保证工作人员的安全。
不仅需注意转动设备和电器,对容器或水管也应小心。
1.4 通道在 E-Cell™ 设备周围应有足够的通道和照明以便操作和维护的安全。
1.5 安全用具当可能暴露在酸碱环境中时,须穿戴橡胶手套、橡胶服、面罩和防护眼镜。
Sun Electronic Systems, Inc. 环境测试室 EC10 说明书

•0.7 FT³ WORKING VOLUME •INTEGRAL USER Temperature Probe•LCO 2 , -73ºC TO +315ºC COOLING Optional LN 2 , -184ºC to +315ºC •IEEE-488, RS232, RS422Remote Communication•EXPANDED I/O ARCHITECTURE Analog Input Ports Analog Output Ports Auxiliary I/O Drivers Digital Parallel Port High Speed Serial Link •LOCAL TEMPERATURE Controlled RampingThe EC10 is an advanced environmental cham-ber intended for automated test system and laboratory applications. Standalone operation is supported by a full function keyboard with a 2 line, 16 character LCD display. The chamber temperature and the user tem-perature probe readings are normally displayed con-tinuously. User programs are easily entered into the EC10 using a BASIC like command set programming language. In an automated test system, the EC10functions as a remote data acquisition and control system using the capability of its expanded I/O archi-tecture.The electrically isolated user temperature probe allows for direct monitoring of critical temperatures on the device under test or certain areas inside the test chamber. As well as being displayed on the front panel,readings are accessible from the IEEE-488 or RS232/422 interfaces.The EC10 command set, whether entered from the local keyboard or downloaded over the IEEE-488 or RS232/422 interfaces, provides for setting chamber temperature, temperature ramping rate and soak time at temperature, temperature deviation limits and tem-perature upper and lower limits.Probe calibration procedures are built into the EC10 using local menu driven format. Special commu-nication commands allow for communication to the analog I/O ports, the high speed serial port (SPI) and the parallel port. The chamber can be controlled re-motely from the RS232/422 port or the IEEE-488 bus interface. When the IEEE-488 bus interface is used,transparent communication from the IEEE-488 bus to the RS232/422 port is supported. Programs and para-meters are stored in battery-backed memory.The PID coefficients used in the EC10 are user adjustable from the keyboard and remote interfaces. In addition, alarm function and sound level, BAUD rate,interrupt assignments and other communication port options are configurable from the front panel using an easy, menu driven format.The EC10 supports several safety features in-cluding a mechanically adjustable over temperature thermostat, upper and lower software temperature lim-its, processor watchdog timer and open and short probe detection.The EC10 is designed to be adaptable to your system application. If you have special requirements,call Sun Systems for solutions.LOCAL AND REMOTE CONTROL INTERFACESThe EC10 supports stand-alone operation with a full function keyboard, a 2-line LCD and a powerful programming language. For automated test systems, a complete talker/listener IEEE-488 interface is available with serial and parallel poll capability. For remote operation over long distances, RS232 and RS422 serial interfaces areChart Recorder。
实验室综合管理系统学生使用手册
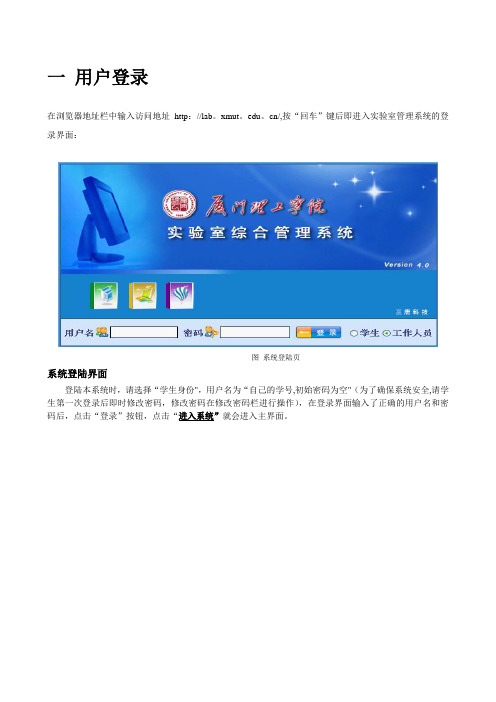
一用户登录在浏览器地址栏中输入访问地址http://lab。
xmut。
edu。
cn/,按“回车”键后即进入实验室管理系统的登录界面:图系统登陆页系统登陆界面登陆本系统时,请选择“学生身份",用户名为“自己的学号,初始密码为空"(为了确保系统安全,请学生第一次登录后即时修改密码,修改密码在修改密码栏进行操作),在登录界面输入了正确的用户名和密码后,点击“登录”按钮,点击“进入系统”就会进入主界面。
二详细操作说明进入登录界面后,系统界面有三个模块:在线学习,实验预约,个人信息。
2.1 在线学习2.1。
1实验项目卡学生点击“实验项目卡”打开所有实验项目列表,学生在这里可以查看到所有实验室开设的实验项目卡信息。
具体操作:(1)点击院系名称前的“”打开院系下所有实验室列表(2)点击实验室名称前的“”打开该实验室承担的所有实验项目列表(3)双击实验项目名称则可以打开实验项目卡信息进行查看2.1.2 实验指导书学生在本模块中可以查找相关实验项目的指导资料,已便于预习.实验指导书的查看:(1)单击“指导书名称”,进入实验指导书窗体。
(2)选择所要下载的实验指导书所在行,点击“全文”超级链接(3)在弹出的窗体中显示实验指导书的具体内容.实验指导书的下载:选择所要下载的实验指导书所在行,单击后面的文档附件列中的“附件”即可查看和下载2。
1。
3 在线交流在线交流:学生对某一知识点或实验项目有疑点都可以在这里通过交流主题的形式发布出来,感兴趣的同学或者相关老师可以以“回贴”的形式进行交流,主题发布人或者老师可以对一些跟主题无关的内容进行删除。
操作流程如下:(1)点击“”打开编辑主题窗体(2)填写好相关的主题内容,单击“发布"即可完成操作(3)其他学生或老师登录后,双击某个主题名称后可以直接查所有人员对该主题的回贴情况,同时也填写自己对该主题的看法进行“回贴"。
2.2 实验预约2.2。
最新(完美版)RNOHelper_V1.1.8使用说明

RNO Helper无线网络优化助手使用说明V1.1.8目录1.概述 (1)2.源数据制作与准备 (2)2.1.工参模板制作 (2)2.2.邻区模板制作 (3)2.3.其它模板制作 (3)3.基本使用介绍 (4)3.1.管理员权限设置 (4)3.2.网络制式设置与版本信息查看 (4)3.3.4G/3G/2G扇区图层制作 (5)3.3.1.RNO专用扇区图层制作 (5)3.3.2.RNO专用扇区图层打开 (6)3.4.小区号-名/基站号-名/经纬定位 (7)3.5.专题图层制作 (7)3.6.网络标签显示 (8)3.7.小区信息显示 (8)3.8.其它图层制作 (8)3.9.保存工作空间 (9)4.规划优化核查功能介绍 (10)4.1.无线参数优化 (10)4.1.1.全网参数检索 (10)4.1.2.小区参数相关性显示 (11)4.2.邻区关系优化 (11)4.2.1.邻区关系表导入 (12)4.2.2.邻区关系显示与手动添加删除 (12)4.2.3.邻区规划更改关系表导出 (13)4.2.4.LTE邻区自动规划 (13)4.2.4.1.自动邻区规划设置 (13)4.2.4.2.单小区可视化邻区自动规划 (14)4.2.4.3. 批量邻区自动规划 (15)4.2.5.站点间切换频度地理化显示 (16)4.3.全网参数核查功能 (16)4.3.1.邻区距离核查-超远邻区核查 (17)4.3.2.邻区个数核查 (17)4.3.3.单向邻区核查 (17)4.3.4.邻区漏配核查 (17)4.3.5.LTE全网PCI核查 (18)4.3.6.LTE同站PCI核查 (18)4.3.7.LTE全网PRACH核查 (18)4.3.8.LTE同站PRACH核查 (18)4.3.9.LTE站点TAC核查 (18)4.3.10.TDS同站频扰核查 (18)4.3.11.TDS全网主频核查 (18)4.3.12.TDS同频同扰核查 (18)4.3.13.TDS邻区扰码核查 (18)4.3.14.TDS同频同扰码组核查 (18)4.3.15.TDS同频同复合码组核查 (18)4.3.16.TDS同频同扰码组同复合码组核查 (18)5.常用功能介绍 (20)5.1.MAPINFO图层转换GOOGLEEARTH图层 (20)5.2.外场测试ATU数据显示功能 (20)5.2.1.ATU数据导出转换为EXCEL表格 (21)5.2.2.导入测试数据并生成对应图层 (21)6.帮助与工具信息 (22)6.1.工具信息 (22)6.2.版本检查更新升级 (23)6.3.VIPLICENSING (23)附录Ⅰ VIP 功能 (25)附录Ⅱ常见问题 (25)附录Ⅲ更新记录 (28)1.1.6版本更新内容 (28)1.1.7版本更新内容 (28)1.1.8版本更新内容 (29)1.概述RNOHelper(无线网络优化助手)可以快速制作LTE、CDMA 、TD-SCDMA、GSM 、CDMA2000、WCDMA、点、泰森等网络地理化显示图层,显示系统内/间邻区关系,漏配邻区核查,常规参数核查,邻区批量自动规划,提供4G/3G/2G网络协同规划优化功能,本文档对RNOHelper常用功能进行讲解,以方便大家提高优化工作效率。
e-test法的原理和操作方法
e-test法的原理和操作方法嘿,咱今儿就来唠唠这个 e-test 法!你说这 e-test 法啊,就像是一把神奇的钥匙,能打开微生物世界的秘密大门。
它的原理呢,其实并不复杂。
简单来说,就是通过一条含有抗生素浓度梯度的试条,来看看细菌对不同浓度抗生素的反应。
这就好比是给细菌设了一个“挑战关卡”,从低浓度到高浓度,看它们能在哪一个“关卡”被拦住。
这多有意思啊!就好像我们玩游戏,一步步冲关,只不过这里的“主角”是细菌啦。
那具体咋操作呢?首先得准备好各种材料,就像厨师做菜前要准备食材一样。
然后把试条放在涂满细菌的平板上,就像给细菌送上了一份特别的“礼物”。
接下来,就等着细菌和试条来一场“奇妙互动”啦。
在这个过程中,可不能马虎哦!得仔细观察,看看细菌在试条周围形成的抑菌圈。
这个抑菌圈就像是细菌的“成绩单”,清楚地显示出它们对不同浓度抗生素的“表现”。
如果抑菌圈大大的,那说明细菌对这种抗生素很敏感呀,一下子就被“镇住”了;要是抑菌圈小小的,或者干脆没有,那可能就得考虑换一种抗生素啦。
你想想看,医生们就是靠着这个 e-test 法,来给病人选择合适的药物,这多重要啊!就好像是在茫茫药海中找到了那根能救命的“稻草”。
而且哦,这个方法还很精确呢!它能给出一个具体的数值,告诉我们细菌对某种抗生素的最小抑菌浓度。
这可就厉害了,比起其他一些方法,它就像是一个“精确打击武器”,能准确地找到目标。
操作e-test 法的时候,还得注意一些细节呢。
比如说,平板要放平,试条要放好,不然结果可就不准确啦。
这就跟我们做事一样,得认真仔细,不能马马虎虎的。
总之呢,e-test 法是个很实用的方法,它为我们了解细菌和抗生素之间的“战斗”提供了有力的工具。
它就像一个默默无闻的英雄,在背后为我们的健康保驾护航。
咱可得好好了解它、掌握它,让它发挥出最大的作用呀!你说是不是呢?。
实验室综合管理系统学生使用手册
实验室综合管理系统学生使用手册一、引言实验室综合管理系统是一种方便、高效的工具,旨在帮助实验室管理人员更好地组织实验室的运作。
本手册旨在向学生介绍如何使用实验室综合管理系统,并提供详细的操作指南。
通过学习本手册,学生将能够熟练地使用实验室综合管理系统,提高实验室工作的效率和准确性。
二、系统登录1.访问系统登录页面在您的浏览器中输入实验室综合管理系统的网址,进入系统登录页面。
2.输入用户名和密码在系统登录页面,输入您的用户名和密码,并点击“登录”按钮。
3.选择角色根据您的身份选择学生角色,并点击“确认”按钮。
三、系统主界面1.个人信息查看在系统主界面,您可以查看您的个人信息,包括姓名、学号、联系方式等。
请确保您的个人信息准确无误。
2.实验室预约实验室综合管理系统提供了实验室预约功能,学生可以提前预约实验室进行实验或学习。
在系统主界面,点击“实验室预约”按钮,进入预约页面。
根据实验室的名称、日期、时间等条件,选择合适的实验室,并填写预约信息。
预约成功后,系统将自动发送预约确认通知到您的邮箱。
3.设备借用如果您需要借用实验室的设备进行实验或学习,可以在系统主界面点击“设备借用”按钮,进入设备借用申请页面。
根据设备的名称、借用日期、归还日期等条件,填写设备借用申请,并提交申请。
系统将自动发送设备借用确认通知到您的邮箱。
4.实验室使用记录查询在系统主界面,点击“实验室使用记录查询”按钮,可以查看您过去的实验室使用记录。
您可以根据日期、实验室名称等条件筛选查询结果,以便更好地了解自己的实验室活动情况。
5.实验室安全管理实验室安全是非常重要的,实验室综合管理系统也提供了实验室安全管理功能。
在系统主界面,点击“实验室安全管理”按钮,可以查看实验室安全规定和操作指南。
请阅读并遵守实验室安全规定,确保实验室工作的安全进行。
四、系统操作注意事项1.保护账户安全请妥善保管您的用户名和密码,不要将其提供给他人。
定期更改密码,并确保密码的强度。
实验室综合管理系统学生使用手册

实验室综合管理系统学生使用手册第一章:系统概述1.1 简介实验室综合管理系统是一套专为学校实验室进行综合管理而设计的软件系统。
该系统通过集成实验室设备的管理、实验室预约的管理、实验数据的管理等功能,为学生提供了更加便捷、高效的实验室使用体验。
1.2 功能特点- 实验室设备管理:学生可以通过系统查询各个实验室的设备信息、设备的可用情况,并可以进行设备的预约、借用等操作。
- 实验室预约管理:学生可以通过系统进行实验室的预约、取消预约、查询预约情况等操作,避免了排队等待的繁琐过程。
- 实验数据管理:学生可以将实验数据通过系统上传、保存,并可以随时查询自己的实验数据和成果。
- 实验室安全管理:系统可以提供实验室安全操作指南、安全事故的报告与查询等功能,确保学生在实验中的安全。
第二章:系统登录与注册2.1 注册学生首次使用系统需要进行注册,填写个人基本信息,并选择所属学院、专业等相关信息进行注册。
2.2 登录已经注册成功的学生可以通过输入用户名和密码进行登录操作,登录成功后即可使用系统提供的功能。
第三章:实验室设备管理3.1 设备查询学生可以通过系统查询各个实验室的设备信息,包括设备名称、设备型号、设备状态等。
通过查询可以了解到实验室设备的可用情况。
3.2 设备预约与借用学生可以通过系统进行实验室设备的预约和借用操作。
预约成功后,学生可以到指定实验室进行实验,并使用预约的设备。
在实验结束后,学生需要及时归还设备,以便他人继续使用。
第四章:实验室预约管理4.1 预约查询学生可以通过系统查询自己已经预约的实验室情况,包括预约日期、预约时间段、实验室名称等。
预约查询功能可以帮助学生合理安排自己的学习时间。
4.2 预约操作学生可以通过系统进行实验室的预约操作,选择实验室、预约日期和时间段等信息进行预约。
系统会根据实验室的可用情况进行预约的确认与否。
4.3 取消预约学生可以在需要的情况下通过系统取消已经预约的实验室。
ENMET RECON 4 四元素连续监测器说明书

NOTE: All specifications stated in this manual may change without notice.
CEMS使用资料大全

CEMS使用资料大全CEMS(联合研究中心,Consorzio di Aziende per l’Educazione Multiculturale nelle Scienze Economiche e di Gestione)是一个国际化的盖门特雅商学院(HEC Paris)为首的商学教育联盟,由全球30多所商学院和大型跨国公司组成。
CEMS致力于培养具备全球视野和跨文化背景的商业领袖。
2.CEMS学生手册:CEMS学生手册是一本详细介绍CEMS项目的指南。
它包含了对CEMS项目和学习体验的概述,以及各会员学校的介绍。
学生手册将告诉你如何申请和参与CEMS项目,以及在项目期间需要了解的一切信息。
3.CEMS学生协会:CEMS学生协会是由CEMS学生组成的组织,旨在促进学生之间的交流、社交和合作。
学生协会通常会在学校内举办各种活动,如演讲、研讨会和商业竞赛。
4.CEMS课程:CEMS课程设计为国际化和跨文化,旨在培养学生的领导才能、全球视野和跨文化沟通能力。
CEMS课程通常由联合研究中心控制,可以在CEMS官方网站上找到最新的课程信息。
5.CEMS实习:CEMS项目要求学生在毕业前完成一个国际实习。
实习通常在CEMS的合作跨国公司或其他国际公司中进行,这为学生提供了与不同文化和商业环境交流的机会。
7.CEMS论坛和研讨会:CEMS学生经常参加国际性的论坛和研讨会,这些活动通常由CEMS官方组织或合作伙伴学校组织。
这些活动提供了一个与其他国际商学生和行业专家交流的平台。
8.CEMS学生交换项目:CEMS学生交换项目允许学生在CEMS成员学校之间进行一个学期或一段时间的交换。
这个交换机会使学生有机会进一步拓宽自己的国际视野和跨文化经验。
9.CEMS授课教授:CEMS课程通常由来自CEMS成员学校的优秀教授授课。
CEMS教授是经验丰富的商业专家,他们将提供专业知识和实际案例研究,为学生提供深入的商业教育。
ECOM-EX Ex-MP4 a 温度计使用说明书

Z o n e1Manual de instruçoes | Bruksanvisning Intrinsically Safe temperature meter Ex-MP4 aOperating InstructionsContent1. Application (4)2. Safety precautions (4)3. Faults and damage (4)4. Safety regulations (4)4.1 Special conditions for conducting measurements in zone 0 (4)5. Safety precautions (5)6. Ex-Data (5)7. Specifications (5)7.1 Table with type-approved batteries (5)8. Functional description / operating instructions (5)8.1 Mode of operation (6)8.2 Structural overview (6)8.3 Optical diagram and field of sight (6)8.4 Operation of the laser sight (7)8.5 Operating the unit (7)8.6 Emission level (8)8.7 Battery replacement (8)8.8 Troubleshooting (8)9. Repair (8)11. Cleaning, maintenance and storage (9)12. Warranty and liability (9)13. EC Declaration of Conformity / Ec declaration of conformity (10)Note:The current safety instructions, EC Declaration of Conformity and the Certificate of Conformity can be downloaded from the relevant product page at , or alternatively they can be requested directly from the manufacturer1. ApplicationThe Ex-MP4 a is a non-contact temperature meter for industrial application in areas with an increased risk of explosion in zones 2 and 1, in accordance with directive 1999/92/EC (ATEX) and 94/9/EG.2. Safety precautionsThese operating instructions contain information and safety regulations which are to be observed without fail for safe operation in the described conditions. Non-observance of this information and these instruc-tions can have serious consequences or it may violate regulations.Please read these operating instructions carefully before starting to use the unit!In case of any doubt (in the form of translation or printing errors) the German language operating3. Faults and damageIf there is any reason to suspect that the safety of the unit has been impaired, it must be withdrawn from use and removed immediately from the Ex-area.Measures must be taken to prevent it from being restarted accidentally.We recommend that the unit is returned to the manufacturer for inspection.The safety of the unit may be compromised, if, for example:- there is visible damage to the housing.- the unit has been subjected to excessive loads.- the unit has been improperly stored.- the unit has been damaged in transit.- unit markings or inscriptions are illegible.- malfunctions occur.- obvious measuring inaccuracies occur.- it is not possible to conduct any more measurements with the unit.- permitted limit values have been exceeded.4. Safety regulationsUse of this unit assumes that the operator observes the conventional safety regulations and has read the certificate in order to eliminate faulty operation of the unit.The following safety regulations must also be complied with:- The unit should not be opened inside the Ex-area.- The battery should only be exchanged outside the Ex-area.- Additional batteries must not be carried in the Ex-area.- Only type-tested batteries should be used.- T he unit should only be operated in the explosive area while situated in the appropriate leather case 030280.- Only accessories approved by ecom instruments GmbH may be used.- Avoid use in aggressive acids or bases.- It must be ensured that the unit is not taken into zone 0.- The device is to be protected against water and dust ingress.4.1 Special conditions for conducting measurements in zone 0The Ex-MP4 a should only be used to measure the temperature in zone 0 after consideration of the fol-lowing conditions.1. The Ex-MP4 a itself should not be taken into the zone 0 area.2. I t is imperative to make sure that the unit is not able to inadvertently enter the zone 0 area either.To ensure this the Ex-MP4 a unit must be used with the corresponding wrist strap.Only the manufacturer‘s wrist strap should be used.5. Safety precautions- Caution! Laser radiation!- Do not stare directly at the laser!- Do not aim the unit at other people!- Risk of eye damage!- Laser class 2- Power: < 1 mW- Wavelength: 630 -670 nm6. Ex-DataEC type approval test certificate no.: EPS 10 ATEX 1 242 XEx-designation: † II 2 G Ex ia op is IIC T4Approved for zone 1, device group II, gas group IIC (explosive gases, vapours or mist), temperature class T4.7. SpecificationsMeasuring range -18 °C to + 400 °CAmbient temperature Ta 0 ... +50 °CStorage temperature -20 °C to +65 °CRelative humidity 10- 95 % r.h. non-condensing at 30 °CEmission level fixed at 0.95Smallest display unit 0.2 °CLasersightingTargetAccuracy -18 °C … -1°C ±3 °C(at 23°C) -1°C … +400 °C : ±2 % of reading or ±2 °C, whichever is greater Repeatability ± 2 % of reading or ±2 °C whichever is greaterSpectral response 7-18 µmResponse time (95%) 500msBatteries / power supply: 1 x 9V alkaline battery according to IEC 6LR61, type-testedDimensions: 152 x 101 x 38 mm200gWeight:approx.CE-designation: ‡ 01028. Functional description / operating instructionsPlease read these operating instructions carefully so that you are familiar with, and are able to use, all of the functions of your Ex-MP4 a. For your own safety and information please read through the instructions on the following pages!8.1 Mode of operationAll objects with a temperature above absolute zero radiate infrared energy, which extends in every direction with the speed of light. If an infrared thermometer is trained on an object, the lens gathers the energy and focuses it on an infrared sensor.The sensor responds by emitting a voltage signal which is directly proportional to the absorbed energy. The microprocessor-controlled electronics in the unit are able to ascertain and display the current temperature (in regard to a wider parameter).Objects with radiant or polished surfaces not only radiate energy but also reflect a proportion of radia -tion from their surrounding area. A factor between 0.1 and 1.0 designated as the emission level makes allowances for this factual calculation so that only the true radiated energy, and not the reflected energy, is consulted for calculating the measured value. The majority of applications are measured with an emission level of 0.95.In the Ex-MP4 a the level is set at 0.95 and cannot be altered.8.2 Structural overviewDisplay Laser8.3 Optical diagram and field of sightDistance sensor – object [mm]E nsure that the specific area or object to be measured islarger than the laser spot size of the device. The smallerthe object the closer the equipment must be. For opti-mum measuring accuracy the area/object should be atleast twice that of the spot size.8.4 Operation of the laser sightThe laser sight is a component of the Ex-MP4 a.Please read through the following section carefully:Warning! Do not stare directly at the laser!Risk of eye damage!Operate the unit carefully!Do not aim the unit at other people!The laser sight enables the unit to be aimed accurately and is useful for sighting small or distant objects. However it does not indicate the size of the spot. This value is distance-dependent and can be inferred from the optical diagram in this manual.The units are equipped with a robust solid state laser which is housed inside the unit itself.8.5 Operating the unit°C deg / °F deg Change-overIn order to switch between centigrade andfahrenheit, the battery compartment has to be opened – havingfirst taken off the leather case.It is then possible to select the temperatureindicator required by sliding Switch A from either degree °C ordegree °F.After selecting the temperature indicator required the leathercase must again be fitted before operation of the equipment in thehazardous area.T he LCD indicator shows the temperature in degrees °C ordegrees °F. After release of the trigger the temperature measu-rement is displayed for a further 7 seconds and at the same timethe word …Hold” is displayed. The battery condition indicator sym-bol shows the state of the battery.O peration of the DeviceFor a temperature reading, the equipment ispointed towards an object and the trigger is pressed. Consider the distancein relation to the spot size at this point (optical diagram) as well as takingthe field of sight into consideration. With increased distance from the object,increase the surface of the measured area of equipment.8.6 Emission levelThe majority of organic materials, as well as coated and oxidised surfaces, possess an emission level of 0.95. For this reason the emission level of the Ex-MP4 a has been set to 0.95 and cannot be altered.When determining the temperatures of shiny or highly polished metallic surfaces inaccurate measure-ments are produced. To compensate this effect the object being measured can be covered with adhesive tape or coated with matt black paint. Wait until the adhesive tape is the same temperature as the underly-ing material. Then determine the temperature of the tape (which is equivalent to the material) or the coated surface.8.7 Battery replacementIf the battery is depleted and only a residual charge remains, the battery symbol appears on the display.If this occurs the battery should be changed in order to ensure safe operation. The battery should only be exchanged outside the Ex-area. When changing the battery make sure that only those batteries specifiedin this manual are used (see point 7.1:Table with type-tested batteries). The use of different batteries is strictly prohibited!To open the battery compartment first remove the leather case from the handle. The compartment can now be opened. You can then remove and exchange the battery. When the battery has been replaced the leather case must be refitted over the handle.- Pay attention to the correct polarity.- Dispose of depleted batteries in an appropriate and environmentally friendly manner!8.8 TroubleshootingCode Malfunction ProcedureSelect target within the range- - - (on the display) Target temperature above orbelow the measuring rangeBattery virtually depleted Check or replace the batteryBattery symbolappearsNo display Battery discharged Check or replace the batteryLaser does not func-Weak or discharged battery Replace batterytion9. RepairRepairs are to be conducted by ecom instruments GmbH or by personnel or service centres authorised by ecom instruments GmbH, because the safety of the unit needs to be tested after repairs are implemented.10. DisposalOld electrical devices as well as …historical“ old electrical devices from ecom instruments GmbH are supplied for disposal at our expense and disposed of free of charge in accordance with European Directive 2002/96/EC and the German electrical law of 16/03/2005. The costs associated with returning devices to ecom instruments GmbH are to be borne by the sender.In accordance with Article 1, Section 18 and Article 2 of the Act revising the law of Waste-Related Product Responsibility for Batteries and Accumulators (Gesetz zur Neuregelung der abfallrechtlichen Produktver-antwortung für Batterien und Akkumulatoren) dated 25 June 2009, we are obligated to provide the following information.Your device contains an alkaline battery.Depleted batteries should never be disposed of along with normal or household waste. Old batteries can contain harmful substances that are hazardous to health and damaging to the environment. Please return the batteries. Return is free of charge and required by law. Please only dispose of discharged batteries in the designated containers.Note: The battery used in this unit poses a fire hazard and can cause chemical injuries if it is used impro-perly. Neither the battery nor the battery cells should be opened or disassembled and they should not be burned or exposed to temperatures exceeding 100°C.If the battery needs to be disposed of, it can be removed as described under point (8.7). The disposal regu-lations specified above are also applicable for old devices.All batteries can be recycled. Precious raw materials such as iron, zinc and nickel can therefore be reused.11. Cleaning, maintenance and storage- O nly use a suitable cloth or sponge to clean the unit.Do not use any solvents or abrasive cleaning agents when cleaning.- I t is recommended that you have the functionality and accuracy of the unit inspected by the manufacturer every two years.- The battery should be removed from the unit during prolonged periods of storage.- Do not allow storage temperatures to exceed or fall below the permitted range of –20 °C to +65 °C!12. Warranty and liabilityIn accordance with our general terms and conditions ecom instruments GmbH provides a warranty for this product for a period of two years regarding its function and material under the specified and permitted ope-rating and maintenance conditions. This excludes all parts that are subject to wear and tear (e.g. batteries, probes, calibration units, LEDs, etc.).This warranty does not extend to products that are used improperly, have been modified, neglected, dama-ged in accidents or exposed to abnormal operating conditions and inappropriate handling.Any claims under the warranty can be invoked by returning the defective equipment to the manufacturer. We reserve the right to repair, adjust or exchange the device.The aforementioned warranty conditions are the sole and only right of the purchaser to compensation,are exclusively valid and replace all other contract or legal warranty obligations. ecom instruments GmbH assumes no liability for special, direct, indirect, accompanying or consequential damage as well as losses including the loss of data, independent of whether it was caused by violation of the warranty obligation, lawful or unlawful action, action in good faith or any other action.If the limitation of a legal warranty as well as the exclusion or limitation of accompanying or consequential damage is not permissible in certain countries, it may be that the aforementioned limitations and exclu-sions are not valid for every purchaser. Should any such clause of these warranty conditions be declared ineffective or unenforceable by a competent court, then the effectiveness or enforceability of any of the other conditions of these warranty conditions shall remain unaffected by such a judgement.13. EC Declaration of ConformityFurther details regarding the Declaration of Conformity can be found at: in the product download area.ecom instruments GmbH | Industriestraße 2 | 97959 Assamstadt | GermanyTel.:+496294/4224-0|Fax:+496294/4224-100|E-Mail:*****************|1/2ecom instruments GmbH | Industriestraße 2 | 97959 Assamstadt | GermanyTel.:+496294/4224-0|Fax:+496294/4224-100|E-Mail:*****************|2/2112ME2AWEEE-Reg.-NCopyright© 2014 ecom instruments GmbH.The contents of this document, either in part or in their entirety, may not be reproduced, forwarded, distributed or saved in any way without ecom instruments GmbH prior written consent.The contents of this document are presented as they currently exist. ecom instruments GmbH does not provide any express or tacit guarantee for the correctness or completeness of the contents of this document, including, but not restricted to, the tacit guarantee of market suitability or fitness for a specific purpose unless applicable laws or court decisions make liability mandatory. ecom instruments GmbH reserves the right to make changes to this document or to withdraw it any time without prior notice.PA000378 / / 03 / 2015WEEE-Reg.-Nr. DE 934 993061120AL01A07Subject to change.。
林木森使用方法第一部分

插入下级科目
• 插入下级科目有2种办法: • 第一种:按照新增一级科目的方法,先插入一个科目, 然后将插入的科目编码改为某科目的下级编码即可。例 如要在1002科目下插入下级科目,可先插入任意一个科 目,再将插入的科目编码修改为100201。 • 第二种:将光标移至需要插入下级科目的科目上,然后 单击右键菜单中的高级中的【插入下级科目编码】,系 统就将自动插入该科目的下级科目编码。再录入此科目 的详细资料。 • ★注意:下级编码增加的位数不只是两位,可以是三位、 四位等,但账簿中科目编码最多为19位。如果采用第二 种方法新增下级科目,系统默认下级科目增加两位。
凭证的填制
填制凭证的快捷键:小键盘的“+” 保存凭证:CTRL +“+”
填制凭证的约定
• • • • 1. 科目必须为末级科目,且科目名称不能为空; 2. 借贷金额必须相等; 3. 签字或封存以后的凭证不能修改; 4. 收款凭证的借方和付款凭证的贷方必须为现金、银行存款科目或其 他资金类科目,以【系统维护\系统参数设置\账套参数】中所设置的 现金科目、银行存款、内行存款、内行借款和货币资金等的编码为准。 5. 转账凭证中不存在现金、银行存款科目或其他资金类科目。即不能 有【系统维护\系统参数设置\账套参数】中所设置的现金科目、银行 存款、内行存款、内行借款和货币资金等编码的科目。 6. 制单和凭证审核不能为同一操作员;只有审核过后出纳才能签字; 7. 当前操作日期如果大于结账日期,自动将操作日期调整为次月1日; 8. 摘要若与上一个分录相同,系统自动显示为省略方式; 9. 凭证存盘时借贷顺序以凭证【参数设置\关于凭证】内的设置为准。
•
• • • •
用+和++的批量录入
Erime操作教程

一,E-Prime组成部分1.实验组成10部分:1.Instruction指导语:“无限时间”,按键消失(注:不要用轻易按到的键),格式为图片(易于排版)。
操作性原则:说明先出现什么,后出现什么,被试如何反应。
范例:2.Fixation注视点:呈现时间500~800 ms,自动消失,大小30字号以上。
3.Stimulus刺激界面:4.Probecueing探测线索:出现在探测界面前面,用于去习惯化和让被试做好准备。
5.Probe探测界面:6.Feedback反馈界面:对被试反应作出正确或错误的反应。
时间:1000~2000ms7.ISI ,SOA,Interval刺激间隔:ISI:上一个刺激终点~下一个刺激起点。
SOA:前一刺激起点~下一个刺激起点)。
两者的关系SOA=ISI+DurationInterval:刺激与目标,目标和其他界面的间隔时间。
8.Buffer Interval 实验缓冲:500~1200ms。
被试作反应后推迟下一个Trial的呈现。
反馈界面也起到缓冲的效果。
9.Mask 掩蔽界面:400~1000ms,常用于启动效应实验和记忆实验。
在记忆实验中,消除刺激的感觉记忆。
10.Exp End 结语界面:1000~1500ms,如,“实验完毕,谢谢您的参与!”2.实验程序控制5要素Duration呈现时间:固定时间,变化时间(设置变量或数组),无限时间(“-1”,“infinite”)Mode呈现方式(=消失方式):自动(不需要设置),按键(无限时间+设置按键在刺激界面),反应(无限时间+反应键在探测界面),自动+反应(固定时间+反应键)Format呈现格式:刺激物属性:字符(字体,大小,前景颜色?,背景颜色,下划线),图片(尺寸大小,文件大小,亮度,色调?,饱和度?,灰度?,对比度);位置;边框(大小,颜色)Response反应方式:键盘反应(字母,数字,功能键);语音反应;外接反应键;脚踏板反应Data logging数据收集:反应时Response Time ;RT ,正误Accuracy;ACC,反应Response;RESP,实验流程示意图3.实验过程Procedure:Session Procedure全过程;CEP Core Experimental Procedure(运行一次是一次Trial,一个Block=指导语+CEP+结束语)4.实验设计的4模式:Paralleling并联模式:(图B)完成CEP1再完成CEP2。
费森尤斯维修重点学习手册.doc

费森尤斯维修重点学习手册.docWo 名词缩写解释HF Hemofiltration HDF Hemodiafiltration4008 选件BPM血压监测器BTM血温监测器BVM血容量监测器OCM在线清除率监测SN-Double Pump单针泵DIASAFE plus Filter细菌过滤器ONLINE plus在线血滤系统Bibag(Standard)干粉CDS中央供液系统模组空间Blood Pump血泵Heparin Pump肝素泵Level Detector空气监测器Bibag/Conc.干粉血液滤过血液滤透编号元件名称中文名称2 Temperature sensor 温度传感器3 Temperature sensor 温度传感器4 Temperature sensor (OCM option) 温度传感器 (OCM选项 )5 Float switch 浮子开关6 Level sensor 液位传感器7 Conductivity cell 电导率单元 ( 电导度传感器 )8 Blood leak detector 漏血探测器9 Pressure transducer 压力传感器10 Reed contact for concentrate A 液簧片触点12 Reed contact for bicarbonate B 液簧片触点21 Flow pump 流量泵22 UF pump 超滤泵23 Concentrate pump 浓缩泵 (A 泵)24 Dialyzer valve 1 透析器阀 124b Dialyzer valve 2 透析器阀 225 Bicarbonate pump 种碳酸盐泵 (B 泵 )26 Bypass valve 旁路阀29 Degassing pump 除气泵 ( 负压泵 )30 Outlet valve 出水口阀31 Balancing chamber valve 1 平衡腔阀 132 Balancing chamber valve 2 平衡腔阀 233 Balancing chamber valve 3 平衡腔阀 334 Balancing chamber valve 4 平衡腔阀 435 Balancing chamber valve 5 平衡腔阀 536 Balancing chamber valve 6 平衡腔阀 637 Balancing chamber valve 7 平衡腔阀 738 Balancing chamber valve 8 平衡腔阀 839 Negative pressure valve 负压阀41 Water inlet valve 进水阀43 Fill valve 填充阀54 Heater rod 加热棒61 Pressure reduction valve 减压阀( 进水减压阀) 63 Filter/water inlet 进水口过滤器65 Loading pressure valve 加载压阀66 Heater block 加热部件66a Water inflow chamber 水流入腔66b Heater rod chamber 加热棒腔66c Float switch chamber 浮子开关腔68 Balancing chamber 平衡腔71 Filter/concentrate 过滤器 /A 液72 Filter/bicarbonate 过滤器 / 重碳酸盐73 Filter/dialysafe 过滤器 / 透析液74 Filter/UF 过滤器 / 超滤75 External flow indicator 外部流量指示器 ( 浮漂 )76 Filter/fill valve 过滤器 / 填充阀77 Heat exchanger 热交换器78 Relief valve 除气阀84 Disinfection valve 消毒阀85 Disinfection connector 消毒连接器 ( 口 )86 Recirculation valve 再循环阀87 Drain valve 排水阀88 Multifunction block 多功能部件88a Degassing chamber 除气腔88b Secondary air separator 第二空气分离器88c Primary air separator 第一空气分离器89 Degassing orifice 负压小孔 ( 玻璃小孔 )90a Acetate rinse chamber 醋酸盐 (A) 清洗腔90b Bicarbonate rinse chamber 重碳酸盐 (B) 清洗腔91 Rinse valve 清洗阀92 Vent valve 排气阀94 Concentrate suction tube A 液吸入管95 Bicarbonate suction tube B 液吸入管97 Air separating pump 空气分离泵 (ASP)98 Rinse valve 清洗阀99 Rinse valve 清洗阀100 Rinse valve 清洗阀102 CDS, concentrate valve 中央供液系统A 液阀104 CDS, bicarbonate valve 中央供液系统 B 液阀109 Temperature sensor 温度传感器110 Conductivity cell (OCM option) 电导率单元 (OCM 选项 ) 111 Hydrophobic filter 疏水过滤器112 Vent valve 排气阀114 Dialysate filter 透析液过滤器115 Disinfection valve sensor 消毒阀传感器116 Fluid sample valve 流体样品阀( 采样器阀) 117 Checkvalve (concentrate) 止回阀 (A 液)118 Check valve (bicarbonate) 止回阀 (B 液)119 Filter (concentrate) 过滤器 (A 液)120 Filter (bicarbonate) 过滤器 (B 液)121 CDS, concentrate connector 中央供液系统 A 液连接器122 CDS, bicarbonate connector 中央供液系统 B 液连接器123 Pressure switch for V102 V102 压力开关124 Pressure switch for V104 V104 压力开关125 Temperature compensation plate 温度补偿板130 Bibag drain valve 干粉排水阀132 Bibag conductivity cell 干粉电导率单元133 Bibag temperature sensor 干粉温度传感器134 Bibag pressure transducer 干粉压力传感器136 Bibag connector 干粉连接器137Bibag microswitch 1138Bibag microswitch 2148Filter (rinse valve 100)149Filter (rinse valve 99)151Orifice182Pressure transducer 2 (Diasafe plus option)183Test valve (Diasafe plus option)184Compressor (Diasafe plus option)188Evacuation valve189Retentate valve190Online filter (Online plus option)191Online 3 valve (Online plus option)192Online 2 valve (Online plus option)193Online 1 valve (Online plus option)194Rinse port (Online plus option)195Substituate port (Online plus option)201Concentrate air separator202Concentrate level sensor203Bicarbonate air separator204Bicarbonate level sensor205Concentrate / bicarbonate mixing point 206Buffer volume chamber210FilterHydraulics measuring pointsA Reduced water inlet pressureB Loading pressureC Pressure of flow pumpD Pressure of degassing pump 干粉微动开关 1 干粉微动开关 2过滤器 ( 清洗阀 100)过滤器 ( 清洗阀 99)小孔 ( 玻璃小孔 )压力传感器 2(Diasafe 选项 )测试阀 (Diasafe 选项 )压缩器 (Diasafe 选项 )抽空阀滞留物阀在线过滤器 (Online 选项 )在线 3 阀 (Online 选项 )在线 2 阀 (Online 选项 )在线 1 阀 (Online 选项 )冲洗口 (Online 选项 )补液口 (Online 选项 )A液空气分离器A液液位传感器B液空气分离器B液液位传感器A/B 液混合点缓冲体积腔过滤器水路测量点A:进水减压压力~B:加载压~C:流量泵压力~D:除气泵压力-T1 测试描述,包含错误信息附注错误说明指定的数值是程序中使用的精确数值具体数值和公差如下:1. Arterial pressure 动脉压 3 mmHg/digit 和测定值的± 1 位2. Venous pressure 动脉压 3 mmHg/digit 和测定值的± 1 位3. Dialysate Pressure 透析液压粗略mmHg/digit 和测定值的± 1 位优良mmHg/digit 和测定值的± 1 位4. CD resolution mS/digit 和精确值的± 1 位5. Temperature 温度0.05 °C/digit 精确值的± 1 位和开始和运行测试的先决条件错误信息描述Power failure 测试进行中的电源失败 .Dialines not conn 透析液管路没有插入到冲洗桥中.Shunt Cover open 冲洗桥打开状态 .Connect A 液连接器在冲洗腔中或者完全没有连接. 该错误信息Wrong conc. Supply 取决于中央供液系统预选中的设置菜单.Blood Sensed by OD 光学探测器检测到系统中有血液.Flow alarm 进或出透析器的线路打结 , 故障发生在水路中 .Water alarm 供水中断 .单独测试步骤的描述Bypass test ( 旁路测试 )........................................................................ ... ..................................... ? .6 Optical detector test ( 光学探测器测试 )................................................................................ ?? 8Blood system test ( 血系统测试 ).............................................................................................. ? .10Venous pressure system test ( 静脉压系统测试 )................................................................. ? .13Air detector test ( 空气探测器测试 )............................................................................(15)Display test ( 显示测试 )............................................................................(18)Arterial pressure system test ( 动脉压系统测试 ) (20)Battery test ( 蓄电池测试 )............................................................................ .. (21)Blood leak test ( 漏血测试 )............................................................................ .. (23)Temperature test ( 温度测试 ).................................................................................................... ? .25Negative pressure holding test ( 负压保持测试 ) (27)Positive pressure holding test ( 正压保持测试 ) (29)UF function test ( 超滤功能测试 )............................................................................ . (34)Conductivity test ( 电导率测试 ) (37)Diasafe/HDF filter test ( 细菌过滤器/ 血液滤透过滤器测试 ) (39)Bypass test旁路测试检查下面的功能:–加热器继电器。
nucel 操作手册

nucel 操作手册【原创实用版】目录1.核反应堆操作手册概述2.核反应堆的工作原理3.核反应堆的操作步骤4.核反应堆的安全措施5.核反应堆的维护保养正文核反应堆操作手册概述:核反应堆操作手册是一本详细指导如何安全、有效地操作和维护核反应堆的指南。
核反应堆是一种利用核裂变或核聚变过程释放能量的设备,它需要经过严格的操作和维护以确保其安全性和可靠性。
核反应堆的工作原理:核反应堆的工作原理基于核裂变或核聚变。
核裂变是指重元素(如铀235 或钚 239)的原子核在吸收中子后破裂成两个或多个较轻的原子核,并释放出大量的能量。
核聚变则是指轻元素(如氢)的原子核在高温和高压下结合成更重的元素(如氦),并释放出能量。
核反应堆的操作步骤:核反应堆的操作步骤包括启动、升温、升压、临界、稳定运行和停堆。
在启动阶段,操作员需要将核燃料棒插入反应堆堆芯,然后开始向反应堆提供中子。
随着中子数量的增加,反应堆会逐渐升温和升压,直到达到临界状态。
在临界状态下,反应堆中的中子数量足以维持链式反应,反应堆开始稳定运行。
在运行过程中,操作员需要定期检查反应堆的各项参数,以确保其安全和稳定。
在停堆阶段,操作员需要将反应堆中的中子数量降至零,以停止链式反应。
核反应堆的安全措施:核反应堆的安全措施包括被动安全系统和主动安全系统。
被动安全系统是指在发生事故时自动启动的系统,如紧急冷却系统。
主动安全系统是指在正常运行时使用的系统,如控制系统和保护系统。
此外,核反应堆还设有多重屏障,包括燃料棒外层、燃料棒破损屏障、反应堆容器和安全壳等,以防止放射性物质泄漏。
核反应堆的维护保养:核反应堆的维护保养包括例行检查、大修和停堆检查。
例行检查是指定期对反应堆进行的检查,以确保其各项参数在正常范围内。
大修是指对反应堆进行的定期维护,通常每几年进行一次。
停堆检查是指在反应堆停堆期间进行的检查,以检查和维修反应堆设备。
总之,核反应堆操作手册为操作和维护核反应堆提供了详细的指导,以确保其安全和可靠性。
ecn流程详解及要求

ecn流程详解及要求下载温馨提示:该文档是我店铺精心编制而成,希望大家下载以后,能够帮助大家解决实际的问题。
文档下载后可定制随意修改,请根据实际需要进行相应的调整和使用,谢谢!并且,本店铺为大家提供各种各样类型的实用资料,如教育随笔、日记赏析、句子摘抄、古诗大全、经典美文、话题作文、工作总结、词语解析、文案摘录、其他资料等等,如想了解不同资料格式和写法,敬请关注!Download tips: This document is carefully compiled by theeditor.I hope that after you download them,they can help yousolve practical problems. The document can be customized andmodified after downloading,please adjust and use it according toactual needs, thank you!In addition, our shop provides you with various types ofpractical materials,such as educational essays, diaryappreciation,sentence excerpts,ancient poems,classic articles,topic composition,work summary,word parsing,copy excerpts,other materials and so on,want to know different data formats andwriting methods,please pay attention!ECN流程详解及其关键要求电子通讯网络(Electronic Communication Network,简称ECN)是一种在金融市场中广泛使用的交易系统,它允许客户直接与其他市场参与者进行交易,而无需通过传统的经纪商。
esun易森TM会计循环实验室使用说明书——学生篇

单击“结算方式”下方的空格,弹出下拉菜单,选择结算方式。
若需要输入票号,单击“票号”下方的空格,输入票号(四位有效)。
单击“科目”下方的空格,弹出下拉菜单,选择相应科目。
若出现“
”,请先单击“ ”展开子下拉菜单,
再选择科目。
单击“借(贷)方”下方的空格,输入金额,回车。
单击“记账符号”下方的空格,在“ ”里打钩。
esun 易森 TM 会计循环实验室使用说明书——学生篇
esun易森 TM会计循环实验室使用说明书
(学生篇)
1
esun 易森 TM 会计循环实验室使用说明书——学生篇
目录
1 平台简介..................................................................................................................4 2 平台操作(快速入门)................................................................................................4
● 请单击“实验室名称”(例如:“
”)进入。
2.3 主要界面说明
2.3.1 实验目的说明。首次登录平台自动播放(登录时在“显示动画”前的方框内打钩)。
7
esun 易森 TM 会计循环实验室使用说明书——学生篇
2.3.2 实验进度标识说明。登录后平台自动播放(登录时在“显示动画”前的方框内打钩)。
2.3.3 各阶段实验内容说明。开始各阶段实验操作前系统自动播放(登录时在“显示动 画”前的方框内打钩)。
单击“
”处,输入数字。
tm 4086 en 操作手册 塑料衬里采样阀说明书
ITT RICHTER CHEMIE-TECHNIK The Answer to Corrosion Series PA/FOperating Manualfor Plastic-LinedSampling ValvesContents1General2Safety3Transport and storage4Product description5Installation6Operation7Maintenance8Faults9Tables, diagrams, drawingsTotal No of pages 5PA for highly viscous media/lowoperating pressure see Section 4.4.2 Local agent:See orderReprinting is generally permitted,indicating the source.However, our prior written consent mustbe obtained in all cases.Note:Before transport, installation operation, etc.TM 4086 en Edition 2/99read these instructions carefully!.Version 1.11General Richter sampling valves comply with the technical conditions of delivery to DIN 3230.1.1Application The valves have a corrosion-resistant plastic lining and are therefore especially suitable for aggressive media.If the valve is to be used for operating data other than those intended, the customer must check carefully whether the design is suitable for the new application.1.2Details on the productType code PA/F:Sampling valve, PFA-lined Nom. sizes:25 and 502SafetyThe notes on safety contained in this operating manual which, if not observed, can result in risks to people are identified with this general hazard symbol.Non-observance of this safety warning may impair the valve and its operation.2.1Staff qualifications and trainingThe staff for installation, operation and maintenance must have the appropriate qualifications for this work.The area of responsibility, authority and supervision of the staff must be regulated precisely by the customer.If the staff do not have the necessary know-how, they are to be trained and instructed.This can, if necessary, be performed by the manufacturer /supplier on behalf of the valve customer.Furthermore, the customer must ensure that the contents of the operating manual are fully understood by the staff.2.2Risks if safety notes are not observedNon-observance of the notes on safety may result in the loss of any and all claims for damages.For example, non-observance may involve the following hazards:• Failure of important functions of the valve / plant.•Risk to people from chemical effects.• Risk to the environment through leaks of dangerous sub-stances.2.3Safety-conscious workingThe following are to be observed:− The notes on safety in this operating manual.− The national regulations on accident prevention.− The work, operating and safety regulations of the customer.2.4Notes on safety for the customer / operator− If hot or cold valves result in hazards, the customer mustprotect these parts from being touched.2.5Notes on safety for maintenanceValves which are exposed to media which are a health hazard must be decontaminated.The points listed in the section on initial commissioning must be followed before recommissioning.2.6Conversion work and production of spare parts by the customerConversion of or changes to the valve are only admissible after consultation with the manufacturer.Original spare parts and accessories authorised by the manufac-turer serve to enhance safety.The use of other parts may annul the liability for any resultant consequences.2.7Inadmissible modes of operationThe operational safety of the valve is only guaranteed if it is used properly in accordance with Section 1 of this operating manual.The application limits specified on the nameplate must under no circumstances be exceeded.3Transport and storageIt is imperative for all transport work to observe generally accepted engineering practice and the accident prevention regulations.3.1UnpackingDirectly after unpacking the consignment must be checked for completeness and any in-transit damage.3.2TransportThe goods being transported must be handled with care to prevent damage.Flange covers serve as protection during transport and must not be removed.3.3StorageIf the valve is not installed immediately after delivery, it must be put into proper storage.It should be stored in a dry room at as constant a temperature as possible.In the case of prolonged storage packing with a desiccant may be necessary. A decision on this must be taken on the basis of thelocal conditions.CAUTION !3.4 Return consignmentsThe operator of valves which have been used foraggressive or toxic media must make sure that they are well rinsed and cleaned before being passed on to the maintenance staff. This applies in particular when the goods are returned to the manufacturer's works.3.4.1GRAS certificateA GRAS certificate according to EUROPUMP on the field of application is to be enclosed with the returned goods.If necessary, safety precautions and decontamination measures are to be mentioned.Pre-printed forms can be requested from Richter.4Product descriptionSampling valves of the series PA/F serve to take samples of liquids directly out of the medium flow.Drawings in Section 9 illustrate the design.4.1BodyThe body is identified with the following data according to DIN EN 19:− Nominal size − Nominal pressure− Material of the armouring − Material of the lining − Manufacturer's code − Foundry code − Melt number4.2BellowsThe advantage of a bellows-type seal is the glandless separation of the medium cham-ber from the environment.4.3Safety packingIf the bellows fail, the safety packing can keep the valve leak-proof for a limited period.4.4Valve actuationThe lever is moved towards the valve body and lifts the plug out of the seat.It must be ensured that a sampling container is connected to the valve.When the lever is released, the valve closes automatically (dead-man switch).The lever is provided with 3 grooved pins ensuring permanent engagement.If the middle pin is removed, the hand lever disengages when not activated and swings freely. Unintentional valve actuation is thus precluded.If the top grooved pin is also removed, the lever can be taken off.Its function, however, is retained.Lever can optionally also be mounted in upright position.4.4.1Star knobThe stroke and thus the pressure reduction and medium flow can be influenced with the star knob.Moreover, the star knob can be used to close the valve like a manual valve.It also serves to enforce tightness in case of damaged seat sealing surfaces or seized particles.4.4.2 Highly viscous media /Low operating pressure With the special design for highly viscous media the changed application limits acc. to the nameplate must be observed and the valve stroke must be set according to the followingsetting instructions.Setting instructions:1) Push sampling lever towards the valve.2) Slowly turn the star knob counterclockwise until the flow intothe sampling bottle corresponds to the desired intensity.3) Release lever and lock star knob in this position (lock out).This procedure ensures that with every subsequent sampling operation (at the same internal pressure) the flow of the sample into the bottle remains within the desired limits without risk to the sampler.In the event of fluctuating operating pressures, we recommend for safety's sake that the star knob is turned clockwise back to the zero point after every sampling operation (lever cannot execute stroke).4.5NameplateA nameplate on the cast iron armouring bears the following data:−Type, nominal pressure, material of the lining− Admissible operating pressures for various temperatures − Richter factory No.−Any customer-specific dataExample of a factory No.: 98 4875/2/1Please indicate this number on all correspondence.5InstallationDirt or damage to the sealing surfaces is best avoided if the flange covers remain on the flanges until just before installation.We recommend the installation of gaskets so that the sealing surfaces are not damaged by the mating flanges.If the risk of damage is particularly high, e.g. with the mating flanges being metal or ceramic-lined, PTFE-coated gaskets with a metal inlay should be used (included in the Richter range of products).5.1Direction of flow and positionInstallation does not depend on the direction of flow. The installa-tion position is normally horizontal with the bottle connection facing vertically downwards (deviations from this position are special versions).5.1EarthingEarthing is performed using the pipe screws.CAUTION !CAUTION !6Operation6.1 Initial commissioningNormally, the valves are tested for leaks with water and air. Therefore, unless special agreements have been made, there could still be residual amounts of water in the flow section. This must be noted in view of a possible reaction with the operating medium.After initial loading at operating pressure and operating tempera-ture the tightening torques of all connection screws must be checked. For tightening torques, see Section 9.6.2ShutdownBefore undoing the flange screws:−Ensure the plant is depressurised.− Rinse out medium.−Observe safety regulations.After dismantling, protect the flanges with flange covers to prevent mechanical damage.6.3Inadmissible modes of operation and theirconsequences•Crystallisation must be prevented (e.g. by heating). Damage to the seat or plug would be the result. In extreme cases leaks may occur.•Increased wear occurs in operation with solids-laden media.•Non-observance of the pressure/temperature diagram may result in damage.7Maintenance7.1Screw connectionsP eriodical checks of the tightening torques in line with the opera-tional requirements at the following points:• Packing nuts•Body screws (seat and cover)• Pipe screwsF or tightening torques, see Section 9.7.2CleaningT he valve is to be cleaned thoroughly before thestart of repair work. Activate the lever repeatedlyand rinse sampling connection. Even if the valvehas been properly drained and rinsed, there couldstill be residual amounts of medium in the valve,e.g. between the sealing surfaces.M oreover, the plastic components may have absorbed medium which emerges gradually from the material after rinsing.P rotective clothing should therefore be worn. See also Section 3.4.7.3Dismantling−Undo groove nut.− Unscrew spring bonnet.−Unscrew cover and seat.−Undo setscrew in the spring bush.− Unscrew spring bush.−Dismantle stem and bellows.−Flange connection: Undo clip and unscrew connection.7.4Assembly−Mount seat and screw tight.−Screw stem into bellows.−Insert stem and bellows into cover.−Also install packing and actuation.−Screw cover to body.−Screw on spring bush. Tighten setscrew.− Thread on spring.−Mount spring bonnet with groove nut.−Mount star knob with hexagon nut.−Screw in bottle connection and secure with clip.7.5TestsA fter assembly, the valve must be tested.• Leak-proofnessT he leak-tightness of the sampling outlet must be tested. The test is conducted to DIN 3230 Part 3, BF and BO, leak rate 1.T est medium:AirT est pressure:16 bar and 1 barT est temperature: 15 to 35°CT esting time:DN 2515 secondsDN 5060 seconds8Faults, causes and remedies•Flange connection ball valve/pipe leaksT ighten flange screws to a tightening torque acc. to Section 9.Should there be a leak, the recommended tightening torques can be exceeded by 10%.I f this does not rectify the leak, dismantle the valve and check it.•Flange connection body/seat or body/cover leaks Retighten body screws. Proceed as above.•Leak at the safety packingB ellows leak.R etighten safety packing and switch offplant as quickly as possible and isolate pipesection with valve.•Valve does not close tightL oosen check nut under the star knob and close the valve usingthe knob. CAUTION !9Tables, diagrams, drawings 9.1Connection dimensions−Face to face:see order−Flange pattern:see order9.2Flow rates K v100for the main flowDN m3/h251550659.1WeightsDN kg251050189.4Tightening torquesLubricate screws, tighten in diametrically opposite sequence. Body screwsDN No. x size Nm25 4 x M123050 4 x M1650Pipe screwsDN No. x size Nm25 4 x M121250 4 x M16309.5Pressure / temperature dataTemperature°C-60-1020150200 Pressure bar10161615149.6Drawing。
- 1、下载文档前请自行甄别文档内容的完整性,平台不提供额外的编辑、内容补充、找答案等附加服务。
- 2、"仅部分预览"的文档,不可在线预览部分如存在完整性等问题,可反馈申请退款(可完整预览的文档不适用该条件!)。
- 3、如文档侵犯您的权益,请联系客服反馈,我们会尽快为您处理(人工客服工作时间:9:00-18:30)。
esun 易森 TM 会计循环实验室使用说明书——学生篇
3.1 平台动画不能正常播放(例如:输入网址,回车,看不到进度条和初始动漫)。..............26 3.2 登录页面中“显示动画”选项的作用。.....................................................................26 3.3 为什么登录后没有“请选择实验室”界面?...............................................................26 3.4 业务说明动画上方的“年月日”(例如“2008 年 12 月 31 日”)代表什么?...................26 3.5 实验室中是否有操作讲解部分? ................................................................................26 3.6 明细账填完但查看业务后就找不到了? ......................................................................27 3.7 明细账漏记一笔,如何能插入到前面的记录中? .........................................................27 3.8 查看帮助文件时,为什么有时会无法播放,或播放异常? ............................................27 3.9 如何切换到另一个实验室? ....................................................................................27
删除凭证按钮(只能删除最后一笔凭证)。单击,删除凭证。
删除记录按钮。在凭证中选中记录行,单击,删除记录。
盖制单章。单击后,在凭证下方显示“ 盖交领款人章。单击后,在凭证下方显示“ 盖出纳人章。单击后,在凭证下方显示“
”。ቤተ መጻሕፍቲ ባይዱ”
”
盖会计主管章。单击后,在凭证下方显示“ 在空白处划线按钮。单击后,在凭证中显示“ 擦除划线按钮。单击,擦除划线。
3
1 平台简介
esun 易森 TM 会计循环实验室使用说明书——学生篇
易森会计循环实验室是一个以生成性目标为主的网络学习平台,注重学习情境的创设,并在 学习过程中向学生提供随机数据及相关线索,引导学生进行思考与分析,独立完成全部的实验操 作。平台模拟手工做账及财务人员的工作流程,将会计循环过程分解为:编写记账凭证及登记日 记账、登记明细账、编制科目汇总表、登记总账、期末结转、编制会计报表六个阶段,并采取“过 关”的形式要求学生依次通过,游戏趣味贯穿始终。
● 请单击“实验室名称”(例如:“
”)进入。
2.3 主要界面说明
2.3.1 实验目的说明。首次登录平台自动播放(登录时在“显示动画”前的方框内打钩)。
7
esun 易森 TM 会计循环实验室使用说明书——学生篇
2.3.2 实验进度标识说明。登录后平台自动播放(登录时在“显示动画”前的方框内打钩)。
2.3.3 各阶段实验内容说明。开始各阶段实验操作前系统自动播放(登录时在“显示动 画”前的方框内打钩)。
2.1.3加载完成后播放片头动画(可以点击“关闭”按钮,略过片头动画)。
5
esun 易森 TM 会计循环实验室使用说明书——学生篇
2.1.4认证登录页面。
※ 如果尚未开通课程,系统提示无法登录。
2.2 实验室的选择
6
esun 易森 TM 会计循环实验室使用说明书——学生篇
● 请单击“ ”、“ ”进行实验室间的切换。
摘要 结算方式
票号 科目 借(贷)方 记账符号
说明
单击“日期”旁的空白处,弹出下拉菜单,选择日期。
单击,实现记账凭证间的切换。
保存凭证后系统自动为凭证分配凭证号(凭证号根据凭证的数量顺序生成)。
单击“ ”,选择下拉菜单中的凭证号,实现凭证间的快速切换。
单击“摘要”下方的空格,输入摘要内容(不超过 50个字),回车。
2.3.1 实验目的说明.........................................................................................7 2.3.2 实验进度标识说明...................................................................................8 2.3.3 各阶段实验内容说明................................................................................8 2.3.4 业务说明................................................................................................9 2.4 六阶段操作说明....................................................................................................9 2.4.1 第一阶段:编写记账凭证、登记日记账..............................................................10
2 平台操作(快速入门)
2.1 登录
4
esun 易森 TM 会计循环实验室使用说明书——学生篇
2.1.1点击“东财在线(www.edufe.com.cn)”主页,“进入教室”后直接点击本课程名称,或 者点击学习园地下“会计循环模拟实验”后回车。
2.1.2等待加载。
加载进度条
如果看不到加载进度条,可能浏览器中没有安装最新的 flashplayer控件,可根据系统提示到指定 的 Ftp 服 务 器 上 下 载 最 新 的 控 件 并 安 装 , 或 者 访 问 Adobe 官 方 网 站 (/flashplayer/?promoid=BUIGP),安装最新版本的 flashplayer控件。
2.4.1 第一阶段:编写记账凭证、登记日记账 2.4.1.1 编写记账凭证
● 操作说明表
★原始凭证展示区
标识
说明
单击,实现原始凭证间的切换
特别说明:当单击原始凭证的任意部分时,原始凭证会出现在页面的最上层,拖拽可跟随鼠标移动。
10
esun 易森 TM 会计循环实验室使用说明书——学生篇
★记账凭证展示区 标识
单击“
”处,输入数字。
特别说明:当单击记账凭证的任意部分时,记账凭证会出现在页面的最上层,拖动记账凭证的上边缘(黄
色部分),记账凭证可跟随鼠标移动。
11
esun 易森 TM 会计循环实验室使用说明书——学生篇
★工具栏展示区
标识
说明
新建凭证按钮。单击,新建凭证。
保存凭证按钮(只能保存有科目的记录)。单击,保存凭证。
8
esun 易森 TM 会计循环实验室使用说明书——学生篇
2.3.4 业务说明
● 请单击“ ”播放业务动漫,单击“下一步”进入实验操作阶段。 ● 请单击“ ”、“ ”进行上下笔业务的切换。 ● 请单击“快速跳转”下拉菜单的条目,进行业务的切换。
2.4 六阶段操作说明
9
esun 易森 TM 会计循环实验室使用说明书——学生篇
2.1 登录 .................................................................................................................4 2.2 实验室的选择......................................................................................................6 2.3 主要界面说明......................................................................................................7
单击“结算方式”下方的空格,弹出下拉菜单,选择结算方式。
若需要输入票号,单击“票号”下方的空格,输入票号(四位有效)。
单击“科目”下方的空格,弹出下拉菜单,选择相应科目。
若出现“
”,请先单击“ ”展开子下拉菜单,
再选择科目。
单击“借(贷)方”下方的空格,输入金额,回车。
单击“记账符号”下方的空格,在“ ”里打钩。
esun 易森 TM 会计循环实验室使用说明书——学生篇
esun易森 TM会计循环实验室使用说明书
(学生篇)
1
esun 易森 TM 会计循环实验室使用说明书——学生篇
目录
1 平台简介..................................................................................................................4 2 平台操作(快速入门)................................................................................................4
2.4.1.1 编写记账凭证....................................................................................10 2.4.1.2 登记日记账.....................................................................................14 2.4.2 第二阶段:登记明细账...................................................................................16 2.4.3 第三阶段:编制科目汇总表.............................................................................17 2.4.4 第四阶段:登记总账......................................................................................18 2.4.5 第五阶段:期末结转......................................................................................19 2.4.6 第六阶段:编制会计报表................................................................................19 2.5 系统工具............................................................................................................20 2.6 实时聊天室..............................................................................................................23 3 FAQ..........................................................................................................................26
