PCI录音系统说明书
唐信电话录音系统说明书_T3系列
Tansonic唐信电话录音系统---T3系列说明书深圳市唐信科技有限公司目录第一章系统简介 (2)第二章基本功能 (2)第三章技术参数 (3)第四章系统安装 (3)4.1 硬件安装 (3)4.2 软件安装 (6)4.3 录音卡接口示意图 (6)4.4 连线 (7)第五章软件操作 (7)5.1 启动系统 (7)5.2 主界面 (7)5.3 登录系统 (10)5.4 数据库选择设置 (11)5.5 录音设置 (12)5.6 系统设置 (14)5.7 录音查询 (19)第六章技术支持 (23)第一章系统简介感谢您选用Tansonic唐信电话录音系统T3系列产品!当基于法律需求或责任认定等原因,需要保留电话通讯过程的录音时,配备一套完善的电话录音系统便显得极为重要。
如何准确无误的保留电话录音以及如何高质量的、方便的查听录音记录,均是系统面临的重要课题。
Tansonic唐信电话录音系统T3系列经过唐信科技在TX2006系列的基础上技术改进有重大突破的新一代电话录音产品。
其功能解决早期因电信机房线路较远或其他因素导致通话双方不平衡,录音声音一方声音大另一方声音小问题、解决以前录音数据量特别巨大的情况下,出现数据库单一(ACCESS数据库)处理速度较慢问题,现可支持多种数据库选择使用;豪华的人机界面继承原TX2006版熟悉的用户使用习惯,通俗易懂的操作习惯让人操作起来得心应手,软件安装完毕几乎不用看说明书都懂得怎样使用。
Tansonic电话录音系统可广泛的应用于商业电话录音,电力调度录音,热线服务电话录音,投诉电话录音,关键岗位电话录音,金融证券录音,公安报警录音,安全部门的监听电话,航空、铁路、交通运输调度录音及各行业的生产调度录音。
第二章基本功能1. 支持XP/WIN2003/VISTA/WIN7/WIN2008等中英文操作环境。
2. 单机系统最多支持1920通道电话同时录音。
3. 采用全新的PCI接口的即插即用录音卡。
HP录音盒系列说明书及安装图

H P录音盒系列说明书及安装图标准化管理处编码[BBX968T-XBB8968-NNJ668-MM9N]杭普HP系列录音说明书一、安装说明计算机系统要求硬件:1) CPU:高于、等于赛扬1GHz 或与其相当者;2) 内存:大于、等于128M;软件:WIN Xp\WIN2003 \WIN7(32位)。
1驱动程序安装说明:1、关闭计算机电源;2、将PCI录音卡插入到主机的PCI插槽中(录音盒是接到电脑USB口);3、打开电源,系统启动后会提示安装驱动程序,驱动程序存储在安装光盘(以下均默认光盘为F:盘)中, 用指定安装→浏览,找到光盘的驱动F:\Driver,“确定”安装完成。
2应用程序安装说明:本软件是绿色软件,只需要将文件拷贝到需要的目录下就可以了,程序不会对操作系统的任何配置进行更改。
安装步骤如下:1、选择好自己的目的安装盘(如D:盘);2、对录音卡,将安装光盘中的“F:\录音软件”目录拷贝到目的盘中;3、进入服务端文件夹,右键,发送到桌面快捷方式。
4、击运行或者它的桌面快捷方式即可启动录音程序。
3服务器网络设置【如无代理服务器则无需以下设置,在客户端直接输入IP地址】:1、查找本机IP地址和路由器IP地址:单击“开始”菜单中的“运行...”在弹出的运行对话框中输入“cmd”命令点击“确定”进入DOS窗口中,在对话框命令提示符下输入“ipconfig”并按回车键,如图显示出本机的IP地址和网关:二、服务端软件使用说明1、系统启动:系统有两种启动方法,一种是随操作系统一起自动启动,二是鼠标左键双击桌面上的图标进行启动。
程序启动后,会自动弹出所示的界面:注:A、如果系统启动后,只有“退出”权限的用户才可以退出并关闭系统。
B、如果系统没设置录音磁盘,则界面下方状态信息区里的“当前磁盘”项会以红色高亮显示。
如果需要系统每次启动时都能自动运行录音程序,需要将桌面上的快捷方式复制到启动菜单中。
操作方法是,在桌面上选中上述图标,按鼠标右键,弹出菜单,选中“复制”,然后打开桌面上“我的电脑”,进入“C:\Documents and Settings\All Users\「开始」菜单\程序\启动”,并将刚才复制的快捷方式,粘贴到该目录下。
UGT-S100 7.1 Channel PCI Sound Card 用户手册说明书

7.1 Channel PCI Sound CardUser ManualModel: UGT-S100All brand names and trademarks are properties of their respective owners.Featuresz Full-duplex playback and recordingz Full-duplex 8CH DAC/2CH ADCz Support 48/44.1 KHz sampling rate for both playback and recordingz Supports the latest Dolby® Digital EX and DTS ES 6.1/7.1 CH DVD soundtrack playbackz DirectSound™ 3 HW accelerationz PCI Rev. 2.2 compliant with bus mastering modesz ACPI compliant power down managementz Support Windows® 2000/ XP/2003/Vista/7 (32/64 bit)System Requirementsz Pentium-class computer with one available PCI slotz Windows® 2000/XP/2003/Vista/7 (32/64 bit)z DirectX 8.1 above is requiredPackage Contentsz Vantec 7.1 Channel PCI Sound Card x 1UGT‐S100 Page 2z Installation Guide x 1z Driver CD x 1* User’s Manual Is on Driver CDNote: Contents may vary depending on the market/country.Hardware & Software InstallationIt is recommended that you remove any previously installed sound card and drivers prior to installing this 7.1 Channel PCI Sound Card to avoid any conflicts. If previously installed drivers are not removed, this 7.1 Channel PCI Sound Card perhaps not function properly. (Note: If your computer has on-board sound you will need to disable it on the motherboard. For more information please see your computer’s documentation or contact your computer’s manufacturer.)Driver InstallationFor Windows® 2000/XP/2003/Vista/7 (32/64 bit)1.Locate an available PCI slot on your computer, and insert this 7.1Channel PCI Sound Card into the slot. Fasten the card to the case using a screw.2.Start your PC, place the Driver CD into the CD-ROM drive. UGT‐S100 Page 3Click the Start button on the taskbar and click Run. Type “D:\\UGT-S100\2000_XP_2003_Vista_7\Setup.exe”. (Assuming you have placed the CD in CD-ROM drive labeled as D).3.Follow any on-screen instructions to complete the softwareinstallation.4.Restart your system.5.Once you have rebooted the computer, this 7.1 Channel PCISound card is ready to be used.Physical ConnectionsUGT‐S100 Page 4The rear panel of this 7.1 Channel PCI Sound Card has the following jacks:1.Line In: Connect to tape/CD/DVD player, or other audio sourcesfor output mixing and/or recording2.MIC In: Connect to microphone3.Line Out: Connect to headphone or amplifying speakers. In4-channel, 6-channel, and 8-channnel configurations, the function of this port becomes Front Speaker Out4.Rear Speaker: Connect to Rear speakers while in 8 channelUGT‐S100 Page 5mode (via external amplifier)5.Surround Speaker: Connect to Surround speakers while in 4/6/8channel modes (via external amplifier)6.Center/Bass Speaker: Connect to Center/Bass speakers while in6/8 channel modes (via external amplifier)7.S/PDIF Out: The Digital Output jack is a S/PDIF Coaxialoutput, you can use an RCA cable to connect this to a digital recorder, mixer or surround receiver. A 75 Ohm digital coaxial cable is required for this type of connectionPlease refer to the audio configuration table below for the function of the audio ports in 2, 4, 6, 8-channel configuration.UGT‐S100 Page 6Port 2-channel 4-channel (*)6-channel 8-channel1 Line In Line In Line In Line In 2Mic InMic In Mic In Mic In 3 Line Out Front SpeakerFrontSpeakerFront Speaker 4 - - RearSpeaker5 - Surround SpeakerSurroundSpeaker Surround Speaker 6 - - Center/Bass SpeakerCenter/BassSpeaker 7 S/PDIF OutS/PDIFOutS/PDIF OutS/PDIF Out(*) 4-Channel mode is not available on Vista/7 (32/64 bit)In addition to the rear panel jacks, this 7.1 Channel PCI Sound Card also has the following internal connection: The Function J10 Analog CD/IN Port(Signals: L-G-G-R) J11Analog CD/IN Port(Signals: G-R-G-L)WarrantyThe Vantec 7.1 Channel PCI Sound Card comes with a 1 year limited warranty(90 day parts). If your unit becomes defective within that time frame, please go to for information on how to receive warranty exchange or repair. Cosmetic defects and missing parts are not covered under this warranty. Please check the contents of the unit to make sure you received all parts. Also, check for any cosmetic flaws. If any parts are missing or if there are cosmetic defects, please contact the retailer from which you purchased the unit immediately and ask for a replacement.Vantec Thermal TechnologiesUGT‐S100 Page 8。
Alpha3000 用户使用手册12

Alpha3000 电话录音系统用户使用手册目录系统简介 (2)一、基本功能 (3)二、技术参数 (4)系统安装 (4)一、硬件安装 (4)1.1微机 (4)1.2 PCI接口录音卡 (4)1.3 PCI接口录音卡安装 (5)1.4连线 (7)软件操作 (7)一、系统启动 (7)二、基本操作 (7)2.1主窗口说明 (7)2.2模块功能 (9)系统简介当基于法律需求或责任认定等原因,需要保留电话通讯过程的录音时,配备一套完善的电话录音系统便显得极为重要。
如何准确无误的保留电话录音以及如何高质量的、方便的查听录音记录,均是系统面临的重要课题。
Alpha3000电话录音系统,是本公司凭借多年来在语音技术方面的专业经验,使用最新数字电子技术,辅以现今为止最先进的电脑及Windows软件所设计完成的一套整合性系统,它可以同时对多路电话通话进行录音、监听和查询。
Alpha3000电话录音系统可广泛的应用于商业电话录音,电力调度录音,热线服务电话录音,投诉电话录音,关键岗位电话录音,传呼台录音,金融证券录音,公安报警录音,安全部门的监听电话,航空、铁路、交通运输调度录音及各行业的生产调度录音。
一、基本功能1.单机系统最多128线电话同时录音。
2.采用全新的PCI接口的即插即用录音卡。
3.录音、监听对通话双方没有任何影响。
4.可实时监听每一条线路的通话内容。
5.可以根据任意给定的条件对录音、备份资料进行快速、简洁的回放查听。
6.可以完整的检测并记录所有外拨电话号码与来电显示号码。
7.系统具有自动同步双备份功能,也可以通过系统手工备份到您想要保存的目录或磁带转录。
8.话务统计功能,可以对所有的拨入、拨出电话进行清单列表、打印、汇总等。
9.电话本功能,可以根据预先设置电话号码信息,自动对呼入、呼出的电话记录进行分类。
10.电话留言功能,在无人接听电话时,系统可以实现自动留言功能。
11.系统具有自动增益功能,可以自动调节通话双方的音量,而不至于声音太小。
录音系统安装手册范本

录音系统安装手册一、服务器安装说明安装步骤:1)、东进语音卡的安装:a、安装东进语音开发包DJDBDK(3.4.0/3.6.3),默认安装,安装完成之后重启电脑,如下图:驱动安装:选择“否,暂时不”,点击下一步选择“从列表或指定的位置安装(高级)”点击下一步选择光驱下G:\DJDBDK\Win2000,点击下一步在弹出的窗口中选择“仍然继续”然后直到安装完毕,重启计算机。
安装完成之后,在任务管理器中,语音卡的状态显示为b、模拟卡检测及加载(以下图片仅做参考,显示的卡为3个模块6个通道):修改配置文件,修改“开始”“所有程序”“DJDBDK”“DJD161A”“TC08A-V.INI”中EnhanceConf = 2,WaveFormat = 1;选择“开始”“所有程序”“DJDBDK”“DJD161A”“AutoCheck”出现如下界面:依次点击“PCI Board Start”和“Save an Exit”按钮加载语音资源,检测正确结果如下:然后选择“开始”“所有程序”“DJDBDK”“DJD161A”“Phone Bank Demo”,出现如下界面:通道数由本次检测到的语音卡为准。
C、8线模拟卡的线路连接,参考C:\DJDBDK\Help\DJD161a目录下的D161A-D081A.chm 帮助文件。
D、数字卡的检测与加载:选择“开始”“所有程序”“DJDBDK”“DJSs1”“SS1 AutoCheck”,依次点击“PCI Board Start”和“Save an Exit”检测语音卡,然后选择“开始”“所有程序”“DJDBDK”“DJSs1”“SS1 Download”加载数字语音卡。
修改“开始”“所有程序”“DJDBDK”“DJSs1”“Tce1-32.ini”中[ModeArray]目录下的PcmMode数组的值都为1,如图:2)、将录音服务器整个文件拷贝到D盘根目录下;3)、使用软件注册程序获得语音卡编号,从语音卡注册码文件中查到对应的注册码,填入注册软件中,点击注册,注册成功会有相应的提示;4)、将OraDB.sql数据库脚本文件导入oracle数据库中;5)、在操作系统中建立一个用户名为hbtx的管理员用户,密码设置为pass;6)、在需要存放录音文件的盘符下建立一个名为Server的文件夹,并将其设置为系统共享,即共享名为Server$;7)、在Setup文件夹目录下找到配置文件server.ini,修改数据库信息、业务服务器信息、业务服务器端口号、录音台号、录音卡的类型、录音路径等信息,在服务器上建立一个数据库服务,数据库SID设为数据库网络服务名,说明如下(有红字说明的部分需要根据实际情况进行修改,其它项无需修改):[系统设置]管理员 = 00000000管理员密码 =222222 //系统退出密码数据库IP =192.168.0.2 //数据库IP数据库SID =zitorcl //数据库SID数据库用户 =SZREC122 //数据库用户数据库密码 =SZREC122 //数据库密码数据库端口号 =1521 //数据库端口号APPSERVER =192.168.0.100 //设为录音服务器需要连接的业务服务器IP地址APPPORT =1003 //设为录音服务器需要连接的业务服务器端口号录音路径 =d:\server\ //录音文件存放路径,即第6)步中设置的serve文件夹路径组号 = 1线号 = 1录音台IP = 192.168.0.9 //录音台IP地址录音台号 =1 //录音服务器的编号,综合话务平台的编号为0,录音平台编号从1开始服务端口号 =5110窗体标题 = ZXRD1000 //窗体标题Logo = 录音服务器//程序名称收主叫方式 = DTMF //两种方式:DTMF和FSK[中继设置];USER模拟卡,SS1中继卡(大写)中继卡类型 = USER //模拟卡设为USER(大写),数字卡设为SS1 (大写)部线路总数 = 4外线坐席 = 2流水编号 =02录音编号 =01初始语音文件表=C:\DJDBDK\Prompt.ini放音线路开始=31放音线路结束=32外线呼出开始=32外线呼出结束=33线呼出开始=1线呼出结束=2;中继卡类型=SS1呼出中继开始 = 1呼出中继结束 = 30;中继卡类型=SS1 时有效[用户设置]自动等待超时处理=1自动最大等待时间=20人工最大排队时间=60自动最大服务时间=3000人工最大服务时间=1800最大振铃时间=30最大呼出振铃时间=60留言时间=20转接控制=0报警语音提示 = 1;2时 122接119 转,1时122、119直接转,0时本地接。
192中文用户手册
AUDIOPHILE 192 PCI 音频接口中文用户说明前言感谢您购买M-audio公司出品的Audiophile 192 PCI 音频接口。
Audiophile 192为电脑和数字音频工作站系统提供了专业音频、MIDI接口支持。
此用户说明书将向您大致介绍Audiophile 192 音频接口的功能特性,帮助您正确使用此产品。
即使您已经有数字录音的经验,我们也建议您花一些时间来阅读此说明。
这将帮助您更加全面的了解Audiophile 192。
最低系统配置Windows下的安装192或96kHz采样频率要求奔腾III 700 MHz或更快的处理器。
192或96kHz采样频率要求256MB内存,48kHz采样频率要求128MB内存。
DirectX9.0b 或更高。
Windows XP (SP1) 或Windows 2000 (SP4)空闲的PCI插槽安装步骤安装Audiophile 192在任何操作系统中,将M-audio Audiophile 192驱动盘插入电脑光驱,浏览并选择您自己使用系统的安装文件。
如果系统将CD自动播放的功能打开,安装将一步步地进行。
当完成软件安装之后,打开电脑机箱,将Audiophile 192插入一个空闲的PCI插槽中,并确定将其插牢。
当完成硬件安装之后,重新启动电脑,并按照指示完成驱动软件的安装。
连接Audiophile 192Audiophile 192提供了以下接口:主输入 1 和 2 – 连接您所使用的模拟外部设备输出(例如话放、键盘)。
S/PDIF 输入 – 连接到一个带有S/PDIF输出口的数字设备。
主输出 1 和2– 用于连接一个两轨录音设备的模拟输出口,或者连接一对有源音箱。
监听输出 1 和 2 – 连接到有源监听音箱。
此对输出口的输出源由在Patchbay/Routing接线器页面的Monitor/Mixer监听混音器来选择。
S/PDIF 输出 – 连接到一个带有S/PDIF输入口的数字设备。
博峰PCI系列语音
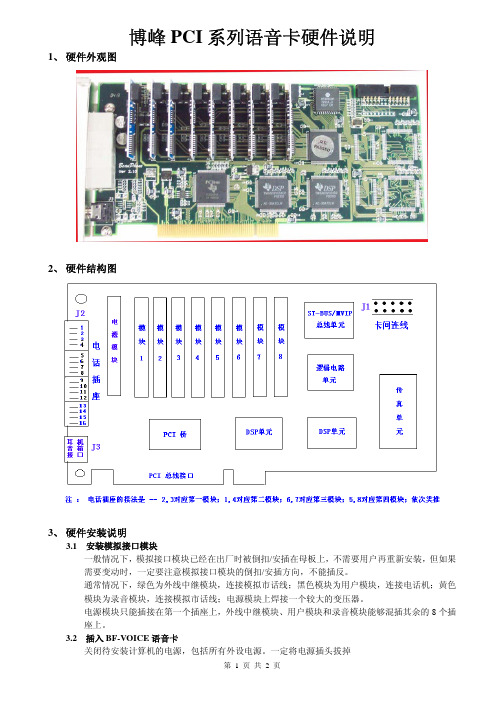
博峰PCI系列语音卡硬件说明1、硬件外观图2、硬件结构图3、硬件安装说明3.1 安装模拟接口模块一般情况下,模拟接口模块已经在出厂时被倒扣/安插在母板上,不需要用户再重新安装,但如果需要变动时,一定要注意模拟接口模块的倒扣/安插方向,不能插反。
通常情况下,绿色为外线中继模块,连接模拟市话线;黑色模块为用户模块,连接电话机;黄色模块为录音模块,连接模拟市话线;电源模块上焊接一个较大的变压器。
电源模块只能插接在第一个插座上,外线中继模块、用户模块和录音模块能够混插其余的8个插座上。
3.2 插入BF-VOICE语音卡关闭待安装计算机的电源,包括所有外设电源。
一定将电源插头拔掉拧下计算机盖的螺丝,小心打开计算机选择空闲的PCI插槽,插入BF-VOICE语音卡用螺丝固定好BF-VOICE语音卡3.3 连接卡间连线为了使插在同一台计算机中的所有卡的任意两个逻辑通道之间可以进行直接交换,每一块BF-VOICE卡上都设有ST-BUS/MVIP-BUS/CT-BUS总线的接口。
如果您在同一台计算机中插入多块语音卡,则必须连接所有卡的ST-BUS/MVIP-BUS/CT-BUS总线的接口。
卡间连线的接口为J1,在连接卡间连线时,一定注意连线方向正确,即所有卡的连线方向一致。
3.4 连接电话机和/或模拟电话线按照实际需要和模块类型,连接必要的模拟电话线和/或电话机,模拟电话线和/或电话机的接口为J2,对于八线卡,每个J2插口含有两条线,并且每个插口的中间两芯为一组信号线,外侧两芯为一组信号线。
3.5 完成安装装回计算机盖,并用螺丝固定好将计算机放平放稳打开计算机电源4、驱动程序安装好硬件,打开计算机电源,进入Windows操作系统。
将BF-VOICE语音卡安装盘(For Windows98/2000/XP)插入光盘驱动器中。
当系统提示找到新硬件,并出现“此向导帮助您为硬件设备安装驱动程序”的对话框时,单击“下一步”。
三汇 NTP-480A PCIe(2.0) VoIP 录音卡 用户手册说明书
三汇NTP系列录音卡NTP-480A/PCIe(2.0)VoIP录音卡Version 1.0杭州三汇信息工程有限公司目录目录 (i)版权申明 (ii)版本修订记录 (iii)第1章概述 (1)1.1功能描述 (1)1.2性能特点 (1)第2章安装 (3)2.1结构示意图 (3)2.2系统要求 (5)2.3安装步骤 (5)附录A 主要技术/性能参数 (6)附录B 技术/销售支持 (7)版权申明本文档版权属杭州三汇信息工程有限公司所有。
杭州三汇信息工程有限公司保留对此文件进行修改而不另行通知之权利。
杭州三汇信息工程有限公司承诺所提供的信息为正确且可靠, 但并不保证本文件绝无错误。
请在使用本产品前, 自行确定所使用的相关技术文件及规格为最新有效之版本。
若因贵公司使用本公司之文件或产品, 而需要第三方之产品、专利或者著作等与其配合时,则应由贵公司负责取得第三方同意及授权。
关于上述同意及授权,非属本公司应为保证之责任。
版本修订记录版本号发布日期修订内容Version1.0 2017.07 新创建此文档。
请访问我们的网站()以获取该文档的最新版本。
第1章 概述NTP系列NTP-480A/PCIe(2.0) VoIP录音卡是三汇公司推出的最大可支持480路IP通话录音的板卡。
本系列板卡可以应用于100M/1000M的网络环境,可通过交换机端口镜像录音。
1.1 功能描述●单卡提供最多480路IP电话处理能力。
●通过端口镜像实现目标交换机的数据采集,能够支持两台交换机同时录音。
●板卡采用端口镜像的形式采集网络上的语音数据,并转发到PC机上。
不对原有通话双方造成任何干扰,也不会被通话双方察觉。
●固件中均写入了唯一的硬件序列号,可用于区分板卡类型,亦可作防伪识别。
●具有硬件授权号识别电路。
用户可向本公司申请唯一的授权号,保护用户软件安全。
1.2 性能特点●支持PCIe x1总线PCIe x1接口,符合PCIe1.0a总线标准,适用各种PCIe插槽,支持即插即用(PNP)。
录音系统说明书
电话录音系统,是本公司凭借多年来在语音技术方面的专业经验,使用最新数字电子技术,辅以现今为止最先进的电脑及Windows软件所设计完成的一套整合性系统,它可以同时对多路电话通话进行录音、监听和查询。
电话录音系统可广泛的应用于商业电话录音,电力调度录音,热线服务电话录音,投诉电话录音,关键岗位电话录音,传呼台录音,金融证券录音,公安报警录音,安全部门的监听电话,航空、铁路、交通运输调度录音及各行业的生产调度录音。
一、基本功能1. 流行的Windows 98/NT/2000/XP操作环境。
2. 单机系统最多128线电话同时录音。
3. 采用全新的PCI接口的即插即用录音卡。
4. 录音、监听对通话双方没有任何影响。
5. 可实时监听每一条线路的通话内容。
6. 可以根据任意给定的条件对录音、备份资料进行快速、简洁的回放查听。
7. 系统具有自动同步双备份功能。
也可以通过系统手工备份到您想要保存的目录或磁带转录。
8. 可以完整的检测并记录所有外拨电话号码与来电显示号码。
9. 强大的电话管理功能,可以对所有的拨入、拨出电话进行清单列表、打印、汇总、分组等。
10. 系统具有自动增益功能,可以自动调节通话双方的音量,而不至于声音太小。
11. 所有谈话内容录为加密格式,保证了录音数据的安全性。
12. 可以设置多达6个盘(可以是硬盘、分区或网络映射盘)自动循环录音。
13. 录音启动方式灵活,具有压控、键控两种启动方式。
14. 录音起始时间可以灵活设置,可以是一段时间内录音,也可以是每天24小时录音。
15. 提供不同的压缩率,满足不同用户的需要,20G的硬盘最多可以保存5600多个小时。
16. 线路适用于电话外线、分机内线、ISDN引出的模拟线等。
17. 当系统的硬盘将满时,系统将自动清除最先录音的资料,以保证系统可以常年不间断运行。
18. 方向判别。
可以判别出呼叫方向,如呼入还是拨出。
19. 系统具有15种权限,可以满足多用户的需要。
唐信电话录音系统说明书_PCI录音卡
内录音,也可以是 24 小时录音,录音起始时间可以灵活设置。
4、方向辨别
自动辨别电话的“拨出”或“拨入”方向,自动检测来电制式并记录所有外
拨电话号码与来电显示号码。
5、实时监听
可实时监听每一条通道的通话内容。
6、自动循环录音
可以设置多达 4 个盘(可以是硬盘、分区或网络映射盘)自动循环录音,当
系统的硬盘空间将满时,系统将自动清除最先录音的文件,确保系统常年不间断
操作系统。
800MHZ Pentium 系列 CPU 以上 可用的 PCI 插槽、一个以上 USB 接口 内存 256M(视配置的增加须适当增加)
硬盘 40G 以上(在压缩比为 1:4 的情况下,每 G 每通道可录约 140 小时,40G 可录约 5600 小时,80G 可录约 12000 小时)
音箱
12、网络查听
在一台 PC 安装电话录音系统以后,可以在局域网里的其它 PC 查听录音。
13、用户管理
系统具有多级用户管理功能,不同权限的用户只能操作其相应的功能。
14、留言信箱
让您的企业不错过任何一个商机,第一时间回复客户,提高客户满意度。在
您的电话无人应答时,将自动转入语音留言系统,并记录下每一次的留言内容,
5.9 未接电话…………………………………………………………………………………………………36
5.10 日志浏览…………………………………………………………………………………………………37
5.11 启动弹屏…………………………………………………………………………………………………36
5.11.1 弹屏系统功能说明……………………………………………………………………………………..36
GX-08 PCI 语音卡说明书1

第一部分GX08 PCI电话语音卡产品概述第一章GX08 PCI电话语音产品的功能特点1.1功能特点▲独特的DSP处理结构,能实时、高效地进行每线独立的数字化录音和放音。
▲独特的DSP处理结构,每线的数字化录音和放音可以同时并独立进行。
可以动态地选择不同的语音编码速率,并进行实时的语音压缩和解压。
▲可靠的双音多频按键(DTMF)检测,可在录音和放音的同时,立即响应DTMF按键。
▲独特的信号音产生(Generation)和识别(Detection)算法,可精确地识别任意频率的音频信号或产生任意频率的音频信号。
▲可靠的爆发音语音检测,能准确识别对方摘机。
特别适合对外拨号/自动语音通知情形。
▲带有主叫识别(Calling Identity Delivery)功能(DTMF/FSK兼容)。
▲FSK数据发送/接收功能。
▲带有ST-BUS和MVIP-BUS总线,可实现同机内任意卡间的任意两个通道之间的交换。
▲卡上带有处理器和大容量的存贮器,不额外占用主机的资源。
▲能识别座席卡的摘机、挂机和拍插等动作。
▲驱动程序使用事件驱动结构,便于多通道编程。
▲不需要额外硬件,可以实现三方通话和会议功能▲提供传真功能,可发送、接收传真▲可以实现简单的TTS(Text to Speech)。
▲多达16块卡在同一台计算机上,并共用IRQ,不占用主机存贮器空间,使用户方便扩容。
▲提供WINDOWS98/2000/NT和UNIX操作系统开发平台。
1.2 板卡功能方框图:Channel Digital Switch InterfacePCI BUS InterfaceST-BUSOrMVIP-BUSControllerLogicControllerDigitalSignalProcessor(DSP)Dual-portStaticRAMFaxFunctionTrunkOrUserLineInterfaceRingPowerInterface1.3 GX08 PCI电话语音卡技术指标接口方式:两线模拟中继接口阻抗:600欧姆频率响应:300Hz~3400Hz中断向量:可选择2、3、5、6、7、10、11、12中的任一个片上缓存:32K~256K Byte数字语音:A-率PCM、ADPCM数据速率:64KBPS、32KBPS、16KBPSDTMF码:0~9、*、#、A、B、C、D交换功能:256通道直接交换呼叫监测:信号音、语音、极性反转主叫号码:FSK、DTMFFAX :FAX Group 3FSK调制方式:逻辑0 :2200Hz±1%逻辑 1 :1200Hz±1%数据传送方式:二进制异步串行方式1.4 GX08 PCI电话语音卡产品包装当您第一次打开GX08 PCI电话产品的包装时,您应该见到以下必备物品:▲GX08 PCI电话语音卡母板一块▲模拟接口模块1~8块(类型和数量视乎您的订购要求)▲本手册一本▲ 1.44M、3.5寸软盘一片和/或CD-ROM光盘一份,盘片内容为Windows 98/2000 驱动程序和应用程序选购物品(视乎您的订购要求):▲铃流电源▲交换电缆第二部分GX08 PCI电话语音卡的安装GX08 PCI电话语音卡为PCI接口,所有插于同一机器中的GX08 PCI语音卡可以共享同一个中断,每一片卡单独占用32个IO口地址。
PCI Express Parallel Card 说明书
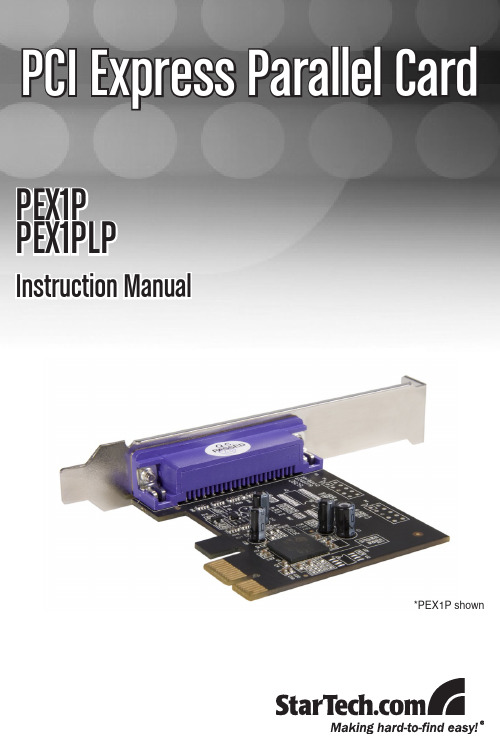
PCI Express Parallel CardPEX1PPEX1PLPInstruction Manual*PEX1P shownFCC Compliance StatementThis equipment has been tested and found to comply with the limits for a Class B digital device, pursuant to part 15 of the FCC Rules. These limits are designed to provide reasonable protection against harmful interference in a residential installation. This equipment generates, uses and can radiate radio frequency energy and, if not installed and used in accordance with the instructions, may cause harmful interference to radio communications. However, there is no guarantee that interference will not occur in a particular installation. If this equipment does cause harmful interference to radio or television reception, which can be determined by turning the equipment off and on, the user is encouraged to try to correct the interference by one or more of the following measures:•Reorient or relocate the receiving antenna.•Increase the separation between the equipment and receiver.•Connect the equipment into an outlet on a circuit different from that to which the receiver is connected.Consult the dealer or an experienced radio/TV technician for help.•Use of Trademarks, Registered Trademarks, and other Protected Names and Symbols This manual may make reference to trademarks, registered trademarks, and other protected names and/or symbols of third-party companies not related in any way to StarT . Where they occur these references are for illustrative purposes only and do not represent an endorsement of a product or service by , or an endorsement of the product(s) to which this manual applies by the third-party company in question. Regardless of any direct acknowledgement elsewhere in the body of this document, StarT hereby acknowledges that all trademarks, registered trademarks, service marks, and other protected names and/or symbols contained in this manual and related documents are the property of their respective holders.Table of ContentsIntroduction (1)Features (1)Package Contents (1)System Requirements (1)Installation (2)Hardware Installation (2)Software Installation (3)Verifying Installation (4)Specifications (5)Technical Support (6)Warranty Information (6)IntroductionThe 1-Port PCI Express to Parallel Adapter Card adds an SPP/EPP/ECP compatible parallel port to any PCI Express enabled PC. Installed into an x1 PCI Express (PCIe) slot and allowing for connections to EPP/ECP parallel peripherals, the PCIe native, single-chip design ensures maximum performance and reliability. Featuring a single DB25 parallel port, perfect for connecting printers, scanners and more and backed by ’s two year warranty and free lifetime technical support.Features•M aximum data transfer rate of 1.5 Mbps•PCI 2.2 and PCI Power Management 1.0 compliant•SPP/EPP/ECP Parallel port fully supports existing Centronics interface •Low Profile compatible for small-form factor PCs (PEX1PLP only) Package Contents•1 x PCI Express Parallel Card•1 x Full-Profile Bracket (PEX1PLP only - Low Profile bracket attached) 1 x Low-Profile Bracket (PEX1P only - Full Profile bracket attached)••1 x Instruction Manual1 x Driver CD•System Requirements•PCI Express enabled computer system with available slotMicrosoft• ® Windows® 2000/XP/Server 2003/Vista/Server 2008 R2/7, or DOS, or Linux®InstallationWARNING! PCI Express cards, like all computer equipment, can be severely damaged by static electricity. Be sure that you are properly grounded before opening your computer case or touching your card. recommends that you wear an anti-static strap when installing any computer component. If an anti-static strap is unavailable, discharge yourself of any static electricity build-up by touching a large grounded metal surface (such as the computer case) for several seconds. Also be careful to handle the card by its edges and not the gold connectors.Hardware Installation1.T urn your computer off and any peripherals connected to the computer (i.e. Printers, external hard drives, etc.). Unplug the power cablefrom the rear of the power supply on the back of the computer and disconnect all peripheral devices.2.Remove the cover from the computer case. See documentation for your computer system for details.3.Locate an open PCI Express slot and remove the metal cover plateon the rear of the computer case (Refer to documentation for your computer system for details.). Note that this card will work in PCI Express slots of additional lanes (i.e. x4, x8 or x16 slots).NOTE: If using the PEX1PLP and installing into a full profile computer case, use a screw driver to remove the screws holding the low profile bracket to the card and replace with the included full profile bracket.4.Insert the card into the open PCI Express slot and fasten the bracket to the rear of the case.5.Place the cover back onto the computer case.Insert the power cable into the socket on the power supply and6.reconnect all other connectors removed in Step 1.Windows 2000/XP/Server 20031.When the Found New Hardware wizard appears on the screen, insert the Driver CD into your CD/DVD drive. If you are prompted to connect to Windows Update, please select the “No, not this time” option and click Next.2.Select the option “Install Drivers Automatically (Recommended)” and then click the Next button.Windows should now start searching for the drivers. Once this has 3.completed, click the Finish button.Windows Vista/Server 2008 R2/71.When the Found New Hardware window appears on the screen, click on the “Locate and install drivers software (recommended)” option. If prompted to search online, select the “Don’t search online” option. 2.When prompted to insert the disc, insert the Driver CD that came with the card, into your CD/DVD drive and Windows will automatically proceed to search the CD.3.If a Windows Security dialog window appears, click the “Install this driver software anyway” option to proceed.4.Once the driver is installed, click the Close button.Windows 2000/XP/Server 2003/Vista/Server 2008 R2/7From the main desktop, right-click on “My Computer” (“Computer” in Vista/7), then select Manage. In the new Computer Management window, select Device Manager from the left window panel.Double-click on the “Ports (COM & LPT)” option. A new ‘PCI Express Parallel Port’ should be visible. The port is ready to connect to new devices.SpecificationsTechnical Support’s lifetime technical support is an integral part of our commitment to provide industry-leading solutions. If you ever need help with your product, visit /support and access our comprehensive selection of online tools, documentation, and downloads. Warranty InformationThis product is backed by a two year warranty.In addition, warrants its products against defects in materials and workmanship for the periods noted, following the initial date of purchase. During this period, the products may be returned for repair, or replacement with equivalent products at our discretion. The warranty covers parts and labor costs only. does not warrant its products from defects or damages arising from misuse, abuse, alteration, or normal wear and tear.Limitation of LiabilityIn no event shall the liability of Ltd. and USA LLP (or their officers, directors, employees or agents) for any damages (whether direct or indirect, special, punitive, incidental, consequential, or otherwise), loss of profits, loss of business, or any pecuniary loss, arising out of or related to the use of the product exceed the actual price paid for the product. Some states do not allow the exclusion or limitation of incidental or consequential damages. If such laws apply, the limitations or exclusions contained in this statement may not apply to you. has been making “hard-to-find easy” since 1985, providing high quality solutions to a diverse IT and A/V customer base that spans many channels, including government, education and industrial facilities to name just a few. We offer an unmatched selection of computer parts, cables, A/V products, KVM and Server Management solutions, serving a worldwide market through our locations in the United States, Canada, the United Kingdom and T aiwan.Visit today for complete information about all our products and to access exclusive interactive tools such as the Cable Finder, Parts Finder and the KVM Reference Guide.。
百灵达 C-1 录音棚电容话筒使用手册说明书

C-1Studio Condenser Microphone V 4.01. Power SupplyYour condenser mic C-1 needs a phantom power supply (+36 to +52 V). If your C-1 is connected to a microphone preamp and supplied with phantom power, the LED on the microphone lights up. BEHRINGER assumes no liability for any damage caused by a defective phantom power supply. Always mute the sound reinforcement system before you switch on the phantom power supply.2. DirectivityYour C-1 features a capsule with a cardioid pickup pattern and is ideal for recordingindividual instruments, vocals and speech. Cardioid pickup pattern means that the sound produced by sources located in front of the mic is strongly picked up. It is often used in recording situations, since this directivity pattern tones down the pickup of sounds located to the back of the microphone.3. Microphone InstallationThere is an adapter on your microphone that lets you mount it on mic stands with either metric (Europe) or imperial-gauge threads (North America). First dismantle the microphone from the stand mount adapter by detaching the fine-thread shoulder screw at the bottom end of the microphone. Fasten the adapter onto the microphone stand, place the microphone into it and tighten the screw again.Basically, the microphone in the stand mount adapter should stand upright and face the sound source at a right angle. The angle of the microphone to the sound source influences the sound of the recording; therefore, experiment with different positions until you achieve the desired sound. To this end, you can rotate the mic in the stand mount adapter by loosening the screw somewhat and tightening it again.Terminals marked with this symbol carry electrical current of sufficient magnitude to constitute riskof electric shock. Use only high-quality commercially-available speaker cables with ¼" TS plugs pre-installed. All other installation or modification should be performed only by qualified personnel.This symbol, wherever it appears, alerts you to the presence of uninsulated dangerous voltageinside the enclosure - voltage that may be sufficient to constitute a risk of shock.This symbol, wherever it appears, alerts you to important operating and maintenance instructions in theaccompanying literature. Please read the manual.Condenser microphones are extremely moisture-sensitive.Never use your microphone in closeproximity to water (e.g. bath tubs, wash basins, sinks, washing machines, pools, etc.).When doing voice recordings, always use the enclosed windscreen to protect the capsule from moisture.Always use the power supply specified in the operating instructions.Take care not to dropyour microphone as this can lead to severe damage.BEHRINGER assumes no liability for any damage caused by the user.After each use, wipe the microphone down with a soft cloth and place it back into itsprotective casing (included with the microphone). Then, lay the small bag containing the moisture-absorbing crystals on top of the microphone head.LEGAL DISCLAIMERMusic Tribe accepts no liability for any loss which may be suffered by any person who relies either wholly or in part upon any description, photograph, or statement contained herein. Technical specifications, appearances and other information are subject to change without notice. All trademarks are the property of their respective owners. Midas, Klark Teknik, Lab Gruppen, Lake, Tannoy, Turbosound, TC Electronic, TC Helicon, Behringer, Bugera, Oberheim, Auratone andCoolaudio are trademarks or registered trademarks of Music Tribe Global Brands Ltd. © Music Tribe Global Brands Ltd. 2021 All rights reserved.LIMITED WARRANTYFor the applicable warranty terms and conditions and additional information regarding Music Tribe’s Limited Warranty, please see complete detailsonline at /warranty.If necessary, you can bend the microphone out of its vertical position by using the hingeon the microphone stand.◊ Please make sure to handle the microphone shaft with attention and care to avoid damaging the screw thread. In no situation should you ever applyexcessive force.Of course, you can detach the C-1 from the stand mount adapter and attach it to a commercially available suspension mount.4. Audio ConnectionUse a balanced XLR microphone cable with the following pin assignment:pin 1 = shielding; pin 2 = +; pin 3 = -. Since your C-1 features gold-plated contact points throughout, we recommend that you use only microphone cables withgold-plated connectors.5. Level Setting/Adjusting the Basic SoundAdjust the gain control in the microphone channel of your mixing console so that the peak LED lights up only occasionally or never at all. The EQ controls in the microphone channel should be set to mid-travel position to start with. To get the sound you want, try changing the mic position relative to the sound source or even move the microphone around in the recording room of your studio. Adjusting the angle at which walls face the sound source can also be helpful. Only when the desired basic sound has been achieved, should you start to use equalizers and signal processors, if any at all (remember: less is often more!) Due to the extremely linear frequency response and the high sonic resolution of your C-1, there is no need for high-frequency “EQing” that can heavily influence the signal and unnecessarily increase the noise level. The C-1 provides that much-desired transparency which often gets lost during recording and mixing.Polar pattern Frequency response6. SpecificationsTransducer type condenser, 16 mmPolar pattern cardioidConnection: gold-plated balanced XLR connector Open circuit sensitivity -33 ± 2 dBV (0 dBV = 1 V/Pa)Frequency response 40 Hz - 20 kHzMax. SPL (1% THD @ 1 kHz) 136 dBNominal impedance 100 ΩLoad impedance >1 kΩSupply voltage +36 - 52 VSupply current 2.5 mADimensions Ø shaft: 54 mmlength: 180 mmWeight approx. 0.42 kgWe Hear You。
PCIe采集卡使用手册说明书
03安全性须知04硬件安装05驱动安装07属性07设备信息09时序13OSD14HDMI15视频18输入26输出格式26Video Crossbar 目录2安全性须知电气方面的安全性操作方面的安全性为避免可能的电击造成严重损害,在搬动计算机主机之前,请先将计算机电源线暂时从电源插座中移除。
■当您要加入硬件装置到系统中或者要移除系统中的硬件装置时,请务必先连接或移除该装置的信号线,然后再连接或移除电源线。
建议在安装硬件装置之前先移除计算机的电源线。
■当您要从主板连接或移除任何的信号线之前,请确定所有的电源线已事先移除。
■在使用硬件卡或扩展卡之前,我们建议您可以先寻求专业人士的协助。
这些装置有可能会干扰接地的回路。
■请确定电源的电压设定已调整到本国/本区域所使用的电压标准值,若您不确定您所属区域的供应电压值多少,那么请就近询问当地的电力公司人员。
■如果电源已损坏,请不要尝试自己修复。
请将之交给专业技术服务人员或经销商来处理。
■在您安装视频采集卡以及加入硬件装置之前,请务必详细阅读本手册提供的相关信息。
■在使用产品之前,请确定所有的排线、电源线都已正确地连接好。
若您发现产品有任何重大的瑕庇,请尽速联系您的经销商。
■为避免发生电气短路情况,请务必妥善保管所有备用螺丝、回形针及其他零件,不要遗留在视频采集卡上或计算机主机中。
■灰尘、湿气以及剧烈的温度变化都会影响视频采集卡的使用寿命,因此,请尽量避免在类似环境中放置、使用。
■请勿将计算机主机放置在容易摇晃的地方。
■若在本产品的使用上有任何的技术性问题,请和经过检定或有经验的技术人员联系。
■3(a)机箱内主板示意图(b)机箱内主板上插上采集卡后的示意图操作步骤1. 关闭计算机电源,拔除电源线。
2. 移除机箱盖,找到 PCI Express 插槽,如图 (a)。
3. 移除您要安装视频采集卡的扩展槽上的槽位盖。
4. 将视频采集卡插入扩展槽直到牢牢插入,如图 (b)。
灵通V.90 K56 Flex PCI PnP 模式声音 传真 模式与语音信息系统说明书

VoiceFax/Modems
with Speakerphone Functions
þ Software Upgradable þ 56,000* bps Data Modem
supporting both V.90 and K56Flex þ 14,400 bps Send & Receive Fax þ Supports speeds up to 115,200 bps þ Full Featured Voice Messaging þ Speakerphone Functions þ V.42 Error Correction and
V.42bis 4-to-1 Data Compression
* Capable of receiving at up to 56kbps, and send at up to 31.2kbps. Due to FCC regulations on power output, receiving speeds limited to 53kbps. Actual speeds vary. Requires compatible phone line and server equipment. Complies with both theV.9056k standard and K56Flex technology protocols.
Feature Notes
In addition to high speed fax and data transfer functions, your fax/modem supports the following additional voice features:
Personal Voice Messaging System
Delta 66 用户手册
Delta 66 用户手册Delta 66 用户手册——快速入门部分Delta 66 的安装有如下几个步骤:1. 将Delta 66 的PCI 卡安装到您的电脑上,并连接上Delta 66 外接盒。
2. 开启电脑,按照Windows 的“安装新硬件向导”来一步步地安装Delta 66 驱动程序。
3. 安装其它随Delta 66 提供的软件。
4. 将你的数字录音软件设置为使用Delta 66 作为音频设备。
5. 连接您的数字和模拟音频设置。
在您的Dleta 系列通用控制界面里为监听和回放进行设置。
硬件安装按照下列步骤安装Delta 66 硬件:1. 关闭您的电脑。
2. 将电脑外壳拆卸开,并将电脑放到一个能使您方便地看到PCI 插槽的地方。
3. 选择一个PCI 插槽用来安装您的Delta 66 PCI 主卡。
4. 在将Delta 66 PCI 主卡从它的防静套中拿出来之前,请先触摸一个接地的金属物件以便释放您身上可能带有的静电。
为了绝对地确保您不会带有可能导致PCI 卡损毁的静电,您还可以佩戴一个接地的放静电护腕。
5. 将电脑机箱后面板上对应将要使用的PCI 插槽的金属保护片移除。
6. 将Delta 66 PCI 主卡插入选定的PCI 插槽。
确保插稳。
7. 用螺丝将卡固定好。
8. 将电脑外壳装上。
接下来安装Delta 66 外接盒,注意,这时候您的电脑应该是关闭的:1. 将Delta 66 外接盒放于桌面上一处方便安全的地方。
2. 用随卡提供的15 针连接线将PCI 主卡和外接盒连接起来。
Windows 软件安装1. 在硬件安装完毕之后,重新启动您的电脑。
当Windows 启动的时候,新的安装硬件将被自动探测到,“找到新硬件向导”也将出现。
点击“下一步”。
2. 按照“找到新硬件向导”的提示一步步地安装软件。
当问及如何定位驱动程序的时候请选择“搜索最合适的驱动程序”,然后将驱动程序定位。
注意,驱动程序位于包装盒内提供的M-Audio 驱动程序光盘的“Delta Series”文件夹中和您电脑的操作系统名称相同的子文件夹中。
ESI - Copyright PCI 音频卡 说明书
高品质 4进4出PCI 音频卡用户指南ESI - Copyright © 2005, 2006Revision 3, July 2008 (国际官网) (中文)索引1. 介绍 (3)1.1. 关键特性 (3)2. 硬件安装 (4)2.1. 系统推荐 (4)2.2. 硬件安装准备 (4)2.3. PCI 板块安装 (5)3. MI/ODI/O 扩展卡 (单独销售) (7)4. 驱动安装 (8)4.1. 安装 (8)4.2. Windows 音频驱动属性 (11)5. 外部设备连接 (12)5.1. MAYA44 接口详述 (12)5.2.基本外接设备链接图 (13)6. MAYA44 控制面板 (17)6.1. 下拉菜单 (17)6.2. 输入部分 (18)6.3. 输出部分 (20)6.4. 采样率部分 (21)6.5. 结构图 (22)7. 和其他应用软件配合 (23)7.1. Cubase SX and Nuendo (23)7.2. Cakewalk SONAR (24)7.3. Tascam Gigastudio (25)7.4. Wave Lab (26)7.5. BPM Studio (27)8. DirectWIRE (29)9.技术指标 (32)10.保修规定 (33)1. 介绍感谢您选择ESI MAYA44,一款高品质24-bit 96kHz/192kHz 4x4音频卡。
您将会惊奇于MAYA44所提供的强力和丰富的性能。
这款产品不但适合刚入门的初学者和一些使用DJ软件的DJ工作者,同时连那些专业音频制作者也感到满意。
主要的性能包括SPDIF同轴和光纤输出,MIC输入自带+48V幻想电源和多通道数字通路。
MAYA44还提供可单独选购的‘MI/ODI/O’光纤子卡,提供额外的数字输入和MIDI接口。
1.1. 关键特性关键特性- 24-bit / 192kHz 数模转换 and 96kHz 模数转换- SPDIF同轴和光纤输出- 麦克风前置放大器带+48V幻象电源- 同时的全双工录音和回放- 快门式光纤输出接口- DirectWIRE 3.0 驱动支持- PCI卡兼容 3.3V 和 5V PCI 插槽- 多通道数字通路性能- EWDM 驱动,支持 MME, DirectSound, ASIO 2.0 and GSIF 2.0- 支持操作系统OS: Microsoft Windows® XP/2000-可单独选购的‘MI/ODI/O’光纤子卡,提供额外的数字输入和MIDI接口(MI/ODI/O)2. 硬件安装2.1. 系统推荐Intel Pentium III 1GHz CPU or equivalent AMD CPU256MB of RAMDirect X 8.1 or higherMicrosoft Windows®XP,2000One available PCI slot2.2. 硬件安装准备PCI MAYA44 卡和其他电脑部件容易受到静电损伤。
M-AUDIO Audiophile 2496声卡 用户手册
M-AUDIO Audiophile 2496用户手册前言感谢您购买Audiophile 2496。
Audiophile 2496 是由M-Audio 公司出品的Delta 系列数字录音系统和接口中的一款,使用了和这一系列的其他产品相同的硬件和软件技术。
即使您已经有数字录音的经验,也请您花一些时间来阅读本说明书。
该说明书将告诉您关于安装这个新音频卡以及随卡提供的软件的信息,帮助您全面了解Audiophile 2496 的功能和用处。
一旦您开始使用本卡,您就会很快发现它强大的能力和鲜明的特点——无论在音质上还是在设计上。
货物清单在您的Audiophile 2496 的包装盒中有下列物品:· 这本使用说明· 一块Audiophile 2496 PCI 卡· 一块Audiophile 2496 的S/P DIF 和MIDI 接口扩展线· 含有Windows 95/98/NT 和Machintosh OS 8.5.1 及更高版本等操作系统下的驱动程序和Delta 控制界面程序的CD· M-Audio 质保和注册卡关于Audiophile 2496 数字录音接口和MIDIAudiophile 2496 为您提供了一对立体声(说是两路单声道)模拟输入和输出,一个扩展的S/P DIF 同轴输出和一个输入——总共四进四出的高质量音频接口。
所有的音频通道都支持24bit 采样位深和从8kHz 到96kHz 的所有采样频率。
Audiophile 兼容PC 和Machintosh上的所有主流软件。
同轴的数字输出口具有输出Doldy Digital 5.1 环绕立体声的能力,使Audiophile 在具有专业级的数字录音、模拟或数字转换、混音以及母带处理能力的同时,也能成为DVD 家庭影院的中心。
用Audiophile 的PCI 卡上的模拟RCA 接口来接收来自您的乐器、调音台、前级功放或立体声接收机输出端的线路信号。
- 1、下载文档前请自行甄别文档内容的完整性,平台不提供额外的编辑、内容补充、找答案等附加服务。
- 2、"仅部分预览"的文档,不可在线预览部分如存在完整性等问题,可反馈申请退款(可完整预览的文档不适用该条件!)。
- 3、如文档侵犯您的权益,请联系客服反馈,我们会尽快为您处理(人工客服工作时间:9:00-18:30)。
LB—PT2002自动数字录音监听系统用户手册深圳市来邦电子有限公司电话: (0755) 82914099 82914499传真: (0755) 82913099第一章简介LB-PT系列数字录音监听系统是我公司结合国内期货行业及其它领域的要求,自行研制并开发的全数字化录音设备。
它能够完成多路对讲机或电话的录音、实时监听、查询等功能,广泛应用于期货经纪公司、电力、公安、证券、寻呼台、各种调度等领域。
1.1 基本功能数字录音系统可以完成如下功能:◎多路对讲电话的录音◎实时监听任一路对讲、电话的通话情况◎实时远端监听任一路对讲机、电话的通话情况◎实时查询任一路对讲机、电话的任一录音◎实时远端查询任一路对讲机、电话的任一录音◎根据录音长度、日期、时间、通道号、重要情况等进行查询◎输入系统管理员密码即可删除录音◎根据用户权限实行分级管理◎连续放音◎带来电显示◎光盘备份及自动清理录音◎系统通话量统计◎支持多达10个硬盘录音◎无千年虫影响1.2 性能特点◆数字录音: 录音及回放全数码方式,高保真原音再现。
镭射光盘存储,防潮,防霉,无机械走带机构的磁头磨损、卡带等机械故障;随机读写,平均寻道时间39毫秒。
◆即时检索: 数据库管理。
实现复杂的通话记录即时检索。
可根据通道号码,通话日期,时间,录音长度,重要情况等检索录音记录。
◆直观界面:操作指示及记录查找结果均有详细显示。
◆语音提示:关键操作、更换光盘、机器故障均有语音提示及警告。
◆定时录音:可预设录音时间◆通话监听:任意通道的即时通话监听。
◆并行操作:录音和通话记录检索重放同时进行。
◆远端控制:通过任一话机实现人机交互、实时地录音检索和监听。
◆安全可靠:分级密码权限管理,通话记录保密性强。
工业级高可靠性器件,冗余设计,自我故障恢复。
1.3录音方式本系统有三种可选的录音方式:压控、音控和键控。
压控(电压控制):根据电压的变化进行录音,即提机就进行录音音控(音频控制):根据检测线路中是否有音频信号来录音,如对讲机等键控(按键控制):根据对话的内容而由对话人通过电话按键*、#来决定录音或结束。
1.4 技术参数输入:8—64 通道,8通道递增阻抗:高阻 > 1兆欧姆信噪比:50d B频率响应:300—3400HZ数位方法:ADPCM 16KBPS采集数率:64Kbit / 1s 每通道,语音可( 1、2、4 )倍压缩光盘:( 1.2GB / 2.6GB / 4.6GB )可重写平均寻道:39MS录音时间:无限制温度:+5℃—+40℃湿度:5%—85%1.5 硬件配置主机:486/66 以上硬盘:1GB以上内存:8M 或以上监视器:VGA可擦写光驱:( 1.2GB、2.6GB、4.6GB ) 可选电源:180—265V AC 47—53HZ第二章安装数字录音系统可对最多64通道线路进行监听录音。
(以下以32路电话线路为例来说明)。
对于被录音的电话而言,录音设备是搭接在该电话线上的,在用于期货经纪公司、证券、寻呼台、114查号台、集团电话等领域中可用以下方式接线。
数码录音系统还可对‘对讲机’进行监控录音。
录音设备是搭接在该‘对讲机总控台’的喇叭线上的,在用于公安、交通、110报警台、电力调度、各种厂矿调度等领域中可用以下方式接线。
如下图所示:系统配置1、软件环境MS_WIN98,WIN20002、交换电缆实现LB-PT2002 PCI卡与卡间交换,需用交换电缆将不同卡的J3互联。
交换电缆是一个十芯的扁平电缆,当您需要卡与卡之间交换时,在购买时请注明,以便配置交换电缆。
3、软件加密狗安装步骤:1、LB-PT2002 PCI语音卡的硬件安装1.1插入LB-PT2002 PCI语音卡1.关闭待安装计算机的电源,包括所有外设电源。
注意:一定将电脑电源线插头拔掉。
2.拧下计算机盖的螺丝,小心打开计算机上盖。
3.选择空闲的PCI插槽,插入LB-PT2002 PCI语音卡。
4.用螺丝固定好LB-PT2002 PCI语音卡。
1.2连接卡间连线为了使插在同一台计算机中的所有卡的任意两个逻辑通道之间可以进行直接交换,每一块LB-PT2002 PCI语音卡上都设有ST-BUS/MVIP-BUS/CT-BUS总线的接口。
如果您在同一台计算机中插入多块语音卡,则必须连接所有卡的ST-BUS/MVIP-BUS/CT-BUS总线的接口。
卡间连线的接口为J3,在连接卡间连线时,一定注意连线方向正确,即所有卡的连线方向一致。
1.3连接电话机和/或模拟电话线按照实际需要和模块类型,连接必要的模拟电话线和/或电话机,模拟电话线和/或电话机的接口为J4,对于四线语音卡,每个J4的插口为一线,并且每个插口的中间两芯为信号线,外侧两芯空闲;对于八线卡,每个J4插口包含两组电话线路接口,并且每个插口的中间两芯为第一组电话接口,外侧两芯为第二组电话接口。
(J4最上边插口中间两芯为第0通道,接有源音箱)1.4 计算机复原装回计算机盖,并用螺丝固定好,连接计算机电源线。
打开所有电源,如果有铃流电源,也同时打开铃流电源。
至此,所有的硬件安装全部完毕,紧接着可以进入软件安装,关于软件安装,参见下一章节。
2、LB-PT2002 PCI语音卡的软件安装LB-PT2002 PCI电话语音卡软件分为驱动程序和应用软件,对驱动程序而言,Windows 98和Windows 2000的安装是有区别的;而对于应用程序的安装,两者是一致的。
用户必须先安装驱动程序,然后安装应用软件。
下面详细叙述:2.1 对于Windows 98驱动程序的安装过程如下:◎安装好硬件,打开计算机电源,进入Windows操作系统。
◎将LB-PT2002 PCI语音卡安装盘(For Windows98/2000)插入软盘驱动器或光盘驱动器中。
◎当系统提示找到新硬件并出现“此向导搜索下列设备的新驱动程序”,并指明“PCI Bridge ”提示对话框时,单击“下一步”。
◎在接下来的对话框中,选择“搜索设备的最新驱动程序(推荐)”,并单击“下一步”。
◎在接下来的对话框中,选择“指定位置”,依据LB-PT2002 PCI语音卡安装盘所插入的驱动器,在编辑框里键入相应的内容。
如LB-PT2002 PCI安装盘在A:驱动器,则键入“A:\Drivers \Win9x”;如果LB-PT2002 PCI安装盘在光盘驱动器E:驱动器,则键入“E:\Drivers\Win9x”。
再单击“下一步”。
◎在接下来的对话框中,单击“下一步”。
◎在接下来的对话框中,单击“完成”;至此,Windows 98的驱动程序安装完毕。
2.2 对于Windows 2000驱动程序的安装过程如下:◆安装好硬件,打开计算机电源,进入Windows操作系统。
◆将LB-PT2002 PCI语音卡安装盘(For Windows98/2000)插入软盘驱动器或光盘驱动器中。
◆当系统提示找到新硬件,并出现“此向导帮助您为硬件设备安装驱动程序”的对话框时,单击“下一步”。
◆在接下来的对话框中,选择“搜索适于我的设备的驱动程序(推荐)”,并单击“下一步”。
◆在接下来的对话框中,选择“指定位置”,并单击“下一步”。
◆在接下来的对话框中,依据LB-PT2002 PCI语音卡安装盘所插入的驱动器,在编辑框里键入相应的内容。
如LB-PT2002 PCI安装盘在A:驱动器,则键入“A:\Drivers \Win2000”;如果LB-PT2002 PCI安装盘在光盘驱动器E:驱动器,则键入“E:\Drivers \Win2000”。
再单击“确定”。
◆在接下来的对话框中,单击“下一步”。
◆在接下来的对话框中,单击“完成”;至此,Windows 2000的驱动程序安装完毕。
2.3 安装录音系统应用程序,在Setup_DrsId目录下运行“Setup”,按“缺省”方式安装。
安装完毕后不选择重新启动计算机,选择“No,I will restart my computer later。
”2.4 在程序组“数字录音系统”下运行“设置”,输入密码“123”,显示如下画面:修改卡数设定、硬盘陈列最大数、硬盘起始(即从C或D盘开始录音)、逻辑方式,按确认纽保存参数后退出。
对于八路录音系统只需修改硬盘陈列最大数和硬盘起始,其他参数缺省设置。
若希望系统在D-E-F盘循环录音,硬盘陈列最大数应设为3和硬盘起始设为1。
.2.5 重新启动计算机。
在程序组“数字录音系统”下运行“数字录音”既可.。
注:setdrs中各系统参数说明如下:硬盘最小剩余空间:指当硬盘剩余空间达到这一数值时,在此硬盘上建立一文件“DISKFREE.SYS",并切换到下一硬盘。
卡数设定:指计算机中录音卡的数量。
声控挂机:指连续若干秒无声音,则挂机。
声控记录最大时限:指声控条件下,最大的录音长度。
硬盘阵列最大数:指用于录音的硬盘或分区数。
起始硬盘号:指硬盘的起始值(C盘为0)挂机忙音(单位为毫秒):指查询端挂机以后,一次通或一次断所经过的时间。
例如:市话忙音一次通或一次断所经过的时间为350毫秒。
计算方法:市话忙音在15秒内“嘟..”的次数为86次,15/(86/2)=350。
挂机检测时间:指在连续若干秒内,检测到挂机忙音,即为挂机。
第三章使用说明3.1 使用说明本系统采用用户登录的操作方式。
操作员初期工作时进入系统的操作员代码为:1操作员密码为:123关机密码为:123操作员代码、密码可以修改和增加。
开机后,录音设备就开始进入录音工作状态,在屏幕上首先出现如下画面:( 图1 )屏幕上的电话机图形,每一个代表一路电话。
每个图形共有四行,第一行是一个电话机,表明该路现在的状态;第二行显示该路录音或查询时间;第三行是该路的电话号码(图中标示);第四行可选择录音重要性,表明该路的逻辑号(即在录音设备上的编号)。
录音四种图标:、、、。
外线查询三种图标:、、。
第一行状态:外线查询工作状态如下:表示该路处于外线查询或监听状态。
录音工作状态如下:表示该路处于录音等待状态。
表示该路正在通话,录音正在进行,只有当被录音的电话摘机,录音才进行。
表示该路不录音。
表示该路没有话音信号,这可能是以下四种原因之一:(一)、通话双方连续无声音超过声控挂机时间。
(二)、该通道正在进行FAX或Modem传送。
(三)、连接到数字录音设备上的信号线接触不良或断开。
(四)、邮局传送过来的线路信号有问题。
数字录音是通过检查线路上的话音信号来判断是否断开,若干秒没有声音就认为断开。
如果断开,就停止录音,当有声音时再恢复,以避免不必要的录音。
键入正确的操作员代码和操作员密码后,系统进入如下画面:( 图2 )可以键入1~ 4 或用→←…确认‟ 来选定各项功能[快速查询] 是根据通道号,日期,时间,长度,重要情况等直接查询并定位,连续放音[通话监听] 是对任一通道实时监听[系统设置] 是对系统各种功能进行初始设置,如系统权限,录音通道,工作时间,光盘浏览及录音方式等。
