专业内存测试软件
aida64怎么使用
aida64 怎么使用
AIDA64 简介
AIDA64 是一款测试软硬件系统信息的工具,它可以详细的显示出PC 的每一个方面的信息。
AIDA64 不仅提供了诸如协助超频,硬件侦错,压力测试和传感器监测等多种功能,而且还可以对处理器,系统内存和磁盘驱动器的性能进行全面评估。
AIDA64 是一个为家庭用户精简的Windows 诊断和基准测试软件。
AIDA64 提供了一个范围广的特点,协助在超频,硬件错误诊断,压力测试,和传感器监测。
它具有独特的能力来评估处理器,系统内存和磁盘驱动器的性能。
AIDA64 是兼容所有的32 位和64 位微软Windows 操作系统,包括Windows 7 和Windows Server 2008 R2。
aida64 怎幺使用
1、使用AIDA64 查看电脑简单信息
打开计算机——系统概述,即可查看计算机的一些基本参数包括CPU ,主板,显卡,内存等(本次示例使用雷神科技提供的高端游戏本—。
整机测试软件

整机测试软件:Everest、CPU-ZEverest是最为全球最负盛名的检测软件,通过这款软件,我们可以很轻松的了解到笔记本电脑的整体配置,当然也就可以很轻松的辨别硬件的真伪,查出配置单中的猫腻。
该软件虽然需要进行安装,但是也可以将安装后的Everest文件夹拷贝到优盘,在准备检测的本本上直接运行。
运行软件,点击计算机—摘要,我们就可以看到笔记本的总体配置情况。
需要逐个检查的有以下几个常见的部分。
点击主板—中央处理器(CPU),可以了解到处理器的各种情况,包括主频、支持指令集等。
还要注意的有内存,点击SPD,我们可以看到所检测的笔记本上采用的内存详细信息。
点击芯片组,我们可以了解笔记本电脑上的芯片组信息,对于采用Intel集成芯片组的本本,建议大家察看一下该项目,因为有Intel的芯片组有GM/GMS/GML等几种,各自性能不同。
对于采用独立显卡的本本而言,其独立显卡是否有所缩水,也是我们要注意的。
点击显示设备—图形处理器,在这里可以看到笔记本显卡的信息。
点击显示器,我们还可以看到液晶屏幕的生产厂商、出厂日期等信息。
不过该信息仅供参考,因为也有不少本本的显示信息并不准确,甚至于完全无法检测。
和Everest类似,CPU-Z同样是检测整机配置的软件,但是其专攻于处理器、内存和芯片组三块,而且是体积小巧的纯绿色软件,所以使用起来非常方便。
运行CPU-Z,其首先出现的界面就是处理器的检测部分。
点击Memory,我们可以察看内存的信息;点击SPD,我们可以察看内存的SPD信息,点击Slot #1或者#2,我们可以选择察看不同的内存条,Module Size则显示内存的容量,Max Bandwidth 则是内存具有的带宽,通常为内存的运行频率,Manufacturer为内存的生产厂商,Manufacturing Data则是内存的出厂日期。
电池测试软件:BatteryMonBatteryMon也可以用拷贝已安装的文件到优盘,检测时直接运行的方法来使用和绿色软件无异。
著名内存测试软件memtest的原理与技术深度剖析

Technical Information∙Windows Installation∙Usageo Online Commandso Memory Sizingo Error Displayo Troubleshooting Memory Errorso Execution Time∙Detailed Descriptiono Memory Testing Philosophyo Memtest86 Test Algorithmso Individual Test DescriptionsWindows InstallationFor windows installation begin by downloading either the Pre-Compiled Windows package to build a boot-able floppy disk or an ISO (zip version) to create a boot-able CD-ROM. After the file is downloaded an extract must be done to uncompress the file(s). To extract right click on the downloaded file and select the "Extract All" option. The extract option will let you choose where the files will be extracted to. To build a bootable floppy go the the folder where the files were extracted and click on the Install icon. The floppy disk will appear to be unformatted by Windows after the install is complete.To build a boot-able CD-ROM use your CD burning software to create an image from the un-zipped ISO file. Be sure to use a create from image option. DO not simply copy the file to a CD. Since Memtest86 is a standalone program it does not require any operating system support for execution. It can be used with any PC regardless of what operating system, if any, is installed. The test image may be loaded from a floppy disk or may be loaded via LILO on Linux systems. Any Unix, Windows or DOS system may be used to create a boot floppy or bootable CD-ROM. Return to topOnline CommandsMemtest86 has a limited number of online commands. Online commands provide control over cache settings, error report modes, test selection and test address range. A help bar is displayed at the bottom of the screen listing the available on-line commands.Command Description:ESC Exits the test and does a warm restart via the BIOS.c Enters test configuration menuMenu options are:1) Test selection2) Address Range3) Memory Sizing4) Error Report Mode5) Show DMI Memory Info6) ECC Mode7) CPU Selection Mode8) Redraw Screen9) Adv. OptionsSP Set scroll lock (Stops scrolling of error messages)Note: Testing is stalled when the scroll lock isset and the scroll region is full.CR Clear scroll lock (Enables error message scrolling)Return to topMemory SizingThe BIOS in modern PC's will often reserve several sections of memory for it's use and also to communicate information to the operating system (ie. ACPI tables). It is just as important to test these reserved memory blocks as it is for the remainder of memory. For proper operation all of memory needs to function properly regardless of what the eventual use is. For this reason Memtest86 has been designed to test as much memory as is possible.However, safely and reliably detecting all of the available memory has been problematic. Versions of Memtest86 prior to v2.9 would probe to find where memory is. This works for the vast majority of motherboards but is not 100% reliable. Sometimes the memory size detection is incorrect and worse probing the wrong places can in some cases cause the test to hang or crash. Starting in version 2.9 alternative methods are available for determining memory size. By default the test attempts to get the memory size from the BIOS using the "e820" method. With "e820" the BIOS provides a table of memory segments and identifies what they will be used for. By default Memtest86 will test all of the ram marked as available and also the area reserved for the ACPI tables. This is safe since the test does not use the ACPI tables and the "e820" specifications state that this memory may be reused after the tables have been copied. Although this is a safe default some memory will not be tested.Two additional options are available through online configuration options. The first option (BIOS-All) also uses the "e820" method to obtain a memory map. However, when this option is selected all of the reserved memory segments are tested, regardless of what their intended use is. The only exception is memory segments that begin above 3GB. Testing has shown that these segments are typically not safe to test. The BIOS-All option is more thorough but could be unstable with some motherboards.The third option for memory sizing is the traditional "Probe" method. This is a very thorough but not entirely safe method. In the majority of cases the BIOS-All and Probe methods will return the same memory map. For older BIOS's that do not support the "e820" method there are two additional methods (e801 and e88) for getting the memory size from the BIOS. These methods only provide the amount of extended memory that is available, not a memory table. When thee801 and e88 methods are used the BIOS-All option will not be available. The MemMap field on the display shows what memory size method is in use. Also the RsvdMem field shows how much memory is reserved and is not being tested.Return to topError DisplayMemtest has three options for reporting errors. The default is an an error summary that displays the most relevant error information. The second option is reporting of individual errors. In BadRAM Patterns mode patterns are created for use with the Linux BadRAM feature. This slick feature allows Linux to avoid bad memory pages. Details about the BadRAM feature can be found at http://home.zonnet.nl/vanrein/badramThe error summary mode displays the following information:Error Confidence Value:A value that indicates the validity of the errors being reported withlarger values indicating greater validity. There is a high probabilitythat all errors reported are valid regardless of this value. However,when this value exceeds 100 it is nearly impossible that the reportederrors will be invalid.Lowest Error Address:The lowest address that where an error has been reported.Highest Error Address:The highest address that where an error has been reported.Bits in Error Mask:A mask of all bits that have been in error (hexadecimal).Bits in Error:Total bit in error for all error instances and the min, max and average bit in error of each individual occurrence.Max Contiguous Errors:The maximum of contiguous addresses with errors.ECC Correctable Errors:The number of errors that have been corrected by ECC hardware.Errors per DIMM slot:Error counts are reported for each memory module installed in thesystem. Use the Show DMI Memory Info runtime option fordetailed memory module information.Test Errors:On the right hand side of the screen the number of errors for each test are displayed.For individual errors the following information is displayed when a memory error is detected. An error message is only displayed for errors with a different address or failing bit pattern. All displayed values are in hexadecimal.Tst: Test NumberFailing Address: Failing memory addressGood: Expected data patternBad: Failing data patternErr-Bits: Exclusive or of good and bad data (this shows the position of the failing bit(s)) Count: Number of consecutive errors with the same address and failing bitsReturn to topTroubleshooting Memory ErrorsPlease be aware that not all errors reported by Memtest86 are due to bad memory. The test implicitly tests the CPU, L1 and L2 caches as well as the motherboard. It is impossible for the test to determine what causes the failure to occur. However, most failures will be due to a problem with memory module. When it is not, the only option is to replace parts until the failure is corrected.Once a memory error has been detected, determining the failing SIMM/DIMM module is not a clear cut procedure. With the large number of motherboard vendors and possible combinations of memory slots it would be difficult if not impossible to assemble complete information about how a particular error would map to a failing memory module. However, there are steps that may be taken to determine the failing module. Here are four techniques that you may wish to use:1) Removing modulesThis is simplest method for isolating a failing modules, but may only be employed when one or more modules can be removed from the system. By selectively removing modules from the system and then running the test you will be able to find the bad modules. Be sure to note exactly which modules are in the system when the test passes and when the test fails.2) Rotating modulesWhen none of the modules can be removed then you may wish to rotate mod ules to find the failing one. This technique can only be used if there are three or more modules in the system. Change the location of two modules at a time. For example put the module from slot 1 into slot 2 and put the module from slot 2 in slot 1. Run the test and if either the failing bit or address changes then you know that the failing module is one of the ones just moved. By using several combinations of module movement you should be able to determine which module is failing.3) Replacing modulesIf you are unable to use either of the previous techniques then you are left to selective replacement of modules to find the failure.4) Avoiding allocationThe printing mode for BadRAM patterns is intended to construct boot time parameters for a Linux kernel that is compiled with BadRAM support. This work-around makes it possible for Linux to reliably run with defective RAM. For more information on BadRAM support for Linux, sail to http://home.zonnet.nl/vanrein/badramSometimes memory errors show up due to component incompatibility. A memory module may work fine in one system and not in another. This is not uncommon and is a source of confusion. In these situations the components are not necessarily bad but have marginal conditions that when combined with other components will cause errors.Often the memory works in a different system or the vendor insists that it is good. In these cases the memory is not necessarily bad but is not able to operate reliably at Athlon speeds. Sometimes more conservative memory timings on the motherboard will correct these errors. In other cases the only option is to replace the memory with better quality, higher speed memory. Don't buy cheap memory and expect it to work with an Athlon! On occasion test 5/8 errors will occur even with name brand memory and a quality motherboard. These errors are legitimate and should be corrected.I am often asked about the reliability of errors reported by Mestest86. In the vast majority of cases errors reported by the test are valid. There are some systems that cause Memtest86 to be confused about the size of memory and it will try to test non-existent memory. This will cause a large number of consecutive addresses to be reported as bad and generally there will be many bits in error. If you have a relatively small number of failing addresses and only one or two bits in error you can be certain that the errors are valid. Also intermittent errors are without exception valid. Frequently memory vendors question if Memtest86 supports their particular memory type or a chipset. Memtest86 is designed to work with all memory types and all chipsets. Only support for ECC requires knowledge of the chipset.All valid memory errors should be corrected. It is possible that a particular error will never show up in normal operation. However, operating with marginal memory is risky and can result in data loss and even disk corruption. Even if there is no overt indication of problems you cannot assume that your system is unaffected. Sometimes intermittent errors can cause problems that do not show up for a long time. You can be sure that Murphy will get you if you know about a memory error and ignore it.Memtest86 can not diagnose many types of PC failures. For example a faulty CPU that causes Windows to crash will most likely just cause Memtest86 to crash in the same way.Return to topExecution TimeThe time required for a complete pass of Memtest86 will vary greatly depending on CPU speed, memory speed and memory size. Memtest86 executes indefinitely. The pass counter increments each time that all of the selected tests have been run. Generally a single pass is sufficient to catch all but the most obscure errors. However, for complete confidence when intermittent errors are suspected testing for a longer period is advised.Return to topMemory Testing PhilosophyThere are many good approaches for testing memory. However, many tests simply throw some patterns at memory without much thought or knowledge of memory architecture or how errors can best be detected. This works fine for hard memory failures but does little to find intermittent errors. BIOS based memory tests are useless for finding intermittent memory errors.Memory chips consist of a large array of tightly packed memory cells, one for each bit of data. The vast majority of the intermittent failures are a result of interaction between these memory cells. Often writing a memory cell can cause one of the adjacent cells to be written with the same data. An effective memory test attempts to test for this condition. Therefore, an ideal strategy for testing memory would be the following:1.write a cell with a zero2.write all of the adjacent cells with a one, one or more times3.check that the first cell still has a zeroIt should be obvious that this strategy requires an exact knowledge of how the memory cells are laid out on the chip. In addition there is a never ending number of possible chip layouts for different chip types and manufacturers making this strategy impractical. However, there are testing algorithms that can approximate this ideal.Return to topMemtest86 Test AlgorithmsMemtest86 uses two algorithms that provide a reasonable approximation of the ideal test strategy above. The first of these strategies is called moving inversions. The moving inversion test works as follows:1.Fill memory with a pattern2.Starting at the lowest addresso check that the pattern has not changedo write the patterns complemento increment the addresso repeat3.Starting at the highest addresso check that the pattern has not changedo write the patterns complemento decrement the addresso repeatThis algorithm is a good approximation of an ideal memory test but there are some limitations. Most high density chips today store data 4 to 16 bits wide. With chips that are more than one bit wide it is impossible to selectively read or write just one bit. This means that we cannot guarantee that all adjacent cells have been tested for interaction. In this case the best we can do is to use some patterns to insure that all adjacent cells have at least been written with all possible one and zero combinations.It can also be seen that caching, buffering and out of order execution will interfere with the moving inversions algorithm and make less effective. It is possible to turn off cache but the memory buffering in new high performance chips can not be disabled. To address this limitation a new algorithm I call Modulo-X was created. This algorithm is not affected by cache or buffering. The algorithm works as follows:1.For starting offsets of 0 - 20 doo write every 20th location with a patterno write all other locations with the patterns complemento repeat above one or more timeso check every 20th location for the patternThis algorithm accomplishes nearly the same level of adjacency testing as moving inversions but is not affected by caching or buffering. Since separate write passes (1a, 1b) and the read pass (1c) are done for all of memory we can be assured that all of the buffers and cache have been flushed between passes. The selection of 20 as the stride size was somewhat arbitrary. Larger strides may be more effective but would take longer to execute. The choice of 20 seemed to be a reasonable compromise between speed and thoroughness.Return to topIndividual Test DescriptionsMemtest86 executes a series of numbered test sections to check for errors. These test sections consist of a combination of test algorithm, data pattern and cache setting. The execution order for these tests were arranged so that errors will be detected as rapidly as possible. A description of each of the test sections follows:Test 0 [Address test, walking ones, no cache]Tests all address bits in all memory banks by using a walking ones address pattern.Test 1 [Address test, own address]Each address is written with its own address and then is checked for consistency. In theory previous tests should have caught any memory addressing problems. This test should catch any addressing errors that somehow were not previously detected.Test 2 [Moving inversions, ones&zeros]This test uses the moving inversions algorithm with patterns of all ones and zeros. Cache is enabled even though it interferes to some degree with the test algorithm. With cache enabled this test does not take long and should quickly find all "hard" errors and some more subtle errors. This test is only a quick check.Test 3 [Moving inversions, 8 bit pat]This is the same as test one but uses a 8 bit wide pattern of "walking" ones and zeros. This test will better detect subtle errors in "wide" memory chips. A total of 20 data patterns are used. Test 4 [Moving inversions, random pattern]Test 4 uses the same algorithm as test 1 but the data pattern is a random number and it's complement. This test is particularly effective in finding difficult to detect data sensitive errors.A total of 60 patterns are used. The random number sequence is different with each pass so multiple passes increase effectiveness.Test 5 [Block move, 64 moves]This test stresses memory by using block move (movsl) instructions and is based on Robert Redelmeier's burnBX test. Memory is initialized with shifting patterns that are inverted every 8 bytes. Then 4mb blocks of memory are moved around using the movsl instruction. After the moves are completed the data patterns are checked. Because the data is checked only after the memory moves are completed it is not possible to know where the error occurred. The addresses reported are only for where the bad pattern was found. Since the moves are constrained to a 8mbsegment of memory the failing address will always be less than 8mb away from the reported address. Errors from this test are not used to calculate BadRAM patterns.Test 6 [Moving inversions, 32 bit pat]This is a variation of the moving inversions algorithm that shifts the data pattern left one bit for each successive address. The starting bit position is shifted left for each pass. To use all possible data patterns 32 passes are required. This test is quite effective at detecting data sensitive errors but the execution time is long.Test 7 [Random number sequence]This test writes a series of random numbers into memory. By resetting the seed for the random number the same sequence of number can be created for a reference. The initial pattern is checked and then complemented and checked again on the next pass. However, unlike the moving inversions test writing and checking can only be done in the forward direction.Test 8 [Modulo 20, ones&zeros]Using the Modulo-X algorithm should uncover errors that are not detected by moving inversions due to cache and buffering interference with the the algorithm. As with test one only ones and zeros are used for data patterns.Test 9 [Bit fade test, 90 min, 2 patterns]The bit fade test initializes all of memory with a pattern and then sleeps for 90 minutes. Then memory is examined to see if any memory bits have changed. All ones and all zero patterns are used. This test takes 3 hours to complete. The Bit Fade test is not included in the normal test sequence and must be run manually via the runtime configuration menu.Return to top。
26种测试软件

28款常用装机检测软件第1页:综合性检测分析篇·检测整机性能现在选择自己DIY攒机的朋友是越来越多,可是选择攒机最大的问题就是质量问题。
自己配置的机器虽然经过反复的挑选、斟酌但是在使用一段时间后一部分的硬件都会暴露出不少的问题,电子产品的质量往往是不能用肉眼去判别的,所以在机器安装完成之后都会使用一些检测软件来测试自己所购买的配件自身有没有存在缺陷,一些好的检测软件基本上都能检测出硬件出厂时的质量问题。
小编经过搜索和整理,将下列28款检测软件推荐给大家,以帮助大家更好的对自己所购买的硬件质量情况。
1、EVEREST Home 2.20下载地址:网通下载EVEREST(原名AIDA32)一个测试软硬件系统信息的工具,它可以详细的显示出PC每一个方面的信息。
EVEREST不仅支持了上千种(3400+)主板,而且支持上百种(360+)显卡,支持对并口/串口/USB这些PN P设备的检测,以及各式各样的处理器的侦测。
新版增加查看远程系统信息和管理,结果导出为HTML、XM L功能。
2、SiSoftware Sandra 2005 SR2a下载地址:网通下载这是一套功能强大的系统分析评比工具,拥有超过 30 种以上的分析与测试模组,主要包括有CPU、D rives、CD-ROM/DVD、Memory、SCSI、APM/ACPI、鼠标、键盘、网络、主板、打印机等,还有 CPU、Drive s、CD-ROM/DVD、Memory 的 Benchmark 工具,它还可将分析结果报告列表存盘。
3、HWiNFO32 V1.53 汉化版下载地址:网通下载HWINFO32 是电脑硬件检测软件。
它主要可以显示出处理器、主板及芯片组、 PCMCIA接口、BIOS版本、内存等信息,另外HWiNFO还提供了对处理器、内存、硬盘(WIN9X 里不可用)以及 CD-ROM 的性能测试功能。
4、PCMark 04 1.3.0(测试整机)下载地址:网通下载这是由鼎鼎大名的Futuremark推出的另一款硬件测试工具,软件的风格和3DMark03如出一辙。
mbpoll32位中文简体版本
mbpoll是一款广泛使用的软件,用于在32位中文简体版本的操作系统中进行内存检查和测试。
作为一款强大而实用的工具,mbpoll在计算机硬件和软件领域都有着重要的作用。
下面将从几个方面对mbpoll32位中文简体版本进行介绍和分析。
一、mbpoll32位中文简体版本的功能mbpoll32位中文简体版本具有丰富的功能,可以对内存进行全面的检查和测试。
其主要功能包括:1. 内存检查:mbpoll可以对内存的各个部分进行检查,包括物理内存和虚拟内存。
通过对内存的读写操作,可以发现内存中的错误和问题,并及时进行修复。
2. 内存测试:mbpoll可以进行内存的压力测试和稳定性测试,检测内存在高负荷下的表现和稳定性,确保系统在运行大型程序或进行复杂计算时能够正常工作。
3. 内存优化:mbpoll可以对内存进行优化,释放闲置内存和优化内存分配,提高系统的运行效率和性能。
二、mbpoll32位中文简体版本的应用领域mbpoll32位中文简体版本广泛应用于各个领域,包括计算机制造商、软件开发商、企业用户和个人用户等。
其主要应用领域包括:1. 计算机制造商:mbpoll可以用于对计算机硬件进行测试和验证,确保计算机在出厂前符合质量标准,提高产品的可靠性和稳定性。
2. 软件开发商:mbpoll可以用于对软件的性能和稳定性进行测试,发现和解决内存相关的问题,提高软件的质量和用户体验。
3. 企业用户:mbpoll可以用于企业的服务器和工作站中,对内存进行定期检查和测试,确保系统的稳定运行和数据的安全性。
4. 个人用户:mbpoll可以用于个人电脑中,对内存进行检查和优化,提高电脑的运行速度和性能。
三、mbpoll32位中文简体版本的优势mbpoll32位中文简体版本具有许多优势,使其成为广受欢迎的内存检查和测试工具。
其主要优势包括:1. 多功能性:mbpoll不仅可以检查和测试内存,还可以对内存进行优化,具有较强的实用性和适用性。
整机测试软件AIDA64

1、AIDA64是一款测试软、硬件系统信息的工具,它可以详细显示出计算机每一个方面的信息。
AIDA64不仅提供了诸如协助超频、硬件侦错、压力测试和传感器监测等多种功能,而且还可以对处理器、系统内存和磁盘驱动器的性能进行全面评估。
2、AIDA64的前身的EVEREST,在16位系统的时候EVEREST 叫AID16,后来随着32位技术的来临改名为AIDA32,后来再次更名为EVEREST 。
现在他的开发商Lavalys公司已经被Finalwire公司所收购,因此他有一次改名为AIDA64.3、AIDA64分为至尊版(Extreme Edition)、商业版(Business Edition)两个版本。
4、AIDA64启动后的窗口类似于window的资源管理器窗口,左边的窗格中列出了各个信息模块及其子模块,右边窗格则显示了当前被选中模块的详细信息。
AIDA64共提供了15个信息模块、可以查看计算机的软、硬件及相关设备的详细信息。
5、为什么内存为800g的硬盘为什么实际比800g小?因为出厂的进制与标准的进制有差别6、查看系统整体概况:计算机→系统摘要:显示了当前系统中所有硬件及操作系统的主要信息和状态,有助于用户快速了解系统概况。
7、检测cpu:主板→中央处理器(cpu)8、性能测试:使用AIDA64能对计算机的性能进行测试,并且将测得的数据和各个时期的主流配置进行比较,形成一个排名表,这样就可以一目了然地看出计算机的性能优劣。
AIDA64的性能测试主要包括对内存、cpu的测试。
9、内存测试:内存测试主要包括内存读取、内存写入、内存复制和内存潜伏测试,其中前三项主要用来测试内存与cpu之间数据交换的速度,这三项的值越高,说明内存的性能就越好,内存潜伏测试的是内存在响应数据处理时的等待时间,改时间越短则表示性能越好。
10、内存读取:在左边窗格选择“内存测试→内存读取”选项,右边窗格中显示出不同配置下内存的读取速度列表,单击工具栏上刷新按钮或f5键,AIDA64开始对本机的内存读取速度进行测试,测试过程中不能进行任何操作——包括移动鼠标和按键盘上的任何键,测试完毕显示数据读取速度,通过和其他配置下内存的读取速度比较,可以很清楚地了解本机内存的数据读取性能。
电脑硬件性能测试软件大全

测试软件:3DMark 11:时至今日,依然没有任何一个测试软件或者游戏能够取代3DMark在游戏玩家心目中的地位,因为3DMark的魅力就在于它所带来的不仅仅是惊艳的画面,更重要的是向广大玩家提供了一种权威、系统、公正衡量显卡性能的分值。
AIDA64:除了检测硬件型号、查看硬件信息之外,还具有基础性能测试功能。
我们用其中自带的内存性能测试组件进行内存读写性能测试。
另外使用Sandra2011测试内存带宽和延迟。
WinRAR:是目前使用最广泛的压缩解压缩软件,而且它自带性能测试工具,可以为广大用户提供系统性能参考,WinRAR压缩/解压缩的运算主要依赖于CPU的性能以及内存性能。
PCMARK 7:在经历跳票风波之后,全球著名图形及系统测试软件开发公司Futuremark为我们带来了新一代的整机性能测试工具——PCMark 7。
和历代前辈一样,PCMark 7也是一套针对PC系统进行综合性能分析的测试套装,不过这次需要操作系统是微软windows7,Windows Vista/XP完全被淘汰。
3D理论性能测试:3DMark 11时至今日,依然没有任何一个测试软件或者游戏能够取代3DMark在游戏玩家心目中的地位,因为3DMark的魅力就在于它所带来的不仅仅是惊艳的画面,更重要的是向广大玩家提供了一种权威、系统、公正衡量显卡性能的分值。
首先是3DMARK11的测试成绩,在综合成绩下,四通道内存要比三通道内存高出2%的性能提升。
Aida64内存性能测试AIDA64除了检测硬件型号、查看硬件信息之外,还具有基础性能测试功能。
我们用其中自带的内存性能测试组件进行内存读写性能测试。
另外使用Sandra2011测试内存带宽和延迟。
在AIDA64中,可以明显看出四通道与三通道的差距,带宽等等的提升也是必然的事情,所以读、写复制上的成绩差距如此明显是很正常的。
WinRAR内存性能测试WinRAR是目前使用最广泛的压缩解压缩软件,而且它自带性能测试工具,可以为广大用户提供系统性能参考,WinRAR压缩/解压缩的运算主要依赖于CPU的性能以及内存性能。
memtest86故障类型

memtest86故障类型Memtest86错误类型及其解决方法Memtest86是一个常用的内存测试工具,它可以帮助我们检测计算机内存的稳定性和性能。
然而,就像任何其他软件工具一样,Memtest86也可能存在故障。
在这篇文章中,我们将探讨Memtest86常见的故障类型以及它们的解决方法。
第一部分:Memtest86工具及其重要性在开始讨论各种故障类型之前,我们先来了解一下Memtest86是什么,以及为什么使用它很重要。
Memtest86是一款用于测试计算机内存的开源软件工具。
它通过执行一系列内存测试,可以帮助我们确定计算机内存中是否存在错误。
内存错误可能导致系统崩溃、数据损坏和其他严重问题,因此在安装操作系统或进行重要工作之前,进行内存测试非常关键。
使用Memtest86可以确保我们的计算机内存能够正常工作,减少系统崩溃和数据损坏的风险。
当然,Memtest86也不是完美无暇的,它可能遇到一些故障类型,下面我们将仔细介绍它们。
第二部分:Memtest86故障类型1. 启动问题在某些情况下,当我们尝试从Memtest86启动时,可能会遇到无法启动的问题。
这可能是由于多种原因引起的,如启动设备设置错误、不兼容的BIOS设置或损坏的启动文件等。
解决方法:- 确保启动设备设置正确。
在BIOS设置中,将启动设备选项设置为正确的USB 驱动器或光盘驱动器。
- 检查并更新BIOS设置。
有时候,不兼容的BIOS设置可能导致Memtest86无法启动。
通过更新BIOS软件,可以修复这些问题。
- 检查启动文件的完整性。
如果启动文件损坏,Memtest86将无法启动。
在这种情况下,可以尝试从其他来源重新下载,并且确保它们没有损坏。
2. 内存识别问题Memtest86在测试内存之前需要正确识别计算机中的内存。
然而,在某些情况下,它可能无法正确识别内存容量或类型,导致无法进行有效的测试。
解决方法:- 更新Memtest86版本。
RST内存检测软件使用说明

闪动的一排测试数字代表内存8颗粒的测试情况。
从左至右,0-7代表第一区域,8-F代表第二区域;0-7代表第三区域,8-F代表第四区域;……依次代表内存条的8颗颗粒。
⒈DDR8位与16位的单面测法:
⑴. 0-7(1 )区域如果出现乱码,代表这根DDR内存条的第1颗粒已经损坏
⑴. 0-7(1 )区域如果出现乱码,代表这根DDR内存条的第1颗粒已经损坏
⑵. 8-F(2 )区域如果出现乱码,代表这根DDR内存条的第2颗粒已经损坏
⑶. 0-7(3 )区域如果出现乱码,代表这根DDR内存条的第3颗粒已经损坏
⑷. 8-F(4 )区域如果出现乱码,代表这根DDR内存条的第4颗粒已经损坏
⒉如果你是128M的双面DDR内存,如以上显示界面图:
1-16M ------------------------------------------------------------------------------------------------------------
1
2
3
4
5
6
7
8
如上图所示:
闪动的一排测试数字代表内存8颗粒的测试情况。
从左至右,0-7代表第一区域,8-F代表第二区域;0-7代表第三区域,8-F代表第四区域;……依次代表内存条的8颗颗粒。
⒈DDR8位与16位的单面测法:
96-112M------------------------------------------------------------------------------------------------------------
电脑硬件检测工具大全
1. EVEREST Professional 1.51.195 汉化版EVEREST(原名AIDA32)一个测试软硬件系统信息的工具,它可以详细的显示出PC每一个方面的信息。
支持上千种(3400+)主板,支持上百种(360+)显卡,支持对并口/串口/USB 这些PNP设备的检测,支持对各式各样的处理器的侦测。
新版增加查看远程系统信息和管理,结果导出为HTML、XML功能。
2. 3DMark 20033.5.0自2002年12月11日宣布更名为Futuremark后,大家便期望着3DMark03的到来。
作为一款最新的显卡测试软件,3DMark03针对显卡提供了四个Game的测试。
第一项测试为Wings of Fury这是一个基于DirectX7的测试,使用了vertex shaders 1.1。
第二和第三项测试分别为Battle of Proxycon和Trolls Lair这两项测试是基于DirectX8的测试,使用了pixel shaders 1.4和vertex shaders 1.1。
第四项测试为Mother Nature,这个场景基于PixelShaders2.0和Vertex Shader2.0引擎,真实的模拟出了大自然的美丽景色。
3DMark03有什么特殊的要求和特性呢?首先,运行测试必须具备在PCMark2002中得分超过2500分得CPU,256MB的内存,1G的硬盘空间和一块完整支持DirectX7.0兼容DirectX9.0的显卡。
在特性上3DMark03与上一版的3DMark2001SE也有这明显的区别。
第一,3DMark03提供了对PixelShaders2.0和Vertex Shader2.0的支持(由于PixelShaders2.0和Vertex Shader2.0就是微软DirectX9.0所提供的,所以要完整运行3DMark03必须安装DirectX9.0,点击下载微软DIRECTX 9.0完全安装版For Win9x/ME/2000/XP)。
Linux内存memtest,详细讲解Linux极品内存检测软件Memtest86

Linux内存memtest,详细讲解Linux极品内存检测软件Memtest86Memtest86是⼀款基于Linux核⼼的测试程序,所以它的安装和使⽤和其它内存测试软件有些不同。
将Memtest86程序下载解压缩后,我们可以看到4个⽂件,其中Install.exe⽤来安装Memtest86程序到软盘。
双击运⾏这个程序,在弹出窗⼝中的“Enter Target diskette drive:”后输⼊你的软盘驱动器的盘符,如a,然后回车。
插⼊⼀张格式化过的软盘,单击回车开始安装,这样Memtest86就安装到软盘了。
前⾯我们说过Memtest86是基于Linux核⼼的,所以在Windows的资源管理器⾥我们看不到软盘上的内容(不要误认为软盘⾥没有内容)。
如果没有软驱,Memtest86的主页有该软件的ISO⽂件,可以直接刻录到光盘,⽤光驱启动后进⾏测试。
测试内存制作好软盘后,我们⽤这张盘来启动电脑 Memtest86会⾃动开始测试内存,其测试界⾯如图1所⽰。
在红⾊显⽰的“Memtest-86 v3.0”程序版本号下,我们可以看到当前系统所采⽤的处理器型号和频率,以及CPU的⼀级缓存和⼆级缓存的⼤⼩及速度,当然也包括测试的主⾓——系统物理内存的容量和速度。
最后显⽰的是主板所采⽤的芯⽚组类型。
通过这些信息我们可以对系统的主要配置有个⼤致的了解。
在系统信息的右侧显⽰的是测试的进度,“Pass”显⽰的是主测试进程完成进度,“Test”显⽰的是当前测试项⽬的完成进度。
“Test #1”显⽰的是⽬前的测试项⽬。
下⽅的“WallTime”显⽰测试已经耗费的时间,在这⼀排数据中“ECC”⼀栏中,显⽰的是当前内存是否⽀持打开ECC校验功能,“TEST”显⽰的是测试的模式,有“标准”和“完全”模式可供选择。
“Pass”显⽰的是内存测试所完成的次数,Memtest86的测试是⽆限制循环的,除⾮你结束测试程序,否则它将⼀直测试下去。
电脑硬件检测与诊断的工具
电脑硬件检测与诊断的工具电脑作为现代人们日常生活和工作中的重要工具,扮演着越来越重要的角色。
但是,在使用电脑的过程中难免会遇到一些硬件故障,如何及时准确地进行检测和诊断就显得尤为关键。
本文将介绍一些电脑硬件检测与诊断的工具,以帮助读者解决电脑故障问题。
一、硬件检测软件1. AIDA64AIDA64是一款功能强大的硬件检测软件,可用于识别和检测计算机硬件的一些问题。
该软件可以监测CPU、内存、硬盘、显卡等硬件的实时运行状态,并提供详细的报告以供用户参考。
此外,该软件还可以进行压力测试,测试计算机在高负载情况下的性能表现。
对于日常电脑用户,AIDA64是一款非常实用的检测软件。
2. CPU-ZCPU-Z是一款简单易用的硬件检测工具,主要用于显示CPU相关信息。
通过CPU-Z,用户可以轻松了解自己的电脑CPU型号、主频、缓存以及制造厂商等信息。
该软件还可以显示内存和主板等硬件信息。
CPU-Z具有小巧便捷,信息直观清晰的特点,非常适合普通电脑用户使用。
二、硬件诊断工具1. 内存检测软件Memtest86+Memtest86+是一款流行的内存检测软件,用户可以将其制作成启动盘或者U盘,在计算机开机时运行软件,以检测计算机中的内存问题。
该软件可以检测内存中的错误和问题,如内存缺陷、内存时序等。
在诊断电脑故障中,内存往往是最容易出现问题的硬件之一,使用Memtest86+可以有效地排除内存故障。
2. 硬盘诊断软件CrystalDiskInfoCrystalDiskInfo是一款常用的硬盘诊断工具,它提供了关于硬盘的重要信息,如温度、读写速度、S.M.A.R.T信息等。
此外,该软件还可以预测硬盘的健康状态,发现硬盘中的坏扇区或者出现的其它问题。
如果用户发现自己的电脑硬盘出现了异常情况,可以使用CrystalDiskInfo进行诊断和修复。
三、总结电脑硬件检测与诊断的工具种类繁多,上述仅为常见的几款工具。
对于普通电脑用户,可以选择使用AIDA64和CPU-Z进行硬件检测,这两款软件简单易用,功能齐全。
RST内存检测软件使用说明

RST内存检测软件使用说明RST内存检测软件使用说明=====================本文档为RST内存检测软件的使用说明,详细介绍了软件操作的步骤和注意事项。
请按照文档指导正确使用软件。
1.简介----------RST内存检测软件是一款用于检测计算机内存健康状况的工具。
它能够帮助用户快速发现内存故障,提高计算机的稳定性和性能。
2.系统要求--------------在使用RST内存检测软件之前,请确保您的计算机满足以下系统要求:- 操作系统:Windows 7或更高版本- 内存:至少2GB可用空间- 处理器.1GHz或更高速度- 显示器分辨率.1024x768或更高3.安装步骤-------------1.软件安装包,双击运行安装包文件。
2.按照安装向导指示,选择安装位置和其他设置。
3.“安装”按钮开始安装进程。
4.完成安装后,“完成”按钮退出安装向导。
4.软件界面和功能------------------RST内存检测软件具有用户友好的界面,以下是软件主要功能的简要介绍:- 测试类型选择:可以选择自动测试或手动测试。
- 测试模式设置:可以选择快速测试或完全测试。
- 测试报告:测试完成后,软件会自动详细的测试报告。
- 错误修复建议:软件会根据测试结果给出相应的错误修复建议。
5.使用步骤-------------5.1 自动测试-----------自动测试模式会自动检测您的计算机内存,并测试报告。
1.打开RST内存检测软件。
2.在主界面上选择“自动测试”选项。
3.“开始测试”按钮,软件会自动开始进行内存测试。
4.等待测试完成,软件会测试报告。
5.2 手动测试-----------手动测试模式允许您选择测试的范围和方式。
1.打开RST内存检测软件。
2.在主界面上选择“手动测试”选项。
3.根据需要选择测试范围和模式。
4.“开始测试”按钮,软件会开始进行内存测试。
5.等待测试完成,软件会测试报告。
xbench的使用方法
xbench的使用方法(最新版2篇)目录(篇1)1.Xbench 的简介2.Xbench 的主要功能3.Xbench 的使用方法4.Xbench 的优点与局限性正文(篇1)【1.Xbench 的简介】Xbench 是一款针对 Windows 系统的性能测试软件,它可以帮助用户检测计算机硬件的性能,包括 CPU、内存、硬盘、显卡等。
通过运行各种测试,用户可以了解自己的计算机性能,以便进行优化或购买新的硬件。
【2.Xbench 的主要功能】Xbench 的主要功能包括:- 检测 CPU 性能:通过运行各种算法测试,评估 CPU 的计算能力。
- 检测内存性能:通过读写测试,评估内存的读写速度。
- 检测硬盘性能:通过连续读写测试,评估硬盘的读写速度。
- 检测显卡性能:通过运行图形测试,评估显卡的图形处理能力。
【3.Xbench 的使用方法】使用 Xbench 非常简单,只需按照以下步骤进行:- 首先,从官方网站下载并安装 Xbench 软件。
- 打开 Xbench,选择需要测试的硬件,如 CPU、内存、硬盘等。
- 点击“开始测试”按钮,软件会自动运行测试。
- 测试完成后,Xbench 会生成详细的测试报告,包括各项性能指标。
【4.Xbench 的优点与局限性】Xbench 的优点包括:- 界面简洁,易于操作。
- 测试全面,可以评估计算机的各项性能。
- 测试结果准确,可以作为购买硬件的参考。
局限性包括:- 只支持 Windows 系统。
目录(篇2)1.xbench 简介2.xbench 的安装与配置3.xbench 的基本使用方法4.xbench 的高级使用方法5.xbench 的优缺点及适用场景正文(篇2)【xbench 简介】xbench 是一个开源的性能测试工具,主要用于测试和比较计算机系统的性能。
它可以测试计算机的 CPU、内存、磁盘和网络等各方面的性能,并提供详细的测试报告,帮助用户了解计算机的性能瓶颈。
内存测试工具RST
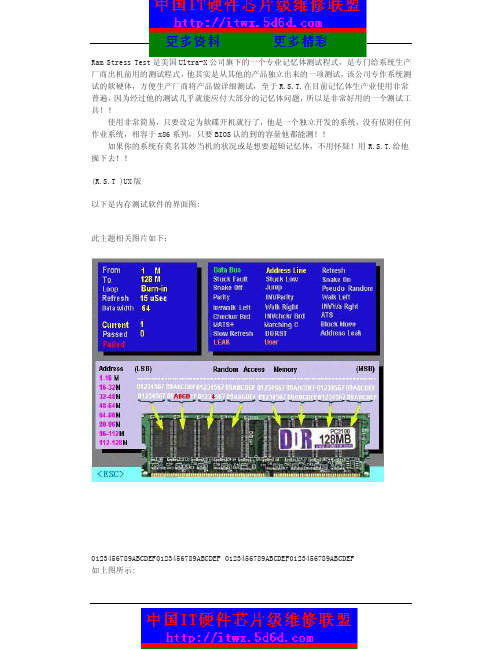
Ram Stress Test是美国Ultra-X公司旗下的一个专业记忆体测试程式,是专门给系统生产厂商出机前用的测试程式,他其实是从其他的产品独立出来的一项测试,该公司专作系统测试的软硬体,方便生产厂商将产品做详细测试,至于R.S.T.在目前记忆体生产业使用非常普遍,因为经过他的测试几乎就能应付大部分的记忆体问题,所以是非常好用的一个测试工具!!使用非常简易,只要设定为软碟开机就行了,他是一个独立开发的系统,没有依附任何作业系统,相容于x86系列,只要BIOS认的到的容量他都能测!!如果你的系统有莫名其妙当机的状况或是想要超频记忆体,不用怀疑!用R.S.T.给他操下去!!(R.S.T )UX版以下是内存测试软件的界面图:此主题相关图片如下:0123456789ABCDEF0123456789ABCDEF 0123456789ABCDEF0123456789ABCDEF如上图所示:闪动的一排测试数字代表内存8颗粒的测试情况。
从左至右,0-7代表第一区域,8-F代表第二区域;0-7代表第三区域,8-F代表第四区域;……依次代表内存条的8颗颗粒。
⒈DDR8位与16位的单面测法:⑴. 0-7(1 )区域如果出现乱码,代表这根DDR内存条的第1颗粒已经损坏⑵. 8-F(2 )区域如果出现乱码,代表这根DDR内存条的第2颗粒已经损坏⑶. 0-7(3 )区域如果出现乱码,代表这根DDR内存条的第3颗粒已经损坏⑷. 8-F(4 )区域如果出现乱码,代表这根DDR内存条的第4颗粒已经损坏⑸. 0-7(5 )区域如果出现乱码,代表这根DDR内存条的第5颗粒已经损坏⑹. 8-F(6 )区域如果出现乱码,代表这根DDR内存条的第6颗粒已经损坏⑺. 0-7(7 )区域如果出现乱码,代表这根DDR内存条的第7颗粒已经损坏⑻. 8-F(8 )区域如果出现乱码,代表这根DDR内存条的第8颗粒已经损坏注意:DDR的颗粒排列循序是1-2-3-4-5-6-7-8⒉如果你是128M的双面DDR内存,如以上显示界面图:1-16M-------------------------------------------------------------------------------16-32M-------------------------------------------------------------------------------32-48M------------------------------------------------------------------------------- 48-64M--------------------------------------------------------------------------从1M到64M的上面的4根虚线上出现乱码的话,说明这根内存的的第一面的颗粒有问题(判断哪个颗粒的好坏按照以上的说明)64-80M-------------------------------------------------------------------------------80-96M------------------------------------------------------------------------------- 96-112M------------------------------------------------------------------------ 112-128M-----------------------------------------------------------------------从64M到128M的上面的4根虚线上出现乱码的话,说明这根内存的的第二面的颗粒有问题(判断哪个颗粒的好坏按照以上的说明)注意:在内存的PCB板上的两边标着1与92的代表第一面,93与184的代表第二面。
电脑硬件检测与诊断的工具
电脑硬件检测与诊断的工具电脑硬件的检测与诊断是维护计算机健康运行的必要步骤。
在使用电脑的过程中,我们常常会遇到各种故障和问题,导致电脑运行变慢、崩溃或者无法正常启动。
这时,我们就需要依靠一些专业的工具来进行硬件的检测和问题的诊断。
本文将介绍一些常用的电脑硬件检测与诊断工具,帮助读者更好地维护电脑的健康。
一、CPU-ZCPU-Z是一款轻量级的软件,主要用于检测计算机的中央处理器(CPU)信息。
它能够显示CPU的型号、核心数量、频率以及支持的指令集等信息。
除了CPU信息外,CPU-Z还可以显示内存(RAM)、主板、显卡等硬件设备的相关信息。
通过CPU-Z,我们可以了解电脑硬件的基本参数,以便更好地了解电脑的性能状况。
二、GPU-ZGPU-Z是一款专门用于检测显卡信息的软件。
显卡在电脑游戏和图形处理方面起着至关重要的作用。
通过GPU-Z,我们可以查看显卡的型号、芯片架构、显存容量、温度以及GPU的频率等重要参数。
这些信息对于电脑游戏爱好者和需要进行图形处理的用户来说,非常有用。
通过检测显卡信息,我们可以了解显卡的性能及其适用范围,以便选择合适的显卡或进行相关故障排除。
三、CrystalDiskInfo硬盘(HDD)是储存电脑数据的重要组成部分,而硬盘的故障往往会导致数据丢失和系统崩溃。
CrystalDiskInfo是一款检测硬盘健康状态的工具,通过读取硬盘的S.M.A.R.T.(Self-Monitoring, Analysis and Reporting Technology)信息,可以了解硬盘的工作温度、错误计数、剩余寿命等重要指标。
当硬盘出现故障风险时,CrystalDiskInfo能够提前发出警报,以便我们及时备份数据并更换硬盘,有效预防硬盘故障引发的问题。
四、MemTest86电脑内存(RAM)是存储计算机运行时数据和指令的关键部件。
当电脑内存出现问题时,可能会导致系统崩溃、程序运行错误等各种异常。
MemTest86使用方法

MemTest86使⽤⽅法最近加了条512内存条,跑oracle半⼩时后⽼是蓝屏,让我怀疑是新加内存条的问题。
到GOOGLE上搜内存测试软件,发现了备受推荐的MemTest86.下⾯是使⽤⽅法哦MemTest86是⼀款相当经典的专⽤内存性能测试软件,虽然已经问世多年,但⾄今不少经验丰富的发烧友仍旧以它作为评估整机内存⼦系统性能的标准。
MemTest86的运作⽅式和⼀般现在常见的测试软件也不⼀样,它有⾃⼰的操作系统,像DOS⼀样,能够在光驱或者软驱启动,并能够按照预先设定的⽅式进⾏内存性能测试。
对于不少发烧友来说,这款软件是最为苛刻的内存测试软件,只要系统稍微不够稳定,那么⼀定不能够顺利完成全程性能测试。
为什么我们要⽤这种“古董”级别的东西来测试我们系统的内存性能?说实话,现在还真的没有哪⼀款内存性能测试软件能够⽐得上MemTest86,⽽且在⼯业界,这款软件仍旧是最为流⾏的内存性能基准测试,尤其适合测试内存系统的稳定性。
仅⼏秒钟后,就会有⼀个奇妙的⼩内存测试程序在您的 3.5 英⼨磁盘上,准备被引导。
执⾏此测试的最好⽅法是当您的机器可空闲⾄少六⼩时时,找⼀些时间 -- 在睡觉前(或离开⼯作时)开始测试是⼀个好主意。
要开始测试,请将 3.5 英⼨磁盘放在驱动器中重新引导您的机器。
当系统引导时,memtest86 程序将⽴即启动:主要的内存突发问题(⽐如“死亡”位)将在⼏秒钟内检测出来。
由特定位模式触发的故障(不幸的是这种故障相当普遍)可能⼏个⼩时也⽆法检测出来,但最终应该会检测出来。
memtest86 ⼀检测到缺陷位,就将在屏幕底部显⽰⼀条消息 -- 测试将继续。
当早上打开监视器时,您会发现测试已完成,如果在屏幕上看不到任何警告信息,那么RAM确定是好的。
但是,如果您继续遇到“坏内存症状”部分列出的问题,那么您的 RAM 可能有突发性问题(这种问题很少发⽣),可能仍需换掉此 RAM。
{内存测试小精灵——SPDINFO

{内存测试小精灵——SPDINFO}{ 内存检测一直是DIYer们非常关注的一个话题。
虽然英特尔公司为我们提供了根据内存读取速度来检测内存是否符合PC133标准的专用工具——Memory Transfer Timing Utility,但测试结果对一般朋友来说可能有些难以理解。
为此,笔者今天介绍另一款小巧玲珑的内存测试工具——SPDINFO.EXE。
它主要是通过测试内存条上的SPD信息来辨别内存,结果真实可靠。
其实,SPDINFO.EXE并不是什么新东西,它是硬件检测工具Sisoft Sandra 2001中的一员。
Sisoft Sandra 2001不仅可以全面测试硬件信息,而且能在一定程度上帮助我们识别硬件的真假。
遗憾的是,该软件太大了,携带很不方便。
好在Sisoft Sandra 2001Professional(专业版)中为我们专门提供了一个名为“SIMM,DIMM & RIMM SPD EEPROM Analyser”的内存测试项目,该项目的主文件就是SPDINFO.EXE(在Sisoft Sandra 2001 Professional的安装目录下),大小仅56KB,而且可以脱离Sisoft Sandra 2001 Professional单独运行。
SPDINFO.EXE主要是通过读取内存条上的SPD信息来测试内存的真假,不过该程序必须工作在MS-DOS方式下(注意:不是纯DOS方式)。
当你在命令提示符后键入“SPDINFO.EXE”并回车确认,你可看到一些帮助信息,这里提示我们必须在程序名后键入欲测试内存的插槽位置(1~8)和主板型号,否则测试无法进行。
如笔者的主板是磐英的6VBA,欲测试第2个插槽上的内存,便键入“SpdInfo.exe 2 6VBA”(注意这里的“2”与“6VBA”之间有一个空格),稍等片刻后便可看到所示的测试结果,信息十分详尽。
不过,这些信息显示的速度很快,而且往往一屏难以显示完全。
检测内存是否兼容的方法

怎么检测自己的电脑的内存是否存在兼容性的问题?一般都是通过软件的测试来确定。
整理了检测内存兼容的三种方法,供大家参考!时下流行的是以StressPrime202X简称SP202X、memtest、memtest86+三款软件测试,如果两三个小时后,机器没什么问题,那么内存兼容性就没问题了。
1、StressPrime202XStressPrime202XSP202X是一位国外电脑高手JohnnyLee做的测试计算机CPU稳定性的软件。
软件基于Prime95版本:23.8.1制作而成,测试的理论、效果和Prime95一样,但操作界面比Prime95方便且人性化。
另外可以配合MBM5使用,可以在测试中直接通过SP2000的调取CPU和北桥芯片的温度。
这个软件也十分小巧,最新版本为0.40,汉化版地址。
使用方法:Step1:这个软件是绿色的,下载完成后,解压缩,直接运行“SP202X”。
Step2:在测试中选择“混合着重CPU和内存”,然后单击“开始”,一般需要测试3个小时以上。
一般通过这三个软件的测试后,整套配置不会存在内存兼容性问题了。
这三个软件有个共同的特点就是都需要手动停止可无限的进行测试,如果自行停止了说明软件出错,也就说存在兼容性隐患。
其实,这种测试的模式不但可以检测系统稳定性,也可以作为超频成功与否的根据。
相对而言,Memtest86+对内存的测试更为准确一些或者更为偏向;其他的两款软件可以作为辅助使用。
最后需要注意两点:1、如果内存的总容量超过1G,在使用Memtest测试的时候,需要开启两个程序,而且在测试过程中最好不要运行其他的软件。
2、对于双核的测试,如果需要SP202X的话,最好开启两个程序。
否则对机器的测试,目前来看不是最苛刻的。
一般情况下选择最苛刻的模式可以减少测试的时间。
2、MemtestMemTest是少见的内存检测工具,它不但可以彻底的检测出内存的稳定度,还可同时测试记忆的储存与检索资料的能力,让你可以确实掌控到目前你机器上正在使用的内存到底可不可信赖。
- 1、下载文档前请自行甄别文档内容的完整性,平台不提供额外的编辑、内容补充、找答案等附加服务。
- 2、"仅部分预览"的文档,不可在线预览部分如存在完整性等问题,可反馈申请退款(可完整预览的文档不适用该条件!)。
- 3、如文档侵犯您的权益,请联系客服反馈,我们会尽快为您处理(人工客服工作时间:9:00-18:30)。
专业内存测试软件 R.S.T
现在的启动光盘上这个软件非常多,在电脑设置光盘启动就可以用这个软件检测内存了!(检测通过的项目显示绿色;正在测试的项目显示黄色;通不过的项目显示红色。
任意一个红色,内存就有问题了!)简介:
此工厂内部专业内存维修软件可以修内存引起的蓝屏,非法操作,死机,不兼容等故障,可以很正确的查出内存芯片损坏的位置,查出后只要换掉此坏芯片就可以修复。
如果是点不亮的内存,在主板上插一根好的内存,再插一根坏的,这样如果能带动的话也能用这个软件来检测,使用方式现在配合说明很简单,能正确的定位芯片位置
01234567 89ABCDEF 01234567 89ABCDEF 01234567 89ABCDEF 01234567 89ABCDEF 如上所示:闪动的一排测试数字代表内存8颗粒的测试情况。
从左至右,0-7代表第一区域,8-F代表第二区域;0-7代表第三区域,8-F代表第四区域;……依次代表内存条的8颗颗粒。
⒈DDR内存8位与16位的单面测法:
⑴. 0-7(1 )区域如果出现乱码,代表这根DDR内存条的第1颗粒已经损坏
⑵. 8-F(2 )区域如果出现乱码,代表这根DDR内存条的第2颗粒已经损坏
⑶. 0-7(3 )区域如果出现乱码,代表这根DDR内存条的第3颗粒已经损坏
⑷. 8-F(4 )区域如果出现乱码,代表这根DDR内存条的第4颗粒已经损坏
⑸. 0-7(5 )区域如果出现乱码,代表这根DDR内存条的第5颗粒已经损坏
⑹. 8-F(6 )区域如果出现乱码,代表这根DDR内存条的第6颗粒已经损坏
⑺. 0-7(7 )区域如果出现乱码,代表这根DDR内存条的第7颗粒已经损坏
⑻. 8-F(8 )区域如果出现乱码,代表这根DDR内存条的第8颗粒已经损坏
注意:DDR内存的颗粒排列循序是1-2-3-4-5-6-7-8
⒉如果你是128M的双面DDR内存,如以上显示界面图:
1-16M
-----------------------------------------------------------------------------------------------------
16-32M-----------------------------------------------------------------------------------------------------
32-48M
---------------------------------------------------------------------------------------------------
48-64M----------------------------------------------------------------------------------------------------
从1M到64M的4根虚线上出现乱码,说明这根内存的第一面颗粒有问题(判断哪个颗粒照上说明)
64-80M
----------------------------------------------------------------------------------------------------
80-96M
--------------------------------------------------------------------------------------------------
96-112M----------------------------------------------------------------------------------------------------
112-128M---------------------------------------------------------------------------------------------------
从64M到128M的4根虚线上出现乱码,说明这根内存的的第二面颗粒有问题(判断好坏照上说明)
注意:在内存的PCB板上的两边标着1与92的代表第一面,93与184的代表第二面。
1---128M的8根虚线是用来区分两面区域的作用。
⒊SD的8位与16位的单面测法:
⑴. 0-7(1)区域如果出现乱码,代表这根SDR内存条的第8颗粒已经损坏
⑵. 8-F(2)区域如果出现乱码,代表这根SDR内存条的第4颗粒已经损坏
⑶. 0-7(3)区域如果出现乱码,代表这根SDR内存条的第7颗粒已经损坏
⑷. 8-F(4)区域如果出现乱码,代表这根SDR内存条的第3颗粒已经损坏
⑸. 0-7(5)区域如果出现乱码,代表这根SDR内存条的第6颗粒已经损坏
⑹. 8-F(6)区域如果出现乱码,代表这根SDR内存条的第2颗粒已经损坏
⑺. 0-7(7)区域如果出现乱码,代表这根SDR内存条的第5颗粒已经损坏
⑻. 8-F(8)区域如果出现乱码,代表这根SDR内存条的第1颗粒已经损坏
注: PCB板上从1到84为第一面,颗粒的排列顺序从1到84为8-7-6-5-4-3-2-1 切记注意)
4.通过以上说明:SD的双面是跟DDR的是一样的。
但是颗粒的好坏判断要按照排列循序来判断。
5.PCB板的短路或者虚焊的测法:如果在8根虚线上都出现乱码,说明这根内存的PCB板有问题
6.点不亮的内存测试方法:很多内存短路或者颗粒损坏后都不能点亮,点不亮的可以用一根好的内存去带动它。
必须SD带SD,DDR带DDR。
软件会自动跳过好的那根去检测坏的那根。
