Alfresco 安装使用手册
Alfresco使用教程
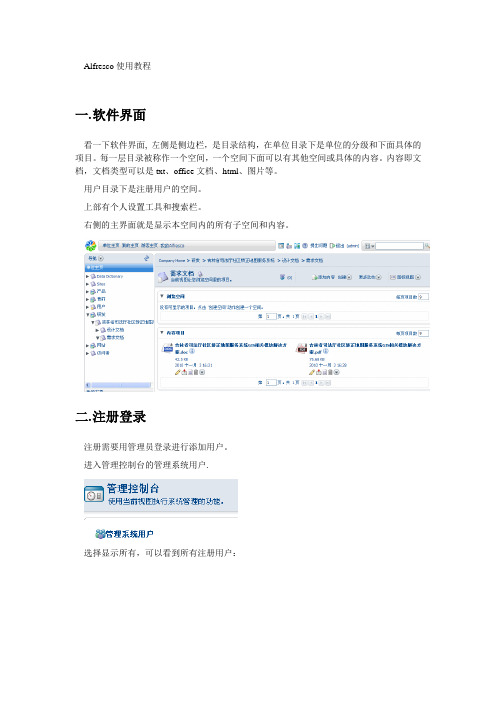
Alfresco使用教程一.软件界面看一下软件界面, 左侧是侧边栏,是目录结构,在单位目录下是单位的分级和下面具体的项目。
每一层目录被称作一个空间,一个空间下面可以有其他空间或具体的内容。
内容即文档,文档类型可以是txt、office文档、html、图片等。
用户目录下是注册用户的空间。
上部有个人设置工具和搜索栏。
右侧的主界面就是显示本空间内的所有子空间和内容。
二.注册登录注册需要用管理员登录进行添加用户。
进入管理控制台的管理系统用户.选择显示所有,可以看到所有注册用户:其中名称是显示名,用户名是登录名,主空间是用户空间,限额是自己空间的最大容量限制。
选择右上角的创建用户填入相应内容和限额,点右上角的下一步。
填入用户登录的用户名密码,空间名称,点击结束,一个用户就添加完毕了。
三.添加空间和内容1.添加空间如果此用户有在此空间下添加空间的权限,在创建里就会有这两项点击高级创建空间向导,选择从头开始。
选择文件夹空间在详细信息里输入空间名称,标题和描述,选择一个图标,点击结束。
一个空间就建立了。
如果直接点击创建空间,就会弹出上面的画面,默认建立的是文件夹空间。
如果新建的是论坛空间,在下面可以建立论坛论坛里可以新建主题和发表回复。
2.创建内容在线输入内容并保存。
四.添加内容注意,添加的所有内容会自动加入到版本管理里。
五.离线编辑文档1.在界面文档的按钮里选择“离线编辑”2.系统会弹出下载界面,并且自动弹出下载窗口。
把文档下载到本地。
3.在本地编辑文件并保存。
4.在工作界面,会看到此文件的工作副本文件,选择上传新版本。
5.然后选择结束编辑,Alfresco会自动把工作副本作为原文件的最新版本。
并且可以选择版本号。
这是编辑过的文件:6.如果想要查看版本,可以在详细信息的版本控制里查看:如果要恢复以前的版本,请下载相应的版本后选择右侧的更新,把此版本作为最新版本上传。
六.内容规则可以用内容规则对文档进行详细控制,这里不做介绍。
Alfresco 安装与配置图解
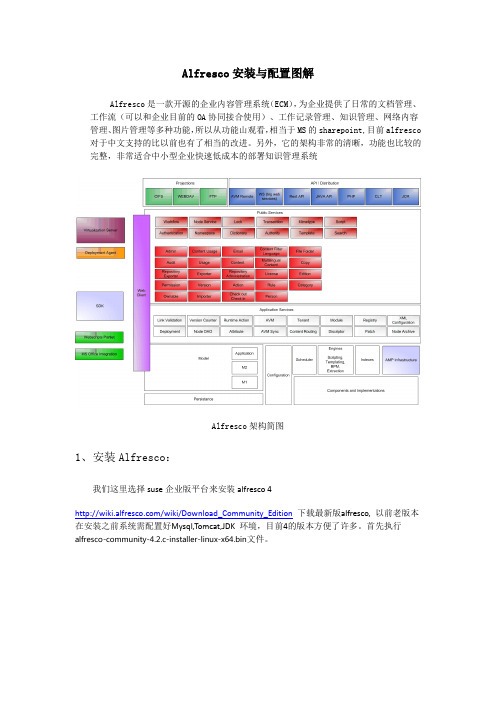
Alfresco安装与配置图解Alfresco是一款开源的企业内容管理系统(ECM),为企业提供了日常的文档管理、工作流(可以和企业目前的OA协同接合使用)、工作记录管理、知识管理、网络内容管理、图片管理等多种功能,所以从功能山观看,相当于MS的sharepoint,目前alfresco 对于中文支持的比以前也有了相当的改进。
另外,它的架构非常的清晰,功能也比较的完整,非常适合中小型企业快速低成本的部署知识管理系统Alfresco架构简图1、安装Alfresco:我们这里选择suse企业版平台来安装alfresco 4/wiki/Download_Community_Edition下载最新版alfresco, 以前老版本在安装之前系统需配置好Mysql,Tomcat,JDK 环境,目前4的版本方便了许多。
首先执行alfresco-community-4.2.c-installer-linux-x64.bin文件。
开始使用,打开浏览器访问:http://localhost:8080/alfresco可以看到alfresco的主页,使用admin用户及前面设定的密码能够正常登陆/opt/alfresco-4.0.a/manager-linux-x64.run在启动tomcat时候出现"tomcat could not be started"我们需要输入下面命令#rm /opt/alfresco-4.0.a/tomcat/temp/catalina.pid2、汉化配置/projects/zh-package/下载相应版本的汉化包unzip language_Pack.zipchmod +x install_language_pack.sh./ install_language_pack.shVim/opt/alfresco/tomcat/webapps/alfresco/WEB-INF/classes/alfresco/web-client-config.xml添加登陆页面的中文语言选项,然后找到<languages> 节点,再添加一行:<language locale="zh_CN">Chinese (Simplified)</language> 最后保存退出。
阿尔法拉維篩滤器控制系统说明说明书

yes yes, complete 2-way
(modbus) 1-4 filters
yes yes, complete 2-way
(modbus) multiple filters
Control systems available for use with Alfa Laval Filter (ALF) installations
Control makes the difference Well-designed control technologies have a significant effect on the quality and costs of many of the processes involved in operating ALF Filter installations. The next-generation 2Touch controls package from Alfa Laval is now available as one of the three standard control options for ALF Filter equipment.
ALF Basic Control Basic, age that ensures optimum operation and alarm handling.
ALF SmartPanel Add-on for the basic control package to provide display of operating data and trend curves on a 7-inch touch screen.
Communication to SCADA Typical use
alfresco备份方案
Alfresco 备份先把附件script奉上:alfresco_incremental_backup我们的备份要包括下面三个部分,执行顺序也要按照1,2,3严格执行。
1.备份solr的index文件。
2.备份alfresco使用的数据库。
3.备份alfresco的文件库。
为什么按照这个顺序?原因很简单,因为solr的index比数据库早,意味备份时文件还没及时建立索引,恢复后solr会自动建立。
数据库比文件库早,意味在备份时用户还没来得及上传文件。
系统基础篇在介绍备份前,首先我们先要了解一下备份所用到的核心技术。
怎样做到每天备份,并且每天备份的数据都保留下来,这样日后我们可以恢复到任何一天呢?试想一下,如果你有500G的alfresco数据,就算你整个5T的硬盘,做完全备份,也只够10天吧,并且网络的传输量,也会大的惊人。
本文的解决方案是基于linux系统,利用到了linux系统中的硬链接功能。
在linux的ext文件格式中,任何一个文件实际由描述文件的inode和存储文件的block所组成,这两个部分并非存储在一起。
文件的inode描述了文件的属性以及用于存储文件的block的位置。
通过inode,你就可以找到存储文件的block,这个block是真正存储文件内容的部分。
block大小是固定的,建立系统时可以自己设定。
存储一个文件,可能不止一个block。
但一个block中,只会包含一个文件的内容。
inode与block相比,其体积几乎忽略不计。
同理,文件夹也是由inode和block组成,不同的是,文件夹的block中所写的内容,实际为文件夹所包含的这些文件的inode信息。
一份文件可以被不止一个的inode索引。
这意味我们在系统上看到多份文件,实际这些文件都指向硬盘上的一份block内容。
说得再通俗一点,我现在有两个文件:/folder1/file/folder2/file用命令stat /folder1/file 会发现它的inode信息我123456,stat /folder2/file也是一样,并且文件的links 数为2,这说明文件被两个inode指引。
FOXBORO OPC SERVER的安装配置
(2)、配置API*Admin 运行API*Admin(单击start,再单击AIM*AT,再 单击API*Admin),在其中进行配置 在Settings中的Server中选Data Server的名字A W70**,然后键入password
目
录
在Authorization中在如下行加入Authorization Code
目
录
我厂FOXBORO系统 OPC SERVER(服务)简介
安装、设置及维护 朱小伟
目
录
一、简单说明
1、 OPC简介 2、 FOXBORO OPC软件AIM*AT OPC组成
(1)、 Data Server(数据库服务) (2)、 AIM OPC Server(OPC服务器) (3)、 OPC Client(OPC客户端)
目
录
2、福克斯波罗AIM*AT OPC的组成
我厂二期热电和甲醇工号DCS使用福克斯波罗公 司的I/A系列控制系统。AIM*AT OPC是该公司I/A系列 控制系统的OPC软件,它分3个部分,分别为:
Data Server(数据服务) AIM OPC Server(服务器) OPC Client(客户端)
目
录
常规:身份验证组别选择“Nooe无”选项 其它选项检查一下应与下面几张图设置一致,一般无需改动
在弹出窗口设置如下:
目
录
目
录
目
录
(4)、AIM*AT OPC Server服务配置
在开始—运行,输入 services.msc命令或者 Start-控制面版- Administrative Tools- Component (组件 ) Services-Services (local)。
Alfresco内容管理仓库连接与操作说明说明书

Package‘alfr’October12,2022Type PackageTitle Connectivity to'Alfresco'Content Management RepositoriesVersion1.2.1Author Roy Wetherall<********************>Maintainer Roy Wetherall<********************>Description Allows you to connect to an'Alfresco'content management repository and interact with its contents using simple and intuitive functions.You will be able to establish a connec-tion session to the'Alfresco'repository,read and upload content and manage folder hierarchies.For more details on the'Alfresco'con-tent management repositorysee<https:///ecm-software/document-management>.Depends R(>=3.5.0)License GPL-3|file LICENSEURL https:///rwetherall/alfr,https://rwetherall.github.io/alfr/BugReports https:///rwetherall/alfr/issuesEncoding UTF-8LazyData trueRoxygenNote6.1.1Imports httr,jsonlite,magrittr,stringrSuggests devtools,httptest,roxygen2,testthat,knitr,rmarkdown,covr,remotes,spelling,fsVignetteBuilder knitrSystemRequirements Alfresco Content Repository(Community orEnterprise)Language en-USNeedsCompilation noRepository CRANDate/Publication2019-07-1904:30:04UTC12alfr R topics documented:alfr (2)alf_node (3)alf_node.delete (4)alf_node.new (5)alf_session (7)alf_session.invalidate (8)alf_session.is_valid (9)Index10 alfr alfr:A package for connecting with AlfrescoDescriptionThe alfr package provides a way to connect to Alfresco and interact with the contents of the repository.Session•alf_session-connection session to an Alfresco repository•alf_session.is_valid-determine whether the session connection to an Alfresco repository is still valid•alf_session.invalidate-invalidates a session so it can no longer use used to connect to an Alfresco repositoryNodes•alf_node-get the details of a folder or content node•alf_node.new-creates a new folder or content node•alf_node.delete-deletes a folder or content nodeAuthor(s)Roy Wetherall<********************>alf_node3 alf_node Get Alfresco nodeDescriptionGets the details of an Alfresco repository node matching node_id or,if provided,the node at relative_path relative to node_id.Usagealf_node(session,node_id="-root-",relative_path=NULL)Argumentssession valid Alfresco repository sessionnode_id node id,defaults to-root-relative_path relative path from node_id to required node,defaults to NULLValueNode detailsExamples#try to establish a connection to the alfresco content repositorymy_session<-tryCatch(alf_session("http://localhost:8080","admin","admin"),error=function(e)NULL)if(!is.null(my_session)){#create documentmy_new_document<-alf_node.new(my_session,node_id="-root-",list(name="example.txt",nodeType="cm:content",relativePath="example"))#upload contentmy_new_document$content$update(system.file("extdata","sample.txt",package="alfr"))#get details of document nodemy_document<-alf_node(my_session,relative_path="example/example.txt")#output the name of the documentprint(my_document$name)4alf_node.delete #output the details of documents contentprint(my_document$content$mime_type)print(my_document$content$mime_type_name)print(my_document$content$size)print(my_document$content$encoding)#read document contentmy_content_file<-file(my_document$content$as.file(),"r")my_content<-readLines(my_content_file)close(my_content_file)print(my_content)#upload new contentmy_updated_document<-my_document$content$update(system.file("extdata","modified_sample.txt",package="alfr"))#print updated content sizeprint(my_updated_document$content$size)#delete documentalf_node.delete(my_session,my_document$id)}alf_node.delete Deletes an Alfresco nodeDescriptionDeletes an Alfresco node identified by node_id.If the node is a folder then all the delete recurses through the primary children.Usagealf_node.delete(session,node_id,permanent=FALSE)Argumentssession valid Alfresco repository sessionnode_id node id to deletepermanent indicates whether the node is permanently deleted or places in the trashcan where where it can be recovered from.FALSE by default.Examples#try to establish a connection to the alfresco content repositorymy_session<-tryCatch(alf_session("http://localhost:8080","admin","admin"),error=function(e)NULL)if(!is.null(my_session)){#create documentmy_new_document<-alf_node.new(my_session,node_id="-root-",list(name="example.txt",nodeType="cm:content",relativePath="example"))#upload contentmy_new_document$content$update(system.file("extdata","sample.txt",package="alfr"))#get details of document nodemy_document<-alf_node(my_session,relative_path="example/example.txt") #output the name of the documentprint(my_document$name)#output the details of documents contentprint(my_document$content$mime_type)print(my_document$content$mime_type_name)print(my_document$content$size)print(my_document$content$encoding)#read document contentmy_content_file<-file(my_document$content$as.file(),"r")my_content<-readLines(my_content_file)close(my_content_file)print(my_content)#upload new contentmy_updated_document<-my_document$content$update(system.file("extdata","modified_sample.txt",package="alfr"))#print updated content sizeprint(my_updated_document$content$size)#delete documentalf_node.delete(my_session,my_document$id)}alf_node.new Create a new Alfresco nodeDescriptionCreates a new Alfresco repository node as a child of node_id.Usagealf_node.new(session,node_id,node_details)Argumentssession valid Alfresco repository sessionnode_id node idnode_details details of new nodeValuenode detailsExamples#try to establish a connection to the alfresco content repositorymy_session<-tryCatch(alf_session("http://localhost:8080","admin","admin"),error=function(e)NULL)if(!is.null(my_session)){#create documentmy_new_document<-alf_node.new(my_session,node_id="-root-",list(name="example.txt",nodeType="cm:content",relativePath="example"))#upload contentmy_new_document$content$update(system.file("extdata","sample.txt",package="alfr"))#get details of document nodemy_document<-alf_node(my_session,relative_path="example/example.txt") #output the name of the documentprint(my_document$name)#output the details of documents contentprint(my_document$content$mime_type)print(my_document$content$mime_type_name)print(my_document$content$size)print(my_document$content$encoding)#read document contentmy_content_file<-file(my_document$content$as.file(),"r")my_content<-readLines(my_content_file)close(my_content_file)print(my_content)alf_session7 #upload new contentmy_updated_document<-my_document$content$update(system.file("extdata","modified_sample.txt",package="alfr"))#print updated content sizeprint(my_updated_document$content$size)#delete documentalf_node.delete(my_session,my_document$id)}alf_session Get connection session to Alfresco content repositoryDescriptionValidates authentication details with Alfresco content repository,returning ticket,server details and endpoints if successful.Usagealf_session(server,username,password)Argumentsserver Alfresco server URLusername user namepassword passwordValueConnection session to Alfresco repositoryExamples#try to establish a connection to the alfresco content repositorymy_session<-tryCatch(alf_session("http://localhost:8080","admin","admin"),error=function(e)NULL)if(!is.null(my_session)){#output session informationprint(paste("Session:[ticket=",my_session$ticket,",server=",my_session$server,"]",sep=""))#verify that the session is validif(alf_session.is_valid(my_session))print("Session verified as valid.")#invalidate the session so that it can no longer be usedalf_session.invalidate(my_session)}alf_session.invalidateInvalidates a session.DescriptionInvalidates a valid session so it can no longer be used to connect to an Alfresco repository.Usagealf_session.invalidate(session)Argumentssession sessionValueTRUE if session has been successfully invalidated,FALSE if session was already invalid.Examples#try to establish a connection to the alfresco content repositorymy_session<-tryCatch(alf_session("http://localhost:8080","admin","admin"),error=function(e)NULL)if(!is.null(my_session)){#output session informationprint(paste("Session:[ticket=",my_session$ticket,",server=",my_session$server,"]",sep="")) #verify that the session is validif(alf_session.is_valid(my_session))print("Session verified as valid.")#invalidate the session so that it can no longer be usedalf_session.invalidate(my_session)}alf_session.is_valid Determine whether a session is valid.DescriptionDetermines whether a given session is still valid or not.Usagealf_session.is_valid(session)Argumentssession sessionValueTRUE if the session is valid,FALSE otherwiseExamples#try to establish a connection to the alfresco content repositorymy_session<-tryCatch(alf_session("http://localhost:8080","admin","admin"),error=function(e)NULL)if(!is.null(my_session)){#output session informationprint(paste("Session:[ticket=",my_session$ticket,",server=",my_session$server,"]",sep="")) #verify that the session is validif(alf_session.is_valid(my_session))print("Session verified as valid.") #invalidate the session so that it can no longer be usedalf_session.invalidate(my_session)}Indexalf_node,2,3alf_node.delete,2,4alf_node.new,2,5alf_session,2,7alf_session.invalidate,2,8alf_session.is_valid,2,9alfr,2alfr-package(alfr),210。
alfresco知识库管理系统用户使用手册

alfresco知识库管理系统用户使用手册目录【名词解释】 21、alfresco知识库管理系统 22、站点 23、文档 34、知识 35、内容 36、标记 3【其它说明】 41、查找内容的3个主要方法 4一、管理系统登陆 41、系统登录 42、界面简介 5二、个人档案管理 61、编辑个人档案 62、更改密码 7三、站点使用说明 81、访问站点 82、”站点“界面简介 83、”文档库“功能说明 94、”维基“功能说明 10四、存储库使用说明 12五、搜索使用说明 131、快速搜索 132、条件搜索 133、关键词组合搜索 14【名词解释】1、alfresco知识库管理系统Alfresco是一款开源的企业内容管理系统,可以为企业提供文档和知识管理的版本控制、移动访问、协同工作等多种功能。
Alfresco支持全文检索,用户使用简单,Alfresco是目前应用最广泛的开源企业知识管理系统,先后有超过500万次的下载,7.4万个社区成员。
我们的财务共享中心知识库管理系统,就是用该软件搭建的。
2、站点站点是存放企业内容的基础。
我们把站点视为仓库,内容视为物资,不同的物资存放在不同的仓库中,比如我们把粮食放在一个仓库中,把矿石放在另外一个仓库中。
站点的作用就是存放特定的内容,并限定访问的用户。
比如目前我们财务知识库的3个站点中,SSC知识库就是存放财务中心的内容,财务中心员工可以访问这些内容;其它2个站点存放的是地市州财务人员相关的内容。
3、文档包括数据库中的信息、企业的各种文档、报表、账单、网页、图片、传真,甚至多媒体音频、视频等等各种电子信息载体。
在我们的知识库系统中,”文档“具体指存放在站点下的”文档库“中的文件。
4、知识知识通常指通过学习、实践或探索所获得的认识、判断或技能。
在我们的知识库系统中,”知识“具体指存放在站点下的”维基“中的文件。
”知识“是基于文档提炼、总结的精华经验,可以通过查看”知识“文章来更快、更好地获取相关信息。
Alfresco安装手册
此文档以Alfresco Community Edition 4.2.f + MySQL 5.5.38为例以图解的方式向您说明了如何安装Alfresco。
一、环境介绍✧Windows 7 旗舰版64位操作系统✧alfresco-community-4.2.f-installer-win-x64.exe✧mysql-5.5.38-winx64.exe✧Navicat_for_MySQL_10.1.7.exe二、Alfresco安装1、下载Alfresco安装程序,这里我们选择下载的是alfresco-community-4.2.f-installer-win-x64.exe安装程序;☞下载地址为:/projects/alfresco/files/2、点击如下图所示的Alfresco安装程序;3、在下图所示的引导安装界面中选择安装语言,这里我们选择“Simplified Chinese- 简体中文”,然后点击“OK”按钮,进入到下一步:4、在下图所示的引导安装界面中点击“前进 >”按钮,进入到下一步:5、在下图所示的引导安装界面中选择“高级”,然后点击“前进 >”按钮进入到下一步:6、在下图所示的引导安装界面中取消选中PostgreSQL选项,然后点击“前进 >”按钮,进入到下一步:7、在下图所示的引导安装界面中将C:\Alfresco改为C:\AlfrescoCE4.2.f,然后点击“前进 >”按钮进入到下一步:8、在下图所示的引导安装界面中依次输入以下内容,然后点击“前进 >”按钮进入到下一步:JDBC URL:jdbc:mysql://localhost:3306/alfrescoce4.2.f?useUnicode=yes& characterEncoding=UTF-8JDBC驱动程序:org.gjt.mm.mysql.Driver数据库名称:alfrescoce4.2.f用户名:root密码:root验证:root9、在下图所示的引导安装界面中点击“前进 >”按钮进入到下一步:10、在下图所示的引导安装界面中点击“前进 >”按钮进入到下一步:11、在下图所示的引导安装界面中点击“前进 >”按钮进入到下一步:12、在下图所示的引导安装界面中输入“管理密码”和“确认密码”,例如123456,然后点击“前进 >”按钮进入到下一步:13、在下图所示的引导安装界面中点击“前进 >”按钮进入到下一步:14、在下图所示的引导安装界面中点击“前进 >”按钮进入到下一步:15、在下图所示引导安装界面中点击“前进 >”按钮进入到下一步:16、在下图所示的引导安装界面中点击“前进 >”按钮进入到下一步:17、最后静静地等待Alfresco安装完成:18、但也不要忘了将MySQL JDBC Driver拷贝到C:\Alfrescoce4.2.f\tomcat\lib目录下。
Alfresco用户手册范本

1 知识管理
2 Alfresco简介
3 Alfresco使用
目 录
knowledge management
1 知识管理
知识管理的定义为,在组织中构建一个量化
与质化的知识系统,让组织中的资讯与知识,透
过获得、创造、分享、整合、记录、存取、更新、
创新等过程,不断的回馈到知识系统内,形成永
Alfresco
2.3.3 操作文件 —— 共享(内部)
操 作 文
共享后,只有拥有本系统帐号的人才能看到此文档, 因为需要登录,其实算单位内部共享。
件
发邮件时附件如果过大,可通过此方式共享给对方。
Alfresco
2.3.3 操作文件 —— 上传新版本
操 作 文 件
对一个文件,可以上传一个新的文件覆盖它。 如果改动较小,请选择“次要更改”; 如果改动较大,就选择“主要更改”。
知识管理要依靠软件,市面上的工具也很多, 今天向大家介绍一款应用最广泛的工具—— Alfresco.
简 介
Alfresco是一个免费的开源系统,开箱即用, web框架,由java技术开发。
Alfresco为企业提供了日常的文档管理、协同 工作、工作记录管理、知识管理、网络内容管理、图 片管理等多种功能。
输入关键字,回车,稍等,页面就会显示搜索结果: 搜 索 文 件
Alfresco
2.6.2 高级搜索
点击搜索框左侧的小箭头, 会弹出高级搜索页面:
高 级 搜 索
以上有不当之处,请大家给与批评指正,谢谢大家!
27
知 识 管
不间断的累积个人与组织的知识成为组织智慧的 循环,在企业组织中成为管理与应用的智慧资本, 有助于企业做出正确的决策,以适应市场的变迁。
安装手册说明书
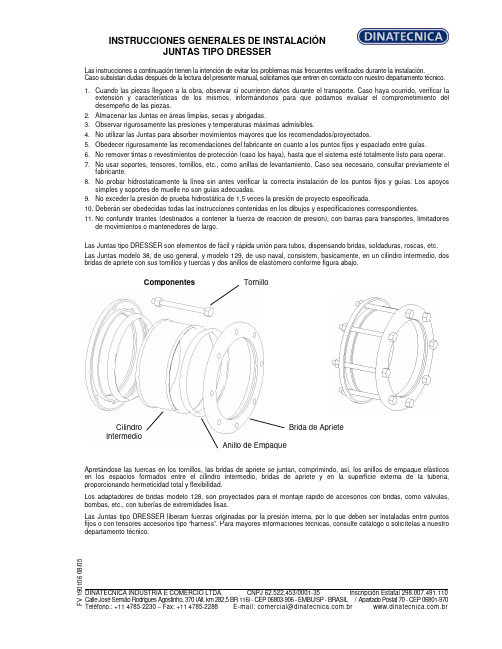
INSTRUCCIONES GENERALES DE INSTALACIÓN JUNTAS TIPO DRESSERLas instrucciones a continuación tienen la intención de evitar los problemas más frecuentes verificados durante la instalación. Caso subsistan dudas después de la lectura del presente manual, solicitamos que entren en contacto con nuestro departamento técnico.1. Cuando las piezas lleguen a la obra, observar si ocurrieron daños durante el transporte. Caso haya ocurrido, verificar la extensión y características de los mismos, informándonos para que podamos evaluar el comprometimiento del desempeño de las piezas.2. Almacenar las Juntas en áreas limpias, secas y abrigadas.3. Observar rigurosamente las presiones y temperaturas máximas admisibles.4. No utilizar las Juntas para absorber movimientos mayores que los recomendados/proyectados.5. Obedecer rigurosamente las recomendaciones del fabricante en cuanto a los puntos fijos y espaciado entre guías.6. No remover tintas o revestimientos de protección (caso los haya), hasta que el sistema esté totalmente listo para operar.7. No usar soportes, tensores, tornillos, etc., como anillas de levantamiento. Caso sea necesario, consultar previamente el fabricante.8. No probar hidrostaticamente la línea sin antes verificar la correcta instalación de los puntos fijos y guías. Los apoyos simples y soportes de muelle no son guías adecuadas.9. No exceder la presión de prueba hidrostática de 1,5 veces la presión de proyecto especificada.10. Deberán ser obedecidas todas las instrucciones contenidas en los dibujos y especificaciones correspondientes.11. No confundir tirantes (destinados a contener la fuerza de reacción de presión), con barras para transportes, limitadores de movimientos o mantenedores de largo.Las Juntas tipo DRESSER son elementos de fácil y rápida unión para tubos, dispensando bridas, soldaduras, roscas, etc. Las Juntas modelo 38, de uso general, y modelo 129, de uso naval, consistem, basicamente, en un cilindro intermedio, dos bridas de apriete con sus tornillos y tuercas y dos anillos de elastómero conforme figura abajo.Componentes Apretándose las tuercas en los tornillos, las bridas de apriete se juntan, comprimindo, así, los anillos de empaque elásticos en los espacios formados entre el cilindro intermedio, bridas de apriete y en la superficie externa de la tubería, proporcionando hermeticidad total y flexibilidad.Los adaptadores de bridas modelo 128, son proyectados para el montaje rápido de accesorios con bridas, como válvulas, bombas, etc., con tuberías de extremidades lisas.Las Juntas tipo DRESSER liberam fuerzas originadas por la presión interna, por lo que deben ser instaladas entre puntos fijos o con tensores accesorios tipo “harness”. Para mayores informaciones técnicas, consulte catálogo o solicítelas a nuestro departamento técnico.F V 190106 08/05 DINATECNICA INDUSTRIA E COMERCIO LTDA. CNPJ 62.522.453/0001-35 Inscripción Estatal 298.007.491.110 Calle José Semião Rodrigues Agostinho, 370 (Alt. km 282,5 BR 116) - CEP 06803-906 - EMBU/SP - BRASIL / Apartado Postal 70 - CEP 06801-970Teléfono.: +11 4785-2230 – Fax: +11 4785-2288 E-mail:*************************.br .brTornilloBrida de Apriete Anillo de EmpaqueCilindro IntermedioINSTRUCCIONES GENERALES DE INSTALACIÓN JUNTAS TIPO DRESSERTipos 38 y 129 ESQUEMA DE MONTAJELimpiar los extremos de los tubos que serán acoplados (aprox.200 mm en cada extremo). Remover completamente cualesquiera oleosidades, rebarbas, salpicaduras de soldadura, etc., de tal forma que los tubos queden limpios y sin ningún saliente que pueda perjudicar el montaje y performance de la Junta. Recomendamos que, después de limpiar los anillos de empaque y, antes del montaje del sistema, sean imersos en una solución de água y jabón (y glicerina, tratándose de temperaturas abajo de 0°C), lo que facilitará el montaje de los mismos.Colocar las bridas de apriete, deslizándolas en el área limpia de los tubos. Posicionar los anillos de empaque cerca de las bridas (uno en cada extremo del tubo).Limpiar bien el cilindro intermedio, poniendo particular atención en los extremos donde asentarán los anillos de empaque. Colocar el cilindro intermedio sobre uno de los tubos terminales.Aproximar el otro terminal hasta conseguir que entre los dos extremos se establezca una holgura de 13mm (tipo 38), y de 13 mm + diámetro del “pipe-stop” (tipo 129). Esta holgura permite la absorción de la dilatación de la línea.Una vez completada la centralización, deslize los anillos de empaque y bridas de apriete contra los extremos (asientos) del cilindro intermedio hasta que se produzca el encaje de los mismos.Insertar los tornillos. Ajustar las tuercas manualmente hasta que se recuesten en las bridas.El apriete final deberá ser dado con dos llaves fijas, una produciendo el torque y otra impidiendo el giro del tornillo.El apriete deberá ser realizado en forma intercalada con fuerza progresiva, hasta conseguir que todos los tornillos tengan un ajuste uniforme. Si en la prueba hidrostática surgiesen escapes, deberá darse un sobre-apriete uniforme, progresivamente, hasta que la prueba presente resultado satisfatório.Cuando haya “pipe-stops”, estos deberán ser retirados antes de la instalación y recolocados después de su finalización.Tipo 128 Deben seguirse los mismos cuidados para los tipos 38 y 129, sin embargo, considerándose que uno de los terminales es parte integrante de la Junta, lo que facilitará su instalación.a) Antes de, eventualmente, modificar cualesquiera de nuestras instrucciones, solicitamos consultarnos. NOTAS: b) Nuestra garantía no cubre daños ocurridos por el incumplimiento de cualesquiera de las recomendaciones aquí expuestas, sin nuestro previo consentimiento.F V 190106 08/05DINATECNICA INDUSTRIA E COMERCIO LTDA. CNPJ 62.522.453/0001-35 Inscripción Estatal 298.007.491.110 Calle José Semião Rodrigues Agostinho, 370 (Alt. km 282,5 BR 116) - CEP 06803-906 - EMBU/SP - BRASIL / Apartado Postal 70 - CEP 06801-970Teléfono.: +11 4785-2230 – Fax: +11 4785-2288 E-mail:*************************.br .br。
Alfresco使用教程
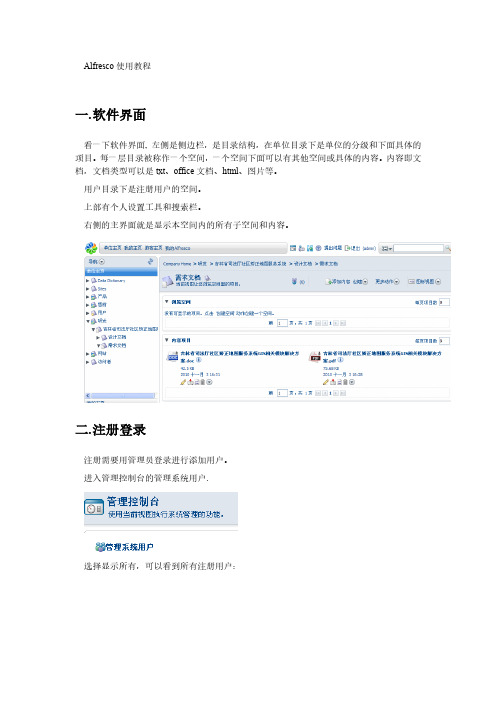
Alfresco使用教程一.软件界面看一下软件界面, 左侧是侧边栏,是目录结构,在单位目录下是单位的分级和下面具体的项目。
每一层目录被称作一个空间,一个空间下面可以有其他空间或具体的内容。
内容即文档,文档类型可以是txt、office文档、html、图片等。
用户目录下是注册用户的空间。
上部有个人设置工具和搜索栏。
右侧的主界面就是显示本空间内的所有子空间和内容。
二.注册登录注册需要用管理员登录进行添加用户。
进入管理控制台的管理系统用户.选择显示所有,可以看到所有注册用户:其中名称是显示名,用户名是登录名,主空间是用户空间,限额是自己空间的最大容量限制。
选择右上角的创建用户填入相应内容和限额,点右上角的下一步。
填入用户登录的用户名密码,空间名称,点击结束,一个用户就添加完毕了。
三.添加空间和内容1.添加空间如果此用户有在此空间下添加空间的权限,在创建里就会有这两项点击高级创建空间向导,选择从头开始。
选择文件夹空间在详细信息里输入空间名称,标题和描述,选择一个图标,点击结束。
一个空间就建立了。
如果直接点击创建空间,就会弹出上面的画面,默认建立的是文件夹空间。
如果新建的是论坛空间,在下面可以建立论坛论坛里可以新建主题和发表回复。
2.创建内容在线输入内容并保存。
四.添加内容注意,添加的所有内容会自动加入到版本管理里。
五.离线编辑文档1.在界面文档的按钮里选择“离线编辑”2.系统会弹出下载界面,并且自动弹出下载窗口。
把文档下载到本地。
3.在本地编辑文件并保存。
4.在工作界面,会看到此文件的工作副本文件,选择上传新版本。
5.然后选择结束编辑,Alfresco会自动把工作副本作为原文件的最新版本。
并且可以选择版本号。
这是编辑过的文件:6.如果想要查看版本,可以在详细信息的版本控制里查看:如果要恢复以前的版本,请下载相应的版本后选择右侧的更新,把此版本作为最新版本上传。
六.内容规则可以用内容规则对文档进行详细控制,这里不做介绍。
福乐斯安装手册_2013.10

福乐斯625胶水 福乐斯625胶水是高温福乐斯(HT/HL/Armaflex)的专 用粘接剂,它适用于介质温度温度高达150℃*的管道的
概要
© Armacell (Guangzhou/Suzhou) Ltd.
7
福乐斯® 安装手册
制冷系统和空调设备的安装建议
·在一些关键部位,如法兰、三通、弯头和管道支撑等 部位要确保每一根福乐斯管材的末端和管道表面粘接 严密可靠。
·所有的设备连接部分要用要求的厚度保温。 ·冷机和冷水管道的间距不能留太近。为了避免凝露,
福乐斯的安装工具
折尺或卷尺
粉笔 用于不规则形 状裁剪 银粉笔
福乐斯® 安装手册
直尺 模板(印在包装箱 上) 剪刀
圆规
短刷
卡规
刮铲
短刀(75mm)
管刀(用于穿孔)
长刀(300mm)
滚刷
磨刀石
胶枪
*一套安装工具至少包括三把刀和一块磨刀石。
3
概要
概要
福乐斯® 安装手册
正确使用福乐斯胶水
福乐斯520胶水 福乐斯520胶水是为福乐斯绝热材料设计的专用胶水。 它可以适用与介质温度高达105℃的管道保温粘接,接 头和接缝等部位的粘接是非常安全可靠的,并可以经受 时间和气候的考验。
1/2 Ø
1/2 Ø
B H
福乐斯® 安装手册
目录
2
© Armacell (Guangzhou/Suzhou) Ltd.
Axia Fusion AoIP Console 快速入门安装指南说明书

Axia Fusion AoIP ConsoleWe have made Fusion the easiest Axia console, ever, to set up. This quick start guide will take you through the basic steps to configure your new Fusion and have you up and running in no time. Before we get started, let’s check your installation type and make sure you have what you need.Installation type: You’ve got your choice of two mixing engines to pair with the Fusion, the StudioEngine or the PowerStation. We are providing instructions for both setups, so make sure you follow the instructions for your engine type .THANK YOU FOR PURCHASING THE AXIA FUSION CONSOLE.1. Tilt the overbridge panel of the Fusion Console (A) forward (toward faders) to gain access to theFusion Console overbridge board.2. Connect one end of the supplied Fusion power cable to the power port on the Fusion Consoleoverbridge board (B). Connect the other end to the 48DVC Output port (C) on the rear of the Axia Power Supply. Connect the Axia Power Supply to AC Mains using the Axia Power Supply power cable provided.3. Connect Ethernet cable to the network connection port on the Fusion Console overbridgeboard (D), connect other end to a configured Ethernet switch (E).4. Connect Ethernet cable to the Livewire port (F) on the StudioEngine, connect other end to aconfigured Ethernet switch (E).5. Connect a 1080p monitor to the DVI-D video port (G) on the StudioEngine.6. Close the Fusion Console overbridge panel (A).7. Continue to Network Configuration with Axia StudioEngine.PHYSICAL CONNECTIONS WITH AXIA STUDIOENGINEIJKLThe Console is now recognized by the network and is ready to be linked to the StudioEngine and configured to load sources. Continue to the “System Configuration” instructions.NETWORK CONFIGURATION WITH AXIA STUDIOENGINE1. Apply Power to the StudioEngine. The front displayshould indicate an error due to sync issue-this is normal. An IP address is needed.2. Tap the rotary encoder knob (I) on the front panel fora menu view, rotate knob until “Engine IP settings” (J) is highlighted, tap knob to select. 3. Rotate knob (I) to select “Net Address” and tap knobto select.4. Once on the Engine IP settings screen (K), rotateknob (I) to move the cursor, tap knob to edit cursor position, rotate to increment value, tap knob to accept change. Repeat for all IP address values. Make a note of this IP address for further configuration in later steps.5. Select check mark to right of address and tap knob(I) to accept.PHYSICAL CONNECTIONS WITH AXIA POWERSTATION1. Tilt the overbridge panel of the Fusion Console (A) forward (toward faders) to gain access to theFusion Console overbridge board.2. Connect one end of the 6-Pin molex power cable supplied with the PowerStation to the Surfaceport (B) on the PowerStation. Connect the other end to the power port on the Fusion Console overbridge board (C).3. Connect Ethernet cable to the network connection port on the Fusion Concole overbridge board(D), connect other end to an available network port on the PowerStation (E).4. Connect 1080p monitor to the DVI-D video port (F) on the PowerStation.5. Connect USB keyboard to USB port (G) on the PowerStation.6. Close the Fusion Console overbridge panel.7. Continue to Network Configuration with Axia PowerStation.NETWORK CONFIGURATION WITH AXIA POWERSTATION1. Boot the PowerStation,a setup screen (I)will appear on the connected video monitor.An IP address is needed.2. Tap the up arrow key on the attached keyboard untilthe “Config IP addr” value is in yellow text. 3. Clear the current value with the Backspace key onthe attached keyboard and use number keys to enter a new value. Make a note of this IP address for further configuration in later steps.4. Tap the arrow keys on the attached keyboard to navigate to “Config NetMask”and “Config Gateway”, enter the needed values.5. Tap the down arrow key on the attached keyboardto navigate to “Save & Reboot”. Tap the Enter key on the attached keyboard to reboot system.6. Disconnect USB keyboard from PowerStation.IINSTALLATION HELPIf you have more questions, you can access the full manual online at /Axia/Fusion or call the Telos Alliance 24/7 Support Team at +1 (216) 622-0247, we’d be happy to help you out.CONTINUE TO THE SYSTEM CONFIGURATION The Console is now recognized by the network and is ready to be linked to the PowerStation then configured to load sources. Continue to the “System Configuration” instructions.1. Using a PC connected to your studio network, launcha web browser and enter the assigned IP addressinto the browser’s address bar. When prompted for authentication enter user name “user”, password is left blank.2. The Fusion control center will launch (A). In the leftcolumn, under “Mix Engine”, select the “Network”link (B), click the “Install” button at the bottom of the new page.3. Enter the value “1” into the “Console Count” field (C)and click “Apply Console Count” (D).4. In the “PS CONSOLE: 1” (E) section, select thediscovered console from the drop down menu (F).Click “Apply IP” (G) to set the IP address and link it to StudioEngine or PowerStation.5. Your Console is now connected and will display“Inactive“ on each channel. On the Monitor Module keypad (H) Press and hold the “*” key and “2” key until “Capture” is displayed.6. Release the keys. For the full-sized Fusion Monitor/Navigation Module, press the“Enter”key,for a Fusion Monitor + 2-Fader Module, press the “#” key.7. Remain logged in to the Fusion Control Center andcontinue to Source Configuration.A BCEFGDH1. In the Fusion Control Center, in the left column under“Console”, select “Sources” (A).2. Click the “Create New Source Profile” button (B).3. On the Source Profile screen, select “Source Type”from the drop down list (C).4. Enter the name of the source in the “Source name”field (D).5. Click the browse button to the right of the “Primarysource” field (E) and select the desired source from the list.6. Click “Apply”.7. In the left column under “Mix Engine”, select “Progand mon out” (F).8. Enter (G)the planned channel numbers for either the StudioEngine (Livewire Sources)or PowerStation (Livewire Sources from DSP) outputs.9. Click the “Apply” button.10. StudioEngine users-skip Step 11 and proceed toStep 12.11. PowerStation users continue to the next step below, “For PowerStation users ONLY”.ABCEDHIJa. In the left column under “I/O subsystem main”,select “Destinations” (H).b. When prompted for authentication enter user name“user”, password is left blank.c. Enter useful labeling in the “Name” field (I).d. Click the browse button (J) to the right of the“Channel” field and select the CR Monitor source from the PowerStation. e. Click the “Apply” button.f. Continue to Step 12.FOR POWERSTATION USERS ONLYThis step configures the designated output on the back of the PowerStation which provides audio to the monitor speaker amplifier for the CR Monitor DSP source.GF12. On the Fusion Console Surface, press the channelencoder knob (K) found at the top of the fader strip for Channel Options.13. The connected video monitor will display theChannel Options (L). Rotate the encoder knob (K) one step to select the source window. (Selected options will be outlined in yellow.) Once the desired option is selected, press the encoder knob (K) to enter the selection.14. Select the “Current Source” option (M). The nextview will show configured source profiles (N). 15. Rotate the encoder knob (K) to highlight the sourcejust created.16. Press the encoder knob (K) to select the highlightedsource.17. Press the Program 1 button on the fader strip (O) soit is illuminated.18. Press the “On” button (P) on the fader strip.19. Move the fader (Q) up-you should hear audio. Themeters on your video display should be active (R). 20. Note: To hear the audio, make sure Program 1 isselected in the monitor section for CR Monitor and that the volume is at an appropriate level.For StudioEngine users only: make sure the xNode output feeding your speaker has been assigned the CR Monitor source output of the StudioEngine. 21. Repeat“Source Configuration”steps to configureadditional sources.MLNROQP YOUR SETUP IS COMPLETE!That’s it! You are now ready to experience the Axia Fusion, a powerful,flexible and easy to use console, packed with all of the capabilities andfeatures you need. Enjoy!KThis Page Intentionally Left BlankThis Page Intentionally Left BlankThis Page Intentionally Left Blank1241 Superior Ave. • Cleveland, Ohio, 44114, USA • +1.216.241.7225 • © 2021 Telos Alliance. All Rights Reserved. C21/1/16009 • 1490-00137-002 — QUICK START GUIDE: FUSION CONSOLE Subscribe to our NewsletterWeekly updates on all things broadcast via email/newsletter Social MediaFacebook: @TelosAlliance Twitter: @TelosAlliance LinkedIn: /TelosAlliance YouTube: TelosAllianceTVProduct Catalog/catalog24/7 Tech SupportRadio: +1 (216) 622-0247TV: +1 (717) 735-3611Radio:*************************TV:**************************QUICK LINKS。
CentOS 7安装Alfresco 5教程(修正版)

Alfresco 5安装---华东纪蕴数据中心目录安装CentOS 7安装wget下载Alfresco 5安装包(bin格式,使用wget下载) 查看并安装Alfresco依赖包设置CentOS 7主机名并添加到hosts卸载postfix安装并配置Alfresco安装CentOS 7●CentOS 7最小化安装,安装方法自己百度●安装完成,查看版本信息,然后yum update升级至最新版。
root@localhost ~]# cat /etc/RedHat-releaseCentOS Linux release 7.2.1511 (Core)[root@localhost ~]# uname -aLinux localhost.localdomain 3.10.0-327.el7.x86_64 #1 SMP Thu Nov 19 22:10:57 UTC 2015 x86_64 x86_64 x86_64 GNU/Linux●关闭SelinuxVi /etc/selinux/config将enforce改为disable保存退出,然后重启。
安装wget安装wgetyum install -y wget下载Alfresco安装包下载Alfresco安装包bin格式,根据这个网址选择需要安装包下载(使用wget下载待用)wget /a/al/alfresco/Alfresco%20201707%20Community/alfresco-community-installer-201707-linux-x64.bin查看并安装Alfresco依赖包yum -y install fontconfig libSM libICE libXrender libXext cups-libs设置CentOS 7主机名hostnamectl set-hostname localhostecho “127.0.0.1 localhost”>> /etc/hosts卸载postfixyum –y remove postfixchmod +x alfresco-community-installer-201707-linux-x64.bin ./alfresco-community-installer-201707-linux-x64.bin配置防火墙端口firewall-cmd --add-port=8080/tcp --permanent firewall-cmd --add-port=8443/tcp --permanent firewall-cmd --add-port=7070/tcp --permanent firewall-cmd --reload查看服务启动状态ss -atulpn访问网站http://IP地址:8080/share/page扩展功能设置屏蔽普通账户的站点创建权限1、进入目录/opt/alfresco-community/tomcat/shared/classes/alfresco/extension2、将custom-public-services-security-context.xml文件复制其中,重启服务器生效。
alfresco安装、备份、恢复教程
alfresco安装、备份、恢复教程一、alfresco安装(环境:64位windows server2008R2enterprise):1、先安装数据库postgreSQL9.1.4,设置、记住postgreSQL数据库超级管理员账号postgres的密码,安装alfresco时要用到;2、新建一个名字叫alfresco数据库;3、再安装alfresco;4、安装组件时,记得选高级(advanced)选项,不要选容易(easy)选项;5、去掉postgreSQL前面的勾,因为之前已经独立安装了postgreSQL数据库了(安装自带的postgreSQL数据库会出错,所以需要独立安装postgreSQL);6、输入postgreSQL数据库超级管理员账号postgres的密码;7、设置alfresco的管理员Admin密码;8、打开程序里的alfresco community目录下的alfresco explorer和alfresco share两个页面,如果都能正常打开说明安装成功;二、alfresco备份:1、postgreSQL数据库的备份:只需拷贝Program Files\PostgreSQL\9.1\下的整个data目录,这个就是存储数据表的;2、Alfresco的备份:只需拷贝Alfresco目录下的整个dlf_data目录,这个就是放存储文件的目录;三、alfresco恢复(在新机器上恢复,如果想升级到最新版本的alfresco,可以在安装alfresco时安装最新的alfresco):1、先按照安装教程,安装好alfresco,测试能正常后,进入步骤2;2、先停止alfresco服务与数据库postgreSQL的服务;3、将已备份的data目录整个覆盖替换到原有的data目录;4、启动数据库,登陆数据库,看看alfresco与postgres数据库是否能正常连接,正常后就进入步骤5,不正常就重启电脑,重复一次2、3步骤;5、将alf_data目录覆盖替换原有的alf_data目录;6、启动alfresco服务;7、打开程序里的alfresco community目录下的alfresco explorer和alfresco share两个页面,如果都能正常打开说明将近恢复成功;8、再用旧账号登陆alfresco,看看repository(存储库)里面的文件都在,能正常打开,说明完全恢复成功;。
格兰富-风扇盘管组合 技术支持手册说明书
496 04 5301 01 Feb 2010TECHNICAL SUPPORT MANUALFan CoilsFEM*X, WAHM, WAHTTABLE OF CONTENTSWiring Diagram 2 − 3. . . . . . . . . . . . . . . . . . . . . . . . . . . . . Airflow Charts 4 − 5. . . . . . . . . . . . . . . . . . . . . . . . . . . . . . . Model Number Identification 6 − 7. . . . . . . . . . . . . . . . . . MODELSFEM2X1800A1 FEM4X1800A1 WAHM182A1 WAHM184A2 WAHT182A1 WAHT184A2FEM2X2400A1 FEM4X2400A1 WAHM242A1 WAHM244A2 WAHT242A1 WAHT244A2FEM4X3000A1 FEM2X3000A1 WAHM302A1 WAHM304A2 WAHT302A1 WAHT304A2FEM2X3500A1 FEM4X3500A1 WAHM362A1 WAHM364A2 WAHT362A1 WAHT364A2FEM2X3600A1 FEM4X3600A1 WAHM422A1 WAHM424A2 WAHT422A1 WAHT424A2FEM2X4200A1 FEM4X4200A1 WAHM482A1 WAHM484A2 WAHT482A1 WAHT484A2FEM2X4800A1 FEM4X4800A1 WAHM602A1 WAHM604A2 WAHT602A1 WAHT604A2FEM2X6000A1 FEM4X6000A1TECHNICAL SUPPORT MANUAL Fan Coils: FEM2X, FEM4X, WAHM**(2,4), WAHT**(2,4)2496 04 5301 01ModelsFEM2X1800A1 FEM4X1800A1FEM2X2400A1 FEM4X2400A1FEM2X3000A1 FEM4X3000A1FEM2X3500A1 FEM4X3500A1FEM2X3600A1 FEM4X3600A1FEM2X4200A1 FEM4X4200A1FEM2X4800A1 FEM4X4800A1FEM2X6000A1 FEM4X6000A1WAHM182A1WAHM242A1WAHM302A1WAHM362A1WAHM422A1WAHM482A1WAHM602A1WAHT182A1WAHT242A1WAHT302A1WAHT362A1WAHT422A1WAHT482A1WAHT602A1TECHNICAL SUPPORT MANUAL Fan Coils: FEM2X, FEM4X, WAHM**(2,4), WAHT**(2,4)496 04 5301 013ModelsWAHM184A2 WAHT184A2WAHM244A2 WAHT244A2WAHM304A2 WAHT304A2WAHM364A2 WAHT364A2WAHM424A2 WAHT424A2WAHM484A2 WAHT484A2WAHM604A2 WAHT604A2TECHNICAL SUPPORT MANUAL Fan Coils: FEM2X, FEM4X, WAHM**(2,4), WAHT**(2,4)4496 04 5301 01AIRFLOW PERFORMANCE − CFM at a given Speed and Static readingModel(* = 2 or 4)Blower Speed Measured Static Pressure, inlet to outlet (inches water column)0.100.200.300.400.500.60FEM*X1800WAHM18*WAHT18*High 766739706666619566Medium 701659619578538499Low 614572530486441396FEM*X2400WAHM24*WAHT24*High 941905868830792753Medium 823786747707665622Low 633583533482431378FEM*X3000WAHM30*WAHT30*High 1130109710631028992955Medium 10331000965928888846Low 840802760713663609FEM2X3500WAHM36*WAHT36*High 143713981354130812571204Medium 128212381192114210901036Low 1168111810671014959903FEM*X3600High 147914371392134412931240Medium 132712821236118711351081Low 1192115111001039970890FEM*X4200WAHM42*WAHT42*High 161615781533148014201353Medium 147914371392134412931240Low 130312581211116111081054FEM*X4800WAHM48*WAHT48*High 180517721739170416691632Medium 165216171581154315041463Low 145814181377133512921248FEM*X6000WAHM60*WAHT60*High 205720241989195419161878Medium 179917661731169516581618Low166716331596155815171475NOTES:1.Airflow based on dry coil at 230V with factory approved filter and electric heater(2 element heater for model sizes 1800 − 3600, 3 element heater for model sizes 4200 − 6000)2.Not recommended for use above 0.60 inches water column external static pressure.3.Shaded cells indicate airflow is greater than 450 CFM per ton.TECHNICAL SUPPORT MANUAL Fan Coils: FEM2X, FEM4X, WAHM**(2,4), WAHT**(2,4)496 04 5301 015STATIC PRESSURE CORRECTION FROM DRY TO WET COIL (inches of water column)Airflow performance chart above was developed using fan coils with DRY coils.When taking a static reading across a WET coil, adjust the static pressure numbers above by adding the values in this table (for a given CFM, wet coil will have greater static pressure drop than dry coil).Model(* = 2 or 4)CFM 50060070080090010001100120013001400150016001700180019002000FEM*X1800WAHM18*WAHT18*.034.049.063−−−−−−−−−−−−−FEM*X2400WAHM24*WAHT24*.016.027.038.049.059−−−−−−−−−−−FEM*X3000WAHM30*WAHT30*−−−.049.059.070.080−−−−−−−−−FEM2X3500WAHM36*WAHT36*−−−−−.055.064.073.081−−−−−−−FEM*X3600−−−−−.034.042.049.056−−−−−−−FEM*X4200WAHM42*WAHT42*−−−−−−−.049.056.063.070−−−−−FEM*X4800WAHM48*WAHT48*−−−−−−−−−.038.043.049.054.059−−FEM*X6000WAHM60*WAHT60*−−−−−−−−−−−.027.031.035.039.043STATIC PRESSURE DROP ACROSS FILTER (inches of water column)Model(* = 2 or 4)CFM 400600800100012001400160018002000FEM*X1800WAHM18*WAHT18*.020.044.075−−−−−−FEM*X2400WAHM24*WAHT24*−.044.075.110−−−−−FEM*X3000WAHM30*WAHT30*−−.048.072.100−−−−FEM2X3500WAHM36*WAHT36*−−−.072.100.130−−−FEM*X3600−−−.072.100.130−−−FEM*X4200WAHM42*WAHT42*−−−−.070.092.120−−FEM*X4800WAHM48*WAHT48*−−−−−.092.120.152−FEM*X6000WAHM60*WAHT60*−−−−−−.120.152.187TECHNICAL SUPPORT MANUAL Fan Coils: FEM2X, FEM4X, WAHM**(2,4), WAHT**(2,4)6496 04 5301 01FAN COIL MODEL NUMBER IDENTIFICATION GUIDEF E M 4X 1800A 1F = Fan CoilS = Standard PSC E = GE X −13MOTOR TYPE U = UpflowM = Multiposition INSTALLATION TYPE2 = R −224 = Environmentally Sound R −410AREFRIGERANTX = TXVMETERING DEVICE1800 = 18,000 BTUH = 1½ tons 2400 = 24,000 BTUH = 2 tons 3000 = 30,000 BTUH = 2½ tons3500 & 3600 = 36,000 BTUH = 3 tons 4200 = 42,000 BTUH = 3½ tons 4800 = 48,000 BTUH = 4 tons 6000 = 60,000 BTUH = 5 tons NOMINAL CAPACITYSales CodeEngineering RevisionFAN COIL MODEL NUMBER IDENTIFICATION GUIDEDigit Position:1, 2345, 6789Example Part Number:WAHM244A 1WA = Air Handler S = Standard MotorH = High Efficiency MotorMOTOR TYPEM = Multiposition Plain Copper Evaporator CoilT = Multiposition Tin −coated Copper Evaporator Coil INSTALLA TION TYPE 18 = 18,000 BTU/hr = 12 TONS 24 = 24,000 BTU/hr = 2 TONS 30 = 30,000 BTU/hr = 22 TONS 36 = 36,000 BTU/hr = 3 TONS 42 = 42,000 BTU/hr = 32 TONS 48 = 48,000 BTU/hr = 4 TONS 60 = 60,000 BTU/hr = 5 TONS NOMINAL COOLING CAPACITY 2 = R −224 = R −410A REFRIGERANT SALES DIGIT EXTRA DIGITTECHNICAL SUPPORT MANUAL Fan Coils: FEM2X, FEM4X, WAHM**(2,4), WAHT**(2,4)496 04 5301 017ACCESSORIES PART NUMBER IDENTIFICATION GUIDEEB AC 01NCBAEB = Evaporator Blower AC = Accessory01 = Product Identifier Number NCB = Non −Combustible Base Kit DFK = Down Flow KitPLG = Power Plug (no heat kit)SPK = Single Point Wiring Kit FKS = Filter Kit Small FKM = Filter Kit Medium FKL = Filter Kit LargeFKX = Filter Kit Extra LargeCTK = Condensate Trap Kit (PVC pipe)Sales CodeELECTRIC HEATER MODEL NUMBER IDENTIFICATION GUIDEEHK 05A K N1EHK = Electric Heater Kit05 = 5 kW 07 = 7 kW 09 = 9 kW 10 = 10 kW 15 = 15 kW 18 = 18 kW 20 = 20 kW 25 = 25 kW 30 = 30 kW NOMINAL HEAT VALUE Sales CodeK = 208 / 230 single −phase H = 208 / 230, 3−phaseKC = 208 / 230, supplied as single phase, field convertible to 3−phase HC = 208 / 230 supplied as 3−phase, field convertible to single phase VOLTAGE (60 Hz)Product Identifier Engineering CodeInternational Comfort Products, LLCLewisburg, T ennessee 37091 USA。
Falcon Shocks 很好的调入指南说明书

1Kit # 00-10-32-400Kit # 00-10-32-100Prior to beginning this install, or any installation, read through the instructions entirely to familiar-ize yourself with the required steps and evaluate if you are experienced and/or capable to per-sonally perform these step and modifications. A factory service manual should be used in con-junction with these instructions and installation.Refer to the parts list to ensure that all necessary components and hardware has been included. If any parts are missing please contact your local TeraFlex dealer for assistance.Shocks: Before starting this install, make sure you have a way to reIncorrect charge pressure can alter shock behavior and could ulti-Your Falcon Shocks were originally charged with nitrogen from the fac-is recommended that they be re-charged with nitrogenpressed air can be used if nitrogen is not readily available.It is important to keep your shocks clean during disassembly and cartridge installation. To help insure that the install is clean, make sure your work area and shocks are cleaned thor-oughly before and through out the entire process. Failure to keep your shocks clean could cause24600-10-32-400160 Full Kit (ALL 4)Seal, Plug, Needle Type, 0.250 OD x 0.250 Total LengthOil/ Grease, Oil, Redline, 4oz Bottled / 5 weightBolt 1/4"-20 UNC x 1.5" Long Socket Head Cap ScrewRetaining Ring (STD), AISI 302 SS, 0.0625" Wire Dia., 1.650" Bore Dia. Tool, Nitrogen, Needle Adapter, Schrader Valve / Complete Assembly Subassembly, ADJ. Base Valve, 1.60", Series 3.2Rubber Plug, lightly oiland small end down Note: Use a soft clap to hold the shock. The car-tridge must be flat or oil will spill out.Push down on the top of the cartridge, this will re-veal the snap ring.Clean out any dirt that may have been trapped inthe snap ring groove.cartridge must be flat56ReservoirReservoir1112End ofNotchSnap Ring13。
Auto_Configure Server 用户手册说明书

User ManualAuto_Configure ServerHyberT one Technology Co.,Ltd.********************************************2011-4-11l IntroductionAuto_Provision server is HyberT one develop for supported HyberTone’s VoIP devices.Via this server, the administrator can maintenance all HyberT one terminal devices anywhere. New Auto_Provision server has more new features:1. New Auto_Provision’s maintenance page approximate HyberT one device’smaintenance page.2. New Auto_Provision server embedded Remote Control server, the administratorcan direct login to anyone connecting in this server’s HyberT one devices anytime without the client side make NAT forward.3. Auto_Provision server base at WEB, the administrator can maintenance thisserver and the HyberTone devices anywhere.l Server RequirementAuto_Provision base on LAMP (Linux Apache; MySQL; PHP), it is WEB software and it can work in Linux platform or Windows platform. We will show the install method as Linux, about Windows’s install course will be ignore. Before install, you must confirm the follow module is installed in you server:1. Apache 2 or later; In Redhat Linux, apache changed name as httpd;2. PHP supported;3. PHP_MySQL supported;4. MySQL 4 or later;Note: Auto_Provision’s character as UTF-8(Chinese version) or en (for English version), if the maintenance page can’t show the word when you login thissystem, just change the apache’s default font to UTF-8 or en.The above module inside at some Linux’s installation disk, please direct choice itwhen you install a new server.The above module can work in windows too. It has Windows version.l Auto_Provision Software Installation1. Login to your server’s apache installed folder, enter the follow commanddownload the Auto_provision software from our server:wget /update/autocfg_en-v2.tgzNote: If you use Redhat Linux platform, the apache’s install folder is:/var/www/html;2. decompression the autocfg_en-v2.tgz file as follow command:tar –xzvf autocfg_en-v2.tgzthe folder will make a new folder as: autocfg_en3. Login to this new folder, enter follow command to install all database:mysql < autocfg_en.sqll Maintenance Auto_Provision ServerAuto-Provision server is WEB; you can maintenance it via IE Explorer, enter the follow URL as your IE Explorer’s address field and press enter key:http://Your Server IP/autocfg_enY ou can see the page as:Default user name is: adminPassword is: adminThe user name and password can change after you login this system;After the above stop, you can see the page as follow, now you can use it.1. Serial Manage:Serial Manage is use to add one new serial HyberT one VoIP devices, the Auto_Provision embedded some prevalent serial, if it not include your devices; please add one new serial at first.Serial Add:Add new devices the server not included;Serial Config file is a special file. If default install didn’t have serial that you need, pleaseConnect us to add new serial devices when you need it.2. Template ManageOpen out the T emplate Manage, and click the T emplate Add.Open the Template Add, you can see the T emplate setting as like as the T erminal Use T emplate Manage. You can set the T erminal common setting beforehand, Like theSIP Proxy, Relay Server, Provision Server and Remote Server settings etc.Select a Serial that you want to add in the Server Name, Fill the T emplate Name to this Template.Note: the Provision Server address format is:http://your_server_ip/autocfg_en/index/down.php?file=Auto Provision Server only supports to configure the Call Setting by default option. If you want configure some special setting. As you want to change the Terminal’s Web password. Please fill in the other settings like this.(Match Case)If you want need more special configuration, Please contact us to gain it.Select and fill the common setting that your need. Click the Add button, Template add Complete.Every serial has a template setting by default; you can modify the default template or delete it.3. Product ManageOpen out the Product Manage; click the T erminal Serial to add the T erminal.For example, i add the HT812 Serial T erminal.Serial Number (SN) is the T erminal’s only identification. Used to identify the one and only setting for the T erminal. You can fine the T erminal SN in the Status Web Page or fine it in the terminal label.Note. If you fill the wrong SN, the terminal will not get the auto provision.User is used to remember customer how use the Terminal. And other settings is as like as the terminal settings.Click the add button, Product add complete.Terminal Bath add allow you to add more sequence terminal at a time.For example, you want to add the SN HT001 to SN HT010, 10 sequence terminal. Y ou can fill SN number as HT010 – 10, that can add 10 sequence terminal.Product Manage you can modify and delete the terminal what you are already add.Terminal Search And Batch Modify, you can search the terminal with some condition like SN, SIP Server and Relay Server etc. And modify the terminal that you searched.Chose the search result terminals, you can modify some common settings for the terminals.4. Data ManageData Manage, allow you backup and restore your auto provision date in your server.1. Data Backup, you can select Backup all data to backup all auto provision data,or choose Leaflets Sheet Data Backup to backup one serial terminal data.Choice of target locations can choose the backup date where to save. Backup to server or backup to your local PC.2. Data Import, Import the provision data that you have backup from you autoprovision server or you local PC.5. System Manage.Change web administrator password and configure Remote Control web port.User Manage. Y ou can change the Auto Provision administrator password.Remote Control Parameter. If you install Remote Control Server, you can fill the Remote Control Server web port. With this web port that Auto Provision can remote access the terminal web page and that needn’t to login Remote Control Server.Back to the Product Manage, select a terminal that you have already added. Click Modify. Y ou will see the Remote to http settings, click it can remote access to the terminal. (Need your terminal have already connect to your Remote Control Server)Remote access to the terminal’s web page, make sure you have configure the Remote Control settings.Remote Server: Fill the Remote Control Server IP address you have input.Remote Server Port: Fill the Remote Control access port.Note. This port is terminal connect to Remote Control Server’s port, not the Remote Control web port.Remote Server ID: Auto Provision use the terminal SN connects to the Remote T erminal. Please keep the value $(SN). $(SN) equal the terminal’s SN.Remote Server Key: If the Remote Server set the Remote Server key. T erminal need set the same that terminal can connect to Remote Server.And more detail about Remote Control Server, please see the Remote Control Server document.Auto Provision setting complete.l Terminal Setting:Finish the Auto Provision setting; now configure your terminal to fetch the configurations from Auto Provision Server.Open your browser and login the terminal web configure page. Enable your terminal Auto provision and configure the Provision Server.Provision Server: Fill the Auto provision URL.Note: The Provision Server URL format is:http://Provision_Server_IP/autocfg_en/index/down.php?file=Use your Provision Server IP instead of Provision_Server_IP. If you fill the wrong URL format. T erminal can’t get the Provision configure.Provision Interval: Units is second. If you want to auto provision per out, fill 3600. Or Keep it empty that auto provision when the terminal at the boot time.Save the terminal configuration, and reboot it. Terminal will fetch the provision configuration at the boot time.。
- 1、下载文档前请自行甄别文档内容的完整性,平台不提供额外的编辑、内容补充、找答案等附加服务。
- 2、"仅部分预览"的文档,不可在线预览部分如存在完整性等问题,可反馈申请退款(可完整预览的文档不适用该条件!)。
- 3、如文档侵犯您的权益,请联系客服反馈,我们会尽快为您处理(人工客服工作时间:9:00-18:30)。
Alfresco安装使用手册
安装环境:CentOS-6.4-64bit、alfresco-community-5.0.c-installer-linux-x64.bin
一、Alfresco安装
a)登录CentOS的root账户
b)上传alfresco-community-5.0.c-installer-linux-x64.bin文件到/root目录
c)输入:yum install libXrender libSM libICE libXext fontconfig cups-libs ntp,安
装程序依赖
d)输入:service ntpd start && chkconfig ntpd on,启动ntpd服务
e)输入:service postfix stop && chkconfig postfix off,停止postfix服务(端口冲突)
f)输入:./alfresco-community-5.0.c-installer-linux-x64.bin --mode text,运行
安装程序
g)进行程序安装向导设置,如下两图:
h)修复alfresco-community-5.0.c中libreoffice不能启动的问题,操作如下图:
输入:vi libreoffice_ctl.sh,把其中如下内容
改为
最后输入:wq,保存并退出
i)输入:service alfresco start,启动alfresco。
启动成功显示如下信息:
j)现在可以通过http://192.168.10.99/share访问alfresco,用户名:admin,密码为步骤e中,安装向导设置中的管理员密码。
二、Alfresco卸载
a)登录CentOS的root账户
b)输入:cd /opt/alfresco-5.0.c
c)输入:./uninstall,开始卸载alfresco。
卸载成功信息如下:
三、Alfresco备份
a)登录CentOS的root账户
b)输入:service alfresco stop,停止alfresco服务。
停止成功显示如下信息:
c)输入:cd /opt/alfresco-5.0.c
d)输入:./postgresql/scripts/ctl.sh start,启动postgresql。
如下图:
e)输入:PGPASSWORD=123456 ./postgresql/bin/pg_dump -c alfresco >
alf_data/alfresco_`date "+%Y-%m-%d"`_db.sql,导出数据库
f)输入:mkdir /backup,创建备份目录。
(非第一次备份,跳过此步骤)
g)输入:cp -rf alf_data /backup/alf_data_`date "+%Y-%m-%d"`,备份文件
h)输入:rm -rf /backup/alf_data_`date "+%Y-%m-%d"`/keystore /backup/alf_data_`date
"+%Y-%m-%d"`/postgresql,删除该目录下不需要备份的文件
四、Alfresco恢复
a)登录CentOS的root账户
b)输入:service alfresco stop,停止alfresco服务
c)输入:cd /opt/alfresco-5.0.c
d)输入:rm -rf alf_data/contentstore alf_data/contentstore.deleted/
alf_data/solr4/ alf_data/alfresco_*.sql,清空已损坏的数据
e)输入:cp -rf /backup/alf_data_xxxx-xx-xx/* alf_data/,还原alf_data数据文
件
f)输入:./postgresql/scripts/ctl.sh start,启动postgresql
g)输入:PGPASSWORD=123456 ./postgresql/bin/psql alfresco <
alf_data/alfresco_xxxx-xx-xx_db.sql,还原数据库
h)输入:service alfresco restart,启动还原后的alfresco服务。
