松下WJ-AVE55视频切换台说明书
多媒体移动平台使用说明三觉

笔记本连接
音频线一端插入笔记本音频接口,VGA连接线 一端连接笔记本的VGA接口。 面向控制面板,把音频线、VGA线的另一端插入 控制面板的音频接口、电脑接口上。 平台视频切换:按下输入信号选择按钮,切换 到电脑1 笔记本切换:按下笔记本的FN键加屏幕切换键 切换。
视频展台使用
打开移动平台后面控制面板上的视频开关,调整 视频展台的位置和高度,按下投影机的 输入信 号选择按钮,切换投影机输出方式为Video,适 当调节视频头以达到理想效果。 镜头上有变焦、光圈调节、聚焦三个控制圈,变 焦调节大小,光圈调节亮度、聚焦调节清晰度。
一般故障排除
ຫໍສະໝຸດ
1、开机不通电 ● 检查插座是否有电 ● 电源线是否插好 ● 开关有没有打开 如果以上检查都正常,请联系我们送修。 2、多媒体移动平台投影灯泡不亮 ● 检查多媒体移动平台投影投影指示灯是否亮 ● 检查多媒体移动平台投影投影电源开关是否打开 ● 检查多媒体移动平台投影投影是否处在无信号自动关机状态 其他故障现象请翻阅投影机使用指南 3、数据投影正常,视频展台无显示或模糊 ● 视频展台开关是否打开,打开后灯亮 ● 视频展台聚焦是否调好 ● 投影机信号是否切换到正确位置 如果以上检查都正常,请联系我们送修
移动平台部件指南
视频展台
投影机控制 MP5控制面板
镜头
支架
背面控制面板
地拉幕
幕布类型:地拉幕 幕布材质:玻珠 对角线: 80英寸 幕布比例:4:3 幕面尺寸:1.62*1.22m 其他性能: 安装方式: 支架式 地拉式幕布可在学校和 教室在任何场地快速搭 安装环境 建多媒体教学环境,使 用极为方便
精品课件!
Panasonic DMC-GX1 Live Viewfinder 使用说明书

Operating Instructions Manuel d’utilisation Instrucciones de funcionamiento 使用说明书LIVE VIEW FINDERVISEUR À VISION DIRECTE VISOR LIVE VIEW 实时取景器C Panasonic Corporation 2011EUPursuant to at the directive 2004/108/EC, article 9(2)Panasonic Testing CentrePanasonic Marketing Europe GmbH Winsbergring 15, 22525 Hamburg, GermanyVQT3T47F1011SM0Model No.DMW-LVF2PP/DMW-LVF2E/DMW-LVF2GK∫Attaching the Live Viewfinder AThis Live Viewfinder is designed only for the Panasonic digital camera DMC-GX1.(As of October 2011)Preparation:•Turn off the camera.•Remove the Live Viewfinder connector protective cover.•Remove the hot shoe cover that is attached to the camera.•Place the hot shoe cover you have removed in its storage bag and store in a safe location.•When attaching and detaching the Live Viewfinder, be sure to do so slowly and carefully.∫Slide the Live Viewfinder into the hot shoe of the digital camera, ensuring that it is fully inserted.1Hot shoe 2Finder3[LVF/LCD] button4Dedicated connector for external viewfinder•Press the lower part of the Live Viewfinder withyour finger, and securely insert the connector as well. (Do not press on the viewfinder part or the [LVF/LCD] button.)∫To remove the Live Viewfinder B1Turn off the camera.2Return the angle of the LiveViewfinder to its original position if it has changed.3Pull in the direction of the arrow while pressing the lock button.•Reattach the hot shoe cover in its original position.•Using the Live Viewfinder with dirt on the connectors may cause damage, soattach the connector protective cover and place it in the storage bag.1Lock button∫How to use C1Switch [ON] the camera.2Press the Live Viewfinder [LVF/LCD] button to switch the display.•Switching via the [LVF/LCD] button will be maintained even when the power of the digital camera is turned [OFF].1[LVF/LCD] button∫About the settings for recording with a low camera angle CBased on the camera angle, set the angle of the Live Viewfinder for easy viewing.•Do not open beyond 90o . Doing so may cause damage.∫Diopter adjustment DLook at the display on the Viewfinder and rotate the diopter adjustment dial to where the screen is clearest.1Diopter adjustment dialNote•Static electricity, electromagnetic waves or other factors depending on the photographic environment may cause the screen to turn black temporarily; however this does not affect the saved image.•If the finder is not displayed when using the camera, it may be becoming loose. Re-attach the finder.•The Live Viewfinder cannot be used with an external flash.•Take care not to drop the Live Viewfinder or subject it to strong impact.•Be particularly careful in the following places as they may cause this unit to malfunction.–Places with a lot of sand or dust.–Places where water can come into contact with this unit such as when using it on a rainy day or on a beach.•Take care not to touch or dirty the finder surface.•When the Live Viewfinder is fitted, do not use it to hold the camera. The camera may drop out of the Live Viewfinder and be damaged.•Before cleaning the Live Viewfinder, wipe the Live Viewfinder with a dry soft cloth.–When the Live Viewfinder is soiled badly, it can be cleaned by wiping the dirt off with a wrung wet cloth, and then with a dry cloth.–Do not use solvents such as benzine,thinner, alcohol, kitchen detergents, etc., to clean the Live Viewfinder, since it may cause the external case to deteriorate or the coating to peel off.–When using a chemical cloth, be sure to follow the accompanying instructions.•As the eye cup cannot be removed, gently wipe it with a dry and soft cloth, and be careful not to remove it.•If you wipe the eye cup too hard and it is removed, consult the dealer or your nearest Service Centre.•Be sure to read the operating instructions of your digital camera.•Condensation occurs when the ambient temperature or humidity changes. Suchcondensation could result in oxidation and or corrosion of internal components leading to service issues or the formation of mold in extreme cases. Condition it to the ambient temperature inside a bag etc. before use.•When not using the Live Viewfinder, be sure to keep it in its storage bag. Store in a dry place, taking care to avoid heat and humidity.•Do not spray the camera with insecticides or volatile chemicals.If the camera is sprayed with such chemicals, the body of the camera may be damaged and the surface finish may peel off.•Do not keep rubber or plastic products in contact with the camera for a long period of time.•Do not disassemble or modify this unit.•If nothing is displayed on the Live Viewfinder, or if the display is not normal, it may be due to the digital camera. Please have your digital camera serviced together with this unit.∫Cautions for UseKeep the unit as far away as possible from electromagnetic equipment (such as microwave ovens, TVs, video games, radio transmitters, high-voltage lines etc.).•Do not use the camera near cell phonesbecause doing so may result in noiseadversely affecting the pictures and sound.•If the camera is adversely affected by electromagnetic equipment and stopsfunctioning properly, turn the camera off and remove the battery and/or the connected AC adaptor. Then reinsert the battery and/orreconnect the AC adaptor and turn the camera on.∫SpecificationsDisplay:Field sequential color LCD viewfinder (1,440,000 dots equivalent)Viewfinder Coverage:Approx. 100%Diopter value:j 4 to i 4diopter Magnification(35mm film camera equivalent):Approx. 1.4k(Approx. 0.7k )-1m -1 50mm infinityEye Point:Approx. 17.5mm(Approx. 0.689q ) (-1m -1)Dimensions:Approx. 29.4mm (W)k47.7mm (H)k 48.9mm (D)[1.16q (W)k 1.88q (H)k 1.93q (D)]Mass (Weight):Approx. 36g(0.07937lb)StandardAccessories:Connector protective cover Storage Bag -If you see this symbol-THE FOLLOWING APPLIES ONLY IN CANADA.THE FOLLOWING APPLIES ONLY IN THE U.S.A.N° de modèleDMW-LVF2PP/DMW-LVF2E/DMW-LVF2GK∫Fixation du viseur à vision directe ACe viseur à vision directe est conçuuniquement pour l’appareil photo numérique DMC-GX1 de Panasonic.(En date d’octobre 2011)Préparatifs:•Mettez l’appareil photo hors marche.•Retirez le couvercle protecteur du connecteur du viseur à vision directe.•Retirez le couvercle de la griffe porte-accessoires fixé à l’appareil.•Placez le couvercle de la griffe porte-accessoires dans son sac de rangement et rangez-le dans un endroit sûr.•Lorsque vous fixez ou désinstallez le viseur à vision directe, veuillez procéder lentement et avec soin.∫Glissez le viseur externe sur la griffe porte-accessoires del’appareil en vous assurant qu’il est complètement inséré.1Griffe porte-accessoires 2Viseur3Touche écran ACL/viseur [LVF/LCD]4Connecteur dédié pour viseur externe.•Avec un doigt, appuyez sur la partie inférieure du viseur; insérez également le connecteur à fond. (N’appuyez pas sur le viseur ni sur la touche écran ACL/viseur [LVF/LCD].)∫Retrait du viseur à vision directe B1Mettez l’appareil photo hors marche.2Au besoin, remettez le viseur en sa position initiale.3Tout en appuyant sur la touche de verrouillage, tirez dans la direction de la flèche.•Remettez le couvercle de la griffe porte-accessoires en sa position initiale.•Utiliser le viseur à vision directe alors que les connecteurs sont sales peutl’endommager; aussi, est-il important de mettre le couvercle protecteur duconnecteur en place et de ranger le tout dans le sac de rangement.1Touche de verrouillage∫Utilisation C1Mettez l’appareil photo en marche.2Appuyez sur la touche écran ACL/viseur [LVF/LCD] pour commuter l’affichage.•Le réglage effectué avec la touche [LVF/LCD] est conservé même si l’appareil est hors marche.1Touche écran ACL/viseur [LVF/LCD]∫Réglages pour des prises de vues en contre-plongée CSelon l’inclinaison de l’appareil photo, réglez l’angle du viseur de manière à mieux voir.•Évitez de l’ouvrir à plus de 90o ; cela pourrait l’endommager.∫Ajustement dioptrique DObservez l’image affichée au viseur et tournez la bague d’ajustement dioptrique jusqu’à la position offrant l’image la plus claire.1Bague de réglage dioptriqueNota•De l’électricité statique, des ondesélectromagnétiques ou d’autres facteurs liés aux conditions de prise de vue peuvent faire virer l’écran au noir; toutefois, cela n’a aucun effet sur l’image enregistrée.•Si aucune image n’est affichée au viseurpendant l’utilisation de l’appareil, il se pourrait qu’il y ait un problème de connexion. Reconnectez le viseur.•Le viseur à vision directe ne peut être utilisé de concert avec un flash externe.•N’échappez pas le viseur externe ni ne le soumettez pas à de violents chocs.•Afin de prévenir les problèmes de fonctionnement, faites particulièrement attention dans les endroits suivants.–Endroits poussiéreux et où il y a du sable.–Endroits où l’appareil pourrait être mouillé (pluie, éclaboussures, etc.).•Assurez-vous de ne pas toucher ou salir la surface du viseur.•Lorsque le viseur est installé, ne l’utilisez pas pour tenir l’appareil. L’appareil peut se détacher du viseur et être endommagé.•Avant de nettoyer le viseur, essuyez-le avec un chiffon doux et sec.–Si le viseur externe devient très sale, il peut être nettoyé à l’aide d’un chiffon doux mouillé et essoré puis avec un chiffon sec.–N’utilisez pas de solvants comme le benzène, diluant, alcool, détergents decuisine, etc., pour nettoyer le viseur puisque cela pourrait causer une détérioration de son boîtier et son fini pourrait se décoller.–Lorsque vous utilisez un tissu chimique, assurez-vous de suivre les instructions qui l’accompagnent.•Du fait que l’œilleton ne peut être enlevé,essuyez-le délicatement avec un chiffon doux et sec et prenez soin de ne pas tenter de l’enlever.•Si l’œilleton venait à se dégager,communiquez avec le détaillant auprès de qui vous avez acheté l’appareil ou avec un centre de service à la clientèle.•Lisez attentivement le manuel d’utilisation de votre appareil photo numérique.•De la condensation peut se former en cas de changement brusque de la température ambiante ou du taux d’humidité. Lacondensation peut entraîner une oxydation ou une corrosion des composants internes, d’où un risque de problèmes de fonctionnement ou la formation de moisissure dans des cas exceptionnels. Avant d’utiliser l’appareil,conditionnez-le aux conditions ambiantes en le plaçant dans un sac de pastique, etc.•Après usage, remettez toujours le viseur à vision directe dans son sac de rangement. Gardez-le dans un endroit sec en prenant soin d’éviter la chaleur et l’humidité.•Ne vaporisez pas l’appareil avec desinsecticides ou des substances chimiques volatiles, cela pourrait causer une détérioration de son boîtier et son fini pourrait se décoller.•Évitez de laisser des produits en caoutchouc ou en plastique en contact avec l’appareil pendant une longue période.•Ne démontez ni ne modifiez pas cet appareil.•S’il n’y a pas d’affichage sur le viseur à vision directe ou si l’affichage semble anormal, l’appareil photo numérique pourrait être en cause. Faites vérifier le viseur et l’appareil photo numérique par un technicien.∫Précautions à prendreÉvitez d’approcher l’appareil de tout équipement magnétisé (four àmicro-ondes, téléviseur, équipement de jeux vidéo, émetteur radio, ligne à haute tension, etc.).•N’utilisez pas l’appareil photo à proximité d’untéléphone cellulaire : cela pourrait entraîner un bruit nuisible à l’image et au son.•Advenant le cas où le fonctionnement de l’appareil serait dérangé par un champ magnétique, coupez le contact, retirez la batterie ou débranchez l’adaptateur secteur pour ensuite soit remettre la batterie en place, soit rebrancher l’adaptateur. Remettez l’appareil en marche.∫SpécificationsAffichage :Viseur couleur ACL à séquence de trames (équivalent de 1440000 points)Couverture du viseur :Environ 100 %Valeur dioptrique :j 4à i 4WARNING:TO REDUCE THE RISK OF FIRE, ELECTRIC SHOCK OR PRODUCT DAMAGE,•DO NOT EXPOSE THIS APPARATUS TO RAIN, MOISTURE, DRIPPING ORSPLASHING AND THAT NO OBJECTS FILLED WITH LIQUIDS, SUCH AS VASES, SHALL BE PLACED ON THE APPARATUS.•USE ONLY THE RECOMMENDED ACCESSORIES.•DO NOT REMOVE THE COVER (OR BACK); THERE ARE NO USER SERVICEABLE PARTS INSIDE. REFER SERVICING TO QUALIFIED SERVICE PERSONNEL.Information on Disposal for Users of Waste Electrical & Electronic Equipment (private households)This symbol on the products and/or accompanyingdocuments means that used electrical and electronic productsshould not be mixed with general household waste.For proper treatment, recovery and recycling,please take these products to designated collection points, where they will be accepted on a free of charge basis. Alternatively, in some countries you may be able to return your products to your local retailer upon the purchase of an equivalent new product.Disposing of this product correctly will help to save valuable resources and prevent any potential negative effects on human health and the environment which could otherwise arise from inappropriate waste handling. Please contact your localauthority for further details of your nearest designated collection point.Penalties may be applicable for incorrect disposal of this waste, in accordance with national legislation.For business users in the European Union If you wish to discard electrical andelectronic equipment, please contact your dealer or supplier for further rmation on Disposal in otherCountries outside the European Union This symbol is only valid in the European Union.If you wish to discard this product, please contact your local authorities or dealer and ask for the correct method of disposal.This Class B digital apparatus complies with Canadian ICES-003.FCC Note:This equipment has been tested andfound to comply with the limits for a Class B digital device, pursuant to Part 15 of the FCC Rules.These limits are designed to provide reasonable protection against harmful interference in a residential installation. This equipment generates, uses and can radiate radio frequency energy and, if not installed and used in accordance with the instructions, may cause harmfulinterference to radio communications. However, there is no guarantee that interference will not occur in a particular installation. If this equipment does cause harmful interference to radio or television reception, which can be determined by turning the equipment off and on, the user is encouraged to try to correct the interference by one or more of the following measures:•Reorient or relocate the receiving antenna.•Increase the separation between the equipment and receiver.•Connect the equipment into an outlet on a circuit different from that to which the receiver is connected.•Consult the dealer or an experienced radio/TV technician for help.Any unauthorized changes ormodifications to this equipment would void the user’s authority to operate this device.This device complies with Part 15 of the FCC Rules. Operation is subject to the following two conditions: (1) This device may not cause harmful interference, and (2) this device must accept any interference received, includinginterference that may cause undesired operation.Responsible Party:Panasonic Corporation of North America One Panasonic Way Secaucus, NJ 07094Support Contact:Panasonic Consumer Electronics CompanyTelephone No.: 1-800-211-PANA (7262)Taux d’agrandissement(équivalent 35mm):Environ 1,4k(environ 0,7k)-1m-1 50mm infinitéAnneau oculaire:Environ 17,5mm(Environ 0,689 po) (-1m-1) Dimensions:Environ 29,4mm (L)k47,7mm (H)k48,9mm (P)[1,16 po (L)k1,88 po(H)k1,93 po (P)] Poids:Environ 36g(0,07937lb) Accessoires:Couvercle protecteurdu connecteurSac de rangement-Si vous voyez ce symbole-CE QUI SUIT NE S’APPLIQUE QU’AU CANADA.Modelo N. DMW-LVF2PP/DMW-LVF2E/DMW-LVF2GK∫Acoplar el visor Live View AEste visor Live View está diseñadoúnicamente para la cámara digital PanasonicDMC-GX1.(A partir de octubre de 2011)Preparación:•Apague la cámara.•Retire la cubierta protectora del conector delvisor vivo.•Retire la tapa de la zapata de contacto unida ala cámara.•Coloque la cubierta de la zapata caliente queretiró en su bolsa de almacenamiento yguárdela en una ubicación segura.•Cuando quite y ponga el visor Live View,asegúrese de hacerlo lenta y cuidadosamente.∫Deslice el visor Live View en lazapata de contacto de la cámaradigital, asegurándose de que estátotalmente introducido.1Zapata de contacto2Visor3Botón [LVF/LCD]4Conector dedicado para el visor externo•Apriete la parte inferior del visor Live View conel dedo, e introduzca de forma segura tambiénel conector. (No presione parte del visor ni elbotón [LVF/LCD].)∫Para quitar el visor Live View B1Apague la cámara.2Devuelva el ángulo del visor LiveView a su posición original si hacambiado.3Tire en la dirección de la flechamientras presiona el botón debloqueo.•Volver a colocar la tapa de la zapata decontacto en su posición original.•Usar el visor vivo con suciedad en losconectores puede causar daño, entoncessujete la cubierta protectora del protectory colóquelo en la bolsa dealmacenamiento.1Botón de bloqueo∫Cómo usarlo C1Encienda la cámara.2Presione el botón del visor vivo[LVF/LCD] para cambiar lavisualización.•El cambio realizado a través del botón[LVF/LCD] se mantendrá incluso alapagar la cámara digital.1Botón [LVF/LCD]∫Acerca de los ajustes para grabarcon un ángulo de cámara bajo CSegún el ángulo de cámara, ajuste elángulo del visor Live View para ver mejor.•No abra más allá de 90o. Si lo hace puedecausar daños.∫Ajuste del dióptrico DMire la visualización en el visor y gire eldisco del ajuste del dióptrico hasta dondela pantalla resulta más clara.1Disco de ajuste del dióptricoNota•La electricidad estática, las ondaselectromagnéticas u otros factores según elentorno fotográfico pueden causar que lapantalla se ponga en negro temporalmente,sin embargo esto no afecta la imagenguardada.•Si el localizador no se visualiza cuando se usala cámara, se puede aflojar. Vuelva a colocarel localizador.•El visor Live View no puede usarse con unflash externo.•Tenga cuidado de no golpear el visor LiveView ni lo someta a fuertes impactos.•Ponga especial cuidado en los lugaressiguientes ya que pueden originar unfuncionamiento defectuoso a esta unidad.–Lugares con mucha arena o polvo.–Lugares donde el agua puede tocar estaunidad como cuando la usa durante un díalluvioso o en una playa.•No toque ni ensucie la superficie del visor.•Cuando está puesto el visor Live View, no louse para sujetar la cámara. La cámara puedesoltarse del visor Live View y puede dañarse.•Antes de limpiar el visor Live View, pase unpaño suave y seco por el mismo.–Cuando el visor Live View está demasiadosucio, puede limpiarse quitando la suciedadcon un trapo mojado y escurrido y luegopasando un trapo seco.–No utilice disolventes como gasolina,diluyente, alcohol, detergentes para cocina,etc., para limpiar el visor Live View ya quede hacerlo podría deteriorarlo y podríapelarse su revestimiento.–Al usar un trapo químico, tenga cuidado deseguir las respectivas instrucciones adjuntas.•Puesto que la caja del visor no se puedequitar, límpiela delicadamente con un pañoseco y suave, y tenga cuidado en no quitarla.•Si limpia la caja del visor con demasiadafuerza y se quita, consulte con su vendedor ocon el centro de asistencia más cercano.•Lea el manual de instrucciones de su cámaradigital.•Se produce condensación cuando la temperaturaambiente o humedad varían. Esta condensaciónpuede provocar oxidación y/o corrosión decomponentes internos causando problemas defuncionamiento o formación de moho en casosextremos. Adáptela a la temperatura ambientedentro de una bolsa, etc., antes de usarla.•Cuando no se usa el visor vivo, asegúrese deguardarlo en su bolsa de almacenamiento.Guárdelo en un lugar seco, evitando el calor yla humedad.•No rocíe la cámara con insecticida o productosquímicos volátiles.Si la cámara se rocía con estos productosquímicos, podría dañarse el cuerpo de lacámara y quitarse la capa superficial.•No deje la cámara en contacto directo conproductos de caucho o plástico durante unlargo período.•No desmonte ni modifique la unidad.•Si no se visualiza nada en el visor en vivo, obien si la visualización no es normal, eso puedeser debido a la cámara digital. Haga reparar sucámara digital junto con esta unidad.∫Precauciones para el usoMantenga la unidad lo más lejos que seaposible de equipos electromagnéticos(como hornos de microondas,televisores, vídeo juegos, trasmisoresradio, líneas de alto voltaje, etc.).•No utilice la cámara cerca de teléfonosmóviles, ya que lo de hacerlo puede producirruido que afectará negativamente a lasimágenes y el sonido.•Si la cámara queda afectada negativamentepor un equipo electromagnético y deja defuncionar correctamente, apague la cámara yquite la batería y/o el adaptador de CAconectado. Luego vuelva a insertar la bateríay/o vuelva a conectar el adaptador de CA yencienda la cámara.∫EspecificacionesVisualización:Campo secuencial delvisor LCD en color(equivalente a1.440.000 puntos)Cobertura del visor:Aprox.100%Valor del dióptrico:j4 a i4dióptricoAmpliación(equivalente a unacámara de películade 35mm):Aprox. 1,4k(Aprox.0,7k)-1m-1 50mm infinitoPunto visual:Aprox. 17,5mm(Aprox.0,689q) (-1m-1)Dimensiones:Aprox. 29,4mm (W)k47,7mm (H)k48,9mm (D)[1,16q (W)k1,88q (H)k1,93q (D)]Masa:Aprox. 36g(0,07937lb)Accesorios de serie:Cubierta protectora delconectorBolsa de almacenamiento-Si ve este símbolo-型号DMW-LVF2PP/DMW-LVF2E/DMW-LVF2GK∫安装实时取景器A本实时取景器是专门为Panasonic数码相机DMC-GX1设计的。
松下推出全新4K制作切换台AV-UHS500MC

I P ro d u c ts In fo rm a tio n□佳能为旗下七款4K专业监视器提供固件升级服务©从左至右:DP-V1710/DP-V1711,DP-V2410,DP-V2411,DP-V2420/DP-V2421,DP-V31206月下旬起,佳能(中国)有限公司将为度y七款4K专业监视器产品0卩-^10、0卩-^11、0卩-(2410、0卩_ V2411、DP-V2420、DP-V2421 和 DP-V3120 提供固件升级服务。
通过此次升级,DP-V1710、DP-V1711、DP-V2411的全黑亮度;由原来的0.005cd/m2降低到0.001cd/m2。
且通过付费升级后,DP-V1710、DP-V1711的全白峰值亮度可由原来的600 cd/m2提升至1000 cd/m2。
全线监视器产品通过此次升级,也进一步完善了各种辅助功能。
当导入由电影摄影机生产厂商提供的U ser LUT 文件或使用调色软件创建的U ser L U T文件时,新固件支持读取视频制作行业广泛使用的“.cube”文件格式的3D-LUT/1D-L U T文件。
同时,还新增加了两种可将R E D品牌数字电影摄影机拍摄的影像转换为HDR(PQ)/S D R的预设LUT。
升级还进一步扩充了支持编辑操作的功能,如H D R监看辅助等。
新固件还新增了 SD-S D I显示比例设置功肯旨,当显示通过SD-SD I输入SD (标清)画面时,可在16:9和4:3的画幅比之间自由切换。
扫描产品二维码,了解产品更多详细信息□松下推出全新4K制作切换台AV-UHS500MC曰前,松下正式推出兼容4K/12G-S D I的紧凑型现场切换台A V-UHS500M C。
除了应用在演播室、转播车、阶梯教室、企业会议室等场合,A V-UHS500M C还非常适合电子现场制作(E F P)。
便于携带与安装的设计,更让它成为舞台演出及各类赛事活动制作系统中的首选工具。
松下 AV-HS450 MC 多格式现场切换台 说明书
H D1080/59.94i,50i,23.98psF*,24psF*720/59.94p,50pS D480/59.94i,576/50i强大的功能您可以将屏幕分为4、9、10以及16个画面。
2块屏幕上可同时显示最多20个通道的信号。
12341234567891347856910212345678910111213141516内置双监视器多画面显示功能可在两块屏幕上显示高达20幅图像每台AV-HS450都标准配置了双路多画面显示器,在2个显示器上可以提供高达20个窗口。
这一独特功能能够节省空间、减少设备成本、并改善节目制作工作流程。
广州市流花路中国大酒店商业大楼13楼邮政编码:510015电话:(020)8667-2130 (020)8667-2131传真:(020)8669-5225广州技术服务中心广州市流花路中国大酒店商业大楼13楼邮政编码:510015电话:(020)8667-0381传真:(020)8669-5225济南技术服务中心济南市二环东路3218号发展大厦B座6层D室邮政编码:250012电话:(0531)8190-8189传真:(0531)8190-8189松下电器(中国)有限公司广播电视系统营销公司〔营业、技术服务〕北京市朝阳区光华路甲8号和乔大厦C 座6层邮政编码:100026电话:(010)6562-6688传真:(010)6562-6186〔技术服务、维修〕北京技术服务中心北京市朝阳区光华路甲8号和乔大厦C 座6层邮政编码:100026电话:(010)6562-6688传真:(010)6562-6185成都技术服务中心成都市顺城大街206号四川大厦7层D座邮政编码:610016电话:(028)8652-1585传真:(028)8652-1585上海市陆家嘴环路1000号汇丰大厦5楼邮政编码:200120电话:(021)3866-7799传真:(021)3866-7033上海技术服务中心上海市陆家嘴环路1000号汇丰大厦5楼邮政编码:200120电话:(021)3866-7799传真:(021)3866-7033广告主:松下电器(中国)有限公司广播电视系统营销公司 北京市朝阳区光华路甲8号和乔大厦C座6层 广告经营者:天津富士印商贸有限公司 天津市河西区恒华大厦1号楼905室 印刷日:2009年5月 奥标许备[2007]第92号快拍存储与画中画存储功能,使操作更流畅标准配置包括两路DSK 及两路画中画功能每个输入通道均带有可切换帧同步器,并且可选内、外同步系统标准配置提供双路冗余电源通过RS-422,实现灵活的云台系统控制4路AUX 母线,其中第1路AUX 母线还可以加入MIX 功能,实现更加灵活的操作视频格式视频处理M/E视频输入视频输出同步输入/输出特 技键下游键画中画WIPE/DVE 模式过渡类型图像处理图像效果键 数键类型过渡类型WIPE/DVE 模式键 数键类型过渡类型画中画数量过渡类型AV-HS450 主要规格帧同步冻 结上变换彩色校正多画面其他功能面 板编辑器COMTALLY/GPI LAN * A1、A2、B1及B2输入的规格取决于所安装的可选设备的规格。
松下切换台AV-UHS500MC又添“新功夫”
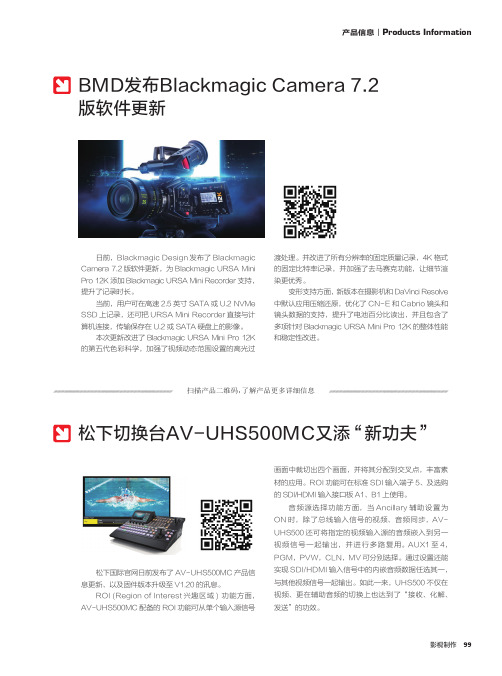
99影视制作日前,Blackmagic Design 发布了BlackmagicCamera 7.2版软件更新,为Blackmagic URSA MiniPro 12K 添加Blackmagic URSA Mini Recorder 支持,提升了记录时长。
当前,用户可在高速2.5英寸SATA 或U.2 NVMeSSD 上记录,还可把URSA Mini Recorder 直接与计算机连接,传输保存在U.2或SATA 硬盘上的影像。
本次更新改进了Blackmagic URSA Mini Pro 12K的第五代色彩科学,加强了视频动态范围设置的高光过渡处理。
并改进了所有分辨率的固定质量记录,4K 格式的固定比特率记录,并加强了去马赛克功能,让细节渲染更优秀。
变形支持方面,新版本在摄影机和DaVinci Resolve 中默认应用压缩还原,优化了CN-E 和Cabrio 镜头和镜头数据的支持,提升了电池百分比读出,并且包含了多项针对Blackmagic URSA Mini Pro 12K 的整体性能和稳定性改进。
BMD发布Blackmagic Camera 7.2版软件更新松下切换台AV-UHS500MC又添 “新功夫”扫描产品二维码,了解产品更多详细信息松下国际官网日前发布了AV-UHS500MC 产品信息更新、以及固件版本升级至V1.20的讯息。
ROI (Region of Interest 兴趣区域) 功能方面,AV-UHS500MC 配备的ROI 功能可从单个输入源信号画面中裁切出四个画面,并将其分配到交叉点,丰富素材的应用。
ROI 功能可在标准SDI 输入端子5、及选购的SDI/HDMI 输入接口板A1、B1上使用。
音频源选择功能方面,当Ancillary 辅助设置为ON 时,除了总线输入信号的视频、音频同步,AV-UHS500还可将指定的视频输入源的音频嵌入到另一视频信号一起输出,并进行多路复用。
Panasonic高清视频相机连接指南说明书

Wi-Fi Connection GuideHigh Definition Video CameraModel No. HC-W850/HC-V750HC-V550/HC-V250SQC0011It is required to install the “Image App” on your smartphone/tablet to connect this unit.1[Android ™]: Select “Google Play™ Store”.[iOS]: Select “App Store SM ”.2Enter “Panasonic Image App” into the search box.3Select “Panasonic Image App” and install it.Install the “Image App” on your smartphone/tablet Confirm the Wi-Fi ® connection method Connect to Wi-FiStep.1Install the “Image App” on your smartphone/tabletAn environment that can connect to the network is required.Step.2Confirm the Wi-Fi ® connection methodConfirm the wireless access point and smartphone used.When connecting to a wireless access point (wireless LAN router)When connecting to a smartphone1Check if the wireless access point is compatible with IEEE802.11b/g/n.≥Proceed to step 2 once the compatibility is confirmed.2Check if the wireless access point is compatible with WPS*.Compatible with WPS:Proceed to A [WPS Connection] of Step.3Not compatible with WPS:Proceed to B [Search for wireless network] of Step.3*WPS is an abbreviation for Wi-Fi Protected Setup™.Proceed to C [Direct Connection] of Step.3≥Android and Google Play are trademarks or registered trademarks of Google Inc.≥App Store is a service mark of Apple Inc.≥“Wi-Fi”, “Wi-Fi Protected Setup”, “WPA” and “WPA2” are marks or registered marks of the Wi-Fi Alliance.≥QR Code is a registered trademark of DENSO WAVE INCORPORATED.A [WPS Connection]1Press the Wi-Fi button on this unit to setup the Wi-Fi.2Touch a Blank row to register a new wireless network.3Touch [WPS Connection].4Press the WPS button on the wireless access point.≥When the connection is complete, a message is displayed on this unit.5Touch [Link to Cell] and start up the smartphone application “Image App”.≥When the connection is complete, images from this unit are displayed on the smartphone screen.B [Search for wireless network]≥Please refer to the operating instruction of the device in use for details about the setting and display of the wireless access point.1Press the Wi-Fi button on this unit to setup the Wi-Fi.2Touch a Blank row to register a new wireless network.3Touch [Search for wireless network].≥For more details about [Manual Setting], please refer to the owner’s manual (PDF format) of this unit.4Touch the wireless access point to connect.≥Touch [ENTER].≥If an Encryption key (Password) is not set on your router, the connection is complete and a message is displayed.5(When there is an Encryption key (Password))Enter the Encryption key (Password) of the wireless access point.≥For details on how to enter characters, refer to the owner’s manual (PDF format).≥When the entry is complete, touch [Enter].6Touch [Link to Cell] and start up the smartphone application “Image App”.≥When the connection is complete, images from this unit are displayed on the smartphone screen.C [Direct Connection]1Press the Wi-Fi button on this unit to setup the Wi-Fi.2Touch [Change connection type] and select [QR code].≥The QR code is displayed on this unit screen.3Start up the smartphone application “Image App”.4On the smartphone, select [QR code], and scan the QR code displayed on the screen of this unit.≥When using an iOS device, perform the following operations:1Select the option that allows you to install the app on the profilescreen of the “Image App“, and follow the on-screen instructions to complete the installation.2Press the home button to close the displayed screen.3After selecting the network name (SSID) of this unit from the Wi-Fi setup of the smartphone, start up “Image App“.≥When the connection is complete, images from this unit are displayed on the smartphone screen.This function can be used with the NFC compatible device with Android (OS version 2.3.3 or later). (Except for some models)NFC is an abbreviation for Near Field Communication.≥When this unit and the smartphone are connected to the same wireless access point, the result is a wireless access point connection. All others are direct connections.1Start up the smartphone application “Image App”.2Touch the smartphone on displayed on the smartphone screen.≥Touch [YES] on the screen of this unit, and proceed with the connection by following the smartphone screen instructions.≥When the connection is complete, images from this unit are displayed on the smartphone screen.≥The NFC function cannot be used on the smartphone when a message to touch the NFC mark of the device is not displayed. Try other connection methods.When connecting to a wireless access point (wireless LAN router)[Wi-Fi Setup] # [Wireless Settings][Wi-Fi Setup] # [Wireless Settings]A [Delete]B[ENTER]A [Delete]B[ENTER]When connecting to a smartphone[Wi-Fi Setup] # [Direct Connection]Connect with using NFC。
松下 ENG 摄像机演播室系统 说明书
摄像机控制系统与P2 HD/DVCPRO HD摄像机同用实现演播室应用的高性能价格比该系统是一种高性价比的解决方案,可与各种P2 HD和DVCPRO HD 摄像机配合使用。
BNC线缆用于长达100米的HD信号传输。
该系统可用于色彩调整、摄像机控制、录像机控制,提供电源、返送图像、内部通信以及更多应用。
使用AC/DC 电源,该电源适合各种现场和演播室使用。
基站摄像机适配器AG-BS300MC AG-CA300MC • 由于采用数字传输,所传输的信号品质不会降低。
• 传输主要信号、返送图像、tally、内部通信、同步锁相,仅通过两条BNC线缆即可连接摄像机控制器。
• 可提供最高70W的功率。
可使用一台小型显示器和伺服变焦。
• AG-BS300MC: AC(100~240V) / DC。
适用摄像机型号:P2HD: AG-HPX303MC, AG-HPX500MC, AJ-HPX3700MC, AJ-HPX2700MC, AJ-HPX3000MC, AJ-HPX2100MC DVCPRO HD: AJ-HDX900MCLCD 视频监视器BT-LH2550MC基 站AG-BS300MCAG-HPX303MCSDI IN视频监视器 BT-LH80WUMCSDI OUT遥控单元 电缆保护装置(第三方)AJ-HPX3700MC视频监视器 BT-LH80WUMCAJ-HPX3700MC SDI INBS OUTCA OUT INCOMOUT(BB)LCD 视频监视器LCD 视频监视器 电缆保护装置镜头取决于摄像机DC OUT SDI OUTCA OUT 基 站电缆保护装置寻像器连接组件CAM VF(可选) (至多摄像机系统(高清系统)松下电器(有限公司〔营业、技术服务〕北京市朝阳区光华路甲8号和乔大厦C 座6层邮政编码:100026电话:(010)6562-6688传真:(010)6562-6186〔技术服务、维修〕北京技术服务中心北京市朝阳区光华路甲8号和乔大厦C 邮政编码:100026电话:(010)6562-6688传真:(010)6562-6185成都技术服务中心成都市顺城大街206号四川大厦7层D 座邮政编码:610016电话:(028)8652-1585传真:(028)8652-1585广州市流花路中国大酒店商业大楼13楼邮政编码:510015电话:(020)8667-2130 (020)8667-2131传真:(020)8669-522513楼邮政编码:510015电话:(020)8667-0381传真:(020)8669-5225济南技术服务中心济南市二环东路3218号发展大厦B 座6层D 室邮政编码:250012电话:(0531)8190-8189传真:(0531)8190-8189上海市陆家嘴环路1000号汇丰大厦5楼邮政编码:200120电话:(021)3866-7799传真:(021)3866-7033上海技术服务中心上海市陆家嘴环路1000号汇丰大厦5楼邮政编码:200120电话:(021)3866-7799传真:(021)3866-7033广告主:松下电器(中国)有限公司 北京市朝阳区光华路甲8号和乔大厦C 座6层 广告经营者:天津富士印商贸有限公司 天津市河西区恒华大厦1号楼905室 印刷日: 2009年7月AG-HPX303MCSDI IN视频监视器 BT-LH80WUMC高/标清兼容 电缆保护装置遥控单元AG-EC4MC遥控单元AJ-RC10MC (第三方)摄像机适配器 AG-CA300MC电源: 输入:24V (24~16V) / 4A 外接 DC 输入 12V / 6A DC 输出:13V / 5A 重量: 1.4kg输出: BS OUT (BNC)GENLOCK OUT (BNC) REMOTE (10-针) INCOM (XLR-5)CA VF (D-sub, 15针) RET (BNC)输入: SDI IN (BNC) BS IN (BNC) DC IN (BNC) RET SW (6针) BATTERY IN (2针)标准选件:线缆(遥控线缆、显示器线缆),蓄电池极板基站 AG-BS300MC电源: 输入: AC100-240V / 1.6~0.6A DC 12V / 1.1A输出: DC24V / 4A 重量: 5.0kg功率: 100-240V, 50/60Hz 输出: SDI OUT x 2 (BNC)VIDEO OUT (BNC, 复合) CA OUT (BNC)GENLOCK OUT (BNC, 模拟环通) DC 24V OUTINCOM (XLR-5)输入: INCOM / TALLY (D-sub, 9针) CA IN (BNC)RET VIDEO (BNC, 复合) RET SDI (BNC)GENLOCK IN (BNC) DC IN (XLR-4) AC INREMOTE (10针)格式: 1080 50i 720 50p625 50i遥控单元 AG-EC4MC电源: 12V / 0.21A重量: 610g标准选件: 10针10米遥控电缆 输入/输出: CAM / BS (10针)VIDEO OUT (BNC, 复合)寻像器连接组件 AG-YA500MC电源: ±5.6V / 0.06A 重量: 410g输出: CAM LENS (12针外螺纹)VF (20针内螺纹)输入: LENS (12针外螺纹) CAM VF (20针内螺纹)CAM VF (D-sub,15针)技术参数变更恕不另行通知。
松下 AG-MX70MC数字音视频切换台 说明书

MC4:2:2:4 图像质量,三维数字特技术,串行数字输入输出接口,字幕标题动画——操作简单,高性能价格比A G -M X 70 D i g i t a l A /V M i x e rAG-MX70 数字音视频切换台,是一款一体化2路总线, 8路输入数字视频切换台,具有高级技术指标的多功能数字视频特技和多路音频调音台。
AG-MX70 提供广播级4:2:2:4 数字分量图像质量,超过600种特技图案和30帧图形存储器用于卷边,划像和标志动画以及利用个人电脑下载字符或图像文件。
带有矩阵菜单的大液晶显示屏幕提供的交互操作界面可以保证快捷轻松的操作。
AG-MX70还提供了三维数字特技选件和SDI 接口板, 此切换台非常适用于数字化后期制作。
多功能的AG-MX70 切换台,无论是在数字编辑系统里与DVCPRO 录像机连接,还是在制作机房或现场用作切换台都可大显身手。
4:2:2:4 数字处理,16:9 划像图案AG-MX70 提供高质量的4:2:2:4数字分量信号处理,既能满足16:9也可以使用4:3的图像划像进行后期编辑制作的需要。
醒目的LCD 屏幕, 矩阵菜单醒目的LCD 显示屏使您方便地监测系统运行状态,具有 5 个旋钮操作的矩阵菜单和5 行屏幕显示,使AG-MX70 的大量功能易于操作。
此菜单和操作面板上的按键连在一起,自动切换显示必要的设置,使操作非常简便同时减少设置的步骤。
2D 和3D 视频特技设计超过600 个2D 数字特技效果包括切换、键图案、马赛克、油画、拖尾和多画面数字特级--多功能的AG-MX70具备多种专业需要的功能,产生专业的制作效果。
AG-VE70MC 的3D数字特级板提供超过1600多三维数字特技,包括卷页、水波纹和水晶效果。
2D 和3D 特技可以组合创造复杂的图像表现,与其他多种切换台相比,更具竞争力。
卷边,划像和标题动画MX-Navi 功能使您方便地通过USB 接口下载图形文件(TGA,BMP, JPEG)与其他图形文件完成复杂的画面。