柯达preps5.3
科达Kodak RETINA近距离摄影附件说明书
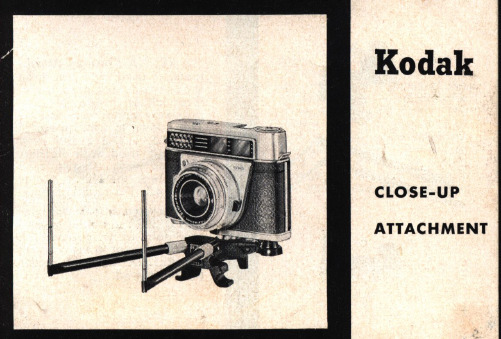
General Instructions for Exposures with R Close-up Lenses
1. Th e R close-up lenses should be screwed on the connecting ring (Cat. No . 62391) .
2. A le ns hood (with supplementary hood, if possible), should be used for all exposures.
3. A change in expbsure time is not required . For best exposures, incide nt light should be metered rather than reflected light. (For incident light readings always clip the diffus inG screen in front of the honeycomb window of your exposure me ter .)
4
Screw the R close-up lens in front of the basic lens of your RETINA camero . The mark on the R lens must conform with the mark on the gauge rods used . For gauge rods 1.5 combine the R 1 : 2 and R 1: 4.5 lenses and screw the combined lenses to the camera, the R1:2 lens next to the camera lens. Filters are screwed to the R close-up lens.
RT标准讲解

吉林亚新工程检测有限责任公司
1 范围 JB/4730的本部分规定了承压设备金属材料受压元件的熔化焊对接接头的 射线和 射线 范围: 的本部分规定了承压设备金属材料受压元件的熔化焊对接接头的X射线和 的本部分规定了承压设备金属材料受压元件的熔化焊对接接头的 射线和γ射线 检测技术和质量分级要求。 本部分适用于承压设备受压元件的制造、安装、在用检测中对接焊 检测技术和质量分级要求。 本部分适用于承压设备受压元件的制造、安装、 接接头的射线检测。用于制作焊接接头的金属材料包括碳素钢、低合金钢、不锈钢、铜及铜合 接接头的射线检测。用于制作焊接接头的金属材料包括碳素钢、低合金钢、 不锈钢、 铝及铝合金和钛及钛合金、镍及镍合金. 金、铝及铝合金和钛及钛合金、镍及镍合金
在长度为在长度为12t的任意选定条形缺陷评定区内相邻缺陷间距不超过的任意选定条形缺陷评定区内在长度为的任意选定条形缺陷评定区内相邻缺陷间距不超过6l的任一组条形缺陷的累计长度应不超过但最小可为但最小可为4的任一组条形缺陷的累计长度应不超过但最小可为iii在长度为6t的任意选定条形缺陷评定区内在长度为的任意选定条形缺陷评定区内相邻缺陷间距不超过3l任一组条形缺陷的累计长度应不超过t但最小可为任一组条形缺陷的累计长度应不超过最小值的规定是考虑防止薄工件评定过严ii级母材小于最小值的规定是考虑防止薄工件评定过严级母材小于12mmiii小于9mm最大值是考虑防止厚工件评定过松级母材大于最大值是考虑防止厚工件评定过松ii级母材大于小于最大值是考虑防止厚工件评定过松级母材大于60mmiii母材大于45mm材大于在球罐设备环缝检测评定时要特别注意多张底片的联合评定在球罐设备环缝检测评定时要特别注意多张底片的联合评定标准规定任意选定条形评定区缺陷很可能跨越多张底片
柯达全胜800III直接制版机
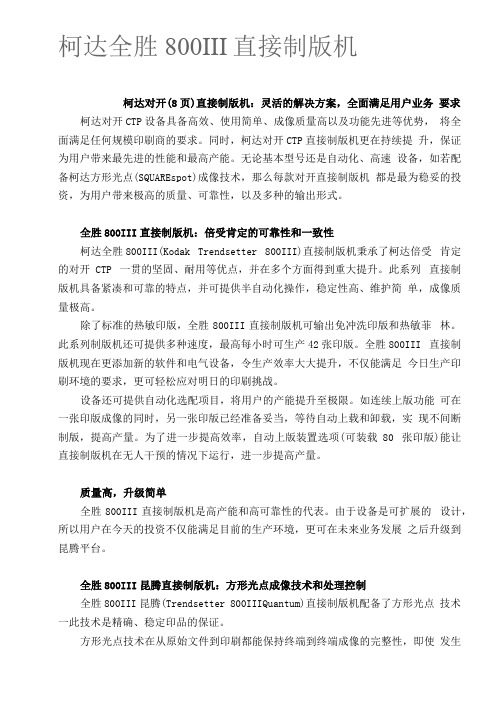
柯达全胜800III直接制版机柯达对开(8页)直接制版机:灵活的解决方案,全面满足用户业务要求柯达对开CTP设备具备高效、使用简单、成像质量高以及功能先进等优势,将全面满足任何规模印刷商的要求。
同时,柯达对开CTP直接制版机更在持续提升,保证为用户带来最先进的性能和最高产能。
无论基本型号还是自动化、高速设备,如若配备柯达方形光点(SQUAREspot)成像技术,那么每款对开直接制版机都是最为稳妥的投资,为用户带来极高的质量、可靠性,以及多种的输出形式。
全胜800III直接制版机:倍受肯定的可靠性和一致性柯达全胜800III(Kodak Trendsetter 800III)直接制版机秉承了柯达倍受肯定的对开CTP 一贯的坚固、耐用等优点,并在多个方面得到重大提升。
此系列直接制版机具备紧凑和可靠的特点,并可提供半自动化操作,稳定性高、维护简单,成像质量极高。
除了标准的热敏印版,全胜800III直接制版机可输出免冲洗印版和热敏菲林。
此系列制版机还可提供多种速度,最高每小时可生产42张印版。
全胜800III 直接制版机现在更添加新的软件和电气设备,令生产效率大大提升,不仅能满足今日生产印刷环境的要求,更可轻松应对明日的印刷挑战。
设备还可提供自动化选配项目,将用户的产能提升至极限。
如连续上版功能可在一张印版成像的同时,另一张印版已经准备妥当,等待自动上载和卸载,实现不间断制版,提高产量。
为了进一步提高效率,自动上版装置选项(可装载80 张印版)能让直接制版机在无人干预的情况下运行,进一步提高产量。
质量高,升级简单全胜800III直接制版机是高产能和高可靠性的代表。
由于设备是可扩展的设计,所以用户在今天的投资不仅能满足目前的生产环境,更可在未来业务发展之后升级到昆腾平台。
全胜800III昆腾直接制版机:方形光点成像技术和处理控制全胜800III昆腾(Trendsetter 800IIIQuantum)直接制版机配备了方形光点技术一此技术是精确、稳定印品的保证。
柯达专业ENDURA Premier纸校准程序说明书

©Eastman Kodak Company, 2012January 2012 • CIS-289CURRENT INFORMATION SUMMARYCalibration Routines for KODAK PROFESSIONAL ENDURA Premier PaperGENERAL INFORMATIONKODAK PROFESSIONAL ENDURA Premier Paper isoptimized for digital printers. Significant testing has been done across a broad range of Kodak Professional and other manufacturers’ digital printers to validate satisfactory digital performance of KODAK PROFESSIONAL ENDURA Premier Paper.Kodak’s Printer Calibrations for KODAK PROFESSIONAL ENDURA Premier PaperT o achieve optimal quality prints on KODAKPROFESSIONAL ENDURA Premier Paper with Kodakdigital output devices such as the KODAK PROFESSIONAL Digital Multiprinter or the KODAK PROFESSIONAL LED II Printer, you must install new calibration files.The latest calibration files for Windows NT and 2000 (V4.3) and Macintosh (V4.3) operating systems areavailable at /go/propapersupport. If your printer does not have the newest calibration files, download and install them at this time. These files currently support:LED and laser printers, including:•KODAK PROFESSIONAL RR 30 Laser Printer •KODAK PROFESSIONAL RP 30 and SRP 30 Laser Printers •KODAK PROFESSIONAL RP 50 LED Printer•KODAK PROFESSIONAL LED II Printers 20R and 20P •KODAK PROFESSIONAL LED Digital Color Printers 20R and 20PCRT printers, including:•KODAK PROFESSIONAL Digital Multiprinters (KPDM & KPDM II)•KODAK DIGITAL SCIENCE LF CRT Color Printer •KODAK 4" CRT Color PrinterNote: New ICC output profiles are also recommended for ENDURA Premier Paper because of its greater color gamut. ICC output profiles can be found at /go/colorprofiles.Other Equipment Manufacturer’s Printer Calibration for KODAK PROFESSIONAL ENDURA PremierPaperThe starting-point recommendations listed in the following table have yielded good image quality in prints on KODAK PROFESSIONAL ENDURA Premier Paper produced by other equipment manufacturers' digital output devices.Calibration Routines for KODAK PROFESSIONAL ENDURA Premier PaperPaper and Output SystemsEASTMAN KODAK COMPANY • ROCHESTER, NY 14650Revised 01-12Calibration Routines for KODAK PROFESSIONAL ENDURA Premier PaperKODAK Publication No. CIS-289Printer CalibrationOce LightJet 430 and 50001.Go to the Oce FTP Site at /PrinterSupport/LJ_Customer_Access.2.Read the "Lightjet Media Read Me" document for information regarding downloading printer aims.3.Select the link to the Media Targets for your Lightjet printer.4.Download the appropriate aim files, as directed in the read-me file.Durst Lambda 130 and 76+Starting D-max: 2.45R, 2.30G, 2.22B (It is possible to obtain higher D-max in images that do not include text.)Basic Calibration settings: Y=91.70, M=81.90, C=0.00, D=116.9Durst Epsilon 30For best results, select HIQ or SIQ mode.Starting D-max: 2.35R, 2.20G, 2.15BBasic Calibration settings: D=0.967, C=0.000, M=0.203, Y=0.159Durst Theta 76Starting D-max: 2.25R, 2.20G, 2.15B,Basic Calibration settings: D=1.452, C=0, M=0.012, Y=0.154Durst Theta 50/51Starting D-max: 2.30R, 2.20G, 2.20BBasic Calibration settings: D=131.00, C=0.0, M=87.00, Y=140.00Durst Zeta Please contact your Durst service representative for the file.Fuji FrontierWe recommend that you use KODAK PROFESSIONAL ENDURA Premier Paper to calibrate the printer channel that you plan to use. If you don't have a recommended channel that you normally use, please start testing with Channel I.1.Load ENDURA Premier Paper into the paper magazine that you will use to print.2.From the Setup and Maintenance menu, select Print Condition Setup and Check . Then select Paper Condition Setup to perform a standard calibration.Noritsu QSS-2711 and Noritsu MP1600Setting up a Channel for KODAK PROFESSIONAL ENDURA Premier Paper1.Set up a paper channel with ENDURA Premier Paper, using the normal Setup procedure. This setup includes MLVA Setup, Uniformity, and Gamma tests.2.If any color changes are needed, enter them using the Magazine Balance function on the NORITSU MP1600 printer.Noritsu QSS 31XX, 32XX, 33XX, 34XX, and R2R printers 1.Contact Noritsu for the software which contains the profile data for KODAK PROFESSIONAL ENDURA Premier Paper.2.If profile data is not available from Noritsu, use the Supra VC channel. Calibrate using the "Registering a New Paper Type and Setup" procedure. Refer to your Noritsu manual.Polielettronica LASERLAB 1.Set these starting Laser Maximum Density values: Y=257, M=236, C=191.2.Starting Color Compensation Values: Y=0.93, M=0.84, C=0.97.3.Proceed with the manufacturer's standard paper calibration procedure. Gretag Netprinter Basic Data required for calibration are available from Gretag Imaging.Sienna Mileca HSP Basic Data required for calibration are available from Sienna Imaging.ZBE ChromiraSelect Kodak on the Emulsion menu, and enter:D-max Aim: 2.45R, 2.45G, 2.40BStarting Calibration Values: (C) 0, (M) 47, (Y) -45, (D) -22 Then follow the standard paper calibration procedure.Kodak, Kodak Professional, Endura, and Supra are trademarks.。
柯达金尊相纸诺日士机器校正
1. 依照诺日士Noritsu彩扩机操作手册概述说明,执行“新相纸类型登记及设定”。
请参阅第 3-3章(见附件)。
2.为柯达金尊数码相纸Premier Digital Paper,选择相纸通道。
在诺日士NORITSU彩扩机上使用柯达金尊数码相纸KODAK Premier Digital Paper3.3 新相纸类型登记及设定 [相纸规格登记/设定]3.3 新相纸类型登记及设定 [相纸规格登记/设定]当要使用新相纸时,必须依照以下步骤执行登记作业,而最多可有三种不同类型的相纸能够同时被登记使用。
进入设定方式如下:在主界面, 按下 F. → 菜单(Menu) → 扩展(Extension) → 设定(Setup) → 激光设定(Laser Setup) →相纸规格登记/设定(Paper Specification Registration/Setup)范例: 相纸规格登记/设定(Paper Specification Registration/Setup) 显示如下如何登记1. 在相纸规格登记/设定画面中, 选择一个新类型的相纸来使用。
最多可有三种不同类型的相纸能被选择。
●当只有一种相纸类型要被登记时,请用第1种来设定。
●当新相纸类型不存在时,请读取相纸类型数据。
细节可参考 ?3.2 读取新相纸的配置文件(Reading the setup data of new paper).范例: 选择相纸类型155:Royal3.3 新相纸类型登记及设定 [相纸规格登记/设定]2. 选择在设定中使用的纸箱。
选择区域的数字与相纸类型的编号相符合。
范例: 纸箱的选择3. 点按 YES: Enter.确认显示。
4. 点按 YES.使用安装新的相纸类型和纸箱登记。
接下来,设置本机能够使用的相纸。
5. 将纸卷放入设定的纸箱,并安装到彩扩机。
有关如何设定相纸的详细信息,请参阅?操作手册–基本操作 -4.2 更换相纸。
1范例: 相纸规格登记/设定画面点按相纸规格登记/设定2 Select the paper type to be set up.2 选择要设定的相纸类型3–93.3 新相纸类型登记及设定 [相纸规格登记/设定]8. 点按 YES:> Next.测试打印的输出及密度仪校正会自动执行。
柯达航空摄影用泛光负片胶片说明书

4. Aerial photographs can be used to locate
'l.X TORK on sensitized materials and equip\' \' men t for aerial photography was started at the Eastman Kodak Company before vVorld \Var 1. During that war, improvements in the sensitivity of photographic materials were made so that, at the time of the Armistice, orthochromatic and panchromatic films, 9t inches by 75 feet, were bei ng man ufactured (1). The most sensitive of these films, Eastman Panchromatic Aero Film, Hypersensitized, could be exposed at about 1/100 second, f/S.6, through a Kodak Wratten Filter No. 25. The K-1 camera was also designed at that time to use this film and is the granddaddy of the large-format automatic aerial cameras of today (2).
柯达胶片
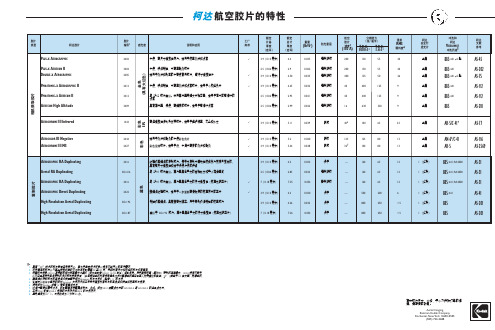
√
7(0.18 毫米)
7.35
0.054
着色明胶
—
160
63
12
超精细纹理胶片,适用于一步复制高清晰度的航空底片或正片
√
3.9(0.10 毫米)
4.2
0.030
快干
—
500
200
6
颗粒极其精细,具有超高分辨率,用于复制极细颗粒的航空胶片
3.9(0.10 毫米)
4.26
5
表I 具有 ESTAR 片基的黑白胶片
三种不同厚度的 ESTAR 片基 (2.5 密耳、3.9 密耳、7 密耳)导致卷在标准航空胶片卷筒上的胶片长度也各不相 同。下面的部件列表说明了每种类型的胶片提供的标准长度。
胶片 规格 编号
4922 4932 4942 5332 536
5272 514 5282 530 5352
50 英尺 100 英尺 200 英尺 500 英尺 500 英尺
40 英尺 75 英尺 150 英尺 350 英尺 350 英尺
—
— 100 英尺 200 英尺 200 英尺
70 毫米 70 毫米 70 毫米 70 毫米 70 毫米
1,000 英尺 1,000 英尺 2,000 英尺 2,000 英尺
931 991 883 8973
884 8983 886 8993
949 952 9814 955
957 961 960
胶片 宽度
胶片长度 ( 无 导 片 或 拖 片)
ESTAR 薄 片基
( 2.5 密 耳)
ESTAR 片基 ( 3.9 密 耳)
ESTAR 厚 片基
(7 密 耳)
70 毫米 70 毫米 70 毫米 70 毫米 70 毫米
RT第四章 射线检测

γ射线的能量是由放射性同位素种类决定的并 且不可改变,由于其能量较高,在透照薄工件时会 出现灵敏度下降的情况。每一种放射性同位素源有 其适用的透照厚度范围,在低于该范围下限使用时, 其灵敏度将急剧下降。因此,为了保证γ射线照相 灵敏度,需要对其透照厚度下限进行控制。换句话 说,通过对透照厚度下限的控制来限制对γ射线源 种类的选择。JB/T4730.2-2005规定了γ射线源或 高能(1MeV以上)X射线适用的透照厚度范围如表 4-1。 表4-1 γ射线源和能量1MeV以上X射线设备的 透照厚度范围(钢、不锈钢、镍合金等)
第四章射线检测工艺 4.1检测工艺的概念 射线检测工艺是指为实现射线检测目的并达到一定 要求而对射线检测活动规定的方法、程序、技术参数和 技术措施等,也泛指详细说明上述方法、程序、参数和 措施的书面文件。由于不同企业的检测对象、检测环境、 设备能力、检测手段以及操作人员的素质等因素不同, 即使对于相同的检测对象,不同的企业编制的检测工艺 可能是不同的。换句话说,就某一检测对象而言,检测 工艺并不是唯一的。尽管相同检测对象可能会有不相同 检测工艺,但是,检测工艺的编制应遵循一定的原则: 满足相关的法规和标准的要求;技术上的先进和经济上 的合理。
4.2射线检测工艺条件的选择 工艺条件是指工艺中的有关参变量及其组合。射线检 测工艺条件包括设备器材条件、透照几何条件、工艺 参数条件和工艺措施条件等。本节讨论一些主要的工 艺条件对射线照相质量的影响及应用选择原则。
4.2.1射线源、能量和胶片系统的选择 1.射线源及能量的选择 选择哪种射线源和多大能量进行透照,一般应考 虑的因素包括射线穿透力和照相灵敏度。应依据被检 工件的材质、采用的透照方式、透照厚度,同时还应 结合不同种类射线源设备的特点、检测环境条件等因 素进行综合考虑,合理选择。 选择射线源和能量需考虑的首要因素是射线源所 发出的射线对被检试件具有足够的穿透能力,即保证 穿透。 X射线能量取决于X射线管两端的电压,随着管电 压的升高,X射线的平均波长变短,有效能量增大,线 质变硬,穿透能力增强。对于γ射线来说,穿透力取 决于放射线源种类。由于放射性同位素发出的射线能 量比较高,因此可以穿透很厚的材料。
柯达 EasyShare V530 变焦数码相机 说明书

用户指南
关于互动式教学,请访问 /go/howto 关于相机帮助,请访问 /go/v530support
Eastman Kodak Company Rochester, New York 14650 © Eastman Kodak Company, 2005
安装软件 ........................................................................................ 12 使用相架底座二代传输照片 .......................................................... 13 使用 USB 电缆传输照片 ................................................................. 13 同样适用于传输 ............................................................................. 14 打印照片 ........................................................................................ 14 相机的底座兼容性 ......................................................................... 17 使用光学变焦 ................................................................................. 18 更改闪光灯设置 ............................................................................. 19 照片拍摄模式 ................................................................................. 20 放映幻灯片 .................................................................................... 23 裁切照片 ........................................................................................ 26 从录像生成照片 ............................................................................. 26 查看照片/录像信息 ........................................................................ 27 使用柱状图查看照片亮度 .............................................................. 27 复制照片和录像 ............................................................................. 28
柯达Retina自动相机系列说明书
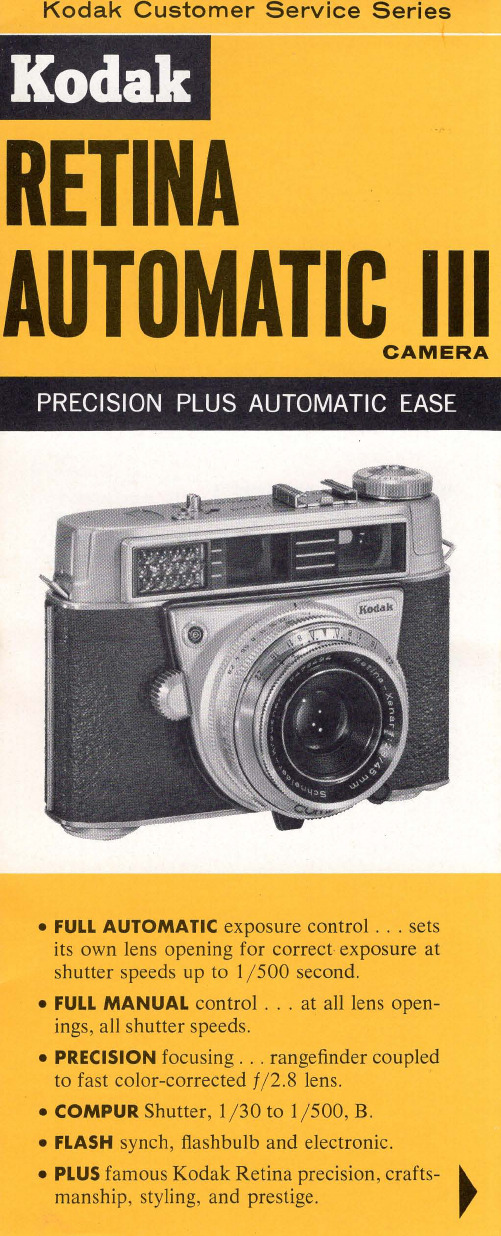
• FULL MANUAall shutter speeds.
• PRECISION focusing ... rangefinder coupled
to fast color-corrected f/ 2.8 lens.
• COMPUR Shutter, 1/ 30 to 1/ 500, B.
But, equally important, you must always be able to impose control. You must be in charge, not the slave of the camera. And this is where the Kodak Retina Automatic III differs from many other "automatic" cameras.
Orient the camera snugly in your hands. Sense its balance and firm, solid feel. Look in a mirror; this camera looks good on you. Every detail speaks excellence, and you will wear it proudly anywhere.
Why own an automatic camera?
Simply because the important thing is always the picture. If you can get rid of all the labor of exposure computations and settings, you're free to concentrate on the subject, the composition - the picture.
柯达 EasyShare 照片打印机 500 说明书
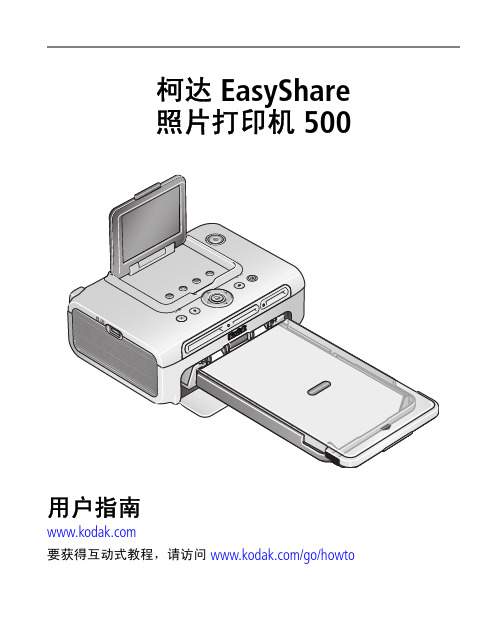
柯达 EasyShare用户指南要获得互动式教程,请访问/go/howtoEastman Kodak CompanyRochester, New York 14650© Eastman Kodak Company, 2005所有屏幕影像均为模拟影像。
蓝牙文字标志和徽标属 Bluetooth SIG, Inc. 所有,任何对此类标志的使用都必须得到许可。
®Wi-Fi是 Wi-Fi Alliance 的注册商标。
伊士曼柯达 (Eastman Kodak) 公司是 CompactFlash 商标的授权使用者。
柯达 (Kodak)、EasyShare 和 XtraLife 是伊士曼柯达 (Eastman Kodak) 公司的商标。
P/N 4J3801_zh-cn/go/support i1LCD10进纸托盘门2电源按钮/指示灯11CF 存储卡插槽3色带盒指示灯 12蓝牙按钮/指示灯4消除红眼按钮/指示灯13取消按钮5传输按钮/指示灯 14相纸指示灯6打印按钮/指示灯 左/右和上/下控件1516USB 设备接口Menu (菜单)按钮78SDIO 存储卡插槽SD/MMC/记忆棒/xD 存储卡插槽1718旋转按钮放映幻灯片按钮9进纸托盘19裁切按钮产品功能1电源接口(直流输入) 4过纸道槽2USB 接口(至计算机) 5色带盒释放杆3通风口 6色带盒(如图示安装)7色带盒盖ii /go/support/go/supportiii目录1 使用入门 (1)为照片打印机安排一个合适摆放位置.............................................1连接电源..........................................................................................2处理与存放色带盒...........................................................................2安装和取下色带盒...........................................................................3处理与存放相纸...............................................................................4装入相纸..........................................................................................5安装进纸托盘...................................................................................62 不使用计算机进行打印 . (7)从存储卡或 USB 闪存盘打印...........................................................7从 PictBridge 兼容设备打印..............................................................8打印已标记的 (DPOF) 照片...............................................................93 关于照片打印机的其它操作 . (10)消除照片中的红眼效果..................................................................10旋转您的照片.................................................................................11放映幻灯片....................................................................................11裁切照片........................................................................................11更改打印照片的尺寸.....................................................................12更改色彩模式.................................................................................14检查耗材量....................................................................................15打印已标记的打印照片..................................................................15检查无线设置.................................................................................15更改语言........................................................................................15更改默认设置.................................................................................16查看“关于”屏幕 (16)目录4 通过计算机使用照片打印机 (17)安装软件 (17)连接到计算机 (19)从存储卡插槽传输照片 (20)从 USB 设备传输照片 (21)从计算机打印 (22)取消打印 (24)5 使用照片打印机的无线功能 (25)从启用蓝牙®无线技术的设备打印照片 (25)通过 Wi-Fi 无线网络打印和传输 (27)6 保养与维护 (31)常规维护 (31)清洁进纸辊轮 (32)携带照片打印机外出 (32)7 故障排除 (33)打印故障 (33)传输/通讯问题 (40)无线网络连接 (41)状态指示灯 (41)有用的链接 (46)电话客户支持 (47)8 附录 (49)照片打印机规格 (49)无线频道 (50)重要安全事项 (51)升级软件和固件 (51)其它维护和保养 (52)保修 (52)监管信息 (54)iv /go/support1使用入门为照片打印机安排一个合适摆放位置■将照片打印机放在一个平坦、干净、无尘、干燥且避免阳光直射的位置。
柯达健康、安全和环境(HSE)供应商规范说明书

EKSP-2285,版本7.12021年6月8日柯达健康,安全和环境(HSE)产品,零件和包装规格目录1.0 目的 (2)2.0 范围 (2)3.0 供应商责任 (2)4.0 定义 (4)5.0 电气和电子设备(EEE)要求 (6)6.0 物品要求 (10)7.0 化学品要求 (12)8.0 包装要求 (15)9.0 附录 (19)附录A –电气和电子设备:受限材料 (19)附录B -物品:受限材料 (20)附录C -化学品:受限材料 (21)附录D –包装:限制材料 (22)附录E –扩展的化学物质清单,其化学文摘社(CAS)编号 (23)附录F –关键组件的安全可追溯性要求 (36)附录G –包装参考 (37)附录H –包装中重金属的测试和取样说明 (38)附录I –修订历史 (38)1.目的伊士曼柯达公司(柯达)期望柯达提供的产品在制造,分销和销售期间均符合所有适用的法律要求。
供应商产品还必须满足超出合规性的其他柯达要求,以减少柯达产品对环境的影响。
“EKSP-2285,柯达健康,安全,以及产品,配件,包装环境(HSE)规范”文件的目的是向供应商沟通柯达的产品要求。
本文档会定期修订。
供应商应符合最新的柯达规范,该规范始终可以在/go/hsesupplier上找到,供应商也应满足最新的法律要求,这些要求可能尚未反映在柯达规范中。
产品要求文件(PRD),工程图或其他文件也可用于传达适用于柯达产品特定要求的详细信息。
健康,安全和环境(HSE)供应商绩效标准中提供了有关柯达对供应商期望的其他指南,该指南可在以下网站找到:/go/hsesupplier2.范围EKSP-2285 适用于提供给柯达的所有产品以及制造这些产品所使用的材料,与生产地点无关。
要求适用于柯达和非KODAK品牌的产品,并且取决于产品类型。
EKSP-2285 为以下类型产品规定了HSE要求:•电气电子设备产品•物品•化工产品•包装3.供应商责任3.1.制造要求:3.1.1制造/出口许可:供应商必须从监管机构和其他政府组织获得并保持任何必要的批准和授权,才能在其制造国/从其制造国/地区进行出口。
柯达报业CTP设备的曝光精度的说明
柯达报业CTP设备的曝光精度的说明报业对CTP的追求在早期表现为:实效性-速度;可靠性-设备稳定、售后服务及时性、要求供应商有高品质的服务保障体系;现如今,随着网络、广播、电视等电子媒体的冲击,报业如何在面对市场竞争环境下求得生存、发展,对生产成本的考量及印刷品质的追求变得更重要了。
柯达报业CTP的发展在保留了商业印刷精度的前提下,速度也有了巨大的提高,如140多张对开版/小时的报业新一代CTP,而且拥有从低端到高端的全方位的系列产品;这里着重解释一下为什么柯达同是1200分辨率的热敏CTP,可以产生175线的印版?柯达方型光点的热敏激光头具备的1200DPI的精度代表如下含义:在一英寸的板材长度上可以成像的独立激光点达到1200个,每个光点在印版上的最小尺寸为25400/1200=21.6微米的正方形。
这个DPI与从前在照排机时代所说的DPI是有本质区别的,后者是指激光头在丝杠上移动时所能产生的激光束的分辨率,而由于存在着激光束本身的光点形状的差异(例如圆形)、激光束能量的分布特性(例如高斯型能量分布, 如紫激光CTP)以及达到印版上的光点的精度下降等原因,使得印版上得到的光点精度远远低于激光束在丝杠上的所谓精度。
在当前的ctp市场上,由于历史等多种原因,存在着上述两种DPI概念共存的现象。
供应商声称的CTP精度究竟是哪种概念是选择设备的关键,判断的方法可以通过软件测试的方法,也可以采用数学公式推算,例如,如果供应商声称报业CTP的分辨率1200-2400DPI的光点精度,则所对应的在印版上的最小光点尺寸应该是25400/2400=10.6X10.6微米,这在报纸印刷或是商报两用的印刷上,紫激光是实现不了的。
再来说说加网线数的问题,许多CTP设备的供应商都宣传加网精度为175线、200线、300线甚至更高,这里且不说这样的线数在实际的纸张、印版、印刷速度下的可行性,先应该问问能够表现的层次有多少?按传统的加网与光点的精度换算法,加网精度/加网线数=16;(因16X16=256灰梯级),则如果要达到175线,必须要制版设备达到175X16=2800DPI的实际光点精度,考虑到前述的丝杠精度与实际曝光点精度之间的差异,恐怕CTP供应商们的精度还要远远高于2800DPI才行。
柯达VISION3 500T彩色底片5219 7219技术数据说明书

KODAK VISION3 500TCOLOR NEGATIVE FILM 5219 / 7219TECHNICAL DATA / COLOR NEGATIVE FILM MARCH 2022H-1-5219 KODAK VISION3 500T Color Negative Film 5219 / 7219 givesyou control and flexibility at every phase of the filmmakingprocess—from capture through post, in both digital andtraditional workflows.KODAK VISION3 500T Film has outstanding skin tones andcolor reproduction, while adding technical innovations thatimprove product performance and increase productversatility. The proprietary, advanced Dye LayeringTechnology (DLT) provides noticeably reduced grain inshadows, allowing you to pull out an amazing amount ofshadow detail. The proprietary Sub-Micron Technologyenables 2 stops of extended highlight latitude, so you canfollow the action into bright light-in a single shot-withoutworrying about blown-out details.KODAK VISION3 500T Film is designed to extend thecapabilities of the DI (digital intermediate) process. Theimproved grain provides better to signal to noisecapabilities allowing the colorist to provide greater detail inshadows, while the extended highlight latitude enablesimproved digital "dodging and burning" to provide moredetails in highlights.BaseKODAK VISION3 500T Color Negative Films 5219 and 7219have an acetate safety base with rem-jet backing.StorageStore unexposed film at 13 C (55 F) or lower. For extendedstorage, store at -18 C (0 F) or lower. Process exposed filmpromptly.Store processed film according to the recommendations inISO 18911:2010, Imaging Materials - Processed SafetyPhotographic Films - Storage Practices.Short Term (less than 6 months)Long Term (more than 6 months)Unexposed film in original, sealedpackage13 C (55 F)RH below 60%-18 C(0 F)RH below 50%Exposed film, unprocessed-18 C(0 F)RH below 20%Not recommended.Process filmpromptly.Process film21 C (70 F)RH 20 to 50%2 C (36 F)RH 20 to 30%This relates to optimized film handling rather than preservation; static, dust-attraction and curl-related problems are generally minimized at the higher relative humidity. After usage, the film should be returned to the appropriate medium- or long-term storage conditions as soon as possible. Warm-up TimesTo prevent film telescoping, moisture condensation, and spotting, allow your film to warm to room temperature (21C/70F) before use:Film PackageRecommended Warm-up Time (Hours)8 C (15 F) Rise 39 C (70 F) Rise8 mm 1 1 ½16 mm 1 1 ½35 mm 3 5For more information about film storage and handling, see ANSI/PIMA ISO-18911, SMPTE RP131-2002, andKODAK Publication No. H-845, The Essential Reference Guide for Filmmakers, available online at/go/referenceguide.Darkroom RecommendationsDo not use a safelight. Handle unprocessed film in total darkness.ExposureExposure IndexesTungsten (3200K) - 500Daylight - 320 (with 85 filter))Use these indexes with incident or reflected light exposure meters and cameras marked for ISO or ASA speeds or exposure indexes. These indexes apply for meter readings of average subjects made from the camera position or for readings made from a gray card of 18 percent reflectance held close to and in front of the subject. For unusually light or dark colored subjects, decrease or increase the exposure i ndicated by the meter accordingly.Color BalanceThese films are balanced for exposure with tungsten illumination (3200K). You can also expose them with tungsten lamps that have slightly higher or lower color temperatures (+/- 200K) without correction filters since final color balancing can be done in post-production.Tungsten (3000 K)None 500Tungsten (3200 K) None 500 KINO FLO 29KINO FLO 32 None 500Daylight (5500 K) WRATTEN 2 OpticalFilter / 85320Metal Halide WRATTEN 2 OpticalFilter / 85320H.M.I. WRATTEN 2 OpticalFilter / 85320KINO FLO 55 WRATTEN 2 OpticalFilter / 85320Fluorescent, WarmWhite † CC30R + CC05M 320 Fluorescent, CoolWhite † CC40R 160* These are approximate corrections only. Make final corrections during printing.† These are starting-point recommendations for trial exposures. If the kind of lamp is unknown, a KODAK WRATTEN2 Color Compensating Filter CC30R + CC20Y can be used with an exposure index (EI) of 250. Note: Consult the manufacturer of high-intensity ultraviolet lamps for safety information on ultraviolet radiation and ozone generation.Exposure Table-Tungsten IlluminationAt 24 frames per second (fps), 180-degree shutter opening, use this table for average subjects that contain a combination of light, medium, and dark colors:Lens Aperture f/1.4f/2f/2.8f/4f/5.6f/8f/11f/16FootcandlesRequired510204080160320640 Reciprocity CharacteristicsYou do not need to make any filter corrections or exposure adjustments for exposure times from 1/1000 of a secondto 1 second.ProcessingProcess in Process ECN-2.Most commercial motion-picture laboratories provide a processing service for these films. See KODAK Publication No. H-24.07, Processing KODAK Color Negative Motion Picture Films, Module 7 available online at/go/h24, for more information on the solution formulas and the procedure for machine processing these films. There are also pre-packaged kits available for preparing the processing solutions. For more information on the KODAK ECN-2 Kit Chemicals, check Using KODAK Kit Chemicals in Motion Picture Film Laboratories KODAK Publication No. H-333, availableonline at /go/h333.IdentificationAfter processing, the product code numbers 5219, or 7219 emulsion, roll, and strip number identification, KEYKODE Numbers, and manufacturer/film identification code (EJ) are visible along the length of the film.Post-ProductionScanningThe wider exposure latitude in KODAK VISION3 Films differentiate film capture from the limited dynamic range of digital capture. Digital "dodging and burning," a very powerful tool in the colorists' toolkit, is now even more powerful—up to two stops more image information canbe extracted from scene highlights in VISION3 Films.If traditional 10-bit scanner data encoding schemes are used to digitize films having this extended density range, highlight information captured on these films could be lost. Kodak has recommendations for extracting the full density range stored on highdynamic range films in a technical document titled Scanning Recommendations for Extended Dynamic Range Camera Films, available online at/go/scanning.Laboratory Aim Densities (LAD)To maintain optimum quality and consistency in the final prints, the laboratory must carefully control the color timing, printing, and duplicating procedures. To aid in color t iming and curve placement, negative originals should be t imed relative to Laboratory Aim Density (LAD) Control Film. The LAD Control Film provides both objective sensitometric control a nd subjective verification of the duplicating procedures used by the laboratory.In the LAD Control Method, the electronic color analyzer used for color timing is set-up with the LAD Control Film to produce a gray video display of the LAD patch, corresponding to 1.0 neutral density (gray) on the print. The negative printing original is then scene-to-scene timed. There are specific LAD values for each type of print or duplicating film that the original can be printed on. For print films, the LAD patch is printed to a neutral gray of 1.0 visual density. For duplicating films, the specified aims are at the center of the usable straight-line portion of the sensitometric curve of the film.Due to normal variations in exposure and processing of color negative films, particular scenes may not print exactly at the same printer lights as the LAD Control Film. The LAD Control Film is intended as a set-up tool for electronic color analyzers and printers. It is NOT a reference that every scene must match. Normal film-to-film and scene-to-scene exposure variability is accommodated by the color timing (grading) process, on an electronic color analyzer set up with the LAD Control Film. Normally exposed and processed color negatives will typically print well within the range of an additive printer setup with the LAD Control Film, although SIGNIFICANT or UNEXPECTED departures from this center point balance may indicate an exposure/filtration problem with the cinematography or with the process control. Some specialized films and/or specialized negative processing techniques (push-processing, pull-processing, "skip-bleach" processing, etc.) may require more extreme adjustment from the LAD printing condition to attain desired results.More information is contained in KODAK Publication H-61,Image StructureFor more information on image-structure characteristics, see KODAK Publication No. H-845, The Essential Reference Guide for Filmmakers available online at /go/referenceguide .Modulation Transfer FunctionThe "perceived" sharpness of any film depends on various components of the motion picture production system. The camera and projector lenses and film printers, among other factors, all play a role. But the specific sharpness of a film can be measured and is charted in the Modulation Transfer Function Curve.This graph shows a measure of the visual sharpness of this film. The x-axis, “Spatial Frequency,” refers to the number of sine waves per millimeter that can be resolved. The y-axis, “Response,”corresponds to film sharpness. The longer and flatter the line, the more sine waves per millimeter that can be resolved with a high degree of sharpness — and the sharper the film.rms GranularityThe “perception” of the graininess of any film is highly dependent on scene content, complexity, color, and density. Other factors, such as film age, processing,exposure conditions, and telecine transfer may also have significant effects.Read with a microdensitometer, using a 48-micrometre aperture. To find the rms Granularity value for a given density, find the density on the left vertical scale and follow horizontally to the characteristic curve and then go vertically (up or down) to the granularity curve. At that point, follow horizontally to theGranularity Sigma D scale on the right. Read the number and multiply by 1000 for the rms value.Note: This curve represents granularity based on modified measuringtechniques. Sensitometric and Diffuse RMS Granularity curves are produced on different equipment. A slight variation in curve shape may be noticed.SensitometryThe curves describe this film's response to red, green, and blue light. Sensitometric curves determine the change in density on the film for a given change in log exposure.Spectral SensitivityThese curves depict the sensitivity of this film to the spectrum of light. They are useful for determining,modifying, and optimizing exposure for blue- and green-screen special-effects work.Spectral Dye-Density CurvesThese curves depict the spectral absorption of the dyesformed when the film is processed. They are useful for adjusting or optimizing any device that scans or prints the film.Note: Cyan, Magenta, and Yellow Dye Curves are peak-normalized.Note: The sensitometric curves and data in this publication represent product tested under the conditions of exposure and processing specified. They are representative of production coatings, and therefore do not apply directly to a particular box or roll of photographic material. They do not represent standards or specifications that must be met by Eastman Kodak Company. The company reserves the right to change and improve product characteristics at any time.Available Roll Lengths and FormatsSee Kodak Motion Picture Products Catalog at /go/mpcatalog To order film in the United States and Canada, call 1- 800-356-3259, prompt 3.Worldwide customers can find the nearest sales office at /go/salesofficesKODAK VISION3 500T Color Negative Film 5219 / 7219KODAK Publication No. H-1-5219 Kodak, Keykode, Vision, and Wratten and the Kodak logo are trademarks.Revised 3-22© 2022 EASTMAN KODAK COMPANY。
美式影调——柯达EasyShare Z915
美式影调——柯达EasyShare Z915
佚名
【期刊名称】《《新潮电子》》
【年(卷),期】2009(000)007
【摘要】实用主义至上——来自大洋彼岸的柯达一直秉承这这样的理念来延续这个影像巨人的数码时代。
不过美国人似乎没有亚洲人的风花雪月,在产品设计上往往缺少了一丝细腻。
典型的美式审美风格,让柯达成为亚洲影像市场上一位金发碧眼的“外乡人”。
【总页数】2页(P90-91)
【正文语种】中文
【中图分类】TB82
【相关文献】
1.柯达EasyShare P712体验美式大炮 [J],
2.超小巧长焦:KODAK EASYSHARE Z915 [J],
3.KODAKZ915美式影调柯达EasyShare Z915 [J],
4.Kodak EasyShare Z915 IS [J],
5.影调抒情浓淡有致(九)——影调在摄影中的应用 [J], 魏德忠
因版权原因,仅展示原文概要,查看原文内容请购买。
扫描仪复印机参数
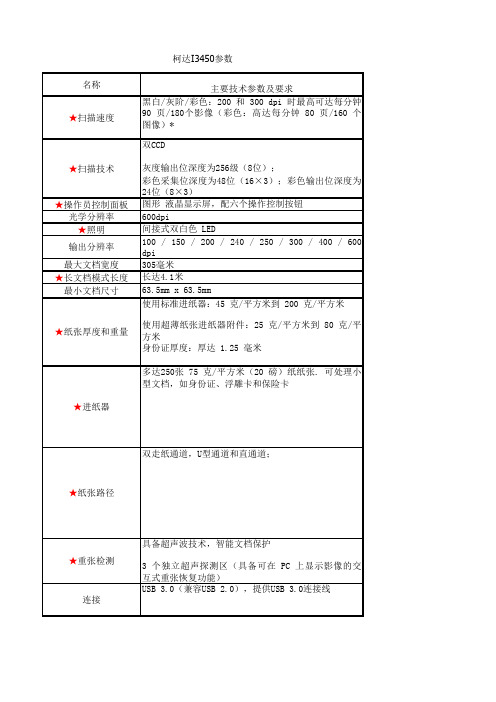
名称主要技术参数及要求★扫描速度黑白/灰阶/彩色:200和300dpi时最高可达每分钟90页/180个影像(彩色:高达每分钟80页/160个图像)*双CCD灰度输出位深度为256级(8位);彩色采集位深度为48位(16×3);彩色输出位深度为24位(8×3)★操作员控制面板图形 液晶显示屏,配六个操作控制按钮光学分辨率600dpi★照明间接式双白色 LED输出分辨率100/150/200/240/250/300/400/600 dpi最大文档宽度305毫米★长文档模式长度长达4.1米最小文档尺寸63.5mm x 63.5mm使用标准进纸器:45 克/平方米到 200 克/平方米使用超薄纸张进纸器附件:25克/平方米到80克/平方米身份证厚度:厚达 1.25 毫米★进纸器多达250张75克/平方米(20磅)纸纸张.可处理小型文档,如身份证、浮雕卡和保险卡★纸张路径双走纸通道,U型通道和直通道;具备超声波技术,智能文档保护3个独立超声探测区(具备可在PC上显示影像的交互式重张恢复功能)连接USB 3.0(兼容USB 2.0),提供USB 3.0连接线柯达I3450参数★扫描技术★纸张厚度和重量★重张检测★捆绑软件JOYsail 批量扫描处理软件;TWAIN 、ISIS 、WIA 驱动程序;Kodak Capture LE(限定版)软件;智能触控;Nuance PaperPort 和OmniPage 。
(可从kodak 网站获取 LINUX SANE 和 TWAIN 驱动程序)★影像处理功能(位于扫描仪内)完美页面扫描;智能阈值处理;自适应阈值处理;3个传感器的智能文档保护、交互式操作员控制面板(OCP)、条形码读取器;纠偏;自动裁剪;相对裁剪;固定裁剪;添加/删除边界;电子滤色;双流扫描;增强型色彩管理;增强型色彩调整;亮度和对比度调整;自动调整方向;自动彩色探测;背景色平滑;智能填满影像边缘;影像合并;基于内容的空白页探测;条纹过滤;填满圆形/矩形孔;锐化过滤;自动亮度;自动白平衡;全色滤色;多色彩滤色;长文档扫描(高达 5.3米),连续扫描模式,自动颜色检测、补丁码、自动照片裁剪、黑白影像分区处理TIFF/多页TIFF 、PDF 、RTF 、TXT 、可搜索PDF 、PDF-A (Kodak Capture Pro Software )、电子邮件、打印机、Microsoft Sharepoint Server 和、Microsoft Word文件、网络文件夹以及驱动器★附件(必须标配)A3尺寸零边距平板附件★附件(可选)柯达Legal 尺寸平板附件;柯达A3尺寸平板附件;文档印刷附件(多达40个字母数字字符的背面扫描后印刷,具有 11 个印刷位置)电力需求100-240 伏(国际),50/60 赫兹成像:< 130 瓦特休眠模式:< 1.5 瓦特关闭:< 0.5 瓦环境因素符合“ENERGY STAR ”(能源之星)标准的扫描仪,操作温度:10–35°C (50–95°F),操作湿度:15%到76% 相对湿度Windows XP 、Windows 7(32和64位)Windows 8(32和64位)、Windows 8.1(32和64位)、Linux Ubuntu 14.04 (LTS)**(32 和 64 位)耗材进纸模块、分纸模块、进纸滚筒、滚筒清洁垫、静电布尺寸重量:15.8公斤(12磅)深度:371毫米(14.6英寸),不包括输入托盘和输出托盘;宽度:431.8毫米(17英寸)高度:237.5毫米(9.4英寸),不包括输入托盘支持的操作系统支持的操作系统文档格式输出和目的地耗电量松下7057参数接口USB2.0售后及资质要求一年硬件免费质保.一年免费上门服务,全国联保.执证工程师上门安装调试.提供厂家针对本项目的授权函及售后服务承诺函。
Zip照片打印机

Zip照片打印机
佚名
【期刊名称】《新潮电子》
【年(卷),期】2015(0)6
【摘要】Polaroid推出的这款全新的便携打印设备zip支持通过iOS和Android 的App进行照片打印,可打印2×3英寸的照片,体积与手机相仿,可以随身携带。
【总页数】1页(P72-72)
【关键词】照片打印机;Zip;打印设备;App;iOS;zip
【正文语种】中文
【中图分类】TP334.8
【相关文献】
1.个人照片打印机性价比新高EPSON Stylus Photo R210照片打印机 [J],
2.照片打印机的进化论——利盟P450照片打印机 [J],
3.专业质量的照片打印机呈妍炫彩S400热升华照片打印机 [J], 师毅
4.佳能SELPHY DS700便携式照片打印机/佳能PIXMA iP90便携式照片打印机[J], 无
5.12款主流照片打印机横向测试:透视照片打印——照片打印机群雄争霸 [J], 顶曦
因版权原因,仅展示原文概要,查看原文内容请购买。
柯达NPS2500彩色数字印刷机成像滚筒使用技巧

柯达NPS2500彩色数字印刷机成像滚筒使用技巧
李颖
【期刊名称】《印刷世界》
【年(卷),期】2012(000)008
【摘要】柯达NPS2500型彩色数字印刷机,其成像滚筒的理论使用寿命为36万印,但在使用过程中如果不加以注意则很难达到此印刷量。
成像滚筒的好坏不仅影响产品质量,同时它也是打印成本增加的一个重要因素。
因此,在使用过程中不仅要严格按照操作规范进行,还要从维护、使用等各个方面加以注意才能使成像滚筒的使用寿命发挥到最大。
笔者在生产中总结了如下一些技巧。
【总页数】2页(P34-35)
【作者】李颖
【作者单位】西安日报社印务中心
【正文语种】中文
【相关文献】
1.柯达鼎盛1000数字印刷机落户中国大恒(集团)有限公司
2.柯达:卓越技术r带来更多数字印刷机遇
3.先认识它,再驾驭它——静电成像数字印刷机的成像原理
4.Disc Graphics引进柯达NexPress数字印刷机
5.柯达按需数字印刷机荣获最佳产品奖
因版权原因,仅展示原文概要,查看原文内容请购买。
- 1、下载文档前请自行甄别文档内容的完整性,平台不提供额外的编辑、内容补充、找答案等附加服务。
- 2、"仅部分预览"的文档,不可在线预览部分如存在完整性等问题,可反馈申请退款(可完整预览的文档不适用该条件!)。
- 3、如文档侵犯您的权益,请联系客服反馈,我们会尽快为您处理(人工客服工作时间:9:00-18:30)。
柯达preps5.3教程
首先要安装好柯达preps5.3:打开软件选择新建模板,这主要选择的是装订样式,根据自己要拼的文件来选择。
进入以后,主要选择印刷方式、宽度和高度(这里的尺寸就是我们要拼的小页尺寸加上角线空隙的尺寸)。
再下面是印张边到孔中心的距离,这我们一般都不要所以把尺寸填大点,把它移到页面外这样打印PS就打不到了。
侧拉规位置
也不常用,选择无就行了。
再后来就是中心标记的长度常用3mm就OK了。
这时点模板选择创建拼版(ctrl+m)。
这时就要填上成品大小(也就是小页大小),拼版页面数量,根据自己要拼多少来决定。
后面再把折叠标记的长度改成3mm。
小页就拼到大版里面了,再根据自己的要求改好空隙和页码,再加入裁切线就好了,保存模版文件。
现在我们开始把要拼的PDF文件置入模板,打开文件列表工
具,先添加文件、再选择对应的模板文件。
选择好模板以后一定要点一下自动选择工具。
在拼好的文件中选中大版文件后选择设备(这一步很重要,能不能输出PS就看这步了。
)这是要选择一个虚拟打印机,为输出PS用的。
设置好以后就可以输出PS文件了。
大功告成只要直接输PS就OK了.
上面的教程写的哪里不好请大家多多谅解,如果有需要PJ 软件的可以和我联系,QQ:1727 123 666。
