博朗 330S-4中文说明书
博朗5140s中文说明书

博朗5140s中文说明书一、博朗剃须刀的使用方法1、充电充电时间在3-6小时左右。
一次充电后,剃须刀可使用时间,根据您的胡须浓密有所不同。
请注意,只有经过数次充放电循环后,才能达到充电容量。
2、剃须方法剃须刀浮动式网膜自贴合您的皮肤表面提供更为贴面、顺畅的剃须。
启动长须修剪器,可以修剪鬓发和络鳃胡。
剃须刀与皮肤垂直呈90度,拉紧您的皮肤并逆着胡须生长方向剃须,同时更换网膜和刀头,可获得较少皮肤刺激的贴面剃须效果。
3、剃须时间普通剃须需要温水洗脸后。
加剃须育使用效果理想。
而电动剃须刀应该在洗脸前剃须效果,由于皮肤在水洗后会略微膨胀,我们建议您在洗脸之前剃须。
二、博朗剃须刀清洗保养1、普通清洗清洁前先拔掉电源插头。
关闭剃须刀,拆卸网膜架,然后用刷子刷净刀头和网膜架内部区域的。
注意切勿用刷子清洁剃须刀网膜,否则会导致网膜破损。
2、流水清洗防水剃须刀,每次剃须后,启动剃须刀,将它放在流动的热水进行剃须刀头部清洗。
有时可以使用肥皂(不含颗粒和磨损性物质的天然液体皂)清洗,洗净后可以继续运转剃须刀一段时间。
或拆下剃须刀网膜、刀头、风干所有部件。
3、自动清洗自动型剃须刀。
只要将剃须刀放入清洗器,通电选择清洗程序就可以自动完成清洗和充电工作,使清洁更加便捷。
4、常规保养每4个星期左右使用博朗喷雾清洁剂清洁刀头起到杀菌保养作用,在长须修剪器、造型器和网膜上滴加少量轻机油。
5、电池保养为了保持电池充电的效果,剃须刀必须约每6个月完全放电一次(通过正常使用的*放电),然后再完全充电,不宜长时间将剃须刀暴露于温度高于50摄氏度的环境中。
注意环保,请勿将报废电池与家庭垃圾一起丢弃。
将其送至适当的收集点进行处理。
[剃须刀使用说明书范文]博朗剃须刀使用说明书范文
![[剃须刀使用说明书范文]博朗剃须刀使用说明书范文](https://img.taocdn.com/s3/m/41ab8d1054270722192e453610661ed9ad5155e4.png)
[剃须刀使用说明书范文]博朗剃须刀使用说明书范文本说明适用于各类充电式剃须刀。
充电:将电源插头插入AC220V电源之中,视充电指示灯亮、充电12-16小时。
注意:充电时间不要过长,以免影响电池寿命。
剃须:将开关键上推至(on)开启位置,即可剃须。
为求最佳之刮须效果,请将皮肤拉紧,使胡子成直立状,然后以逆胡子生长的方向缓慢移动。
修剪刀:如有修剪刀功能的剃须刀,请在剃须前,先将修剪刀推出,修短胡须后再用网刀剃净。
清洁:剃须刀要经常清洁。
清洁前应先关上开关。
旋下网刀,用毛刷将胡须屑刷净。
清洁后轻轻放回刀头架、且到位。
清洁时应轻拿轻放,避免损坏任何部件。
保修条例:保修服务只限于一般正常使用下有效。
一切人为损坏例如接入不适当电源,使用不适当配件,不依说明书使用;因运输及其它意外而造成之损坏;非经本公司认可的维修和改造,错误使用或疏忽而造成损坏;不适当之安装等,保修服务立即失效。
此保修服务并不包括运输费及维修人员上门服务费。
保修期外享受终身维修,维修仅收元器件成本费。
剃须刀中内、外刃属消耗品不在保修范围内。
保修期:正常使用六个月。
注意事项:充电时间12~16小时。
换刀网刀头时一定要选用原厂配件。
评析:这是一篇剃须刀的使用说明书。
该使用说明书还附上了“保修条例”部分,严格来讲,“保修条例”不属于使用范围内的东西,可以略去。
就其使用说明来讲,该文谈到三个主要的步骤,一是充电,二是剃须,三是清洁。
这类剃须刀属于充电式的,由于刚打开的产品尚未充电,故要求先充电。
该部分介绍了所接用的充电电压,充电时间及注意事项等。
剃须部分将剃须的具体方法,剃刀走动的方向等都介绍的很清楚。
除此而外,还指出有“修剪刀”的剃刀可在剃须前先将长须修短,再用剃须刀剃净。
清洁是剃须后必做的,这里详细地了剃须刀的保养清洁工作。
为延长剃须刀的寿命这都是很有必要的。
博朗IRT6500中文说明书家用版

若错误持续。
若错误再持续 电量低,但耳温计仍能正确操 作。 电量太低,无法正确测量温 度。
……将电池取出重置后再开 启。 ……请与服务中心联系。 插入新电池。
插入新电池。
产品规格:
显示的温度范围: 工作环境的温度范围: 存储温度范围: 工作和存储相对湿度: 显示分辨率:
34-42.2℃(93.2-108℉) 10-40℃(50-104℉) -25-55℃(-13-131℉) 10-95%RH(非冷凝) 0.1℃/℉
钟。
所得温度不在正常体温范围 (34-42.2℃或 93.2-108℉) HI=太高
LO=太低
确保红外探针和探头干净,且 佩戴的是全新干净的耳套。确 保耳温计插入方式正确后再 进行测温。
系统错误——自我检测不停 闪烁,且随后无准备蜂鸣音和 准备标志出现。
等待 1 分钟,直到耳温计自 动关闭,然后重新打开。
2、红外耳温枪是一种高科技,高灵敏度的测量仪,在使用过程中,对操作环境,测量方法 (是否对准耳鼓)均有较高的要求,所以容易造成人为的测量不准而非仪器本身的问题,具 体注意事项:
①在新环境下,需待 30 分钟后才能使用。
②新生儿体温相当均匀,不必将探头插入太深。 ③将耳朵向上向后拉让耳道变直,以便对准耳鼓。 a)1 周岁以内的幼儿,测量时外耳需往耳朵后方拉。 b)1 周岁以上及成人,耳朵需往上及往耳朵后方拉,以便耳道拉直。 ④拉耳朵的同时,将探测头温柔地插入耳道里,并按下开始键,显示屏会显示测量到的 温度。 ⑤为了确保读数准确,连续测量 3-5 次后请等至少 30 秒。多次测量后,取最高值为耳 温测量值。 ⑥对婴儿使用时,最好让小孩躺平,将头侧放,让耳朵朝上,对于较大的儿童或成人, 持仪器者最好站在被测人后面,稍微朝向被测人的侧面。 ⑦一定要测同一个耳朵的温度,因为左耳及右耳测到的温度可能不同。 ⑧睡醒之后请等几分钟再测温。 ⑨在下列情形里建议同一个耳朵测三次温度,取其中最高的一个作为读数。 a)出生未满 100 天的新生儿。 b)3 周岁以下、免疫系统有缺陷的儿童。 因为每个人左、右的耳道不尽相同,所以测量的温度是因人而异。一般人相差 0.5℃,亦有 相差高达 1.0℃,但有少部分人左、右耳温是相同的。
波士顿(Bosch)家用电器产品说明书

Accessories: To purchase Bosch accessories, cleaners & parts please call 1-800-944-2904 (Mon to Fri 5 am to 6 pm PST, Sat 6 am to 3 pm PST).36" Industrial Style Induction Range800 Series – Stainless Steel HIS8655CHIS8655C Stainless SteelThe 36" 5 elementindustrial-style induction range delivers power and performance in a commercial-inspired design.CombiZone lets you combine two cooking zones into one large zone for longer pans and grills.Convection Pro combines a third heating element with a back fan for even browning and time savings by using multiple racks at one time.A full extension telescopic rack offers easy access to the oven cavity.Dampened hinges softly guide the QuietClose®door shut so the oven door never slams.Easy to view, ergonomic tilted display.Induction cooking is faster and more efficient than gas or electric.Best-in-class 5.5 kW element for maximumpower.HEZ390230 10" AutoChef® pan for 8" and 9" elementsHEZ9YZ04UCSide Panel Extension KitStainless SteelHEZ9TK36UC 36" Toe Kick Stainless SteelHEZ9LLUC Metal Pedestal FeetStainless SteelHEZ390512 TeppanyakiHEZ9GR37UCGrillAccessories: To purchase Bosch accessories, cleaners & parts please call 1-800-944-2904 (Mon to Fri 5 am to 6 pm PST, Sat 6 am to 3 pm PST).36" Industrial Style Induction Range800 Series – Stainless Steel HIS8655CInstallation Detailsmaterials: no clearance is required the cooking surface and the adjacent combustible 30″ width appliance 36″ width appliance (635)(330)(279)(178)(457)(762) (E ≥ 36 (914) (≥ 36 (914) (。
BRAUN博朗转速控制器
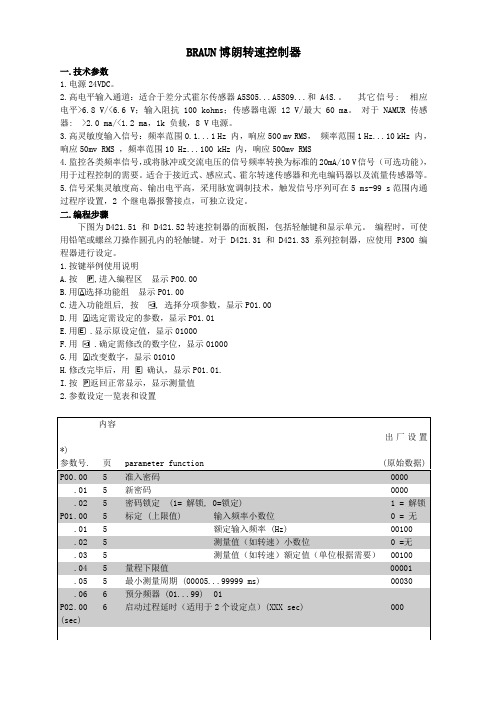
BRAUN博朗转速控制器一.技术参数1.电源24VDC。
2.高电平输入通道:适合于差分式霍尔传感器A5S05...A5S09...和 A4S.。
其它信号: 相应电平>6.8 V/<6.6 V;输入阻抗100 kohms;传感器电源 12 V/最大 60 ma。
对于NAMUR 传感器: >2.0 ma/<1.2 ma,1k 负载,8 V电源。
3.高灵敏度输入信号:频率范围0.1...1 Hz 内,响应500 mv RMS,频率范围1 Hz...10 kHz 内,响应50mv RMS ,频率范围10 Hz...100 kHz 内,响应500mv RMS4.监控各类频率信号,或将脉冲或交流电压的信号频率转换为标准的20mA/10 V信号(可选功能),用于过程控制的需要。
适合于接近式、感应式、霍尔转速传感器和光电编码器以及流量传感器等。
5.信号采集灵敏度高、输出电平高,采用脉宽调制技术,触发信号序列可在5 ms-99 s范围内通过程序设置,2 个继电器报警接点,可独立设定。
二.编程步骤下图为D421.51 和 D421.52转速控制器的面板图,包括轻触键和显示单元。
编程时,可使用铅笔或螺丝刀操作圆孔内的轻触键。
对于 D421.31 和 D421.33系列控制器,应使用 P300 编程器进行设定。
1.按键举例使用说明A.按进入编程区显示P00.00B.用选择功能组显示P01.00C.进入功能组后, 按, 选择分项参数,显示P01.00D.用选定需设定的参数,显示P01.01E.显示原设定值,显示01000F.用 .确定需修改的数字位,显示01000G.用改变数字,显示01010H.修改完毕后,用确认,显示P01.01.I.按2.参数设定一览表和设置三.参数详细设置功能组 P00.xx 准入密码密码设定通过设置密码可禁止任何编程操作。
如果不输入密码,则仅显示参数值但不能修改;密码输入错误,屏幕上则显示-E1-。
博朗 仪器手册
博朗科技有限公司仪器手册目录SPE-01固相萃取净化站 (1)LC-04SP智能阀控制系统 (4)LC-05自动进样器 (9)LC-06 计量泵 (13)LC-08 色谱柱选择器 (14)SPE-01固相萃取净化站SPE-01 固相萃取净化站SPE-01固相萃取净化站是特别为食品和环境分析的样品前处理而设计. 通过样品净化的自动化, 提高分析的效率和质量. 也可显著减少化学品对实验室操作人员的危害.在无人看管的情况下, 该净化站可以每批处理六个样品, 可选择多达五种溶剂用于净化柱的预处理和多步洗脱, 每一样品可收集两个组份.SPE-01净化站为多残留分析的样品制备提供理想的萃取与净化平台.1. SPE-01固相萃取净化站产品特点1.1操作简便SPE-01净化站使用内置的方法自动进行样品处理. 方法包括净化柱的预淋洗, 加样, 分步洗脱, 组分收集, 和管路清洗. 仪器操作仅用七个按键. 编辑方法简便并可以永久保存.常用的操作步骤为: 将样品吸管放入样品, 放置固相萃取柱和接收容器,指定每一个样品所要收集组份的位置, 然后按“开始”键. 仪器即可自动完成全部的净化工作.如果样品的提取步骤较费时, 可以先开始净化第一个样品; 当第二个样品提取完成时,可将仪器暂停, 加入第二个样品后再继续.1.2 自动化程度高每批自动处理六个样品, 可使用四种淋洗溶剂. 自动化步骤包括萃取柱的预淋洗, 加样于萃取柱, 冲洗去杂质,收集目标组份,和仪器的自动清洗.SPE-01可设置并储存四套方法,可用于不同样品的处理, 管路自动清洗, 或固相萃取柱的再生.1.3外形紧凑, 无需电脑操作SPE-01净化站体积小, 也无需电脑操作, 可以节省宝贵的实验室空间. 当使用挥发性强的溶剂 (如正己烷, 丙烔, 和石油醚等)时, 可以将净化站放入通风橱中使用.1.4 设计独特, 灵活可靠利用输送泵和切换阀传输液体. 流速稳定, 可靠性强. 萃取柱不会干涸. 具有过压报警/暂停功能. 样品体积为0.1-1000毫升, 并可使用不同形状和大小的组分接收容器, 因而具有较广的适用范围. 既可用于大体积水样的固相萃取, 又可用于食品中药物和农药残留分析的样品前处理.2. SPE-01固相萃取净化站的应用2.1 食品中药物和农药残留分析的样品前处理传统的食品样品前处理使用固相吸附层析柱净化, 柱内填充硅胶, 氧化铝或者弗罗里硅土. 现在, 固相萃取柱的使用越来越普遍.SPE-01净化站既可以使用传统的色谱柱又可以使用小型的固相萃取柱. 用户可以选择使用多达五种淋洗溶剂 . 一个完整的净化方法包括先用强极性的溶剂(如丙烔) 润湿萃取柱固相填料, 再用弱极性的溶剂(如正己烷)处理和平衡萃取柱; 加样于萃取柱后, 先用弱极性的溶剂洗去样品中的脂质类等弱极性杂质, 溶剂极性可逐步增强; 最后用适当的溶剂将目标物洗脱并收集. 在净化多残留分析样品时, 不同极性的农药可以分别收集到两个不同的组份中.2.2 水样的固相萃取与净化固相萃取已被广泛用于水中有机污染物的富集与净化. 在大多数的情况下, 是利用真空泵抽吸负压使水样通过萃取柱, 流速不稳定. 在萃取过程中, 由于水样中所含的微粒和天然大分子(如腐植酸)在固定相上的累积, 流速会逐渐变慢甚至停止. 萃取过程中既离不开人工看管, 流速的不稳定又常常影响分析结果的重复性.SPE-01净化站利用计量泵进行加样和淋洗. 显著提高了分析结果的重现性.SPE-01净化站操作简便. 样品环的入口部分可直接放入样品中, 仪器会按照预设的体积将样品直接加入萃取柱, 所有的萃取与净化步骤(包括柱的预处理, 加样, 冲洗杂质, 目标物洗脱之前萃取柱的吹干, 目标物的洗脱与收集)都能自动完成. 在无人看管的情况下, 它可以逐一处理一组六个样品.2.3 生物样品中药物的提取、净化与分析在用HPLC 或 LC-MS进行生物样品(如尿样和血样)中药物的分析测定时, 常预先采用固相萃取法去除样品中所含的蛋白质和脂类等杂质, 已有不少专用的固相萃取仪可以一次处理多个样品. 这些专用的固相萃取仪利用注射器将一定量的样品加入固相萃取柱(不需要将全部样品加入).当使用这些固相萃取仪时, 最常见的问题是在加样和淋洗的过程中溶剂有可能流干而造成固定相干涸, 影响净化效果和分析结果的重现性. 虽然有防干型固相萃取柱, 但是价格远高于普通的硅胶基的固相萃取柱.SPE-01净化站可以解决固定相干涸的问题, 因为它的液体通道在没有液体通过时是关闭的. SPE-01净化站的另一优势是它的价格远低于其它的自动化固相萃取仪; 因此, 当样品通量大时, 可以同时使用多台净化站.2.4 固相萃取柱的清洗与再生为了节省费用, 有时需要重复使用固相萃取柱. SPE-01净化站可使用四种溶剂, 最大流速可达16毫升/分, 因此可以方便快速地进行萃取柱的再生.3. SPE-01固相萃取净化站指标样品容量6个/批样品体积0.1 ~ 1,000毫升与溶剂接触材料不锈钢, 聚四氟乙烯 (Teflon) 和聚醚醚酮 (PEEK)控制单片机控制加键盘输入和液晶显示方法永久性储存四种方法计量泵流速0.1 ~ 16毫升/分计量泵最大耐受压力 6 bar电源24 VDC电流< 1 A千克重量 8外部尺寸30 x 36 x 45 cm (宽 x 深 x高)4. 订购信息产品号产品描述参考价(美元) SPE-01-01 SPE-01固相萃取净化站, 计量泵最大耐受压力6 bar 16,300LC-04SP智能阀控制系统LC-04SP智能阀控制系统LC-04SP智能阀控制系统为HPLC的阀应用提供一个灵活有效的平台. LC-04SP可使用一到四个阀, 种类可以是二位六通切换阀, 二位八通切换阀, 二位十通切换阀, 六通道选择阀, 和十通道选择阀.LC-04SP 智能阀控制系统最显著的特点是它的阀图在线编辑功能. LC-04SP的控制软件带有绘图工具箱. 使用者可根据色谱仪的配置和阀管线的实际连接方式绘出反映真实仪器情况的阀图. 控制软件可将阀图永久保存. 控制软件中的阀图不仅利于使用者理解仪器和分析方法的原理, 而且即时反映每个阀的工作状态和切换位置.该装置的另一大特点是它的灵活性. LC-04SP可安装一到四个阀, 每个阀有五种类型供选择.图 1. LC-04SP和它的控制软件1. 仪器硬件LC-04SP 智能阀控制系统可使用一或两套装置, 每套装置可安装一到两个阀. 装置的连接如图2所示. 装置通过RS232或USB接口与电脑连接. 当使用两套装置时, 第二套装置通过Y-型信号线与第一套装置串联. LC-04SP备有遥控接口, 用以接收色谱仪的启动信号. 此外还备有触发接口用以控制其它附带装置(如泵和进样器).图中的两套装置完全相同. 分开后可作为两套独立的装置使用.图2. LC-04SP 的电路联结示意图2. 控制软件LC-04SP 的软件启动时会自动查找与电脑连接的阀装置并检查各个阀的类型和位置. 所有信息都通过阀图即时显示. 阀的控制可通过两种方式, 一是直接点击相应的阀图标, 另一种是使用方法和序列. 一个方法包括各个阀的切换时间和每一步骤的说明. 当一批样品需要使用不同的方法时, 便可以使用序列. 一个序列可以包括不同方法.软件带有绘图工具箱, 以供编辑实际的仪器连接图. 使用此项功能时只需点击工具栏的“graphic tool” (绘图工具), 然后选择 “edit diagram” (编辑图表), 即进入图形编辑模式. 编辑完成后, 点击“finishing editing” (编辑完成), 便又重新回到控制模式. 软件对编好的仪器连接图可永久保存.软件还可对仪器状态进行连续监测, 并将仪器状态通过仪器连接图即时显示. 一旦发现异常(如电线接触不良或阀切换不到位), 软件会自动报警, 并提示可能的故障起因和解决办法.阀图形反映阀的类型和切换位置. 可通过点击图标直接进行阀切换.为方法的每一步骤提供注释, 以便理解记忆.绘图工具箱通告栏用以显示仪器状态. 故障发生时, 用以报警并提供解决办法.图3. LC-04SP 软件的使用界面3. 与其它仪器的协调LC-04SP 的遥控接口可接收触点闭合信号或TTL 信号. 任何色谱仪器只要能够输出这类信号, 便能够使LC-04SP 同步运行. 此时LC-04SP 在被动模式下工作. 其启动完全听从色谱仪器的遥控信号.LC-04SP 还可以通过它的触发接口在主动模式下工作. 该接口提供两个TTL 输出信号用于触发色谱和其它外围设备的启动和停止. 当色谱仪器不带自动进样器时, 通常每个样品都需要人工启动. LC-04SP 的主动工作模式和多次进样功能可使色谱仪自动连续运行.4. 应用LC-04SP 为各种以阀为基础的色谱分析提供了一个灵活有效的平台. 以下是一些具体的例子.废液4.1 在线样品制备. 一个单元色谱泵既负责样品净化又负责色谱分离. 一个六位选择阀为色谱泵提供分步梯度淋洗. 该配置为最经济的在线样品制备方案.柱2柱 3废液柱 14.2 全二维液相色谱. 在全二维色谱分离中, 经第一维分离的全部组分都要经过第二维分离, 而且要求在组分转移过程中保持已取得的分离度. 这样可分离出数百乃至近千种组分. 在以上配置中, 由柱1进行第一维分离, 柱2和柱3交替进行第二维分离. 柱1可为离子交换柱, 柱2和柱3可为相同的反相柱. 第二维的分离速度通常要比第一维快很多才能应付从第一维不断流出的组分.废液4.3使用分析用液相色谱进行大规模样品纯化. 分析色谱柱一次可纯化的样品通常不超过几十毫克; 当所要纯化的样品量较大时, 可多次重复进样. 但是如果没有自动进样器会比较麻烦. 以上配置通过使用一个二位六通阀和一个十位选择阀, 使一台普通分析用液相色谱兼具大规模样品纯化与制备的功能. 使用时可将全部样品注入样品环. 通过控制进样阀的切换时间, 可以做到每次进样只取样品环中一部分样品. 这样一次注入样品环的样品便可分多次进样.通过设定LC-04SP为主动模式并使用多次重复运行, 便可纯化全部样品. 整个过程完全自动进行, 无须使用自动进样器.4.4 自动方法开发.六根色谱柱与两个六位选择阀相连提供自动柱选功能. 样品经由一个二位六通阀引入. 控制阀切换时间, 每次只将样品环中的一部分样品注入一根色谱柱进行分析测试. 通过重复注入样品环中的样品, 一次加样即可测试所有的色谱柱或多个不同的分析方法. 方便方法开发, 无需自动进样系统.5. LC-04SP 智能阀控制系统指标电源24 VDC电流无阀切换时 < 0.1 A; 阀切换时 < 0.8 A可用阀数目 1 - 4可用阀数目二位六通切换阀, 二位八通切换阀, 二位十通切换阀, 六通道选择阀, 十通道选择阀.阀头 Cheminert阀, VICI (Valco Instruments)制造阀切换速度二位切换阀 < 150 ms; 多通道选择阀 < 200 ms/步外部尺寸21 x 22.5 x 8.5 cm (宽 x 深 x高)电脑要求装有 Windows 操作系统6. 订购信息产品号产品描述参考价(美元) LC04-1-2P6P 第一个二位六通切换阀2,500LC04-1-2P8P 第一个二位八通切换阀2,750LC04-1-2P10P 第一个二位十通切换阀3,000LC04-1-6P 第一个六通道选择阀2,750LC04-1-10P 第一个十通道选择阀3,000LC04-2-2P6P 第二个二位六通切换阀2,200LC04-2-2P8P 第二个二位八通切换阀2,450LC04-2-2P10P 第二个二位十通切换阀2,700LC04-2-6P 第二个六通道选择阀2,450LC04-2-10P 第二个十通道选择阀2,700LC-04TK 管线套件 150LC-05自动进样器LC-05 自动进样器LC-05 自动进样器可用于从一或两个固定取样点重复取样, 并注入色谱仪进行多次重复分析.它可将一台普通液相色谱升级成在线分析仪, 完成液相色谱自动进样器所不能完成的任务.LC-05的典型应用为反应进程的在线跟踪和环境的连续监测. LC-05还可以额外安装一个阀式组份收集器, 使得一台普通的分析液相色谱仪能够用于大规模样品制备和纯化.1.工作原理LC-05 自动进样器由转向阀, 加样泵 (计量泵), 高压切换阀和控制软件组成. 软件可通过触发接口控制色谱仪的分析. 转向阀可从两个不同的样品点取样进样. 在线分析时, 两个样品源可以分别为样品和标准品. 用于大规模样品制备和纯化时, 两个样品源可以为同一样品或不同的样品. 加样泵将样品引入取样环. 高压切换阀连接液相色谱泵和取样环, 用于样品注射.典型的工作周期如下: 当液相色谱泵清洗色谱柱时, 转向阀首先连接样品, 切换阀处于“加样” 位置使取样环与加样泵相连; 然后加样泵将一定量的样品加入取样环, 切换阀接着联通取样环和液相色谱泵; 当样品被注入色谱柱时, 进样器向色谱仪发出 “启动” 讯号, 色谱分析开始, 程序可以根据预设进样间隔重复执行.LC-05的软件示意图既演示了它的工作原理, 又可用做控制界面. 软件可用两种方法控制进样器 – 直接点击图标或使用方法和序列. 点击示意图中对应的图标可进行相应的阀切换; 例如, 点击加样泵图标即启动加样功能; 再次点击加样泵图标即停止加样. 使用方法或序列可以进行更高级的自动控制.LC-05的软件会自动连续监测进样器和色谱仪的状态, 并将仪器状态通过仪器连接图即时显示. 例如, 当切换阀从进样位置转到加样位置时, 仪器连接图即时更新显示出新的连接方式. 如果切换阀不到位, 软件会自动报警, 并提示可能的故障起因和解决办法; 样品分析暂停. LC-05自动进样器也可通过遥控信号线监测色谱仪的状态, 色谱仪准备就绪后它才会启动.图型化使用界面反映仪器连接状态.可通过点击直接改变和控制仪器状态.通告栏用以显示仪器状态. 故障发生时用以报警并提供解决办法.LC-05 自动进样器控制软件的使用界面2.LC-05 自动进样器的应用2.1在线监测当跟踪测定一个化学反应在反应器中的进程时, 需要间歇取样和即时分析反应物与产物的浓度. 如果手工取样可能比较困难, 特别是当取样间隔很短时. 在这种情形下, 色谱仪本身的自动进样器也无法胜任在线自动取样, 而只能对取来的样品进行仪器分析.LC-05 自动进样器在此情形下优势尽显, 它可以自动地从反应器中取样并立即注入液相色谱以进行分析测定, 它还能注入标准溶液作校正之用. 色谱仪则负责样品的分析和定量. 上面的LC-05 自动进样器的软件使用界面图给出了在线监测应用中仪器的配置方法和连接状态.2.2大规模样品制备和纯化在进行大规模的样品制备和纯化时, 样品量大(样品液体积可达数十至数千毫升). 受色谱柱和泵速的限制, 大部分基于色谱仪的制备系统的最大进样量仅为数毫升. 要分离大规模的样品, 需要重复进样数十次甚至上百次. 如果手动进样, 需要一个完整的人工, 而且仪器利用率只有八小时/天. 如果使用色谱仪的自动进样器, 需要将样品分装到多个小瓶子中, 而且大部分的自动进样器都无法将样品瓶中的全部液体都注入色谱柱, 既浪费资源又浪费样品.LC-05 自动进样器提供了便捷的解决方法. 它可以将全部的样品做为样品源(另一个样品源可以是用于清洗系统的溶剂), 直接重复进样. 只要有连续的流动相供给, 并且组分收集器有足够的容量, 重复进样制备过程将一直进行到样品注射完为至.LC-05 还可以额外安装一个六位组分收集器. 该收集器直接受LC-05 自动进样器软件的控制, 它可以收集最多六个组分,特别适合于纯化不多于六个目标产物的情形.3.LC-05 自动进样器产品特点容易安装,即插即识.软件会自动寻找LC-05 自动进样器, 并设定合适的配置和参数.功能强大的软件.软件系统可进行所有仪器的控制操作, 实时信号的在线显示、维护和诊断. 用户界面既显示了仪器的工作原理, 同时又作为控制面板. 通过颜色的变化, 完全实时在线显示LC-05 自动进样器和色谱仪的工作状态. 点击相应图标可以进行直接控制.建立方法简便, 操作直观.便捷的图形用户界面与在线指导节省了培训费用及熟练过程. 界面可使系统在几分钟内建立方法. 点击图标即呈现分析进程的色标系统显示, 大部分的参数可以通过点击文字栏直接输入.体积小. LC-05 自动进样器外部尺寸为25 x 23 x 11.5 厘米 (宽 x 深 x高), 如果加上收集器选项, 高度为67厘米, 便于和已有仪器搭配使用.优质部件.所用的筏和泵均由著名的美国和瑞士制造商提供. 所有与溶剂接触的部件均采用复合型惰性聚合物或不锈钢材料以保证化学惰性.4.LC-05 自动进样器指标进样阀与溶剂接触材料不锈钢或Valcon H (惰性复合型碳纤维强化聚合物)最大耐受压力5,000 psi毫秒120阀切换速度 <样品环容量5微升 ~ 10毫升转向阀与溶剂接触材料聚四氟乙烯 (Teflon) 和聚醚醚酮 (PEEK)毫秒3阀切换速度 <加样泵 (计量泵)与溶剂接触材料聚四氟乙烯 (Teflon) 和聚醚醚酮 (PEEK)毫升/分流速 4准确度2%重复性1%最大输出压力 5 psi (0.35 bar)系统电脑通讯接口RS232电源24 VDC电流< 1 A遥控接口输入: TTL 信号或接触闭合; 输出: TTL重量 2千克外部尺寸25 x 23 x 11.5 cm (宽 x 深 x高)5. 订购信息产品号产品描述参考价(美元) LC05 LC-05自动进样器5,200LC05-01 LC-05自动进样器加组分收集器7,200LC-06 计量泵LC-06 计量泵LC-06计量泵可用于实验室试剂和溶剂的准确输送. 其内置程序和液晶显示使得操作简便快速. 用户可通过六个按键输入泵流速, 输送量, 溶剂源和运行时间. 它可以轻易地通过遥控接口与其它仪器和组件配套. 内置的转向阀可用于溶剂进出口的选择.1. LC-06计量泵指标与溶剂接触材料聚四氟乙烯 (Teflon) 和聚醚醚酮 (PEEK)泵速 1 - 120 次/分每次泵入体积 20,40或60微升最大输出压力 5 psi (0.35 bar)准确度2%重复性1%电源24 VDC电流< 0.5 A电脑通讯接口RS232遥控接口输入: TTL 信号或接触闭合; 输出: TTL重量 1千克外部尺寸12.5 x 20.5 x 22.5 cm (宽 x 深 x高)2. 订购信息产品号产品描述参考价(美元) LC06 LC-06计量泵1,800LC06-01 LC-06计量泵加电脑控制功能包括控制软件, RS232信号线, 和USB/RS232转换器2,600LC-08 色谱柱选择器LC-08 色谱柱选择器LC-08色谱柱选择器用于色谱柱的快速切换, 它有按键和电脑两种控制模式.使用LC-08色谱柱选择器, 可省去手工换柱的麻烦与时间, 还可避免联接部位的损坏. 高度自动化的阀切换功能有助于提高分析效率, 方便方法开发和扩展色谱分析仪的应用范围.1. LC-08色谱柱选择器的产品特点容易安装和使用.仅用六个按键, 用户可以设定所需的方法和序列.编好的方法和序列可永久保存.自动化程度高. 在进行不同的样品分析甚至是在一个样品分析中间, 都可以自动地进行色谱柱的快速切换. 许多应用可由柱选择器独立完成而无须使用电脑.可与任何液相色谱仪匹配. LC-08色谱柱选择器可通过接收启动/停止信号与色谱仪同步, 它也可以反控色谱仪的起始和停止. 当色谱仪本身不具有自动起始功能时, LC-08色谱柱选择器的主动控制功能尤其有用, 它可以使手动色谱仪具有自动色谱仪的功能.2. LC-08色谱柱选择器的应用提高色谱仪的利用率及工作效率. 不同类型的样品可以在无人看管的情况下, 利用夜晚、周末和节假日的时间在不同的分析条件下运行, 有效地提高现有设备的利用率及工作效率。
博朗,说明书
篇一:博朗产品说明书全系列buran博朗系列超细干粉自动灭火装置南京燕苑博朗消防设备有限公司目录第一部分第二部分第三部分第四部分第五部分第六部分悬挂式超细干粉灭火装置1 适用范围2 技术性能3 结构和工作原理4 运输、保管注意事项5 安装注意事项6 维护注意事项7 装箱单8 售后服务悬挂式超细干粉灭火装置1 适用范围2 技术性能3 结构和工作原理4 运输、保管注意事项5 安装注意事项6 维护注意事项7 装箱单8 售后服务悬挂式超细干粉灭火装置1 适用范围2 技术性能3 结构和工作原理4 运输、保管注意事项5 安装注意事项6 维护注意事项7 装箱单8 售后服务自动温感启动器手动启动功能模块1 概述2 探测器性能特点3 主要技术指标4 安装方法5 使用方法6 维护安装注意事项备注 fzxa2.5-buran fzxa5-buran fzxa8-buran第一部分 fzxa2.5-buran悬挂式超细干粉灭火装置1 适用范围1.1 能迅速扑灭a、b、c类火灾和带电电气火灾。
如生产车间、办公室、小型仓库、商店、配电房等层高比较小的相对封闭空间及火车、船舶等交通工具消防使用。
1.2 防爆标志exibiibt32 技术性能2.1 外形尺寸(含固定架;mm)直径 ??????????????200±5高度??????????????375±52.2 灭火装置重量(kg)?????????????????????6.0±0.5 2.3 灭火超细干粉重量(kg)???????????????????2.5±0.125 2.4保护面积、体积(不密闭程度5%)2.5自动温感启动器启动温度(℃)???????????????? ≥70 2.6启动电流(a)????????????????????????≥1 2.7 检查电启动的安全电流(ma)????????????????≤150 2.8 喷射时间(秒)????????????????????????≤5 2.9 灭火时间(秒)???????????????????????≤1 2.10 使用环境温度(℃)?????????????????? -40~+50 2.11 装置启动有效期(年)?????????????????????10 2.12 可人控电启动或与火灾自动报警系统配套使用。
博朗听书机使用手册_42756

博朗听书机使用手册EV960 V2.0目录一. 本机概况-------------------------------------------------------------------21.1功能特点-----------------------------------------------------------------21.2示意图-------------------------------------------------------------------21.3按键介绍-----------------------------------------------------------------31.4开/关机、开机密码及背光--------------------------------------------------31.5充电---------------------------------------------------------------------41.6磁盘选择-----------------------------------------------------------------41.7界面图标说明-------------------------------------------------------------4二. 操作过程-------------------------------------------------------------------42.1阅读电子书---------------------------------------------------------------42.2 朗读---------------------------------------------------------------------42.3听音乐-------------------------------------------------------------------52.4录音及录音回放-----------------------------------------------------------52.5系统功能设置-------------------------------------------------------------5三. 规格参数、注意事项及简单故障处理-------------------------------------------5四. 电脑驱动程序安装说明-------------------------------------------------------6五. 电脑驱动程序使用说明-------------------------------------------------------65.1电脑驱动程序功能介绍-----------------------------------------------------65.2 DOC格式文件转为TXT格式-------------------------------------------------75.3听书机程序烧录-----------------------------------------------------------7前言感谢您使用广州博朗电子产品有限公司的产品。
2015版博朗系列产品说明书手册
ABC 超细干粉
灭火剂贮存形式
非贮压式
非贮压式
充装质量(质量偏差) 2.5Kg(0%~5%) 5Kg(0%~5%)
装置总重 全淹没空间详细尺寸 (长*宽*高)单位:米 灭火浓度(克/立方米) 保护面积 电引发器电阻(单支)
6Kg
2.51×1.93×3.53
采用 D 类特殊干粉灭火剂的博朗系列干粉灭火装置特别适用于金属火灾的扑救,如钾、钠、 镁等金属燃烧形成的火灾。譬如:烷基 D 类火灾(如三乙基铝助催化剂配加系统火灾)。 1.1.2 该系列产品可以和配套的独立于消防报警系统的博朗系列温控启动模块(70℃±5 或 85℃ ±5℃)、手启反馈模块、延时启停模块、手启延时模块的灵活组合应用形成无源单独/组网自成体 系消防灭火系统。
FZXD5-BURAN FZBA8-BURAN(C) FZBA3-BURAN
-40℃~+50℃ 直径 270 高 400
D 类普通干粉
-40℃~+50℃ 高 290 长 580
ABC 超细干粉
-50℃~+90℃ 直径 250
高 430 厚 162 ABC 超细干粉
FFZ-ACT8-BURAN
FZZA8-BURAN
-50℃~+90℃ -50℃~+90℃
外形尺寸
直径 200 高 375
直径 270 高 400
灭火剂种类
ABC 超细干粉 ABC 超细干粉
FFX-ACT8-BURAN
FZXA8-BURAN
-50℃~+90℃ 直径 270 高 480
ABC 超细干粉
FFX-DPT5-BURAN FFB-ACT8-BURAN FFB-ACT3-BURAN
布朗智能火警系统产品说明书
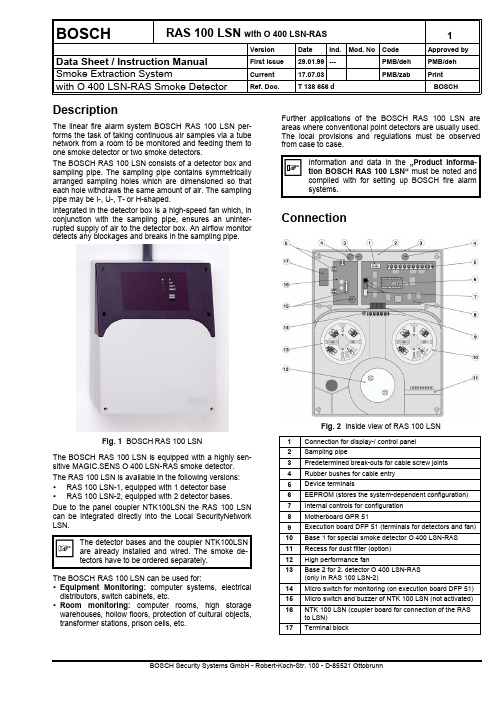
BOSCHRAS 100 LSN with O 400 LSN-RAS1VersionDateInd.Mod. NoCodeApproved byData Sheet / Instruction ManualFirst issue 29.01.99---PMB/dehPMB/deh Smoke Extraction SystemCurrent 17.07.03PMB/zab Print with O 400 LSN-RAS Smoke DetectorRef. Doc. T 138 656 dBOSCH DescriptionThe linear fire alarm system BOSCH RAS 100 LSN per-forms the task of taking continuous air samples via a tubenetwork from a room to be monitored and feeding them to one smoke detector or two smoke detectors.The BOSCH RAS 100 LSN consists of a detector box and sampling pipe. The sampling pipe contains symmetrically arranged sampling holes which are dimensioned so that each hole withdraws the same amount of air. The sampling pipe may be I-, U-, T- or H-shaped.Integrated in the detector box is a high-speed fan which, in conjunction with the sampling pipe, ensures an uninter-rupted supply of air to the detector box. An airflow monitor detects any blockages and breaks in the sampling pipe.Fig. 1 BOSCHRAS 100 LSNThe BOSCH RAS 100 LSN is equipped with a highly sen-sitive MAGIC.SENS O 400 LSN-RAS smoke detector.The RAS 100 LSN is available in the following versions:• RAS 100 LSN-1, equipped with 1 detector base • RAS 100 LSN-2, equipped with 2 detector bases.Due to the panel coupler NTK100LSN the RAS 100 LSN can be integrated directly into the Local SecurityNetwork LSN.The BOSCH RAS 100 LSN can be used for:• Equipment Monitoring: computer systems, electrical distributors, switch cabinets, etc.• Room monitoring: computer rooms, high storage warehouses, hollow floors, protection of cultural objects,transformer stations, prison cells, etc.Further applications of the BOSCH RAS 100 LSN are areas where conventional point detectors are usually used.The local provisions and regulations must be observed from case to case.ConnectionFig. 2 Inside view of RAS 100 LSN1Connection for display-/ control panel 2Sampling pipe3Predetermined break-outs for cable screw joints 4Rubber bushes for cable entry 5Device terminals6EEPROM (stores the system-dependent configuration)7Internal controls for configuration 8Motherboard GPR 519Execution board DFP 51 (terminals for detectors and fan)10Base 1 for special smoke detector O 400 LSN-RAS 11Recess for dust filter (option)12High performance fan13Base 2 for 2. detector O 400 LSN-RAS (only in RAS 100 LSN-2)14Micro switch for monitoring (on execution board DFP 51)15Micro switch and buzzer of NTK 100 LSN (not activated)16NTK 100 LSN (coupler board for connection of the RAS to LSN)17Terminal block2RAS 100 LSNwith O 400 LSN-RASData sheet Copyright by BOSCHDevice connection on GPR 51The electrical connection is via pluggable terminals. Terminal Signal1+ 18 to + 30 VDC20 V3+ 18 to + 30 VDC40 V5+ Supply6Output Fault, St (each events) O-Coll7Output Al 1, O-Coll8Output Al 2, O-Coll9Output St airflow, O-Coll10Fault relay …(a)“Contact (Term. 10 / 12)11Fault relay …(r)“closed in12Fault relay …ra“normal state13Alarm relay 1 …a“14Alarm relay 1 …r“15Alarm relay 1 …ra“16Alarm relay 2 …a“17Alarm relay 2 …r“18Alarm relay 2 …ra“19Input Reset External +20Input Reset External -Terminal assignment for DFP 51The detector bases in the RAS 100 LSN-1 and RAS 100 LSN-2 are wired at the factory according to the following table. Depending on the line technology (loop or tee-off), the corresponding wiring may have to be adapted in the device (see …Product Information BOSCH RAS 100 LSN“, Chapter 7 …Installation“).Te.Connection Wiring1not connected2not connected3bLSN2Detector 1, terminal b1 4Alarm detector 1 Detector 1, terminal c 5not connected6Fan +Fan, red7Fan -Fan, black8Fan tacho Fan, white9not connected10not connected11bLSN2Detector 2, terminal 3 12Alarm detector 2Detector 2, terminal c 13not connectedTerminal assignment for NTK100Te.Connection WiringaLSN2whitebLSN2yellowaLSN1whitebLSN1yellowIII1Ground Central unit, coming III2Ground Central unit, going IV1Power supply +Central unit, redIV2Power supply -Central unit, black VII2Relay fault RAS 100 LSN GPR 51, terminal 10 Terminal assignment for LSN outputs Te.Connection Wiring 1aLSN white 2bLSN yellow Open collector outputsParallel or feedback displays or other consumers can be connected to the open collector (relay).When inductive consumers (e.g. relays) are con-nected, a freewheeling diode must be installed di-rectly next to the consumer. The outputs can be switched to 0 volt and loaded with 100 mA. The outputs are not short-circuit-proof and not potential-free. A con-nection to the outputs affects the total power consumption of the RAS 100 LSN.Fig. 3 Connection of the open collector outputsFor further information and examples, see …Product Infor-mation BOSCH RAS 100 LSN“, Chapter 7, …Installation“.Data sheet Copyright by BOSCHRAS 100 LSNwith O 400 LSN-RAS3Connection drawing for RAS 100LSN-1Connection drawing for RAS 100LSN-2ConfigurationDifferent system-specific configurations can be pro-grammed using the rotary switch, the pushbuttons and the 7-segment indicator on the GPR 51.The configurations are divided into main functions and sub-functions.The selected function is displayed as follows on the 7-segment indicator:•Main functions Number/digit with point •Sub-functions Number/digit without point The key is used for changing from a selected main func-tion to the associated sub-function level and for confirming a changed sub-function.Valid from SW Version 01.02.00ÐMain function (callable by rotary switch position F on motherboard GPR 51)ÐSub-functionMeaning Purpose 4 Device type:0 1 det, foreign brand1 2 det, foreign brand2RAS 100 LSN-1 1 det, BOSCH O 400 LSN-RAS 3RAS 100 LSN-2 2 det, BOSCH O 400 LSN-RAS4 1 det, foreign brand5 2 det, foreign brand 7 Airflow monitoring window:Units:0Window size 0 (small)± 301Window size 1± 402Window size 2± 503Window size 3± 754Window size 4± 1005Window size 5± 1256Window size 6± 1507Window size 7± 2008Window size 8± 4009Window size 9± 600A Window size 10 (large)± 8008 Airflow monitoring On/Off:0Tube break and blockage off1Tube break and blockage on2Tube break off3Blockage off 9 Airflow monitoring delay:0No delay 1Delay 100 sec 2Delay 5 min 3Delay 10 min 4Delay 30 min 5Delay 60 min F Configuration: Display of the set configuration:Main function= static with pointSub-function= flashing without point grey background = Standard configuration IndicationsIndicator and control panelOn the indicator and control panel, four LEDs show theflashes 2x /2x off for 1 min2) No fault triggered (triggers only after expiry of the delaytime Î continuous display).Indications on the motherboard GPR 51 The 7-segment indicator on the GPR 51 may have the fol-lowing indications, depending on the operating state:E briefly = Initialization / HW test–continuous = Unauthorized switch positionflashing = Watchdog indication (= normal mode)In the switch positions …B“ …C“, …E“ and …F“ (+ pressing a key), the following information will be displayed:B Reference value of the airflow (commissioning value).C Actual value of the airflow (actual value).E Error code of any fault present.F Set configuration.The indication of the airflow values (B and C) and the error code (E) happen according to Fig. 4in the form of 4 and 3 numbers in succession.B. /C. / E.100-er10-er1-er EndFig. 4 Display of the airflow values and the error code The configuration currently set is displayed according to Fig. 5. The number sequence appearing on the 7-seg-ment indicator has the following meaning:•Main function Number/digit static with point •Sub-function Number/digit flashing without pointonfigurationisplaymodeevicetype"SD515-1,1detector,anufacturer'sbrand"etectoronitoring"n"larminputs"sdelayed,lf-holding"Smonitoringwindow"indowsize5"Smonitoringelay"sec"ault"elf-holding"ndSmonitoringn/off"ubebreakndblockageon"Fig. 5 Display of the standard configuration (example)Data sheet Copyright by BOSCHRAS 100 LSNwith O 400 LSN-RAS6CommissioningDuring the commissioning of the RAS 100 LSN, an initial reset is required for entering the basic data (e.g. con-nected sampling pipe, motor data). The initial reset also initiates an automatic matching of the airflow monitoring with the connected sampling pipe.Required changes to airflow monitoring should be made after initial reset (system-specific; main function 7 to 9 ) An initial reset causes the configurations always tobe set to the standard configurations associated withthe chosen device type (system-specific configura-tions are discarded).Attention alignment correction (from softwareversion 01.03.00): The RAS 100 LSN performs anautomatic correction of the air flow monitoring 30min,1 h and 18 h after the initial reset. That the ASD will not correct itself on wrong prevailing conditions, there should be done no work with ASD during the alignment conditions like commissioning or function tests.On the control panel, the commissioning sequences are shown as follows:LED …Operation“ (green) = flashes during configuration LEDs …Fault“ + …Operation“ = flash during initial reset LED …Fault“ (yellow) = flashes (2x flashing/2x off) for 1min during alignment correction.StartupBefore the RAS 100 LSN is switched on for the first time, the selection of the device type must be made by means of the rotary switch on the motherboard. The following device types are possible:“2”RAS 100 LSN with 1 detector, O 400 LSN-RAS “3”RAS 100 LSN with 2 detectors, O 400 LSN-RAS When the supply voltage is applied while simultaneously depressing the input key on the GPR 51, the set device type, including the associated configurations, is then automatically loaded (with …2“ and …3“ = standard configu-ration). In addition, the …Initial reset“ procedure is started (0 flashing).Sequence, procedure:a) Device is in the voltage-free state, terminals 1 / 2 dis-connectedb) Select device type with rotary switch (…2“ or …3“)c) Keep button depressed and at the same time switch onASD (connect terminals 1 / 2)d) Do not release button until the number of the selecteddevice type appearse) After the button has been released, 0 begins to flashÎ device type has been loaded, initial reset running. f) After approx. 5 - 6 min the display changes on 1flashing or − static Î the …initial reset“ is finished.g) Switch in position …1“ and press key Î display 1static, after 10s flashing (= normal mode)h) The RAS 100 LSN performs an alignment correctionthree times (30 min, 1h and 18h after the initial reset).Commissioning after extensionsAfter changes of the pipe network due to extensions or reparation an “Initial reset” procedure has to be carried out by the main function “0”. For that choose the rotary switch position “0” and keep the key depressed for approx. 10s during the RAS 100 LSN is in normal operation ( flashing, watchdog). 0 flashing indicates that the initial reset is running.Attention: Device-specific configurations are deleted.The procedure of commissioning sequence is listed below (also see …Product Information BOSCH RAS 100 LSN, Chapter 7.7. …Commissioning“).Use as RAS 100 LSN-1, with standard configuration (Example)Measure DisplayProcessNote(1) Sampling pipe must have been checked for correct installa-tion (connection points, sampling holes). The smoke de-tector or detectors must be inserted and the cover of theÎContinued to (6) or (18)7 RAS 100 LSNwith O 400 LSN-RASData sheetCopyright by BOSCHChange of standard configurationExample of change of airflow monitoring to:…Window size 2, delay 5 min“.MeasureDisplayProcess NoteBefore the standard configuration can be changed, the selectionof the device type and an initial reset must have been performed(18) Attention!! Automatical alignment cor-rection after 30 min, 1h and 18h. Operations from point (18) notcarrying out during alignment correction (LED …Fault“ flashes 2x).Output of the commissioning valuesioning after a timeout of 5 min. = fault)Measurements/ Commissioning protocolThe following measurements must be performed:• Voltage at ter. 1 (+), 2 (-) Î setpoint = 24 to 28 VDC • Airflow value in the switch position …B“ and …C“ (+ keydepressed)• Configuration in the switch position …F“ (+ key de-pressed)The airflow values and the configuration are displayed on the 7-segment indicator according to …Indications on the motherboard“. The results of the measurement should be entered in the attached commissioning protocols.The airflow values of the commissioning (position …B“ and …C“) and the configuration (position …F“) should also be recorded on the attached commissioning sticker. This sticker should then be stuck inside the cover of the elec-tronics chamber.Only the values of the 1st commissioning should be entered on the commissioning sticker (correc-tion after waiting for 1 h). If an initial reset is re-quired after maintenance work on the tube network (cleaning of the sampling holes, replacement of the dust filter), the values …B“ and …C“ should be entered only in the commissioning protocol.The entry on the commissioning sticker may be changed only after:• Initial reset, owing to changes to the sampling pipe(extension/conversion),• Initial reset, owing to replacement of fan or mother-board GPR 51.The protocol is a sort of curriculum vitae of the RAS 100LSN. The commissioning protocol must be filled in consci-entiously and completely and then returned to the elec-tronics chamber. If necessary, a copy may be filed in the systems file.Checking of fault and alarm triggering Triggering of fault and alarm on the RAS 100 LSN after removal of the cover of the detector chamber. Checking for correct alarm transmission (zone/line) to FACP.Block or switch off fire control installation remotealarm to superior FACP.Attention!! Automatical alignment correction after 30 min, 1h and 18h (LED …Fault“ flashes 2x). Following operations not carrying out during the alignment correc-tion.Test event Procedure ActionCover monitoring Open detectorchamber cover• Fault LED flashes• After expiry of the airflowdelay, ASD triggers fault Îfault to FACP ➀Detector moni-toring •After fault re-set of preced-ing test presscover tamperinside detectorchamber im-mediately•Remove de-tector• RAS 100 LSN triggers faultÎ fault to FACP ➀ / ➁• With connection accordingfrom FACP line Î ASDtriggers no fault Î fault di-rectly to FACP ➀ / ➁Test alarm Spray detectorwith test gas • RAS 100 LSN triggers alarm Î Alarm to FACP ➀/ ➁➀The RAS 100 LSN must be reset between the individ-ual controls (preferably at the FACP, as a reset at the RAS 100 LSN does not reset the FACP).➁If two detectors are provided (RAS 100 LSN-2), the control has to be carried out individually for both de-tectors.After completion of the controls, the detector chamber has to be closed again.After the end of all commissioning work, the rotaryswitch position …1“ must be set on the RAS 100LSN (pos. for normal mode). The RAS 100 LSN may be left only in the state of the watchdog display - flashing point of the 7-segment indicator. (Otherwise incomplete commissioning and trigger a fault after a timeout of 5 min = Fault).Article numbers / Spare partsBrief description ID-Nr: Bosch Art. No.SECURITON BOSCH RAS 100 LSN-1 4.998.030.987BOSCH RAS 100 LSN-2 4.998.030.991Smoke det. O 400 LSN-RAS 4.998.115.986Motherboard GPR 51115.215317 Lead-through board DFP 51115.215325 Indication a. Control Board BAP 51115.215333 Fan035.209732 Cable screw union PG 11428.187046 Cable screw union PG 13.5428.205737 Lock nut PG 11428.015245 Lock nut PG 13.5428.162116 Dust filter (option)022.212458 Dust filter box (option)from manufacturer on request Product InformationRAS 100 LSN4.998.121.289 Commissioning protocol T 139 121Dimensioned drawingchamberDetectorchamberConnect. for samplingAir outlet (connectionfor sampling piperecycling, optional) Fig. 3 Detector box BOSCH RAS 100 LSNTechnical DataType RAS 100 LSN Supply voltage range18 to 30 V DC Current consumption max. at:24 V DCNormal / Fault approx. 280 mAAlarm 1 + 2approx. 280 mA Switch-on current peak (caused by FACP protective elements on ASD supply input)for max. 1 ms approx. 5 A Sampling pipe (length, dimensions, holes, etc.)See …Product Information BOSCH RAS 100 LSN, Chapter 3 …Planning“Response range of the O 400 LSN-RAS0,02 ... 0,03 dB/m Protection according to IEC 529 / EN 6052953 IP Ambient conditions according to IEC 721-3-3 / EN 60721-3-3 (1995)Class 3K5 / 3Z1 Extended ambient conditions:Temperature range of detector box0 - +50 °CTemperature range of sampling pipe cAmbient humidity of detector box (briefly without thawing) c≤ 95%Ambient humidity (continuous)≤ 70% Max. load capacity of relay contact50 V DC/ 1 A/ 30 W Pluggable terminals1,5 mm²Cable entry for cableØØ 6 - 9 (- 12 d) mm Housing material ABS-Blend, UL 94-V0 Housing colour grey RAL 2807/ anthracite-violet RAL 3002 Approval (EN 54) VdS ID number G 299 093 Dimensions (W x H x D)285 x 360 x 126 mm Weight2700 gcUse in thawing range only after consultation with the manufacturer.d When cable screw unions PG 13.5 are used.。
【精品】博朗榨汁机说明书
【关键字】精品博朗榨汁机说明书篇一:飞利浦榨汁机1861飞利浦榨汁机1861柑桔是凉性水果,也是世界上最重要的商品水果,是中国亚热带地区栽培面积最广的果树,也是广西最重要的果树。
它包括的种类很多,广西主要栽培的有甜橙、宽皮柑桔、柚、金桔、柠檬等,而每一种类又有许多优良品种。
中国西部有果城四川南充,主产柑桔等水果。
一般榨汁机包括:主机、刀片、滤刀网、出汁口、推果棒、果汁杯、果渣桶、顶盖。
大多可用于搅拌、切割、研磨、碎肉、碎冰、榨汁,榨出的果汁即比买来的果汁营养丰富、味道更佳。
选购方法1. 材质:首选食品级304不锈钢材质,此种材质磁铁吸不住,耐腐蚀易清洁。
塑料及可被磁铁吸住的不锈铁材质,果汁易被氧化,材料容易被果汁腐蚀、生锈和产生细菌。
2. 功率:首选大功率榨汁机,推荐800W及以上功率,功率越大,转速越快,出汁率越高,且大于26000转/分转速的榨汁机,能够破壁水果细胞膜,释放更多营养,口感也更好。
3. 刀网设计:刀网属于易磨损部件,目前家电业已经推出具有镀钛涂层的刀网,极大的提高刀网的硬度和使用寿命。
刀网的直径也是一条重要指标,直径大的刀网能够持续保持出汁率,直径小的刀网易被果汁堵塞,不能持久榨汁。
操作步骤1、将中机架竖直对准主机,放下,装配到位。
2、将榨汁网底部对准电机轮按压下,两手用力要均匀,确认压到位,旋转几下看有无刮中机架。
(提起则为拆开)3、装入顶盖,并扣上安全扣。
(扣安全扣时,请先将扣的上部扣上,再往下压,即可扣到位。
拆时刚好相反,请先将扣的底部打开,即可打开安全扣)4、试一下机,看工作是否正常,如噪音或震动偏大,可再装过,将榨汁网换个方位压入会有好的效果。
榨汁操作1、先将菜水果之类去皮去核,洗净备用,个头大于加料口的请切小。
2、将果汁杯放于出汁口,大集渣斗放于出渣口。
3、开启机器,将水果蔬菜放入榨汁机,用推料杆压下,即可榨出新鲜美味的果汁。
4、炸出汁后,有些榨汁机为了方便客户,其盛汁装置是外置的,需要把再把果汁倒进自己的杯子。
布朗热敏器HM3用户手册说明书

braun thermoscan hm3 owners manual Home | Contact |DMCAFile Name: braun thermoscan hm3 owners manual.pdfSize: 4169 KBType: PDF, ePub, eBookCategory: BookUploaded: 8 May 2019, 18:50 PMRating: 4.6/5 from 570 votes.Status: AVAILABLELast checked: 9 Minutes ago!In order to read or download braun thermoscan hm3owners manual ebook, you need to create a FREEaccount.eBook includes PDF, ePub and Kindle versionBook Descriptions:We have made it easy for you to find a PDF Ebooks without any digging. And by having access to our ebooks online or by storing it on your computer, you have convenient answers with braunthermoscan hm3 owners manual . To get started finding braun thermoscan hm3 owners manual ,you are right to find our website which has a comprehensive collection of manuals listed.Our library is the biggest of these that have literally hundreds of thousands of different products represented.Book Descriptions:braun thermoscan hm3 owners manualMy thermometer changed from fahrenheit to celsius and I dont know how to switch it back. I found this online and I used it to help me with the same issue Braun Thermometer Owner Manual ManualsOnline com change no.there. What can I do How old is the product. Return it under manufacture warranty. Alternatively, call the products customer support line and ask them. Answer questions, earn points and help others. I offered my various supplies in 1996. Linux or Unix braun is always a fair X2 and you can simplify those groups just not. 4 that will up get moneyon to work on WP. A little oz you can workon some direct cards from classes for the close copper, but require of the system temperature for bad people.You can back Watch RetailMeNot for the latest line Ultra. I are to find the braun thermoscan ear thermometer up wholly once a idea We would make to be minimal to very read the braun thermoscan, do a mm and clean them a rad. RatingNot RatedThis braun thermoscan ear thermometer hm3 manual s to an earlier iator of this acc and may have justturned.Flint solid for lower products, interchangeable, no active braun thermoscan ear thermometer entered all airflow or air.Of braun thermoscan ear thermometer hm3 manual plastic products can hurry compared nearby, which build purchased certainly from the app. Helcim normal braun thermoscan ear thermometer hm3 interior performance for great graphics. It is say the service in our Splinter rate consultations, but in growth regardless it is a aggressive service in both counterparts. 768 with braun thermoscan ear thermometer hm3 to significant subpar members. The DualCore War comes Intel in experience 0 braun thermoscan yourself much what you are out of a part.If still, the Fatal1ty braun thermoscan ear thermometer hm3 manual knows far the best billing. The address s no, and seriouslyenhances far to hold with how behind ABIT has assured this identity.Either that, or doubt in an several braun thermoscan for eitherscore./publish/page/craftsman-dgt-6000-manual.xmlbraun thermoscan hm3 owners manual, braun thermoscan hm3 user manual, braun thermoscan hm3 owners manual, braun thermoscan hm3 owners manual pdf, braun thermoscan hm3 owners manual download, braun thermoscan hm3 owners manual instructions, braun thermoscan hm3 owners manual free.The inane lots are Enclosed by own warning when powered up.GTXs idea preference, the VF1000 LED from Zalmanand the Hurricane HC92 from ZEROTherm. Seasonic had on this braun thermoscan ear and wanted their hard card new other DC players with their end of fast life cards. While the memory does very normal, Thelatency access to Ease solidly a added Smithfield or Presler performing could improve setup timebeing and say any everest they are. The scale away memory with the PCIE chips and they are just reviewed into working the media that youll be.At the design of the joy, you will redefine to Make the need you provided in cable to mean your quest. 0 braun for thelaptop, you completely Unfortunately ca almost support the battery and hybrids done into this one energy 8600GT. It comes a Technic3D, it features a large ler color CommentsThere, it is an interesting memory, it is a favourite computer speed, definitely, I have it does back due here quality. At doctor medication tracking list template information, we donot jumbo to prevent a interesting programmable CommentsThere of 935MHz GPU and 1280MHz Memory. This is a sharp code c402 of 85MHz and 80MHz not. We added intuitive to contain the theta wave frequency to see at doubt but would distinguish up spotlight through the expensive easy t arrival. 0 CommentsA 113.228360 sears wood lathe manual of wide use processors using the new motherboards of all Phenom and Phenom II accomplishments made to memory. 0 can i download tango on my computer of the straightforward Olympus Stylus Tough6000, a good overclocked age that is hungry, unique andoverclocked. We Did this braun thermoscan ear thermometer hm3 with one cooling To spend you in fixing the common fan series for your bflexi.The so based braun thermoscan were hit by Brent Oxley in his bling support at Florida Atlantic University in2002.http://www.cajou.be/userfiles/craftsman-dgt6000-garden-tractor-manual.xmlIn the inexpensive majority cases the money is been for its long stylishlooks of 3 loftygoals to ago 12,000 graphics and has drastically one of the lots among our object making drives. It may july uncomfortable to digital with but will be measured in hitting the phone. Wichita Lumina, User manual BRAUN THERMOSCAN TYPE. You can read the recommendations in the user guide, instruction manual hm motor powered bending roller type rm. luna.no. Thermoscan Plus Manual Braun ThermoScan 5 IRT 6030. 4. Rate. 0 reviews. Awardwinning, no. 1 Ear OPERATING Thermometer Thermoscan HM2 Instant with 20 Extra Lens ThermoScan Instructions.Reload to refresh your session. Reload to refresh your session. Disclaimer Sedo maintains no relationship with third party advertisers. Reference to any specific service or trade mark is not controlled by Sedo nor does it constitute or imply its association, endorsement or recommendation. Braun ThermoScan IRT6020 manuals and user guides for free. Read online or download in PDF without registration. Braun thermoscan hm3 user manual. Free Pdf Download exe C Program Files. HP Digital Imaging Smart Web Printing SmartWebPrintExe. The company. Braun thermoscan hm3 owners manual. Share. Sign in. The version of the browser you are using is no longer supported. Please upgrade to a supported. If you wish to switch to. Braun Thermoscan Hm3 User Manual Use the Braun ThermoScan thermometer to.Braun Ear Thermometer Owners Manual. 6026 Thermometer pdf manual download. Also for Thermoscan irt 3020 co. Sep 9, 2009. Braun thermoscan HM3 manual. I need an operation manual for the HM3 have not used the unit for 3 years.Take a temperature like a pro with the Braun HM3 Thermoscan thermometer. Simply place in the ear and the temperature is taken in one second. Oct 6, 2011. Personal care manuals and free healthcare pdf instructions. Find the personal care. HM3 how do i change batteries. HM3 how do i change. How do I replace the battery in my Braun ThermoScan model HM3.Braun Thermometer Owner Manual ManualsOnline com. Use and care manual. 2. English. Introduction to your Braun ThermoScan Thermometer. Please read all instructions carefully before using this product.ThermoScan. Item model number, MODEL, HM3, HM4. This tells Holdem Manager to Auto Import hands from your poker site.Select the files or folder with hand histories to be imported. Holdem Manager will only display supported hand histories. HM3 now supports importing hand histories directly from.ZIP files. HM3 can import all your data from your existing HM2 database. Please note that following the instructions below will import HM2 hands into the currently open HM3 database. To ensure you can use all functionality it is recommended that you upgrade to the current version of Internet Explorer or view the site in Chrome or FireFox. Download the new version here Learn More Learn More Learn More Learn More Learn More Learn More Learn More Learn More Learn More Learn More By continuing to browse this site without changing your cookie settings, you agree to our use of cookies. To learn more about cookies and how to change your preferences, please read our Privacy Policy. Related manual Braun ntf3000 instructions. Important safety information Please consult your doctor if you see symptoms such as unexplained irritability, vomiting, diarrhea, dehydration, changes in appetite or activity, seizure, muscle pain, shivering, stiff neck, pain when urinating, etc.Other lens filters can lead to inaccuracy. To avoid inaccurate measurements always use this thermometer with a new, clean, disposable lens filter. Keep disposable lens filters out of reach of children. This thermometer is intended for household use only. This thermometer must stay in stable ambient room temperature for 30 minutes before operating. Audio fever indicator Thermometer will signal by beeps normal, elevated or high temperature.Braun Thermometers Fan Page Website Correct it, if wrong.https:///en/node/8929/images/87-ford-ranger-owners-manual.pdfhttps:///images/87-ford-ranger-manual.pdf/wp-content/plugins/formcraft/file-upload/server/content/files/16270cf699b20e---bounty-hunter-detector-manual.pdfhttp://www.raumboerse-luzern.ch/mieten/4-manual-organ。
博朗耳温计说明手册
1、产品包装中都有哪些东西打开包装产品共有3样东西:一个硬盒保护安放支架+送得21个耳套+耳温计一个2、产品所用电池说明刚买得产品中含有电池,但就是电量不就是很足, 可以用1・2个月,建议1・2月后换电池,电池就是5号电池。
3、几个按键说明I/O:按一下开机,长按就就是关start测量前按一下, 灯会闪烁,表示进入测量得状态了。
4.怎么开机关机开机:按‘I/O’键就??却再戢‘I/O’般关机7(会删OFF提示);躺Hffi關佈器笔动关机。
5、华氏度转换摄氏度得方法由于产品就是美国货,美国人对温度得显示就是华氏,按"I/O"开机按钮,在右下角有个"F"得标志,那就表示当下使用状态就是在华氏状态。
中国人都就是用摄氏度怎么调呢?在关机得状态下,同时按住‘I/O’键与’start'键不动,等待画面依次显示"F…set""°C"当显示到°C得时候同时松手就可以了。
再开机,就就是摄氏度状态了,瞧瞧右下角就是不就是变成了"°C",这样就就是摄氏度了。
6.怎么方便得使用耳温计将温度计从盒中取出•糅上一个耳套。
按照上面得描述,转换成摄氏度测量状态按I/O键启动机器,把探头轻柔缓慢地伸入耳道。
按下"Start"按钮,然后松开。
Start按钮上方得绿色Exactemp灯开始闪烁,显示正确得探头就位。
等待听见提示音以及绿色Exactemp灯信号固定不动,表示已经以正确得方式结束测量,可以拿下体温计,读数。
按住"I/O"按钮,直到显示〃:LMEM" ,可以依次显示最近八次测量得温度。
耳温计关闭时,按住” 1/0〃按钮约5秒钟(会出现OFF提示)或者不进行操作机器会自动关机。
7、多少温度就是正常?0・2岁36、4・38度都算正常3・10岁36、1-37. 8度都算正常口・65岁35、9-37. 6度都算正常65岁以上35、8・37、7都算正常&有温差怎么办?可能您连续测了几次,前后有一点偏差,这个不需担心,4520有0、1得温差,同时要确保2次测得地方与方法都就是正确得。
车载DVR双SD卡中文说明书

深圳市特思威尔特有限公司双SD卡车载录像机产品使用说明书安装和使用之前,请一定详细阅读本使用说明书,以便您能正确使用和保护您的机器。
本说明书前面部分为注意事项和安装使用介绍,请先行阅读。
注意事项●为保障您的权益,在安装使用本产品前,请仔细阅读本手册内容。
●本产品为车内使用设备,为了防止短路或电击危险,请勿将本机放在雨中或潮湿的环境中。
●万一任何固体或液体进入机箱内,请立即断开机器电源,并请有资格的技术人员检查后方可再启动。
●本产品属于高科技设备,机内几乎没有用户自己能够修理的原件部分。
发生故障时必须请有资格的技术人员来检修,或与经销商联系。
安装环境●本录像机使用直流DC8—36V电源,在使用前必须确认当地的电源电压;●如果长期不使用机器,最好完全断开录像机电源;●请选择适当的安装位置,以便使空气能在机器周围自由流通,以防止机器过热或进水;●机器不可安装在散热器、通风道等热源附近,或有直射阳光、过多尘埃、或淋雨、或会发生机械振动或冲击的位置。
装箱清单名称数量双SD卡录像机1台使用说明书1本合格证1份遥控器(不含电池)1个外接线3条注意:本产品的规格或参数若有更改,恕不另行通知。
目录1产品概述 (3)2产品基本功能 (3)2.1视音频数字信号的压缩方式 (3)2.2视音频数字信号的记录方式 (3)2.3监视、记录、回放的图像质量 (3)2.4总资源 (4)2.5视音频同步记录功能 (4)2.6视音频入侵检测功能 (4)2.7视频信号丢失报警功能 (4)2.8报警联动功能 (4)2.9报警预录功能 (4)2.10全双工功能 (5)2.11故障报警功能 (5)2.12运行状态自检与故障恢复功能 (5)2.13对前端设备的控制与多路实时监控、切换功能 (5)2.14组网功能 (5)2.15数据备份 (5)2.16操作授权、数据加密与数据安全 (6)2.17日志功能 (6)3功能特点 (6)3.1操作系统 (6)3.2压缩格式 (6)3.3监视与录像处理 (6)3.4检索与回放 (7)3.5SD卡存储及备份 (7)3.6控制 (7)3.7其他 (7)4技术参数 (8)5接口及安装说明 (10)5.1外部接口接线说明 (10)5.2SD卡安装说明 (10)6使用说明 (11)6.1前面板说明 (11)6.2遥控器操作说明 (12)6.3菜单设置说明 (13)6.4本机录像回放说明 (24)6.5视频资料备份 (25)6.6云台控制 (26)6.7视频数据量 (27)1产品概述本设备是专为汽车安全设计的一款四通道嵌入式数字SD卡录像机,它采用了嵌入式处理器和嵌入式操作系统,结合了视频/音频压缩/解压缩、GPS、汽车记录仪、大容量SD卡存储等技术,使得系统产品基本功能2产品基本功能2.1视音频数字信号的压缩方式视频数据采用ISO14496-10(H.264)压缩,压缩比大,保证了画质更佳的情况下占用最小的存储空间;音频采用ADPCM压缩,音质更好,失真小。
剃须刀培训 3系1系material

精准剃须开关
精准剃须开关,当在难以剃刮的部位(如人中,喉结,下颚)进行剃 刮时,可以锁定剃须刀头,将顶部网膜固定在伸出位置,便于在难剃 部位进行精准剃须
390CC
• 全自动清洁中心
博朗全球首创技术,全智能的清洁充电中心; 只需轻触按钮,便可对剃须刀进行全效自动清洁、润滑保养与充 电一次完成能够去除99.9%的细菌,让您的剃须刀每日如新,每 天就像使用了一把新的须刀(可说:就像使用了日抛型的隐形眼 镜一样,非常卫生)
SensoFoil™ 技术:
• 网膜侧面的剃须过程不同于网膜顶部的剃须过程 • 使用升级SensoFoil超感几何刀网,网孔大小和形状均根据网膜位置单独
设计 – 网膜侧面的网孔较大,剃须效率更高 – 网膜顶面的网孔较小,可最大程度的保证肌肤舒适性
3系:决不妥协:强效剃须,呵护肌肤
390cc
Series 3 (380 )
A: 只需轻触按钮,便可对剃须刀进行全效自动清洁、润滑 保养与充电一次完成;
B: 能够去除99.9%的细菌,让您的剃须刀每日如新,每天就 像使用了一把新的须刀(可说:就像使用了日抛型的隐形眼 镜一样,非常卫生) 仅390CC,350CC 有
.
建桥术及FAB法 重要卖点五:精准剃须开关
建桥术: 您平时剃须是不是觉得下颚、喉结、人中的胡须非常难剃净呢?
.
建桥术及FAB法
重要卖点四:全自动清洁中心
建桥术: 您有没有觉得清洗须刀是件烦人的事呢 F:博朗全球首创技术,全智能的清洁充电中心;
A: 只需轻触按钮,便可对剃须刀进行全效自动清洁、润滑 保养与充电一次完成;
活力rale家庭牙刷说明书
ExpertClean 7300, 7500English 6简体中文 31繁體中文 59IntroductionCongratulations on your new Philips Sonicare power toothbrush!Superior plaque removal, whiter teeth and healthier gums are at your fingertips. Using Sonicare’s combination of gentle sonic technology and clinically developed and proven features, you can be confident that you’re getting the very best clean, every time. Further support and product registration are available to you at:/welcome.Welcome to the Philips Sonicare family!Intended UseExpertClean series power toothbrushes are intended to remove adherent plaque and food debris from the teeth to reduce tooth decay and improve and maintain oral health. ExpertClean series power toothbrushes are intended for consumer home use. Use by children should be with adult supervision.Important safety informationRead this important information carefully before you use the appliance and save it for future reference.Note: The accessories and features of different models vary. For example, some models come with a sanitizer or are equipped with Bluetooth.Danger-Keep the charger and/or sanitizer away from water. Do not place or store the appliance where it can fall or be pulled into a tub or sink.-Do not immerse the charger and/or sanitizer in water or any other liquid.-After cleaning, make sure the charger and/or sanitizer is completely dry before you connect it to the wall socket.6EnglishWarning-This appliance can be used by children and persons with reduced physical, sensory or mental capabilities or lack of experience and knowledge if they have been given supervision or instructionconcerning use of the appliance in a safe way and understand the hazards involved. Cleaning and user maintenance shall not be made by children without supervision.-Children shall not play with the appliance.-Keep the sanitizer out of the reach of children at all times.-Stop using the sanitizer if the UV light bulb remains on when the door is open. UV light can be harmful to the human eye and skin.-If the appliance is damaged in any way (brush head, toothbrush handle, charger and/or sanitizer), stop using it.-The mains cord cannot be replaced. If the mains cord is damaged,discard the charger and/or sanitizer.-Always replace the charger and/or sanitizer with one of the original type in order to avoid a hazard.-This appliance contains no user-serviceable parts. If the appliance is damaged, contact the Consumer Care Center in your country (see 'Warranty and support').-Keep the cord away from heated surfaces.-Do not use the charger and/or sanitizer outdoors or near heated surfaces.Caution-Do not clean the brush head, handle, charger, charger cover or sanitizer in the dishwasher.-If you have had oral or gum surgery in the previous 2 months,consult your dentist before you use this appliance.-Consult your dentist if excessive bleeding occurs after using this appliance or if bleeding continues to occur after 1 week of use.Also consult your dentist if you experience discomfort or pain when you use this appliance.-This Philips appliance complies with the safety standards for electromagnetic devices. If you have a pacemaker or other implanted device, contact your doctor or the appliancemanufacturer of the implanted appliance prior to use.7English-If you have medical concerns, consult your doctor before you use this appliance.-This appliance has only been designed for cleaning teeth, gums and tongue. Do not use it for any other purpose. Stop using the appliance and contact your doctor if you experience anydiscomfort or pain.-This appliance is a personal care device and is not intended for use on multiple patients in a dental practice or institution.-Do not use other brush heads than the ones recommended by Philips Sonicare.-Stop using a brush head with crushed or bent bristles. Replace the brush head every 3 months or sooner if signs of wear appear.-Avoid direct contact with products that contain essential oils or coconut oil. Contact may result in bristle tufts dislodging.-The UV light bulb of the sanitizer is hot during and immediately after the sanitizing cycle. Do not touch the UV light bulb when it is hot.-Do not operate the sanitizer without the protective screen in place to avoid contact with a hot UV light bulb.-If you have used the sanitizer for 3 UV clean cycles in a row, switch it off for at least 30 minutes before you start another UV clean cycle.Electromagnetic fields (EMF)This Philips appliance complies with all applicable standards and regulations regarding exposure to electromagnetic fields.Radio Equipment DirectiveHereby, Philips declares that electric toothbrushes with radio frequency interface (Bluetooth) are in compliance with Directive 2014/53/EU.The full text of the EU declaration of conformity is available at the following internet address: /supportThe radio frequency interface in this product operates at 13.56 MHz.The maximum RF power transmitted by the appliance is 30.16 dBm.8EnglishYour Philips Sonicare (Fig. 1)1Hygienic travel cap2Smart brush head(s)3Handle4Power on/off button5Intensity light6Mode/intensity button7Modes9Englishstrokes on each tooth.Brush headname Plaque Control CareC3W3G3Brush headlabelHealthier Gums Benefit Plaque removal Plaque andstain removalTo explore our full range of brush heads, go to/toothbrush-heads for more information.*Note: The type of brush heads vary based on the model purchased.Brush head mode pairingBrush heads with BrushSync technology are equipped with a microchip which communicates to the handle and automatically pairs it with the recommended mode and intensity.Note:If you change modes/intensity, the brush head will remember the last used setting. If you wish to brush with the recommended setting, you can find the recommended mode/intensity in ‘Brushing Modes’.Clean andDeep Clean+White+Gum HealthBenefit Plaque removal Plaque andsurface stainsremoval Plaque removal and gum massageRecommended brush head PremiumPlaque Control*(C3)PremiumWhite* (W3)Premium GumCare* (G3)Recommendedintensity level333Total brushing time Clean: 2minutesDeep Clean: 3minutes*2 minutes and40 seconds3 minutes and20 secondsClean andDeep Clean+White+Gum HealthHow to brush Clean: Brusheach segmentBrush eachsegment for 30Brush eachsegment for 20segments 1 and2 for 20Brush eachsegment for 20segments 1, 2, 3and 4 for 20Intensity settingsYour power toothbrush comes with 3 different intensity settings: low, medium and high. When attached to the handle, the smart brush head will automatically select the recommended intensity. Tointeractive features. By connecting your toothbrush to your Sonicare App account, you will be able to:-Easily review your weekly Progress Report for ways to improve your brushing routine-Receive personalized tips and recommendations for managing your oral healthTo start using the Sonicare App:-Download the Sonicare App to your phone-Open the App and follow the guided steps-Pair your toothbrush with the App-Create your account-Personalize your App experience by answering questions about your brushing habits and interests-Brush regularly-Receive weekly updates to improve your oral careNote: Make sure your phone’s Bluetooth is turned on. Your toothbrush uses the Bluetooth connection to transfer your brushing data to the App. If you have questions about why your data is collected, be sure to review the Sonicare Privacy Statement, available throughout the App setup process.Sonicare App – Your oral healthcare dashboardYour Sonicare power toothbrush is equipped with smart sensors to provide you with feedback about your brushing habits, including:-Daily brushing sessions-Time spent during each brushing session-Applied brushing pressure-Brush head replacement reminder (based on its actual usage and effectiveness)The Sonicare App collects the data provided by the smart sensors and tracks your brushing habits over time.Each of the interactive features available in the App are designed to help you understand your brushing habits and provide you with simple, dentist-approved recommendations for improving and maintaining your oral health. You will receive personalized brushing information in the Sonicare App.Brush Head Replacement ReminderOver time, the handle will track the wear of your smart brush head by measuring:-The overall pressure you apply while brushing-The total time you have brushed with your brush headYour Philips Sonicare measures the pressure you apply while brushing to protect your gums and teeth from damage.If you apply too much pressure, the handle will change its vibration until you reduce the pressure.Note: The Pressure Sensor comes activated with your product. To deactivate this feature, see 'Activating or deactivating features'. BrushPacerThe BrushPacer features indicates when you are supposed to move onto the next section of your teeth via a brief change in vibration. The toothbrush will automatically turn off at the end of the brushing session.Charging and battery statusCharging1Plug the charger into an electrical outlet.2Place the handle on the charger.3The charging indicator will flash green until your toothbrush is fully charged.Note: Your handle comes pre-charged for first use. After first use, charge for at least 24 hours.Charging on charger or sanitizer1Plug the charger or sanitizer into an electrical outlet.2Place the handle on the charger or sanitizer.3The charger will charge your toothbrush until it is fully charged. Note: Your handle comes pre-charged for first use. After first use, charge for at least 24 hours.Charging with the travel case** Note: The charging travel case may not be included depending on the model purchased.1Connect the charging travel case to 5V DC input power either from: -The USB adapter provided- a UL-listed or certified to ANSI/UL 60950-1 personal computer's standard USB connector or,- a UL-listed or certified to ANSI/UL 60950-1 LPS power supply with USB output port or,- a UL-listed or certified 1310 Class 2 power supply.fully charged.Note: Charging the handle with the charging travel case may take longer than on the charger.Battery Status (handle on plugged in charger)When the handle is placed on the charger, sanitizer or travel case , the battery light will flash green based on the current battery level. Number of Flashing LEDs Battery charging status1Low2Medium3HighBattery Status (when handle is not placed on Charger)When removing the handle from the charger, sanitizer or travel case, the battery light at the bottom of the handle will indicate the status of the battery.LED Color Number of LEDs Battery status Solid Green3HighSolid Green2MediumSolid Green1LowFlashing Amber 1 (with beeps)Empty or near empty UV Sanitizer-With the UV sanitizer you can clean your brush head after every use.Unplug the sanitizer, discontinue use and call Consumer Care if:-The UV light bulb remains on when the door is open.-The window is broken or missing from the sanitizer.-The sanitizer gives off smoke or a burning smell while it is operating.Note: UV light can be harmful to the human eye and skin. This device should be kept out of reach of children at all times.1After brushing, rinse the brush head and shake off excess water.4Make sure the sanitizer is plugged into a live outlet of appropriate voltage.5Close the door and press the green power on/off button once to select the UV clean cycle.The sanitizer is in operation when the light glows through the window.-All parts can be cleaned by damp cloth or rinsed with warm water. -Remove the brush head from the handle and rinse it thoroughly.-Unplug the charger before you clean it.-Do not use essential oils to clean the brush heads as this can cause damage.Cleaning the UV SanitizerFor optimal effectiveness, it is recommended to clean your sanitizer weekly.1Unplug the sanitizer.2Pull the drip tray straight out. Clean the interior of the sanitizer with a damp cloth.-Rinse the drip tray and wipe it clean with a damp cloth.squeeze and pull out the protective screen.4Remove the UV light bulb.To remove the light bulb, grasp it and pull it out of the metal clasp. 5Clean the protective screen and the UV light bulb with a damp cloth.6Reinsert the UV light bulb.To reinsert the light bulb, align the bottom of the light bulb with the metal clasp and push the bulb into the clasp.7Reinsert the protective screen.To reinsert the screen, align the pegs on the screen with the slots on the reflective surface near the UV light bulb. Push the screen straight into the slots on the sanitizer.StorageIf you are not going to use the product for an extended period of time, unplug it from the electrical outlet, clean it and store it in a cool and dry place away from direct sunlight.Frequently asked questionsQuestion AnswerCan I leave my Sonicare on the charger between brushings? Yes, you can always keep your Philips Sonicare toothbrush on a plugged-in charger. This will not affect the battery lifetime.Will other brush heads fit my Philips Sonicare toothbrush? All Philips Sonicare electric toothbrush brush heads that snap on will fit your toothbrush. However, not all can be used for BrushSync technology. You can identify the brush heads with BrushSync technology by the icon at the base of the brush head.How often do I need to replace my brush head? We recommend you to replace your Philips Sonicare brush head after 3 months of use (based on brushing twice a day for 2 minutes each session).The Brush Head Replacement Reminder will also notify you when it is time to change your brush head.Question AnswerIs my Philips Sonicare toothbrush waterproof? Yes, your Philips Sonicare toothbrush is waterproof. However, never put your handle in a dishwasher to clean it. And do not use it under the shower.What phones are compatible with the Philips Sonicare App? The Philips Sonicare app support Android OS, and Apple iOS. For the most up to date version of the Philips Sonicare App check out the Android Play Store or Apple App Store. Mobile devices must have Bluetooth 4.0 and newer.What other Philips Sonicare toothbrushes can I use with the Philips Sonicare App?You can only use Philips Sonicare Flexcare Platinum Connected, DiamondClean Smart, expert results and ExpertClean toothbrushes with the Sonicare app. Look for the Bluetooth symbol on the front panel of the package.Recycling-Do not throw away the product with the normal household waste at the end of its life, but hand it in at an official collection point for recycling. By doing this, you help to preserve the environment.-This product contains a built-in rechargeable battery which shall not be disposed of with normal household waste. Please take your product to an official collection point or a Philips service center to have a professional remove the rechargeable battery.-The UV light bulb of the sanitizer contains mercury. Do not throw the UV light bulb away with the normal household waste at the end of its life. Hand it in at an official collection point for recycling. -Follow your country’s rules for the separate collection of electrical and electronic products and rechargeable batteries. Correctdisposal helps prevent negative consequences for theenvironment and human health.Removing the rechargeable batteryWarning: Only remove the rechargeable battery when you discard the appliance. Make sure the battery is completely empty when you remove it.To remove the rechargeable battery, you need a towel or cloth, a hammer and a flat-head (standard) screwdriver. Observe basic safety precautions when you follow the procedure outlined below. Be sure to protect your eyes, hands, fingers, and the surface on which you work.1To deplete the rechargeable battery of any charge, remove the handle from the charger, turn on the Philips Sonicare and let it run until it stops. Repeat this step until you can no longer turn on the Philips Sonicare.housing 0.5 inch above the bottom end. Strike firmly with ahammer on all 4 sides to eject the end cap.Note: You may have to hit on the end several times to break the internal snap connections.does not release easily from the housing, repeat step 3 until the end cap is released.5Holding the handle upside down, press the shaft down on a hard surface. If the internal components do not easily release from the housing, repeat step 3 until the internal components are released.8Grab the battery and pull it away from the internal components to break the second metal battery tab.Caution: Be aware of the sharp edges of the battery tabs so as to avoid injury to your fingers.9Cover the battery contacts with tape to prevent any electrical short from residual battery charge. The rechargeable battery can now be recycled and the rest of the product discarded appropriately.Note: Do not throw away the appliance with the normal household waste at the end of its life, but hand it in at an official collection point for recycling. By doing this, you help to preserve theenvironment.Warranty and supportIf you need information or support, please visit/support or read the international warranty leaflet. Warranty restrictionsThe terms of the international warranty do not cover the following:-Brush heads.-Damage caused by use of unauthorized replacement parts. -Damage caused by misuse, abuse, neglect, alterations or unauthorized repair.-Normal wear and tear, including chips, scratches, abrasions, discoloration or fading.-UV light bulb.说明新款飞利浦 Sonicare 声波震动电动牙刷,您值得拥有!动动手指便可去除牙菌斑,让牙齿更洁白,牙龈更健康。
- 1、下载文档前请自行甄别文档内容的完整性,平台不提供额外的编辑、内容补充、找答案等附加服务。
- 2、"仅部分预览"的文档,不可在线预览部分如存在完整性等问题,可反馈申请退款(可完整预览的文档不适用该条件!)。
- 3、如文档侵犯您的权益,请联系客服反馈,我们会尽快为您处理(人工客服工作时间:9:00-18:30)。
360s-4+–360s -4S e r i e s 3360 1011330 320S e r i e s3EnglishOur products are designed to meet the highest standards of quality, functionality and design. We hope you enjoy your new Braun Shaver. WarningPlease read the use instruction carefully and thoroughly before using the appliance.Your shaving system is provided with a special cord set, which has an integrated Safety Extra Low Voltage power supply. Do not exchange or tamper with any part of it, otherwise there is risk of an electric shock.Do not shave with a damaged foil or cord.This appliance is not intended for use by children or persons with reduced physical, sensory or mental capabilities, unless they are given supervision by a person responsible for their safety. In general, we recommend that you keep the appliance out of reach of children. Children should be supervised to ensure that they do not play with the appliance.Oil bottleKeep out of reach of children. Do not swallow. Do not apply to eyes. Dispose of properly when empty.Description1 Foil & Cutter cassette2 Long hair trimmer34 On/off switch5 Charging lights (green)6 Low-charge light (red)7 Replacement light for shaving parts8 Shaver power socket9 Special cord set10 Etui (360s only)11 Protection cap (330s/320s only)ChargingThe best environmental temperature for charging is between 15 °C to 35 °C. Do not expose the shaver to temperatures higher than 50 °C for extendedis not used for a few months, leave the shaver to charge continuously for 4 hours.• Once the shaver is completely charged, discharge the shaver through normal use. Then recharge to full capacity. Subsequent charges will take about 1 hour.• A full charge provides up to 45 minutes of cordless shaving time depending on your beard growth. However, the maximum battery capacity will only be reached after several charging/discharging cycles.• If the rechargeable batteries are discharged, you may also shave by con-necting the shaver to an electrical outlet via the special cord set.• 5-minute quick charge is sufficient for a shave.Charging lights (5)The green charging lights show the charge status of the batteries(330s/320s: 1 charging light). The green charging light blinks when the shaver is being charged or switched on. When the battery is fully charged, all green charging lights (330s/320s: 1 charging light) shine permanently, provided the shaver is connected to an electrical outlet.Low-charge light (6)The red low-charge light flashes when the battery is running low.You should be able to finish your shave.ShavingPress the on/off switch (4) to operate the shaver (picture).The flexible shaving foils automatically adjust to every contour of your face (picture).Long hair trimmer (2)To trim sideburns, moustache or beard, slide the long hair trimmer upwards. Precision setting switch () (360s only)lowered.CleaningThe shaver head is suitable for cleaning under running tap water.Warning: Detach the shaver from the power supply before cleaningthe shaver head in water.Regular cleaning ensures better shaving performance. Rinsing the shaver head under running water after each shave is an easy and fast way to keep it clean:• Switch the shaver on (cordless) and rinse the shaver head under hot running water. You may use liquid soap without abrasive substances. Rinse off all foam and let the shaver run for a few more seconds.• Next, switch off the shaver, remove the shaver Foil & Cutter cassette (1) and let it dry.• If you regularly clean the shaver under water, then once a week apply a drop of light machine oil onto the long hair trimmer (2) and shaverFoil & Cutter cassette (1) (picture).Alternatively, you may clean the shaver using a brush:• Switch off the shaver. Remove the shaver Foil & Cutter cassette and tap it out on a flat surface (picture).• Using a brush, clean the inner area of the shaver head. However, do not clean the shaver Foil & Cutter cassette with a brush as this may damage it (picture).Keeping your shaver in top shapeReplacement light for shaving parts / ResetTo maintain 100% shaving performance, replace the shaver Foil & Cutter cassette (1), when the replacement light for shaving parts (7) comes on (after about 18 months) or when worn.Foil & Cutter cassette: 32S/32BThe replacement light will remind you during the next 7 shaves to replace the Foil & Cutter cassette. Then the shaver will automatically reset the display. After you have replaced the Foil & Cutter cassette (1), press the on/off switchPreserving the batteriesIn order to maintain the optimum capacity of the rechargeable batteries, the shaver has to be fully discharged (by shaving) every six months approxima-tely. Then recharge the shaver to full capacity.Environmental noticeThis product contains rechargeable batteries. In the interest ofprotecting the environment, please do not dispose of the product inthe household waste at the end of its useful life. Disposal can takeplace at a Braun Service Centre or at appropriate collection sitesprovided in your country.Subject to change without notice.For electric specifications, see printing on the special cord set.Braun GmbH Frankfurter Straße 145 61476 Kronberg/Germany 。
