特斯拉Model3用户指导
特斯拉Model3用户手册说明书

• • • Contribute to your building’s overall sustainability with targeted investments that generate resultsTrane – by Trane Technologies (NYSE: TT), a global climate innovator – creates comfortable, energy efficient indoor environments through a broad portfolio of heating, ventilating and air conditioning systems and controls, services, parts and supply. For more information, please visit or .© 2020 Trane. All Rights Reserved.All trademarks referenced in this document are the trademarks of their respective owners.PROD-SLB055-ENMay 13, 2020The Trane Indoor Air Quality Assessment will provide concrete guidance based on your overall system performance. We’ll help you identify areas for improvement in order to meet guidelines and optimize indoor air quality.Where possible we will conduct the assessment remotely through your building automation system (BAS). All on-site assessments of the physical environment will be performed following recommended safety guidelines.When completed, your Account Manager will review the results and share a detailed IAQ assessment report that includes strategic recommendations, with a focus on the key drivers of indoor air quality: building ventilation, humidity control, filtration and clean air. For example:Modifying your controls sequences and setpoints to optimize ventilation and performanceAdding additional sensors to more closely measure humidity and temperature or adding a dedicated outdoor air unitIncorporating air cleaning technologies into your system, like MERV-13 filters or a robust photo catalytic air cleaning systemBuilding confidence with IAQIt’s a normal human emotion – fear of the unknown. Most people don’t know what building management does to ensure the quality of the air in their building. You can help build their confidence by ensuring your HVAC system is performing optimally to provide more comfortable, cleaner indoor air.Trane is here to help. Like you, we are passionate about clean indoor air. The Trane Air System Quality Recognition award recognizescustomers who share that commitment. Customers who participate in the Trane Indoor Air Quality Assessment may be recognized for their efforts by Trane.The U.S. Centers of Disease Control and Prevention (CDC) and World Health Organization (WHO) both published recommendations for occupyingworkplaces.1,2 In addition, two leading industry trade associations, ASHRAE and REHVA, published guidance for operating building HVAC systems.3,4 These HVAC-related recommendations generally focus on four key areas:Dilute: Proper ventilation ensures that plenty of fresh, outdoor air comes into the building to dilute the buildup of indoor contaminants. Adjusting building ventilation is one tool that can influence indoor air quality.Exhaust: Getting exhaust air out efficiently is equally important—especially air from kitchens,restrooms and combustion systems.Contain : Maintaining indoorhumidity levels within the ASHRAE-recommended range maximizes the comfort of building occupants.Clean : Of increasing concern is the HVAC system’s ability to reduce micro-organisms, such as mold, bacteria and viruses.1. Interim Guidance for Businesses and Employers to Plan and Respond to COVID-19, CDC2. Getting your workplace ready for COVID-19, WHO, dated 3 March 20203. ASHRAE Position Document on Infectious Aerosols, dated 14 April 20204. REHVA COVID-19 guidance document, dated 3 April 2020A fresh take on your indoor air quality—from the industry expertTo learn more and schedule your Indoor Air Quality Assessment, contact your local Trane office or visit today.The transmission of Covid-19 may occur in a variety of ways and circumstances, many of the aspects of which are currently not known. HVAC systems, products, services and other offerings have not been tested for their effectiveness in reducing the spread of Covid-19, including through the air in closed environments.。
特斯拉 Model S 用户指南说明书

Trigo Product CenterRelease Notes Fix pack 4.1.0.13aNote: Before using this information and the product it supports, read the information in “Notices”at the end of this document.10 June 2006This edition of this document applies to Trigo Product Center, version 4.1.0.13a, and to all subsequent releases and modifications until otherwise indicated in new editions.© Copyright International Business Machines Corporations 2006. All rights reserved. Licensed Materials-Property of IBM. US Government Users Restricted Rights – Use, duplication or disclosure restricted by GSA ADP Schedule Contract with IBM Corp.Table of Contents1. Overview (2)1.1 Fix pack requirements (2)2. Product fixes (2)2.1 Fixes for 4.1.0.13a (2)2.2 Fixes for 4.1.0.12a (2)2.3 Fixes for 4.1.0.11 (3)2.3.1Override with Blank feature disabled (3)2.4 Fixes for 4.1.0.10 (3)2.5 Fixes for 4.1.0.9 (3)2.6 Fixes for 4.1.0.8a (4)2.7 Fixes for 4.1.0.8 (4)2.8 Fixes for 4.1.0.7 (5)3. Known issues and limitations (5)4. Installation (5)4.1 Installation notes (5)4.1.1Removal of J2EE and JSSE (5)4.2 Preparation (7)4.2.1Stopping the whole application on the local machine (7)4.2.2Backup (7)4.2.3Delete Tomcat working directory (8)4.3 Apply Fix Pack (8)4.3.1Unpack tar file (8)4.3.2Verify configuration files (8)4.4 Test installation (9)4.4.1Start Trigo Product Center (9)4.4.2Check status (10)1. OverviewThis document addresses customer requests, installation instructions, and notes for Trigo Product Center Fix Pack 4.1.0.13a on the following platform:•Tomcat/Oracle1.1 Fix pack requirementsTrigo Product Center 4.1.0.7 must be installed prior to the application of Fix Pack 4.1.0.13a. Ifworking with a version prior to 4.1.0.7, it is required to upgrade to 4.1.0.7 first and then apply the4.1.0.13a Fix Pack.2. Product fixesThis section identifies issues that have been reported and resolved with the application of this fix pack.Note: The Tracking Number column uses APAR, PMR, and Internal CR record numbers.2.1 Fixes for 4.1.0.13aDescriptionTrackingNumberJR23783 Cannot import all items from a cvs file.2.2 Fixes for 4.1.0.12aDescriptionTrackingNumberJR22156 Cannot delete spec, even if not in useJR21730 Attribute Search choice should jump.Impact: No change in the UI. Grouped attributes are highlighted when searched forin tab view.JR22158 Empty paths displayed in left paneJR22547 Jobs failing after MTPing 4.1.0.10 in production2.3 Fixes for 4.1.0.11DescriptionTrackingNumberJR21938 Attribute not included in exportJR21924 Attribute order changing from sub-spec to secondary specJR21688 Inheritance path and source not displayedJR22037 Inheritance Rules lost when category tree is rolled backJR21470 Category search unsuccessful - if category name contains "+ "JR22213 IPG Performance comparisonJR22482 Can't override the inherited value through scripting2.3.1 Override with Blank feature disabledProblem: The change made in 4.1.0.9 was for attribute values to be trimmed before being saved.This change was made so that there is proper matching of attribute values (i.e. for lookup tables).However, a problem surfaces when blank spaces are used to override inheritance. The trim fixdisables the overriding feature.Solution: A simple fix will be made to keep the trim fix intact. Trimming is done only forattributes with non-blank characters. Meaning "A " and " A" will be trimmed to "A", but " " will remain as " ".2.4 Fixes for 4.1.0.10TrackingDescriptionNumber18654 Fixes & Optimization of duplicate sub spec script operationsNA Back port of custom export/import tool – Refer to "Export/Import User Guide" for additional information.2.5 Fixes for 4.1.0.9DescriptionTrackingNumberJR21056 Incorrect duplicate sub spec errorJR21036 Script parsing error (explicit final new line required)JR20850 getSpecNameList() does not work for SUB_SPEC parameter valueJR21055 getSpecNameList() returns all spec names for CATEGORY_TREE_SPEC parameter, instead of just the category tree specsJR20852 Get inheritance rule by attribute full path returns no resultJR20981 Lookup table keys don't get leading/trailing white space trimmedJR21123 Fix multi-occurrence ordering on importJR21061 Unexpected results when using the copy toolJR20610 Inheritance source goes to wrong placeJR21469 Issue with non-persistent attributes2.6 Fixes for 4.1.0.8aTrackingNumberDescriptionJR21238 Workflow scheduler stuck on productionDebug code has been added to catch and report certain Java exceptions that willbe thrown if corruptions of workflow static data occur in the database. Forexample, if rows are deleted from the db tables containing workflow static data,while collaboration area that references the workflow still has items movingthrough it. Data corruption should never occur of course; hence these particularJava exceptions should actually never occur.JR21206 Using getFullHTTPResponse(..) method to download zip files.2.7 Fixes for 4.1.0.8Tracking number Description01638Positional placement of new spec attributes.04359Rollback the changeover to the light Data Entry UI screens13524 Ordering of locale attributes is not consistent across specs when new locales are added to the system01114 Clicking on source of inheritance does not direct to the exact location of the attribute15080 Cannot add subspec attribute through spec association screen if Secondary spec or category spec has only single node.15584 View code not handling an invalid attribute properly15634 Extra line ${RM} ${TOP}/etc/tomcat33/webapps/trigo in start_appsvr.sh script removes tomcat working dir15743 Duplicate sub spec validation error preventing save of category entries13405 Redundant execution of queries15761 ItemEdit widget exception when trying to display inherited value2.8 Fixes for 4.1.0.7Refer to the release notes for maintenance releases 4.1.0.7-4.1.0.7c.3. Known issues and limitationsThe following table identifies known issues and limitations related to this release.JR22268 Inconsistent Attribute Values in system-default and user-defined views. Targeted to be addressed for 4.1.0.13JR21545 Issue with displaying inheritance rules. Debug code was implemented in 4.1.0.9 to better analyze the issue and to aid in providing a solution for a future Fix Pack.18633 When removing a subspec, an error occurs stating that a duplicate subspec has been added. The error should not occur as the subspec is removed.Workaround: Log out of WebSphere Product Center and log back in to clear the errormessage.4. InstallationThis section provides general guidelines to apply a Fix Pack to Trigo Product Center. Someinformation may differ depending on the methods used for previous installations. Contact your support representative for Trigo Product Center with any installation issues.4.1 Installation notesPreviously, it was necessary to perform a full installation for all files. The current installationprocess only updates the files that have changed to the current working version directory.4.1.1 Removal of J2EE and JSSECR: P12188Due to new company guidelines, J2EE and JSSE are no longer bundled as part of the Trigoinstallation file. This is not an issue for customers using WebSphere or WebLogic, only customers using Tomcat.J2EE - Java 2 Platform, Enterprise EditionJ2EE is a Trigo prerequisite with the use of Tomcat; therefore the J2EE JAR file, which is part of “Version 1.3.1 of the Java 2 SDK, Enterprise Edition ("J2EE" SDK)”, will need to be downloaded by the customer from the Sun Microsystems website (/j2ee/sdk_1.3/). Follow the instructions on the website to download and install the entire J2EE SDK.Note: The J2EE jar file is included in the J2EE SDK tar file.Figure 1 - Link to download J2EE SDK tar fileOnce this tar file is downloaded, it is extracted to a location defined by the customer.Since j2ee.jar is no longer included when a Trigo enterprise build is created and it is a prerequisite for Trigo Product Center, the following environment variable needs to be set to identify the location of the j2ee.jar file. The environment variable is defined in the init_trigo_vars.sh file.File to edit:$TOP/setup/init_trigo_vars.shEnvironment variable:J2EE_JAR=(location of j2ee.jar file including the file name)For Example:J2EE_JAR=/opt/j2sdkee1.3.1/lib/j2ee.jarNote: This step is not required for WebSphere or WebLogic.JSSE - Java Secure Socket ExtensionJSSE was being used to provide HTTPS post functionality. After careful review, it was determined that this functionality was not being used, therefore the functionality and the associated JAR file were removed.4.2 PreparationBefore attempting to apply the latest Fix Pack to Trigo Product Center, the following preparation is recommended:4.2.1 Stopping the whole application on the local machineComplete the following steps to stop the Trigo Product Center instance:1. Check the scheduler to make sure there are no critical jobs that need to be completed.If the queue is clear, kill the scheduler manually by running the script:$TOP/bin/go/stop/stop_scheduler.sh2. Abort the entire application by running the script:$TOP/bin/go/abort_local.shAll services running on the local machine are aborted. The RMI registry is aborted.Note: Check to make sure all processes have stopped using the 'ps' command.Kill any rogue "java" or "rmiregistry" processes that remain after shutting down the instance.Occasionally, it may take several attempts to kill all java processes.4.2.2 Backup•Create a full backup of the current Trigo Product Center directories before applying the Fix Pack. The Fix Pack will overwrite files that have changed. If any issues occur, thebackup will allow a rollback to a previous version•It is recommended to apply the Fix Pack to a test system to identify any issues before applying the Fix Pack to a production system•Perform a full backup of the database before applying the Fix Pack to a production system Note: Do not delete the old Trigo Product Center version until thorough testing of the new installation is completed.4.2.3 Delete Tomcat working directoryFor configurations using Tomcat, delete the Tomcat working directory using the followingcommand:rm -rf $TOP/etc/default/tomcat33/webapps/ccdOnce the working directory has been deleted, begin the application of the Fix Pack.4.3 Apply Fix PackTo apply the Fix Pack to Trigo Product Center, complete the following tasks:Unpack tar fileUpdate configuration filesTest installation4.3.1 Unpack tar filePurpose: To extract and update any new installation files into the current working directoryNote: GNU tar is needed to untar the Trigo Product Center files.1.Copy the Trigo Product Center tar file to the user or temporary directory.Example:{HOME_OF_TRIGO}/tarballs2. CD to $TOP, the current working directory, and unpack the tar file:Using GNU tar, the following command extracts and unzips the tar file:Example:Tar using an absolute path:tar zxvf /home/trigo/tarballs/trigo_4107a_05_fixpak_tom_ora.tgz 4.3.2 Verify configuration filesVerify all configuration files required by the new installation and make any updates as needed.Refer to the backup copy of the configuration files for the previous installation if needed.austin.propertiesadmin_properties.xmlinit_trigo_vars.shTrigo license fileaustin.propertiesOn startup, the system will use this file to read in all system level parameters. This fileincludes settings for the database layer (connection parameters), directory settings,default character sets, thread-pooling parameters, and other settings, which aredocumented in the file.File location: $TOP/etcadmin_properties.xmlThis file is used by the administrative utilities to configure clusters of the application.File location: $TOP/etcinit_trigo_vars.shThe initialization file is the shell script that initializes the shell variables used by thesystem.File location: $TOP/setupTrigo License FileThe license file contains the license keys needed to use the Trigo application.File location: $TOP/etc/runtime4.4 Test installation4.4.1 Start Trigo Product CenterTo start the Trigo Product Center, execute the following script:$TOP/bin/go/start_local.shThe script starts all the services required to run Trigo Product Center.Note: This process should take approximately 30-40 seconds, depending on the speed of the processor.4.4.2 Check statusRun the $TOP/bin/go/rmi_status.sh script that was provided by Trigo Product Center andverify the following services have started correctly.•admin_<machine name>•appsvr_<machine name>•eventprocessor•queuemanager•scheduler•workflowYOU HAVE SUCCESSFULLY APPLIED THE LATEST MAINTENACE RELEASE FOR TRIGO PRODUCT CENTER!NoticesIBM may not offer the products, services, or features discussed in this document in all countries. Consult your local IBM representative for information on the products and services currently available in your area. Any reference to an IBM product, program, or service is not intended to state or imply that only that IBM product, program, or service may be used. Any functionally equivalent product, program, or service that does not infringe any IBM intellectual property right may be used instead. However, it is the user’s responsibility to evaluate and verify the operation of any non-IBM product, program, or service.IBM may have patents or pending patent applications covering subject matter described in this document. The furnishing of this document does not give you any license to these patents. You can send license inquiries, in writing, to:IBM Director of LicensingIBM CorporationNorth Castle DriveArmonk, NY 10504-1785U.S.A.The following paragraph does not apply to the United Kingdom or any other country where such provisions are inconsistent with local law:INTERNATIONAL BUSINESS MACHINES CORPORATION PROVIDES THIS PUBLICATION “AS IS” WITHOUT WARRANTY OF ANY KIND, EITHER EXPRESS OR IMPLIED, INCLUDING, BUT NOT LIMITED TO, THE IMPLIED WARRANTIES OF NON-INFRINGEMENT, MERCHANTABILITY OR FITNESS FOR A PARTICULAR PURPOSE. Some states do not allow disclaimer of express or implied warranties in certain transactions, therefore, this statement may not apply to you.This information could include technical inaccuracies or typographical errors. Changes are periodically made to the information herein; these changes will be incorporated in new editions of the publication. IBM may make improvements and/or changes in the product(s) and/or program(s) described in this publication at any time without notice.Any references in this information to non-IBM Web sites are provided for convenience only and do not in any manner serve as an endorsement of those Web sites. The materials at those Web sites are not part of the materials for this IBM product and use of those Web sites is at your own risk.IBM may use or distribute any of the information you supply in any way it believes appropriate without incurring any obligation to you.Licensees of this program who wish to have information about it for the purpose of enabling: (i) the exchange of information between independently created programs and other programs (including this one) and (ii) the mutual use of the information which has been exchanged, should contact:IBM Burlingame LaboratoryDirector IBM Burlingame Laboratory577 Airport Blvd., Suite 800Burlingame, CA 94010U.S.ASuch information may be available, subject to appropriate terms and conditions, including in some cases, payment of a fee.The licensed program described in this document and all licensed material available for it are provided by IBM under terms of the IBM Customer Agreement, IBM International Program License Agreement, or any equivalent agreement between us.Any performance data contained herein was determined in a controlled environment. Therefore, the results obtained in other operating environments may vary significantly. Some measurements may have been made on development-level systems and there is no guarantee that these measurements will be the same on generally available systems. Furthermore, some measurement may have been estimated through extrapolation. Actual results may vary. Users of this document should verify the applicable data for their specific environment.Information concerning non-IBM products was obtained from the suppliers of those products, their published announcements or other publicly available sources. IBM has not necessarily tested those products and cannot confirm the accuracy of performance, compatibility or any other claims related to non-IBM products. Questions on the capabilities of non-IBM products should be addressed to the suppliers of those products.This information may contain examples of data and reports used in daily business operations. To illustrate them as completely as possible, the examples may include the names of individuals, companies, brands, and products. All of these names are fictitious and any similarity to the names and addresses used by an actual business enterprise is entirely coincidental.All statements regarding IBM’s future direction or intent are subject to change or withdrawal without notice, and represent goals and objectives only.Programming interface informationProgramming interface information, if provided, is intended to help you create application software using this program.General-use programming interfaces allow you to write application software that obtain the services of this program’s tools.However, this information may also contain diagnosis, modification, and tuning information. Diagnosis, modification and tuning information is provided to help you debug your application software.Warning: Do not use this diagnosis, modification, and tuning information as a programming interface because it is subject to change.Trademarks and service marksThe following terms are trademarks or registered trademarks of International Business Machines Corporation in the United States or other countries, or both:IBMthe IBM logoAIXCrossWorldsDB2DB2 Universal DatabaseDominoLotusLotus NotesMQIntegratorMQSeriesTivoliWebSphereMicrosoft, Windows, Windows NT, and the Windows logo are trademarks of Microsoft Corporation in the United States, other countries, or both.MMX, Pentium, and ProShare are trademarks or registered trademarks of Intel Corporation in the United States, other countries, or both.Java and all Java-based trademarks are trademarks of Sun Microsystems, Inc. in the United States, other countries, or both.Other company, product or service names may be trademarks or service marks of others.IBM WebSphere Product Center.。
model 3买了后悔死了
model 3买了后悔死了
1、model 3买了后悔死了完全没有必要,一些车主觉得model 3缺点太多。
一些model 3车主反馈电动车充电真心不方便,而且开空调严重影响续航,一些节假日model 3车主上高速跑长途回老家,由于堵车和充电不便等原因,车子抛锚在高速上,十分窝火。
实际上这些都是电动汽车的通病,随着电池技术的发展,配套措施的完善,像model 3这样的电动车的普及率会越来越高。
2、model 3买了后悔死了是部分车主的个人看法,model 3仍十分热销。
在刚刚过去的9月份model 3销量高达3万多台,位居9月轿车销量排行榜第六位,说明model 3的产品力还是得到了普遍的认可的。
值得肯定的是9月轿车销量排行榜前5名中,国产电动车占据了3席,分别是红光mini、比亚迪秦
和比亚迪汉,看来国产轿车翻身的希望就在新能源车型上了。
3、特斯拉model 3 降价到19万了是谣言,特斯拉model 3
最便宜的时候是23.59万元人民币。
2021年7月30日,特斯拉官方微博宣布,特斯拉Model 3标准续航升级版的价格下调15000元人民币,调整后的价格为235900元人民币(此为补
贴后起售价)。
目前特斯拉model 3最便宜的后轮驱动版的补贴前起售价为279900元人民币。
本网页“model 3买了后悔死了特斯拉model 3 降价到19万了吗”仅为个人生活经验分享,不提供任何产品及服务。
如果您发现本网“model 3买了后悔死了特斯拉model 3 降价到
19万了吗”信息有误、需要更新或删除,请与我们联系,我们将及时核实处。
model 3 使用手册

model 3 使用手册摘要:1.Model 3 简介2.Model 3 的外观和内饰3.Model 3 的性能和续航4.Model 3 的智能科技配置5.Model 3 的驾驶辅助系统6.Model 3 的充电和保养7.Model 3 的安全提示正文:【Model 3 简介】Model 3 是特斯拉公司推出的一款电动汽车,其定位为中高端消费者市场。
Model 3 凭借其出色的性能、时尚的外观和智能科技配置,受到了全球消费者的欢迎。
【Model 3 的外观和内饰】Model 3 的外观设计简约大方,采用了特斯拉家族式的设计语言。
内饰部分,Model 3 同样以简约为主题,取消了传统汽车的大部分物理按键,转而使用超大尺寸的中控触摸屏进行操作。
【Model 3 的性能和续航】Model 3 搭载了特斯拉先进的电动驱动系统,性能强劲。
根据不同的配置,Model 3 提供了多种续航里程选择,满足消费者不同的出行需求。
此外,Model 3 支持特斯拉的超级充电网络,充电速度快,方便出行。
【Model 3 的智能科技配置】Model 3 配备了特斯拉最新的智能科技配置,包括自动泊车、自动驾驶辅助、智能召唤等功能。
这些功能不仅提高了驾驶的便捷性,还大大提升了驾驶的安全性。
【Model 3 的驾驶辅助系统】Model 3 搭载了特斯拉的自动驾驶辅助系统,可以通过摄像头、雷达等传感器实时监测周围环境,提供车道保持、自动紧急制动、自动变道等功能,帮助驾驶员更安全、轻松地驾驶。
【Model 3 的充电和保养】Model 3 的充电方式分为快充、慢充和超级充电。
快充和慢充可以通过家用电源或充电桩进行,超级充电则需要使用特斯拉的超级充电站。
在保养方面,Model 3 的保养周期较长,降低了保养成本。
【Model 3 的安全提示】为了确保驾驶安全,Model 3 提供了一系列安全提示功能,包括安全带提醒、车门未关提醒、驾驶辅助系统故障提醒等。
model 3 使用手册

model 3 使用手册
Model 3是特斯拉公司的一款电动汽车,以下是关于Model 3
使用手册的全面回答:
一、驾驶操作。
Model 3使用手册首先会详细介绍如何启动和停止车辆,包括
使用钥匙卡或者手机应用来解锁和锁定车辆,以及如何启动和停止
车辆的电动驱动系统。
此外,手册还会提供关于座椅调整、方向盘
操作、灯光控制、雨刮器操作等方面的详细说明。
二、车辆功能。
手册会对Model 3的各种功能进行介绍,包括中控屏的操作、
音频系统的使用、导航系统的设置、充电接口的使用等。
同时还会
介绍一些高级功能,比如Autopilot自动驾驶辅助系统的使用方法、智能预热功能的操作等。
三、维护保养。
使用手册还会包括对Model 3的日常维护保养的介绍,比如定
期检查轮胎气压、更换雨刮器片、定期检查刹车系统等。
此外,手
册还会提供一些故障排除的方法,比如如何处理电池充电问题、如
何应对车辆故障灯的提示等。
四、安全须知。
手册还会详细介绍Model 3的安全功能和安全驾驶注意事项,
包括安全带的正确使用、安全气囊的作用、紧急情况下的操作指南等。
五、法律法规。
最后,手册还会提供一些关于驾驶Model 3时需要遵守的法律
法规,比如交通标志的含义、交通规则的遵守等。
总之,Model 3使用手册会从驾驶操作、车辆功能、维护保养、安全须知和法律法规等多个方面全面介绍如何正确、安全地驾驶和
使用这款电动汽车。
希望这些信息能够帮助你更好地了解Model 3
的使用方法和注意事项。
model 3 使用手册
model 3 使用手册摘要:1.Model 3 简介2.Model 3 的外观设计3.Model 3 的性能表现4.Model 3 的安全配置5.Model 3 的驾驶辅助系统6.Model 3 的充电与续航7.Model 3 的使用与维护手册正文:【Model 3 简介】Model 3 是特斯拉(T esla)推出的一款纯电动轿车,自2017 年开始生产以来,受到了全球消费者的热捧。
Model 3 以其出色的性能、时尚的外观和环保的特点,成为了新能源汽车市场的佼佼者。
【Model 3 的外观设计】Model 3 采用了特斯拉家族式的设计语言,整体造型简约大气。
前脸封闭式格栅搭配两侧狭长的大灯,使车头看起来更加低矮、修长。
车身侧面,Model 3 线条流畅,营造出强烈的运动感。
车尾则采用了溜背式设计,进一步强调了其运动气息。
【Model 3 的性能表现】Model 3 搭载了一台最大功率可达202kW 的电动机,最大扭矩为404N·m。
其0-100km/h 加速时间仅需5.3 秒,性能表现相当出色。
与此同时,Model 3 提供了多种电池容量选择,最大续航里程可达660 公里(根据不同配置和电池容量,实际续航里程可能有所差异)。
【Model 3 的安全配置】Model 3 在安全方面同样表现优秀,车辆配备了主副驾驶座安全气囊、侧气囊、头部气帘等被动安全装备。
此外,Model 3 还搭载了主动安全驾驶辅助系统,包括自动紧急制动、车道保持辅助、交通信号灯识别等功能,有效降低驾驶风险。
【Model 3 的驾驶辅助系统】Model 3 配备了特斯拉的Autopilot 自动驾驶辅助系统,该系统集成了自适应巡航、车道保持、自动泊车等功能,使得驾驶变得更加轻松便捷。
通过不断升级的OTA(Over The Air)在线升级,Model 3 的自动驾驶辅助系统还将持续优化,为用户带来更智能的驾驶体验。
特斯拉Tesla Model 3 用户手册

前后开启和关排闭 座椅......................................................................................
13
清抛使脚洁光用垫外内、汽部饰修车补车漆罩及车身维修
9456
座椅开启和关安闭 全带......................................................................................
开启和关闭
高电功压率部壁件挂式连接器
778
车门...................................................................................................
关电于池电保池养
79
车窗...................................................................................................
TESLA
TESLA MOTORS TESLA ROADSTER
MODEL 3
本文档所包含的所有其他的商标是其各自所有者的财产;本文使用这些商标,并不意味对其产品或服务的赞助或背书认可。严禁擅 用本文档中显示的或汽车上的任何商标。
内容
用户信息
免责明....................................................................................... ........
14
检清查洁和雨更刷换喷雨水刷头片
97
model 3 使用手册
model 3 使用手册(实用版)目录1.model 3 简介2.model 3 的特性与功能3.使用 model 3 的步骤与技巧4.model 3 的维护与保养5.model 3 的安全须知正文【model 3 简介】model 3 是一款由特斯拉公司生产的电动汽车,具有出色的性能和舒适的内饰。
它的设计简洁大方,线条流畅,极具未来感。
model 3 提供了多种颜色和配置选择,可以满足不同消费者的需求。
【model 3 的特性与功能】model 3 具有以下几个特性和功能:1.长续航里程:model 3 的续航里程可以达到 358 英里 (579 公里),可以满足日常使用和远程旅行的需求。
2.快速充电:model 3 可以在超级充电站进行快速充电,大约 30 分钟可以充至 80% 电量。
3.智能自动驾驶:model 3 配备了智能自动驾驶系统,可以实现自动驾驶和自动泊车等功能。
4.舒适内饰:model 3 的内饰采用了高品质材料和精湛工艺,提供了舒适的驾驶环境和宽敞的后排空间。
【使用 model 3 的步骤与技巧】1.开车前准备:在开车前,需要检查车辆的电量、轮胎压力和刹车系统等,以确保安全行驶。
2.进入车辆:进入车辆后,需要调整座椅和后视镜,系好安全带,然后启动车辆。
3.驾驶车辆:在驾驶车辆时,需要遵守交通规则,注意安全行驶。
model3 提供了多种驾驶模式,可以根据不同的驾驶情况进行选择。
4.充电:当车辆电量不足时,需要及时充电。
可以前往特斯拉超级充电站或者使用家庭充电桩进行充电。
5.维护与保养:为了保持车辆的性能和安全性,需要定期进行维护和保养。
建议每年进行一次全面的车辆检查和保养。
【model 3 的安全须知】在驾驶 model 3 时,需要遵守交通规则,注意安全行驶。
以下是一些安全须知:1.系好安全带:驾驶员和乘客需要系好安全带,以保证安全。
2.不要酒后驾车:酒后驾车会影响驾驶员的判断和反应能力,会增加交通事故的风险。
特斯拉 Model 3 用户手册说明书

©1999 Whelen Engineering Company Inc.Form No.13465C (050208)A u t o m o t i v e : S i r e n s /S w i t c h e sFor warranty information regarding this product, visit /warrantyDANGER! Sirens produce extremely loud emergency warning tones! Exposure to these tones without proper and adequate hearing protection, could cause ear damage and/or hearing loss! The Occupational Safety & Health Administration () provides information necessary to determine safe exposure times in Occupational Noise Exposure Section 1910.95. Until you have determined the safe exposure times for your specific application,operators and anyone else in the immediate vicinity should be required to wear an approved hearing protection device. Failure to follow this recommendation could cause hearing loss!•Proper installation of this product requires the installer to have a good understanding of automotive electronics, systems and procedures.•Whelen Engineering requires the use of waterproof butt splices and/or connectors if that connector could be exposed to moisture.•Any holes, either created or utilized by this product, should be made both air- and watertight using a sealant recommended by your vehicle manufacturer.•Failure to use specified installation parts and/or hardware will void the product warranty.•If mounting this product requires drilling holes, the installer MUST be sure that no vehicle components or other vital parts could be damaged by the drilling process. Check both sides of the mounting surface before drilling begins. Also de-burr the holes and remove any metal shards or remnants. Install grommets into all wire passage holes.•If this manual states that this product may be mounted with suction cups, magnets, tape or Velcro®, clean the mounting surface with a 50/50 mix of isopropyl alcohol and water and dry thoroughly.•Do not install this product or route any wires in the deployment area of your air bag. Equipment mounted or located in the air bag deployment area will damage or reduce the effectiveness of the air bag, or become a projectile that could cause serious personal injury or death. Refer to your vehicle owner’s manual for the air bag deployment area. The User/Installer assumes full responsibility to determine proper mounting location, based on providing ultimate safety to all passengers inside the vehicle.•For this product to operate at optimum efficiency, a good electrical connection to chassis ground must be made. The recommended procedure requires the product ground wire to be connected directly to the NEGATIVE (-) battery post (this does not include products that use cigar power cords).•If this product uses a remote device for activation or control, make sure that this device is located in an area that allows both the vehicle and the device to be operated safely in any driving condition.•It is recommended that these instructions be stored in a safe place and referred to when performing maintenance and/or reinstallation of this product.•FAILURE TO FOLLOW THESE SAFETY PRECAUTIONS AND INSTRUCTIONS COULD RESULT IN DAMAGE TO THE PRODUCT OR VEHICLE AND/OR SERIOUS INJURY TO YOU AND YOUR PASSENGERS!CAUTIONLoud siren noise can cause hearing damage and/or loss.Refer to OSHA Section 1910.95prior to putting ANY siren into service!Wear Protection!ACTIVATION OF THIS SIREN MAY DAMAGE UNPROTECTED EARS!Warnings to InstallersWhelen’s emergency vehicle warning devices must be properly mounted and wired in order to be effective and safe. Read and follow all of Whelen’s written instructions when installing or using this device. Emergency vehicles are often operated under high speed stressful conditions which must be accounted for when installing all emergency warning devices. Controls should be placed within convenient reach of the operator so that they can operate the system without taking their eyes off the roadway. Emergency warning devices can require high electrical voltages and/or currents. Properly protect and use caution around live electrical connections.Grounding or shorting of electrical connections can cause high current arcing, which can cause personal injury and/or vehicle damage, including fire. Many electronic devices used in emergency vehicles can create or be affected by electromagnetic interference. Therefore, after installation of any electronic device it is necessary to test all electronic equipment simultaneously to insure that they operate free of interference from other components within the vehicle. Never power emergency warning equipment from the same circuit or share the same grounding circuit with radio communication equipment. All devices should be mounted in accordance with the manufacturer’s instructions and securely fastened to vehicle elements of sufficient strength to withstand the forces applied to the device. Driver and/or passenger air bags (SRS) will affect the way equipment should be mounted. This device should be mounted by permanent installation and within the zones specified by the vehicle manufacturer, if any. Any device mounted in the deployment area of an air bag will damage or reduce the effectiveness of the air bag and may damage or dislodge the device. Installer must be sure that this device, its mounting hardware and electrical supply wiring does not interfere with the air bag or the SRS wiring or sensors. Mounting the unit inside the vehicle by a method other than permanent installation is not recommended as unit may become dislodged during swerving; sudden braking or collision. Failure to follow instructions can result in personal injury. Whelen assumes no liability for any loss resulting from the use of this warning device. PROPER INSTALLATION COMBINED WITH OPERATOR TRAINING IN THE PROPER USE OF EMERGENCY WARNING DEVICES IS ESSENTIAL TO INSURE THE SAFETY OF EMERGENCY PERSONNEL AND THE PUBLIC.Warnings to UsersWhelen’s emergency vehicle warning devices are intended to alert other operators and pedestrians to the presence and operation of emergency vehicles and personnel. However, the use of this or any other Whelen emergency warning device does not guarantee that you will have the right-of-way or that other drivers and pedestrians will properly heed an emergency warning signal. Never assume you have the right-of-way. It is your responsibility to proceed safely before entering an intersection, driving against traffic, responding at a high rate of speed, or walking on or around traffic lanes. Emergency vehicle warning devices should be tested on a daily basis to ensure that they operate properly. When in actual use, the operator must ensure that both visual and audible warnings are not blocked by vehicle components (i.e.: open trunks or compartment doors), people, vehicles, or other obstructions. It is the user’s responsibility to understand and obey all laws regarding emergency warning devices. The user should be familiar with all applicable laws and regulations prior to the use of any emergency vehicle warning device. Whelen’s audible warning devices are designed to project sound in a forward direction away from the vehicle occupants. However, because sustained periodic exposure to loud sounds can cause hearing loss, all audible warning devices should be installed and operated in accordance with the standards established by the National Fire Protection Association.Safety FirstThis document provides all the necessary information to allow your Whelen product to be properly and safely installed. Before beginning the installation and/or operation of your new product, the installation technician and operator must read this manual completely. Important information is contained herein that could prevent serious injury or damage.Installation Guide:Project-A-Flex® Speaker System51 Winthrop RoadChester, Connecticut 06412-0684Phone: (860) 526-9504Internet: Sales e-mail: autosale@Customer Service e-mail: custserv@®ENGINEERING COMPANY INC.The Project-A-Flex® siren speaker allows the horn and driver to be installed separately under the hood of even the most compact vehicles. The speaker driver can be mounted on the firewall or the fenderwall virtually any distance from the horn. Through the use of acoustical flexible tubing, the horn can be mounted behind the vehicles grille, under the bumper or any other concealed location that will allow the forward projection of sound. The acoustical flexible tubing not only allows easier installation, but also substantially increases the sound level gain.Installation Instructions:1.Check the contents of the kit to insure that all parts and components are in the package. See exploded parts drawing on front page.2.Determine the ideal mounting location for the driver and speaker horn assembly.Follow diagrams on left.3.After the location for the speaker driver has been chosen, use the driver mounting bracket as a template for making and drilling the bracket mounting holes.4.After the driver mounting bracket is securely mounted to the vehicle, install the speaker driver to the bracket using ¼” X 20 X ½” hex head cap screws.5.Install the driver adapter (item 11) to the speaker driver, making sure to insert the rubber seal (item 2) and fiber spacer seal (item 3) between the adapter and driver.Continue the assembly process in the sequence shown in the drawing on pg. 1.6.Install the speaker horn assembly at the chosen location on the front grill of the vehicle (fig. 4). Speaker horn assembly may be secured with the enclosed ty-wraps (item 10).7.Route the acoustical flexible tubing from the driver to the speaker horn assembly following the warnings to the left. To fit the acoustical tubing, cut it at the nearest 4”length (see text at the top of the page).8.Clamp the flexible acoustical tubing securely over the speaker horn and driver adapters with the two hose clamps (item 8). Use ty-wraps (item 10) to secure acoustical tubing in place (figs. 2 & 3).IMPORTANT: Due to the lightweight nature of some plastic front grilles, when mounting the speaker horn upon it, harmonic vibration (distortion) of the siren sound is possible. In this case use a mounting location for the speaker horn other than the speaker grille itself. Example: Grille Mounting Posts, Metal Bumper Flanges, etc.the speaker driver and the speaker horn to cut the flexible tubing at the 4”。
特斯拉Model_3_用户画像浅析
160AUTO TIMEAUTO AFTERMARKET | 汽车后市场特斯拉Model 3用户画像浅析1 引言近几年,在新能源补贴政策、购置税、路权等优惠政策推动下,新能源汽车市场快速崛起。
但随着优惠政策的逐渐收缩,新能源汽车市场结束了爆发式增长,2019年出现小幅下滑,年销量仅92.3万台,新能源汽车市场正在由政策主导向市场主导转型。
2020年,随着五菱宏光MINI EV 的上市、造车新势力蔚来/小鹏/理想等企业的崛起、特斯拉的国产化,新能源汽车市场发展迎来了较大幅度的上扬,增速突破20%,年销量达到114.8万辆。
特斯拉作为中高端新能源汽车市场的标杆,在发展前期销量受产能限制带来的交付时间长以及缺少低价位产品等因素影响,销量虽保持高速增长,但总体规模无较大突破(历年销量如图1所示)。
随着中国上海超级工厂的建成,Model 3的正式投产,国产版Model 3较进口版价格大幅降低,且价格多次下调,同时依靠其自动驾驶、电池系统等特有产品优势,快速抢占国内新能源市场,销量快速攀升,2020年全年销量接近14万台,成为特斯拉品牌的主要销量来源。
中国作为全球最大的新能源汽车市场,随着电动车在消费领域的不断普及,特斯拉Model 3成功在中国引领了一批开放、热情的年轻用户,本文针对特斯拉Model 3购车用户的研究,明确用户特征和喜好,将有助于引导新能源汽车未来发展。
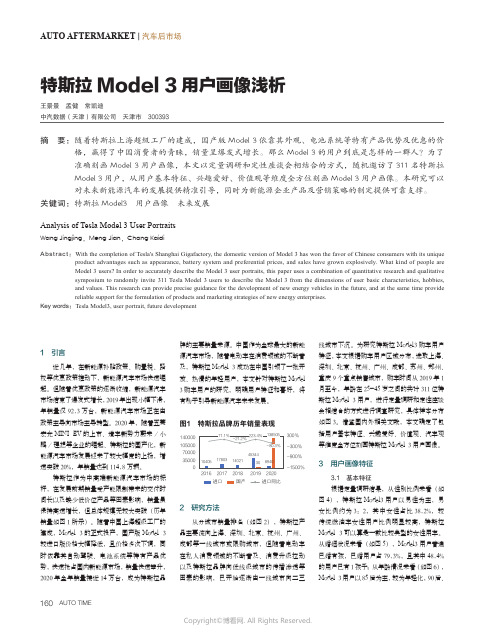
图1 特斯拉品牌历年销量表现1400001050007000035000300%-300%-900%-1500%20162017201820192020进口国产进口同比2 研究方法从分城市销量排名(如图2),特斯拉产品主要流向上海、深圳、北京、杭州、广州、成都等一线城市或限购城市,但随着电动车在私人消费领域的不断普及、消费升级拉动以及特斯拉品牌向低线级城市的传播渗透等因素的影响,已开始逐渐由一线城市向二三线城市下沉。
为研究特斯拉Model3购车用户特征,本文根据购车用户区域分布,选取上海、深圳、北京、杭州、广州、成都、苏州、郑州、重庆9个重点销售城市,购车时间从2019年1月至今,年龄在25-45岁之间的共计311位特斯拉Model 3用户,进行定量调研和定性座谈会相结合的方式进行调查研究,具体样本分布如图3。
model 3 使用手册
model 3 使用手册欢迎您购买特斯拉 Model 3!作为一款先进的电动汽车,Model 3 带给您的不仅仅是独特的驾驶体验,还有出色的性能和智能的功能。
本使用手册将全面介绍 Model 3 的操作指南和相关功能,帮助您更好地了解和使用您的新车。
第一章:车辆概述1.1 Model 3 简介Model 3 是特斯拉推出的一款纯电动轿车,采用现代化的设计和先进的科技,为您带来高效能源利用、低碳环保的出行方式。
1.2 外观与内饰Model 3 拥有简洁流线的外观设计,兼顾美观与空气动力学性能。
内饰采用高品质材料,配备舒适且智能化的控制和显示系统。
1.3 动力系统Model 3 配备高效的电动驱动系统,提供动力强劲、响应迅速的驾驶体验。
电池组可实现长续航里程,让您远离繁琐的加油过程。
第二章:驾驶操作指南2.1 进入车辆使用您的特斯拉手机应用或者电子钥匙进入车辆。
一旦接近车辆,车门将自动开启,您只需轻松上车。
2.2 启动与停车踏入刹车踏板并将换挡杆拨至 D 档,即可启动车辆。
停车时,将换挡杆拨至 P 档并拉手刹。
2.3 加速与刹车Model 3 采用电动驱动系统,提供平顺且迅猛的加速感受。
当您松开油门时,车辆将自动减速。
刹车时,轻踩刹车踏板即可实现可靠的制动效果。
2.4 转向操作您可以通过转动方向盘来控制车辆的转向。
Model 3 配备专业的电动助力转向系统,使转向更轻松。
2.5 车辆巡航使用巡航控制功能时,您可以将车辆设置为一定的速度和跟车间距,让车辆自动维持行进。
巡航控制可极大地减轻长途驾驶的疲劳感。
第三章:智能功能3.1 自动驾驶Model 3 配备先进的驾驶辅助系统,可实现自动驾驶。
在指定道路条件下,您可以将车辆设置为自动驾驶模式,享受更轻松的驾驶体验。
请注意,自动驾驶需要在合适的道路环境下使用,并时刻保持警觉。
3.2 导航与娱乐系统Model 3 配备智能导航与娱乐系统,可提供实时交通信息和导航指引。
model3操作技巧
model3操作技巧Model 3 操作技巧Model 3 是特斯拉旗下一款非常受欢迎的电动汽车,它以其出色的性能和智能化的功能而备受瞩目。
为了让用户更好地使用Model 3,下面将介绍一些操作技巧和注意事项。
1. 钥匙卡和手机解锁Model 3 支持两种方式解锁车辆:钥匙卡和手机。
钥匙卡是一张小巧的卡片,可以通过触摸车门柄来解锁。
手机解锁则需要通过特斯拉官方应用程序,在手机蓝牙连接的情况下,轻触手机屏幕即可解锁车辆。
2. 导航系统Model 3 配备了一套智能的导航系统,可以提供实时路况信息和最佳路线规划。
您可以通过触摸屏幕中的导航图标来打开导航功能,并输入目的地地址。
导航系统会自动规划最佳路线,并在屏幕上显示出来。
此外,您还可以使用语音命令来操作导航系统,例如“导航到XXX”。
3. Autopilot 自动驾驶功能Model 3 配备了 Autopilot 自动驾驶功能,可以辅助驾驶和提供安全性能。
在使用Autopilot 时,您需要将双手放在方向盘上并保持警觉,以便随时接管控制。
您可以通过点击方向盘上的控制杆来启用Autopilot,并使用控制杆上的按钮来调整巡航速度和跟车距离。
4. 车辆控制设置在 Model 3 中,您可以通过触摸屏幕上的“控制”图标来打开车辆控制设置。
在这个菜单中,您可以调整座椅、车内温度、音响系统等各种设置。
您还可以个性化设置驾驶器官的感应程度、转向灵敏度和刹车力度等参数,以适应自己的驾驶习惯。
5. 超级充电站特斯拉在全球范围内建有大量的超级充电站,为 Model 3 的充电提供便利。
您可以使用导航系统来查找最近的超级充电站,并规划充电路线。
在到达充电站后,您只需将车辆插入充电器,并按照屏幕上的指示进行操作,即可开始充电。
6. 省电模式和预热功能Model 3 提供了省电模式和预热功能,以帮助用户更好地管理电池寿命和车辆温控。
在省电模式下,车辆会限制某些功能的使用,以延长续航里程。
揭秘特斯拉MODEL 3不可告人的核心秘密
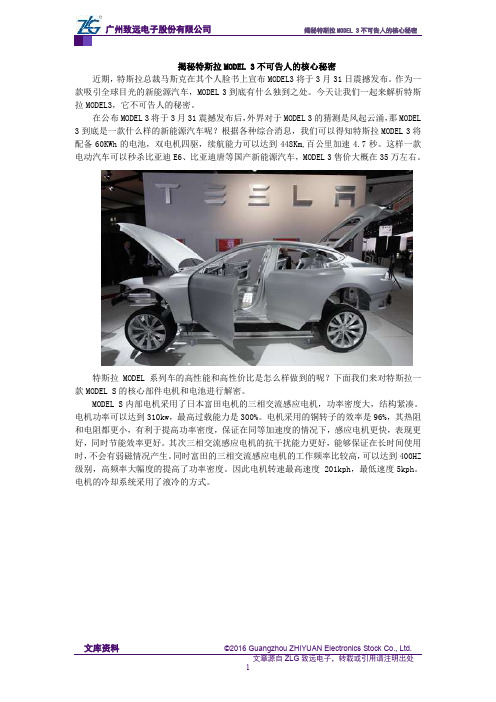
揭秘特斯拉MODEL 3不可告人的核心秘密近期,特斯拉总裁马斯克在其个人脸书上宣布MODEL3将于3月31日震撼发布。
作为一款吸引全球目光的新能源汽车,MODEL 3到底有什么独到之处。
今天让我们一起来解析特斯拉MODEL3,它不可告人的秘密。
在公布MODEL 3将于3月31震撼发布后,外界对于MODEL 3的猜测是风起云涌,那MODEL 3到底是一款什么样的新能源汽车呢?根据各种综合消息,我们可以得知特斯拉MODEL 3将配备60KWh的电池,双电机四驱,续航能力可以达到448Km,百公里加速4.7秒。
这样一款电动汽车可以秒杀比亚迪E6、比亚迪唐等国产新能源汽车,MODEL 3售价大概在35万左右。
特斯拉MODEL 系列车的高性能和高性价比是怎么样做到的呢?下面我们来对特斯拉一款MODEL S的核心部件电机和电池进行解密。
MODEL S内部电机采用了日本富田电机的三相交流感应电机,功率密度大,结构紧凑。
电机功率可以达到310kw,最高过载能力是300%。
电机采用的铜转子的效率是96%,其热阻和电阻都更小,有利于提高功率密度,保证在同等加速度的情况下,感应电机更快,表现更好,同时节能效率更好。
其次三相交流感应电机的抗干扰能力更好,能够保证在长时间使用时,不会有弱磁情况产生。
同时富田的三相交流感应电机的工作频率比较高,可以达到400HZ 级别,高频率大幅度的提高了功率密度。
因此电机转速最高速度 201kph,最低速度5kph。
电机的冷却系统采用了液冷的方式。
MODEL S架构MODEL S用控制更加复杂的感应电机而不用控制简单效率更高的永磁电机很大程度上就是因为感应电机功率密度更高,配合矢量控制或者直接转矩控制能实现非常大的工作范围。
再配合液冷的话,可以耐受较长时间低速全转矩输出,极端工况也不会有退磁的隐忧。
至于高速限制,更多的是因为效率的问题,高速运行的话开关损耗和铁损都会变大,整体效率就低了,所以电动车一般不会给特别高的转速。
特斯拉MODEL S车主手册

MODEL S 车主手册8.0概述 (2)内部简介 (2)外观简介 (3)开启和关闭 (4)车门 (4)车窗 (8)行李箱 (9)前备箱 (11)手套箱 (13)天窗 (14)杯托 (15)座位和安全约束系统 (16)前后排座椅 (16)座椅安全带 (18)儿童安全座椅 (21)安全气囊 (27)驾驶 (31)驾驶员设定 (31)方向盘 (32)后视镜 (35)启动和关闭电源 (36)档位 (37)仪表板 (38)灯光 (43)雨刮器和清洗器 (48)制动器 (49)牵引力控制 (51)驻车辅助 (52)车辆保持 (54)弹射起步模式 (55)行程信息 (56)获得最大行驶里程 (57)后视摄像头 (58)辅助驾驶 (59)关于辅助驾驶 (59)主动巡航控制 (61)辅助转向 (65)自动变道 (67)自动泊车 (69)车道辅助 (74)防撞辅助 (76)车速辅助 (78)使用触摸屏 (79)触摸屏简介 (79)控制 (84)设置 (87)温度控制 (90)智能空气悬架 (94)媒体和音频系统 (96)电话 (99)地图和导航 (101)日历 (103)安全设置 (104)连接至 Wi-Fi (105)软件更新 (106)移动应用程序 (107)充电 (108)车辆电气部件 (108)电池信息 (110)充电说明 (111)保养 (116)汽车保养时间表 (116)轮胎养护 (117)临时轮胎修理................................................................................121清洁.. (125)雨刮器片和清洗器喷头 (128)储液罐 (129)顶升和举升 (132)零配件 (133)规格 (134)识别标签 (134)车辆负载 (135)尺寸和重量 (137)子系统 (139)轮毂和轮胎 (145)道路救援 (149)联系路边援助 (149)运输说明 (150)用户信息 (152)关于本车主信息 (152)免责声明 (153)报告安全缺陷 (154)合格性声明 (155)1.内车门把手(从车内打开车门 见第 5页)2.主动巡航控制(主动巡航控制 见第 61页)和辅助转向(请参阅辅助转向 见第 65页)3.远光灯(远光大灯 见第 46页)、转向信号灯(转向信号灯 见第 46页)、雨刮器和清洗器(雨刮器和清洗器 见第 48页)4.方向盘按钮 - 左(使用方向盘按键 见第 32页)5.仪表板(仪表板 见第 38页)6.方向盘按钮 - 右(使用方向盘右侧按键 见第 32页)7.换挡杆(换挡 见第 37页)8.触摸屏(触摸屏简介 见第 79页)9.杂物箱按钮(手套箱 见第 13页)10.电动车窗开关(开启和关闭 见第 8页)11.外部后视镜调节开关(后视镜 见第 35页)12.座椅(前后排座椅 见第 16页)13.转向柱调节器(上图未明确显示)(方向盘 见第 32页)14.喇叭(喇叭 见第 34页)15.制动器(制动器 见第 49页)16.危险警告灯(危险警告灯 见第 47页)17.驾驶室温度控制(温度控制 见第 90页)18.杯托(杯托 见第 15页)2Model S 用户手册1.外部车灯(灯光见第 43页)2.门把手(使用外门把手见第 5页)3.天窗(选配)(天窗见第 14页)4.充电端口(充电说明见第 111页)5.前视摄像头(关于辅助驾驶见第 59页)6.外部后视镜(后视镜见第 35页)7.前备箱盖/前备箱(前备箱见第 11页)8.雷达传感器(上图未明确显示)(关于辅助驾驶见第 59页)9.车轮和轮胎(轮毂和轮胎见第 145页)10.后视摄像头(后视摄像头见第 58页)11.行李箱/行李箱盖(行李箱见第 9页)12.超声波传感器(驻车辅助见第 52页和关于辅助驾驶见第 59页)概述3无钥匙车门锁定和解锁上锁和解锁 Model S 十分方便。
model 3 使用手册
model 3 使用手册
【实用版】
目录
1.model 3 简介
2.model 3 的使用说明
3.model 3 的维护保养
4.model 3 的安全提示
5.结论
正文
model 3 是一款由特斯拉公司生产的电动汽车。
它以其出色的性能和先进的技术而闻名。
在这篇文章中,我们将介绍如何使用和维护 model 3。
首先,让我们看看如何使用 model 3。
在启动车辆之前,请确保车辆已经被充电。
然后,进入车辆并按下“启动”按钮。
接下来,将脚放在刹车上并按下“驾驶模式”按钮,选择“驾驶模式”。
现在,您可以开始驾驶了。
在使用 model 3 的过程中,您需要注意一些事项。
例如,请勿将车辆暴露在极端温度下,这可能会损坏电池。
此外,请勿在车辆行驶时进行急加速或急刹车,这可能会对电池造成损伤。
在使用完车辆后,您需要对其进行充电。
您可以在家中或公共充电站进行充电。
在充电时,请确保车辆被正确接地,并使用符合特斯拉公司标准的充电线。
除了使用和充电,您还需要定期维护 model 3。
您可以将车辆送到特斯拉服务中心进行维护,也可以在家中进行一些简单的维护。
例如,您可以检查轮胎的气压,更换刹车片,以及清洁车辆。
在使用 model 3 时,您还需要注意一些安全提示。
例如,请勿在车
内放置易燃物品,以免发生火灾。
此外,请勿在车辆行驶时使用手机或电子设备,这可能会分散您的注意力。
综上所述,model 3 是一款出色的电动汽车,它为您提供了方便的出行方式。
model 3 使用手册
model 3 使用手册【最新版】目录1.Model 3 简介2.Model 3 的主要特点3.Model 3 的使用方法4.Model 3 的维护与保养5.Model 3 的安全提示正文【Model 3 简介】Model 3 是一款由特斯拉公司生产的电动汽车,自推出以来,凭借其出色的性能、舒适的驾驶体验和时尚的外观,受到了广大消费者的欢迎。
Model 3 提供多种版本,以满足不同消费者的需求。
【Model 3 的主要特点】Model 3 具有以下几个主要特点:1.长续航里程:Model 3 的续航里程可以达到 600 公里以上,满足日常通勤和远程旅行的需求。
2.强劲动力:Model 3 搭载的电机最大功率可达 200kW,百公里加速仅需 5.3 秒。
3.智能驾驶:Model 3 配备了 Autopilot 自动驾驶系统,可以在高速公路上自动切换车道、自动泊车等。
4.超级充电:Model 3 支持特斯拉超级充电网络,充电 30 分钟可恢复约 200 公里的续航。
【Model 3 的使用方法】1.驾驶前准备:检查轮胎气压、刹车系统、灯光等,确保车辆处于良好状态。
2.钥匙启用:将钥匙靠近车辆,按下解锁按钮解锁车辆,然后按下启动按钮启动车辆。
3.驾驶模式选择:通过中控屏幕选择驾驶模式,包括舒适模式、运动模式等。
4.驾驶:行驶过程中,请遵守交通规则,注意安全。
【Model 3 的维护与保养】1.定期检查:建议每 5000 公里进行一次定期检查,包括轮胎、刹车系统、电池等。
2.更换机油:建议每 10000 公里更换一次机油。
3.充电维护:建议定期检查充电接口和充电线,确保充电正常。
4.软件更新:及时更新车辆软件,以获得更好的驾驶体验。
【Model 3 的安全提示】1.驾驶安全:遵守交通规则,保持安全距离,注意行车安全。
2.充电安全:使用原装或认证的充电设备进行充电,避免非法改装或不规范的充电行为。
3.乘员安全:请确保车内乘员均系好安全带,儿童使用合适的儿童座椅。
特斯拉model3使用说明书
特斯拉model3使用说明书特斯拉Model 3 使用说明书感谢您选择特斯拉 Model 3 电动汽车!本使用说明书包含了有关 Model 3 的详细信息和操作指南,请您仔细阅读并遵守所有提示和警告。
1. 车辆概况Model 3 是一款电动轿车,拥有超过 500 公里的续航里程和强大的动力表现。
其具有四个座位和大量存储空间,可满足您的各种需求。
2. 车辆操作2.1 开机按下钥匙卡的中心突起按钮,车辆将开机。
如果您使用的是手机钥匙,则按下车辆钥匙卡上的锁车/解锁按钮启动车辆。
此时,您将听到车辆发出一声欢迎声。
2.2 驾驶在启动车辆后,踩下制动器,将换挡杆(或档杆)置于 D(或驾驶)档,松开制动器即可开始行驶。
2.3 停车在行驶过程中,踩下制动器,将换挡杆(或档杆)置于 P(或停车)档,松开制动器即可停车。
在停车前,请确保您已经将车辆完全停稳,并且没有任何机械部件与车辆接触。
2.4 充电Model 3 可以通过特斯拉的 Supercharger 设施或任何公共充电网络进行充电。
要开始充电,请将充电器插头插入车辆左侧的充电口中。
充电过程中,请勿离开车辆,并确保充电器和车辆的连接牢固。
3. 安全提示3.1 驾驶安全驾驶车辆时,请遵守道路交通法规,并保持警觉。
特斯拉 Model 3 配备了自动辅助驾驶系统,但在无人驾驶的情况下仍需注意安全。
请勿使用手机、电脑等其他电子设备,以免分散驾驶注意力。
如果您感到疲劳,请立即停车休息。
3.2 充电安全在充电车辆之前,确保插座电压和电流与车辆所需充电规格相符。
充电器应稳固地插入插座,勿在雨天或潮湿环境下充电。
3.3 紧急情况如果您遇到紧急情况,请通过车载电话或紧急呼叫按钮与特斯拉客服联系。
若需要紧急维修,请将车辆停靠在安全的区域,并拨打特斯拉维修服务电话。
谢谢您的阅读,祝您驾驶愉快!。
model 3 使用手册

model 3 使用手册摘要:1.引言2.车辆概述3.驾驶与操作4.信息娱乐系统5.车辆设置与个性化6.维护与保养7.安全与法规8.问题与解答正文:【引言】特斯拉Model 3是一款高性能电动汽车,为驾驶者带来全新的驾驶体验。
本使用手册旨在帮助您更好地了解和操作Model 3,以确保您的驾驶安全和舒适。
【车辆概述】Model 3拥有出色的加速性能、超长续航里程和先进的智能系统。
车辆采用全电动驱动,提供安静、舒适的驾驶环境。
外观设计简洁大方,内部空间宽敞,为乘客提供舒适的乘坐体验。
【驾驶与操作】Model 3采用单踏板驾驶模式,驾驶者只需通过一个踏板即可实现加速、减速和制动。
车辆还配备了自动辅助驾驶功能,可在高速公路上自动切换车道、调整车速以及自动泊车。
【信息娱乐系统】Model 3的信息娱乐系统采用15英寸触摸屏,集成车辆控制、导航、音乐播放等功能。
系统支持语音识别和手势控制,方便驾驶者进行操作。
此外,特斯拉还提供OTA在线升级服务,为用户提供实时更新和更多功能。
【车辆设置与个性化】Model 3提供了丰富的车辆设置选项,包括能量回收、转向力度、悬架硬度等。
用户可以根据个人喜好进行调整,以实现最佳的驾驶体验。
此外,特斯拉还提供了座椅加热、空调控制等功能,以提高驾驶舒适度。
【维护与保养】作为电动汽车,Model 3的维护成本较低。
电池寿命长,正常使用情况下可保证8-15年。
定期保养主要包括轮胎检查、制动系统检查、电机冷却液检查等。
特斯拉还提供远程诊断和道路救援服务,确保车辆始终保持良好的运行状态。
【安全与法规】Model 3遵循我国相关安全法规,配备多种主动和被动安全装置,如气囊、侧气帘、车身稳定控制系统等。
驾驶者应遵守交通法规,确保行车安全。
同时,特斯拉还提供驾驶培训课程,帮助用户了解车辆性能和驾驶技巧。
【问题与解答】本手册提供了Model 3使用过程中可能遇到的问题及解答。
如遇到其他问题,请咨询特斯拉客服或前往特斯拉服务中心。
model3维修手册

model3维修手册(最新版)目录1.Model 3 维修手册概述2.维修手册的内容3.维修手册的使用方法4.维修手册的重要性5.结论正文1.Model 3 维修手册概述Model 3 是特斯拉公司推出的一款电动汽车,凭借其出色的性能和设计,受到了广泛关注和好评。
为了方便用户和维修人员进行车辆的维修和保养,特斯拉公司提供了详细的维修手册。
本文将对 Model 3 维修手册进行概述,以帮助大家更好地了解和利用这份手册。
2.维修手册的内容Model 3 维修手册包含了车辆的各个方面的维修和保养信息,包括以下几个部分:(1) 车辆简介:介绍了 Model 3 的基本信息,如车辆尺寸、性能参数等。
(2) 底盘和车身:包括车辆的底盘系统、车身结构、悬挂系统等部分的维修和保养方法。
(3) 电池和电力系统:介绍了 Model 3 的电池组、电机、充电系统等部分的维修和保养知识。
(4) 空调和舒适系统:涵盖了车辆的空调系统、座椅、车窗等部分的维修和保养方法。
(5) 传感器和控制系统:包括车辆的各种传感器、控制器等电子部件的维修和保养知识。
(6) 维修工具和设备:介绍了在维修过程中可能需要使用的工具和设备。
3.维修手册的使用方法在使用 Model 3 维修手册时,建议按照以下步骤进行:(1) 确定问题:在维修之前,首先要对车辆的问题进行准确描述,以便快速找到相应的解决方案。
(2) 查找相关信息:根据问题,查找维修手册中相应的章节,了解问题的原因和解决方法。
(3) 准备工具和设备:在维修之前,要确保已经准备好手册中提到的工具和设备。
(4) 维修和保养:按照手册中的指导进行维修和保养。
(5) 检查效果:维修完成后,要对车辆的性能进行检查,确保问题已经得到解决。
4.维修手册的重要性Model 3 维修手册对于车辆的维修和保养具有重要意义,主要体现在以下几个方面:(1) 提高维修效率:通过查阅维修手册,可以快速了解车辆的维修和保养知识,提高维修人员的工作效率。
- 1、下载文档前请自行甄别文档内容的完整性,平台不提供额外的编辑、内容补充、找答案等附加服务。
- 2、"仅部分预览"的文档,不可在线预览部分如存在完整性等问题,可反馈申请退款(可完整预览的文档不适用该条件!)。
- 3、如文档侵犯您的权益,请联系客服反馈,我们会尽快为您处理(人工客服工作时间:9:00-18:30)。
用户指南
CHINA
内容
容内
概述............................................................... 2
内部简介.................................................................................2 外观简介.................................................................................3 触摸屏简介............................................................................. 4
保养........................................................... 109
保养时间表......................................................................... 109 轮胎养护.............................................................................110 清洁....................................................................................115 雨刮器片和清洗器喷头 ...................................................... 118 储液罐................................................................................ 119 顶升和举升......................................................................... 121 零配件................................................................................ 122
使用触摸屏...................................................80
控制......................................................................................80 温度控制...............................................................................85 地图和导航........................................................................... 89 媒体和音频系统....................................................................92 电话......................................................................................94 日程表..................................................... 96 使用语音指令....................................................................... 97 安全设置...............................................................................98 HomeLink® 通用收发器.........................................................99 连接至 Wi-Fi....................................................................... 101 软件更新.............................................................................102
充电........................................................... 103
车辆电气部件..................................................................... 103 电池信息.............................................................................105 充电说明.............................................................................106
座位和安全约束系统.................................... 21
前后排座椅........................................................................... 21 座椅安全带........................................................................... 24 Model 3 让儿童安全就坐......................................................27 气囊......................................................................................35
开启和关闭.....................................................7
钥匙........................................................................................7 车门......................................................................................11 车窗......................................................................................13 后备箱.................................................................................. 14 前备箱.................................................................................. 16 内部储物与电子设备.............................................................18
Autopilot 自动辅助驾驶................................63
关于 Autopilot 自动辅助驾驶................................................ 63 主动巡航控制....................................................................... 65 辅助转向...............................................................................69 自动泊车...............................................................................72 车道辅助...............................................................................75 防撞辅助...............................................................................77 车速辅助...............................................................................79
驾驶............................................................. 38
驾驶员设定........................................................................... 38 方向盘.................................................................................. 40 后视镜.................................................................................. 42 启动和关闭电源....................................................................43 挡位......................................................................................44 车灯......................................................................................45 车辆状态...............................................................................48 雨刮器和清洗器....................................................................51 制动器.................................................................................. 52 牵引力控制........................................................................... 54 驻车辅助...............................................................................55 车辆保持...............................................................................57 赛道模式...............................................................................58 获得最大行驶里程................................................................ 59 后视摄像头........................................................................... 60 行车记录仪........................................................................... 61 行人警示系统....................................................................... 62
