最新conference手册说明
V2 conference Admin Manual管理员手册
Admin ManualV 5.6Ownership ClaimsV2 Technology, Inc. reserves the right to interpret this manual. V2 Technology, Inc. reserves the right to alter, modify, or otherwise change in any manner the content hereof without obligation of V2 Technology, Inc. to notify any person of such revision or changes.No part of this manual may be added, deleted, modified, abstracted, translated, reproduced, or adopted in any form or by any means without the prior written permission of V2 Technology, Inc. Due care has been taken to make the Admin Manual as accurate as possible. V2 Technology, Inc. makes no representation or warranties with respect to the contents hereof and shall not be responsible for any loss or damage caused to the User by the direct or indirect use of the Admin Manual.V2 Technology, Inc. may own the patents, patent-pending rights, trademarks, copyright or other intellectual properties mentioned in this manual. Except otherwise stated in written form by V2 Technology, Inc. the ownership of this manual doesn’t mean that you are entitled to use any of these rights, trademarks, copyrights or other intellectual properties.All marks and trademarks are properties of the respective companies with which they are associated.The GIPS technologies and their respective trademarks used by this software are owned by Global IP Sound AB. The copyright claims are as follows.Portions Copyright © 1999-2009 Global IP Sound Inc. All rights reserved.Global IP Sound,GIPS,SoundWare,NetEQ,iPCM,iLBC,GIPS V oiceEngine,and associated design marks and logos are trademarks owned or used under license by Global IP Sound AB,and may be registered in the United States and other countries.Patents and Patents Pending, Global IP Sound Inc.Copyright © 1999-2009 V2 Technology, Inc. All rights reserved.ContentsOwnership Claims (1)Contents (I)About this manual (1)1. System Introduction (2)2. Server Installation (3)2.1. System Requirements (3)2.2. MyODBC Program Installation (3)2.3. SDK Program Installation (3)2.4. Conference Server Installation Procedure (3)2.5. IM Server Installation (16)3. Server Configuration (21)3.1. Configure the Master Server (21)3.1.1. Database Configuration (21)3.1.2. Conference Server Management (24)3.1.3. IM Server Management (29)3.2. Configure the Slave Server (38)3.3. Upgrade the Slave Server Automatically (39)4. Log in to the Management System (43)4.1. Log in to the Management System of Maser Server (43)4.1.1. Personal Details (44)4.1.2. Department Management (45)4.1.3. User Management (47)4.1.4. Conference Scheduling (50)4.1.5. Conference Management (58)4.1.6. System Configuration (60)4.1.7. Monitor equipment (64)4.1.8. Database (67)4.1.9. Address Book (68)4.1.10. Resource Statistics (69)4.1.11. Change Server Type (71)4.1.12. Exit System (71)4.2. Log in to the Management System of the Slave Server (71)4.2.1. Change Server Type (72)4.2.2. Authorization Password Configuration (72)4.2.3. Resource Statistics (73)4.2.4. Modify Password (73)4.2.5. Exit System (73)Annex A PSTN Server Installation Instructions (74)1. System Requirements (74)2. Installation Procedure (75)2.1. Install the Board (75)2.2. Wiring (75)2.3. Parameter Setup (75)Annex B Connection to SIP Terminals (77)1. Permissible Rights (77)2. Operating Procedure (77)3. Relations (78)4. Handling Conflicts (78)Annex C Server Port Information (80)Annex D H.323 Routing User (83)About this manualThe audience of this manual is system admin of V2 Conference This manual involves implementation details of V2 Conference system as well as other work performed by the system admin.This manual offers the following information:z System IntroductionIntroduction to the V2 Conference Systemz Server InstallationSystem requirements and server installing procedurez Server ConfigurationHow to configure and start Master Server and Slave Serverz Log in to the Management SystemThe actions that may be performed by the system admin in the management system of the Master Server and Slave Server1.System IntroductionV2 Conference is composed of the video conferencing server, conferencing management server and endpoint. Of which, the video conferencing server and endpoint are designed to perform the collection, compression, transmission, exchanging and routing of the multi-media information for conferencing. Whereas the conferencing management server provides users with a tool to perform system management and maintenance. By accessing the conferencing management server through such web browsers as IE, remote system management and maintenance such as database configuration, server startup and monitoring, conferencing management, user management, and resources inquiry may be performed. All the conferencing applications (installation, download and upgrade of the endpoint programs) and management applications are WEB enabled. Conference system can combine the monitor system. During the conference, moderator call the monitor user, and then display its video in the conference.Conference system can combine the monitor system, administrator can configure the monitor functions when the server supports monitor commutate service.The V2 Conference system supports the multi-server cascading deployment, allowing the CPU and network processing bottleneck to be distributed to multi servers. In such way, several thousand users may videoconference at the same time. By configuring and managing the master server, the operation of each functional module on the slave server may be dynamically monitored and managed.2.Server Installation2.1.System RequirementsOne or more servers may be deployed to take care endpoint applications depending on system size and requirements. System requirements of the video conferencing serve are shown in the following table.Minimum configuration Recommended configurationCPU PentiumIV Pentium IV 3.0G or above Dual XEON CPURAM 512M and above 2G and aboveSupported RecommendedOperating system Windows 2000Windows 2003Windows XPWindows VistaWindows 7Windows 2003 Server2.2.MyODBC Program InstallationIf the conference server is not installed MyODBC procedures, it needs to install the program first. If the Active/Active mode is using, secondary server also needs to install this program. The installation process will not repeat here.2.3.SDK Program InstallationIf the conference server is not installed SDK procedures, it needs to install the program first. If the Active/Active mode is using, secondary server also needs to install this program. The installation process will not repeat here.2.4.Conference Server Installation ProcedureInsert the CD-ROM into the CD drive. The installation program will start automatically, with the following welcome interface displayed.Figure 2-1Accept the agreement by checking the “I have read and accept it”. Click the “Next” button and follow the onscreen prompts to select the installation directory.Figure 2-2Click “Next” button to display the License Agreement as shown in the following figure.Figure 2-3You may select the default path or click “Browse” button to select other installation directory. After that, click “Next” button.Figure 2-4The system will prompt you to choose the installation version. “Formal Edition” is the official version while “Trial Edition” is a trial version (the four participants and two conference rooms version). Select the “Formal Edition” and then click “Next” as shown in the following figure.Figure 2-5Onscreen prompt will ask you to choose the Master Server or Slave Server. After that, click “Next” button to open the Port Configuration window as shown in the following figure.Figure 2-6Management Port is the port of the management system, which is defaulted as 18080. Web server port is 8080. Conference Mysql Port is the port of Mysql, which is defaulted as 3307. After setting, click the “Next” button to open the following window, showing the need to support dual-hot information.Figure 2-7The default is “No”, means does not need dual-hot feature, pass this step. If select "Yes", means choice the dual-hot feature, administrators should prepare the software similars to the “Life Keeper” to configure Dual Hot-backup, and add the three services of conference, when the failure of the main server, the system will activate the slave host through the consultation measurement software (generally through the heart diagnosis) to ensure that application in a short time to return fully to normal use. Main host and slave host need only one Aladdin encryption device, and the host should install the Aladdin encryption driver. The setup programme shown as below. Click the arrow in front of the “Hasp HL Net License Manager”, select the first option, install the service.Figure 2-8In the Figure 2-7 click “Next”, show the dual-hot standby IP setting information, shown as follow;Figure 2-9Input the master host, slave host and drift IP address. Click “Next”, show the window as below.Figure 2-10To start installation, click “Next”. For the Slave Server, the installation completion window will be displayed after the installation is completed.For the Master Server, the encryption driver installation window will be popped up as shown in the following figure.Figure 2-11Ensure that you meet the requirements. Then, click “Next” to display the Installing Parameters window as follows:Figure 2-12Two options are available, the Install SenseIV Driver and the Uninstall SenseIV Driver. If you have never installed the encryption driver before, select the Install SenseIV Driver option. Then, click “Next” to continue to open the following window.Figure 2-13Click “Finish” button to finish the driver installation. The server installation completion window is displayed as follows.Figure 2-14Check “Go to conference’s homepage” and click “Finish” to finish the server installation. The server configuration window will be opened.Notes:z To protect customer’s legal rights, highly secured hardware encryption is used toprevent against pirating at the maximum extent. Ensure to find this device in thepackaging as shown in the following figure.Figure 2-15z The server installation package contains updated versions of Tomcat(5.0.0.28),MySQL(4.1.13), and JDK(1.4.2).After the server installation is completed, ConfMachineLoader and ConfTomcat services will be started by system automatically.To manually start or stop these services, Windows management tools should be used.z Only the installation of the encryption driver is completed could the encryption device be plugged into the USB port. Installation of the encryption driver is notnecessary for the users who have installed the encryption driver or are using the trialversion.2.5.IM Server InstallationInsert the CD-ROM into the CD drive. The installation program will start automatically, with the following welcome interface displayed.Figure 2-16Click “Next” to display the License Agreement as shown in the following figure. Accept the agreement by checking the “I have read and accept it”.Figure 2-17Display the webservice password setting page, as shown below. Input the webservice password. When the administrator adds IM server in the conference management system, it will prompt this password. If the password is wrong, it will not boot the server, and indicating that the wrong password. Then click “Next”.Figure 2-18Click “Next” button and follow the onscreen prompts to select the installation directory. You may select the default path or click “Browse” button to select other installation directory.Figure 2-19Click “Next” to open the following window. To start installation, click “Next”.Figure 2-20The server installation completion window is displayed as follows. Click “Finish” button to finish the server installation.Figure 2-213.Server ConfigurationBoth the Master Server and Slave Server need to be installed and configured. For trial use, you may only install the Master Server. All the servers need to be assigned a public or intranet IP address. The server uses the intranet IP address to transfer information over the intranet or uses the public IP address to transfer information to or from the external network. It is recommended that a well equipped computer be used as the master server.3.1. Configure the Master ServerUpon installation of the Master Server, the management system login window will be opened (or enter IP address and port number in the address line of the IE browser).Enter user name and password of the system administrator and click “Login”, the initial username and password are all admin, the system will prompt you to configure the database.Our conferencing system is compatible with a wide range of databases, including MySQL, MS SQLSERVER, Oracle and DB2.3.1.1.Database Configuration3.1.1.1.MySQL DatabaseTogether with installation of the server program, MySQL is also installed by the system by default. Click the “Database Configuration” icon to display the following page.Figure 3-1Select MySQL as the database and odbc driver name, select its address (local or remote) and port3307. Enter root’s password, then click the “Connection Test” button to display the page. Click the “Create Database” button to complete database configuration.3.1.1.2.MS SQLSERVER DatabaseIf the MS SQLSERVER database is available on the server, you can also select MS SQLSERVER as the database to be connected. Click the “Database Configuration” icon to open the following page.Figure 3-2Select MS SQLSERVER as the database and odbc driver name, select its address (local or remote) and port 1433. Enter root’s password, then click the “Connection Test” button to display the page. Click the “Create Database” button to complete database configuration.3.1.1.3.Oracle DatabaseIf the Oracle database is available on the server, you can also select Oracle as the database to be connected. Click the “Database Configuration” icon to open the following page.Figure 3-3Select Oracle as the database, Oracle global SID and odbc driver name, select its address (local or remote). Enter the user system’s password, and then click the “Test Connection” button to perform database configuration. The system will then displays the prompt “The database doesn’t exist, please use the Database Configuration Assistant of Oracle9i to create the database.” Open the “Database Configuration Assistant” window and select “Create Database”, set the template to General Purpose, database to CONFDB, and database character set to UTF8. Finally enter password of the new database SYS and SYSTEM.Having done that, click “Connection Test” and the system will than prompt that the database doesn’t exist. Click the “Create Database” button to complete the configuration.3.1.1.4.DB2 DatabaseIf the DB2 database is available on the server, you can also select DB2 as the database to be connected. Click the “Database Configuration” icon to open the following page.Figure 3-4Select DB2 as the database and odbc driver name, select its address (local or remote) and port 50000. Enter root’s password, then click the “Connection Test” button to display the page. Click the “Create Database” button to complete database configuration.3.1.2.Conference Server ManagementFollowing the database configuration step, the step adding server may be performed. Click the “Conference Server Management” icon to display the server management page.3.1.2.1.Add a serverClick the “Add server” button to display the following page.Figure 3-5z Server NameIt is preferred that the server name should carry information about the server in an easily recognizable way, such as address, functions, etc. The name should be unique, with the length not exceeding 30 characters. The first server to be created is the master server by default, with the name “master”. Only one master server is needed.z Server IP addressServer local IP addressz Management system port18080 by defaultz Web server port8080 by defaultz Startup passwordIdentical with the “validation password” in the system configuration option.z Service optionsAvailable functions and requirements are shown in the following table. Ensure sufficient encryption resources for all available services.Service options Available functions RequirementsConferencing service Allowing users to log in to the conference room via this serverH.323 service Two-way conferencing with H.323devicesCannot be used together withV oIP serviceService options Available functionsRequirementsPSTN voice card service Two-way conferencing with telephone devices The voice card hardware isneeded, please see PSTN Server InstallationInstructions -{}-SIP service Allowing two-way conferencing with SIP endpointsV oIP service Connecting telephones to the conference Public IP address must beused by the server, and an IPtelephone card is needed.Cannot be used together withH.323 serviceH.323 routing service Using the conferencing server as the router, allowing one H.323 to be connected with another H.323Can only be configured and started on the Master Server Guest serviceGuest users can login to the server that has this serivceIf the maximum number ofguest users in the encryptingresources is 0, this service isnot supported and displayed by the Server. And the Master and SlaveServer also support thisservice.Monitor commutate service Conference server which has this service is responsible for connecting monitoring equipment, obtains the video of the monitor point and transmits to the conference users. If the maximum number ofmonitor users in the encrypting resources is 0, this service is not supported anddisplayed by the Server.After entering all the service options, click the “OK” button. The available server list will be displayed as follows.Figure 3-6For the servers that are not started, you may also view or modify their service information. Thechange of the Slave Server configuration information is similar to the Master Server. Configurations that possibly need to be changed are listed in the following table. Normally the defaulted configurations will be selected. For port information, please see the Annex.Service name Parameter name Parametermasterfs mcuspace Space of the conference room. If set to 0, the space size will not be limited.slavefs uploadmaxnumberThe maximum processes that simultaneouslyperform file uploading between the master fileserver and the slave file server. downloadmaxnumberThe maximum processes that simultaneouslyperform file downloading between the master fileserver and the slave file server.mastermcu conftimeDefaulted that 300 seconds prior to the end of theconference, a prompt will be displayedconflog Defaulted as 1. If 0, log files will not be savedslavemcu Maxusernum The maximum number of participants who log in to the clients of the Slave Server is defaulted as 300slavemcuforpstn MaxV oIPChannelNumber Maximum PSTN channel number is defaulted as 2slavemcuforsip _PasswordThe password that is used to register on the thirdparty’s server._UserIDThe user account that is used to register on thethird party’s server._externalGKIP The registering server address of the third party_prefixRemove the unnecessary prefix in the externaldevice access codeslavemcuforh323 or slavemcuforvoip _PasswordThe password that is needed to register on GK ofthe third party_UserIDThe user account that is needed to register on GKof the third party_externalGKIP GK address of the third party_prefixRemove the unnecessary prefix in the externaldevice access codeNotes: Only the client moderator user has the right to check if V oIP registration is made, by which to decide if proper V oIP service is configured3.1.2.2.Start your serverEnsure that proper server configuration is made. After that, click the “Start” button to start the server. Start of the Master Server depends on its available encryption resources whereas start of the Slave Server depends on the total amount of encryption resources used by the servers that hasbeen successfully started as well as the its own available encryption resources. You should first start the master server then start the slave server. If succeed, the server state will become green from red. Please see the following figure.Figure 3-7For the servers that have been started, one can only view their information and service information and cannot delete them. The user amount and conference room amount of the system resources depend on the amount supported by the system’s encryption resources. Clicking the “Stop” button may turn off the server. If the Master Server is turned off, all its slave masters will be turned off accordingly.The list of all the servers that have been started is displayed on the opened management system page of the Master Server.Notes:z Sometimes for system expansion needs, the existing encryption needs to be changed. To do that, first delete all the servers in the server list. Then plug in newencrypting hardware. After that, use the Windows service management tool to first turnoff the ConfMachineLoader and ConfTomcat services and then turn on them. Next, addand start servers again. Now the videoconferencing may continue to be performed.z The slave server may be automatically stopped or started in its own managementsystem. In such case, the start mode may be changed accordingly when trying to log into the management system of the master server.z To modify the configuration of a server that has been started, you must first stopthen start it again.3.1.2.3.Separate server from the cascading systemIf Slave Server has encryption resources, it can be separated from the cascading system and works as a Master Server. The operation steps are as follows:step 1:The admin log in to the management system of Slave Server and stop all services.step 2:Change the Slave Server to the Master Server by “Change Server Type” function.After completed the settings above, user can operate the server as Master Server.Notes: If the slave server has no encryption resources, it cannot be converted into the master server.3.1.2.4.Server combinationThe system supports server combination function; user can integrate sub-systems into a larger cascading system to meet the resources requirements of holding a large meeting.step 1:The admin log in to the management system of Master Server and stop all services.step 2:Change the Master Server to the Slave Server by “Change Server Type” function.step 3:Add the Slave Server to the Central Server.step 4:Restart the Slave Server.After completed the settings above, system will integrate the Slave Server’s encryption resources into the Central Server’s automatically, such as Maximum no. of concurrent conference, Maximum no. of attendees etc. The admin can examine the information in the resource statistics page.Notes:z If the security dongle does not support server combination, the Master Servercannot be converted into the Slave Server.z You should first start the Central Server and then start the Slave Server.z After changing the server type, meanwhile, all conference and user information inMaster Server may also be deleted, the admin should backup it before use the function. 3.1.3.IM Server Management3.1.3.1. MySQL-FrontIf IM server and Master server are installed on the same host, you can skip this section; If IM server and Master server are not installed on the same host, you need to modify the database parameters by MySQL-Front program.First, you need to install MySQL-Front program on the host which has been installed the Master server. The installation process will not be repeated here. Details on how to modify the database parameters are as follows.Step 1 Open the MySQL-Front, Click the “File” icon, and choose “Connection”, it will pop up the “open session” dialog box, as shown below:Figure 3-8Step 2 Click the “New …” icon and it will pop up the “add session” dialog box. It includes four tabs: General, Connection, Login and Data Browser, as shown below:Figure 3-9Step 3 Click the “General” tab to enter your login information. The login name is same as the database user name. For more details of the database, please refer to “Database Configuration”. Then choose the “Connection” tab, as shown below:Figure 3-10Step 4 Connection setting. Enter Master server IP address, Mysql port 3307, and then choose the “Login” tab, as shown below:Figure 3-11Step 5 Login setting. Enter the user name and password of the database. Click “” icon and it will pup up the “Select Databases” dialog box, as shown below:Figure 3-12Step 6 Select the Database “mysql” and then click "OK" button to return to the “open session” dialog box. Select one database which you want to log in, click "OK" button to open the “Database Login” dialog box, as shown below:Figure 3-13Step 7 Enter the password of the database. Click “OK” icon to open the “Database User’s Object Browser” page, as shown below:Figure 3-14Step 8 Click the “+”icon in the left folder panel to expand Mysql folder, select “user” in the pull-down menus and then Click the "data browser" button on the menu bar to open “Data Browser” page, as shown below:Figure 3-15Step 9 Select the string “localhost” under the Host column and change it to percent symbol "%", then click the “” icon on the tool bar to save your settings, as shown below:Figure 3-16Step 10 Click “user” item under “mysql” in the left folder panel, you can see the parameters of Host have been modified, as shown below. Now the IM server is available for you.Figure 3-173.1.3.2.IM Server ManagementClick “IM Server Management” icon to display the IM server management page as below.Figure 3-18First click "Add server" button that shown as Figure 3-19. Creation of the first created IM server contains data access service by default, the other two services optional. IM users log in to the IM system through this master server after activated the IM. The first IM server in the server list is marked as "Master".IP Address/Domain Name: user can enter multiple IP addresses of IM server, compart with semicolon.Validate Password is the password for the communication of management system and servers, bydefault is empty, 0-6 characters in length.When IM server is deployed in internet, user needs to install STUN server. The initial value of the default address is: 59.151.40.134. User can also modify it, configure two public network addresses, running “server.exe” by command format in the two servers as follows: "server.exe-h local_ip-a remote_server_ip" (which local_ip is local server IP, remote_server_ip is another server IP). Use any one network address as STUN server IP address.Figure 3-19The second and subsequent creation of IM server, the page is shown as Figure 3-20. Service Pack does not contain data access services, the other two services optional, and must choose one of them. In the server list is marked as "Slave".Figure 3-20In all the IM servers should contain at least data access service and directory service, if used in the LAN, can not choose transfer service.The methods of starting the server and interface parameters are the same to the conference server. Not repeat them here.After running the server, download IM software, then activates IM, user can use it. The operation。
atlassian conference操作手册
Atlassian Conference 操作手册一、会议注册与登录1.访问Atlassian Conference 官方网站。
2.点击"注册" 按钮,填写相关信息并完成注册。
3.在收到确认邮件后,点击邮件中的链接进行账号激活。
4.登录Atlassian Conference,进入个人中心,完善个人信息。
二、会议日程查看1.登录Atlassian Conference 后,进入"会议日程" 页面。
2.可以按照日期、时间、议题等筛选会议,并查看具体的议程安排。
3.点击每个议程项,可查看该议程的详细信息,包括演讲者、议题等。
三、演讲者与议题管理1.在"会议日程" 页面,可查看所有演讲者和议题信息。
2.若需管理演讲者或议题,可点击页面右上角的"管理" 按钮。
3.在管理页面,可对演讲者或议题进行编辑、删除等操作。
四、用户组与讨论区设置1.在个人中心,可创建或管理用户组,为用户组分配角色和权限。
2.在"讨论区" 页面,可创建不同主题的讨论区,并对每个讨论区进行管理。
3.用户可在相应的讨论区中发表观点,与其他用户互动交流。
五、会议资料上传与分享1.在"会议资料" 页面,可上传相关资料供参会者下载或在线查看。
2.可设置资料的下载权限和有效期,确保资料的安全性。
3.在上传资料时,可选择将其分享到特定的用户组或所有用户。
六、实时聊天与问答1.在会议进行期间,可在"实时聊天" 区域与其他参会者进行交流。
2.可通过聊天窗口向演讲者提问,提问时请注意文明用语。
3.演讲者或组织者将根据问题进行回答或进一步讨论。
七、会议投票与反馈1.在某些议程结束后,可进行投票以表达对该议程的意见和建议。
2.可根据需求设置不同的投票选项,并选择匿名或实名投票。
3.组织者将根据投票结果进行统计和分析,以改进会议的安排和内容。
Logitech ConferenceCam CC3000e 产品说明书

Logitech® ConferenceCam CC3000eThe Logitech® ConferenceCam CC3000e combines breakthrough a ff ordability and professional audio and video to turn any meeting space into a video-enabled collaboration place. By using your familiar computing environment and VC application of choice, the CC3000e is plug-and-play and easy to deploy. Workgroups of 6-10 people can now experience the productivitybene fi ts of crystal-clear face-to-face communication.Logitech ConferenceCam CC3000eLogitech Inc. 7700 Gateway Blvd., Newark, CA 945601With Skype for Business, Microsoft ® Lync™ and Vidyo deployments; Lync requires plug-in download. 2With Skype for Business, Microsoft ® Lync™, Skype™, Cisco Jabber™ and Vidyo deployments 3With NFC-enabled mobile devices 4See /ciscocompatibility for the latest version./CC3000eTo order, contact your reseller or call us at 800-308-8666Published February 2016© 2016 Logitech. Logitech, the Logitech logo and other Logitech marks are owned by Logitech and may be registered. All other trademarks are the properties of their respective owners. Logitech assumes no responsibility for any errors that may appear in this publication. Product, pricing and feature information contained herein is subject to change without notice.ConferenceCam CC3000e Price: $999.99Part #: 960-000982UPCCode*************Windows ® 7 or 8Mac OS ® X 10.7 or higherGoogle Chromebook Version 29.0.1547.70, Platform 4319.79.0For full HD support, please check with your software application provider for system requirements.Speakerphone, Camera, Remote Control, Powered Hub, Wall/Table Mount, Two 16-foot cables forSpeakerphone/Hub and Camera/Hub Connection, USB cable for Hub/PC connection, Adhesive solution for hub mounting, power adapter, Quick Start Guide.2-year limited hardwareCamera130 x 130 x 150 mm 5.12 x 5.12 x 5.91” 590g /20.81oz Speakerphone 240 x 240 x 68 mm 9.45 x 9.45 x 2.68” 810g / 28.57oz Hub95 x 74 x 34 mm 3.74 x 2.91 x 1.34” 50g / 1.76ozRemote50 x 120 x 9.8 mm 1.97 x 4.72 x 0.36” 48g / 1.69ozPackage500 x 145 x 300 mm 19.69 x 5.71 x 12.13” 3590g / 126.63oz Wall/Table Mount 210 x 120 x 99 mm 8.27 x 4.72 x 3.90” 255g/8.99ozHD 1080p video quality at 30 frames-per-second Brings life-like full HD video to conference calls,enabling expressions, non-verbal cues and movements to be seen clearly.H.264 UVC 1.5 with Scalable Video Coding (SVC) Frees up PC bandwidth by putting video processing within the camera, adjusting dynamically to the available bitstream. The result is a smoother video stream in applications like Microsoft ® Lync™ 2013.90-degree fi eld of view with mechanical 260-degree pan and 130-degree tiltThe generously wide fi eld of view and silky smooth pan and tilt controls enhance collaboration by making it easy to see everyone in the room.10x lossless zoomZero in on close-ups of objects and whiteboard content with outstanding detail and clarity.ZEISS ® lens certi fi edHigh-precision lens automatically focuses on people and objects to deliver razor-sharp resolution wherever the lens is pointed.Far-end camera controlOperate camera pan, tilt and zoom functions of another Logitech ConferenceCam in the remote location.1Omni-directional full duplex micsConference participants can clearly converse from a 20-foot diameter around the base, making it seem like conversations are happening in the same room.Acoustic echo cancellation and noise-cancelling Optimized to hear and be heard even in noisy environments.Wideband audio supporting stereo or mono audio modesTrue wideband audio enables people on both sides of the call to enjoy a life-like communication experience.Touch controlsProvide excellent response for call answer/ end 2, volume, mute and other functions withouttransmitting audible noise through the audio path.LCD displays Caller ID and other infoView call-related info 2 (caller ID, call duration, etc.) and speakerphone/camera function indicators (volume control, etc.) on LCD display screen.Dockable remote controlOperate camera pan, tilt and zoom, volume up/down and answer/hang-up 2 functions on the base console or with remote control that docks in console when not in use.Compatible with Mac ® and PCEmployees simply connect a laptop of their choice to conduct life-like meetings within their own familiar computing environment.USB video/audio connectivity and Bluetooth ® audio connectivity with NFC (Near Field Communication) pairing 3USB plug-and-play connectivity makes set-up with a laptop or thin client simple, or connect to a Bluetooth ® device for professional audio calls. Easily pair NFC-enabled mobile devices to the CC3000e by simply touching them together.Optimized for Microsoft ® Lync™, Cisco ®compatible 4 (with Jabber ® and Webex ®), works with Skype™, integrated with Vidyo ®Broad application compatibility ensures an integrated experience with most business-grade VC platforms.Camera “Home” presetUser-de fi ned preset returns camera to preferred viewing position upon wake-up.Visual call status indicatorOnboard LEDs fl ash to provide a visual alerts and call status.Kensington Security SlotCamera and speakerphone are each provisioned with Kensington Security Slots to help secure the equipment with anti-theft locks.CAMERASmooth motorized pan, tilt and zoom, controlled from remote or console260-degree pan, 130-degree tilt 10X lossless zoom90-degree Field of ViewFull HD 1080p 30fps with onboard H.264 UVC 1.5 encoding Camera “Home” preset keyFar-end control (PTZ) of ConferenceCam products ZEISS ® Optics with autofocus Kensington Security SlotLED to con fi rm video streaming Standard tripod threadSPEAKERPHONELEDs for speakerphone streaming, mute, hold, and Bluetooth ® pairing Microphones (Tx)Two omni-directional microphones supporting 20-foot diameter rangeFrequency response: 100Hz – 7.75KHz Sensitivity: -28dB +/-3dBDistortion: <1% @ 1KHz at 65dB Speakers (Rx)Frequency response: 120Hz – 10KHz Sensitivity: 83dBSPL +/-3dB at 1W/1M Max output: 95dBSPLDistortion: <5% from 200Hz Kensington Security Slot REMOTE CONTROLDockable remote control for all available functions 10-foot range remote controlHUB / CABLECentral mountable hub for connection of all componentsIncluded adhesive solution for under-table mounting Two 16-foot cables for connection between hub and camera/speakerphoneOne 10-foot USB cable for connection to PC/Mac AC Power adapterCOMPLIANCE AND TOOLSUSB 2.0 compliantUVC-compliant video and audio for broad application compatibilityOptimized for Microsoft ® Lync™, Cisco ® compatible,4 works with Skype™, integrated with Vidyo ® Downloadable diagnostic toolField upgradeable fi rmware tool for PC or Mac Downloadable app plug-ins for advanced feature support for PC or Mac。
会议接待手册 英语范文
会议接待手册英语范文English:In crafting a conference reception manual, it's crucial to prioritize seamless coordination and impeccable hospitality. Start by outlining the roles and responsibilities of the reception team, including greeting attendees, providing registration assistance, and offering information about the event schedule and facilities. Emphasize the importance of professionalism, friendliness, and efficiency in all interactions. Detail procedures for handling various scenarios, such as VIP arrivals, latecomers, or unexpected issues. Provide clear instructions for utilizing any technology or software involved in registration or check-in processes. Address security protocols, including badge distribution and access control. Additionally, incorporate contingency plans for emergencies like medical incidents or facility disruptions. Ensure thorough training for all staff involved in reception duties, covering both routine procedures and emergency protocols. Regularly update the manual to reflect any changes in procedures or technology. Finally, encourage feedback from both attendees and staff to continuously improve the reception experience.中文翻译:制定会议接待手册时,重要的是优先考虑无缝协调和完美的款待。
2023年CCF计算机系统大会手册说明书

08.02最新、电子版会议手册下载信息更新详见最新电子版手册�.会议名称:�.会议时间:�.会议地点:�.官方网站:CCF 计算机系统大会(CCFSys ����)����年�月�日:上午、下午:报到下午(��:�� ‒ ��:��):前导论坛����年�月� ‒ �日:上午(��:�� ‒ ��:��):特邀报告下午(��:�� ‒ ��:��):技术论坛南昌国际博览城绿地铂瑞酒店地址:南昌市红谷滩新区上饶大街����号(乘坐地铁�号线至国博站,出�号口即到)https:///CCFSys����会议须知02C H I N A C O M P U T E RF E D E R A T I O NC H I N A C O M P U T E R F EDE R A T I O N南昌国际博览城绿地铂瑞酒店Primus Hotel Nanchang International Expo City电话 : ����-��������地址 : 江西省南昌市红谷滩区上饶大街����号酒店信息03C H I N A C O M P U T E RF E D E R A T I O N2023年CCF计算机系统大会智能时代的计算机系统: 从研究到产业化酒店交通路线04C H I N A C O M P U T E RF E D E R A T IO NC H I N A C O M P U T E R F EDE R A T I O N05C H I N A C O M P U T E RF E D E R A T I O N大会日程全天��:�� - ��:��下午��:�� - ��:���-体系结构优秀青年学者与博士生发展论坛���P��P��P��P��P��P��李超、侯小凤��:�� - ��:����:�� - ��:����:�� - ��:��分布式计算与系统专委换届工作会议���陈贵海分布式计算与系统专委年度工作会议���叶保留��:�� - ��:��大会主席致辞钱德沛 院士��:�� - ��:����:�� - ��:��学会领导致辞金海 教授本地组织单位致辞罗嗣海 南昌大学党委书记��:�� - ��:��工业软件的发展之路何积丰 院士��:�� - ��:����:�� - ��:��新形势下高性能计算的可持续发展钱德沛,院士��:�� - ��:��System Research is Dead, Long Live System Research!何征宇,蚂蚁集团平台技术事业群总裁��:�� - ��:��CCF-蚂蚁软硬协同基金发布钱德沛、何征宇��:�� - ��:���-概率型数据结构设计及其应用���杨仝、罗来龙�-智能边缘计算体系结构与软硬件系统���A 周知、吴松�-算力网技术论坛三层国际厅A郭得科、彭晓晖�-区块链分布式账本技术论坛���C 黄华威、郑子彬�-新黄金时期下的处理器安全���B 吕勇强、胡伟�-高性能图计算体系结构和系统软件���张宇、赵进�-高性能互连论坛���董德尊、雷斐�-量子计算系统���付祥、劳玲玲��-面向下一代异构计算的软件栈建设���翟季冬、李斌线下研讨会。
atlassian conference操作手册

atlassian conference操作手册摘要:1.会议概要2.会议注册3.会议议程4.演讲嘉宾5.会议地点与住宿6.交通指南7.会议费用与支付8.会议赞助9.会议联系方式正文:【1.会议概要】Atlassian Conference 是一场专注于Atlassian 产品与技术的盛会,旨在为我国广大Atlassian 用户、合作伙伴和开发者提供一个交流与分享的平台。
会议将邀请业界专家进行主题演讲,分享Atlassian 产品在团队协作、项目管理、软件开发等方面的最佳实践。
【2.会议注册】要参加Atlassian Conference,请访问会议官网进行在线注册。
注册时需填写个人信息、选择参会类型(标准票/VIP 票等)和支付方式(支付宝/微信支付等)。
注册成功后,您将收到确认邮件,邮件内包含参会二维码,请妥善保管。
【3.会议议程】会议议程包括主题演讲、工作坊、圆桌讨论等多种形式。
您可以根据个人需求选择参加不同场次的议程。
会议议程将在会议前一个月在官网上公布,敬请关注。
【4.演讲嘉宾】Atlassian Conference 将邀请来自全球的知名专家、行业领袖和创新者担任演讲嘉宾。
嘉宾们将分享他们在Atlassian 产品领域的丰富经验和独到见解,为参会者带来极具价值的内容。
【5.会议地点与住宿】会议将在我国某知名城市的国际会议中心举行。
参会者可以根据会议提供的住宿建议预订周边酒店,也可以选择自行安排住宿。
【6.交通指南】会议中心附近有公交、地铁等多种交通方式。
建议参会者提前查看会议提供的交通指南,规划合适的出行路线。
【7.会议费用与支付】会议费用根据参会类型不同而有所区别。
参会者需在注册时选择支付方式并完成支付。
支付成功后,将无法退款。
如有特殊情况,请与会议主办方联系。
【8.会议赞助】Atlassian Conference 欢迎各类企业进行赞助合作。
赞助商将享有品牌宣传、展位展示、演讲机会等权益。
第十八届全国胶体与界面化学学术会议会议手册说明书

conference手册说明
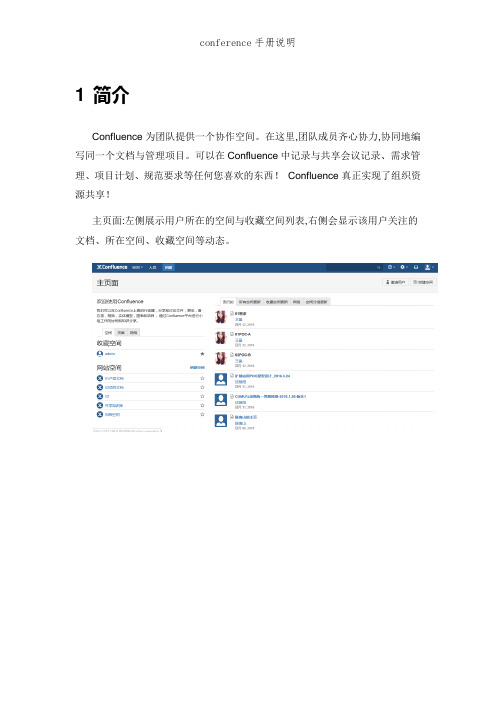
1 简介Confluence为团队提供一个协作空间。
在这里,团队成员齐心协力,协同地编写同一个文档与管理项目。
可以在Confluence中记录与共享会议记录、需求管理、项目计划、规范要求等任何您喜欢的东西!Confluence真正实现了组织资源共享!主页面:左侧展示用户所在的空间与收藏空间列表,右侧会显示该用户关注的文档、所在空间、收藏空间等动态。
2 主要功能2.1 空间2.1.1 创建空间(admin)Confluence就是以创建“空间”的方式管理文档,可以按类别创建多个空间,如项目文档空间、产品文档空间、其她文档空间。
每个空间下可以管理不同的页面,如:空白页、博文、jira、产品需求、任务报告、回顾、报导文章等模板页面。
(还可以自定义模板)如上图所示:当前就是以最高权限admin进入系统,admin可以创建“空间”,包括:文档空间、空白空间、知识库与团队空间。
四个不同的空间都可以创建属于该空间下的不同页面。
如:1. 知识库:知识库空间下可以创建“指导文章”“故障排除文章”或自定义模板。
2. 文档空间:文档空间下可以创建“空白页面”,在页面上可制定文档模板。
2.1.2 编辑空间点击“编辑”按钮可对空间的首页进行介绍。
文档里嵌入了OFFICE部分控件,可直使用上面的功能,还可以插入文件、图片、链接等更多内容。
2.1.3 关注点击“关注”按钮,在弹出的页面可管理关注该页面的人员,如果该页面发生变化,各个人员登陆后可瞧见发生变化的信息。
2.1.4 更多功能点击右侧更多功能可列出更多的功能为用户使用。
2.2 子空间(admin以下用户)点击“创建”按钮,可为空间创建子空间,选择已有的分类模板或自定义模板。
子空间所具有的功能继承了空间的功能。
子空间下可继续创建子空间,并为子空间选择已有的分类模板或自定义模板2.3 个人空间(个人用户)每个用户都可创建自己的个人空间,个人空间拥有空间就是全部功能,个人用户可在自己的个人空间上创建博文、空白页、JIRA报告、任务报告、指导文章、产品需求、回顾或自定义模板,在创建的各类文件上写作。
iecon2020会议手册

iecon2020会议手册IECON 2020 Conference GuideIntroduction:Welcome to the IECON 2020 Conference Guide! This comprehensive handbook aims to provide all the necessary information for participants attending the upcoming IECON 2020 conference. In this guide, you will find details about the conference program, keynote speakers, workshops, social events, and important logistical information. Let's explore the exciting opportunities awaiting you at IECON 2020!Conference Overview:IECON 2020 is an internationally renowned conference dedicated to the latest advancements in industrial electronics, control, and automation. With a broad scope covering various fields, including power electronics, robotics, renewable energy systems, and more, the conference brings together researchers, practitioners, and industry experts to share their knowledge and collaborate.Conference Program:The conference program spans over several days and includes a diverse range of activities. It encompasses plenary sessions, keynote addresses, technical paper presentations, workshops, tutorials, panel discussions, and poster sessions. The program is designed to accommodate the diverse interests and needs of conference participants, allowing for ample networking opportunities and exchange of ideas.Keynote Speakers:IECON 2020 features a lineup of renowned keynote speakers who are experts in their respective fields. These speakers will deliver insightful talks, sharing their expertise and highlighting the latest trends and breakthroughs in industrial electronics and automation. Their presentations will provide valuable insights and inspire new perspectives among the conference attendees.Technical Paper Presentations:One of the highlights of IECON 2020 is the technical paper presentations. Researchers from around the globe submit their original work, which undergoes a rigorous peer-review process. Accepted papers will be presented in dedicated sessions, where authors will showcase their findings and engage in discussions. This platform encourages knowledge sharing, collaboration, and the exploration of emerging research areas.Workshops and Tutorials:IECON 2020 offers workshops and tutorials led by prominent experts in specific fields related to industrial electronics and automation. These sessions aim to provide in-depth knowledge and practical guidance on various topics, ranging from control systems to intelligent manufacturing. Attending these workshops and tutorials will enrich participants' understanding of cutting-edge technologies and their applications.Social Events and Networking:IECON 2020 acknowledges the importance of social interactions and networking opportunities for conference attendees. Throughout theconference, participants will have the chance to engage in various social events, including gala dinners, networking luncheons, and receptions. These events provide a relaxed and informal environment for participants to connect, exchange ideas, and build professional relationships.Logistical Information:To ensure a smooth and enjoyable experience, the conference guide provides essential logistical information. It includes details about the conference venue, accommodation options, transportation, and city attractions. Additionally, participants will find information about registration procedures, visa requirements (if applicable), and other practicalities thatwill facilitate their attendance at IECON 2020.Conclusion:In conclusion, the IECON 2020 Conference Guide serves as a comprehensive resource for conference participants, offering valuable information about the program, keynote speakers, technical paper presentations, workshops, tutorials, social events, and logistical details. It is designed to enhance attendees' experience and ensure their active participation in this premier industrial electronics and automation conference. We look forward to welcoming you to IECON 2020 and witnessing the exchange of knowledge, collaboration, and innovation that lies ahead.。
(完整版)会议手册

*************
会议手
rut 册主办单位:***承办单位:***
年*月*日
目录
一、会议须知---------------------------------------------- 3
二、会议日程安排------------------------------------------ 4
三、会议代表名单------------------------------------------ 5
四、公司简介---------------------------------------------- 6
会议须知
、为确保会议各项任务的完成,请参会人员仔细阅读本须知。
二、报到期间,请您核对所发资料袋内物品,如有缺少请及时与工作人员联系。
内含物品:会议手册、会议稿纸、笔等材料。
三、请与会代表遵守作息时间,并保管好材料及个人随身物品。
四、开会期间,请将手机调整到无声或振动状态。
五、请自驾车的参会人员进入酒店时,说明参加*** 会议,以便领取免费停车证。
六、会议用餐时间及地点:
* 月24* 12:00-13:00 **** 自助餐
七、会务组联系方式:
***** 姓名电话
***** 姓名电话
会议日程安排
参会代表
公司简介。
会议手册(修订版)

会议手册(修订版)
概述:
本手册的目的是为了指导和协助组织和参加会议的人员,确保会议的高效、有序进行。
本手册适用于公司内部所有的会议,必须遵循和执行其中的指导原则。
会前准备:
- 确定会议的主题和议程,并将其发送给所有参与者。
- 建立会议参与人员名单,并确认是否需要代理或者替补。
- 确定会议时间、地点和时长,并提前预约场地和设备。
- 对于需要讲解的内容,提前准备好演示文稿和其他必要的资料。
会议进行中:
- 按照议程进行会议,并为每个议题控制时间。
- 尊重每个人的发言,并确保所有的参与者都有机会发言。
- 监督和记录会议讨论的重点和决策结果。
- 鼓励对会议管理及议题相关方面的反馈和建议。
会后跟进:
- 确认会议讨论和决策的结果,并对所有相关人员发送记录。
- 开会后立即修订组织或公司的流程信令,将其更新。
- 对于所有行动项,进行跟进并设立期限,确保所有任务得到及时完成。
总结:
本手册是确保会议高效、有序进行的关键,将确保参与者都可以充分参与,以便就所有的议题做出明确的决策。
通过遵循这本手册的原则,我们可以确保所有的会议都能够被管理、监督和评估,从而在公司寻求成功的整个过程中特别重要。
conference手册说明
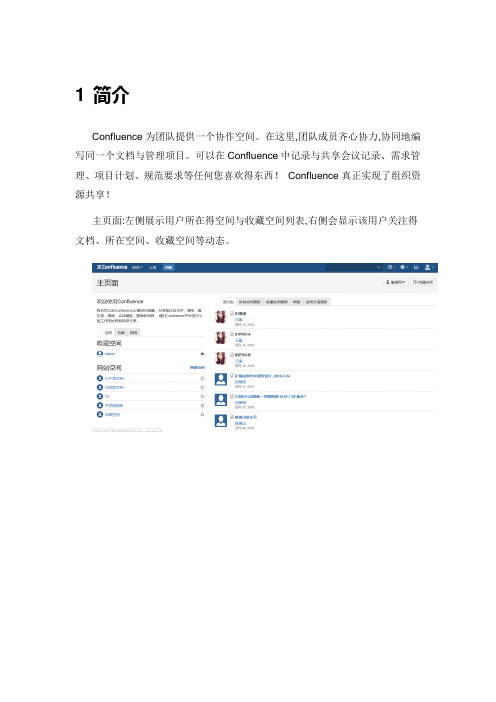
1 简介Confluence为团队提供一个协作空间。
在这里,团队成员齐心协力,协同地编写同一个文档与管理项目。
可以在Confluence中记录与共享会议记录、需求管理、项目计划、规范要求等任何您喜欢得东西!Confluence真正实现了组织资源共享!主页面:左侧展示用户所在得空间与收藏空间列表,右侧会显示该用户关注得文档、所在空间、收藏空间等动态。
2 主要功能2.1 空间2.1.1 创建空间(admin)Confluence就是以创建“空间”得方式管理文档,可以按类别创建多个空间,如项目文档空间、产品文档空间、其她文档空间。
每个空间下可以管理不同得页面,如:空白页、博文、jira、产品需求、任务报告、回顾、报导文章等模板页面。
(还可以自定义模板)如上图所示:当前就是以最高权限admin进入系统,admin可以创建“空间”,包括:文档空间、空白空间、知识库与团队空间。
四个不同得空间都可以创建属于该空间下得不同页面。
如:1. 知识库:知识库空间下可以创建“指导文章”“故障排除文章”或自定义模板。
2. 文档空间:文档空间下可以创建“空白页面”,在页面上可制定文档模板。
2.1.2 编辑空间点击“编辑”按钮可对空间得首页进行介绍。
文档里嵌入了OFFICE部分控件,可直使用上面得功能,还可以插入文件、图片、链接等更多内容。
2.1.3 关注点击“关注”按钮,在弹出得页面可管理关注该页面得人员,如果该页面发生变化,各个人员登陆后可瞧见发生变化得信息。
2.1.4 更多功能点击右侧更多功能可列出更多得功能为用户使用。
2.2 子空间(admin以下用户)点击“创建”按钮,可为空间创建子空间,选择已有得分类模板或自定义模板。
子空间所具有得功能继承了空间得功能。
子空间下可继续创建子空间,并为子空间选择已有得分类模板或自定义模板2.3 个人空间(个人用户)每个用户都可创建自己得个人空间,个人空间拥有空间就是全部功能,个人用户可在自己得个人空间上创建博文、空白页、JIRA报告、任务报告、指导文章、产品需求、回顾或自定义模板,在创建得各类文件上写作。
2021国际能源化学与工程大会手册

2021国际能源化学与工程大会手册1.这次大会的主题是“能源化学与工程的未来发展方向”。
The theme of this conference is "Future Development of Energy Chemistry and Engineering".2.大会将邀请国内外知名专家学者进行主题报告。
The conference will invite well-known experts and scholars at home and abroad to give keynote speeches.3.会议期间将举办多个分论坛,涵盖能源材料、能源转化、能源存储等研究领域。
During the conference, multiple sub-forums will be held, covering research areas such as energy materials, energy conversion, and energy storage.4.与会者可以在会场内外交流学术观点,扩大学术交流。
Participants can exchange academic views inside and outside the venue to promote academic communication.5.大会将举办展览,展示最新的能源化学与工程领域的科研成果。
The conference will host an exhibition to showcase the latest research achievements in the field of energy chemistry and engineering.6.会议期间安排了专门的座谈会,让参会人员就行业热点问题展开深入讨论。
Special forums are arranged during the conference toallow participants to have in-depth discussions on industryhot topics.7.本次大会旨在促进能源领域的学术交流与合作,促进科技创新与成果转化。
BenQ DVY32 Video Conference Camera 用户手册说明书

DVY32Video Conference CameraUser ManualDisclaimerBenQ Corporation makes no representations or warranties, either expressed orimplied, with respect to the contents of this document. BenQ Corporation reserves the right to revise this publication and to make changes from time to time in the contentsthereof without obligation to notify any person of such revision or changes. CopyrightCopyright 2021 BenQ Corporation. All rights reserved. No part of this publication may be reproduced, transmitted, transcribed, stored in a retrieval system or translated into any language or computer language, in any form or by any means, electronic, mechanical, magnetic, optical, chemical, manual or otherwise, without the prior written permission of BenQ Corporation.T able of ContentsImportant notices (4)Application instructions (4)Electric safety (4)Transport caution (4)Careful installation (4)Magnetic Interference (4)Do not disassemble discretionarily (4)Package contents (5)Features (6)Installation instructions (7)Product interface (7)Camera operation (8)Interface instruction (8)Using the privacy cover (9)Application instructions (10)Remote control (10)Menu settings (11)Appendix A: The Optional Wall Mount (19)Installing the wall mount (20)Appendix B: The Optional Display Mount (22)Installing the display mount on a display (23)Installing the display mount on a display with a VESA mount (25)Product information (27)Specifications (27)Dimensions (29)Maintenance and troubleshooting (30)Maintenance (30)Troubleshooting (30)12/9/21Important notices4Important noticesThis manual briefly introduces the camera functions, installation, and operations. Please read carefully before application.Application instructionsT o prevent damages to this camera or any products connected to it, this product canonly be used within the specified range:1.Do not expose the camera to rain or moisture.2.This product contains no parts which can be maintained by users themselves. Anydamage caused by dismantling the product by user without permission is notcovered by warranty.3.T o prevent an electric shock, do not disassemble the camera; only qualifiedtechnicians can perform installation and maintenance.4.Do not use under conditions that exceed the limited temperature, humidity orpower supply specifications.5.When cleaning the camera lens, please wipe it with a dry soft cloth. When theproduct is heavily soiled, please wipe it gently with a neutral detergent. Do not usestrong or corrosive cleaning agents to avoid scratching the lens and affecting theimage quality.Electric safetyThis product must be installed in strict compliance with local electrical safety standards.T ransport cautionAvoid heavy pressure, severe vibration, soaking damage to the product in transportation, storage, and installation.Careful installation1.The camera body is made of organic material, please do keep away from corrosiveliquid, gas, or solid material.2.Do not rotate the camera head violently, otherwise it may cause mechanical failure;3.This product should be placed on a stable desktop or other horizontal surface. Donot install the product obliquely, otherwise it may display inclined image.4.Ensure there are no obstacles within rotation range of the holder.5.Do not power on before completing installation.Magnetic InterferenceElectromagnetic fields at specific frequencies may affect the video image. This product is Class A. It may cause radio interference in household application. Appropriate measure is required.Do not disassemble discretionarilyWe are not responsible for any damage caused by unauthorized disassembling.Package contents5 Package contentsOpen the sales package and check the contents. If any item is missing or damaged, please contact your dealer immediately.CameraUSB cablePrivacy CoverQuick start guide• Before discarding the package, check that you haven't left any accessories inside the box.• Dispose of packaging materials wisely. Y ou can recycle the cardboard carton. Consider storingthe package (if possible) for future transport of the display.• Do not leave plastic bags within reach of young children or babies.Features6FeaturesThis product is a new 4K ePTZ video conference camera. It is built with AI functions,which can automatically frame all people in the meeting and center them in the scene. It also has ideal functions and superior performance, adopting advanced ISP processingalgorithms so as to provide vivid images with evenly clear brightness, strong colorlayering, high resolution, and fantastic color rendition. The camera is easy and convenient to install and maintain, as well as being stable and reliable.• Ultra HD 4K Resolution: It employs a 1/2.8 inch high-quality CMOS sensor; supports4K; provides 4K@ 30fps (MJPG or H.264) video resolution at most; and provides clear video and vivid expressions and movements. At the same time, it is compatible with1080p and 720p resolution.• EPTZ: EPTZ and 5X digital Zoom• Auto framing: With an excellent facial detection algorithm, automatically adjust thezoom level according to the number of people in the meeting as well as centering them within the frame thereby allowing all the people in the meeting to be shown in thescreen.• Optimized imaging: Clear images even in dim lighting.• Built-in omnidirectional microphone: Includes 2 built-in omnidirectional microphones,(all-round omnidirectional microphones). Features a noise suppression algorithm thatensures your voice will be perfect. The effective omnidirectional microphone range isup to 8 meters.• Multiple video encoding formats: Support H.264, H.265, MJPEG, YUV video encodingwhich enables the video to play more fluidly.• Easy to use: No need to download drivers; just plug and play via USB 3.0.• Multiple installations: Standard equipped with mold clamp. Easy to install on any devices.• Dual stream output: The USB 3.0 port support main stream and sub-stream output atthe same time.• Wide variety of applications: Can be used for personal video conferencing, enterprisevideo conferencing, unified collaboration and more.Installation instructions 7Installation instructionsProduct interfaceNo.Name Omni-Directional microphones for audio input LED for indicating when the camera is activated Lens (fixed focus)IR sensor for remote control Screw hole for tripod Mounting and locating hole Flexible clip/base USB 3.0 output interface12345678Installation instructions 8Camera operation1.Fix the product on top of the display, place it directly on a desktop, or install it on a tripod or mount.2.The tilt angle of the camera mount should be less than 85 degrees.3.Connect the camera via the USB cable to the display, video conference terminal, or other USB input device, log in the video conference software, and select a video device to have image output.Interface instructionThe interface illustration is as shown below.If you want to adjust the camera parameters in a third-party software, go to SETUP > Image Style and select Custom mode to enable image adjustments in the third-party software. Refer to Setup on page 13 for more information.85°Installation instructions 9Using the privacy cover1.Flip up the cap of the privacy cover.2.Lean the privacy cover slightly forward on the front of the camera and make sure that the cap is lined up with the camera lens.3.Push the privacy cover onto the top side of the camera to make sure that the indent on the cover fits properly on the camera.4.To use, flip the cap down to cover the lens.Once the privacy cover is installed on the camera, do not attempt to shift it to the right or left.This may scratch the surface of the camera. T o move the cover’s position, remove it from thecamera and re-install it in the correct position.Application instructions10Application instructionsRemote controlRemote Control Indicator LEDLights up anytime a button is pressed.Disable Camera KeyDisables/Enables video from the camera.Arrow Keys• Allows you to navigate and select items in the OSD settings menu.• Pans and/or tilts the view of the camera when zoomed in on a scene.Preset Camera View Keys 1 / 2 / 3• Press a key to have the camera switch to the view that has been preset for the respective key.• Press and hold any of the keys for 2 seconds to set that the current camera view as the preset view for that key.Zoom In/Out KeyPress to zoom in or out on a specific scene Mute KeyMutes/Unmutes the microphone on the camera.Menu KeyOpens or closes the camera’s OSD settings menu.OK KeyConfirms any selection made in the camera’s OSD settings menu.12345678Application instructions11 Menu settingsMain MenuPress the menu key on the remote control to display the camera’s OSD settings menu, and then use the arrow and OK keys to navigate and select submenus or items.The sections below will detail the available settings in each submenu.Application instructions12PresetDescriptionsSet Sets the current zoom in/out position as preset setup. Select a value from 1 -10.Call Recalls the preset position. Select a value from 1 -10.Application instructions13 SetupDescriptionsAuto Framing • Enables the facial detection algorithm automatically adjust the zoom level according to the number of people in the meeting as well as centering them within the frame.The options include: ON / OFF• When set to ON you can also set the level of sensitivityof the algorithm.Image Style Changes the look of the image to preset styles.The options include: BenQ Color (Default) / Low Light Source / Zoom Optimized / Custom.OSD Flip-H Flips the OSD menu if the image is not presented in a mirrored orientation.The options include: ON / OFFDual Stream Enables/Disables a second image stream for a second application.The options include: ON / OFFUSB Mode Sets the mode for the camera’s USB interface. The options include: ISOC / BULKApplication instructions14Exposure:DescriptionsMode Configures the exposure to preset modes based on the settings listed below.The options include: Auto / Manual / SAE / Bright.EV Enables/Disables the exposure value for the image (only available in Auto mode).The options include: ON / OFFBLC Activates a backlight for the image (only available in Auto mode).The options include: ON / OFFFlicker Selects the amount of flicker for the image (only available in Auto, SAE, or Bright mode).The options include: ON / OFF / 50Hz / 60HzGain Limit Adjusts the gain limit for the image (only available in Auto or Bright mode).Select a value from 1 to 15 (by intervals of 1)DRC (Dynamic Range Correction)Adjusts the amount of correction for the ratio between the darkest and brightest parts of an image (only available in Auto mode).The options include: Close or a value from 1 - 8 (by intervals of 1).Shutter Adjusts the shutter speed for the camera (only available in Manual or SAE mode).Select a value from 1/30 to 1/10000Gain Adjusts the gain value for the camera (only available in Manual or SAE mode).Select a value from 1 to 15 (by intervals of 1).Application instructions15 Color:DescriptionsWB Mode Configures the white balance setting to preset modes based on the settings listed below.The options include: Auto / Manual / One Push / VARRG T uning Adjusts the amount of red in the image (only available in Auto or Manual mode).Select a value from -10 to 10 (by intervals of 1).BG T uning Adjusts the amount of blue in the image (only available in Auto or Manual mode).Select a value from -10 to 10 (by intervals of 1).Saturation Adjusts the amount of color saturation in the image. Select a value from 0 to 50 (by intervals of 1).Hue Adjusts the hue level in the image.Select a value from 0 to 8 (by intervals of 1).AWB Sensitivity Selects the level of sensitivity for the auto white balance feature (only available in Auto mode).The options include: High / Middle / LowColor T emp Adjusts the color temperature value for the image (only available in VAR mode).Select a value from 2400K to 7100K (by intervals of 100).Application instructions 16Image:Descriptions Brightness Adjusts the brightness level for the image.Select a value from 0 - 100 (by intervals of 1).Contrast Adjusts the contrast level (the difference between dark and light colors) for the image.Select a value from 0 - 100 (by intervals of 1).Sharpness Adjusts the sharpness level (the distinctness between different tones or colors) for the image.Select a value from 0 - 15 (by intervals of 1).Flip-HFlips the image horizontally.The options include: ON / OFF Flip-VFlips the image vertically.The options include: ON / OFF B&W ModeT oggles the image between color or black and white.The options include: Color / Black/White GammaAdjusts the tone luminance.The options include: Default / 0.34 / 0.39 / 0.47 / 0.50Low-Light Mode Enables/Disables low-light mode.The options include: Close / OpenApplication instructions 17Noise Reduction:DescriptionsNR-2DDisables or adjusts the level of 2D noise reduction.The options include: OFF or a value from 1 to 7 (by intervals of 1).NR-3D Disables or adjusts the level of 3D noise reduction.The options include: OFF or a value from 1 to 8 (by intervals of 1).Application instructions18VersionThis menu displays the version number for the camera.Restore DefaultSelect YES for this option and press OK to restore the camera’s settings to their default values.Appendix A: The Optional Wall Mount19 Appendix A: The Optional Wall MountIf you purchase an optional wall mount, first open the package and check the contents. If any item is missing or damaged, please contact your dealer immediately.Mount1/4-20 screw (for Camera)Bracket stopperM6 screw anchor x 4Nut and washer x 4• Before discarding the package, check that you haven't left any accessories inside the box.• Dispose of packaging materials wisely. Y ou can recycle the cardboard carton. Consider storingthe package (if possible) for future transport of the display.• Do not leave plastic bags within reach of young children or babies.20Appendix A: The Optional Wall MountInstalling the wall mountT o install the wall mount:1.Choose the location on the wall for the mount and then mark the four screw anchorinstallation points on the wall.The screw holes on the mount for the measure 100mm x 50mm.2.Install the four screw anchors into the wall at the marked points.3.Install the mount onto the screw anchors.4.Install the bracket stopper onto the top side of the wall mount.Appendix A: The Optional Wall Mount 215.Secure the wall mount onto the wall with the four sets of nuts and washers.6.Install the camera onto the wall mount so that the bracket stopper on the mountfits into the tripod screw hole on the camera, and then secure the camera byscrewing the 1/4-20 screw into the camera’s mounting hole.22Appendix B: The Optional Display MountAppendix B: The Optional Display MountIf you purchase an optional display mount, first open the package and check the contents.If any item is missing or damaged, please contact your dealer immediately.MountBracket stopperRubber washer x 4Cape screw x 2Anti-skid nut x 2Metal washer x 21/4 screw (for camera)• Before discarding the package, check that you haven't left any accessories inside the box.• Dispose of packaging materials wisely. Y ou can recycle the cardboard carton. Consider storingthe package (if possible) for future transport of the display.• Do not leave plastic bags within reach of young children or babies.Appendix B: The Optional Display Mount23 Installing the display mount on a displayT o install the display mount directly on a display:1.Flip open the neck of the mount.2.Rotate the legs of the mount outward.3.Install the bracket stopper onto the mount.4.Align the mount to the location you want it to be on the display and then lower itonto the display.5.If necessary further rotate the legs of the mount so that the openings on the legsalign with the screw holes on the rear of the display.6.Secure the mount to the display by installing, from the outside-in, a washer and acape screw through the openings on both legs of the mount and into the screwholes on the display.Appendix B: The Optional Display Mount247.Install the camera onto the wall mount so that the bracket stopper on the mountfits into the tripod screw hole on the camera, and then secure the camera byscrewing the 1/4-20 screw into the camera’s mounting hole.Appendix B: The Optional Display Mount25 Installing the display mount on a display with a VESA mountT o install the display mount a display with a VESA mount:1.Flip open the neck of the mount.2.Rotate the legs of the mount outward.3.Install the bracket stopper onto the mount.4.Align the mount to the location you want it to be on the display and then lower itonto the display so that the legs are in between the rear of the display and the VESA mount.5.If necessary further rotate the legs of the mount so that the openings on the legsalign with the openings on brackets of the VESA mount.6.Align, from the inside-out, a washer and anti-skid nut through the openings on bothlegs of the mount and the openings on the bracket of the VESA mount, and then secure the mount to the VESA mount by installing a cape screw to each of the anti-skid nuts.Appendix B: The Optional Display Mount267.Install the camera onto the wall mount so that the bracket stopper on the mountfits into the tripod screw hole on the camera, and then secure the camera byscrewing the 1/4-20 screw into the camera’s mounting hole.Product information27 Product informationSpecificationsCamera Sensor4K UHDEffective Pixels8.28MP,16:9Field of View120°(D) / 110°(H)/ 72°(V) ResolutionMain Stream: 4K@30fps, 1080p@30fps,720p@30 fpsSub Stream:720P@fps, 480P@30fps Zoom Digital: 5xPan / Tilt DigitalFocus Auto and ManualLens Type GlassLow Light Performance0.1 LuxAuto Framing YesPreset position OSD: 10, Remote Control: 3 Backlight contrast On/OffExposure Auto/ManualVideo adjustmentsBrightness, Definition, Saturation,Contrast, White Balance, Gain, Anti-Flicker, Low Brightness Compensation,BLCDNR2D and 3D DNRSNR>50dBAudio Microphone Omni-Directional mics Pickup Range Up to 8mEcho Cancellation YesVideo Output USB3.0 Compression Format MJPEG, YUY2, H.264, H.265Power Input Voltage DC5V Input Current1A (max) Power Consumption5W (max)Compatibility Operating SystemsWindows 7, 8.1, or 10, Linux, Chrome TMOS*, macOS TM 10.10 and higher*Contact BenQ service for available ChromebookmodelsUSB Plug and PlayDimensions Dimensions (HxWxD)180.1mm x 47.4mm × 44.0mm Weight0.4 kgProduct information 28PackageContents Included • 4K UHD conference cam • Remote control • USB 3.0 Type-B cable• Privacy coverProduct information29 DimensionsUnit: mmMaintenance and troubleshooting30Maintenance and troubleshootingMaintenance1.Please disconnect the camera if it is not used for a long time.e soft cloth or tissue to clean the camera cover.3.Wipe it with a soft, dry cloth when cleaning the camera lens. Wipe it gently with amild detergent if needed. Do not use strong or corrosive detergents to avoidscratching the lens and affecting the image.T roubleshooting1.No video output- Check whether the USB cable is well connected and the power indicator light isON.- Check whether the machine could do self-check after being restarted.- Restart the display.- Check whether the camera is well recognized by display.2. No image: Check the USB cable quality and whether it is well connected.3.Image dithering when zoom-in or zoom-out- Check whether the camera installation position is solid.- Check whether there is a shaking machine or object around the camera.。
logitech conference connect 快速入门指南说明书
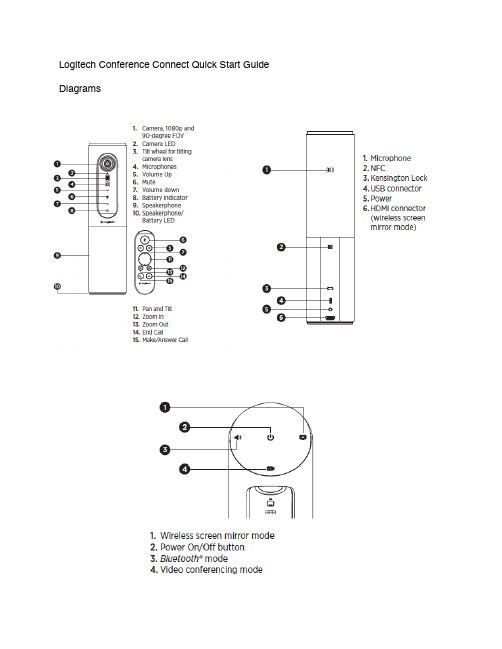
Logitech Conference Connect Quick Start Guide DiagramsNote: If you are the organizer of a video conference call using Skype for Business, Teams or any other video conferencing software, please ensure participants have been sent a meeting link to access the call. Participants should also be asked to test the meeting link prior to the meeting to ensure that their system is working correctly. For details on how to create video meetings links in Skype for Business or MS Teams please see the videos and PFD’s on the ISS Web page.Connecting the Camera to your Computer1.Connect the provided USB cable to the USB connector on the rear of the device,and then insert the USB into your computer2.Connect the provided power cable into the rear of the device and plug the powercable into an outlet (Note the power cable is optional as the device has aninternal battery, however we recommend you keep it plugged in to prevent thebattery dying during a call)3.Power on the device by pressing the Power On/Off button on the top4.Press the Video conferencing mode button to turn on the camera andmicrophone5.Remove the lens cover, the cover also serves as a remote control for the camera6.Once the conference connect camera is connected to your computer andpowered on it will be available to be used by your system in your videoconference call.7.By default your system may choose to use its built-in web camera or microphone,to select the conference connect log into your meeting. To resolve this accessthe settings with in the call and select Device Settings, then select the LogitechConference Camera options. A video of how to resolve this issue is available at: https://www.unb.ca/saintjohn/iss/services-facstaff/video_conference.htmlAt the End of Your Call1.Exit the meeting room2.Power off the conference connect camera3.Disconnect the power cable form the outlet and the device4.Disconnect the USB cable from your computer and the device5.Place the two cables, camera with lens cover remote, and user guide back in thecase and return it to the Hans W. Klohn Commons。
会议手册(范本)2023简版
会议手册(范本)会议手册 (范本)目录- [1. 介绍](1-介绍)- [2. 会议概要](2-会议概要)- [3. 会议议程](3-会议议程)- [4. 参会人员](4-参会人员)- [5. 地点和时间](5-地点和时间)- [6. 会议材料](6-会议材料)- [7. 会议规则](7-会议规则)- [8. 事项](8-事项)1. 介绍本会议手册提供了一个范本,以供会务人员准备和组织会议时参考使用。
本手册包含会议概要、会议议程、参会人员、地点和时间、会议材料、会议规则以及事项等内容。
2. 会议概要本会议旨在讨论和决策相关议题,推动项目的进展和发展。
参会人员将分享他们的观点和经验,以期达成共识和制定相应的行动计划。
3. 会议议程本次会议的议程如下:- 开幕和主题演讲:会议主席将致辞并进行主题演讲,介绍本次会议的目标和重点。
- 环境分析和项目状况汇报:相关人员将对项目的环境进行分析,并汇报项目的最新进展情况。
- 议题讨论:根据会议要求,讨论各个议题,收集参会人员的意见和建议。
- 决策和行动计划:根据讨论结果,制定决策和相应的行动计划,明确责任人和截止日期。
- 和闭幕:会议主席进行并宣布会议结束。
4. 参会人员- 会议主席:[主席姓名]- 项目负责人:[负责人姓名]- 相关部门代表:[部门代表姓名]- 项目团队成员:[成员姓名]- 其他相关人员:[人员姓名]5. 地点和时间- 地点:[会议地点]- 时间:[会议开始时间] - [会议结束时间]6. 会议材料本次会议的材料包括:- 会议议程表- 项目进展报告- 相关资料和文档7. 会议规则- 准时参会:请所有参会人员在指定时间前到达会议地点。
- 尊重他人:请参会人员保持礼貌和尊重,遵守会议纪律。
- 提前准备:请参会人员提前准备并熟悉会议材料。
- 积极参与:请参会人员积极参与讨论和决策过程。
- 笔记记录:请参会人员做好会议笔记,以便后续查阅和参考。
8. 事项- 饮食安排:本次会议将提供茶水和午餐。
(完整版)会议手册
未知驱动探索,专注成就专业会议手册目录1.引言2.会议准备–设定目标–确定参与人员–安排会议时间和地点–发送会议邀请函3.会议前准备–确定议程–收集和准备会议材料–确保会议设备正常运行4.会议进行–主持会议–记录会议要点未知驱动探索,专注成就专业–管理会议时间–促进参与5.会议后处理–撰写会议纪要–分配任务和行动计划–跟进会议进展–收集反馈1. 引言本文档是一份关于如何组织和进行会议的完整版手册,旨在帮助委员会成员、项目团队或其他组织机构的相关人员顺利地进行会议。
会议是组织内外沟通和决策的重要方式之一,如何高效地组织会议对于提高工作效率、推进项目进展至关重要。
该手册将介绍会议前、会议中和会议后的相关准备工作和处理事项,以帮助您更好地规划和管理会议流程。
2. 会议准备在召开会议之前,需要进行一些准备工作,以确保会议的顺利进行。
设定目标明确会议的目标和目的非常重要。
确定会议的目标将有助于确定议程和确定参与人员,确保会议的成果对组织或项目具有实际意义。
确定参与人员根据会议的目标和议程,确定应邀请的参与人员。
确保邀请函清晰地说明与会者的身份和责任,以便他们知道自己是否需要做些准备。
安排会议时间和地点根据参与人员的日程安排,选择一个适合大多数人的时间和地点。
在安排时间时,请尽量避免与其他重要事项冲突,以确保所有关键人员都能参加。
发送会议邀请函准备会议邀请函,并通过电子邮件或其他适当的通信方式发送给参与人员。
邀请函中应包含会议的目标、时间、地点、议程等信息,以便与会者提前做好准备。
3. 会议前准备在会议开始之前,需要进行一些准备工作,以确保会议的顺利进行。
确定议程制定会议议程是确保会议高效进行的关键步骤。
将会议目标和参与人员的需求纳入考虑,确定会议的议程,包括讨论的主题和时间安排。
收集和准备会议材料根据议程,收集并准备相关的会议材料,如报告、数据分析等。
确保这些材料在会前分发给与会者,以便他们有足够的时间来熟悉和准备。
Esri User Conference 2020 虚拟会议指南说明书
We are excited to welcome you to the virtual 2020 Esri User Conference! To help direct you through the conference we created this simple guide to highlight industry focused sessions including on-demand user presentations, technical workshops with live Q&A sessions, and industry presentations.While we can't replicate the same experience of being together in person, we will do our best to create an amazing event that will continue to move you and our community forward. Get Familiar with the Virtual UC PlatformThe User Conference will be held virtually this year through an online platform. To familiarize yourself with this experience, be on the lookout for an email that will include a UC Attendee Guide, tutorial video, and link to access the platform. Registered attendees can start to log-in the morning of 7/13.Watch the Plenary Session LivestreamWatch three thought-provoking days of powerful stories about how GIS is making a difference in the world. See demonstrations of the latest technology and capabilities ArcGIS offers.•Part 1: GIS—Interconnecting Our WorldMonday, July 13 | 10:00 a.m.–12:00 p.m.*•Part 2: GIS—Interconnecting Our World: ArcGIS Technology and Applications Tuesday, July 14 | 10:00 a.m.–11:00 a.m.*•Part 3: GIS—Interconnecting Our World: Making Geographic Knowledge Pervasive Wednesday, July 15 | 10:00 a.m.–11:00 a.m.*Virtually Network with Thousands of Your PeersThe world's largest GIS conference offers you virtual networking and collaboration opportunities with peers. Find others who face similar challenges and have solved them using geospatial solutions.User Presentations | AEC On-demandSession: Best Practices in GIS in AEC: It Takes More Than Just a Pretty App•Highly Available Esri Enterprise Implementation, Data Center Migration and System Integration Sarah Elliott & Jacob Raymond, JacobsSession: BIM + GIS: Bringing the Inside Out and the Outside In•A New Project Workflow Paradigm with Connector for ArcGIS and BIM 360Chuck Pietra, C&S Companies•The BIM-GIS Integration: Advanced Processes Solving System InteractionsMatthieu Muller, EgisSession: Field Data Solutions for AEC Projects•Harnessing Mobile Data Collection During Construction of A Tailings Embankment Michael DeVasto, GZA GeoEnvironmental•Evolving Mobile Field Inspection - ArcPad to Collector and BeyondJoel Carter, CardnoSession: System of Record for AEC Projects•Geospatially-Enabled Quality Control of Texas' First Reservoir In 30 YearsChris Akin, Dunaway Associates•Bridging the Visualization and Sharing GapTeresa Smithson, JacobsSession: Data Collection and Monitoring for AEC Projects•5D WebGIS for Urban RenewalFrederic Jehan, Egis•Monitoring Hydroelectric Scheme Tunnel Health Using GIDIE, ArcGIS GeoEvent and Operations DashboardCarla Evans & John Gilby, Golder AssociatesSession: AEC Project Delivery•AEC Culture Shift: Geospatial Delivery Should Use a Web-First ApproachDarin Welch & Ian Grasshoff, HNTB Corporation•21st Century Infrastructure Project Execution Redefining Phases Utilizing EsriKourosh Langari, Caltrans.Technical Workshops Streaming live with Q&AMonday, July 131:40 p.m.–2:40 p.m.3D Across ArcGIS1:40 p.m.–2:40 p.m.ArcGIS Enterprise: An Introduction1:40 p.m.–2:40 p.m.ArcGIS Pro: The Road Ahead1:40 p.m.–2:40 p.m.ArcGIS: Understanding the Platform1:40 P.M.–2:40 P.M. Developing and Executing a Geospatial Strategy1:40 p.m.–2:40 p.m.Living Atlas of the World: An Introduction2:50 p.m.–3:50 p.m.ArcGIS Online: An Introduction2:50 p.m.–3:50 p.m.Real-Time Across the ArcGIS Platform2:50 p.m.–3:50 p.m.ArcGIS Enterprise: An Overview of Deployment Options2:50 p.m.–3:50 p.m.ArcGIS Pro: Q&A with the Product Team2:50 p.m.–3:50 p.m.ArcGIS Workforce: An Introduction and What's New2:50 p.m.–3:50 p.m.ArcGIS StoryMaps: What's New and What's Coming2:50 p.m.–3:50 p.m.Esri Data and Location Services: An Overview2:50 p.m.–3:50 p.m.ArcGIS Data Reviewer: An IntroductionTuesday, July 147:30 a.m.–8:30 a.m.ArcGIS Pro: An Introduction to Mapping and Visualization7:30 a.m.–8:30 a.m.ArcGIS Indoors: Overview and Roadmap7:30 a.m.–8:30 a.m.ArcGIS Tracker: An Introduction and What's New7:30 a.m.–8:30 a.m.ArcGIS Enterprise: What's New7:30 a.m.–8:30 a.m.ArcGIS Online: Q&A with the Product Team7:30 a.m.–8:30 a.m.ArcGIS Online: The Road Ahead7:30 a.m.–8:30 a.m.What's New in Imagery8:40 a.m.–9:30 a.m.CAD: An Introduction to Using BIM Data from Revit in ArcGIS Pro 8:40 a.m.–9:30 a.m.3D on the Web with ArcGIS8:40 a.m.–9:30 a.m.ArcGIS Online: Q&A with the Product Team8:40 a.m.–9:30 a.m.Lidar Classification and Feature Extraction8:40 a.m.–9:30 a.m.So Many Amazing Basemaps! But Which is Right for You?1:40 p.m.–2:40 p.m.ArcGIS Enterprise: The Road Ahead1:40 p.m.–2:40 p.m.ArcGIS Online: Using Smart Mapping in the New Map Viewer1:40 p.m.–2:40 p.m.ArcGIS Pro: Migrating from ArcMap1:40 p.m.–2:40 p.m.Utility Network Management: Introduction to the Utility Network and Trace Network1:40 p.m.–2:40 p.m.Best Practices for Publishing ArcGIS Online and ArcGIS Enterprise Services 1:40 p.m.–2:40 p.m.Incorporating Business Value in Your GIS Strategy2:50 p.m.–3:50 p.m.CAD: Introduction to Using CAD Data in ArcGIS2:50 p.m.–3:50 p.m.ArcGIS Enterprise: Q&A with the Product Team2:50 p.m.–3:50 p.m.ArcGIS Hub: Collaborating and Engaging with Your Community2:50 p.m.–3:50 p.m.ArcGIS Survey123: What's New2:50 p.m.–3:50 p.m.ArcGIS: App Configuration, Customization, or Development2:50 p.m.–3:50 p.m.ArcGIS Solutions for COVID-19 Response and Recovery2:50 p.m.–3:50 p.m.CAD: Introduction to Using CAD Data in ArcGIS2:50 p.m.–3:50 p.m.ArcGIS Enterprise: Q&A with the Product Team2:50 p.m.–3:50 p.m.ArcGIS Hub: Collaborating and Engaging with Your Community2:50 p.m.–3:50 p.m.ArcGIS Survey123: What's NewWednesday, July 157:30 a.m.–8:30 a.m.ArcGIS Field Apps: The Road Ahead7:30 a.m.–8:30 a.m.Applying Spatial Data Science: A Complete Workflow7:30 a.m.–8:30 a.m.ArcGIS API for JavaScript: 3D Visualization7:30 a.m.–8:30 a.m.ArcGIS Business Analyst: What's New and Coming Soon8:40 a.m.–9:30 a.m.Integrating BIM and GIS for AEC and Asset Owners8:40 a.m.–9:30 a.m.Field Apps: Q&A with the Product Team8:40 a.m.–9:30 a.m.ArcGIS Navigator: An Introduction and What's New8:40 a.m.–9:30 a.m.ArcGIS Enterprise: Migration Strategies8:40 a.m.–9:30 a.m.Deep Dive into Deep Learning1:40 p.m.–2:40 p.m.ArcGIS Enterprise: Data Storage Strategies1:40 p.m.–2:40 p.m.ArcGIS Pro: Tips and Tricks1:40 p.m.–2:40 p.m.ArcGIS Solutions for Electric and Telecommunications Utilities: An Overview 1:40 p.m.–2:40 p.m.ArcGIS Urban for Smart Cities1:40 p.m.–2:40 p.m.Building Web Applications in ArcGIS Online1:40 p.m.–2:40 p.m.Creating Orthoimages, DTMs and 3D Mesh in ArcGIS1:40 p.m.–2:40 p.m.Utility Network Management: Advanced Capabilities of the Utility Network 2:50 p.m.–3:50 p.m. A Deep Dive into 3D Analysis Options2:50 p.m.–3:50 p.m.ArcGIS Collector: An Introduction and What's New2:50 p.m.–3:50 p.m.ArcGIS Enterprise: Publishing Content and Services2:50 p.m.–3:50 p.m.ArcGIS Workflow Manager: What’s New2:50 p.m.–3:50 p.m.Creating and Visualizing Voxel Layers in ArcGIS2:50 p.m.–3:50 p.m.Extending ArcGIS Survey1232:50 p.m.–3:50 p.m.Spatial Analysis and Data Science: Q&A with the Product TeamTechnical Presentations | AEC On-demandSession 11781: BIM and GIS - Digital Innovation in Engineering and DeliverySession 11787: AEC Project Delivery SubscriptionExpo & Esri ShowcaseIn the Expo, interact virtually with our sponsors and exhibitors. See how they are impacting their industries, get your questions answered, and discover GIS-powered products and services.In the Esri Showcase you can explore the latest product solutions and get your questions answered by experts from industry, product, and software app teams.Engage with the AEC team in the AEC Showcase via live chat, you will also be able to schedule a 15-minute meeting with a subject matter expert, account manager, solution engineer, or professional services consultant.The Expo and Esri Showcase can be visited all-hours but Interactive activities (live chat, scheduled meetings) are staffed to published schedule:•Monday, July 1312:05 p.m.–3:50 p.m.*•Tuesday, July 147:30 a.m.–9:40 a.m. and 11:10 a.m.–3:50 p.m.*•Wednesday, July 157:30 a.m.–9:40 a.m. and 11:10 a.m.–3:50 p.m.*Architecture, Engineering, and Construction Special Interest Group (SIG) Thursday, July 16 10:30 a.m.–11:30 a.m.*Join the Esri AEC team and AEC Community members for short presentations and a panel discussion. Attendees will connect with presenters via chat. Presentations will include: •GIS applied across the entire project lifecycle•GIS technology for the 4 phases of a project•Introduction to Esri professional services•2020 SAG award winner•Panel discussion: How location is the building block for innovation in AECEsri Services AppointmentsObtain valuable guidance and feedback in designing, implementing, and strengthening your geospatial solutions. Sign up for an appointment by choosing your appointment type and submitting a form with your information. You will be contacted by Esri to schedule your appointment: https:///en-us/about/events/uc/experience/arcgis-appointments Review Jack Dangermond’s UC Q&ACheck out the answers to common questions about key updates on the latest advancements in Esri technology, emerging innovations, and the road ahead for GIS. The information included is provided by Esri subject matter experts and offers both insights and practical guidance to help you apply new technologies and workflows in your next project.。
- 1、下载文档前请自行甄别文档内容的完整性,平台不提供额外的编辑、内容补充、找答案等附加服务。
- 2、"仅部分预览"的文档,不可在线预览部分如存在完整性等问题,可反馈申请退款(可完整预览的文档不适用该条件!)。
- 3、如文档侵犯您的权益,请联系客服反馈,我们会尽快为您处理(人工客服工作时间:9:00-18:30)。
1简介
1
Confluence为团队提供一个协作空间。
在这里,团队成员齐心协力,协同地2
编写同一个文档和管理项目。
可以在Confluence中记录和共享会议记录、需求3
管理、项目计划、规范要求等任何你喜欢的东西! Confluence真正实现了组织4
资源共享!
5
主页面:左侧展示用户所在的空间和收藏空间列表,右侧会显示该用户关注6
的文档、所在空间、收藏空间等动态。
7
8
9
10
2主要功能
11
2.1空间
12
2.1.1创建空间(admin)
13
Confluence是以创建“空间”的方式管理文档,可以按类别创建多个空间,14
如项目文档空间、产品文档空间、其他文档空间。
每个空间下可以管理不同的页15
面,如:空白页、博文、jira、产品需求、任务报告、回顾、报导文章等模板页16
面。
(还可以自定义模板)
17
18
如上图所示:当前是以最高权限admin进入系统,admin可以创建“空间”,19
包括:文档空间、空白空间、知识库和团队空间。
四个不同的空间都可以创建属20
于该空间下的不同页面。
21
如:
22
1.知识库:知识库空间下可以创建“指导文章”“故障排除文章”或23
自定义模板。
24
2.文档空间:文档空间下可以创建“空白页面”,在页面上可制定25
文档模板。
26
2.1.2编辑空间
27
点击“编辑”按钮可对空间的首页进行介绍。
28
29
30
文档里嵌入了OFFICE部分控件,可直使用上面的功能,还可以插入文件、31
图片、链接等更多内容。
32
2.1.3关注
33
点击“关注”按钮,在弹出的页面可管理关注该页面的人员,如果该页面发34
生变化,各个人员登陆后可看见发生变化的信息。
35
36
2.1.4更多功能
37
点击右侧更多功能可列出更多的功能为用户使用。
38
39
40
2.2子空间(admin以下用户)
41
点击“创建”按钮,可为空间创建子空间,选择已有的分类模板或自定义模42
板。
子空间所具有的功能继承了空间的功能。
43
子空间下可继续创建子空间,并为子空间选择已有的分类模板或自定义模板
44
45
2.3个人空间(个人用户)
46
每个用户都可创建自己的个人空间,个人空间拥有空间是全部功能,个人用47
户可在自己的个人空间上创建博文、空白页、JIRA报告、任务报告、指导文章、48
产品需求、回顾或自定义模板,在创建的各类文件上写作。
49
50
以创建博文为例,为博文命名,系统会按月份进行分类,发布的博文可在左51
侧列表中显示。
在博文中,通过@用户的方式来通知某一个用户。
52
53
点击“编辑”按钮,即可在已经创建的博文下发布相关信息,可设置权限、54
设置关注人最后发布博文。
55
56
2.4空间管理
57
以“文档空间”为例
58
2.4.1概览
59
概览是对空间细节的编辑和空间的删除。
60
61
2.4.2权限
62
1.权限配置
63
通过用户组、用户还有匿名用户对该“空间”页面、博文、评论、附件、权64
限、邮件的操作配置权限。
65
66
2.受限页面
67
受限页面显示了被指定的组或用户对页面访问的权限。
68
69
2.4.3内容工具
70
1.模板:为空间创建模板,规范文档,使团队成员按照特定模板写71
作。
72
蓝图:以模板的形式体现,分为任务报告蓝图、产品需求蓝图、回73
顾蓝图等,创建蓝图后confluence会自生成目标蓝图供参考使用。
74
全局页面模板:创建全局页面模板,应用于所有页面
75
76
2.重排页面:通过拖拽方式重排页面
77
78
3.独立页面:该报告显示所有未与其他页面链接的独立页面
79
80
4.未定义页面:指曾在Confluence中被链接,但现已不存在的页81
面
82
83
84
5.附件:列出详细附件信息
85
86
6.回收站:保存着所有被删除的页面、博客和附件。
你可以从这里87
恢复或者清除这些项目
88
7.导入:从Confluence服务器的某个文件夹中导入文本文件
89
90
8.导出:可以通过HTML、PDF、XML文档格式导出空间
91
92
9.RSS源:通过订阅RSS源,你可以在Confluence发生更新时及93
时获得通知。
为了能够显示RSS源,你需要一个RSS客户端或者支持RSS 94
的Web浏览器。
95
2.4.4外观
96
主要是对conference页面主题、色彩方案、版式等进行设置
97
98
99
2.4.5集成
100
与第三方环境实现集成。
101
3特点
102
3.1权限控制
103
对于创建的页面,设置单独成员或分组成员,设置页面查看或编辑权限。
104
3.2设置页面位置移动
105
可将页面挪动到其他空间或本空间的其他位置。
106
3.3关注任务
107
为当前页面配置关注人,页面发生变化可在关注人的空间显示。
108
3.4Wiki关联
109
已经上传过的文档可以通过链接的形式,链接到新建页面中。
如:已经上传110
过V1.0.0的软件版本文件或页面。
选中V1.0.0点击超链接按钮。
111
112
在弹出的页面中,选中目标文件,点击“插入”按钮可完成超链文件,页面113
如下图所示:
114
115
3.5页面布局
116
在工具栏页面,可以选择不同的列布局。
117
4需注意问题
118
4.1空间命名唯一
119
创建的空白页、博文、jira、产品需求、任务报告、回顾、报导文章等模板120
的名字必须保证唯一性,因为CONFLUENCE最大的特点是可以以链接的方式找到121
相关文件。
所以必须保证空间命名唯一。
122
4.2删除页面权限
123
个人用户只有创建页面的权限,没有删除页面的权限。
删除页面权限需联系124
管理员。
125
126。
