思科3560G交换机常用配置
思科3560G配置

!
interface GigabitEthernet0/3
switchport trunk encapsulation dot1q
switchport mode trunk
!
interface GigabitEthernet0/4
switchport trunk encapsulation dot1q
switchport mode trunk
!
interface GigabitEthernet0/5
switchport access vlan 2
switchport mode access
!
interface Vlan1
ip address 10.0.1.254 255.255.255.0
!
interface Vlan2
ip address 10.0.2.254 255.255.255.0
ip access-group 101 in
BTEDI-CORE-SW#sh run
Building configuration...
Current configuration : 6447 bytes
!
version 12.2
no service pad
service timestamps debug uptime
service timestamps log uptime
interface GigabitEthernet0/18
switchport access vlan 4
switchport mode access
cisco3560基本配置

cisco3560基本配置模式功能提示符进入命令退出命令非特权模式查看CISCO 设备的简单运行状态Switch>开机时自动进入特权模式配置系统参数,升级IOS软件,备份配置文件Switch#在非特权模式下键入ENABLE quit返回非特权模式全局模式CISCO交换机大部分配置都是在这个模式下进行Switch(config)# 在特权模式下键入configure terminal quit返回特权模式监控模式升级IOS系统软件Switch:开机时摁住面板上的MODE 键约5秒钟2.1.2 基本设置命令基本设置命令任务命令全局设置config terminal设置访问用户及密码Username username password password 设置特权密码enable secret password设置路由器名Hostname name设置静态路由ip route destination subnet-mask next-hop启动IP路由ip routing启动IPX路由ipx routing端口设置interface type slot/number设置IP地址ip address address subnet-mask设置IPX网络ipx network network激活端口no shutdown物理线路设置line type number启动登录进程login [local|tacacs server]设置登录密码Password password显示命令任务命令查看版本及引导信息show version查看运行设置show running-config查看开机设置show startup-config显示端口信息show interface type slot/number显示路由信息show ip route2.3 通过Telnet进入命令行接口Telnet协议在TCP/IP协议族中属于应用层协议,通过网络提供远程登录和虚拟终端功能。
思科3560G交换机常用配置

思科3560G交换机常用配置一.配置telnet登陆账号和密码用串口线连上交换机Switch(config)#usernaSwitch(config)#username admin pasSwitch(config)#username admin password 123Switch(config)#line vty 0 4Switch(config-line)#login localSwitch(config-line)#end%SYS-5-CONFIG_I: Configured from console by consoleSwitch#wr二.配特权密码Switch#conf tEnter configuration commands, one per line. End with CNTL/Z.Switch(config)#enable password 456三.划分vlanSwitch(config)#vlan 10Switch(config-vlan)#int vlan 10Switch(config-if)#%LINK-5-CHANGED: Interface Vlan10, changed state to upSwitch(config-if)#ip add 192.168.10.1 255.255.255.0四.配dhcpSwitch(config)#ip dhcp pool vlan10Switch(dhcp-config)#network 192.168.10.0 255.255.255.0Switch(dhcp-config)#default-router 192.168.10.1Switch(dhcp-config)#dns-server 192.168.1.1Switch(dhcp-config)#五.划分端口Switch(config)#int range fastEthernet 0/1-5 进入1-5端口Switch(config-if-range)#switchport mode access 并把接口方式改为accessSwitch(config-if-range)#switchport access vlan 10把1-5端口划vlan 10Switch(config-if-range)#no sh六. 配静态路由Switch(config)#ip route 0.0.0.0 0.0.0.0 192.168.10.2 192.168.10.2是一跳地址七. 配置完一定要保存Switch#wrBuilding configuration...[OK]。
思科3560 配置命令

switch> 命令行模式;config#特权模式一、配置交换机vlan模式;有两种方式第一种:config#vlan ID 这里的ID是需要你个人给要划分的vlan起的编号config-if#name 名字switch#show vlan brief 查看vlan 用来检验是否配置成功第二种:switch#vlan database 交换机的vlan配置状态switch(vlan)#vlan ID name 名字配置vlan 并且分配相应的名字二、3560上开启路由功能配置switch(config)#ip routingswitch(config)#ip route ipaddress net-hop 配置路由(静态)switch(config)#ip default-gateway ipaddress 配置网关三、开启聚合链路配置#conf tSW(config)#interface range f1/1 - 2SW(config-if)#channel-group 1 mode desirable/onSW(config-if)#swithportSW(config-if)#switchport mode trunkSW(config-if)#switchport trunk encap dot1q四、启动telnet管理模式switch(config)#line vty 0 4switch(config-line)#password 密码switch(config-line)#login五、开启cisco日志功能switch(config)#logging onswitch(config)#logging trap 信息switch(config)#logging host 你的IP地址switch(config)#logging facility 你选着的信息配置3550作为dhcp服务器六、配置cisco启动dhcp功能配置地址池switch(config)ip dhcp pool 名字switch(config-pool)network maskswitch(config-pool)dns-serverswitch(config-pool)default-router 网关设置dhcp保留不分配的地址switch(config)ip dhcp excluded-address 地址地址第一步;从起交换机第二步;配置1)按下MODE键后给3560加电。
cisco3560配置手册

3层交换机:管理ip:192.168.1.2 上门连路由器ip:192.168.1.5分2个段:Vlan1 192.168.1.0 255.255.255.0 网关192.168.1.2Vlan5 172.16.5.0 255.255.254.0 网关172.16.5.1键入3560设备管理IP地址Switch>enableSwitch#conf tSwitch(config)# interface vlan 1Switch(config-if)#ip address 192.168.1.253 255.255.255.0 --这里应该用192.168.1.x的地址Switch(config-if)#no shutdownSwitch(config-if)#exitSwitch(config)#line vty 0 4Switch(config-line)#loginSwitch(config-line)#password ciscoSwitch# configure terminalSwitch(config)# ip routingSwitch(config)#ip route 0.0.0.0 0.0.0.0 192.168.1.5 添加到router的默认路由第一步:创建VLAN:Switch>enSwitch#Vlan DatabaseSwitch(Vlan)>Vlan 5 Name vlan5exit第二步:设置VLAN IP地址:Switch#Config TSwitch(Config)>Int Vlan 5Switch(Config-vlan)Ip Address 172.16.5.1 255.255.255.0Switch(Config-vlan)No Shut第三步:设置端口全局参数Switch(Config)Interface Range Fa 0/1 – 12 (1-12当trunk口,用来级联其他交换机)Switch(Config-if-range)Switchport Mode TRUNKSwitch(Config-if-range) switchport trunk encapsulation dot1qEXITSwitch(Config)Interface Range Fa 0/13 – 24 (13-24当访问口用)Switch(Config-if-range)Switchport Mode AccessSwitch(Config-if-range)Spanning-tree Portfast第四步:将端口添加到VLAN5,20-24添加到VLAN5(12-19不添是在vlan1吗?对)Switch(Config)Interface Range Fa 0/20 - 24Switch(Config-if-range)Switchport Access Vlan 5将3550作为DHCP服务器/*VLAN 1和5可用地址池和相应参数的配置, VLAN1和5要设几个地址池*/ 各设一个Switch(Config)Ip Dhcp Pool Test01/*设置可分配的子网*/Switch(Config-pool)Network 192.168.1.0 255.255.255.0/*设置DNS服务器*/Switch(Config-pool)Dns-server 202.103.224.68/*设置该子网的网关*/Switch(Config-pool)Default-router 192.168.1.2Switch(Config)Ip Dhcp Pool Test05/*设置可分配的子网*/Switch(Config-pool)Network 172.16.5.0 255.255.254.0 (这个段给他510台机器使用)/*设置DNS服务器*/Switch(Config-pool)Dns-server 202.103.224.68 (设为电信dns 有问题吗?没问题)/*设置该子网的网关*/Switch(Config-pool)Default-router 172.16.5.1第5步:设置DHCP保留不分配的地址Switch(Config)Ip Dhcp Excluded-address 192.168.1.1 192.168.1.80Switch(Config)Ip Dhcp Excluded-address 192.168.1.121Switch(Config)Ip Dhcp Excluded-address 192.168.1.250 192.168.1.254(VLAN1只分配81到120的ip)第6步:启用路由/*路由启用后,各VLAN间主机可互相访问*/Switch(Config)Ip Routing第7步:配置访问控制列表Switch(Config)access-list 105 permit ip 172.16.5.0 0.0.1.255 any (any=0.0.0.0. 255.255.255.255吗)(要允许172.16这个段上网,需要设这个吗)不用Switch(Config)access-list 105 permit ip 172.16.5.0 0.0.1.255 192.168.1.2 0.0.0.0(允许访问路由器)Switch(Config)access-list 105 permit udp any any eq bootpcSwitch(Config)access-list 105 permit udp any any eq tftp第7,8步可以省略第8步:应用访问控制列表/*将访问控制列表应用到VLAN 5Switch(Config)Int Vlan 5Switch(Config-vlan)ip access-group 105 out第9步:结束并保存配置Switch(Config-vlan)EndSwitch#wr。
Cisco 3560 系列简单三层划分 配置

Cisco 3560 系列简单三层划分配置三层交换机具备网络层的功能,实现VLAN 相互访问的原理是:利用三层交换机的路由功能,通过识别数据包的IP地址,查找路由表进行选路转发,三层交换机利用直连路由可以实现不同VLAN 之间的相互访问。
三层交换机给接口配置IP 地址。
采用SVI(交换虚拟接口)的方式实现VLAN 间互连。
SVI是指为交换机中的VLAN 创建虚拟接口,并且配置IP地址。
实现目标:PC3能访问PC1和PC2, 但PC1不能和PC2/PC3互通 PC2不能和PC1/PC3互通。
\一、首先我们配置PC上的IP和GateWay:PC1IP: 192.168.1.2Submark: 255.255.255.0Gateway: 192.168.1.1PC2IP: 192.168.2.2Submark: 255.255.255.0Gateway: 192.168.2.1PC3IP: 192.168.1.3Submark: 255.255.255.0Gateway: 192.168.1.1二、其次进行对Cisco2950进行vlan划分:Switch1:Switch>en --进入特权Switch#conf t --全局配置Enter configuration commands, one per line. End with CNTL/Z.Switch(config)#vlan 2 --创建vlan 2 使用默认vlan名Switch(config-vlan)#exit --退出vlan 2 配置操作Switch(config)#vlan 3 --创建vlan 3Switch(config-vlan)#exit -- 退出vlan 3 配置操作Switch(config)#int fa0/2 --配置交换机2口Switch(config-if)#switch access vlan 2 设置交换机2口为vlan 2 Switch(config-if)#exit --退出2口操作Switch(config)#int fa0/3 --配置3口Switch(config-if)#switch acces vlan 3 --设置交换机3口为 vlan 3 Switch(config-if)#exit --退出3口配置操作。
Catalyst 3560 交换机接口配置
Catalyst 3560 交换机接口配置Catalyst 3560支持的以太网接口说明请见下表。
表3-1 Catalyst 3560接口说明项目说明接口类型 FE电接口:符合100Base-TX物理层规范GE电接口:1000Base-TX物理层规范工作速率 FE电接口可以选择10Mbit/s、100Mbit/s两种速率GE电接口可以选择10Mbit/s、100Mbit/s、1000Mbit/s三种速率工作模式自动协商模式二层口配置3560的所有端口缺省的端口都是二层口,如果此端口已经配置成三层端口的话,则需要用switchport来使其成为二层端口。
配置端口速率及双工模式可以配置快速以太口的速率为10/100Mbps及千兆以太口的速率为10/100/1000-Mbps; 但对于SFP端口则不能配置速率及双工模式,有时可以配置nonegotiate,当需要联接不支持自适应的其它千兆端口时管理口配置命令目的Step 1 configure terminal 进入配置状态.Step 2 interface interface-id 进入端口配置状态.Step 3 speed {10 | 100 | 1000 | auto | nonegotiate} 设置端口速率注 1000 只工作在千兆口. GBIC模块只工作在1000 Mbps下. nonegotiate 只能在这些GBIC上用1000BASE-SX, -LX, and -ZX GBIC.Step 4 duplex {auto | full | half} 设置全双工或半双工.Step 5 end 退出Step 6 show interfaces interface-id 显示有关配置情况Step 7 copy running-config startup-config 保存Switch# configure terminalSwitch(config)# interface fastethernet0/3Switch(config-if)# speed 10Switch(config-if)# duplex half配置三层口Catalyst 3560支持三种类型的三层端口:· SVIs: 即interface vlanNote 当生成一个interface Vlan时,只有当把某一物理端口分配给它时才能被激活·三层以太网通道口(EtherChannel): :以太通道由被路由端口组成。
CISCO思科交换机3650G配置命令大全

CISCO思科交换机3650G配置命令大全1.在基于IOS的交换机上设置主机名/系统名: switch(config)# hostname hostname在基于CLI的交换机上设置主机名/系统名:switch(enable) set system name name-string2.在基于IOS的交换机上设置登录口令:switch(config)# enable password level 1 password 在基于CLI的交换机上设置登录口令:switch(enable) set passwordswitch(enable) set enalbepass3.在基于IOS的交换机上设置远程访问:switch(config)# interface vlan 1switch(config-if)# ip address ip-address netmask switch(config-if)# ip default-gateway ip-address在基于CLI的交换机上设置远程访问:switch(enable) set interface sc0 ip-address netmask broadcast-addressswitch(enable) set interface sc0 vlanswitch(enable) set ip route default gateway4.在基于IOS的交换机上启用和浏览CDP信息: switch(config-if)# cdp enableswitch(config-if)# no cdp enable为了查看Cisco邻接设备的CDP通告信息:switch# show cdp interface [type modle/port]switch# show cdp neighbors [type module/port] [detail]在基于CLI的交换机上启用和浏览CDP信息:switch(enable) set cdp {enable|disable} module/port为了查看Cisco邻接设备的CDP通告信息:switch(enable) show cdp neighbors[module/port][vlan|duplex|capabilities|detail]5.基于IOS的交换机的端口描述:switch(config-if)# description description-string基于CLI的交换机的端口描述:switch(enable)set port name module/number description-string 6.在基于IOS的交换机上设置端口速度:switch(config-if)# speed{10|100|auto}在基于CLI的交换机上设置端口速度:switch(enable) set port speed moudle/number {10|100|auto} switch(enable) set port speed moudle/number {4|16|auto}7.在基于IOS的交换机上设置以太网的链路模式:switch(config-if)# duplex {auto|full|half}在基于CLI的交换机上设置以太网的链路模式:switch(enable) set port duplex module/number {full|half}8.在基于IOS的交换机上配置静态VLAN:switch(vlan)# vlan vlan-num name vlaswitch(vlan)# exitswitch# configure teriminalswitch(config)# interface interface module/numberswitch(config-if)# switchport mode accessswitch(config-if)# switchport access vlan vlan-numswitch(config-if)# end在基于CLI的交换机上配置静态VLAN:switch(enable) set vlan vlan-num [name name]switch(enable) set vlan vlan-num mod-num/port-list9. 在基于IOS的交换机上配置VLAN中继线:switch(config)# interface interface mod/portswitch(config-if)# switchport mode trunkswitch(config-if)# switchport trunk encapsulation {isl|dotlq} switch(config-if)# switchport trunk allowed vlan remove vlan-list switch(config-if)# switchport trunk allowed vlan add vlan-list在基于CLI的交换机上配置VLAN中继线:switch(enable) set trunk module/port[on|off|desirable|auto|nonegotiate]Vlan-range [isl|dotlq|dotl0|lane|negotiate]10.在基于IOS的交换机上配置VTP管理域:switch(vlan)# vtp domain domain-name在基于CLI的交换机上配置VTP管理域:switch(enable) set vtp [domain domain-name]11.在基于IOS的交换机上配置VTP 模式:switch# vlan databaseswitch(vlan)# vtp domain domain-nameswitch(vlan)# vtp {sever|cilent|transparent}switch(vlan)# vtp password password在基于CLI的交换机上配置VTP 模式:switch(enable) set vtp [domain domain-name] [mode{ sever|cilent|transparent }][password password] 12. 在基于IOS的交换机上配置VTP版本:switch# vlan databaseswitch(vlan)# vtp v2-mode在基于CLI的交换机上配置VTP版本:switch(enable) set vtp v2 enable13. 在基于IOS的交换机上启动VTP剪裁:switch# vlan databaseswitch(vlan)# vtp pruning在基于CL I 的交换机上启动VTP剪裁:switch(enable) set vtp pruning enable14.在基于IOS的交换机上配置以太信道:switch(config-if)# port group group-number [distribution{source|destination}]在基于CLI的交换机上配置以太信道:switch(enable) set port channel moudle/port-rangemode{on|off|desirable|auto}15.在基于IOS的交换机上调整根路径成本:switch(config-if)# spanning-tree [vlan vlan-list] cost cost在基于CLI的交换机上调整根路径成本:switch(enable) set spantree portcost moudle/port costswitch(enable) set spantree portvlancost moudle/port [costcost][vlan-list]16.在基于IOS的交换机上调整端口ID:switch(config-if)# spanning-tree[vlan vlan-list]port-priorityport-priority在基于CLI的交换机上调整端口ID:switch(enable) set spantree portpri {mldule/port}priorityswitch(enable) set spantree portvlanpri {module/port}priority [vlans] 17. 在基于IOS的交换机上修改STP时钟:switch(config)# spanning-tree [vlan vlan-list] hello-time seconds switch(config)# spanning-tree [vlan vlan-list] forward-time seconds ` switch(config)# spanning-tree [vlan vlan-list] max-age seconds在基于CLI的交换机上修改STP时钟:switch(enable) set spantree hello interval[vlan]switch(enable) set spantree fwddelay delay [vlan]switch(enable) set spantree maxage agingtiame[vlan]18. 在基于IOS的交换机端口上启用或禁用Port Fast 特征: switch(config-if)#spanning-tree portfast在基于CLI的交换机端口上启用或禁用Port Fast 特征:switch(enable) set spantree portfast {module/port}{enable|disable} 19. 在基于IOS的交换机端口上启用或禁用UplinkFast 特征: switch(config)# spanning-tree uplinkfast [max-update-ratepkts-per-second]在基于CLI的交换机端口上启用或禁用UplinkFast 特征:switch(enable) set spantree uplinkfast {enable|disable}[rate update-rate] [all-protocols off|on]20. 为了将交换机配置成一个集群的命令交换机,首先要给管理接口分配一个IP地址,然后使用下列命令: switch(config)# cluster enable cluster-name21. 为了从一条中继链路上删除VLAN,可使用下列命令:switch(enable) clear trunk module/port vlan-range22. 用show vtp domain 显示管理域的VTP参数.23. 用show vtp statistics显示管理域的VTP参数.24. 在Catalyst交换机上定义TrBRF的命令如下:switch(enable) set vlan vlan-name [name name] type trbrf bridge bridge-num[stp {ieee|ibm}]25. 在Catalyst交换机上定义TrCRF的命令如下:switch (enable) set vlan vlan-num [name name] type trcrf{ring hex-ring-num|decring decimal-ring-num} parent vlan-num 26. 在创建好TrBRF VLAN之后,就可以给它分配交换机端口.对于以太网交换,可以采用如下命令给VLAN分配端口:switch(enable) set vlan vlan-num mod-num/port-num27. 命令show spantree显示一个交换机端口的STP状态.28. 配置一个ELAN的LES和BUS,可以使用下列命令:ATM (config)# interface atm number.subint multiointATM(config-subif)# lane serber-bus ethernet elan-name29. 配置LECS:ATM(config)# lane database database-nameATM(lane-config-databade)# name elan1-nameserver-atm-address les1-nsap-addressATM(lane-config-databade)# name elan2-nameserver-atm-address les2-nsap-addressATM(lane-config-databade)# name …30. 创建完数据库后,必须在主接口上启动LECS.命令如下:ATM(config)# interface atm numberATM(config-if)# lane config database database-nameATM(config-if)# lane config auto-config-atm-address31. 将每个LEC配置到一个不同的ATM子接口上.命令如下: ATM(config)# interface atm number.subint multipointATM(config)# lane client ethernet vlan-num elan-num32. 用show lane server 显示LES的状态.33. 用show lane bus显示bus的状态.34. 用show lane database显示LECS数据库可内容.35. 用show lane client显示LEC的状态.36. 用show module显示已安装的模块列表.37. 用物理接口建立与VLAN的连接:router# configure terminalrouter(config)# interface media module/portrouter(config-if)# description description-stringrouter(config-if)# ip address ip-addr subnet-maskrouter(config-if)# no shutdown38. 用中继链路来建立与VLAN的连接:router(config)# interface module/port.subinterfacerouter(config-ig)# encapsulation[isl|dotlq] vlan-number router(config-if)# ip address ip-address subnet-mask39. 用LANE 来建立与VLAN的连接:router(config)# interface atm module/portrouter(config-if)# no ip addressrouter(config-if)# atm pvc 1 0 5 qsaalrouter(config-if)# atm pvc 2 0 16 ilnirouter(config-if)# interface atm module/port.subinterface multipoint router(config-if)# ip address ip-address subnet-maskrouter(config-if)# lane client ethernet elan-numrouter(config-if)# interface atm module/port.subinterface multipoint router(config-if)# ip address ip-address subnet-namerouter(config-if)# lane client ethernet elan-namerouter(config-if)# …40. 为了在路由处理器上进行动态路由配置,可以用下列IOS命令来进行:router(config)# ip routingrouter(config)# router ip-routing-protocolrouter(config-router)# network ip-network-numberrouter(config-router)# network ip-network-number41. 配置默认路由:switch(enable) set ip route default gateway42. 为一个路由处理器分配VLANID,可在接口模式下使用下列命令: router(config)# interface interface numberrouter(config-if)# mls rp vlan-id vlan-id-num43. 在路由处理器启用MLSP:router(config)# mls rp ip44. 为了把一个外置的路由处理器接口和交换机安置在同一个VTP 域中:router(config)# interface interface numberrouter(config-if)# mls rp vtp-domain domain-name45. 查看指定的VTP域的信息:router# show mls rp vtp-domain vtp domain name46. 要确定RSM或路由器上的管理接口,可以在接口模式下输入下列命令:router(config-if)#mls rp management-interface47. 要检验MLS-RP的配置情况:router# show mls rp48. 检验特定接口上的MLS配置:router# show mls rp interface interface number49. 为了在MLS-SE上设置流掩码而又不想在任一个路由处理器接口上设置访问列表:set mls flow [destination|destination-source|full]50. 为使MLS和输入访问列表可以兼容,可以在全局模式下使用下列命令:router(config)# mls rp ip input-acl51. 当某个交换机的第3层交换失效时,可在交换机的特权模式下输入下列命令:switch(enable) set mls enable52. 若想改变老化时间的值,可在特权模式下输入以下命令:switch(enable) set mls agingtime agingtime53. 设置快速老化:switch(enable) set mls agingtime fast fastagingtime pkt_threshold 54. 确定那些MLS-RP和MLS-SE参与了MLS,可先显示交换机引用列表中的内容再确定:switch(enable) show mls include55. 显示MLS高速缓存记录:switch(enable) show mls entry56. 用命令show in arp显示ARP高速缓存区的内容。
Cisco3560三层交换机VLAN的配置案例文档资料
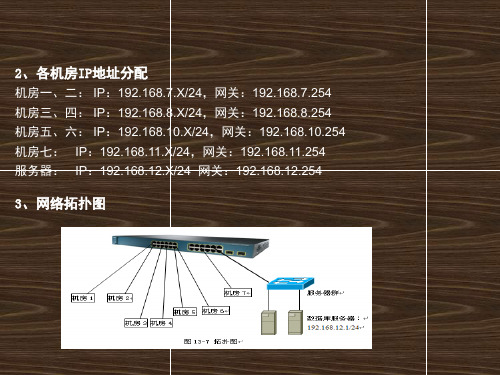
段的服务器。
2、各机房IP地址分配
机房一、二: IP:192.168.7.X/24,网关:192.168.7.254 机房三、四: IP:192.168.8.X/24,网关:192.168.8.254 机房五、六: IP:192.168.10.X/24,网关:192.168.10.254 机房七: IP:192.168.11.X/24,网关:192.168.11.254 服务器: IP:192.168.12.X/24 网关:192.168.12.254
3560(config)#access-list 102 deny ip 192.168.8.0 0.0.0.255 192.168.7.0 0.0.0.255 3560(config)#access-list 102 deny ip 192.168.8.0 0.0.0.255 192.168.10.0 0.0.0.255 3560(config)#access-list 102 deny ip 192.168.8.0 0.0.0.255 192.168.11.0 0.0.0.255 3560(config)#access-list 102 permit ip any any 3560(config)#access-list 103 deny ip 192.168.10.0 0.0.0.255 192.168.7.0 0.0.0.255 3560(config)#access-list 103 deny ip 192.168.10.0 0.0.0.255 192.168.8.0 0.0.0.255 3560(config)#access-list 103 deny ip 192.168.10.0 0.0.0.255 192.168.11.0 0.0.0.255 3560(config)#access-list 103 permit ip any any 3560(config)#access-list 104 deny ip 192.168.11.0 0.0.0.255 192.168.7.0 0.0.0.255 3560(config)#access-list 104 deny ip 192.168.11.0 0.0.0.255 192.168.8.0 0.0.0.255 3560(config)#access-list 104 deny ip 192.168.11.0 0.0.0.255 192.168.10.0 0.0.0.255 3560(config)#access-list 104 permit ip any any
3560G配置命令大全

3560G配置命令大全1.在基于IOS的交换机上设置主机名/系统名:witch(config)#hotnamehotname在基于CLI的交换机上设置主机名/系统名:witch(enable)etytemnamename-tring2.在基于IOS的交换机上设置登录口令:witch(config)#enablepawordlevel1paword在基于CLI的交换机上设置登录口令:witch(enable)etpawordwitch(enable)etenalbepa3.在基于IOS的交换机上设置远程访问:witch(config)#interfacevlan1witch(config-if)#ipaddreip-addrenetmakwitch(config-if)#ipdefault-gatewayip-addre在基于CLI的交换机上设置远程访问: witch(enable)etinterfacec0ip-addrenetmakbroadcat-addrewitch(enable)etinterfacec0vlanwitch(enable)etiproutedefaultg ateway4.在基于IOS的交换机上启用和浏览CDP信息:witch(config-if)#cdpenablewitch(config-if)#nocdpenable为了查看Cico邻接设备的CDP通告信息:witch#howcdpinterface[typemodle/port]witch#howcdpneighbor[typemodule/port][detail]在基于CLI的交换机上启用和浏览CDP信息:witch(enable)etcdp{enable|diable}module/port为了查看Cico邻接设备的CDP通告信息:witch(enable)howcdpneighbor[module/port][vlan|duple某|capabilitie|detail]5.基于IOS的交换机的端口描述:witch(config-if)#decriptiondecription-tring基于CLI的交换机的端口描述:witch(enable)etportnamemodule/numberdecription-tring6.在基于IOS的交换机上设置端口速度:witch(config-if)#peed{10|100|auto}在基于CLI的交换机上设置端口速度: witch(enable)etportpeedmoudle/number{10|100|auto}witch(enabl e)etportpeedmoudle/number{4|16|auto}7.在基于IOS的交换机上设置以太网的链路模式:witch(config-if)#duple某{auto|full|half}在基于CLI的交换机上设置以太网的链路模式:witch(enable)etportduple某module/number{full|half}8.在基于IOS的交换机上配置静态VLAN:witch#vlandatabaewitch(vlan)#vlanvlan-numnamevlawitch(vlan)#e某itwitch#configureteriminalwitch(config)#interfaceinterfacemodule/numberwitch(config-if)#witchportmodeaccewitch(config-if)#witchportaccevlanvlan-numwitch(config-if)#end在基于CLI的交换机上配置静态VLAN:witch(enable)etvlanvlan-num[namename]witch(enable)etvlanvlan-nummod-num/port-lit9.在基于IOS的交换机上配置VLAN中继线:witch(config)#interfaceinterfacemod/portwitch(config-if)#witchportmodetrunkwitch(config-if)#witchporttrunkencapulation{il|dotlq}witch(config-if)#witchporttrunkallowedvlanremovevlan-litwitch(config-if)#witchporttrunkallowedvlanaddvlan-lit在基于CLI的交换机上配置VLAN中继线:witch(enable)ettrunkmodule/port[on|off|deirable|auto|nonegotiate]Vlan-range[il|dotlq|dotl0|lane|negotiate]10.在基于IOS的交换机上配置VTP管理域:witch#vlandatabaewitch(vlan)#vtpdomaindomain-name在基于CLI的交换机上配置VTP 管理域:witch(enable)etvtp[domaindomain-name]11.在基于IOS的交换机上配置VTP模式:witch#vlandatabaewitch(vlan)#vtpdomaindomain-namewitch(vlan)#vtp{ever|cilent|tranparent}witch(vlan)#vtppaword paword在基于CLI的交换机上配置VTP模式:witch(enable) etvtp[domaindomain-name][mode{ever|cilent|tranparent}][pawordpaword]12.在基于IOS的交换机上配置VTP版本:witch#vlandatabaewitch(vlan)#vtpv2-mode在基于CLI的交换机上配置VTP版本:witch(enable)etvtpv2enable13.在基于IOS的交换机上启动VTP剪裁:witch#vlandatabaewitch(vlan)#vtppruning在基于CLI的交换机上启动VTP剪裁:witch(enable)etvtppruningenable14.在基于IOS的交换机上配置以太信道:witch(config-if)#portgroupgroup-number[ditribution{ource|detination}]在基于CLI的交换机上配置以太信道:witch(enable)etportchannelmoudle/port-rangemode{on|off|deirable|auto}15.在基于IOS的交换机上调整根路径成本:witch(config-if)#panning-tree[vlanvlan-lit]cotcot在基于CLI 的交换机上调整根路径成本:witch(enable)etpantreeportcotmoudle/portcotwitch(enable)etpa ntreeportvlancotmoudle/port[cotcot][vlan-lit]16.在基于IOS的交换机上调整端口ID:witch(config-if)#panning-tree[vlanvlan-lit]port-priorityport-priority在基于CLI的交换机上调整端口ID:witch(enable)etpantreeportpri{mldule/port}prioritywitch(enab le)etpantreeportvlanpri{module/port}priority[vlan]17.在基于IOS的交换机上修改STP时钟:`witch(config)#panning-tree[vlanvlan-lit]ma某-ageecond在基于CLI的交换机上修改STP时钟:witch(enable)etpantreehellointerval[vlan]witch(enable)etpant reefwddelaydelay[vlan]witch(enable)etpantreema某ageagingtiame[vlan]18.在基于IOS的交换机端口上启用或禁用PortFat 特征:witch(config-if)#panning-treeportfat在基于CLI的交换机端口上启用或禁用PortFat特征:witch(enable) etpantreeportfat{module/port}{enable|diable}19.在基于IOS的交换机端口上启用或禁用UplinkFat特征:witch(config)#panning-treeuplinkfat[ma某-update-ratepkt-per-econd]在基于CLI的交换机端口上启用或禁用UplinkFat特征:witch(enable)etpantreeuplinkfat{enable|diable}[rateupdate-rate][all-protocoloff|on]20.为了将交换机配置成一个集群的命令交换机,首先要给管理接口分配一个IP地址,然后使用下列命令:witch(config)#cluterenablecluter-name21.为了从一条中继链路上删除VLAN,可使用下列命令:witch(enable)cleartrunkmodule/portvlan-range22.用howvtpdomain显示管理域的VTP参数.23.用howvtptatitic显示管理域的VTP参数.24.在Catalyt交换机上定义TrBRF的命令如下: witch(enable)etvlanvlan-name[namename]typetrbrfbridgebridge-num[tp{ieee|ibm}]25.在Catalyt交换机上定义TrCRF的命令如下:witch(enable)etvlanvlan-num[namename]typetrcrf{ringhe某-ring-num|decringdecimal-ring-num}parentvlan-num26.在创建好TrBRFVLAN之后,就可以给它分配交换机端口.对于以太网交换,可以采用如下命令给VLAN分配端口:witch(enable)etvlanvlan-nummod-num/port-num27.命令howpantree显示一个交换机端口的STP状态.28.配置一个ELAN的LES和BUS,可以使用下列命令:ATM(config)#interfaceatmnumber.ubintmultiointATM(config-ubif)#laneerber-buethernetelan-name29.配置LECS:ATM(config)#lanedatabaedatabae-nameATM(lane-config-databade)#nameelan1-nameerver-atm-addrele1-nap-addreATM(lane-config-databade)#nameelan2-nameerver-atm-addrele2-nap-addreATM(lane-config-databade)#name…30.创建完数据库后,必须在主接口上启动LECS.命令如下:ATM(config)#interfaceatmnumberATM(config-if)#laneconfigdatabaedatabae-nameATM(config-if)#laneconfigauto-config-atm-addre31.将每个LEC配置到一个不同的ATM子接口上.命令如下:ATM(config)#interfaceatmnumber.ubintmultipointATM(config)#lan eclientethernetvlan-numelan-num32.用howlaneerver显示LES的状态.33.用howlanebu显示bu的状态.34.用howlanedatabae显示LECS数据库可内容.35.用howlaneclient显示LEC的状态.36.用howmodule显示已安装的模块列表.37.用物理接口建立与VLAN的连接:router#configureterminal router(config)#interfacemediamodule/portrouter(config-if)#decriptiondecription-tringrouter(config-if)#ipaddreip-addrubnet-makrouter(config-if)#nohutdown38.用中继链路来建立与VLAN的连接:router(config)#interfacemodule/port.ubinterfacerouter(config -ig)#encapulation[il|dotlq]vlan-numberrouter(config-if)#ipaddreip-addreubnet-mak39.用LANE来建立与VLAN的连接: router(config)#interfaceatmmodule/portrouter(config-if)#noipaddrerouter(config-if)#atmpvc105qaalrouter(config-if)#atmpvc2016ilnirouter(config-if)#interfaceatmmodule/port.ubinterfacemultipointrouter(config-if)#ipaddreip-addreubnet-makrouter(config-if)#laneclientethernetelan-numrouter(config-if)#interfaceatmmodule/port.ubinterfacemultipointrouter(config-if)#ipaddreip-addreubnet-namerouter(config-if)#laneclientethernetelan-namerouter(config-if)#…40.为了在路由处理器上进行动态路由配置,可以用下列IOS命令来进行:router(config)#iproutingrouter(config)#routerip-routing-protocolrouter(config-router)#networkip-network-numberrouter(config-router)#networkip-network-number41.配置默认路由:witch(enable)etiproutedefaultgateway59.访问时间和保持时间参数是可配置的:60.配置HSRP跟踪:router(config-if)#tandygroup-numbertracktype-numberinterface-priority42.为一个路由处理器分配VLANID,可在接口模式下使用下列命令:61.要显示HSRP路由器的状态:router(config)#interfaceinterfacenumberrouter(config-if)#mlrpvlan-idvlan-id-num43.在路由处理器启用MLSP:router(config)#mlrpip44.为了把一个外置的路由处理器接口和交换机安置在同一个VTP域中:router(config)#interfaceinterfacenumberrouter(config-if)#mlrpvtp-domaindomain-name45.查看指定的VTP域的信息: router#howmlrpvtp-domainvtpdomainname46.要确定RSM或路由器上的管理接口,可以在接口模式下输入下列命令:router(config-if)#mlrpmanagement-interface47.要检验MLS-RP的配置情况:router#howmlrp48.检验特定接口上的MLS配置:router#howmlrpinterfaceinterfacenumber49.为了在MLS-SE上设置流掩码而又不想在任一个路由处理器接口上设置访问列表:etmlflow[detination|detination-ource|full]50.为使MLS和输入访问列表可以兼容,可以在全局模式下使用下列命令:router(config)#mlrpipinput-acl51.当某个交换机的第3层交换失效时,可在交换机的特权模式下输入下列命令:witch(enable)etmlenable54.确定那些MLS-RP和MLS-SE参与了MLS,可先显示交换机引用列表中的内容再确定:witch(enable)howmlinclude55.显示MLS高速缓存记录:witch(enable)howmlentry56.用命令howinarp显示ARP高速缓存区的内容。
cisco3560交换机所有配置命令

channel-group command 2-70
channel-protocol command 2-74
Cisco Network Assistant
See Network Assistant
Cisco Redundant Power System 2300
configuring 2-464
auto qos voip command 2-52
Auto Smartports macros and LLDP 2-347
B
BackboneFast, for STP 2-808
backup interfaces
configuring 2-882
displaying 2-593
boot helper command 2-62
boot helper-config file command 2-63
booting
Cisco IOS image 2-66
displaying environment variables 2-524
interrupting 2-61
manually 2-64
boot loader
accessing A-1
booting
Cisco IOS image A-3
helper image 2-62
directories
creating A-19
displaying a list of A-8
removing A-23
boot private-config-file command 2-65
boot system command 2-66
思科3560交换机中文配置手册

3560客户中文配置手册第1章概述1-11.1 概述1-11.2 初次访问设备1-21.2.1 通过Console口访问设备1-2第2章命令行方式访问设备2-12.1.1 命令行模式2-12.1.2 基本设置命令2-12.2 通过Console口进入命令行接口2-22.3 通过Telnet进入命令行接口2-2第3章接口配置3-13.1 概述3-13.2 二层口配置3-13.2.1 配置端口速率及双工模式3-13.3 配置一组端口3-23.4 配置三层口3-33.5 监控及维护端口3-53.5.1 监控端口和控制器的状态3-53.5.2 刷新、重置端口及计数器3-73.5.3 关闭和打开端口3-83.6 交换机端口镜像配置3-93.6.1 创建一个本地SPAN会话3-103.7 以太通道端口组(Ethernet Port Groups)3-11第4章配置VLAN 4-124.1 简介4-124.2 可支持的VLAN 4-124.3 配置正常范围的VLAN 4-124.3.1 删除VLAN 4-144.3.2 将端口分配给一个VLAN 4-154.4 配置VLAN Trunks 4-164.5 配置VTP DOMAIN 4-184.6 配置VLAN接口地址4-18第5章交换机HSRP配置5-1第6章路由协议配置6-36.1.1 静态路由6-36.1.2 RIP路由6-36.1.3 OSPF路由6-5第1章概述1.1 概述3560交换机是支持二层、三层功能的交换机,共分为EMI,SMI两个版本Enhanced Multilayer Software Image增强多层软件镜像软件(EMI)•EMI提供了一组更加丰富的企业级功能,包括基于硬件的高级IP单播和多播路由。
•支持双机热备(HSRP),OSPF路由功能.Standard Multilayer Software Image标准多层软件镜像软件(SMI)•SMI功能集包括高级QoS、速率限制、访问控制列表(ACL),以及基本的静态和路由信息协议(RIP)路由功能支持VLAN·到1005 个VLAN·支持VLAN ID从1到4094(IEEE 802.1Q 标准)·支持ISL及IEEE 802.1Q封装安全·支持IOS标准的密码保护·静态MAC地址映射·标准及扩展的访问列表支持,对于路由端口支持入出双向的访问列表,对于二层端口支持入的访问列表·支持基于VLAN的访问列表3层支持(需要多层交换的IOS)·HSRP·IP路由协议o RIP versions 1 and 2o OSPFo IGRP及EIGRPo BGP Version 4支持以下SFP模块:·1000BASE-T SFP: 铜线最长100 m·1000BASE-SX SFP: 光纤最长1804 feet (550 m)·1000BASE-LX/LH SFP: 光纤最长32,808 feet (6 miles or 10 km)·1000BASE-ZX SFP: 光纤最长328,084 feet (62 miles or 100 km)管理从用户与设备交互的特点来分,访问设备的方式可以分为命令行方式和Web方式。
cisco3560思科交换机常用配置教程与实例
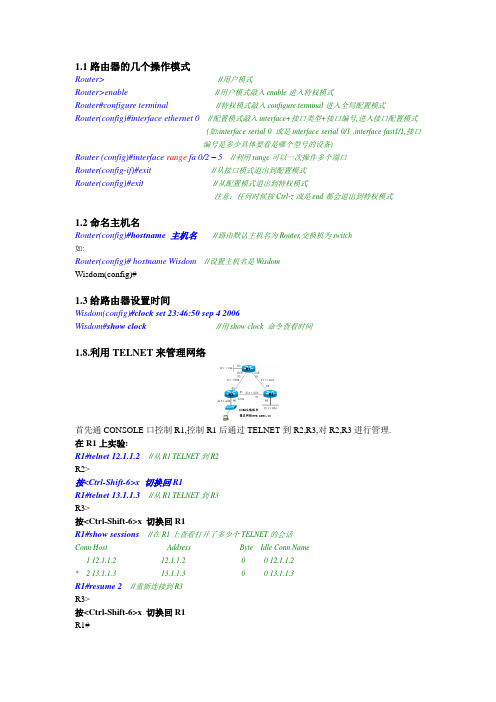
1.1路由器的几个操作模式Router>//用户模式Router>enable//用户模式敲入enable进入特权模式Router#configure terminal//特权模式敲入configure terminal进入全局配置模式Router(config)#interface ethernet 0//配置模式敲入interface+接口类型+接口编号,进入接口配置模式(如:interface serial 0 或是interface serial 0/1 ,interface fast1/1,接口编号是多少具体要看是哪个型号的设备)Router (config)#interface range fa 0/2 – 5//利用range可以一次操作多个端口Router(config-if)#exit //从接口模式退出到配置模式Router(config)#exit//从配置模式退出到特权模式注意:任何时候按Ctrl-z或是end都会退出到特权模式1.2命名主机名Router(config)#hostname 主机名//路由默认主机名为Router,交换机为switch如:Router(config)#hostname Wisdom//设置主机名是WisdomWisdom(config)#1.3给路由器设置时间Wisdom(config)#clock set 23:46:50 sep 4 2006Wisdom#show clock//用show clock 命令查看时间1.8.利用TELNET来管理网络首先通CONSOLE口控制R1,控制R1后通过TELNET到R2,R3,对R2,R3进行管理.在R1上实验:R1#telnet 12.1.1.2//从R1 TELNET到R2R2>按<Ctrl-Shift-6>x 切换回R1R1#telnet 13.1.1.3//从R1 TELNET到R3R3>按<Ctrl-Shift-6>x 切换回R1R1#show sessions//在R1上查看打开了多少个TELNET的会话Conn Host Address Byte Idle Conn Name1 12.1.1.2 12.1.1.2 0 0 12.1.1.2* 2 13.1.1.3 13.1.1.3 0 0 13.1.1.3R1#resume 2//重新连接到R3R3>按<Ctrl-Shift-6>x 切换回R1R1#R1#disconnect 1//从R1是主动断开到R2的连接(断开一个TELNET的会话)在R2上实验:R2#show users//在R2上查看有谁登录到路由器Line User Host(s) Idle Location* 0 con 0 idle 00:00:002 vty 0 idle 00:01:52 12.1.1.1R2#clear line 2//发现有人TELNET过来,把他清除R2#show usersLine User Host(s) Idle Location* 0 con 0 idle 00:00:00注意:Show session和show user的区别Disconnect 和Clear line的区别Ctrl+shift+6 x 和resume1.9 PING、TraceRoute、Debug、Sysloga.使用PING命令R1#ping 12.1.1.2如果ping的结果是!!!!!则表明网络正常.如果ping的结果是…..则表明网络不通.如果ping的结果是U.U.U则表明下一跳不可达.b.使用traceroute命令, 在网络层上追踪源到目的地址所经过的路由器.(或是数据包经过的路径)例:R2#traceroute 33.1.1.3Tracing the route to 33.1.1.31 12.1.1.1 4 msec 4 msec 4 msec2 13.1.1.34 msec 4 msec *//从以上可以看出从R2 到达33.1.1.3经过了12.1.1.1和13.1.1.3两个路由器例:………………………………………………………………………………………………………………….3.3使用串口管理交换机。
cisco35603层交换机和路由器连接,交换机如何配置
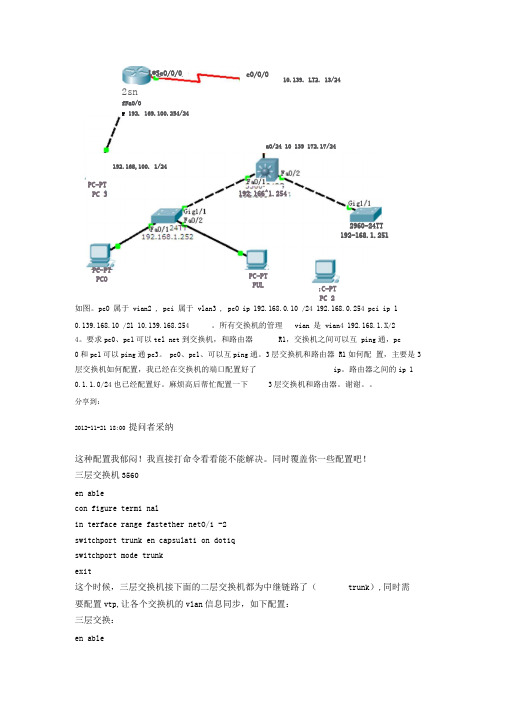
如图。
pcO 属于 vian2 , pci 属于 vlan3 , pcO ip 192.168.0.10 /24 192.168.0.254 pci ip 1 0.139.168.10 /21 10.139.168.254 。
所有交换机的管理 vian 是 vian4 192.168.1.X/2 4。
要求pc0、pc1可以tel net 到交换机,和路由器 R1,交换机之间可以互 ping 通,pc0和pc1可以ping 通pc3。
pc0、pc1、可以互ping 通。
3层交换机和路由器 R1如何配 置,主要是3层交换机如何配置,我已经在交换机的端口配置好了ip 。
路由器之间的ip 1 0.1.1.0/24也已经配置好。
麻烦高后帮忙配置一下3层交换机和路由器。
谢谢。
分享到:2012-11-21 18:00 提问者采纳 这种配置我郁闷!我直接打命令看看能不能解决。
同时覆盖你一些配置吧!三层交换机3560en ablecon figure termi nalin terface range fastether netO/1 -2switchport trunk en capsulati on dot1qswitchport mode trunkexit这个时候,三层交换机接下面的二层交换机都为中继链路了(trunk ),同时需 要配置vtp,让各个交换机的vlan 信息同步,如下配置:三层交换:en able L®SeO/0/0 eO/O/O 2sn fFaO/O r 192. 169.100.254/24 10.139. LT2. 13/24 PC-PT PC 3 aO/24 10 139 172.17/24 192.168,100. 1/24 PC-PT PCO 2960-24TT 192-168.1.251 192.166^1.254 PC-PT PUL :C-PTPC 2con figure termi nalvtp domai n net vtp mode server两个二层交换机都要配:en ablecon figure termi nalvtp domai n netvtp mode clie nt然后在三层交换上配置vlanen ablevla n databasevla n 2vla n 3vla n 4exitcon figure termi nalin terface vla n 2ip address 192.168.0.254 255.255.255.0 exitin terface vla n 3ip address 10.139.168.254 255.255.248.0 exitin terface vla n 4ip address 192.168.1.254 255.255.255.0然后在第一个二层交换机上将PC划分相应的vlan当中en ablecon figure termi nalin terface fastethernet0/1switchport mode access switchport access vla n 2 in terface fastethernet0/2 switchport mode access switchport access vla n 3这样内网通信基本没问题了。
cisco3560参数
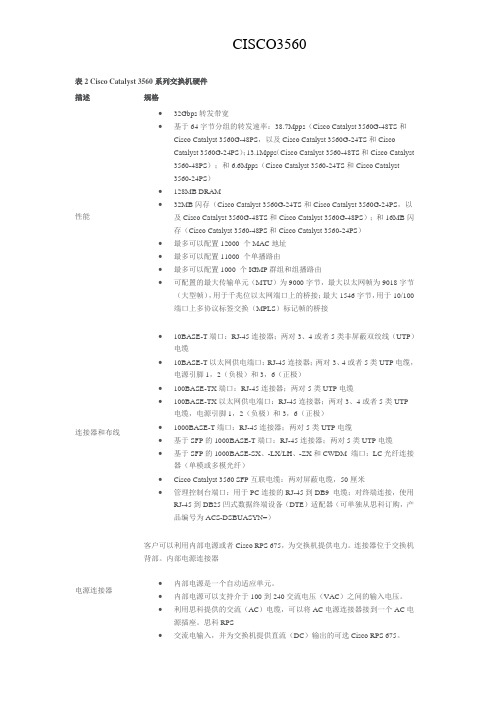
表2 Cisco Catalyst 3560系列交换机硬件描述规格性能∙32Gbps转发带宽∙基于64字节分组的转发速率:38.7Mpps(Cisco Catalyst 3560G-48TS和Cisco Catalyst 3560G-48PS,以及Cisco Catalyst 3560G-24TS和CiscoCatalyst 3560G-24PS);13.1Mpps(Cisco Catalyst 3560-48TS和Cisco Catalyst 3560-48PS);和6.6Mpps(Cisco Catalyst 3560-24TS和Cisco Catalyst3560-24PS)∙128MB DRAM∙32MB闪存(Cisco Catalyst 3560G-24TS和Cisco Catalyst 3560G-24PS,以及Cisco Catalyst 3560G-48TS和Cisco Catalyst 3560G-48PS);和16MB闪存(Cisco Catalyst 3560-48PS和Cisco Catalyst 3560-24PS)∙最多可以配置12000 个MAC地址∙最多可以配置11000 个单播路由∙最多可以配置1000 个IGMP群组和组播路由∙可配置的最大传输单元(MTU)为9000字节,最大以太网帧为9018字节(大型帧),用于千兆位以太网端口上的桥接;最大1546字节,用于10/100端口上多协议标签交换(MPLS)标记帧的桥接连接器和布线∙10BASE-T端口:RJ-45连接器;两对3、4或者5类非屏蔽双绞线(UTP)电缆∙10BASE-T以太网供电端口:RJ-45连接器;两对3、4或者5类UTP电缆,电源引脚1,2(负极)和3,6(正极)∙100BASE-TX端口:RJ-45连接器;两对5类UTP电缆∙100BASE-TX以太网供电端口:RJ-45连接器;两对3、4或者5类UTP 电缆,电源引脚1,2(负极)和3,6(正极)∙1000BASE-T端口:RJ-45连接器;两对5类UTP电缆∙基于SFP的1000BASE-T端口:RJ-45连接器;两对5类UTP电缆∙基于SFP的1000BASE-SX、-LX/LH、-ZX和CWDM 端口:LC光纤连接器(单模或多模光纤)∙Cisco Catalyst 3560 SFP互联电缆:两对屏蔽电缆,50厘米∙管理控制台端口:用于PC连接的RJ-45到DB9 电缆;对终端连接,使用RJ-45到DB25凹式数据终端设备(DTE)适配器(可单独从思科订购,产品编号为ACS-DSBUASYN=)电源连接器客户可以利用内部电源或者Cisco RPS 675,为交换机提供电力。
- 1、下载文档前请自行甄别文档内容的完整性,平台不提供额外的编辑、内容补充、找答案等附加服务。
- 2、"仅部分预览"的文档,不可在线预览部分如存在完整性等问题,可反馈申请退款(可完整预览的文档不适用该条件!)。
- 3、如文档侵犯您的权益,请联系客服反馈,我们会尽快为您处理(人工客服工作时间:9:00-18:30)。
思科3560G交换机常用配置
一.配置telnet登陆账号和密码
用串口线连上交换机
Switch(config)#userna
Switch(config)#username admin pas
Switch(config)#username admin password 123
Switch(config)#line vty 0 4
Switch(config-line)#login local
Switch(config-line)#end
%SYS-5-CONFIG_I: Configured from console by console
Switch#wr
二.配特权密码
Switch#conf t
Enter configuration commands, one per line. End with CNTL/Z.
Switch(config)#enable password 456
三.划分vlan
Switch(config)#vlan 10
Switch(config-vlan)#int vlan 10
Switch(config-if)#
%LINK-5-CHANGED: Interface Vlan10, changed state to up
Switch(config-if)#ip add 192.168.10.1 255.255.255.0
四.配dhcp
Switch(config)#ip dhcp pool vlan10
Switch(dhcp-config)#network 192.168.10.0 255.255.255.0
Switch(dhcp-config)#default-router 192.168.10.1
Switch(dhcp-config)#dns-server 192.168.1.1
Switch(dhcp-config)#
五.划分端口
Switch(config)#int range fastEthernet 0/1-5 进入1-5端口
Switch(config-if-range)#switchport mode access 并把接口方式改为access
Switch(config-if-range)#switchport access vlan 10把1-5端口划vlan 10
Switch(config-if-range)#no sh
六. 配静态路由
Switch(config)#ip route 0.0.0.0 0.0.0.0 192.168.10.2 192.168.10.2是一跳地址七. 配置完一定要保存
Switch#wr
Building configuration...
[OK]。
