计算机图形学 MFC VC++6.0制作的简单时钟源代码
Visual_C++基于对话框的MFC应用程序【简单时钟】

1.1创建对话框的应用程序1.使用AppWizard创建应用程序框架首先,创建一个对话框应用程序,其工程文件名为:ch1.dsp。
具体步骤如下:(1)启动Visual C++6.0,在File菜单中选择new菜单项;(2)在new对话框的Project页中选择MFC AppWizard(exe)选项,在Project name框中输入:ch1,并在Location框中指定希望的目录路径,编译系统生成的各种文件将会存放在该目录下,然后点击[OK]按钮(3)MFC AppWizard-Step1中选择Dialog based选项,MFC AppWizard-Step2到MFC AppWizard-Step4中取默认选项;(4)进入VC对话框设计界面后,选中[TODO:在这里设置对话控制。
]静态框并按del键删除该框,选中[取消]按钮并按del键删除该按钮;(5)将[确认]按钮拖曳到对话框的下方中间。
生成的对话框设计窗口(如图1-1所示)。
图1-12.向类中添加系统消息响应函数Windows应用程序的采用事件触发、消息驱动机制和大量的消息响应函数构成了应用程序的主体。
本示例需要用到两个消息响应函数OnCtlColor()和OnTimer(),前者响应窗口消息:WM_CTLCOLOR,后者响应窗口消息:WM_TIMER。
关于这两个函数的功能和用法暂且略过,留待后面小节再叙。
这里先介绍响应函数加载的方法。
在CCh1Dlg类中添加OnCtlColor()函数的操作方法如下:(1)打开类向导(MFC ClassWizard)窗口,选择Message Maps 页;(2)选择工程、类和对象标识。
在Message Maps页的Project、Class name、Object Ids框中分别选择:ch1、CCh1Dlg、CCh1Dlg;(3)添加响应函数。
在Message Maps页的Messages框中选中并双击窗口消息:WM_CTLCOLOR,此时,消息WM_CTLCOLOR 的响应函数OnCtlColor()被添加到类向导底部Member Functions框中。
vc6.0中用MFC编写计算器代码
// CKcalculateDlg.cpp : implementation file//#include "stdafx.h"#include "math.h"#include "CKcalculate.h"#include "CKcalculateDlg.h"#ifdef _DEBUG#define new DEBUG_NEW#undef THIS_FILEstatic char THIS_FILE[] = __FILE__;#endif// double m_first; //存储一次运算的第一个操作数及一次运算的结果// double m_second; //存储一次运算的第二个操作数// CString m_operator; //存储运算符// double m_coff; //存储小数点的系数权值/////////////////////////////////////////////////////////////////////////////// CAboutDlg dialog used for App About/////////////////////////////////////////////////////////////////////////////class CAboutDlg : public CDialog{public:CAboutDlg();// Dialog Data//{{AFX_DATA(CAboutDlg)enum { IDD = IDD_ABOUTBOX };//}}AFX_DATA// ClassWizard generated virtual function overrides//{{AFX_VIRTUAL(CAboutDlg)protected:virtual void DoDataExchange(CDataExchange* pDX);// DDX/DDV support//}}AFX_VIRTUAL// Implementationprotected://{{AFX_MSG(CAboutDlg)//}}AFX_MSGDECLARE_MESSAGE_MAP()};CAboutDlg::CAboutDlg() : CDialog(CAboutDlg::IDD){//{{AFX_DATA_INIT(CAboutDlg)//}}AFX_DATA_INIT}void CAboutDlg::DoDataExchange(CDataExchange* pDX){CDialog::DoDataExchange(pDX);//{{AFX_DATA_MAP(CAboutDlg)//}}AFX_DATA_MAP}BEGIN_MESSAGE_MAP(CAboutDlg, CDialog)//{{AFX_MSG_MAP(CAboutDlg)// No message handlers//}}AFX_MSG_MAPEND_MESSAGE_MAP()/////////////////////////////////////////////////////////////////////////////// CCKcalculateDlg dialogCCKcalculateDlg::CCKcalculateDlg(CWnd* pParent /*=NULL*/) : CDialog(CCKcalculateDlg::IDD, pParent){// void UpdateDisplay(double);// void Calculate(void);//{{AFX_DATA_INIT(CCKcalculateDlg)/////////////////////////////////////////////////////////////////////////////////////////////////// //isXdeY=false;m_display = _T("");m_PI=3.14159265358979323846;m_first=0.0;m_second=0.0;m_operator=_T("+");m_coff=0;m_display=_T("0.0");//}}AFX_DATA_INIT// Note that LoadIcon does not require a subsequent DestroyIcon in Win32m_hIcon = AfxGetApp()->LoadIcon(IDR_MAINFRAME);}void CCKcalculateDlg::DoDataExchange(CDataExchange* pDX){CDialog::DoDataExchange(pDX);//{{AFX_DATA_MAP(CCKcalculateDlg)DDX_Text(pDX, IDC_DISPLAY, m_display);//}}AFX_DATA_MAP}BEGIN_MESSAGE_MAP(CCKcalculateDlg, CDialog)//{{AFX_MSG_MAP(CCKcalculateDlg)ON_WM_SYSCOMMAND()ON_WM_PAINT()ON_WM_QUERYDRAGICON()ON_BN_CLICKED(IDC_BUTTON0, OnButton0)ON_BN_CLICKED(IDC_BUTTON1, OnButton1)ON_BN_CLICKED(IDC_BUTTON2, OnButton2)ON_BN_CLICKED(IDC_BUTTON3, OnButton3)ON_BN_CLICKED(IDC_BUTTON4, OnButton4)ON_BN_CLICKED(IDC_BUTTON5, OnButton5)ON_BN_CLICKED(IDC_BUTTON6, OnButton6)ON_BN_CLICKED(IDC_BUTTON7, OnButton7)ON_BN_CLICKED(IDC_BUTTON8, OnButton8)ON_BN_CLICKED(IDC_BUTTON9, OnButton9)ON_BN_CLICKED(IDC_BUTTON_ADD, OnButtonAdd)ON_BN_CLICKED(IDC_BUTTON_MINUS, OnButtonMinus)ON_BN_CLICKED(IDC_BUTTON_MUTIPL Y, OnButtonMutiply) ON_BN_CLICKED(IDC_BUTTON_DIV, OnButtonDiv)ON_BN_CLICKED(IDC_BUTTON_SIGH, OnButtonSigh)ON_BN_CLICKED(IDC_BUTTON_POINT, OnButtonPoint)ON_BN_CLICKED(IDC_BUTTON_CLEAR, OnButtonClear)ON_BN_CLICKED(IDC_BUTTON_SQRT, OnButtonSqrt)ON_BN_CLICKED(IDC_BUTTON_RECI, OnButtonReci)ON_BN_CLICKED(IDC_BUTTON_EQUAL, OnButtonEqual)ON_BN_CLICKED(IDC_BUTTON_SIN, OnButtonSin)ON_BN_CLICKED(IDC_BUTTON_COS, OnButtonCos)ON_BN_CLICKED(IDC_BUTTON_LOG, OnButtonLog)ON_BN_CLICKED(IDC_BUTTON_XDEY, OnButtonXdeY)//}}AFX_MSG_MAPEND_MESSAGE_MAP()/////////////////////////////////////////////////////////////////////////////// CCKcalculateDlg message handlers/////////////////////////////////////////////////////////////////////////////BOOL CCKcalculateDlg::OnInitDialog(){CDialog::OnInitDialog();// Add "About..." menu item to system menu.// IDM_ABOUTBOX must be in the system command range.ASSERT((IDM_ABOUTBOX & 0xFFF0) == IDM_ABOUTBOX);ASSERT(IDM_ABOUTBOX < 0xF000);CMenu* pSysMenu = GetSystemMenu(FALSE);if (pSysMenu != NULL){CString strAboutMenu;strAboutMenu.LoadString(IDS_ABOUTBOX);if (!strAboutMenu.IsEmpty()){pSysMenu->AppendMenu(MF_SEPARATOR);pSysMenu->AppendMenu(MF_STRING, IDM_ABOUTBOX, strAboutMenu);}}// Set the icon for this dialog. The framework does this automatically// when the application's main window is not aSetIcon(m_hIcon, TRUE); // Set big iconSetIcon(m_hIcon, FALSE); // Set small icon// TODO: Add extra initialization herereturn TRUE;// return TRUE unless you set the focus to a control}void CCKcalculateDlg::OnSysCommand(UINT nID, LPARAM lParam){if ((nID & 0xFFF0) == IDM_ABOUTBOX){CAboutDlg dlgAbout;dlgAbout.DoModal();}else{CDialog::OnSysCommand(nID, lParam);}}// If you add a minimize button to your dialog, you will need the code below// to draw the icon. For MFC applications using the document/view model,// this is automatically done for you by the framework.void CCKcalculateDlg::OnPaint(){if (IsIconic()){CPaintDC dc(this); // device context for paintingSendMessage(WM_ICONERASEBKGND, (WPARAM) dc.GetSafeHdc(), 0);// Center icon in client rectangleint cxIcon = GetSystemMetrics(SM_CXICON);int cyIcon = GetSystemMetrics(SM_CYICON);CRect rect;GetClientRect(&rect);int x = (rect.Width() - cxIcon + 1) / 2;int y = (rect.Height() - cyIcon + 1) / 2;// Draw the icondc.DrawIcon(x, y, m_hIcon);}else{CDialog::OnPaint();}}// The system calls this to obtain the cursor to display while the user drags// the minimized window.HCURSOR CCKcalculateDlg::OnQueryDragIcon(){return (HCURSOR) m_hIcon;}////////////////////////////////////////////////////////////////////////////////////////////////////////////////////////////////////////////// ////////////////////////////////////////////////////////////////////////////////////////////////////////////////////////////////////////////// //////////////////////////按键代码//////////////////////////////////////////////////////////////////////////////////////////////////////////////////////////////////////////////void CCKcalculateDlg::OnButton0(){// TODO: Add your control notification handler code hereonButtonN(0);}void CCKcalculateDlg::OnButton1(){// TODO: Add your control notification handler code hereonButtonN(1);}void CCKcalculateDlg::OnButton2(){// TODO: Add your control notification handler code hereonButtonN(2);}void CCKcalculateDlg::OnButton3(){// TODO: Add your control notification handler code hereonButtonN(3);}void CCKcalculateDlg::OnButton4(){// TODO: Add your control notification handler code hereonButtonN(4);}void CCKcalculateDlg::OnButton5(){// TODO: Add your control notification handler code hereonButtonN(5);}void CCKcalculateDlg::OnButton6(){// TODO: Add your control notification handler code hereonButtonN(6);}void CCKcalculateDlg::OnButton7(){// TODO: Add your control notification handler code hereonButtonN(7);}void CCKcalculateDlg::OnButton8(){// TODO: Add your control notification handler code hereonButtonN(8);}void CCKcalculateDlg::OnButton9(){// TODO: Add your control notification handler code hereonButtonN(9);}////////////////////////////////////////////////////////////////////////////////////////////////////////////////////////////////////////////// ////////////////////////////////////////////////////////////////////////////////////////////////////////////////////////////////////////////// ////////////////计算按键代码//////////////////////////////////////////////////////////////////////////////////////////////////////////////////////////////////////////////void CCKcalculateDlg::OnButtonAdd(){// TODO: Add your control notification handler code here Calculate();m_operator="+";}void CCKcalculateDlg::OnButtonMinus(){// TODO: Add your control notification handler code here Calculate();m_operator="-";}void CCKcalculateDlg::OnButtonMutiply(){// TODO: Add your control notification handler code here Calculate();m_operator="*";}void CCKcalculateDlg::OnButtonDiv(){// TODO: Add your control notification handler code here Calculate();m_operator="/";}void CCKcalculateDlg::OnButtonSigh(){// TODO: Add your control notification handler code here m_second=-m_second;UpdateDisplay(m_second);}void CCKcalculateDlg::OnButtonPoint(){// TODO: Add your control notification handler code here m_coff =0.1;}void CCKcalculateDlg::OnButtonClear(){// TODO: Add your control notification handler code here m_first=0.0;m_second=0.0;m_operator="+";m_coff = 1.0;UpdateDisplay(0.0);}void CCKcalculateDlg::OnButtonSqrt(){// TODO: Add your control notification handler code here if( m_second==0 ){m_first=sqrt(m_first);UpdateDisplay(m_first);}else{m_second=sqrt(m_second);UpdateDisplay(m_second);}}void CCKcalculateDlg::OnButtonReci(){// TODO: Add your control notification handler code here if( fabs(m_second ) < 0.000001 && fabs( m_first )<0.000001) {m_display="除数不能为零";UpdateDisplay(false);return;}if( fabs(m_second ) < 0.000001){m_first=1.0/m_first;UpdateDisplay(m_first);}else{m_second=1.0/m_second;UpdateDisplay(m_second);}}void CCKcalculateDlg::OnButtonEqual(){// TODO: Add your control notification handler code hereXdeY();Calculate();}void CCKcalculateDlg::UpdateDisplay(double ck){m_display.Format(_T("%f"),ck);int i=m_display.GetLength();//格式化输出,将输出结果后的零截去while(m_display.GetAt(i-1)=='0'){m_display.Delete(i-1,1);i--;}//更新编辑框变量m_displayUpdateData(false);}void CCKcalculateDlg::Calculate(void){//将前一次数据与当前数据进行运算,作为下次的第一操作数,并在编辑框显示switch(m_operator.GetAt(0)){case '+': m_first+=m_second;break;case '-': m_first-=m_second;break;case '*': m_first*=m_second;break;case '/':if( fabs(m_second ) <= 0.000001){m_display="除数不能为0";UpdateData(false);return;}m_first/=m_second;break;}m_second=0.0;m_coff=1.0;m_operator=_T("+");//更新编辑框显示内容UpdateDisplay(m_first);}void CCKcalculateDlg::onButtonN(int n){if(m_coff==1.0)//作为整数输入数字时m_second=m_second*10+n;else{//作为小数输入数字m_second=m_second+n*m_coff;m_coff*=0.1;}//更新编辑框的数字显示UpdateDisplay(m_second);}void CCKcalculateDlg::OnButtonSin(){// TODO: Add your control notification handler code here m_second=m_second*m_PI/180;m_second=sin(m_second);UpdateDisplay(m_second);}void CCKcalculateDlg::OnButtonCos(){// TODO: Add your control notification handler code here m_second=m_second*m_PI/180;m_second=cos(m_second);UpdateDisplay(m_second);}void CCKcalculateDlg::OnButtonLog(){// TODO: Add your control notification handler code here m_second=log10(m_second);UpdateDisplay(m_second);}void CCKcalculateDlg::OnButtonXdeY(){// TODO: Add your control notification handler code here temp=m_second;m_second=0.0;UpdateDisplay(m_second);isXdeY=true;}void CCKcalculateDlg::XdeY(){if(isXdeY){m_second=m_second;m_second=pow(temp,m_second);}}////////////////////////////////////////////////////////////////////////////////////////////////////////////////////////////////////////////// ////////////////////////////////////////////////////////////////////////////////////////////////////////////////////////////////////////////// ////////////以下是CKcalculateDlg.h代码// /////////CKcalculateDlg.h : header file//////////////////////////////////////////////////////////////////////////////////////////////////////////////////////////////////////////////#if !defined(AFX_CKCALCULATEDLG_H__8DEB211E_CFCF_44C8_895C_BEF4E77EBE6C __INCLUDED_)#defineAFX_CKCALCULATEDLG_H__8DEB211E_CFCF_44C8_895C_BEF4E77EBE6C__INCLUD ED_#if _MSC_VER > 1000#pragma once#endif // _MSC_VER > 1000/////////////////////////////////////////////////////////////////////////////// CCKcalculateDlg dialogclass CCKcalculateDlg : public CDialog{// Constructionpublic:void XdeY(void);bool isXdeY;double temp;double m_PI;void onButtonN(int n);void UpdateDisplay(double ck);void Calculate();CCKcalculateDlg(CWnd* pParent = NULL); // standard constructor// Dialog Data//{{AFX_DATA(CCKcalculateDlg)enum { IDD = IDD_CKCALCULATE_DIALOG };CString m_display;//}}AFX_DATAdouble m_first;//存储一次运算的第一个操作数及一次运算的结果double m_second;//存储一次运算的第二个操作数CString m_operator;//存储运算符double m_coff;//存储小数点的系数权值// ClassWizard generated virtual function overrides// {{AFX_VIRTUAL(CCKcalculateDlg)protected:virtual void DoDataExchange(CDataExchange* pDX);// DDX/DDV support//}}AFX_VIRTUAL// Implementationprotected:HICON m_hIcon;// Generated message map functions//{{AFX_MSG(CCKcalculateDlg)virtual BOOL OnInitDialog();afx_msg void OnSysCommand(UINT nID, LPARAM lParam);afx_msg void OnPaint();afx_msg HCURSOR OnQueryDragIcon();afx_msg void OnButton0();afx_msg void OnButton1();afx_msg void OnButton2();afx_msg void OnButton3();afx_msg void OnButton4();afx_msg void OnButton5();afx_msg void OnButton6();afx_msg void OnButton7();afx_msg void OnButton8();afx_msg void OnButton9();afx_msg void OnButtonAdd();afx_msg void OnButtonMinus();afx_msg void OnButtonMutiply();afx_msg void OnButtonDiv();afx_msg void OnButtonSigh();afx_msg void OnButtonPoint();afx_msg void OnButtonClear();afx_msg void OnButtonSqrt();afx_msg void OnButtonReci();afx_msg void OnButtonEqual();afx_msg void OnButtonSin();afx_msg void OnButtonCos();afx_msg void OnButtonLog();afx_msg void OnButtonXdeY();//}}AFX_MSGDECLARE_MESSAGE_MAP()};//{{AFX_INSERT_LOCA TION}}// Microsoft Visual C++ will insert additional declarations immediately before the previous line.#endif// !defined(AFX_CKCALCULATEDLG_H__8DEB211E_CFCF_44C8_895C_BEF4E77EBE6C_ _INCLUDED_)。
MFC实现简单的小闹钟
播放声音
❖ 加入Mmsystem.h头文件。 ❖ 加入winmm.lib文件。可以在工程中设置,也可以在文件中
加入以下语句: #pragma comment(lib,"winmm.lib") ❖ 用PlaySound()函数播放声音。
11
最小化到托盘
❖ 把程序放到托盘上的本质就是先在托盘区绘制一个图标,然 后把程序隐藏不见,再对托盘的图标进行消息处理,就可以 了。 绘制图标以及确定图标所传送消息的函数只有一个, 那就是——— WINSHELLAPI BOOL WINAPI Shell_NotifyIcon( DWORD dwMessage, PNOTIFYICONDATA pnid );
nIDEvent)中加入响应函数, 捕获nIDEvent==1的那个 WM_TIMER,并响铃,然 后KillTimer(1)关掉定时 器时器。
8
定时保存的问题
❖ 由于第一个功能是设置定 时器,设定的时间可能是 很多天之后,而应用程序 不可能保证一直运行到很 多天之后,所以必须要保 存用户设定的时间,每次 启动时自动读入这个时间, 继续上次定时。
14
然后就是在CPP文件中加入函数onShowTask的实现了:
15
实现情况
❖ 基本功能实现。但是不是很实用,每次定时之后要么保持程 序一直运行,要么在设定时间到达之前手动开启才能听到闹 铃。
解决方案的设想: 1.设置开机启动,让程序自动运行。 2.设置任务计划,在特定的时间开启程序。
❖ 这个函数负责向系统传递消息,以添加、修改或删除托盘区 的图标。
12
❖ 这个函数里面首先给NOTIFYICONDATA赋值,然后调用 shell_NotifyIcon, 头一个参数是NIM_ADD,表示添加。然 后用函数ShowWindow 隐藏主窗口,这样,就实现了将程
Vc++6.0 定时器的创建和关闭
Vc++6.0 定时器的创建和关闭如下实现的是:在工程运行后,每5秒定时弹出一个MessageBox窗口MFC工程dialog中的使用:(工程创建:打开VC6.0---菜单file---new---projects----MFC AppWizard(exe) 工程命名为:XS )*****************在进入Dialog画面时,设置定时器::SetTimer(~~~~~~)*****************如下是在CXSDlg类中成员函数OnInitDialog设置************************** CXSDlg::OnInitDialog函数里{::SetTimer(this->hWnd,8,5000,NULL) //(this->hWnd为当前Dialog)(8为ID)(5000为5秒),NULL~~~~~ return TRUE;}***********以下:菜单view---ClassWizard---会弹出一个MFC ClassWizard画面,在画面Messages:中找到WM_TIMER选中后---MFC ClassWizard画面右手边单击Add Function---单击下面的Edit Codes************************************ 此后会进入到:void CTestkbDlg::OnTimer(UINT nIDEvent){// TODO: Add your message handler code here and/or call default //在这里写入每一段时间里你想实现的代码就可以,现在,我只实现弹出“你好!XS”MessageBox("你好!XS");CDialog::OnTimer(nIDEvent);}**************************************运行试试看~~你会发现,一进入介面,就每5秒弹出一个窗口“你好!XS”************************如果你想实现按下一个控件BUTTEN来实现定时器,可以把::SetTimer(this->hWnd,8,5000,NULL) 这个写入到你的BUTTEN控件函数中,就可以实现,记住,在用完Timer定时器后用KillTimer()把定时器关掉o(^_^)o*************************************************** ******************************************************* **************************************************** **************************最后,如果你不是用ClassWizard来创建OnTimer()函数,而是自己创建:1. CXSDlg.h文件中,写入afx_msg void OnTimer(UINT nIDEvent);声明的,2. CXSDlg.cpp文件:写入OnTimer()函数代码段的,3. 记得也要在CXSDlg.cpp文件中的如下位置写入 ON_WM_TIMER():~~~~~~~~~~~~~~~~~~~~~~~~~~~~BEGIN_MESSAGE_MAP(CTestkbDlg, CDialog)//{{AFX_MSG_MAP(CTestkbDlg)ON_WM_SYSCOMMAND()ON_WM_PAINT()ON_WM_QUERYDRAGICON()ON_WM_TIMER()//}}AFX_MSG_MAPEND_MESSAGE_MAP()。
计算机图形学 MFC VC++6.0制作的简单时钟源代码
// TODO: Add your command handler code here
Timer=1;
SetTimer(1,100,NULL);
}
void CMFCFrame1View::OnTimer(UINT nIDEvent)
{
// TODO: Add your message handler code here and/or call default
{
// dቤተ መጻሕፍቲ ባይዱfault preparation
return DoPreparePrinting(pInfo);
}
void CMFCFrame1View::OnBeginPrinting(CDC* /*pDC*/, CPrintInfo* /*pInfo*/)
{
// TODO: add extra initialization before printing
// CMFCFrame1View drawing
/////////////////////////////////////////////////////////////////////////////
// CMFCFrame1View printing
BOOL CMFCFrame1View::OnPreparePrinting(CPrintInfo* pInfo)
// CMFCFrame1View
IMPLEMENT_DYNCREATE(CMFCFrame1View, CView)
BEGIN_MESSAGE_MAP(CMFCFrame1View, CView)
//{{AFX_MSG_MAP(CMFCFrame1View)
ON_WM_CREATE()
MFC实现简单的小闹钟

播放声音
❖ 加入Mmsystem.h头文件。 ❖ 加入winmm.lib文件。可以在工程中设置,也可以在文件中
加入以下语句: #pragma comment(lib,"winmm.lib") ❖ 用PlaySound()函数播放声音。
11
最小化到托盘
❖ 把程序放到托盘上的本质就是先在托盘区绘制一个图标,然 后把程序隐藏不见,再对托盘的图标进行消息处理,就可以 了。 绘制图标以及确定图标所传送消息的函数只有一个, 那就是——— WINSHELLAPI BOOL WINAPI Shell_NotifyIcon( DWORD dwMessage, PNOTIFYICONDATA pnid );
❖ 需求分析 ❖ 实现过程 ❖ 实现情况
内容概要
1
需求分析
❖ 程序功能: 实现一个小闹钟。 首先有两个标签页(CTabCtrl控件类),一个标签是
定时器,设定好时间和提示音乐后点击OK,当设定 的时间到达后(可以使用CTime类),提示音乐响 起;另一个标签是倒计时器,设定好倒计时的秒数, 点击OK后便开始倒计时(使用WM_TIMER消息来 实现计时),当倒计时减小到0时,提示音乐响起。
14
然后就是在CPP文件中加入函数onShowTask的实现了:
15
实现情况
❖ 基本功能实现。但是不是很实用,每次定时之后要么保持程 序一直运行,要么在设定时间到达之前手动开启才能听到闹 铃。
解决方案的设想: 1.设置开机启动,让程序自动运行。 2.设置任务计划,在特定的时间开启程序。
16
Thank You!
❖ 程序已经最小化到托盘区了,但是呢,对托盘图标的操作如何进行呢? 这就体现了结构NOTIFYICONDATA的成员uCallbackMessage 的作用 了。它所提供的作用就是,当用户用鼠标点击托盘区的图标的时候(无 论是左键还是右键),会向hWnd所代表的窗口传送消息,如果是上例, 消息的名称就是WM_SHOWTASK。根据VC的消息机制,对自定义消 息增加消息响应函数。
vc编写一个模拟时钟的程序(VC write an analog clock program)
vc编写一个模拟时钟的程序(VC write an analog clock program)I'm sorry, my program is too big, 4M, because there are other functionsNo way. Towel section proceduresVoid CFill_areaView:: myShowColok (CDC, *pDC){M_time=CTime:: GetCurrentTime ();PDC->FillRect (&CRect (0,0, rect.Width (), rect.Height ()), &CBrush (RGB (100100100));CBrush brush (RGB (150150150));CBrush *oldbrush=pDC->SelectObject (&brush);CPen pen (PS_SOLID, 3, RGB (0,0,0));CPen *oldpen=pDC->SelectObject (&pen);PDC->Ellipse (rect.Width (), /2- (rect.Height ()), /2, rect.Height () (/2-10 ()), /2- (rect.Height ()), /2, rect.Width (), /2+ (rect.Height ()), /2, rect.Height () (&CRect (), /2+ (rect.Height ()), /2-10 (/2-10) /2) /2-10 ());PDC->Ellipse (&CRect (rect.Width ()), /2-3, rect.Height (), /2-3, rect.Width (), /2+3, rect.Height () /2+3);CPen PEN2 (PS_SOLID, 7, RGB (0,0,0));PDC->SelectObject (&pen2);PDC->MoveTo (rect.Width (), /2, rect.Height (), /2-16* (rect.Height (), /2-10) /20);PDC->LineTo (rect.Width (), /2-15* (rect.Height ()), /20, rect.Height (), /2-6* (rect.Height ()) /2-10) /20 (/2-10);PDC->LineTo (rect.Width (), /2-15* (rect.Height ()), /20, rect.Height (), /2+12* (rect.Height ()) /2-10) /20 (/2-10);PDC->LineTo (rect.Width (), /2+15* (rect.Height ()), /20, rect.Height (), /2+12* (rect.Height ()) /2-10) /20 (/2-10);PDC->LineTo (rect.Width (), /2+15* (rect.Height ()), /20, rect.Height (), /2-6* (rect.Height ()) /2-10) /20 (/2-10);PDC->LineTo (rect.Width (), /2, rect.Height (), /2-16* (rect.Height (), /2-10) /20);PDC->MoveTo (rect.Width (), /2-15* (rect.Height ()), /20+25, rect.Height (), /2+12* (rect.Height ()) /2-10) /20 (/2-10);PDC->LineTo (rect.Width (), /2-15* (rect.Height ()), /20+25, rect.Height (), /2+12* (rect.Height ()) /2-10) /20+30 (/2-10);PDC->LineTo (rect.Width (), /2-15* (rect.Height ()), /20+25+40, rect.Height (), /2+12* (rect.Height ()) /2-10) /20+30 (/2-10);PDC->LineTo (rect.Width (), /2-15* (rect.Height ()), /20+25+40, rect.Height (), /2+12* (rect.Height ()) /2-10) /20 (/2-10);PDC->MoveTo (rect.Width (), /2+15* (rect.Height ()), /20-25, rect.Height (), /2+12* (rect.Height ()) /2-10) /20 (/2-10);PDC->LineTo (rect.Width (), /2+15* (rect.Height ()), /20-25, rect.Height (), /2+12* (rect.Height ()) /2-10) /20+30 (/2-10);PDC->LineTo (rect.Width (), /2+15* (rect.Height ()), /20-25-40, rect.Height (), /2+12* (rect.Height ()) /2-10) /20+30 (/2-10);PDC->LineTo (rect.Width (), /2+15* (rect.Height ()), /20-25-40, rect.Height (), /2+12* (rect.Height ()) /2-10) /20 (/2-10);CPen pen1 (PS_SOLID, 1, RGB (0,0,0));PDC->SelectObject (&pen1);Double alpha=0;MyPoint, P1, P2, p3;P1=m_pointColok[0], p2=m_pointColok[4], p3=m_pointColok[5];For (int i=0; i<=60; i++){Alpha=i*6*pi/180;P1.x=m_pointColok[0].x*cos (alpha) -m_pointColok[0].y*sin (alpha);P1.y=m_pointColok[0].x*sin (alpha) +m_pointColok[0].y*cos (alpha);PDC->MoveTo (ChangePoint (P1).X, ChangePoint (P1).Y);P2.x=m_pointColok[4].x*cos (alpha) -m_pointColok[4].y*sin (alpha);P2.y=m_pointColok[4].x*sin (alpha) +m_pointColok[4].y*cos (alpha);P3.x=m_pointColok[5].x*cos (alpha) -m_pointColok[5].y*sin (alpha);P3.y=m_pointColok[5].x*sin (alpha) +m_pointColok[5].y*cos (alpha);If (i%5==0)PDC->LineTo (ChangePoint (P2).X, ChangePoint (P2).Y);ElsePDC->LineTo (ChangePoint (P3).X, ChangePoint (P3).Y);PDC->SetBkMode (TRANSPARENT);CFont font;Font.CreateFont (16,12,0,0, FW_NORMAL),假,假,假,ansi_charset,out_default_precis,clip_default_precis,default_quality,default_pitch | ff_swiss,“Arial”);CFont * oldfont = PDC -> SelectObject(与字体);/ /改变字体PDC -> SetTextColor(RGB(255205100));PDC -> TextOut(矩形。
c语言实现的时钟

C语言控制台时钟环境:vc6.0 Windows all/*Clock.c*/#include<windows.h>#include<stdio.h>#include<math.h>#include<time.h>CONSOLE_SCREEN_BUFFER_INFO csbiInfo;extern WINBASEAPI HWND WINAPI GetConsoleWindow();time_t T;struct tm * now;int min,sec;float hour;void ti(){time ( &T );now = localtime ( &T );hour=now->tm_hour%12;min=now->tm_min-15;sec=now->tm_sec-15;}void main(){ float a,b,c;float x=0,y=0,ex=400,ey=260,radian=0,oldx,oldy,radius=190;float mx=0,my=0,oldmx,oldmy,mradius=140;float hx=0,hy=0,oldhx,oldhy,hradius=100;int kd_r1,kd_r2,kd_radius=230,kd_radius1,old_kd_x,old_kd_y,kd_radian=0,k=0,q=0,oldk,oldq; HWND hwnd;HANDLE hOut;HDC hdc;HBRUSH hbr;HPEN hpn,gpn,rpn,ppn2,ypn,bpn,kdpn,rkdpn,dotpn,blue,black,blkdpn,pkdpn;hwnd=GetConsoleWindow();system("mode con cols=100 lines=34 ");hdc = GetDC(hwnd);hOut = GetStdHandle(STD_OUTPUT_HANDLE);hbr= CreateSolidBrush(RGB(0,0,00));rpn=CreatePen(PS_SOLID,1,RGB(255,0,0));ppn2=CreatePen(PS_SOLID,2,RGB(255,255,0));hpn=CreatePen(PS_SOLID,1,RGB(0,255,255));blue=CreatePen(PS_SOLID,3,RGB(0,0,255));bpn=CreatePen(PS_SOLID,1,RGB(255,255,255));gpn=CreatePen(PS_SOLID,2,RGB(0,255,0));pkdpn=CreatePen(PS_SOLID,3,RGB(255,0,255));kdpn=CreatePen(PS_SOLID,1,RGB(255,255,0));rkdpn=CreatePen(PS_SOLID,5,RGB(255,0,0));blkdpn=CreatePen(PS_SOLID,6,RGB(0,0,0));black=CreatePen(PS_SOLID,3,RGB(0,0,0));SelectObject(hdc,hbr);SelectObject(hdc,hpn);Ellipse(hdc,ex-radius-25,ey-radius-25,ex+radius+25,ey+radius+25);SelectObject(hdc,gpn);Ellipse(hdc,ex-radius,ey-radius,ex+radius,ey+radius);SetTextColor(hdc,RGB(0,255,0));SetBkColor(hdc,RGB(0,0,0));while(kd_radian<=360){//时钟时刻模块if(kd_radian%5==0){if(kd_radian%90==0){kd_radius=230;SelectObject(hdc,rkdpn);}else{kd_radius=225;SelectObject(hdc,pkdpn);}}else{kd_radius=215;SelectObject(hdc, kdpn);kd_radius1=205;}a=sin(kd_radian/180.0*3.14);b=cos(kd_radian/180.0*3.14);y=kd_radius*a;x=kd_radius*b;MoveToEx(hdc,ex,ey,NULL);LineTo(hdc,ex+x,ey+y);y=kd_radius1*a;x=kd_radius1*b;old_kd_x=x;old_kd_y=y;SelectObject(hdc,blkdpn);MoveToEx(hdc,ex,ey,NULL);LineTo(hdc,ex+old_kd_x,ey+old_kd_y);kd_radian+=6;};TextOut(hdc,ex+kd_radius+8,ey-7,TEXT("3"),1); TextOut(hdc,ex-4,ey+kd_radius+8,TEXT("6"),1); TextOut(hdc,ex-kd_radius-20,ey-5,TEXT("9"),1); TextOut(hdc,ex-4,ey-kd_radius-16,TEXT("12"),2); while(1){ //时钟指针模块ti();a=sec*6/180.0*3.14;b=min*6/180.0*3.14;c=(hour*30.0-90.0+(min+15)/2.0)/180.0*3.14;/*秒针*/oldx=x;oldy=y;SelectObject(hdc,black);MoveToEx(hdc,ex,ey,NULL);LineTo(hdc,ex+oldx,ey+oldy);y=radius*sin(a);x=radius*cos(a);if(sec==59) putchar('\a');if(sec%2==0) SelectObject(hdc, rpn);else SelectObject(hdc, hpn);MoveToEx(hdc,ex,ey,NULL);LineTo(hdc,ex+x,ey+y);if(sec==-15) {putchar('\a');Sleep(900);}a=(sec-30)*6/180.0*3.14;oldk=k;oldq=q;SelectObject(hdc,black);MoveToEx(hdc,ex,ey,NULL);LineTo(hdc,ex+oldk,ey+oldq);k=radius/8*cos(a);q=radius/8*sin(a);SelectObject(hdc, ppn2);MoveToEx(hdc,ex,ey,NULL);LineTo(hdc,ex+k,ey+q);/*分针*/oldmx=mx;oldmy=my;SelectObject(hdc,black);MoveToEx(hdc,ex,ey,NULL);LineTo(hdc,ex+oldmx,ey+oldmy);my=mradius*sin(b);mx=mradius*cos(b);SelectObject(hdc, gpn);MoveToEx(hdc,ex,ey,NULL);LineTo(hdc,ex+mx,ey+my);LineTo(hdc,ex+mx,ey+my);/*时针*/ oldhx=hx;oldhy=hy;SelectObject(hdc,black);MoveToEx(hdc,ex,ey,NULL);LineTo(hdc,ex+oldhx,ey+oldhy);hy=hradius*sin(c);hx=hradius*cos(c);SelectObject(hdc, blue);MoveToEx(hdc,ex,ey,NULL);LineTo(hdc,ex+hx,ey+hy);Sleep(100);TextOut(hdc,ex-65,ey-kd_radius+60,TEXT("珍惜时间=热爱生命"),17); }ReleaseDC(hwnd, hdc);}。
MFC之模拟时钟

MFC之模拟时钟最近在学习MFC,程序设计⽼师布置”画板“和”模拟时钟“作为实验来实践,由于没去上课,⽹上搜索的很多教程⼏乎都是以VC6.0为基础的,⽽⾝边⼏乎都是VS2008以上,对于初学者来说,有时仿照VC6.0的教程在VS2008或更⾼的环境上难免会出现⼀些困难,特此将模拟时钟程序在VS2008环境下的开发过程总结如下:1.新建项⽬项⽬类型选择“MFC”,模板选择“MFC应⽤程序”,名称⾃拟,这⾥命名为”Clock"。
选择好以后效果如下:2.MFC应⽤程序向导设置选择“下⼀步"这⾥有两个更改,⼀是”应⽤程序类型”选择“基于对话框”,同时取消选中“使⽤Unicode库”。
完成以上两步之后,直接单击“完成”即可。
三、核⼼部分1.⾸先打开“类视图”,选择"CClockDlg"在该类的头⽂件中,找到如下代码:紧接着后⾯添加三个变量⽤于临时保存时间的秒、分、时。
int m_Sec, m_Min, m_Hour;插⼊后的效果如下:2.⼿动添加⼀个消息映射函数,完成时间的获取和指针的绘制。
在CClockDlg类的头⽂件中找到如下代码:在其中增加⼀⾏如下:afx_msg void OnTimer(UINT nIDEvent);增加后显⽰效果如下:接着在资源管理器中找到CClockDlg类的cpp⽂件来实现刚才的函数声明需要添加的代码如下:1void CClockDlg::OnTimer(UINT nIDEvent)2 {3// TODO: Add your message handler code here and/or call default4 CTime time = CTime::GetCurrentTime(); //获得系统时间5 m_Sec = time.GetSecond();6 m_Min = time.GetMinute();7 m_Hour = time.GetHour();89 CDC* pDC = GetDC();10 CRect rect;11 GetClientRect(&rect); //获取客户区域12 CBitmap bitmap; //定义图⽚类13 bitmap.LoadBitmap(IDB_BITMAP1); //加载位图14 CDC memdc; //定义临时画布15 memdc.CreateCompatibleDC(pDC); //创建画布16 memdc.SelectObject(&bitmap); //关联图⽚1718int x = rect.Width()/2;19int y = rect.Height()/2;2021 CPen MinutePen(PS_SOLID,2,RGB(0,0,0)); //设置分针画笔22 memdc.SelectObject(&MinutePen);23 memdc.MoveTo(x,y);24//绘制分针25 memdc.LineTo(x+(long)40*cos(PI/2-2*PI*m_Min/60.0),y-(long)40*sin(PI/2-2*PI*m_Min/60.0));26 CPen HourPen(PS_SOLID,3,RGB(0,0,0)); //设置时针画笔27 memdc.SelectObject(&HourPen);28 memdc.MoveTo(x,y);29//绘制时针30 memdc.LineTo(x+(long)30*cos(PI/2-2*PI*(5*m_Hour/60.0+m_Min/12.0/60.0))31 ,y-(long)30*sin(PI/2-2*PI*(5*m_Hour/60.0+m_Min/12.0/60.0)));32 CPen SecondPen(PS_SOLID,1,RGB(255,0,0)); //设置秒针画笔33 memdc.SelectObject(&SecondPen);34 memdc.MoveTo(x,y);35 memdc.LineTo(x+(long)50*cos(PI/2-2*PI*m_Sec/60.0),y-(long)50*sin(PI/2-2*PI*m_Sec/60.0));//绘制秒针36 memdc.MoveTo(x,y);37 memdc.LineTo(x+(long)10*cos(PI/2-2*PI*(m_Sec+30)/60.0),y-(long)10*sin(PI/2-2*PI*(m_Sec+30)/60.0));//绘制秒针38 SecondPen.DeleteObject();39 MinutePen.DeleteObject();40 HourPen.DeleteObject();41 pDC->BitBlt(0,0,rect.right,rect.bottom,&memdc,0,0,SRCCOPY); //复制图⽚42 memdc.DeleteDC(); //复制临时画布到预览窗⼝43 bitmap.DeleteObject(); //删除图⽚44 ReleaseDC(pDC);45 CDialog::OnTimer(nIDEvent);46 }3.设置时钟位图打开“资源视图”在“资源视图”中添加资源资源类型选择“Bitmap",然后选择”导⼊”,把实现准备好的BMP⽂件导⼊。
【图形时钟c语言vc6.0】c语言,,,,,图形模拟时钟

【图形时钟c语言vc6.0】c语言,,,,,图形模拟时钟c语言图形模拟时钟20XX-20XX学年第二学期《高级语言程序设计》课程设计报告题目:图形模拟时钟专业:计算机科学与技术班级:14级(2)班姓名:王欣指导教师:陈广宏成绩:计算机学院20XX年5月20日目录1设计内容及要求 (2)1.1设计要求 (2)1.2程序结构流程图 (2)2概要设计 (4)2.1概要分析 (4)2.2数据结构设计.............................(). (6)2.3用法说明 (6)2.4实验结果要求 (7)3设计结果与分析 (7)3.1实验结果 (7)3.2实验结果与分析 (7)4小结 (8)致谢 (8)参考文献 (8)源代码 (9)1设计内容及要求1.1设计要求模拟机械钟表行走;要准确地利用数字显示日期和时间;在屏幕上显示一个活动时钟;程序界面设计合理,色彩得体大方,显示正确;各指针运动规律正确;数字式时钟的时间显示与指针式时钟显示一致;按任意键时程序退出。
在屏幕上显示一个图形时钟(用程序绘制一个班于时钟样式相似即可),时间与系统时间一致,且要随着时间的走到准确的走动。
1.2程序结构流程图图1:总程序流程图2:指针转动流程图2概要设计2.1概要分析(1)voiddrawclock函数voiddrawclock(intx,inty,intcolor){intr=150;floatth;setcolor(color);circle(x,y,r);circle(x,y,2);}作用:画表盘(r为表盘的半径,x,y为圆心的坐标。
)(2)voiddrawHand函数voiddrawHand(intx,inty,floatth,intl,intcolor){intx1,y1;x1=x+l*sin(th);y1=y-l*cos(th);setcolor(color);line(x,y,x1,y1);}作用:画指针x:直线起点的横坐标y:直线起点的纵坐标x1:直线终点的横坐标y1:直线终点的纵坐标(3)voidmain()函数Part①:intgdriver=dETEcT,gmode;structtimecurtime;..............类型和最高分辨率floatth_hour,th_min,th_sec; initgraph(&gdriver,&gmode,”“);下页c语言图形模拟时钟Graphdriver---配适器graphmode---显示模式Part②:setbkcolor(0); ....................背景色Part③:while(!kbhit()){drawclock(x0,y0,14); ..................函数()gettime(&curtime);.........得到当前系统时间gotoxy(35,20);...............定位输出位置Part④:if((float)curtime.ti_hourif((float)curtime.ti_hourprintf(“%.0f:”,(float)curti me.ti_hour);}...........输出小时else............下午的时间处理{printf(“Pm”);if((float)curtime.ti_hour-12printf(“%.0f:”,(float)curtime.ti_hour-12); }..........输出小时Part⑤:if((fl oat)curtime.ti_minprintf(“%.0f:”,(float)curtime.ti_min); .......输出分钟(同part④)if((float)curtime.ti_secprintf(“%.0f”,(float)curtime.ti_sec);Part⑥:以下三行计算表针转动角度,以竖直向上为起点,顺时针为正th_sec=(float)curtime.ti_sec*0.1047197551;-------------*(2π/60=0.1047197551)th_min=(float)curtime.ti_min*0.1047197551+th_sec/60.0;th_hour=(float)curtime.ti_hour*0.523598775+th_min/12.0;----*(2π/12=0.5235987755)Part⑦:drawHand(x0,y0,th_hour,70,2); ...................画时针drawHand(x0,y0,th_min,110,3); ...................画秒针Part⑧:settextstyle(2,0,3);..............设置字体2:文字的字体;0:文字的方向;3:文字的大小outtextxy(270,160,”madEBY:Sdw”);.............输出字体(270,160)为字体的坐标Part⑨:sleep(1);...........延时一秒后刷新cleardevice();.............清除图形屏幕closegraph().......关闭图形系统,退出图形方式2.2数据结构设计1)是对时钟程序做全面的分析,即对程序要使用的编写方法功能,运行方式进行分析,并做出正确的解决方案。
简单实用的LED时钟控件源码
简单的LED时钟控件下面是该控件的源码/**//////////////////////////////////////////////////////////////////////////////////////////////////////// #ifndef __MFC_EXT_DIGITCLOCK_H__#define __MFC_EXT_DIGITCLOCK_H__// EDClock.h : header file//#define IntegerCount 3#define DecimalCount 5//4/**//////////////////////////////////////////////////////////////////////////////// CDigitDisplayer windowclass CDigitDisplayer : public CStatic...{// Constructionpublic:CDigitDisplayer();virtual ~CDigitDisplayer();// Attributespublic:static COLORREF origin;// Operationspublic:COLORREF GetColor() const ...{ return m_color;}COLORREF SetColor(COLORREF color);double m_number;void DisplayDigit(double number);void GetDigit(double number);// Overrides// ClassWizard generated virtual function overrides//{{AFX_VIRTUAL(CDigitDisplayer)protected:virtual void PreSubclassWindow();//}}AFX_VIRTUAL// Implementationpublic:// Generated message map functionsprotected://{{AFX_MSG(CDigitDisplayer)afx_msg BOOL OnEraseBkgnd(CDC* pDC);afx_msg void OnPaint();afx_msg void OnSize(UINT nType, int cx, int cy);//}}AFX_MSGprivate:COLORREF m_color;UINT m_w;UINT m_h;BITMAP m_bm;HBITMAP m_hBitmap[13];UINT m_nTimer;int m_digit[10];void Output(UINT digit, UINT pos);DECLARE_MESSAGE_MAP()};/**////////////////////////////////////////////////////////////////////////////////{{AFX_INSERT_LOCA TION}}// Microsoft Developer Studio will insert additional declarations immediately before the previous line.#endif // __MFC_EXT_DIGITCLOCK_H__//// Author: Xie Jingwei, Chinese Spell: 谢敬伟// Email to me, jw_xie@// A digital clock control, :-)//// Usage: See the header, just simple// Please Note: Make sure ADD the 12 bitmaps to your project, and// sort the ID to correct order. I used IDB_BITMAP1 to IDB_BITMAP12// side by side. See following://// Digit: ID V ALUE// 0 IDB_BITMAP1 100// 1 IDB_BITMAP2 101// 2 IDB_BITMAP3 102// 3 IDB_BITMAP4 103// 4 IDB_BITMAP5 104// 5 IDB_BITMAP6 105// 6 IDB_BITMAP7 106// 7 IDB_BITMAP8 107// 8 IDB_BITMAP9 108// 9 IDB_BITMAP10 109// : IDB_BITMAP11 110// IDB_BITMAP12 111//// There are three properties.// face color <-----> SetColor();// style <-----> SetStyle();// alarm mode <----> SetAlarm();/**///////////////////////////////////////////////////////////////////////////////// EDClock.cpp : implementation file//数码管显示#include "stdafx.h"#include "resource.h"#include "DigitDisplayer.h"#include "math.h"#ifdef _DEBUG#define new DEBUG_NEW#undef THIS_FILEstatic char THIS_FILE[] = __FILE__;#endif// The resource bitmap face color//static COLORREF origin;COLORREF CDigitDisplayer::origin = RGB(255, 0, 0);/**//////////////////////////////////////////////////////////////////////////////// CDigitDisplayerCDigitDisplayer::CDigitDisplayer()...{m_color = origin;for(int i = 0; i< 13; i++) ...{//创建数码显示的位图HBITMAP temp = (HBITMAP)::CreateMappedBitmap(AfxGetApp()->m_hInstance, i+IDB_BITMAP1, 0, NULL, 0);//创建合适的位图m_hBitmap[i] = (HBITMAP)::CopyImage( temp, IMAGE_BITMAP, 0, 0, LR_COPYRETURNORG | LR_COPYDELETEORG);//将位图存入缓存以备显示}for(i=0;i<8;i++) m_digit[i]=0;m_number=0;}CDigitDisplayer::~CDigitDisplayer()...{for(int i = 0; i< 12; i++) ...{if(m_hBitmap[i])::DeleteObject(m_hBitmap[i]);//清空缓存}}BEGIN_MESSAGE_MAP(CDigitDisplayer, CStatic)//{{AFX_MSG_MAP(CDigitDisplayer)ON_WM_ERASEBKGND()ON_WM_PAINT()ON_WM_SIZE()//}}AFX_MSG_MAPEND_MESSAGE_MAP()/**//////////////////////////////////////////////////////////////////////////////// CDigitDisplayer message handlersvoid CDigitDisplayer::PreSubclassWindow()...{::GetObject(m_hBitmap[0], sizeof BITMAP, &m_bm);CStatic::PreSubclassWindow();}void CDigitDisplayer::OnPaint() //设置数码宽度和高度...{CPaintDC dc(this); // device context for paintingCRect rectClient;GetClientRect(&rectClient);m_h = rectClient.Height();m_w = rectClient.Width()/(IntegerCount+DecimalCount+2);DisplayDigit(m_number);}BOOL CDigitDisplayer::OnEraseBkgnd(CDC* pDC) //给数码显示准备无效区域...{// TODO: Add your message handler code here and/or call defaultCBrush brush;brush.CreateSolidBrush(::GetSysColor(COLOR_WINDOWTEXT) );CBrush* pOldBrush = pDC->SelectObject(&brush);CRect rectClient;GetClientRect(&rectClient);pDC->PatBlt(0, 0, rectClient.Width(), rectClient.Height(), PA TCOPY);pDC->SelectObject(pOldBrush);return CStatic::OnEraseBkgnd(pDC);}void CDigitDisplayer::Output(UINT digit, UINT pos)//数字输出...{// draw the bitmapCClientDC dc(this);CDC dcMem;dcMem.CreateCompatibleDC(&dc);CBitmap* pBitmap = CBitmap::FromHandle( m_hBitmap[digit] );CBitmap* pOldBitmap = dcMem.SelectObject(pBitmap);dc.StretchBlt(m_w*pos, 0, m_w, m_h,&dcMem, 0, 0, m_bm.bmWidth, m_bm.bmHeight, SRCCOPY);dcMem.SelectObject(pOldBitmap);dcMem.DeleteDC();}COLORREF CDigitDisplayer::SetColor(COLORREF color)//显示数字的颜色设置,若是红色,则改为显示时的绿色。
VC6.0制作简易计算器MFC[整理]
![VC6.0制作简易计算器MFC[整理]](https://img.taocdn.com/s3/m/7cf2c93fbc64783e0912a21614791711cc797937.png)
1、单击File(文件)菜单,选中New(新建),创建新工程。
2、选择工程栏中MFC AppWizard[exe]应用程序,并命名工程名称为calculator.(如图)3、选择MFC应用程序为“基于对话框”类型,其他选项默认。
单击完成(如图)4、修改界面。
经过前3步骤,VC6.0生成的工作界面如图所示。
先将对话框中的“TODO:在这里设置对话控制”静态文字控件和“确定”按钮控件删除,再使用工具箱将界面拖动控件修改为如图所示的界面。
该图所示是使用工具箱的控件拖放制作的计算器初始界面。
由于这些控件都有默认的名字,所以我们要对控件进行改名,右击Button1按钮,选中Properties(属性)选项以修改控件的属性,如图所示。
在弹出的对话框中,将Button1按钮的Caption(标题)属性修改为“+”,此时初始界面同时变成相应的“+”如下图所示。
修改后的界面如图所示,控件的Caption属性就是控件显示出来的值。
按照前文所讲述的方式,将界面上的按钮控件和静态文本控件的Caption属性都做相应的修改,修改后的界面如图所示。
5、为Edit(编辑)控件添加类的成员变量。
首先,右击Edit控件,选择ClassWizard(建立类向导)选项,如下图所示。
在弹出的对话框中,选择上方MemberVariables选项卡,选中DIC_EDIT1,然后单击单击右侧的Add Variable按钮,如图所示。
单击Add Variable按钮后会跳出,如图所示的对话框,该对话框是设置成员变量的命名和数据类型,在此可以命名为m_data1.注意:控件的ID只是标记一个控件,程序中不能直接控制ID,只能通过修改变量来改变控件的状态。
00相应的,再将另外两个Edit控件命名,本项目就将这3个Edit控件命名为:●IDC_EDIT1:m_data1,类型为double.●IDC_EDIT2:m_data2,类型为double.●IDC_EDIT3:m_result,类型为double.6、添加按钮控件的消息处理函数。
VC++ 6.0 MFC 俄罗斯方块 自动求解 代码 源程序
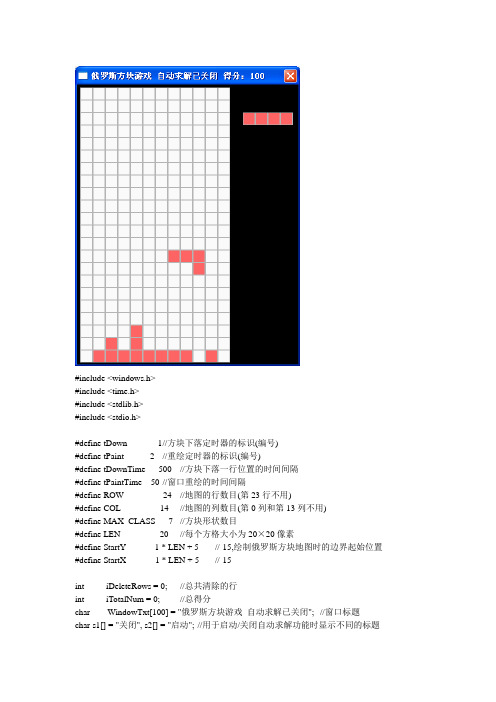
#include <windows.h>#include <time.h>#include <stdlib.h>#include <stdio.h>#define tDown 1 //方块下落定时器的标识(编号)#define tPaint 2 //重绘定时器的标识(编号)#define tDownTime 500 //方块下落一行位置的时间间隔#define tPaintTime 50 //窗口重绘的时间间隔#define ROW 24 //地图的行数目(第23行不用)#define COL 14 //地图的列数目(第0列和第13列不用)#define MAX_CLASS 7 //方块形状数目#define LEN 20 //每个方格大小为20×20像素#define StartY -1 * LEN + 5 //-15,绘制俄罗斯方块地图时的边界起始位置#define StartX -1 * LEN + 5 //-15int iDeleteRows = 0; //总共清除的行int iTotalNum = 0; //总得分char WindowTxt[100] = "俄罗斯方块游戏自动求解已关闭"; //窗口标题char s1[] = "关闭", s2[] = "启动"; //用于启动/关闭自动求解功能时显示不同的标题bool bAuto; //是否自动求解的标志bool Pause; //是否暂停的标志int Map[ROW][COL]; //俄罗斯方块的地图(被占据的方格为1,否则为0) int CurrentBox[4][4]; //当前落下的方块int CurrentY, CurrentX; //当前落下方块的当前位置(指左上角位置)int NextBox[4][4]; //下一个将落下的方块int Box[MAX_CLASS][4][4] = //7种方块形状{{{0,0,0,0},{1,1,1,1},{0,0,0,0},{0,0,0,0}},{{0,0,0,0},{0,1,0,0},{1,1,1,0},{0,0,0,0}},{{0,0,0,0},{1,1,0,0},{0,1,1,0},{0,0,0,0}},{{0,0,0,0},{0,1,1,0},{1,1,0,0},{0,0,0,0}},{{0,1,1,0},{0,0,1,0},{0,0,1,0},{0,0,0,0}},{{0,1,1,0},{0,1,0,0},{0,1,0,0},{0,0,0,0}{{0,0,0,0},{0,1,1,0},{0,1,1,0},{0,0,0,0}}};void InitMap( ); //初始化地图int NewFall( ); //新的方块落下void BuildNextBox( ); //产生下一个随机的方块int Test( int y, int x, int box[4][4] ); //测试在(y,x)位置是否能放置方块box,能放置返回1,否则返回0int Drop( ); //定时时间到,当前方块下降一行位置void PutBox( ); //放置当前方块int Move( int Right ); //(通过方向键)移动方块,参数right为1表示向右移动,为0表示向左移动void Clear( ); //清除满足条件的行int Rotate( ); //测试旋转是否可行,如果可行则旋转当前方块int RotateTest( int Box1[4][4], int Box2[4][4] ); //旋转当前方块int count1( int y, int x, int box[4][4] ); //新增函数int BestStartX( ); //新增函数LRESULT CALLBACK WndProc( HWND, UINT, WPARAM, LPARAM ); //窗口处理函数声明int WINAPI WinMain( HINSTANCE hInstance, HINSTANCE hPrevInstance,PSTR szCmdLine, int iCmdShow ) //入口函数{static TCHAR szAppName[ ] = TEXT ("Russion");HWND hwnd;MSG msg;WNDCLASS wndclass;wndclass.style = CS_HREDRAW | CS_VREDRAW;wndclass.lpfnWndProc = WndProc;wndclass.cbClsExtra = 0;wndclass.cbWndExtra = 0;wndclass.hInstance = hInstance;wndclass.hIcon = LoadIcon( NULL, IDI_APPLICATION );wndclass.hCursor = LoadCursor( NULL, IDC_ARROW );wndclass.hbrBackground = (HBRUSH)GetStockObject( WHITE_BRUSH );wndclass.lpszMenuName = NULL;wndclass.lpszClassName = szAppName;if( !RegisterClass( &wndclass ) ){MessageBox( NULL, TEXT ("Program requires Windows NT!" ),szAppName, MB_ICONERROR );return 0;}hwnd = CreateWindow( szAppName, WindowTxt,WS_OVERLAPPED | WS_SYSMENU | WS_BORDER,CW_USEDEFAULT, CW_USEDEFAULT,(COL + 4) * LEN, //窗口宽度:(14+4)×20=360像素ROW * LEN, //窗口高度:24×20=480像素(包括标题栏部分)NULL, NULL, hInstance, NULL );ShowWindow( hwnd, iCmdShow );UpdateWindow( hwnd );while( GetMessage( &msg, NULL, 0, 0 ) ){TranslateMessage( &msg );DispatchMessage( &msg );}return msg.wParam;}//初始化地图(将第0列和第13列、第23行设置为1(被占据),其他位置设置为0) void InitMap( ){int y, x;for( y = 0; y < ROW; y++ ){for( x = 0; x < COL; x++ ){//第0列、第13列、第23行设置为1(被占据)if( x < 1 || x > COL - 2 || y > ROW - 2 )Map[y][x] = 1;else Map[y][x] = 0;}}}//计算在(y,x)位置(左上角位置)上放置方块box后空出的方格数int count1( int y, int x, int box[4][4] ){if( !Test(y,x,box) ) return 100; //不能在(y,x)位置放置box,返回∞if( Test(y+1,x,box) ) return 100; //如果box还能下降,也返回∞int tmpy, tmpx;int c = 0; //空出的方格数for( tmpx = 0; tmpx < 4; tmpx++ ) //考虑第0~3列{for( tmpy = 3; tmpy >= 0; tmpy-- ){if( box[tmpy][tmpx] ) break;}tmpy++;if( tmpy>0 ){for( ; tmpy<4; tmpy++ ){if( tmpy+y<0 || tmpy+y>=ROW || tmpx+x<0 || tmpx+x>=COL ) continue;if(!Map[tmpy+y][tmpx+x]) c++; //空出的方格}}}return c;}//当启动自动求解功能时,求下一个方块的最佳下降位置//策略1为:放置后,空出的方格数最少,为MinC1,此时能达到最高位置为MaxY1,该位置为BestX1;//策略2为:放置后,能下降的位置最高,为MaxY2,此时空出的方格数为MinC2,该位置为BestX2;//必有MaxY1<=MaxY2, MinC1>=MinC2//取二者的折衷,策略为:优先采取策略1,但如果MinC2==MinC1或MaxY2>=MaxY1+2,则取策略2int BestStartX( ){int X, Y, tmpx, tmpy; //循环变量int BestX = 0, MaxY = 0, MinC = 100;//最终所求的最佳下降位置int BestX1, MaxY1, MinC1; //策略1:MinC:最佳位置处放置方块时,空出的空格最少,BestX:最佳下降位置,MaxY:能下降到的位置int BestX2, MaxY2, MinC2; //策略2:最佳位置为能下降的位置最高int c; //以上策略求最值时用到的辅助变量int tBox1[4][4], tBox2[4][4]; //tBox2为实现旋转时用到的临时变量int Rotates = 0, Rotates1 = 0, Rotates2 = 0;//找到最佳位置后,当前方块需要旋转的次数int Last1, Last2; //Last1为下一个方块未旋转时最下一个方格所在的行,Last2为旋转后最下一个方格所在的行memcpy(tBox1, NextBox, sizeof(tBox1)); memcpy(tBox2, NextBox, sizeof(tBox1)); for( tmpy=3; tmpy>=0; tmpy-- ) //统计tBox1中最下一个方格所在的行{for( tmpx=0; tmpx<4; tmpx++ ) if(tBox1[tmpy][tmpx]) break;if(tmpx<4) break;}Last1 = tmpy;BestX1 = 0, MaxY1 = 0, MinC1 = 100; BestX2 = 0, MaxY2 = 0, MinC2 = 100;//枚举从第0~COL-4列下落for( X=0; X<=COL-4; X++ ){for( Y=0; Y<=ROW-1; Y++ )if( !Test( Y, X, tBox1 ) ) break;Y--;c = count1(Y,X,tBox1);if( c<MinC1 || c==MinC1 && Y+Last1>MaxY1 )MinC1 = c, BestX1 = X, MaxY1 = Y+Last1;if( Y+Last1>MaxY2 || Y+Last1==MaxY2 && c<MinC2 )MinC2 = c, BestX2 = X, MaxY2 = Y+Last1;}//第1次旋转,旋转后为tBox1Last2 = RotateTest(tBox1, tBox2); memcpy(tBox1, tBox2, sizeof(tBox1));for( X=0; X<=COL-4; X++ ){for( Y=0; Y<=ROW-1; Y++ )if( !Test( Y, X, tBox1 ) ) break;Y--;c = count1(Y,X,tBox1);if( c<MinC1 || c==MinC1 && Y+Last2>MaxY1 )MinC1 = c, BestX1 = X, MaxY1 = Y+Last2, Rotates1 = 1;if( Y+Last2>MaxY2 || Y+Last2==MaxY2 && c<MinC2 )MinC2 = c, BestX2 = X, MaxY2 = Y+Last2, Rotates2 = 1;}//第2次旋转,旋转后为tBox1Last2 = RotateTest(tBox1, tBox2); memcpy(tBox1, tBox2, sizeof(tBox1));for( X=0; X<=COL-4; X++ ){for( Y=0; Y<=ROW-1; Y++ )if( !Test( Y, X, tBox1 ) ) break;Y--;c = count1(Y,X,tBox1);if( c<MinC1 || c==MinC1 && Y+Last2>MaxY1 )MinC1 = c, BestX1 = X, MaxY1 = Y+Last2, Rotates1 = 2;if( Y+Last2>MaxY2 || Y+Last2==MaxY2 && c<MinC2 )MinC2 = c, BestX2 = X, MaxY2 = Y+Last2, Rotates2 = 2;}//第3次旋转,旋转后为tBox1Last2 = RotateTest(tBox1, tBox2); memcpy(tBox1, tBox2, sizeof(tBox1));for( X=0; X<=COL-4; X++ ){for( Y=0; Y<=ROW-1; Y++ )if( !Test( Y, X, tBox1 ) ) break;Y--;c = count1(Y,X,tBox1);if( c<MinC1 || c==MinC1 && Y+Last2>MaxY1 )MinC1 = c, BestX1 = X, MaxY1 = Y+Last2, Rotates1 = 3;if( Y+Last2>MaxY2 || Y+Last2==MaxY2 && c<MinC2 )MinC2 = c, BestX2 = X, MaxY2 = Y+Last2, Rotates2 = 3;}MinC = MinC1, BestX = BestX1, MaxY = MaxY1, Rotates = Rotates1;if( MinC2==MinC1 || MaxY2>=MaxY1+2 )MinC = MinC2, BestX = BestX2, MaxY = MaxY2, Rotates = Rotates2;if( Rotates>0 ){for( int i=0; i<Rotates; i++ ){RotateTest(NextBox, tBox1);memcpy(NextBox, tBox1, sizeof(tBox1));}}return BestX;}int NewFall( ) //新的方块落下(如果能落下返回1,否则不能落下返回0(程序就该结束了)) {int y, x;CurrentY = 0; //当前方块的当前位置是指该方块(4×4大小)的左上角所在位置if(bAuto) CurrentX = BestStartX( );else CurrentX = COL / 2 - 2; //初始为(0,5)for( y = 0; y < 4; y++ ){for( x = 0; x < 4; x++ )CurrentBox[y][x] = NextBox[y][x];}BuildNextBox( ); //产生下一个随机的方块return Test( CurrentY, CurrentX, CurrentBox );}int no[400] = {3,3,5,1};void BuildNextBox( ) //产生下一个随机的方块{static int j=0;int i, y, x;i = rand()%MAX_CLASS; //随机生成0~6的整数for( y = 0; y < 4; y++ ){for( x = 0; x < 4; x++ )NextBox[y][x] = Box[i][y][x];}}//测试在(y,x)位置(左上角位置)是否能放置方块box,能放置返回1,否则返回0int Test( int y, int x, int box[4][4] ){int tmpy, tmpx;for( tmpy = 0; tmpy < 4; tmpy++ ){for( tmpx = 0; tmpx < 4; tmpx++ ){if( Map[tmpy + y][tmpx + x] && box[tmpy][tmpx] )return 0;}}return 1;}int Drop( ) //定时时间到,当前方块下降一行位置(如果能下降返回1,否则返回0){int NewY;NewY = CurrentY + 1;if( Test( NewY, CurrentX, CurrentBox ) ){CurrentY = NewY;return 1;}return 0;}void PutBox( ) //在当前位置(CurrentY,CurrentX)放置当前方块(此时当前方块已经不能下降了){int y, x;for( y = 0; y < 4; y++ ){for( x = 0; x < 4; x++ ){if( CurrentBox[y][x] )Map[CurrentY + y][CurrentX + x] = CurrentBox[y][x];}}}int Move( int Right ) //(通过方向键)移动方块,参数right为1表示向右移动,为0表示向左移动{int x;if( Right ) x = CurrentX + 1; //向右移动一列位置else x = CurrentX - 1; //向左移动一列位置if( Test( CurrentY, x, CurrentBox ) ){CurrentX = x;return 1;}return 0;}void Clear( ) //清除满足条件的行{int y, x; //循环变量int DelY, DelX; //循环变量int Full; //一行是否满的标志for( y = 0; y < ROW - 1; y++ ) //检查第0~22行{Full = 1;for( x = 1; x < COL - 1; x++ ) //检查每行的第1~12列{if( !Map[y][x] ){Full = 0; break;}}if( Full ) //第y行满了,删除该行,该行以上的其他行下移一行{iDeleteRows++; iTotalNum = iDeleteRows*100; //更新得分for( DelY = y; DelY > 0; DelY-- ){for( DelX = 1; DelX < COL - 1; DelX++ )Map[DelY][DelX] = Map[DelY-1][DelX];}for( DelX = 1; DelX < COL - 1; DelX++ ) //第0行置为0Map[0][DelX] = 0;}}}int Rotate( ) //测试旋转是否可行,如果可行则旋转当前方块{int y, x;int TmpBox[4][4];RotateTest( CurrentBox, TmpBox );if( Test( CurrentY, CurrentX, TmpBox ) ){for( y = 0; y < 4; y++ ){for( x = 0; x < 4; x++ )CurrentBox[y][x] = TmpBox[y][x];}return 1;}else return 0;}/*0000 0000 0000 //旋转规律是:Box3[y][x] = Box1[y][3-x] -> 方块绕竖直方向对称变换0100-> 0010-> 0010 //Box2[x][y] = Box3[y][x] -> 沿着主对角线对称变换(相当于矩阵转置)1110 0111 01100000 0000 0010 */int RotateTest( int Box1[4][4], int Box2[4][4] ) //旋转当前方块{ //新增返回值为:旋转后的Box2中最下一个方格所在的行int y, x;for( y = 0; y < 4; y++ ){for( x = 3; x >=0; x-- )Box2[x][y] = Box1[y][3 - x];}for( y=3; y>=0; y-- ) //统计Box2中最下一个方格所在的行{for( x=0; x<4; x++ ){if(Box2[y][x]) break;}if(x<4) break;}return y;}LRESULT CALLBACK WndProc( HWND hwnd, UINT message, //窗口处理函数WPARAM wParam, LPARAM lParam ){HDC hdc, hdcMem;int y, x;PAINTSTRUCT ps;HBITMAP hBitMap;HPEN hPen;HBRUSH hBrush;static int cxClient, cyClient; //窗口客户区宽度和高度char str[20]; //用于显示得分的变量switch( message ){case WM_CREATE:SetTimer( hwnd, tDown, tDownTime, NULL ); //开启两个定时器SetTimer( hwnd, tPaint, tPaintTime, NULL );srand( (unsigned)time( NULL ) );bAuto = false;Pause = false;InitMap( );BuildNextBox( ); //先随机产生一个方块NewFall( ); //方块落下并随机产生下一个方块sprintf( str, " 得分:%d", iTotalNum ); strcat( WindowTxt, str );SetWindowText(hwnd,WindowTxt);return 0;case WM_SIZE:cxClient = LOWORD( lParam ); //取得窗口客户区宽度和高度cyClient = HIWORD( lParam );return 0;case WM_TIMER:switch( wParam ){case tDown: //下降定时器if( !Drop( ) ) //如果不能下降则放置当前方块{PutBox( );MessageBeep( -1 );Clear( ); //清除//刷新得分sprintf( str, "%d", iTotalNum ); WindowTxt[36] = 0;strcat( WindowTxt, str ); SetWindowText(hwnd,WindowTxt);if( !NewFall( ) ) //如果新的方块不能落下,则程序结束{KillTimer(hwnd, tDown );KillTimer(hwnd, tPaint );//PostMessage( hwnd, WM_CLOSE, NULL, NULL );}}break;case tPaint: //重绘定时器InvalidateRect(hwnd, NULL, FALSE); //强制重绘窗口工作区break;}case WM_KEYDOWN:switch( wParam ){case VK_LEFT: //"向左"方向键if(bAuto) break;Move(0); break;case VK_RIGHT: //"向右"方向键if(bAuto) break;Move(1); break;case VK_UP: //"向上"方向键:旋转if(bAuto) break;Rotate( ); break;case VK_DOWN: //"向下"方向键:当前方块下移一行位置if(bAuto) break;MessageBeep( -1 ); Drop( ); break;case VK_RETURN: //回车键:暂停Pause = !Pause;if( Pause ) //暂停、自动求解时也可以暂停KillTimer( hwnd, tDown );else //启动{if(bAuto) SetTimer( hwnd, tDown, tDownTime/5, NULL );else SetTimer( hwnd, tDown, tDownTime, NULL );}break;case VK_SPACE:if(bAuto) break;while( 1 ) //使用永真循环,使得当前方块一直下降到不能下降为止{if( !Drop( ) ){PutBox( ); Clear( );sprintf( str, "%d", iTotalNum ); WindowTxt[36] = 0;strcat( WindowTxt, str ); SetWindowText(hwnd,WindowTxt);if( !NewFall( ) ) //如果新的方块不能落下,则程序结束{KillTimer(hwnd, tDown );KillTimer(hwnd, tPaint );//PostMessage( hwnd, WM_CLOSE, NULL, NULL );}break;}}break;case VK_F1:bAuto = !bAuto;if(bAuto) //自动求解{KillTimer(hwnd, tDown );SetTimer( hwnd, tDown, tDownTime/5, NULL );memcpy( WindowTxt+25, s2, strlen(s2) ); //修改标题}else{KillTimer(hwnd, tDown );SetTimer( hwnd, tDown, tDownTime, NULL );memcpy( WindowTxt+25, s1, strlen(s1) ); //修改标题}SetWindowText(hwnd,WindowTxt);break;}case WM_PAINT: //重绘窗口工作区hdc = BeginPaint( hwnd, &ps );hdcMem = CreateCompatibleDC( hdc );hBitMap = CreateCompatibleBitmap( hdc, cxClient, cyClient );SelectObject( hdcMem, hBitMap );//画地图最外面的矩形(4, 4, 246, 446)Rectangle( hdcMem, StartX + LEN * 1 - 1,StartY + LEN * 1 - 1,StartX + LEN * (COL - 1) + 1, StartY + LEN * (ROW - 1) + 1 );hPen = CreatePen( PS_SOLID, 1, RGB(180, 180, 180) );SelectObject( hdcMem, hPen );hBrush = CreateSolidBrush( RGB(250, 250, 250) );SelectObject( hdcMem, hBrush );for( y = 1; y < ROW - 1; y++ ) //画地图中的每一格{for( x = 1; x < COL - 1; x++ ){Rectangle( hdcMem, StartX + LEN * x, StartY + LEN * y,StartX + LEN * (x + 1), StartY + LEN * (y + 1) );}}DeleteObject( hPen );DeleteObject( hBrush );hPen = CreatePen( PS_SOLID, 1, RGB(180, 180, 180) ); SelectObject( hdcMem, hPen );hBrush = CreateSolidBrush( RGB(255, 100, 100) );SelectObject(hdcMem, hBrush);for( y = 1; y < ROW - 1; y++ ) //画出地图中每个被占据的方格{for( x = 1; x < COL - 1; x++ ){if( Map[y][x] ){Rectangle( hdcMem, StartX + LEN * x, StartY + LEN * y,StartX +LEN * (x + 1), StartY + LEN * (y + 1) );}}}for( y = 0; y < 4; y++ ) //画当前方块{for( x = 0; x < 4; x++ ){if( CurrentBox[y][x] ){if( y + CurrentY > 0 ){Rectangle( hdcMem, (x + CurrentX) * LEN + StartX,(y + CurrentY) * LEN +StartY,(x + CurrentX + 1) * LEN + StartX,(y + CurrentY + 1) * LEN + StartY );}}}}for( y = 0; y < 4; y++ )//在窗口右边区域画下一个方块{for( x = 0; x < 4; x++ ){if( NextBox[y][x] ){Rectangle( hdcMem, (x + COL) * LEN + StartX,(y + 2) * LEN + StartY,(x+ COL + 1) * LEN + StartX, (y + 3) * LEN + StartY );}}}DeleteObject( hPen );DeleteObject( hBrush );DeleteObject( hBitMap );BitBlt( hdc, 0, 0, cxClient, cyClient, hdcMem, 0, 0, SRCCOPY );DeleteDC( hdcMem );EndPaint( hwnd, &ps );return 0;case WM_DESTROY:KillTimer(hwnd, tDown );KillTimer(hwnd, tPaint );PostQuitMessage( 0 );return 0;}//end of switch( message )return DefWindowProc( hwnd, message, wParam, lParam );}。
计算机图形学c语言代码(笑脸、时钟、还有一个实在是不好意思说)
计算机图形作业费了很大脑子写出来的!!!1、时钟(鄙人最得意的一个作品)#include<graphics.h>#include<math.h>#include<dos.h>#define pi 3.1415926#define X(a,b,c) x=a*cos(b*c*pi/180-pi/2)+300;#define Y(a,b,c) y=a*sin(b*c*pi/180-pi/2)+240;#define d(a,b,c,d) X(a,b,c);Y(a,b,c);Bline(300,240,x,y,d)void plot_circle_points(int xc, int yc, int x, int y, int c){putpixel(xc+x, yc+y, c);putpixel(xc-x, yc+y, c);putpixel(xc+x, yc-y, c);putpixel(xc-x, yc-y, c);putpixel(xc+y, yc+x, c);putpixel(xc-y, yc+x, c);putpixel(xc+y, yc-x, c);putpixel(xc-y, yc-x, c);}void Bcircle (int xc, int yc, int radius, int c){int x, y, p;x=0;y=radius;p=3-2*radius;while (x<y){plot_circle_points(xc, yc, x, y, c);if (p<0) p=p+4*x+6;else{p=p+4*(x-y)+10;y-=1;}x+=1;}if (x == y)plot_circle_points(xc, yc, x, y, c);}void Bline (int x1, int y1, int x2, int y2, int c){int x, y, tmp;int dx, dy, d;float k;if( 0 == (x1 - x2)){x = x1;if(y1 > y2){ tmp = y1;y1 = y2; y2 =tmp;}for(y = y1; y < y2; y ++){putpixel(x, y, abs(getpixel(x,y)-c));}return;}k = (float)(y2 -y1)/(float)(x2 - x1);if(k > 1.0){tmp = x1; x1 = y1; y1 = tmp;tmp = x2; x2 = y2; y2 = tmp;}else if(k > 0){}else if(k < -1.0){x1 = -x1;x2 = -x2;tmp = x1; x1 = y1; y1 = tmp;tmp = x2; x2 = y2; y2 = tmp;}else if( k < 0){y1 = - y1;y2 = - y2;}else{y = y1;if(x1 > x2){ tmp = x1; x1 = x2; x2 = tmp;}for(x = x1; x <= x2; x ++){putpixel(x, y, abs(getpixel(x,y)-c));}return;}if(x1 > x2){tmp = x1; x1 = x2; x2 = tmp;tmp = y1; y1 = y2; y2 = tmp;}dx = x2 - x1;dy = y2 - y1;d = 2 * dy - dx;x = x1; y = y1;for(; x < x2; x ++){if(k > 1){putpixel(y, x, abs(getpixel(y, x) - c));}else if(k > 0){putpixel(x, y, abs(getpixel(x,y)-c));}else if( k < -1){putpixel(-y, x, abs(getpixel(-y,x)-c));}else if(k < 0){putpixel(x, -y, abs(getpixel(x,-y)-c));}else {}if(d >= 0){y++;d+=2*dy-2*dx;}else{d+=2*dy;}}}void init(){int i,l,x1,x2,y1,y2;setbkcolor(1);Bcircle(300,240,200,15);Bcircle(300,240,205,15);Bcircle(300,240,5,15);for(i=0;i<60;i++){if(i%5==0) l=15;else l=5;x1=200*cos(i*6*pi/180)+300;y1=200*sin(i*6*pi/180)+240;x2=(200-l)*cos(i*6*pi/180)+300;y2=(200-l)*sin(i*6*pi/180)+240;Bline(x1,y1,x2,y2,15);}}void main(){int x,y;int gd,gm;unsigned char h,m,s;struct time t[1];detectgraph(&gd, &gm);initgraph(&gd,&gm," ");init();gettime(t);h=t[0].ti_hour;m=t[0].ti_min;s=t[0].ti_sec;d(150,h,30,7);d(170,m,6,14);d(190,s,6,4);while(!kbhit()){while(t[0].ti_sec==s)gettime(t);sound(400);delay(70);sound(200);delay(30);nosound();d(190,s,6,4);s=t[0].ti_sec;d(190,s,6,4);if (t[0].ti_min!=m){d(170,m,6,14);m=t[0].ti_min;d(170,m,6,14);}if (t[0].ti_hour!=h){d(150,h,30,7);h=t[0].ti_hour;d(150,h,30,7);sound(1000);delay(240);nosound();delay(140);sound(2000);delay(240);nosound();}}}2、笑脸(初学者作品很漂亮的!)#include "Conio.h"#include "graphics.h"#define closegr closegraphvoid initgr(void){int graphdriver=DETECT, graphmode=0;initgraph(&graphdriver, &graphmode, " "); }int main(){int i,j;initgr();setbkcolor(0);cleardevice();setcolor(2);circle(320,240,200);setcolor(14);line(320,280,320,200);ellipse(230,210,40,140,70,60);ellipse(410,210,40,140,70,60);ellipse(320,220,220,320,120,140);outtextxy(500,450,"xiao xiao!");getch();closegraph();return 0;}3、电扇(只能叫这个了本来想画车轮,没想到。
VC++控件创建及调用

VC++基于MFC控件的创建以及调用案例少将要求:创建一个简单的时间控件,获取系统的当前时间。
在Microsoft Visual Studio 2008中调用该时间控件显示在窗口中。
程序设计:1.打开Microsoft Visual C++ 6.0,新建一个MFC 工程,工程名:TimeActiveX运行选择ActiveX后在空白区域右键>>Insert New····选择Insert New····弹出如下界面。
选择自己创建的控件。
时钟控件的界面外观开始是一个椭圆形状我们可以在onDraw函数中自己定义控件的外观。
参考代码如下://这里可以自己定义控件的外观void CTimeActiveXCtrl::OnDraw(CDC* pdc, const CRect& rcBounds, const CRect& rcInvalid){// TODO: Replace the following code with your own drawing code.pdc->FillRect(rcBounds,CBrush::FromHandle((HBRUSH)GetStockObject(WHITE_BRUSH)));//pdc->Ellipse(rcBounds);//去掉默认椭圆外观/*要求改变控件的背景颜色等,步骤如下1.定义画刷2.将时钟背景改为透明模式3.定义画刷的矩形范围,rcBounds值是onDraw()函数中的参数,由系统传来4.设置文字的前景色*/CBrush brush=(TranslateColor(GetBackColor()));//1pdc->SetBkMode(TRANSPARENT);//2pdc->FillRect(rcBounds,&brush);//3pdc->SetTextColor(TranslateColor(GetForeColor()));//4//显示时钟CTime tm=CTime::GetCurrentTime();CString str=tm.Format("%H:%M:%S");pdc->TextOut(15,15,str);}这样我们所看到的时钟外观效果就是下面图中的所看到的了。
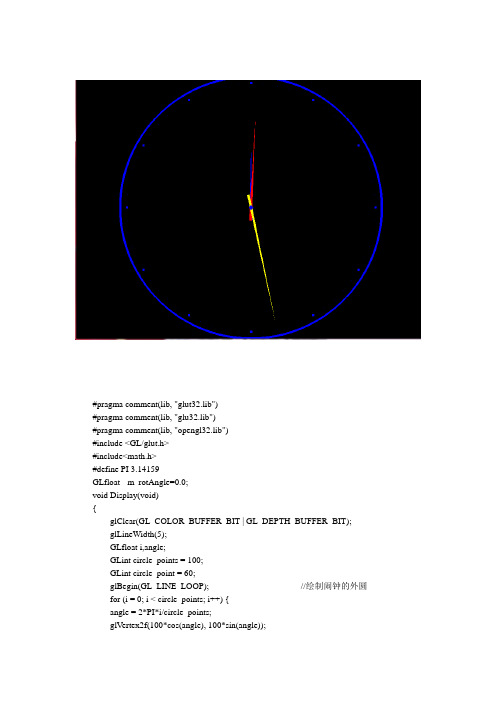
简单Opengl时钟时钟源代码可以运行
#pragma comment(lib, "glut32.lib")#pragma comment(lib, "glu32.lib")#pragma comment(lib, "opengl32.lib")#include <GL/glut.h>#include<math.h>#define PI 3.14159GLfloat m_rotAngle=0.0;void Display(void){glClear(GL_COLOR_BUFFER_BIT | GL_DEPTH_BUFFER_BIT);glLineWidth(5);GLfloat i,angle;GLint circle_points = 100;GLint circle_point = 60;glBegin(GL_LINE_LOOP); //绘制闹钟的外圆for (i = 0; i < circle_points; i++) {angle = 2*PI*i/circle_points;glVertex2f(100*cos(angle), 100*sin(angle));}glEnd();glBegin(GL_LINE_LOOP); //绘制原点小圆for (i = 0; i < circle_points; i++) {angle = 2*PI*i/circle_points;glVertex2f(cos(angle), sin(angle));}glEnd();glMatrixMode(GL_MODELVIEW);glLoadIdentity();glPointSize(1);glBegin(GL_POINTS); //绘制秒针刻度for (i = 0; i < circle_point; i++) {angle = 2*PI*i/circle_point;glVertex2f(95*cos(angle), 95*sin(angle));}glEnd();glMatrixMode(GL_MODELVIEW);glLoadIdentity();glPointSize(5);glBegin(GL_POINTS); //绘制时针刻度for (i = 0; i < 12; i++) {angle = 2*PI*i/12;glVertex2f(95*cos(angle), 95*sin(angle));}glEnd();glMatrixMode(GL_MODELVIEW);glLoadIdentity();glColor3f(1.f,1.f,0.f);glPushMatrix(); //绘制秒针glRotatef(m_rotAngle, 0.0f, 0.0f, 1.0f);glTranslatef(0.0f, 10.0f, 0.0f);glBegin(GL_TRIANGLES);glVertex3f(0, -100, 0);glVertex3f(1, 0, 0);glVertex3f(-1, 0, 0);glEnd();glPopMatrix(); //绘制分针glColor3f(1.f,0.f,0.f);glPushMatrix();glRotatef(m_rotAngle/60, 0.0f, 0.0f, 1.0f);glTranslatef(0.0f, 10.0f, 0.0f);glBegin(GL_TRIANGLES);glVertex3f(0, -80, 0);glVertex3f(1, 0, 0);glVertex3f(-1, 0, 0);glEnd();glPopMatrix();glColor3f(0.f,0.f,1.f);glPushMatrix(); //绘制时针glRotatef(m_rotAngle/3600, 0.0f, 0.0f, 1.0f);glTranslatef(0.0f, 10.0f, 0.0f);glBegin(GL_TRIANGLES);glVertex3f(0, -60, 0);glVertex3f(1, 0, 0);glVertex3f(-1, 0, 0);glEnd();glPopMatrix();m_rotAngle += 6.0f;if( m_rotAngle > 216000.0f)m_rotAngle = 0.0f;glutSwapBuffers();}void Init(){glEnable(GL_DEPTH_TEST); //启用隐藏面移除glClearColor(0.0f, 0.0f, 0.0f, 1.0f );}void GLTimer(int value){glutPostRedisplay();glutTimerFunc(100, GLTimer, 1);}void Reshape(int w, int h){GLfloat nRange = 100.0f;if(h == 0)h = 1;glViewport(0, 0, w, h);glMatrixMode(GL_PROJECTION);glLoadIdentity();if (w <= h)glOrtho (-nRange, nRange, nRange*h/w, -nRange*h/w, -nRange*2.0f, nRange*2.0f);elseglOrtho (-nRange*w/h, nRange*w/h, nRange, -nRange, -nRange*2.0f, nRange*2.0f);glMatrixMode(GL_MODELVIEW);glLoadIdentity();}int main(int argc, char* argv[]){glutInit(&argc, argv);glutInitDisplayMode(GLUT_DOUBLE | GLUT_RGB | GLUT_DEPTH);glutInitWindowSize(800, 600);glutCreateWindow("时钟");glutReshapeFunc(Reshape);glutDisplayFunc(Display);glutTimerFunc(100, GLTimer, 1);Init();glutMainLoop();return 0;}。
VC6.0时钟教程-支持高清浏览
{
CPoint ptEnd = ptCenter;
p t E n d . O f f s e t ( ( i n t ) ( n Radius * s i n ( 2 * PI * ( i %60) / 60) ) ,
( i n t ) ( - nRadius * cos(2 * PI * ( i %60) / 60) ) ) ; CRect r c Dot(- 2, - 2, 2, 2) ;
■ 下面对类CClockElement的源代码进行编写。 ➢ 因为在后面的绘图中需要用到sin和cos这两个数
学计算公式,因此需包含头文件<MATH.H>以便使 用数学函数库。为后面计算使用,还需定义数学 常量PI(3.1415926535)。 ➢ 时钟的每个组成部分都有绘图区域区域,因此, 可在基类中定义绘图区域变量。同理,可以定义 颜色变量,为了是颜色不显得单调,这里为每个 控件设置两种颜色(如果想使程序更加绚丽,可 以设置更多颜色)。 ➢ 对应的,这些变量需增加接口函数来进行访问。 ➢ 对于每个组成部分都应该有的Draw函数,当然也 需在基类中定义,但是,该函数对于基类来说是 无需函数实现的,因此可定义为纯虚函数。
rc Dot.OffsetRect(ptEnd);
pDC-> E l l i p s e ( r c Dot); }
// 绘制12 个小方框,表示12 个正点 p
DC- >SelectObject(& penMain); pOld Brush = pDC->SelectObject(& brOther);
CClockElement::CClockElement() {
m_nRadius = 0; m_crMain = RGB(255, 255, 255); m_crOther = RGB(128, 128, 128); }
c#winform时钟的实现代码

c#winform时钟的实现代码代码如下:复制代码代码如下:using System;using System.Collections.Generic;using ponentModel;using System.Data;using System.Drawing;using System.Text;using System.Windows.Forms;namespace Simpclock{public partial class Form1 : Form{DateTime date = DateTime.Now;public Form1(){InitializeComponent();}private void Form1_Load(object sender, EventArgs e){date = DateTime.Now;}private void OnPaint(object sender, PaintEventArgs e){Font font = new Font("Times New Roman", 20);Graphics g = CreateGraphics();g.DrawString(date.ToString(), font, Brushes.Firebrick, 10,330 );g.DrawString(date.DayOfWeek.ToString(), font, Brushes.Red, 250, 330);DrawDial(g);DrawSecondPointer(g);DrawMinutePointer(g);DrawHourPointer(g);}//刷新时间private void OnTime(object sender, EventArgs e){date = DateTime.Now;Invalidate();}//画钟表//表盘部分Point GetPosition(int s, Point center, double radius)//定位{Point p = new Point();double x = center.X + radius * Math.Sin(Math.PI / 30 * s);double y = center.Y - radius * Math.Cos(Math.PI / 30 * s);p.X = (int)x;p.Y = (int)y;return p;}void DrawDial(Graphics g)//外圆及刻度{int n;Rectangle rect = new Rectangle(40, 10, 300, 300);//g.FillEllipse(Brushes.White, 40, 10, 300, 300);g.DrawEllipse(new Pen(Color.Black, 3), rect);Point p1, p2;Point center = new Point(190, 160);for (n = 0; n < 60; n++){p1 = GetPosition(n, center, 150);if (n % 5 == 0){p2 = GetPosition(n, center, 130);g.DrawLine(new Pen(Color.Black, 2), p1, p2);}else{p2 = GetPosition(n, center, 140);g.DrawLine(Pens.Red, p1, p2);}}Font font = new Font("Times New Roman", 20);n = 0;p1 = GetPosition(n, center, 130);g.DrawString("XII", font, Brushes.Black, p1.X - 25, p1.Y);n += 15;p1 = GetPosition(n, center, 130);g.DrawString("III", font, Brushes.Black, p1.X - 35, p1.Y - 15);n += 15;p1 = GetPosition(n, center, 130);g.DrawString("VI", font, Brushes.Black, p1.X - 20, p1.Y - 30);n += 15;p1 = GetPosition(n, center, 130);g.DrawString("IX", font, Brushes.Black, p1.X, p1.Y - 15);}//秒针部分void DrawSecondPointer(Graphics g){Point center = new Point(190, 160);Point p;p = GetPosition(date.Second, center, 130);g.DrawLine(Pens.Red, center, p);g.FillEllipse(Brushes.Red, new Rectangle(p.X - 2, p.Y - 2, 4, 4)); }//分针部分void DrawMinutePointer(Graphics g){Point center = new Point(190, 160);Point p;p = GetPosition(date.Minute, center, 120);g.DrawLine(Pens.Blue, center, p);//g.FillEllipse(Brushes.Blue, new Rectangle(p.X - 4, p.Y - 4, 8, 8)); }//时针部分Point GetHourPosition(Point center, double radius){Point p = new Point();int h = date.Hour;int m = date.Minute;double t = Math.PI / 6 * h + Math.PI / 360 * m;double x = center.X + radius * Math.Sin(t);double y = center.Y - radius * Math.Cos(t);p.X = (int)x;p.Y = (int)y;return p;}void DrawHourPointer(Graphics g){Point center = new Point(190, 160);Point p = GetHourPosition(center, 100);g.DrawLine(new Pen(Brushes.Black, 2), center, p); //去指针圆尖// g.FillEllipse(Brushes.Black,// new Rectangle(p.X - 6, p.Y - 6, 12, 12));g.FillEllipse(Brushes.YellowGreen,new Rectangle(center.X - 6, center.Y - 6, 12, 12)); }}}。
攻克VC软件开发 时间日期显示软件制作

攻克VC软件开发时间日期显示软件制作需要源码的加QQ467477957打开Microsoft Visual C++ 6.0,File -> New ->Projects/MFC AppWizard(exe) 填写工程名称和路径->OK编译、运行软件开发结果:Delete键删除多余控件,调整大小,添加一些控件,最终如图:其中添加的控件有组合框控件单击添加的组合框控件,在General下的Caption(标题)修改为:休闲娱乐添加的编辑框控件:右击添加的控件,选择最后的Properties属性,出现编辑框属性在Styles风格下,勾选Read-only只读单击主框架,在Styles下选择最小化框此时主框架出现编译,运行:为编辑框添加成员变量CString m_strTime切换到Class View,在主对话框CMyDlg中添加一个类成员函数,完成刷新时间显示在主对话框CMyDlg中,添加WM_TIMER消息响应函数,和代码在主对话框CMyDlg的OnInitDialog()中,加入启动计时函数及初始化显示函数编译、运行:修改应用程序图标:在Resource View选项卡中,Delete删除IDR_MAINFRAME,将刚引入图标的ID修改为IDR_MAINFRAME编译、运行:在工程的Debug/目录下,发现应用程序图标改变为我们想要的图标。
使用位图作为对话框背景Resource view -> Dialog -> 双击对话框,出现对话框的初始化函数OnInitDialog()创建位图画刷为对话框添加WM_CTLCOLOR消息响应函数,使用位图画刷填充对话框背景在Dlg.h中添加一个画刷变量编译、运行:右击编辑框,选择最后的Properties属性,出现编辑框属性。
在Styles风格下,去掉勾选Read-only只读编译、运行:发布软件:修改编译方式为静态编译编译、运行:到G:\时间日期显示软件\时间日期显示软件\Debug目录下找到.exe软件即可发布。
- 1、下载文档前请自行甄别文档内容的完整性,平台不提供额外的编辑、内容补充、找答案等附加服务。
- 2、"仅部分预览"的文档,不可在线预览部分如存在完整性等问题,可反馈申请退款(可完整预览的文档不适用该条件!)。
- 3、如文档侵犯您的权益,请联系客服反馈,我们会尽快为您处理(人工客服工作时间:9:00-18:30)。
this->m_hGLContext = wglCreateContext(hDC);
if(this->m_hGLContext==NULL)
{//创建失败
return FALSE;
}
if(wglMakeCurrent(hDC,this->m_hGLContext)==FALSE)
{//选为当前RC失败
ON_COMMAND(ID_FILE_PRINT_PREVIEW, CView::OnFilePrintPreview)
END_MESSAGE_MAP()
/////////////////////////////////////////////////////////////////////////////
if(this->SetWindowPixelFormat(hDC)==FALSE)
{
return 0;
}
if(this->CreateViewGLContext(hDC)==FALSE)
{
return 0;
}
return 0;
}
BOOL CMFCFrame1View::CreateViewGLContext(HDC hDC)
return FALSE;
}
return TRUE;
}
void CMFCFrame1View::OnDestroy()
{
CView::OnDestroy();
// TODO: Add your message handler code here
if(wglGetCurrentContext()!=NULL)
}
}
if(SetPixelFormat(hDC,this->m_GLPixelIndex,&pixelDesc)==FALSE)
{
return FALSE;
}
return TRUE;
}
int CMFCFrame1View::OnCreate(LPCREATESTRUCT lpCreateStruct)
计算机图形学MFC VC++6.0制作的简单时钟
// MFCFrame1View.cpp : implementation of the CMFCFrame1View class
//
#include "stdafx.h"
#include "MFCFrame1.h"
#include "MFCFrame1Doc.h"
glClearColor(1.0,1.0,1.0,1.0);
glClear(GL_COLOR_BUFFER_BIT);
glMatrixMode(GL_MODELVIEW);
glLoadIdeБайду номын сангаасtity();
gluLookAt(0.0,0.0,10.0,0.0,0.0,0.0,0.0,1.0,0.0);
{
CView::Dump(dc);
}
CMFCFrame1Doc* CMFCFrame1View::GetDocument() // non-debug version is inline
{
ASSERT(m_pDocument->IsKindOf(RUNTIME_CLASS(CMFCFrame1Doc)));
BOOL CMFCFrame1View::SetWindowPixelFormat(HDC hDC)
{
PIXELFORMATDESCRIPTOR pixelDesc=
{
sizeof(PIXELFORMATDESCRIPTOR),
1,
PFD_DRAW_TO_WINDOW|PFD_SUPPORT_OPENGL|
{
if (CView::OnCreate(lpCreateStruct) == -1)
return -1;
// TODO: Add your specialized creation code here
HWND hWnd = this->GetSafeHwnd();
HDC hDC = ::GetDC(hWnd);
}
void CMFCFrame1View::OnEndPrinting(CDC* /*pDC*/, CPrintInfo* /*pInfo*/)
{
// TODO: add cleanup after printing
}
/////////////////////////////////////////////////////////////////////////////
// CMFCFrame1View drawing
/////////////////////////////////////////////////////////////////////////////
// CMFCFrame1View printing
BOOL CMFCFrame1View::OnPreparePrinting(CPrintInfo* pInfo)
}
else
{
aspect = (GLdouble)width/(GLdouble)height;
}
glViewport(0,0,width,height);
glMatrixMode(GL_PROJECTION);
glLoadIdentity();
gluPerspective(40.0,aspect,5.0,1000.0);
BEGIN_MESSAGE_MAP(CMFCFrame1View, CView)
//{{AFX_MSG_MAP(CMFCFrame1View)
ON_WM_CREATE()
ON_WM_DESTROY()
ON_WM_SIZE()
ON_COMMAND(IDM_ZIXUAN, OnZixuan)
ON_WM_TIMER()
// CMFCFrame1View construction/destruction
CMFCFrame1View::CMFCFrame1View()
{
// TODO: add construction code here
this->m_GLPixelIndex = 0;
this->m_hGLContext = NULL;
{
// TODO: Add your command handler code here
Timer=1;
SetTimer(1,100,NULL);
}
void CMFCFrame1View::OnTimer(UINT nIDEvent)
{
// TODO: Add your message handler code here and/or call default
return (CMFCFrame1Doc*)m_pDocument;
}
#endif //_DEBUG
/////////////////////////////////////////////////////////////////////////////
// CMFCFrame1View message handlers
if(this->m_GLPixelIndex==0)
{
this->m_GLPixelIndex = 1;
if(DescribePixelFormat(hDC,this->m_GLPixelIndex,sizeof(PIXELFORMATDESCRIPTOR),&pixelDesc)==0)
{
return FALSE;
glRotatef(-90.0,1.0,0.0,0.0);/*返回原坐标*/
glTranslatef(-3.0,0.0,0.0);
SwapBuffers(dc.m_ps.hdc);
glDrawBuffer (GL_BACK);
glFlush();
}
void CMFCFrame1View::OnZixuan()
PFD_DOUBLEBUFFER|PFD_SUPPORT_GDI,
PFD_TYPE_RGBA,
24,
0,0,0,0,0,0,
0,
0,
0,
0,0,0,0,
32,
0,
0,
PFD_MAIN_PLANE,
0,
0,0,0
};
this->m_GLPixelIndex = ChoosePixelFormat(hDC,&pixelDesc);
// the CREATESTRUCT cs
cs.style |= (WS_CLIPCHILDREN | WS_CLIPSIBLINGS);
return CView::PreCreateWindow(cs);
}
/////////////////////////////////////////////////////////////////////////////
}
void CMFCFrame1View::OnDraw(CDC* pDC)
{
CMFCFrame1Doc* pDoc = GetDocument();
ASSERT_VALID(pDoc);
// TODO: add draw code for native data here
CPaintDC dc(this);
{
CView::OnSize(nType, cx, cy);
// TODO: Add your message handler code here
GLsizei width,height;
