DS-5400HPro 操作手册
产权登记管理系统操作讲解【久其公司】资料

统
软件功能结构
产 权 登 记
7
业务办理-占有登记(事业单位)
点击进入
业务办理
8
业务办理-占有登记(事业单位)
办理步骤
选择办理业务
业务办理
9
业务办理-占有登记(事业单位)
业务办理
判断依据:是否取得 事业单位法人资格证
10
业务办理-占有登记(事业单位)
业务办理
填写法定代表人
11
业务办理-占有登记(事业单位)
上报
23
事业单位所办企业产权登记办理
产权登记事项-占有产权(企业)
点击进入
24
事业单位所办企业产权登记办理
产权登记事项-占有产权(企业)
投资总额与企业申报资产总额 一致,股权比例总额必须100%
填写企业申报在数取得法人资格情况下,注册日期和注册号必填;
填入出资企业或个人名称,
反之不必填;
企业组织代码或个人身份证号
业务办理
单位(性质)分类、 管理级次
12
业务办理
业务办理-占有登记(事业单位)
指标提取:自动获取单位当前年度的上一年固定资产数据 打印:将登记表另存文件,进行A3/A4打印 导出:选择打印机后,导出表文件 运算:检验已填数字,验证数值逻辑关系
自动计算合计值;
13
业务办理-占有登记(事业单位)
业务办理
17
业务办理-占有登记(事业单位)
业务办理
查看办理状态
对办理中与已完成状态的事项进行查看
查看办理日志
18
• 产权证打印
产权证打印
办理完成 单据
选择打印 模板
证书打印
19
产权证打印
DS-5400H 操作手册
5.1 5.2 第6章 6.1 6.2 6.3 第7章 7.1 7.2 第8章 8.1 8.2 8.3 8.4 8.4.1 8.4.2
票据通设置 ...................................... 5-2 票据通的使用 .................................... 5-3 用户调整设置 ................................... 6-1 链式装纸页首调整 ................................ 6-1 摩擦装纸页首调整 ................................ 6-2 撕纸位置调整 .................................... 6-3 故障和保养 ..................................... 7-1 故障处理 ........................................ 7-1 保养与维护 ...................................... 7-6 规格 ........................................... 8-1 打印机规格 ...................................... 8-1 接口接头引脚 .................................... 8-4 字符集 .......................................... 8-8 控制码摘要表 ................................... 8-14 ESC/P和LQ仿真控制码摘要表 ...................... 8-14 OKI仿真控制码摘要表 ............................ 8-18
罗斯蒙特5400说明书

1. 确保按照危险场所认证标准、国家和当地电气规范把外壳接地(包括端子隔室内部的本质 安全接地)。
2. 确保断开电源。 3. 卸下接线端子护盖 (见图)。 4. 把电缆穿过电缆压盖 / 配管。对于隔爆 / 防燃安装,应使用经过检定具有隔爆或防燃性能
的电缆压盖或配管进线装置。安装接线时打一个滴水环,滴水环的底部低于电缆 / 配管入 口。
合于工艺。 2. 把带天线和法兰的液位计降到储罐的喷嘴中。 3. 根据选择的法兰和垫片以足够的扭矩拧紧螺栓和螺母。
卡套 夹
夹持式储罐连接 1. 在储罐法兰上放置一个垫片。 2. 把液位计和天线降到储罐中。 3. 使用夹子把卡套紧固到储罐上。 4. 松开螺母,以转动液位计外壳。 5. 转动液位计外壳,使电缆入口 / 显示板面向所需方向。 6. 拧紧螺母。
*00825-0106-4026*
罗斯蒙特 5400 系列
© 2011 罗斯蒙特有限公司。保留所有权力。所有标识均为其所有者的财产。
快速安装指南
00825-0106-4026, EA 版 2011 年 8 月
艾默生过程控制 罗斯蒙特测量有限公司 美国明尼苏达州 Chanhassen 市 市场大道 8200 号, 55317 电话 (美国):1 800 999 9307 电话 (国际):+1 952 906 8888 传真:+1 952 949 7001
5. 按下列页面所示接线。 6. 卸下用于运输的橙色保护塑料塞。使用随附的金属塞将不用的端口密封。 7. 安装护盖,紧固电缆压盖,确保保护盖安全接合以符合隔爆要求(若使用 M20 电缆压盖,
则需要转接器)。 对于 ATEX、 IECEx、 NEPSI、 INMETRO 和 TIIS 安装,应使用锁紧螺钉锁紧护盖。 8. 连接电源。
得实 DS-5400HPro 针式打印机操作手册
得实 DS-5400HPro 针式打印机操作手册得实 DS-5400HPro 针式打印机操作手册1:引言1.1 目的1.2 范围1.3 读者对象1.4 前置要求2:安装2.1 包装清单2.2 安全须知2.3 硬件安装2.4 驱动安装3:打印机配置3.1 连接设置3.2 字符设置3.3 纸张设置3.4 打印质量设置4:打印操作4.1 打印测试页4.2 单面打印4.3 双面打印4.4 打印调整5:维护与故障排除5.1 打印头清洁5.2 纸路清理5.3 打印质量问题解决 5.4 故障排除6:其他功能介绍6.1 网络打印6.2 打印机管理软件7:文档更新与支持7.1 版本记录7.2 技术支持注:本文档涉及附件:附件1:打印机驱动安装文件附件2:打印机配置工具注:本文所涉及的法律名词及注释:1:打印机:指一种用于将电子文档转换为实体纸质文档的设备。
2:针式打印机:一种使用针来打印字符的打印机技术。
3:连接设置:设置打印机与计算机之间的连接方式,如USB、网络等。
4:字符设置:设置打印机的字符编码、字体和大小等参数。
5:纸张设置:设置打印机使用的纸张类型、大小和方向等参数。
6:打印质量设置:设置打印机的打印质量模式和速度等参数。
7:打印测试页:用于测试打印机是否正常工作的测试页。
8:单面打印:打印单面的文档。
9:双面打印:打印双面的文档。
10:打印调整:调整打印机的打印位置和对齐方式等参数。
11:打印头清洁:清洁打印机的打印头,以提高打印质量。
12:纸路清理:清理打印机的纸路,以防止纸张卡纸或打印故障。
13:打印质量问题解决:解决打印机打印质量不佳的问题。
14:故障排除:排除打印机故障和错误的步骤和方法。
15:网络打印:通过网络共享打印机,实现多台计算机使用同一台打印机打印。
16:打印机管理软件:用于管理和监控打印机状态和任务的软件。
Philips 5400idel Full HD 小型平板电视说明书
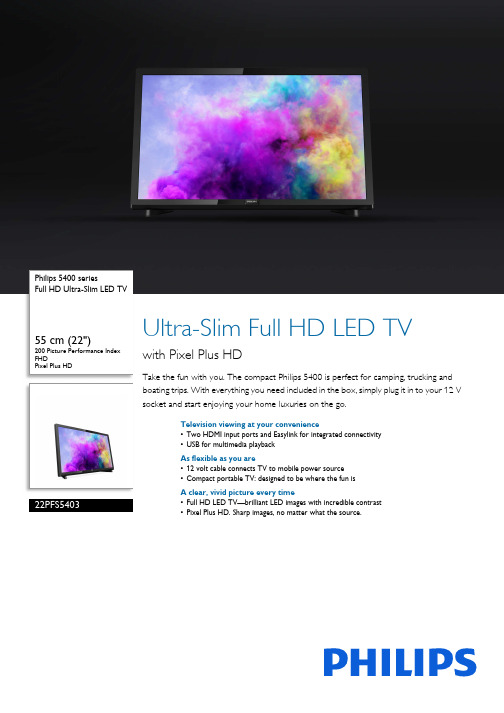
Philips 5400 seriesFull HD Ultra-Slim LED TV55 cm (22")200 Picture Performance Index FHDPixel Plus HD22PFS5403Ultra-Slim Full HD LED TVwith Pixel Plus HDTake the fun with you. The compact Philips 5400 is perfect for camping, trucking and boating trips. With everything you need included in the box, simply plug it in to your 12 V socket and start enjoying your home luxuries on the go.Television viewing at your convenience•Two HDMI input ports and Easylink for integrated connectivity•USB for multimedia playbackAs flexible as you are•12 volt cable connects TV to mobile power source•Compact portable TV: designed to be where the fun isA clear, vivid picture every time•Full HD LED TV—brilliant LED images with incredible contrast•Pixel Plus HD. Sharp images, no matter what the source.Issue date 2023-10-18Version: 5.0.1EAN: 87 18863 01465 3© 2023 Koninklijke Philips N.V.All Rights reserved.Specifications are subject to change without notice. Trademarks are the property of Koninklijke Philips N.V. or their respective owners.SpecificationsFull HD Ultra-Slim LED TV55 cm (22") 200 Picture Performance Index, FHD, Pixel Plus HDHighlights12-volt cableConnect your TV easily when on the road using a 12 volt cabler attached to your car, truck, caravan, boat, or any 12 volt power source.Portable DesignStylish, compact, lightweight and portable. Your small screen TV lets you catch up with your favourite programmes in any location, whether it is in the kitchen or camping with your family outside. This portable TV keeps you up to date with the news as well as the latest results from your favourite sports. It is designed to be where the fun is!Pixel Plus HDPhilips Pixel Plus HD engine optimises picture quality to deliver crisp images with beautiful contrast. So whether you are watching cable TV or from a disc, you'll enjoy sharper images with brighter whites and deeper blacks.Full HD LED TVPicture Quality matters. Regular HDTVs deliver quality, but you expect more. Imagine crisp detail paired with high brightness, incredible contrast and realistic colours for a true to life picture.Two HDMI input ports with EasylinkAvoid cable clutter with a single HDMI cable to carry both picture and audio signals from your devices to your TV. HDMI uses uncompressed signals, ensuring the highest quality from source to screen. Together with Philips Easylink, you'll need only one remote control to perform most operations on your TV,DVD, Blu-ray, set top box or home theatre system.Picture/Display•Aspect ratio: 4:3/16:9•Diagonal screen size (inch): 22 inch •Diagonal screen size (metric): 55 cm •Display: LED Full HD•Panel resolution: 1920 x 1080p•Picture enhancement: Pixel Plus HDSupported Display Resolution•Computer inputs: up to 1920 x 1080 @ 60 Hz •Video inputs: up to 1920 x 1080pTuner/Reception/Transmission•Digital TV: DVB-T/T2/T2-HD/C/S/S2•Video Playback: NTSC, PAL, SECAM •MPEG Support: MPEG2, MPEG4Multimedia Applications•Video Playback Formats: Containers: AVI, MKV, H264/MPEG-4 AVC, MPEG-1, MPEG-2, MPEG-4, WMV9/VC1, HEVC (H.265)•Music Playback Formats: AAC, MP3, WAV, WMA (v2 up to v9.2)•Subtitles Formats Support: .SMI, .SRT, .SSA, .SUB, .TXT, .ASS•Picture Playback Formats: JPEG, BMP, GIF, PNGUser Interaction•Programme: Pause TV, USB Recording*•Ease of Use: One-stop Home button•Firmware upgradeable: Firmware upgradeable via USB•Screen Format Adjustments: Autozoom,Superzoom, Movie expand 16:9, Unscaled, 4:3, 16:9•Signal strength indication•Teletext: 1000 page Hypertext•Electronic Programme Guide*: 8 day Electronic Programme GuideSound•Output power (RMS): 6 W•Speaker configuration: 2 x 3 W full-range speaker •Sound Enhancement: Incredible Surround, Clear Sound, Auto Volume Leveller, Bass Control, Smart SoundConnectivity•Number of HDMI connections: 2•EasyLink (HDMI-CEC): Remote control pass-through, System audio control, System standby, One touch play•Number of scarts (RGB/CVBS):1•Number of USBs: 1•Other connections: Antenna IEC75, SatelliteConnector, Common Interface Plus (CI+), Digital audio out (optical), Audio in (DVI), PC-In VGA, Headphone outPower•Mains power: AC 220 - 240 V 50/60 Hz •Ambient temperature: 5°C to 35°C •Standby power consumption: <0.3 W •Energy Label Class: A•EU Energy Label power: 20 W•Power Saving Features: Auto switch-off timer, Eco mode, Picture mute (for radio)•Off mode power consumption: N/A •Annual energy consumption: 30 kW·h •Presence of lead: Yes*•Mercury content: 0 mgAccessories•Included accessories: Remote Control, 2 x AAA Batteries, Power cord, Quick start guide, Legal and safety brochure, Tabletop stand, 12-volt cableColour & Finish •TV Front: Black High Gloss Dimensions•Set Width: 512.3 mm •Set Height: 318 mm •Set Depth: 54.1 mm •Product weight: 2.6 kg•Set width (with stand): 512.3 mm •Set height (with stand): 324 mm •Set depth (with stand): 118 mm •Product weight (+stand): 2.6 kg •Box width: 595 mm •Box height: 425 mm •Box depth: 112 mm•Weight incl. Packaging: 3.5 kg•Wall-mount compatible: 75 x 75 mm •TV stand width distance: 374.3 mm*EPG and actual visibility (up to 8 days) is country- and operator-dependent.*Energy consumption in kWh per year based on the powerconsumption of the television operating 4 hours per day for 365 days. The actual energy consumption will depend on how the television is used.*The TV supports DVB reception for 'Free to air' broadcast. Specific DVB operators may not be supported. An up to date list can be found in the FAQ section of the Philips support website. For some operators Conditional Access and subscription are required. Contact your operator for more information.*(Philips) only compatible with specific Philips player device.*This television contains lead only in certain parts or components where no technology alternatives exist in accordance with existing exemption clauses under the RoHS Directive.。
海康威视HC、HCS、HC+、HF、MD

海康威视HC、HCS、HC+、HF、MD系列板卡用户使用手册(Ver1.0)非常感谢您购买我公司的产品,如果您有什么疑问或需要请随时联系我们。
本手册适用于DS-4000HC、DS-4000HC+、DS-4000HF、DS-4000MD系列压缩、解压缩板卡。
本手册可能包含技术上不准确的地方、或与产品功能及操作不相符的地方、或印刷错误。
本手册的内容将根据产品功能的增强而更新,并将定期改进或更新本手册中描述的产品或程序,更新的内容将会在本手册的新版本中加入,恕不另行通知。
目录第一章产品简介 (3)1.1概述 (3)1.2产品性能 (3)第二章产品安装 (4)2.1 注意事项 (4)2.2 驱动程序安装、删除、更新 (5)2.2.1 没有安装过海康威视HC系列板卡驱动的计算机 (5)2.2.2 已经安装过海康威视HC系列板卡驱动的计算机 (8)2.2.3 成功安装驱动 (8)2.2.4驱动程序更新与删除 (10)2.3 SDK及DEMO软件安装 (11)2.4 媒体播放器插件 (11)第三章技术参数 (15)3.1产品技术参数 (15)3.2所有类型编码卡编码参数介绍 (15)第四章产品应用与开发支持 (17)第五章常见问题解答 (18)第一章产品简介1.1概述1、DS-4000HC、DS-4000HC+、DS-4000HF系列压缩板卡是海康威视第三代视音频压缩卡,采用H.264视频压缩标准,使用高性能的DSP处理器实现音视频压缩编码。
此系列产品包括DS-4004HC、DS-4008HC、DS-4016HCS、DS-4004HC+、DS-4008HC+、DS-4004HF DS-4008HF等型号。
2、DS-4000MD系列解压缩板卡是海康威视第三代视音频解压缩板卡,采用高性能的DSP处理器,实现解压缩海康威视所有压缩系列产品的码流同时实现视音频输出及视频矩阵功能。
此系列产品包括DS-4002MD、DS-4004MD等型号。
Philips 5400系列全高清超薄LED电视说明书

Philips 5400 seriesFull HD Ultra Slim LED TV with Pixel Plus HD55 cm (22") Full HD LED TV 22PFA5403S Full HD Ultra Slim LED TVwith Pixel Plus HDMade for fun, the Philips 5000 TV brings a quality picture to the small screen. It's compact enough to be moved between rooms quickly and without hassle, while its minimalist design makes it a welcome addition wherever you place it.A clear, vivid picture every time•Full HD LED TV—brilliant LED images with incredible contrast•Pixel Plus HD gives you beautiful images you’ll loveTelevision viewing at your convenience•One HDMI input and easy link for integrated connectivity•USB for multimedia playbackIssue date 2018-07-09Version: 10.1.112 NC: 8670 001 52149EAN: 87 18863 01533 9© 2018 Koninklijke Philips N.V.All Rights reserved.Specifications are subject to change without notice. Trademarks are the property of Koninklijke Philips N.V. or their respective owners.SpecificationsFull HD Ultra Slim LED TV55 cm (22") Full HD LED TVHighlightsFull HD LED TVPicture Quality matters. Regular HDTVs deliver quality, but you expect more. Imagine crisp detail paired with high brightness, incredible contrast and realistic colors for a true to life picture.USB (photos, music, video)Share the fun. Connect your USB memory-stick, digital camera, mp3 player or other multimedia device to the USB port on your TV to enjoy photos, videos and music with the easy to use onscreencontent browser.Picture/Display•Display: LED Full HD•Panel resolution: 1920 x 1080•Aspect ratio: 4:3/16:9•Picture enhancement: Pixel Plus HDSmart Interaction•Ease of Use: One-stop Home button•Firmware upgradeable: Firmware upgradeable via USB•Screen Format Adjustments: 4:3, 16:9, Autozoom •Electronic Program Guide*: 8 days Electronic Program GuidSound•Output power (RMS): 6W•Sound Enhancement: Auto Volume Leveller, Incredible SurroundConnectivity•Number of HDMI connections: 1•Number of USBs: 1•Other connections: Antenna IEC75, PC-In VGA, PC Audio In (3.5mm)•EasyLink (HDMI-CEC): System standby, One touch play•Number of AV connections: 1Multimedia Applications•Video Playback Formats: Containers: AVI, MKV, H264/MPEG-4 AVC, MPEG-1, MPEG-2, MPEG-4•Subtitles Formats Support: .SRT, .TXT, .ASS •Music Playback Formats: MP3•Picture Playback Formats: JPEG, PNGSupported Display Resolution•Computer inputs: up to 1920x1080 @ 60Hz •Video inputs: 24, 25, 30, 50, 60 Hz, up to 1920x1080pTuner/Reception/Transmission•MPEG Support: MPEG2, MPEG4•Video Playback: PAL, SECAM, NTSC •Analog TV: PAL, SECAMPower•Mains power: AC 110 - 240 V 50/60Hz •Off mode power consumption: <0.5 W •Ambient temperature: 5 °C to 35 °C•Power Saving Features: Auto switch-off timer, Eco modeDimensions•Box dimensions (W x H x D): 595 x 420 x 112 mm•Set dimensions (W x H x D): 512.3 x 308 x 48.8 mm•Set dimensions with stand (W x H x D): 512.3 x 324 x 110.3 mm •Product weight: 2.55 kg•Product weight (+stand): 2.59 kg•VESA wall mount compatible: Y=100mm •Weight incl. Packaging: 3.9 kgAccessories•Included accessories: Remote Control, 2 x AAA Batteries, Power cord, Quick start guide, Legal and safety brochure, Table top stand*Energy consumption in kWh per year, based on the powerconsumption of the television operating 4 hours per day for 365 days. The actual energy consumption will depend on how the television is used.*(Philips) only compatible with specific Philips player device.*This television contains lead only in certain parts or components where no technology alternatives exist in accordance with existing exemption clauses under the RoHS Directive.*Philips TV does not gaurantee 100% interoperability with all HDMI CEC devices。
得实打印机色带更换方法

安装好的图片:
ห้องสมุดไป่ตู้ 四、拆开色带架:
五、拆开后的色带架:
六、取出旧的色带:
七、将心色带倒入:
注意面上的色带,扭结部分暴露在 外面
八、先将色带其它部分装好:
安装扭结部分,顺着斜槽方向装 入
安装好的扭结部分:
九、装好色带架:
(正面)
(背面)
(侧面)
十、DS2600II、DS5400HPRO、 DS1现方式做保护处理对用户上传分享的文档内容本身不做任何修改或编辑并不能对任何下载内容负责
得实打印机色带更换办法
市场上常见的两种色带模拟图
普通环形色带
得实扭结色带(旋转180°)
一、得实(DS)通用原装色带 (型号M21-1)
二、拆开包装:
三、准备好需要更换的色带架:
迅达5400apmmr现场安装手册
迅达5400A P M M R现场安装手册(总126页)-CAL-FENGHAI.-(YICAI)-Company One1-CAL-本页仅作为文档封面,使用请直接删除安装缩略图摘要本手册提供了在亚太区范围内使用脚手架安装300P MMR主要安装步骤的详细说明。
本手册为保密文件,并仅供授权的培训人员使用。
目录1 安全建议 (4)1.1 概要 (4)1.2 使用符号 (4)2 先决条件 (5)2.1 产品概述 (5)2.2 安装步骤 (7)2.3 专用工具 (9)3 施工现场准备工作 (10)4 导轨安装 (15)4.1 准备工作 (15)4.2 导轨支架安装 (15)4.3 导轨安装 (21)4.3.1 导轨基座 (21)4.3.2 导轨安装 (22)4.4 连接板校正 (24)5 Varidor 30AP C2 厅门入口安装 (25)5.1 门框预安装 (27)5.2 地坎支架 (30)5.3 门框和机械横梁 (31)5.4 地坎和护脚板 (35)5.5 门板 (36)5.6 C2井道互锁装置 (40)5.7 门解锁装置 (41)5.8 安装门重锤 (42)5.9 防护罩 (44)6 PMS420无齿轮机组安装 (45)6.1 机组支架 (47)6.2 安装PMS420无齿轮机组 (48)6.3 *手动应急操作选配装置 (51)6.4 制动器调整和制动力测试 (57)6.5 *曳引钢丝绳悬挂装置安装 (58)6.6 *安装限速器 (62)7 *安装GGM2-AP对重 (71)7.1 先决条件 (71)7.2 *机械安装 (72)7.2.1 *缓冲器支撑 (72)7.2.2 *对重校正 (73)7.2.3 *安全钳(选配) (74)7.2.4 *导靴 (76)7.2.5 油杯(选配) (79)7.2.6 *对重块 (79)7.2.7 *补偿链悬挂装置 (80)7.2.8 地震传感器(选配) (81)7.3 *调整和最后检查 (82)7.4 对重防护屏 (83)7.4.1 *对重防护屏后置 (83)7.4.2 *对重防护屏侧置 (84)8 安装轿厢架FRS9-AP/FRM9-AP (87)8.1 安装轿厢架FRS9-AP (87)8.2 FRS9-AP安全钳和导靴选配件 (98)8.3 FRM9-AP安全钳和导靴选配件 (99)9 安装曳引绳 (100)9.1 处理钢丝绳 (100)9.2 安装钢丝绳 (101)9.3 钢丝绳绳头安装 (105)9.4 检查钢丝绳张紧度和绳的润滑 (109)9.5 限速器钢丝绳 (110)10 轿厢P9KD-AP(CM)安装 (117)10.1 轿厢安装步骤 (118)10.2 *安装轿厢装璜 (134)10.3 安装满载、超载开关 (143)10.4 轿厢平衡装置 (144)11 V30 AP轿门安装 (145)11.1 C2轿门 (145)11.1.1 轿门机驱动 (146)11.1.2 轿门板 (147)11.1.3 轿门刀 (149)11.2 安装光幕(MiniMax光幕LVH) (151)12 安装缓冲器 (157)13 安装补偿链 (159)13.1 补偿链导向装置 (159)13.1.1 4-滚轮导靴 (159)13.1.2 2-滚轮导靴 (162)13.2 补偿链 (165)14 安装MX-GC (170)14.1 先决条件 (170)14.2 材料范围 (171)14.3 控制柜 (172)14.4 井道信息 (174)14.4.1 井道信息IGSI (174)14.4.2 绝对值线型井道信息系统 (190)14.5 控制柜内模块 (210)14.6 机房电缆 (211)14.7 井道电缆 (215)14.7.1 准备 (220)14.7.2 安装 (223)14.7.3 调整和最后检查 (229)14.8 OKR (231)14.9 随行电缆 (236)14.9.1 带IGSI和LONCIB的MX-GC,HQ<=70m (237)14.9.2 带IGSI和LONCIB的MX-GC,HQ>70m (238)14.9.3 带IGSI和LONIC/LONICK的MX-GC,HQ<=70m (239)14.9.4 带IGSI和LONIC/LONICK的MX-GC,HQ>70m (240)14.10 控制柜内ASIXA32.Q的概述与名称 (241)15 VARIODYN VF44BR和VF88BR安装 (243)15.1 VARIODYN VF44BR安装 (243)15.2 VARIODYN VF88BR安装 (249)1 安全建议1.1 概要安全要求所有参与的安装人员必须熟悉并遵守公司以及当地的安全规范,特别要注意以下几点:•照明必须充足,以保证安全生产。
迅达5400部分调试资料说明教材
5400电梯部份资料JRVR:独立运行JRV:保留JNFF:消防员开关JBF:消防开关JAB:锁梯SAB、JBF、JBFF:消防主菜单:StatusLift;电梯状态Login/Logout;密码Commands;命令ServiceVisit;服务访问CarCall;轿内召唤TeminalCall;用于M10 FloorCall;庁外召唤Door;门SpecialTrips;特殊运行KFM;不开门模式测试运行DFM-U;测试运行-上DFM-D;测试运行-下JLF;学习运行Services;服务功能ServiceJAB;锁梯ServiceJRV;独立运行ServiceSAB;ServiceJBF;消防功能LMS Commission;LMS调试NominalLoad;正常负载EmptyCar;空轿箱FullLoad;满载SystemCheck;系统检查EmptyCarBot;空轿箱上部EmptyCaeTop;空轿厢在下部Empty Car Mid;空轿厢中间Acceptance Mode;验收模式.Adj. FloorLevelling;平层调整Drv End Commis;调试结束保存驱动参数.Freeze Node Tree;锁定节点Invalidate SDM ;(未使用).Unlock Terminal;终端解锁时间设定Teach-in mode;学习模式外呼印板SMLCDLanguage;SMLCD语言US English;英语French;法German;德Spanish;西Numeric;Tests ;测试1.LON;(1)Service Pin;Pin测试(进入后按一下印板上的PIN按钮,来检查通讯状态)(2)LON Board ;(进入后通过选择印板类型和地址来查找印板的通讯状态)(3)Force SW downl;下载软件2.Servitel Call;(1)Reg Center;(2)Aux Center;3.VF Test;变频器测试(1)DC Link Test; 直流环测试(2)CurrentLoopTst; 电流环测试(3)EstimMotorPara; 主机参数估算(4)Direction Test; 方向测试(5)ZeroPositionTest; 零位测试(6)EstimatInertia; 惯量估算(7)Memory Test; 记忆测试(8)Fan Test; 风扇测试(9)LED Test; 灯测试(10)ChargeDCLTest; DCL加载测试(11)DischargDCLTst; DCL不加载测试(12)CapFormingTest; 电容测试(13)FCR Test; FCR测试(14)FCR IGBT Test; FCR IGBT测试4.Ck Empty Car;空轿厢检查5.Acceptance;验收(1)Brake Test;抱闸测试2)EN81 Test; EN81测试3)Traction Test;曳引测试4)Overspeed 1 Test;超速1测试5)Overspeed 2 Test;超速测试6)TripTimeTest7)UpTermSlowDown 慢速下行测试8)DownTermSlowDo 慢速上行测试9)KNE Test KNE测试【五】Status;状态1.Status Group;群控状态2.Drive;驱动3.I/Os;4.Board I/Os;印板I/O5.Versions;版本1)GC Software;GC软件版本2)Drive Software;驱动软件版本6.PCT Type;PCT类型7.Date & Time;日期&时间8.Load;负载9.Position Abs;绝对位置10.Positin Rel;相对位置11.LON ;总线节点状态12.LON nodes CH1;总线节点状态13LON nodes CH2;总线节点状态14.BIO nodes type;总线节点状态15.Floor Enables;可用楼层1)Normal Floors;正常楼层2)Secured Floors;被封锁楼层16.Calls ;呼梯1)Floor Calls;厅外呼梯2)Car Calls ;轿内呼梯17、LON SW-Dwnload ;软件下载状态18.Available Srv 可用服务19.Oil Temp ;油温(液压梯专用)20.Brake Test ;抱闸测试结果21.Drive AMPS;电流未使用【六】Parameters;参数1.Group ;群控1)Floor Markings ;层楼标记2)Call Space;3)Walk Time Mult;4)Riser Car Dist;5)Walking Speed;6)Allocation Dir;2.Lift 电梯1)Over The Hill; 2)Min Board Time; 3)Min Exit Time;3.Door;门1)HoldOpen Exit;内令开门保持2)HoldOpen Board;外召开门保持3)Final Timer;强迫关门时间4)Min Door Open ;最小开门时间4.Door2;第二侧门1)HoldOpen Exit;2)HoldOpen Board;3)Final Timer;4)Min Door Open;5.Car;轿厢1)Delay Cab Light;照明延时2)Minimal Load ;最小负载3)Main Floor;6.主楼层1)Services;服务参数2)JAB Floor;JAB楼层3)JBF Alt Floor;JBF附属楼层4)JBF Floor;JBF楼层5)JNO Release 6)KW Sel Lift 7)Access Codes8)NF Sel Lift 9)RNO Rec Floor 10)Park Floor11)Park Floor Ena 12)Park Door Time7.Drive General;一般驱动参数V-Insp;安装运行速度V-Recall;召会速度V-Relevel;再平层速度V4;额定速度A2加速度A6 减速度A-Relevel再平层加速度J1加加速度J3加减速度J5减减速度J7减加速度J-Relevel再平层加加速度KSERE-DistKSERE距离Relevel Dist再平层距离Max Door Zone最大门区Unbalance Bot下平衡Unbalance Top上平衡Break Start De抱闸打开延时Max Trip Time最大运行时间Win Auto Tacho Res Auto Tacho Pre IndiceHyd Switch Tim Hyd Pause Tim Early Brake早期抱闸KB Feedback抱闸触点反馈FS_Nom US_NomIS_Nom Pole Pairs P Gain Speed Ti Speed P-Ampli AccelP-Ampli Decel Dist-Stop Prec I Ampli DecelMin Distance最小楼层距离On Level Dist水平距离Y/Delta Enable Y/Delta Time Softstop TimeColdOil MinTim ColdOil MaxTim AST Timeout Relevel TriesCold Oil Temp Warm Oil Temp Regulated Up Fast DownInsp Speed PWM Offset Up PWM Offset DwnServoFreq Accel Up Accel Down Decel UpDecel Down PWM Max Up PWM Start Down PWM Min DownSpeed Reg Up Speed Fast Dwn IGS Direction8.Drive Settings;驱动设置Tacho Factor转速因数编码器参数Nominal Load额定载荷Reeving Factor曳引比TachFactrMotor主机编码器Gear Ratio减速比TractnDiameter曳引轮直径Inertia 惯量Code Type代码类型安全标准类型ETSL TypeETSL类型速度监控类型Encoder Type编码器类型Gear Type减速箱类型InvInputV oltage输入电压Nominal Speed额定速度Inverter Setting变频器类型Id Motor主机ID ShaftInfoType井道信息类型Brake Type抱闸类型Load Type称重类型Phase Dir.相序Servitel远程监控(未使用)Install No Dir Call JAB Dir Call BR Dir Call JRVDir Call SRE Dir Call NT Dir Call NS Dir Call EOSTest Trip Test Call Periodic Call Reg CenterAl Center Pic Center Aux Center Mini CenterReserve Own Dial Nbr Dial Prefix Dial Substr1Dial Substr2 Ans Time Win Modem Baud Modem InitModem Setup1 Modem Setup2 FaultPerPeriod Trips Til NTError Delay9.System系统1)Date 日期2)Time 时间LCD Password密码【七】ErrorLog 故障表1.Show 显示2.Show All 显示所有故障3.Clear Errors 清除故障【八】Statistics统计1.Car Trips 轿厢运行次数2.Door Trips 门运行次数3.2.Door Trips 二侧门运行次数4.Run Hours 运行小时5.Clear 清除结果一、零位测试步骤电梯在更换或调整主机编码器或原测试零位丢失后需进行零位测试。
Seagate 5400.1 安装指南说明书

Barracuda 5400.1 Installation GuideST320015AATA Interface Disc DrivesPublication Number: 100280502, Rev. B, November 2003The easiest way to install your driveDiscWizard TM, available exclusively from Seagate, provides you with cus-tomized installation instructions for your hard drive. You can download Dis-cWizard for free from the Seagate web site at /support or run the program directly from your web browser. In either case, you should run DiscWizard before you install your drive.If you cannot run DiscWizard, follow the instructions on this installation sheet to install and configure your drive.What you need• A Phillips screwdriver and four 6-32 UNC drive mounting screws •Forced-air ventilation to provide adequate drive cooling•An ATA interface cable. For optimum drive performance and data integ-rity, we recommend using an 80-conductor Ultra ATA/100 cable (which can be identified by its blue, gray, and black connectors).Handling precautions/Electrostatic discharge protection •Disc drives are fragile. Do not drop or jar the drive. Handle the drive only by the edges or frame. Keep the drive in the protective SeaShell TM con-tainer until you are ready to install it to minimize handling damage.•Drive electronics are extremely sensitive to static electricity. While installing the drive, wear a wrist strap and cable connected to ground.•Turn off the power to the host system during installation.•Do not disassemble the drive; doing so voids the warranty. Return the entire drive for depot service if any part is defective.•Do not apply pressure or attach labels to the circuit board or to the top of the drive.Caution.Do not cover, seal, or insert any object into this hole.This hole has two purposes:•To allow condensation inside the hard disc to escape•To allow air pressure inside the hard disc to equalize with ambient pres-sureNote.If this hole is covered, sealed, or penetrated by any object, the drive reliability may be compromised and could lead to permanent damage—doing so voids the warranty.Installation instructions1.Set the jumpersNote.The instructions below assume that you are installing your new Seagate drive in a system that already has a working hard drive. To install the drive in a system that has no working hard drive, see the section titled, “What to do if you don’t have a working hard drive”located on back of this sheet.a.Make sure that your existing drive is set up as a “master.” See the drivelabel or manufacturer’s web site for jumper settings.b.Your new drive is shipped with a jumper in the “cable select” position.Set the drive as a “slave” by removing this jumper from the jumper pins. Save the jumper in case you ever need to reconfigure the drive.2.Mount the drive and attach cablesa.Slide the drive into a 3.5-inch drive bay. You can mount the drive in anyorientation, but we recommend mounting with the circuit board down. Note.To mount the drive in a 5.25-inch drive bay, you must purchase mounting brackets, available from your computer dealer.b.Secure the drive using four 6-32 UNC mounting screws in either theside-mounting or bottom-mounting holes. Insert the screws no more than 0.20 inches (5.08 mm) into the bottom-mounting holes and no more than 0.14 inches (3.55 mm) into the side-mounting holes. Caution.Do not overtighten thescrews or use metricscrews. This may dam-age the drive.c.Make sure the blue connectoron your Ultra ATA/100 cable isplugged into the primary IDEport on your computer’s moth-erboard or host adapter. Seeyour computer manual to deter-mine the location of the primaryIDE connector.d.Make sure the black connectoron the cable is plugged intoyour existing hard drive.e.Plug the gray connector intoyour new Seagate hard drive.Caution.When plugging in theinterface cable, makesure that pin 1 on the cable (indicated by a stripe along thehard drive, you can purchase a Y-shaped power splitting cable from your computer dealer which effectively converts one power connec-tor into two.3.Start up your computerClose your computer case and restart your computer. your computer may automatically detect your new drive. If your computer does not automati-cally detect your new drive, follow the steps below.a.Restart your computer.b.While the computer restarts, run the System Setup program (some-times called BIOS or CMOS setup). This is usually done by pressing a special key, such as DELETE, ESC, or F1 during the startup process.c.Within the System Setup program, instruct the system to auto detectyour new drive.d.Enable LBA and UDMA modes if the Setup program gives you thisoption.e.Save the settings and exit the Setup program. When your computerrestarts, it should recognize your new drive. If your system still doesn’t recognize your new drive, see the troubleshooting section on the backof this sheet.4.Partition and format the driveBefore your new drive can store data, it must be partitioned (assigned one or more drive letters) and each partition must be formatted. You can parti-tion and format the drive using DiscWizard or using programs built into Windows. Using DiscWizard is generally easier and faster.Partitioning and formatting using Windows utility software Caution.Partitioning or formatting a drive erases all the data on that drive.Make sure you select the correct drive!a.Insert a bootable startup diskette or CD (usually included in your Win-dows operating system package) and restart your computer.b.If booting from a diskette, type fdisk at the A: prompt. If you bootedfrom a CD, the partitioning wizard may start automatically.c.Create a primary DOS partition on your new drive.d.Create secondary partitions if needed.e.If booting from a diskette, type format x: at the A: prompt, where x isthe letter of your first new partition. If you booted from a CD, run the formatting program.f.Repeat the format process for all new partitions.Congratulations. You’re done!If you have problems with your installation, see the troubleshooting infor-mation on this page or contact Seagate Support Services.How to make your new drive the boot driveIf you want to boot your computer from your new Seagate drive, you must copy all the system files from your old boot drive to your new Seagate drive. DiscWizard makes this process quick and easy:a.Run DiscWizard (see the first paragraph of this sheet for instructions).b.Select “Maintenance” from the main DiscWizard menu.c.Select “Copy files” in the maintenance options menu.d.Choose the source and destination drives and begin the copy proce-dure.Note.DiscWizard copies all the files from your old boot drive, including data files, software and hidden system files.e.After copying the files, remove both hard drives from your computer.f.Change the master/slave jumpers to configure your new Seagate driveas the master and your old drive as the slave.g.Reinstall the drives in your computer.h.Restart your computer; it will recognize and boot from your new harddrive. Do NOT repartition or format the drives.What to do if you don’t have a working hard driveFollow the steps below to install your new Seagate hard drive in a system that does not have a working hard drive.Note.This procedure requires that you have access to the Internet and can boot your computer from a diskette drive. The alternative is to install your drive, boot from your Windows system CD or diskette, and then use the Windows utilities to set up the drive.a.Download DiscWizard Starter Edition from the Seagate web site (seethe link at /support).b.Run the program to create a bootable DiscWizard diskette.c.Follow the instructions on the front of this sheet to install your new harddrive in your computer, but set the new drive as a “master,” not as a “slave,” and place it on the connector at the end of the ATA cable.d.Insert the DiscWizard diskette in the diskette drive.e.Restart your computer. It will boot from the DiscWizard CD and Dis-cWizard Starter Edition will start up automatically.f.From the DiscWizard Starter Edition main menu, select “Setup YourHard Disc.” Follow the online instructions.g.When DiscWizard is done, it prompts you to install your operating sys-tem on the new hard drive. See your operating system manual for fur-ther instructions.TroubleshootingIf your drive is not working properly, follow these troubleshooting steps. If these steps do not solve the problem, contact your dealer or visit http:// to download SeaTools disc diagnostics software and obtain more information.1.Does the drive spin up? If you cannot hear a faint whine and clickingnoise when power is applied to the drive, make sure that the power connector and interface cable are securely attached and the jumpersare installed correctly.2.Does the computer recognize the drive? Make sure the master/slave jumpers are set correctly on all installed hard drives. Verify that the drive is detected by the system CMOS or Setup program.3.Does Scandisk find any defects? Run Scandisk from the commandprompt. If defects are found, the drive may be damaged.4.Does the drive format to full capacity? Verify that your BIOS hasAutodetect and LBA mode enabled. On some older computers, you may need to run DiscWizard to use the full capacity of your drive.5.The computer hangs on startup. Verify that your system is ATA/100compatible, with a UDMA mode setting. If your computer has a proces-sor speed of less than 400 MHz, your system may not be able to sup-port the highest data transfer rates used in Ultra ATA/100, and could experience intermittent system hangs or poor drive performance, especially when transferring large files. To prevent this, you can pur-chase an Ultra ATA/100 host adapter card or run the utility program UATA100.exe, available on the Seagate web site (see http:// /support/kb/disc/ultra_ata100.html).Seagate support servicesFor online information about Seagate products, visit or e-mail your **************************************.If you need help installing your drive, consult your dealer first. If you need additional help, call a Seagate technical support specialist. Before calling, note your system configuration and drive model number.Africa+1-405-324-4714Netherlands00 800-47324283 Australia1800-14-7201New Zealand0800-443988 Austria0 800-20 12 90Norway00 800-47324283 Belgium00 800-47324283Poland00 800-311 12 38 China*800-810-9668Spain00 800-47324283 Denmark00 800-47324283Sweden00 800-47324283 France00 800-47324283Switzerland00 800-47324283 Germany00 800-47324283Singapore800-1101-150 Hong Kong800-90-0474Taiwan*00-800-0830-1730 Hong Kong*001-800-0830-1730Thailand001-800-11-0032165India1-600-33-1104Turkey00 800-31 92 91 40 Indonesia001-803-1-003-2165United Kingdom00 800-47324283 Ireland00 800-47324283USA/Canada/1-800 SEAGATE or Italy00 800-47324283Latin America+1-405-324-4700 Malaysia1-800-80-2335Other EuropeanMiddle East+1-405-324-4714countries+1-405-324-4714*ChineseWarranty.To determine the warranty status of your Seagate disc drive, contact your place of purchase or visit our web site at for more information. Return Merchandise Authorization (RMA).Run SeaTools to diagnose your drive before requesting a return authorization. In addition, please verify that your drive is defective by following the troubleshooting checklist in this guide. Seagate offers com-prehensive customer support for all Seagate drives worldwide. Seagate customer service centers are the only facilities authorized to service Seagate drives. Drive return procedures vary depending on geographical location and are subject to current international trade regulations.Shipping the driveBack up the data before shipping. Seagate assumes no responsibility for data lost during shipping or service.Shipping drive in an unapproved container voids the warranty. Pack the drive with original box and packing materials. Use no other materials. This prevents electrical and physical damage in transit.Electromagnetic compliance for the European Union. This model complies with the European Union requirements of the Electromagnetic Compatibility Directive 89/ 336/EEC of 03 May 1989 as amended by Directive 92/31/EEC of 28 April 1992 and Directive 93/68/EEC of 22 July 1993. Compliance of this drive, as a system compo-nent, was confirmed with a test system. We cannot guarantee that your system will comply. The drive is not meant for external use (without properly designed enclosure, shielded I/O calbe, ect.).Sicherheitsanleitung 1. Das Gerrät ist ein Einbaugerät, das für eine maximale Umgebungstempeatur von 60°C vorgesehen ist. 2. Zur Befestigung des Lufwerks werden 4 Schrauben 6-32 UNC-2A benötigt. Bei seitlicher Befestigung darf die maxi-male Länge der Schrauben im Chassis nicht merh als 3,3 mm und bei Befestigung an der Unterseite nicht mehr als 5,08 mm betragen. 3. Als Versorgungsspannugen wer-den benötigt: +5V +/- 5% 1,2A; +12V +/- 5% 2,0A 4. Die Versorgungsspannung muss SELV entsprechen. 5. Alle Arbeiten auf dem Festplattte dürfen nur von Ausgebiletem Serciepersonal durchgeführt werden. Bitte entfernen Sie nicht die Aufschriftens-childer des Laufwerkes. 6. Der Einbau des Laufwerkes muss den Anforderungen gemäss DIN IEC 950 VDE 0805/05.90 entspreche.© 2003 Seagate Technology LLC All rights reservedPublication number: 100280502, Rev. B, November 2003, Printed in U.S.A. Seagate, Seagate Technology, and the Seagate logo are either registered trademarks or trademarks of Seagate Technology LLC. Barracuda is a registered trademark of Seagate Technology LLC. Other product names are registered trademarks or trade-marks of their owners. Seagate reserves the right to change, without notice, product offerings or specifications.。
得实 DS-5400HPro 针式打印机操作手册
3
企业公开信息:
1. 售后服务请致电全国各地得实服务网点电话,或拨打: 400-810-9998(手机) 800-810-9998(免费) 2. 产品工作、待机、休眠及关闭状态的最大及最小能耗如下: 产品使用状态 工作时 待机 休眠 关闭 最大能耗 85W 7W 6W 小于 0.1W 最小能耗 10W 5W 5W 0
在安装打印机之前,首先要确定一个合适的地方放置打印机。 这里“合适的地方”是指: 请将打印机平放在工作台上。 避免将打印机置于过热、过度潮湿和灰尘过多的地方。 接上稳定电源,避免与电冰箱之类大功率或有干扰的电器同 一电源。 关闭打印机电源开关后,才能拔插电源线,打印机应尽可能 放置在接近插座的地方,便于使用。 打印机必须放置在走纸空间足够的地方。 如果用打印机并行接口连接,必须确保电缆长度在 2 米范围 内。用 RS-232C 连接,可选 SPC-32K 转换器,连接距离可在 15 米以内。
注:只有当产品无任何外接输入电源时,才能实现零能耗。 3. 如果用户需对产品性能升级或更换模块, 请来电咨询, 我们将给您 详细解答。 4. 当您弃置达到使用寿命年限的针式打印机产品时, 我们建议您将废 弃产品返还给本公司或全国各地的得实服务网点, 由得实集团作统 一处理,以保护生态环境。 5. 本产品能使用含 50%回收纤维的打印纸进行打印。
8.1 打印机规格 ...................................... 8-1 8.2 接口接头引脚 .................................... 8-4 8.3 字符集 .......................................... 8-8 8.4 控制码摘要表 ................................... 8-14 8.4.1 ESC/P和LQ仿真控制码摘要表 .................. 8-14 8.4.2 OKI仿真控制码摘要表 ........................ 8-18 附录 1:电子信息产品污染控制的说明..................... 9-1
最新得实打印机色带更换方法

市场上常见的两种色带模拟图
普通环形色带
得实扭结色带(旋转180°)
一、得实(DS)通用原装色带 (型号M21-1)
二、拆开包:
三、准备好需要更换的色带架:
四、拆开色带架:
五、拆开后的色带架:
六、取出旧的色带:
七、将心色带倒入:
注意面上的色带,扭结部分暴露在 外面
八、先将色带其它部分装好:
安装扭结部分,顺着斜槽方向装 入
安装好的扭结部分:
九、装好色带架:
(正面)
(背面)
(侧面)
十、DS2600II、DS5400HPRO、 DS1000等有色带卡的安装方法:
安装好的图片:
结束语
谢谢大家聆听!!!
29
- 1、下载文档前请自行甄别文档内容的完整性,平台不提供额外的编辑、内容补充、找答案等附加服务。
- 2、"仅部分预览"的文档,不可在线预览部分如存在完整性等问题,可反馈申请退款(可完整预览的文档不适用该条件!)。
- 3、如文档侵犯您的权益,请联系客服反馈,我们会尽快为您处理(人工客服工作时间:9:00-18:30)。
2
安全规范
使 用 注 意 事 项
为了避免受到电击和伤害及防止损坏打印机, 在接上电源之前, 务请注意以下重要事项: 仔细阅读操作手册等说明文件。 打印机必须平放在固定的台面上。 避免震动、碰撞、高温和阳光直射、灰尘等。 请勿将打印机置于潮湿的环境中,请勿让雨水等任何液体沾湿打 印机。 打印机应安放在接近插座的地方,方便操作者进行电源插头的拔 插操作。 确保电源的电压值与打印机所规定的电压值一致,避免与电冰箱 等大功率或有干扰的电器同一电源。 为保证安全操作,三脚插头必须插进三孔交流电源插座中,其中 地线必须有效接地。 电源延长线必须为三芯并正确连接,以提供接地。 若交流电源插座与打印机插头不匹配,请更换合适的交流电源插 座,以保证人员、设备的安全使用。 连接打印机通讯电缆时,请先关闭打印机和计算机的电源,选用 适合的联机电缆将打印机和计算机连接起来, 并锁定卡口和旋紧 螺丝。 请勿接触打印头外壳,以防止高温伤害。 清洁打印机前,先关闭电源开关,从电源插座拔掉电源插头。用 软棉绒布沾少量中性清洁剂或酒精,轻抺打印机外部。 如遇打印机发生故障,除认可的合格技术员外,不可擅自进行维 修工作。
8.1 打印机规格 ...................................... 8-1 8.2 接口接头引脚 .................................... 8-4 8.3 字符集 .......................................... 8-8 8.4 控制码摘要表 ................................... 8-14 8.4.1 ESC/P 和 LQ 仿真控制码摘要表................. 8-14 8.4.2 OKI 仿真控制码摘要表........................ 8-18 附录 1:电子信息产品污染控制的说明..................... 9-1
控制面板 ....................................... 3-1 按钮及其指示灯 .................................. 3-1 开机功能 ........................................ 3-4 组合功能 ........................................ 3-7 参数设置 ....................................... 4-1
送纸旋钮: 手动送纸(仅在断电情况下使用) 。
电 源 线: 连接打印机和电源插座。
安装打印机 1-4
1.4 安装和拆卸色带盒
先将打印机放在将要使用的地方,清除打印机所有包装物件(这 些包装物件用于保证打印机运输时不受损坏) , 并妥善保存包装物件及 纸箱,以备后用。
色带盒的安装
1、关闭打印机电源。 2、先把面盖揭起,如下图所示。
本产品信息如有更改,恕不另行通知。 本资料仅供参考。除中国现行法律法规规定,得实集团 不承担任何由于使用本资料而造成的直接或间接损失的责 任。 得实集团保留最终解释权。
目 录
第1章 1.1 1.2 1.3 1.4 1.5 1.6 1.7 第2章 2.1 2.2 2.3 2.4 第3章 3.1 3.2 3.3 第4章 安装打印机 ..................................... 1-1 开箱和检查 ...................................... 1-1 放置打印机 ...................................... 1-2 打印机部件 ...................................... 1-3 安装和拆卸色带盒 ................................ 1-5 打印机和主机连接 ................................ 1-8 连接电源 ....................................... 1-10 安装打印驱动程序 ............................... 1-11 纸的安装和使用.................................. 2-1 选纸 ............................................ 调校打印头间隙 .................................. 使用单页纸 ...................................... 使用链式纸 ...................................... 2-1 2-1 2-2 2-3
6.1 链式装纸页首调整 .................................. 6-1 6.2 摩擦装纸页首调整 .................................. 6-2 6.3 撕纸位置调整 ...................................... 6-3 第7章 故障和保养 ..................................... 7-1
7.1 故障处理 .......................................... 7-1 7.2 保养与维护 ........................................ 7-6 第8章 规格 ........................................... 8-1
4.1 如何进行参数设置 ................................ 4-2 4.2 系统设置 ........................................ 4-3 4.3 纸张设置 ........................................ 4-7 4.4 接口设置 ....................................... 4-12 4.5 ESC/P 和 LQ 仿真参数设置......................... 4-13 4.6 OKI 仿真参数设置 ............................... 4-16 4.7 双向测试及纵向校正 ............................. 4-17 4.8 打印针自动调整设置 ............................. 4-21 4.9 打印针补偿设置 ................................. 4-22 4.10 恢复出厂参数设置 ................................ 4-24 第5章 票据通设置和使用 ................................ 5-1 1
第 1章
1.1 开箱和检查
安装打印机
打开纸箱,对照下图检查箱内部件和附件是否齐全。如果有任何 部件遗失,请与卖方联系。 注意:使用之前,请先取出打印头固定板,保留原包装箱及缓冲材料, 以备以后使用。
安装打印打印机之前,首先要确定一个合适的地方放置打印机。 这里“合适的地方”是指: 请将打印机平放在工作台上。 避免将打印机置于过热、过度潮湿和灰尘过多的地方。 接上稳定电源,避免与电冰箱之类大功率或有干扰的电器同 一电源。 关闭打印机电源开关后,才能拔插电源线,打印机应尽可能 放置在接近插座的地方,便于使用。 打印机必须放置在走纸空间足够的地方。 如果用打印机并行接口连接,必须确保电缆长度在 2 米范围 内。用 RS-232C 连接,可选 SPC-32K 转换器,连接距离可在 15 米以内。
安装打印机 1-2
1.3 打印机部件
要熟悉打印机部件及功能,请参阅下一页。
安装打印机 1-3
间隙调杆: 调校打印头间隙,以配合纸张厚度。 导 纸 板: 调整前摩擦式进纸(单页纸)的边缘位置,导向纸张正 确送入。 入 纸 槽: 前摩擦式进纸(单页纸)的通道。 打 印 头: 由打印针及其驱动部分组成。 面 盖: 保护打印头及其它内部部件并降低噪音。 控制面板: 表示打印机状态,可对打印机功能进行多种简易操作。 送纸调杆: 该调杆有两个位置, 电源开关: 电源接通或断开。 色 带 盒: 内装打印色带。 色带导架: 固定色带芯。 链 接 轮: 控制链式纸的传动、左右调整位置、锁定。 口: 连接计算机与打印机,标准配置为并行接口、USB 接口。 为链式纸, 为单页纸。
5.1 票据通设置 ........................................ 5-2 5.2 票据通的使用 ...................................... 5-3 第6章 用户调整设置.................................... 6-1
3
企业公开信息:
1. 售后服务请致电全国各地得实服务网点电话,或拨打: 400-810-9998(手机) 800-810-9998(免费) 2. 产品能耗: 产品使用状态 工作时 操作模式功率(休眠) 待机功率(关闭) 最大能耗 106W 3.4W 0.1W 最小能耗 10W
a. 本产品符合 GB21521-2014 《打印机、 传真机能效限定值及能效等 级》一级能效等级最高要求。 b. 打印机停止使用 5 分钟(默认出厂设置) ,即自动切换到节能模 式(详见第 4 章) 。 c. 只有当产品无任何外接输入电源时,才能实现零能耗。 3. 在换气不畅的房间中长时间使用或打印大量文件时, 建议用户适时 换气。 4. 如果用户需对产品性能升级或更换模块, 请来电咨询, 我们将给您 详细解答。 5. 当您弃置达到使用寿命年限的针式打印机或其原装耗材时, 我们建 议您将废弃产品返还给本公司或全国各地的得实服务网点, 由得实 集团作统一处理,以保护生态环境。 6. 本产品能使用含 70%回收纤维的再生纸进行打印。在不影响使用 的情况下,为节约资源,请选择使用再生纸;请选择双面打印。 7. 产品与电网电源的断开装置: 通过拔掉电源线插头能彻底切断产品 与电源电网的连通。 4