足反射疗法
足反射疗法

足反射疗法【足反射疗法概述】足反射疗法,简称“足疗”,是一种通过对双脚的经穴、反射区施以按摩手法,刺激双脚穴位,从而调整脏腑虚实,疏通经络气血,以预防或治疗某些疾病的方法。
足疗中的足部按摩和针灸术是祖国传统医学中起源较早的医疗技术,在古代医学中占有相当重要的地位,是宝贵的医学遗产。
在《史记》中,司马迁就记叙了上古时代,有位摸脚治病的民间医生,名叫俞跗,他治病不用汤液醴酒,仅用“针石挢引、案杌毒熨”双脚的方法,就能治愈疾病。
一直到战国名医扁鹊,在治疗虢太子尸厥症时,还盛赞俞跗的高超医技为“一拨见病之应”。
但是,由于受到中国两千多年封建社会的封建意识和风俗习惯的影响,赤裸双足被认为粗鲁不雅,因而这种极有医疗价值的足部按摩疗法,逐渐被排斥在正统医学之外,严重地阻碍了其发展。
然而在国外,中国的足疗法却被广泛运用和流传,日本称之为“足心道”疗法;欧美国家称之为“反射疗法”或“区域疗法”,真是墙内开花墙外香。
直到1978年后,足部反射区疗法才通过各种渠道传回“娘家”。
1990年4月,在北京首次举行了全国足部反射区健康法研讨会,卫生部正式同意成立了“中国足部反射区健康法研究会”,杭雄文先生任理事长。
并在1991年7月,成为由卫生部归口管理的全国学术性团体。
从此,足部反射区健康法这一简便易行、效果显著的自我保健方法在我国各地得到了迅速的推广及运用。
【足反射疗法基本内容】一、足反射区位置足部反射区分为足底、足内侧、足外侧、足背部四大部分,其顺序大致如下:足底:肾上腺、肾、输尿管、膀胱、额窦、脑垂体(垂体)、小脑及脑干、三叉神经、鼻、头部(大脑)、颈椎、甲状旁腺、甲状腺、眼、耳、斜方肌、肺及支气管、心(左)、脾(左)、胃、胰腺、十二指肠、小肠、横结肠、降结肠(左)、乙状结肠及直肠(左)、肛门(左)、肝(右)、胆囊(右)、盲肠及阑尾(右)、回盲瓣(右)、升结肠(右)、腹腔神经丛、生殖腺(睾丸或卵巢)、失眠点。
足内侧:膀胱、鼻、颈椎、甲状旁腺、胸椎、腰椎、骶骨(骶椎)、尾骨内侧、前列腺或子宫、尿道及阴道、髋关节、直肠及肛门、腹股沟、肋骨、下身淋巴腺(腹部淋巴腺)、消渴点、便秘点。
足部反射区按摩疗法

足部反射区按摩疗法第一章:概述第一节.足部保健按摩的起源与发展什么是足疗?即足部反射区按摩疗法,隶属于无损伤医学,一种物理疗法。
是通过各种按摩手法对足部各个反射区的刺激按摩,使人体的生理机能得到调整,提高自身免疫系统的功能,从而达到防病,治病,起到保健强身目的的按摩方法。
一、足部保健按摩的起源足疗起源于古代,发展于近代,盛行于现代。
足部按摩和针灸术是祖国传统医学中起源较早的医疗技术,在古代医学中占有相当重要的地位,是宝贵的医学遗产。
在《史记》中,司马迁就记叙了上古时代,有位摸脚治病的民间医生,名叫俞跗,他治病不用汤液药酒,仅用“针石挢引、案杌毒熨”双脚的方法,就能治愈疾病。
一直到战国名医扁鹊,在治疗虢太子尸厥症时,还盛赞俞跗的高超医技为“一拨见病之应”;两千多年前的经典医著《黄帝内经》,详细介绍全身经络和腧穴,其中许多足部的穴位。
书中指出:经络、穴位与五脏六腑的关系,脏腑有病可通过经络反映到体表穴位,根据不同穴位的症状,推断相关的脏腑功能出现的问题;《黄帝内经》提到按摩治病的原理,得出“不通则痛,通则不痛”的疏通经络气血的治病机制。
足部穴位可反映及治疗全身多种疾病,通过对足部进行按摩、针灸等治疗,相应的内脏功能紊乱可以得到纠正,使人体恢复健康,减少疾病发生,起到保健延年的作用。
足疗,就是通过手法对足部反射区的刺激按摩,调整人体生理机能,提高免疫系统功能,达到防病、治病、保健、强身的按摩方法。
因为诸多原因,足部按摩一直未能登上大雅之堂,而是在民间流传。
宋代文豪苏东坡对坚持摩擦足底涌泉穴对身体的益处就大加赞赏,称“其效不甚觉,但积累至百余日,功用不可量……若信而行之,必有大益。
”二、足疗在世界的发展中医疗法(包括足部按摩)在唐代即传人日本、朝鲜。
元朝以后又传人欧洲;20世纪初,美国医生威廉-菲茨杰拉德以现代医学方法研究整理足部反射疗法的成果,于1917年发表了《区域疗法》(Zone Therapy)一书;20世纪80年代在台湾传教的瑞士神父吴若石先生用“足部按摩术”治好了他多年的风湿关节炎,他在《若石健康法――足部反射自学手册》一书序中说:“8年前,源自中国古代的足部按摩术治好了困扰我多年的风湿性关节炎,于是我发愿要将这中国的遗产归还给每一个中国人。
足部反射区按摩放松及基本手法
足部反射区按摩放松及基本手法
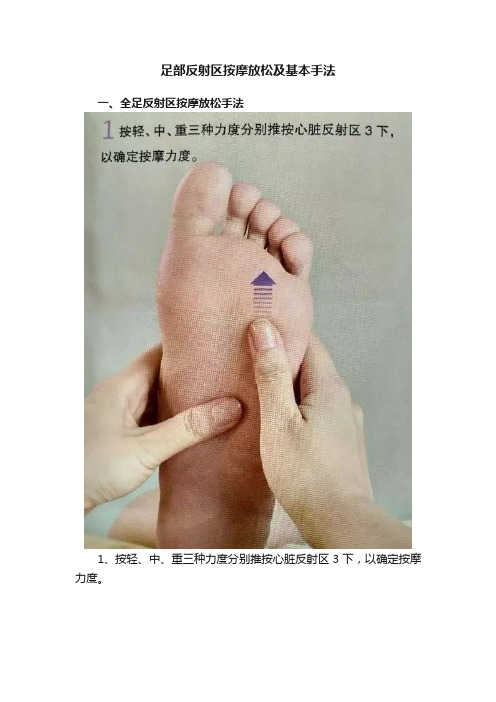
一、全足反射区按摩放松手法
1、按轻、中、重三种力度分别推按心脏反射区3下,以确定按摩力度。
2、先轻按足背、足底前部,从上往下,用力揉搓,再以同样手法揉搓足部内侧和外侧。
3、用食指和中指钳夹住足趾,逐一从下至上牵拉3~5次。
4、转动脚踝,先顺时针摇转9下,再逆时针摇转9下。
5、甩动整个足部,以加速踝部血液循环。
6、单手或双手从下往上推按整个小腿,至左足放松结束,再按同样手法放松右足,完成全足放松。
二、全足反射区按摩基本手法
对于比较狭长的区域,用砭石棒或手指指关节桡侧刮按。
面积较大的反射区,用大拇指或者用手掌来推按。
面积较小的反射区,直接用砭石棒或大拇指指腹点按会比较方便。
牵拉的按摩方式通常用于放松足趾,以适应按摩。
团揉足趾,可简捷而又完整地刺激足趾相应反射区。
以360度环形旋转脚踝,可放松控制脚部运动的主要肌肉群。
足底反射疗法适应症与禁忌症(试行)

附件:
足底反射疗法适应症与禁忌症(试行)
一、足底反射疗法适应症:
1.作为辅助疗法有一定疗效的病种:单纯性失眠,神经衰弱,紧张性头痛,疲劳综合症,便秘,慢性胃炎,胃肠道功能紊乱症,胃痉挛,慢性支气管炎,糖尿病等。
2.作为辅助疗法可减轻或缓解症状的病种:支气管哮喘,腰椎间盘突出症,中风后遗症,风湿性关节炎,膝关节骨性关节炎,感冒,慢性胆囊炎,月经不调,痛经等病症。
二、足底反射疗法禁忌症:
1.腿足部骨折、脱位。
2.腿足部关节结核、骨髓炎、化脓性关节炎等。
3.高热、传染病。
4.有出血倾向如血友病等疾病。
5.腿足部皮肤有溃破、创伤者。
6.严重心脑血管疾病、重度骨质疏松、恶性肿瘤。
7.妊娠期间禁用,月经期间慎用。
足底反射疗法只是以上疾病在明确诊断基础上采用的辅助疗法,要在中医辨证的基础上,依据患者不同的病情,区分患者不同的体质,辨证选择不同的足部反射区或经络穴位,进行推拿手法刺激,达到治疗疾病的目的。
- 1 -
- 2 -。
足部反射疗法

足部反射疗法足部反射疗法是一种古老的疗法,认为人体的各个部位都与脚底的特定区域相连,通过按摩和刺激脚底的特定部位,可以促进身体的自愈能力,调整身体的功能平衡,缓解各种疾病和不适。
正规的足部反射疗法是由经过专业培训和认证的反射疗法师进行的,可以作为一种辅助治疗手段。
起源足部反射疗法源于古代中医理论,相信脚底的穴位和身体器官之间存在着对应关系。
古代医学家认为,通过按摩和刺激脚底的特定区域,可以改善气血循环,调整脏腑功能,从而达到治疗疾病的目的。
足部反射疗法在欧洲得到了广泛传播和应用,成为一种常见的自然疗法。
工作原理足部反射疗法认为,脚底的各种器官和组织都有对应的反射区域,通过刺激这些区域可以影响到相应的身体部位。
按摩脚底,特别是按摩到有疼痛或不适感的区域,可以促进神经系统的活跃,释放压力,调节体内的能量平衡,帮助身体清除毒素,改善循环系统功能,加速身体康复。
作用与效果足部反射疗法被认为可以对多种疾病和不适产生积极的作用。
按摩脚底可以帮助缓解头痛、失眠、焦虑、消化问题、疲劳等常见问题。
此外,足部反射疗法还有助于提高身体的免疫力,促进细胞的再生,减轻慢性疼痛,调节内分泌系统的平衡,提升身体的整体健康水平。
适用人群足部反射疗法适用于各个年龄段的人群,很多人通过足部反射疗法来放松身心,缓解日常的压力和不适感。
特别是那些长期处于高压工作环境下的人群,足部反射疗法可以帮助他们恢复身心平衡,增强身体的抵抗力,提高工作效率和生活质量。
使用注意事项虽然足部反射疗法是一种自然疗法,但在接受足部反射疗法之前还是需要注意一些事项。
首先,确保选择受过专业培训和认证的反射疗法师进行操作,避免造成不良后果。
其次,如果有严重的慢性病、感染、出血等情况,最好在专业医生指导下再进行反射疗法。
最后,一般情况下,每次反射疗法的时间应该在30分钟到1小时之间,根据个人身体状况适当调整。
足部反射疗法是一种安全、自然的疗法方式,可以作为一种辅助治疗手段,帮助人们改善身体健康,提高生活质量。
足部反射区疗法
足部反射区疗法足部反射区疗法足部存在着与人体各组织器官相对应的同名反射区。
反射区分布在整个足部(包括足底、足内侧、足外侧及足背,少数反射区延伸至小腿部),足部反射区按摩是祖国医学的宝贵遗产。
我们的祖先早就认识到足部的许多敏感反应点(足三阴经及足三阳经在足部的腧穴)与人体内脏(脏腑)的关系。
如足厥阴肝经的大敦、行间、太冲、中封;足太阴脾经的隐白、大都、太白、公孙、商丘;足少阴肾经的涌泉、然谷、太溪、大钟、水泉、照海;足太阳膀胱经的昆仑、仆参、申脉、金门、京骨、通骨、至阴;足少阳胆经的丘墟、足临泣、地王会、侠溪、窍阴;足阳明胃经的解溪、冲阳、陷谷、内庭、厉兑等腧穴。
刺激这些腧穴可起到治疗保健作用。
在古籍中曾有“观趾法”及“足心道” 的记载。
足部按摩是用适当的手法对双足反射区进行刺激,促使病变部位特循环功能加强、新陈代谢旺盛,并通过经络的传导、体液的调节和神经的反射,改善全身其他组织器官的生理功能,增强机体的免疫力,从而达到防治疾病的目的。
足部反射区疗法原理:一、人体疾病的发生、发展是由于阴阳的平衡被打破所致。
足部反射区与机体各脏腑器官有密切联系,对反射区进行按摩刺激。
可调节机体达到新的平衡,消除疾病,恢复健康。
二、中医认为,人体存在一个经络系统,将脏腑组织器官联系为一个有机整体,维系气血运行,使各部位功能协调平衡。
主要是十二正经和奇经八脉。
其中足太阴脾经、足少阴肾经、足厥阴肝经、阴维脉、阴跷脉起于足部;足阳明胃经、足太阳膀胱经、足少阳胆经、阳维脉、阳跷脉终止于足,都通往特定的脏器。
双足通过经络系统与人体各脏腑器官的复杂联系,构成了足部与全身的统一性和整体性,脏腑功能失调和病理变化会反应到足部。
对足部反射区按摩刺激可调理全身经络。
足部反射区按摩疗法中”反射区”这一概念,是指”神经集结点”。
人体每个组织器官在其双足都有其神经末梢的终末点而固定在一定部位上,即所谓”反射区”。
也就是指人体的各组织器官,五脏六腑,在其双足均有相对应的解剖位置,这一解剖位置称之为”反射区”。
足部反射疗法心得——手法篇
足部反射疗法心得——手法篇
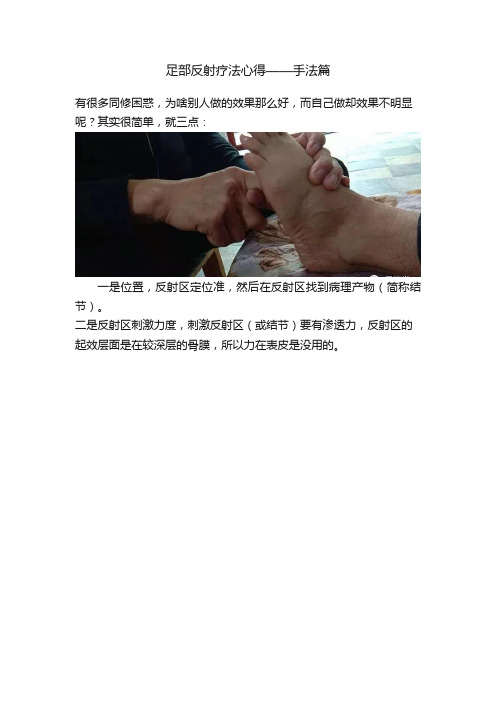
有很多同修困惑,为啥别人做的效果那么好,而自己做却效果不明显呢?其实很简单,就三点:
一是位置,反射区定位准,然后在反射区找到病理产物(简称结节)。
二是反射区刺激力度,刺激反射区(或结节)要有渗透力,反射区的起效层面是在较深层的骨膜,所以力在表皮是没用的。
三是手法,讲到第二点就涉及到一个手法问题了,(不管用手还是用棒)初学者手法点按要稳要准(必要的时候要狠),刮按要慢,我们的皮肤肌肉是有弹性的,快了,力还没渗透进去就过了,应该像练太极一样,找准反射区边缘顶进去然后柔、慢、匀速匀力的刮按才能有渗透力又很舒适。
而且能更细致的感受到反射区的结节,有利于反射区的细致定位和诊断。
手法开始应当由轻到重,同时感受患者的承受度,以能承受为宜。
当熟练后,下手就能感受到反射区内异常,并手法逐渐有渗透力可渐加快手法速度。
同时注意以下两点:
一、遇到有经常心悸、乏力头昏,面色特苍白等症状的特别体虚患者,开始一两次不要按太重,以轻手法为宜,以免出现心悸、喘不过气、昏厥等情况,等治疗好转可逐渐加力。
二、同一个反射区按的时间不宜太过长,要知道过犹不及,特别是体虚者。
曾经遇到过一位肾虚前列腺炎患者,因足反治疗效果显著,所以晚上回去后自己按前列腺反射区,一按就按三四十分钟,第二天发现遗精了。
一般来说一个反射区不要超过十分钟,重力点按不要超过两分钟。
这是本人长期跟随刘老师学习实践总结的手法体悟。
常见病足反射疗法45方
常见病足反射疗法45方足疗处方 = 基本反射区 + 主治器官反射区 + 相关器官反射区基本反射区:肾上腺、肾脏、输尿管、膀胱、尿道。
主治器官反射区:主治器官由两个方面确定,一是病灶区,即主治疾病相对应的器官反射区;二是病因区,即导致主治疾病的主要原因反射区。
相关器官反射区:可分为纵向的和横向的两个方面。
纵向的就是与主治器官属于一个系统的器官反射区;横向的就是主治器官周围的邻居反射区。
医患配合康复有期。
不要以为,治病只是医生的事,疗效好坏全在医生的水平高低。
不是的,要想疾病康复快,医患配合笑颜开。
特别是重大疾病的治疗,医患之间心灵相通,互相信任,互相鼓励,形成一种强大的战胜疾病的正能量,比什么都重要。
同时,医患配合得好,才能准确掌握疾病发展变化的规律,及时调整处方,缩短康复进程。
为了满足初学者的愿望,给大家一个“拐棍”,将“柳奕反射疗法百病处方”附后,供参考。
1、高血压:22肾脏、23输尿管、24膀胱、1大脑、3小脑及脑干、5三叉神经、7颈部、(12甲状腺)、13副甲状腺、21肾上腺、(33心脏)、(53颈椎)、(54胸椎)、思想乐观,注意休息,饮食清淡,低脂低盐2、糖尿病:肾、输尿管、膀胱、脑垂体、甲状腺、肾上腺、胃、(胰腺)、十二指肠、肝、胆、坐骨神经。
控制甜食3、肥胖症(减肥):肾、输尿管、膀胱、脑垂体、(甲状腺)、甲状旁腺、肾上腺、心。
饮食规律,少食脂肪,多搞运动。
4、慢性腹泻:22肾、23输尿管、24膀胱、25小肠、26阑尾、27回盲瓣、28升结肠、29横结肠、30降结肠、31乙状结肠,直肠、32肛门、40下身淋巴、55腰椎、56骶椎。
注意饮食卫生,避免劳累和精神紧张。
5、便秘:肾脏、输尿管、膀胱、(小肠、升结肠、横结肠、降结肠、乙状结肠、直肠)、腰椎、骶骨、(内尾骨)、外尾骨,注意多吃蔬菜水果。
6、头痛: 肾脏.输尿管.膀胱.大脑.小脑脑干.三叉神经.鼻子.脾7、失眠: 肾脏.输尿管.膀胱.大脑.额窦.小脑脑干.脑垂体三叉神经.上腹神经丛.失眠区.梦区8、三叉神经痛:1大脑、3小脑及脑干、5三叉神经、9耳、53颈椎、66颈以上淋巴。
足反射疗法

足反射疗法一、什么是足反射疗法近年来国内兴起的足部反射疗法,在国际上通称为Reflexology,即反射学或反射法,是以反射理论为基础的一种医疗保健方法。
反射疗法是一个广泛的概念,但其最重要的分支,是足反射疗法,亦即以双足为施术部位的反射法。
由于双足在人体所处的特殊地位,使足反射疗法成为整个反射学的重要组成部分。
在足部每个反射区与人体的某一个脏腑器官相对应。
当某一个脏腑器官有了病变或者不正常的时候,在脚上相对应的反射区就会出现对压痛敏感,或颜色及外形的变化,或者其它的病理症候。
也就是说,我们的双脚上,存在着全身的信息,它就象人体的一个“早期警报系统”,随时用它自己特有的语言,告诉我们身体的那一个部位存在这问题,帮助我们发现疾病和诊断疾病。
另一方面,我们的双脚,又象是一部治疗机的终端,当我们对足部某一个反射区施加刺激的时候,我们手法所产生的各种刺激,通过神经反射作用,又可以调节与这个反射区相对应的脏腑器官,使它由不平衡转为平衡,由不正常转为正常,从而可收到保健与治病的效果。
二、足反射疗法的功效1、促进血液循环双脚处在人体最低下的部位,与心脏距离最远,很容易出现末梢循环障碍,供血不足,静脉回流不畅,一些新陈代谢的废料可能在足部积存下来,产生某种毒素,侵犯各个关节和器官,引起关节炎和一些器官的病变。
通过对足部施行反射法刺激,是足部的血液循环通畅,可带走在足部积存的代谢尾产物,运到肾脏处理后排出体外。
由于双足处于距心脏最远的一端,双足的血液循环改善,将促使全身的血液循环亦处于良好状态。
2、调节各脏腑器官的功能对足部反射区所施加的刺激,通过神经反射作用,能调整其所对应的脏腑器官的功能,延缓这些器官的衰老过程,是处于紊乱失衡状态的脏器功能转为正常。
例如,对足部的心反射区施加适当的刺激,能改善心脏的功能。
是心动过速、心动过缓或心律不规则的患者,恢复较正常的心律,比使用药物更为安全可靠。
3增强内分泌系统对足部各腺体反射区施加的刺激,能有效地调节各内分泌腺的功能。
足部反射区疗法
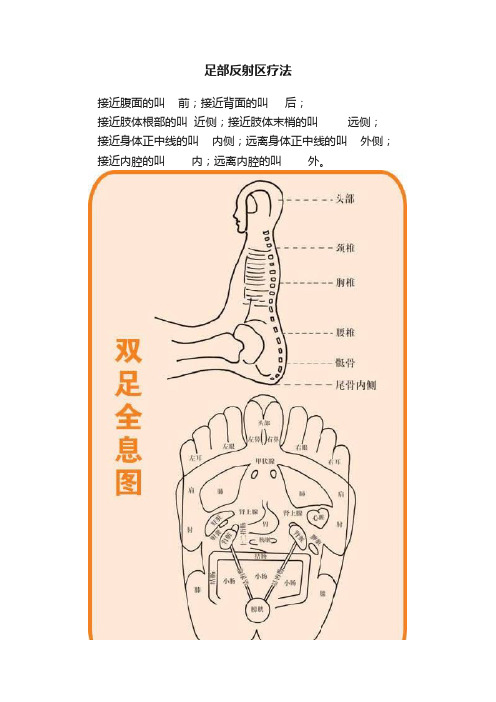
足部反射区疗法接近腹面的叫前;接近背面的叫后;接近肢体根部的叫近侧;接近肢体末梢的叫远侧;接近身体正中线的叫内侧;远离身体正中线的叫外侧;接近内腔的叫内;远离内腔的叫外。
足部按摩顺序:1.包脚、上油(虎口处上油,对掌搓至掌心发热)2.起始动作:双掌相对上下擦足底足背;双掌相对上下擦足内外侧缘;右手推抹足趾;双掌鱼际推抹足背;提抹足背足心(四指在足背,拇指在足底,向足趾方向提)3.基本反射区:肾、肾上腺、输尿管、膀胱、腹腔神经丛;4.脚趾:额窦、大脑、脑垂体、小脑脑干、三叉神经、颈项部、眼睛、耳朵;5.足底:甲状腺、甲状旁腺、斜方肌、肺、支气管、胃、胰、十二指肠、心脾(肝胆)、小肠(升结肠、横结肠、降结肠)、生殖腺。
6.足内侧:鼻、颈椎、甲状旁腺、胸椎、腰椎、尾骨、骶椎、子宫(川字形)、尿道、髋关节(半月形)、直肠、肛门、坐骨神经(小腿内侧)。
7.足外侧:肩、肘、膝、尾骨、生殖腺(川字形)、髋关节(半月形)、下腹部、坐骨神经(小腿外侧)。
8.足背:上下颌、扁桃体、胸腺、内耳迷路、喉、气管、食道、横膈膜、肋骨、肩胛骨、上下淋巴液、腹股沟9.基本反射区:肾、肾上腺、输尿管、膀胱、腹腔神经丛;10.结束动作:拿小腿腓肠肌;双掌相对搓揉脚趾内外缘;一手托足跟摇踝关节;单手掌背拍击足底;双掌来回拍击足背足部按摩视频:基本反射区肾上腺反射区位置:双脚掌第2跖骨与第3跖骨之间,足底部“人”字形交叉点凹陷处。
适应症:心率不齐、昏厥、炎症、过敏、哮喘、风湿病、关节炎、肾上腺皮质功能不全等。
膀胱反射区位置:内踝前下方双足足掌内侧舟骨下方。
输尿管反射区位置:双足足掌自肾到膀胱反射区之间的弧形线状区域。
足趾反射区额窦(鼻窦)反射区位置:十个足趾的趾端,右边额窦在左足,左边额窦在右足。
大脑反射区位置:双足趾趾腹全部。
脑垂体反射区位置:大脑反射区深部,双足趾腹中央部位。
鼻反射区位置:双足大脚趾趾腹内侧延伸到大脚趾指甲根部,第一指关节。
足部反射疗法
足部反射疗法—足诊一、概述足诊是中医学的一种重要的诊断方法,它与中医学常用的头诊、面诊、鼻诊、耳诊一样,但因多方面的原因已频临失传。
近年来,由于足部反射区按摩法国际性兴趣起、发展、推广,足诊又以其独特的功效开始成为引人注目的一种诊断方法。
但此足诊参考资料,不作医学临床诊断标准!二、足部反射疗法的有痛诊断法“痛则不通,通则不痛”这是中医经络学的原理之一。
判断反射区疼痛的意义,是一个较为关键的问题。
否者诊断就易造成误诊、漏诊。
要重视问诊、望诊。
宾客的主诉,包括既往史、家族史、年龄、一般状态、体质、营养状况、体位(体味)、必要的常规化验、生理化验、X线、B超、CT等检查。
三、足部反射疗法的无痛诊断法1、足部望诊的内容包括:足部色诊和足部形诊两部分。
A、正常趾甲应透明有光泽,是健康的象征;B、趾甲有纵沟,不平薄软,剥脱为人体营养不良的表现;C、趾甲畸形,如嵌甲为神经系统有病及失眠;D、趾甲下有一条或数条纵行黑线为内分泌失调、痛经、月经紊乱;E、趾甲青紫说明人体循环系统有障碍;F、趾甲下有瘀斑说明有出血性隐患;G、趾甲变形说明脏腑功能失调;H 大脚趾饱满红润,趾甲正常表示人体的功能正常;I、大脚趾偏歪为脏腑失调的表现;J、大拇趾肿胀为糖尿病;H、右足第五趾的趾关节部出现鸡眼,为肩部出现疾病;L:双足大拇趾干瘪无力,则提示该人长期患失眠症、神经衰弱等神经系统疾病;M:左脚的拇趾比右脚的拇趾大,表示此人患有偏食、糖尿病、月经不调、长疙瘩的疾病;N:拇趾浮肿的人,表示有高血压、糖尿病的倾向;O、扁平足可由于骨骼、韧带、肌肉受损及先天性发育不良所引起;P、足底拇指趾关节处趾骨突起为颈椎病;Q:足部反射区长鸡眼、硬结、往往表示相对应的器官有慢性病变;R:足部皮肤出现干瘪皱褶,提示该人的新陈代谢障碍,胃肠功能差,内分泌失调;2、切诊——四种异常现象。
(1)气感(气泡、水流感)气感的产生是由于局部血液循环障碍,供氧不良,以致二氧化碳不能交换代谢排出,在组织细胞中含有二氧化碳,当我们用手指向一个方向推压时,将气体趋赶集中,气体集中膨胀,手才能感觉到气体的存在,患者也会感到有明显的疼痛。
足反射疗法操作指南
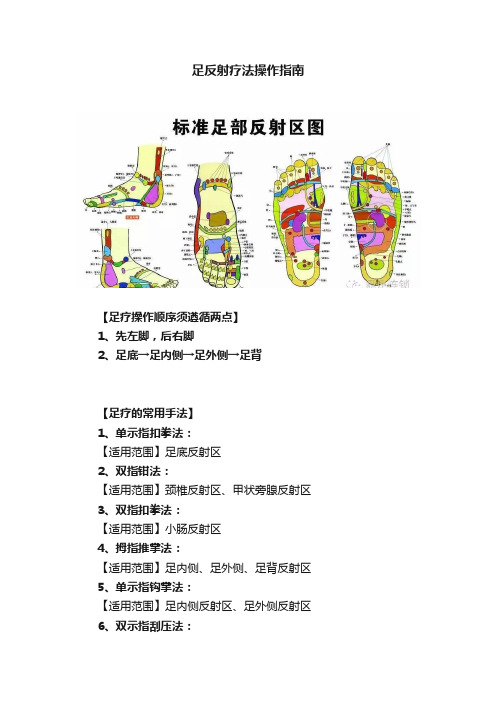
足反射疗法操作指南【足疗操作顺序须遵循两点】1、先左脚,后右脚2、足底→足内侧→足外侧→足背【足疗的常用手法】1、单示指扣拳法:【适用范围】足底反射区2、双指钳法:【适用范围】颈椎反射区、甲状旁腺反射区3、双指扣拳法:【适用范围】小肠反射区4、拇指推掌法:【适用范围】足内侧、足外侧、足背反射区5、单示指钩掌法:【适用范围】足内侧反射区、足外侧反射区6、双示指刮压法:【适用范围】适用于横膈膜反射区7、双拇指指腹推压法:【适用范围】肩胛骨反射区、胸反射区8、拇指腹按压法:【适用范围】腹股沟、肋骨、上(下)身淋巴腺反射区左足反射区1、心脏:位于左足底第四、五跖骨体间,在肺脏反射区下方。
【功用】补心益气,生血。
2、肾上腺:位于双足足底第二、三跖骨体之间,距跖骨头近心端一拇指宽处。
【功用】补肾填精,活血祛风,抗休克,抗过敏。
3、肾:位于双足足底第二、三跖骨体之间,近跖骨底处(肾上腺反射区下一横指)【功用】补肾填精,壮阳,温精通脉,醒神开窍,清热利湿,利便通淋。
4、输尿管:位于双足足底自肾脏反射区斜向内方,至足舟骨内下方,呈弧形带状区。
【功用】通淋排石,清热利湿,泻火解毒。
5、膀胱:位于双足内踝前方,足舟骨下方,踇展肌内缘旁。
【功用】清热泻火,通利小便,解毒。
6、额窦:位于双足10个足趾趾端。
【功用】清热疏风,通络止痛。
【手法】(踇趾)自外侧向内侧横向按摩。
(其它足趾头)从趾端向趾根方向按摩。
7、垂体:位于双足踇趾趾腹中央部位。
【功用】调节内分泌,平衡阴阳。
8、小脑及脑干:位于双足踇趾腹根部靠近第二趾骨处。
【功用】疏经通络,解除紧张,调节身体平衡。
9、三叉神经:位于双足踇趾近第二趾的一侧。
【功用】疏风清热,通络止痛。
10、鼻:位于双足踇趾远节趾骨内侧,自踇趾趾腹边缘延伸到踇趾趾甲根部呈L形。
【功用】清热,疏风,通鼻窍。
11、头部(大脑):位于双足踇趾的趾腹全部。
【功用】平肝潜阳,清头明目,镇静安神,疏经通络12、颈项:位于双足踇趾趾腹根部横纹处。
足部反射区疗法原理

足部反射区疗法原理足部反射区疗法原理在人类进化过程中,双脚扮演了重要角色,从猿进化为人,是从步行开始的,因而扩大了眼界,促进了脑髓发育,推动了感官和意识发展。
双脚是人体运动和负重器官。
承受身体全部重量。
人体有206块骨头,双足有52块,占全身骨数量的25%。
双足有66个关节、38条肌肉、214条韧带,错综复杂地互相连接,相互作用;协调支撑人体,走、跑、跳、踢、蹬完成各种动作。
从动物演化成人,在漫长的过程中,人类在赤脚状态下生活。
双脚受大脑支配,完成各种动作,把接触的信息传递给大脑。
全身359个穴位,足部有66个,足部有86个反射区。
人体十二正经中,有六条经脉分布到足部,足部为足三阴经之始,足三阳经之终,与手三阳经、手三阴经相连属,循行全身。
长期演化使足部分布了人体最典型的全息穴位群(即反射区),每一侧足部分布有7200个以上神经末梢,负责与大脑信息传递。
人体各部位器官,在足部均有对应区域,真实而及时地反映所对应器官的功能状况。
人体生理活动依赖体内能量流动,体内能量(中国人解释为真气或元气)本应在经络中或通路中顺畅流动。
但因为紧张、压力、疾病、外伤等而阻滞不畅,使人致病。
足部反射区疗法用适当手法或相关器械,对双足反射区进行按摩、刺激,疏通通路,恢复能量流动,促进自身修复能力,改变器官功能,重建人体平衡和谐。
足部反射区疗法原理有:一、阴阳平衡原理物质的运动在阴阳相互制约下进行。
在平衡与不平衡变化中循环往复。
人体疾病的发生、发展是由于阴阳的平衡被打破所致。
足部反射区与机体各脏腑器官有密切联系,对反射区进行按摩刺激。
可调节机体达到新的平衡,消除疾病,恢复健康。
二、经络原理中医认为,人体存在一个经络系统,将脏腑组织器官联系为一个有机整体,维系气血运行,使各部位功能协调平衡。
主要是十二正经和奇经八脉。
其中足太阴脾经、足少阴肾经、足厥阴肝经、阴维脉、阴跷脉起于足部;足阳明胃经、足太阳膀胱经、足少阳胆经、阳维脉、阳跷脉终止于足,都通往特定的脏器。
足底部反射区操作方法
足底部反射区操作方法足底部反射区操作是一种中医疗法,旨在通过刺激足底上的反射区来促进身体的自愈和健康。
其理论基础是“身体的各个器官和组织都有反射点,这些反射点集中在身体的特定部位,如足底,按摩这些反射区可以刺激对应部位的能量流动,从而调整和平衡身体的功能”。
足底部反射区操作顾名思义就是通过按摩、刺激足底上的反射区域来达到疗效。
一般而言,足底上的反射区域与身体的各个器官、组织和系统有着相关性。
按摩这些反射区域可以促进血液循环,增强免疫力,缓解疼痛,调节内分泌等。
下面介绍一下足底部反射区操作的具体方法:1. 准备工作首先,洗净双脚,用暖水泡脚10-15分钟,热水可以帮助放松脚部肌肉,加大经络的血液流通。
然后用毛巾把脚擦干净,可以使用适量的按摩油来增加按摩的滑动感。
2. 足底按摩技巧按摩手法要轻柔、放松,可使用手掌、拇指、食指等部位进行按摩。
可以沿着脚背到脚心的方向进行来回推压按摩,也可以以旋转、揉捏、挤压等方式进行操作。
在进行按摩时,按摩的力度要适中,不宜过强以免造成不适。
3. 反射区域的刺激按摩时应重点刺激足底上的反射区域。
一般按摩的起始点是脚背,从脚顶到脚跟慢慢进行按摩,然后进入足底的刺激。
按摩的时候要特别关注各个反射区域,包括头部、颈部、胸部、腹部、肾脏、肝脏、胆囊、肠胃等器官和组织的反射区。
可以根据需要在病症或不适的地方重点按摩。
4. 持续均匀按摩足底按摩应持续一段时间,不可急于求成。
按摩时间一般建议为20-30分钟,每天进行1-2次。
持续均匀的按摩不仅可以刺激全身的反射区,还可以放松身心,达到舒缓疲劳的效果。
5. 结束后的护理按摩结束后,可以用热毛巾敷在足底,或者再次放入温水中泡脚,以起到舒缓和放松的作用。
这样可以让血管舒张,促进血液和能量的流通。
需要注意的是,足底部反射区操作虽然是一种安全有效的疗法,但并非适用于所有人群。
如孕妇、严重心脏病患者、严重高血压患者、皮肤损伤或有感染的人等应避免或谨慎操作。
足疗中反射区及操作流程ppt课件

足掌背→抖下肢→拍脚
背。→双脚:双臂摇
橹→搓小腿结束。
第七章 足部反射区
❖ 肾脏
❖ 生理功能:人体重要的排泄器官,主要的生理功能是形成尿液, 它以尿的形式排泄人体代谢过程中产生的废物(尿素、尿酸等) 和多余的水分以保持体内细胞生活环境的相对平衡和人体代谢的 正常运行,尿形成以后由输尿管输送到膀胱内储存,当膀胱内的 尿量储存到一定量的时候再由尿道排除体外。
❖ 定位:位于双足底踇趾基底部的中间偏外侧; ❖ 功效:调节内分泌、平衡营养; ❖ 适应症:各种内分泌失调,发育不良、智力发育不全、遗尿、更
年期综合症、糖尿症、高血压; ❖ 按摩手法:由上向下深入定点按压3-5次;
三叉神经
❖ 生理功能:是面部感觉神经,指挥咀嚼肌的运动神经,支配 眼部、上下颌、口腔、颜面皮肤、肌肉运动以及感觉
❖足内外侧:颈椎→胸椎→腰椎→骶骨→尾骨内侧→前列腺或 子宫→外侧生殖腺→膝→肘→肩→足背:鼻(右侧)→上颌→ 下颌→扁桃腺→喉与气管及食管→胸部淋巴腺→胸→内耳迷路 →肩胛骨→横膈膜→肋骨→上身淋巴腺→下身淋巴腺→髋关节 →腹股沟→下腹部→小腿部直肠及肛门→基本反射区→放松手 法(如金鱼摆尾→拍脚背)→用毛巾把左脚包好。 ❖(4)右脚:同左脚顺序,仅左脚“心、脾”反射区换成右脚 “肝、胆”反射区。
❖ 注:基本反射区有的地方只有肾、输尿管、膀胱三个反射区, 有的为肾上腺、肾、输尿管、膀胱、尿道(阴茎或阴道)五 个反射区,这里的六个反射区是按《足部按摩师职业技能鉴 定教材》(2002.06,中国劳动社会保障出版社)取的。
用足部反射区治疗的通用方法

用足部反射区治疗的通用方法
采用足部反射区疗法治疗疾病,最关键的问题是找准痛点。
按压痛点有针刺般的痛感,按压其他部位只是酸痛。
第一种方法就是具体反射区法,通过对病痛反射区的刮压找到颗粒、结节、条索、硬块,对其刮压锥揉达到治疗的效果。
比如胃痛,在胃区一定有颗粒或结节,通过对其刮压锥揉胃痛也就缓解或消失了。
第二种方法就是整体疗法。
通过对全脚的反射区逐一刮压锥揉达到治疗的效果,这种方法对亚健康人群比较适用。
如采取全足按摩,一般先从左脚开始,按摩三遍肾- 输尿管- 膀胱三个反射区后(为了打通排毒通道),按脚底- 脚内侧- 脚外侧- 脚背的顺序进行,按着由脚尖到脚踝,由小腿到脚踝的方向。
结束时再将肾- 输尿管- 膀胱三个反射区按摩三遍。
然后再按上述次序按摩右脚。
按摩时,大的次序不能乱,小的变动是允许的。
重点按摩时,大致上也是按照基本反射区- 主要反射区- 相关反射区- 基本反射区的顺序进行。
按摩的力度;力度大小要适当、均匀,可以使用刮痧板。
所谓适
当,以“得气”即使患者有酸痛感为原则,根据患者对痛觉的敏感程度、病情、反射区的部位适当掌握,以患者能承受为度。
对于敏感点要到位锥揉,怕痛就用水滴石穿的方法慢慢渗透。
但并不是越痛越好。
掌握分寸不容易,需要在实践中慢慢体会。
所谓均匀。
指按摩力量要慢慢渗人、缓缓抬起,并有一定的节奏,不可忽快忽慢,时轻时重。
按摩的补泻手法:按照“实者泻之,虚者补之”的原则,对实证,体质较好的患者可采用较强的刺激手法;对虚证,病重体弱的患者用弱刺激手法,延长疗程,使患者的内部机能逐渐恢复。
- 1、下载文档前请自行甄别文档内容的完整性,平台不提供额外的编辑、内容补充、找答案等附加服务。
- 2、"仅部分预览"的文档,不可在线预览部分如存在完整性等问题,可反馈申请退款(可完整预览的文档不适用该条件!)。
- 3、如文档侵犯您的权益,请联系客服反馈,我们会尽快为您处理(人工客服工作时间:9:00-18:30)。
Appendix 2. Foot reflexology procedures Reflexology sequence outlineThe researcher follows Farnsworth’s method, taught to the researcher at the Australian College of Tactile Therapies. This method is similar to Ingham’s method. We will start at the right foot as follows:Relaxing techniques1.Ankle stretch ‘under’2.Ankle stretch ‘over’3.Ankle loosening4.Side to side5.Spinal stretch6.Metatarsal knead7.Diaphragm relaxer8.Toe rotation (Farnsworth, p 11-4)Working the spine1.Toe walk up sacral-coccyx zone2.Toe walk up lumbar zone3.Toe walk up thoracic zone4.Finger walk up cervical zone5.Toe walk down thoracic zone6.Toe walk down lumbar, sacral-coccyx zone7.Spinal stretch and metatarsal knead (Farnsworth, p 11-4)Working the lungs1.Diaphragm relaxer then toe walk from medial metatarsal upwards fromdiaphragm to base of toes2.Do five plantar zones in between metatarsals, repeat other hand, back to startmetatarsal knead3.Finger walk dorsal five zones in between metatarsals with thumb in fist medial tolateral4.Change hands, repeat lateral to medialWorking the toes1.Toe walk sideways over throat-thyroid reflex both ways2.Finger walk cervical while stretching toe with holding fingers3.Toe walk down large toe plantar side latched onto fingers, work medial to lateralall toes latched onto fingers, work medial to lateral all toes to their roots4.Repeat other coming back to start (use other hand)5.Hook in and back up on pituitary with medial thumb6.Working the brain7.Toe walk the ridge (eye and ear reflexes) both ways using lateral aspect or edgeof thumbs pulling down padding8.Side to side relaxer9.Metatarsal knead (Farnsworth, p 11-4 – 11-5)Working the digestive system1.Toe walk waistline to diaphragm, cross hatch in both direction with foot indorsiflexion2.Wring out with thumbs3.Toe walk waistline to heel line, cross hatch in both directions with foot indorsiflexion and wring out with thumb4.Work the adrenal gland5.Work the ileocecal valve reflex hook in and back up right foot6.If on left foot cross hatch plantar heel zone working the sigmoid flexor threeways with thumb then hook in and back up7.Side to side relaxer (Farnsworth, p 11-5)Working the lateral and medial heel areas1.Finger walk lateral hip, knee, leg reflex zone2.Change hands and finger walk same reflex from dorsal side to plantar side3.Finger walk hip, sciatic reflex around external malleolus4.Change hands and finger walk same reflex going opposite direction underneath5.Change hands pin point…with index finger rotate clockwise on lateralreproductive reflex6.Ankle loosening7.Dorsiflex foot, toe walk medial Achilles tendon three times8.Reflex rotate using thumb as a fulcrum on medial reproductive reflex9.Ankle loosening10.Finger walk across ankle medial to lateral and lateral to medial11.Finish with full range of relaxing techniques (Farnsworth, p 11-5)Details of each procedure are described below. Before using the procedures, the reflexologist has to understand how to hold the client’s foot and how to use thumb and fingers effectively.Basic holding techniqueThe heel of the holding hand will be placed firmly on the metatarsal pad of the footwith the fingers relaxed over the toes and the thumb on the medial edge of the greattoe or the small toe…drop the wrist slightly to relax the longitudinal tendon of thefoot, this gives you control over the foot and allows you to push the foot back or tobring it forward using the natural spring of the ankle joint (Byers 2001, p 27).Picture 1Basic holding techniqueThe inside (medial) edge of the thumb is the used part, ‘…walk the thumb by slightly bending and unbending the 1st joint…it will “creep” forward in this natural position…taking tiny bites…like a snail who leaves a steady, even trail…’ (Byers 2001, pp 28-29).LeverageThis technique helps you to put effective pressure on each area of the foot.‘…place the fingers of your working hand firmly underneath [each area] for leverage in opposition to your thumb and do the walking motion with your thumb, letting the fingers follow along as you move (Byers 2001, p 28).Picture 3Basic thumb walking techniquePicture 2Position for the basic thumb techniquePicture 4LeverageInside medialThe same as the thumb technique, taking creeping motions by smaller and smaller bites and exerting a constant and steady forward pressure…the finger always moves in a forward direction, never backwards or sideways…the index, third and fourth fingers can walk individually or together…we use …[this technique] to work certain areas which could not be worked as effectively by using the thumbs (Byers 2001, p 30).Hook-in, back-up technique or bumblebee actionUsing the thumb technique…bend the 1st joint of the thumb slightly and exert pressure with the medial (inside) corner of the thumb…on the reflex point, push in and bend the thumb to approximately a 90º angle as you drop the wrist…(Byers 2001, p 31).Picture 5Basic finger walking techniquePicture 6Hook-in, back-up[This] technique is a valuable aid in working particularly tender areas…use thebasic holding position with the holding hand and flex the foot slowly onto thethumb, flex several times; this gives increased pressure at the reflex point…(Byers 2001, p 32).Picture 7Pivot point techniqueRelaxing TechniquesAnkle stretch ‘under’Support the right heel with the left hand with your thumb around the outside of the ankle, just below the ankle bone…grasp the top of the foot in your other hand and gently rotate it a few times in one direction, then a few in the other (Lidell 1984, p 137).Picture 8Ankle stretch ‘under’Ankle stretch ‘over’Place the …[right] hand with the fingers together over the dorsal side of the footwith the webbing between the thumb and fingers over the ankle joint where the foot is joined onto the leg; the rest of the fingers are wrapped around the leg, place the heel of the…[left] hand on the plantar surface of the foot…push the foot backfirmly with the heel of the hand and let it return, in a slight oval motion, via its own natural spring (Byers 2001, p 35).Ankle looseningPlace the heel of the hands below the anklebone, one on the medial side and one on the lateral side, then move the hands rapidly back and forth, the hands will be going in the opposite direction from each other, the foot will shake from side to side(Byers 2001, p 34).Picture 9Ankle looseningSide-to-side (back and forth)Place the center of the palms of the hands, one on the medial side on the 1stmetatarsal head and one on the lateral side on the 5th metatarsal head, with thefingers relaxed, and then move the hands rapidly back and forth (Byers 2001, p 33).Picture 10Side–to-sideSpinal twist/stretchPlace the hands together with the palms facing down and index fingers touchingeach other; the thumbs will also be down, with the foot tipped out, place the hands as a unit firmly around the foot, with the webbing between the thumbs and fingers placed in the spinal reflex area and the thumbs on the plantar surface of the foot, the center of the two hands will be placed on or slightly above the pelvic guideline,keeping your arms straight and then drop your wrists, the hand should be used as a unit keeping all the fingers together and the hands touching at all times, the handclosest to the heel will remain stationary and firmly support the foot, while the other hand will twist slowly and smoothly back and forth as far as possible in eachdirection, after several movements, slide the two hands together gradually inching toward the toes and continue the twisting movement …keep the hand toward theheel stationary and firm at all times, continue this process until the hand nearest the toes is over the great toe (Byers 2001, p 34).Picture 11Spinal twistMetatarsal kneadingPlace the fingers of the right hand (holding hand) on the dorsum of the foot from the medial side, with the index finger placed just below the base of the toes and thethumb in a vertical position resting in the medial edge of the foot…with the lefthand make a fist with the flat part placed against the plantar surface of the foot(metatarsal area) directly opposite the right hand, first push the fist against themetatarsal pad, then …knead with the holding hand release a little pressure with the fist…keep both hands in contact with the foot at all times…[and] repeat severaltimes. (Byers 2001, p 33).Diaphragm/solar plexus tension relaxerStarting on the medial side of the foot, place the slightly bent working thumb on the base of the metatarsal head, grasp the foot at the base of the toes with the holding hand, making sure the thumb and index finger are placed around the great toe; it is important that the holding hand is placed squarely over the toes and not to the side, lift the foot with the holding hand and then pull the metatarsals onto the thumb (applying extra pressure with the thumb); the pressure of pulling fingers should be on the dorsum of the foot at the base of the toes; when pulling the toes onto the thumb, the heel of the holding hand should come slightly away from the plantar surface, be careful not to bend the toes while doing this; the thumb should then take one small sideways step toward the lateral side and continue this process across the entire diaphragm/solar plexus reflex, repeat the process several times, continue until you reach the lateral edge (Byers 2001, p 38).Picture 12Metatarsal kneadingPicture 13Diaphragm/solar plexus relaxation techniqueToe rotationHold the base of the toe you wish to rotate firmly with the thumb and fingers of the holding hand, the thumb on the plantar surface and the fingers on the dorsal surface, take the thumb and 1st two fingers of your working hand and place them over the toe all the way to its base, with a slight lift, rotate each toe, first in one direction several times, and repeat in the opposite direction (Byers 2001, p 37).Picture 14Toe rotationWorking the spinal reflexStart by working the sacral/coccyx area, roll the thumb over the edge of the heel(often a callused area) and walk up approximately one half inch towards theleg…then start by using the right thumb and begin to walk up the sacral/coccyxreflex from the base of the heel to approximately the pelvic guideline or as far as the hand can reach, repeat several times on a slightly different path, covering all sides of the reflex and never losing contact with the foot, work the lumbar reflex by placing the fingers over the top of the foot and the thumb remains approximately on thepelvic guideline, walk up the lumbar reflex to the waistline guideline and thencontinue walking the thoracic reflex until reaching the 7th cervical reflex, locatedbelow the base of the great toe…repeat several times…use the index finger whenworking the cervical reflex for an extra fine treatment, start by supporting the foot with the fingers of the left hand which are placed over the toes and hold the greattoe firmly with the thumb and index finger, the working hand then supports the foot with the thumb and the 3rd, 4th and 5th fingers while the index finger walks from the base of the great toe to the base of the nail, repeat this several times…[after that]working down the spinal reflex by supporting the foot on the metatarsal pad withthe fingers pointing upwards and bent at the knuckle joints, use the thumb of theworking hand to walk all the way down the spinal reflex, repeat several times usinga slightly different path each time (Byers 2001, p 53-55).CervicalThoracicSacral Coccygeal Picture 15Curves of the spine and footCervical (7) Thoracic (12) Lumbar (5) Sacrum/ coccyx Picture 16The spinal reflex compared to the spinal vertebraeLumbarPicture 17Working across the sacral~coccyx reflex Picture 18Working up the sacral~coccyx reflexPicture 20Working up the thoracic reflex Picture 19Working up the lumbar reflexLung reflexFirst, work the plantar surface of the foot…use the basic holding position, tilt the foot slightly outwards and gently spread the toes, using the right thumb, apply the basic thumb technique, work up the grooves formed by the bones between each toe, starting with the groove between the great toe and the 2nd toe…separate the great toe and the 2nd toe with the holding hand in order to open the grooves properly, after several passes up this area, proceed with the same technique in the groove between the 2nd and the 3rd toes, then the 3rd and 4th toes, and then the 4th and 5th toes, change hands and with the left thumb, work back in the opposition direction starting with the groove between the 4th and 5th toes…work this same area on the dorsal surface of the foot, this area may be very tender and should be worked very gently at first…working just to the client’s discomfort tolerance, start with the right foot using the right hand as the working hand, place the left fist (holding hand) in thePicture 21Working up the cervical reflexPicture 22 Working across the cervical reflexmetatarsal padding of the foot, then place the thumb of the working hand on the index finger of the holding hand for leverage and work down the dorsum of the foot with the medial corner of the index finger, work in the groove between the great toe and the 2nd toe, making sure the fist is pushing the foot back as this will spread the region while working, line up the 1st knuckle of the fist with the groove you are working, this enables the working finger to line up with that groove, work this area several times and then move to the following grooves repeating this procedure with each groove, change hands and repeat this procedure in the opposite direction (Byers 2001, pp 102-103).Picture 24 Working the lung/breast reflex (dorsal surface)Picture 23 Working the lung reflexPicture 25Thyroid and parathyroid gland reflexesSince the thyroid gland is located at the base of the neck area, the reflex area will be located at the base of the great toe, to work this area effectively…use the thumb of the holding hand to spread the great toe so that it may be worked on effectively by the thumb of the working hand on those of the holding hand; using the basic thumb technique, make several passes, walking across the base of the great toe from the medial side to the lateral side, change hand and come back in the opposite direction in the same manner; this, of course, is done in order to completely cover thecomparatively wide reflex area for the thyroid gland reflex; working several passes in one direction and then changing hands to work in the opposite direction will give you complete coverage of the thyroid reflex area; this will also include theparathyroid gland reflex since they are buried in the thyroid gland (Byers 2001, p 145).Picture 27 Working the thyroid reflex lateral to medial Picture 26Working the thyroid reflex medial to lateralSinus reflexesStarting on the right foot, use the right hand as the working hand and the left as the supporting hand, place the fingers of the supporting hand horizontally across the dorsal surface of the toes, with the index finger level with the tip of the toes, place the fingers of the working hand over the outside of the supporting fingers; the first two fingers of the working hand should be over the first two knuckles of the supporting fingers for leverage, using the basic thumb technique and starting with the great toe, work down the middle and lateral edge of each toe from its tip to its base, the working hand and the holding hand move together as a unit as you move from toe to toe; remember, the first fingers of the working hand should be over the first two knuckles of the supporting fingers…work each toe several times and take about 6 to 10 small bites down the toe, then change hands and repeat this process with the left thumb, starting on the small toe, always work down the middle and then the medial edge of each toe to its base…(Byers 2001, pp 104-105).Picture 29Leverage for working the sinus reflexPicture 28 Working the sinus reflexPituitary gland reflexTo pinpoint the pituitary reflex…always look for the widest point on both sides of the great toe and then draw an imaginary line from point to point…the pituitaryreflex will be found at the midpoint of this hypothetical line…this midpoint should be close to the center of the great toe…when working on the right foot that you use the right hand, and on the left foot you use the left hand; the holding hand will be used to support and protect the great toe, always cover the toes with the fingers of the holding hand, use the fingers of the working hand for leverage; the leveragefingers are always on the outside of the holding hand; this is done to prevent anyinjury or unnecessary pain to the top of the great toe…always use the medial corner of the thumb of the working hand by utilizing the hook-in, back-uptechnique…remember the bumblebee who sits down and backs up…making 3 or 4 working contacts with this area…(Byers 2001, p 143).Picture 30Locating the pituitary gland reflexWorking the brainHold the right great toe with the thumb and index finger of the right hand, the 1st joint of the index finger of the left hand will be resting on the tip of the thumb, this stabilizes the index finger which is used to work across the tip of the great toe in a rolling motion with the wrist, start with the lateral edge of the tip of the index finger and rill across the tip of the great toe, pick up the index finger and move to where you finished and repeat this process until the entire tip of the great toe is covered, repeat this entire process several times on both feet (Byers 2001, p 50).Picture 31Working the pituitary gland reflexstarting positionPicture 32Working the pituitary gland reflex hook in ,back~up techniquePicture 33Working the brain reflexEye and ear reflexStart on the right foot with the right hand as the working hand, the fingers of the left hand (holding hand) are placed on the dorsum of the foot opposite the thumb…flat against the metatarsal area along the plantar surface of the foot, place the rightthumb of the working hand on the ridge making sure to use the lateral edge of thethumb, the ridge is formed where the base of the small toes meet the metatarsalpadding…the thumb will walk from medial to lateral in a forward motion across this ridge starting at the base of the second toe and continuing to the lateral edge of the foot…the walking motion must be one in which the thumb walks all the way across the base of the small toes, is picked up, comes back and starts over…with thepressure of the thumb exerted downward toward the heel…repeat several times,then change hands and walk in the opposite direction several times (Byers 2001, p 92-93).Stomach reflexThe largest part of the stomach reflex is going to be found on the left foot…located below the diaphragm guideline of the foot and above the waistline guideline…start with the left hand on the left foot and work from the waistline guideline in a criss-cross motion up to the diaphragm guideline and cover the entire region, use the basic holding technique, then change hands and cone back in the opposite direction, giving the ‘criss-cross’ effect (Byers 2001, p 117).Picture 34Working the eye and ear reflex medial to lateralPicture 35Working the eye and ear reflex lateral tomedialPicture 36 Stomach reflex (left foot)Picture 37Working the stomach reflexLiver reflexThe liver reflex is on the right foot…the reflex area covers the space from thewaistline guideline to the diaphragm guideline from the medial to the lateral side of the right foot…start with the right hand and work the area towards the diaphragmguideline using the basic holding technique…then come back over the area, change hands, and walk across the area in the opposite direction angling towards thediaphragm guideline (Byers 2001, p 118).Gallbladder reflexGenerally, the gallbladder reflex will be around the 3rd or 4th zone above thewaistline guideline approximately a third of the way to the diaphragm guideline;simultaneously, while working the liver reflex you are going to be working thegallbladder reflex, the gallbladder reflex can also be located on the dorsal surface of the foot just opposite the reflex site on the plantar surface (Byers 2001, pp 118-119).Picture 38Liver/gallbladder reflexPicture 39Liver/gallbladder reflex (dorsal surface)Pancreas reflexThe reflex area for the pancreas is found on both feet, but mainly on the left foot and is located slightly above the guideline to the waist to approximately half way to the diaphragm guideline; to work this area, use the basic thumb technique with the left hand, in tiny caterpillar bites, while using the basic holding technique with the right hand; after several slow and complete passes from the medial to the lateral side, change hands and work in the same manner from the other direction; on the right foot the reflex will be slightly below the waistline guideline (Byers 2001, p 119).Picture 41Working the gallbladder reflex (dorsal surface)Picture 40Working the liver reflexPicture 42Pancreas reflexPicture 43Working the pancreas reflex (left foot)Adrenal gland reflexThe adrenal gland reflexes are located in the area halfway between the waistline guideline and the diaphragm guideline, on the medial side and next to the protruding tendon; work the adrenal gland reflex by holding the foot with the heel of the holding hand in the metatarsal padding and the thumb on the great toe, which, when pushed back, extends the tendon for a landmark; use the right hand to work on the right foot and the left hand for working on the left foot, using the basic thumb technique, walk slowly from the waistline guideline toward the diaphragm guideline; when approximately halfway up this area, you will find a very sensitive area (adrenal gland reflex) on the medial side of the foot right next to the protruding tendon…you may also use the pivot rotation technique to work this all important reflex…hold the thumb on the exact reflex area and then flex the foot back and forth on the pivot of the thumb; be careful not to exert too much pressure initially, rather work up to the desired pressure (Byers 2001, p 146).Picture 45Working the adrenal gland reflex usingpivot point techniquePicture 44Adrenal gland reflexSmall and large intestine reflexesStart on the right foot with the left hand using the basic holding position, working the area from the waistline guideline to the pelvic guideline for both the large and small intestines, work across this area first with the right hand and then the left hand with the basic thumb technique using the criss-cross method (Byers 2001, p 121).Ileocecal valve reflexThe ileocecal valve reflex is always worked by using the hook-in, back-up technique; this reflex area is found on the plantar surface-lateral side (little toe side) of the right foot, below the waistline guideline. To locate this reflex, use the basic holding technique with the right hand and use the left thumb as the working hand, run the thumb down the lateral edge of the right foot between the waistline guideline and the pelvic guideline into the deepest part of the curve which is about halfway between the two guidelines; once located, place the thumb in a horizontal position, roll it from the edge of the foot straight around into the reflex, make sure the thumb is bent at the first joint and use the wrist to hook-in, back-up; this reflex will be fairly close to the lateral edge of the foot on the plantar surface between the 4th and 5th zones (Byers 2001, p 121).Picture 47Working the ileocecal valve reflexPicture 46Ileocecal valve reflexSigmoid colon reflexThe way to locate the sigmoid flexure, a pin-point reflex, is to begin on the medial side of the left foot where the heel guideline and the spinal reflex intersect…fromthis point, angle down at approximately 45º to where the 3½ zone line intersects that angle…use the basic holding technique, tip the foot out with the right hand, the left thumb will walk down the 45º angle from the pelvic guideline to where the linesintersect (3½ zone line) and apply the hook-in, back-up technique…after working the whole line downward and using the left thumb for the hook-in, back-uptechnique, change hands and place the heel of the left foot in the palm of the lefthand; tip the foot out in a comfortable position and put the fingers of the working(right) hand around the ankle for leverage, making sure the index finger is placedunder the anklebone; this prevents contortion of the thumb joint; starting on themedial point of the pelvic line, walk the thumb down at a 45º angle to this pin-point reflex, stop, hook-in, back-up and then repeat the process several times…(Byers2001, pp 122-123).Picture 48 Sigmoid flexure reflex (left foot) Picture 49Working the sigmoid flexure with the left handPelvic reflexWork the pelvic area by keeping the foot back and straight, using the basic holding technique, place the thumb of the working hand on the heel for leverage, using all fingers, work the entire pelvic area in many directions by changing the angle of the wrist (Byers 2001, p 57).Picture 50Working the sigmoid flexure with the right hand, starting positionPicture 51Working the sigmoid flexure,hook-in, back-up techniquePicture 52Working the pelvic reflex areaKnee/leg reflexTo work this reflex, the fingers can be used very effectively and thus save the thumb form overuse, use the basic holding technique, place the fingers of the left hand on the lateral edge of the dorsal surface and the thumb on the heel area for leverage, walk the fingers in several directions by changing the angle of the wrist, use the index finger, middle finger or both fingers simultaneously to work this area, also use the alternate hand and come over the top of the foot working toward the lateral edgewith the fingers (Byers 2001, p 57).Picture 54Working the pelvic area using thepivot rolling techniquePicture 53Working the pelvic area using the pivot rolling techniqueHip/sciatic reflexPlace the heel of the right foot on the 3rd and 4th fingers of the left hand with the index finger resting underneath the lateral side of the anklebone and the thumb on the bottom of the heel for leverage, place the holding hand on the metatarsal padding, keeping the foot back and straight, walk with the index finger in a forward motion angling at an approximately 45º angle into the anklebone, go approximately one quarter to one half inch, stop, lift up, come back and start over, repeat this process several times, change hands, then place the right heel on the palm of the right hand with the 3rd finger resting under the anklebone on the lateral side of the foot, walk it toward you, about one quarter to one half inch, this time the left holding hand will be placed on the metatarsal pad holding the foot back and straight (Byers 2001, p 55).Picture 55Working the knee reflexPicture 56Working down the knee reflex。