Python在ABAQUS二次开发中的应用实例.ppt
abaqus python二次开发入门案例
Abaqus是一款强大的工程仿真软件,而Python则是一种高效、易学的编程语言。
通过Python 对Abaqus进行二次开发,可以大大提高仿真效率。
以下是Abaqus Python二次开发入门案例的步骤:
安装Abaqus和Python
首先需要安装Abaqus和Python。
Abaqus可以从官网下载安装包,而Python则可以从官网下载安装。
了解Abaqus Python API
在Abaqus中,Python API是用来编写脚本和插件的工具。
通过Python API,可以实现对Abaqus 的二次开发。
需要了解Abaqus Python API的基本知识,包括模块、工具、数据对象等等。
编写Python脚本
根据需求,编写Python脚本来实现特定的功能。
例如,可以编写一个脚本,用来自动生成模型、执行仿真、结果后处理等等。
在编写脚本的过程中,需要使用Abaqus Python API提供的函数和方法。
运行Python脚本
将编写的Python脚本保存,并在Abaqus中运行。
在运行脚本之前,需要确保Abaqus已经启动,并且已经连接到了Python解释器。
调试和优化
在运行脚本的过程中,可能会遇到各种问题,需要进行调试和优化。
需要对Python脚本进行逐步调试,找到问题所在,并且优化代码,提高仿真效率。
以上是Abaqus Python二次开发入门案例的基本步骤。
在开发过程中,需要不断学习和积累经验,才能够更好地利用Python API实现对Abaqus的二次开发。
ABAQUS二次开发教程
ABAQUS(Python语言)二次开发人生苦短,我用Python作者:Fan ShengbaoPython2.72017年12月目录第一章Python程序基本语法 (1)1.1Python语法结构 (1)1.2Python元组 (1)1.3Python列表 (1)1.4Python字典 (2)1.5Python集合 (3)1.6Python字符串 (3)1.7Python分支语句 (4)1.8Python循环语句 (5)1.8.1for循环 (5)1.8.2while循环 (5)1.9Python定义函数 (5)1.10Python模块 (6)1.11Python包 (7)1.12Python文件和目录 (7)1.12.1目录操作 (7)1.12.2文件操作 (7)1.13Python异常处理 (8)第二章ABAQUS/Python二次开发 (9)2.1ABAQUS执行Python程序 (9)2.2编写ABAQUS/Python程序 (10)2.3ABAQUS录制Python程序 (10)2.4ABAQUS/Python对象介绍 (11)2.4.1 session对象 (11)2.4.2 mdb对象 (11)2.4.3 odb对象 (13)2.5ABAQUS完整二次开发示例 (14)2.6ABAQUS二次开发常用函数 (16)2.6.1 Part模块常用函数 (16)第一章Python程序基本语法1.1Python语法结构Python语言以缩进来约束每个程序块,编写程序时要特别注意每一行的缩进量,同一层次的语句应具有相同的缩进量。
下面是一段Python程序示例:#-*- coding:utf-8 -*-for i in range(1,10):for j in range(1,i+1):print str(j)+'x'+str(i)+' = '+str(i*j),print该段程序主要功能是实现乘法口诀表输出打印,其中“#-*- coding:utf-8 -*-”是约定文档的编码方式。
ABAQUS二次开发-Python脚本运行方式
ABAQUS二次开发—Python编程语言
1.1 ABAQUS软件界面下运行Python脚本 方式2:
点击“File”=>“Run Script…”弹出选择Python脚本文件,点击“OK”后直接运行
ABAQUS二次开发—Python编程语言
1.1 ABAQUS软件界面下运行Python脚本 方式3:
方式2:启动ABAQUS/Viewer界面的同时运行Python脚本 abaqus viewer script=D:\myPython.py abaqus viewer startup=D:\myPython.py
注:方式2中的Python脚本只能进行后处理过程,否则一 个错误将发生
ABAQUS二次开发—Python编程语言
点击“File”=>“Macro Manager…”弹出选择Python宏文件,点击“Run”后运行
ABAQUS二次开ห้องสมุดไป่ตู้—Python编程语言
1.1 ABAQUS软件界面下运行Python脚本
方式4:
2
1
4
3
1 打开Python脚本文件 2 选择要执行的脚本 3 选择执行脚本的方式 4 运行脚本文件
1.2 以命令行形式运行ABAQUS/Python脚本
方式3:不启动ABAQUS/CAE 界面的同时运行Python脚本 abaqus cae noGUI=D:\myPython.py
方式4:不启动ABAQUS/Viewer界面的同时运行Python脚本 abaqus viewer noGUI=D:\myPython.py
注:ABAQUS软件界面不会出现,脚本文件中的任何打印 输出将被忽略。适用于生成cae或直接提交计算 的脚本文件。
利用Python对Abaqus进行后处理结果输出
利用Python对Abaqus进行后处理结果输出-----中大_戚超_2016.10.31 概述在Abaqus的二次开发过程中,通常需要采用Python脚本语言将Abaqus的计算结果进行输出,然后再进行处理。
Python使Abaqus的内核语言,使用较为方便,Abaqus运行Python语言的方式有多种,可以直接命令窗口,也可以读入脚本,还可以采用类似批处理的方式。
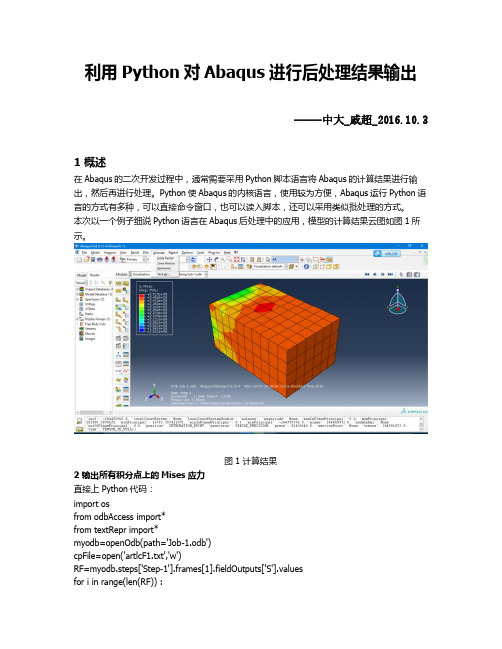
本次以一个例子细说Python语言在Abaqus后处理中的应用,模型的计算结果云图如图1所示。
图1 计算结果2 输出所有积分点上的Mises应力直接上Python代码:import osfrom odbAccess import*from textRepr import*myodb=openOdb(path='Job-1.odb')cpFile=open('artlcF1.txt','w')RF=myodb.steps['Step-1'].frames[1].fieldOutputs['S'].valuesfor i in range(len(RF)) :cpFile.write('%.3F\n' %(RF[i].mises))else:cpFile.close()#引入模块,因为需要打开结果文件#打开结果文件,并复制给变量myodb#打开一个txt文件#将输出场赋值给RF#循环语句,向txt文件逐行写入mises应力Abaqus的结构层次分的很细,比如结果文件下分如下:使用过Abaqus的都知道step表示载荷步,frame表示载荷子步,因而在读取Mises应力时需要详细地指定输出哪一步的应力,而应力结果是输出场数据(fieldOutput)的中一种,需要指定是何种应力,程序才知道怎么读取并写入。
由于Abaqus里面涉及的变量特别多,通常很难记清楚那一项下面都有哪些量可以调用,此时比较好的方式是采用print 函数查看,例如查看myodb.steps['Step-1'].frames[1].fieldOutputs 下面有哪些变量可以调用,在窗口输入:print myodb.steps['Step-1'].frames[1].fieldOutputs显示:{'AC YIELD': 'FieldOutput object', 'CF': 'FieldOutput object', 'E': 'FieldOutput object', 'PE': 'Fiel dOutput object', 'PEEQ': 'FieldOutput object', 'PEMAG': 'FieldOutput object', 'RF': 'FieldOutput object', 'S': 'FieldOutput object', 'U': 'FieldOutput object'}各种不同的结果,包括位移、应力和支反力等等,因此可以知道通过如下的方式读取应力:myodb.steps['Step-1'].frames[1].fieldOutputs ['S']此时读取的信息特别多,我们想要的是其中的数值信息,因此可以:myodb.steps['Step-1'].frames[1].fieldOutputs ['S'].values通过此句能够读取所有节点的应力数据,输出其中一个:print myodb.steps['Step-1'].frames[1].fieldOutputs ['S'].values[0]显示:({'baseElementType': 'C3D8R', 'conjugateData': None, 'conjugateDataDouble': 'unknown', 'da ta': array([-855397.25, 58.817497253418, 358.723419189453, -139.652938842773, -456.986175537109, 4.29301929473877], 'f'), 'dataDouble': 'unknown', 'elementLabel': 1, 'fac e': None, 'instance': 'OdbInstance object', 'integrationPoint': 1, 'inv3': -855606.3125, 'localCoordSystem': None, 'localCoordSystemDouble': 'unknown', 'magnitude': None, 'maxInPlanePrincipal': 0.0, 'maxPrincipal': 359.0310********, 'midPrincipal': 58.7767 486572266, 'minInPlanePrincipal': 0.0, 'minPrincipal': -855397.5, 'mises': 855606.375, 'nodeLabel': None, 'outOfPlanePrincipal': 0.0, 'position': INTE GRATION_POINT, 'precision': SINGLE_PRECISION, 'press': 284993.25, 'sectionPoint': None, 'tr esca': 855756.5, 'type': TENSOR_3D_FULL})输出的信息特别多,但是可以看到有mises这一项。
Python在Abaqus的应用04

stress.type
tuple
stress.validInvariants
FieldValueArray
stress.values
• Print the value of each member using getPaths() and eval(path)
Python语言在ABAQUS中的应用

Python语言在ABAQUS中的应用采用python脚本语言二次开发ABAQUS,通过开发python脚本程序处理ABAQUS重复工作,提高了工作效率。
标签Python;ABAQUS;交换输入;函数引言ABAQUS是大型通用的有限元分析软件,可以模拟绝大部分工程材料的线性和非线性行为,获得了广大用户的认可,在建筑结构分析领域应用广泛。
Python是一种面向对象的脚本语言,,该语言已经诞生20余年,它的简洁性和易用性使程序的开发过程变得简单,特别适用于快速应用开发。
在此介绍一下编写脚本快速建模。
编写Python脚本快速建立模型是ABAQUS高级用户经常使用的功能之一。
例如,在Abaqus/CAE中建模时需要反复输入各种参数和设置多个对话框,编写脚本只需要几条语句就可以实现。
如果经常建立相同或类似模型,还可以编写独立的模块,还可以编写脚本创建材料库,运行Python脚本后Material Manager 将自动出现定义的材料。
在此介绍3种最常用的快速建立模型的方法,包括交互式输入、创建材料库。
1.交互式输入交互式输入直接指定模型参数,而无需在Abaqus/CAE下选择多个菜单、多个按钮,可以节省许多建模时间。
Abaqus脚本接口提供3种交互式输入函数,分别是:getInput()函数、getInputs()函数和getWarningReply ()函数,详细介绍参见Abaqus 6.10帮助手册《Abaqus Scripting User’s Manual》第6.7节“Prompting the user for input”和<《Abaqus Scripting Reference Manual》第49.5节“User input commands”。
GetInput()函数脚本getInput.py将调用getInput()函数自定义输入参数,开平方根运算后输出计算结果。
程序测试代码如下:from abaqus import *from math import sqrtinput=getInput(’please enter a number ‘,’9’)number=float(input)print sqrt(number)GetInputs()函数脚本getInputs.py将调用getInputs()函数自定义输入并输出数据信息,代码如下:from abaqus import *x=getInputs(((’please enter the first number ‘,’2’),(’please enter the second number’,’5’),(’please enter the third number’,’8’)))print xGetWarningReply ()函数脚本getWarningReply.py将调用get Warning Reply ()函数来创建警告对话框。
ABAQUS二次开发教程

ABAQUS (Python 语言)二次开发人生苦短,我用 Python作者: Fan ShengbaoPython2.72017 年 12 月目录1第一章 Python 程序基本语法 ......................................................................................................1.1Python 语法结构 (1)1.2Python 元组 (1)1.3Python 列表 (1)1.4Python 字典 (2)1.5Python 集合 (3)1.6Python 字符串 (3)1.7Python 分支语句 (4)1.8Python 循环语句 (5)1.8.1for 循环 (5)1.8.2while 循环 (5)1.9Python 定义函数 (5)1.10Python 模块 (6)1.11Python 包 (7)1.12Python 文件和目录 (7)1.12.1目录操作 (7)1.12.2文件操作 (7)1.13Python 异常处理 (8)9第二章 ABAQUS/Python 二次开发 .............................................................................................2.1ABAQUS执行 Python 程序 (9)2.2编写 ABAQUS/Python 程序 (10)2.3ABAQUS录制 Python 程序 (10)2.4ABAQUS/Python 对象介绍 (11)2.4.1 session 对象 (11)2.4.2 mdb 对象 (11)2.4.3 odb 对象 (13)2.5ABAQUS完整二次开发示例 (14)2.6ABAQUS二次开发常用函数 (16)2.6.1 Part 模块常用函数 (16)第一章 Python 程序基本语法1.1 Python 语法结构Python 语言以缩进来约束每个程序块,编写程序时要特别注意每一行的缩进量,同一层次的语句应具有相同的缩进量。
在abaqus中使用python实现功能(1,2)
在abaqus中使用python实现的功能(一、二)By lxm9977(lxm200501@)功能一:实行提交多个job的功能。
对象:Job object使用:在源文件开始写上import job,源程序用mdb.jobs[name] 使用名字为name的job对象。
建立一个job对象的方法:z利用已有的inp文件中建立job:mdb.JobFromInputFile()z利用已有的cae中建立job: Job(...)建议用第一种方法。
设定参数的方法:9利用第一种方法建立job的时候,可以设定很多的参数,比如type,queue,userSubroutine等。
格式:mdb.JobFromInputFile(name=,inputFile=,type=,queue =,userSubroutine=,…….)。
9也可以先建立一个job,然后利用job对象的setValues来设定参数,格式:job.setValues(type=,queue=,userSubroutine=,…….)。
一个简单的例子:文件:job.pyfrom abaqusConstants import *import jobmdb.JobFromInputFile(name='job-1-1',inputFileName='Job-1.inp')#基于inp文件Job-1.inp建立名称为job-1-1的jobmdb.jobs['job-1-1'].setValues(waitMinutes=1)#设定参数mdb.jobs['job-1-1'].submit()#提交任务mdb.jobs['job-1-1'].waitForCompletion()运行:在cmd下面运行:Abaqus cae nogui=job.py如果是多个job,同样道理了,不多说了。
Python语言和ABAQUS后处理二次开发定稿

Python语言和ABAQUS后处理二次开发1易桂莲杜家政隋允康2(北京工业大学机械工程与应用电子技术学院,100124北京)摘要:采用Python脚本语言二次开发ABAQUS的后处理模块,讨论了ABAQUS的脚本接口和对象模型在二次开发中的作用和调用流程。
通过开发Python脚本程序提取ABAQUS进行数值模拟后的计算结果,有效地解决了提取大量结果进行重复操作的问题,提高了后处理的效率。
关键词:ABAQUS后处理二次开发;Python;动力响应分析;振动特性0 引言ABAQUS是国际上最先进的大型通用有限元计算分析软件之一,可以模拟绝大部分工程材料的线性和非线性行为。
ABAQUS自带的CAE是进行有限元分析的前后处理模块,也是建模、分析和后处理的人机交互平台,它具有良好的人机对话界面,因此ABAQUS软件在工程中得到了广泛的应用。
Python是一种面向对象的脚本语言,它功能强大,既可以独立运行,也可以用作脚本语言。
特别适用于快速的应用程序开发[1]。
通过开发Python脚本程序提取ABAQUS进行数值模拟后的计算结果,有效地解决了提取大量结果进行重复操作的问题1 二次开发接口介绍ABAQUS 脚本接口是一个基于对象的程序库,脚本接口中的每个对象都拥有相应的数据成员和函数。
对象的函数专门用于处理对象中的数据成员,被称为相应对象的方法,用于生成对象的方法被称为构造函数。
在对象创建后,可以使用该对象提供的方法来处理对象中的数据成员[2]。
ABAQUS提供了一套应用程序编程接口(API,Application Program Interface)来操作ABAQUS/CAE实现建模/后处理等功能。
接口编程采用Python的语法编写脚本,但扩展了Python脚本语言,额外提供了大约500个对象模型。
对象模型之间关系复杂,图1展示了这些对象模型之间的层次结构和相互关系。
其中,Container表示容器,里面包含有其他的对象;Singular object表示单个对象。
基于Python的Abaqus二次开发实例讲解
基于Python的Abaqus二次开发实例讲解(asian58 2013.6.26)基于Python的Abaqus的二次开发便捷之处在于:1、所有的代码均可以先在Abaqus\CAE中操作一遍后再通过rp文件读取,然后再在此基础上进行相应的修改;2、Python是一种解释性语言,读起来非常清晰,因此在修改程序的过程中,不存在程序难以理解的问题;3、Python是一种通用性的、功能非常强大的面向对象编程语言,有许多成熟的类似于Matlab函数的程序在网络上流传,为后期进一步的数据处理提供了方便。
为了更加方便地完成Abaqus的二次开发,需进行一些相关约定:1、所有参数化直接通过点的坐标值进行,直接对几何尺寸的参数化反而更加繁琐;2、程序参数化已不允许在模型中添加太多的Tie,因此不同零部件的绑定直接通过共节点来进行,这就要求建模方法与常规的建模方法有所区别。
思路如下:将一个整机拆成几个大的Part来建立,一个Part中包含许多零件,这样在划分网格式时就可以自动实现共节点的绑定。
不同的零件可通过建立不同的Set来进行区分,不同Part 的绑定可以通过Tie来实现。
将一个复杂的结构拆成几个恰当的Part来建立,一方面可以将复杂的模型简单化,使建立复杂模型成为可能;另一方面,不同的Part可单独调用,从而又可实现程序的模块化,增加程序的适应范围,延长程序的使用寿命,也方便后期程序的维护和修改。
3、通过py文件建立起的模型要进行参数优化,已不适合采用Isight中Abaqus模块,需要用到Isight的Simcode模块。
下面详细解释一个臂架的py文件。
#此程序用来绘制臂架前段#导入相关模块# -*- coding: mbcs -*-from abaqus import *from abaqusConstants import *#定义整个臂架的长、宽、高L0=14300W0=1650H0=800#创建零件P01_12 L1=H0+200 W1=200 T1=12s = mdb.models['Model-1'].ConstrainedSketch(name='__profile__', sheetSize=2000.0)g, v, d, c = s.geometry, s.vertices, s.dimensions, s.constraints s.setPrimaryObject(option=STANDALONE)s.rectangle(point1=(W0/2, L1/2), point2=(W0/2+W1, -L1/2))s.rectangle(point1=(-W0/2, L1/2), point2=(-W0/2-W1, -L1/2))p = mdb.models['Model-1'].Part(name='Part-1', dimensionality=THREE_D, type=DEFORMABLE_BODY)p = mdb.models['Model-1'].parts['Part-1'] p.BaseShell(sketch=s)session.viewports['Viewport: 1'].setValues(displayedObject=p) del mdb.models['Model-1'].sketches['__profile__']#定义零件的厚度p = mdb.models['Model-1'].parts['Part-1'] f = p.faces pickedFaces01 = f.findAt (((W0/2, L1/2, 0),),((-W0/2, L1/2, 0),), ) p.assignThickness(faces=pickedFaces01, thickness=T1) p.Set(faces=pickedFaces01, name='P01_12')#创建辅助平面和辅助坐标系p = mdb.models['Model-1'].parts['Part-1']p.DatumCsysByThreePoints(name='Datum csys-1', coordSysType=CARTESIAN, origin=( 0.0, 0.0, 0.0), line1=(1.0, 0.0, 0.0), line2=(0.0, 1.0, 0.0))p = mdb.models['Model-1'].parts['Part-1']p.DatumPlaneByPrincipalPlane(principalPlane=XYPLANE, offset=L0)#创建零件P02_12 L2=L1 W2=W1 T2=12p = mdb.models['Model-1'].parts['Part-1'] d = p.datums#将草图原点参数化t = p.MakeSketchTransform(sketchPlane=d[5], sketchUpEdge=d[4].axis2, sketchPlaneSide=SIDE1, sketchOrientation=RIGHT, origin=(0.0, 0.0, L0)) s = mdb.models['Model-1'].ConstrainedSketch(name='__profile__', sheetSize=29006.85, gridSpacing=725.17, transform=t) g, v, d1, c = s.geometry, s.vertices, s.dimensions, s.constraints s.setPrimaryObject(option=SUPERIMPOSE)p = mdb.models['Model-1'].parts['Part-1']s.rectangle(point1=(W0/2, L2/2), point2=(W0/2+W2, -L2/2))s.rectangle(point1=(-W0/2, L2/2), point2=(-W0/2-W2, -L2/2))p = mdb.models['Model-1'].parts['Part-1']d2 = p.datumsp.Shell(sketchPlane=d2[5], sketchUpEdge=d2[4].axis2, sketchPlaneSide=SIDE1, sketchOrientation=RIGHT, sketch=s)s.unsetPrimaryObject()del mdb.models['Model-1'].sketches['__profile__']#定义零件的厚度p = mdb.models['Model-1'].parts['Part-1'] Array f = p.facespickedFaces02 = f.findAt(((W0/2, L1/2, L0),),((-W0/2, L1/2, L0),), )p.assignThickness(faces=pickedFaces02, thickness=T2)p.Set(faces=pickedFaces02, name='P02_12')#创建零件P03_12和零件P04_08T3=12T4=8p = mdb.models['Model-1'].parts['Part-1']d = p.datumst = p.MakeSketchTransform(sketchPlane=d[5], sketchUpEdge=d[4].axis2, sketchPlaneSide=SIDE1, sketchOrientation=RIGHT, origin=(0.0, 0.0, L0)) s = mdb.models['Model-1'].ConstrainedSketch(name='__profile__', sheetSize=29006.85, gridSpacing=725.17, transform=t)g, v, d1, c = s.geometry, s.vertices, s.dimensions, s.constraintss.setPrimaryObject(option=SUPERIMPOSE)#创建草图p = mdb.models['Model-1'].parts['Part-1']s.Line(point1=(-W0/2-W1, H0/2), point2=(-W0/2, H0/2))s.Line(point1=(W0/2, H0/2), point2=(W0/2+W1, H0/2))s.Line(point1=(-W0/2-W1, -H0/2), point2=(-W0/2, -H0/2))s.Line(point1=(W0/2, -H0/2), point2=(W0/2+W1, -H0/2))p = mdb.models['Model-1'].parts['Part-1']d2 = p.datumsp.ShellExtrude(sketchPlane=d2[5], sketchUpEdge=d2[4].axis2,sketchPlaneSide=SIDE1, sketchOrientation=RIGHT, sketch=s, depth=L0, flipExtrudeDirection=ON)s.unsetPrimaryObject()del mdb.models['Model-1'].sketches['__profile__']#定义零件P03_12的厚度p = mdb.models['Model-1'].parts['Part-1']f = p.facespickedFaces03 = f.findAt(((-W0/2, H0/2, L0/2),),((W0/2, H0/2, L0/2),),)p.assignThickness(faces=pickedFaces03, thickness=T3)p.Set(faces=pickedFaces03, name='P03_12')#定义零件P04_12的厚度p = mdb.models['Model-1'].parts['Part-1']f = p.facespickedFaces04 = f.findAt(((-W0/2, -H0/2, L0/2),),((W0/2, -H0/2, L0/2),),)p.assignThickness(faces=pickedFaces04, thickness=T4)p.Set(faces=pickedFaces04, name='P04_12')#创建零件P05_08T5=8p = mdb.models['Model-1'].parts['Part-1']d = p.datumst = p.MakeSketchTransform(sketchPlane=d[5], sketchUpEdge=d[4].axis2, sketchPlaneSide=SIDE1, sketchOrientation=RIGHT, origin=(0.0, 0.0, L0))s = mdb.models['Model-1'].ConstrainedSketch(name='__profile__',sheetSize=29006.85, gridSpacing=725.17, transform=t)g, v, d1, c = s.geometry, s.vertices, s.dimensions, s.constraintss.setPrimaryObject(option=SUPERIMPOSE)p = mdb.models['Model-1'].parts['Part-1']s.Line(point1=(-W0/2-W1/2, H0/2), point2=(-W0/2-W1/2, -H0/2))s.Line(point1=(W0/2+W1/2, H0/2), point2=(W0/2+W1/2, -H0/2))p = mdb.models['Model-1'].parts['Part-1']d2 = p.datumsp.ShellExtrude(sketchPlane=d2[5], sketchUpEdge=d2[4].axis2,sketchPlaneSide=SIDE1, sketchOrientation=RIGHT, sketch=s, depth=L0,flipExtrudeDirection=ON)s.unsetPrimaryObject()del mdb.models['Model-1'].sketches['__profile__']#定义零件P05_8的厚度p = mdb.models['Model-1'].parts['Part-1']f = p.facespickedFaces05 = f.findAt(((-W0/2-W1/2, 0, L0/2),),((W0/2+W1/2, 0, L0/2),),)p.assignThickness(faces=pickedFaces05, thickness=T5)p.Set(faces=pickedFaces05, name='P05_08')#创建零件P06_08L6=W0+W1n=L0//2520+1T6=8p = mdb.models['Model-1'].parts['Part-1']f, d = p.faces, p.datumst = p.MakeSketchTransform(sketchPlane=f[0], sketchUpEdge=d[4].axis2, sketchPlaneSide=SIDE1, sketchOrientation=RIGHT, origin=(W0/2+W1/2, -H0/2,0))s = mdb.models['Model-1'].ConstrainedSketch(name='__profile__',sheetSize=28684, gridSpacing=717, transform=t)g, v, d1, c = s.geometry, s.vertices, s.dimensions, s.constraintss.setPrimaryObject(option=SUPERIMPOSE)p = mdb.models['Model-1'].parts['Part-1']#循环命令绘制平行隔板for i in range(0,n): Array s.Line(point1=(-500-(i*2520), H0), point2=(-500-(i*2520), 0.0))p = mdb.models['Model-1'].parts['Part-1']f1, d2 = p.faces, p.datumsp.ShellExtrude(sketchPlane=f1[0], sketchUpEdge=d2[4].axis2,sketchPlaneSide=SIDE1, sketchOrientation=RIGHT, sketch=s, depth=L6,flipExtrudeDirection=ON)s.unsetPrimaryObject()del mdb.models['Model-1'].sketches['__profile__']#定义零件P06_08的厚度p = mdb.models['Model-1'].parts['Part-1']f = p.facesfor i in range(0,n): Array pickedFaces = f.findAt(((0, H0/4, 500+i*2520),))p.assignThickness(faces=pickedFaces, thickness=T6)p.Set(faces=pickedFaces, name='P06_08_'+str(1+i))#创建零件P07_12,P08_12W7=200L7=W0+W1T7=12T8=12p = mdb.models['Model-1'].parts['Part-1']f, e = p.faces, p.edgest = p.MakeSketchTransform(sketchPlane=f.findAt(coordinates=(W0/2+W1/2, 0.0, 100.0)),sketchUpEdge=e.findAt(coordinates=(W0/2+W1/2, 0.0, 0.0)),sketchOrientation=RIGHT,sketchPlaneSide=SIDE1,origin=(W0/2+W1/2, -H0/2, 0.0))s = mdb.models['Model-1'].ConstrainedSketch(name='__profile__',sheetSize=53678, gridSpacing=1341, transform=t)g, v, d, c = s.geometry, s.vertices, s.dimensions, s.constraintss.setPrimaryObject(option=SUPERIMPOSE)p = mdb.models['Model-1'].parts['Part-1']#循环命令绘制平行隔板for i in range(0,n):s.Line(point1=(400+i*2520, -H0), point2=(600+i*2520, -H0))s.Line(point1=(400+i*2520, 0), point2=(600+i*2520, 0))p = mdb.models['Model-1'].parts['Part-1']f1, e1 = p.faces, p.edgesp.ShellExtrude(sketchPlane=f.findAt(coordinates=(W0/2+W1/2, 0.0, 100.0)),sketchUpEdge=e.findAt(coordinates=(W0/2+W1/2, 0.0, 0.0)),sketchPlaneSide=SIDE1,sketchOrientation=RIGHT, sketch=s, depth=W0+W1, flipExtrudeDirection=ON, keepInternalBoundaries=ON)s.unsetPrimaryObject()del mdb.models['Model-1'].sketches['__profile__']#定义零件P07_12的厚度p = mdb.models['Model-1'].parts['Part-1']f = p.facesfor i in range(0,n):pickedFaces07 = f.findAt(((0, H0/2, 400+i*2520),),((0, H0/2, 600+i*2520),),) p.assignThickness(faces=pickedFaces07, thickness=T7)p.Set(faces=pickedFaces07, name='P07_12_'+str(1+i))fp=[]for i in range(0,2):fp.append(f.findAt(((0, H0/2, 400+i*2520),),((0, H0/2, 600+i*2520),),))p.Set(faces=fp, name='P07_fp')#定义零件P08_12的厚度p = mdb.models['Model-1'].parts['Part-1']f = p.facesfor i in range(0,n):pickedFaces08 = f.findAt(((0, -H0/2, 400+i*2520),),((0, -H0/2, 600+i*2520),),) p.assignThickness(faces=pickedFaces08, thickness=T7)p.Set(faces=pickedFaces08, name='P08_12_'+str(1+i))#为中间隔板创建空腔#定义相关参数边界距离、圆角d0=100r0=100p = mdb.models['Model-1'].parts['Part-1']f1, e1 = p.faces, p.edgest = p.MakeSketchTransform(f.findAt(coordinates=(0, 0.0, 500.0)),sketchUpEdge=e.findAt(coordinates=(W0/2+W1/2, 0.0, 500.0)),sketchPlaneSide=SIDE1, sketchOrientation=RIGHT,origin=(0.0, 0.0, 500.0))s = mdb.models['Model-1'].ConstrainedSketch(name='__profile__',sheetSize=5910.0, gridSpacing=147.0, transform=t)g, v, d1, c = s.geometry, s.vertices, s.dimensions, s.constraintss.setPrimaryObject(option=SUPERIMPOSE)p = mdb.models['Model-1'].parts['Part-1']p.projectReferencesOntoSketch(sketch=s, filter=COPLANAR_EDGES)#创建矩形s.rectangle(point1=(-W0/2-W1/2+d0, H0/2-d0), point2=(W0/2+W1/2-d0, -H0/2+d0)) #创建圆角s.FilletByRadius(radius=r0,curve1=g[29], nearPoint1=(-W0/2-W1/2+d0, H0/2-d0), curve2=g[26], nearPoint2=(-W0/2-W1/2+d0, H0/2-d0))s.FilletByRadius(radius=r0, curve1=g[26], nearPoint1=(-W0/2-W1/2+d0, -H0/2+d0), curve2=g[27], nearPoint2=(-W0/2-W1/2+d0, -H0/2+d0)) s.FilletByRadius(radius=r0, curve1=g[27], nearPoint1=(W0/2+W1/2-d0, -H0/2+d0), curve2=g[28], nearPoint2=(W0/2+W1/2-d0, -H0/2+d0)) s.FilletByRadius(radius=r0, curve1=g[28], nearPoint1=(W0/2+W1/2-d0, H0/2-d0), curve2=g[29], nearPoint2=(W0/2+W1/2-d0, H0/2-d0))p = mdb.models['Model-1'].parts['Part-1']f1, d2 = p.faces, p.datumsp.CutExtrude(f.findAt(coordinates=(0, 0.0, 500.0)),sketchUpEdge=e.findAt(coordinates=(W0/2+W1/2, 0.0, 500.0)),sketchPlaneSide=SIDE1, sketchOrientation=RIGHT, sketch=s, depth=L0, flipExtrudeDirection=OFF)s.unsetPrimaryObject()del mdb.models['Model-1'].sketches['__profile__']#开始建立梁Beam_1p = mdb.models['Model-1'].parts['Part-1']f, d = p.faces, p.datums#绘制参考面p.DatumPlaneByOffset(plane=f.findAt(coordinates=(W0/2, -H0/2, 100.0)),flip=SIDE2, offset=8.0)dp1 = d.keys()[-1]p = mdb.models['Model-1'].parts['Part-1']d = p.datumst = p.MakeSketchTransform(sketchPlane=d[dp1], sketchUpEdge=d[4].axis1,sketchPlaneSide=SIDE1, sketchOrientation=RIGHT, origin=(0.0, 0.0,0.0))s = mdb.models['Model-1'].ConstrainedSketch(name='__profile__', sheetSize=31857.0, gridSpacing=796.0, transform=t)g, v, d1, c = s.geometry, s.vertices, s.dimensions, s.constraintss.setPrimaryObject(option=SUPERIMPOSE)p = mdb.models['Model-1'].parts['Part-1']#计算中间加强梁的数量if n%2==1:n1=n//2 n2=n//2 else:n1=n//2 n2=n//2-1 for i in range(0,n1):s.Line(point1=(-500-i*2520*2, W0/2+W1/2), point2=(-500-2520-i*2520*2,-W0/2-W1/2 )) for i in range(0,n2):s.Line(point1=(-500-2520-i*2520*2,-W0/2-W1/2), point2=(-500-2*2520-i*2520*2,W0/2+W1/2 ))#在基准平面dp1上面绘制梁p = mdb.models['Model-1'].parts['Part-1'] d2 = p.datums e = p.edgesp.Wire(sketchPlane=d2[dp1], sketchUpEdge=d2[4].axis1, sketchPlaneSide=SIDE1, sketchOrientation=RIGHT, sketch=s) s.unsetPrimaryObject()del mdb.models['Model-1'].sketches['__profile__'] edges1=[] for i in range(0,n-1): edges1.append (e.findAt(((0, -H0/2-8, 500+2520/2+i*2520),),)) p.Set(edges=edges1, name='Beam_1') ############################开始定义有限元分析的相关参数 #定义材料mdb.models['Model-1'].Material(name='steel')mdb.models['Model-1'].materials['steel'].Elastic(table=((210000.0, 0.3), )) mdb.models['Model-1'].materials['steel'].Density(table=((7.8e-06, ), ))#定义壳单元属性mdb.models['Model-1'].HomogeneousShellSection(name='shell', preIntegrate=OFF, material='steel', thicknessType=UNIFORM, thickness=10.0, thicknessField='', idealization=NO_IDEALIZATION, poissonDefinition=DEFAULT,thicknessModulus=None, temperature=GRADIENT, useDensity=OFF, integrationRule=SIMPSON, numIntPts=5) #赋所有壳单元属性p = mdb.models['Model-1'].parts['Part-1']for i in range(1,5):region1 = p.sets['P0'+str(i)+'_12']p.SectionAssignment(region=region1, sectionName='shell', offset=0.0,offsetType=FROM_GEOMETRY , offsetField='',thicknessAssignment=FROM_GEOMETRY )region2 = p.sets['P05_08']p.SectionAssignment(region=region2, sectionName='shell', offset=0.0, offsetType=FROM_GEOMETRY, offsetField='',thicknessAssignment=FROM_GEOMETRY)for i in range(1,n+1): Array region3 = p.sets['P06_08_'+str(i)]p.SectionAssignment(region=region3, sectionName='shell', offset=0.0,offsetType=FROM_GEOMETRY, offsetField='',thicknessAssignment=FROM_GEOMETRY)for i in range(1,n+1):region4 = p.sets['P07_12_'+str(i)]p.SectionAssignment(region=region4, sectionName='shell', offset=0.0,offsetType=FROM_GEOMETRY, offsetField='',thicknessAssignment=FROM_GEOMETRY)for i in range(1,n+1):region5 = p.sets['P08_12_'+str(i)]p.SectionAssignment(region=region5, sectionName='shell', offset=0.0,offsetType=FROM_GEOMETRY, offsetField='',thicknessAssignment=FROM_GEOMETRY)#定义梁单元属性mdb.models['Model-1'].LProfile(name='L_65', a=65.0, b=65.0, t1=7.0, t2=7.0)mdb.models['Model-1'].BeamSection(name='B_65', integration=DURING_ANALYSIS,poissonRatio=0.0, profile='L_65', material='steel', temperatureVar=LINEAR,consistentMassMatrix=False)#赋所有梁单元属性p = mdb.models['Model-1'].parts['Part-1']region = p.sets['Beam_1']p.SectionAssignment(region=region, sectionName='B_65', offset=0.0,offsetType=MIDDLE_SURFACE, offsetField='',thicknessAssignment=FROM_SECTION)p.assignBeamSectionOrientation(region=region, method=N1_COSINES, n1=(0.0, 0.0,-1.0))#定义装配体import assemblya = mdb.models['Model-1'].rootAssemblya.DatumCsysByDefault(CARTESIAN)p = mdb.models['Model-1'].parts['Part-1']a.Instance(name='Part-1-1', part=p, dependent=ON)#定义分析步import stepmdb.models['Model-1'].StaticStep(name='Step-1', previous='Initial')#定义底面与梁的tiedimport interactiona = mdb.models['Model-1'].rootAssemblyregion1=a.instances['Part-1-1'].sets['P04_12']region2=a.instances['Part-1-1'].sets['Beam_1']mdb.models['Model-1'].Tie(name='Constraint-1', master=region1, slave=region2, positionToleranceMethod=COMPUTED, adjust=OFF, tieRotations=ON, thickness=ON)#开始定义耦合#导入相关模块import regionToolseta = mdb.models['Model-1'].rootAssemblyd, r = a.datums, a.referencePoints#定义参考点a.ReferencePoint(point=(0.0, H0/2, 500+2520/2))rp1 = r.keys()[-1]refPoints1=(r1[rp1], )region1=regionToolset.Region(referencePoints=refPoints1)s1 = a.instances['Part-1-1'].facesregion2 = a.instances['Part-1-1'].sets['P07_fp']mdb.models['Model-1'].Coupling(name='Constraint-2', controlPoint=region1, surface=region2, influenceRadius=WHOLE_SURFACE, couplingType=DISTRIBUTING, localCsys=None, u1=ON, u2=ON, u3=ON, ur1=ON, ur2=ON, ur3=ON)#########################定义边界条件import loada = mdb.models['Model-1'].rootAssemblyd, r = a.datums, a.referencePointsregion = a.instances['Part-1-1'].sets['P02_12']mdb.models['Model-1'].DisplacementBC(name='SPC', createStepName='Initial', region=region, u1=SET, u2=SET, u3=SET, ur1=SET, ur2=SET, ur3=SET,amplitude=UNSET, distributionType=UNIFORM, fieldName='', localCsys=None)a = mdb.models['Model-1'].rootAssemblyregion = a.instances['Part-1-1'].sets['P08_12_'+str(n-1)]mdb.models['Model-1'].DisplacementBC(name='SPC2', createStepName='Initial', region=region, u1=SET, u2=SET, u3=SET, ur1=SET, ur2=SET, ur3=SET,amplitude=UNSET, distributionType=UNIFORM, fieldName='', localCsys=None)r1 = a.referencePointsrefPoints1=(r1[rp1], )region = regionToolset.Region(referencePoints=refPoints1)mdb.models['Model-1'].ConcentratedForce(name='force', createStepName='Step-1',region=region, cf2=-10000.0, distributionType=UNIFORM, field='',localCsys=None)mdb.models['Model-1'].Gravity(name='G', createStepName='Step-1', comp2=-9.8, distributionType=UNIFORM, field='')#################划分网格import meshp = mdb.models['Model-1'].parts['Part-1']p.seedPart(size=20.0, deviationFactor=0.1, minSizeFactor=0.1)p.generateMesh()a = mdb.models['Model-1'].rootAssembly###############创建作业并提交分析import jobmdb.Job(name='006', model='Model-1', description='', type=ANALYSIS, atTime=None, waitMinutes=0, waitHours=0, queue=None, memory=90,memoryUnits=PERCENTAGE, getMemoryFromAnalysis=True,explicitPrecision=SINGLE, nodalOutputPrecision=SINGLE, echoPrint=OFF,modelPrint=OFF, contactPrint=OFF, historyPrint=OFF, userSubroutine='',scratch='', multiprocessingMode=DEFAULT, numCpus=4, numDomains=4) mdb.jobs['006'].submit(consistencyChecking=ON)mdb.jobs['006'].waitForCompletion()###############进入后处理模块import visualizationo3 = session.openOdb(name='F:/ABAQUS/006.odb')session.viewports['Viewport: 1'].setValues(displayedObject=o3)session.viewports['Viewport: 1'].odbDisplay.display.setValues(plotState=( CONTOURS_ON_DEF, ))session.viewports['Viewport: 1'].view.setValues(session.views['Iso'])mdb.saveAs(pathName='F:/ABAQUS/006.cae')第11 页共11 页。
ABAQUS二次开发教程

ABAQUS二次开发教程ABAQUS(Python语言)二次开发人生苦短,我用Python作者:Fan Shengbao2017年12月目录Python程序基本语法1.1Python语法结构Python语言以缩进来约束每个程序块,编写程序时要特别注意每一行的缩进量,同一层次的语句应具有相同的缩进量。
下面是一段Python程序示例:#-*- coding:utf-8 -*-for i in range(1,10):for j in range(1,i+1):print str(j)+'x'+str(i)+' = '+str(i*j),print该段程序主要功能是实现乘法口诀表输出打印,其中“#-*- coding:utf-8 -*-”是约定文档的编码方式。
程序主体部分由两个嵌套的for循环语句组成,可以看到每一个for循环块的内部都具有相同的缩进量。
程序输出结果如下:1x1=11x2=2 2x2=41x3=3 2x3=6 3x3=91x4=4 2x4=8 3x4=12 4x4=161x5=5 2x5=10 3x5=15 4x5=20 5x5=251x6=6 2x6=12 3x6=18 4x6=24 5x6=30 6x6=361x7=7 2x7=14 3x7=21 4x7=28 5x7=35 6x7=42 7x7=491x8=8 2x8=16 3x8=24 4x8=32 5x8=40 6x8=48 7x8=56 8x8=641x9=9 2x9=18 3x9=27 4x9=36 5x9=45 6x9=54 7x9=638x9=72 9x9=81Python程序中一行中“#”号后面的内容为注释,“#”号只支持单行注释,多行注释可使用“’’’ …‘’’”注释符。
'''Python'''1.2P ython元组Python中的元组(tuple)相当于C语言中的数组简化版,其内容和长度均不可变,只能对其内容进行访问。
abaqus 二次开发详解

#开头的为注释行.第一步, 建立建模环境, 这一步中py将从abaqus中导入建模所需的所有程序模块.from part import *接下来定义草图环境mdb.models['Model A'].Sketch(name='__profile__', sheetSize=200.0)mdb.models['ModelA'].sketches['__profile__'].sketchOptions.setValues(constructionGeometry=ON, decimalPlaces=2, dimensionTextHeight=5.0, grid=ON,gridFrequency=2, gridSpacing=5.0, sheetSize=200.0, viewStyle=AXISYM)上面的设定为大小200*200, 格栅间距为5, 文字标注高度为5.mdb.models['Model A'].sketches['__profile__'].ObliqueConstructionLine(point1=(0.0, -100.0), point2=(0.0, 100.0))本句语句设定轴对称模型的对称轴线位置mdb.models['Model A'].sketches['__profile__'].rectangle(point1=(0.0, 0.0),point2=(40.0, -40.0))该语句绘制矩形, 从点0,0 至点40,-40mdb.models['Model A'].Part(dimensionality=AXISYMMETRIC, name='Boden',type=DEFORMABLE_BODY)定义模型为轴对称, 名字为boden,为可变形体mdb.models['Model A'].parts['Boden'].BaseShell(sketch=mdb.models['ModelA'].sketches['__profile__'])del mdb.models['Model A'].sketches['__profile__']绘图完成不要忘记收回建模环境所占的内存第二节: 材料定义 -------------------- 2楼第三节: 装配 -------------------- 3楼第四节: 分析步定义 -------------------- 4楼第五节: 接触定义 -------------------- 5楼第六节: 荷载边界定义 ----------------- 6楼第七节: 网格划分控制 ------------------ 7楼第八节, 任务提交及杂项功能 -------- 8楼关于如何在python中提交多个任务的问题 9楼第二节, 材料定义from material import *from section import *从ABAQUS提供的接口中导入材料库和组件库mdb.models['Model-A'].Material(name='Boden')定义材料名mdb.models['Model A'].materials['Boden'].Density(table=((2000.0, ), ))定义材料密度mdb.models['Model A'].materials['Boden'].Elastic(table=((210546.3, 0.3333), ))定义材料线弹性模量和泊松比, 其它的材料, 如弹塑性, 粘弹性材料均对应不同的对象函数. mdb.models['Model A'].HomogeneousSolidSection(material='Boden',name='boden',thickness=1.0)mdb.models['ModelA'].parts['Boden'].assignSection(region=Region(faces=mdb.models['ModelA'].parts['Boden'].faces[0:1]), sectionName='boden')设定组件为坐标无关性材料,厚度为单位厚度, 并将属性附给所用的组件第三节, 装配from assembly import *首先, 导入装配所用到的对象mdb.models['ModelA'].rootAssembly.DatumCsysByThreePoints(coordSysType=CYLINDRICAL, origin=(0.0, 0.0, 0.0), point1=(1.0, 0.0, 0.0), point2=(0.0,0.0, -1.0))定义坐标类型为柱坐标, 原点0,0,0,另外两个为单位向量, 确定该坐标轴的方向.mdb.models['Model A'].rootAssembly.Instance(name='Boden-1',part=mdb.models['Model A'].parts['Boden'])生成草图对像boden的实体, 名字叫Boden-1. 无偏移插入第四节, 定义分析步from step import *象其它步一样, 先导入分析步要用到的模块mdb.models['Model A'].ImplicitDynamicsStep(initialInc=0.005,maxNumInc=1024,name='Step-1', noStop=OFF, nohaf=OFF,previous='Initial',timeIncrementationMethod=FIXED, timePeriod=5.12)定义对动力隐式分析, 时长为0.005*1024=5.12个时间单位, 前一步为Initialmdb.models['Model A'].fieldOutputRequests['F-Output-1'].setValues(variables=('U',))定义输出到ODB文件的数据, 这里只定义了位移输出mdb.models['Model A'].fieldOutputRequests['F-Output-1'].setValues(frequency=1)定义位移输出的频率为每步都输出mdb.models['Model A'].steps['Step-1'].Restart(frequency=1, overlay=ON)定义重启动析, 每一步记录, 只记录最后一次的正确状态第五节, 定义接触from interaction import *依然是先导入所用的模块mdb.models['Model A'].rootAssembly.PartitionEdgeByParam(edges=(mdb.models['Model A'].rootAssembly.instances['Boden-1'].edges[3], ), parameter=0.975)在上部即第3面的97.5%的地方设定一个点, 用于定义接触mdb.models['Model A'].ContactProperty('IntProp-1')定义接触属性名mdb.models['Model A'].interactionProperties['IntProp-1'].TangentialBehavior(formulation=FRICTIONLESS)mdb.models['Model A'].interactionProperties['IntProp-1'].NormalBehavior(allowSeparation=OFF, augmentedLagrange=OFF, pressureOverclosure=HARD)定义接触特性,为无摩擦硬接触不允许分开mdb.models['Model A'].SurfaceToSurfaceContactStd(adjustMethod=NONE,createStepName='Initial', interactionProperty='IntProp-1', master=Region(side1Edges=mdb.models['Model A'].rootAssembly.instances['fun-1'].edges[0:1]), name='Int-1', slave=Region(side1Edges=mdb.models['Model A'].rootAssembly.instances['Boden-1'].edges[4:5]), sliding=FINITE)这一句是建立接触对, 分别为两个面上的一条边, 这里边的定义由ABAQUS内定, 具体可以查阅参考手册第六节, 荷载边界定义from load import *mdb.models['Model A'].PeriodicAmplitude(a_0=1.0, data=((3.0, 1.1), (3.2, 1.7)), frequency=2.454, name='Fourier',start=0.0, timeSpan=STEP)定义fourier级数表示的荷载mdb.models['Model A'].Pressure(amplitude='Fourier', createStepName='Step-1', distribution=UNIFORM, magnitude=50.0, name='Load-1', region=Region(side1Edges=mdb.models['Model A'].rootAssembly.instances['fun-1'].edges[2:3]))定义压强, 设定加载的分析步,区域及放大系数mdb.models['Model A'].DisplacementBC(amplitude=UNSET,createStepName='Initial',distribution=UNIFORM, localCsys=None, name='BC-1', region=Region(edges=mdb.models['Model A'].rootAssembly.instances['Boden-1'].edges[0:1]+\mdb.models['Model A'].rootAssembly.instances['Boden-1'].edges[2:3]+\mdb.models['Model A'].rootAssembly.instances['fun-1'].edges[3:4]),u1=SET,u2=UNSET, ur3=UNSET)mdb.models['Model A'].DisplacementBC(amplitude=UNSET, createStepName='Initial', distribution=UNIFORM, localCsys=None, name='BC-2', region=Region(edges=mdb.models['Model A'].rootAssembly.instances['Boden-1'].edges[1:2]),u1=UNSET, u2=SET, ur3=UNSET)设定边界位移为0的边界条件, 注意语法中对象相加的方法.第七节, 网格划分控制from mesh import *import mesh导入网格划分模块elemType1 = mesh.ElemType(elemCode=CAX8,elemLibrary=STANDARD,secondOrderAccuracy=OFF, hourglassControl=STIFFNESS, distortionControl=OFF)elemType2 = mesh.ElemType(elemCode=CAX6M, elemLibrary=STANDARD)a1 = mdb.models['Model A'].rootAssemblyf1 = a1.instances['Boden-1'].facesfaces1 = f1[0:1]regions =(faces1, )a1.setElementType(regions=regions, elemTypes=(elemType1, elemType2))定义其中一个物体的网格为二次8结点单元, 如果其中有无法划分成四边形单元的情况, 则用三角形二次6结点单元.elemType1 = mesh.ElemType(elemCode=CAX4, elemLibrary=STANDARD)elemType2 = mesh.ElemType(elemCode=CAX3, elemLibrary=STANDARD)a1 = mdb.models['Model A'].rootAssemblyf1 = a1.instances['fun-1'].facesfaces1 = f1[0:1]regions =(faces1, )a1.setElementType(regions=regions, elemTypes=(elemType1, elemType2))定义其中一个物体的网格为一次4结点单元,如果其中有无法划分成四边形单元的情况, 则用三角形一次3结点单元.mdb.models['Model A'].rootAssembly.seedPartInstance(regions=(mdb.models['Model A'].rootAssembly.instances['fun-1'], ), size=0.5)mdb.models['Model A'].rootAssembly.seedPartInstance(regions=(mdb.models['Model A'].rootAssembly.instances['Boden-1'], ), size=1)定义网格划分全局单元大小.mdb.models['Model A'].rootAssembly.generateMesh(regions=(mdb.models['ModelA'].rootAssembly.instances['Boden-1'],mdb.models['ModelA'].rootAssembly.instances['fun-1']))按照定义划分单元第八节, 任务提交及杂项功能mdb.models.changeKey(fromName='Model A', toName='Fall-Muster')修改模型名称mdb.Model(name='Fall-015', objectToCopy=mdb.models['Fall-Muster'])拷贝模型mdb.models['Fall-015'].materials['Boden'].elastic.setValues(table=((210546.3, 0.15),))修改模型中的材料属性mdb.Job(contactPrint=OFF, description='', echoPrint=OFF, explicitPrecision=SINGLE, historyPrint=OFF, model='Fall-015', modelPrint=OFF,multiprocessingMode=THREADS, name='Job-015', nodalOutputPrecision=SINGLE, numCpus=1, numDomains=1, parallelizationMethodExplicit=LOOP,parallelizationMethodStandard=TREE, preMemory=1024.0, scratch='',standardMemory=2048.0, standardMemoryPolicy=MODERATE, type=ANALYSIS,userSubroutine='')生成任务mdb.saveAs(pathName='D:/temp/FundamentSchwingungStudie')保存模型mdb.jobs['Job-015'].submit()提交任务关于如何在python中提交多个任务的问题:如果您使用下面这样的命令做的提交mdb.jobs['Job-01'].submit()mdb.jobs['Job-02'].submit()mdb.jobs['Job-03'].submit()你就会看到, 所有的任务是一次性提交的, 多个任务在一起运行, 这肯定不是你想看到的结果, 如何完成一个接着一个的提交呢, 其实很简单, 在每个任务后面加上一句mdb.jobs['Job-01'].waitForCompletion()就可以了.那么上面的语句就改为mdb.jobs['Job-01'].submit()mdb.jobs['Job-01'].waitForCompletion()mdb.jobs['Job-02'].submit()mdb.jobs['Job-02'].waitForCompletion()mdb.jobs['Job-03'].submit()mdb.jobs['Job-03'].waitForCompletion()......就一切OK了。
在abaqus中利用python语言建模例子
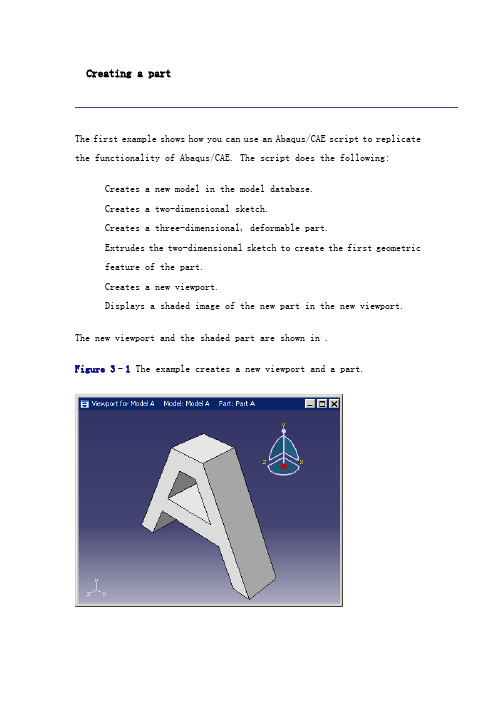
Creating a partThe first example shows how you can use an Abaqus/CAE script to replicate the functionality of Abaqus/CAE. The script does the following:Creates a new model in the model database.Creates a two-dimensional sketch.Creates a three-dimensional, deformable part.Extrudes the two-dimensional sketch to create the first geometric feature of the part.Creates a new viewport.Displays a shaded image of the new part in the new viewport.The new viewport and the shaded part are shown in .Figure 3–1 The example creates a new viewport and a part.The example scripts from this manual can be copied to the user's working directory by using the Abaqus fetch utility:abaqus fetch job=scriptNamewhere is the name of the script (see ). Use the following command to retrieve the script for this example:abaqus fetch job=modelAExampleNote: Abaqus does not install the sample scripts by default during the installation procedure. As a result, if the Abaqus fetch utility fails to find the sample script, the script may be missing from your Abaqus installation. You must rerun the installation procedure and request Abaqus sample problems from the list of items to install.To run the program, do the following:1.Start Abaqus/CAE by typing abaqus cae.2.From the startup screen, select Run Script.3.From the Run Script dialog box that appears, select .4.Click OK to run the script.Note: If Abaqus/CAE is already running, you can run the script by selecting File Run Script from the main menu bar.The example script"""A simple example: Creating a part."""from abaqus import *import testUtils()from abaqusConstants import *import sketchimport partmyModel = (name='Model A')mySketch = (name='Sketch A', sheetSize=xyCoordsInner = ((-5 , 20), (5, 20), (15, 0),(-15, 0), (-5, 20))xyCoordsOuter = ((-10, 30), (10, 30), (40, -30), (30, -30), (20, -10), (-20, -10),(-30, -30), (-40, -30), (-10, 30))for i in range(len(xyCoordsInner)-1):(point1=xyCoordsInner[i],point2=xyCoordsInner[i+1])for i in range(len(xyCoordsOuter)-1):(point1=xyCoordsOuter[i],point2=xyCoordsOuter[i+1])myPart = (name='Part A', dimensionality=THREE_D, type=DEFORMABLE_BODY)(sketch=mySketch, depth=myViewport = (name='Viewport for Model A',origin=(10, 10), width=150, height=100)(displayedObject=myPart)How does the script work?This section explains each portion of the example script.from abaqus import *This statement makes the basic Abaqus objects accessible to the script. It also provides access to a default model database using the variable named mdb. The statement, from abaqusConstants import *, makes the Symbolic Constants defined by the Abaqus Scripting Interface available to the script.import sketchimport partThese statements provide access to the objects related to sketches and parts. sketch and part are called Python modules.The next statement in the script is shown in . You can read this statement from right to left as follows:1.Create a new model named Model A.2.Store the new model in the model database mdb.3.Assign the new model to a variable called myModel.Figure 3–2 Creating a new model.mySketch = (name='Sketch A', sheetSize=This statement creates a new sketch object named Sketch A in myModel. The variable mySketch is assigned to the new sketch. The sketch will be placed on a sheet 200 units square. Note the following:A command that creates something (an “object” in object-orientedprogramming terms) is called a constructor and starts with anuppercase character. You have seen the Model and Sketch commands that create Model objects and Sketch objects, respectively.The command uses the variable myModel that we created in theprevious statement. Using variables with meaningful names in ascript makes the script easier to read and understand.xyCoordsInner = ((-5 , 20), (5, 20), (15, 0),(-15, 0), (-5, 20))xyCoordsOuter = ((-10, 30), (10, 30), (40, -30),(30, -30), (20, -10), (-20, -10),(-30, -30), (-40, -30), (-10, 30))These two statements define the X- and Y-coordinates of the vertices that form the inner and outer profile of the letter “A.” The variable xyCoordsInner refers to the vertices of the inner profile, and the variable xyCoordsOuter refers to the vertices of the outer profile.for i in range(len(xyCoordsInner)-1):(point1=xyCoordsInner[i],point2=xyCoordsInner[i+1])This loop creates the inner pr ofile of the letter “A” in mySketch. Four lines are created using the X- and Y-coordinates of the vertices in xyCoordsInner to define the beginning point and the end point of each line. Note the following:Python uses only indentation to signify the start and the end ofa loop. Python does not use the brackets {} of C and C++.The len() function returns the number of coordinate pairs inxyCoordsInner—five in our example.The range() function returns a sequence of integers. In Python, as in C and C++, the index of an array starts at zero. In our example range(4) returns 0,1,2,3. For each iteration of the loop in theexample the variable i is assigned to the next value in the sequence of integers.Similarly, a second loop creates the outer profile of the “A”character. myPart = (name='Part A',dimensionality=THREE_D, type=DEFORMABLE_BODY)This statement creates a three-dimensional, deformable part named Part A in myModel. The new part is assigned to the variable myPart. (sketch=mySketch, depth=This statement creates a base solid extrude feature in myPart by extruding mySketch through a depth of .myViewport = (name='Viewport for Model A',origin=(20,20), width=150, height=100)This statement creates a new viewport named Viewport for Model A in session. The new viewport is assigned to the variable myViewport. The origin ofthe viewport is at (20, 20), and it has a width of 150 and a height of 100.(displayedObject=myPart)This statement tells Abaqus to display the new part, myPart, in the new viewport, myViewport.statement sets the render style of the part display options in myViewport to shaded. As a result, myPart appears in the shaded render style.Reading from an output databaseThe second example shows how you can use the Abaqus Scripting Interface to read an output database, manipulate the data, and display the results using the Visualization module in Abaqus/CAE. The Abaqus Scripting Interface allows you to display the data even though you have not written it back to an output database. The script does the following:Opens the tutorial output database.Creates variables that refer to the first and second steps in the output database.Creates variables that refer to the last frame of the first and second steps.Creates variables that refer to the displacement field output in the last frame of the first and second steps.Creates variables that refer to the stress field output in the last frame of the first and second steps.Subtracts the displacement field output from the two steps and puts the result in a variable called deltaDisplacement.Subtracts the stress field output from the two steps and puts the result in a variable called deltaStress.Selects deltaDisplacement as the default deformed variable.Selects the von Mises invariant of deltaStress as the default field output variable.Plots a contour plot of the result.The resulting contour plot is shown in .Figure 3–3 The resulting contour plot.Use the following commands to retrieve the script and the output database that is read by the script:abaqus fetch job=odbExampleabaqus fetch job=viewer_tutorialThe example script"""Script to open an output database, superimpose variablesfrom the last frame of different steps, and display a contour plot of the result."""from abaqus import *from abaqusConstants import *import visualizationmyViewport = (name='Superposition example',origin=(10, 10), width=150, height=100)# Open the tutorial output database.myOdb = (path='')# Associate the output database with the viewport. (displayedObject=myOdb)# Create variables that refer to the first two steps.firstStep = ['Step-1']secondStep = ['Step-2']# Read displacement and stress data from the last frame# of the first two steps.frame1 = [-1]frame2 = [-1]displacement1 = ['U']displacement2 = ['U']stress1 = ['S']stress2 = ['S']# Find the added displacement and stress caused by# the loading in the second step.deltaDisplacement = displacement2 - displacement1deltaStress = stress2 - stress1# Create a Mises stress contour plot of the result.outputPosition=INTEGRATION_POINT,refinement=(INVARIANT, 'Mises'))How does the script work?This section explains each portion of the example script.from abaqus import *from abaqusConstants import *These statements make the basic Abaqus objects accessible to the script as well as all the Symbolic Constants defined in the Abaqus Scripting Interface.import visualizationThis statement provides access to the commands that replicate the functionality of the Visualization module in Abaqus/CAE (Abaqus/Viewer). myViewport = (name='Superposition example')This statement creates a new viewport named Superposition example in the session. The new viewport is assigned to the variable myViewport. The origin and the size of the viewport assume the default values. odbPath = ''This statement creates a path to the tutorial output database. myOdb = (path=odbPath)This statement uses the path variable odbPath to open the output database and to assign it to the variable myOdb.(displayedObject=myOdb)This statement displays the default plot of the output database in the viewport.firstStep = ['Step-1']secondStep = ['Step-2']These statements assign the first and second steps in the output database to the variables firstStep and secondStep.frame1 = [-1]frame2 = [-1]These statements assign the last frame of the first and second steps to the variables frame1 and frame2. In Python an index of 0 refers to the first item in a sequence. An index of –1 refers to the last item in a sequence.displacement1 = ['U']displacement2 = ['U']These statements assign the displacement field output in the last frame of the first and second steps to the variables displacement1 and displacement2.stress1 = ['S']stress2 = ['S']Similarly, these statements assign the stress field output in the last frame of the first and second steps to the variables stress1 and stress2. deltaDisplacement = displacement2 - displacement1This statement subtracts the displacement field output from the last frame of the two steps and puts the resulting field output into a new variable deltaDisplacement.deltaStress = stress2 - stress1Similarly, this statement subtracts the stress field output and puts the result in the variable deltaStress.This statement uses deltaDisplacement, the displacement field output variable that we created earlier, to set the deformed variable. This is the variable that Abaqus will use to display the shape of the deformed model.outputPosition=INTEGRATION_POINT,refinement=(INVARIANT, 'Mises'))This statement uses deltaStress, our stress field output variable, to set the primary variable. This is the variable that Abaqus will display in a contour or symbol plot.final statement sets the plot state to display a contour plot on the deformed model shape.SummaryThe examples illustrate how a script can operate on a model in a model database or on the data stored in an output database. The details of the commands in the examples are described in later sections; however, you should note the following:You can run a script from the Abaqus/CAE startup screen when you start a session. After a session has started, you can run a script from the File Run Script menu or from the command line interface.A script is a sequence of commands stored in ASCII format and canbe edited with a standard text editor.A set of example scripts are provided with Abaqus. Use the abaqusfetch command to retrieve a script and any associated files.You must use the import statement to make the required set of Abaqus Scripting Interface commands available. For example, the statement import part provides the commands that create and operate on parts.A command that creates something (an “object” in object-orientedprogramming terms) is called a constructor and starts with anuppercase character. For example, the following statement uses the Model constructor to create a model object.myModel = (name='Model A')The model object created is['Model A']You can use a variable to refer to an object. Variables make your scripts easier to read and understand. myModel refers to a model object in the previous example.A Python script can include a loop. The start and end of a loop iscontrolled by indentation in the script.Python includes a set of built-in functions. For example, the len() function returns the length of a sequence.You can use commands to replicate any operation that can be performed interactively when you are working with Abaqus/CAE; for example, creating a viewport, displaying a contour plot, and setting the step and the frame to display.。
使用python进行ABAQUS的二次开发的简要说明(byYoung2017.06.27)
使用python进行ABAQUS的二次开发的简要说明(byYoung2017.06.27)(所有用词以英文为准,翻译仅供参考)一、abaqus二次开发总述:首先最重要的知识点需要明确,abaqus在求解核心(Solver/ Kernel)和图形用户界面(GUI)之间使用的交互语言天然就是python,因此使用python进行abaqus二次开发是十分自然的选择(当然你也可以用C++,但是鉴于python所拥有的各类开源库函数的优势,python应当是二次开发的首选)。
abaqus已经使用python 写好了很多用于计算、建模、GUI等操作的模块,因此二次开发的重点在于灵活调用这些模块,完成自己的设计计算需求。
所以原则上,所有能通过abaqus/CAE交互完成的操作,使用脚本都可以实现。
并且由于Python提供的丰富的函数资源库,会使得很多复杂的建模的过程更加参数化,更加可控,有时候甚至更加简单。
其次二次开发的学习要点在于勤查手册,其中Abaqus Scripting User's Manual和Abaqus Scripting User's Reference Manual是查阅的重点,其中后者是abaqus中各个object内置方法,路径,输入参数等的详细说明。
最后关于调用脚本的几种用法说明:(1)直接在命令行调用调用脚本并打开cae界面: abaqus cae script=myscript.py调用用于可视化操作脚本,打开显示界面(注意:此时只有visualization模块被激活): abaqus cae viewer=myscript.py 调用脚本在命令行执行,同时不打开GUI界面,但会进入python 交互界面:abaqus cae noGUI=myscript.py(2)在abaqus的GUI界面调用按照Main Menu: File->Run Script,选择需要调用的脚本文件,abaqus会进行执行(3)在abaqus的命令行交互界面调用(command line interface,在abaqus的GUI界面打开之后,窗口的最下方会有命令输入的位置,在这里也可以调用python脚本,执行方法是键入命令:execfile('myscript.py')abaqus的python脚本其实和其他应用场景下的python脚本没有太多区别,只不过有很多abaqus已经开发好的对象库可供使用,其学习过程和学习任何其他python库都是一致的。
python abaqus 二次开发 循环 提交作业
在Python中进行ABAQUS二次开发时,可以使用循环来提交多个模拟任务。
以下是一个简单的示例代码,演示如何使用循环提交多个模拟任务:pythonimport abaqusfrom abaqus import *from abaqusConstants import *mdb = Mdb()# 定义模拟任务名称列表sim_names = ['sim1', 'sim2', 'sim3']# 循环提交模拟任务for sim_name in sim_names:# 创建模型model = mdb.models.newModel(name=sim_name)# 创建分析步骤step = model.StaticStep(name='step1', previous='Initial', timePeriod=1.0, initialInc=0.1, minInc=1e-05, maxInc=0.1)# 创建载荷和边界条件# ...# 提交模拟任务job = mdb.jobs.submit(name=sim_name, model=sim_name, steps=[step], ndm=1, nsm=0, nsteps=1, nc=0, np=1, fext='', fint='', fintp='', freq=0, nfreq=10, tsmear=0.0, dt=0.1, tend=1.0, timePeriod=1.0)在这个示例中,我们首先定义了一个包含多个模拟任务名称的列表sim_names。
然后,我们使用for循环遍历每个任务名称,创建一个新的模型,并在模型中定义一个静态分析步骤。
我们还定义了载荷和边界条件,并使用submit方法提交模拟任务。
在submit方法中,我们指定了模拟任务的名称、模型名称、分析步骤、网格尺寸、边界条件等参数。
- 1、下载文档前请自行甄别文档内容的完整性,平台不提供额外的编辑、内容补充、找答案等附加服务。
- 2、"仅部分预览"的文档,不可在线预览部分如存在完整性等问题,可反馈申请退款(可完整预览的文档不适用该条件!)。
- 3、如文档侵犯您的权益,请联系客服反馈,我们会尽快为您处理(人工客服工作时间:9:00-18:30)。
File → Run Script,打开相应的.py文件,即可执行; 刚打开ABAQUS界面,直接选择Run Script也可; 可以在GUI界面下部的命令行接口输入脚本语句执行。
ABAQUS 脚本概述
创建ABAQUS脚本
➢ 创建脚本有3种常用方法: ➢ ①在GUI建模时录制宏(macro)
Python在ABAQUS二次开发中 的应用实例
主要内容
• 一、ABAQUS 脚本概述 • 二、Python 语言简介 • 三、ABAQUS脚本编写
一、ABAQUS 脚本概述
ABAQUS 脚本概述
ABAQUS软件简介
➢ ABAQUS是国际著名的CAE软件,它以解决实际工业问题能力和强大 的非线性功能赢得广泛声誉。航空工业是ABAQUS最重要的应用领域 之一,波音、空中客车、洛克希德•马丁等是其长期合作的用户。
句,需要用分号分开。如:x=1;y=2;z=3。如果一个逻辑语句太长需要分行写, 需要用反斜杠“\”进行连接(有括号括起来的内容就不用)。 不同代码块之间要注意用冒号和缩进来区分代码块之间的层次关系,如:
for i in range(0,b3): if (iAnglelowfg[i]=='/'): for l in range(0,i-j-1): c3[k]=c3[k]+iAnglelowfg[j+l+1] j=i elif (iAnglelowfg[i]==']'):
优点:界面直观,简单易懂; 缺点:操作步骤繁琐,不利于修改,缺乏通用性。
➢ ②通过inp文件建模
优点:可以直接在ABAQUS中提交; 缺点:只包含模型节点信息,代码较多,修改不便;
➢ ③使用Python语言建模
优点:代码少,语言友好,可移 植性好,可进行参数化修改;
缺点:不够直观。
ABAQUS 脚本概述
中国石油大学焦中良开发 可以实时获取CAE每步操作对应的脚本命令
ABAQUS 脚本概述
调试ABAQUS脚本
➢ 调试脚本有多种方法,这里介绍Abaqus自带的PDE中的调试。 ➢ PDE(Python Development Environment,Python开发环境)有以下功能:
编辑Python文件、调试Python脚本或插件; 创建guiLog脚本,录制所有的GUI动作; 通过GUI(guiLog)运行Python脚本或在ABAQUS/CAE之外运行Python脚本; 设置延迟(delay)和断点(breakpoint),并查看代码的执行情况; 在watch窗口中查看变量值等。
➢ 打开方式
File → Abaqus PDE,然后打开相应的.py文件,即可编辑调试。
ABAQUS 脚本概述
调试ABAQUS脚本
点 点 点 点 点
按钮可以调试整个脚本文件; 按钮可以逐行调试脚本文件,调试行显示为蓝色; 按钮可以停止调试文件; 按钮可以设置断点,调试时将调到此行为止; 按钮,然后点 按钮,可以录制CAE中的操作,点
➢ ABAQUS脚本接口直接与内核进行 通 信 ( communicate ) , 而 与 ABAQUS/CAE 的 图 形 用 户 界 面 (GUI)无关。如果将所有的脚本 接口命令存储于文件中,该文件则 称为脚本(script)。脚本由一系列 纯ASCII格式的Python语句组成,扩 展名一般为.py。
File → Macro Manager 可以按需录制任何操作对应的命令
➢ ②直接编辑abaqus.rpy文件
建模时工作目录下自动生成abaqus.rpy文件 使用软件EditPlus可以直接打开编辑 保存.cae文件并退出后才能生成.rpy文件
➢ ③借助PythonReader.exe软件
Python 语言简介
基本规则
代码按级别从大到小解读,之间用操作符“.”连接。如:
mdb.models[‘Model-1’].materials[‘BPCOMPOSITE’].Depvar(n=5)
表示将模型‘model-1’的材料‘BPCOMPOSITE’里的子程序相关参数设为5。 语句前加上 # 号,表示是注释内容,这个语句将不被执行; 使用中文注释,要在文件最开始加上:# -*- coding: UTF-8-* 以换行来识别一个逻辑语句的结束。如果需要在一个物理行中编写多个逻辑语
➢ ABAQUS分析过程由三个步骤 组成:
前处理( ABAQUS/CAE ); 模拟计算(ABAQUS/Standard
或者ABAQUS/Explicit); 后处理( ABAQUS/CAE )。
➢ 建模过程主要集中在前处理步 骤中。
ABAQUS 脚本概述
ABAQUS建模方法
常用的ABAQUS建模方法主要有三种: ➢ ①在ABAQUS/CAE界面建模
命令行接口 (CLI)
命令
Python 解释器
ABAQUS/CAE
inp文件
ABAQUS/Standard ABAQUS/Explicit
odb文件
脚本 rpy文件
ABAQUS 脚本概述
ABAQUS脚本接口
➢ 编写脚本可以实现以下功能:
自动执行重复任务; 进行参数分析; 创建和修改模型; 访问输出数据库(ODB文件); 定制ABAQUS环境文件; 创建ABAQUS插件程序。
ABAQUS脚本接口
➢ ABAQUS有限元分析软件二次开发环境提供的脚本接口,是基于Python语言进行的定 制开发。
➢ 在 ABAQUS/CAE 中 进 行 建 模 和 进
GUI
行后处理时,对话框中做的所有设 置 都 由 ABAQUS/CAE 从 内 部 发 出 与之对应的命令(command)。
Python 语言简介
保留字段
➢ 定义变量名、函数名的时候,避免使用保留字段。如:
保留字段 and \ not \ or break continue class def if \ else \ elif print while from \ import return
说明 逻辑“与”“非”“或” 中止循环语句 继续执行下一次循环 定义类 定义函数或者方法 条件判断语句 输出语句 循环语句 导入模块 返回函数计算结果
