烽火汇聚交换机常用配置
中兴,华为,烽火交换机常用配置命令教程

中兴,华为,烽火交换机常用配置命令教程交换机工作于OSI参考模型的第二层,即数据链路层。
交换机内部的CPU会在每个端口成功连接时,通过将MAC地址和端口对应,形成一张MAC表,不同品牌交换机配置可能有所不同,本文将详细介绍中兴,华为,烽火交换机常用配置参数,需要的朋友可以参考下ZXDSL8210常用命令查看板卡类型和软硬件版本号 showcard进入DSL模式 dsl查看端口状态 showinfo查看ADSL速率摸板 showprof更改端口应用的速率摸板 linecfg查看ADSL端口的线路质量 showperf打开ADSL端口 enable关闭ADSL端口 disable重启ADSL端口 resetport进入atm atm在atm下查看PVC showvcx allZXDSL8220常用命令查看板卡类型和软硬件版本号 sh card查看ADSL端口状态 show adsl status查看ADSL速率摸板 show adsl profile查看速率摸板D3M具体信息 show adsl profile d3m更新端口的流量信息 update adsl-perf card_list/port_list关闭ADSL端口 shutdown interface打开ADSL端口 no shutdown interfaceZXDSL9210设备常用命令查看板卡配置和版本号 show card查看设备版本号 show version查看ADSL端口状态 show interface查看一块板卡端口状态 show adsl status slot 1查看ADSL端口线路质量 show adsl physical查看ADSL线路摸板种类 show adsl profile查看D3M摸板的配置 show adsl profile d3m进入ADSL端口 int adsl-mpvc card/port关闭ADSL端口 shutdown打开ADSL端口 no shutdown中兴SU3查看板卡状态 show card all查看端口状态 show port查看速率摸板 show adsl lineprofile all查看线路质量 show adsl port端口号 option physical 开端口 port 端口号 enable关端口 port 端口号 disable华为MA5100&MA5103常用命令保存系统配制数据到FLASH内存 save查看单板状态 show board阻塞端口 block解除阻塞端口 no block激活端口 activate去激活端口 deactivate套片复位 chipset reset 0MA5300常用命令保存系统配置3 write查看单板状态 show board 0查看adsl端口状态 show adsl port state查看vdsl端口状态 show vdsl port state查看告警 show alarm history all查看板卡类型和运行状态 show board查看vlan show vlan all配制摸板 adsl line-profile add 3激活端口 adsl activate adsl 端口 3MA5600常用命令保存系统配制数据到FLASH内存 save查看单板状态 display board 0查看所有配制信息 disp running -config查看ADSL端口状态 display adsl port state查看vdsl端口状态 display vdsl port state查看xdsl 配置摸板 display adsl line-profile all查看vlan display vlan all查看告警 displayalarm history all查看上行板卡端口状态 display port state查看某个vlan所绑定下行端口 display vlan VLAN号查看上行板卡端口所绑定的vlan display port vlan配制摸板 adsl line-profile adddisplay interface adsl 0/1/1中兴交换机配置个人心得:命令的使用要注意各种用户模式。
烽火交换机简单配置说明
烽火交换机简单配置与故障排查说明本文档针对烽火网管系列交换机简单配置做以下说明,请每个工作人员仔细阅读,牢固掌握交换机配置使用规范,防止人为使用设备不当造成的网络故障。
一,所有交换机从线路上撤回如果没有损坏,经测试可以复用的,必须经过以下配置放可再投入使用。
步骤1 交换机原有配置清除登录交换机将网线插入交换机外接配置口ETH口,在本地计算机配置网络IP: 192.168.2.5 子网掩码:255.255.255.0 网关地址默认不输入任何IP,在本地计算机打开IE浏览器在地址栏输入192.168.2.1用户名admin 密码12345界面如下选择左边配置选项系统配置-系统重启-最后选项(rebootToFactoryDault)选择设置系统充气后便还愿为出厂设置。
步骤2 重新再配置交换机-隔离端口首先按原有方式进入交换机配置界面,配置端口隔离Pvlan选择左边配置VLAN配置-私有VLAN配置在pvlan号输入1 除了1口上联口保持-状态其他端口均点选为| 状态如图然后选择设置设备完成后状态如上图,然后保存设置选择系统配置保存配置选择SA VE 后点选设置完毕。
步骤3 加入到小区任何地方,在系统上均要写入楼号单元层等信息。
选择-系统配置-系统信息,在系统名称里如上图写入交换机所在位置信息,写入后点选设置设置完毕后,选择保存配置选择SA VE 点选设置完毕。
二.更换小区主节点交换机配置说明所有小区主节点交换机均配置有管理IP地址,所有更换行为均要通知宽带部63313048 或63313028,新换交换机均要配置原有管理IP地址方可更换。
更换后经专家座席确认管理地址生效后放可离开工作现场。
按上述方法进入交换机管理界面,在系统配置-网络配置中按照上图方法写入相应的管理IP 和网关,写入后点选设置生效。
每个主节点为主管理交换机,相应配置角色为命令行交换机,配置方法如下图在集群管理-全局配置角色选择命令交换机选择确认后选设置生效,然后保存设置,完毕。
烽火交换机最常用配置命令
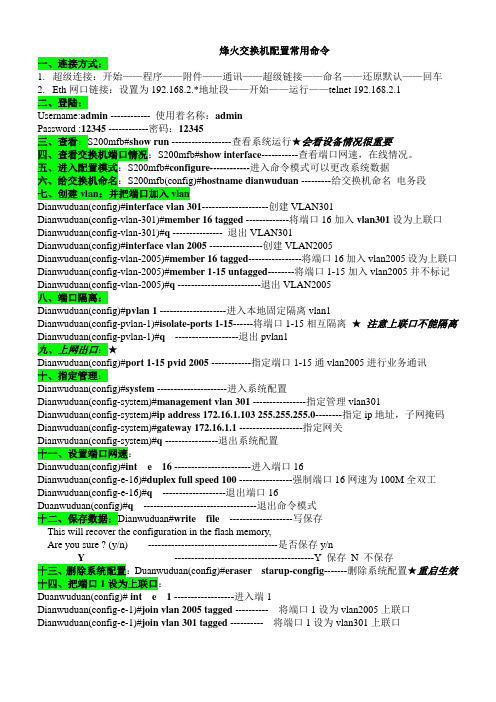
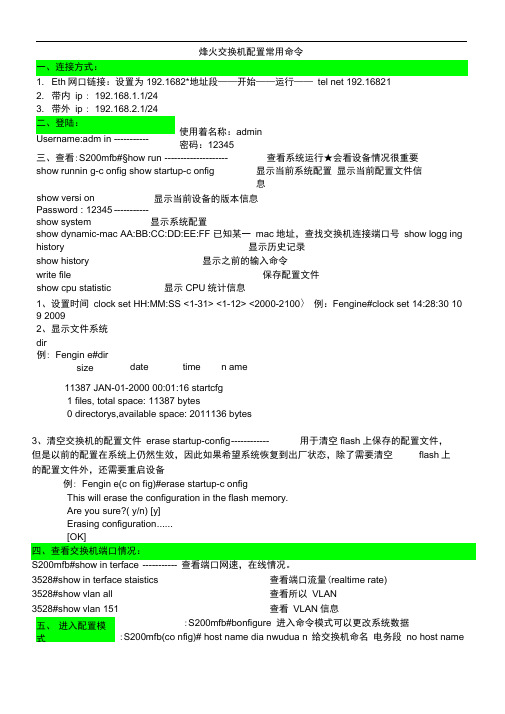
烽火交换机配置常用命令一、连接方式:1.超级连接:开始——程序——附件——通讯——超级链接——命名——还原默认——回车2.Eth网口链接:设置为192.168.2.*地址段——开始——运行——telnet 192.168.2.1二、登陆:Username:admin ------------ 使用着名称:adminPassword :12345 ------------密码:12345三、查看:S200mfb#show run ------------------查看系统运行★会看设备情况很重要四、查看交换机端口情况:S200mfb#show interface-----------查看端口网速,在线情况。
五、进入配置模式:S200mfb#configure------------进入命令模式可以更改系统数据六、给交换机命名:S200mfb(config)#hostname dianwuduan ---------给交换机命名电务段七、创建vlan:并把端口加入vlanDianwuduan(config)#interface vlan 301--------------------创建VLAN301Dianwuduan(config-vlan-301)#member 16 tagged -------------将端口16加入vlan301设为上联口Dianwuduan(config-vlan-301)#q --------------- 退出VLAN301Dianwuduan(config)#interface vlan 2005 ----------------创建VLAN2005Dianwuduan(config-vlan-2005)#member 16 tagged----------------将端口16加入vlan2005设为上联口Dianwuduan(config-vlan-2005)#member 1-15 untagged--------将端口1-15加入vlan2005并不标记Dianwuduan(config-vlan-2005)#q -------------------------退出VLAN2005八、端口隔离:Dianwuduan(config)#pvlan 1 --------------------进入本地固定隔离vlan1Dianwuduan(config-pvlan-1)#isolate-ports 1-15------将端口1-15相互隔离★注意上联口不能隔离Dianwuduan(config-pvlan-1)#q-------------------退出pvlan1九、上网出口:★Dianwuduan(config)#port 1-15 pvid 2005 ------------指定端口1-15通vlan2005进行业务通讯十、指定管理:Dianwuduan(config)#system ---------------------进入系统配置Dianwuduan(config-system)#management vlan 301 ----------------指定管理vlan301Dianwuduan(config-system)#ip address 172.16.1.103255.255.255.0--------指定ip地址,子网掩码Dianwuduan(config-system)#gateway 172.16.1.1 -------------------指定网关Dianwuduan(config-system)#q ----------------退出系统配置十一、设置端口网速:Dianwuduan(config)#int e 16 -----------------------进入端口16Dianwuduan(config-e-16)#duplex full speed 100 ----------------强制端口16网速为100M全双工Dianwuduan(config-e-16)#q-------------------退出端口16Duanwuduan(config)#q ----------------------------------退出命令模式十二、保存数据:Dianwuduan#write file-------------------写保存This will recover the configuration in the flash memory,Are you sure ? (y/n) ---------------------------------------是否保存y/nY ------------------------------------------Y 保存N 不保存十三、删除系统配置:Duanwuduan(config)#eraser starup-congfig-------删除系统配置★重启生效十四、把端口1设为上联口:Duanwuduan(config)# int e 1 ------------------进入端1Dianwuduan(config-e-1)#join vlan 2005 tagged ---------- 将端口1设为vlan2005上联口Dianwuduan(config-e-1)#join vlan 301 tagged ---------- 将端口1设为vlan301上联口Dianwuduan(config-e-1)#pvid 1 ----------------------- 取消端口1的pvid 出口。
烽火交换机常用配置

二、烽火交换机配置:❑接入方式通过Console口进行本地配置带内/带外的telnet或sshWEB页面❑部分有关管理的缺省设置带内ip:192.168.1.1/24带外ip:192.168.2.1/24本机登陆用户名、密码:admin,12345或guest,12345SNMP的只读集合:publicSNMP的读写集合:NETMAN❑Web页面配置根据交换机配置的默认web管理地址通过IE浏览器进行配置以烽火2008mfb为例❑设备缺省的web网管IP地址为192.168.2.1;❑设备缺省的用户名为:admin❑密码为:12345❑选择成员及类型时,可以通过单击代表相应端口类型的字符,选择合适的配置。
其中“-”代表不是该VLAN的成员,“T”代表是该VLAN的成员输出数据包带标识符,“U”代表是该VLAN的成员但输出数据包不带标识符,“T”“U”表示该接口的Pvid时该vlan。
❑查看及保存配置(特权模式下#)❑show running-config 显示当前系统配置❑show startup-config 显示当前配置文件信息❑show version 显示当前设备的版本信息❑show system 显示系统配置❑show interface [<1-64>] 显示端口信息❑show vlan [<1-4094>] 显示vlan信息❑show dynamic-mac AA:BB:CC:DD:EE:FF已知某一mac地址,查找交换机连接端口号❑show logging history 显示历史记录❑show history 显示之前的输入命令❑ls 显示文件系统❑write file 保存配置文件❑show cpu statistic 显示CPU统计信息。
❑1、设置时间❑clock set HH:MM:SS <1-31> <1-12> <2000-2100>❑例:Fengine#clock set 14:28:30 10 9 2009❑2、显示文件系统❑dir❑例:Fengine#dir❑size date time name❑-------- ------ ------ --------❑11387 JAN-01-2000 00:01:16 startcfg❑ 1 files, total space: 11387 bytes❑0 directorys,available space: 2011136 bytes❑3、清空交换机的配置文件erase startup-config用于清空flash上保存的配置文件,但是以前的配置在系统上仍然生效,因此如果希望系统恢复到出厂状态,除了需要清空flash上的配置文件外,还需要重启设备例:Fengine(config)#erase startup-configThis will erase the configuration in the flash memory.Are you sure?(y/n) [y]Erasing configuration.......[OK]❑4、配置交换机系统的名字。
烽火交换机配置说明

步骤1 启动超级终端选择“开始>所有程序>附件>通讯>超级终端”菜单项,Windows XP 系统启动超级终端。
步骤2 新建连接如图1-2 所示。
在“名称”文本框中输入新建连接的名称;选择图标。
然后单击“确定”按钮。
图1-2 新建连接步骤3 设置连接端口进入如图1-3 所示的[连接到]窗口后,请根据PC(或配置终端)实际使用的端口在“连接时使用”下拉列表框中进行选择。
然后单击“确定”按钮。
图1-3 连接端口设置步骤4 设置通信参数进入如图1-4 所示的[端口属性]窗口后,请按表1-1 中的描述进行通信参数的设置。
说明在其它的Windows 操作系统中,“每秒位数”可能被描述为“波特率”;“数据流控制”可能被描述为“流量控制”。
图1-4 端口通信参数设置表1-1 通信参数参数取值每秒位数(波特率)9600数据位8奇偶校验无停止位1数据流控制(流量控制)无步骤5 启动超级终端后,选择“文件>属性”菜单项,进入如图1-5 所示的[连接属性]窗口。
选择“设置”页签,在“终端仿真”下拉列表框中选择“VT100”。
单击“确定”按钮结束设置。
图1-5 终端类型选择后续处理按照以上5 个步骤结束设置后,按下“Enter”键,屏幕出现<Quidway>提示符,表示进入命令行接口。
此时就可输入命令,配置或管理S-switch。
<Quidway><Quidway>system-view[Quidway][Quidway]traffic classifier xiansu[Quidway-classifier-xiansu]if-match any[Quidway-classifier-xiansu]quit[Quidway][Quidway]traffic behavior xiansu[Quidway-behavior-xiansu]car cir 2048 cbs 409600 //cbs=200*cir(此部分不输入,为注释部分,1024代表限速100K,2048即200K,CBS后面是前面数字的200倍)[Quidway-behavior-xiansu]quit[Quidway][Quidway]traffic policy xiansu[Quidway-trafficpolicy-xiansu]classifier xiansu behavior xiansu[Quidway-trafficpolicy-xiansu]quit[Quidway][Quidway]interface Ethernet0/0/1[Quidway-Ethernet0/0/1]traffic-policy xiansu inbound //入方向限速1M(此部分不输入,为注释部分)[Quidway-Ethernet0/0/1]qos lr cir 2048 cbs 409600 //出方向限速1M(此部分不输入,为注释部分,1024代表限速100K,2048即200K,CBS后面是前面数字的200倍)[Quidway-Ethernet0/0/1]quit结束以下为更改限速,即重新限速需要输入下列命令:<Quidway><Quidway>system-view[Quidway][Quidway]interface Ethernet0/0/1[Quidway-Ethernet0/0/1]undo traffic-policy inbound[Quidway-Ethernet0/0/1]undo qos lr然后重复第一步的动作。
华为中兴烽火交换机配置加组播配置

中兴交换机可以登录到交换机,会出现如下提示:其中login为admin,password为zhongxing。
登录到设备后,便进入用户模式,用户模式的提示符是交换机的主机名后跟一个“>”,如下:在用户模式下输入enable命令(或缩写en)和相应口令后,即可进入全局配置模式,缺省无密码。
如下所示:这样就进入全局配置模式,在该模式下,可以进行全局数据的配置和配置信息的查看。
清空配置:一般在进行数据配置之前,需要清空原有数据,防止原有数据和即将配置的数据产生冲突或者带来隐患。
在配置前,可以通过show run命令查看现有设备的配置,如果有数据,则需要清空,操作如下:配置主机名用户名默认为zte ,一般根据需要作修改,这样会便于记忆,能更好的区分设备。
zte(cfg)#hostname 2826E_2F 在全局模式下修改2826E_2F(cfg)#主机名已经有zte 变成设置的2826E-2F 了。
设置系统日期和时间一般情况下,设备的开机时间为出产时间,在使用交换机之前,需要修改系统时间。
这样在查询设备告警等信息时时间才准确。
首先,查看系统时间,看是否准确,命令为show date-time然后修改系统时间,set date xx time xx 例如:设置登录用户名和密码在telnet 到交换机时,需要设置交换机的用户名和密码,默认情况下使用console 的用户名和密码。
默认情况下,登陆到全局模式的enable 密码为空,建议设置密码以保证交换机的安全。
命令如下: 设置远程登录地址set ipport 0 ipaddress 0.0.0 1注:如只想检测而不关闭端口,请配置关闭端口的保护功能。
组播功能配置具体配置如下:............................... 为端口创建描述名称命令格式 ............... 命令模式命令功能create port <portnumber> name <name> 全局为端口创建描述名称clear port <portlist> name 全局清除端口名称烽火交换机S2000交换机命令行登录及主机名配置1.交换机的登录Username: adminPassword: 123452.进入交换机的配置模式Fengine#configFengine(config) #3.配置交换机的主机名主机名的格式是:地市名称+郊县名称_乡镇名称-设备厂商缩写_设备型号Fengine(config)# hostname Y-YTCun_WHZ_SW2016-1S2000交换机的VLAN配置与查看业务要求:1-2口上联,3-5口上网(vlan1000),6-9可视电话(2103),10-16 IPTV (2104) 配置过程:config /配置模式下int vlan 1000 /创建上网vlan1000 进入vlan配置模式mem 1-2 tag /将上联口1-2添加到vlan 1000 ,上联口设置成tag 模式mem 3-5 untag /添加上网用户接口,用户接口设置成untag模式q /退出vlan1000,返回配置模式int vlan 2103 /创建可视电话vlan 2103mem 1-2 tag /将上联口1-2添加到vlan 2103 ,上联口设置成tag 模式mem 6-9 untag /添加可视电话用户接口,用户接口设置成untagqint vlan 2104mem 1-2 tagmem 10-16 untagqport 3-5 pvid 1000 /设置用户接口的pvid,pvid值与所在vlan值相同port 6-9 pvid 2103 /设置用户接口的pvid,pvid值与所在vlan值相同port 10-16 pvid 2104port 1-16 flow-ctrl disable 关闭所有端口流量控制在普通模式下输入show vlan命令来查看vlan配置结果,如下交换机网管的配置与查看config /进入配置模式int vlan 100 /在交换机内创建管理vlan 100(更改管理VLAN前必须先创建所要使用的VLAN)mem 1-2 tag /上联口加入管理vlan,这里假设为1-2口qsystem /进入系统配置模式ip add 10.1.1.1 /配置交换机带内远程网管IP地址和掩码gateway 10.1.1.254 /配置网关management vlan100 /指定vlan 100为管理vlan说明:网管IP和网关地址,管理VLAN的配置根据具体规划而定。
烽火交换机基本配置
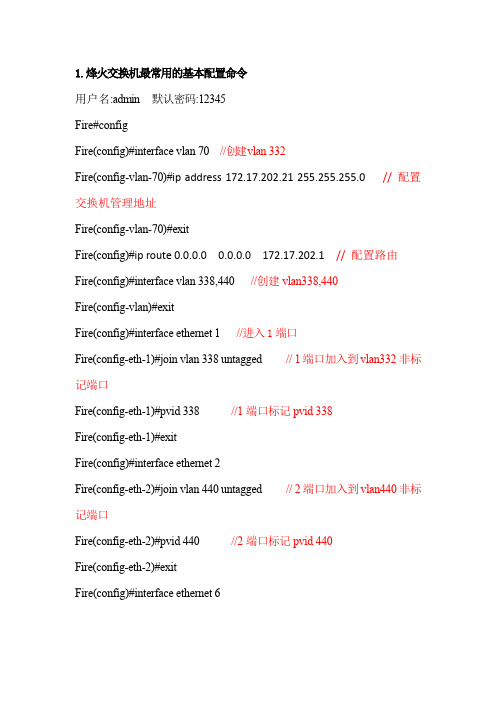
1.烽火交换机最常用的基本配置命令用户名:admin 默认密码:12345Fire#configFire(config)#interface vlan 70 //创建vlan 332Fire(config-vlan-70)#ip address 172.17.202.21255.255.255.0// 配置交换机管理地址Fire(config-vlan-70)#exitFire(config)#ip route 0.0.0.0 0.0.0.0 172.17.202.1 // 配置路由Fire(config)#interface vlan 338,440 //创建vlan338,440Fire(config-vlan)#exitFire(config)#interface ethernet 1 //进入1端口Fire(config-eth-1)#join vlan 338 untagged // 1端口加入到vlan332 非标记端口Fire(config-eth-1)#pvid 338 //1端口标记pvid 338Fire(config-eth-1)#exitFire(config)#interface ethernet 2Fire(config-eth-2)#join vlan 440 untagged // 2端口加入到vlan440非标记端口Fire(config-eth-2)#pvid 440 //2端口标记pvid 440Fire(config-eth-2)#exitFire(config)#interface ethernet 6Fire(config-eth-6)#join vlan 70,338,440 tag // 6端口加入到vlan70,338,440 标记端口Fire(config-eth-6)#exitFire(config)#exitFire#write file // 保存2.烽火交换机常用命令Fire#show interface 1 // 查看1端口状态Fire#show interface staistics 1 // 查看端口流量(realtime rate)Fire#show vlan all // 查看所有VLANFire#show vlan 338 // 查看VLAN信息Fire(config)#no vlan 338 // 删除vlan 332Fire(config-eth-9)#shutdown // 关闭9号端口Fire(config-eth-9)#no shutdown // 开启9号端口Fire(config-vlan-338)#description yewu // vlan描述Fire(config-eth-1)#description yewu // 端口描述Fire(config-eth-1)#rate-limit rx 1024 //限速收为1M带宽(数值必须是64的整数倍)例:20480为20MFire(config-eth-1)#rate-limit tx 1024 //限速发为1M带宽(数值必须是64的整数倍)例:20480为20M。
烽火交换机常用的基本配置命令配置案例
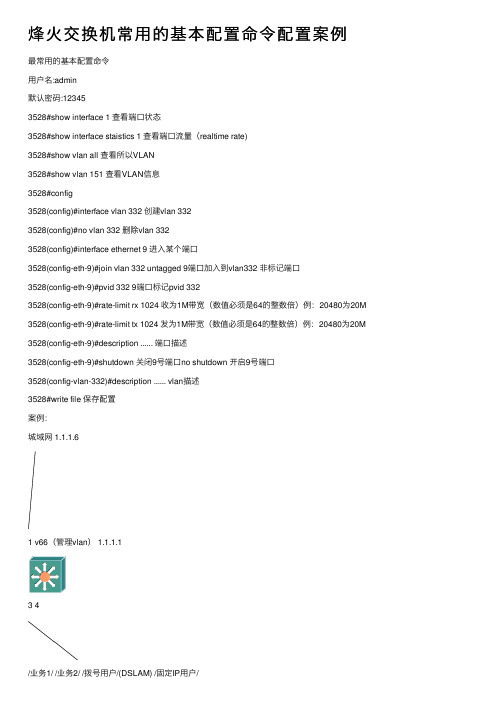
烽⽕交换机常⽤的基本配置命令配置案例最常⽤的基本配置命令⽤户名:admin默认密码:123453528#show interface 1 查看端⼝状态3528#show interface staistics 1 查看端⼝流量(realtime rate)3528#show vlan all 查看所以VLAN3528#show vlan 151 查看VLAN信息3528#config3528(config)#interface vlan 332 创建vlan 3323528(config)#no vlan 332 删除vlan 3323528(config)#interface ethernet 9 进⼊某个端⼝3528(config-eth-9)#join vlan 332 untagged 9端⼝加⼊到vlan332 ⾮标记端⼝3528(config-eth-9)#pvid 332 9端⼝标记pvid 3323528(config-eth-9)#rate-limit rx 1024 收为1M带宽(数值必须是64的整数倍)例:20480为20M 3528(config-eth-9)#rate-limit tx 1024 发为1M带宽(数值必须是64的整数倍)例:20480为20M 3528(config-eth-9)#description ...... 端⼝描述3528(config-eth-9)#shutdown 关闭9号端⼝no shutdown 开启9号端⼝3528(config-vlan-332)#description ...... vlan描述3528#write file 保存配置案例:城域⽹ 1.1.1.61 v66(管理vlan) 1.1.1.13 4/业务1/ /业务2/ /拨号⽤户/(DSLAM) /固定IP⽤户/V100 V200 V300 V400(打标的原则:A.设备接设备tag,设备接⽤户untag;B.端⼝对端打标状态始终与本端⼝⼀致,即对端tag,则端⼝tag,对端untag,则端⼝untag.C.untag的端⼝⼀定要打相应的pvid值)1 在config模式下创建vlan,更改⽤户名和密码,更改主机名称S3500(config)#hostname HostA更改主机名称HostA (config)#S3500(config)#adduser aaa group administrators password 111增加⼀个名为“aaa”,密码为111管理员⽤户S3500(config)#interface vlan 100创建vlan100并进⼊S3500(config-vlan-100)# interface vlan 200创建vlan200并进⼊S3500(config-vlan-200)#quit退出vlan200S3500(config)# interface vlan 66,300,400创建vlan300和400,在config模式下创建vlan如果只带1个参数则表⽰创建这个vlan 并进⼊,如果跟2个参数,则代表创建连续的多个vlan,vlan号为第1个参数到第2个参数,使⽤no命令删除,命令⾏定义跟创建vlan⼀样2 在vlan配置模式下,绑定vlan的IP地址S3500(config-vlan-66)#ip address 1.1.1.1 255.255.255.255在vlan内绑定IP地址S3500(config-vlan-66)#quit退出vlan配置模式S3500(config)#3 配置⽹管使⽤的ACL配置了VLAN IP在以后属于这个VLAN的任意⼀个端⼝是不能ping通交换机的,必须要配置ACL并将ACL应⽤到端⼝以后才可以在此端⼝PING通交换机以及telnetS3500(config)# access-list 1创建access-list 1并进⼊(ACL)S3500(config-acl-1)# rule 1 arp any 1.1.1.1 255.255.255.255此处IP地址为绑定的IP地址S3500(config- acl-1)#rule 1 action traptocpu onlyS3500(config- acl-1)#quit退出S3500(config)#4 在端⼝配置模式下配置端⼝信息在举例中交换机,需要在端⼝上启⽤ACL,透传vlanS3500(config)#interface ethernet 1进⼊端⼝1S3500(config-eth-1)#join vlan 66,100,200,300 tag端⼝1加⼊vlan100,200,300,400,为打标端⼝,此命令格式为join vlan 1,3,5-7,不连续vlan之间⽤“,”号隔开,连续vlan间⽤“-”隔开(1,3,5-7表⽰加⼊1,3,5,6,7)后⾯跟tagged或者untagged,定义端⼝为打标端⼝(tagged),或者为不打标端⼝(untagged)。
烽火交换机配置
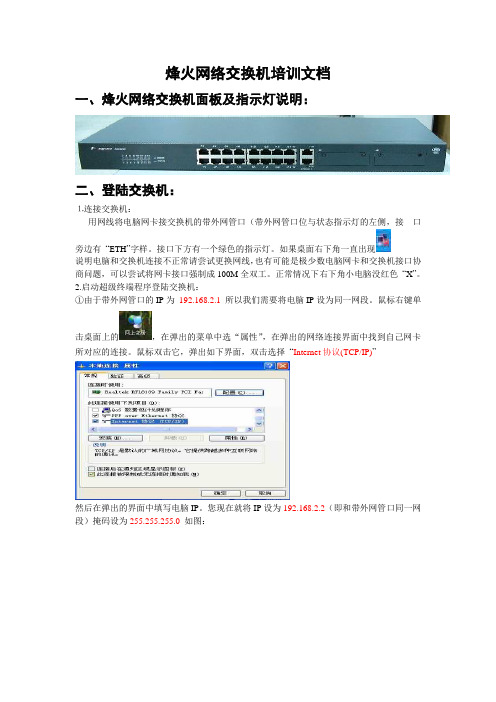
烽火网络交换机培训文档一、烽火网络交换机面板及指示灯说明:二、登陆交换机:⒈连接交换机:用网线将电脑网卡接交换机的带外网管口(带外网管口位与状态指示灯的左侧,接口旁边有“ETH”字样。
接口下方有一个绿色的指示灯。
如果桌面右下角一直出现说明电脑和交换机连接不正常请尝试更换网线,也有可能是极少数电脑网卡和交换机接口协商问题,可以尝试将网卡接口强制成100M全双工。
正常情况下右下角小电脑没红色“X”。
2.启动超级终端程序登陆交换机:①由于带外网管口的IP为192.168.2.1所以我们需要将电脑IP设为同一网段。
鼠标右键单击桌面上的,在弹出的菜单中选“属性”,在弹出的网络连接界面中找到自己网卡所对应的连接。
鼠标双击它,弹出如下界面,双击选择“Internet协议(TCP/IP)”然后在弹出的界面中填写电脑IP。
您现在就将IP设为192.168.2.2(即和带外网管口同一网段)掩码设为255.255.255.0如图:②启动超级终端程序:点桌面上的,选择“所有程序”->“附件”->“通讯”->“超级终端”。
如图:。
如果第一次登陆,需要您填写电话号码什么的,随意乱填就行,直到看到如下界面“连接使用时”选择“TCP/IP(Winsock)”地址填写:192.168.2.1,端口23点“确定”后即可登陆交换机。
若您配置的是S2008MA交换机,使用串口配置线登陆,则直接选择相应的COM口。
三.交换机VLAN的配置1.假设1-2口上联,3-5口上网(vlan1000),6-9可视电话(2103),10-16IPTV(2104)admin12345 /按上面一节讲的方法登录交换机,看到交换机界面后依次输入用户名密码进入交换机config /配置模式下int vlan 1000 /创建上网vlan1000mem 1-2 tag /将上联口1-2添加到vlan 1000 ,上联口设置成tag 模式mem 3-5 untag /添加上网用户接口,用户接口设置成untag模式qint vlan 2103 /创建可视电话vlan 2103mem 1-2 tag /将上联口1-2添加到vlan 2103 ,上联口设置成tag 模式mem 6-9 untag /添加可视电话用户接口,用户接口设置成untagqint vlan 2104mem 1-2 tagmem 10-16 untagq /返回配置模式port 3-5 pvid 1000 /设置用户接口的pvid,pvid值与所在vlan值相同port 6-9 pvid 2103 /设置用户接口的pvid,pvid值与所在vlan值相同port 10-16 pvid 2104port 1-16 flow-ctrl disable 关闭所有端口流量控制///////////////如果看IPTV和视频电话业务需配置如下命令一般业务不用配置/////////////////////// port 1-16 packet-limit broadcast 0 /关闭所有端口广播包限制port 1-16 packet-limit dlf 0 /关闭所有端口dlf包限制port 1-16 packet-limit multicast 0 /关闭所有端口组播包限制port 1-16 packet-limit b-m /关闭广播包组播包混合限制这个限制选项有的软件版本没有port 1-16 packet-limit b-m-f /关闭广播、组播、DLF包组合限制这个限制选项有的软件版本没有igmp-snoop /进入组播监听功能配置模式igmp-snoop enable /开启IPTV 视频电话所需的组播监听功能quit /返回配置模式/////////////////////////////////////////////////////////////////////////////////////////////////////////////////////////////////////////// quit /返回普通模式write file /保存配置回车/确认保存2.配置完后,可以在普通模式下输入show vlan命令来查看vlan配置结果,如下:3.如果本台交换机还需要加挂交换机,那么完全可以下挂在1口或2口上。
S200烽火交换基本配置(自编)

************************************************* Switch OS (Version 1.23 ) ** ** For Fengine S2000MFB ** ** Copyright 2000-2007 FiberHome Networks *************************************************User Access VerificationUsername: admin (用户名)Password: ***** (密码12345)S2000MFB#show run(查看系统配置)Current Configuration:hostname S2000MFBno auth-degenerate!!logging configuration.logging onlogging history 3logging terminal 7no logging syslog!!!User configuration.adduser admin group administrators password 827ccb0eea8a706c4c34a16891f84e7b config-file auto-save disableconfig-file auto-upload disable!!SNMP Configurationsnmp location WuHan-Chinasnmp contact R&D WuHan, FHN Technologies co.,Ltd.snmp auth-trap enablesnmp timertrap interval defaultsnmp timertrap disable!management ACL configurationmanagement acl disable!syslog server configuration!line console 1length 24monitortimeout 10 0login locallanguage englishno colorline vty 1 5length 24no monitortimeout 10 0login locallanguage englishno color!!SGM Configurationsgmsgm role candidatesgm trap-translation disable!!Cos Configurationcoscos disablecos queue mode weighted-round-robin cos queue 0 weight 1cos queue 1 weight 2cos queue 2 weight 4cos queue 3 weight 8cos priority 0 queue 0cos priority 1 queue 0cos priority 2 queue 1cos priority 3 queue 1cos priority 4 queue 2cos priority 5 queue 2cos priority 6 queue 3cos priority 7 queue 3cos priority remap disablecos priority 0 map-to 0cos priority 1 map-to 0cos priority 2 map-to 0cos priority 3 map-to 0cos priority 4 map-to 0cos priority 5 map-to 0cos priority 6 map-to 0cos priority 7 map-to 0!!!Vlan Configurationinterface vlan 1member 1-9 untaggedinterface vlan 50member 1 tagged!!MAC Aging Configurationmac aging-time 300mac learn-mode independence!!System Configurationsystemmanagement vlan 50ip address 10.127.41.7/24gateway 10.127.41.1out-band ip address 192.168.2.1/24arp-request timer 0anti-attack enabledot1q ingress-filter disablebpdu tunnel mac 01:80:C2:00:00:03 uplink-port 0 !!Igmp Snooping Configurationigmp-snoopingigmp-snooping proxy vlan 1igmp-snooping proxy disableigmp-snooping disableigmp-snooping fast-leave disableigmp-snooping drop-filtered enableigmp-snooping proxy igmpv3-support disable igmp-snooping max multicast-group 256!!Radius Configurationradiusradius disable!!Dot1x Configurationdot1x disabledot1x user lock disabledot1x user lock fail-times 3dot1x user lock trap enable!!Loop Check configurationloop-check trap disableloop-check action isolationloop-check expire-time 0!!Dtag Configuration!!Dhcp Configuration!!Spnm Configurationspnmspnm disablespnm password switchspnm send-access-mac disable spnm community NETMAN!!Rmon configuration!!Anti-arp Configurationanti-arp disable!ftpd configurationno ftpd!!Ethernet Configuration interface ethernet 1join vlan 50 taggedjoin vlan 1 untaggedauto-neg 10M half enable auto-neg 10M full enable auto-neg 100M half enable auto-neg 100M full enable auto-neg pause disable duplex full speed 100flow-ctrl disablepacket-limit broadcast 64 packet-limit multicast 0 packet-limit dlf 64no shutdownloop-check enableloop-check vlan 1dtag disablesecurity-mac disableuser-limit number 0interface ethernet 2join vlan 1 untaggedauto-neg 10M half enable auto-neg 10M full enableauto-neg 100M half enable auto-neg 100M full enable auto-neg pause disable duplex full speed 100flow-ctrl disablepacket-limit broadcast 64 packet-limit multicast 0 packet-limit dlf 64no shutdownloop-check enableloop-check vlan 1dtag disablesecurity-mac disableuser-limit number 0interface ethernet 3join vlan 1 untaggedauto-neg 10M half enable auto-neg 10M full enable auto-neg 100M half enable auto-neg 100M full enable auto-neg pause disable duplex full speed 100flow-ctrl disablepacket-limit broadcast 64 packet-limit multicast 0 packet-limit dlf 64no shutdownloop-check enableloop-check vlan 1dtag disablesecurity-mac disableuser-limit number 0interface ethernet 4join vlan 1 untaggedauto-neg 10M half enable auto-neg 10M full enable auto-neg 100M half enable auto-neg 100M full enable auto-neg pause disable duplex full speed 100flow-ctrl disablepacket-limit broadcast 64packet-limit multicast 0 packet-limit dlf 64no shutdownloop-check enableloop-check vlan 1dtag disablesecurity-mac disableuser-limit number 0interface ethernet 5join vlan 1 untaggedauto-neg 10M half enable auto-neg 10M full enable auto-neg 100M half enable auto-neg 100M full enable auto-neg pause disable duplex full speed 100flow-ctrl disablepacket-limit broadcast 64 packet-limit multicast 0 packet-limit dlf 64no shutdownloop-check enableloop-check vlan 1dtag disablesecurity-mac disableuser-limit number 0interface ethernet 6join vlan 1 untaggedauto-neg 10M half enable auto-neg 10M full enable auto-neg 100M half enable auto-neg 100M full enable auto-neg pause disable duplex full speed 100flow-ctrl disablepacket-limit broadcast 64 packet-limit multicast 0 packet-limit dlf 64no shutdownloop-check enableloop-check vlan 1dtag disablesecurity-mac disableuser-limit number 0interface ethernet 7join vlan 1 untaggedauto-neg 10M half enable auto-neg 10M full enable auto-neg 100M half enable auto-neg 100M full enable auto-neg pause disable duplex full speed 100flow-ctrl disablepacket-limit broadcast 64 packet-limit multicast 0 packet-limit dlf 64no shutdownloop-check enableloop-check vlan 1dtag disablesecurity-mac disableuser-limit number 0interface ethernet 8join vlan 1 untaggedauto-neg 10M half enable auto-neg 10M full enable auto-neg 100M half enable auto-neg 100M full enable auto-neg pause disable duplex full speed 100flow-ctrl disablepacket-limit broadcast 64 packet-limit multicast 0 packet-limit dlf 64no shutdownloop-check enableloop-check vlan 1dtag disablesecurity-mac disableuser-limit number 0interface ethernet 9join vlan 1 untagged duplex autoflow-ctrl disablepacket-limit broadcast 64packet-limit multicast 0packet-limit dlf 64no shutdownloop-check enableloop-check vlan 1dtag disablesecurity-mac disableuser-limit number 0!!end (以上是本机系统配置)S2000MFB#configure(进入系统模式)%Enter configuration commands.End with Ctrl+Z or command "quit" & "end"S2000MFB(config)#interface vlan 50 200(创建上网VLAN 50到200之间的值)51,52,53,54,55,56,57,58,59,60,61,62,63,64,65,66,67,68,69,70,71,72,73,74,75,76,77,78,79,80,81,8 2,83,84,85,86,87,88,89,90,91,92,93,94,95,96,97,98,99,100,101,102,103,104,105,106,107,108,10 9,110,111,112,113,114,115,116,117,118,119,120,121,122,123,124,125,126,127,128,129,130,131 ,132,133,134,135,136,137,138,139,140,141,142,143,144,145,146,147,148,149,150,151,152,153, 154,155,156,157,158,159,160,161,162,163,164,165,166,167,168,169,170,171,172,173,174,175,1 76,177,178,179,180,181,182,183,184,185,186,187,188,189,190,191,192,193,194,195,196,197,19 8,199,200,(以下是一个端口,我以第2个端口为例,下面端口重复操作)S2000MFB(config)#interface vlan100(创建上网VLAN 100 )S2000MFB(config-vlan-100)#member 2untagged(将上联口2添加到NLAN 100,untag模式)S2000MFB(config-vlan-100)#q(退回)S2000MFB(config)#port2-3pvid 100(设置用户接口的pvid,pvid值与所在vlan值相同S2000MFB(config)#qS2000MFB#configure%Enter configuration commands.End with Ctrl+Z or command "quit" & "end"S2000MFB(config)#interface ethernet 2(进入端口2设置模式)S2000MFB(config-eth-2)#description To_LianYunGang(设置描述“To_LianYunGang”)S2000MFB(config-eth-2)#qS2000MFB(config)#q(以下是上行口的配置)S2000MFB#configure%Enter configuration commands.End with Ctrl+Z or command "quit" & "end"S2000MFB(config)#interface ethernet1{进入端口1设置模式即上行口(根据设备设端口)}S2000MFB(config-eth-1)#join vlan 50-200tagged(上行口通过的vlan值,模式为tag)S2000MFB(config-eth-1)#no join vlan 1(不让vlan 1通过)S2000MFB(config-eth-1)#qS2000MFB(config)#q(以下是管理VLAN的配置)S2000MFB#configure%Enter configuration commands.End with Ctrl+Z or command "quit" & "end"S2000MFB(config)#interface vlan 50(创建管理VLAN为50)S2000MFB(config-vlan-50)#member 1-2tagged (将上联口1添加到vlan 50,tag模式)S2000MFB(config-vlan-50)#qS2000MFB(config)#syssyslog systemS2000MFB(config)#system(进入系统配置模式)S2000MFB(config-system)#ip address192.168.1.1 255.255.255.0(配置交换机带内远程网管IP地址和掩码)S2000MFB(config-system)#gateway 192.168.1.0(配置网关)S2000MFB(config-system)#management vlan50(指定vlan 50为管理vlan)S2000MFB(config-system)#qS2000MFB(config)#qS2000MFB#write fil(写入)确定(Y)注:1,show run 查看系统配置2,no XXX no+指令就是删除当前的配置3,write fil 写入修改后的指令永久保存蓝色部分为系统指令!红色为要配置的数据!。
烽火汇聚交换机常用配置
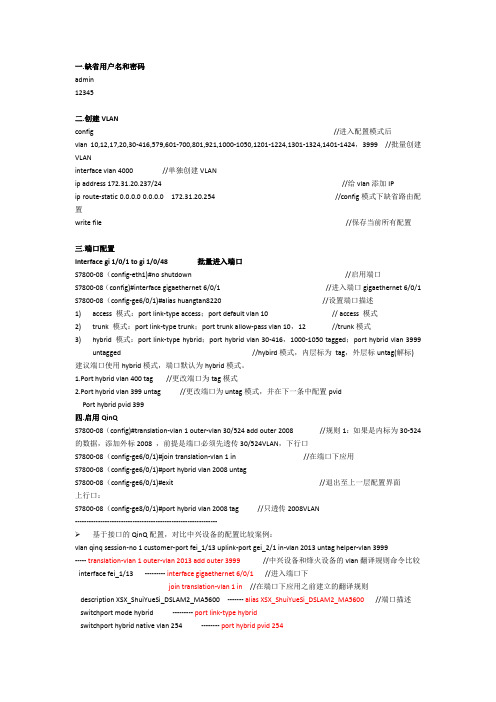
一.缺省用户名和密码admin12345二.创建VLANconfig //进入配置模式后vlan10,12,17,20,30-416,579,601-700,801,921,1000-1050,1201-1224,1301-1324,1401-1424,3999 //批量创建VLANinterface vlan 4000 //单独创建VLANip address 172.31.20.237/24 //给vlan添加IPip route-static 0.0.0.0 0.0.0.0 172.31.20.254 //config模式下缺省路由配置write file//保存当前所有配置三.端口配置Interface gi 1/0/1 to gi 1/0/48 批量进入端口S7800-08(config-eth1)#no shutdown //启用端口S7800-08(config)#interface gigaethernet 6/0/1 //进入端口gigaethernet 6/0/1 S7800-08(config-ge6/0/1)#alias huangtan8220 //设置端口描述1)access 模式:port link-type access;port default vlan 10 //access 模式2)trunk 模式:port link-type trunk;port trunk allow-pass vlan 10,12 //trunk模式3)hybrid 模式:port link-type hybrid;port hybrid vlan30-416,1000-1050tagged;port hybrid vlan 3999untagged//hybird模式,内层标为tag,外层标untag(解标)建议端口使用hybrid模式,端口默认为hybrid模式。
1.Port hybrid vlan 400 tag //更改端口为tag模式2.Port hybrid vlan 399 untag //更改端口为untag模式,并在下一条中配置pvidPort hybrid pvid 399四.启用QinQS7800-08(config)#translation-vlan 1 outer-vlan 30/524 add outer 2008 //规则1:如果是内标为30-524的数据,添加外标2008 ,前提是端口必须先透传30/524VLAN,下行口S7800-08(config-ge6/0/1)#join translation-vlan 1 in //在端口下应用S7800-08(config-ge6/0/1)#port hybrid vlan 2008 untagS7800-08(config-ge6/0/1)#exit //退出至上一层配置界面上行口:S7800-08(config-ge8/0/1)#port hybrid vlan 2008 tag//只透传2008VLAN--------------------------------------------------------------基于接口的QinQ配置,对比中兴设备的配置比较案例:vlan qinq session-no 1 customer-port fei_1/13 uplink-port gei_2/1 in-vlan 2013 untag helper-vlan 3999-----translation-vlan 1 outer-vlan 2013 add outer 3999 //中兴设备和烽火设备的vlan翻译规则命令比较interface fei_1/13 --------- interface gigaethernet 6/0/1//进入端口下join translation-vlan 1 in//在端口下应用之前建立的翻译规则description XSX_ShuiYueSi_DSLAM2_MA5600 -------aliasXSX_ShuiYueSi_DSLAM2_MA5600//端口描述switchport mode hybrid --------- port link-type hybridswitchport hybrid native vlan 254 --------port hybrid pvid 254switchport hybrid vlan 2013 tag ---------port hybrid vlan 2013 tagswitchport hybrid vlan 254 untag --------port hybrid vlan 254 untagswitchport hybrid vlan 3999 untag ---------port hybrid vlan 3999 untagswitchport qinq customer ----------dot1q tunnel enable上联口中兴设备需要定义uplink,烽火设备无需该配置,将外层标签定义为untag即可。
烽火交换机配置命令集
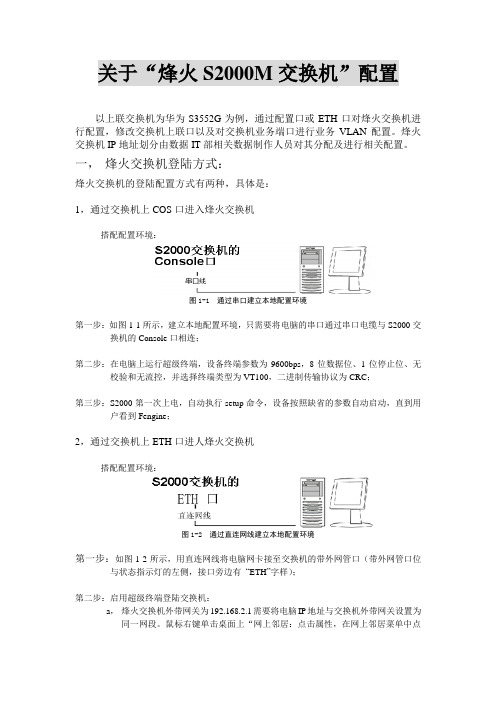
关于“烽火S2000M交换机”配置以上联交换机为华为S3552G为例,通过配置口或ETH口对烽火交换机进行配置,修改交换机上联口以及对交换机业务端口进行业务VLAN配置。
烽火交换机IP地址划分由数据IT部相关数据制作人员对其分配及进行相关配置。
一,烽火交换机登陆方式:烽火交换机的登陆配置方式有两种,具体是:1,通过交换机上COS口进入烽火交换机搭配配置环境:图1-1 通过串口建立本地配置环境第一步:如图1-1所示,建立本地配置环境,只需要将电脑的串口通过串口电缆与S2000交换机的Console口相连;第二步:在电脑上运行超级终端,设备终端参数为9600bps,8位数据位、1位停止位、无校验和无流控,并选择终端类型为VT100,二进制传输协议为CRC;第三步:S2000第一次上电,自动执行setup命令,设备按照缺省的参数自动启动,直到用户看到Fengine;2,通过交换机上ETH口进人烽火交换机搭配配置环境:图1-2 通过直连网线建立本地配置环境第一步:如图1-2所示,用直连网线将电脑网卡接至交换机的带外网管口(带外网管口位与状态指示灯的左侧,接口旁边有“ETH”字样);第二步:启用超级终端登陆交换机:a,烽火交换机外带网关为192.168.2.1需要将电脑IP地址与交换机外带网关设置为同一网段。
鼠标右键单击桌面上“网上邻居:点击属性,在网上邻居菜单中点击属性,如图1-3;图1-3 本地连接属性b,单击internet 协议(TCP/IP),将IP地址设置为192.168.2.2 (与烽火外带网关设置为同一网段),子网掩码设置为255.255.255.0 ,如图1-4;图1-4 interface 协议(TCP/IP)属性c,点击桌面“开始”-“程序“-“附件”-“通讯”-“超级终端”,进入到超级终端的“连接描述”在名称对话框中随便输个名称列如:123,进入到“连接到”,如图1-5 ;图1-5:连接描述选项框d,进入“连接到”后,点击“连接时使用”选现中的“TCP/IP(winsock),在主机地址中输入:192.168.2.1 点击确定直到用户看到Fengine,如图1-6。
烽火交换机配置命令
烽火交换机配置常用命令1. Eth 网口链接:设置为192.1682*地址段——开始——运行—— tel net 192.16821 2. 带内 ip : 192.168.1.1/24 Password : 12345 ----------- show system 显示系统配置show dynamic-mac AA:BB:CC:DD:EE:FF 已知某一 mac 地址,查找交换机连接端口号 show logg ing history 显示历史记录 show history 显示之前的输入命令 保存配置文件显示CPU 统计信息 1、设置时间 clock set HH:MM:SS <1-31> <1-12> <2000-2100〉 例:Fengine#clock set 14:28:30 109 20092、显示文件系统 dir11387 JAN-01-2000 00:01:16 startcfg1 files, total space: 11387 bytes0 directorys,available space: 2011136 bytes3、清空交换机的配置文件 erase startup-config ------------ 用于清空flash 上保存的配置文件,但是以前的配置在系统上仍然生效,因此如果希望系统恢复到出厂状态,除了需要清空flash 上的配置文件外,还需要重启设备例: Fengin e(c on fig)#erase startup-c onfigThis will erase the configuration in the flash memory. Are you sure?( y/n) [y] Erasing configuration ...... S200mfb#show in terface ----------- 查看端口网速,在线情况。
烽火交换机基本配置
1.烽火交换机最常用的基本配置命令用户名:admin 默认密码:12345Fire#configFire(config)#interface vlan 70 //创建vlan 332Fire(config-vlan-70)#ip address 172.17.202.21255.255.255.0// 配置交换机管理地址Fire(config-vlan-70)#exitFire(config)#ip route 0.0.0.0 0.0.0.0 172.17.202.1 // 配置路由Fire(config)#interface vlan 338,440 //创建vlan338,440Fire(config-vlan)#exitFire(config)#interface ethernet 1 //进入1端口Fire(config-eth-1)#join vlan 338 untagged // 1端口加入到vlan332 非标记端口Fire(config-eth-1)#pvid 338 //1端口标记pvid 338Fire(config-eth-1)#exitFire(config)#interface ethernet 2Fire(config-eth-2)#join vlan 440 untagged // 2端口加入到vlan440非标记端口Fire(config-eth-2)#pvid 440 //2端口标记pvid 440Fire(config-eth-2)#exitFire(config)#interface ethernet 6Fire(config-eth-6)#join vlan 70,338,440 tag // 6端口加入到vlan70,338,440 标记端口Fire(config-eth-6)#exitFire(config)#exitFire#write file // 保存2.烽火交换机常用命令Fire#show interface 1 // 查看1端口状态Fire#show interface staistics 1 // 查看端口流量(realtime rate)Fire#show vlan all // 查看所有VLANFire#show vlan 338 // 查看VLAN信息Fire(config)#no vlan 338 // 删除vlan 332Fire(config-eth-9)#shutdown // 关闭9号端口Fire(config-eth-9)#no shutdown // 开启9号端口Fire(config-vlan-338)#description yewu // vlan描述Fire(config-eth-1)#description yewu // 端口描述Fire(config-eth-1)#rate-limit rx 1024 //限速收为1M带宽(数值必须是64的整数倍)例:20480为20MFire(config-eth-1)#rate-limit tx 1024 //限速发为1M带宽(数值必须是64的整数倍)例:20480为20M。
(烽火)交换机简易操作指南(V1[1].0)
![(烽火)交换机简易操作指南(V1[1].0)](https://img.taocdn.com/s3/m/17f2b413a8114431b80dd802.png)
WLAN项目烽火交换机简易操作指南一.WLAN项目烽火交换机快速登录方法:1.将电脑网线连接到交换机右下角的ETH口(带外网管登录)(1)汇聚交换机S3528F-AC (S3928MF-220)将自己的电脑设置为192.168.0.10 子网掩码255.255.255.0 无网关,无DNS开始—运行—cmd—telnet 192.168.0.1Username: adminPassword: 12345(2)POE交换机S2200ME-PAF-AC将自己的电脑设置为192.168.2.10 子网掩码255.255.255.0 无网关,无DNS开始—运行—cmd—telnet 192.168.2.1Username: adminPassword: 123452.将串口线连接到交换机右上角的CON口(CONSOLE线登录)开始—所有程序—附件—通讯—超级终端每秒位数9600数据位8奇偶校验无停止位1数据流控制无Username: adminPassword: 12345二.以烽火S2216ME-PAF-AC交换机为例,示范烽火POE交换机基本查障命令行以及一些简单的故障检测应对措施:(1)查看交换机各端口对AP的供电功率show pse int可见,交换机1-15口均有功率且基本为3000mW左右即3W左右。
如果某端口功率较其他端口功率过低且工作不正常的话,建议检查如下三点:①AP是否工作正常。
②网线质量、长度方面是否存在问题。
③是否已经安装了AP自带供电模块。
(2)查看交换机各端口状态以上可见,交换机1-15口均为UP状态,同时上联口为18口也UP。
如果某端口物理连接上已经有AP,但端口未UP,建议检查如下三点:①AP是否工作正常。
②网线质量、长度方面是否存在问题。
③如未使用AP自带供电模块,请show pse int查看是否使能了POE交换机供电功能(3)关闭1-16端口供电功能(4)打开1-16端口供电功能(5)查看交换机各端口连接AP的MAC地址㈠如果有未能学习到某端口AP的MAC地址的情况,建议检查如下两点:①AP是否工作正常。
烽火交换机配置说明

烽火交换机配置说明步骤1 启动超级终端选择“开始>所有程序>附件>通讯>超级终端”菜单项,Windows XP 系统启动超级终端。
步骤2 新建连接如图1-2 所示。
在“名称”文本框中输入新建连接的名称;选择图标。
然后单击“确定”按钮。
图1-2 新建连接步骤3 设置连接端口进入如图1-3 所示的[连接到]窗口后,请根据PC(或配置终端)实际使用的端口在“连接时使用”下拉列表框中进行选择。
然后单击“确定”按钮。
图1-3 连接端口设置步骤4 设置通信参数进入如图1-4 所示的[端口属性]窗口后,请按表1-1 中的描述进行通信参数的设置。
说明在其它的Windows 操作系统中,“每秒位数”可能被描述为“波特率”;“数据流控制”可能被描述为“流量控制”。
图1-4 端口通信参数设置表1-1 通信参数参数取值每秒位数(波特率)9600数据位8奇偶校验无停止位1数据流控制(流量控制)无步骤5 启动超级终端后,选择“文件>属性”菜单项,进入如图1-5 所示的[连接属性]窗口。
选择“设置”页签,在“终端仿真”下拉列表框中选择“VT100”。
单击“确定”按钮结束设置。
图1-5 终端类型选择后续处理按照以上5 个步骤结束设置后,按下“Enter”键,屏幕出现提示符,表示进入命令行接口。
此时就可输入命令,配置或管理S-switch。
system-view[Quidway][Quidway]traffic classifier xiansu[Quidway-classifier-xiansu]if-match any[Quidway-classifier-xiansu]quit[Quidway][Quidway]traffic behavior xiansu[Quidway-behavior-xiansu]car cir 2048 cbs 409600 //cbs=200*cir(此部分不输入,为注释部分,1024代表限速100K,2048即200K,CBS后面是前面数字的200倍)[Quidway-behavior-xiansu]quit[Quidway][Quidway]traffic policy xiansu[Quidway-trafficpolicy-xiansu]classifier xiansu behavior xiansu[Quidway-trafficpolicy-xiansu]quit[Quidway][Quidway]interface Ethernet0/0/1[Quidway-Ethernet0/0/1]traffic-policy xiansu inbound //入方向限速1M(此部分不输入,为注释部分)[Quidway-Ethernet0/0/1]qos lr cir 2048 cbs 409600 //出方向限速1M(此部分不输入,为注释部分,1024代表限速100K,2048即200K,CBS后面是前面数字的200倍)[Quidway-Ethernet0/0/1]quit结束以下为更改限速,即重新限速需要输入下列命令:system-view[Quidway][Quidway]interface Ethernet0/0/1[Quidway-Ethernet0/0/1]undo traffic-policy inbound[Quidway-Ethernet0/0/1]undo qos lr然后重复第一步的动作。
烽火S2224ME-PAF交换机基本配置V2.0
烽火S2224ME-PAF交换机基本配置举例1、Console线配置1.1 连接配置第一步:将PC通过串口电缆与交换机的Console口相连;第二步:在微机上运行仿真程序(如超级终端或SecureCRT),设备终端参数为9600bps,8位数据位、1位停止位、无校验和无流控;第三步:交换机第一次上电,设备按照缺省的参数自动启动,直到用户登录界面;1.2 基本配置举例假设本交换机1-22口接AP,并要求开启POE供电功能;23-26口作为级联口。
AP的管理VLAN为200,WLAN业务VLAN为300,交换机管理VLAN 为400,IP为192.168.2.5/24,网关为192.168.2.1(交换机管理VLAN也可以和AP为相同管理VLAN)。
(彩色底色部分为变量)配置命令如下:admin //默认管理员账户12345 //默认登录密码conf //进入配置模式int vlan 200 //创建AP管理VLAN 200,并进入配置member 1-22 untagged //将1-22口,以untagged模式加入VLAN 200 app 1-22 //将1-22口pvid设为AP管理VLAN相同ID member 23-26 tagged //将23-26口,以tagged模式加入VLAN 200 exit //返回到配置模式int vlan 300 //创建业务VLAN 300,并进入配置member 1-26 tagged //将全部端口以tagged模式加入VLAN 300exit //返回到配置模式int vlan 400 //创建交换机管理VLAN 400member 23-26 tagged //将23-26口,以tagged模式加入VLAN 400 exit //返回到配置模式system //进入系统配置模式management vlan 400 //设置交换机管理VLAN为400ip address 192.168.2.5/24 //配置交换机管理地址及掩码gate 192.168.2.1 //配置交换机管理地址网关exit //返回到配置模式port 1-22 pse enable //开启1-22口POE供电功能exit //返回到特权模式wr f //保存配置y //确定保存假设本交换机1-16口接AP,并要求开启POE供电功能;17-22口作为有线接入使用(17-22口可以通过有线测试业务VLAN,一般情况下WLAN工程建议不作此配置);23-26口作为级联口。
- 1、下载文档前请自行甄别文档内容的完整性,平台不提供额外的编辑、内容补充、找答案等附加服务。
- 2、"仅部分预览"的文档,不可在线预览部分如存在完整性等问题,可反馈申请退款(可完整预览的文档不适用该条件!)。
- 3、如文档侵犯您的权益,请联系客服反馈,我们会尽快为您处理(人工客服工作时间:9:00-18:30)。
一.缺省用户名和密码admin12345二.创建VLANconfig //进入配置模式后vlan 10,12,17,20,30-416,579,601-700,801,921,1000-1050,1201-1224,1301-1324,1401-1424,3999 //批量创建VLANinterface vlan 4000 //单独创建VLANip address 172.31.20.237/24 //给vlan添加IPip route-static 0.0.0.0 0.0.0.0 172.31.20.254 //config模式下缺省路由配置write file //保存当前所有配置三.端口配置Interface gi 1/0/1 to gi 1/0/48 批量进入端口S7800-08(config-eth1)#no shutdown //启用端口S7800-08(config)#interface gigaethernet 6/0/1 //进入端口gigaethernet 6/0/1 S7800-08(config-ge6/0/1)#alias huangtan8220 //设置端口描述1)access 模式:port link-type access;port default vlan 10 // access 模式2)trunk 模式:port link-type trunk;port trunk allow-pass vlan 10,12 //trunk模式3)hybrid 模式:port link-type hybrid;port hybrid vlan 30-416,1000-1050 tagged;port hybrid vlan 3999untagged //hybird模式,内层标为tag,外层标untag(解标) 建议端口使用hybrid模式,端口默认为hybrid模式。
1.Port hybrid vlan 400 tag //更改端口为tag模式2.Port hybrid vlan 399 untag //更改端口为untag模式,并在下一条中配置pvidPort hybrid pvid 399四.启用QinQS7800-08(config)#translation-vlan 1 outer-vlan 30/524 add outer 2008 //规则1:如果是内标为30-524的数据,添加外标2008 ,前提是端口必须先透传30/524VLAN,下行口S7800-08(config-ge6/0/1)#join translation-vlan 1 in //在端口下应用S7800-08(config-ge6/0/1)#port hybrid vlan 2008 untagS7800-08(config-ge6/0/1)#exit //退出至上一层配置界面上行口:S7800-08(config-ge8/0/1)#port hybrid vlan 2008 tag //只透传2008VLAN--------------------------------------------------------------➢基于接口的QinQ配置,对比中兴设备的配置比较案例:vlan qinq session-no 1 customer-port fei_1/13 uplink-port gei_2/1 in-vlan 2013 untag helper-vlan 3999----- translation-vlan 1 outer-vlan 2013 add outer 3999 //中兴设备和烽火设备的vlan翻译规则命令比较interface fei_1/13 --------- interface gigaethernet 6/0/1 //进入端口下join translation-vlan 1 in //在端口下应用之前建立的翻译规则description XSX_ShuiYueSi_DSLAM2_MA5600 ------- alias XSX_ShuiYueSi_DSLAM2_MA5600 //端口描述switchport mode hybrid --------- port link-type hybridswitchport hybrid native vlan 254 -------- port hybrid pvid 254switchport hybrid vlan 2013 tag --------- port hybrid vlan 2013 tagswitchport hybrid vlan 254 untag -------- port hybrid vlan 254 untagswitchport hybrid vlan 3999 untag ---------port hybrid vlan 3999 untagswitchport qinq customer ---------- dot1q tunnel enable上联口中兴设备需要定义uplink,烽火设备无需该配置,将外层标签定义为untag即可。
五.端口聚合S7800-08(config)#interface eth-trunk 1 // 聚合端口配置,新建trunk1 S7800-08(config-eth-trunk-1)#port link-type trunk //配置trunk1的端口模式S7800-08(config-eth-trunk-1)#port trunk allow-pass vlan 2002-2009 //设置trunk口透传VLANS7800-08(config-eth-trunk-1)#mode lacp-static //模式建议使用LACP静态S7800-08(config)#interface gigaethernet 6/0/2 //进入端口S7800-08(config-ge6/0/2)#join eth-trunk 1 //应用聚合规则S7800-08(config)#interface gigaethernet 6/0/3 //进入端口S7800-08(config-ge6/0/3)#join eth-trunk 1 //应用聚合规则六.端口镜像S7800-08(config)#mirror group 1 gigaethernet 6/0/9 //创建镜像组1,设置目的端口为6/0/09 S7800-08(config)#interface gigaethernet 6/0/10 //进入源端口被监控口S7800-08(config-ge6/0/10)#mirror both group 1 //在源端口应用镜像组1,双向七. Igmp-Snooping配置igmp-snooping{start|stop} 命令用来全局使能/去使能组播监听协议。
igmp-snooping{enable|disable}命令用来配置在接口上使能/去使能组播监听。
igmp-snooping mvlan 命令用来创建/删除组播VLAN 并在创建VLAN 时进入mvlan节点,配置本命令前需在全局配置视图下执行igmp-snooping start 和接口配置视图下执行igmp-snooping enable。
S7808(config)#igmp-snooping startS7808(config)#interface gigaethernet 1/0/20S7808(config-ge1/0/20)#igmp-snooping enableS7808(config-ge1/0/20)#quitS7808(config)#igmp-snooping mvlan 100S7808(config-igmpsnoop-mvlan100)#show igmp-snooping 命令用来显示和查看全局配置信息,包括igmp-snooping 使能状态、查询报文的次数、全局通用最大查询时间、全局老化时间等状态。
SDJI-QF-S7812-T3#show igmp-snoopingIgmp-snooping : startRobustness : 2Query Interval : 60 secondsMax Response Time : 10 secondsLastmember Query Number : 2Lastmember Query Interval : 1 secondsV2router Aging Time : 180 secondsshow igmp-snooping egress-port命令用来显示和查看IGMP-snooping 配置模式下出端口的配置信息,包括出端口的组播地址(group address)、组播VLAN(MVLAN)、接口(interface) 以及类型(type)等等信息。
S7808#show igmp-snooping egress-portTotal Entry(s) : 3Group Address : 239.253.244.1MVlan : 80Source Address : *Interface : eth-trunk-2Type : dynamicExpires : 00:00:55Out Vlan : 80V3 Mode : invalidGroup Address : 239.253.244.2MVlan : 80Source Address : *Interface : eth-trunk-2Type : dynamicExpires : 00:00:55Out Vlan : 80V3 Mode : invalidGroup Address : 239.253.244.4MVlan : 80Source Address : *show igmp-snooping group 命令用来显示和查看IGMP-snooping 配置模式下组播组的配置信息,包括组播组的组播地址(group address)、组播VLAN(MVLAN)以及预加入组播的成员信息等等。
S7808#show igmp-snooping groupTotal Entry(s) : 5Group Address MVlan Pre-join MemNum V3FilterMode239.253.244.1 80 disable 1 invalid239.253.244.2 80 disable 1 invalid239.253.244.4 80 disable 1 invalid239.253.244.5 80 disable 1 invalid239.253.244.7 80 disable 1 invalid八.其他常用命令1)第三方光模块兼容允许:进入端口后S7800-08(config-ge6/0/1)#service unsupported-transcriver enableS7800-08(config-ge6/0/1)#errdisable detect cause gbic-invalid disable2)其他帮助命令show run查看所有配置信息show version查看软件版本信息show device查看所有板卡信息show interface gigaethernet 6/0/12查看该端口信息show interface gigaethernet 6/0/12 conf查看该配置信息show mac-dy vlan 962查看该vlan下所有动态mac地址信息show mac-dy interface gigaethernet 6/0/12查看该端口下所有动态mac地址信息3)修改设备名称:hostname FHN-S7800-ShuiYueShi_S7800修改用户名和密码:username zxr10 password admin simple定义新用户权限为:username zxr10 domain telnet/consol/ssh4)配置设备loopback地址S7800-08(config)#interface loopback 1S7800-08(config-L 0)#ip address 10.0.0.1 255.255.255.2555)配置用户登录失败检查user reauth-interval 0username admin reauth-interval 06)检查背板连接,建议升级完后使用此命令test higig status all7)查看激光器Show laser hard detial(注:文档可能无法思考全面,请浏览后下载,供参考。