雅马哈功放维修手册(含电路图)Yamaha-A1
YAMAHA DSP-A1

IMPORTANT Please record the serial number of this unit in the space below. Model: Serial No.:
The serial number is located on the rear of the unit. Retain this Owner’s Manual in a safe place for future reference.
This product, when installed as indicated in the instructions contained in this manual, meets FCC requirements. Modifications not expressly approved by Yamaha may void your authority, granted by the FCC, to use the product.
10 Power Sources – The unit should be connected to a
power supply only of the type described in the operating instructions or as marked on the unit.
YAMAHA 功率放大器P4500 P3200 P1600 说明书
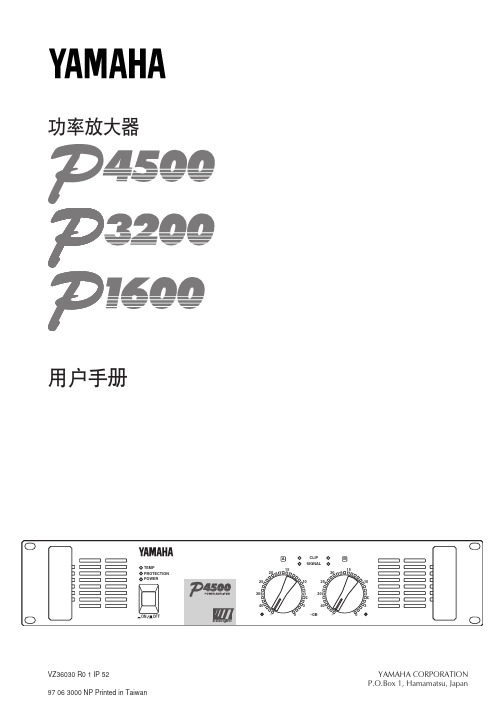
控制装置和功能
■ 前面板
2 3 4
A TEMP PROTECTION POWER 25 30 6 40
ON OFF
CLIP SIGNAL 15 10 25 30
B 15 10
20
20
6 40 –dB ∞ 0 3
3 ∞ 0
EEEngine
1
5 6
① 电源开关和指示器
这是主电源开关、按下放大器电源接通,再次按下 断开电源、当放大器电源接通时,电源指示器点 亮。
⑥ 音量控制
这些音量控制可以在-∞dB-0dB之间,分31个档 次调节音平音量。通过保护控制来固定音量。 在控制钮上装上安全盖,并且如下图所示,拧紧四 个孔上的螺钉。
20 25 30 6 40 ∞ 0 3 –dB 40 ∞ 0 3 15 10 25 30 6 20 15 10
1
■ 后面板
1 2 3 4
–
+
+
–
–
+
ᔢࢅ5ˮ
ᔢࢅ5ˮ
ᔢࢅ9ˮ
ዯဉᇹᄻ
ዯဉᇹᄻ
并联方式的连接
SPEAKERS
CHANNEL B
BRIDGE
CHANNEL A
ࢾᆐ݀ೊ
STEREO BRIDGE STEREO PARALLEL MAX. OUTPUT 450W/4Ω (STEREO) MAX. OUTPUT 900W/8Ω (BRIDGE)
INPUT
CHANNEL B G CHANNEL A G
(BRIDGE) (PARALLEL)
BRIDGE
SPEAKERS
CHANNEL B CHANNEL A
(STEREO) 4-8Ω/SP (BRIDGE) 8-16Ω/SP STEREO BRIDGE
ALA功放摩机

ALA功放摩机雅马哈公司的AI.A功放和天龙公司的无反馈双超线性功放被认为是“解决了甲类与乙类之争”的电路,电路不复杂、技术指标不错而得到众多发烧友及生产厂家的青睐。
本文为一台ONE牌A930台并机采用ALA技术,但表现在听感上较硬发紧,分析力不太好。
于是决定摩上一摩,下面便是摩机步骤: (1)从图6-19电路分析,信号通路存在两个为校正lc提供“悬浮供电”而设雅马哈公司的AI.A功放和天龙公司的无反馈双超线性功放被认为是“解决了甲类与乙类之争”的电路,电路不复杂、技术指标不错而得到众多发烧友及生产厂家的青睐。
本文为一台ONE牌A930台并机采用ALA技术,但表现在听感上较硬发紧,分析力不太好。
于是决定摩上一摩,下面便是摩机步骤:(1)从图6-19电路分析,信号通路存在两个为校正lc提供“悬浮供电”而设立的大电容cciii,ciis),并且成为前级的容性负载而增加失真,这一失真不能被ALA电路所校正。
场效应管带容性负载的能力较强,因此首先用一对中功率管K214/J 77代替VT109、VT110(2:SA1145/2SC2275),并在VD101、VD102支路中串人一个470n的多田微调电阻,调整它使VT109 VT110的lC为12~18mA(原机lc宴测为0.98mA),使其工作在甲类状态。
须注意的是,改动后要为VT109,VT110配上一副小型散热器。
(2)ALA校正回路的阻抗(R.。
7+R133)较高,而原机的推动管使用双极型晶体管,负载较重会影响校正效果,对信号通路也会带来较大衰减。
因此t照样用K214/J 7 7代替VT112、VT113(2SA1306/2SC3298),使前级负载减轻、损耗变小,并能抑制有害的反向传输。
调节PR2使输出级(VT114、VT115)的IC增至90~130mA,这时VT114. VT115会有一些温升,只要不烫手便不必担心,倒是要密切注意VT112、VT113的管壳温度,如太高须换较大的散热器。
YAMAHA PW80 维修手册 2004说明书
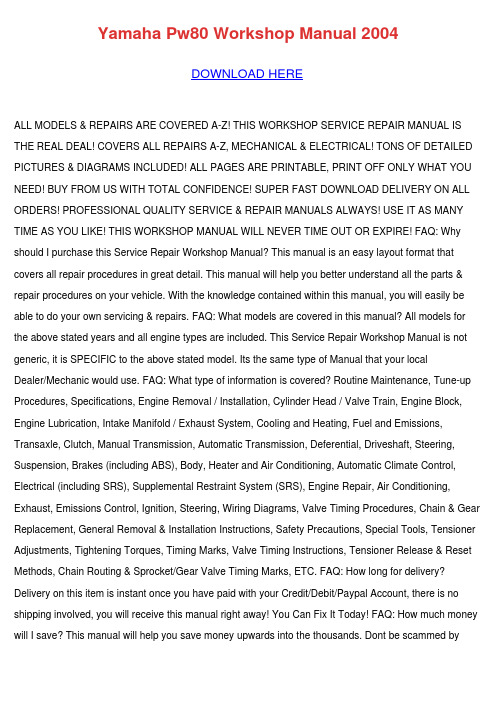
Yamaha Pw80 Workshop Manual 2004DOWNLOAD HEREALL MODELS & REPAIRS ARE COVERED A-Z! THIS WORKSHOP SERVICE REPAIR MANUAL IS THE REAL DEAL! COVERS ALL REPAIRS A-Z, MECHANICAL & ELECTRICAL! TONS OF DETAILED PICTURES & DIAGRAMS INCLUDED! ALL PAGES ARE PRINTABLE, PRINT OFF ONLY WHAT YOU NEED! BUY FROM US WITH TOTAL CONFIDENCE! SUPER FAST DOWNLOAD DELIVERY ON ALL ORDERS! PROFESSIONAL QUALITY SERVICE & REPAIR MANUALS ALWAYS! USE IT AS MANY TIME AS YOU LIKE! THIS WORKSHOP MANUAL WILL NEVER TIME OUT OR EXPIRE! FAQ: Why should I purchase this Service Repair Workshop Manual? This manual is an easy layout format that covers all repair procedures in great detail. This manual will help you better understand all the parts & repair procedures on your vehicle. With the knowledge contained within this manual, you will easily be able to do your own servicing & repairs. FAQ: What models are covered in this manual? All models for the above stated years and all engine types are included. This Service Repair Workshop Manual is not generic, it is SPECIFIC to the above stated model. Its the same type of Manual that your localDealer/Mechanic would use. FAQ: What type of information is covered? Routine Maintenance, Tune-up Procedures, Specifications, Engine Removal / Installation, Cylinder Head / Valve Train, Engine Block, Engine Lubrication, Intake Manifold / Exhaust System, Cooling and Heating, Fuel and Emissions, Transaxle, Clutch, Manual Transmission, Automatic Transmission, Deferential, Driveshaft, Steering, Suspension, Brakes (including ABS), Body, Heater and Air Conditioning, Automatic Climate Control, Electrical (including SRS), Supplemental Restraint System (SRS), Engine Repair, Air Conditioning, Exhaust, Emissions Control, Ignition, Steering, Wiring Diagrams, Valve Timing Procedures, Chain & Gear Replacement, General Removal & Installation Instructions, Safety Precautions, Special Tools, Tensioner Adjustments, Tightening Torques, Timing Marks, Valve Timing Instructions, Tensioner Release & Reset Methods, Chain Routing & Sprocket/Gear Valve Timing Marks, ETC. FAQ: How long for delivery? Delivery on this item is instant once you have paid with your Credit/Debit/Paypal Account, there is no shipping involved, you will receive this manual right away! You Can Fix It Today! FAQ: How much money will I save? This manual will help you save money upwards into the thousands. Dont be scammed bymechanics charging you tons of money for a small job that you can do yourself using the information & knowledge contained on this manual. FAQ: Is this manual hard to use? No, not at all. If you can open up an email then you can use this manual, its that simple! This manual is in PDF format and will work on any PC/MAC computer using Microsoft Windows. IE: XP, NT, 2000, Vista, Windows 7 EtcDOWNLOAD HERESimilar manuals:1997 Yamaha BANSHEE YFM350X ATV Service Manual1999 -2003 Yamaha XJR MOTORCYCLE Service ManualYamaha WR450FR WR450 WR 450 MOTORCYCLE Workshop Service / Repair ManualYamaha XJ600 Diversion Seca II MOTORCYCLE Workshop Service / Repair ManualYamaha XJ750 XJ750K XJ 750 MOTORCYCLE Workshop Service Repair ManualYamaha XT660R XT660X XT660 MOTORCYCLE Workshop Service / Repair Manual 2004Yamaha FJR1300 MOTORCYCLE Workshop Service / Repair Manual 20011988 - 1990 Yamaha FZR400 Service Shop Workshop RepaYamaha 125 RD Motorcycle Owners ManualYamaha Banshee 350 Service Repair Manual - All YearsYamaha FZR 600 Service Repair Manual PDF All YearsYamaha YZF R1 Service Repair Manual 98-991999 Yamaha XVS1100(L) Service Manual DownloadYamaha YFZ-R1 Service Manual PDF R1 Repair EBook 2000-012004 Yamaha Motorcycle YZF R1 Service Manual Download1998 Yamaha Motorcycle YZF R1 Service Manual Download2003 Yamaha Motorcycle YZF R6 Service Manual Download2004-2005 Yamaha YFZ-450 ATV Workshop Service Repair + Owners Manual2000 Yamaha Waverunner GP 1200R Workshop Service / Repair ManualYamaha Raptor YFM 660 Service Manual Atv Quad1987-2002 Yamaha Banshee YFZ350 ATV Workshop Service, Repair Manuals And Supplementaries1998 - 2004 Yamaha YFM400 ATV Factory Workshop Repair Service ManualYamaha Banshee YFZ350 ATV Workshop Service, Repair Manuals And Supplementaries 1998 - 2001 Yamaha Beartracker YFM250 ATV Workshop Repair Manual1989 - 2001 Yamaha YFS200 Blaster ATV Workshop Service Repair Manual1989 - 2007 Yamaha YFA1 YFM125 Breeze Grizzly ATV Workshop Service Repair Manuals + User's ManualsYamaha XVS 1100 Drag Star 1999 Workshop Service Manual2000 - 2002 Yamaha Waverunner GP 1200R Workshop Service Repair Manual2003 - 2005 Yamaha Waverunner GP1300R Workshop Service Repair Manual1997 - 1999 Yamaha Waverunner GP760 - GP1200 Workshop Service Repair Manual1998 - 2000 Yamaha Waverunner GP800 Workshop Service Repair Manual2001 - 2005 Yamaha Waverunner GP800R Workshop Service Repair Manual2002 - 2006 Yamaha Grizzly YFM660 ATV Workshop Service Repair Manual2003 - 2004 Yamaha YFM400 4WD Kodiak ATV Workshop Service Repair Manual1990 - 1998 Yamaha PZ480 Phazer Snowmobile Workshop Service Repair Manual2001 Yamaha YFM660 Raptor ATV Workshop Service Repair Manual + Parts Views Catalogue 2004 Yamaha YXR660 Rhino ATV Workshop Service Repair Manual1999-2003 Yamaha XV16 Road Star Motorcycle Workshop Service Repair Manual2002 Yamaha XV17 Road Star Warrior Motorcycle Workshop Service Repair Manual1999 - 2007 Yamaha XVZ13 Royal Star + Venture Motrcycle Workshop Service Repair Manual 2000 - 2004 Yamaha Waverunner SUV SV1200 Workshop Service Repair ManualYamaha Xt500 XT 500 SR 500 Sr500 Workshop Service Repair ManualTHE BEST 01-06 Yamaha Raptor 660 ATV Service ManualTHE BEST 03-06 Yamaha Kodiak 450 ATV Service ManualTHE BEST 98-08 Yamaha Grizzly 600 & 660 ATV Service ManualTHE BEST 06-08 Yamaha Raptor 700 ATV Service ManualTHE BEST 06-08 Yamaha Rhino 450 Service ManualTHE BEST 87-06 Yamaha Banshee 350 ATV Service ManualTHE BEST 87-99 Yamaha Big Bear 350 4x4 ATV Service ManualTHE BEST 91-04 Yamaha Warrior 350 ATV Service ManualTHE BEST 96-99 Yamaha Big Bear 350 2x4 Service ManualTHE BEST 99-04 Yamaha Bear Tracker 250 ATV Service ManualTHE BEST 98-05 Yamaha Bruin 250 ATV Service ManualTHE BEST 2007 Yamaha Grizzly 700 ATV Service Manual1996 - 2007 Yamaha Waverunner SJ700 Superjet Workshop Service Repair Manual1999 - 2006 Yamaha TTR250 Motorcycle Workshop Service Repair Manual1988 - 2005 Yamaha XV250 Virago Motorcycle Workshop Service Repair ManualTHE BEST 2003-2006 Yamaha RX1 Snowmobile Series Service ManualYamaha TDM 900 2002-2005 Service Repair Manual TDM900THE BEST 2000-2004 Yamaha GP1200R Waverunner Personal Watercraft Service Manual THE BEST 2003-2008 Yamaha GP1300R Waverunner Service ManualYamaha YZ250 2-strokes Service Repair Manual 2001 2002 2003 2004 2005 2006 Multi Yamaha YZF R6 2003-2005 Service Repair Manual & Parts CatalogueYamaha YZF R6 2008 Service Repair Manual & Parts CatalogueYamaha TTR 250 1999-2006 Service Repair Manual TTR250 TT250RYamaha TT 600 2004-2009 Service Repair Manual TT600Yamaha YZF R6 1999-2002 Service Repair Manual & Parts CatalogueYamaha YZF-R1 2002-2003 Service Repair Manual & Parts Catalogue R1Yamaha YZF-R1 2004-2006 Service Repair Manual R1Yamaha AEROX 50 Manuale Officina Riparazione Catalogo PartiYamaha TDM 900 2002-2005 Manuale Servizio Riparazione Officina TDM900THE BEST 92-97 Yamaha V-Max 4 750/780cc Series Snowmobile Service ManualTHE BEST 89-99 Yamaha Ovation 340 Series Snowmobile Service ManualYamaha XJR 1300 1999-2003 Service Repair Manual XJR1300Yamaha YZ85 2002-2006 Service Repair Manual & MicroficheYamaha YFM700R RAPTOR 700 Service Manual 2005-2008Yamaha Phazer Venture PZ50X PZ50GTX PZ50RTX PZ50MTX PZ50VTX PZ50MPX PZ50WPZ50GTW PZ50FXW PZ50MW PZ50VTW PZ50MPW VK10W Factory Workshop Service Manual 2007-2008 Yamaha YXR70FX 700EFI Rhino Service Repair Workshop Manual. Cheapest On Tradebit.2004, 2005 And 2006 Yamaha Rhino YXR66 660 Service Manual.2003 Yamaha Kodiak YFM400FAR 400 ATV Service Repair Workshop Manual. Cheapest On Tradebit2001 Yamaha YFM660FP Grizzly ATV Service Manual, Instant Download.Yamaha YFZ 450 Service Repair Manual 2003-2006THE BEST 2007 Genuine Yamaha Grizzly 350 IRS ATV Service ManualTHE BEST 1988-2008 Genuine Yamaha YFS200 Blaster ATV Service ManualTHE BEST 1992-1998 Genuine Yamaha Timberwolf 250 2x4 ATV Service ManualTHE BEST 1994-2000 Genuine Yamaha Timberwolf 250 4x4 ATV Service ManualTHE BEST 1997-2000 Genuine Yamaha GP760/GP1200 Waverunner Service ManualTHE BEST 1999-2002 Genuine Yamaha XL1200 LTD Waverunner Service ManualTHE BEST 1995-2005 Genuine Yamaha Wolverine 350 ATV Service ManualYamaha RAPTOR 660 Service Manual 2001-2005Yamaha YFM400 Big Bear 400 Service Manual 2000-2006Yamaha Grizzly 550 700 FI Service Manual 2009-2012Yamaha FZS 600 Fazer Service Manual 1998-2001Yamaha YZF-R6 2006-2007 Manuale Servizio Officina R6 (Italiano)Yamaha YFM350 Grizzly 350 IRS Service Manual 2007-2011Yamaha BR 250 Bravo Snowmobile Service Repair Manual BR250Yamaha YZF R6S 2006-2009 Service Manual & Parts CatalogueTHE BEST 1994-2006 Yamaha Venture/V-Max 600 Series Snowmobile Service Manual 2007 - 2008 Yamaha FX NYTRO Snowmobile Service Repair Workshop Manual2007 - 2008 Yamaha Phazer Venture Snowmobile Service Repair Workshop Manual。
功放电路原理与维修

精选ppt
20
5;4558D维修关键几点测量;
该集成块关键点测量主要有8脚供电, 3脚R声道输出和1脚R声道输出, 及5脚L声道输入和7脚L声道输输出;
精选ppt
21
6;4558D 检修方法;
①完全无声,检查8脚供电是否正常,电压正常。万用表R×1档黑表笔接地,红表笔触碰4558D输入端5脚或3脚, 没有咔嚓声4558D损坏
精选ppt
32
2)当触碰4558D的6脚有声音
,触碰音量电位器中心插头没有声音,检查电容c5是否开路,有声音 检查音量电位器是否损坏,插头接触不良
精选ppt
33
3 声音小;失真
声音小,失真故障也比较常见,也是功放最难修的故障,该故障不好查 找。我们在修声音小,失真时,先把所有音量开到最大,然后用万用表 RX1档黑表笔接地,红表笔逐级触碰各输入端,看声音能否大一些,如 果触碰声音大,说明后级正常。得向前级检查。
17
2: 4558D引脚作用
1脚: R声道 放大信号输出(1) 2脚: R声道反相信号输入(1) 3脚:R声道信号输入(1) 4脚 :接地 5脚 :L声道同相信号输入(2) 6脚: L声道反相信号输入(2) 7脚;L声道 放大信号输出(2) 8:Vcc 电源
精选ppt
18
3;4558D 内部电路
该集成块集成块8脚外接供电, R 声道信号由6脚输入,,7脚输出。 L声道由2脚输入,1脚输出。 3脚5脚反相输入接地。 4脚接电源地。(反相输入的内部电路)
精选ppt
19
4;4558D;外围电路;
4558D的8脚为电源供电脚, R 声道信号由R6,电位器 R7的中心抽头取出由C5耦合 送入到4558D的3脚,放大后 的音频信号由1脚输出,由C8 耦合后输出。L声道同样由5脚 输入,7脚输出。4脚接电源负 极2脚6脚接R L声道的反相信号输入。
ARCAM 雅骏 DiVA A75 AV功放维修电路图
The input pair (Q606,607,618,619,706,707,718,719) are in a Darlington configuration to lower input current offset which in turn will lower DC offset at the output, as the impedances seen on the input nodes are necessarily high for the wide bandwidth required.
Service Manual
A65/75
Issue 1.0
DiVA A65, A75 & P75 Plus Amplifiers
ARCAMຫໍສະໝຸດ Contents List
! Contents list ! Circuit description ! Service guide ! Circuit diagrams ! Component overlays ! Circuit board parts list ! General assembly parts list
The output stage is a simple bipolar darlington (Q614,615,714,715). However, the devices used are Darlington devices with integral diodes. This means the bias temperature compensation is part of the output device enabling smaller number of devices, no extra devices on the heatsink (vital for this mechanical layout) and more consistent temperature compensation of bias. Also the resistors are also integral, saving a large amount of PCB real estate and hand insertion cost, while also able to be used as bias set test points and protection sensing.
YAMAHA XM6150 4220 说明书

2 衰减器
这些控制用于减弱每一个通道,从-∞ dB到0dB输入 信号。
在桥接模式中,在一对通道中只有第一个通道的衰减器有 效。例如,A-B组的A通道,C-D组的C通道以及E-F组的 E通道(只有XM6150)。
通风 ............................................................8
支架安装 .....................................................8 安装EIA标准支架 .......................................8
76.2 88
4-C15 78
3 XLR输入
接线为针1-地线,针2-正极(+),针3-负极(-)。
ེ
21
3
ದ
4 欧式连接器
这些平衡欧式连接器用于连接输入信号。
在桥接模式中,在一对通道中只有第一个通道的欧式连接 器有效。例如,A-B组的A通道,C-D组的C通道以及E-F 组的E通道(只有XM6150)
目录
控制装置和功能 ...........................................4 前面板 ......................................................4 后面板 ......................................................5
5 通道对全通道的开关
此开关用于将通道A连接到全通道时提供的输入信 号。
YAMAHA EMX5014C 说明书

POWERED MIXERPOWERED MIXER 使用说明书ZH发挥调音台的最佳性能第12~18页速成指南第7~11页2EMX5014C 使用说明书 The above warning is located on the rear of the unit.Explanation of Graphical SymbolsThe lightning flash with arrowhead symbol within an equilateral triangle is intended to alert the user to the presence of uninsulated “dangerous voltage” within the product’senclosure that may be of sufficient magnitude to constitute a risk of electric shock to persons.The exclamation point within an equilateral triangle is intended to alert the user to the presence of important operating andmaintenance (servicing) instructions in the literature accompanying the product.IMPORTANT SAFETY INSTRUCTIONS1Read these instructions.2Keep these instructions.3Heed all warnings.4Follow all instructions.5Do not use this apparatus near water.6Clean only with dry cloth.7Do not block any ventilation openings. Install in accordance with the manufacturer’s instructions.8Do not install near any heat sources such as radiators, heat registers, stoves, or other apparatus (including amplifiers) that produce heat.9Do not defeat the safety purpose of the polarized or grounding-type plug. A polarized plug has two blades with one wider than the other. A grounding type plug has two blades and a third grounding prong. The wide blade or the third prong are provided for your safety. If the provided plug does not fit into your outlet, consult an electrician for replacement of the obsolete outlet.10Protect the power cord from being walked on or pinched particularly at plugs, convenience receptacles, and the point where they exit from the apparatus.11Only use attachments/accessories specified by the manufacturer.12Use only with the cart, stand, tripod, bracket, or table specified by the manufacturer, or sold with the apparatus. When a cart is used, use caution when moving the cart/apparatus combination to avoid injury from tip-over.13Unplug this apparatus duringlightning storms or when unused for long periods of time.14Refer all servicing to qualified service personnel. Servicing is required when the apparatus has beendamaged in any way, such as power-supply cord or plug is damaged, liquid has been spilled or objects have fallen into the apparatus, the apparatus has beenexposed to rain or moisture, does not operate normally, or has been dropped.(98-6500)WARNINGTO REDUCE THE RISK OF FIRE OR ELECTRIC SHOCK, DO NOT EXPOSE THIS APP ARA TUS TO RAIN OR MOISTURE.IMPORTANTPlease record the serial number of this unit in the space below.Model:Serial No.:The serial number is located on the bottom or rear of the unit.Retain this Owner’s Manual in a safe place for future reference.使用说明书 EMX5014C 3(5)-4请在操作使用前,首先仔细阅读下述内容* 请将本说明书存放在安全的地方,以便将来随时参阅。
雅马哈 AV 前置放大器连接说明书
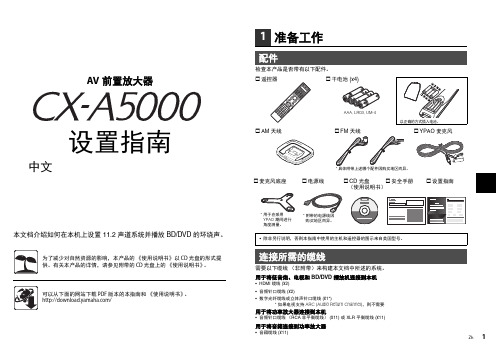
Zh12Zh将功率放大器和低音炮(配有内置放大器)连接到本机,并将音箱连接到功率放大器。
1将本机的 PRE OUT 插孔连接到所有 11 个声道的功率放大器的主输入插孔(a 或 b )。
进行非平衡连接时 (a ),请使用音频针口缆线(RCA 非平衡缆线)将本机的 PRE OUT (RCA) 插孔连接到放大器的主输入 (RCA) 插孔。
进行平衡连接时 (b ),请使用 XLR 平衡缆线将本机的 PRE OUT (XLR) 插孔连接到放大器的主输入 (XLR) 插孔。
2使用音频针口缆线将低音炮(配有内置放大器)连接到本机的 SUBWOOFER PRE OUT 1–2 插孔。
3将每个音箱连接到功率放大器上对应的音箱端子。
有关音箱连接的详情,请参见功率放大器和音箱的使用说明书。
•根据您的功率放大器,可能需要更改其设置,以便从本机接收的音频从连接到放大器的音箱发出。
•您可以将 2 个低音炮连接到本机,然后将它们分别置于房间的右/左两侧(或前/后两侧)。
在使用 2 个低音炮的情况下,将电源线插入交流墙壁电源插座后,请配置“低音炮配置”。
有关详情,请参见《使用说明书》。
•如果您具有支持触发器功能的 Y amaha 功率放大器(如 MX-A5000),则可通过系统连接在操作(如打开/关闭)本机的同时控制此功率放大器。
有关详情,请参见《使用说明书》。
2连接功率放大器、音箱和低音炮SUBWOOFERZh33连接外部装置(1将外部装置连接至本机。
a 使用 HDMI 缆线将 BD/DVD 播放机连接至本机。
如果 BD/DVD 播放机当前通过 HDMI 缆线直接连接到电视,则应将此缆线从电视断开,然后将其连接到本机。
b 使用其他 HDMI 缆线将电视连接至本机。
c 用数字光纤缆线或立体声针口缆线将电视连接至本机。
在本机上播放电视视频时需要此连接。
如果电视支持 ARC (Audio Return Channel),则不需要此连接。
YAMAH MODUS F11 F01 说明书

Model
Serial No.
Purchase Date
FCC INFORMATION (U.S.A.)
1. IMPORTANT NOTICE: DO NOT MODIFY THIS UNIT!
This product, when installed as indicated in the instructions contained in this manual, meets FCC requirements. Modifications not expressly approved by Yamaha may void your authority, granted by the FCC, to use the product.
雅马哈 DSP-AX2功放图纸

2.0
0.1 0 0 0 0 ~ 2.1 4.0 4.0 0 2.5 0.4
3.3
3.1
0.1 0.1 2.5 0
IC512, 515–519, 525–527 : µPC4570G2 IC509 : NJM2904M-T1 Dual OP Amp
OUT1 1 –IN1 2 +IN1 3 8 +VCC 7 OUT2 6 –IN2 5 +IN2
Q75
-B1 +B1 RY4
REAR CENTER
Q79
-B1 +B2
5
VCR 2/DVR IN (L/R) VIDEO AUX (L/R)
INHIBIT IC503 IC504 IC505 3/5
IC508 1/7
RC
RC
RC
FRONT
Q520, 521 Q541, 542 FL/FR
Q354, 359
1.6
L
0 -11.0
11.6 0 0 0 0 0 0 0 11.6
3
~
~
~
~
~
~
IC
2 ON/OFF CONTROL (VC) 5 GND
5.0 0.1 0.1 0.1 0 5.0 0 0.8 4.9 0 4.9 4.9 3.3 0 0 0.8
0 0.1 0.1 0.1
~
0
0.1
0.1
0.1
0.1
A
B
C
D
E
F
G
DSP-AX2
H
s BLOCK DIAGRAM
1
J, R, T ONLY
Q501–503 Q504–508 XL502 1 XL501 2
雅马哈YAMAHA--YDA148功放芯片datasheet资料pdf文档
{ Residual Noise • 48µVrms (VDDP=12V, GAIN[1:0]=L,L, NCDRC[1:0]=L,L)
{ Efficiency • 91 % (VDห้องสมุดไป่ตู้P=12V, RL=8Њ)
CHAPTER 4 Examples of Application Circuits ··············································27
CHAPTER 5 ELECTRICAL CHARACTERISTICS ······································33
7.2 Board Design ................................................................................................................. 40
CATALOG No.: LSI-6DA148A00
7.1 Audio Characteristics..................................................................................................... 37
7.1.1 Measurement Environment············································································································· 37 7.1.2 Example of typical characteristics ·································································································· 38
YAMAHA GF24 12 GF16 12 GF12 12功率放大器 说明书
的电源线有引起火灾或电击的危险。 ● 切勿拆卸本机的罩盖。若不遵守、则会引起电击。若
您认为需要进行内部检查、维修或修理、请与经销 商联系。
● 切勿改造本机、这样做会引起火灾或电击的危险。 ● 若已经发生雷电、请尽快关断电源开关、并且从电
源插座拔出电源线。 ● 若可能发生雷电、在接线的状态下切勿触摸电源线。
请远离本机使用电话。
前言
非常感谢您购买 Yamaha 的 GF24/12,GF16/12 或者 GF12/12 型混频控制台。 这些型号的混频控制台各提供有充足的 12 种输出接口,并适应从音乐会声音的增强到安 装系统的应用范围的丰富变化。为了充分发挥混频控制台的功能以及保证无故障地长期使 用,请认真阅读本手册。
功率放大器
用户手册
妥善保存手册以备以后参考。
C
注意事项
— 为安全操作 —
警告
安装 ● 仅可将本机的电源线与本用户手册中述及、以及在
本机上标出型号的AC电源插座连接。若不遵守、则 会引起火灾或电击的危险。 ● 切勿使水侵入本机或使本机受潮。若不遵守、则会 引起火灾或电击。 ● 切勿将装有液体的容器或小型金属物品放置在本机 的顶部。若液体或金属物品 侵入本机, 则会引起火 灾或电击的危险。 ● 切勿将重物(包括本机)放置在电源线上。损坏的电 线有引起火灾或电击的危险。尤其应注意、切勿将 包裹地毯的重物放置在电源线上。
20
10
20
10
20
10
20
10
20
10
20
10
20
10
30
PRE 10
30
PRE 10
30
雅马哈ACD1功率放大器遥控单元中文说明书V1.1版

网络设置 (“6. Network Setup”) ........................ 16
IP 地址模式设置 (“6. Network Setup” ➝ “IP Address Mode”) ... 16 IP 地址设置 (“6. Network Setup” ➝ “IP Address”)............. 16 检查 MAC 地址 (“6. Network Setup” ➝ “MAC Address”)......... 16 外接控制器的端口设置 (“6. Network Setup” ➝ “IP Ctrl Port #”) ........... 17
I Amp ID
这是连接到 ACD1 的每台放大器的 ID。必须使用位于每台放大器后面板上的 [AMP ID] 开关将连接到同一台 ACD1 [DATA PORT] 接口的放大器设为非重叠 ID 。对于连接到 [MONITOR/REMOTE] 接口的放大器,会根据所使用的接 口确定 Amp ID。
4
MONITOR/REMOTE.............................................. 23 DATA PORT..............................................输出监听 (“3. Output Monitor”) .............12
尺寸 ................................................................... 24
2
ACD1 参考手册
前言
关于本书
本书主要对 ACD1 放大器控制设备本身的操作和规格进行了说明。 使用 ACD1 时,还需要参阅本书之外的其它 说明书。 G 本书之外的其它说明书
雅马哈 ACD1 AMPLIFIER CONTROL DEVICE 说明书
日本的第一台DTS AV中心——雅马哈DSP-A1

P S P
公 司 开 发 的 电 影 环 绕声 系 统
D
、
这 索
,
一A
l
的规 格
种 方式 和 杜 比数 字环绕 声 S R
期盼能在家庭欣赏到DT S
环 绕声 水准的
。
一A
l
面 板正 上 方 的 三 个 明 显
IN E
尼 动 态 数字 声音 系 统S D D S 不 同 胶 片 上 只记 录 同步信号 声音数 据记录 在C D
理 器 的 AV
E T C
,
中 心
t 1 e e ’ a
其 中 以
a l c M 从’
、
A D
的
T h
HE T A
a
s
D IG IT A L
e a
。
的
a
bla
n
最有 名 气
, 。
在美
S
VD
DT S
,
加 上雅马 哈独 有的i C
国
,
就音质而 言支 持D 习
的
一DS
。
P
势 必 将环 绕声推 向 一个 新的
。
相 比 A
,
l
的 5 个主 要 声 道 的 输
3O
F R
,
除 超低 音 外 的 7 声 道
,
出 功 率 都增 加 了 出 功 率 也 增加 了
DS P
一
A
一
的 最 大 特 点 就 是 既能 重 放 现 在 呼
,
声最高 的 杜 比数字 也 能 重放近来 声 誉鹊起 的 D T
L D
1)
,
S
。
去年美 国推 出
雅马哈的保护线路
保护诊断的主题:
• 打开自我诊断模式 Image loading • 保护取消模式 • 取消自我诊断模式
精品图纸网
精品图纸网
STARTING DIAGNOSTIC MODE
Image loading
精品图纸网
TYPICAL POWER SUPPLY ERROR SENSING CIRCUITRY
Image loading
INDICATES AN
“PRV” 表示一个或 多个稳定的电压不 正确或没有 X
FUSED TRANSFORMERS
±0.2Vdc 偏差 从 1.2V 在 PIN 35 启动 PRV. 单元关闭
精品图纸网
(From page 22 of RX-V630/HTR-5560 Service Manual)
检修顺序 显示单位 “PS-PROTECT” 提示: 单位显示 “PS-Protect” 开始后 开机后会有1/2-1秒钟的延迟,然后关机 检修顺序: 查证阻抗选择开关 再恰当的位置 位置取决于: 1) 喇叭等级 2) 喇叭配置 连接到无极调压器 (设定在线路电压) 按<STANDBY / ON> 键,在前面板. 核实开机后1/2-1秒钟后关机 如果是的,请关闭无极调压器,分离接线.
连接到自耦变压器 (设在最小的电压) 使用交流
连接线2个公插头插入自耦变压器. 另一端接入功放内的交流 开关插座,然后把电源插头插入后版面的插座
精品图纸网
精品图纸网
电源继电器忽略过程 为检修保护症状
• 先把无极调压器调到0伏,把2个接头插入后面板的转换插口,把功放 本身的插头插入功放背后的转换插座。
直流平衡保护 “DC PRT” 主题:
• 线路描述 • 功能 • 检修
