BIEE11g开发及发布
BIEE11g集群系统环境安装配置手册-v1.0

BIEE 集群系统测试环境安装配置手册Table of Contents1.文档介绍 (1)1.1文档目的 (1)1.2缩写与术语定义 (1)1.3目标 (1)1.4系统用户与密码汇总 (1)2.安装前的准备 (2)2.1操作系统准备 (2)2.2Linux系统设置 (2)2.3软件介质的准备 (3)3安装和配置OBIEE (3)3.1安装RCU (Repository Creation Utility) (3)3.2安装BIEE (10)3.3安装p1*******_111170_Linux-x86-64 (154.155都必须安装) (24)3.4安装patch p1*******_111170_Linux-x86-64(154,155都必须安装) (25)1.文档介绍1.1文档目的本文档介绍Oracle BIEE1117及其补丁系统的安装、配置过程,详细记录配置信息,用于以后系统的维护和相关人员的培训。
1.2缩写与术语定义1.3目标1.4系统用户与密码汇总2.安装前的准备Oracle BIEE安装需要一定的系统参数和相关的软件包的支持,特别是Linux系统的系统,本节介绍安装的需要做的准备工作。
2.1操作系统准备其中操作系统、Oracle DB(实例需要以AL32UTF8为字符集)以及Oracle DB Client(需要安装管理员版客户端)均由浦发技术人员安装完成,此文档不再赘述。
2.2Linux系统设置1.确认Linux系统已支持Utf8,例如例如EN_UTF8,US_UTF8,ZH_UTF8等!(已由浦发技术人员确认)2.由于Linux系统由模板生成,需要确保151,154,155三台机器拥有不同的机器名。
之后,并修改linux的host文件 /etc/hosts (以154机器为例,除了需要修改成红框中的第1、2行,还需要添加第3行和第4行对155、151机器的映射,这样后续安装即可以机器名来进行引用)(在155机器上的配置)3.确认Linux版本命令:cat /etc/version内核: Linux version 3.0.13-0.27-default命令: lsb_release -a系统版本: SUSE Linux Enterprise Server 11 (x86_64)4.修改系统参数 (154和155)编辑文件:/etc/security/limits.conf 加入以下语句:oracle soft nofile 65536oracle hard nofile 65536oracle soft nproc 16384oracle hard nproc 163845.创建安装用户biee(154和155)命令: useradd -m biee passwd biee1234创建用户 biee 密码 biee12346.确保biee拥有dba和oinstall组的权限(154和155)及其对oracle客户端目录下的oraInventory目录的写权限。
Oracle BIEE 11g Sampleapp107-部署指南
Oracle Business Intelligence Enterprise Edition 11.1.1.5 S AMPLE A PPLICATION 10722–D EPLOYMENT G UIDE Disclaimer: This document contains instructions for deploying Sample Application (SampleApp) for Oracle Business Intelligence Enterprise Edition 11.1.1.5. SampleApp consists of comprehensive set of illustrative examples for OBIEE 11g. It is distributed as free content and it is not maintained or supported by Oracle as a licensed product.Table of Contents1Introduction (4)1.1Prerequisites (4)1.2Content Organization (4)1.3Known issue in V107 (4)2Deploying Mandatory Components (5)2.1Laying Out Installation Files (5)2.2Restoring Database Dumps (7)2.3Creating Weblogic Server Users (8)2.4Deploying analyticsRes in WLS (9)2.5Deploying Metadata Dictionary Folder in WLS (11)2.6OBIEE Configuration Settings (12)2.7Configuring SampleApp Mapviewer Content (16)2.8Deploying SampleApp BI Publisher Content (21)3SampleApp Action Framework Content (24)3.1Prerequisites (24)3.2Deploying ActionSamples.ear (24)3.3Adding Required Credentials (26)3.4Configuring OBI EE Actions Framework files (27)3.5Actions Commentary setup in Oracle Application Express (APEX) (28)3.6Restarting Services and Verifying the Install (32)4SampleApp Essbase Content (Optional) (33)4.1Prerequisites (33)4.2Creating Essbase Data sources (33)4.3Creating Cube Source for Essbase BIEE integration example (36)4.4Configuration Settings (43)5SampleApp TimesTen Content (Optional) (45)5.1Prerequisites (45)5.2Creating BISAMPLE_TT database (45)5.3ODBC Settings (46)5.4OBIEE Environment settings (48)6SampleApp MS SSAS Cube (Optional) (49)6.1Prerequisites (49)6.2Attaching BISAMPLE SSAS cube (49)6.3RPD Configuration Edits (50)7SampleApp ODI (Oracle Data Integrator) Content (Optional) (52)7.1Prerequisites (52)7.2Configuring ODI Repository (52)7.3Loading SAMP_REVENUE_F table (59)8Additional Optional Configurations (62)8.1Deploying Custom Skin (62)8.2Reverting to SampleAppLite (64)8.3Custom Authenticator Plug-In (65)8.4Enabling BI Publisher Usage Tracking (65)9Appendix 1 (69)1IntroductionThe Oracle Sample Application (SampleApp) for Business Intelligence Suite Enterprise Edition Plus (EE) is a comprehensive set of illustrative examples and best practices for OBIEE 11g. It demonstrates a broad range of OBIEE 11g capabilities including Enhanced visualizations such as interactive dashboards, modeling best practices, Action Framework, BI Publisher, Scorecard and Strategy Management, Mobile style sheets, Semantic layer modeling, Multi-source federation and Integration with products such as Essbase, Oracle OLAP, ODM, TimesTen, ODI and so on.OBIEE SampleApp contents and its code are distributed free. It is not maintained or supported by Oracle as a licensed product.1.1PrerequisitesCore components of Sample the following products to be installed and configured. Admin privileges on OBIEE and Oracle DB will be required to deploy SampleApp components.Oracle Business Intelligence Enterprise Edition 11.1.1.5, Simple installOracle 11g R2 Database : OBIEE SampleApp deploys a set of small sized database schemas to support the examplesOptional components within SampleApp have the following prerequisites. They are required if and only you wish to configure SampleApp integration to these respective product related contents/ services.Oracle EssbaseOracle Application Express (required for Action Framework configuration)Oracle Data mining option for Oracle 11g R2 DatabaseOracle TimesTen 11g DatabaseOracle Data Integrator 11gR1 (11.1.1.3)Microsoft SQL Server 2008 with Analysis Services1.2Content OrganizationThe dashboards and analyses within SampleApp are grouped together by relatedfunctional/ product areas. It is sequenced and organised under dashboards asshown in the screenshot here.Once SampleApp is deployed, navigate to “General Index” dashboad to see the fulllist of its contents. “Configuration” dashboard contains the setup details suc h asuser credentials, database diagram, dimentional hierarchy diagrams, rpd physcial,logical and logical hierarchy diagram and so on.Many of the other dashboard pageshave inline help documentation on the contents exibited on those respective pages/analyses.1.3Known issue in V107A dashboard in SampleApp build 10722 (Dashboard 3.10 Query Building > Selection Steps on hierarchies) is mistakenly pointing to wrong catalog reports. Appendix 1 at the end of this document indicates the simple fix to point it back to appropriate content.2Deploying Mandatory Components2.1Laying Out Installation FilesFollow the instructions below in the sequence listed in order to lay out the installation files into appropriate directories under your OBIEE 11g installation –2.1.1 Configure Install scriptDownload SampleApp V10722 Installation ZIP Files from OTN which contains installation files including database dump filesSave the zip file on to the machine where OBIEE 11g is preconfigured, up and running.Use 7-zip (on windows) or unzip command (on Linux) to unzip the zip files to a directory of your choice on the machine.On windows environments, unzip file directly under C:\ or D:\ directory to avoid path length potential issues whileunzipping. Some nested folder structure in the install can get quite long and create issues with Windows envs notsupporting such long file paths. Placing them directly under a root drive will reduce the file path length and avoid apotential unzip issue. Detailed instructions for unzipping the installation files are provided in the README.txt file which is available at the same location as zip files.Edit the “installSA.bat” installation script using a text editor to specify correct values for the following variable names.“installSA.bat” file will be used on Windows/DOS environments and “installSA.sh” file will be used on Linux/Unixenvironments. Double check the values for following variable values. Incorrect values can result in incorrect setup orenvironment corruption :OBIEE_INSTALL_HOME– this should contain full directory path to OBIEE installation, forexample,- Under Linux : /scratch/laliv/obi11g- Under Windows : c:\OBI11G (as shown in the picture)OBIEE_INSTANCE– this should contain the active instance folder name. It is set to“instance1” by default.2.1.2 Run Install scriptOpen a command line window and navigate to unzip folder. Execute “installSA.bat” (for Windows/DOS) or “installSA.bat”(for Linux/Unix) file from the command prompt. On Linux, you may have to change the permissions of the file in order toexecute it (example –“chmod +x installSA.sh”). Once execute permissions are assigned you can execute the script from its directory as “./installSA.sh” or using the command “sh installSA.sh”2.1.3 Troubleshooting Install ScriptWhen you execute installSA.sh on Linux, you may encounter the following error-bash: ./installSA.sh: /bin/sh^M: bad interpreter: No such file or directoryIf you encounter this error, then create a new file called installSA1.sh, copy and paste the contents of installSA.sh into the new file installSA1.sh. Then grant execute privileges on this new file using chmod 777 installSA1.sh. Now execute installSA1.sh to run the installer.If your OBIE E installation is of is of …Enterprise‟ and not …Simple‟ type, then your setup will have both AdminServer andbi_server1. In this case, the installer will give the following error while trying to copy a couple of files for Actions becausethe path needs to be bi_server1 instead of AdminServer[INFO] Copying files for Actionscp: target`/app/oracle/product/obiee/11g/user_projects/domains/bifoundation_domain/servers/AdminServer/tmp/_WL_u ser/analytics_11.1.1/silp1v/war/res/b_mozilla/actions/' is not a directorycp: target`/app/oracle/product/obiee/11g/user_projects/domains/bifoundation_domain/servers/AdminServer/tmp/_WL_u ser/analytics_11.1.1/silp1v/war/res/s_blafp/images/' is not a directoryThese two copy steps need to be manually executed with the appropriate paths on your setup.1) Copy Comment.gif and NoComment.gif from your SampleApp install location /Actions/CommentaryArtifacts to thefollowing two locations on your OBIEE install/installhome/user_projects/domains/bifoundation_domain/servers/bi_server1/tmp/_WL_user/analytics_11.1.1/7 dezjl/war/res/b_mozilla/actionsand/installhome/user_projects/domains/bifoundation_domain/servers/bi_server1/tmp/_WL_user/analytics_11.1.1/7 dezjl/war/res/s_blafp/images2) Copy UserScripts.js from your SampleApp install location /Actions/CommentaryArtifacts to the following twolocations on your OBIEE install/installhome/user_projects/domains/bifoundation_domain/servers/bi_server1/tmp/_WL_user/analytics_11.1.1/7 dezjl/war/res/b_mozilla/actionsand/installhome/ Oracle_BI1/bifoundation/web/app/res/b_mozilla/actionsC:\OBI11G\Oracle_BI1\bifoundation\web\app\res\b_mozilla\actionsIf your environment doesn‟t support neither batch nor shell scripts, then you will ha ve to carry out the copy process manually before you proceed with the rest of the steps. Similarly if any part of the “installSA” script fails, retry the fail edcommand and all the remaining commands manually. You may open the script using a text editor and refer it to understand the source and target files paths and the list of files to be copied.RPD file: The SampleApp.rpd file that is in the install directory does NOT need to be moved into your BIEE install. It will be used directly by EM administration process, and needs to be copied to the machine where you will run EM browserfrom.2.2Restoring Database DumpsIn this section, we will use Oracle data pump to import the definition and data for several database schemas. If any of these schemas exist, they must be dropped before you begin the import. In case they cannot be dropped, the schemas may be imported into different schema names using schema mapping options available for impdp command. If the schema names and/or passwords are changed, it will require additional corrections and configurations in SampleApp RPD.From you SampleApp installation files, copy \DataSources\ORCL\SASCHEMAS.dmp file to the machine where Oracle database 11gR2 is up and runningUnzip this file to a folder on the database server, say “C:\datapump\”Connect to database using a sysdba user and create a directory object to import the database dump. Change the database connection parameters (highlighted in red) to reflect your connection settings.sqlplus "sys/Admin123@sampledb1 as sysdba"create or replace directory datapumpdir as 'c:\datapump';Import the database dump using the command below.impdp "'"sys/Admin123@sampledb1 as sysdba"'" directory=datapumpdir dumpfile=SASchemas.dmpversion=11.2.0.0.0 schemas=BISAMPLE,OBIEE_NAVTEQ,BIFOD,BIBPM,DEV_ODI_REPO,ODI_STAGINGLOGFILE=SASchemas_imp.logNOTE:- Change the value of Version parameter depending on the version of your target database.During the import process you may get the warning ORA-39082: Object typeVIEW:"BISAMPLE"."ODM_SAMP_CUSTOMERS_LTV" created with compilation warningsThis a known warning and can be ignored.Once the import is completed, connect back to the database using a sysdba user and execute the following sqlcommands.To connect use - sqlplus "sys/Admin123@sampledb1 as sysdba"alter user BISAMPLE identified by BISAMPLE;alter user OBIEE_NAVTEQ identified by obiee_navteq;alter user BIFOD identified by BIFOD;alter user BIBPM identified by BIBPM;alter user DEV_ODI_REPO identified by DEV_ODI_REPO;alter user ODI_STAGING identified by ODI_STAGING;Next connect as obiee_navteq/obiee_navteq@sampledb1 and execute the following insert statementsinsert into user_sdo_maps select * from obiee_navteq.my_maps;insert into user_sdo_themes select * from obiee_navteq.my_themes;insert into user_sdo_styles select * from obiee_navteq.my_styles;insert into user_sdo_cached_maps select * from obiee_navteq.my_tile_cache;commit;2.3Creating Weblogic Server Users2.3.1 Start Weblogic AdminServerOn your server, navigate to: \InstallHome\user_projects\domains\bifoundation_domain\bin and run startWebLogic.cmd or startWebLogic.sh depending on your environment OS. You will be prompted with your Administrator credentials created during platform install. Bringing up this service may take a few minutes depending on your environment, wait until the command linestops scrolling and indicates server in RUNNING mode. Keep this command window up to keep server up.2.3.2 Importing Users in WeblogicThis step is required in order to have most of the SampleApp features to work. Make sure the FMW import happens properly on your environment.Open the weblogic Administration console online (http://localhost:7001/console use the loginyou created in BIEE installation to log in).From home screen, click on Security Realms link.Then select “myrealm” option.Go to the migration page tab. Go to theImport tab.In the 'Import Directory on Server',point to the directory where you savedthe SampleApp Install files, navigate to the core folder and FMW_Users_Definition subdirectory within that.For e.g.:- c:/SampleAppinstall/Core/FMW_Users_Definition.Click on Save. This should importall the SampleApp users into yourenvironment. To confirm it, clickon Users and Groups tab.Verify that you can see the new users like abell, etccreated now. You should be able to login using any ofthese users in OBIEE.2.3.3 User CredentialsThe list of users in this build is listed in the table below. Passwords for all SampleApp users imported, as well as the RPD encryption password is uniquely set to : Admin1232.4Deploying analyticsRes in WLSThis step allows to point WLS to the file folder location where you have pasted custom filesfor SampleApp (Images, styles, messages…).Login to weblogic Administration console (http://localhost:7001/console use the loginyou created in BIEE installation to log in).Navigate to deployments area.Click on the Install button in thedeployments area to install a newweb application. (If Install button isnot enabled, click on Lock & Editon the left frame).In the Install Application Assistantdialog, provide the path:\installhome\instances\instance1\bifoundation\OracleBIPresentationServicesComponent\coreapplication_obips1 This should give the option to select analyticsRes as a valid application to deploy.Select analyticsRes and click on Next.In the next screen, choose the default option …Install this deployment asan applicatio n‟ and click Next.In the next screen, under the Source Accessibility section, choose …I will make the deployment accessible from the following location’.Click Finish.In the deployment screen, confirm that the new application called analyticsRes is now available.Click on …Activate Changes‟.Once this completes, start the deployment called …analyticsRes‟.2.5Deploying Metadata Dictionary Folder in WLSThis step is required to make metadata dictionary available within SampleApp.IMPORTANT Note :The metadata dictionary folder name SampleApp_BI0001 in the path\installhome\instances\instance1\metadatadict\SampleApp_BI0001should be the same as the rpd name that is online currently. If your rpd name has changedto say SampleApp_BI0002 or SampleApp_BI0003, then change the directory name of the SampleApp_BI0001 under metadatadict to the same name as the rpd.2.5.1.1 D eploying the Dictionary in WLSWithin the weblogic Administration consolescreen, click on Deployments area.Click on the Install button in thedeployments area to install a new webapplication. (If Install button is notenabled, click on Lock & Edit on the leftframe).In the Install Application Assistant dialog, provide the path \installhome\instances\instance1\metadatadict.This should give the option to select metadatadict as a valid application to deploy. Select metadatadict and click on Next In the next screen, choose the default option …Install this deployment as an application‟ and click Next.In the next screen, under the SourceAccessibility section, choose …I willmake the deployment accessiblefrom the following location’.ClickFinishIn the deployment screen, confirm that thenew application called metadatadict is nowavailable.Click on …Activate Changes‟Once this completes, start the deployment called…metadatadict‟2.6OBIEE Configuration Settings2.6.1 NQSConfig.ini EditsOpen NQSConfig.ini file from the following location:\InstallHome\instances\instance1\config\OracleBIServerComponent\coreapplication_obis12.6.1.1 U SER_REF_GUIDSMake sure the following tag (in green) is set as shown below in your NQConfig file and save it :->[SERVER]...FMW_UPDATE_ROLE_AND_USER_REF_GUIDS = YES;2.6.1.2 U SAGE TRACKINGThe following entry is not mandatory, but will allow the usage tracking SampleContent to show data, it is advised that you set these tags as described :->[USAGE_TRACKING]ENABLE = YES;...DIRECT_INSERT = YES;PHYSICAL_TABLE_NAME = "10 - System DB (ORCL)"."Catalog"."dbo"."S_NQ_ACCT";CONNECTION_POOL = "10 - System DB (ORCL)"."UT Connection Pool";2.6.2 Instanceconfig.xml EditsOpen Instanceconfig.xml file from the following location :\InstallHome\instances\instance1\config\OracleBIPresentationServicesComponent\coreapplication_obips1Comment the following tag.<Catalog><UpgradeAndExit>false</UpgradeAndExit></Catalog>Make sure you have all the following tags (in green below) in the file, within the existing <ServerInstance> tag. Some of these entries may already be present in your file. Ensure that entries are made only once and are in appropriate locations.<ServerInstance>...<SpatialMaps><LayerDataLayout><MaxRecords>1000</MaxRecords></LayerDataLayout></SpatialMaps><LightWriteback>true</LightWriteback>...<ps:Catalog xmlns:ps="oracle.bi.presentation.services/config/v1.1"><ps:UpgradeAndExit>false</ps:UpgradeAndExit><ps:UpdateAccountGUIDs>UpdateAndStartNormally</ps:UpdateAccountGUIDs></ps:Catalog><LogonParam><TemplateMessageName>LogonParamSQLTemplate</TemplateMessageName><MaxValues>100</MaxValues></LogonParam><SubjectAreaMetadata><DictionaryURLPrefix>/metadatadict/</DictionaryURLPrefix></SubjectAreaMetadata>…</ServerInstance>2.6.3 RPD EditsYou need to have access to admintool for offline editing of your RPD to configure necessary changes for connectivity to your database system. The RPD is included in the …Core‟ folder of the install package.If you are using Linux environment, you need to access the rpd by editing it from a windows environment, using the OBIEE admintool client. The Admintool client can be downloaded from url:/technetwork/middleware/bi-enterprise-edition/downloads/bus-intelligence-11g-165436.htmlIMPORTANT Note :Always open Admintool by opening the Start program menu, and navigating on to the menu icon within the Oracle Business Intelligence menu. Do NOT open the RPD simply double click on the RPD file or typing Admintool.exe in command lineOpen Admintool then open the SampleApp.RPD file offline from your installer location :RPD Password for opening offline : Admin1232.6.3.1 E dit BI_EE_HOME Variable Value:Navigate to Manage>Variables menu, double click on the BI_EE_HOME Repository Variable, update the default initializer string from its current value to the correct full path of the following directory on your BIEE install :\InstallHome\instances\instance1\bifoundation\OracleBIServerComponent\coreapplication_obis1For example, in a Linux environment, as an example, that value could be :/scratch/laliv/obi11g/instances/instance1/bifoundation/OracleBIServerComponent/coreapplication_obis12.6.3.2 U pdate RPD variables that contain database connection informationThe connection pools setting uses repository variables to connect to the underlying database. You must update these variables to allow the RPD to properly connect. On the RPD click on Manage->Variables and update the following variables to appropriate values to connect to your database.DB_HOST - This variable holds the value of the database host machine.DB_PORT - This variable holds the value of the port.DB_SID - This variable holds the SID information.DB_USERNAME - This variable holds the database username. (Must be BISAMPLE)WLS_HOST - This host information should be the computer name (or IP) of your Weblogic Server host.2.6.3.3 U pdate Session variables that contain Essbase connection informationFollowing session variables and init blocks are used by Essbase Option for connection pools setting. If you are planning to deploy Essbase option you must update the initiation of these variables to allow the RPD to properly connect. On the RPD click on Manage->Variables and update the following session variable and init block to appropriate values to connect to your databases : Verify DUAL Cube Name (=BISAMPLE) - This variable holds the name of the Sample Essbase cubeVerify DUAL ESSB HOST - This variable holds the name or IP of Essbase host serverMake sure you update the init block default SQL to return the proper value. Also edit the default value for each variables.2.6.3.4 U pdate Database Password in RPD connection poolsIf you have not changed the OOB password for BISAMPLE user (pwd = …BISAMPLE‟), then there should be no edit needed in the RPD. If you have changed the value of the password for the BISAMPLE user, you need to edit password values for all the Connection Pool entries in RPD that use the above variables with your correct password value.2.6.3.5 U pdate settings with RCU db for Scheduler Connection PoolThe values in “Scheduler Connection Pool” under “07 – Scheduler Jobs” database need to be updated to point to the BIPLATFORM schema that is installed during OBIEE installation. In the connection pool, update the data source name with the appropriate values of database host, sid, port, username and password of the BIPLATFORM schema.✓Note :The BIPLATFORM schema is the one that is used during the OBIEE installation process.2.6.3.6 E xpected Consistency Warnings✓Important : Expected Consistency WarningRun a consistency check of your RPD. You should see the single following consistency warning message :This warning is expected; do not try to fix it. Fixing it would break the OLAP API functionality. In case you see other errors or warnings coming up, please process previous steps again starting from the original RPD.2.6.3.7 S ave your offline RPD.2.6.4 Setting the default rpd and webcat paths through EMLogin to the EM administration screen using the url http://localhost:7001/em (Replace the hostname and port-number based on your setup)2.6.4.1 R PD and Webcat selection2.6.4.1.1.1 RPD selectionUse the login you created in BIEE installation to log in to the EM console.Expand 'Business Intelligence' node on the left and choose Coreapplication.Now click on the Deployment tab onthe right. Next, go to the Repositorytab.Click on 'Lock and Edit Configuration'to enable you to change the defaultsettings.In the 'Upload BI Server Repository' section, click on the Browse button and locate the SampleApp.rpd that you updated with correct connection information, on your client machine.Enter Admin123 as the password ( this is the offline password for SampleApp.rpd)Keep on the same configuration screen to update webcat selection2.6.4.1.1.2 Webcat selectionYour platform install, does not yet point to SampleApp catalog, you need to update the path at the bottom of the same EM screen, with the location looking like this.$ORACLE_INSTANCE/bifoundation/OracleBIPresentationServicesComponent/$COMPONENT_NAME/catalog/XXXXXX. Change the path to point to SampleApp Webcat so the location looks like this.$ORACLE_INSTANCE/SampleAppWebcat2.6.4.1.1.3 Apply changesClick onApply (topright cornerof screen)Click on 'Activate Changes‟2.6.4.2 E nable CachingEM screen also offers you the possibility of turning OBIEE cache on or off. Leaving cache set to off will allow to see physical SQL logs for every query. Performance should not be of issue with the low data volume in the sample database. To Switch Cache off, click on tab …Capacity Management‟, sub-tab …Performance‟. Disable cache there and click on Activate changes.2.7Configuring SampleApp Mapviewer ContentConfirm that WLS server and WLS managed servers are up and running, and make sure OMPNCTL is not running (neither OBIS nor OBIPS are running). Stop BI Server and Presentation Server if they are running.2.7.1 mapViewerConfig.xml EditsOpen the Mapviewer console (Login with the username/password that you provided while installing the product).Select Management option and click on configuration under …Manage MapViewer‟ page. This will open the mapViewerConfig.xml on your setup. Example: http://10.146.219.202:7001/mapviewer/faces/admin/admin.jspxMake the following change to the xml file:2.7.1.1 <security_config>In the <security_config> property of this file, make the following changes:Change the <proxy_enabled_hosts> property to the following :Substitute the hostname, IP address and port to the correct values on your setup.(NOTE:- There are 4 entries here. Two of them refer to the hostname and while two refer to the ip address of the machine where OBI is installed. Update all 4 entries to the hostname and ip address on your setup)<proxy_enabled_hosts>http://localhost:7001/mapviewer,http://localhost:7001/,http://10.178.221.72:7001/,http:// 10.178.221.72:7001/mapviewer </proxy_enabled_hosts>Substitute any entries with these tags with the property entries below: If the entry already exists, confirm that the value is as shown below. If the entry does not exist, then add a new entry with the value given below.<disable_direct_info_request> true </disable_direct_info_request><disable_info_request> true </disable_info_request><disable_csf>true</disable_csf><enforce_security_role> true </enforce_security_role>2.7.1.2 P redefined Data SourcesAt the end of the file, in the section named 'Predefined Data Sources', add the following data source entry. Replace the ipaddress, sid and port to the correct values of the database where the obiee_navteq schema has been created in the above steps.<map_data_source name="OBIEE_NAVTEQ_Sample"jdbc_host="10.229.147.238" (use your db ip)jdbc_sid="orcl" (use your db sid)jdbc_port="1521" (use your db port)jdbc_user="obiee_navteq"jdbc_password="!obiee_navteq" (use your selected password if different from OOB)jdbc_mode="thin"number_of_mappers="3"allow_jdbc_theme_based_foi="false"/>Make sure all tags have been closed correctly and also make sure the above data source is not within the comments section (ensure that it is outside the comments section which is represented by <!-- .. -->)2.7.1.3 S ave & Restart, VerifyClick on Save & Restart button at the bottom of the file. Once it is restarted, Click on Data sources. You should now seeOBIEE_NAVTEQ_Sample as an entry there.To confirm that the Mapviewer configuration is working, choose the Map Tile Layer called OBIEE_WORLD_MAP and click on 'View Map / Manage tiles' option. In the window that opens up, click on the 'Show Map' button. This should display the world map. Repeat the steps for the Map Tile Layer called OBIEE_WORLD_MAP_FAST and confirm that the world map is displayed.。
obiee11g常见问题集锦

1biee如何实现下钻逻辑维? (5)2BIEE创建资料档案库时可选二进制文件和mds xml文档,这两者有什么区别? (5)3biee服务启动失败,请问到哪里查看错误日志? (5)4obiee content can not be displayed in the iframe这个问题怎么解决? (7)5biee做数据权限是不是要借助第三方软件?比如LDAP sever之类的。
(7)6BIEE analytics : nQSError:27004,表未解析 (7)7[nQSError: 22040] 要使用Ago 函数, 查询('[D10 期间.Period Key]') 的存储级别必须是静态级别 (8)8BIEE导入元数据报连接失败,怎么配置连接oracle数据库,需要装客户端吗? . 10 9我想把一个老环境的biee内容搬到一个新环境上去,都需要copy哪些文件? (12)10BIEE Rpd保存报错:事务更新处理失败 (14)11BIEE可以支持左外关联吗?怎么弄? (15)12怎么修改BIEE的Logo? (15)13Rpd的表和字段特别多,如何能快速地定位到自己要找的表或字段? (16)14BIEE用归档的方式迁移,保存的数据格式没有迁移过来,如何解决? (16)15BIEE仪表盘提示的值能不能传到rpd总参与运算? (18)16为什么每修改一下rpd,都要去em中装载才能生效,哪里能设置一下,不这么麻烦?2017BIEE 已拒绝用户访问路径,错误代码:O9XNZMXB ,请问如何解决? (20)18BIEE如何批量给用户设置登陆默认页? (21)19BIEE会话日志中文乱码问题如何解决? (21)20BIEE中组和计算项的区别? (21)21数据库表里的数据修改了,为什么刷新报表数据没同步更新呢? (22)22BIEE迁移过后,登陆系统报“验证期间出错”,登陆rpd报GUID不匹配,如何解决?2223BIEE在哪里能看到报表最终在oracleDB中执行的sql? (23)24BIEE11g在哪里定义无结果时返回的内容?10g有,11g没找到在哪? (26)25BIEE的提示能否显示名称但是传值的时候将编码传给分析呢? (26)26BIEE 日志无法获取 (27)27OBIEE 高速缓存如何设置定期清理 (27)28如何实现合并单元格 (28)29biee11g目录使用“重命名,且勾选保留对此项的旧名称的引用”功能后,仪表盘菜单栏出现重复的目录 (28)30BIEE报表忽然无法显示 (29)31BIEE文本输入框问题 (29)32BIEE汇总行自定义条件时不起作用? (29)33BIEE EVALUATE函数 (35)34请问一下,当结束时间小于开始时间需要弹出一个对话框(提示时间选择有误),需要怎么做 (36)35BIEE跨库连接查询 (44)36安装biee的数据库信息在哪查看? (45)37BIEE 如何提高报表的查询效率 (45)38请问OBIEE的publisher与answer有什么区别,分别指代什么? (46)39BI分析的过滤条件要做类似月份>=201301 and (同比增长量<0 or 环比增长量<0)这种的该怎么做? (47)40请问下登录时的用户ID 改成账号,是要在哪里修改? (47)41关于BIEE报表出现‘撤销钻探并查看提示值’的问题 (47)42DEV_MDS,DEV_BIPLATFORM这两个用户的密码变了,BIEE需要修改哪些地方?. 48 43BIEE迁移过后,在设置用户登录默认页时报错:已拒绝用户访问路径/user/...... . 53 44各位大牛,BIEE的分析中,如果想做一个链接到别的报表,怎么在URL中取IP地址和Port啊? .. (56)45BIEE Answer中创建分析,过滤器可以用当前登录用户来过滤么? (56)46BI Answer的仪表盘提示如果用SQL语句的话,是否可以取一个(ID、DESC)对?5647rpd可以对单个的用户设置日志记录级别,但是我想对一个角色进行日志级别,如何设置呢 (58)48请问在BIEE Answer上能实现按钮功能么? (59)49biee 11g 验证和授权如何实现? (59)50Ago函数如何使用? (60)51如何保存报表到特定目录。
BIEE11g集群系统环境安装配置手册-v10

BIEE 集群系统测试环境安装配置手册Table of Contents1.文档介绍 (1)1.1文档目的 (1)1.2缩写与术语定义 (1)1.3目标 (1)1.4系统用户与密码汇总 (1)2.安装前的准备 (2)2.1操作系统准备 (2)2.2Linux系统设置 (2)2.3软件介质的准备 (3)3安装和配置OBIEE (3)3.1安装RCU (Repository Creation Utility) (3)3.2安装BIEE (10)3.3安装p1*******_111170_Linux-x86-64 (154.155都必须安装) (24)3.4安装patch p1*******_111170_Linux-x86-64(154,155都必须安装) (25)1.文档介绍1.1文档目的本文档介绍Oracle BIEE1117及其补丁系统的安装、配置过程,详细记录配置信息,用于以后系统的维护和相关人员的培训。
1.2缩写与术语定义1.3目标1.4系统用户与密码汇总2.安装前的准备Oracle BIEE安装需要一定的系统参数和相关的软件包的支持,特别是Linux系统的系统,本节介绍安装的需要做的准备工作。
2.1操作系统准备其中操作系统、Oracle DB(实例需要以AL32UTF8为字符集)以及Oracle DB Client(需要安装管理员版客户端)均由浦发技术人员安装完成,此文档不再赘述。
2.2Linux系统设置1.确认Linux系统已支持Utf8,例如例如EN_UTF8,US_UTF8,ZH_UTF8等!(已由浦发技术人员确认)2.由于Linux系统由模板生成,需要确保151,154,155三台机器拥有不同的机器名。
之后,并修改linux的host文件 /etc/hosts (以154机器为例,除了需要修改成红框中的第1、2行,还需要添加第3行和第4行对155、151机器的映射,这样后续安装即可以机器名来进行引用)(在155机器上的配置)3.确认Linux版本命令:cat /etc/version内核: Linux version 3.0.13-0.27-default命令: lsb_release -a系统版本: SUSE Linux Enterprise Server 11 (x86_64)4.修改系统参数 (154和155)编辑文件:/etc/security/limits.conf 加入以下语句:oracle soft nofile 65536oracle hard nofile 65536oracle soft nproc 16384oracle hard nproc 163845.创建安装用户biee(154和155)命令: useradd -m biee passwd biee1234创建用户 biee 密码 biee12346.确保biee拥有dba和oinstall组的权限(154和155)及其对oracle客户端目录下的oraInventory目录的写权限。
01.BIEE 11G概览

异构数据源 - 关系,多维,非结构化
8
汉得公司
版权所有
仪表盘
100%瘦客户端 统一所有分析样式 共享,协作,发布 自由定义用户和组
9
汉得公司
版权所有
Oracle Essbase
分析 - 前瞻性:预测和What-if分析 - 针对复杂业务场景的简单建模 - 先进的,跨维计算 - 财务,时间序列和自定义计算 - 自定义分析应用 - 多用户写回 最佳的性能和可扩展性(MOLAP ) - 灵活的存储 - Block, Aggregate & Hybrid - 优化的负载性能,滴进 - 高性能集群 - 20000并发用户,15个维度, 十亿条记录的亚秒级响应 Oracle BI 与 Oracle EPM集成 - 共享元数据,计算逻辑,维度,安全
6
汉得公司
版权所有
Oracle Business Intelligence 11 g
新特性
7
汉得公司
版权所有
BI Server
完整的BI工具套件 - 一致的用户界面,元数据计算, 数据访问,安全 最佳ROLAP性能 - 智能请求生成 - 智能功能导航 - 智能复杂计算 - 智能聚合导航 - 智能高速缓存 - 优化的分布式数据访问 多用户开发
汉得公司 汉得信息技术股份有限公司版权所有 版权所有
Oracle Business Intelligence 11 g
新特性 - 统一ROLAP和MOLAP - 行动框架:Action Framework 和 SOA集成 - KPIs 作为核心源数据对象 集成 - OBI Server + Essbase - OBIEE + WebCenter Spaces 和协作 - OBIEE + 11g Fusion Middleware - OBIEE +安全企业搜索 (Secure Enterprise Search) 用户体验 - 面向任务,新的起始页,用户验证 - 改进的可视化,交互性和用户体验 - 空间智能 (Spatial) 利用Oracle技术优势 - Oracle融合中间件 - Oracle企业管理器 - Oracle身份管理
biee 11g 客户端(biee32位安装手册)

BIEE 11G WINDOWS 32位安装步骤:注:由于linux、unix或者64位windows没有包含客户端工具,所以如果需要用客户端工具,那么需要单独装biee32位(RCU等都需要重新创建),安装手册(1、2所示)。
1用RCU创建BIPLATFORM1. 1选择安装介质位置1.2运行\rcuHome\BIN\rcu.bat1.3填写数据库信息主机名:--数据库主机名称端口:--数据库端口(1521)服务名:--安装Oracle数据库时设置的服务名(orcl)用户名:sys --Oracle数据库系统用户口令:Welcome1 --数据库用户sys的密码1.4先决条件检查1.5选择组建Oracle Business Intelligence1.6设置用户密码1.7创建信息(默认)1.8选择创建表空间1.9BIPLATFORM创建成功2 进入BIEE安装(D:\bi32\bishiphome\Disk1\setup.exe)2.1 进入安装界面2.2 选择简单安装2.3 进行先决条件检查点击一步2.4 选择指定安装目录2.6 填写BIEE登陆页面管理员用户名及密码2.7 选择安装组件2.8 填写数据库详细资料2.9取消更新一路下一步待100%之后,点击完成,结束安装。
3 客户端管理工具3.1打开建模工具Administrator tool在线打开,并输入口令:3.2用Administrator tool在线打开其他服务器上的rpd 这里以20作为示例3.2.1创建odbc打开odbc,点击新建:选择Oracle BI Server输入ODBC名称及bi server 地址点击完成,odbc创建成功。
3.2.2用Administrator tools 在线打开20上rpd 同3.1打开Administrator tools,选择新创建的odbc名称。
输入20的资料库密码及用户名和口令。
Oracle Biee 11g + SQLServer安装历程
Oracle Biee 11g + Sqlserver 2008 安装配置公司要用Obiee的项目了,于是Bo暂且放下,开始装biee。
本来感觉Bo挺卡的,响应得也慢,还会不时出错。
现在Obiee 11g装好一比较才发现,什么叫做卡。
安装起来还真费劲,本来都装好了,结果擅自改了配置文件,接下来一直报服务器内部错误。
没办法解决,于是重装。
网上已经有不少关于Oracle Biee + Oracle Database 安装配置教程,并且本是一家的产品安装基本没什么问题,就不再赘述。
Obiee + Sqlserver 的安装配置才是关键,当中问题还不少,折腾了一下午还没搞定!开始进入正题,安装biee 11g 之前先下载rcu 创建资料库配置,rcu只支持3种数据库:Oracle ,Sql Server ,DB2;DB2还没用过,看文档介绍得貌似更麻烦一些,暂且不管。
选择SqlServer数据库,可以新建一个空数据库来测试。
当然前提是安装了SqlServer,我装的版本是Sqlserver2008企业版R2,网上有中文版下载,这个大概也要装2-3小时。
若选择Oracle的话版本有要求,11g R2的版本官网下载即可。
Sql Server默认端口号是1433。
一路下一步到rcu 创建选择组件时,只选了必要的BI组件和元数据服务。
若不选元数据服务接下来安装biee会直接报错。
下面的问题就开始了!点下一步就直接报错,元数据服务错误,错误代码RCU-6083 。
按照提示查了日志,在最下面错误提示部分找到一段脚本ALTER database YourDatebaseName SET READ_COMMITTED_SNAPSHOT ON打开SSMS执行之。
再重试rcu下一步,结果仍然报错。
再查日志,又有一段脚本SELECT @collate = convert(sysname, serverproperty('COLLATION'))IF ( charindex(N'_CI', @collate) > 0 )BEGINselect @collate = replace(@collate, N'_CI', N'_CS')exec ('ALTER database $(DATABASE_NAME) COLLATE ' + @collate)ENDGO又打开SSMS执行。
Biee发送邮件的简单配置及biee webservice的使用
Biee发送邮件的简单配置及biee webservice的使用配置分为2部分(biee11G):1,在EM(http://127.0.0.1:7001/em)中配置发送邮件的代理邮件服务器点击锁定和编辑配置编辑邮件服务器,可以使用126,163等邮箱。
配置好后保存并重启biee服务器,可以在em中重启2, 创建agnet(代理)打开http://127.0.0.1:7001/analytics,新建agent,配置agent。
第一栏可以不用修改第二栏也不用修改第三栏也可以不用修改第四栏是配置的重点。
你需要选择发送内容的类型(如Analysis或者Dashboard),然后选择相应的报表选择发送报表的格式PDF选择发送方式作为附件发送第五栏配置收件人第六栏第7栏可以不用配置然后保存,并调用agent。
你还可以通过webservice来调用agent来发送邮件前期准备请看我的另一篇文章biee webservice的使用java .此片文章是bi publisher webservice 的使用。
和biee的webservice类似。
Wsdl地址参考:http://192.168.44.xxx:9704/analytics/saw.dll/wsdl/v6/SAWSessionService?wsdlhttp://192.168.44.xxx:9704/analytics/saw.dll/wsdl/v6/IBotService?wsdlimport oracle.bi.web.soap.IBotService;import oracle.bi.web.soap.IBotServiceSoap;import oracle.bi.web.soap.SAWSessionService;public class TestAgentReport {public static void main(String[] args) {String sessionID;SAWSessionService myPort = new SAWSessionService();sessionID=myPort.getSAWSessionServiceSoap().logon("xxxx", "xxxxx");IBotService ibotService=new IBotService();IBotServiceSoap iBotServiceSoap=ibotService.getIBotServiceSoap();iBotServiceSoap.executeIBotNow("/shared/test_xx/xxxxxx", sessionID);}}。
BIEE11G客户化设置

BIEE11G客户化设置BIEE 11G个性化设置咖啡版本:V1.0文档变更记录目录BIEE页面个性化设置 (4)1.个性化皮肤文件部署流程 (4)1.1.创建皮肤文件夹 (4)1.2.拷贝皮肤文件 (4)1.3.部署皮肤文件 (4)1.4.修改配置文件,指定系统默认使用的皮肤文件 (9)2.个性化配置功能点 (10)2.1.替换logo (10)2.2.修改系统名称 (11)2.3.修改powered by oracle图标 (11)2.4.修改版权信息 (12)2.5.修改登录页面 (12)2.5.1.替换背景图片 (12)2.5.2.去掉背景图片上方的“系统名称” (13)2.5.3.修改登录框上“登录”的字体颜色 (14)2.5.4.去掉登录框上“登录”下方的说明 (14)2.5.5.去掉下方的版权和产品信息 (14)2.5.6.调整登录框的位置 (14)2.5.7.效果图 (15)2.5.8.备注 (15)2.6.去掉右上角菜单栏不必要的链接 (15)3.关于是否需要重启服务的说明 (17)BIEE11G页面客户化设置1.个性化皮肤文件部署流程1.1.创建皮肤文件夹在BIEE安装目录下建立一个文件夹my_skincd /home/oracle/BIEE11Gmkdir my_skin1.2.拷贝皮肤文件把Oracle_BI1/bifoundation/web/app/res/sk_blafp文件夹拷贝到my_skin下cd /home/oracle/BIEE11G/Oracle_BI1/bifoundation/web/app/res cp -R sk_blafp /home/oracle/BIEE11G/my_skin把Oracle_BI1/bifoundation/web/app/WEB-INF文件夹拷贝到my_skin下cd /home/oracle/BIEE11G/Oracle_BI1/bifoundation/web/app cp -R WEB-INF /home/oracle/BIEE11G/my_skin1.3.部署皮肤文件进入控制台http://192.168.101.141:7001/console点击“部署” “锁定并编辑”选择“安装”选择皮肤选择“将此部署安装为应用程序”完成激活更改启动控制部署成功1.4.修改配置文件,指定系统默认使用的皮肤文件/home/oracle/BIEE11G/instances/instance1/config/OracleBI PresentationServicesComponent/coreapplication_obips1/instanceconfig.xml文件,加入如下内容/home/oracle/BIEE11G/my_skin。
ORACLE BIEE 11G安装文档
安装ORACLE BIEE 11G前言:安装环境:windows server 2003 64bit系统,2G以上物理内存,并且安装SQL2005数据库。
安装准备:ORACLE BIEE 11G 64位安装软件,RCU资料档案库安装文件夹安装RCU运行\BIN\rcu.bat开始安装进入安装界面点击下一步选择创建资料档案库填写数据库资料,在此之前需要新建数据库,并且确定排序规则是chinese_prc_cs_as 即开启区分大小和重音的数据库。
并修改数据库端口,以及确定服务开启。
/view/01f1e7e9856a561252d36fd3.htmlSQL默认端口是1433,但有时会出现服务器与端口错误的情况,这是因为SQL默认端口1433没有启动,需另行在SQL启动端口以及服务。
Rcu检查先决条件,如全部正常,点击【确定】,输入BIEE资料库对应的数据库用户名,点击【下一步】,元数据服务与数据库类型有关,按照提示在SQL运行命令ALTER database TEST_BIEE(数据库名称)SET READ_COMMITTED_SNAPSHOT ON语句,必须退出CRU才能执行成功。
再次运行,成功了。
点击确定输入BIEE资料库用户对应的密码,可以保持一致,也可以为不同的用户设置不同的密码,输入完成后,点击【下一步】,确认信息后直接创建资料库创建完成安装BIEE进入BIEE安装介质,进入bishiphome/disk1,点击setup开始安装,BIEE安装欢迎页面,点击【下一步】选择“跳过软件更新”,点击【下一步】选择“企业安装”,点击【下一步】BIEE安装环境检查,如一切正常,点击【下一步】,物理内存需要大于两个GBIEE会默认安装WebLogic,也可以选择其他已安装好的WebLogic,此处保持默认。
选择“创建新BI系统”,并输入新WebLogic的管理员用户名及密码,点击【下一步】,如创建时,有如下错误提示信息,请在Windows host文件中,加入服务器hostname与ip 的对应。
BIEE11g入门培训(详细资料)

BIEE11g入门培训教程编写:北京殷塞信息技术有限公司编写日期:2012/6/19版本:V1。
0目录BIEE11g入门培训教程 (1)1. ORACLE BIEE基础 (5)1.1. OBIEE 概述 (5)1。
1.1。
BIEE 历史 (5)1.1.2. 数据模型 (5)1。
2. BIEE 安装 (6)1.2.1. JDK要求 (6)1.2。
2. 下载BIEE (6)1。
2.3. 安装BIEE (7)1。
2。
4. Logs (9)1.3。
配置 (10)1.3.1. 安装后的目录 (10)1.3.2。
几个重要的配置文件 (10)1。
4。
预览Demo效果 (10)1。
4。
1。
启动BI服务和OC4J (10)1。
4。
2。
打开BIEE仪表盘 (11)2。
BIEE 开发步骤 (12)2.1。
数据库 (12)2。
1.1。
安装数据库 (12)2。
2。
创建资料库 (12)2.2.1。
资料库 (12)2。
3。
创建物理模型 (13)2.3。
1。
导入物理表 (13)2.3.2. 创建物理模型 (16)2.3.3。
新建主键和外键 (17)2.4。
创建逻辑模型 (20)2。
4.1. 创建逻辑层 (20)2。
4.2. 查看逻辑层 (21)2。
4.3. 修改逻辑层 (21)2。
5. 创建展现模型 (22)2.5.1。
创建展现层 (22)2。
6. 保存资料库 (22)2.6。
1。
保存资料库 (22)2。
6.2. 修改密码 (23)2。
7。
发布资料库 (23)2.7。
1. 修改NQSConfig。
INI (24)2。
7。
2。
重启Oracle BI Server (24)2.8. Answers –答复 (24)2.8.1. 登陆BI EE11g (24)2。
8.2。
选择主题 (25)2.8.4。
保存报表 (28)2。
9。
Dashboards –仪表盘 (29)2。
9.1。
创建仪表盘 (29)2。
9。
2。
编辑仪表盘 (29)2。
Weblogic_11g_安装_部署_优化

目录Weblogic_11g_x64(安装、部署、优化) (2)一、Weblogic 11g(10.3.6)安装流程 (2)1.1安装JDK(JDK版本:jrockit-jdk1.6.0_45-R28.2.7-4.1.0-win-x64) (2)1.1.1安装界面 (2)1.1.2修改JDK安装目录 (3)1. 1.3JDK目录复制完成 (4)1. 1.4安装JRE (4)1. 1.5修改JRE目录 (5)1. 1.6JDK安装进度 (5)1. 1.7 完成JDK安装 (6)1.2安装Weblogic 11g (7)1.2.1放置Weblogic安装文件 (7)1.2.2解压安装包 (7)1.2.3安装界面 (8)1.2.4创建中间件主目录 (9)1.2.5安全注册 (9)1.2.6邮件设置 (10)1.2.7配置管理 (10)1.2.8安全配置 (11)1.2.9安装类型 (11)1.2.10选择JDK (12)1.2.11产品目录 (12)1.2.12安装概要 (13)1.2.13安装进度 (13)1.2.14完成安装 (14)二、Weblogic 11g(10.3.6)项目部署 (15)2.1打开weblogic配置工具 (15)2.2创建域 (15)2.3配置域 (16)2.4修改域名 (16)2.5输入用户名密码 (17)2.6选择JDK (18)2.7服务器配置类型 (18)2.8修改端口 (19)2.9创建项目 (19)2.10完成部署 (20)2.11替换删除文件 (20)2.12编辑startWebLogic.cmd文件 (20)2.13建立项目 (20)三、Weblogic 11g(10.3.6)项目优化 (21)3.1修改文件 (21)3.2设置JDK内存 (21)3.3设置线程数 (22)3.4 Weblogic数据库连接池连接数设置 (22)3.5 WebLogic的服务设置(配置\优化) (23)3.6 Windouws服务器设置 (23)3.7 Oracle数据库设置 (23)Weblogic_11g_x64(安装、部署、优化)一、Weblogic 11g(10.3.6)安装流程1.1安装JDK(JDK版本:jrockit-jdk1.6.0_45-R28.2.7-4.1.0-win-x64)1.1.1安装界面双击应用程序进入安装界面,点击“Next”按钮,如下图:1.1.2修改JDK安装目录进入安装目录选择窗口,修改安装目录后,点击“Next”按钮(注:此处不使用默认目录,因为JDK对带空格的目录不兼容修改目录为:C:\Java\jrockit-jdk1.6.0_45-R28.2.7-4.1.0)如下图:1. 1.3JDK目录复制完成点击“Next”按钮,如下图:1. 1.4安装JRE选择“安装JRE”后点击“Next”按钮,如下图:1. 1.5修改JRE目录修改JRE安装目录后,点击“Next”按钮(注:此处不使用默认目录,因为JDK对带空格的目录不兼容修改目录为:C:\Java\jrockit-jre1.6.0_45-R28.2.7)如下图:1. 1.6JDK安装进度进入JDK安装进度窗口,等待JDK安装完成,如下图:1. 1.7 完成JDK安装点击“Done”按钮,完成安装,如下图:1.2安装Weblogic 11g1.2.1放置Weblogic安装文件将Weblogic 11g安装程序放入到JDK安装目录下,如下图:1.2.2解压安装包使用组合键Ctrl+R打开运行窗口,在窗口输入cmd后点击回车键(如下图1),调出doc窗口后,进入JDK安装目录,输入命令:java -D64 -jar wls1036_generic.jar后点回车键解压Weblogic安装程序(如下图2):图(1)图(2)1.2.3安装界面解压完成后,会自动弹出安装界面,点击“下一步”按钮,如下图:1.2.4创建中间件主目录选择“创建新的中间件主目录”,修改中间件目录(如:E:\bea)后点击“下一步”按钮,如下图:1.2.5安全注册进入注册安全更新窗口,此处不输入电子邮件同时将“我希望通过My Oracle Support接收安全更新”前的对勾去掉后,(注:取消对勾时出现信息提示窗口时选择“Yes”)点击“下一步”按钮,如下图:1.2.6邮件设置点击“下一步”按钮后,会提示“尚未提供电子邮件地址”,选择“Yes”,如下图:1.2.7配置管理出现提示“是否希望绕过配置管理器…”时,选择“Yes”,如下图:图31.2.8安全配置勾选“我不希望接收配置中存在安全问题…”后点击“继续”按钮,如下图:1.2.9安装类型选择安装类型后点击“下一步”(注:根据实际需求选择安装类型,此处选择典型),如下图:1.2.10选择JDK点击“浏览”按钮,使用本地JDK后,点击“下一步”按钮,如下图:1.2.11产品目录1.2.12安装概要进入安装概要界面后点击“下一步”按钮,如下图:1.2.13安装进度1.2.14完成安装点击“完成”按钮,完成安装,如下图:二、Weblogic 11g(10.3.6)项目部署2.1打开weblogic配置工具进入“开始菜单”,打开“Configuration Wizard”,如下图:2.2创建域选择“创建新的Weblogic域”,点击“下一步”,如下图:2.3配置域使用默认项,点击“下一步”,如下图:2.4修改域名2.5输入用户名密码输入“名称”及“用户密码”后点击“下一步”(注,要记住该名称及密码,便于以后维护weblogic),如下图:2.6选择JDK选择“开发模式”及可用JDK后,点击“下一步”,如下图:2.7服务器配置类型选择服务器配置类型(注:选择管理服务器)后,点击“下一步”,如下图:2.8修改端口修改项目使用端口后,点击“下一步”,如下图:2.9创建项目点击“创建”,如下图:2.10完成部署点击“完成”,如下图:2.11替换删除文件进入Weblogic目录:..\wlserver_10.3\server\lib(此处为:E:\bea\wlserver_10.3\server\lib),(1)使用给出的文件替换现有的oracle.jar和antlr-2.7.6.jar(2)删除ojdbc6.jar2.12编辑startWebLogic.cmd文件进入Weblogic项目目录:..\ user_projects\domains\base_domain\bin\(此处为:E:\bea\user_projects\domains\nccm2015\bin\)编辑startWebLogic.cmd文件,在set CLASSPATH=%SA VE_CLASSPATH%后面添加以下内容:@REM hibernate3set PRE_CLASSPATH=%WL_HOME%\server\lib\antlr-2.7.6.jarset CLASSPATH=%PRE_CLASSPATH%;%CLASSPATH%2.13建立项目进入Weblogic项目目录:..\ user_projects\domains\base_domain\ autodeploy \(此处为:E:\bea\user_projects\domains\nccm2015\autodeploy)将项目复制到该目录下即完成项目的部三、Weblogic 11g(10.3.6)项目优化3.1修改文件进入Weblogic目录:..\ wlserver_10.3\common\bin\(此处为:E:\bea\wlserver_10.3\common\bin\),编辑commEnv.cmd文件,修改以下内容:修改前::sunif "%PRODUCTION_MODE%" == "true" goto sun_prod_modeset JA V A_VM=-clientset MEM_ARGS=-Xms32m -Xmx200m -XX:MaxPermSize=128m -XX:+UseSpinningset JA V A_OPTIONS=%JA V A_OPTIONS% -Xverify:nonegoto continue:sun_prod_modeset JA V A_VM=-serverset MEM_ARGS=-Xms32m -Xmx200m -XX:MaxPermSize=128m -XX:+UseSpinninggoto continue修改后::sunif "%PRODUCTION_MODE%" == "true" goto sun_prod_modeset JA V A_VM=-clientset MEM_ARGS=-Xms128m –Xmx800m -XX:MaxPermSize=512m -XX:+UseSpinningset JA V A_OPTIONS=%JA V A_OPTIONS% -Xverify:nonegoto continue:sun_prod_modeset JA V A_VM=-serverset MEM_ARGS=-Xms128m –Xmx800m -XX:MaxPermSize=512m -XX:+UseSpinninggoto continue3.2设置JDK内存进入Weblogic项目目录:..\ user_projects\domain\bin \(此处为:E:\bea\user_projects\domain\bin\)编辑seDomainEnv.cmd文件:修改前:If”%JA V A_VENDOR%”=”Sun”(Set WLS_MEM_ARGS_64BIT=-Xms256m –Xmx512mSet WLS_MEM_ARGS_32BIT=-Xms256m –Xmx512m)else(Set WLS_MEM_ARGS_64BIT=-Xms512m –Xmx512m Set WLS_MEM_ARGS_64BIT=-Xms51 2m –Xmx512m )Set MEM_PERM_SIZE_32BIT=-XX:PermSize=48mSet MEM_MAX_PERM_SIZE_32BIT=-XX:MaxPermSize=128m修改后:If”%JA V A_VENDOR%”=”Sun”(Set WLS_MEM_ARGS_64BIT=-Xms512m –Xmx1024mSet WLS_MEM_ARGS_32BIT=- Xms512m –Xmx1024m)else(Set WLS_MEM_ARGS_64BIT=-Xms1024m Xmx1024mSet WLS_MEM_ARGS_64BIT=-Xms1024m –Xmx1024m )Set MEM_PERM_SIZE_32BIT=-XX:PermSize=128mSet MEM_MAX_PERM_SIZE_32BIT=-XX:MaxPermSize=256m说明:红色字体为修改的内容,具体修改值根据实际内存确定-Xmx3550m:设置JVM最大堆内存为3550M。
BIEE 10G 移植到 11G 方法

Beta Training: Upgrad e Lab1.Unzip the UpgradeLab.zip inside your image. This contains a 10g RPD and Webcat.2.Login to Enterprise Manager and check your BI system is running (i.e. you can login to BI)http://localhost:7001/emTypically the Administrator credentials are biadmin/welcome13. On the Deployment tab, notice which RPD and webcat is being used currently:Make a note of this. You will need it to switch back to this RPD/Webcat following the upgrade exercise.Note that you may need to ‘Lock and Edit’ the configuration in order to see the webcat location. Make sure that you release the configuration before continuing.4.Navigateto ?:\<installfolder>\instances\instance1\bifoundation\OracleBIServerComponent\coreappli cation_obis1Create a new folder called ‘server’, then copy the ‘sample’ folder with all subfolders into the new folder:This folder will provide the data for the rpd you are about to upgrade.5.Start the Upgrade Assistant and follow through the prompts.?:\<installfolder>\Oracle_BI1\bin\ua.bata.Browse to the paint10g.rpd that you unzipped in step 1.b.The credentials for this RPD are Administrator/Administratorc.You must create a password to secure the upgraded RPD. Use ‘w elcome1’d.Browse to the paint10g folder that contains the 10g webcat. You unzipped thisfolder in step 1.e.Specify an empty folder for deliveries if you do not have this folder.f.Specify the location and credentials to login to your Weblogic Admin Server(typically biadmin/welcome1)g.Select ‘Upgrade’6. Refresh the Deployments tab in Enterprise Manager7. Check that you are now using the 10g rpd and webcat (upgraded to 11g).8. Login to BI and view the paint dashboard (you will not have any data yet).9. Open the RPD online using the AdmintoolRepository Password: welcome1biadmin/welcome110. Update the BI_EE_HOME variable to pointto ?:\<installfolder>\instances\instance1\bifoundation\OracleBIServerComponent\coreappli cation_obis111.Save.12. Refresh the dashboard13.Go back to EM and ‘Lock and Edit’ the configuration on the Deployment tab14.In the Upload BI Server Repository sectiona.Browse for the Sample Application RPDYou will find thisin: ?:\<installfolder>\instances\instance1\bifoundation\OracleBIServerComponent\core application_obis1\repositoryb.Enter ‘welcome1’ for the Repository Password and Confirm the password.15. In the Presentation Service Repository sectiona.Enter the path to the SampleApp webcatYou will find thisin: ?:\<installfolder>\instances\instance1\bifoundation\OracleBIPresentationServicesCo mponent\coreapplication_obips1\catalog\SampleApp16.Press the Apply button to apply changes to EM17.Refresh the EM page using the icon shown below:18.Press ‘Activate Changes’ to write changes to config files.19. Select the Capacity Management tab where you can Restart BI processes20.Select the BI Server and Restart Selected21.Select the BI Presentation Server and Restart Selected22.Login to BI and make sure you have the Sample Application back.。
obiee11g常见问题集锦资料

1biee如何实现下钻逻辑维? (4)2BIEE创建资料档案库时可选二进制文件和mds xml文档,这两者有什么区别? (4)3biee服务启动失败,请问到哪里查看错误日志? (5)4obiee content can not be displayed in the iframe这个问题怎么解决? (6)5biee做数据权限是不是要借助第三方软件?比如LDAP sever之类的。
(6)6BIEE analytics : nQSError:27004,表未解析 (6)7[nQSError: 22040] 要使用Ago 函数, 查询('[D10 期间.Period Key]') 的存储级别必须是静态级别 (7)8BIEE导入元数据报连接失败,怎么配置连接oracle数据库,需要装客户端吗? (9)9我想把一个老环境的biee内容搬到一个新环境上去,都需要copy哪些文件? (11)10BIEE Rpd保存报错:事务更新处理失败 (13)11BIEE可以支持左外关联吗?怎么弄? (14)12怎么修改BIEE的Logo? (14)13Rpd的表和字段特别多,如何能快速地定位到自己要找的表或字段? (15)14BIEE用归档的方式迁移,保存的数据格式没有迁移过来,如何解决? (15)15BIEE仪表盘提示的值能不能传到rpd总参与运算? (17)16为什么每修改一下rpd,都要去em中装载才能生效,哪里能设置一下,不这么麻烦?1917BIEE 已拒绝用户访问路径,错误代码:O9XNZMXB ,请问如何解决? (19)18BIEE如何批量给用户设置登陆默认页? (20)19BIEE会话日志中文乱码问题如何解决? (20)20BIEE中组和计算项的区别? (20)21数据库表里的数据修改了,为什么刷新报表数据没同步更新呢? (21)22BIEE迁移过后,登陆系统报“验证期间出错”,登陆rpd报GUID不匹配,如何解决?2123BIEE在哪里能看到报表最终在oracleDB中执行的sql? (22)24BIEE11g在哪里定义无结果时返回的内容?10g有,11g没找到在哪? (25)25BIEE的提示能否显示名称但是传值的时候将编码传给分析呢? (25)26BIEE 日志无法获取 (26)27OBIEE 高速缓存如何设置定期清理 (26)28如何实现合并单元格 (27)29biee11g目录使用“重命名,且勾选保留对此项的旧名称的引用”功能后,仪表盘菜单栏出现重复的目录 (27)30BIEE报表忽然无法显示 (28)31BIEE文本输入框问题 (28)32BIEE汇总行自定义条件时不起作用? (28)33BIEE EVALUATE函数 (34)34请问一下,当结束时间小于开始时间需要弹出一个对话框(提示时间选择有误),需要怎么做 (35)35BIEE跨库连接查询 (43)36安装biee的数据库信息在哪查看? (44)37BIEE 如何提高报表的查询效率 (44)38请问OBIEE的publisher与answer有什么区别,分别指代什么? (45)39BI分析的过滤条件要做类似月份>=201301 and (同比增长量<0 or 环比增长量<0)这种的该怎么做? (46)40请问下登录时的用户ID 改成账号,是要在哪里修改? (46)41关于BIEE报表出现‘撤销钻探并查看提示值’的问题 (46)42DEV_MDS,DEV_BIPLATFORM这两个用户的密码变了,BIEE需要修改哪些地方?. 47 43BIEE迁移过后,在设置用户登录默认页时报错:已拒绝用户访问路径/user/...... . 52 44各位大牛,BIEE的分析中,如果想做一个链接到别的报表,怎么在URL中取IP地址和Port啊? .. (55)45BIEE Answer中创建分析,过滤器可以用当前登录用户来过滤么? (55)46BI Answer的仪表盘提示如果用SQL语句的话,是否可以取一个(ID、DESC)对?5547rpd可以对单个的用户设置日志记录级别,但是我想对一个角色进行日志级别,如何设置呢 (57)48请问在BIEE Answer上能实现按钮功能么? (58)49biee 11g 验证和授权如何实现? (58)50Ago函数如何使用? (59)51如何保存报表到特定目录。
Oracle BIEE 11g

2.界面内容组织更有条理,更清晰。 3.新增或改进功能: ——提示条:样式、类型。
Web界面及新增功能
——层结构:提示条、列。
Web界面及新增功能
——图形:滑块功能。
Web界面及新增功能
——表:用户拖拽。
Web界面及新增功能
——记分卡
Web界面及新增功能
资料库
4.在连接数据库的时候需要用到连接池数据源名称写全称,或者是在BIEE11g自带的 oracle客户端中重新配置一次TNS,然后用简称。
资料库
5.层结构可作为一个对象,拖到展现层中使用,下图为报表展现时的效果。
6.相对BIEE10g的版本来说,11g不能够直接在RPD中创建用户及用户组。
Web界面及新增功能
OBIEE 10g 无要求 不安装 45分钟左右
注:安装期间,请关闭防火墙、杀毒软件等。 附:《Oracle biee 11g 安装指引.doc》
工具
OBIEE 11g OBIEE 10g
BI 管理
目录管理器 作业管理器 BI ODBC 客户机
Administration
Catalog Manager Job Manager ODBC Client
——地理信息化
安全
安全架构图:
安全
用户及组的创建:
安全
应用程序角色创建及权限分配:
安全
数据权限设置:
安全
功能权限设置:
安全
OBIEE 11g 用户/组创建 应用程序角色创建及 权限分配 数据权限设置 功能权限设置 控制台
EM
OBIEE 10g 资料库 资料库 资料库 Web
资料库 Web
Oracle BIEE (Business Intelligence) 11g 11.1.1.6.0 学习RPD资料档案库创建
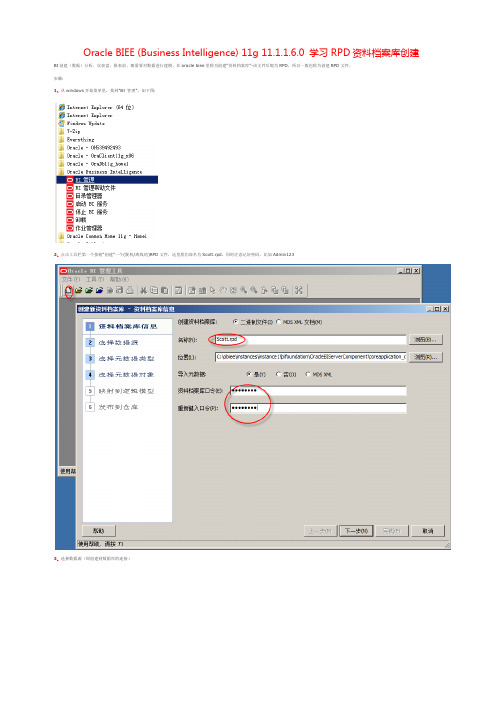
Oracle BIEE (Business Intelligence) 11g 11.1.1.6.0 学习RPD资料档案库创建BI创建(数据)分析、仪表盘、报表前,都需要对数据进行建模,在oracle biee里称为创建“资料档案库”-该文件后缀为RPD,所以一般也称为创建RPD文件。
步骤:1、从windows开始菜单里,找到"BI 管理",如下图:2、点击工具栏第一个按钮“创建”一个(脱机/离线的)RPD文件,这里我们命名为Scott.rpd,同时注意记好密码,比如Admin1233、选择数据源(即创建到数据库的连接)注1:上图中的数据源名称,其实就是oracle连接串(当然你可以在tnsname.ora里配置,并复制到指定位置,但是我觉得这种方式比较麻烦,还不如直接指定连接串来得直接),下面是示例连接串:(DESCRIPTION=(ADDRESS_LIST=(ADDRESS=(PROTOCOL=TCP)(HOST=localhost)(PORT=1521)))(CONNECT_DATA=(SERVICE_NAME=orcl)))注2:用户名这里,我们指定oracle的经典用户名scott(默认密码是tiger),安装oracle db时,如果这个用户被锁,可用dba帐号解锁4、导入元数据,这里我们暂时只导入一张表SCOTT.EMP5、点击导入按钮时,参照下图,填写db用户名/密码等信息6、导入后,应该类似下面这样,但是根节点的名称太长了,我们可以在根节点上右击->重命名,改个更有意义的名称,比如localhost7、从【物理】层,把SCOTT拖到【业务模型和映射】层8、创建一个聚合字段(SAL_SUM),很多报表中通常会对某字段做汇总统计,这里我们对工资SAL字段,创建一个汇总字段,如下图,先创建副本9、在创建好的“SAL副本”上右击->选择属性10、修改新字段的名称为SAL_SUM(这样看上去可读性更强一些)11、切换到【聚合】页,选择【默认聚合规则】为"Sum",即汇总求合12、把【SCOTT】从【业务模型和映射】层拖到【表示】层13、最终三个层的视图应该类似下面这样注:其实这三层,类似于软件开发中的经典三层结构,【物理】层表示数据的物理表结构,而【业务模型和映射】层相当于【BusinessModel】层,而最终的【表示】层,有点象M-V-VM中的【ViewModel】层,用于最终报表/分析的展现。
- 1、下载文档前请自行甄别文档内容的完整性,平台不提供额外的编辑、内容补充、找答案等附加服务。
- 2、"仅部分预览"的文档,不可在线预览部分如存在完整性等问题,可反馈申请退款(可完整预览的文档不适用该条件!)。
- 3、如文档侵犯您的权益,请联系客服反馈,我们会尽快为您处理(人工客服工作时间:9:00-18:30)。
BIEE11G开发及发布
2012.11.23
1.创建RPD
1.开始-》所有程序-》Oracle Business Intelligence打开BI管理进行创建OR 修改rpd
文件。
如下图:
填写rpd文件名称、存入路径、资料档案库口令。
下面我以连接oracle数据为例:如下图
选择数据库用户。
选择所需求的表从左边添加到右边
确定
完成:
2.对实事表与维表建立联系。
双击实事表:
3.建业务模型和映射,在业务模型与映射层中的空白单机,“新建业务模型”。
4.修改实事表的度量,度量聚合方式以及中文命名方便查看,维表中的维度命名方便
查看。
度量调置如下图:
维度设置如下图:
5.建表示层,在表示层中的空白单机,“新建主题区域”
6.添加表示层内容。
方法一:直接把业务层的表拖到表示层修改表名,删除不用的字段。
方法二:新建表示表,再把所需内容分类拖到表示表中。
7.保存并检测唯一性
2.上传rpd文件,并创建资料文件存放路径
1.找开BIEE安装后存放路径。
如
D:\BIEE11g6.0\instances\instance1\bifoundation\OracleBIPresentationServicesCo
mponent\coreapplication_obips1\catalog。
在概路径下新建一个文件用来存放资
料文件。
文件夹名最与rpd文件相对应。
如rpd:dome_one.rpd -- dome_one.
2.打开http://127.0.0.1:7001/em输入用户/密码。
在左边菜单-》Farm_bifoundation_domain->Business Intelligence->coreapplication->部署->资料档案库。
如下图:
上传所序rpd文件与资料存放路径:
应用、激活更改。
3.画报表
打开http://127.0.0.1:9704/analytics输入用户/密码。
选择“分析”。
保存。
再新建“仪表盘”
最近页面:
4.BIEE系统中一些常用的变量:
5.BIEE报表样式设置.
1.在“分析”中的“标准”设置报表样式是全局的,再“结果”中分别对其中的元素的样式设置是局部。
6.叙述
BIEE中的叙述是一个很好的东西,在很多情况下都会用到。
编辑叙述:
最终效果:
【数据中国大讲坛】2012年11月28号《BIEE入门》,讲解者:叶紫(美女哦)。
讲课方式,语音,YY频道号:85536471。
在感恩节这一天,我们吸收了美女讲师叶紫,作为我们的BIEE讲师。
我们要满怀着感激,感谢数据中国大讲坛的讲师们的无私分享,他们为每一次的课程都付出了很多的心血。
每每当我看到叶紫细心准备的课件,当我回忆起ltd、Y神、狼等人的辛苦付出,我就眼含泪水、心怀感激。
感谢你们,正是你们的辛勤劳作养育了数据中国大讲坛。
【宗旨】打造中国最大的IT知识远程分享平台,提升中国IT人的职业技能。
【口号】自由分享,快乐成长(数据中国,共享共赢)
【讲座预告】每周三晚八点半在YY频道85536471免费讲解数据库与商业智能BI相关知识。
详情见官网 (欢迎注册)
【意见和建议】对讲座有什么意见,不管是形式或者内容都可以发邮件给我above@,有了你的支持,才有我们前进的动力。
