锐科P200 200W多模脉冲光纤激光器说明书V2版
P60M脉冲光纤激光器

● 激光器输出波长在 1060~1085nm 范围内,工作时可发出超过 60W 的激光辐射,属 于 IV 级激光产品。在使用过程中,请避免眼睛和皮肤接触到光输出端直接发出或 散射出来的辐射。
%
光束质量
<1.6
/
光斑直径
6
7
8
mm
红光指示
可选
/
输出光纤长度
2
/
m
是否抗高反射
是
/
电控特性
锐科内部
4 / 14
备注
/ / / / 随重复频率变化 多脉宽可选 /
M2 1/e2
/ /
工作电压 功率消耗
冷却方式 工作温度 存储温度
湿度 模块尺寸
23
24
25
/
/
380
其他特性
风冷
0
/
x00-0xFF);
0:输出最小功率;255:输出最大功率
功率锁存信号
上升沿锁存功率输出
GND
打标板卡的信号地(数字地)
报警信号
具体定义见表 5
VCC
5V 输入电压,报警信号光耦隔离用
激光器采用光纤耦合输出半导体激光器的方式进行泵浦,相对于传统的激光器,能够 将每瓦的泵浦光转换效率提高 10 倍以上;采用风冷系统,散热系统更紧凑,体积小巧, 能够在实验室或室外等多种环境使用;采用一体化全光纤设计,操作便捷,可独立使用, 亦可嵌入在用户设备上使用。
激光器输出的脉冲激光在 1060~1085nm 范围内,采用工业激光器标准 DB25 接口,使 用 24V 直流供电。
锐科P100M V2.1脉冲光纤激光器说明书8脉宽
2. 安装
2.1. 安装尺寸图 1)尺寸图
图 1 激光器尺寸图(单位 mm)
3
2)光隔离器输出头尺寸图
武汉锐科光纤激光技术股份有限公司
脉冲光纤激光器使用手册 V2.1
图 2 输出光隔离器尺寸图(单位 mm) 隔离器输出头以最终出厂产品为准
请不要损坏标签和揭开盖子,否则产品的任何损坏将不被保修。 3) 激光器的输出头是与光缆相连接的,使用时请小心处理输出头,防止灰尘或其它污
染,清洁输出端透镜时请使用专用的镜头纸。激光器没有安装在系统设备上且不 出光的时候,请将光隔离器保护罩盖好以免灰尘污染。 4) 如果不按本使用手册规定的方法使用激光器,它所产生的保护功能将被削弱。因 此,该产品必须在正常的环境下使用。 5) 激光器处于运行状态时,严禁安装输出端准直器。
7) 不要直接观看输出头,在操作该机器时要确保长期配戴预防 1μm 波长激光防护 眼境。
8) 没有脉冲的最长使用时间为 50 x 10-6 秒。 9) 电源中断对激光器的危害很大,请提供连续电源。
1.4. 技术参数
序号
项目
表 2 100W 脉冲激光器系列参数表 条件
指标值
光学 特性
电学 特性 机械
1
工作模式
2 平均输出功率@250ns
3
功率调节范围
4
中心波长@250ns
5
光谱宽度@250ns
6
输出功率不稳定度
7
脉冲宽度
8 脉冲建立时间@250ns
9 脉冲关断时间@250ns
重复频率可调范围 10
@250ns
11
光斑直径
小功率脉冲光纤激光器说明书(一体机)-A00
小功率脉冲光纤激光器使用说明书武汉锐科光纤激光器技术有限责任公司安全信息在使用该产品之前,请先阅读和了解这份用户手册并熟悉我们为您提供的信息。
这份用户手册提供了重要的产品操作,安全以及其他信息给您以及所有将来的用户作参考。
为了确保操作安全和产品的最佳性能,请遵循以下注意和警告事项以及该手册的其他信息去操作。
●锐科公司脉冲光纤激光器是IV级的激光产品。
在打开24VDC电源前,要确保连接是正确的24VDC的电源并确认正负极,错误连接电源,将会损坏激光器。
●该激光器在1060~1085nm波长范围内发出超过5W、10W、15W、20W、25W、30W(根据不同激光器型号)的激光辐射。
避免眼睛和皮肤接触到光输出端直接发出或散射出来的辐射。
●不要打开机器,因为没有可供用户使用的产品零件或配件。
所有保养或维修只能在锐科公司内进行。
●不要直接观看输出头,在操作该机器时要确保长期配戴激光安全眼镜。
安全标识及位置上面二个安全标识符号表示有激光辐射,我们把这符号标在产品光纤盒体盖顶上。
目录1.产品描述 (1)1.1 产品描述 (1)1.2实际配置清单 (1)1.3使用环境要求及注意事项 (1)1.4技术参数 (2)2.安装 (3)2.1 安装尺寸图 (3)2.2 安装方法 (4)3.控制接口 (5)4.操作程序 (6)4.1 前期检查工作 (6)4.2 操作步骤 (6)4.3打标过程中应注意的事项 (7)5.质保及返修、退货流程 (7)5.1一般保修 (7)5.2保修的限定性 (7)5.3服务和维修 (8)1.产品描述1.1 产品描述锐科脉冲激光器是是为高速和高效的激光打标系统而专门发展的。
为工业激光打标机和其它应用提供了一款理想的高功率激光能量源。
脉冲激光器相对于传统的激光器,能够对每瓦的泵浦光转换效率提高10倍以上,低能量消耗的自动设计,适合实验室或室外操作。
精巧,可独立放置,可随时使用,能够直接嵌入用户的设备上。
IPG光纤激光器说明书样本
产品质量保证条款谢谢贵公司购买我公司光纤激光器!贵公司需在发货后一个月内确认产品的质量问题, 如果不能尽快在一个月内确认的话, 就会造成在服务和供货上不必要的麻烦, 特别是对于产品不是在美国本土安装的。
我们将给贵公司提供最好的质量和技术支持, 在设备的安装和调试操作方面我们有一套详细的方案。
能够经过以下两种途径确认产品的质量:1.将已付资费同时写好地址的信封寄给我方2.直接上网进行确认所有提供的信息都是必须保密的有任何问题能够直接拨打客服电话 ( 508) 373-1157安全条款:1.警告鉴于对人体潜在的伤害, 请按照规定的程序进行操作, 如果不这样做的话, 对自己或者她人都会造成伤害2.警示鉴于产品潜在的危险, 请按照规定的程序进行操作, 如果不这样做的话, 对产品自身或者产品的零配件都会有损害3.重要事项关于产品的操作事项请按照说明书逐步操作。
你公司所购买的是400瓦的光纤激光器, 执行标准是21 CFR 1040.10, 激光波长达到1070纳米, 经过光纤输出的激光的功率实际上已经超过400瓦, 对人的眼睛和皮肤都会造成伤害, 尽管这种辐射是不可见的, 可是这种激光对人的角膜的伤害是无法避免的, 在设备工作的时候必须带上激光护目镜。
警告:在设备工作中请根据波长范围选择合适的护目镜, 请仔细阅读产品上的安全标签, 产品的输出功率和波长范围。
有很多供应商为我们提供原材料和零配件。
如果设备经过重新安装或者改进的话, 由终端客户负全责。
在设备的调试, 操作过程当中如果不按照规定的程序运行, 就会造成一定的危害在设备运行过程中, 不要随意触动光纤激光器任何部件。
比如光纤准直器。
在靠近激光的位置会从不同的角度发散出激光, 这些激光会从不同的镜面物体反射, 反射的激光强度都会对人的眼睛和皮肤造成一定的伤害。
激光对人的皮肤, 服装都会造成很大的伤害, 激光能够引燃比如酒精, 汽油之类的溶剂, 激光能够进行切割和焊接, 在安装和使用设备的时候请谨慎使用一些易燃的材料和气体。
锐科 W W中功率单模激光器说明书 CW V

.
单模连续光纤激光器 说明书
100W~750W
武汉锐科光纤激光技术股份有限公司 Wuhan Raycus Fiber Laser Technologies Co., Ltd.
锐科1kw连续光纤激光器使用说明书

版本:V0连续光纤激光器使用说明书1000W武汉锐科光纤激光器技术有限责任公司WuHan Raycus Fiber Laser Technologies CO., LTD安全信息在使用该产品之前,请先阅读和了解这份用户手册并熟悉我们为您提供的信息。
这份用户手册提供了重要的产品操作,安全以及其他信息给您以及所有将来的用户作参考。
为了确保操作安全和产品的最佳性能,请遵循以下注意和警告事项以及该手册的其他信息去操作。
●连续光纤激光器是IV级的激光产品。
在接入交流电源前,要确保连接是正确的三相380VAC的电源,错误连接电源,将会损坏激光器。
●请确保使用带有可靠接地以及过流保护装置的交流电源。
使用时务必保证激光器的可靠接地,以避免可能产生的人身伤害。
●该激光器在1080nm波长范围内发出超过1000瓦的激光辐射。
避免眼睛和皮肤接触到光输出端直接发出或散射出来的辐射。
●不要打开激光器,因为没有可供用户使用的产品零件或配件。
所有保养或维修只能在锐科公司内进行。
●在操作该机器时要确保全程配戴激光安全防护眼镜。
即使佩戴了激光安全防护眼镜,也严禁直接观看输出头。
安全标识及位置上面二个安全标识符号表示有激光辐射,我们把这符号标在产品光纤盒体盖顶上。
目录1. 产品描述 (1)1.1. 产品描述 (1)1.2 实际配置清单 (1)1.3 使用环境要求及注意事项 (1)1.4 性能参数 (2)2. 安装 (2)2.1 安装尺寸图 (2)2.2 安装方法 (4)2.3 冷却系统要求 (4)3. 控制接口与操作 (5)3.1串口操作-超级终端 (8)3.2外部RS232控制 (15)3.3外部模拟量控制 (16)4. 质保及返修、退货流程 (17)4.1一般保修 (17)4.2保修的限定性 (17)4.3服务和维修 (17)版本:V0 1.产品描述1.1. 产品描述光纤激光器相对于传统的激光器,能够使每瓦的泵浦光转换效率提高10倍以上,低能量消耗的自动设计,适合实验室或室外操作。
说明书-锐科-500W-CW-V1
1 安全信息
感谢您选择锐科光纤激光器,本用户手册为您提供了重要的安全、操作、维护及其它 方面的信息。故在使用该产品之前,请先仔细阅读本用户手册。为了确保操作安全和产品 运行在最佳状态,请遵守以下注意和警告事项以及该手册中的其他信息。
1.1 安全标识
警告:可能造成严重的人身伤害甚至危及生命安全。
注意:可能造成对一般的人身伤害或者产品、设备的损坏。
1.1 安全标识 .......................................................................................................................... 1 1.2 激光安全等级 .................................................................................................................. 1 1.3 安全标识 .......................................................................................................................... 2 1.4 光学安全 .......................................................................................................................... 3 1.5 电学安全 .......................................................................................................................... 3 1.6 其他安全注意事项 .......................................................................................................... 3 2 产品介绍.....................................................................................................................................4
RFL-P20MB 脉冲光纤激光器使用说明书

User’s guide Ytterbium Pulsed Fiber Laser RFL-P20MB Ver.: 2.0Ytterbium Pulsed Fiber LaserUser’s GuideRFL-P20MBWuhan Raycus Fiber Laser Technologies Co., Ltd.,2018Proprietary information. All rights reservedIssued 19 October 2018User’s guide Ytterbium Pulsed Fiber Laser RFL-P20MB Ver.: 2.0Safety InformationPlease read this instruction carefully and familiarize yourself with the information we have provided before you use the product. In this brochure, important operation procedures, safety and other information are provided for you and all future users. In order to ensure operating safely and optimal performance of the product, please do according to following warnings, cautions and other information.Raycus pulsed fiber laser is classified as a high power Class IV laser device. Before supplying the power to the device, please make sure that the correct voltage of 24VDC power source is connected and the anode and cathode are right. Failure to connect power source correctly will cause damage to the device.The device emits invisible 1060~1085nm wavelength light with average power 20W. Do not expose your eyes or skin to the radiation of the laser.Do not take apart the device, because there are no replaceable accessories available for users to use. Any maintenance can only be proceeded in Raycus.Do not look into the light output end directly. Use appropriate laser safety eyewear when operating the device.Safety labels and locationsThe two labels above is located on the top of the cover of the device, representing laser radicalization.User’s guide Ytterbium Pulsed Fiber Laser RFL-P20MB Ver.: 2.0Content1. Description (1)1.1. Product description (1)1.2. Actual configuration list (1)1.3. Environmental requirements and cautions (1)1.4. Specifications (2)2. Mounting (3)2.1 Mounting dimensions (3)2.2 Method of installation (4)3. Control Interface (5)4. Operation Regulations (9)4.1 Pre-inspection (9)4.2 Operation procedures (9)4.3 Cautions (10)5. Instructions for warranty, return and maintenance (10)5.1 General warranty (10)5.2 Limitations of warranty (10)5.3 Service and repairs (11)User’s guide Ytterbium Pulsed Fiber Laser RFL-P20MB Ver.: 2.0 1. Description1.1. Product descriptionRaycus pulsed laser is an ideal high power laser source with high speed and high efficiency. It is specially designed for industrial laser making system and other applications.Compared with traditional lasers, pulsed laser has some unique advantages in increasing the conversion efficiency of the pump light 10 times higher. Its low power consumption and automotive design make it appropriate for operating both in and outside the lab. Besides, it is exquisite and convenient for its independence in placement, free time in using and facility in connecting to equipment directly.The device can emit 1060~1085nm wavelength pulsed light under the control of industrial laser’s standard interface driven by 24VDC power source.1.2. Actual configuration listTable 1. Configuration list1.3. Environmental requirements and cautionsPulsed laser should be driven by 24VDC±1V power source.1)Caution: Make sure the corresponding wires of the device are properly grounded.2)All the maintenance to the device should only be done by Raycus, because there is noreplacement or accessory provided with the device. Please do not try to damage the labels or open the cover in order to prevent against electric shock, or the warranty will be invalid.3)The output head of the product is connected with an optical cable. Please be careful handlingthe output head. Avoid dirt and any other contaminations. Please use the specialized lens paper when cleaning the lens. Please lid the laser with protective cover of the light isolator to be against dirt only when the laser is not installed in the device or not in working.4)If the operating the device fails to follow this instruction, the protective function will beweakened. Therefore, it should be used under normal conditions.5)Do not install the collimating device into the output head when the laser device is in working.1 / 11User’s guide Ytterbium Pulsed Fiber Laser RFL-P20MB Ver.: 2.06)The device has three cooling fans at the rear panel to dissipate heat. In order to guaranteeenough airflow to help giving heat off, there must be a space of at least 10 cm’s width for airflow in front and rear side of the device. As the cooling fans are working at blow condition, if laser is mounted in a cabinet with fans, the directio n should be same as laser’s fans.7)Do not look into the output head of the device directly. Please do wear appropriate lasersafety eyewear during the time when operating the device.8)Make sure the pulse repetition rate higher than 10 kHz.9)For the longest time without pulse is only 100 us. If there is no pulse output, please stopmarking at once, to avoid further damage of the device.10)Power source sudden interruption will do great harm to the laser device. Please make surethe power supply works continuously.1.4.SpecificationsTable 2. 20MB pulsed fiber laser specificationsUser’s guide Ytterbium Pulsed Fiber Laser RFL-P20MB Ver.: 2.02. Mounting2.1Mounting dimensions1) Fiber Laser module dimensions (As shown in Fig. 1).Figure 1. Dimension drawing of laser module (Unit: mm).2) Isolated output isolator (As shown in Fig. 2).Figure 2. Dimension drawing of output isolator (Unit: mm).3 / 11User ’s guide Ytterbium Pulsed Fiber Laser RFL-P20MB Ver.: 2.02.2Method of installation1) Fix the module stable to the bracket and keep the laser in good ventilation.2) Connect the power line to 24VDC power and ensure enough DC output power. Keep it clearto the polarity of the electric current: anode-brown; cathode-blue; PE-yellow and green. The definition figure is shown in Fig. 3.24V+24V —Figure 3. Definition of power line wires3) Make sure that the interface of the external controller matches the laser and the control cableis well connected to the laser’s interface. The recommended electrical connection is shown in Fig. 4.Figure 4. Schematic of recommended electrical connection4) The bending radius of the delivery fiber should not exceed 15 cm.4 / 11GND3. Control InterfaceThere are DB9 and DB25 interfaces at the rear of the laser. The DB9 is a RS232 interface only used for debugging, no needs to connect. And DB25 is the joint interface connecting control system to the laser system, please make sure the connection is reliable before operation. Feet of the DB25 are defined as follows in Fig. 5.Figure 5. Connect port of controllerTable 3 Definition of connect ports of controller5 / 111)The pump current of diode laser and the laser output power are controlled by setting the valueof PIN1-PIN8 (TTL level). PIN1-PIN8 can be set from 0~255,corresponding to the laser output power from 0~100%(the actual laser power may not be strictly linear with the setting value). The relationship between PIN value and output power is shown in Table 4:Table 4 Definition of power control pins.2)PIN 10 and PIN 14 are all digital GND.3)PIN 17 receives external 5V DC voltage to provide power supply for alarm signal.4)PIN 18 is the start signal of the MO. PIN19 is the input for the optical output signal. Theelectrical level for both PIN18 and PIN19 are 5V. Before turning on PIN 19, MO signal must be switched ON, in other word, the signal of PIN 18 must be ahead of PIN 19 at least 5 ms, and otherwise the laser machine may be damaged.5)PIN 20 provides control of the frequency. The frequency range should be 10 kHz~1000kHz, depends on the varying power levels of different laser machines.ATTENTION: The frequency signal must be ahead of the EM signal at least 5 ms,otherwise the laser machine may be damaged.Below figure shows DB25 sequence diagram:6 / 11User’s guide Ytterbium Pulsed Fiber Laser RFL-P20MB Ver.: 2.0Figure 6 DB25 sequence diagramT1:Represent the initialization time of the laser machine. The initialization time is less than10s from power-on to perform initialization.T2:Represent the pump recharge time, usually around 5ms.T3:Represent the frequency switching time. Frequency needs to be adjusted before optical laser output, and the switching time should not less than 5ms.T4:Represent the pulse build-up time. Usually the build-up time is less than 200 us from the pump current raising up to reach the 90% power of the optical pulse.T5:Represent the pulse shut down time. Usually the shut down time is less than 100 us from the pump current decliner to drop to the 10% power of the optical pulse.6)Definition of alarm signalTable 5 Definition of warning signalPS 1:PIN 17 receives external DC voltage to provide power supply for alarm signal. Therefore, please make sure PIN17 is connected to the +5V power supply. The temperature warning will7 / 11User’s guide Ytterbium Pulsed Fiber Laser RFL-P20MB Ver.: 2.0remain if the power or DB25 port is not well connected.PS 2: If the voltage or current states of the laser are abnormal, the alarm might present “POWER ERR” due to using different marking card (for example: Beijing JCZ Technology Co. marking card,).PS 3: If the laser output system is abnormal, the alarm might present “SYSTEM ERR”due to using different marking card (for example: Beijing JCZ Technology Co. marking card,). 7)Introduction of laser pulse duration controlPIN2, 3, and 22 on DB25 port not only used for the foundation control of the laser machine, but also achieves the pulse duration control as the extender.Table 6 Laser duration control signala)Marking machine send the command to the laser machine by the PIN2 on the DB25 port, meanwhile send the clock signal to the PIN3. The comment is the binary form, and delivers the most significant bit as the priority.b)The order structure from marking machine to the laser machine is: 0xA5+instruction code.c)0xA5(A5h)is the comment byte to active the laser pulse duration control port. 0xA5 and the following data will be directly sent as the serial input form to the PIN2 on the DB25 port.d)The input data length is 4 bytes: the first byte of instruction code should be 0x01(01h), the second byte and the third byte are the value of the binary coding of laser duration (for example: 200 is the decimal number of 0x00C8, represents the setting pulse duration is 200ns).e)PIN22 is the Enable signal. The Enable should achieve high state at least 10us before PIN2 and PIN3 changing. The Enable should achieve low state at least 10us after PIN2 and PIN3 changing. Figure 7 shows the adjustment process of laser duration control.f)PIN19 should decrease to low state before adjusting laser pulse duration.8 / 11User’s guide Ytterbium Pulsed Fiber Laser RFL-P20MB Ver.: 2.0Figure 7 Schematic of laser pulse duration adjustment(200ns)For example, if using Beijing JCZ Technology Co. marking card to adjust laser pulse duration, the setting processes are described as follows:a)Make sure the power supply, DB25 cable, control card and computer are correctly connected, and then turn on the 24V power supply.b)Open Ezcad2.7.6 (or other version), then click ‘F3’, the configuration parameter should s how up, select ‘Fiber’ in category of the ‘Laser Control’ panel, follow that select ‘IPG_YLPM’, and then close this window.c)Pulse duration can be modified by the ‘Duration’ on the right side of the window. If the setting duration is smaller than the limiting minimum value, the duration of output laser will be 2ns (minimum). If the setting duration is larger than the limiting maximum value, the duration of output laser will be 200ns (maximum). If the setting duration within the range, the duration of output laser will tend to the smaller side.4. Operation Regulations4.1 Pre-inspection1)Make sure the device appearance is in good condition and the output fiber is neitherexcessively bended nor broken.2)Make sure signal line of laser and marking system are properly connected.4.2 Operation procedures1)Starting procedures9 / 11User’s guide Ytterbium Pulsed Fiber Laser RFL-P20MB Ver.: 2.0Please make sure the control system is on before you turn on the fiber laser. Only after at least 1 minute since the power turned on, the subsequent operations can be proceeded.2)Frequency set introductionsThe frequency setting range is from 10 kHz to 1000 kHz.3)Laser marking checkingFor the device initial testing, first turn the power down to zero without turning on the marking system after the device is successfully started. Then draw a quadrate, marking continuously while slowly increasing the power from 0% to 100% at the same time. Meanwhile, use a ceramic material to observe the laser and the laser should become stronger, otherwise shut down the device and check. If operating normally, the marking system can be used in common order afterwards.4.3 Cautions1)Marking frequency must be in the range of 10 kHz to 1000 kHz.2)It should not modify the frequency while marking.3)Stop marking first before shutting down the device, then turn the power down to zero and cutthe power off.5. Instructions for warranty, return and maintenance5.1 General warrantyAll products are warranted by Raycus against defects and problems in materials and workmanship during the warranty period according to the purchase order or specifications and we guarantee the product will accord with the specification under normal use.Raycus has the right to choose to repair or replace any product that proves to be defective in materials and workmanship selectively during the warranty period. Only products with particular defects are under warranty. Raycus reserves the right to issue a credit note for any defective products produced in normal conditions.5.2 Limitations of warrantyThe warranty does not cover the maintenance or reimbursement of our product of which the problem results from tampering, disassembling, misuse, accident, modification, unsuitable physical or operating environment, improper maintenance, damages due to excessive use or not10 / 11User’s guide Ytterbium Pulsed Fiber Laser RFL-P20MB Ver.: 2.0following the instructions caused by those who are not from Raycus. Customer has the responsibility to understand and follow this instruction to use the device. Any damage caused by fault operating is not warranted. Accessories and fiber connectors are excluded in this warranty.According to the warranty, client should write to us within 31 days since the defect is discovered. This warranty does not involve any other party, including specified buyer, end-user or customer and any parts, equipment or other products produced by other companies.5.3 Service and repairsRaycus is responsible for all the maintenance, for there is no accessory available inside for users to use. Please contact Raycus as soon as possible when problems under warranty about maintenance happen to the product. The product returned with permission should be placed in a suitable container. If any damage happens to the product, please notify the carrier in document immediately.All the items about warranty and service above provided by Raycus are only for reference; formal contents about warranty and service are subject to the contract.Wuhan Raycus Fiber Laser Technologies Co. Ltd.All Rights Recerved.11 / 11。
深圳锐科光电DALI2 DT8模块说明文档 V2.2

DALI2.0DT8调色温模块规格书V2.2版权声明本手册版权归属深圳锐科光电科技有限公司(简称锐科光电)所有,并保留一切权利。
非经锐科光电书面同意,任何单位及个人不得擅自摘录本手册部分或全部内容。
免责声明由于产品版本升级或其他原因,本手册内容会不定期更新。
除非另有约定,本手册仅作为使用指导,本手册所有陈述、信息和建议不构成任何明示或暗示的担保。
版本信息版本时间更新内容V1.02018.5.30发布V2.22021.8.1更新一、产品概述本公司的DALI2.0色温模块,符合IEC62386-101:2018Ed2.0、IEC62386-102:2018 Ed2.0、IEC62386-207:2018Ed2.0(DT6)和IEC62386-209:2011Ed1.0(色温)标准协议,同时支持DT6(LED模块)和DT8(颜色控制-色温)协议。
采用了原装进口瑞萨单片机芯片,完美兼容TRIDONIC(锐高)、OSRAM(欧司朗)、PHILIPS(飞利浦)等国际知名品牌的DALI控制系统。
本DALI模块把国际标准DALI协议信号转换成PWM信号,应用于LED两路色温开关电源上,实现DALI系统控制方式。
两路PWM互补输出,任何色温输出的最大功率与单路最大输出功率一致,默认物理色温范围为2700K-6500K,物理色温范围可更改,调光范围为1%~100%。
具备Push DIM、高压防误接、故障检测等功能。
二、模块图示图1DALI2.0色温模块RK-DALIT8-V3正面图2DALI2.0色温模块RK-DALIT8-V3反面图3DALI2.0色温模块RK-DALIT8-V3尺寸图板尺寸:37.5mm X17.5mm X1.2mm三、引脚说明引脚标识说明电气参数PIN1DA DALI接口引脚11.5V~22.5VPIN2DA DALI接口引脚11.5V~22.5VPIN3GND电源输入地引脚GNDPIN4ERC冷色温错误检测输入引脚低电平(小于0.7V)表示电源冷光正常(不开路不短路);高电平(3.6V-5V)表示冷光灯故障(开路或者短路)。
锐科脉冲光纤激光器使用手册说明书

RFL-P20Q脉冲光纤激光器使用说明书武汉锐科光纤激光技术股份有限公司Wuhan Raycus Fiber Laser Technologies CO., LTD.安全信息在使用该产品之前,请先阅读和了解这份用户手册并熟悉我们为您提供的信息。
这份用户手册提供了重要的产品操作,安全以及其他信息给您以及所有将来的用户作参考。
为了确保操作安全和产品的最佳性能,请遵循以下注意和警告事项以及该手册的其他信息去操作。
a)锐科公司脉冲光纤激光器是IV级的激光产品。
在打开24VDC电源前,要确保连接是正确的24VDC的电源并确认正负极,错误连接电源,将会损坏激光器。
b)该激光器在1060~1085nm波长范围内发出超过20 W的激光辐射。
避免眼睛和皮肤接触到光输出端直接发出或散射出来的辐射。
c)不要打开机器,因为没有可供用户使用的产品零件或配件。
所有保养或维修只能在锐科公司内进行。
d)不要直接观看输出头,在操作该机器时要确保长期配戴激光安全眼镜。
安全标识及位置上面二个安全标识符号表示有激光辐射,我们把这符号标在产品光纤盒体盖顶上。
目录1.产品描述 (1)1.1. 产品描述 (1)1.2. 实际配置清单 (1)1.3. 使用环境要求及注意事项 (1)1.4. 技术参数 (2)2. 安装 (3)2.1. 安装尺寸图 (3)2.2. 安装方法 (4)3. 控制接口 (5)4. 操作程序 (7)4.1. 前期检查工作 (7)4.2. 操作步骤 (7)4.3. 打标过程中应注意的事项 (7)5. 质保及返修、退货流程 (8)5.1. 一般保修 (8)5.2. 保修的限定性 (8)5.3. 服务和维修 (8)武汉锐科光纤激光技术股份有限公司P20-30QS脉冲光纤激光器使用手册1.产品描述1.1.产品描述锐科脉冲激光器是为高速和高效的激光打标系统而专门发展的。
为工业激光打标机和其它应用提供了一款理想的高功率激光能量源。
脉冲激光器相对于传统的激光器,能够对每瓦的泵浦光转换效率提高10倍以上,低能量消耗的自动设计,适合实验室或室外操作。
锐科-小体积新外观C1500-C2000说明书

4.3 电源连接 ........................................................................................................................ 22
4.4 接口定义 ........................................................................................................................ 23
2 产品介绍.....................................................................................................................................8
2.1 产品特性 .......................................................................................................................... 8
RFL-C1500/C2000 连 续 光纤激光器
说明书
武汉锐科光纤激光技术股份有限公司 Wuhan Raycus Fiber Laser Technologies Co., Ltd.
1
目录
武汉锐科光纤激光技术股份有限公司
用户手册 RFL-C1500X、1500H/2000X、2000H
1 安全信息.....................................................................................................................................4
武汉锐科光纤激光器 200W连续光纤激光器 说明书
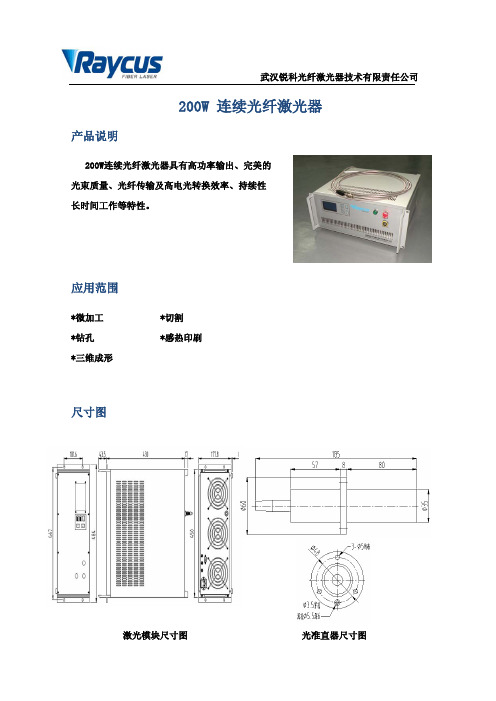
200W 连续光纤激光器
产品说明
200W连续光纤激光器具有高功率输出、完美的 光束质量、光纤传输及高电光转换效率、持续性 长时间工作等特性。
应用范围
*微加工 *钻孔 *三维成形
*切割 *感热印刷
尺寸图
激光模块尺寸图
光准直器尺寸图
技术参数
武汉锐科光纤激光器技术有限责任公司
1064±1 200 5-100 <3 <1.2 3
220±10%, 50Hz 850 风冷
484×490.5×185.8 0-45 10-95 15
地址: 中国武汉东湖开发区华中科技大学科技园创新基地10号楼 ADD: Base 10th Bldg Hust Industry District Innov.Hi-Tech Devel.Zone,Hubei
连续光纤激光器 偏振 输出中心波长(nm) 额定输出功率(W) 功率调节范围(%) 长期长度(m) 工作电压(VAC) 功率消耗(20℃)(W) 冷却方式 模块尺寸W×D×H(mm) 工作温度范 工作湿度范围(%) 重量(kg)
200W CW 任意
Wuhan,P.R.China 电话TEL: +86-27-81338818 传真FAX: +86-27-81338810 邮编P.C: 430223
网址:
激光机操作指南
激光机操作指南【安全须知】1.绝对禁止将身体的任何一个部位放置在可能的激光通路上,包括但不限于:激光机左端的开放光路、横梁的封闭光路之内、激光头下方;女生注意头发不要卷入正在运行的激光机轨道中;2.小心激光机门等活动部件坠落或关闭时伤手;3.在对激光机足够熟悉之前,请勿使用垫铁等重物压平材料,以免光头碰撞重物造成光头损坏;4.激光机报警时(连续滴滴滴滴,响4次),应当停止切割,向助教或航模队队员报修;5.勿大力操作激光机,包括但不限于:面板按键、线路插头、激光机门等,以免造成机器损坏。
【切割之前】切割前需要的准备有图纸、材料等。
[图纸准备]按一般顺序为:绘图、编号、偏刀宽、排版、打断点、转格式等。
1.绘图绘图推荐使用CATIA,绘制三维图后投影至二维,转格式为*.dwg输出。
之后使用AutoCAD进行处理,初步的处理包括删去重线等等。
去重线可以考虑使用CAXA电子图版,有专门的功能,省时省力。
2.零件编号许多零件外形相似但有区别,如翼肋、隔框、桁条等,需要编号以明确零件。
编号应位于零件内部,刻在零件上,而并不切透。
因此编号需要使用与需要完全切透的边线和孔等特征不同的颜色,推荐边线使用bylayer(随层)(默认是黑色或白色),编号使用红色。
3.偏刀宽使用AutoCAD的offset(偏移)命令对切口宽度造成的材料尺寸损失进行补偿。
导入的图纸,大多数外形线是不相连接的,仅用offset命令需要一段线一段线地偏移,比较费力;而对于大部分零件来说,它们的外形是封闭的,可以先连接外形线再偏移。
具体做法为:输入命令pedit(编辑多段线)——回车——M(选择编辑多条多段线)——回车——用鼠标框选所有需要偏刀宽的外形线——右键确定——回车(同意将所选曲线转换为多段线)——J(接合线)——回车(同意默认连接距离)——回车(退出),这样所选框线会被连为一体,可以方便地进行之后的操作。
注意这里需要的图纸是没有重线的图纸,重线会造成难以预知的结果。
RFL-B500D 蓝光 500W 光纤输出半导体激光器 使用说明书
RFL-B500D蓝光500W光纤输出半导体激光器使用说明书目录1安全信息 (3)1.1安全标识 (3)1.2激光安全等级 (3)1.3安全标识 (4)1.4光学安全 (5)1.5电学安全 (5)1.6其他安全注意事项 (5)2产品介绍 (6)2.1产品特性 (6)2.2型号说明 (6)2.3装箱清单 (7)2.4开箱及检查 (7)2.5运行环境 (8)2.6注意事项 (9)2.7产品性能 (9)3安装说明 (11)3.1输出头的尺寸与安装 (12)3.2冷却系统安装与要求 (12)3.3安装注意事项 (13)4产品的使用 (14)4.1前后面板 (15)4.2电源连接 (17)4.3接口定义 (17)4.4激光器工作模式及控制方式 (23)4.5激光器启动操作流程 (24)4.6控制方式的选择 (24)4.7红光控制 (31)4.8关机操作顺序 (31)5常见故障及处理措施 (31)5.1告警显示 (31)5.2告警处理措施 (31)6质保及返修、退货流程 (33)6.1一般保修 (33)6.2保修的限定性 (33)6.3技术支持及产品维修 (33)感谢您选择无锡锐科光纤输出半导体激光器,本使用说明书为您提供了重要的安全、操作、维护及其它方面的信息。
故在使用该产品之前,请先仔细阅读本使用说明书。
为了确保操作安全和产品运行在最佳状态,请遵守以下注意和警告事项以及该说明书中的其他信息。
1.1安全标识◆可能造成严重的人身伤害甚至危及生命安全。
◆可能造成一般的人身伤害或者产品、设备的损坏。
1.2激光安全等级根据国标GB7247.1,条款9,该系列激光器属于4类激光仪器。
该产品发出波长在450nm或450nm附近的激光辐射,且由输出头辐射出的光功率大于500W(取决于型号),直接或间接的暴露于这样的光强度之下会对眼睛或皮肤造成伤害。
尽管该辐射可见或不可见,光束仍会对视网膜或眼角膜造成不可恢复的伤害。
在激光器运行时必须全程佩戴合适且经过认证的激光防护眼镜。
医用激光设备使用说明书

医用激光设备使用说明书使用说明书一、概述本使用说明书旨在对医用激光设备的正确使用进行详细说明,以确保用户能够正确操作设备并获得安全有效的治疗效果。
请用户在使用前仔细阅读本说明书,并按照指导进行操作。
二、设备介绍1. 设备名称:医用激光设备2. 型号:XXXX3. 适用范围:本设备适用于医疗机构进行激光治疗,包括但不限于皮肤病、美容、眼科等领域。
4. 技术参数:详细的技术参数请参考附录。
三、安全注意事项1. 本设备仅限医疗机构专业人员操作,且需遵守相关法律法规以及医疗行业的伦理规范。
2. 激光设备具有辐射性,请使用者佩戴相应的个人保护装备,包括护目镜、手套等。
3. 不得将设备用于非医疗目的,且不得将设备交给未经培训的人员操作。
4. 在使用设备前,请确保设备的工作环境符合相关安全要求,如操作台面干净整洁、设备插座接地良好等。
5. 操作设备前,请确保设备和操作区域无燃烧性气体或易燃物。
6. 请勿将手指或其他物体放入设备的激光出射窗。
7. 使用完毕后,请及时关闭设备电源并进行清洁和维护。
四、操作步骤1. 准备工作1.1 确保设备处于稳定的工作环境,电源插座接地良好。
1.2 检查设备是否处于正常工作状态,如灯光、显示屏等。
1.3 穿戴个人保护装备。
2. 操作流程2.1 打开设备电源,并进行自检。
2.2 调整相关参数,如激光强度、照射时间等,根据具体治疗需求进行设置。
2.3 检查治疗区域是否清洁并进行消毒处理。
2.4 将激光设备对准治疗区域,并按下治疗按钮,开始治疗程序。
2.5 治疗过程中,注意观察患者的状态,如有异常情况应立即停止治疗并进行处理。
五、维护保养1. 每日清洁1.1 关闭设备电源,并拔掉电源插头。
1.2 用软布蘸取少量清洁剂,轻擦设备外壳及操作面板,注意避免进入水或清洁剂。
1.3 使用干布擦干设备并放置于干燥通风处。
2. 定期维护2.1 按照厂商建议的周期进行设备维护,包括更换耗材、清洁光学元件等。
100W-300W声光调Q光纤激光器

创鑫激光,激光中国芯! 了解更多信息,欢迎进入深圳市创鑫激光股份有限公司官网:
2 目录
公司简介……………………………………………………………………………………… 1 第一章 特性说明……………………………………………………………… 4 第二章 安全信息……………………………………………………………… 5 1- 安全规定………………………………………………………………………………… 5 2- 激光防护………………………………………………………………………………… 6 3- 一般安全指示…………………………………………………………………………… 6 4- 更多安全信息………………………………………………………………………… 10 第三章 产品描述…………………………………………………………… 11 1- 特性简介……………………………………………………………………………… 11 2- 激光器型号说明…………………………………………………………………… 11 3- 合格证………………………………………………………………………………… 12 第四章 详细规格…………………………………………………………… 13 1- 光学特性参数表…………………………………………………………………… 13 2- 一般特性参数表…………………………………………………………………… 14 3- 结构布局……………………………………………………………………………… 15
电源线颜色 棕色 蓝色 黄绿色
电路连接 220/110VAC GND 激光器外壳
注意: ◎ 请确保设备外壳良好的接地,接地回路中任意点的中断都可能导致人身伤害。 供电电压中断对设备使用十分危险,请提供持续不间断的供电电压。 ◎ 在给激光器供电前,请确保 AC 供电电压(220/110VAC)正确使用且接 线正确,任何错误的接线方式,都有可能会造成人身或设备的伤害; ◎ 在开启激光器前,请先确认电压是否正常。 ◎ 本产品无用户需自行维修的零件、部件或与组件,所有检修作业需创鑫激光 的专业人员完成; ◎ 为避免电路短路,请勿卸下机壳,擅自拆装激光器和破坏相关标签,将有触 电或灼伤的危险,且任何私自拆装或被篡改后的产品不再享受保修权利。
- 1、下载文档前请自行甄别文档内容的完整性,平台不提供额外的编辑、内容补充、找答案等附加服务。
- 2、"仅部分预览"的文档,不可在线预览部分如存在完整性等问题,可反馈申请退款(可完整预览的文档不适用该条件!)。
- 3、如文档侵犯您的权益,请联系客服反馈,我们会尽快为您处理(人工客服工作时间:9:00-18:30)。
武汉锐科光纤激光技术股份有限公司
用户手册 P200 V2
5 激光器故障及处理措施 ...................................................................................................... 22 6 质保及返修、退货流程 ...................................................................................................... 23
1 安全信息
武汉锐科光纤激光技术股份有限公司
用户手册 P200W V2
感谢您选择锐科光纤激光器,本用户手册为您提供了重要的安全、操作、 维护及其它方面的信息。故在使用该产品之前,请先仔细阅读本用户手册。 为了确保操作安全和产品运行在最佳状态,请遵守以下注意和警告事项以及 该手册中的其他信息。
1.1 安全标识
3 安装 ....................................................................................................................................... 9 3.1 整机尺寸图 ................................................................................................................. 9 3.2 输出头的尺寸与安装................................................................................................ 11 3.3 冷却系统安装与要求................................................................................................ 11 3.4 安装注意事项 ........................................................................................................... 12
可能造成严重的人身伤害甚至危及生命安全。
可能造成对一般的人身伤害或者产品、设备的损坏。
1.2 激光安全等级 根据欧洲标准 EN 60825-1,条款 9,该系列激光器属于 4 类激光仪器。
该产品发出波长在 1064nm 或 1064nm 附近的激光辐射,且由输出头辐射出的 光功率大于 200W。直接或间接的暴露于这样的光强度之下会对眼睛或皮肤造 成伤害。尽管该辐射不可见,光束仍会对视网膜或眼角膜造成不可恢复的伤 害。在激光器运行时必须全程佩戴合适且经过认证的激光防护眼镜。
6.1 一般保修 ................................................................................................................... 23 6.2 保修的限定性 ........................................................................................................... 24 6.3 技术支持及产品维修................................................................................................ 24
2 产品介绍................................................................................................................................ 4 2.1 产品特性 ..................................................................................................................... 4 2.2 装箱清单 ..................................................................................................................... 4 2.3 开箱及检查 ................................................................................................................. 4 2.4 运行环境 ..................................................................................................................... 5 2.5 注意事项 ..................................................................................................................... 6 2.6 产品性能 ..................................................................................................................... 6
RFL-P200 脉 冲 光纤激光器
说明书
武汉锐科ቤተ መጻሕፍቲ ባይዱ纤激光技术股份有限公司 Wuhan Raycus Fiber Laser Technologies Co., Ltd.
武汉锐科光纤激光技术股份有限公司
用户手册 P200 V2
目录
1 安全信息................................................................................................................................ 1 1.1 安全标识 ..................................................................................................................... 1 1.2 激光安全等级 ............................................................................................................. 1 1.3 安全标识 ..................................................................................................................... 2 1.4 光学安全 ..................................................................................................................... 3 1.5 电学安全 ..................................................................................................................... 3 1.6 其他安全注意事项...................................................................................................... 3