hpux 更换根盘镜像
HP-UX11.11系统镜像及镜像恢复与重建课件

镜像盘在线更换和重做镜像
#lvreduce -m 0 /dev/vg00/lvol*(1-8) /dev/dsk/cxtydz
从故障盘中删除根卷组的各逻辑
卷镜像(切断各逻辑卷的对应镜 像联系)
#vgreduce /dev/vg00 /dev/dsk/cxtydz
从根卷组中删除故障盘(修改
文件从中删除cxtydz) 更换故障盘
后若拔除一块盘,则新盘不能成功引导)
(#mkboot -a “hpux -lq(;0)/stand/vmunix” /dev/rdsk/cXtYdZ) (为避免根盘出现同样情况,建议也为
根盘设置一下取消引导仲裁机制)
#lvextend -m 1 /dev/vg00/lvol*(1-8) /dev/dsk/cxtydz
(lvlnboot -b
人有了知识,就会具备各种分析能力, 明辨是非的能力。 所以我们要勤恳读书,广泛阅读, 古人说“书中自有黄金屋。 ”通过阅读科技书籍,我们能丰富知识, 培养逻辑思维能力; 通过阅读文学作品,我们能提高文学鉴赏水平, 培养文学情趣; 通过阅读报刊,我们能增长见识,扩大自己的知识面。 有许多书籍还能培养我们的道德情操, 给我们巨大的精神力量, 鼓舞我们前进。
将根盘每个逻辑卷镜像扩展到新的物理盘 上(根盘逻辑卷1-8) #lvlnboot -R 更新恢复BDRA(引导数据预留区) (lvlnboot -b lvlnboot -s lvlnboot -r lvlnboot -d) (包括lvol1(boot)、lvol2(swap、dump)lvol3 (root))
为新硬盘设置内核引导路径及取消引
传统方法换根盘
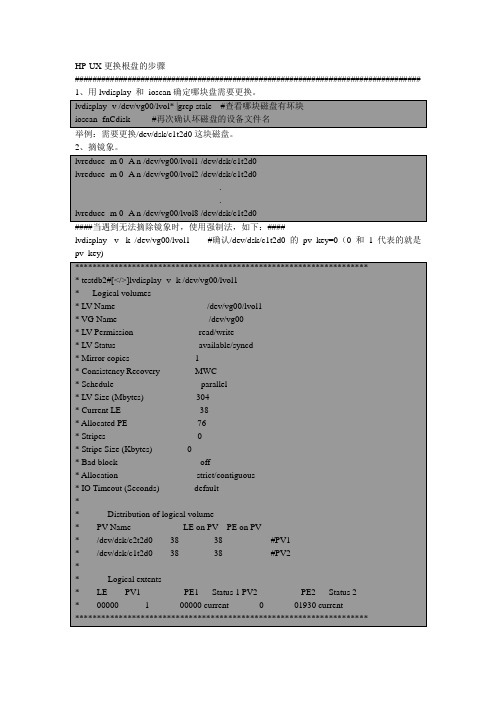
Itanium定位盘位:sasmgr set_attr -D /dev/sasd0 -q lun=/dev/rdsk/c*t*d* -q locate_led=on1、传统方法换根盘(拆mirror,建mirror)PA 换根盘操作ioscan -kfnCdiskvgdisplay -v vg00 | morelvdisplay -v /dev/vg00/lvol2lvdisplay -v -k /dev/vg00/lvol2 | more/*-k 参数显示pv 的k 值,如果遇到ghost 盘,需要-k来拆除,在lvreduce时候也加上-k 跟上key 值lvreduce -m 0 -A n /dev/vg00/lvol1 /dev/dsk/c1t15d0 lvreduce -m 0 -A n /dev/vg00/lvol2 /dev/dsk/c1t15d0 lvreduce -m 0 -A n /dev/vg00/lvol3 /dev/dsk/c1t15d0 lvreduce -m 0 -A n /dev/vg00/lvol4 /dev/dsk/c1t15d0 lvreduce -m 0 -A n /dev/vg00/lvol5 /dev/dsk/c1t15d0 lvreduce -m 0 -A n /dev/vg00/lvol6 /dev/dsk/c1t15d0 lvreduce -m 0 -A n /dev/vg00/lvol7 /dev/dsk/c1t15d0 lvreduce -m 0 -A n /dev/vg00/lvol8 /dev/dsk/c1t15d0 lvreduce -m 0 -A n /dev/vg00/lvol9 /dev/dsk/c1t15d0 vgreduce -f vg00 /dev/dsk/c1t15d0pvchange -a N /dev/dsk/c1t15d0==============replace disk==============insf -e -H 0/0/2/0.2.0pvcreate -B /dev/rdsk/c1t15d0 /*如果格式化不成功,或者该硬盘以前用于其他vg,就需要加-f 参数,强制格式化vgextend /dev/vg00 /dev/dsk/c1t15d0mkboot /dev/rdsk/c1t15d0mkboot -a "hpux -lq(;0)/stand/vmunix" /dev/rdsk/c1t15d0 mkboot -a "hpux" /dev/rdsk/c1t15d0pvdisplay -v /dev/dsk/c3t15d0 | grep 'current.*0000 $' /*检测vg中lv 的顺序,要使两个pv 中lv 的顺序是一致lvextend -m 1 /dev/vg00/lvol1 /dev/dsk/c1t15d0lvextend -m 1 /dev/vg00/lvol2 /dev/dsk/c1t15d0lvextend -m 1 /dev/vg00/lvol3 /dev/dsk/c1t15d0lvextend -m 1 /dev/vg00/lvol4 /dev/dsk/c1t15d0lvextend -m 1 /dev/vg00/lvol5 /dev/dsk/c1t15d0lvextend -m 1 /dev/vg00/lvol6 /dev/dsk/c1t15d0lvextend -m 1 /dev/vg00/lvol7 /dev/dsk/c1t15d0lvextend -m 1 /dev/vg00/lvol8 /dev/dsk/c1t15d0for lvol in lvol1 lvol2 lvol3 lvol4 lvol5 lvol6 lvol7 lvol8 /*还有其他命名格式的lv 名称,也可以写在后面> do> lvextend -s –m 1 /dev/vg00/$lvol /dev/dsk/c1t15d0> done lvsync -T /dev/vg00/lvol* /*如果有其他命名的lv,要单独同步,lvol*只能同步lvol 开头的lv,lvextend 加-s 不会再扩展不同步lv,最后由lvsync 统一同步lvlnboot -b /dev/vg00/lvol1lvlnboot -r /dev/vg00/lvol3lvlnboot -s /dev/vg00/lvol2lvlnboot -d /dev/vg00/lvol2lvlnboot -R -v /dev/vg00 /*老版本的系统没有安装patch,可能没有-R的参数,需要单独更新vg 信息使用-b -r- s- d setboot -a 0/0/2/0.2.0 /*设置备用启动路径-p 是设置主的启动路径setboot -v# vi /stand/bootconfl /dev/dsk/c1t15d0 /*l代表lvm的意思l是字母L的大写IA 换根盘操作ioscan -fnCdiskvgdisplay -v vg00 | morelvdisplay -v /dev/vg00/lvol1. . .lvdisplay -v /dev/vg00/lvol9lvdisplay -v -k /dev/vg00/lvol2 | morelvreduce -m 0 -A n /dev/vg00/lvol1 /dev/disk/disk5_p2 lvreduce -m 0 -A n /dev/vg00/lvol2 /dev/disk/disk5_p2 lvreduce -m 0 -A n /dev/vg00/lvol3 /dev/disk/disk5_p2 lvreduce -m 0 -A n /dev/vg00/lvol4 /dev/disk/disk5_p2 lvreduce -m 0 -A n /dev/vg00/lvol5 /dev/disk/disk5_p2 lvreduce -m 0 -A n /dev/vg00/lvol6 /dev/disk/disk5_p2 lvreduce -m 0 -A n /dev/vg00/lvol7 /dev/disk/disk5_p2 lvreduce -m 0 -A n /dev/vg00/lvol8 /dev/disk/disk5_p2 vgreduce -f vg00 /dev/disk/disk5_p2=========================replace disk=========================IA 机器上创建根盘镜像vi /tmp/idf3EFI 500MBHPUX 100%HPSP 400MBidisk -f /tmp/idf -w /dev/rdisk/disk5/*创建分区文件,以及对pv 进行分区,可以用两条命令替代。
hpunixmirrorabootdisk(HP小机根盘作镜像)
hpunixmirrorabootdisk(HP小机根盘作镜像)(如果以前你的硬盘被使用过,或你不想在使用该磁盘的数据,可以运行mediainit格式化改硬盘。
mediainit通过格式化介质来初始化硬盘,通过读写测试模式来校验介质的完整性,然后闲置所有发现的坏块。
mediainit会破坏硬盘上说有现存的用户数据:#mediainit /dev/rdsk/c0t3d0)选择一个内置的硬盘。
例如/dev/dsk/c0t8d0做成一个启动盘:pvcreate -f -B /dev/rdsk/c0t8d0(使用参数“-B”创建一个用于镜像的可引导的LVM磁盘)将这个硬盘加入vg00中:vgextend /dev/vg00 /dev/dsk/c0t8d0将启动文件装入硬盘引导区: mkboot /dev/dsk/c0t8d0对/stand , / , 交换区作镜像: lvextend -m 1 /dev/vg00/lvol1 /dev/dsk/c0t8d0 (/stand)lvextend -m 1 /dev/vg00/lvol2 /dev/dsk/c0t8d0 (/swap)lvextend -m 1 /dev/vg00/lvol3 /dev/dsk/c0t8d0 (/)对vg00上的其它逻辑卷作镜像: lvextend -m 1 /dev/vg00/lvol4 /dev/dsk/c0t8d0lvextend -m 1 /dev/vg00/lvol5 /dev/dsk/c0t8d0lvextend -m 1 /dev/vg00/lvol6 /dev/dsk/c0t8d0lvextend -m 1 /dev/vg00/lvol7 /dev/dsk/c0t8d0lvextend -m 1 /dev/vg00/lvol8 /dev/dsk/c0t8d0拷贝正确的AUTO到新的LIF区,注意使用字符设备:mkboot -a "hpux -lq (;0)/stand/vmunix" /dev/dsk/c0t5d0 (系统主引导盘)mkboot -a "hpux -lq (;0)/stand/vmunix" /dev/dsk/c0t8d0lvlnboot -R指定引导逻辑卷、根逻辑卷、主交换逻辑卷(用swapinfo确定交换逻辑卷在什么地方)、转储逻辑卷,为根和交换镜像拷贝更新包含在BDRA中等启动信息:lvlnboot -b /dev/vg00/lvol1lvlnboot -r /dev/vg00/lvol3lvlnboot -s /dev/vg00/lvol2lvlnboot -d /dev/vg00/lvol2恢复所有的BDRA信息:lvlnboot -R确定引导逻辑卷、根逻辑卷、主交换逻辑卷以及转储逻辑卷的:(检查镜像正确与否):lvlnboot -v显示当前的主引导路径和替代引导路径:setboot。
hpux 更换根盘镜像
HP-UX 更换根盘镜像专题方法一1,拆除设备镜像,踢出坏盘.解除镜像:vgdisplay vg00 //查看vg00中的LV的镜像状态。
lvreduce –m 0 /dev/vg00/lvol1 /dev/dsk/cXtYd0lvreduce –m 0 /dev/vg00/lvol2 /dev/dsk/cXtYd0...拆除所有vg00中所有mirror的lvvgreduce vg00 /dev/dsk/cXtYd02.换盘,做镜像在镜像盘上创建物理卷,并设置成可引导设备。
# pvcreate -f -B /dev/rdsk/cXtYd0 //-B可以启动。
将此盘添加到根卷。
# vgextend /dev/vg00 /dev/dsk/cXtYd0生成LIF引导信息和AUTO文件。
# mkboot /dev/rdsk/cXtYd0 //创建BOOT区# mkboot -a "hpux -lq (;0)/stand/vmunix" /dev/rdsk/cXtYd0# mkboot -a "hpux -lq (;0)/stand/vmunix" /dev/rdsk/cXtYd0给根盘上的所有逻辑卷做镜像,务必从第一个LV开始,按顺序执行,镜像需要一定时间,请耐心等待。
# lvextend -m 1 /dev/vg00/lvol1 /dev/dsk/cXtYd0 /BOOT卷# lvextend -m 1 /dev/vg00/lvol2 /dev/dsk/cXtYd0# lvextend -m 1 /dev/vg00/lvol3 /dev/dsk/cXtYd0# lvextend -m 1 /dev/vg00/lvol4 /dev/dsk/cXtYd0# lvextend -m 1 /dev/vg00/lvol5 /dev/dsk/cXtYd0# lvextend -m 1 /dev/vg00/lvol7 /dev/dsk/cXtYd0# lvextend -m 1 /dev/vg00/lvol8 /dev/dsk/cXtYd0...镜像所有的vg00中的lv更新引导、根和主交换的镜像副本包含在BDRA中的引导信息。
HP UX 安腾11.23根镜像
HPUX 11.23下根盘镜像全过程(上)分类:HPUX 2009-04-27 16:17 395人阅读评论(0) 收藏举报、知识准备HPUX 11.23与11.22版本配置根盘镜像的最大的不同:1. 新增加了HPSP分区;11.22系统根盘只划分了两个分区EFI/HP-UX,在11.23系统中,划分了3个分区,分别为EFI/HP-UX/HPSP.相应在使用idisk命令划分硬盘分区时使用的/tmp/partitionfile 文件中的内容也做了相应调整.2. EFI分区大小从原先的100M,增加到500M二、实验目的对一台HP rx8640机器的2号分区根盘(146GB)镜像;三、操作过程1. From HPUX, use vgdisplay to identify the disk that is in vg00. Use ioscan to find the spare disk.# vgdisplay -v --> vg00 is on /dev/dsk/c0t6d0s2# ioscan -efunC disk --> c2t6d0Class I H/W Path Driver S/W State H/W Type Description========================================================================disk 1 0/0/0/2/0.6.0 sdisk CLAIMED DEVICE HP 146 GST3146855LC/dev/dsk/c0t6d0 /dev/rdsk/c0t6d0/dev/dsk/c0t6d0s1 /dev/rdsk/c0t6d0s1/dev/dsk/c0t6d0s2 /dev/rdsk/c0t6d0s2/dev/dsk/c0t6d0s3 /dev/rdsk/c0t6d0s3Acpi(HWP0002,PNP0A03,0)/Pci(2|0)/Scsi(Pun6,Lun0)/HD(Part1,Sig0E481F42-F04C-11DC-8002-D6217B60E5 88)//EFI/HPUX/HPUX.EFIdisk 0 0/0/0/2/1.2.0 sdisk CLAIMED DEVICE Optiarc DVD RW AD-5170A/dev/dsk/c1t2d0 /dev/rdsk/c1t2d0disk 2 0/0/0/3/0.6.0 sdisk CLAIMED DEVICE HP 146 GST3146855LC/dev/dsk/c2t6d0 /dev/rdsk/c2t6d02. Create the system, OS, and service partitions.# vi /tmp/partitionfile3EFI 500MBHPUX 100%HPSP 400MB# idisk -wf /tmp/partitionfile /dev/rdsk/c2t6d0idisk version: 1.31********************** WARNING ***********************If you continue you may destroy all data on this disk.Do you wish to continue(yes/no)? yes <-- Answer "yes" and not "y"3. Create device files needed for the new partitions.# insf -eC diskinsf: Installing special files for sdisk instance 1 address 0/0/0/2/0.6.0 insf: Installing special files for sdisk instance 0 address 0/0/0/2/1.2.0 insf: Installing special files for sdisk instance 2 address 0/0/0/3/0.6.0 insf: Installing special files for sdisk instance 3 address 0/0/12/1/0/4/1.0.0 insf: Installing special files for sdisk instance 4 address 0/0/12/1/0/4/1.1.0 insf: Installing special files for sdisk instance 5 address 0/0/12/1/0/4/1.2.0 insf: Installing special files for sdisk instance 6 address 0/0/12/1/0/4/1.3.0 insf: Installing special files for sdisk instance 7 address 0/0/14/1/0/4/1.0.0 insf: Installing special files for sdisk instance 8 address 0/0/14/1/0/4/1.1.0 insf: Installing special files for sdisk instance 9 address 0/0/14/1/0/4/1.2.0 insf: Installing special files for sdisk instance 10 address 0/0/14/1/0/4/1.3.04. Verify the partition table.# idisk /dev/rdsk/c2t6d0idisk version: 1.32EFI Primary Header:Signature = EFI PARTRevision = 0x10000HeaderSize = 0x5cHeaderCRC32 = 0xe51d545dMyLbaLo = 0x1MyLbaHi = 0x0AlternateLbaLo = 0x1117732fAlternateLbaHi = 0x0FirstUsableLbaLo = 0x22FirstUsableLbaHi = 0x0LastUsableLbaLo = 0x1117730cLastUsableLbaHi = 0x0Disk GUID = 711f04da-2190-11dd-8001-d6217b60e588PartitionEntryLbaLo = 0x2PartitionEntryLbaHi = 0x0NumberOfPartitionEntries = 0xcSizeOfPartitionEntry = 0x80PartitionEntryArrayCRC32 = 0x280b786cPrimary Partition Table (in 512 byte blocks):Partition 1 (EFI):Partition Type GUID = c12a7328-f81f-11d2-ba4b-00a0c93ec93bUnique Partition GUID = 711f066a-2190-11dd-8002-d6217b60e588 Starting Lba Lo = 0x22Starting Lba Hi = 0x0Ending Lba Lo = 0xfa021Ending Lba Hi = 0x0Partition 2 (HP-UX):Partition Type GUID = 75894c1e-3aeb-11d3-b7c1-7b03a0000000 Unique Partition GUID = 711f0688-2190-11dd-8003-d6217b60e588 Starting Lba Lo = 0xfa022Starting Lba Hi = 0x0Ending Lba Lo = 0x110af30bEnding Lba Hi = 0x0Partition 3 (HPSP):Partition Type GUID = e2a1e728-32e3-11d6-a682-7b03a0000000 Unique Partition GUID = 711f06a6-2190-11dd-8004-d6217b60e588 Starting Lba Lo = 0x110af30cStarting Lba Hi = 0x0Ending Lba Lo = 0x1117730bEnding Lba Hi = 0x0EFI Alternate Header:Signature = EFI PARTRevision = 0x10000HeaderSize = 0x5cMyLbaLo = 0x1117732fMyLbaHi = 0x0AlternateLbaLo = 0x1AlternateLbaHi = 0x0FirstUsableLbaLo = 0x22FirstUsableLbaHi = 0x0LastUsableLbaLo = 0x1117730cLastUsableLbaHi = 0x0Disk GUID = 711f04da-2190-11dd-8001-d6217b60e588PartitionEntryLbaLo = 0x1117730ePartitionEntryLbaHi = 0x0NumberOfPartitionEntries = 0xcSizeOfPartitionEntry = 0x80PartitionEntryArrayCRC32 = 0x280b786cAlternate Partition Table (in 512 byte blocks):Partition 1 (EFI):Partition Type GUID = c12a7328-f81f-11d2-ba4b-00a0c93ec93b Unique Partition GUID = 711f066a-2190-11dd-8002-d6217b60e588 Starting Lba Lo = 0x22Starting Lba Hi = 0x0Ending Lba Lo = 0xfa021Ending Lba Hi = 0x0Partition 2 (HP-UX):Partition Type GUID = 75894c1e-3aeb-11d3-b7c1-7b03a0000000 Unique Partition GUID = 711f0688-2190-11dd-8003-d6217b60e588 Starting Lba Lo = 0xfa022Starting Lba Hi = 0x0Ending Lba Lo = 0x110af30bEnding Lba Hi = 0x0Partition 3 (HPSP):Partition Type GUID = e2a1e728-32e3-11d6-a682-7b03a0000000 Unique Partition GUID = 711f06a6-2190-11dd-8004-d6217b60e588 Starting Lba Lo = 0x110af30cStarting Lba Hi = 0x0Ending Lba Hi = 0x0Legacy MBR (MBR Signatures in little endian):MBR Signature = 0x6c041f71Protective MBR5. Verify that the device files were created properly.# ioscan -efnC disk --> c2t6d0 is 0/0/0/3/0.6.06. Populate the /efi/hpux/ directory in the new EFI system partition.# mkboot -e -l /dev/rdsk/c2t6d07. Change the auto file for the mirror to boot without quorum.NOTE: Using "s1"# echo "boot vmunix -lq" > /tmp/AUTO.lq# efi_cp -d /dev/rdsk/c2t6d0s1 /tmp/AUTO.lq /EFI/HPUX/AUTONOTE: We assume that if we boot from the primary, the mirror is fullyfunctional and therefore we don't need to override quorum. Your site mightrequire that both disks override quorum.8. Verify the contents of the auto file on the primary and the mirror.NOTE: Using "s1"# efi_cp -d /dev/rdsk/c0t6d0s1 -u /EFI/HPUX/AUTO /tmp/AUTO.pri# efi_cp -d /dev/rdsk/c2t6d0s1 -u /EFI/HPUX/AUTO /tmp/AUTO.alt# cat /tmp/AUTO.priboot vmunix# cat /tmp/AUTO.altboot vmunix -lq分享到:∙上一篇:HPUX下定位网卡位置∙下一篇:HPUX 11.23下根盘镜像全过程(下)HPUX 11.23下根盘镜像全过程(下)分类:HPUX 2009-04-27 16:19 300人阅读评论(0) 收藏举报9. Add the new partition to vg00.NOTE: Using "s2"# pvcreate -fB /dev/rdsk/c2t6d0s2Physical volume "/dev/rdsk/c2t6d0s2" has been successfully created.# vgextend vg00 /dev/dsk/c2t6d0s2Volume group "vg00" has been successfully extended.Volume Group configuration for /dev/vg00 has been saved in /etc/lvmconf/vg00.conf10. Mirror all logical volumes in vg00.NOTE: Using "s2"# lvextend -m 1 /dev/vg00/lvol1 /dev/dsk/c2t6d0s2The newly allocated mirrors are now being synchronized. This operation willtake some time. Please wait ....Logical volume "/dev/vg00/lvol1" has been successfully extended.Volume Group configuration for /dev/vg00 has been saved in /etc/lvmconf/vg00.conf # lvextend -m 1 /dev/vg00/lvol2 /dev/dsk/c2t6d0s2The newly allocated mirrors are now being synchronized. This operation willtake some time. Please wait ....Logical volume "/dev/vg00/lvol2" has been successfully extended.Volume Group configuration for /dev/vg00 has been saved in /etc/lvmconf/vg00.conf # lvextend -m 1 /dev/vg00/lvol3 /dev/dsk/c2t6d0s2The newly allocated mirrors are now being synchronized. This operation willtake some time. Please wait ....Logical volume "/dev/vg00/lvol3" has been successfully extended.Volume Group configuration for /dev/vg00 has been saved in /etc/lvmconf/vg00.conf # lvextend -m 1 /dev/vg00/lvol4 /dev/dsk/c2t6d0s2The newly allocated mirrors are now being synchronized. This operation willtake some time. Please wait ....Logical volume "/dev/vg00/lvol4" has been successfully extended.Volume Group configuration for /dev/vg00 has been saved in /etc/lvmconf/vg00.conf # lvextend -m 1 /dev/vg00/lvol5 /dev/dsk/c2t6d0s2The newly allocated mirrors are now being synchronized. This operation willtake some time. Please wait ....Logical volume "/dev/vg00/lvol5" has been successfully extended.Volume Group configuration for /dev/vg00 has been saved in /etc/lvmconf/vg00.conf # lvextend -m 1 /dev/vg00/lvol6 /dev/dsk/c2t6d0s2The newly allocated mirrors are now being synchronized. This operation willtake some time. Please wait ....Logical volume "/dev/vg00/lvol6" has been successfully extended.Volume Group configuration for /dev/vg00 has been saved in /etc/lvmconf/vg00.conf # lvextend -m 1 /dev/vg00/lvol7 /dev/dsk/c2t6d0s2The newly allocated mirrors are now being synchronized. This operation willtake some time. Please wait ....Logical volume "/dev/vg00/lvol7" has been successfully extended.Volume Group configuration for /dev/vg00 has been saved in /etc/lvmconf/vg00.conf # lvextend -m 1 /dev/vg00/lvol8 /dev/dsk/c2t6d0s2The newly allocated mirrors are now being synchronized. This operation willtake some time. Please wait ....Logical volume "/dev/vg00/lvol8" has been successfully extended.Volume Group configuration for /dev/vg00 has been saved in /etc/lvmconf/vg00.conf11. Add the new disk to /stand/bootconf.NOTE: Using "s2"# vi /stand/bootconfl /dev/dsk/c0t6d0s2l /dev/dsk/c2t6d0s212. Verify that the new disk was added to vg00, and the lv's are in sync.# vgdisplay -v vg00--- Volume groups ---VG Name /dev/vg00VG Write Access read/writeVG Status availableMax LV 255Cur LV 8Open LV 8Max PV 16Cur PV 2Act PV 2VGDA 4PE Size (Mbytes) 32Total PE 8692Alloc PE 2330Free PE 6362Total PVG 0Total Spare PVs 0Total Spare PVs in use 0--- Logical volumes ---LV Name /dev/vg00/lvol1LV Status available/syncd LV Size (Mbytes) 1792 Current LE 56Allocated PE 112Used PV 2LV Name /dev/vg00/lvol2LV Status available/syncd LV Size (Mbytes) 8192 Current LE 256Allocated PE 512Used PV 2LV Name /dev/vg00/lvol3LV Status available/syncd LV Size (Mbytes) 992 Current LE 31Allocated PE 62Used PV 2LV Name /dev/vg00/lvol4LV Status available/syncd LV Size (Mbytes) 512 Current LE 16Used PV 2LV Name /dev/vg00/lvol5LV Status available/syncd LV Size (Mbytes) 128 Current LE 4Allocated PE 8Used PV 2LV Name /dev/vg00/lvol6LV Status available/syncd LV Size (Mbytes) 9184 Current LE 287Allocated PE 574Used PV 2LV Name /dev/vg00/lvol7LV Status available/syncd LV Size (Mbytes) 7776 Current LE 243Allocated PE 486Used PV 2LV Name /dev/vg00/lvol8LV Status available/syncd LV Size (Mbytes) 8704 Current LE 272Allocated PE 544Used PV 2--- Physical volumes ---PV Name /dev/dsk/c0t6d0s2 PV Status available Total PE 4346Free PE 3181Proactive Polling OnPV Name /dev/dsk/c2t6d0s2PV Status availableTotal PE 4346Free PE 3181Autoswitch OnProactive Polling On13. Verify that the BDRA was updated properly. Take note of the HW paths for step 14.# lvlnboot -vBoot Definitions for Volume Group /dev/vg00:Physical Volumes belonging in Root Volume Group:/dev/dsk/c0t6d0s2 (0/0/0/2/0.6.0) -- Boot Disk/dev/dsk/c2t6d0s2 (0/0/0/3/0.6.0) -- Boot DiskBoot: lvol1 on: /dev/dsk/c0t6d0s2/dev/dsk/c2t6d0s2Root: lvol3 on: /dev/dsk/c0t6d0s2/dev/dsk/c2t6d0s2Swap: lvol2 on: /dev/dsk/c0t6d0s2/dev/dsk/c2t6d0s2Dump: lvol2 on: /dev/dsk/c0t6d0s2, 014. Add EFI primary and high availability boot path menu entries.# setboot -p 0/0/0/2/0.6.0# setboot -h 0/0/0/3/0.6.0# setboot -b on15. Verify that the primary and mirror boot paths are configured properly.# setbootPrimary bootpath : 0/0/0/2/0.6.0HA Alternate bootpath : 0/0/0/3/0.6.0Alternate bootpath : 0/0/0/1/0Autoboot is ON (enabled)16. Test the new mirror by booting off of it.# cd /# shutdown -ry 0SHUTDOWN PROGRAM05/14/08 17:19:51 EATBroadcast Message from root (console) Wed May 14 17:19:51...SYSTEM BEING BROUGHT DOWN NOW ! ! !# grep "Boot device" /var/adm/syslog/syslog.logvmunix: Boot device's HP-UX HW path is: 0/0/0/2/0.6.017. Change the boot sequence in order to boot from mirror disk /dev/dsk/c2t6d0:# setboot -p 0/0/0/3/0.6.0# setboot -h 0/0/0/2/0.6.0# setboot -b on# setbootPrimary bootpath : 0/0/0/3/0.6.0HA Alternate bootpath : 0/0/0/2/0.6.0Alternate bootpath : 0/0/0/1/0# cd /# shutdown -ry 018. Verify which disk/kernel you booted from.# grep "Boot device" /var/adm/syslog/syslog.logvmunix: Boot device's HP-UX HW path is: 0/0/0/3/0.6.0overhpux 11.23安腾做mirror步骤详细说明,见全文...HPUX 11.23与11.22版本配置根盘镜像的最大的不同:1. 新增加了HPSP分区11.22系统根盘只划分了两个分区EFI / HP-UX,在11.23系统中,划分了3个分区,分别为EFI / HP-UX / HPSP相应在使用idisk命令划分硬盘分区时使的/tmp/partitionfile 文件中的内容也做了相应调整。
HP-UX11.1111.2311.31镜像步骤(精)
1. Create a physical volume using pvcreate with th—B opti on Pvcreate -B/dev/rdsk/c0t3d0 2. Add the physical volume to your existi ng root volume group with vgexte nd: Vgexte nd /dev/vg00 /dev/dsk/c0t3d0 3. use mkboot to place boot utilities in the boot area; mkboot /dev/rdsk/c0t3d0 4. Use mkboota to add an AUTO file in boot LIF area: Mkboot - a “ hpux (52.3.0;0/stand/vmunix ” /dev/rdsk/c0t3d0 5. Mirror the root logical volume to the above disk Lvextend -m 1 /dev/vg00/lvol1 /dev/dsk/c0t3d0 6.Mirror the primary swap logical volume: Lvextend -m 1 /dev/vg00/prswaplv/dev/dsk/c0t3d0 7. Verify that the boot in formation con tai ned in the BDRA of the boot disks in the root volume group has bee n automatically updated by Ivin boot with the locati ons of the mirror copies of root and primary swap: Lvln boot — How to replace a disk while mirrored In the eve nt you n eed to replace a non-fun cti onal mirrored disk, you should perform the following steps to ensure that the data on the replacement disk are both synchronized and valid: 1. Run vgcfgbackup to save the volume group configuration information, if necessary. 2. Remove the disk from the volume group using vgreduce 3. Physically disc onnect the bad disk and conn ect the replaceme nt 4. Run vgcfgrestore to restore LVM configuration information to the added disk. 5. Run vgchange—y to reactivate the volume group to which the disk bel on gs. Since the volume group is already curre ntly active, no automatic synchroni zati on occurs. 6. Now run vgs ync to manu ally synchronize all exte nts in the volume group. mirror disk 详细步骤1、建立将被用做镜像的可启动LVM盘# pvcreate -B /dev/rdsk/c2t2d0 2 将这个硬盘添加到当前卷组中# vgextend vg00 /dev/dsk/c2t2d0 3 设置为启动盘# mkboot /dev/rdsk/c2t2d0 4 将正确的AUTO文件考倍到新的LIF区域# mkboot -a "hpux -lq /stand/vmunix" /dev/rdsk/c2t2d0 5 分别镜象各个LV # lvextend -m 1 /dev/vg00/lvol1/dev/dsk/c2t2d0 ..... # lvextend -m 1 /dev/vg00/lvol8 /dev/dsk/c2t2d0 6 更新BDRA 信息# /usr/sbi n/lvl nboot -b /dev/vg00/lvol1(启动)# /usr/sbi n/lvl nboot -s /dev/vg00/lvol2(交换)# /usr/sbi n/lvln boot -d /dev/vg00/lvol2(dump #/usr/sbin/lvlnboot -v -r /dev/vg00/lvol3 7、检查BDRA 的正确# /usr/sbin/lvlnboot -R /dev/vg00 & 检查镜象有没有正确创建# lvlnboot -v 9、模拟硬盘坏,拔出一块,换上新的(相同插槽),启动ISL>hpux -is -lq 10、MOUNT文件系统# mount -a 11、恢复Ivm 配置信息在新的硬盘上# vgcfgrestore -n vgOO /dev/rdsk/c2t2d0 12 重新建立启动、AUTO 文件# mkboot /dev/rdsk/c2t2d0 # mkboot -a "hpux -lq /stand/vmunix " /dev/rdsk/c2t2d0 13 改变VG 属性,vg 同步# vgchange -a y vgOO # vgsync vgOO 14 验证有没有配好。
关于hpux换镜像硬盘的方法
关于hpux换镜像硬盘的方法关于hpux换硬盘的疑惑镜像的两个硬盘坏了一个,更换步骤如下1、备份vg的配置信息#vgcfgbackup vg022、剥离镜像#lvreduce -m 0 -A n lv_name /dev/dsk/cXtXdX 3、物理操作:换盘4、测试盘的可用性#ioscan /dev/dsk/cXtXdX5、恢复lvm配置信息到pv#vgcfgrestore -n vg02 /dev/dsk/cXtXdX 6、激活新的pv(不知道这个“激活”用的恰不恰当)#vgchange -a y vg007、重建镜像#lvextend -m 1 lv_name /dev/dsk/cXtXdX疑惑:做完上诉第二步,是否可以用一下步骤代替3、将pv从vg中拿走#vgreduce -A n vg02 /dev/dsk/cXtXdX 4、物理操作:换盘5、测试盘的可用性#ioscan /dev/dsk/cXtXdX6、格式化pv#pvcreate /dev/rdsk/cXtXdX7、将pv加入vg#vgextend vg02 /dev/dsk/cXtXdX 8、重建镜像#lvextend -m 1 lv_name /dev/dsk/cXtXdX这样一个过程和aix下换盘就一致了2006-11-21 23:12 pangyi以前找的一篇文章1. Determine which lvol's are mirrored in the volume group of thefaulty disk.# lvdisplay -v /dev/vgXX/lvol* | more2. Reduce any logical volumes that have mirror copies on the faulty disk.# lvreduce -m 0 /dev/vgXX/lvolX /dev/dsk/cXtXd0 (for 1 way mirroring) # lvreduce -m 1 /dev/vgXX/lvolX /dev/dsk/cXtXd0 (for 2 way mirroring) NOTE: You must repeat the lvreduce for every lvolX on the faultydisk.3. Reduce the volume group.# vgreduce /dev/vgXX /dev/dsk/cXtXd04. Replaced the faulty hot swap disk.5. Initialize the replaced disk for LVM.# pvcreate -f /dev/rdsk/cXtXd06. Extend the volume group.# vgextend /dev/vgXX /dev/dsk/cXtXd07. Restore the volume group information.# vgcfgrestore -n /dev/vgXX /dev/rdsk/cXtXd08. Activate the volume group containing the replaced disk.# vgchange -a y /dev/vgXX9. The volume group will now resynchronize the mirroring. NOTE: If the resync does not occur, issuethis command:# vgsync /dev/vgXX实践出真知。
在HPUX11iV3系统中更换已镜像的非根磁盘(原创)
在HPUX11iV3系统中更换已镜像的非根磁盘(原创)在HPUX 11iV3系统中更换已镜像的非根磁盘(原创)变化:HP新版操作系统(B11.31),在磁盘设备这部分和以往的版本有些区别,磁盘设备有两种表达形式,一种为传统的方式(/dev/dsk/cCtTdD),另一种为永久性设备名,也就是说不按位置,如这块盘在系统中一号槽位上叫/dev/disk/disk1,把这块盘拔到插到别的槽位上还disk1。
这一点和Tru64 unix v5.X版本一样了。
所以在更换LVM磁盘方面有一些新的变化。
更换步骤:如果磁盘上的所有物理盘区在另一个磁盘上均有副本,并且您的磁盘不是引导磁盘,则可以使用此步骤。
举例:如要更换的磁盘的Lunpath 硬件路径为0/1/1/1.0x3.0x0,其设备专用文件名为 /dev/disk/disk14 和 /dev/rdisk/disk14。
1. 将硬件路径保存到磁盘。
运行 ioscan 命令并记录故障磁盘的硬件路径。
# ioscan –m lun /dev/disk/disk14Class I Lun H/W Path Driver S/W State H/W Type Health Description========================================================================disk 14 64000/0xfa00/0x0 esdisk CLAIMED DEVICE offline HP MSA Vol0/1/1/1.0x3.0x0/dev/disk/disk14 /dev/rdisk/disk14LUN 实例编号为14,LUN 硬件路径为64000/0xfa00/0x0,Lunpath 硬件路径为 0/1/1/1.0x3.0x0。
更换故障磁盘后,将创建新的 LUN 实例和 LUN 硬件路径。
要在更换磁盘后标识该磁盘,必须使用 Lunpath 硬件路径(在本示例中为0/1/1/1.0x3.0x0)。
更换HP盘阵上含镜像的PVG里的坏盘
lifls /dev//rdsk/c0t6d0 lifcp /dev/rdsk/c0t6d0:AUTO - 查看autofile内容
lifls /dev/rdsk/c0t6d0 查看lif内容
lifls /dev/rdsk/c0t6d0 查看lif内容
mkboot -a "hpux" /dev/rdsk/c0t6d0 (如果不用默认的hpux,这里可以'hpux'换成'hpux -lq')
8. 镜像LV
用lvlnboot查看各个lv的特殊功能
2. 拆镜像
#lvreduce -m 0(数字0) /dev/vgname/lvname /dev/dsk/cxtxdx //删除/dev/dsk/cxtxdx上的镜像副本,使镜像个数为0,即只留原副本
wg2q_2:[/]#vgdisplay -v |grep 'LV Name' 查询需要拆除的lvname
在故障机A(已修复)上导出vg的map文件:#vgexport –s –v –p –m /tmp/vgname.map vgname
将上步导出的map文件copy到未修复的B机,放入临时目录/tmp/map/vgname.map
在B机上导出vg信息,破坏掉vg信息:#vgexport vgname
disk 1 0/1/1/0.0.0 sdisk CLAIMED DEVICE HP 73.4GST373454LC
/dev/dsk/c2t0d0 /dev/rdsk/c2t0d0
#rmsf -H 0/1/1/0.0.0 fail_disk_path
LV Name /dev/vg00/lvol1
HP-UX下做磁盘镜像
HP-UX下做磁盘镜像环境:系统现有两块磁盘,一块作为主盘,一块作为镜像盘用ioscan -nfCdisk可以查看到两个磁盘/dev/dsk/c0t0d0 //此盘为主盘/dev/dsk/c0t2d0 //此盘将作为镜像盘用swinstall –l bundle查看系统是否安装MirrorDisk/UX镜像的步骤:1、pvcreate -f -B /dev/rdsk/c0t2d0 //使用参数“-B”创建一个用于镜像的可引导的LVM磁盘:2、vgextend /dev/vg00 /dev/dsk/c0t2d0 //将上一步的LVM磁盘添加到根卷组中3、mkboot /dev/c0t2d0 //将新磁盘制作成为可引导的磁盘4、 lvextend -m 1 /dev/vg00/lvol1 /dev/dsk/c0t2d0lvextend -m 1 /dev/vg00/lvol2 /dev/dsk/c0t2d0lvextend -m 1 /dev/vg00/lvol3 /dev/dsk/c0t2d0lvextend -m 1 /dev/vg00/lvol4 /dev/dsk/c0t2d0lvextend -m 1 /dev/vg00/lvol5 /dev/dsk/c0t2d0lvextend -m 1 /dev/vg00/lvol6 /dev/dsk/c0t2d0lvextend -m 1 /dev/vg00/lvol7 /dev/dsk/c0t2d0lvextend -m 1 /dev/vg00/lvol8 /dev/dsk/c0t2d0//将VG00中的所有设备都镜像到镜像盘,-m 1表示拷贝一份镜像,如果文件系统较大,等待时间可能会长一点,如下:# lvextend -m 1 /dev/vg00/lvol1The newly allocated mirrors are now being synchronized. This operation willtake some time. Please wait ....Logical volume "/dev/vg00/lvol1" has been successfully extended.Volume Group configuration for /dev/vg00 has been saved# lvextend -m 1 /dev/vg00/lvol2The newly allocated mirrors are now being synchronized. This operation willtake some time. Please wait ....Logical volume "/dev/vg00/lvol2" has been successfully extended.Volume Group configuration for /dev/vg00 has been saved in /etc/lvmconf/vg00.conf第5步:拷贝正确的AUTO文件到新的LIF区# mkboot -a "hpux -lq(;0)/stand/vmunix" /dev/dsk/c0t0d0 # mkboot -a "hpux -lq(;0)/stand/vmunix" /dev/dsk/c0t2d0 第6步:指定引导逻辑卷、根逻辑卷、主交换逻辑卷(用swapinfo确定交换逻辑卷在什么地方)、转储逻辑卷,为根和交换镜像拷贝更新包含在BDRA中等启动信息:# lvlnboot -b /dev/vg00/lvol1Volume Group configuration for /dev/vg00 has been saved in /etc/lvmconf/vg00.conf# lvlnboot -r /dev/vg00/lvol3Volume Group configuration for /dev/vg00 has been saved in /etc/lvmconf/vg00.conf# lvlnboot -s /dev/vg00/lvol2Volume Group configuration for /dev/vg00 has been saved in /etc/lvmconf/vg00.conf# lvlnboot -d /dev/vg00/lvol2Volume Group configuration for /dev/vg00 has been saved in /etc/lvmconf/vg00.conf第7步:恢复所有的BDRA信息# lvlnboot -RVolume Group configuration for /dev/vg00 has been saved第8步:确定引导逻辑卷、根逻辑卷、主交换逻辑卷以及转储逻辑卷的设置(检查镜像正确与否)# lvlnboot -vBoot Definitions for Volume Group /dev/vg00:Physical Volumes belonging in Root Volume Group:/dev/dsk/c0t0d0 (0/0/2/0.0.0) -- Boot Disk/dev/dsk/c0t2d0 (0/0/2/0.2.0) -- Boot DiskBoot: lvol1 on: /dev/dsk/c0t0d0/dev/dsk/c0t2d0Root: lvol3 on: /dev/dsk/c0t0d0/dev/dsk/c0t2d0Swap: lvol2 on: /dev/dsk/c0t0d0/dev/dsk/c0t2d0Dump: lvol2 on: /dev/dsk/c0t0d0, 0第9步:将引导盘设置为镜像盘(重启检验是镜像是否成功)# setbootPrimary bootpath : 0/0/2/0.0.0 //此时c0t2d0为主引导盘Alternate bootpath : 0/0/2/0.2.0Autoboot is ON (enabled)Autosearch is ON (enabled)# setboot -p 0/0/2/0.2.0 -a 0/0/2/0.0.0 //将c0d0t0设为主引导盘# shutdown -ry 0 //从镜像盘启动(lvrmboot - remove LVM logical volume link to root, primary swap, ordump volume)首先申明,LVM(Logical Volume Manager)是操作系统中一个磁盘管理子系统,而不是文件系统!在LVM里,一个PV(Physical Volume,物理卷)对应且只对应一个物理硬盘,一个或者多个PV组成一个VG(Volume Group,卷组),而从一个VG里又可以虚拟划分出若干个LV(Logical Volume,逻辑卷),真正的文件系统是创建在LV上面的,如下图示:可以在LV上建文件系统,也可以不建文件系统而直接使用,这时叫裸设备(raw device)。
HP-UX(MirrorDisk配置和恢复)
MirrorDisk配置和恢复(DNT内部技术文档)目录一、配置Mirror Disk 31、执行lvlnboot -v命令检查系统中的启动设备 32、创建第二块系统盘 33、为第二块磁盘创建boot引导信息 44、为第二块磁盘创建auto引导信息 45、扩展vg00,添加第二块硬盘 46、扩展vg00中各逻辑卷,添加镜像磁盘 47、执行如下操作后重新启动系统 58、在启动Main Menu出现时,从第二块磁盘启动 59、系统启动以后执行如下操作 6二、镜像盘损坏(主启动盘)的恢复 61.系统环境 62.模拟主镜像盘损坏(主启动盘) 73.镜像盘启动后,替换新磁盘 73.故障解决方法 8一、在线修复丢失的镜像盘 81.将lvm header恢复到disk 82. 重新激活vg 83.同步stale的extent 84.将boot 程序从好的disk ,复制到新加的disk 8 5.更新启动信息 9二、进入管理模式修复Mirror Disk 91. 从镜像盘启动 92. 进入管理模式 103.初始化磁盘 104. 恢复卷组信息到新更换的盘. 105. 激活卷组,开始镜像同步 106. 挂起/usr ,使得mkboot命令可用 107. 加载启动工具 118. 加载自启动文件. 119. 更新 LIF's Label file 1110. 重新启动 11二、如果vgcfgrestore新磁盘失败 111.从镜像盘启动 112. 进入管理模式 113. 重新导入导出vg00,vgchange -a y vg00 114. 激活卷组 125.Lvlnboot –R 126. mount /usr 127. 重新配置mirror disk (参考mirror disk配置) 12三、备注 12一、配置Mirror Disk1、执行lvlnboot -v命令检查系统中的启动设备#lvlnboot -vBoot Definitions for Volume Group /dev/vg00:Physical Volumes belonging in Root Volume Group:/dev/dsk/c1t2d0 (0/0/1/1.2.0) -- Boot DiskBoot: lvol1 on: /dev/dsk/c1t2d0Root: lvol3 on: /dev/dsk/c1t2d0Swap: lvol2 on: /dev/dsk/c1t2d0Dump: lvol2 on: /dev/dsk/c1t2d0, 02、创建第二块系统盘#pvcreate -f -B /dev/rdsk/c2t0d03、为第二块磁盘创建boot引导信息#mkboot /dev/dsk/c2t0d04、为第二块磁盘创建auto引导信息#mkboot -a "hpux -lq (;0)/stand/vmunix" /dev/dsk/c2t0d05、扩展vg00,添加第二块硬盘#vgextend /dev/vg00 /dev/dsk/c2t0d06、扩展vg00中各逻辑卷,添加镜像磁盘lvextend -m 1 /dev/vg00/lvol1 /dev/dsk/c2t0d0lvextend -m 1 /dev/vg00/lvol2 /dev/dsk/c2t0d0lvextend -m 1 /dev/vg00/lvol3 /dev/dsk/c2t0d0lvextend -m 1 /dev/vg00/lvol4 /dev/dsk/c2t0d0lvextend -m 1 /dev/vg00/lvol5 /dev/dsk/c2t0d0lvextend -m 1 /dev/vg00/lvol6 /dev/dsk/c2t0d0lvextend -m 1 /dev/vg00/lvol7 /dev/dsk/c2t0d0lvextend -m 1 /dev/vg00/lvol8 /dev/dsk/c2t0d0lvextend -m 1 /dev/vg00/lvol9 /dev/dsk/c2t0d0lvextend -m 1 /dev/vg00/lvol10 /dev/dsk/c2t0d0 或者采用循环结构for i in /dev/vg00/lvol*dolvextend –m 1 $i /dev/dsk/c2t0d0done7、执行如下操作后重新启动系统lvdisplay /dev/vg00/lvol1lvlnboot -r /dev/vg00/lvol3 /dev/vg00lvlnboot -b /dev/vg00/lvol1 /dev/vg00lvlnboot -s /dev/vg00/lvol2 /dev/vg00lvlnboot -d /dev/vg00/lvol2 /dev/vg00lvlnboot -Rv#shutdown –ry 08、在启动Main Menu出现时,从第二块磁盘启动Main Menu:>seaP0 0/0/2/0.6 intscsia.6 Random access mediasP1 0/0/2/1.6 intscsia.6 Random access medias P0 0/4/0/0.0 Random access mediasP3 0/10/0/0.1 Random access mediasP4 1/10/0/0.5 Sequene access mediasMain Menu:>bo p19、系统启动以后执行如下操作#lvlnboot -v#lvdisplay -v /dev/vg00/lvol1二、镜像盘损坏(主启动盘)的恢复1.系统环境[l2000:root]/#lvlnboot -RvBoot Definitions for Volume Group /dev/vg00:Physical Volumes belonging in Root Volume Group:/dev/dsk/c1t2d0 (0/0/1/1.2.0) -- Boot Disk/dev/dsk/c1t0d0 (0/0/1/1.0.0) -- Boot DiskBoot: lvol1 on: /dev/dsk/c1t2d0/dev/dsk/c1t0d0Root: lvol3 on: /dev/dsk/c1t2d0/dev/dsk/c1t0d0Swap: lvol2 on: /dev/dsk/c1t2d0/dev/dsk/c1t0d0Dump: lvol2 on: /dev/dsk/c1t2d0, 02.模拟主镜像盘损坏(主启动盘)关机后卸载主启动盘/dev/dsk/c1t2d0,从镜像启动盘/dev/dsk/c1t0d0启动3.镜像盘启动后,替换新磁盘# vgcfgrestore -n /dev/vg00 /dev/rdsk/c1t2d0。
HP-UX硬盘镜像
1、查看硬盘分配#ioscan –fnC disk可以看到当前主机有两块硬盘c0t6d0、c3t6d0,其中c0t6d0已预装操作系统,分配给根卷组vg00,另一块硬盘c3t6d0未使用。
因此将c0t6d0作为主盘,c3t6d0作为镜像盘。
c3t6d0分区2、对镜像盘做分区EFI Primary Header:Signature = EFI PARTRevision = 0x10000HeaderSize = 0x5cHeaderCRC32 = 0xb671872b MyLbaLo = 0x1AlternateLbaLo = 0x88bb991 FirstUsableLbaLo = 0x22LastUsableLbaLo = 0x88bb96e Disk GUID =8ee3b282-5066-11dc-8001-d6217b60e588PartitionEntryLbaLo = 0x2NumberOfPartitionEntries = 0xcSizeOfPartitionEntry = 0x80PartitionEntryArrayCRC32 = 0xc7ba57c0Primary Partition Table (in 512 byte blocks): Partition 1 (EFI):Partition Type GUID =c12a7328-f81f-11d2-ba4b-00a0c93ec93bUnique Partition GUID =8ee3b4b2-5066-11dc-8002-d6217b60e588Starting Lba = 0x22Ending Lba = 0xfa021 Partition 2 (HP-UX):Partition Type GUID =75894c1e-3aeb-11d3-b7c1-7b03a0000000Unique Partition GUID =8ee3b4da-5066-11dc-8003-d6217b60e588Starting Lba = 0xfa022 Ending Lba = 0x87f396d Partition 3 (HPSP):Partition Type GUID =e2a1e728-32e3-11d6-a682-7b03a0000000Unique Partition GUID =8ee3b4f8-5066-11dc-8004-d6217b60e588Starting Lba = 0x87f396e Ending Lba = 0x88bb96dEFI Alternate Header:Signature = EFI PART Revision = 0x10000HeaderSize = 0x5cHeaderCRC32 = 0x810a3fbeMyLbaLo = 0x88bb991AlternateLbaLo = 0x1FirstUsableLbaLo = 0x22LastUsableLbaLo = 0x88bb96eDisk GUID =8ee3b282-5066-11dc-8001-d6217b60e588PartitionEntryLbaLo = 0x88bb970NumberOfPartitionEntries = 0xcSizeOfPartitionEntry = 0x80PartitionEntryArrayCRC32 = 0xc7ba57c0Alternate Partition Table (in 512 byte blocks): Partition 1 (EFI):Partition Type GUID =c12a7328-f81f-11d2-ba4b-00a0c93ec93bUnique Partition GUID =8ee3b4b2-5066-11dc-8002-d6217b60e588Starting Lba = 0x22Ending Lba = 0xfa021Partition 2 (HP-UX):Partition Type GUID =75894c1e-3aeb-11d3-b7c1-7b03a0000000Unique Partition GUID =8ee3b4da-5066-11dc-8003-d6217b60e588Starting Lba = 0xfa022Ending Lba = 0x87f396dPartition 3 (HPSP):Partition Type GUID =e2a1e728-32e3-11d6-a682-7b03a0000000Unique Partition GUID =8ee3b4f8-5066-11dc-8004-d6217b60e588Starting Lba = 0x87f396eEnding Lba = 0x88bb96dLegacy MBR (MBR Signatures in little endian):MBR Signature = 0x14b2e38eProtective MBR3、建立新分区的设备文件(c3t6d0s1、s2、s3)rx7620b:[/]#insf -e -Cdiskinsf: Installing special files for sdisk instance 1 address 1/0/0/3/0.6.0insf: Installing special files for sdisk instance 0 address 1/0/0/3/1.2.0 insf: Installing special files for sdisk instance 2 address1/0/1/1/0/1/1.6.04、初始化EFI分区的FAT filesystem5、格式化EFI分区(s1)和LIF分区(part of s2)efi_lsFileName Last Modified Size EFI/ 8/22/2007 0 STARTUP.NSH 8/22/2007 296 total space 523251712 bytes, free space 519856128 bytesliflsvolume ISL10 data size 7984 directory size 8 06/04/19 14:02:34 filename type start size implement created===============================================================ISL -12800 584 242 0 06/04/19 14:02:34AUTO -12289 832 1 0 06/04/19 14:02:34HPUX -12928 840 1024 0 06/04/19 14:02:34PAD -12290 1864 1468 0 06/04/19 14:02:34 LABEL BIN 3336 8 0 07/08/22 12:24:056、硬盘启动指定-lq选项–lq 指在硬盘坏掉一块的情况下照样启动检查EFI分区AUTO文件的内容boot vmunix -lq7、对HPSP 盘进行复制Copy the HP service partition400+0 records in400+0 records out8、初始工作区硬盘并挂在卷组中Initialize the LVM partition (s2) and add it to vg009、复制磁盘内容Mirror the LVs to the s2 partition10、检查镜像盘LABEL文件内容# lvlnboot –v //查看磁盘内容1、Write the contents of the LABEL file, i.e. set root, boot, swap anddump device:# lvlnboot -r /dev/vg00/lvol3# lvlnboot -b /dev/vg00/lvol1# lvlnboot -s /dev/vg00/lvol2# lvlnboot -d /dev/vg00/lvol22、 # lvlnboot –v (to check it)Boot Definitions for Volume Group /dev/vg00:Physical Volumes belonging in Root Volume Group:/dev/dsk/c3t2d0s2 (0/1/1/1.2.0) -- Boot Disk/dev/dsk/c2t1d0s2 (0/1/1/0.1.0) -- Boot DiskBoot: lvol1 on: /dev/dsk/c3t2d0s2/dev/dsk/c2t1d0s2Root: lvol3 on: /dev/dsk/c3t2d0s2/dev/dsk/c2t1d0s2Swap: lvol2 on: /dev/dsk/c3t2d0s2/dev/dsk/c2t1d0s2Dump: lvol2 on: /dev/dsk/c3t2d0s2, 011、指定镜像磁盘的地址做为备用引导磁盘地址。
HP-UX命令大全
HP-UX 命令大全# ioscan –fnkC disk# swinstall –s /cdrom/(filename) <安装软件补丁从cdrom下># swremove <卸除应用程序># shutdown 0 <进入单用户模式># init 3 <进入多用户># umount /opt <卸除opt><umount /opt 时报错,不能umount opt,可以用ps –ef |grep opt 命令查看opt进程然后用 kill –9 5988 > -9 强行关掉命令,5988 进程名# swlist –l fileset –a state|grep PHKL_18543 <查找PHKL_18543这个补丁是否安装># lvextend –L 30 /dev/vg00/lvol5 <扩大逻辑卷为30兆># extendfs /dev/vg00/rlvol5 <r 一定要加这个字母># mount /opt# mount –a <全部设备mount># bdf <查看容量是否扩大># lvextend –L 200 /dev/vg00/lvol6 <在线将tmp文件系统扩展到800Mb># fsadm –b 819200 /tmp# bdf# tsm <启动多进程,用ctrl_t切换窗口或按F1、F2来切换># make_tape_recovery –Av <备份系统到磁带上、备份到磁带上的系统文件看不到。
用这个命令之前必须安装Ignite-ux这个软件># chmod 777 或 444 <该文件执行属性,777 改为可执行文件同时放开权限,444 收回权限同时改为不可执行文件># mstm <查看机器信息># armdsp –i <查看VA信息># cvui <设置VA命令>< /opt/sanmgr/hostagent/sbin (先进入这个目录)/HA_trigger 先 stop 后 start/dial_trigger stop start磁盘柜进程全部先 stop 后starl,否则找不到VA># armmgr –s shut / start 别名 <VA关机和重起>VA控制器第一步:# cd /opt/sanmgr/commandview/server/data# mv DeviceDBfile DeviceDBfile.old第二步:# cd /opt/sanmgr/hostagent/sbin# ./HA_trigger stop# ./dial_trigger stop# ./HA_trigger start# ./dial_trigger start# armdiscover# armdiscover <查找阵列柜># amdsp -a fc <查看FC60状态,disk状态要显示Optimal,显示Replaced要注意># amdsp -d fc|grep "Disk State" <查看FC60硬盘状态># pa pri 1/0/0/2/0.6.0 <改动启动路径(主)># pa alt 1/0/0/2/0.6.0 <改动启动路径(副)># lvlnboot –v <查看启动路径># setboot –s ./off <设置机器是否自动启动># setboot –b ./off# mediainit /dev/rdsk/cxtydz <对一个磁盘进行格式化和校验其完整性># swapinfo <查看机器的一些信息># dmesg <查看MEMORY># top <查看CPU># swlist <查看安装了那些软件># vgdisplay –v <查看FreePE(硬盘剩余大小)># grep –i error syslog.log <快速查看syslong.log内的错误># egrep –i “war|err|fail|scsi|lan” /dev/adm/syslog/syslog.log# ioscan –kfnCtape <查看磁带机># lanscan <查看网卡># ioscan –kfnCfc <查看光纤卡># ioscan –fnH0/0/1/0 <查看0/0/1/0地址信息># netstat –in# ifconfig lan*# info_col.11 <收集机器信息,做安装报告用># info_col.1026 <收集10.26版本信息># dd if=/dev/rdsk/cxtydo of=/dev/rdsk/cxtydo bs=1024k <整盘copy,if后面是旧盘,of后面是新盘># dd if=/dev/dsk/cxtydo of=/dev/dsk/cxtydo bs=1024k# sar –d <查看硬盘使用频率>添加磁带机:第一种方法:# tsm# sam# peripheral devices ? Tape drives <在Actions项选择Add>第二种方法:在kernel内修改stape 改成In <在Actions ? Add drives to kernel>加机械臂驱动(可以在kernel改):schgr -? inspt --? inspt0 -? inSetup 网卡IP:# cd /etc/rc.config.d# vi netconfshift:1,$ s/old/new/g <把所有Old replace New># tar rv 文件名 <copy文件到磁带上># tar xv 文件名 <从磁带copy到本机上># tar cv <删除磁带上的所有内容># tar tv <查看磁带上的内容># tar tvf /dev/rmt/1m <指定1m磁带机文件名># tar rvf /dev/rmt/1m tmp <copy tmp目录到1m磁带机上># mt offl <磁带退出>3. findfind命令是功能最强的命令之一,但同时也是命令行结构最难以掌握的命令之一。
HP-UX更换根盘的步骤
setboot -v
6、更新BDRlvlnboot -v -r /dev/vg00/lvol3
lvlnboot -s /dev/vg00/lvol2
lvlnboot -d /dev/vg00/lvol2
7、确认以上信息是否都正确建立。
lvlnboot -R /dev/vg00
建议通常都使用强制摘除镜象,避免鬼盘。
3、踢盘
vgreduce /dev/vg00 /dev/dsk/c1t2d0
vgreduce -f /dev/vg00 #强制把/dev/dsk/c1t2d0从vg00
################################################
(注意:首先镜像lvol1)
lvextend -m 1 /dev/vg00/lvol1 /dev/dsk/c1t2d0
lvextend -m 1 /dev/vg00/lvol2 /dev/dsk/c1t2d0
.
.
lvextend -m 1 /dev/vg00/lvol8 /dev/dsk/c1t2d0 #lvol1---lvol8
#补充一个确定坏盘的命令:#
# dd if=/dev/dsk/c1t2d0 of=/dev/null bs=256k #
#观察哪块硬盘指示灯常亮即为坏硬盘#
################################################
4、换盘,比如新盘认到的设备文件名为/dev/dsk/c1t2d0
HP-UX更换根盘的步骤
###############################################################################
HPUX11.31根盘镜像
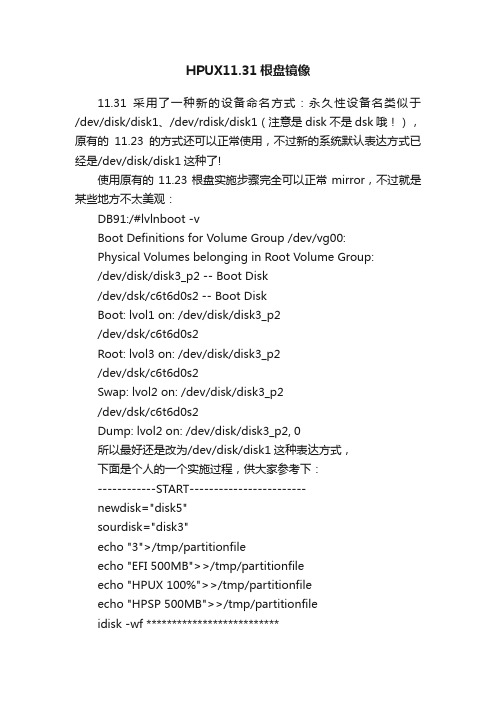
HPUX11.31根盘镜像11.31采用了一种新的设备命名方式:永久性设备名类似于/dev/disk/disk1、/dev/rdisk/disk1(注意是disk不是dsk哦!),原有的11.23的方式还可以正常使用,不过新的系统默认表达方式已经是/dev/disk/disk1这种了!使用原有的11.23根盘实施步骤完全可以正常mirror,不过就是某些地方不太美观:DB91:/#lvlnboot -vBoot Definitions for Volume Group /dev/vg00:Physical Volumes belonging in Root Volume Group:/dev/disk/disk3_p2 -- Boot Disk/dev/dsk/c6t6d0s2 -- Boot DiskBoot: lvol1 on: /dev/disk/disk3_p2/dev/dsk/c6t6d0s2Root: lvol3 on: /dev/disk/disk3_p2/dev/dsk/c6t6d0s2Swap: lvol2 on: /dev/disk/disk3_p2/dev/dsk/c6t6d0s2Dump: lvol2 on: /dev/disk/disk3_p2, 0所以最好还是改为/dev/disk/disk1这种表达方式,下面是个人的一个实施过程,供大家参考下:------------START------------------------newdisk="disk5"sourdisk="disk3"echo "3">/tmp/partitionfileecho "EFI 500MB">>/tmp/partitionfileecho "HPUX 100%">>/tmp/partitionfileecho "HPSP 500MB">>/tmp/partitionfileidisk -wf **************************insf -e -Cdiskefi_fsinit -d /dev/rdisk/"$newdisk"\_p1mkboot -e -l /dev/rdisk/$newdiskefi_ls -d /dev/rdisk/"$newdisk"\_p1lifls -l /dev/rdisk/"$newdisk"\_p2efi_cp -d /dev/rdisk/"$newdisk"\_p1 -u /EFI/HPUX/AUTO /tmp/x; cat /tmp/xmkboot -a "boot vmunix -lq" /dev/rdisk/$newdiskdd if=/dev/rdisk/"$sourdisk"\_p3 of=/dev/rdisk/"$newdisk"\_p3 bs=1024kpvcreate -B /dev/rdisk/"$newdisk"\_p2vgextend /dev/vg00 /dev/disk/"$newdisk"\_p2for i in 1 2 3 4 5 6 7 8dolvextend -m 1 /dev/vg00/lvol$i /dev/disk/"$newdisk"\_p2donelvlnboot -Rvsetboot -a ******* -h **********--------------END---------------注意这不是一个完全的脚本,需要修改的:)另外一个地方需要注意:HPSP的大小由400MB扩大为500MB,否则会报:#dd if=/dev/rdsk/c0t6d0s3 of=/dev/rdsk/c6t6d0s3 bs=1024kI/O error400+0 records in399+1 records out原因不太清楚,但是不影响好像。
镜像、鬼盘换盘步骤
碰到镜像根盘鬼盘的换盘步骤如下:1. #vgreduce -f /dev/vgXX2. #lvreduce -A n -m 0 -k /dev/vgXX/lvolX /dev/dsk/cXtYdZ3. replace disk4. #pvcreate -B /dev/rdsk/cXtYdZ5. #mkboot -l /dev/rdsk/cXtYdZ6. #mkboot -a "hpux -lq(;0)/stand/vmunix" /dev/rdsk/cXtYdZ7. #vgextend /dev/vgXX /dev/dsk/cXtYdZ8. #lvextend -m 1 /dev/vgXX/lvolX /dev/dsk/cXtYdZ...9. #setboot -v#lvlnboot -v检查并设置启动配置注:1、为保证前后lvmtab 内容不变,最好先对lvmtab 文件进行备份2、在出现鬼盘的情况下,可以尝试备份lvmtab 后,用#lvscan 命令重建lvmtab 文件问:What is a Ghost Disk?答:PV that has failed or not even physically connected but still recorded in the lvmtab. A Ghost Disk is usually indicated by #vgdisplay reporting more Current PVs(recorded in lvmtab) than Active PVs(recorded in kernel).问:鬼盘的换盘步骤?答:一般换盘步骤是在换完硬盘后用命令#vgcfgrestore -n /dev/vgXX /dev/rdsk/cXtYdZ在新盘写入VGRA 和PVRA 信息但是由于lvmtab和kernel里的PV信息不对,会提示“Mismatch between the backup file and the runningkernel!”假如你100%肯定备份的vg信息是对的,可以加参数#vgcfgrestore -R必须先释放pv才能更换#vgreduce -f /dev/vgXXTo remove all PVs that are “free”, i.e. there is no LV having extents on that PV. Otherwise, if the PV is not free, #vgreduce -f reports an extents map to identify the associated LVs.You must free all PEs using lvreduce/lvremove before the PV can be removed.Check LV state#lvdisplay -v /dev/vgXX/lvolX假如lv做了镜像#lvreduce -A n -m 0 -k /dev/vgXX/lvolX /dev/dsk/cXtYdZ删除坏盘镜像假如lv没有做镜像#lvremove -A n /dev/vgXX/lvolX没有做镜像的话,lv的数据会丢失〈参数解释〉--------------------------------------------------------------------------------vgreduce-f vg_name force reduction of missing physical volume(s) in agiven volume group. This option does not requirea physical volume (PV) to be supplied on thecommand line. vgreduce obtains the name of eachphysical volume (PV) belonging to the volume groupfrom the file /etc/lvmtab. It then reads the LVMstructures from each PV and compares these withthat held by the kernel to work out which PVs aremissing. PVs which are missing will be candidatesfor removal. If all the physical extents on themissing PV are free then it will be removed fromthe volume group. Otherwise vgreduce will reportthe physical to logical extent mapping. Formissing PVs, which have extents in use, you mustfree up all the extents by using lvreduce(1M) orlvremove(1M) and re-run vgreduce with the -foption. This option is most commonly used whenthe vgdisplay(1M) command shows "Cur PV" higherthan "Act PV" and all of the PVs belonging to thevolume group are attached. This option only workson PVs and not on links.example: vgreduce -f /dev/vg01--------------------------------------------------------------------------------lvreduce -k This option should be used only in thespecial instance when you want to reduce amirrored logical volume on a physical volumethat is missing or has failed.Use this option with the -m option.example: lvreduce -m 0 -k /dev/vg01/lvol1 /dev/dsk/c1t0d0附:在没碰到鬼盘的情况下,换镜像根盘的步骤如下1.vgcfgrestore -n /dev/vg00 /dev/rdsk/c3t6d02.vgchange -a y -q n vg003.mkboot -l /dev/dsk/cXtYdZ ; lifls -l /dev/dsk/cXtYdZ4.mkboot -a "hpux -lq (;0)/stand/vmunix" /dev/rdsk/c3t6d0 ; lifcp /dev/dsk/cXtYdZ:AUTO -5.lvlnboot -v (check & set lvlnboot)6.pvdisplay -v <replaced disk> | grep current7.vgsync vg008.lvdisplay -v $(find /dev/vg00 -type b) | grep stale | wc -l (check the progress of the sync)。
HP-UX系统LVM和镜像
Physical Volume Reserved Area Contents: ID's for volume group and physical volumes Physical extent size Physical volume size Bad block directory Size and location of other disk structures
LE和PE的对应(非镜像方式)
Logical Volume
Logical Extent
Physical Volume
4 Mb 4 Mb
Physical Extent
1 2 3 4 5 6 7
4 Mb 4 Mb
3 4 5 6 7
LE和PE的对应(镜像方式)
Logical Volume Physical Volume
/dev/vg01
ROOT DISK
NEW LVM DISK PVRA
/
dev vg01
BAD BLOCK POOL
创建卷组设备文件
3) 创建卷组设备文件 # mknod /dev/vg01/group c 64 0x010000 由于minor number是系统底层标识VG的标志,所以每个VG的group 文件的这两位(红色)必须是唯一的。否则VG无法创建 可以使用如下命令查看所有vg的group文件的minor number # ll /dev/vg*/group NEW LVM DISK PVRA ROOT DISK
/dev/dsk/c5t1d0
LVM基本操作 LVM基本操作
新添加物理硬盘或LUN
ioscan –fnCdisk insf –e
重新扫描IO 生成新的设备文件
HP-UX11.11系统镜像及镜像恢复与重建

#lvextend -m 1 /dev/vg00/lvol* /dev/dsk/cxtydz #lvlnboot -R lvlnboot -s lvlnboot -r lvlnboot -d) #lvlnboot -v #lvdisplay -v /dev/vg00/lvol*|more setboot shutdown -ry 0
制作根盘镜像
#swlist
查看有没有装镜像软件(B2491BA MirrorDisk/UX) #ioscan -fnC disk 扫描磁盘设备 #pvcreate -B -f /dev/rdsk/cxtydz 强制清除物理盘原有信息创建可引导的物
理卷
#vgextend /dev/vg00 /dev/dsk/cxtydz
重做镜像
#ioscan -fnC disk #pvcreate -B -f /dev/rdsk/cxtydz #vgextend /dev/vg00 /dev/dsk/cxtydz #mkboot -l /dev/rdsk/cxtydz #mkboot -a “hpux -lq(;0)/stand/vmunix” /dev/rdsk/cxtydz (#mkboot -a “hpux -lq(;0)/stand/vmunix” /dev/rdsk/cXtYdZ)
引导
#lvlnboot -v
交换 转储
根
验证BDRA(引导数据预留区)的设置
#lvdisplay -v /dev/vg00/lvol*|more
验证各逻辑卷是否正确连接配置
setboot设置引导路径
shutdown -ry 0重启验证镜像是否成功
- 1、下载文档前请自行甄别文档内容的完整性,平台不提供额外的编辑、内容补充、找答案等附加服务。
- 2、"仅部分预览"的文档,不可在线预览部分如存在完整性等问题,可反馈申请退款(可完整预览的文档不适用该条件!)。
- 3、如文档侵犯您的权益,请联系客服反馈,我们会尽快为您处理(人工客服工作时间:9:00-18:30)。
HP-UX 更换根盘镜像专题方法一1,拆除设备镜像,踢出坏盘.解除镜像:vgdisplay vg00 //查看vg00中的LV的镜像状态。
lvreduce –m 0 /dev/vg00/lvol1 /dev/dsk/cXtYd0lvreduce –m 0 /dev/vg00/lvol2 /dev/dsk/cXtYd0...拆除所有vg00中所有mirror的lvvgreduce vg00 /dev/dsk/cXtYd02.换盘,做镜像在镜像盘上创建物理卷,并设置成可引导设备。
# pvcreate -f -B /dev/rdsk/cXtYd0 //-B可以启动。
将此盘添加到根卷。
# vgextend /dev/vg00 /dev/dsk/cXtYd0生成LIF引导信息和AUTO文件。
# mkboot /dev/rdsk/cXtYd0 //创建BOOT区# mkboot -a "hpux -lq (;0)/stand/vmunix" /dev/rdsk/cXtYd0# mkboot -a "hpux -lq (;0)/stand/vmunix" /dev/rdsk/cXtYd0给根盘上的所有逻辑卷做镜像,务必从第一个LV开始,按顺序执行,镜像需要一定时间,请耐心等待。
# lvextend -m 1 /dev/vg00/lvol1 /dev/dsk/cXtYd0 /BOOT卷# lvextend -m 1 /dev/vg00/lvol2 /dev/dsk/cXtYd0# lvextend -m 1 /dev/vg00/lvol3 /dev/dsk/cXtYd0# lvextend -m 1 /dev/vg00/lvol4 /dev/dsk/cXtYd0# lvextend -m 1 /dev/vg00/lvol5 /dev/dsk/cXtYd0# lvextend -m 1 /dev/vg00/lvol7 /dev/dsk/cXtYd0# lvextend -m 1 /dev/vg00/lvol8 /dev/dsk/cXtYd0...镜像所有的vg00中的lv更新引导、根和主交换的镜像副本包含在BDRA中的引导信息。
# /usr/sbin/lvlnboot -r /dev/vg00/lvol3 //ROOT# /usr/sbin/lvlnboot -s /dev/vg00/lvol2 //SWAP# /usr/sbin/lvlnboot -d /dev/vg00/lvol2# /usr/sbin/lvlnboot -b /dev/vg00/lvol1检查BDRA是否正确,恢复链接。
# /usr/sbin/lvlnboot -R给磁盘加上引导路径# /usr/sbin/ setboot -a验证是否正确创建镜像。
# lvlnboot –v如果有如下信息,则表示镜像成功;如果不正确,则根据显示信息查找原因,重新镜像。
Boot Definitions for Volume Gruop /dev/vg00:Physical Volumes belonging in Root Volume Group:/dev/dsk/cXtYd0 (….) Boot Disk/dev/dsk/cXtYd0(….) Boot DiskBoot: lvol1 on: /dev/dsk/cXtYd0/dev/dsk/cXtYd0Boot: lvol3 on: /dev/dsk/cXtYd0/dev/dsk/cXtYd0Boot: lvol2 on: /dev/dsk/cXtYd0/dev/dsk/cXtYd0Dump: lvol2 on: /dev/dsk/cXtYd0,0方法一是最普遍的方法,最安全,可用性最强,我们平时98%的换盘都能用这种方法解决。
注:有时在拆镜像是会碰到这种方法拆不掉的lv,# lvdisplay -v /dev/vg00/lvol1lvdisplay: Warning: couldn't query physical volume "/dev/dsk/c2t2d0"The specified path does not correspond to physical volume attached tothis volume grouplvdisplay: Warning: couldn't query all of the physical volumes.--- Logical volumes ---LV Name /dev/vg00/lvol1VG Name /dev/vg00LV Permission read/writeLV Status available/staleMirror copies 1Consistency Recovery MWCSchedule parallelLV Size (Mbytes) 88Current LE 11Allocated PE 22Stripes 0Stripe Size (Kbytes) 0Bad block offAllocation strict/contiguousIO Timeout (Seconds) default--- Distribution of logical volume ---PV Name LE on PV PE on PV/dev/dsk/c1t0d0 11 11--- Logical extents ---LE PV1 PE1 Status 1 PV2 PE2 Status 20000 ??? 0000 stale /dev/dsk/c1t0d0 0000 current0001 ??? 0001 stale /dev/dsk/c1t0d0 0001 current0002 ??? 0002 stale /dev/dsk/c1t0d0 0002 current0003 ??? 0003 stale /dev/dsk/c1t0d0 0003 current0004 ??? 0004 stale /dev/dsk/c1t0d0 0004 current0005 ??? 0005 stale /dev/dsk/c1t0d0 0005 current0006 ??? 0006 stale /dev/dsk/c1t0d0 0006 current0007 ??? 0007 stale /dev/dsk/c1t0d0 0007 current0008 ??? 0008 stale /dev/dsk/c1t0d0 0008 current0009 ??? 0009 stale /dev/dsk/c1t0d0 0009 current0010 ??? 0010 stale /dev/dsk/c1t0d0 0010 current这是该这么办?这种情况下我们通过pv值来拆镜像,# lvdisplay -v -k /dev/vgtest/lvtest--- Logical volumes ---LV Name /dev/vgtest/lvtestVG Name /dev/vgtestLV Permission read/writeLV Status available/syncdMirror copies 1Consistency Recovery MWCSchedule parallelLV Size (Mbytes) 400Current LE 100Allocated PE 200Stripes 0Stripe Size (Kbytes) 0Bad block onAllocation strictIO Timeout (Seconds) default--- Distribution of logical volume ---PV Name LE on PV PE on PV/dev/dsk/c2t0d0 100 100/dev/dsk/c2t2d0 100 100--- Logical extents ---LE PV1 PE1 Status 1 PV2 PE2 Status 2 0000 0 0000 current 1 0000 current 0001 0 0001 current 1 0001 current 0002 0 0002 current 1 0002 current 0003 0 0003 current 1 0003 current 0004 0 0004 current 1 0004 current0006 0 0006 current 1 0006 current 0007 0 0007 current 1 0007 current 0008 0 0008 current 1 0008 current 0009 0 0009 current 1 0009 current 0010 0 0010 current 1 0010 current 0011 0 0011 current 1 0011 current 0012 0 0012 current 1 0012 current 0013 0 0013 current 1 0013 current 0014 0 0014 current 1 0014 current 0015 0 0015 current 1 0015 current 0016 0 0016 current 1 0016 current 0017 0 0017 current 1 0017 current 0018 0 0018 current 1 0018 current 0019 0 0019 current 1 0019 current 0020 0 0020 current 1 0020 current 0021 0 0021 current 1 0021 current 0022 0 0022 current 1 0022 current 0023 0 0023 current 1 0023 current 0024 0 0024 current 1 0024 current 0025 0 0025 current 1 0025 current 0026 0 0026 current 1 0026 current 0027 0 0027 current 1 0027 current 0028 0 0028 current 1 0028 current 0029 0 0029 current 1 0029 current 0030 0 0030 current 1 0030 current 0031 0 0031 current 1 0031 current 0032 0 0032 current 1 0032 current 0033 0 0033 current 1 0033 current 0034 0 0034 current 1 0034 current 0035 0 0035 current 1 0035 current 0036 0 0036 current 1 0036 current 0037 0 0037 current 1 0037 current 0038 0 0038 current 1 0038 current 0039 0 0039 current 1 0039 current 0040 0 0040 current 1 0040 current 0041 0 0041 current 1 0041 current 0042 0 0042 current 1 0042 current 0043 0 0043 current 1 0043 current 0044 0 0044 current 1 0044 current 0045 0 0045 current 1 0045 current 0046 0 0046 current 1 0046 current 0047 0 0047 current 1 0047 current 0048 0 0048 current 1 0048 current0050 0 0050 current 1 0050 current 0051 0 0051 current 1 0051 current 0052 0 0052 current 1 0052 current 0053 0 0053 current 1 0053 current 0054 0 0054 current 1 0054 current 0055 0 0055 current 1 0055 current 0056 0 0056 current 1 0056 current 0057 0 0057 current 1 0057 current 0058 0 0058 current 1 0058 current 0059 0 0059 current 1 0059 current 0060 0 0060 current 1 0060 current 0061 0 0061 current 1 0061 current 0062 0 0062 current 1 0062 current 0063 0 0063 current 1 0063 current 0064 0 0064 current 1 0064 current 0065 0 0065 current 1 0065 current 0066 0 0066 current 1 0066 current 0067 0 0067 current 1 0067 current 0068 0 0068 current 1 0068 current 0069 0 0069 current 1 0069 current 0070 0 0070 current 1 0070 current 0071 0 0071 current 1 0071 current 0072 0 0072 current 1 0072 current 0073 0 0073 current 1 0073 current 0074 0 0074 current 1 0074 current 0075 0 0075 current 1 0075 current 0076 0 0076 current 1 0076 current 0077 0 0077 current 1 0077 current 0078 0 0078 current 1 0078 current 0079 0 0079 current 1 0079 current 0080 0 0080 current 1 0080 current 0081 0 0081 current 1 0081 current 0082 0 0082 current 1 0082 current 0083 0 0083 current 1 0083 current 0084 0 0084 current 1 0084 current 0085 0 0085 current 1 0085 current 0086 0 0086 current 1 0086 current 0087 0 0087 current 1 0087 current 0088 0 0088 current 1 0088 current 0089 0 0089 current 1 0089 current 0090 0 0090 current 1 0090 current 0091 0 0091 current 1 0091 current 0092 0 0092 current 1 0092 current0094 0 0094 current 1 0094 current0095 0 0095 current 1 0095 current0096 0 0096 current 1 0096 current0097 0 0097 current 1 0097 current0098 0 0098 current 1 0098 current0099 0 0099 current 1 0099 current# lvreduce -k 1 -m 0 /dev/vgtest/lvtestLogical volume "/dev/vgtest/lvtest" has been successfully reduced.还有时候你会碰到一个镜像是跨三个硬盘,# lvdisplay -v /dev/vg00/OracleVol--- Logical volumes ---LV Name /dev/vg00/OracleVolVG Name /dev/vg00LV Permission read/writeLV Status available/staleMirror copies 1Consistency Recovery MWCSchedule parallelLV Size (Mbytes) 1600Current LE 200Allocated PE 400Stripes 0Stripe Size (Kbytes) 0Bad block onAllocation strictIO Timeout (Seconds) default--- Distribution of logical volume ---PV Name LE on PV PE on PV/dev/dsk/c3t5d0 125 125/dev/dsk/c3t6d0 75 75/dev/dsk/c3t4d0 200 200--- Logical extents ---LE PV1 PE1 Status 1 PV2 PE2 Status 2 00000 /dev/dsk/c3t5d0 00995 stale /dev/dsk/c3t4d0 00913 current00001 /dev/dsk/c3t5d0 00996 current /dev/dsk/c3t4d0 00914 current00002 /dev/dsk/c3t5d0 00997 current /dev/dsk/c3t4d0 00915 current00003 /dev/dsk/c3t5d0 00998 stale /dev/dsk/c3t4d0 00916 current00004 /dev/dsk/c3t5d0 00999 current /dev/dsk/c3t4d0 00917 current00006 /dev/dsk/c3t5d0 01001 current /dev/dsk/c3t4d0 00919 current 00007 /dev/dsk/c3t5d0 01002 current /dev/dsk/c3t4d0 00920 current 00008 /dev/dsk/c3t5d0 01003 current /dev/dsk/c3t4d0 00921 current 00009 /dev/dsk/c3t5d0 01004 current /dev/dsk/c3t4d0 00922 current 00010 /dev/dsk/c3t5d0 01005 current /dev/dsk/c3t4d0 00923 current 00011 /dev/dsk/c3t5d0 01006 current /dev/dsk/c3t4d0 00924 current 00012 /dev/dsk/c3t5d0 01007 current /dev/dsk/c3t4d0 00925 current 00013 /dev/dsk/c3t5d0 01008 current /dev/dsk/c3t4d0 00926 current 00014 /dev/dsk/c3t5d0 01009 current /dev/dsk/c3t4d0 00927 current 00015 /dev/dsk/c3t5d0 01010 current /dev/dsk/c3t4d0 00928 current 00016 /dev/dsk/c3t5d0 01011 stale /dev/dsk/c3t4d0 00929 current 00017 /dev/dsk/c3t5d0 01012 current /dev/dsk/c3t4d0 00930 current 00018 /dev/dsk/c3t5d0 01013 current /dev/dsk/c3t4d0 00931 current 00019 /dev/dsk/c3t5d0 01014 current /dev/dsk/c3t4d0 00932 current 00020 /dev/dsk/c3t5d0 01015 current /dev/dsk/c3t4d0 00933 current 00021 /dev/dsk/c3t5d0 01016 current /dev/dsk/c3t4d0 00934 current 00022 /dev/dsk/c3t5d0 01017 current /dev/dsk/c3t4d0 00935 current 00023 /dev/dsk/c3t5d0 01018 current /dev/dsk/c3t4d0 00936 current 00024 /dev/dsk/c3t5d0 01019 current /dev/dsk/c3t4d0 00937 current 00025 /dev/dsk/c3t5d0 01020 current /dev/dsk/c3t4d0 00938 current 00026 /dev/dsk/c3t5d0 01021 stale /dev/dsk/c3t4d0 00939 current 00027 /dev/dsk/c3t5d0 01022 current /dev/dsk/c3t4d0 00940 current 00028 /dev/dsk/c3t5d0 01023 current /dev/dsk/c3t4d0 00941 current 00029 /dev/dsk/c3t5d0 01024 current /dev/dsk/c3t4d0 00942 current 00030 /dev/dsk/c3t5d0 01025 current /dev/dsk/c3t4d0 00943 current 00031 /dev/dsk/c3t5d0 01026 current /dev/dsk/c3t4d0 00944 current 00032 /dev/dsk/c3t5d0 01027 current /dev/dsk/c3t4d0 00945 current 00033 /dev/dsk/c3t5d0 01028 current /dev/dsk/c3t4d0 00946 current 00034 /dev/dsk/c3t5d0 01029 current /dev/dsk/c3t4d0 00947 current 00035 /dev/dsk/c3t5d0 01030 current /dev/dsk/c3t4d0 00948 current 00036 /dev/dsk/c3t5d0 01031 current /dev/dsk/c3t4d0 00949 current 00037 /dev/dsk/c3t5d0 01032 current /dev/dsk/c3t4d0 00950 current 00038 /dev/dsk/c3t5d0 01033 current /dev/dsk/c3t4d0 00951 current 00039 /dev/dsk/c3t5d0 01034 current /dev/dsk/c3t4d0 00952 current 00040 /dev/dsk/c3t5d0 01035 current /dev/dsk/c3t4d0 00953 current 00041 /dev/dsk/c3t5d0 01036 current /dev/dsk/c3t4d0 00954 current 00042 /dev/dsk/c3t5d0 01037 current /dev/dsk/c3t4d0 00955 current 00043 /dev/dsk/c3t5d0 01038 stale /dev/dsk/c3t4d0 00956 current 00044 /dev/dsk/c3t5d0 01039 stale /dev/dsk/c3t4d0 00957 current 00045 /dev/dsk/c3t5d0 01040 current /dev/dsk/c3t4d0 00958 current 00046 /dev/dsk/c3t5d0 01041 current /dev/dsk/c3t4d0 00959 current 00047 /dev/dsk/c3t5d0 01042 current /dev/dsk/c3t4d0 00960 current 00048 /dev/dsk/c3t5d0 01043 current /dev/dsk/c3t4d0 00961 current00050 /dev/dsk/c3t5d0 01045 current /dev/dsk/c3t4d0 00963 current 00051 /dev/dsk/c3t5d0 01046 current /dev/dsk/c3t4d0 00964 current 00052 /dev/dsk/c3t5d0 01047 current /dev/dsk/c3t4d0 00965 current 00053 /dev/dsk/c3t5d0 01048 current /dev/dsk/c3t4d0 00966 current 00054 /dev/dsk/c3t5d0 01049 current /dev/dsk/c3t4d0 00967 current 00055 /dev/dsk/c3t5d0 01050 current /dev/dsk/c3t4d0 00968 current 00056 /dev/dsk/c3t5d0 01051 stale /dev/dsk/c3t4d0 00969 current 00057 /dev/dsk/c3t5d0 01052 current /dev/dsk/c3t4d0 00970 current 00058 /dev/dsk/c3t5d0 01053 current /dev/dsk/c3t4d0 00971 current 00059 /dev/dsk/c3t5d0 01054 current /dev/dsk/c3t4d0 00972 current 00060 /dev/dsk/c3t5d0 01055 stale /dev/dsk/c3t4d0 00973 current 00061 /dev/dsk/c3t5d0 01056 stale /dev/dsk/c3t4d0 00974 current 00062 /dev/dsk/c3t5d0 01057 stale /dev/dsk/c3t4d0 00975 current 00063 /dev/dsk/c3t5d0 01058 stale /dev/dsk/c3t4d0 00976 current 00064 /dev/dsk/c3t5d0 01059 current /dev/dsk/c3t4d0 00977 current 00065 /dev/dsk/c3t5d0 01060 current /dev/dsk/c3t4d0 00978 current 00066 /dev/dsk/c3t5d0 01061 current /dev/dsk/c3t4d0 00979 current 00067 /dev/dsk/c3t5d0 01062 current /dev/dsk/c3t4d0 00980 current 00068 /dev/dsk/c3t5d0 01063 current /dev/dsk/c3t4d0 00981 current 00069 /dev/dsk/c3t5d0 01064 current /dev/dsk/c3t4d0 00982 current 00070 /dev/dsk/c3t5d0 01065 current /dev/dsk/c3t4d0 00983 current 00071 /dev/dsk/c3t5d0 01066 current /dev/dsk/c3t4d0 00984 current 00072 /dev/dsk/c3t5d0 01067 current /dev/dsk/c3t4d0 00985 current 00073 /dev/dsk/c3t5d0 01068 current /dev/dsk/c3t4d0 00986 current 00074 /dev/dsk/c3t5d0 01069 current /dev/dsk/c3t4d0 00987 current 00075 /dev/dsk/c3t5d0 01070 current /dev/dsk/c3t4d0 00988 current 00076 /dev/dsk/c3t5d0 01071 current /dev/dsk/c3t4d0 00989 current 00077 /dev/dsk/c3t5d0 01072 current /dev/dsk/c3t4d0 00990 current 00078 /dev/dsk/c3t5d0 01073 current /dev/dsk/c3t4d0 00991 current 00079 /dev/dsk/c3t5d0 01074 current /dev/dsk/c3t4d0 00992 current 00080 /dev/dsk/c3t5d0 01075 current /dev/dsk/c3t4d0 00993 current 00081 /dev/dsk/c3t5d0 01076 current /dev/dsk/c3t4d0 00994 current 00082 /dev/dsk/c3t5d0 01077 current /dev/dsk/c3t4d0 00995 current 00083 /dev/dsk/c3t5d0 01078 stale /dev/dsk/c3t4d0 00996 current 00084 /dev/dsk/c3t5d0 01079 current /dev/dsk/c3t4d0 00997 current 00085 /dev/dsk/c3t5d0 01080 current /dev/dsk/c3t4d0 00998 current 00086 /dev/dsk/c3t5d0 01081 current /dev/dsk/c3t4d0 00999 current 00087 /dev/dsk/c3t5d0 01082 current /dev/dsk/c3t4d0 01000 current 00088 /dev/dsk/c3t5d0 01083 current /dev/dsk/c3t4d0 01001 current 00089 /dev/dsk/c3t5d0 01084 current /dev/dsk/c3t4d0 01002 current 00090 /dev/dsk/c3t5d0 01085 current /dev/dsk/c3t4d0 01003 current 00091 /dev/dsk/c3t5d0 01086 current /dev/dsk/c3t4d0 01004 current 00092 /dev/dsk/c3t5d0 01087 current /dev/dsk/c3t4d0 01005 current00094 /dev/dsk/c3t5d0 01089 stale /dev/dsk/c3t4d0 01007 current 00095 /dev/dsk/c3t5d0 01090 current /dev/dsk/c3t4d0 01008 current 00096 /dev/dsk/c3t5d0 01091 current /dev/dsk/c3t4d0 01009 current 00097 /dev/dsk/c3t5d0 01092 current /dev/dsk/c3t4d0 01010 current 00098 /dev/dsk/c3t5d0 01093 current /dev/dsk/c3t4d0 01011 current 00099 /dev/dsk/c3t5d0 01094 current /dev/dsk/c3t4d0 01012 current 00100 /dev/dsk/c3t5d0 01095 current /dev/dsk/c3t4d0 01013 current 00101 /dev/dsk/c3t5d0 01096 current /dev/dsk/c3t4d0 01014 current 00102 /dev/dsk/c3t5d0 01097 current /dev/dsk/c3t4d0 01015 current 00103 /dev/dsk/c3t5d0 01098 current /dev/dsk/c3t4d0 01016 current 00104 /dev/dsk/c3t5d0 01099 current /dev/dsk/c3t4d0 01017 current 00105 /dev/dsk/c3t5d0 01100 current /dev/dsk/c3t4d0 01018 current 00106 /dev/dsk/c3t5d0 01101 current /dev/dsk/c3t4d0 01019 current 00107 /dev/dsk/c3t5d0 01102 current /dev/dsk/c3t4d0 01020 current 00108 /dev/dsk/c3t5d0 01103 current /dev/dsk/c3t4d0 01021 current 00109 /dev/dsk/c3t5d0 01104 current /dev/dsk/c3t4d0 01022 current 00110 /dev/dsk/c3t5d0 01105 current /dev/dsk/c3t4d0 01023 current 00111 /dev/dsk/c3t5d0 01106 current /dev/dsk/c3t4d0 01024 current 00112 /dev/dsk/c3t5d0 01107 stale /dev/dsk/c3t4d0 01025 current 00113 /dev/dsk/c3t5d0 01108 current /dev/dsk/c3t4d0 01026 current 00114 /dev/dsk/c3t5d0 01109 current /dev/dsk/c3t4d0 01027 current 00115 /dev/dsk/c3t5d0 01110 current /dev/dsk/c3t4d0 01028 current 00116 /dev/dsk/c3t5d0 01111 current /dev/dsk/c3t4d0 01029 current 00117 /dev/dsk/c3t5d0 01112 current /dev/dsk/c3t4d0 01030 current 00118 /dev/dsk/c3t5d0 01113 current /dev/dsk/c3t4d0 01031 current 00119 /dev/dsk/c3t5d0 01114 current /dev/dsk/c3t4d0 01032 current 00120 /dev/dsk/c3t5d0 01115 stale /dev/dsk/c3t4d0 01033 current 00121 /dev/dsk/c3t5d0 01116 stale /dev/dsk/c3t4d0 01034 current 00122 /dev/dsk/c3t5d0 01117 current /dev/dsk/c3t4d0 01035 current 00123 /dev/dsk/c3t5d0 01118 current /dev/dsk/c3t4d0 01036 current 00124 /dev/dsk/c3t5d0 01119 stale /dev/dsk/c3t4d0 01037 current 00125 /dev/dsk/c3t6d0 00451 current /dev/dsk/c3t4d0 01038 current 00126 /dev/dsk/c3t6d0 00452 current /dev/dsk/c3t4d0 01039 current 00127 /dev/dsk/c3t6d0 00453 current /dev/dsk/c3t4d0 01040 current 00128 /dev/dsk/c3t6d0 00454 current /dev/dsk/c3t4d0 01041 current 00129 /dev/dsk/c3t6d0 00455 current /dev/dsk/c3t4d0 01042 current 00130 /dev/dsk/c3t6d0 00456 current /dev/dsk/c3t4d0 01043 current 00131 /dev/dsk/c3t6d0 00457 current /dev/dsk/c3t4d0 01044 current 00132 /dev/dsk/c3t6d0 00458 current /dev/dsk/c3t4d0 01045 current 00133 /dev/dsk/c3t6d0 00459 current /dev/dsk/c3t4d0 01046 current 00134 /dev/dsk/c3t6d0 00460 current /dev/dsk/c3t4d0 01047 current 00135 /dev/dsk/c3t6d0 00461 current /dev/dsk/c3t4d0 01048 current 00136 /dev/dsk/c3t6d0 00462 current /dev/dsk/c3t4d0 01049 current00138 /dev/dsk/c3t6d0 00464 current /dev/dsk/c3t4d0 01051 current 00139 /dev/dsk/c3t6d0 00465 current /dev/dsk/c3t4d0 01052 current 00140 /dev/dsk/c3t6d0 00466 current /dev/dsk/c3t4d0 01053 current 00141 /dev/dsk/c3t6d0 00467 current /dev/dsk/c3t4d0 01054 current 00142 /dev/dsk/c3t6d0 00468 current /dev/dsk/c3t4d0 01055 current 00143 /dev/dsk/c3t6d0 00469 current /dev/dsk/c3t4d0 01056 current 00144 /dev/dsk/c3t6d0 00470 current /dev/dsk/c3t4d0 01057 current 00145 /dev/dsk/c3t6d0 00471 current /dev/dsk/c3t4d0 01058 current 00146 /dev/dsk/c3t6d0 00472 current /dev/dsk/c3t4d0 01059 current 00147 /dev/dsk/c3t6d0 00473 current /dev/dsk/c3t4d0 01060 current 00148 /dev/dsk/c3t6d0 00474 current /dev/dsk/c3t4d0 01061 current 00149 /dev/dsk/c3t6d0 00475 current /dev/dsk/c3t4d0 01062 current 00150 /dev/dsk/c3t6d0 00476 current /dev/dsk/c3t4d0 01063 current 00151 /dev/dsk/c3t6d0 00477 current /dev/dsk/c3t4d0 01064 current 00152 /dev/dsk/c3t6d0 00478 current /dev/dsk/c3t4d0 01065 current 00153 /dev/dsk/c3t6d0 00479 current /dev/dsk/c3t4d0 01066 current 00154 /dev/dsk/c3t6d0 00480 current /dev/dsk/c3t4d0 01067 current 00155 /dev/dsk/c3t6d0 00481 current /dev/dsk/c3t4d0 01068 current 00156 /dev/dsk/c3t6d0 00482 current /dev/dsk/c3t4d0 01069 current 00157 /dev/dsk/c3t6d0 00483 current /dev/dsk/c3t4d0 01070 current 00158 /dev/dsk/c3t6d0 00484 current /dev/dsk/c3t4d0 01071 current 00159 /dev/dsk/c3t6d0 00485 current /dev/dsk/c3t4d0 01072 current 00160 /dev/dsk/c3t6d0 00486 current /dev/dsk/c3t4d0 01073 current 00161 /dev/dsk/c3t6d0 00487 current /dev/dsk/c3t4d0 01074 current 00162 /dev/dsk/c3t6d0 00488 current /dev/dsk/c3t4d0 01075 current 00163 /dev/dsk/c3t6d0 00489 current /dev/dsk/c3t4d0 01076 current 00164 /dev/dsk/c3t6d0 00490 current /dev/dsk/c3t4d0 01077 current 00165 /dev/dsk/c3t6d0 00491 current /dev/dsk/c3t4d0 01078 current 00166 /dev/dsk/c3t6d0 00492 current /dev/dsk/c3t4d0 01079 current 00167 /dev/dsk/c3t6d0 00493 current /dev/dsk/c3t4d0 01080 current 00168 /dev/dsk/c3t6d0 00494 current /dev/dsk/c3t4d0 01081 current 00169 /dev/dsk/c3t6d0 00495 current /dev/dsk/c3t4d0 01082 current 00170 /dev/dsk/c3t6d0 00496 current /dev/dsk/c3t4d0 01083 current 00171 /dev/dsk/c3t6d0 00497 current /dev/dsk/c3t4d0 01084 current 00172 /dev/dsk/c3t6d0 00498 current /dev/dsk/c3t4d0 01085 current 00173 /dev/dsk/c3t6d0 00499 current /dev/dsk/c3t4d0 01086 current 00174 /dev/dsk/c3t6d0 00500 current /dev/dsk/c3t4d0 01087 current 00175 /dev/dsk/c3t6d0 00501 current /dev/dsk/c3t4d0 01088 current 00176 /dev/dsk/c3t6d0 00502 current /dev/dsk/c3t4d0 01089 current 00177 /dev/dsk/c3t6d0 00503 current /dev/dsk/c3t4d0 01090 current 00178 /dev/dsk/c3t6d0 00504 current /dev/dsk/c3t4d0 01091 current 00179 /dev/dsk/c3t6d0 00505 current /dev/dsk/c3t4d0 01092 current 00180 /dev/dsk/c3t6d0 00506 current /dev/dsk/c3t4d0 01093 current00181 /dev/dsk/c3t6d0 00507 current /dev/dsk/c3t4d0 01094 current 00182 /dev/dsk/c3t6d0 00508 current /dev/dsk/c3t4d0 01095 current 00183 /dev/dsk/c3t6d0 00509 current /dev/dsk/c3t4d0 01096 current 00184 /dev/dsk/c3t6d0 00510 current /dev/dsk/c3t4d0 01097 current 00185 /dev/dsk/c3t6d0 00511 current /dev/dsk/c3t4d0 01098 current 00186 /dev/dsk/c3t6d0 00512 current /dev/dsk/c3t4d0 01099 current 00187 /dev/dsk/c3t6d0 00513 current /dev/dsk/c3t4d0 01100 current 00188 /dev/dsk/c3t6d0 00514 current /dev/dsk/c3t4d0 01101 current 00189 /dev/dsk/c3t6d0 00515 current /dev/dsk/c3t4d0 01102 current 00190 /dev/dsk/c3t6d0 00516 current /dev/dsk/c3t4d0 01103 current 00191 /dev/dsk/c3t6d0 00517 current /dev/dsk/c3t4d0 01104 current 00192 /dev/dsk/c3t6d0 00518 current /dev/dsk/c3t4d0 01105 current 00193 /dev/dsk/c3t6d0 00519 current /dev/dsk/c3t4d0 01106 current 00194 /dev/dsk/c3t6d0 00520 current /dev/dsk/c3t4d0 01107 current 00195 /dev/dsk/c3t6d0 00521 current /dev/dsk/c3t4d0 01108 current 00196 /dev/dsk/c3t6d0 00522 current /dev/dsk/c3t4d0 01109 current 00197 /dev/dsk/c3t6d0 00523 current /dev/dsk/c3t4d0 01110 current 00198 /dev/dsk/c3t6d0 00524 current /dev/dsk/c3t4d0 01111 current 00199 /dev/dsk/c3t6d0 00525 current /dev/dsk/c3t4d0 01112 current 这是拆镜像就要把所以要拆lv的硬盘全加上就行lvreduce -m 0 /dev/vg00/OracleVol /dev/dsk/c3t5d0 /dev/dsk/c3t6d0方法二不拆镜像,直接拔盘换盘,通过vg同步的方法来实现。