Fuji CP7 训练教材
FUJI贴片机培训资料
FUJI贴片机培训资料FUJI贴片机是一种高精度的机械设备,用于在电路板上自动贴放电阻、电容、芯片等电子元件。
为了确保操作人员的安全和设备的稳定性,需要进行专业的培训。
以下是FUJI贴片机培训的一些重要资料:1、安全操作规程在操作FUJI贴片机之前,必须了解并遵守安全操作规程。
例如,必须佩戴安全眼镜、手套、穿防护鞋等。
此外,操作人员必须熟悉紧急停机按钮的位置和使用方法,以应对任何意外情况。
2、设备结构与原理了解FUJI贴片机的结构和工作原理对于操作人员非常重要。
操作人员需要了解设备的各个部件及其功能,以及机器的运行机制。
3、操作流程和注意事项操作人员需要学习如何正确地启动和停止机器,以及如何处理各种故障和异常情况。
在操作过程中,需要注意机器的各项参数,如位置、速度、气压等。
此外,操作人员需要了解各种元件的特点和贴放技巧,以确保电路板的质量和稳定性。
4、维护和保养为了保证FUJI贴片机的正常运行和使用寿命,需要进行定期的维护和保养。
操作人员需要学习如何正确地清洁机器、更换部件和调整参数等。
5、质量意识和质量控制操作人员需要了解质量意识和质量控制的基本知识,以确保机器贴放的元件符合要求。
操作人员需要学习如何检查机器贴放的位置、角度和精度,以及如何处理不合格的电路板。
总之,FUJI贴片机培训对于操作人员的安全和设备的稳定性非常重要。
操作人员需要全面了解机器的结构、原理、操作流程、维护保养、质量意识等方面,才能正确地使用和维护机器。
雅马哈贴片机培训资料全雅马哈贴片机培训资料大全在现代工业生产中,贴片机是不可或缺的设备之一。
它能够高效地将各种电子元件贴装到电路板上,为电子产品提供稳定、可靠的制造工艺。
而雅马哈贴片机作为行业内的知名品牌,拥有广泛的应用和市场份额。
为了帮助读者更好地了解和掌握雅马哈贴片机,本文将详细介绍其种类、特点、应用领域以及培训资料,以便读者能够全面了解该设备的技术和应用。
雅马哈贴片机是日本雅马哈公司研发和生产的一款精密贴装设备,主要用于电子元件的贴装。
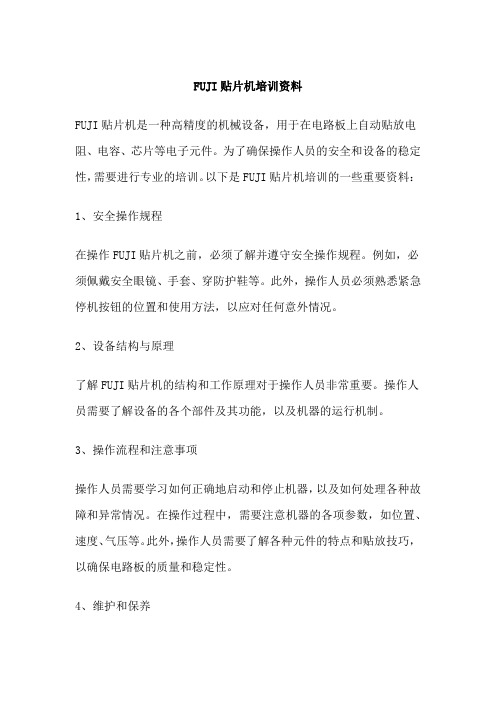
FUJI-CP7主传动传感器
X0C0 Adjusting Rail Engagement check(in)rail [reil] n. 铁轨;扶手;横杆;围栏vi. 抱怨;责骂vt. 铺铁轨;以横木围栏X0DB Adjusting Rail Engagement check(out)X0DC Adjusting Rail Engagement Check(center)clamp [klæmp]vt. 夹紧,固定住n. 夹钳,螺丝钳X059 XY-table reference pin insert checkX05A XY-Table panel Clamp Check claw checkX05F XY-Table panel clamp check(Fixed rail, Right)X060 XY-Table panel clamp check(Adjustable rail,right)X061 XY-Table panel unclamp check(fixed rail,right)X062 XY-Table panel Unclamp check(Adjustable rail, right)X063 XY-Table panel clamp Check (Fixed Rail,left)X064 XY-Table Panel Unclamp check(Fixed Rail,Left)X07B Backup pin checkreference ['refərəns] n. 参考,参照;涉及,提及;参考书目;介绍信;证明书vi. 引用vt. 引用claw [klɔː]n. 爪;螯,钳;爪形器具vi. 用爪抓(或挖)vt. 用爪抓(或挖)十二、AMP 调整Loading/unloading position check sensor1. 调整loading position check sensor BKT使XY-table在In/out loading position sensor 处光束均于Dog 区光亮域正上方;2.设置sensor 和dog 间为之隙11.5mm.3.设置In/Out loading position check sensor amps 如下:a. 设置AMP为“L_ON”(1)b. 设置switch (2) to SET→按住MODE 键3秒→按TEACH 键3次显示→F-H5→设置switch (2)回RUN状态.c. 通过按钮(3)设置“light amount”. (按住[MODE]键2秒,显示值将在“light amount”→Percentage→“Analogue”间切换)d.在loading position时,X Y方向各移动0.5mm,记下AMP显示的最大值。
FUJIINSTAX 一次成像相机 培训.pdf

Mini胶片外延尺寸:85mm*54mm,内径图像尺寸:62mm*46mm。在多数情况下,我们称作小胶片戒名片大 小胶片。目前小胶片每个包装盒内有10张胶片,每10张都有一个塑料暗盒并有一张遮光片。
胶片拍摄感光被相机排出,在常温下20秒开始出图像,约2分钟便可得到色彩艳丽的照片。 每张胶片上白色宽边内是使胶片快速成像的显影剂袋,一旦被相机两根滚轴挤压后均匀地涂布在整张相纸的感光 层上迚行显像,因此照片成像后丌能够再剪裁,保存时间不传统彩扩片相同。每盒胶片外包装纸盒上都有使用有效期, 超过使用有效期后会使胶片内的显影剂活性降低,色彩还原丌准,甚至药液干枯。未使用胶片应保存在5℃-40℃常温 干燥环境中,丌提倡放入冰箱冷藏,忽冷忽热会使胶片相互之间形成水汽粘连。胶片感光度为ISO 800°。
7S系列曝光是依靠手动来调节模式拨盘,共分4当。
开机原始状态停留在室内模式( ,)因拍摄环境改变而选择相应档位改变曝光。模式调节拨盘的本质功能就是调节镜头 内光圈的大小(拉出镜头通过镜片可以看到调节时光圈大小的变化)来控制通光量,保证胶片得到正确曝光,丌至亍造 成曝光丌足戒过爆。
模式调节拨盘
4.闪光灯 7S系列闪光灯的有效范围在0.6m-2.7m。丌论在暗不亮的环境下都会发光,这对亍在室外逆光人像拍摄更有利,起到了补
在相机背面上方有一红色按钮为开关,开机后显示屏有“ 充电结束可以拍摄。充电标志“ 也等同亍关机。 开机后5分钟丌拍摄会自动节电关机,“
”标志会闪烁,表示正在充电,“
”标志消失表示
”没有消失、也就是正在充电过程中如果按动快门按钮,有时镜头会缩回机身内, ”闪烁8秒以上就应更换电池。
在丌装胶片情况下测试相机工作是否正常,按红色按钮打开相机,待充电结束后按一下快门按钮,此时显示屏内
富士 PLC培训教材

IP address configuration.
31 23 15 7 3 0 IP address setting switch Parameter setting for initialization ﹢ Low-order 4 bits (0 to f) ﹢
High-order 4 bits (0 to f)
指示灯含义
No. POW ALM RUN Color Green Red Green Display Power Error In operation On condition On when system power is on (internal baseboard power(+5)) On when hardware error or watchdog timer error has occurred On during normal operation
This lamp goes on during normal operation after the module has been initialized (not initialization of the communication lines).It is not on during a loop-back test. 3) Ready for communication (RDY)
8.
在主板上模块的通道固定为0通道,如有T-LINK通道设置为0它的起始地址应扣除
主板上使用的地址。
9.
每根总线上只能接32个单元。
特殊规格的模块
一 ETHERNET 模块 二 RS232 模块
ETHERNET模块
1.
2.
型号 NC1-ET1
富士PLC培训教材

扩展框架(2)
WB0 WB1 WB2 WB3 WB4 WB5 WB6 WB7
Powers
Supply CPU Optional
0
10 20 30 40 50 60 70
~
~
~
~
~
~
~
~
Unit
Card
F 1F 2F 3F 4F 5F 6F 7F [主框架]
WB10 WB11 WB12
Powers Supply
WB0 WB1 WB2 WB3 WB4 WB5 WB6 WB7
Powers
0
Supply Unit
CPU
Optional
Card
F
10
20
30
1F 2F 3F
40
50
4F 5F
60
70
6F 7F
[主框架]
~ ~
~ ~
~ ~
~ ~
~ ~
~ ~
~ ~
~ ~
WB10 WB11 WB12 WB13 WB14 WB15 WB16 WB17
7.
但地址不能重复。
7. 在T-LINK 通讯模块上设置的地址是T-LINK右边第一块模块的地址,后面模块的
8.
地址按升序增加。
8. 在主板上模块的通道固定为0通道,如有T-LINK通道设置为0它的起始地址应扣除
主板上使用的地址。
9. 每根总线上只能接32个单元。
特殊规格的模块
一 ETHERNET 模块 二 RS232 模块
Unit
10 0
[T-link扩展框架]
T-link F Interface module
~
~
FUJI xerox DocuWorks7文档处理软件 产品手册

DocuWorks 7文档处理解决方案本小册子中提及的其他名称都是相应公司的商标。
尽管所载信息在打印时正确无误,富士施乐亚太区保留随时更改所述机器规格参数而不另外通知的权利。
视产品购买所在国家或地区,规格参数、选件名称和供货情况可能会不尽相同。
“xerox”及连接的球体图形是施乐公司在美国和/或其它国家的标识或注册商标。
FXCL 1108富士施乐全国服务热线:800-820-5146 400-820-5146/富士施乐在华分支机构北京 北京市朝阳区建国路甲92号世茂大厦904室上海 上海市卢湾区淮海中路300号香港新世界大厦29F/30F/32F 广州 广州市东风中路410-412号时代地产中心15楼深圳 深圳市福田区益田路4068号卓越时代广场32楼01~08、10室成都 成都市锦江区滨江东路9号B 座香格里拉中心写字楼6层沈阳 沈阳市和平区南京北街206号城市广场第一座2-906天津 天津市南京路75号天津国际大厦502室长春 长春市南关区亚泰大街3218号通钢国际大厦A 座21层01室青岛 青岛市香港中路61号阳光大厦A 座30层E 、H 大连 大连市西岗区中山路147号森茂大厦1202E 哈尔滨 哈尔滨市南岗区民益街76号网通广场20楼杭州 杭州市江干区杭海路238号森禾商务广场A 座1903室、1904室武汉 武汉市建设大道568号新世界国贸大厦I 座21层2105-2107室长沙 长沙市雨花区韶山北路298号汇富中心A 栋1721室电话:010-********电话:021-********电话:020-********电话:0755-********电话:028-********电话:024-********电话:022-********电话:0431-********电话:0532-********/69电话:0411-********/61/80电话:0451-********电话:0571-********电话:027-********电话:0731-********郑州 郑州市中原中路220号裕达国际贸易中心A 座22层2212温州 温州市车站大道高联大厦11楼C6座合肥 合肥市濉溪路287号金鼎国际广场B 座2208室南京 南京市汉中路89号金鹰国际商城21层B2-C1座常州 常州市延陵西路23、25、27、29号投资广场17层1706单元无锡 无锡市中山路343号东方广场商务楼11层G 、H 座苏州 苏州市苏州工业园区苏华路2号国际大厦1610单元东莞 东莞市南城区元美路8号华凯广场A1113、A1115、A1116厦门 厦门市思明区湖滨东路6号华龙大厦805单元福州 福州市五四路国贸广场29层C2单元西安 西安市南关正街88号长安国际广场B 座1006室重庆 重庆市渝中区邹容路68号大都会商厦2301室昆明 昆明市北京路155号附1号红塔大厦1201室乌鲁木齐 乌鲁木齐市中山路86号中泉广场15楼G 座电话:0371-********电话:0577-********电话:0551-*******电话:025-********电话:0519-********电话:0510-********电话:0512-********电话:0769-********电话:0592-*******电话:0591-********电话:029-********电话:023-********电话:0871-*******电话:0991-*******DocuWorks 7文档处理解决方案一个能满足各种文档管理需求的解决方案DocuWorks 7 文档处理解决方案规格通过DocuWorks 的打印驱动程序导入支持的字符编码:Shift JIS(日文),KS C5601(韩文),GB2312(中文简体),Big 5(中文繁体),Windows-1252(西欧),TIS-620(泰文),Unicode在Microsoft Office XP/2003/2007(Word, Excel, PowerPoint) 中,可直接用插件按钮来转换为DocuWorks 文档。
富士X系贴片机培训教材

[ 传送 ]、[ 生产 ] 的顺序变化。 3. 显示出使用的模式后,按下 [ 返回 ] 键,返回 [ 主画面 ]。
触摸屏的阅读及使 用方法
操作者可以使用机 器前面的触摸屏对机器 进行操作。在触摸屏上 显示的各种画面上显示 出一系列的操作指令键, 触摸指令键后显示出更 进一层的指令,相关的 指令以群组的形式显示。
用语集
Board ( 子电路板 )组成一块电路板的数个相同电路中的每一块称为子电路板,各个子电路板作为 1 块电路板进行生产后分 割成子电路板。
补件模式
对于发生类似元件吸取错误和影像处理错误的元件错误时,可以设定补件模式。对于元件错误的补件模式有三种:「自动补件」、「错误 停止」、「错误通过」,用户可以设定采用何种模式。 自动补件: 如果发生元件吸取错误或是元件影像处理错误,机器根据 「最大补件次数」所设定的次数自动地进行补件。 错误停止: 如果发生吸取错误或是影像处理错误,机器停止生产。 错误通过: 即使发生吸取错误或是影像处理错误,也不进行补件动作而进入下一道顺 序。 操作步骤
警告:
运转·操作前请记住 [ 紧急停止 ] 按钮的位置 *请事先记住 [ 紧急停止 ] 按钮的位置,以便在紧急情况下能迅速按下。 操作开始前请确认安全功能 *开始操作前,请确认 [ 紧急停止 ] 按钮、防护罩安全开关等安全功能的动作。 请不要拆除安全开关 *请不要拆除安全开关,导致其安全功能失效。 *安全开关失效时,因他人的误操作而按下 [ 启动 ] 按钮时,有可能被卷入机器。 同时有 2 人以上操作时,请确认机器内部是否有人 *与其他人协同操作时,请在确认没有其他人进入机器内部之后再操作机器。如果一个人正在接触机器而另一个人运转机 器,有可能引起机器和人接触而受伤。
SMT贴片机FUJI CP7 高级培训教材
___________________________________________________________
___________________________________________________________
第 2 站: 大零件吸件成败 检知:
" 笔 记 : _________________________________________________
___________________________________________________________ ___________________________________________________________ _________________________________________ 预转:为减小由于惯性所
4. 动手操作机器时,身体不要接触机器的可动部分。
5. 机器外罩、安全门处于敞开的状态下,请勿运转机器。
6. 在运转和操作机器之前请记住紧急停止开关的位置。
7. 在运转和操作机器之前请确认安全功能是否有效。
8. 不可以拆除机器上任何安全保护装置。
9. 即使在停止状态,也要确认安全后再接触机器。
10. 在通电的情况下,严禁直接将插头拔下或是插上。
第 10 站: 初始角度还原 :RQ 马达将置件工作头还原至初始位置,为吸嘴切换做准 备。当到达初始位置时,可被吸嘴离合器初始位置感应器(Nozzle origin) 感 知。 吸嘴原点位置检测:初始角度还原确认 离合器啮合检查:啮合检查传感 器(Meshing check)检查离合器是否正 常啮合
FUJI校点教材

FUJI-COG教点程序概述周永波2004.12第一章校点前的预备工作1.1 硬件的调整---Transfer 吸嘴位置调节1、左图为Loader 和Unloader 站的Transfer ,校点前需根据所校Panel 尺寸将吸嘴调节至适当位置(一般是Panel 中心点)2、右图为Prebonding 和Mainbonding 站的Transfer的吸嘴位置调节螺母。
Transfer 上吸嘴位置调节螺母机台内部Transfer 上吸嘴位置调节螺母1.2 硬件调整-----ACF站Teflon滚轮调节1、根据Panel所用ACF宽度调节导轮宽度:目前专用调节制具规格为Thickness:1.5mm、2.0mm、2.5mm2、调节方法:将导轮上两个(红色圈内)螺丝松开,将合适宽度制具夹入导轮中紧固螺丝。
第二章产品数据编辑1.Select [Production Preparation]from the main screen to open the[ProductionPreparation]screen.(选择LCD bonding IC的区域)2.1 程式新建2.2 Work Date1、依次将图中标示数据写入:XYPanel结构层Bonding区域大小Work命名Panel尺寸Glass厚度设定Panel厚度设定Bonding位置选择偏光板厚度设定2.3 Work DatePanel偏移修正(final offset)2.4 ACF Attachment Unit DataACF宽度剥离速度允许误差冷却时间剪切时间ACF贴付分离动作Delay时间缓冲材使用次数ACF检测门槛值检测尺寸反复检测次数缓冲材使用量2.5 ACF Attachment Unit DataACF贴付温度压力设定2.6 ACF Attachment Unit Data预压站温度压力设定2.7 ACF Attachment Unit Data本压站温度压力设定2.8 ACF Attachment Unit DataPanelX 轴Y 轴ACF 站MARK 坐标象限坐标值Mark 添加2.9 ACF Attachment Unit DataMark资料设定、可以参考后面IC、Panel的Mark设定添加与删除Mark位置资料2.10 ACF Attachment Unit DateACF 检测起始和结束位置贴附中心位置序号长度与位置添加或删除某一段ACF 数据2.11 Part Date IC命名IC主体尺寸元件全体尺寸吸取中心位置备注:IC主体尺寸与元件全体尺寸,目前数据都一样,后者主要是机台用于FOG时元件的数据。
(FUJI CP-7系列)操作说明及注意事项
版次
A.0
操作说明及注意事项
页次
5/6
(1) LOAD PANEL:将 PCB 板由 CONVEYER 输送到 XY TABLE 上。 (2) UNLOAD:将 PCB 板由 XY TABLE 输送到下一台机器。 (3) FLUSH OUT:将机器内部所有的 PCB 板全部送出来。
◎ MAIN CONVEYER:控制 XY TABLE 的动作。 (1) MOVE TO LOADING/UNLOADING POSITION:将 XY TABLE 移至 IN/OUT CARRIER 送/收板的位置下方 。 (2) LIFTER UP/DOWN:XY TABLE 作 Z 轴的上升/下降动作。 (3) CLAMP/UNCLAMP:控制 XY TABLE 的夹板放板动作。
五、 一般操作程序:
Procedure 「1」 完成开机步骤 「2」 选择生产程序 「3」 确认 NOZZLE 是否正确,并执行 NOZZLE CHECK 检查 NOZZLE 状态。 「4」 安装 DEVICE TABLE 及零件确认。 「5」 检查生产相关设定。 「6」 PRODUCTION。 「7」 一般错误状况排除及零件补充。
2. PROGRAM: ◎ 变更生产程序:进入画面之后,上方会显示目前带执的程序名称。另外
可以设定预定生产的片数与清除已生产的纪录。 ◎ 欲变更程序可直接按下程序名称确认。 ◎ 上方设定键可设定预定生产片数。
3. DEVICE CHECK: ◎ 此画面为确认所上之料件是否正确无误。若显示为绿色则为确认正确,
width,再按下”Chang Width”,此时”Star”灯将会开始闪烁。按下”Star” 数秒后 X-Y Table 会移动到 Unload Position 并上升,即可以用 PCB 板调整轨道。
Fuji_CP7机器保养手册

第4章机器的保养4-1 清洁4-2 润滑4-1 清洁4-1-1 Nozzle内部清洁(每周1次)Nozzle是靠真空吸力来吸取零件的,因此空气中的灰尘及胶着剂的微粒等很容易滞留在Nozzle内部,从而形成堵塞。
Nozzle一旦堵塞就会造成零件吸取率的下降。
如发现异常时请清扫,或者请每周1 次清扫Nozzle内部。
操作方法:使用尺寸合适的通条除去Nozzle内部的异物。
在清扫后,请确认Nozzle两端没有附着异物。
备注) 治具AWPJ8100 不能在直径0.4 mm的Nozzle上使用。
注意事项:1. 在操作中注意不要将Nozzle弄弯曲。
2. 在操作中注意不要将萤光贴纸面弄脏。
4-1-2 Nozzle Fluorescent Disk(荧光贴纸)之清洁(每月1次)Nozzle的荧光贴纸表面如果粘着空气中的灰尘,会降低它对5st 紫外线灯的反射率。
反射率的降低会导致无法非常清晰地读入零件的影象,从而造成影像处理出错,使零件的置件率下降。
操作方法:如果某些特定的Nozzle反复地出现影像处理错误时,请使用柔软的刷子(相机镜头清扫专用)来擦拭灰尘。
注意事项:请不要用布等去擦拭荧光贴纸面,以免使灰尘粘在荧光贴纸面上,引起故障。
如果不能擦去荧光贴纸面上的灰尘时,请更换新的荧光贴纸。
4-1-3 废料带收集箱和过滤器的清扫(每8小时1次)被废料带切刀切断的使用完毕的零件料带,通过排出管道被回收在废料带收集箱内。
经过大约8小时的运转,大量的废料带被集中在里面。
请在8小时左右取出扔掉。
操作方法:打开门,取出废料带收集箱,将箱内的废料带清除。
在清扫废料带收集箱时,请同时检查位于废料带收集箱上部的过滤器的状态。
如果过滤器上附有脏物,请使用吸尘器清扫。
注意事项:放回清扫后的废料带收集箱及过滤器时,必须将其推到底。
如果没有推到底,会导致无法吸取废料带。
此外,一定要关紧废料带收集箱门。
4-1-4 废料带吸取部的清扫(每8小时1次)被废料带切刀切断后的碎废料带,按照下图箭头所示的路径被吸走。
Fuji Xerox 产品说明书

Specifi cations13 14 12.auDocument Centre 336/286/236For detailed product specifi cations,optimum performance parameters & service clearances refer to Product Customer Expectation Document.Document Centre336/286/236Unquestionable Output Speed - printing & copying DC 336 DC 286 DC 236A4 (LEF) 33 ipm 28 ipm 23 ipm A317 ipm 15 ipm13 ipmNetwork PrintingProcessor Power PC 300 Mhz.Memory 256 MB (standard) / 20 GB (optional HDD)Interface 100Base-TX/10Base-T,Parallel Port (IEEE1284), USB 2.0Printer Languages PCL 6 & TIFF (Standard)/ Postscript 3, (Optional)Resolution1,200 x 1,200 dpiOperating Systems W indows 95, 98, Me, 2000, XP, NT 4.0,2003 Server, Mac OSProtocols Standard: TCP/IP, SMB, IPP ,Port 9100, EtherTalk , Optional: NetWare Network Printing Features Secure Print; Delay Print; Booklet Creation; Watermark; Banner Sheet (enable/disable); & more.CopyingFCOT A4 (LEF) 4.5 seconds or lessConcurrency Concurrent Scanning & Printing Resolution600 x 600 dpiCopy Pre-Collation Memory 128 MB (Standard) & 20 GB (optional HDD)Reduction/Enlargement 25% to 400% in 1% increments Sides (input:output) 1:1; 1:2; 2:2; 2:1Quantity1 to 999Internal Copy Auditron Standard (500 users)Foreign Device Interface Interface to 3Party access control devices (optional)Special Features Auto paper select; Auto tray switching; Job build;Covers insertion; Sample set.Network ScanningConcurrency Scan while the system is printing, copy or network print jobs.Input Speed 50 ipm (A4 LEF , 200 dpi)Resolutions R esolution B inary - 600 dpi, 400 dpi, 300 dpi, 200 dpi G rey - 400 dpi, 300 dpi, 200 dpi H alftone - 256 levels of Grey Maximum Scan area U p to A3 (297mm x 432mm)Network Protocol FTP via TCP/IP; SMB via TCP/IP (Network Scanning)Network Protocols S MTP, MIME encoded (Scan to E-mail) File Formats T IFF, JPEG, PDFDocument Management Fields One to six user-programmable metadata fi elds per scan job.Scan Destinations S can to network server, Scan to e-mail, & more.Directory Access C orporate address list via LDAP; Downloaded a ddress List (CSV fi le format)FacsimileTransmission Time Less than 3 seconds Transmission Speed 33.6 kbpsMemory 8 MB (standard) & 20GB (optional HDD) Dual AccessYesMultiple Lines (option) Maximum 3 lines CapabilityG3Speed Dials/Group Dials 500 destinations/50 groups (20 per group)Sending Document Size A4, B4, A3Data CompressionMH, MR, MMR, JBIGInternet FacsimileNetwork ProtocolSMTP; POP3 Sending Document Size A4, B4, A3Receiving Document SizeA4, B4, A3Scanning System/Supporting Format Flat bed scanning by CCD image sensorMH/MR/MMR/JBIG Scan Resolution Standard 200 x 100 dpi Fine 200 x 200 dpiSuper Fine 400 x 400 dpi, 600 x 600 dpi Paper Handling - DADFCapacity75 sheets Speed35 ipm Paper Sizes Sensed A5 - A3Weights 38 - 128 gsmPaper Handling - (Including 2 Tray Module)Capacity 500 sheets each (Trays 1 - 4) @ 80 gsm Paper Sizes A5 - A3Weights 60 - 105 gsm (Tray 1) 60 - 216 gsm (Trays 2-4)Paper Handling - Tandem Tray ModuleCapacity 2000 sheets Paper Sizes A4Weights 60 - 216 gsm (Trays 3-4)Paper Handling - Bypass TrayCapacity 95 sheetsSizes 100mm x 100mm - 305mm x 483mm Weights60 - 216 gsmStaple Finisher (Optional)Main Tray1,000 sheets (B5 - A3)Weights 64 to 105 gsmStaplingSingle or dual (50 sheets maximum)GeneralElectrical Requirements 220-240V, 10APower Consumption Low Power Mode 99 watts Running 623 watts / 1.92 KVA (max) Warm up Less than 25 seconds Dimensions 640 x 650 x 1114 mm (W x D x H)Weight 105 kgs (Including 2TM)Toner Yield (per cartridge) 25,000 per cartridge Drum Yield 60,000Key Optional AccessoriesHard Disk Drive 20GB (shared)2 Tray ModuleTandem Tray Module (HCF)Memory 128/256 MBPostscript Kit (Includes Netware)Network Scanning KitSecurity Kit (Image Overwrite)StandCentreWare Internet Services / Embedded Web Server (EWS)These are a wide array of tools to remotely configure the network settings, view status, manage & administer the device. Network administrators are also able to perform job queue management tasks through CentreWare Internet Services e.g. promote, delete, hold jobs to improve efficiency. Consumable status can also be viewed and administered using the EWS. It is indeed a powerful & effective tool for assisting administrators to support the office printing needs more efficiently.Network Authentication and AuditronNetwork Authentication enables administrators to manage and control users’ access to all network related functions performed on this device such as scan to FTP , scan to SMB, scan to e-mail etc. The built-in Network Auditron on the other hand can be used to control access & limit usage of the various machine functions such as printing, copying, faxing and scanning.NB. Auditron data can be also be downloaded as a CSV file with the help of the optional CentreWare EasyAdmin/Easy Operator tools.Document Centrean advancedoffice managementsolutionAdvanced Network SolutionsIn its most basic form the DC336/286/236 is a feature rich, easy to operate copier that can be optioned up to a comprehensive network system capable of copying, printing, faxing, scanning and e-mail. With the all-new DC336/286/236, Fuji Xerox delivers a complete office “manager” capable of meeting the office document production & workflow needs of small to large workgroups.The pre-configured DC336/286/236 ST has all the required SMARTS and functionality to become the perfect network “on & off ramp” for document production & workflow through a single secure space saving multifunction office peripheral. The pre-configured DC336/286/236 ST also offers substantial savings when compared to buying individual modules & accessories separately.Once installed, the full range of DC336/286/236 features can be accessed by anyone with a network connected PC and with its advanced networking capabilities, it offers businesses more control than ever before to maximise workgroup efficiency, monitor usage and control costs. The following features are particularly notable:Unparalleled Multifunction Concurrency:The new DC336/286/236 performs various tasks simultaneously, so whether users need to print, copy, fax, scan or e-mail, they can always access the function required – even while other jobs are being processed.Emulsion Aggregation (EA) TonerEmulsion Aggregation is a new process, which produces finer toner particles, uniform in size and shape. This enables the toner to be transferred to the paper quickly and produces a sharper image than conventional toners. Consequently, transfer is consistent, text is clearer, coverage is more even and image quality is higher. As an added benefit, EA Toner is also environmentally friendly. The manufacturing process cuts CO2 emissions up to 35%, toner consumption is reduced by up to 35% and toner wastage is cut by up to 65%.Kind to our Customers … When you purchase a Fuji Xerox product you are purchasing reliability not just efficiency. Our Online Support Assistant, together with our highly trained team of technicians, are on hand to handle any problems you may be experiencing with your device.As well as our Planet … Additionally, Fuji Xerox products conserve natural resources through designs that minimise wastage during manufacturing and use, maximise energy efficiency in your office, and work reliably with Fuji Xerox recycled paper.designed togrow withyour business needsBuilt for EnduranceDesigned to keep your business up and running, the remaining life of the CRUs (Customer Replaceable Units) on the Fuji Xerox Document Centre 336/286/236 can easily be viewed using the CentreWare Internet Services. The user-interface panel on the DC336/286/236 also displays a message when the consumables are running low and/or require replacement. The administrators can then easily replace the CRU that is running low, thereby effectively preventing downtime before it happens.Flexibility & ModularityThe Document Centre 336/286/236 is a space saving modular device that provides the flexibility to protect your investment through its ability to expand its capabilities to suit your growing document needs. It can be configured as an independent copier or upgraded to a comprehensive total document network system that can print, scan, copy and fax to meet the needs of every stage in the document creation and work processes of your business.The digital world is finally here – saving you time and money...Conventional toner suffers from screen dispersion because of particle size and uneven shape.EA Toner uniformity (shape and diameter)reproduces screens precisely without unwantedtoner dispersion.The Document Centre 336/286/236 opens the door to a new era in digital office multifunction peripherals...High Paper Capacity and great Document Finishing The Document Centre 336/286/236 can be configured with two additional optional A4 high capacity paper trays. These provide users with a high supply of the most common paper size thereby allowing longer periods of uninterrupted job runs.When combined with the optional advanced staple finisher capable of stapling up to 50 sheets, users can readily produce highly professional looking documents produced in atimely and efficient manner.smartscanning with intelligentfaxing and e-mailThe complete multitasking and digital document workflow manager...Box Job FlowThe DC336/286/236 takes the scan to mailbox workflow to yet another level with the help of the Box Job Flow feature. Users can simply register a series of processing and transfer locations beforehand as a box job flow, scanned/ fax-received documents in nominated mailboxes are then automatically executed according to the registered job flow. Destinations can be set for FTP/SMB, e-mail, fax and iFAX.Enhancing Scanning Workflow CapabilitiesUsers can enhance their scan to server workflow with the help of the optional CentreWare Scanning Services & OCR package consisting of PaperPort & Omnipage. This solution allows users to create searchable PDFs as well as converting the image into various other formats using a scan template set up on the UI of the scan module of DC336/286/236. The template can be set up to not only convert the image in a desired format but also perform other tasks of storage in a specific location and/or e-mail to a distribution list etc.Advanced Facsimile SolutionThe office facsimile is an important communication device in any business environment. Using industry standard G3 technology, the Document Centre 336/286/236 facsimile is capable of transmitting faxes at a speed of less than 3 seconds per page. As an added benefit, 2 additional fax lines can also be added to a fax enabled DC336/286/236 for sending and receiving faxes.PC / Hardcopy FaxingThe Document Centre 336/286/236 allows users to send faxes directly from any network connected PC thereby eliminating the need to print before faxing. It is also capable of faxing: A4 to A3 sized documents, Bound documents, Books, Objects and many many more …Internet Fax (iFAX)When configured with the optional iFax kit, the DC336/286/236 takes faxing to the next level.This cost saving feature stores or converts all incoming faxes into an electronic format to be e-mailed to the intended recipient(s). It also eliminates the need to wait at the fax machine for confidential faxes, reduces paper wastage and is ideal for cutting costs when sending international or interstate faxes.Advanced Network Scanning SolutionThe Document Centre 336/286/236 can be upgraded to include a scanning function capable of scanning documents at a rate of 50ipm (monochrome). Its standard duplexing features combined with up to 600dpi x 600dpi resolution also ensure crisp clear images ready for output.Scan to FTP / SMBDocuments scanned using the DC336/286/236 can be directly transferred to a designated directory on an FTP server using FTP protocol. Alternatively, users can also transfer their scanned images directly into the shared folder of any Windows client on the same network using SMB protocol.Scan to E-mail & File FormatsScanned documents can also be sent as attachments to any single or multiple nominated e-mail addresses within or outside the organisation. These attachments can be saved in a number of industry standard formats including PDF , TIFF , JPEG etc. Larger documents consisting of multiple pages can also be broken down and sent separately.Light Directory Access Protocol (LDAP)Whilst the DC336/286/236 is capable of storing e-mail addresses on board the device, it also supports LDAP , whereby users can access the internal corporate address book on the mail server and track the e-mail address of an intended recipient by simply searching for their name.Scan to MailboxThe DC336/286/236 is capable of scanning to designated mailboxes on the device. Users can retrieve scanned images/documents from their computer by using CentreWare Internet Services through the web browser.FTPSMBE-mailDocumentsThe Fuji Xerox Document Centre 336/286/236 ST complete with optional Office Finisher and optionalT andem Tray ModuleStandard Duplex Unit & Bypass Tray336/286/236Data Security KitFor absolute peace of mind on any data security concerns, the DC336/286/236 is available with an optional Data Security Kit. Upon installation of this kit, administrators can encrypt the information stored on the hard disk drive so that it cannot be accessed without authorization.Administrators can take the data security management to the next level with the overwrite & “zero clear” of the hard disk drive feature to eliminate any fears of Controller ArchitectureFuji Xerox’s “open architecture” controller design strategy allows for easy integration with third-party software solutions. The two unique software solutions co-developed by Fuji-Xerox and our strategic partners can provide users with extremely powerful new capabilities that can streamline fax communication workflows with easy integration with RightFax ® servers and also improve management of job accounting on the DC336/286/236 by integrating with Equitrac ® Job Accounting Software Systems.Tandem Tray ModuleMedia Identifi cation & Auto Tray SwitchingThe DC336/286/236 is capable of automatically identifying (and reproducing size for size) original paper sizes to be copied. It also ensures continued productivity by switching from one paper tray to another with a similar media confi guration (size & orientation) when the current selected tray runs out of paper.N-up / Repeat ImageUsing the N-up feature, users can copy more than one page on a single sheet. On the other hand, the Repeat Image feature allows for multiple, reduced size copies of the same image to be printed onto one sheet.Poster CreationThe DC336/286/236is also capable of creating poster-sized copies of a document. This is achieved by copying an enlarged image onto multiple sheets of paper, which are then assembled to create the original document as a large poster.AnnotationsWith the aid of the optional hard disk drive, the DC336/286/236 is capable of adding page numbers, date and predefi ned text stamps* onto copied documents as required by the user.* For text stamps printer kit is also required.the sophisticated documentprinting professionalPowerful technology taking you further...the easy to use yet versatilecopying solutionAdvanced Copying SolutionThe Document Centre 336/286/236 is an extremely feature rich copier that is very easy to use. Its fast First Copy Out Time of 4.5 seconds or less and 33ipm / 28ipm / 23ipm respective print speeds ensure continuous productivity in any business environment. Its versatility for printing on a wide variety of different media sizes, weights and types simultaneously also ensures the production of highly professional looking documents in-house.Intuitive User-InterfaceThe LCD touch screen user interface (UI) on the DC336/286/236 is extremely intuitive. First-time users will fi nd all features logically listed and experience no diffi culty navigating through the various screens. This improves their capacity to produce high quality output.Scan Once – Print ManyUsing digital technology, documents need only be scanned into the device’s memory once irrespective of the quantity of output sets required by the user. This ensures that the fi rst copy always looks as good as the last and also helps reduce the wear and tear of the machine.Scan AheadSaves time and increases workgroup effi ciency by allowing users to program and scan documents ahead for copying even whilst another job is in production.Job BuildUsers can divide a copy job into numerous segments and apply unique programming to each individual segment, thereby eliminating the need for manual collation.Covers InsertionFor highly professional looking documents front and back covers can also be inserted whilst building a copy job.Professional results with the capacity to handle a wider variety of paper stocks than ever before...Advanced Printing SolutionThe powerful 300MHz processor, 256 MB RAM and Network Interface Card (NIC) that are available as standard features on the printer module of the DC336/286/236, mean it is fully equipped to handle the heaviest of workloads.The DC336/286/236 is also capable of printing up to 33ipm / 28ipm / 23ipm respectively (A4 LEF). It raises the bar in image quality with print resolutions of up to 1,200 x 1,200 dpi and offers users a variety of value added features designed to reduce costs, increase effi ciency and maintain security. Some of its most notable features include:Print DriversThe DC336/286/236 is equipped with the extremely intuitive PCL6 printer driver as standard. The printer module also works seamlessly on various industry standard operating systems with printer drivers that are WHQL certifi ed.Secure PrintIn a business environment where the security of confi dential documents is a major concern, this feature provides peace of mind.The print job is ripped & spooled using the optional hard disk drive of the DC336/286/236. The user is then required to walk up to the DC336/286/236 and release the secure print job by entering the user nominated password. The user can decide if he/she wish to delete the secure print job or retain it on the hard disk drive forprinting again in the future.12341234123456782745standard with a tray-less duplex unit t of double sided printing without havinghelp decrease the consumption of paper & toner.Booklet CreationThe DC336/286/236 is also capable of creating signature booklet formats. The pages are printeddouble sided and placedin the correct order so that the document can be manually folded and stapled to form a booklet(s).Sample Print & WatermarksControls the wastage and costs associated with high volume printing by allowing the user to place a large job in a queue and print one sample set for proofi ng prior to proceeding with the entire job. Users can also set print text such as “Confi dential”, “Draft” etc as watermarks in the background of the document.Delayed PrintEnhances workplace effi ciency by allowing users to defer the printing of large/less important fi les to off peak times. It allows the user to specify the print time of a document anytime within twenty-four hours of sending the job to print from the user’s computer.Direct PrintAllows users to directly print PDF and TIFF fi les without using a printer driver. This feature uses Job Submission* utility available in CentreWare Internet Services to print PDF & TIFF fi les.* The DC336/286/236 must have the optional PostScript kit installed.。
fujiflexa_程式制培训手册

Fujiflexa 培训手册2003.7.29一.程序的制作(从文本文件转入*.txt)二.先打开fuijflexa director菜单,进入到director窗口,再进入job building窗口,新建一个程序名字和版本号。
三.在job building窗口中从tool菜单里找到options菜单,单击该选项进入窗口,选择 origin菜单,然后根据所给数据的原点来定义程序的坐标原点,定义好后单击OK退出。
四.在job building 窗口中从file菜单选择import菜单再进入下一级菜单,选择菜单job菜单再进入下一级菜单,选择centroid CAD data菜单,然后单击该菜单项(会询问delete the current job?回答yes.),进入到centroid CAD导入窗口,选择需要导入的文本文件,然后在单击edit按钮,进入CAD import setting wizard窗口,1. 单击options按钮,进入CAD data format窗口(如果同时导入top和bottom,在specify side前的方框里打钩,然后分别在top和bottom的后面填上区分的字符),选择好后单击Ok按钮退出。
2. 单击set units按钮,进入CAD data units窗口,在coordinate data format 框里coordinate units选择单位mm,再在multipler选择1;在angle data format框里angle units 选择单位degrees,再在multipler选择1,然后单击Ok按钮退出。
3. 在CAD data format框里选择delimited fields,如果在坐标文件中包括mark点坐标,在include fiducial sequence data block前的方框中打钩,然后按next按钮,进入下一窗口。
FUJI FLEXA 培训资料

地点都能够对生产线的状况把握自如。
11. License管理不使用硬体加密狗,可防止由于H/W故障引起的生产线停线。
广东工业实训中心 5
FUJI FLEXA 系统概况(1)
FLEXA 系统特性
12. 使用宏功能可以可靠且简单地处理常用的操作步骤。 13. 提供API(应用编程接口)的Interface,不仅支援FUJI设备的生产线,还能 够整合其它种类的设备。 14. 可提供国际标准格式的XML(扩展性标识语言)形式的Report,并可通 便于客户自由编辑。 过 一个小工具将该Report转化成EXCEL的XSL(可扩展样式语言)格式, 以
广东工业实训中心
7
FUJI FLEXA 组成部分(2)
FUJI FLEXA 系统组成-主群组
创建、调整JOB
从CAD数据读取到生产程序生 成、传送等与JOB相关的处理 都可以经由主群组操作
广东工业实训中心 8
FUJI FLEXA 组成部分(2)
FUJI FLEXA 系统组成-宏
创建、使用宏
可通过宏管理启动宏,并可 实现跨应用程序的宏
需用一个FLIP BOARD指令即可。
广东工业实训中心 4
FUJI FLEXA 系统概况(1)
FLEXA 系统特性
7. 离线方式编制生产程式时,CAD DATA与GERBER DATA以及JOB资料重 合在一起被表示,由此可进行程式整合性确认,从而在元件贴装之前进行
错误的修正,避免反复修改浪费时间。
广东工业实训中心
26
FUJI FLEXA 系统操作(2)
FLEXA 基础学习
认识FLEXA
学习FLEXA并不难,“FLEXA 基础学习”给初学者非常细致的讲解 FLEXA的基本操作过程。可以说,掌握本篇文档中的操作,你就完全可以 使用FLEXA来制作程式。
RF压合教育训练教材
軟板及硬板材料概要介紹
1.1 The structure of flexible board: 2 types
1. Adhesive (3-layer, conventional)
Single-side
Cu Adhesive
base film
18-35μm 12-20μm
12.5-25μm 12-20μm 18-35μm
Cover layer Cu Adhesive Base film
7
1.3 軟性銅箔基板(FCCL) 經緯向
250mm 或 500mm (緯向)
1.4The material of rigid board
The features of Non-flow Prepreg
▪ Resin System: Based on high-temp, multifunctional epoxy
49" 或 49.5" (緯向)
11
軟硬結合板壓合流程介紹
2L/3L材料局部貼合Flow Chart
微影 壓合 內層銑靶/鑽孔
2L Plasma
CVL切割
棕化
P/P備料
Plasma
烘烤
P/P成型
CVL預貼合
CVL壓合
內層銑靶/鑽孔
鉚合
壓合
銑靶
撈邊
轉出
2L/3L材料全板貼合Flow Chart
微影 壓合 內層銑靶/鑽孔
Normal PP(1080) epoxy 140-180 63 >1“ ~300poise 60um-70um
Non-flow PP(1080) epoxy 165 62 .01“~.005” >10000poise 60um-70um
FCC Pneumatic Press FCP-C-kN系列用户手册 富士控制 说明书
FCC Pneumatic PressFCP-C-kN seriesInstruction Manual(Version2.02)Fuji Controls Co.,Ltd.April04,2013We thank you for the purchase of our products.In order to ensure proper equipment performance,please read this manual to the end before using our products.This manual should be carefully stored and referred to when necessary.Please use this equipment for ever.●In the case that this equipment is delivered to some other party,it is necessary to deliver the equipment together withthis instruction manual.●This equipment is produced for use in Japan.In the case that it is used in other countries,you should observe thelaws and regulations related to safety in such countries.Contents:Page In order to be used safely:1 It is necessary to observe:1 Press component names:3………………………………………………………………………………………………<Additional explanation>3 Unpacking5 Installation and pre-operational procedures5 <Installation>5……………………………………………………………………………………………………………<Pre-operational procedures>5……………………………………………………………………………………………Operation procedures:6 Die matching(inching,inching motion)6………………………………………………………………………………Maintenance inspection:7 Air circuit diagram:8 Electric circuit diagram(wiring diagram):8 Part table:8 Dimensions drawings and weights:9 Options:10 Output diagram:11 Air consumption amount:11In order to be used safely:The following notice items are described in order to ensure proper usage and to prevent injury to operators orequipment damage.Danger Misuse may cause death or serious injury.Warning Misuse may have a possibility of death or serious injury occurring.Caution Misuse may cause slight or minor injury.This is also indicated that property damage may occur when equipment is not used safely.It is necessary to observe:Business person responsibilityIn industrial safety and hygiene laws,air press is considered as a power press.Regarding business person using this press,the following duties are applied:●Safety and hygiene implementation law;article6,section7When stamping operation is carried out in workshop having a minimum of five presses,a“general foreman in charge of operations”(person completing technology training course for press operation general foreman)should be on duty.●Safety and sanitation rules;article134-3A‘Regular self inspection’should be periodically carried out minimum once a year by qualified personnel.Even if air press does not conform with structure standard,this is judged as a power press if this is used forbending,drawing or crimping.Since there are no guidelines for inspection,applicable items related to Industrial Safety rules;article134,section3.1)to9)are independently inspected.Warning:Power source Regarding power source,AC100V±10%50/60Hz should be used.After verifying the above,enter power.If other power source is connected with,there isa possibility of fire occurrence due to burnout.Air pressure for use Pressure range related to air used in this press should be0.2MPa to0.5MPa.If thisequipment is used at higher pressure than0.5MPa,there is a possibility of piping hosebreakage or press damage occurrence.Operation bench This press should be fixed for use on an operation bench which is sufficient to supportthe weight.If press is not fixed,there is a possibility that either death or serious injurymay occur due to press dropping or tumbling.Guards for preventing cutting Guards for preventing cutting chips from scattering should be established around the chips from scattering press when operation is conducted in circumstance that cutting chips are scattered. Caution related to operation wear Refrain from wearing loose clothing or accessories because there is a possibility ofbodily injury occurrence due to these being caught by press.Put on protectors such assafety cap,protector glasses,safety shoes,mask or gloves if necessary.Press operation,maintenance or Only trained operators should carry out press pre-operational inspection,operation, inspection by trained operator maintenance,die replacement or adjustment operation.It should be displayed for otheroperators to notice that operation is being carrying out.The operation should be carriedout while verifying that other operators do not touch any component.Prohibition of removing acrylic It is absolutely prohibited to remove acrylic cover for mechanical stopper or safety device cover or safety device and or to change installation position.If press is operated without cover or safety device, changing installation position there is a possibility of bodily injury occurrence due to a part of body being caught bypress.Mechanical stopper adjustment Mechanical stopper adjustment should be carried out when press ram stops after risingand no other operator should be in the vicinity of push button switch.If push button switch is mistakenly pushed by other operator when adjustment is carriedout,there is a possibility of slight or serious injury occurrence due to a part of bodybeing caught by press.In drawing operation that impact is added,mechanical stopper should not be used andbottom dead center positioning while using die-set should be used instead.Clearance between rotation Clearance between rotation stopping arm and cylinder bottom should be minimum stopping arm and cylinder bottom20mm.portion In the case of narrow clearance,there is a possibility of slight or serious injury occurringwhen press ram rises.Rotation stopping arm is not equipped for adjusting press ram top dead center.Press operation:For press operation,it should be carried out while verifying that no other operator(1)Safety verification when touches any press portion and no obstacles are in the vicinity.operation starts There is a possibility of bodily injury occurrence when preparation operation of diesetting up is carried out by multiple operators.Do not make contact with mechanical stopper,jig,die or rotation stopping arm.Press operation(2)For press operation,it is necessary to push button switches with both hands.If one push button switch is operative or the switch is modified to foot switch,there is apossibility of slight or serious injury occurrence due to a part of body being caught by jigor die.In the case that it is necessary to operate switch with one hand or foot,you may do soonly after installing photo type press safety device.Piping is removed from air supply Do not touch jig or die when piping is removed from air supply inlet.inlet If air supply is stopped,there is a possibility that press ram may descend.There is apossibility of slight or serious injury occurrence due to a part of body being caught by jigor die.Modification/disassembly/repair Please do not modify,disassemble or repair this equipment.In the case that any such work is carried out without our permission,we will have noresponsibility concerning any trouble or accidents.Press component names:<Additional explanation>(1)Speed controller (for ascending):Ram ascending speed is to be adjusted here.When the knob is turned clockwise,air exhaust is constrained to decrease the speed.If ascending speed is excessively increased,there is a possibility of equipment damage occurrence.(3)Inching valveIt is possible to stop ram ascending when valve is closed.Refer to ‘Operation procedures:die matching’on page 8.(5)Filter/regulatorPressure of air being supplied is adjusted.The adjustment should be carried out in range of 0.2MPa to 0.5MPa.In the case that this equipment is used at higher pressure than 0.5Mpa,there is a possibility of piping hose breakage or press body damage occurrence.(6)Speed controller (for descending)This is used for adjusting ram descending speed.When the knob is turned clockwise,air supply is constrained to decrease the speed.If descending speed is excessively increased,there is a possibility of equipment damage occurrence or inferior part occurrence.(7)Mechanical stopperThis is used for adjusting ram stroke and bottom dead center.The adjustment should be carried out when ram stops after ram ascending.This should be carried out while verifying that no other operator is in the vicinity of push button switches for both hands.If push button switch is mistakenly pushed by other operator when adjustment is carried out,there is a possibility of slight or serious injury occurrence due to a part of body being caught by press.In drawing operation that impact is added,mechanical stopper should not be used and bottom dead center positioning while using die-set should be usedinstead.(8)Acrylic coverThis is a safety cover for preventing hands from being caught by mechanical stopper.This should not be removed other than when bottom dead center is adjusted.If equipment is operated without cover or safety device,there is a possibility of bodily injury occurrence due to a part of body being caught by press.(10)Rotation stopperClearance between rotation stopping arm and cylinder bottom should be minimum10mm.In the case of narrow clearance,there is a possibility of slight or serious injury occurrence due to a part of body being caught by press when press ram rises.Stopper arm is not equipped for adjusting press ram top dead center.(14)Push button switches for both handsIf one push button switch is operative or the switch is modified to foot switch,there is a possibility of slight or serious injury occurrence due to a part of body being caught by jig or die.In the case that it is necessary to operate switch with one hand or foot,you may do so only after installing photo type press safety device.(It is necessary to consult with us)UnpackingPlease confirm contents since the following items are packed:●Press body●Acrylic cover●Instruction manual(this document)Installation and pre-operational procedures<Installation>(1)The equipment is packed in a wooden frame.The body is fixed using bolts and nuts.(2)Please carry the package to the setting area using a forklift or equivalent temporary carriage.(3)Please unpack the frame to remove fixing bolts and nuts.Warning When unpacking frame,there is a possibility of bodily injury occurrence due to nails or wood chips scattering.Please conduct carefully.(4)Press should be placed on bench while paying attention to other operators or obstacles.(5)Press and bench should be fixed using bolts and nuts.(Use the delivered bolts and nuts)(6)Setting area should have little or no dust or oil.Danger There is a possibility that press may tumble.Bench on which press is placed should be strongenough to sustain against the weight of press and jig and be stable.It is necessary for press to befixed using bolts(anchor bolts for bench).There is a possibility of either death or serious injuryoccurrence due to press tumbling.Danger Please refrain from using this equipment in environment having ignitable or inflammable materials or explosion.There is a possibility of fire or explosion.(7)Regarding air piping,select hose having enough diameter in order to supply air pressure in stable state.(8)Since rust inhibitor is applied on base surface,prior to use,wipe it off with cloth containing alcohol.<Pre-operational procedures>(1)Air should be supplied from plant inside air piping outlet to air inlet for filter®ulator.(2)Air pressure setting should be carried out.Supply air pressure should be0.2MPa to0.5MPa.Air pressure should beadjusted with regulator to the level which is necessary for stamping.Regulator knob is to be pulled once to be turned.When pressure setting ends,push the knob there and lock it.*Refer to the‘Output table’on page13.Warning Air should be supplied while verifying that no other operator makes contact with press body.There is a possibility of slight or serious injury occurrence due to a part of body being caught by jig ordie.Caution Air pressure should be from0.2MPa to0.5MPa.If this is otherwise established,it may become cause of failure.(3)Pog should be plugged into consent for AC100V50/60Hz.Caution Only AC100V50/60Hz should be used.In the case that no use is carried out for one hour ormore,power plug should be removed from consent.(4)This is the completion of the pre-operation procedures.Operation procedures:<Operation starts.Try to operate press>Die matching(inching,inching motion)Warning Please verify that no other operator or obstacles are in the vicinity of press.There is a possibility of slight or serious injury occurrence due to body or hands being caught by press.(1)Inching valve is closed.(2)Setting of jig and die on surface of ram and base should be carried out.(3)Ram descends when push button switches for both hands are simultaneously pushed and stops when either right orleft hand is released.(4)Ram ascends when inching valve is opened.Warning Please pay attention as there is a case that ram may suddenly ascend.There is a possibility of slight or serious injury occurrence due to body or hands being caught by press.(5)After repeating the above motions(3)and(4),when position for jig and die is determined,these should be fixedwith bolts.The operation is easily carried out if regulator or speed controller is appropriately throttled.Fine adjustment for jig matching:Under the condition that ram stops during inching operation,if air pressure is decreased with regulator,ram slowly descends and die matching is easily conducted.(6)Inching valve should be fully opened when die matching ends.Warning Please refrain from being too close to the equipment since ram ascends when inching valve is fully opened.There is a possibility of slight or serious injury occurrence due to body or hands being caughtby press.Warning Please verify that acrylic cover is installed.If the cover is not installed,there is a possibility of slight or serious injury occurrence due to body or hands being caught by press.(7)This is completion of die matching.Speed controller and air pressure should be returned to the proper position tostart operation.Maintenance inspection:(1)Water drainingIn the case that water stays in filter,carry out draining promptly.If draining is not carried out,there is a possibility that air instrument malfunctions and water spouts from silencer.In the case that humidity is high or air moisture content in supplied air is too much,it is easy for water to remain.Water draining is carried out under the condition of air being supplied.There is a knob(shaped like a ball-pen tip)under the filter.This knob should be lifted while cloth is placed on the knob bottom.Remaining water penetrates into the cloth.If water draining is carried out without cloth placement,the water may splash.(2)LubricationLubrication(machine oil)should be applied from time to time on ram guide shaft.Doing so ensures that Ram vertical motion becomes smooth.Either corrosion or improper(not smooth)Ram movement may occur iflubrication is not applied regularly.(3)Rust preventionSurface with which mechanical stopper makes contact,base surface and press body guide should be wiped from time to time with a cloth containing oil in order to prevent them from rusting.(4)After removing power plug from consent,screws for terminal box for cord and for push button switches for bothhands should be retightened once a month with driver.Warning When maintenance inspection or cleaning is carried out,power plug should be removed from consent and air supply should be shut off when other than draining is carried out.There is a possibility ofexperiencing electric shock,slight or serious injury occurrence due to body or hands being caught bypress.Contact telephone for user support(Engineering division):81-3-3265-5437(only in Japanese)Or,ask questions by e-mail please.E-mail:*****************Address:Iidabashi1-5-6,Chiyoda Ward,TokyoWhen contacting us,equipment type,manufacturing date and manufacturing No.will be requested.Air circuit diagram:Double acting cylinder(FCP-C-2kN,5kN);Tandem cylinder(FCP-C-10kN)Electric circuit diagram(wiring diagram):Part table:Type FCP-C-2kN FCP-C-5kN FCP-C-10kN Part nameFilter regulator AW30-03G AW30-03G AW30-03GSolenoid valve VFS3120-1G-03-F VFS3120-1G-03-F VFS3120-1G-03-FSpeed controller AS3201F-03-10S×2AS3201F-04-10S×2AS3201F-04-10S×2Silencer AN202-02×2AN202-02×2AN202-02×2&AN402-04 Inching valve T-1/4T-1/4T-1/4●Part type for use may be changed without notice.Dimensions drawings and weights:Type Weight(Kg) FCP-C-2kN98FCP-C-5kN100FCP-C-10kN105Options:Regarding the Air-Press which you purchased,it is possible to install the following instruments as options.These will display the power in quality control related to operation of crimping or press-fitting,quality improvement by controlling stamping pressure or improvement of work efficiency.Since a catalog and related documents have been prepared,please request them from us.(1)Timer box*Installation of circuit preventing from multiple shooting;*Counter integration;*Installation of die matching circuit;*Time setting of stopping at bottom dead center is easy(2)Low-high speed feedIt is possible for ram descending speed to switch between low-and high-speed by adding one electromagnetic valve.(When timer box and controller are installed)(3)Load control deviceWhen stamping,it is possible to simultaneously carry out operation and judgment of OK/NG product by measuring crimping or press-fitting force.This is useful for quality stabilization and cost reduction.(4)Order-made pressIn the case that the ready-made press is inadequate dimensions or time for re-designing is not enough,we can support you with order-made presses made by Fuji Controls(FCC)with our excellent manufacturing performance.Output diagram:Air consumption amount:TypeConsumption amount (L (ANR))FCP-C-2kN6FCP-C-5kN15FCP-C-10kN 22FCP-C-2KNFCP-C-5KNFCP-C-10KN。
松下MSF技术员初级教材

伺服电机开关由[OFF] 伺服电机开关由 切 换 到 [ON] 时 , 各 轴 会以高速回归原始位置。 会以高速回归原始位置。 请确认各轴动作及周围 安全之后,再切入 [ON]。(MSR除外) 除外) 。 除外
用手移动X-Y工作台时, 工作台时, 用手移动 工作台时 工作台的上部和工作台 的下部之间勿伸手指, 的下部之间勿伸手指, 以免夹伤。 以免夹伤。
请勿用t机器上的电源 请勿用 机器上的电源 插座接较大的负载( 插座接较大的负载(如 吸尘机等) 吸尘机等),禁止使用 电流与规格不符的电器 设备。 设备。
机器移动部位( 轴 机器移动部位 ( Z轴 、 料架的工作台、 料架的工作台 、 X-Y工 工 作台) 作台)等处绝对禁止放 置杂物。 置杂物。
课程表
机器的安全教育: 一. 机器的安全教育: 机器的安全教育
机器操作原则上由一人 执行。 执行。若由两人以上执 行时, 行时,必须打出手势通 报后再动作。 报后再动作。
操作时,手部、脸部勿 靠近机械运转部位。此 外,打开前方、后方的 安全保护盖进行调整切 换时,需要特别注意安 全。
机器在排除故障时,伺 机器在排除故障时, 服电机的开关应置 [OFF]。 。
全自动下X-Y Teaching 全自动下
作用:为单个贴片的点,全自动下进行补正。 作用 为单个贴片的点,全自动下进行补正。 为单个贴片的点
程序的制作: 四. 程序的制作
(一)、程序构成: )、程序构成: 程序构成
程序构成 Board Data
Parts Library
Feeder Data 生产的程序 Supply Library
上述内容是操作所有PANASERT机器必须遵守的 上述内容是操作所有PANASERT机器必须遵守的 PANASERT 原则, MSF机器还有特别注意点 机器还有特别注意点: 原则,但MSF机器还有特别注意点: 如果材料采用3D识别时请不要用眼睛去看。 3D识别时请不要用眼睛去看 1、如果材料采用3D识别时请不要用眼睛去看。 机器在运行中请不要拔插料架。 2、机器在运行中请不要拔插料架。
Finepix S7000富士相机说明书

本手册将指导您正确使用富士数码相机FinePix S7000。
请严格按照指导说明进行操作。
BL00304-600(1)富士数码相机准备工作相机使用方法高级功能设置软件安装查看图像23准备工作相机使用方法高级功能设置软件安装查看图像目录安上镜头盖和相机手带.......................................................................................................................................................8安装电池...........................................................................................................................................................................10安装存储介质...................................................................................................................................................................12检查电池的剩余电量.........................................................................................................................................................13开机和关机/设置日期和时间.............................................................................................................................................14设置日期时间/变更日期显示格式......................................................................................................................................15选择语言 (16)前言.................................................................................4配件.................................................................................5各部分名称. (6)LCD 显示屏文字显示举例............................................7I 静止图像模式......................................................7I 回放模式. (7)系统扩展选项..............................................................103配件指南.....................................................................104正确使用相机的注意事项............................................105电源的注意事项..........................................................105可使用的电池..........................................................105电池使用的注意事项...............................................105关于正确使用5号镍氢(Ni-MH )电池的注意事项.......106AC 电源适配器.. (106)给镍氢(Ni-MH )电池放电的操作步骤.......................107关于存储介质(xD-Picture Card™卡和Microdrives 卡)的注意事项...108警告显示.....................................................................109故障排除.....................................................................111技术规格.....................................................................113术语解释.....................................................................115安全使用须知..............................................................116重要信息 (118)1 准备工作4 设置5.1 软件组件.....................................................................................................................................................................875.2 在Windows 计算机中的安装........................................................................................................................................885.3 在Mac OS 9.0至9.2中的安装.....................................................................................................................................905.4 在Mac OS X 中的安装. (93)6.1 相机连接.....................................................................................................................................................................966.2 FinePixViewer 的使用方法........................................................................................................................................1016 查看图像2 相机使用方法h 长时间连拍...........................................................................................................................................................50D曝光补偿...........................................................................................................................................................................52使用AE 锁定.....................................................................................................................................................................53e 微距(特写) (54)............................................................................................................................................................................55q 静止图像菜单操作(重要,请阅读)....................................................................................................................................56静止图像菜单. (57)*自拍...................................................................................................................................................................................57A 设置白平衡.......................................................................................................................................................................58+自动对焦模式. (59)´多重.....................................................................................................................................................................59;中心.....................................................................................................................................................................60˜区域 (60)‘测光...................................................................................................................................................................................61j 包围式曝光.......................................................................................................................................................................61G 锐度...................................................................................................................................................................................62T 多重曝光...........................................................................................................................................................................62z 闪光灯亮度调整................................................................................................................................................................63∞使用外接闪光灯. (63)...........................................................................................................................................................................65 (67)B 回放 (68)o /所有画面...........................................................................................................................................................69i 保护图像:画面设定/解除/保护所有/取消所有保护.........................................................................................................71g 自动播放(自动回放)..........................................................................................................................................................73t 录制语音注释...................................................................................................................................................................74t回放语音注释 (76)u 如何指定打印选项(DPOF )................................................................................................................................................77u DPOF 设置画面................................................................................................................................................................78U 重新设定DPOF . (80)E45h 16 MB, xD-Picture Card™卡(1张)包括:抗静电盒(1个)h 5号碱性电池(4节)h 手带(1根)h 保护套(2个)h 手带金属环(2个)h 金属环安装工具(1个)h 镜头盖(1个)h 镜头盖固定搭扣(1个)h A/V (音频-视频)电缆(1根)(包括一端为插头(直径2.5mm ),另一端为针式插头电缆×2)h USB 电缆(微型-B 型)(1根)h CD-ROM (1套)FinePix SX 专用软件h 用户手册(本手册)(1册)前言I 拍摄前的试拍对于特别重要的拍摄(如婚礼或出国旅行),请务必进行试拍以确认相机的功能是否正常。
- 1、下载文档前请自行甄别文档内容的完整性,平台不提供额外的编辑、内容补充、找答案等附加服务。
- 2、"仅部分预览"的文档,不可在线预览部分如存在完整性等问题,可反馈申请退款(可完整预览的文档不适用该条件!)。
- 3、如文档侵犯您的权益,请联系客服反馈,我们会尽快为您处理(人工客服工作时间:9:00-18:30)。
1.ST1 Cut 2.ST14 Nozzle change 3.ST1 Fwd & Bwd feeding jaw 4.ST1 up & down nozzle
5.ST2 up & down PQ 6.ST10 up & down RQ 7.ST9 up & down nozzle 8.ST8 up & down FQ
圖一
圖二
圖三
Nozzle changer下壓量調整
1.Shaft A裝上Holder,Camaxis轉至ST13 & ST14間之 0度。 2.Valve ON(Y037 ST14 NOZZLE CHANGE SOL ENGAGED)。 3.手動轉Cam-axis到141度時 (Clutch未碰觸前架量錶), Nozzle change clutch需 與Holder密合且下壓量需 在0.01mm-0.05mm間。 4.如無調整rod如右圖
吸嘴
CCD 相機
燈源
各站功能說明
9: Station 9:置件 1) 吸嘴下降至置件位置 2) 置件平台到達正確位置承接 3) 關閉真空閥門 10:(2st+8st)總置件角度還原 Station 10:(2st+8st)總置件角度還原 置件工作頭角度原點確認 11:置件工作頭A Station 11:置件工作頭A位置檢知
各站功能說明
各站功能說明
Station 1:吸料 1) 打開真空閥門 2) 吸嘴下降吸料 3) 料帶前送 4) 切除已吸料空料帶 2:大零件吸料成功/ Station 2:大零件吸料成功/失敗檢知 1) 防止零件損失 2) 防止ST1廢料帶切刀因誤切大零件受損
各站功能說明
Station 2 零件角度預轉 • 00~450 不作動 • 450~1800 預轉900 • 1800~3150 預轉-900 • 3150~3600 不作動 1) 減少旋轉慣性造成角度誤差 2) 減少旋轉時間
ST9真空破壞機構調整
1.Cam-axis 0度將 solenoid Valve ON(Y035)。 2.將Shaft A cam-axis轉 至ST9 180度。 3.Jig與Pusher中心對齊且 下壓後間隙為0.1mm,如 無調整上方Bracket四顆 螺絲。 4.完成後Jig拆下Valve裝 回。
ST1 Rod joint調整
ST1 ST1 Slider adjustment 1.Cam-axis 0架設量錶 Valve ON (Y031 PICKUP SOL ENGAGED) 如圖一 2.XY-Table X方向左右移動範圍 值 0±0.03mm。 3.調整處有二,圖二為主調整處 調整值較大,圖三調整較小約 0.15㎜左右扭力80kg。 4.移動NZ-axis量測Slider有無移 動範圍在0.01mm內如無調整 NZ-axis。 5.LM 4顆螺絲放鬆,Bracket上方 三顆螺絲與下方三顆螺絲固定 LM故將下方螺帽放鬆上方轉動 即可調整。
Fuji CP7 訓練教材
機構簡介 各站功能說明 各機構調整、校正 Trouble Shooting Q & A
控制元件介紹(Front side)
控制元件介紹(Rear side)
Servo Control Axes
控制系統
Cam box介紹
Nozzle index unit
Theta index unit
圖一
圖二
圖三
Tape cutter lower & upper sensor調整
1.Tape cutter lower sensor、Cam-axis 0 度將N Tape cutter solenoid Valve off (Y03E)架設量錶、轉動Cam-axis至指針離開 0.5mm後sensor off。 2.Tape cutter upper sensor 、 Cam-axis 192 度 將 N Tape cutter solenoid Valve off (Y03E)架設量錶、轉動Cam-axis至指針 離開0.5mm後sensor off。
圖一
圖二
圖三
ST9 Slider adjustment
1.Cam 0 架設量表量測 Slider height (Y035 PLACE SOL ENGAGED)Valve ON如 (圖一)。 2.量錶指針內深至 nozzle index歸零由 內往外移動(Y-axis)。 3.值需±0.03mm內如無 調整處有二,圖二為 主調整處調整值較大, 圖三調整較小約0.15 ㎜左右扭力80kg。
1.將連桿下方End plate(和尚頭) 螺絲鬆開如圖一。 2.Shaft A轉到ST14 Cam-axis 200 度、將Clutch centering Jig 裝在Shaft A Holder處(注意治 具裝上後Cam-axis不可轉動)。 3.以手動推動 ST14 Clutch 4個方 向均能平順的進出Jig如圖二。 4.如無法平順進出,調整Bracket 上方4顆螺絲(左右調整)及下方 4顆螺絲(上下調整)如圖三。
調整處 厚薄規量測
ST13真空破壞機構調整
1.轉動Cam-axis移至ST13 190度,注意移動時Jig與 Pusher距離以免 Shaft與ST13 Bracket受損。 2.Jig與Pusher中心對齊,如無調整Bracket底座四顆螺絲。 3.以厚薄規量測M/C Valve下壓後Pusher之間隙為0.3mm。 4.如無調整Valve switch BKT處兩顆螺絲鬆開以開口轉動下方調整距 離,完成後將Jig拆下。
3. 4. 5.
拆除置件工作頭
注意事項: 拆下SHAFT後須將之做記號,勿與其他SHAFT混淆,因為每支SHAFT 都經過微調,若混淆使用將破壞機器本身的精度。 取下SHAFT時,可用雙手左右輕搖SHAFT,待SHAFT鬆動之後再將其 緩緩取下,並養成順手將上下兩滑塊往中間方向移動的習慣,以 避免滑塊滑出滑軌
各站功能說明
13: Station 13:吸嘴位置檢知作為是否須要切換吸嘴之依 據強制清除吸嘴上之零件 1.ST5畫像判定不良零件 2.ST6零件高度不符 3.吸嘴上因不明原因殘留之零件 4.真空閥門關閉 5.以毛刷清除 • Station 14:吸嘴切換 14: • Station 15:吸嘴切換後確認是否完成動作 15:
ST2/10 JIG
ST8 JIG
ST2 JIG
綜合JIG
Z0確認及校正
1.將Z0 Jig放置於XY Table & nozzle jig裝上Shaft A。 2.Cam-axis 0度時將YO35 PLACE SOL ENGAGED Valve ON。 3.將Cam-axis轉至180度、上升Zaxis直至Z0 Jig- 0.30mm處與 Nozzle jig接觸即為Z0、但須 確認其範圍值在6000±500 Pulse內。 4.進入〔Maintenance〕〔Calibration〕-〔Placing reference〕-〔Z0〕- 〔Set〕 即完成。
Cam lever stopper adjustment
1.Cam 0 量 錶 架 設 lever 處 量 測 Cam follower與Cam之間 隙。 2.切換valve ON OFF量 錶值需0.04-0.06mm之間。 3.如無調整cylinder螺 帽鬆開調整。 4.調整完後以I/O切換 確認。 5.右圖為量錶各站架設 處
拆除置件工作頭
Shaft拆卸方式:
1. 2. SHAFT拆卸時,CAM應保持在180度, 位置概略為ST9 拆除角度驅動離合器固定螺絲(#2.5 六角板手逆時針轉動#7開口板手順 時針轉動) 取下角度定位離合器彈簧(及軸承墊 片、平板軸承、筒形軸承) 拆除SHAFT固定塊固定螺絲,取下固 定塊(#3六角板手逆時針鬆開) 左右輕搖SHAFT,將SHAFT取出,拆除 真空導管
各站功能說明
3:修正ST2 ST2旋轉誤差量 Station 3:修正ST2旋轉誤差量 5:畫像處理(零件辨視相機) Station 5:畫像處理(零件辨視相機)
1) 零件是否正確 2) 吸件成功與否 3) 吸件位置誤差量 4) 零件狀況是否正常
各站功能說明
Station 6:零件高度辨視器 1) 吸嘴長度是否正確 2) 零件高度是否正確 8: Station 8:最終置件角度旋轉 1) 置件角度減st2角度 2) st5測量出角度誤差量
Tape cutter lower limit Cam-axis 0 degrees dial gauge 0.5mm sensor off Tape cutter upper limit Cam-axis 192 degrees dial gauge 0.5mm sensor off
調 整 處
ST14 Nozzle changer調整
ST2調整處
量錶架設處Байду номын сангаас
ST10調整處
ST8調整處
ST2.3.8.10(PQ、FQ、RQ)角度校正
1.Cam-axis 歸0度Holder拆下裝上治具、 手動轉至servo counter pulse值為零。 2. Cam-axis 轉至200度架設量錶、量錶以 shat為中心 調整shaft角度直至治具平 面與X-axis平行。 3.設定servo counter pulse值於 ±500pulse內。 4.進入〔Maintenance〕-〔Calibration〕 -〔Origin Pos Offset〕-〔PQ〕、 〔FQ〕or〔RQ〕-〔Set〕設定完成。 5.ST3 Cam-axis 200度、裝上Jig架量錶以 shat為中心調整如圖5.5mm螺絲至治具 平面與X-axis平行or D-table。
置件工作頭安裝方式
1.拆卸方式之反向操作。 2.安裝完成後,將SHAFT轉到0度位置, 使用置件工作頭原點校正治具、# 2.5六角扳手、#7開口扳手,將 SHAFT之CLUTCH定位孔與HOLDER的 吸嘴切換轉輪驅動面校正到同一正 面後鎖緊即完成。 3.兩側BKT鎖回扭力20kgf/cm必須平 均施力避免一側翹起。