2_智能进入与启动系统16766
WINDOWS操作系统启动过程详解

WINDOWS操作系统启动过程详解基本上,操作系统的引导过程是从计算机通电自检完成之后开始进行的,而这一过程又可以细分为预引导、引导、载入内核、初始化内核,以及登录这五个阶段。
预引导阶段:当我们打开计算机电源后,预引导过程就开始运行了。
在这个过程中,计算机硬件首先要完成通电自检(Power-On Self Test,POST),这一步主要会对计算机中安装的处理器、内存等硬件进行检测,如果一切正常,则会继续下面的过程。
如果计算机BIOS是支持即插即用的(基本上,现阶段能够买到的计算机和硬件都是支持这一标准的),而且所有硬件设备都已经被自动识别和配置,接下来计算机将会定位引导设备(例如第一块硬盘,设备的引导顺序可以在计算机的BIOS设置中修改),然后从引导设备中读取并运行主引导记录(Master Boot Record,MBR)。
至此,预引导阶段成功完成。
引导阶段:引导阶段又可以分为:初始化引导载入程序、操作系统选择、硬件检测、硬件配置文件选择这四个步骤。
在这一过程中需要使用的文件包括:Ntldr、Boot.ini、、Ntoskrnl.exe、Ntbootdd.sys、Bootsect.dos(非必须)。
初始化引导载入程序:在这一阶段,首先出场的是ntldr,该程序会将处理器由实模式(Real Mode)切换为32位平坦内存模式(32-bit Flat Memory Mode)。
不使用实模式的主要?因是,在实模式下,内存中的前640KB是为MS-DOS保留的,而剩余内存则会被当作扩展内存使用,这样Windows XP将无法使用全部的物理内存。
而32位平坦内存模式下就好多了,Windows XP自身将能使用计算机上安装的所有内存(其实最多也只能用2GB,这是32位操作系统的设计缺陷)。
接下来ntldr会寻找系统自带的一个微型的文件系统驱动。
大家都知道,DOS和Windows 9x操作系统是无法读写NTFS文件系统分区的,那么Windows XP的安装程序为什么可以读写NTFS分区?其实这就是微型文件系统驱动的功劳了。
NP点读机系列升级操作说明
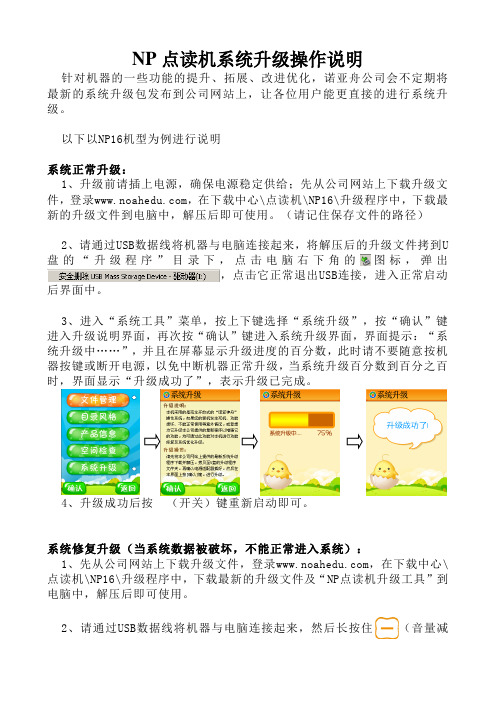
NP点读机系统升级操作说明针对机器的一些功能的提升、拓展、改进优化,诺亚舟公司会不定期将最新的系统升级包发布到公司网站上,让各位用户能更直接的进行系统升级。
以下以NP16机型为例进行说明系统正常升级:1、升级前请插上电源,确保电源稳定供给;先从公司网站上下载升级文件,登录,在下载中心\点读机\NP16\升级程序中,下载最新的升级文件到电脑中,解压后即可使用。
(请记住保存文件的路径)2、请通过USB数据线将机器与电脑连接起来,将解压后的升级文件拷到U盘的“升级程序”目录下,点击电脑右下角的图标,弹出,点击它正常退出USB连接,进入正常启动后界面中。
3、进入“系统工具”菜单,按上下键选择“系统升级”,按“确认”键进入升级说明界面,再次按“确认”键进入系统升级界面,界面提示:“系统升级中……”,并且在屏幕显示升级进度的百分数,此时请不要随意按机器按键或断开电源,以免中断机器正常升级,当系统升级百分数到百分之百时,界面显示“升级成功了”,表示升级已完成。
4、升级成功后按(开关)键重新启动即可。
系统修复升级(当系统数据被破坏,不能正常进入系统):1、先从公司网站上下载升级文件,登录,在下载中心\点读机\NP16\升级程序中,下载最新的升级文件及“NP点读机升级工具”到电脑中,解压后即可使用。
2、请通过USB数据线将机器与电脑连接起来,然后长按住(音量减小键)不放,同时按下(开关键),当系统出现bios序号时,如“NP16_BIOSTv1.0 Press OK-key to low-level formattins press other key to enter udisk”,松开音量减小键,屏幕显示“usb disk”,进入USB连接中。
注意:当您的机器开不了机时,请先进行格式化,格式化后所有数据需重新拷贝,请通过USB数据线将机器与电脑连接起来,然后长按住(音量减小键)和(确认键)不放,同时按下(开关键),系统开机后,松开开关键,之后再松开音量减小键,当系统出现bios序号时,如“NP16_BIOST v1.0 Press OK-key to low-level formattins press other key to enter udisk”,松开确认键,屏幕显示“formatting…”进行格式化,格式化完成后自动进入USB连接中。
siemens ipc3000 smart v2016 操作说明
1.2
外部设计 ........................................................................................................................... 10
1.3
操作员控件 ....................................................................................................................... 14
SIMATIC IPC3000 SMART(2016 版)
4
操作说明, 06/2019, A5E41134026 - AD
目录
前言....................................................................................................................................... 3
需要的基本知识 需要具备个人计算机和 Microsoft 操作系统的相关知识。 同时,最好了解自动化控制工程方面的一般知识。
在信息系统中的位置 SIMATIC IPC3000 SMART 文档包括以下部分: ● SIMATIC IPC3000 SMART 快速安装指南 ● SIMATIC IPC3000 SMART 操作说明 产品随附的附件盒中提供了快速安装指南和“文档和驱动程序”DVD。 操作说明是“文档和 驱动程序”DVD 的一部分。 有关如何使用软件的详细说明,请参见相应的文档。
3.2 3.2.1 3.2.2
安装设备 ........................................................................................................................... 24 安装信息 ........................................................................................................................... 24 安装位置和方式 ................................................................................................................ 25
海尔 凌越S14-1SH 14英寸强悍性能笔记本电脑 使用说明书
本计算机有特定的电源需求︰ · 限使用本机专用或经认可的交 / 直流电源适配器。 · 随机所附的交 / 直流电源适配器虽符合国际性旅游需求之设计,但所处之地的电 源供应仍需稳定且不受干扰。若您不清楚当地电器规格,请与您的经销商或所处当 地电力公司洽询。 · 电源插头可能是两插或三插的接地插头。若是三插的插头,其第三个插脚是非常 重要的安全装置,请勿任意破坏它。如果您没有合适的插座,请洽合格的电工技师 来装设。 · 拔电源线时,避免直接用拉扯的方式将电线拔出,务必从插头处拔起,以确保安 全。 · 请确认您所使用的插头及延长线是否可承受全部插着的设备所需求的总电流量。 · 清洁计算机前,切记务必先拔掉电源插头。
便携式电脑
目录
须知 ........................................................................................2 维护与操作指南 .......................................................................3 系统启动 .................................................................................6 系统功能巡礼 : 前视图 ( 上盖在开启状态 ) - 机型 A ..................8 系统功能巡礼 : 前视图 ( 上盖在开启状态 ) - 机型 B ..................9 LED 指示灯 ............................................................................10 键盘 ( 机型 A) .........................................................................12 键盘 ( 机型 B) .........................................................................13 复合功能键与视觉图标 ............................................................14 系统功能巡礼 : 前视图、左视图与右视图 ( 机型 A) ..................15 系统功能巡礼 : 前视图、左视图与右视图 ( 机型 B) .................. 16 系统功能巡礼 : 下视图与后视图 ...............................................17 Control Center .......................................................................18 Windows 10 设置 ...................................................................20 显示设备 .................................................................................21 音效功能 .................................................................................22 电源选项 .................................................................................22 安装驱动程序 .......................................................................... 23 无线网络模块 ( 选配 ) ..............................................................24 Bluetooth 模块 ( 选配 ) ...........................................................24 TPM ( 选配 ) ...........................................................................25 故障修理 .................................................................................27 规格 ........................................................................................28 《废弃电器电子回收处理条例》提示性说明.............................. 31 产品中有害物质的名称及含量...................................................32
新版星级酒店评定标准
星级酒店评定标准1 范围本标准规定了旅游饭店星级的划分条件、服务质量和运营规范要求。
本标准适用于正式营业的各种旅游饭店。
2 规范性引用文件下列文件对于本文件的应用是必不可少的。
凡是注日期的引用文件,仅注日期的版本适用于本文件,凡是不注日期的引用文件,其最新版本(包括所有的修改单)适用于本文件。
GB/T 16766 旅游业基础术语GB/T 10001.1 标志用公共信息图形符号第1部分:通用符号GB/T 10001.2 标志用公共信息图形符号第2部分:旅游设施与服务符号GB/T 10001。
4 标志用公共信息图形符号第4部分:运动健身符号GB/T 10001。
9 标志用公共信息图形符号第9部分:无障碍设施符号GB/T 15566.8 公共信息导向系统设置原则与要求第8部分:宾馆和饭店3 术语和定义下列术语和定义适用于本标准。
3.1旅游饭店 tourist hotel以间(套)夜为单位出租客房,以住宿服务为主,并提供商务、会议、休闲、度假等相应服务的住宿设施,按不同习惯可能也被称为宾馆、酒店、旅馆、旅社、宾舍、度假村、俱乐部、大厦、中心等。
4 星级划分及标志4.1用星的数量和颜色表示旅游饭店的星级。
旅游饭店星级分为五个级别,即一星级、二星级、三星级、四星级、五星级(含白金五星级).最低为一星级,最高为五星级。
星级越高,表示饭店的等级越高。
(为方便行文,“星级旅游饭店"简称为“星级饭店”。
)4.2星级标志由长城与五角星图案构成,用一颗五角星表示一星级,两颗五角星表示二星级,三颗五角星表示三星级,四颗五角星表示四星级,五颗五角星表示五星级,五颗白金五角星表示白金五星级。
5 总则5。
1星级饭店的建筑、附属设施设备、服务项目和运行管理应符合国家现行的安全、消防、卫生、环境保护、劳动合同等有关法律、法规和标准的规定与要求。
5.2各星级划分的基本条件见附录A,各星级饭店应逐项达标。
5.3星级饭店设备设施的位置、结构、数量、面积、功能、材质、设计、装饰等评价标准见附录B。
海尔 天越S9 27英寸窄边框一体机台式电脑 使用说明书
金属机构件
3.2 使用注意事项
• 请勿长时间的操作电脑,这有可能导致疲劳损伤。长时间观看电脑显示屏或外部显示器 屏幕可能会导致眼睛疲劳;过长时间的让身体保持同一姿势或是重复同样的动作,将 有可能造成疲劳损伤,比如过度频繁地使用键盘、触摸板和鼠标。以劳逸结合的方式进 行操作,将会有助于提高您的工作效率。
• 请调整显示屏的角度,桌面及椅子的高度,选择最合理、最舒适的姿势。 • 当电脑正常运行 时,会将系统的热量散发到机器表面,请勿将电脑长时间的放在膝上或
• 请勿使用非本产品配备的电源适配器,也不可以将本产品的电源适配器用于其他电器设 备,这将可能造成严重的后果。
• 使用延长电源线时请注意电源插座总的电力负载,避免过载。 • 请勿放置任何物品于电源线上,也不要将电源线置于容易被踩踏的地方。 • 从插座上拔掉电源线时,请握住插头部分,不要直接拉扯电源线。 • 电源适配器工作会有一定程度的发热,请将其放置在散热条件良好的环境中。
用于连接外置麦克风,进行语言输入工作。
6 耳机输出
用于连接耳机或外置扬声器等音频输出设备。
7
使用入门
第二章 使用入门
2.1 连接AC适配器
请按照以下步骤连接适配器: 1. 取出适配器和电源线,连接适配器和电源线。 2. 将交流电源插头插入电源插座。 3. 将 AC 适配器直流输出端插入电脑电源插口。 4. 确认所有连线已经完全连接。
电源接口
本适配器为本一体机专用,请勿将之使用在其他电器设备上,其他适配器外形虽然可能与 本适配器相似,但不是本一体机专用,请勿使用。 由于各国的电压不同,电源插头的设计也不同,假如您将在其他国家使用本产品,请在当 地选购合适的电源线或配备转换插座。
8
注意事项
win7启动过程详解及引导故障的解决
win7启动过程详解及引导故障的解决一、windows7的启动过程电脑加电后,首先是启动BIOS程序,BIOS自检完毕后,找到硬盘上的主引导记录MBR(Master Boot Record),然后由MBR读取分区表DPT((Disk Partition Table),从中找出主活动分区,读取主活动分区的分区引导记录PBR (Partition Boot Record),最后PBR再搜寻分区内的启动管理器文件BOOTMGR(winxp中是NTLDR),在BOOTMGR被找到后,控制权就交给了BOOTMGR。
BOOTMGR读取\boot\bcd文件(BCD=Boot Configuration Data,也就是“启动配置数据”,简单地说,windows7下的bcd文件就相当于xp下的boot.ini 文件),如果存在着多个操作系统并且选择操作系统的等待时间不为0的话,这时就会在显示器上显示操作系统的选择界面。
在我们选择启动WINDOWS7后,BOOTMGR就会去启动盘寻找WINDOWS\system32\winload.exe,然后通过winload.exe加载windows7内核,从而启动整个windows7系统。
可以把这个过程简单地概括为:BIOS-->MBR-->DPT-->PBR--> Bootmgr-->BCD-->Winload.exe-->内核加载-->启动windows7系统。
二、可能出现的引导故障解决1、mbr出现问题主要是mbr代码被改写,因为被改写的代码不同,所以出错信息也各不相同。
比如我们装了windows7与ubuntu双系统,ubuntu改写了mbr,在我们把ubuntu所在的分区格式化后,既进不了windows7,也进不了ubuntu,解决的办法就是重写mbr。
对于重写mbr,我们所熟知的是在dos下用fdisk /mbr命令进行重写。
U60超級行動電腦快速入門指南说明书
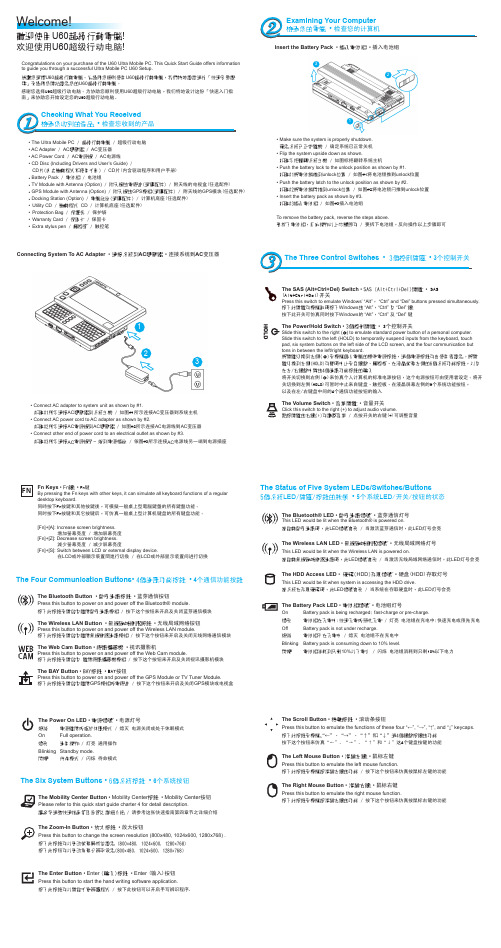
Insert the Battery Pack • 插入電池組 • 插入电池组• Make sure the system is properly shutdown. 確定系統已正常關機 / 确定系统已正常关机• Flip the system upside down as shown.如圖示把翻轉系統主機 / 如图标把翻转系统主机 • Push the battery lock to the unlock position as shown by #1.如圖#1將電池鎖推到unlock 位置 / 如图#1将电池锁推到unlock 位置• Push the battery latch to the unlock position as shown by #2.如圖#2將電池鎖閂推到unlock 位置 / 如图#2将电池锁闩推到unlock 位置• Insert the battery pack as shown by #3. 如圖#3插入電池組 / 如图#3插入电池组To remove the battery pack, reverse the steps above.要拆下電池組,反向操作以上步驟即可 / 要拆下电池组,反向操作以上步骤即可Welcome!歡迎使用U60超級行動電腦!欢迎使用U60超级行动电脑!Congratulations on your purchase of the U60 Ultra Mobile PC. This Quick Start Guide offers information to guide you through a successful Ultra Mobile PC U60 Setup.感謝您選擇U60超級行動電腦。
為協助您順利使用U60超級行動電腦,我們特地設計這份「快速安裝說明」來協助您開始設定您的U60超級行動電腦。
感谢您选择U60超级行动电脑。
丰田卡罗拉智能上车和启动系统解析(上)
丰田卡罗拉智能上车和启动系统解析(上)一汽丰田生产的第十代顶级版卡罗拉(COROLLLA),配备了丰田汽车公司2005款的无需操纵钥匙的智能上车和启动系统。
它是集遥控门锁控制和发动机停机控制(防盗停止启动)功能于一体的系统,即通过控制器区域网络(CAN)总线和局域互联网(LIN)总线及主车身ECU之间建立相互通信,在车辆6个电子钥匙振荡器检测区域内执行智能上车和智能启动功能。
本文就该系统的部件组成、工作原理和更换主要部件后ID代码注册等进行介绍,以便读者对新款卡罗拉的新技术运用有所了解。
1.智能上车和启动系统主要控制部件及功能智能上车和启动系统主要控制部件及功能见表。
2.智能启动系统结构及工作原理智能启动系统由主车身ECU控制启动功能,系统组成如图所示。
(1)钥匙钥匙内的智能上车和启动系统收发器接收来自振荡器的请求信号,并将自产生的lD代码(在后面文章中解释为S 码)返回到车门控制接收器。
当钥匙电池电量低时钥匙接收来自发动机开关的无线电波。
并将自产生的ID代码(S码)返回到发动机开关。
遥控门锁控制发射器可远距离控制车门的锁止或解锁及后备厢的开启。
机械钥匙可打开驾驶员车门,但不能启动发动机。
(2)振荡器认证ECU在发动机和车门及后备厢全关闭时,以每隔0.25秒/次、+5V的交变信号传输给各振荡器,作为各振荡器工作信号电压,由各振荡器L-C电路。
为认证ECU检测钥匙的请求信号和钥匙ID(S码)代码发送、接收产生最初的无线电载波。
(3)发动机开关发动机开关由一个瞬时按钮开关、双色(琥珀色、绿色)LED指示灯和收发器钥匙放大器组成。
驾驶员按照指示灯亮起状态检查当前电源模式和发动机能否启动(指示灯状态和电源模式状态。
如图所示)。
在发动机运转期间主车身ECU检测到系统故障时,琥珀色指示灯将闪烁。
在这种状态下,如果发动机停止运转,则可能无法启动,应进行故障诊断。
(4)主车身ECLI主车身ECU由IG1、IG2继电器执行电路和CPU及保持电路组成。
u盘安装系统,电脑开机不了的问题,电脑反应慢解决方案
一、解决电脑开机慢:二、教你如何用U盘装系统:三、电脑开机不了的普遍原因:一、解决电脑开机慢:1、禁用闲置的IDE通道右键点击“我的电脑-属性”,然后点击“硬件”接着点击“设备管理器",在其中打开“IDE ATA/PA TA控制器”然后分别进入主要和次要IDE通道,选择“高级设置",在这里找到“当前传送模式"为“不适用”的一项,将此项的“设备类型"设置为“无”。
2、优化视觉效果右键单击“我的电脑”--“属性”—“高级”,在“性能”栏中,点击“设置”——“视觉效果",调整为最佳性能,或只保留一些必要的项目。
3、启动和故障恢复"我的电脑”--"属性"-—"高级"——"启动和故障修复”中点击“设置”,去掉"将事件写入系统日志",”发送管理警报","自动重新启动"选项;将”写入调试信息”设置为”无”;点击”编辑”,在弹出记事本文件中:[Operating Systems] timeout=30 //把缺省时间30 秒改为0 秒。
4、禁用错误报告”我的电脑”-—"属性”—-"高级”-—点"错误报告”,点选“禁用错误汇报”,勾选"但在发生严重错误时通知我"-—确定。
5、设置系统还原单击“开始”--“所有程序”—-“附件"——“系统工具"—“系统还原”,在系统还原界面,去掉“在所有驱动器上关闭系统工程还原”前边的勾,在“可用的驱动器”区中,选系统盘所在的分区,单击“设置”进入“系统还原设置"窗口,将“要使用的磁盘空间”调到5%或更小,“确定”返回,按上述方法将其它分区设禁用。
6、关闭自动更新关闭自动更新具体操作为:右键单击“我的电脑”—-“属性”—-“自动更新",在“通知设置”一栏选择“关闭自动更新。
威利斯智能系统用户指南说明书
analyzes them.After the first hour, W.I.S. changes to standard hourly measurement cycles.the w.i.s. application1. Makes recommendations to optimise the use of chemicals (e.g. type, dosage);2. Shows trends and variations over time;3. Provides a true understanding of spa water quality;4.Anticipates any changes in spa water quality and notifies you in time.Name of the spa and its water temperatureWater temperatureWeather forecast for the area Daily analysis report and recommendationspHLast measured pH, ORP, conductivityFirmware updatesummaryIntroducing W.I.S. 1Setting the application 5Creating an account 6Initial configuration 7Maintenance 11Precautions for use 14Warranty summary 15Technical characteristics 17Troubleshooting 19setting the application download the application to start the w.i.s. deviceFollow the instructions in the Application step by step.packaging; you will need it for the safe storage of W.I.S. afterremoving it from the water.follow the application’s instructionsOpen the W.I.S. device.Switch ON the W.I.S. device.You may also remove the inner protective cover and then push the button.Use the opening tool to remove the top lid.W.I.S. ready.Be careful! Sensitive area! Make sure that no drops of water enter the inside of the W.I.S. device.W.I.S. ready.closing the w.i.s. deviceput your w.i.s. into the waterturn the bottom cover to the left to remove the protective caps of the sensors. Remove the sensor caps and store them in the original packaging; they will be useful when W.I.S. is winterized.Screw the bottom cover back on before placing W.I.S. in the water.Make sure that the top lid is tightly in place before placing the device back into the water to ensure that W.I.S. is watertight.When placing the top lid on W.I.S., align the notches with thepins.Before initial configuration, follow the Application’s instructions.connecting w.i.s. to the internet Follow the Application’s instructions.create your spaFollow the Application’s instructions.Do you need help? Visit our website:11Push the button for at least 5 seconds until the yellow LED starts to blink.Replacing the sensors.technical characteristicsW.I.S. sensors are patent protected; they are made by multi-component injection moulding. The Twist&Lock system makes replacing the sensors easier. The orange sensor measures the ORP (Redox). The grey sensor measures water conductivity. The blue sensor measures the pH value.switching off the w.i.s. device.Before starting any maintenance, switch OFF the W.I.S. device.12Do you need help? Visit our website:It is recommended that the 3 sensors (orange, grey, blue) are cleaned once a month. Take W.I.S. out of the water, remove the protective cover and clean the sensors with a damp, non-abrasive cloth. Replace the protective cover on W.I.S., and simply drop W.I.S. back into the spa.charging the w.i.s. deviceIndicator lightThe indicator light located under the lid of the W.I.S. device displays the status of W.I.S.Push the button for 5 seconds: My W.I.S. blinks green three times: W.I.S. is switching on. My W.I.S. blinks yellow once: W.I.S. is switching off.Long life batteryUSB cable and charger included.Charge your W.I.S. for a minimum of 6 hoursT u r n e d o nT u r n e d o ffDo you need help? Visit our website: 13forced into place. Check whether the connector is compatible with the socket and try again.for any data loss. Contact us for assistance at www.in case your device needs servicing (ex-14Do you need help? Visit our website:This warranty (…Warranty”) applies to all countries in which the W.I.S. product (…Product”) has been sold on the market by Wellis or an authorised retailer. Wellis warrants that, at the time of its original pur-chase, the Product is free from defects in material, design and workmanship subject to the following terms and conditions:The Warranty applies to the product’s end-purchaser (the “Customer”). In no way does the Warranty limit the rights of the Customer under the mandatory pro-visions of applicable national law, nor does it limit the rights of the Customer as outlined in his/her contract with the Product retailer/distributor.The Warranty is valid provided that the Customer presents the Product with the original proof of pur-chase, such as an invoice, receipt, sales slip, war-ranty certificate issued by an authorised retailer accompanied by a sales slip, or proof of credit card payment if the purchase took place over the Inter-net. The proof of purchase must contain the date of purchase, a precise description of the Product and, if applicable, the name of the authorised retailer and the serial number. In the event that the aforemen-tioned documents cannot be presented, or that the information required is incomplete or illegible, Wellis reserves the right to freely deny the Warranty.The Warranty is only valid if the Product was em-ployed for personal use. It does not cover profes-sional use or Products rented out for commercial purposes.The Warranty Period is valid for a maximum of 2 (TWO) YEARS from the date the first Customer pur-chased the Product from Wellis or an authorised re-tailer (…Warranty Period”).During the Warranty Period, Wellis shall repair or re-place the defective Product free of charge, at its sole discretion and within the limits of available stock. Wellis shall return the repaired Product, or another Product in good working condition to the Customer. All parts or materials that have been replaced will become the property of Wellis.The Warranty Period of a repaired or replaced Prod-uct will not be extended or renewed.The Warranty applies to defects that arise when us-ing the Product in accordance with the Installation and Use Guide. It does not cover Product mainte-nance, repairs, or part replacement due to normal wear and tear or ageing. Furthermore, the Warranty is invalid if:furthermore, the warranty is invalid if:The defect is attributable to the Product being: used in a manner that is inconsistent with the installa-tion and use guide, subjected to rough treatment, extreme heat or environmental conditions, or rapid environmental or temperature changes, exposed to corrosion, oxidation, or unauthorised modifications and/or connections, subjected to repairs made by unauthorised personnel or by the Customer, subject-ed to repairs made with unauthorised replacement parts, improperly used or used while connected to an inappropriate power supply, exposed to an accident or forces of nature, used in a spa with untreated wa-ter, exposed to chemicals or subjected to any other act beyond the reasonable control of Wellis,The Customer does not inform Wellis or the author-ised Product retailer of the defect within thirty (30) days of its appearance during the Warranty Period;The Product is not returned to Wellis or the author-ised Product retailer within sixty (60) days of the de-fect’s appearance during the Warranty Period;The Product series or identification number has been removed, deleted, damaged, altered or rendered il-legible;The Product series or identification number has been removed, deleted, damaged, altered or rendered il-legible;The defect is the result of the Product being used with an accessory that is not manufactured or sup-plied by Wellis.Do you need help? Visit our website: 15The application gives dosages or tips for informa-tional purposes only. Wellis cannot be held liablewith regard to the information given. The Applicationuser remains the sole decision-maker with regard tothe chemicals added to his swimming spa, and to itsmanagement.The Customer agrees to return the Product in itsoriginal packaging. Wellis is not responsible for anyProduct damage that occurs during transport due toinappropriate packaging.Wellis reserves the right to request a flat-rate feefrom the Customer to cover the cost of shipping andhandling.This Warranty constitutes the sole and exclusivelegal remedy of the Client against Wellis, and Wel-lis’s sole and exclusive liability to the Customer interms of defective Products. This Warranty replacesall other warranties and guarantees, whether oral,written, legal (except for those that are mandatory),contractual, quasi-delict, or otherwise. Wellis is notliable for incidental or consequential damages or ex-penses. Any modification to the Warranty requiresthe prior written consent of Wellis. The Warranty issubject to French law, insofar and to the extent thatthe peremptory norms of the law of domicile or ofthe Customer’s head office do not provide otherwise.16Do you need help? Visit our website:Do you need help? Visit our website: 1718Do you need help? Visit our website:Do you need help? Visit our website: 19u s e r g u i d e-2021。
(产品管理)智能进入与起动系统产品规格说明书VH

(产品管理)智能进入与起动系统产品规格说明书VH智能进入和起动系统1产品概述11.1目的11.2定义和缩写11.3参考文档11.4参考标准12产品结构和原理12.1系统框图12.2产品组成列表及供货方式22.3功能概述32.4智能钥匙技术指标42.5RKE(遥控)功能逻辑描述52.5.1遥控解锁(车门锁)功能52.5.2遥控闭锁(车门锁)功能62.5.3遥控解锁(行李箱锁(后背门))功能72.5.4遥控寻车功能82.6PE(智能进入)功能92.6.1智能操作区域界定92.6.2PE解锁(车门锁)功能102.6.3PE闭锁(车门锁)功能112.6.4PE解锁(行李箱锁(后背门))功能13 2.7PS(智能起动)功能逻辑描述142.7.1PS钥匙预认证142.7.2PS钥匙认证152.7.3电源适配功能152.7.4发动机起动流程182.7.5紧急起动功能192.7.6强制起动功能202.7.7紧急停机功能212.8备用钥匙功能222.8.1备用进入功能描述222.8.2备用起动车辆、电压切换功能描述22 2.9发动机防盗功能逻辑描述232.10EMS认证流程232.10.1EMS认证算法232.10.2防盗知识灯功能232.11起动按钮检测及LED控制232.11.1起动按钮按键检测及诊断232.11.2起动按钮背景灯控制242.11.3起动按钮工作指示灯控制252.12ESCL控制262.12.1硬件接口电路262.12.2ESCL 解锁262.12.3ESCL 闭锁272.13提示功能逻辑描述292.13.1起动未找到钥匙或者钥匙不合法提示功能292.13.2智能钥匙离开提示功能292.13.3智能钥匙低电量提示功能322.13.4起动按钮故障提示功能322.13.5制动踏板未踩下提示功能332.13.6起动时不于空档提示功能342.13.7智能锁车时电源状态非OFF提示功能352.13.8智能锁车时钥匙于车内提示功能362.14休眠唤醒功能描述363通讯接口373.1.1接口类型373.1.2外围电路及参数383.2BootLoader功能384产品技术参数384.1主要技术指标384.1.1PEPS控制器技术指标384.1.2起动按钮技术指标394.1.3低频天线技术指标394.1.4IMMO天线技术指标405试验标准406其他需求406.1产品安装位置406.2产品尺寸406.3材料要求406.4连接器要求406.5装配及拆卸406.6寿命和可靠性406.7环境406.8回收(重复利用)40 6.9汽车安全性406.10法定义务406.11质量保证要求406.12接插件型号407信号定义407.1CAN BUS网络拓扑40 7.2接插件管脚定义41 7.3CAN通信矩阵417.4CAN网络诊断417.5PEPS学习匹配41此行切勿删除,目录结束卷标1产品概述1.1目的本文档的目的是对智能进入和起动系统的功能进行定义,为后续功能维护及开发提供参考依据。
智能进入系统说明书
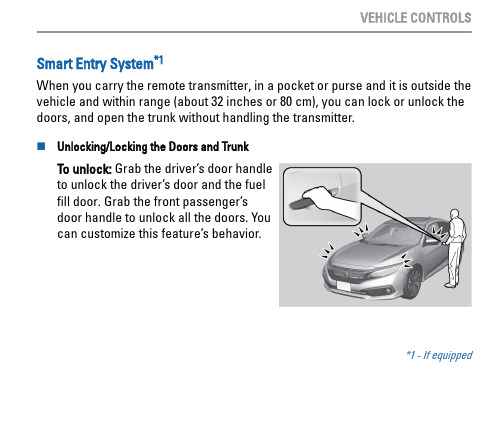
Smart Entry System*1When you carry the remote transmitter, in a pocket or purse and it is outside the vehicle and within range (about 32 inches or 80 cm), you can lock or unlock the doors, and open the trunk without handling the transmitter.n Unlocking/Locking the Doors and TrunkTo unlock: Grab the driver’s door handle to unlock the driver’s door and the fuel fill door. Grab the front passenger’s door handle to unlock all the doors. Youcan customize this feature’s behavior.*1 - If equippedVEHICLE CONTROLSVEHICLE CONTROLSTo lock: Press the door lock button on Array the front door. If the remote transmitteris inside the vehicle, the doors will notlock.Note: System range is affected by radio signals from other devices (forexample, cell phones or tablets) so for best results, carry the remotetransmitter separately from these devices.n Customizing Door Lock and Unlock SettingsCustomize the auto door lock and unlock settings to your preference.Models with Color AudioUsing the Driver Information Interface1.Press the Display/Information button, then select Vehicle Settings. Pressthe ENTER button.2.Select Door Setup.3.Select Auto Door Lock or Auto Door Unlock to customize.Models with Display AudioUsing the Audio/Information Screen1.Press the Home button.2.Select Settings.3.Select Vehicle.4.Select Door/Window Setup.5.Select Auto Door Lock or Auto Door Unlock to customize.n Walk Away Auto Lock®When you walk away from the vehicle while carrying the remotetransmitter, the doors and trunk can automatically lock if the followingconditions are met:•The remote transmitter is within a range of 5 feet (1.5 m).•All doors and the trunk are closed.•There is no additional remote transmitter inside the vehicle.Follow these steps:1.Exit the vehicle, close the door and stay near it. Listen for a beep. The system is activated.2.Walk at least 5 feet (1.5 m) away.3.Listen for a beep and look for the lights to flash. The doors lock.The auto lock function is set to OFF as the factory default setting. It can be set to ON using the audio/information screen. If you set the auto lock function to ON, only the remote transmitter that was used to unlock the driver's door prior to the setting change can activate auto lock. To turn on this feature, follow the steps below:Models with Display AudioUsing the Audio/Information Screen1.Press the HOME button then select Settings .2.Select Vehicle .3.Select Door/Window Setup .4.Select Walk Away Auto Lock ®, then selectON.VEHICLE CONTROLSHANDLING THE UNEXPECTEDSmart Entry System Battery StrengthModels with Smart Entry SystemIf the beeper sounds, the To Start, Hold Remote Near Start Button message appears on the driver information interface, and the indicator on the ENGINE START/STOP button flashes, and the engine won’t start. Start the engine as follows:1.Touch the center of the ENGINE START/ Array STOP button with the A logo on thekeyless access remote while theindicator on the ENGINE START/STOPbutton is flashing. The buttons on thekeyless access remote should be facingyou.The ENGINE START/STOP buttonflashes for about 30 seconds.2.Depress the brake pedal or clutch pedal and press the ENGINE START/STOPbutton within 10 seconds after the beeper sounds and the ENGINE START/STOP button changes from flashing to on.If you do not depress the pedal, the mode will change to ACCESSORY.。
小米平板2双系统刷机常见问题解决方法v5.4

小米平板2双系统刷机常见问题解决方法v5.4目录.......................................1.无法从U盘启动2.从U盘启动出现 Shim UEFI key management3.从U盘启动出现 Certificate Verification Failed4.开机按F2无法进BIOS5.开机出现 Access Denied 蓝屏6.安卓系统安装后无法启动或无法进入恢复模式(REC)7.Windows 无法启动或无法切换到安卓系统8.Miui 安装不成功9.Win 系统安装不成功10.11.修改 BIOS 中的“UEFI Secure Boot”后无法保存12.已经安装安卓Win,想更换安卓版本,但不想重装Windows13.出现 Error Code 04 错误14.16G平板用镜像恢复法安装安卓系统后无第12分区15.Lineage Win 双系统的 Windows 无法充电一、无法从 U 盘启动如果确认U盘和OTG 正常,但就是无法从U盘启动,请按下面顺序检查各项:•检查U盘是否是Fat32格式,以及U盘内容是否正确;•检查平板电量是否充足,电量不足会导致平板U口带负载能力下降,注意,有的平板电池老化,会有“显示电量充足,实际电量不足”的情况;•确保平板U口不要带太多负载,不建议通过USB-HUB同时接U 盘和键盘;•用分区管理工具检查U盘是否有其它隐藏分区,有的U盘做过启动盘,被设置了隐藏分区。
可以用分区管理工具把U盘中所有分区都删除,然后将整个U盘划分为一个Fat32分区,再把刷机包解压到U盘中。
解压方法见下面视频:刷机包解压操作演示•如果开机后总是进入下面 UEFI Shell 界面:请尝试按下面步骤修改 BIOS 中的启动序列。
将下图红框中的启动项调整为图中顺序,然后选箭头所指的“保存”。
一般来说平板就可以正常从U盘启动了。
•某些情况下,非正常中止操作会导致U盘状态改变而无法进入PE。
DS-K1T672系列人脸识别终端快速启动指南说明书

Backlight
1 Make sure the gang box is installed on the wall.
You should purchase the gang box separately.
Direct Direct Sunlight Indirect Sunlight Close to Light Sunlight through Window through Window
The addi onal force shall be equal to three mes the weight of the equipment but not less than 50N. The equipment and its associated moun ng means shall remain secure during the installa on. A er the installa on, the equipment, including any associated moun ng plate, shall not be damaged.
2 Appearance
Camera Camera
103.36 mm
20.7mm
IR Light
IR Light
Screen
Network Interfen ng Area
TAMPER
Debugging Port (For Debugging Only)
Wiring Terminal
91.84 mm
microUSB (USB microUSB to USB cable to connect with USB interface)
PSAM Card Slot (Reserved)
智能进入及启动系统

1.传感器概述
工作原理
解锁功能:当用户携带合法钥匙,触发相应的功能后(例如门把手上的微动开关或者内侧的 电容传感器),相对应的天线被激活,搜索其覆盖范围内是否有合法钥匙,此时天线发出低 频信号,当钥匙收到天线的低频信号后会发出高频信号,高频信号通过射频收发器传递到控 制单元,控制单元验证钥匙是否合法,如果验证通过,解锁相应的门锁。
智能进入及启动系统
PEPS工作原理
1.传感器概述
概念
智能进入及启动系统,即PEPS系统,主要是指控制汽车五门解锁及车辆 启动的系统。
PE:解组成
主要由天线、射频收发器及控制单元组成。
一般需要配置5根左右天线(根据车辆配置而定) 两前门各一个(部分车型每个车门配备一个)、车内两个、后备箱一个、后备箱 一个。 智能进入及启动控制单元部分车型是单独的控制单元,还有一部分车型控制单元 集成到车身控制单元里。
启动功能:当用户携带合法钥匙,触发相应的功能后(例如一键启动开关),车内的天线被 激活,搜索其覆盖范围内是否有合法钥匙,此时天线发出低频信号,当钥匙收到天线的低频 信号后会发出高频信号,高频信号通过射频收发器传递到控制单元,控制单元验证钥匙是否 合法,如果验证通过,则将启动信号通过CAN网络传递给发动机控制单元或者整车控制单元、 变速器控制单元或者电子换挡执行单元、车身控制单元进行防盗验证,验证通过则允许启动 车辆。
