IRC5控制柜追加PROFIBUS_DP模块的操作
ABBIRC5中文操作手册

维修服务支持体系
官方维修服务
ABB提供官方的维修服务,用户可以通过官方渠道联系维修中心进行 维修。
技术支持热线
ABB提供技术支持热线,用户可以通过拨打热线电话获取技术支持和 故障排除建议。
在线故障诊断工具
ABB提供在线故障诊断工具,用户可以通过官方网站下载并使用该工 具进行故障诊断。
维修培训课程
ABB提供维修培训课程,用户可以参加培训课程学习如何自行进行简 单的故障排除和维修操作。
提高使用的便捷性。
多功能化
为了满足不断变化的市场需求,测量设备 将向多功能化方向发展,集成更多的测量 和分析功能。
绿色环保
环保意识的提高将推动测量设备向绿色环 保方向发展,采用更环保的材料和工艺, 降低能耗和废弃物排放。
升级换代计划安排
硬件升级
根据市场需求和技术发展趋势,对ABBIRC5的硬件进行升级,提高处理速度、存储容 量和通信性能。
02
安装与调试
安装前准备
确认IRC5控制器型号、规格及配件是否齐全,检查外观 是否完好,无明显损伤。
准备安装工具和材料,如螺丝刀、扳手、电缆等。
阅读并理解本操作手册,熟悉安装步骤和注意事项。
确保安装环境符合控制器的工作要求,如温度、湿度、 防尘等。
安装步骤与注意事项
01 将控制器安装在坚固、无振动的平面上,避免阳 光直射和雨淋。
界面元素详解
按钮
点击执行相应命令 或操作。
下拉菜单
提供一系列选项供 用户选择。
图标
代表不同功能的图 形符号,直观易懂。
文本框
输入或显示文本信 息。
滑块
通过拖动调整参数 值。
04
基本操作与流程
开机启动及初始化设置
Profibus冗余链路模块操作手册

备注:电接口速率由拨码开关 SW[4...7]设置或者自适应,所有电口速率一致.
PROFIBUS DP 总线冗余链路模块 Manual V1.0
http//:/
注意事项:
1, 请配置 DC(12~36)V 工业标准电源,推荐工作电压 24V,否则可能会引起通信故障或设备损坏。 2, 使用继电器告警输出时,外部回路不能超过额定的继电器最大容量,否则将可能损坏继电器。 3, 本设备属于精密通信设备,请切实做好设备的接地工作。设备接地是通过侧板上专门的接地螺钉,客户安装时要使用专用的 接地导线进行接地。
拨码开关
告警继电器输出触点
电源 1 正极
电源负,电源 1 和电源 2 电源 2 正极 典型应用方案:
一、将简单的、非冗余的 DP 总线转换成两路相对应的冗余总线:
http//:/
深圳市讯记科技有限公司
二、将双主站冗余变为单总线结构:
PROFIBUS DP 总线冗余链路模块 Manual V1.0
and 12MBit/s. ¾ 具备 4000V 的防雷击以及 1.5A 的过流保护和 600W 浪涌保护功能; ¾ 终端电阻:本机不带终端电阻,请按需要外接.
电源及保护:
¾ 电源:双电源冗余输入,DC(12-36)V,典型 DC24V,功耗小于 4W, 具有 DC1500V 电压隔离以及反接保护功能,工业端子接口. ¾ 继电器告警输出:光纤链路故障和电源故障告警输出,触点最大容量:DC48V/1A,工业端子接口.
Criterion:B Level 2 ¾ IEC61000-4-3:2006(RS) 3V/m(80-1000MHz)Criterion:A Level 2 RoHS 认证: ¾ Test Standards:EN1122:2001 EPA3050B,EPA3052 EPA3540C,EPA3060A ¾ Testing item:Pb Cd Hg Cr6+ PBBs ¾ Test Results:N.D.
IRC5控制柜追加PROFIBUS_DP模块的操作
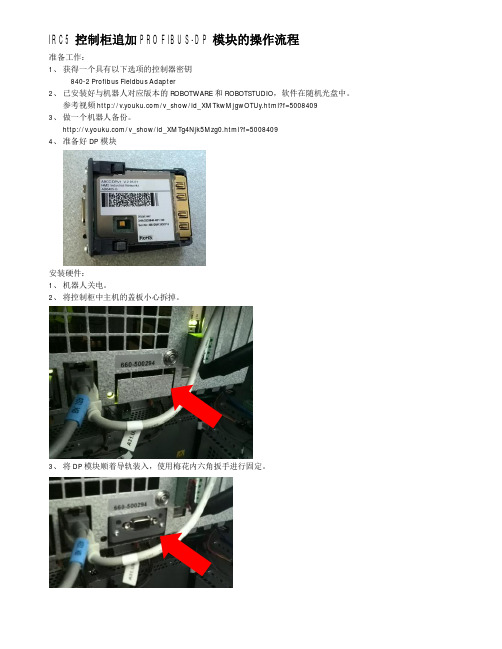
IRC5控制柜追加PROFIBUS-DP模块的操作流程准备工作:1、获得一个具有以下选项的控制器密钥840-2 Profibus Fieldbus Adapter2、已安装好与机器人对应版本的ROBOTWARE和ROBOTSTUDIO,软件在随机光盘中。
参考视频/v_show/id_XMTkwMjgwOTUy.html?f=50084093、做一个机器人备份。
/v_show/id_XMTg4Njk5Mzg0.html?f=50084094、准备好DP模块安装硬件:1、机器人关电。
2、将控制柜中主机的盖板小心拆掉。
3、将DP模块顺着导轨装入,使用梅花内六角扳手进行固定。
更新机器人系统:1、在ROBOTSTUDIO中重新建一个机器人系统,其中:1-1控制器密钥使用新的具有840-2 Profibus Fieldbus Adapter1-2驱动器密钥使用原来的密钥。
2、将系统下载安装到机器人控制柜。
参考视频/v_show/id_XMjAwNzgzMjgw.html?f=4977720查看密码 cp至此,加装DP模块的操作完成,关于DP模块的设置请参考以下的视频/v_show/id_XMTg4OTc2OTc2.html?f=5008409*******************************************************************************************以上的详细操作说明可参考以下的资料,当当,京东,亚马逊有售。
入门必读:《工业机器人实操与应用技巧》进阶参考:《工业机器人典型应用案例精析》虚拟仿真:《工业机器人工程应用虚拟仿真教程》关注微信公众号,了解更多ABB机器人使用技巧。
三菱PLC PROFIBUS-DP接口模块用户手册(详细篇)

PROFIBUS 网络中发生通讯错误时,通讯异常局变成以下状态。使用通讯状态信息,在 PLC 程序中 设定连接回路(输入 X1,缓冲存储器 2040 到 2079),使系统能够安全动作。 误输出、误动作,可能是造成事故的原因。 (1) 主站的输入数据,保持通讯异常前的数据。 (2) 主站断开时,各从站的输出状态按照参数的设定。 (3) 从站断开时,其它从站的输出状态按照主站的参数设定。
[安装时的注意事项]
注意
请在所使用的 CPU 模块用户手册上所记载的一般规格所要求的环境中使用。如在一般规格范围以 外的环境中使用时,会造成触电、火灾、误动作、产品损坏及劣化。
按住模块下部的安装模块用扳手,将固定模块用的突起牢固插入基板模块的固定孔中,进行安 装。如未正确安装好模块,会造成误动作、故障、跌落等。如在振动较多的环境中使用时,应使 用螺丝固定模块。
使用说明书编号 SH(名)-080126-A 初版印刷 SH(名)-080126-B 修正
使用说明书编号,记载在本说明书内侧封页左下侧。 改订内容
有关本手册中使用的总称、略称,2.1 节,2.4 节,4.1.3 项,4.1.4 项,
5.1 节,5.1.1 项,5.4 节,8.1 节,8.2 节
本书不能对工业所有权、以及其他权利的实施进行保证,且也不能许诺实施权。另外,由于使用本书记载内容而 引起的工业所有权上的问题,本社一律不对此负有责任。
固定螺丝时,请在规定的力矩范围内进行操作。螺丝固定过松,会造成跌落、短路、误动作等。 螺丝固定过紧,会引起螺丝或模块破损,造成跌落、短路、误动作等。
源 切 切 拆装模块时,必须从外部将电 全相 断后进行操作。如未全相 断,可能会引起产品的损坏。 碰 导 子 这样 不要 触模块的 电部分及电 部分。 会造成模块的误动作,引起故障等。
Profibus-DP 从站模块使用手册

Ⅱ2
7.1.4 手轮操作门限(POSMMT) .......................................................................... 20 7.1.5 WDT复位间隔(WDT_TI) ............................................................................ 20 7.1.6 总线接口复位(RSTBUS)............................................................................ 20 7.1.7 信号断线操作(BRKOP) .............................................................................. 20 7.1.8 断线指定位置(LOSPOS)............................................................................ 20 7.1.9 信号断线时间(DPSLTO) ............................................................................ 20 7.1.10 ESD操作(ESDOP).................................................................................... 21 7.1.11 ESD指定位置(ESDPOS)......................................................................... 21 7.1.12 ESD超越电机热保护(ESDSUP0) ........................................................... 21 7.1.13 ESD超越本地操作(ESDSUP1) ............................................................... 21 7.1.14 ESD超越间断运行(ESDSUP2) ............................................................... 21 7.1.15 ESD超越联锁操作(ESDSUP3) ............................................................... 21 8. GSD文件 ..................................................................................................................22 Porfibus DP模块标准版GSD文件 ...................................................................................... 22
3. E-WT Profibus-DP通讯配置说明

E-Wind Turbine Profibus-DP 通讯配置说明1 硬件设置Profibus-DP 从站通讯模块使用的是泗博PM-125,如下图所示。
要对其在Profibus-DP 总线上的地址进行设置,持续点按PM-125面板上的ProfiBus 地址配置按钮即可,一般选择设置为7。
该模块有四个指示灯,分别为PBF\STA\TX\RX 。
指示灯状态及含义如下表所示。
指示灯 状态 含义STA 绿灯闪烁 ProfiBus-DP 总线上有数据通讯 绿灯灭 无数据通讯 PBF 红灯常亮 ProfiBus-DP 总线数据通讯失败红灯灭 数据通讯正常 RX 绿灯闪烁 串口接收有数据 绿灯灭 串口无接收数据 TX绿灯闪烁 串口发送有数据 绿灯灭串口无发送数据2 软件设置2.1 E-Wind Turbine 侧的设置E-Wind Turbine 中Profibus-DP 通讯模块主要有三个功能,通讯连接情况诊断、数据实时监视、数据接收和发送。
下图是ProfiBus-DP 通讯配置画面,用来对使用的串口进行配置,包括串口号、波特率等。
注意泗博PM125模块的波特率为19200。
其他参数保持默认值即可。
下图是ProfiBus-DP通讯时的实时数据显示画面。
E-Wind Turbine运行时,在实时数据显示对话框中可以看到通过Profibus总线实时传递的数据值。
点击“Data to PLC”按钮显示由E-Wind Turbine发送至外部控制器PLC的参数数据;点击“Data from PLC”按钮显示E-Wind Turbine由外部控制器PLC接收的控制数据。
硬件通讯状态指示灯指示当前通讯状态,绿色为通讯正常,红色为通讯故障。
系统运行状态指示灯指示当前运行状态,点击可以操作运行和停止。
绿色为正在运行,红色为停止运行。
E-Wind Turbine在与外部控制器通讯时有两种运行模式:正常工作和测试模式。
正常工作时,E-Wind Turbine实时运行,与外部控制器进行数据交换;测试模式时,E-Wind Turbine不运行,系统产生测试数据与外部控制器进行数据交换,用于通讯连接测试。
PROFIBUSDP主从配置方法步骤

PROFIBUSDP主从配置方法步骤Profibus DP是一种常见的工业领域使用的通信协议,用于连接主控制设备和从控制设备。
主从配置是建立Profibus DP通信的关键步骤之一、下面将详细介绍Profibus DP主从配置的方法步骤。
1.硬件准备:首先,需要准备好Profibus DP网络所需的硬件设备,包括主控制设备、从控制设备、Profibus DP总线电缆和连接器。
主控制设备和从控制设备要能够支持Profibus DP协议。
2.确定网络拓扑结构:根据实际需要确定Profibus DP网络的拓扑结构,包括总线的起点和终点、主设备和从设备的位置等。
常见的拓扑结构有星型、总线型和环型。
3.连接总线电缆:根据确定的拓扑结构,连接总线电缆。
将总线电缆逐层连接到各个从设备上。
4.设置从设备:对于每个从设备,需要进行相应的设置,包括地址设定、通信速率设定、数据长度设定等。
这些设置应该与主设备的设置相匹配,以实现正常的通信。
在设置地址时,需要确保各个从设备的地址不重复。
5.设置主设备:设置主设备的操作与设置从设备类似,需要设定主设备的地址、通信速率、数据长度等参数。
主设备通常还需要配置输入输出模块、控制逻辑等内容,以实现对从设备的控制。
6.进行通信测试:完成主从设备的设置后,可以进行通信测试。
通过发送读写命令,检查从设备是否正常响应,并验证通信的正确性和稳定性。
如果发现通信故障,可以通过查看故障代码进行故障诊断。
7.完善配置:根据实际需要,进一步完善配置。
可以添加更多的从设备,配置更多的输入输出模块,调整通信速率和数据长度等参数,以满足具体的应用需求。
总的来说,Profibus DP主从配置方法的步骤包括硬件准备、确定网络拓扑结构、连接总线电缆、设置从设备、设置主设备、进行通信测试和完善配置。
这些步骤可以帮助用户成功地建立起Profibus DP通信,并实现对从设备的控制。
profibus dp通讯使用说明
profibus dp通讯使用说明Profibus DP通讯使用说明简介Profibus DP是一种用于工业自动化领域的通信协议,具有高速、可靠、实时性好等特点。
本文将对Profibus DP通讯进行详细说明。
Profibus DP的特点•高速性: Profibus DP支持高达12 Mbit/s的通信速率,能够满足大多数工业自动化应用的通信需求。
•可靠性: Profibus DP采用了差分信号传输和冗余通信机制,使得通信稳定可靠,抗干扰能力强。
•实时性: Profibus DP能够在实时的控制系统中使用,确保传输数据的及时性和准确性。
•灵活性: Profibus DP支持多种拓扑结构,如总线型、星型、环型等,可根据实际应用需求进行灵活配置。
Profibus DP的硬件连接使用Profibus DP进行通讯时,需要注意以下硬件连接的要点:1. 使用正确的通讯电缆进行连接,确保电缆符合Profibus DP的标准,包括电缆类型、屏蔽要求等。
2. 通过正确的连接器将各个设备连接到Profibus DP总线上,确保连接器的质量和稳定性。
3. 确保每个设备的地址设置正确,避免地址冲突导致通讯故障。
4. 对于较长的总线长度,需要使用合适的终端电阻进行衰减和防止信号反射。
Profibus DP的通讯配置在使用Profibus DP进行通讯前,需要进行相关的通讯配置,具体步骤如下: 1. 对于每个设备,需要在控制系统中进行设备参数的配置,包括设备地址、通信速率等。
2. 确定需要进行通讯的数据类型和数据量,并进行相关的参数设置。
3. 配置控制系统的通讯模块,确保其支持Profibus DP通讯,并进行相应的配置和参数设置。
Profibus DP的应用领域Profibus DP在工业自动化领域具有广泛的应用,包括但不限于以下几个方面: - 工业控制系统中的数据采集与传输 - 设备之间的联网和通讯 - 远程监控和控制 - 传感器与执行器的连接与控制总结Profibus DP通讯是一种高速、可靠的通信协议,适用于工业自动化领域的各种应用。
Profibus DP 操作调试设置流程
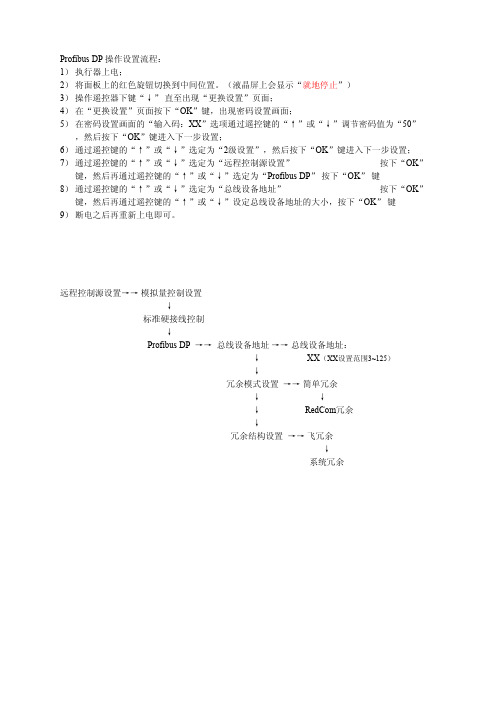
远程控制源设置→→ 模拟量控制设置 ↓ 标准硬接线控制 ↓ Profibus DP →→ 总线设备地址 →→ 总线设备地址: ↓ XX(XX设置范围3~125) ↓ 冗余模式设置 →→ 简单冗余 ↓ ↓ ↓ RedCom冗余 ↓ 冗余结构设置 →→ 飞冗余 ↓ 流程: 1) 执行器上电; 2) 将面板上的红色旋钮切换到中间位置。(液晶屏上会显示“就地停止”) 3) 操作遥控器下键“↓” 直至出现“更换设置”页面; 4) 在“更换设置”页面按下“OK”键,出现密码设置画面; 5) 在密码设置画面的“输入码:XX”选项通过遥控键的“↑”或“↓”调节密码值为“50” ,然后按下“OK”键进入下一步设置; 6) 通过遥控键的“↑”或“↓”选定为“2级设置”,然后按下“OK”键进入下一步设置; 7) 通过遥控键的“↑”或“↓”选定为“远程控制源设置” 按下“OK” 键,然后再通过遥控键的“↑”或“↓”选定为“Profibus DP” 按下“OK” 键 8) 通过遥控键的“↑”或“↓”选定为“总线设备地址” 按下“OK” 键,然后再通过遥控键的“↑”或“↓”设定总线设备地址的大小,按下“OK” 键 9) 断电之后再重新上电即可。
如何在 WinCC 中创建一个 PROFIBUS

如何在WinCC 中创建一个PROFIBUS-DP 连接?显示订货号描述通过PROFIBUS-DP 连接,可直接在WinCC 中看到I/O 的输入/输出。
为此,WinCC 提供一个PROFIBUS 通道,用于PC 与PROFIBUS 设备的连接。
在WinCC 中创建PROFIBUS-DP 连接的步骤如下:1. 组态PC 站在SIMATIC Manager 中创建一个PC 站。
该PC 站表示WinCC 服务器或WinCC 单站系统。
图1:创建一个PC 站∙通过双击“Configuration”打开硬件组态编辑器。
∙添加一个应用到机架上。
图2:添加一个应用∙添加一个CP5613 (或所用的PROFIBUS CP) 到机架。
图3:添加CP5613∙双击该CP,打开CP 属性。
∙选择“Operating Mode”标签页,启用该CP 作为主站。
请确保将已创建的应用分配给该CP。
图4:定义操作模式∙关闭属性对话框。
添加PROFIBUS 从站(例如,ET200M、ET200S 等)。
确保这些从站收到正确的PROFIBUS 地址。
直接通过DIP 开关在从站上设置PROFIBUS地址。
∙保存并编译组态。
∙将组态装载到PC 站。
确保PG/PC 接口设置到“PC Internal”且刚才的组态对应于PC 的实际组态。
可通过在桌面或开始任务栏中的图标启动站组态编辑器(德语:“Komponenten Konfigurator”) 来检查实际组态。
图5:站组态编辑器2. 组态WinCC 项目∙启动WinCC Explorer 并创建一个新WinCC 项目。
∙在WinCC Explorer 中选择“Tag Management”,右击打开弹出菜单。
图6:添加一个新驱动器∙选择“Add New Driver...”。
在随后打开的对话框中选择“PROFIBUS-DP”并通过“Open”确认该选择。
∙现在添加一个新连接到该通道(“右击> New Driver Connection...”)。
PROFIBUS-DP用户手册(V1.01)

文档编号 版本 密级 PRONET-S002 V1.01内部公开 南京埃斯顿自动控制技术有限公司研发部资源类别:共25页PROFIBUS-DP 用户手册拟制: 日期: 审核: 日期: 批准: 日期:修订记录日期 修订版本 描述 作者 2008/08/28 1.00 初稿完成 徐慧2009/09/14 1.01 Profibus-DPV0, DPV1 , DPV2合并在DP100模块的一个DSP程序。
易健第一章:前言本说明书内容主要介绍PROFIBUS接线,配置,功能和软件协议。
z第二章:PROFIBUS简介z第三章:产品概述z第四章:安装信息z第五章:PROFIBUS-DP通讯z第六章:GSD文件说明及参数设定z第七章:LED灯指示说明及故障排除方法z第八章:参数模式/对象字典z第九章:参数描述第二章:PROFIBUS 简介2.1 PROFIBUS 概况PROFIBUS是一个国际化、开放性且独立于供货商的(vendor-independent)通讯协议标准,广泛应用于生产、制造、加工和建筑自动化以及其它自动化控制领域。
PROFIBUS 根据不同需求及应用,有三种主要类型:PROFIBUS-DP、PROFIBUS-PA及PROFIBUS-FMS:z PROFIBUS-DP(Decentralized Periphery):PROFIBUS-DP是一种速率快且成本低的通讯系统,专为高速数据传输而设计的。
PROFIBUS-DP被广泛使用,尤其在远程I/O系统、马达控制中心以及变频器的应用上。
采用PROFIBUS-DP连接自动化系统与分散外围装置间通讯时,可达到最佳化的效果。
z PROFIBUS-PA(Process Automation):PROFIBUS-PA(通常附有 MBP-IS 传输技术)是一种用于过程自动化的PROFIBUS通讯系统,PROFIBUS-PA以PROFIBUS-DP为基础,在数据传输上为PROFIBUS-DP通讯协议的延伸,专门支持本质安全防爆应用,可藉由本质安全防爆MBP-IS接口,应用在有爆炸危险的区域。
PROFIBUS_DP主站和从站通讯的设计与实现
PROFIBUS_DP主站和从站通讯的设计与实现PROFIBUS_DP(Process Field Bus - Decentralized Periphery)是一种用于工业自动化领域的通信协议,主要用于连接主站(Master)和从站(Slave)之间进行高效、可靠的数据交换。
1.网络规划和布线:在设计和实施PROFIBUS_DP通信网络之前,需要进行网络规划和布线。
这包括确定主站和从站的物理位置,确定总线长度和拓扑结构,选择合适的网络线缆和连接器,并确保电缆长度、封装和终端阻抗等参数符合规范要求。
2.主站和从站选择:根据系统要求和通信需求,选择合适的PROFIBUS_DP主站和从站设备。
主站设备通常具有更强大的处理能力和更丰富的通信功能,而从站设备则主要负责执行具体的控制任务。
3.通信参数设置:在开始通信之前,需要对主站和从站的通信参数进行设置。
这包括波特率、传输速率、帧格式、地址分配等参数的配置。
主站和从站需要使用相同的通信参数才能正确地进行通信。
4.主站和从站通信协议:PROFIBUS_DP主站和从站之间的通信协议是实现通信的核心。
主站负责发送请求,从站负责响应请求并返回相应结果。
通信协议通常包括数据帧的格式和解析规则、握手和确认机制、错误处理等内容。
主站和从站需要根据PROFIBUS_DP协议规范进行开发和实现。
5.数据交换和处理:主站通过发送请求,从站接收请求并返回响应,主站接收响应,并进行数据处理。
这涉及到数据包的传输和解析,数据的读写和处理,错误的检测和恢复等。
主站和从站需要按照PROFIBUS_DP协议规范来实现数据的交换和处理。
6.系统测试和调试:在设计和实现完PROFIBUS_DP主站和从站通信之后,需要进行系统测试和调试。
这包括检查通信连接的正确性,测试通信的可靠性和稳定性,验证数据的准确性和一致性,以及排除可能存在的通信故障。
总结起来,PROFIBUS_DP主站和从站通信的设计和实现需要进行网络规划和布线、选择合适的设备、设置通信参数、实现通信协议、进行数据交换和处理,以及进行测试和调试。
PROFIBUS模块安装说明说明书

PROFIBUS Module for use with Motor Insight, C440 and S611InstallationThe PROFIBUS module is designed to be used in industrial applications and installed in accordance with this document.Mount the ModuleTo mount the PROFIBUS adapter to Motor Insight® or C440-COM-ADP the following pro-ceedure must be preformed.• Place the tabs opposite the PROFIBUS con-nector into the lower slots provided on theMotor Insights right side.• Pivot the module on the lower tabs toward the Motor Insight.• Gently press the module and Motor Insight together.Connect the PROFIBUS Adapter to PROFIBUS Connect the PROFIBUS terminal to the PROFIBUS DB9 connector located on the side of the module. The connector has screws for positive retention to eliminate accidental unplugging.Connect 24 Vdc control power to the 5-position header.• The connector has screws for positive reten-tion to eliminate accidential unplugging.• Use one wire per terminal.Set the PROFIBUS addressThe PROFIBUS address is set using the DIP switches located on the face of the module. The PROFIBUS address is binary with the major units numbered to the left of the switch on the side label. Adding up the major units set to ON deter-mines the address of the module.Example: To set the address to 25, start from the switch mark 32 and set the switches to Off (32), ON (16), ON (8), OFF (4), OFF (2) ON (1) (16+8+1 =25).Note: Address is only updated upon power up.The PROFIBUS baud rate is set automatically using an auto baud technology, there is no needto set the baud rate. For more information on the PROFIBUS attributes and how to modify them, refer to the appropriate user manual. Motor Insight MN04209001E, C440 MN04201001E or S611MN03902011E.The GSD file is located on the Eaton web site, go to .C441S - 120 Vac Input SpecificationSpecification Value Number of Inputs4Nominal Voltage120 Vac Nominal Current15mA Operating Frequency50/60Hz Signal Delay max.30msInput type IEC 61131-2Type 1 Digital C441Q - 24 Vdc Input Specificationterminals 0V and 24.connector.2Installation Leaflet IL04209006EEffective July 2010PROFIBUS Module for use with Motor Insight, C440 and S611EATON CORPORATION Specification Value Number of Inputs 4Nominal Voltage 24 Vdc Nominal Current 5mAType Current SinkingInput TypeIEC 61131-2, Type 1 Digital Max 24 Vdc Source Current50mAPROFIBUS Adapter Setup and ConfigurationConfigure C441 Profibus Adapter1. Load the gsd file for the C441 Profibus Adapter into the Master’s configuration tool.2. Select and add the C441 Profibus Adapter to the network configuration.3.The default configuration for the C441 Profibus Adapter is a StandAlone IO base. If the C441 Profibus Adapter is to connect to a base device; remove the modules from all 28 slots of the default configuration.4.Select and add the attached device’s base moduleto slot 1 of the C441 Profibus Adapter configuration. NOTE: The appropriate base module MUST be placed in slot 1 of the configuration. Failure to do so will cause configuration to fail.5.Select and add the desired modules for the data exchange into slots 2 - 28. Select only those modules supported by the base module (See the base device’s user manual for a list of sup-ported modules)Example Configuration :I/O moduleType Description C441 MotorInsight Base base - no IO Attached Device Com Adapter Outputs output - 1 byteControls C441 adapter outputsMI Command Register output - 2 bytes Controls MI Relay-start/stop Com Adapter Inputs input - 1 byte Status of C441 adapt-er inputsMI RMS Current Ave input - 2 bytes Average rms current readingMI RMS Voltage Ave input - 2 bytes Average rms voltage readingMI Total Kilowattsinput - 2 bytesTotal power readingSetup C441 Profibus Adapter Device Parameters1.Select the C441 Profibus Adapter to display its device param-eters.2. Set the “Enable Device Parameters & Adapter Outputs ComLosBehavior” parameters.Note: To enable writing of the device parameters into the attached base device “Enable Device Parameters” must be set to “Download Device Parameters”.Setup the Device Parameters1.Select the base module in the configuration to display its device parameters. The base module contains the parameters to en-able/disable faults, set thresholds, etc. for the attached device.Example: The following parameters can be found in C441 MotorInsight Base Module• CT Multiplier • Overload FLA• Overload Trip Class • GND Fault Trip Level • Low KW Trip Level • High KW Trip Level• Under Voltage Trip Level •Over Voltage Trip LevelAfter all configuration is complete, save and download the new configuration settings to the Master(PLC) & C441 Profibus Adapter.Profibus DiagnosticsThe C441 Profibus Adapter provides the user with status information along with fault and warning data relevant to the operation of the attached base module. Fault and warning information is presented to the user through extended diagnostics. All fault information is sent to the Master as high priority diagnostic messages (ext. diag. bit set in diagnostic message). All warning information is sent as low prior-ity diagnostic messages (ext diag. bit clear). Low priority diagnostic messages are issued as the fault condition clears.See the User Manual for the attached base module’s diagnostic mes-sage bit definitionsEnvironmental Ratings of the ModuleTransportation and StorageTemperature -40ºC to 85ºC (-40ºF to 185ºF)Humidity 5 - 95 % non-condensing OperatingTemperature -20ºC to 50ºC (-4ºF to 122ºF)Humidity 5 - 95 % non-condensing AltitudeAbove 2000meters (6600feet)consult factory ShockICE 60068-2-2715G any direction for 11 milliseconds Vibration IEC 60068-2-63G in any directionPolution Degree 33Installation Leaflet IL04209006EEffective July 2010PROFIBUS Module for use with Motor Insight, C440 and S611EATON CORPORATION Approvals / CertificationsModule Electrical RequirementsVoltage Range 18 - 30 Vdc Current DrawApprox. 30 mANotesFor use with Eaton UL Listed Power Supply Catalog Nos. PSS55A, PSS55B, PSS55C, or PS160E.Any UL Listed isolated power supply with a maximum of 30 Vdc output may be used, provided that a UL Listed or Recognized Fuse rated no more than 3A maximum be installed.5pin 24 VDC Power, RS485 ConnectorInstallation Leaflet IL04209006E Effective July 2010PROFIBUS Module for use with Motor Insight, C440 and S611Eaton Corporation Electrical Sector1000 Cherrington Parkway Moon Township, PA 15108 United States877-ETN-CARE (877-386-2273) © 2009 Eaton Corporation All Rights ReservedPrinted in USAPublication No. IL04209006E July 2010, Rev. 007PowerChain Management is a registered trademark of Eaton Corporation.All other trademarks are property of theirrespective owners.。
PROFIBUS DP 从机通信模块 DVPPF02-SL 操作手册说明书

DVPPF02-SLPROFIBUS DP Slave Communication Module Operation ManualDVP-0155320-01Warning3 This operation manual provides introduction on the functions, specifications, installation, basic operation,settings and network protocol for DVPPF02-SL.3 This is an OPEN TYPE device and therefore should be installed in an enclosure free of airborne dust,humidity, electric shock and vibration. The enclosure should prevent non-maintenance staff fromoperating the device (e.g. key or specific tools are required to open the enclosure) in case danger and damage on the device may occur. DO NOT touch any terminal when the power is switched on.3 Please read this operation manual thoroughly and follow the instructions in case damages on the device or injuries on the operation staff occur.Table of Content1Introduction to DVPPF02-SL (2)1.1Features (2)2Product Profile and Outline (2)3Installation (4)3.1Dimensions (4)3.2Connecting DVPPF02-SL to PLC MPU (4)3.3Installing DVPPF02-SL and PLC MPU on DIN Rail (4)3.4PIN Definition for PROFIBUS DP Port (5)3.5Connecting to PROFIBUS DP Port (5)3.6Address Switch (5)4Establishing PROFIBUS DP Network by DVPPF02-SL (6)5Transmission Distance and Baudrate (6)6GSD File (7)7Mapping Areas and Status Registers (7)8Configuring DVPPF02-SL (8)8.1Configuring DVPPF02-SL (8)8.2I/O Configuration for DVPPF02-SL (8)9LED Indicators and Trouble-shooting (9)10Application Example (10)1 Introduction to DVPPF02-SL1. Thank you for choosing Delta DVPPF02-SL PROFIBUS DP slave communication module. To ensurecorrect installation and operation of the product, please read this operation manual carefully before using it.2. This operation manual only provides introductory information on DVPPF02-SL. For more detailedinformation on the PROFIBUS DP protocol, please refer to relevant references or literatures.3. DVPPF02-SL is a PROFIBUS DP slave communication module, used for connecting the DeltaDVP-SV and DVP-SX2 series PLC to the PROFIBUS DP network. DVPPF02-SL is a left-sideextension module, and no external power supply is required when using it. The power is supplied by the PLC MPU (main processing unit).1.1 Featuresz Supports the loop data transmission between the PROFIBUS DP master and many slaves.z Auto-detects baudrate; supports max. 12M bps.z Self-diagnosisz A PLC MPU is extendable to max. 8 modules on its left hand side.z Supports max. 100 words of I/O output and 100 words of I/O input.2 Product Profile and Outline2.1 Product Profiles1 Interface for left-side I/O module2 I/O module fastening clip3 I/O module positioning hole4 POWER indicator5 NET indicator6 PROFIBUS DP port7 DIN rail clip 8 Digital display 9 Address switch10 Positioning clip 11 Nameplate 12I/O module interface(35mm)railDIN13DVP-PLC Operation Manual 22.2 SpecificationsPROFIBUS DP PortInterface DB9connector Transmission method High-speed RS-485Transmission cable Shielded twisted pair cableElectrical isolation 500 VDCCommunicationData type Cyclic data exchangeModule name DVPPF02-SLGSD document DELA0AFE.GSDProduct ID 0AFESerial baudrate supported (auto-detection) 9.6k, 19.2k, 93.75k, 187.5k, 500k, 1.5M, 3M, 6M, 12M bps (bits/second)Electrical SpecificationPower supply voltage 24 VDCInsulation voltage 500 VDCPower consumption 2 WWeight 115g EnvironmentInterference immunity ESD (IEC 61800-5-1, IEC 6100-4-2)EFT (IEC 61800-5-1, IEC 6100-4-4)Surge Teat (IEC 61800-5-1, IEC 6100-4-5)Conducted Susceptibility Test (IEC 61800-5-1, IEC 6100-4-6)Storage/operation Operation: -10 to 50°C (temperature), 90% (humidity) Storage: -25 to 70°C (temperature), 95% (humidity)Shock/vibration immunity International standards: IEC 61800-5-1, IEC 60068-2-6/IEC 61800-5-1, IEC 60068-2-273 Installation3.1 DimensionsUnit: mm3.2 Connecting DVPPF02-SL to PLC MPUz Open the fastening ports for the I/O module on the left hand side of the PLC MPU and insert the DVPPF02-SL alongside the fastening clips, as c.z Press the clips to make sure the connection is tight, as d.3.3 Installing DVPPF02-SL and PLC MPU on DIN Railz Use 35mm DIN rail.z Open the DIN rail clips on DVPPF02-SL and the PLC MPU. Insert DVPPF02-SL and the PLC MPU onto the DIN rail.z Clip up the DIN rail clip on DVPPF02-SL and the PLC MPU to fix them on the DIN rail.DVP-PLC Operation Manual 43.4 PIN Definition for PROFIBUS DP PortPINNameDefinition1 -- N/C2 -- N/C3 RxD/TxD-P Sending/receiving data P (B)4 --N/C5 DGND Data reference potential (C)6 VP Power voltage - positive7 -- N/C8RxD/TxD-NSending/receiving data N (A) 9 --N/C3.5 Connecting to PROFIBUS DP PortInsert the PROFIBUS DP bus connector into the PROFIBUS DP port on DVPF02-SL. Screw it tight to ensure DVPF02-SL and the PROFIBUS DP bus are properly connected.3.6 Address SwitchThe address switches on DVPPF02-SL are used for setting up the node address of DVPPF02-SL on the PROFIBUS DP network. The switches are two rotary switches x160 and x161. Range for each switch: 0 ~ F. See the table below for the setup range for the switches.DVP-PLC Operation Manual6Address DefinitionH’1 ~ H’7D Valid PROFIBUS address H’0 or H’7E ~ H’FFInvalid PROFIBUS addressExample: If you are to set the node address of DVPPF02-SL to 26 (decimal), simply switch x161 to 1 and x160to A. 26 (decimal) = 1A (hex) = 1×161 + A×160. Notes:z Set up the address of DVPPF02-SL when the power is off. Re-power the module after youfinish setting up the address.z Changing the setting of address when DVPPF02-SL is operating is regarded invalid. zUse slotted screwdriver carefully to adjust the address in case you scrape the module.4Establishing PROFIBUS DP Network by DVPPF02-SLDVPPF02-SL is used for connecting the DVP-SV and DVP-SX2 series PLC to the PROFIBUS DP network.5 Transmission Distance and BaudrateThe baudrate for PROFIBUS DP communication ranges from 9.6k to12M bits per second (bps). The length of cable is determined by the transmission speed. The transmission distance can be from 100 to 1,200 meters. See the table below for the baudrates DVPPF02-SL support and their corresponding transmission distance.Baudrate (bps) 9.6k 19.2k 93.75k187.5k500k 1.5M 3M 6M 12MDistance (m) 1,200 1,200 1,2001,000400 200 100 100 100 6 GSDFileGSD file is a text file, used for identify the PROFIBUS DP device (master or slave). A GSD file includes data required for configuring a slave on the PROFIBUS DP master, information on the supplier,baudrates supported and applicable I/O. When using DVPPF02-SL, first import the GSD file to thesoftware for configuring the PROFIBUS DP master, then DVPPF02-SL and items to be configured will be displayed in the software. You can download the GSD file for DVPPF02-SL from Delta’s website: /7 Mapping Areas and Status RegistersThe PLC MPU is extendable to 8 DVPPF02-SL modules on its left hand side. The first module is atlocation 1. See the table below for the I/O mapping and status registers of DVPPF02-SL at different locations.Explanations on status registers for DVPPF02-SL:High byte Low byteCode Definition Code Definition0 Normal status 0 No error1 Initializing F1 DVPPF02-SL is initializing.F0 The node address of DVPPF02-SL is out of range.F2 Error in low voltage detectionF3 DVPPF02-SL enters factory test mode.F4 DVPPF02-SL is disconnected from the master.2 ErrorF5 Error in parameterDVP-PLC Operation Manual8High byteLow byteCodeDefinitionCodeDefinitionF7 Hardware error2 ErrorF9 Configuration error8 Configuring DVPPF02-SL8.1 Configuring DVPPF02-SLWhen you configure DVPPF02-SL in the software for PROFIBUS DP master and DVPPF02-SL is offline from the PROFIBUS DP master, you can select to “clear I/O data” or “hold I/O data”, as shown below.Figure 8.1-1ParameterValue DefinitionHold I/O dataAfter DVPPF02-SL goes offline from the master, the I/O data will remain the same as they were before being offline.Los comm. with masterClear I/O dataAfter DVPPF02-SL goes offline from the master, the output data will be reset to 0 and input data remain the same.8.2 I/O Configuration for DVPPF02-SLWhen DVPPF02-SL is configured in the software for the PROFIBUS DP master, it offers many choices for configuration, satisfying all kinds of data length demands. See the table below. The output configuration means the data is sent from the master to the salve; the input configuration means from the salve to the master.Output configuration Input configuration I/O configuration1 word out 1 word out 1 word out 1 word in2 words out 2 words out 2 words out 1 word in4 words out 4 words out 4 words out 1 word in8 words out 8 words out 8 words out 1 word in16 words out 16 words out 16 words out 1 word in32 words out 32 words out 32 words out 1 word in64 words out 64 words out 64 words out 1 word in 9 LED Indicators and Trouble-shootingz POWER LEDThe POWER LED displays the status of the power supply for DVPPF02-SL.LED status Indication How to correctGreen light on The power supply is normal.--Off No power supply 1. Check if the connection between DVPPF02-SLand the PLC MPU is normal.2. Check if the power supply from the PLC MPUis normal.z NET LEDThe NET LED displays the communication status between DVPPF02-SL and the PROFIBU DP master.LED status Indication How to correctGreen light on A connection is established betweenthe master and slave.--Red light on DVPPF02-SL has notestablished aconnection with themaster.1. Check if DVPPF02-SL is connected with thePROFIBUS DP bus.2. Check if the communication cable betweenDVPPF02-SL and the PROFIBUS DP master iswell connected.3. Check if the actual address of DVPPF02-SL isconsistent with the address configured in thesoftware.4. Check if the GSD file is used correctly.z Digital DisplayThe digital display shows the status of DVPPF02-SL.Code Indication How to correct1 ~ 7D The node address ofDVPPF02-SL when it is operating normally.--F0 The node address ofDVPPF02-SL is out ofrange.Set the node address of DVPPF02-SL to be 1 to125.Code Indication How to correct F1 DVPPF02-SL is initializing. --F2 Error in low voltagedetection1. Check if the connection between DVPPF02-SLand the PLC MPU is normal.2. Check if the power supply from the PLC MPU isnormal.F3 DVPPF02-SL enters factorytest mode.Write 0 into D6350 in the PLC MPU.F4 DVPPF02-SL isdisconnected from themaster.Check if the communication cable betweenDVPPF02-SL and the PROFIBUS DP master iswell connected.F5 Error in parameter Check if the GSD file is used correctly.F7 Hardware error Send the module back to factory for repair. F9 Configuration error Check if the GSD file is used correctly.80 The PLC MPU connectedto DVPPF02-SL is in STOPstatus.Switch the PLC MPU to RUN.Operation of Digital Display1. When DVPPF02-SL is in normal operation status and the PLC MPU is in RUN status, the digitaldisplay will only show its node address.2. When DVPPF02-SL is in normal operation status and the PLC MPU is in STOP status, the digitaldisplay will how its node address and the STOP status code alternately.3. When DVPPF02-SL is initializing or in error status and the PLC MPU is in RUN status, the digitaldisplay will show its node address, initialization code or error code alternately.4. When DVPPF02-SL is initializing or in error status and the PLC MPU is in STOP status, the digitaldisplay will show its node address, initialization or error code and STOP status code alternately.10 Application ExampleApplication:A data exchange between Siemens S7-300 PLC and DVPPF02-SL through the PROFIBUS DP network Connecting DVPPF02-SL to the PROFIBUS DP Network:1. The Siemens S7-300 PLC is the PROFIBUS DP master and DVPPF02-SL the slave. See Figure10-1 for the network structure.DVP-PLC Operation Manual 10Figure 10-12. Set the PROFIBUS address of DVPPF02-SL to “1”.3. Connect a DVP-SV PLC on the right side of DVPPF02-SL and check if the connection is proper. Configuring DVPPF02-SL on the PROFIBUS DP Network by Software:z Creating a new project using the software wizard1. Open the software SIMATIC Manager, as Figure 10-2.Figure 10-22. Select “File” => “New Project Wizard”, as Figure 10-3.DVP-PLC Operation Manual12Figure 10-33.Click “Next” in the wizard, as Figure 10-4.Figure 10-44. Select a CPU type for the S7-300 model we are using and click “Next”, as Figure 10-5.5. Select a language for selected blocks and click “Next”, as Figure 10-6.6. Enter the project name and click “Finish”, as Figure 10-7.DVP-PLC Operation Manual14Figure 10-77.A new window for the newly created project then appears, as Figure 10-8.Figure 10-8z Adding PROFIBUS DP bus1. Select “SIMATIC 300 Station” in the new project window and double click “Hardware” in theright-hand side window. A new window “HW-Config” will then appear.Figure 10-92. In the HW Config window, double click “DP” in the (0)UR window, as Figure 10-10, and a new dialogbox will appear.Figure 10-103. In the new dialog box, click “Properties” to open another dialog box, as Figure 10-11.DVP-PLC Operation Manual16Figure 10-114. In this dialog box, select an address for the master and click “New” to open another dialog box, asFigure 10-12.Figure 10-125. In this dialog box, select transmission rate and profile for the bus and click “OK”, as Figure 10-13.Figure 10-136. In this successive dialog box, confirm the address and transmission rate of the PROFIBUS DP busand click “OK”.Figure 10-147. In this successive dialog box, confirm all information for the DP bus and click “OK”, as Figure 10-15.DVP-PLC Operation Manual18Figure 10-158. After all the parameters are set, a PROFIBUS DP bus will be created after the UR window, as Figure10-16.Figure 10-16z Adding GSD file1. In the HW Config window, select “Options” => “Install GSD File”, as Figure 10-17.10-17Figure2. Find the location to save the GSD file, select the GSD file to be installed and click “Install”, as Figure10-18.Figure 10-183. After the GSD file is added, we can find DVPPF02-SL in the right-hand side window, as Figure 10-19.DVPPF02-SL is the new module created.DVP-PLC Operation Manual20Figure 10-19z Adding the slave DVPPF02-SL and setting up parameters1. Select the PROFIBUS DP bus and double click the DVPPF02-SL in the right-hand side, as Figure10-20, to open a dialog box.Figure 10-202. In this dialog box, select an address for DVPPF00-SL, as Figure 10-21. The address has to beconsistent with the address set by the address switch on DVPPF02-SL. Next, click “OK”.Figure 10-213. DVPPF02-SL is now added to the PROFIBUS DP bus, as Figure 10-22.Figure 10-224. Select Slot 0 and double click “1 Word Out” on the right-hand side window, as Figure 10-23.DVP-PLC Operation Manual22Figure 10-235.Configure “1 Word Out” to Slot 0, as Figure 10-24.Figure 10-246. Configure other slots as the way Slot 0 is configured, as Figure 10-25. Finish configuring Slot 0 toSlot 2.Figure 10-257. After DVPPF02-SL is configured, double click the slave DVPPF02-SL on the PROFIBUS DP bus inFigure 10-25, and a dialog box will appear, as Figure 10-26. See 8.1 for definitions of the parameters in the dialog box.Figure 10-268. Download the configured parameters. After the master establishes a connection with DVPPF02-SL,the NET LED on DVPPF02-SL will be constantly on in green color.Data Mapping:DVP-PLC Operation Manual24Figure 10-30The data mapping for the parameters shown in Figure 10-30 is illustrated in Table 10-1.Table 10-1Program Example:The program for masterz Write the program for master in OB1.z When M0.0 is ON, write 1000 into PQW256 and 2000 into PQW258. The master will then send thedata in PQW256 and PQW258 to D6000 and D6001 in the slave through the PROFIBUS DP bus.z When M0.0 is ON, write the data in PIW256 to MW10 and data in PIW258 to MW12. The data inPIW256 and PIW258 are sent from D6250 and D6251 in the slave to the master through thePROFIBUS DP bus.The program for slavez Compile the program by Delta WPLSoft software. See the software help document for details.z When M0 is ON, write 3000 into D6250 and 4000 into D6251. DVPPF02-SL will send the data in D6250 and D6251 to PIW256 and PIW258 in the master through the PROFIBUS DP bus.z When M1 is ON, write the value in D6000 to D10 and the value in D6001 to D11. The data in D6000 and D6001 are sent from the master to DVPPF02-SL through the PROFIBUS DP bus.MEMODVP-PLC Operation Manual 26。
profibus-DP(从站地址设定)
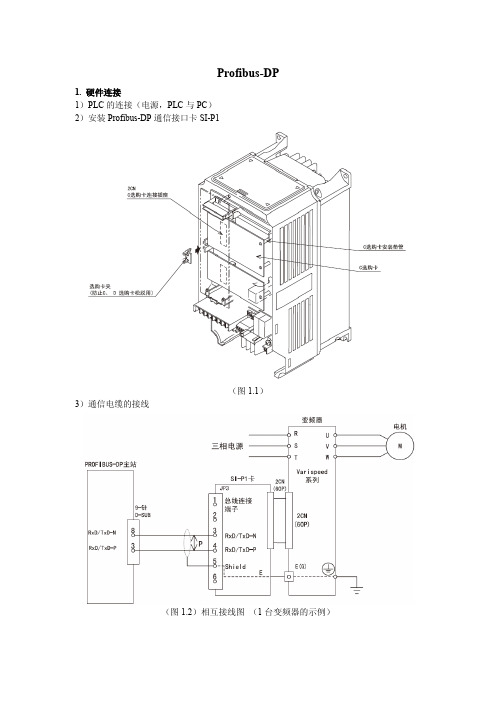
Profibus-DP1. 硬件连接1)PLC的连接(电源,PLC与PC)2)安装Profibus-DP通信接口卡SI-P1(图1.1)3)通信电缆的接线(图1.2)相互接线图(1台变频器的示例)4)变频器主体的设定2. 组态1)硬件连接完成后,打开SIMATIC Manager软件,出现如下的界面。
点击Finish。
(图2.1)2)点击新建(图2.2)3)输入文件名后,点击OK,(这里以文件名090122为例)。
(图2.3)(图2.4)4)右键选择090122→Insert New Object→SIMATIC 300 Station(图2.5)5)双击右边的对话框中的SIMATIC 300(1),双击Hardware。
(图2.6)(图2.7)6)选择SIMA TIC 300 → RACK-300 → Rail,双击或拖入编辑界面中。
(图2.8)(图2.9)7)选择UR窗口中的“1”,添加电源(电源的型号查看PLC标注),此例中PLC电源选择SIMATIC 300→PS-300→ PS 307 2A。
双击或拖入编辑界面中。
(图2.10)(图2.11)8)选择UR窗口中的“2”,添加CPU(CPU的型号查看PLC标注),此例中PLC的CPU 选择SIMA TIC 300→CPU 313C-2 DP→ 6ES7 313-6CE01。
双击或拖入编辑界面中。
在弹出的Properties对话框中,选择现场总线,点击New → OK → OK(图2.12)(图2.13)(图2.14)(图2.15)9)添加GSD文件,选择Options→ Install New GSD → YASKOOCA.gsd。
(图2.16)(图2.17)(图2.18)10)添加变频器驱动,选择Profibus-DP→ Additional Field Devices → Drives→VARISPEED PROFIBUS-DP,拖在现场总线上,选择变频器地址(地址为SI-P1卡上的地址开关1,地址开关2),此例中地址为7,点击OK,(如果有多个变频器连接,可依次拖入,地址也顺次下去,此例中为一个变频器)。
库卡机器人Profibus通信的步骤,一起来学习吧!
库卡机器人Profibus通信的步骤,一起来学习吧! 对于工业机器人来说通讯一直是一个很重要的环节,在学习中一般会觉得有些困难,但是通讯都有固定的套路,只要认真学习和实践慢慢就会掌握,小编特意整理了库卡机器人Profibus通信的步骤,一起来学习吧! 一:配置要使用的倍福模块文件 1、确定要添加的倍福模块型号,本例需配置的是EK1100和EL6731(0010)从站模块; 2、从倍福官网下载这两个模块的配置文件; 3、打开Work Visual4.0; 4、在不打开任何项目的情况下依次点击:文件>>Import/Export>>导入设备说明文件>>继续>>查找>>根据不同的文件夹右下角选择显示EtherCATESI 或PROFIBUS GSD 格式>>选择你要添加的文件>>打开>>以后一直点继续直到完成; 5、点击菜单栏工具>>DTM样本管理>>查找安装的DTM>>全部添加到右侧一栏后,点击OK。
二:用WorkVisual下载库卡机器人项目 1、通过示教器查看当前库卡机器人IP地址,查看方法顺序:手动T1模式>>投入运行>>网络配置,例如其IP地址为192.168.3.10; 2、将电脑的IP地址设置成与机器人统一网段,192.168.3.11; 3、将网线插到机器人控制柜内的KLI接口; 4、点击查找项目; 5、打开可用单元所显示的项目,并右键激活控制器; 6、右键总线结构>>添加>>X44>>OK; 7、右键EtherCAT>>添加>>从DTM选择里找到你要添加的EK1100文件> >OK; 8、右键EBus>>添加>>从DTM选择里找到你要添加的EL6731(0010)文件> >OK; 9、设置站号:双击EL6731-0010 >>Gateway settings>>设置站号(例:35)> >Apply>>OK; 10、右键ProfibusIO>>添加>>选择EL6731-0010 GSD文件>>OK; 11、右键EL6731-0010>>Module...>>从右侧一栏添加你需要的输入输出数量,并拖放到左侧>>Apply>>OK; 12、映射IO:输入输出接线>>左侧选择KR C输入、输出端,右侧选择EL6731-0010>>选择要映射的IO,右键>>连接,完成映射,配置完成。
WINCC 通过PROFIBUS-DP 协议连接
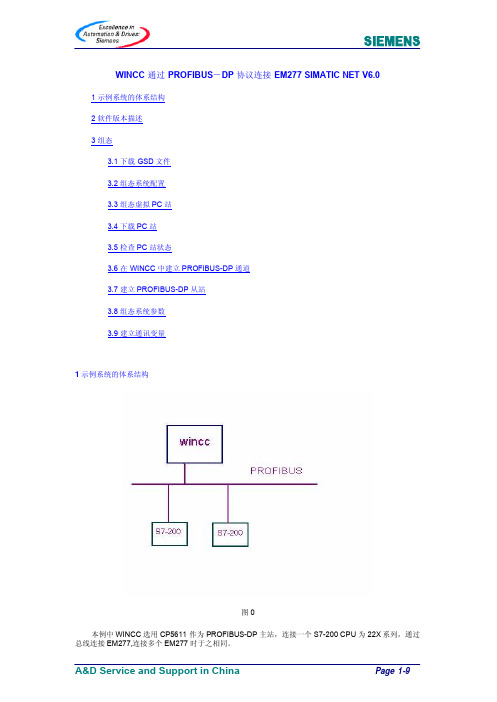
WINCC 通过PROFIBUS-DP 协议连接EM277 SIMATIC NET V6.01 示例系统的体系结构2 软件版本描述3 组态3.1 下载GSD文件3.2 组态系统配置3.3 组态虚拟PC站3.4 下载PC站3.5 检查PC站状态3.6 在WINCC中建立PROFIBUS-DP通道3.7 建立PROFIBUS-DP从站3.8 组态系统参数3.9 建立通讯变量1 示例系统的体系结构图 0本例中WINCC选用CP5611作为PROFIBUS-DP 主站,连接一个S7-200 CPU 为22X系列,通过总线连接EM277,连接多个EM277时于之相同。
2 软件版本描述需要软件1:SIMATIC NET V6.0 SP4 PROFIBUS-DP2: WINCC V5.13 组态3.1 先从网上下载EM277的GSD文件(siem089d.gsd),集成于STEP7中,图 1图 23.2 配置网卡,在项目中插入一个PC STATION, 象配置S7-300一样在第一行插入APPLICATION, 在第四行插入CP5611(此处以CP5611作为DP-MASTER), 在PROFIBUS网上添加EM277,配置通讯接口区。
以S7-200中V1200以后16个字输入16个字输出,PROFIBUS地址为4为例。
VW1200~1230作为S7-200的输入区,VW1232~1262作为S7-200的输出区。
图 3插入PC STATION 命名为EM277图 4配置CP5611作为DP-MASTER配置16个字输入16个字输出图 5配置EM277的地址偏移量为1200。
图 63.3 编译存盘后,配置虚拟PC STATION.于实际配置一样在第一行添加APPLICATION图 7进入虚拟PC STATION画面第一行添加APPLICATION INDEX表示行数 NAME 任意。
图 8图 9进入配置网卡界面图 10选择CP5611的模式为CONFIGURED MODE INDEX为4(行数)配置完后退出。
贝加莱PROFIBUS_DP使用指南

贝加莱PROFIBUS_DP使用指南贝加莱工业自动化(上海)有限公司Chen ZhipingB&R Industrial Automation16/F, Blk.C, 70 Cao Bao Road, Shanghai 200235, P.R.China目录1前言 (2)1.1PROFIBUS FMS (2)1.2PROFIBUS DP主站 (2)1.3PROFIBUS DP从站 (2)2硬件配置 (2)2.12005主站 (2)2.22005从站 (2)2.32003从站 (2)3应用程序 (2)3.12005主站 (2)3.22005从站 (2)3.32003从站 (2)4EX450的配置 (2)4.1EX450配置文件 (3)4.1.1 选择所要配置的网络(ProfiBus) (3)4.1.2 插入主站模块 (3)4.1.3 插入从站模块 (4)4.2配置总线参数 (5)4.2.1 配置主站参数 (6)4.2.2 配置从站参数 (7)4.2.3 online download (8)4.2.4 通过Online下拉菜单诊断整个网络配置 (9)4.2.5 保存配置文件,转换为B&R数据模块 (10)4.2.6 监视通讯数据 (10)1 前言贝加莱提供多种PROFIBUS方案, 本文当仅讨论PROFIBUS DP方案.1.1 PROFIBUS FMS只能选用2005系列的NW150, 模块提供D9公插头,有两个拨码可设置波特率和站号.1.2 PROFIBUS DP主站只能选用2005系列的EX450.66-1(或者EX450.66-2, 差别在缓冲区大小为前者的两倍), 需要调用DPMASTER函数库.1.3 PROFIBUS DP从站●2003系列中, 选用IF361,需要调用IF361函数库.●2005系列中, 选用IF661(SG3, 需要调用IF661函数库)和IF761(SG4)2 硬件配置2.1 2005主站PS465+IF260+3EX450.66-1 (或3EX450.66-2).2.2 2005从站PS465+IF260+CP476+3IF661.9.2.3 2003从站CP476+7IF361.70-1.3 应用程序3.1 2005主站●3EX450.66模块●调用DPMaster库。
PROFIBUS-DP组态接线,每个师傅说法都不一样,听听专业解读

PROFIBUS-DP组态接线,每个师傅说法都不一样,听听专业解读PROFIBUS 是一种具有广泛应用范围的、开放的数字通信系统,在集中自动化系统向分散自动化系统转移方面是一种重大突破。
由于PROFIBUS一直侧重于系统集成和系统工程等方面,尤其是侧重于应用行规的研究开发,使得该总线具有适合于快速、时间要求严格的应用和复杂的通信任务的特点,成为唯一能够全面覆盖工厂自动化和过程自动化应用的现场总线,特别适用于工厂自动化和过程自动化领域。
因而从诞生至今,PROFIBUS 在现场总线技术领域一直是国际市场上的领导者。
随着PROFIBUS的大量应用,许多用户开始接触并使用了现场总线。
但由于用户对现场总线技术的了解程度不同,再加上现场施工情况复杂,因而很有可能导致许多项目的现场总线通讯上可能存在着一些隐患,如果不能及时发现和处理,将有可能导致系统出现通讯故障,从而影响整个系统的正常运行。
PROFIBUS网络通讯的本质是RS485串口通讯,按照不同的行业应用,主要有三种通讯行规:DP(Decentralized Peripherals),FMS(Field Message Specification)和PA(Process Automation)行规。
一、PROFIBUS-DP线的正确接法普及正确接法如下图,不用解释,看图就明白。
PROFIBUS 电缆很简单的,就只有两根线在里面,一根红的一根绿的,然后外面有屏蔽层。
接线的时候,要把屏蔽层接好,不能和里面的电线接触到。
要分清楚进去的和出去的线分别是哪个,假如是一串的,就是一根总线下去,中间不断地接入分站,这个是很常用的方法。
在总线的两头的两个接头,线都要接在进去的那个孔里,不能是出的那个孔,然后这两个两头的接头,要把它们的开关置为ON状态,这时候就只有进去的那个接线是通的,而出去的那个接线是断的。
其余中间的接头,都置为OFF,它们的进出两个接线都是通的(记忆方法:ON表示接入终端电阻,所以两端的接头拨至ON;OFF表示断开终端电阻,所以中间的接头要拨至 OFF)。
- 1、下载文档前请自行甄别文档内容的完整性,平台不提供额外的编辑、内容补充、找答案等附加服务。
- 2、"仅部分预览"的文档,不可在线预览部分如存在完整性等问题,可反馈申请退款(可完整预览的文档不适用该条件!)。
- 3、如文档侵犯您的权益,请联系客服反馈,我们会尽快为您处理(人工客服工作时间:9:00-18:30)。
IRC5控制柜追加PROFIBUS-DP模块的操作流程
准备工作:
1、获得一个具有以下选项的控制器密钥
840-2 Profibus Fieldbus Adapter
2、已安装好与机器人对应版本的ROBOTWARE和ROBOTSTUDIO,软件在随机光盘中。
参考视频/v_show/id_XMTkwMjgwOTUy.html?f=5008409
3、做一个机器人备份。
/v_show/id_XMTg4Njk5Mzg0.html?f=5008409
4、准备好DP模块
安装硬件:
1、机器人关电。
2、将控制柜中主机的盖板小心拆掉。
3、将DP模块顺着导轨装入,使用梅花内六角扳手进行固定。
更新机器人系统:
1、在ROBOTSTUDIO中重新建一个机器人系统,其中:
1-1控制器密钥使用新的具有840-2 Profibus Fieldbus Adapter
1-2驱动器密钥使用原来的密钥。
2、将系统下载安装到机器人控制柜。
参考视频/v_show/id_XMjAwNzgzMjgw.html?f=4977720查看密码 cp
至此,加装DP模块的操作完成,关于DP模块的设置请参考以下的视频
/v_show/id_XMTg4OTc2OTc2.html?f=5008409
*******************************************************************************************以上的详细操作说明可参考以下的资料,当当,京东,亚马逊有售。
入门必读:《工业机器人实操与应用技巧》
进阶参考:《工业机器人典型应用案例精析》
虚拟仿真:《工业机器人工程应用虚拟仿真教程》
关注微信公众号,了解更多ABB机器人使用技巧。
