juniper ha配置
Juniperssg-140防火墙冗余配置步骤分析

Juniper ssg 140防火墙HA配置步骤一、设置步骤1、将两台防火墙的第六个端口连接在一起,我们设置将原有防火墙设置为主防火墙,新增加的防火墙为备份的防火墙,备份的防火墙只连接第六个端口,其他的端口将在防火墙配置完毕后才连接上。
2、使用终端线缆连接到防火墙的Console口,超级终端参数设置为9600-8-无-1-无。
二、命令行配置方式蓝色字体为在超级终端上输入的命令1、主防火墙配置ns204>unset interface e6 ip将端口6的IP地址删除,ns204>set interface e6 zone ha将端口6和HA区域绑定一起配置NSRPns204->ns204-> get nsrp查看NSRP配置信息nsrp version: 2.0cluster info:cluster id not set: nsrp is inactive 默认的情况下NSRP没有激活VSD group info:init hold time: 5heartbeat lost threshold: 3heartbeat interval: 1000(ms)group priority preempt holddown inelig master PB other memberstotal number of vsd groups: 0Total iteration=3808,time=2721060,max=880,min=286,average=714RTO mirror info:run time object sync:disabledping session sync: enabledcoldstart sync donensrp link info:no nsrp link has been defined yetNSRP encryption: disabled--- more ---NSRP authentication: disabledNSRP monitor interface: nonenumber of gratuitous arps: 4 (default)track ip: disabledns204-> set nsrp cluster id 1 设置cluster组号ns204(M)-> set nsrp vsd id 0 设置VSD的组号,这条命令可以不用输入,因为防火墙的默认的虚拟安全数据库(VSD)的值是0。
juniper防火墙基本配置文档

防火墙基本配置步骤
防火墙的基本配置分三个步骤:
1、配置接口的IP地址和接口模式。
2、配置默认路由!
3、配置允许策略,TRUST到UNTRUST的策略!
这个是接口栏的截图:单击EDIT即可进行编辑!这里需要编辑trust口和untrust口!
这是点击trust口的edit后进入的配置界面,您只要输入IP地址和掩码位即可!注意:Manage ip* 对应的空白框一定不要填入内容,截图里的是自动生成的!其他保持默认,单击下面的OK即可完成!
下图是点击untrust口的edit进入编辑,选择static ip ,填入IP地址和掩码位,这里的IP是公网IP地址,manage ip那依然保持空白,模式为route,然后在service options选项栏中,将web ui,telnet,ping;三处打勾,如图!
然后点击OK即可完成!
点击左栏的Destination选项即可出现路由界面:新建点击NEW即可!
下图为点击NEW后出现的画面:如图填入内容,ip address/netmask填入0.0.0.0/0,
Next hop处选择gateway,在interface 处的下拉菜单中选择出口,gateway ip address填入UNTRUST口IP地址的下一跳网关即可!其他默认单击OK完成!
trust,TO处选择untrust,然后点击NEW!
点击new后的配置界面,如图配置即可!source address,destination address,service三处都选择ANY,action选permit, 在logging处打勾,其他保持默认,点击OK即可!
下图为蓝影标出的这条策略就是如上图配置完成后看到的结果!。
Juniper常用配置

Juniper常用配置一、基本操作1、登录设备系统初始化用户名是root,密码是空。
在用户模式下输入configure 或者是edit可以进入配置模式。
2、设置用户名:ethot-nameE某4200。
3、配置模式下运行用户模式命令,则需要在命令前面加一个run,如:runhowinterface4、在how后面使用管道符号加上diplayet将其转换成et格式命令howprotocolopf|diplayet6、交换机重启:requetytemreboot7、交换机关机:requetytemhalt二、交换机基本操作2.1设置root密码实例:2.2设置删除主机名实例:2.3开启Telnet登陆服务实例:2.4开启远程h登陆E某交换机默认是没有开启SSH服务,当你打开了SSH服务而没有制定SSH的版本,系统自动支持V1和V2版本。
如果你指定了SSH的版本,则系统只允许你指定版本的SSH登陆。
实例:[editytemervice]#\设置SSH支持V1版本\2.5打开/关闭端口E某交换的端口可以通过diable来关闭(类似于Cico的hutdown命令),恢复就是删除diable参数(相当于Cico的nohutdown)。
#\恢复端口,相当于nohutdown一个端口\[edit][edit]三、VLAN操作3.1添加VLAN实例:如果创建一个名字为chai_vlan的VLAN10,并且网关设置为192.168.1.1/24,ge-0/0/1属于该VLAN。
1、创建VLAN(VLAN下直接将端口加入到VLAN)#\设置chai_vlan的vlanid\#\设置vlan描述\#\以下所有操作都是对chai_vlan进行\#\回到最外层菜单\#\将绑定三层逻辑子端口\——起三层#\将端口加入到VLAN中\#\将端口加入到VLAN中\#配三层接口地址#\回到最外层菜单\3.2删除VLAN由于一个VLAN创建之后,会被端口引用,可能还创建了三层端口,因此在删除vlan的时候需要把端口引用关系解除同时删除三层vlan子端口,删除步骤如下:3.3Trunk配置#\删除端口信息\#回到最外层菜单。
Juniper 防火墙HA配置详解_主从(L3 路由模式)

J u n i p e r防火墙H A配置详解_主从(L3路由模式)------------------------------------------作者xxxx------------------------------------------日期xxxxJuniper HA 主双(L3)路由模式配置实际环境中防火墙做主双是不太可能实现全互联结构,juniper防火墙标配都是4个物理以太网端口,全互联架构需要防火墙增加额外的以太网接口(这样会增加用户成本),或者在物理接口上使用子接口(这样配置的复杂性增加许多),最主要的是用户的网络中大多没有像全互联模式那样多的设备。
因此主双多数实现在相对冗余的网络环境中。
HAG 2/23G 2/1G 2/1G 2/23G 2/24G 2/24防火墙A上执行的命令set hostname ISG1000-Aset intset interface "ethernet1/4" zone "HA"set nsrp cluster id 1set nsrp rto-mirror syncset nsrp vsd-group id 0 priority 10set nsrp vsd-group id 0 preemptset nsrp vsd-group id 0 monitor interface ethernet1/1 set nsrp vsd-group id 0 monitor interface ethernet1/2 set interface ethernet1 zone trustset interface ethernet1 ip /24set interface ethernet1 manage-ipset interface ethernet2 zone Untrustset .254/24set inter.1set interface eth1 manageset interface eth2 manage防火墙B上执行的命令set hostname ISG1000-Bset interface "ethernet1/4" zone "HA"set nsrp cluster id 1set nsrp rto-mirror syncset nsrp vsd-group id 0 priority 100set nsrp vsd-group id 0 preemptset nsrp vsd-group id 0 monitor interface ethernet1/1 set nsrp vsd-group id 0 monitor interface ethernet1/2 set interface ethernet1 zone trustset interface ethernet1 ip /24set interface ethernet1 manage-ipset interface ethernet2 zone Untrustset interface ethernet2 manage-ip 172.16.1.2set interface eth1 manageset interface eth2 manage任意一个防火墙上执行的命令即可set policy id 2 from "Trust" to "Untrust" "Any" "Any" "ANY" permitset policy id 3 from "UnTrust" to "trust" "Any" "Any" "ANY" permit___________________________________________________________最后 A 和 B 都必须执行的命令exec nsrp sync global save。
【设置】juniper防火墙详细配置手册

【关键字】设置Juniper防火墙简明实用手册(版本号:V1.0)目录1juniper中文参考手册重点章节导读版本:Juniper防火墙5.0中文参考手册,内容非常庞大和繁杂,其中很多介绍和功能实际应用的可能性不大,为了让大家尽快用最短的时间内掌握Juniper 防火墙的实际操作,下面简单对参考手册中的重点章节进行一个总结和概括,掌握了这些内容大家就可以基本能够完成安全部署和维护的工作。
1.1 第二卷:基本原理1.1.1第一章:ScreenOS 体系结构●安全区●安全区接口●策略1.1.2第二章:路由表和静态路由●配置静态路由1.1.3第三章:区段●安全区●配置安全区●功能区段:HA区段1.1.4第四章:接口●接口类型:安全区接口:物理●接口类型:安全区接口:功能区段接口●察看接口●配置安全区接口:将接口绑定到安全区、从安全区解除接口绑定、修改接口、跟踪IP地址●二级IP地址1.1.5第五章:接口模式●透明模式●NAT模式●路由模式1.1.6第六章:为策略构建块●地址:地址条目、地址组●服务:预定义的服务、定制服务●DIP池:端口地址转换、范例:创建带有PAT的DIP池、范例:修改DIP池、扩展接口和DIP●时间表1.1.7第七章:策略●三种类型的策略●策略定义●策略应用1.1.8第八章:地址转换●地址转换简介●源网络地址转换●目的网络地址转换●映射IP 地址●虚拟IP地址1.1.9第十一章:系统参数●下载/上传设置和固件●系统时钟1.2 第三卷:管理1.2.1第一章:管理●通过WEB 用户界面进行管理●通过命令行界面进行管理●管理的级别:根管理员、可读/ 写管理员、只读管理员、定义Admin用户●保证管理信息流的安全:更改端口号、更改Admin 登录名和密码、重置设备到出厂缺省设置、限制管理访问1.2.2监控NetScreen 设备●储存日志信息●事件日志●信息流日志●系统日志1.3 第八卷:高可用性1.3.1NSRP●NSRP 概述●NSRP 和NETSCREEN 的操作模式●NSRP集群●VSD组●同步1.3.2故障切换●设备故障切换(NSRP)●VSD 组故障切换(NSRP)●为设备或VSD 组故障切换配置对象监控2Juniper防火墙初始化配置和操纵对一台空配置的Juniper防火墙我们可以用两种方法去进行操纵:Console 控制台和WEB。
Juniper防火墙配置图解

Juniper 防火墙v6.0以上版本 L2tpvpn (for XP Win7)配置图解防火墙端配置1、新建地址池Objects – IP Pools – NewIP Pool Name :用户自定义名称Start IP :用户自定义一段地址的起始地址End IP :用户自定义一段地址的结束地址2、修改L2TP 默认设置VPNs – L2TP – Default Settings3、建立用户和组3.1 新建用户Objects – Users – Local -- New重复这个过程,建立多个用户3.2 新建用户组Objects – Users – Local Group -- New4、建立Vpn Tunnel建立tunnel前,先确定好用于拨入VPN的接口编号。
VPNs – L2TP – Tunnel -- New5、建立策略Policy – Policies – NewSource Address : 选择 Dial-UP VPNDestination Address : 选择 New Address ,填入你要访问的目的地址或目的地址段Service :选择要访问的服务Action : 选择 tunnelL2TP :选择新建的L2TP vpn tunnelLogging :可选记录访问日志客户端配置1.1XP端配置1.1.1建立拨号网上邻居右键属性-点击新建连接向导图标点击完成,vpn拨号配置建立完,后面进行配置调整在新建的vpn连接上右键属性提示保留配置时选择Y1.1.2修改注册表点击开始—运行 --- 键入 regedit命令点击确定,进入注册表配置。
进入HKEY_LOCAL_MACHINE\SYSTEM\CurrentControlSet\Services\RasMan\Paramete rs ,在右侧新建值命名为“ProhibitIpSec”注意大小写,数值为1修改完毕后重启计算机,进行vpn拨号测试用户名和密码栏中填入防火墙端配置的用户名和密码。
Juniper路由器配置命令介绍

Juniper路由器配置命令介绍Juniper路由器配置命令介绍目录1、简介2、配置基础命令2.1 进入操作模式2.2 配置系统参数2.3 设置管理接口2.4 配置路由表3、高级配置命令3.1 OSPF配置3.2 BGP配置3.3 VRF配置3.4 MPLS配置4、安全配置命令4.1 配置防火墙4.2 配置安全策略4.3 配置VPN4.4 配置ACL5、故障排查命令5.1 显示命令5.2 路由故障排查5.3 硬件故障排查5.4 访问控制故障排查6、性能优化命令6.1 接口配置6.2 QoS配置6.3 缓存配置6.4 动态路由配置1、简介Juniper路由器是一种支持多种网络协议的高性能路由器。
本文档介绍了Juniper路由器的配置命令,并根据功能分类进行了细化。
2、配置基础命令2.1 进入操作模式- login:登录路由器- cli:进入命令行操作模式- configure:进入配置操作模式2.2 配置系统参数- set system hostname <hostname>:设置路由器主机名- set system domn-name <domn-name>:设置路由器域名- set system time-zone <time-zone>:设置时区- set system name-server <ip-address>:设置DNS服务器2.3 设置管理接口- set interfaces <interface> unit <unit> family inet address <ip-address/mask>:配置管理接口的IP地质- set interfaces <interface> unit <unit> family inet address dhcp:使用DHCP分配管理接口的IP地质2.4 配置路由表- set routing-options static route <destination> next-hop <next-hop>:配置静态路由- set routing-options router-id <id>:配置路由器ID- set protocols ospf area <area> interface <interface>:配置接口与OSPF区域的关联3、高级配置命令3.1 OSPF配置- set protocols ospf area <area> interface <interface>:配置接口与OSPF区域的关联- show ospf neighbor:显示OSPF邻居信息- show ospf route:显示OSPF路由表3.2 BGP配置- set protocols bgp group <group-name> neighbor<neighbor-address>:配置BGP邻居- set protocols bgp group <group-name> family <family>:配置BGP邻居的地质族- show bgp neighbor:显示BGP邻居信息- show bgp summary:显示BGP邻居摘要信息3.3 VRF配置- set routing-instances <instance-name> interface<interface>:配置接口与VRF的关联- set routing-instances <instance-name> routing-options static route <destination> next-hop <next-hop>:配置静态路由3.4 MPLS配置- set protocols mpls interface <interface>:启用接口的MPLS功能- set protocols mpls label-switched-path <LSP-name> to <destination-address> : 配置LSP的路径4、安全配置命令4.1 配置防火墙- set security policies from-zone <from-zone> to-zone <to-zone> policy <policy-name> match <match-conditions> then permit/deny:配置安全策略4.2 配置安全策略- set security zones security-zone <zone-name> address-book address <address-name> <ip-address>:配置地质对象- set security zones security-zone <zone-name> host-inbound-traffic system-services <services>:配置允许进入防火墙的服务4.3 配置VPN- set security ike proposal <proposal-name> authentication-method <method>:配置IKE提议- set security ike gateway <gateway-name> ike-policy <policy-name>:配置IKE网关- set security ipsec vpn <vpn-name> bind-interface<interface>:绑定VPN到接口4.4 配置ACL- set firewall family inet filter <filter-name> term <term-name> from protocol <protocol>:配置ACL规则- set firewall family inet filter <filter-name> term <term-name> then accept/discard:配置ACL规则动作5、故障排查命令5.1 显示命令- show interfaces <interface> detl:显示接口详细信息- show route <destination> : 显示路由信息- show chassis hardware:显示硬件信息5.2 路由故障排查- show bgp summary:显示BGP邻居摘要信息- show ospf neighbor:显示OSPF邻居信息- show route protocol <protocol>:显示指定协议的路由5.3 硬件故障排查- show chassis hardware:显示硬件信息- show log messages:显示系统日志消息- request support information:收集支持信息文件5.4 访问控制故障排查- show security policies from-zone <from-zone> to-zone <to-zone> policy <policy-name>:显示安全策略信息- show security zones interfaces:显示接口与安全域的关联信息6、性能优化命令6.1 接口配置- set interfaces <interface> mtu <mtu-size>:设置接口MTU大小- set interfaces <interface> description <description>:设置接口描述6.2 QoS配置- set class-of-service interfaces <interface> unit<unit> scheduler-map <map-name>:为接口配置调度器映射- set class-of-service scheduler-maps <map-name> forwarding-class <forwarding-class> scheduler <scheduler-name>:配置调度器映射6.3 缓存配置- set forwarding-options cache hit-cache-size <size>:设置缓存大小- set forwarding-options cache timeout <timeout-value>:设置缓存超时时间6.4 动态路由配置- set protocols ospf area <area> interface <interface> passive:将接口设置为OSPF被动接口- set routing-instances <instance-name> interface <interface> passive:将接口设置为VRF被动接口附件:无法律名词及注释:无。
Juniper路由器配置详解

Juniper路由器配置详解第一章:Juniper路由器概述Juniper Networks是全球知名的网络设备供应商之一,其路由器产品以高性能和可靠性而闻名。
本章将介绍Juniper路由器的基本概念和架构。
首先将介绍Junos操作系统,然后探讨Juniper路由器的不同系列和型号。
第二章:Juniper路由器接口配置Juniper路由器的接口配置非常重要,它决定了如何连接路由器以及与其他设备进行通信。
本章将详细讨论接口类型、接口配置命令以及不同接口的特性和用途。
第三章:基本路由配置路由是网络中数据包传输的基础,对于Juniper路由器的配置来说非常重要。
本章将介绍如何配置静态路由和动态路由,包括OSPF和BGP等常用路由协议。
第四章:高级路由配置高级路由配置允许更复杂的路由策略和动态路由选择。
本章将讨论路由策略配置和路由过滤列表等高级路由功能,以及如何实现路由红istribution和路由聚合。
第五章:安全配置网络安全对于任何企业来说都是至关重要的。
本章将介绍如何配置Juniper路由器的安全功能,包括防火墙、虚拟私有网络(VPN)和安全策略等。
我们还将谈及如何使用Juniper安全套件提供的高级保护机制来保护网络。
第六章:QoS配置服务质量(QoS)是保证网络性能的重要因素之一。
本章将详细讨论如何使用Juniper路由器的QoS功能来管理带宽、优化流量和提供最佳用户体验。
第七章:管理配置管理配置是确保Juniper路由器正常运行的关键。
本章将讨论如何配置远程访问、系统日志和故障排除等管理功能。
我们还将介绍如何使用Junos Space网络管理平台来实现集中化管理和配置。
第八章:高可用性配置高可用性是企业网络的重要要求之一。
本章将介绍如何配置Juniper路由器的高可用性功能,包括冗余路由器、Virtual Chassis和Link Aggregation等。
我们还将讨论如何实现网络故障恢复和负载均衡。
Junipersrx210-HA配置实例及图解
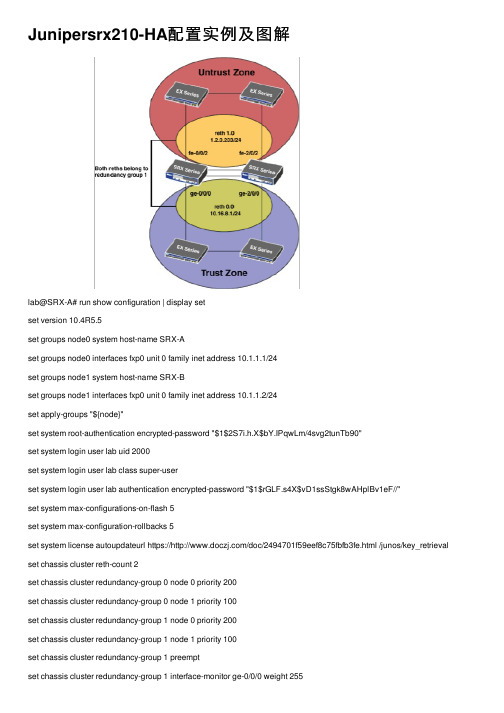
Junipersrx210-HA配置实例及图解lab@SRX-A# run show configuration | display setset version 10.4R5.5set groups node0 system host-name SRX-Aset groups node0 interfaces fxp0 unit 0 family inet address 10.1.1.1/24set groups node1 system host-name SRX-Bset groups node1 interfaces fxp0 unit 0 family inet address 10.1.1.2/24set apply-groups "${node}"set system root-authentication encrypted-password "$1$2S7i.h.X$bY.IPqwLm/4svg2tunTb90"set system login user lab uid 2000set system login user lab class super-userset system login user lab authentication encrypted-password "$1$rGLF.s4X$vD1ssStgk8wAHplBv1eF//"set system max-configurations-on-flash 5set system max-configuration-rollbacks 5set system license autoupdateurl https:///doc/2494701f59eef8c75fbfb3fe.html /junos/key_retrieval set chassis cluster reth-count 2set chassis cluster redundancy-group 0 node 0 priority 200set chassis cluster redundancy-group 0 node 1 priority 100set chassis cluster redundancy-group 1 node 0 priority 200set chassis cluster redundancy-group 1 node 1 priority 100set chassis cluster redundancy-group 1 interface-monitor ge-2/0/0 weight 255set chassis cluster redundancy-group 1 interface-monitor fe-0/0/2 weight 255set chassis cluster redundancy-group 1 interface-monitor fe-2/0/2 weight 255set interfaces ge-0/0/0gigether-options redundant-parent reth0set interfaces fe-0/0/2 fastether-options redundant-parent reth1set interfaces ge-2/0/0gigether-options redundant-parent reth0set interfaces fe-2/0/2 fastether-options redundant-parent reth1set interfaces fab0 fabric-options member-interfaces fe-0/0/5set interfaces fab1 fabric-options member-interfaces fe-2/0/5set interfaces reth0 redundant-ether-options redundancy-group 1set interfaces reth0 unit 0 family inet address 192.168.1.1/24set interfaces reth1 redundant-ether-options redundancy-group 1set interfaces reth1 unit 0 family inet address 172.56.3.35/16set routing-options static route 0.0.0.0/0 next-hop 172.56.0.1set security zones security-zone untrust interfaces reth1.0set security zones security-zone trust interfaces reth0.0set security policies from-zone trust to-zone untrust policy HA-policy match source-address any set security policies from-zone trust to-zone untrust policy HA-policy match destination-address any set security policies from-zone trust to-zone untrust policy HA-policy match application anyset security policies from-zone trust to-zone untrust policy HA-policy then permit{primary:node0}[edit]lab@SRX-A# run show chassis cluster statusCluster ID: 1Node Priority Status Preempt Manual failoverRedundancy group: 0 , Failover count: 1node0 200 primary no nonode1 100 secondary no noRedundancy group: 1 , Failover count: 7node0 200 primary yes nonode1 100 secondary yes no{primary:node0}[edit]lab@SRX-A# run show chassis cluster interfacesControl link 0 name: fxp1Control link status: UpName Child-interface Statusfab0 fe-0/0/5 upfab0fab1 fe-2/0/5 upfab1Fabric link status: UpRedundant-ethernet Information:Name Status Redundancy-groupreth0 Up 1reth1 Up 1Interface Monitoring:Interface Weight Status Redundancy-group fe-2/0/2 255 Up 1 fe-0/0/2 255 Up 1ge-2/0/0 255 Up 1ge-0/0/0 255 Up 1{primary:node0}[edit]lab@SRX-A# show## Last changed: 2011-09-06 00:38:39 UTCversion 10.4R5.5;groups {node0 {system {host-name SRX-A;}interfaces {fxp0 {unit 0 {familyinet {address 10.1.1.1/24;}}}}}system {host-name SRX-B;interfaces {fxp0 {unit 0 {familyinet {address 10.1.1.2/24;}}}}}}apply-groups "${node}";system {root-authentication {encrypted-password "$1$2S7i.h.X$bY.IPqwLm/4svg2tunTb90"; ## SECRET-DATA } login {user lab {uid 2000;class super-user;authentication {encrypted-password "$1$rGLF.s4X$vD1ssStgk8wAHplBv1eF//"; ## SECRET-DATA } }}max-configurations-on-flash 5;max-configuration-rollbacks 5;license {autoupdate {url https:///doc/2494701f59eef8c75fbfb3fe.html /junos/key_retrieval; }}}chassis {reth-count 2; redundancy-group 0 { node 0 priority 200; node 1 priority 100;}redundancy-group 1 { node 0 priority 200; node 1 priority 100; interface-monitor {ge-0/0/0 weight 255; ge-2/0/0 weight 255;fe-0/0/2 weight 255;fe-2/0/2 weight 255;}}}}interfaces {ge-0/0/0 {gigether-options { redundant-parent reth0; }}fe-0/0/2 {fastether-options { redundant-parent reth1; }}ge-2/0/0 {gigether-options { redundant-parent reth0; }}fe-2/0/2 {}}fab0 {fabric-options {member-interfaces {fe-0/0/5;}}}fab1 {fabric-options {member-interfaces {fe-2/0/5;}}}reth0 {redundant-ether-options { redundancy-group 1; }unit 0 {familyinet {address 192.168.1.1/24;}}}reth1 {redundant-ether-options { redundancy-group 1; }unit 0 {familyinet {address 172.56.3.35/16;}}}routing-options {static {route 0.0.0.0/0 next-hop 172.56.0.1; }}security {zones {security-zoneuntrust { interfaces {reth1.0;}}security-zone trust {interfaces {reth0.0;}}}policies {from-zone trust to-zone untrust { policy HA-policy { match {source-address any;destination-address any;application any;}then {permit;}}} }}{primary:node0}[edit]。
Juniper-HA配置

command:set clock timezone 7set clock dst recurring start-weekday 2 0 3 02:00 end-weekday 1 0 11 02:00 set vrouter trust-vr sharableset vrouter "untrust-vr"exitset vrouter "trust-vr"unset auto-route-exportexitset service "TCP_8080" protocol tcp src-port 0-65535 dst-port 8080-8080 set service "TCP_15000" protocol tcp src-port 0-65535 dst-port 15000-15000 set alg appleichat enableunset alg appleichat re-assembly enableset alg sctp enableset auth-server "Local" id 0set auth-server "Local" server-name "Local"set auth default auth server "Local"set auth radius accounting port 1646set admin mail alertset admin mail server-name "mail.taaa"set admin mail mail-addr1 "itsupport@taaa"set admin mail traffic-logset admin auth web timeout 10set admin auth server "Local"set admin format dosset zone "Trust" vrouter "trust-vr"set zone "Untrust" vrouter "trust-vr"set zone "DMZ" vrouter "trust-vr"set zone "VLAN" vrouter "trust-vr"set zone id 100 "Untrust2"set zone "Untrust-Tun" vrouter "trust-vr"set zone "Trust" tcp-rstset zone "Untrust" blockunset zone "Untrust" tcp-rstset zone "MGT" blockset zone "DMZ" tcp-rstset zone "VLAN" blockunset zone "VLAN" tcp-rstset zone "Untrust2" blockunset zone "Untrust2" tcp-rstset zone "Untrust" screen tear-dropset zone "Untrust" screen syn-floodset zone "Untrust" screen ping-deathset zone "Untrust" screen ip-filter-srcset zone "Untrust" screen landset zone "V1-Untrust" screen tear-dropset zone "V1-Untrust" screen syn-floodset zone "V1-Untrust" screen ping-deathset zone "V1-Untrust" screen ip-filter-srcset zone "V1-Untrust" screen landset zone "Untrust2" screen tear-dropset zone "Untrust2" screen syn-floodset zone "Untrust2" screen ping-deathset zone "Untrust2" screen ip-filter-srcset zone "Untrust2" screen landset interface "ethernet0/0" zone "Trust"set interface "ethernet0/1" zone "DMZ"set interface "ethernet0/2" zone "Untrust2"set interface "ethernet0/4" zone "Untrust"set interface "ethernet0/6" zone "HA"set interface "ethernet0/7" zone "HA"set interface ethernet0/0 ip 192.168.168.253/24set interface ethernet0/0 natunset interface vlan1 ipset interface ethernet0/0:1 ip 192.168.168.254/24 set interface ethernet0/0:1 natset interface ethernet0/2 ipset interface ethernet0/2 routeset interface ethernet0/2:1 ipset interface ethernet0/2:1 routeset interface ethernet0/4 ipset interface ethernet0/4 routeset interface ethernet0/4:1 ipset interface ethernet0/4:1 routeset interface ethernet0/0:1 mtu 1500set interface ethernet0/2:1 mtu 1500set interface ethernet0/4:1 mtu 1500unset interface vlan1 bypass-others-ipsecunset interface vlan1 bypass-non-ipset interface ethernet0/0 manage-ip 192.168.168.251 set interface ethernet0/4 manage-ipset interface ethernet0/0 ip manageableset interface ethernet0/0:1 ip manageableset interface ethernet0/2 ip manageableset interface ethernet0/2:1 ip manageableset interface ethernet0/4 ip manageableset interface ethernet0/4:1 ip manageableset interface ethernet0/2 manage sshset interface ethernet0/2 manage sslset interface ethernet0/2:1 manage sslset interface ethernet0/4 manage pingset interface ethernet0/4 manage sslset interface ethernet0/4:1 manage sslset interface ethernet0/4 monitor track-ip ipset interface ethernet0/4 monitor track-ip ip threshold 5set interface ethernet0/4 monitor track-ip ip weight 255unset interface ethernet0/4 monitor track-ip dynamicset interface "ethernet0/2" mip host 192.168.168.1 netmask 255.255.255.255 vr "trust-vr" set interface "ethernet0/2" mip host 192.168.168.2 netmask 255.255.255.255 vr "trust-vr" set interface "ethernet0/2" mip host 192.168.168.3 netmask 255.255.255.255 vr "trust-vr" set interface "ethernet0/2" mip host 192.168.168.4 netmask 255.255.255.255 vr "trust-vr" set interface "ethernet0/2" mip host 192.168.168.5 netmask 255.255.255.255 vr "trust-vr" set interface "ethernet0/2" mip host 192.168.168.6 netmask 255.255.255.255 vr "trust-vr" set interface "ethernet0/2" mip host 192.168.168.7 netmask 255.255.255.255 vr "trust-vr" set interface "ethernet0/4" mip host 192.168.168.1 netmask 255.255.255.255 vr "trust-vr" set interface "ethernet0/4" mip host 192.168.168.2 netmask 255.255.255.255 vr "trust-vr" set interface "ethernet0/4" mip host 192.168.168.3 netmask 255.255.255.255 vr "trust-vr" set interface "ethernet0/4" mip host 192.168.168.4 netmask 255.255.255.255 vr "trust-vr" set interface "ethernet0/4" mip host 192.168.168.5 netmask 255.255.255.255 vr "trust-vr" set interface "ethernet0/4" mip host 192.168.168.6 netmask 255.255.255.255 vr "trust-vr" set interface "ethernet0/4" mip host 192.168.168.7 netmask 255.255.255.255 vr "trust-vr" unset flow no-tcp-seq-checkset flow tcp-syn-checkunset flow tcp-syn-bit-checkset flow reverse-route clear-text preferset flow reverse-route tunnel alwaysset hostname SSG140-TR-1set pki authority default scep mode "auto"set pki x509 default cert-path partialset nsrp cluster id 1set nsrp cluster name SSG140-Tanrichset nsrp rto-mirror syncset nsrp vsd-group id 0 priority 100set nsrp vsd-group id 0 preemptset nsrp vsd-group id 1 priority 120set nsrp vsd-group id 1 preemptset nsrp secondary-path ethernet0/0set nsrp monitor interface ethernet0/0set nsrp monitor interface ethernet0/2set nsrp monitor interface ethernet0/4set nsrp vsd-group id 0 monitor interface ethernet0/0set nsrp vsd-group id 0 monitor interface ethernet0/2set nsrp vsd-group id 0 monitor interface ethernet0/4set nsrp vsd-group id 1 monitor interface ethernet0/0set nsrp vsd-group id 1 monitor interface ethernet0/2set nsrp vsd-group id 1 monitor interface ethernet0/4set nsrp monitor track-ip threshold 100set nsrp ha-link probeset dns host dns1 src-interface ethernet0/4set dns host dns2 src-interface ethernet0/4set dns host dns3 src-interface ethernet0/2set address "Untrust" "Manage team 1" 255.255.255.255set address "Untrust" "Manage team 2" 255.255.255.255set address "Untrust2" "Manage Team 1" 255.255.255.255set address "Untrust2" "Manage Team 2" 255.255.255.255set ike respond-bad-spi 1set ike ikev2 ike-sa-soft-lifetime 60unset ike ikeid-enumerationunset ike dos-protectionunset ipsec access-session enableset ipsec access-session maximum 5000set ipsec access-session upper-threshold 0set ipsec access-session lower-threshold 0set ipsec access-session dead-p2-sa-timeout 0unset ipsec access-session log-errorunset ipsec access-session info-exch-connectedunset ipsec access-session use-error-logset vrouter "untrust-vr"exitset vrouter "trust-vr"exitset url protocol websenseexitset policy id 1 from "Trust" to "Untrust" "Any" "Any" "ANY" permitset policy id 1exitset policy id 2 from "Trust" to "Untrust" "Any" "Any" "ANY" denyset policy id 2exitset policy id 3 from "Trust" to "Untrust2" "Any" "Any" "ANY" nat src permit set policy id 3exitset policy id 4 from "Trust" to "Untrust2" "Any" "Any" "ANY" denyset policy id 4exitset policy id 5 from "Untrust" to "Trust" "Any" "MIP()" "bbb" permit logset policy id 5set dst-address "MIP()"set service "TCP_15000"set service "TCP_8080"exitset policy id 6 from "Untrust" to "Trust" "Manage team 1" "MIP()" "ANY" permit logset policy id 6set src-address "Manage team 2"set dst-address "MIP()"set dst-address "MIP()"set dst-address "MIP()"set dst-address "MIP()"set dst-address "MIP()"set dst-address "MIP()"exitset policy id 7 from "Untrust" to "Trust" "Any" "Any" "ANY" denyset policy id 7exitset policy id 8 from "Untrust2" to "Trust" "Any" "MIP(<publicIP>)" "bbb" permit logset policy id 8set dst-address "MIP(<publicIP>)"set service "TCP_15000"set service "TCP_8080"exitset policy id 9 from "Untrust2" to "Trust" "Manage Team 1" "MIP(<publicIP>)" "ANY" permit log set policy id 9set src-address "Manage Team 2"set dst-address "MIP(<publicIP>)"set dst-address "MIP(<publicIP>)"set dst-address "MIP(<publicIP>)"set dst-address "MIP(<publicIP>)"set dst-address "MIP(<publicIP>)"set dst-address "MIP(<publicIP>)"exitset policy id 10 from "Untrust2" to "Trust" "Any" "Any" "ANY" denyset policy id 10exitset nsmgmt report proto-dist enableset nsmgmt report statistics ethernet enableset nsmgmt report statistics attack enableset nsmgmt report statistics flow enableset nsmgmt report statistics policy enableset nsmgmt report alarm traffic enableset nsmgmt report alarm attack enableset nsmgmt report alarm other enableset nsmgmt report alarm di enableset nsmgmt report log config enableset nsmgmt report log info enableset nsmgmt report log self enableset nsmgmt report log traffic enableset nsmgmt bulkcli reboot-timeout 60set ssh version v2set ssh enableset config lock timeout 5unset license-key auto-updateset snmp port listen 161set snmp port trap 162set vrouter "untrust-vr"exitset vrouter "trust-vr"unset add-default-routeset route 0.0.0.0/0 interface ethernet0/2:1 gateway <publicIP> preference 40set route 0.0.0.0/0 interface ethernet0/4:1 gateway <publicIP> preference 30set route 0.0.0.0/0 interface ethernet0/2 gateway <publicIP> preference 20set route 0.0.0.0/0 interface ethernet0/4 gateway <publicIP> preference 10exitset vrouter "untrust-vr"exitset vrouter "trust-vr"exit[文档可能无法思考全面,请浏览后下载,另外祝您生活愉快,工作顺利,万事如意!]。
Juniper防火墙配置

• 并发VPN隧道数 25/40 ,最大并发会话数 8,000/16,000
• 新会话/秒 2,800 最大安全策略数 200 最大安全区数量 8
• 最大虚拟路由器数量 3/4 最大虚拟局域网数量 10/50 • 固定I/O 5x10/100 • 微型物理接口模块(Mini-PIM)扩展插槽 (I/O) 2 • 802.11 a/b/g 可选
2021/7/1
16
目录
• Juniper防火墙简介及作用 • Juniper防火墙基本配置 • Juniper防火墙的接口模式 • Juniper防火墙的策略 • Juniper防火墙端口映射
2021/7/1
17
Juniper管理方式
•Web UI 默认的管理地址是 默认用户名密码是netscreen
• SSG 140 o 350+ Mbps FW / 100 Mbps VPN o 8 FE + 2 GE Interfaces + 4 PIM slots o 会话数:48000
• SSG 320M/350M o 450+ Mbps FW / 175 Mbps VPN; 550+ Mbps FW / 225 Mbps VPN; o 4 GE + 3 or 5 PIM slots o 会话数:48000;
256000ssg550mssg520m规格对照之规格对照之ssg5ssg5防火墙性能大型数据包160mbps?防火墙性能imix90mbps?每秒处理的防火墙数据包数量30000pps?3dessha1vpn性能40mbps?并发vpn隧道数2540最大并发会话数800016000?新会话秒2800最大安全策略数200最大安全区数量8?最大虚拟路由器数量34最大虚拟局域网数量1050?固定io7x1010080211abg可选?需要购买扩展许可规格对照之规格对照之ssg20防火墙性能大型数据包160mbps?防火墙性能imix90mbps?每秒处理的防火墙数据包数量30000?pps3dessha1vpn性能40mbps?并发vpn隧道数2540最大并发会话数800016000?新会话秒2800最大安全策略数200最大安全区数量8?最大虚拟路由器数量34最大虚拟局域网数量1050?固定io5x10100?微型物理接口模块minipim扩展插槽io?80211abg可选?需要购买扩展许可ssg202规格对照之规格对照之ssg140防火墙性能大型数据包350mbps?防火墙性能imix300mbps?每秒处理的防火墙数据包数量100000pps?3dessha1vpn性能100mbps?并发vpn隧道数500最大并发会话数48000?并发vpn隧道数500最大并发会话数48000?新会话秒8000最大安全策略数1000最大安全区数量40?最大虚拟路由器数量6最大虚拟局域网数量100?固定io8x101002x101001000?物理接口模块pim扩展插槽io?无80211abgssg1404规格对照之规格对照之ssg350防火墙性能大型数据包550mbps?防火墙性能imix500mbps?每秒处理的防火墙数据包数量225000pps?3dessha1vpn性能225mbps?并发vpn隧道数500最大并发会话数128000?新会话秒12500最大安全策略数2000最大安全区数量40?最大虚拟路由器数量8最大虚拟局域网数量125?固定io4x101001000?物理接口模块pim扩展插槽io?无80211abg?可转换为junos软件ssg3505产品特点与效益列表产品特点与效益列表特点一
Juniper HA配置方法

set interfaces reth0 unit 0 family inet address 192.168.3.1/24
//为冗余逻辑接口配置IP地址
set interfaces ge-0/0/4 gigether-options redundant-parent reth1
set interfaces ge-3/0/4 gigether-options redundant-parent reth1
set interfaces reth1 redundant-ether-options redundancy-group 1
//把物理端口加入到冗余接口reth,并把接口reth1加入数据冗余组redundancy-group 1
5)用网线连接两台设备的ha数据端口,端口可以自定义,除了带外端口外,都可以指定为数据端口,输入:
root@SRX-A#set interfaces fab0 fabric-options member-interfaces fe-0/0/0
root@SRX-A#set interfaces fab1 fabric-options member-interfaces fe-1/0/0
set chassis cluster redundancy-group 1 interface-monitor ge-3/0/4 weight 255
set chassis cluster redundancy-group 1 interface-monitor ge-3/0/5 weight 255
//定义cluster-id和node,同一个集群cluster-id必须相同,取值范围为0-15,0代表禁用集群;node取值范围为0-1,0代表主设备
Juniper路由器配置命令介绍
Juniper路由器配置命令介绍本文档是关于Juniper路由器配置命令的介绍,旨在帮助用户快速了解和使用Juniper路由器的各种命令。
以下是文档的详细内容。
第一章:登录和基本配置1.登录Juniper路由器- 进入路由器的命令行界面- 输入用户名和密码进行登录2.基本配置命令- 配置路由器的主机名- 配置管理接口的IP地质- 设置路由器的时钟- 保存配置更改第二章:接口配置1.配置物理接口- 激活和禁用接口- 配置接口IP地质- 配置接口子网掩码- 配置接口速率和双工模式- 配置接口上的ACL(访问控制列表)2.配置逻辑接口- 配置VLAN接口- 配置子接口- 配置隧道接口第三章:路由配置1.配置静态路由- 添加静态路由- 删除静态路由- 配置默认路由- 查看路由表2.配置动态路由- 配置OSPF(开放最短路径优先)协议 - 配置BGP(边界网关协议)协议- 配置RIP(路由信息协议)协议第四章:安全配置1.配置防火墙规则- 添加入站规则- 添加出站规则- 配置地质转换(NAT)2.配置VPN- 配置IPSec VPN- 配置SSL VPN第五章:监控和故障排除1.监控命令- 查看接口状态- 查看路由器 CPU 和内存使用情况 - 查看硬盘使用情况2.故障排除命令- 执行连通性测试- 查看日志信息- 跟踪路由本文档涉及附件:附件1:Juniper路由器配置示例文件(示例配置文件,供参考使用)本文所涉及的法律名词及注释:1.ACL(访问控制列表):用于控制网络流量的一种机制,可以限制特定源IP地质或目的IP地质的访问权限。
2.OSPF(开放最短路径优先):一种用于动态路由选择的内部网关协议,使用最短路径优先算法确定最佳路由。
3.BGP(边界网关协议):一种用于在互联网自治系统之间交换路由信息的外部网关协议。
4.RIP(路由信息协议):一种用于在小型网络中交换路由信息的距离矢量路由协议。
Juniper路由器配置命令介绍
Juniper路由器配置命令介绍Juniper路由器配置命令介绍⒈系统配置命令⑴ `set system hostname`:设置设备的主机名。
⑵ `set system domn-name`:设置设备的域名。
⑶ `set system login user`:设置设备的登录用户信息。
⒉接口配置命令⑴ `set interfaces interface-name unit logical-unit-number family inet address ip-address/subnet-mask`:配置接口的IP地址和子网掩码。
⑵ `set interfaces interface-name unit logical-unit-number family inet6 address ipv6-address/prefix-length`:配置接口的IPv6地址和前缀长度。
⑶ `set interfaces interface-name unit logical-unit-number vlan-id vlan-tagged`:配置接口的VLAN标签。
⒊路由配置命令⑴ `set routing-options static route destination next-hop`:配置静态路由。
⑵ `set protocols ospf area area-id`:配置OSPF路由协议。
⒋安全配置命令⑴ `set security zones security-zone zone-nameinterfaces interface-name`:将接口分配给安全区域。
⑵ `set security policies from-zone source-zone to-zone destination-zone policy policy-name then permit`:配置安全策略以允许数据流动。
⒌ VPN配置命令⑴ `set security ike proposal proposal-name authentication-method pre-shared-keys`:配置IKE提议的预共享密钥认证方法。
JuniperSRX防火墙HA双机配置步骤
JuniperSRX防火墙HA双机配置步骤JSRP要求两台设备在软件版本、硬件型号、板卡数量、插槽位置及端口使用方面严格一一对应。
由于SR某是转发与控制层面完全分裂架构,JSRP需要控制层面(配置同步)和数据层面(Seion同步)两个平面的互联,建议控制和数据层面互联链路使用光纤链路直连(部分平台强制要求光纤链路直连)。
整个JSRP配置过程包括如下7个步骤配置Cluterid和Nodeid(对应ScreenOSNSRP的cluterid并需手工指定设备使用节点id)指定ControlPort(指定控制层面使用接口,用于配置同步及心跳)指定FabricLinkPort(指定数据层面使用接口,主要eion等RTO同步)配置RedundancyGroup(类似NSRP的VSDgroup,优先级与抢占等配置)每个机箱的个性化配置(单机无需同步的个性化配置,如主机名、带外管理口IP地址等)配置RedundantEthernetInterface(类似NSRP的Redundant冗余接口)配置InterfaceMonitoring(类似NSRPinterfacemonitor,是RG数据层面切换依据)1.1.配置Cluterid和NodeidSR某在启用JSRP之后,组成Cluter的两台机箱会被抽象成一台逻辑的机箱,cluterid和nodeid将会被存放在EEPROM内,每个机箱内部的各个业务引擎通讯用的TNP地址都需要重新分配,因此设备需要重启生效。
注意,这一步两个node都需要配置。
配置命令:SR某5800Ar某5800a>etchaiclutercluter-id1node0reboot//注1:注意该命令需在operational模式下输入//注2:CluterID取值范围为1–15,当CluterID=0时会unetcluter配置,成为单机SR某5800Br某5800b>etchaiclutercluter-id1node1reboot1.2.指定ControlPort这一步只对SR某5K有效(两个node都需要配置),因为SR某3K的ControlPort是固化的,无需指定。
JuniperJunosSRX系列ClusterHA配置汇总情况

1.插线指定主备On device A: >set chassis cluster cluster-id 1 node 0 rebootOn device B: >set chassis cluster cluster-id 1 node 1 reboot定义控制层端口(可配置网管口)On device A:{primary:node0}set groups node0 system host-name HQ-CS-FW-SRX550-1set groups node1 system host-name HQ-CS-FW-SRX550-2set apply-groups "${node}" //必配-----------------set groups node0 interfaces fxp0 unit 0 family inet address <ip address/mask>——Device A's management IP address on fxp0 interface set groups node1 interfaces fxp0 unit 0 family inet address <ip address/mask——Device B's management IP address on fxp0 interface ----------------配置网管地址各设备型号控制线端口SRX Series Chassis Cluster Slot Numbering, and Physical Port and Logical Interface Naming4.定义数据层端口On device A:{primary:node0}-fab0 is node0 (Device A) interface for the data link# set interfaces fab0 fabric-options member-interfaces ge-0/0/2 -fab1 is node1 (Device B) interface for the data link# set interfaces fab1 fabric-options member-interfaces ge-9/0/25.配置redundancy-group{primary:node0}set chassis cluster redundancy-group 0 node 0 priority 100set chassis cluster redundancy-group 0 node 1 priority 50set chassis cluster redundancy-group 1 node 0 priority 100set chassis cluster redundancy-group 1 node 1 priority 50注:Redundancy Group 0 for the Routing Engine failover properties 必配Redundancy Group 1 to define the failover properties for the Reth interfaces(all the interfaces will be in one Redundancy Group in this example) 建议所有端口放一个Group6. 配置端口监控On device A:{primary:node0}set chassis cluster redundancy-group 1 interface-monitor ge-0/0/3 weight 255set chassis cluster redundancy-group 1 interface-monitor ge-0/0/4 weight 255set chassis cluster redundancy-group 1 interface-monitor ge-9/0/3 weight 255set chassis cluster redundancy-group 1 interface-monitor ge-9/0/4 weight 255注:监控所有端口Interface monitoring is not recommended for redundancy-group 0.7.配置Reth interface 并划入zoneConfigure the Redundant Ethernet interfaces (Reth interface) and assign the Redundant interface to a zone.On device A:{primary:node0}# set chassis cluster reth-count <max-number> //配置reth 端口数量留够数量-for first interface in the group (on Device A) //配置reth端口,配置IP地址# set interfaces ge-0/0/4 gigether-options redundant-parent reth1-for second interface in the group (on Device B)# set interfaces ge-9/0/4 gigether-options redundant-parent reth1-set up redundancy group for interfaces# set interfaces reth1 redundant-ether-options redundancy-group 1# set interfaces reth1 unit 0 family inet address 192.168.1.1/24-for first interface in the group (on Device A)# set interfaces ge-0/0/3 gigether-options redundant-parent reth0-for second interface in the group (on Device B)# set interfaces ge-9/0/3 gigether-options redundant-parent reth0-set up redundancy group for interfaces# set interfaces reth0 redundant-ether-options redundancy-group 1# set interfaces reth0 unit 0 family inet address 10.10.10.200/24//reth端口,划zone# set security zones security-zone untrust interfaces reth0.0# set security zones security-zone trust interfaces reth1.0配置实例:On device A: >set chassis cluster cluster-id 1 node 0 rebootOn device B: >set chassis cluster cluster-id 1 node 1 rebootset groups node0 system host-name HQ-CS-FW-SRX550-1set groups node1 system host-name HQ-CS-FW-SRX550-2set apply-groups "${node}"set interfaces fab0 fabric-options member-interfaces ge-0/0/2set interfaces fab1 fabric-options member-interfaces ge-9/0/2set chassis cluster redundancy-group 0 node 0 priority 100set chassis cluster redundancy-group 0 node 1 priority 50set chassis cluster redundancy-group 1 node 0 priority 100set chassis cluster redundancy-group 1 node 1 priority 50set chassis cluster redundancy-group 1 interface-monitor ge-0/0/6 weight 255set chassis cluster redundancy-group 1 interface-monitor ge-0/0/7 weight 255set chassis cluster redundancy-group 1 interface-monitor ge-9/0/6 weight 255set chassis cluster redundancy-group 1 interface-monitor ge-9/0/7 weight 255set chassis cluster reth-count 20set interfaces ge-0/0/6 gigether-options redundant-parent reth0set interfaces ge-9/0/6 gigether-options redundant-parent reth0set interfaces reth0 redundant-ether-options redundancy-group 1set interfaces reth0 unit 0 family inet address 192.168.222.254/24set interfaces ge-0/0/7 gigether-options redundant-parent reth1set interfaces ge-9/0/7 gigether-options redundant-parent reth1set interfaces reth1 redundant-ether-options redundancy-group 1set interfaces reth1 unit 0 family inet address 192.168.212.254/24set security zones security-zone untrust interfaces reth0.0set security zones security-zone trust host-inbound-traffic protocols allset security zones security-zone trust interfaces reth1.0 host-inbound-traffic system-services all set security zones security-zone trust interfaces reth1.0 host-inbound-traffic protocols all----------------排错查看指令------------------------show chassis cluster statusshow chassis cluster interfacesshow chassis cluster statisticsshow chassis cluster control-plane statisticsshow chassis cluster data-plane statisticsshow chassis cluster status redundancy-group 1关于切换request chassis cluster failover node 【node-number】redundancy-group 【group-number】explaination:•node 【node-number】Number of the chassis cluster node to which the redundancy group fails over.Range: 0 through 1•redundancy-group 【group-number】—Number of the redundancy group on which to initiate manual failover.Redundancy group 0 is a special group consisting of the two Routing Engines in the chassis cluster.After a manual failover, you must use the 【request chassis cluster failover reset】command before initiating another failover.Sample : user@host> request chassis cluster failover node 0 redundancy-group 1user@host> request chassis cluster failover reset redundancy-group 0清除HA统计数据user@host> clear chassis cluster statistics清除控制心跳数据统计Cleared control-plane statistics清除数据心跳线统计Cleared data-plane statistics清除Cluster数据统计Clear chassis cluster failover-countSrx Cluster upgrade1. Load the new image file on node 0.2. Perform the image upgrade without rebooting the node by entering:user@host> request system software add image_name3. Load the new image file on node 1.4. Repeat Step 2.5. Reboot both nodes simultaneously.不间断升级:request system software in-service-upgrade (Maintenance) ISSUrequest system software in-service-upgrade image_name<no-copy><no-sync><no-tcp-syn-check><no-validate><reboot><unlink>Options Explaination :•image_name—Location and name of the software upgrade package to be installed.•no-copy—(Optional) Installs the software upgrade package but does not save the copies of package files.•no-sync—Stops the flow state from synchronizing when the old secondary node has booted with a new Junos OS image.This parameter applies to SRX100, SRX210, SRX220, SRX240, and SRX650 devicesonly. It is required for an ICU.•no-tcp-syn-check—(Optional) Creates a window wherein the TCP SYN check for the incoming packets is disabled. The default value for the window is 7200 seconds (2 hours).This parameter applies to SRX100, SRX210, SRX220, SRX240, and SRX650 devicesonly.•no-validate—(Optional) Disables the configuration validation step at installation. The system behavior is similar to that of the request system software add command.This parameter applies to SRX100, SRX210, SRX220, SRX240, and SRX650 devices only.•reboot—Reboots each device in the chassis cluster pair after installation is completed.This parameter applies to SRX1400, SRX3400, SRX3600, SRX5600, and SRX5800 devices only. It is required for an ISSU. (The devices in a cluster are automatically rebooted following an ICU.)•unlink—(Optional) Removes the software package after successful installation.user@host> request system software in-service-upgrade/var/tmp/junos-srxsme-11.2R2.2-domestic.tgz no-syncISSU: Validating package。
juniper配置方法

juniper配置方法先说的就是本人对juniper的产品不是特别熟悉,以前维护的城域网上只有M5,M10这些设备,所以只能写些基本的入门配置,但是相信大部分人使用的也是这部分的东西。
不得不说一些超级基础的东西,它的命令航有两层:操作模式,配置模式 : 如果对比其他厂商的设备,就是用户模式,和特权模式的区别。
Juniper的命令行特别就特别在它的层次化上面了,相信大部分用过juniper产品的人开始对这个所谓的层次化感到头疼不已,至少我是这个感觉。
呵呵,下嫦刃醇父龌 镜拿 睿 拖骴os下的dir、md、cls、cd什么的,先记住吧,后面我在更详细的讲解。
(好像自己很明白似的,hoho,大家共勉吧)进入配置模式: configure (基本就按cisco的config t理解)进入下一层次: edit(进入某个模式配置,可以按cisco下的int et 1/0,router ospf等任何进入子模式的命令理解)设值命令: set (设置命令,具体赋值使用,比如加ip地址,ospf中的什么命令等)删除命令: delete (同no)提交: commit (和cisco理解不同,cisco是命令一旦执行即生效,juniper是先放在一个叫“擦写块”(具体怎么写忘记了)的东西里面,然后只有commit才能放在running config中,就这么理解即可)空格键完成未敲完的单词(同cisco中的tab建)可能上面这些东西大家不好理解,别慌,下面的例子中我争取讲明白了。
:)当然,最好还是多用show, ?等命令寻求帮助,慢慢自己学习。
下面就是一些具体的东西了juniper中的接口定义:Cisco中的接口定义大家都很明白了,比尔et 1/1,serial 0/2等等Juniper中的接口定义如下:接口名称-大槽号/小槽号/端口号接口名称包括:at—ATM类的口,没有用过,不清楚e1— E1接口e3— E3接口fe— 100M口so— POS口t1— T1口t3— DS-3口ge— GE口fxp0是特殊的,代表管理网口的名称,固定的!别说你不明白E1/E3/SO/T3/T1是什么,不明白以后再说吧,我对SDH的理解也就技术支持的水平,还得请教别人哩,呵呵大槽号:此主题相关图片如下:小槽位:M40 and M160从上到下+---+| ||0 |+---+| ||1 |+---+| ||2 |+---+| ||3 |+---+其他的从右到左+----+----+----+----+| 3 | 2 | 1 | 0 |+----+----+----+----+端口号:M40/M160 从上到下,从右到左+---------+| | || 2 | 0 |+----+----+| | || 3 | 1 |+----+----+其他的从右到左,从下到上+---------+| | || 3 | 2 |+----+----+| | || 1 | 0 |+----+----+一个例子:Fe-5/2/3 〔端口名称-大槽号/小槽号/端口号〕看一个接口配置的基本例子:####节选###########interfaces {fe-1/0/3 {unit 0 {family inet {address 10.0.20.1/24;}family mpls}}}####节选结束#########看到上面的配置了吧,感觉和cisco或者其他的配置不同了吧,后面我会附一个完整配置,大家感觉一下,呵呵。
juniper防火墙双机配置案例

概述juniper防火墙的双机具有高冗余性和安全性,便于管理,分为三种组网模式:layer3的A/P组网模式layer3的full-mesh的A/P组网模式layer3的full-mesh的A/A组网模式其中layer3A/P模式对环境要求最低,是业界广为流行的配置。
但是,其利用率不高,同一时间只有一台防火墙处理网络流量,一侧链路和设备出现故障时提供冗余切换。
配置要求硬件和软件版本相同,接口编号相同,放入HA的接口要统一。
配置时只需清空备的那一台,然后将HA、manger ip 、MGT端口ip,及个性化配置即可。
两台防火墙用e4口连接。
配置主防火墙unset interface e4 ip//清空e4口的ip地址set interface e4 zone ha//将e4口和HA区域绑定//-----配置NSRP----set nsrp cluster id 1//设置cluster组号set nsrp vsd id 0//设置虚拟安全数据库的组号0set nsrp vsd-group id 0 priority 50//设置nsrp主设备的优先级(优先级数值越大,优先级越小)set nsrp rto syn//设置配置同步set nsrp vsd-group id 0 monitor interface ethernet3set nsrp vsd-group id 0 monitor interface ethernet1//设置防火墙监控的端口//只有当备份防火墙配置之后,主设备上才能检测到备防火墙的状态(get nsrp)set nsrp vsd-group hb-interval 200//设置心跳信息每隔200秒发送问候信息set nsrp vsd-group hb-threshold 3//设置心跳信息总共发出3次问候信息save//保存配置备防火墙unset all//恢复出厂设置set interface e4 zone ha//将e4和ha区域绑定set nsrp cluster id 1//设置cluster组号set nsrp vsd id 0//设置vsd组号set nsrp vsd-group id 0 priority 100//设置nsrp主设备的优先级(优先级数值越大,优先级越小)set nsrp rto syn//设置配置同步set nsrp vsd-group id 0 monitor interface ethernet3set nsrp vsd-group id 0 monitor interface ethernet1//设置防火墙监控的端口set nsrp vsd-group hb-interval 200//设置心跳信息每隔200秒发送问候信息set nsrp vsd-group hb-threshold 3//设置心跳信息总共发出3次问候信息save //保存同步配置在备机上操作exec nsrp sync global-config check-sum//将两台设备的配置进行校检,如有不同,备份的设备将会在重启后把主设备上的配置导入备份主机中exec nsrp sync global-config save//如有不同,备份的设备将会在重启后把主设备上的配置导入备份主机中。
- 1、下载文档前请自行甄别文档内容的完整性,平台不提供额外的编辑、内容补充、找答案等附加服务。
- 2、"仅部分预览"的文档,不可在线预览部分如存在完整性等问题,可反馈申请退款(可完整预览的文档不适用该条件!)。
- 3、如文档侵犯您的权益,请联系客服反馈,我们会尽快为您处理(人工客服工作时间:9:00-18:30)。
SSG550(B)-> set nsrp vsd-group id 0 priority 100 设置NSRP主设备的优先权值,priority值越小,优先权越高。
get nsrp 查看冗余状态
SSG550(M)-> set nsrp vsd-group hb-interval 200 设置心跳信息每隔200秒将发出问候信息
SSG550(M)-> set nsrp vsd-group hb-threshold 3 设置心跳信息总共发出3次问候信息
SSG550(B)-> set nsrp vsd-group hb-threshold 3 设置心跳信息总共发出3次问候信息
SSG550(B)-> save
在备机上同步配置
SSG550(B)-> exec nsrp sync global-config check-sum (将两台设备的配置进行校检,如有不同,备份的设备将会在重启后把主设备上的配置导入备份主机中)
SSG550(M)-> save
备份防火墙配置
unset all 恢复出厂状态
reset 重启 n-y
set interface e4 zone ha 将端口4和HA区绑定一起
(注意权值设置不一样,其余配置与主配置相同)
SSG550-> set nsrp cluster id 1 设置cluster组号
SSG550(M)-> set nsrp rto syn 设置配置同步
SSG550(M)-> set nsrp vsd-group id 0 monitor interface ethernet3 设置防火墙监控的端口,假设端口3出现故障或所连接的交换机出现故障,防火墙的工作状态将切换到备份防火墙上。
主防火墙
unset interface e4 ip 将e4的ip地址删除
set interface e4 zone ha 将e4和HA区域绑定一起
SSG550-> set nsr
SSG550(B)-> set nsrp vsd-group id 0 monitor interface ethernet1 设置防火墙监控的端口,假设端口1出现故障或所连接的交换机出现故障,防火墙的工作状态将切换到备份防火墙上。
SSG550(B)-> set nsrp vsd-group hb-interval 200 设置心跳信息每隔200秒将发出问候信息
SSG550(B)-> exec nsrp sync global-config save (如有不同,备份的设备将会在重启后把主设备上的配置导入备份主机中)
SSG550(M)-> set nsrp vsd id 0 设置VSD的组号,这条命令可以不用输入,因为Netscreen防火墙的默认的虚拟安全数据库(VSD)的值是0。
SSG550(M)-> set nsrp vsd-group id 0 priority 50 设置NSRP主设备的优先权值,priority值越小,优先权越高。
SSG550(M)-> set nsrp vsd-group id 0 monitor interface ethernet1 设置防火墙监控的端口,假设端口1出现故障或所连接的交换机出现故障,防火墙的工作状态将切换到备份防火墙上。
注:如没有监控端口2,端口2出现故障或连接网络出现故障,将不会激活防火墙工作状态切换
SSG550(B)-> set nsrp rto syn 设置配置同步
SSG550(B)-> set nsrp vsd-group id 0 monitor interface ethernet3 设置防火墙监控的端口,假设端口3出现故障或所连接的交换机出现故障,防火墙的工作状态将切换到备份防火墙上。
