数字式多功能计时器
H5CR多功能数字计时器说明书
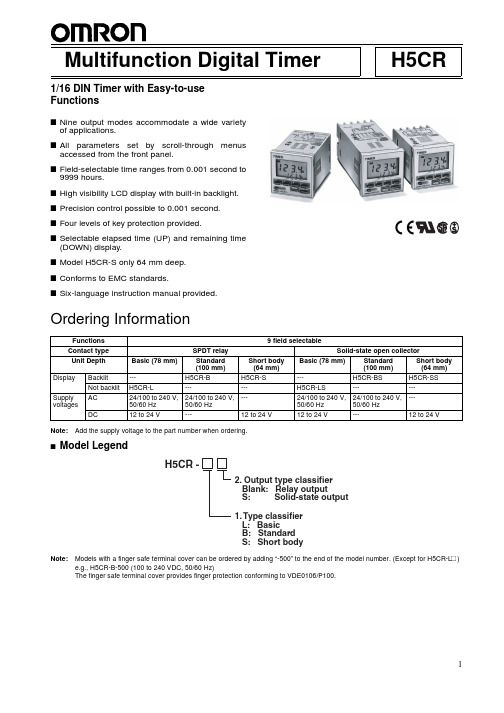
H5CRMultifunction Digital Timer1/16 DIN Timer with Easy-to-use FunctionsI Nine output modes accommodate a wide varietyof applications.I All parameters set by scroll-through menusaccessed from the front panel.I Field-selectable time ranges from 0.001 second to 9999 hours.I High visibility LCD display with built-in backlight.I Precision control possible to 0.001 second.I Four levels of key protection provided.I Selectable elapsed time (UP) and remaining time(DOWN) display.I Model H5CR-S only 64 mm deep.I Conforms to EMC standards.ISix-language instruction manual provided.Ordering InformationNote:Add the supply voltage to the part number when ordering.IModel LegendNote:Models with a finger safe terminal cover can be ordered by adding “-500” to the end of the model number. (Except for H5CR-L #)e.g., H5CR-B-500 (100 to 240 VDC, 50/60 Hz)The finger safe terminal cover provides finger protection conforming to VDE0106/P100.RC+Functions 9 field selectableContact type SPDT relay Solid-state open collectorUnit Depth Basic (78 mm)Standard (100mm)Short body (64mm)Basic (78 mm)Standard (100mm)Short body (64mm)Display Backlit ---H5CR-B H5CR-S---H5CR-BS H5CR-SSNot backlit H5CR-L------H5CR-LS------Supply voltagesAC 24/100 to 240V, 50/60 Hz 24/100 to 240V, 50/60 Hz ---24/100 to 240V, 50/60 Hz 24/100 to 240V, 50/60 Hz ---DC12 to 24 V---12 to 24 V12 to 24 V---12 to 24 VIAccessories (Order Separately)Note:1.Y92A-48G is a finger safe terminal cover which is attached to the P3G-08 Socket.2.Supplied with each Unit.SpecificationsNameModelHard cover Y92A-48Soft coverY92A-48F1Track Mounting/Front Connecting Socket (for H5CR-L # only)---P2CF-08Finger safe type P2CF-08-E Back Connecting Socket (for H5CR-L # only)---P3G-08Finger safe typeP3G-08 with Y92A-48G (see note 1)Finger Safe Terminal Cover for H5CR-B #/-S #Y92A-48T Flush Mounting Adapter (see note 2)Y92F-30ModelH5CR-L (Basic type)H5CR-B (Standard type)H5CR-S (Short body type)Classification Digital timerMountingFlush or Surface mounting Flush mountingExternal connections 8P socket Screw terminals (M3.5 screw)Enclosure ratings IP40IP54 (panel surface)Display modes Elapsed time (UP), remaining time (DOWN)Output modes A, A-1, A-2, A-3, b, b-1, d, E, FReset system Power reset (except A-3, b-1, and F modes), External, manual, automatic resets (internal according to A-1, b, b-1, d, and E mode operation)Input signals Start, reset inputsStart, reset, gate, key protect inputsInput method No-voltage input: Via opening and closing of contactControl outputs SPDT contact output and transistor output (NPN open collector)Display LCD without backlight LCD with backlight Digits4 digitsMax. time settings 9.999 s (0.001 s units), 99.99 s (0.01 s units), 999.9 s (0.1 s unit), 9999 s (1 s unit), 99 min 59 s (1 s unit), 999.9 min (0.1 min unit), 9999 min (1 min unit), 99 hr 59 min (1 min unit), 999.9 hr (0.1 hr unit), 9999 hr (1 hr unit)Memory backup Backup time for power interruption: Approx. 10 years at 20 C Mounting method DIN track mounting, surface mounting, and flush mounting Flush mounting Approved standardsUL508, CSA C22.2 No. 14Conforms to EN61010-1IRatingsICharacteristicsModelH5CR-L (Basic type)H5CR-B (Standard type)H5CR-S (Short body type)Rated supply voltage100 to 240 VAC (50/60 Hz)24 VAC (50/60 Hz)12 to 24 VDC (permissible ripple: 20% max.)100 to 240 VAC (50/60 Hz)24 VAC (50/60 Hz)12 to 24 VDC (permissible ripple: 20% max.)Operating voltage range 85% to 110% of rated voltagePower consumption Approx. 3 VA at 50 Hz, 240 VAC; approx. 1 W at 24 VDCApprox. 5 VA at 50 Hz, 240 VAC Approx. 2 W at 24 VDCReset and control signals Min. pulse width 1 ms/20ms selectable Gate ---Min. pulse width: Approx. 20 ms Key protect ---Response time: 1 sOne-shot time0.1 to 20 s (select from 7 kinds) or sustainedPower reset (except A-3, b-1, and F mode)Min. power opening time: 0.5 s Signal, reset, gate inputsNo-voltage input ON impedance: 1 k W max. (Approx. 2 mA when 0 W )ON residual voltage:2 V max.OFF impedance:100 k W min.Key protect input---No-voltage inputON impedance: 1 k W max. (Approx. 2 mA when 0 W )ON residual voltage:1 V max.OFF impedance:100 k W min.Control outputs Contacts: 5 A at 250 VAC, resistance load (cos f = 1)Transistor output: Open collector 100mA at 30 VDC max. residual voltage 2 V max. (Approx. 1 V)Ambient temperature –10 C to 55 C (with no icing)Storage temperature –25 C to 65 C (with no icing)Ambient humidity 35% to 85%Case Light grayRepeat accuracy (including temperature and voltage effects)Power start: 0.01% 0.05 s max.Control signal start: 0.005% 0.03 s max. *(rate for set value)Insulation resistance 100 M W min. (at 500 VDC) (between current-carrying terminal and exposed non-current-carrying metal parts, and between non-continuous contacts)Dielectric strength 2,000 VAC, 50/60 Hz for 1 min (between current-carrying terminal and exposed non-current-carrying metal parts) for 100 to 240 VAC type 1,000 VAC for 24VAC/12 to 24 VDC transistor output typeSurge voltage3 kV (between power terminals) for 100 to 240 VAC type, 1 kV for 24 VAC/12 to 24 VDC type4.5 kV (between current-carrying terminal and exposed non-current-carrying metal parts) for 100 to 240 VAC type, 1.5 kV for 24 VAC/12 to 24 VDC typeNoise immunity 2 kV (between power terminals)( 480 V for 12 to 24 VDC) and 600 V (between input terminals), square-wave noise by noise simulator (pulse width: 100 ns/1 m s, 1-ns rise)Static immunity Malfunction: 8 kV; destruction: 15 kVVibration Destruction 10 to 55 Hz with 0.75-mm single amplitude each in three directions Malfunction 10 to 55 Hz with 0.5-mm single amplitude each in three directions ShockDestruction 294 m/s 2 (30G) each in three directions Malfunction98 m/s 2 (10G) each in three directions Life expectancy Mechanical 10 million operations min.Electrical100,000 operations min. (5 A at 250 VAC in load resistance)EMC(EMI):EN50081-2Emission Enclosure:EN55011 Group 1 class A Emission AC Mains:EN55011 Group 1 class A (EMS):EN50082-2Immunity ESD:EN61000-4-2: 4 kV contact discharge (level 2)8 kV air discharge (level 3)Immunity RF-interference:ENV50140:10 V/m (80 MHz to 1 GHz) (level 3)Immunity Conducted Disturbance:ENV50141:10 V (0.15 to 80 MHz) (level 3)Immunity Burst:EN61000-4-4: 2 kV power-line (level 3)2 kV I/O signal-line (level 4)WeightH5CR-L: Approx. 105 g, H5CR-B: Approx. 160 g, H5CR-S: Approx. 120 gNomenclatureIFactory SettingsThe following table shows the timer settings when it is shipped. Please change the settings as necessary to suit the system before opera-tion. Settings and the display receive power from the internal battery and are therefore unaffected by external power interruptions.Note:With the initial settings, there will be no output even if the power supply is connected. External inputs and outputs cannot be used without a power supply.1213Model H5CR-B (Standard)/H5CR-S (Short body)H5CR-L (Basic)Time range - -. - -s Present value 0.00 s Presets0.00 s UP/DOWN mode UPOutput mode A: Signal on delay (I)Output time Sustained Input signal time 20 ms Key protect level KP-1---OperationI Block DiagramI I/O FunctionsInputs Start signal Stops timing in A-2 and A-3 (power on delay) modes. Starts timing in other modes.Reset Resets present value (to zero in UP modes, to preset in DOWN mode).Count inputs are not accepted while reset input is ON.Reset indicator lit while reset input is ON.Gate Inhibits timer operation.Key protect Makes keys inoperative according to key protect level.Key protected indicator lit while key protect input is ON.Effective when power supply is turned off.Effective when protect terminals are shorted.Outputs Control output (OUT)Outputs made according to designated output mode when corresponding preset is reached.I Operational OverviewThis flowchart shows operation common to all H5CR models. Refer to the following Setting Item Table for details on the operation of specific models.I Setting Item TableNote: 1.Changes made in setting mode become effective when run mode is entered.2.The time range setting appears first when setting mode is entered.3.*The key protection function is not included in the H5CR-L.<KP-4><KP-3>I ExamplesRun ModeChanging the Set ValueT o change the set value from 3 hr 5 min to 4 hr 5 min, press the 3key so that the number 4 appears in the hour’s place.•Pressing keys 1 through 4 increments the corresponding col-umn by 1.•The columns can be changed in any order, but the output willbe turned ON if the set value is less than the present value.•Nonsignificant zeros are suppressed on the set value display.Note:Read Changing Set Values in the Precautions section,page16, before changing the Timer set value during op-eration.Setting ModeChanging Settings in the Set Mode1.Press the MODE key to switch from run mode to set mode.•The Timer will continue operation if switched from run mode to set mode during operation.•The MODE key will be locked if the key protection function is enabled.•Settings changed in the set mode are not effective until run mode is entered. As the operating conditions will change in this case, always reset operation with the RESET key or a re-set input.2.Press the MODE key to scroll successively through the items that can be set.3.Changing the selected item•Press the MODE key until the desired item appears.•Change the item setting by pressing keys 1 through 4. (Pressthe DISPLAY key to switch back from set mode to run mode.)ITiming ChartsThe gate input is not included in the H5CR-L.Output mode A: Signal ON delay 1 (Timer resets when power comes ON.)Output mode A-1: Signal ON delay 2 (Timer resets when power comes ON.)Output mode A-2: Power ON delay 1 (Timer resets when power comes ON.)Output mode A-3: Power ON delay 2 (Timer does not reset when power comes ON.)Power Start signalGate ResetControl outputSet valueTiming diagramUPDOWNSet valueTiming starts when the start signal goes ON.While the start signal is ON, the timer starts when the power comes ON or when the reset input goes OFF .The control output is controlled using a sustained or one-shot time period.Basic OperationPower**Start signal inputTimingOutput* Output is instantaneous when setting is 0.** Start signal input is disabled during timing.Power Start signalGate ResetControl outputSet valueTiming diagramUPDOWNSet valueTiming starts when the start signal goes ON, and is reset when the start signal goes OFF .While the start signal is ON, the timer starts when the power comes ON or when the reset input goes OFF .The control output is controlled using a sustained or one-shot time period.*Output is instantaneous when setting is 0.Basic OperationPower Start signal inputTimingOutputPower Start signalGate ResetControl outputSet valueTiming diagramUPDOWNSet valueTiming starts when the reset input goes OFF .The start signal disables the timing function (i.e., same function as the gate input).The control output is controlled using a sustained or one-shot time period.*Output is instantaneous when setting is 0.Basic OperationPower TimingOutputPower Start signalGate ResetControl outputSet valueTiming diagramUP DOWNSet valueTiming starts when the reset input goes OFF .The start signal disables the timing function (i.e., same function as the gate input).The control output is controlled using a sustained or one-shot time period.*Output is instantaneous when setting is 0.Basic OperationPower TimingOutputSustainedOutput mode b-1: Repeat cycle 2 (Timer does not reset when power comes ON.)Power Start signalGate ResetControl output* Normal output operation will not be possible if the set time is too short.Set the value to at least 100 ms (contact output ** Start signal input is disabled during timing.TimingTiming Timing Timing Timing starts when the start signal goes ON.The control output is turned ON when time is up.While the start signal is ON, the timer starts when the power comes ON or when the reset input goes OFF .* Normal output operation will not be possible if the set time is too short.Set the value to at least 100 ms (contact output ** Start signal input is disabled during timing.Basic OperationPower Start signal OutputTimingTiming Timing Timing Timing starts when the start signal goes ON.The status of the control output is reversed when time is up (OFF at start).While the start signal is ON, the timer starts when the power comes ON or when the reset input goes OFF .* Normal output operation will not be possible if the set time is too short.Set the value to at least 100 ms (contact output ** Start signal input is disabled during timing.Sustained Basic OperationStart signal TimingTimingTiming starts when the start signal goes ON.The control output comes ON when time is up.While the start signal is ON, the timer starts when power comes ON or when the reset input goes OFF .Basic OperationStart signal * Normal output operation will not be possible if the set time is too short.Set the value to at least 100 ms (contact output ** Start signal input is disabled during timing.Sustained TimingTimingNote:A twin timer can be created by using one of the repeat modes. For example, if the set value is 60 s and the one shot time is 10 s in repeat mode, the control output will turn OFF for 50 s and ON for 10 s. (In the first cycle, however, the control output will turn OFF for 60 s.) In this way, the work of two timers can be performed by a single timer.Output mode E: Interval (Timer resets when power comes ON.)Output mode F: Cumulative (Timer does not reset when power comes ON.)* Output functions only during start signal input when setting is 0.** Start signal input is enabled during timing.Power Start signal OutputTimingTiming starts when the start signal comes ON.The control output is reset when time is up.While the start signal is ON, the timer starts when power comes ON or when the reset input goes OFF .* Output is disabled when the setting is 0.** Start signal input is disabled during timing.Basic OperationPower Start signal OutputTimingStart signal enables timing (timing is stopped when the start signal is OFF or when the power is OFF).A sustained control output is used.* Output is instantaneous when setting is 0.SustainedBasic OperationPower Start signal OutputTimingTiming10 s50 s 60 sDimensionsNote:All units are in millimeters unless otherwise indicated.484884.063.760.714.344.8 x 44.8 484866444.8 x 44.8H5CR-LSurface/Flush Mounting H5CR-BFlush MountingH5CR-S Flush Mounting4848100644.8 x 44.8IDimensions with Y92F-30 Flush Mounting Adapter4858685.95848610092.8AH5CR-BH5CR-SPanel CutoutsPanel cutouts areas shown below.(according to DIN43700).Y92F-30Flush mounting adapterPanel Y92F-30Flush mounting adapterPanel Note 1. The mounting panel thicknessshould be 1 to 4 mm.2. It is possible to mount timers side by side, but only horizontally.H5CR-LP2CF-08584866460 min.60 min.45+0.6-045+0.6-0+10A = {48n - 2.5 + (n -1) x 4}Panel Flush mountingadapter P3G-08Rear surfaceconnection socket44.8 x 44.8With Y92A-48F1 attached.44.8 x 44.8+1A = (51n - 5.5)With Y92A-48 attached.IAccessories (Order Separately)Eight, M3.5 x 7.5 semsT wo, 4.5 dia.holes70 max.50 max.20.3 max.7.83 4.535.44P2CF-08-E (Finger Safe Terminal Type)Conforming to VDE0106/P10050 max.40±0.270 max.M3.5 x 7.5 semsT wo, 4.5 dia. holes7.835.421.5 max.20.31931.35 4.54527 dia.45 4.917Back Connecting SocketP3G-08Terminal Arrangement/Internal Connections (Bottom View)Finger Safe Terminal CoverConforming to VDE0106/P100Y92A-48G(Attachment for P3G-08 Socket)Y92A-48T(Attachment for H5CR-B (/-S ()Hard Cover Y92A-48Soft Cover Y92A-48F1T welve, 6.4 dia. holes3447.7 x 47.748 x 4847.416.524.627.6InstallationI Terminal ArrangementNote:Do not connect unused terminals.I ConnectionsPrecautionsIPower Supplies•The input circuit is not insulated from the power supply circuit.The internal circuit might be damaged by a surrounding AC cir-cuit, so use an insulated AC power supply with equipment con-nected to the input circuit.•If power is interrupted for less than 10 ms, operation will continue normally. If power is interrupted for between 10 and 500 ms, op-eration will be inconsistent, and timing may stop or reset, de-pending on the mode.•Connect the power supply voltage through a relay or switch in such a way that the voltage reaches a fixed value immediately.•Depending on switching frequency, current surges may degrade relay contacts; relays with a capacity greater than 10 A are rec-ommended.IInput and Output•Do not use external sources to increase the voltage of input sig-nals (control signal, reset, gate, and key protection).•Be sure that the load of the control output (contact, transistor) is less than the maximum values indicated in the specifications. If the output load exceeds the recommended value, the life span of the contact output type will be shortened dramatically, and the transistor of the transistor output type will be damaged.•The transistor output is insulated from the internal circuitry by a photocoupler, so either NPN or PNP transistors can be used.ISelf-diagnostic Function•The following displays will appear if an error occurs. The present value and output enter the same status as after pressing the RE-SET key.IChanging Set Values•The Timer set value can be changed while the timer is operating,so a high value can be set temporarily to inactivate the timer, or a low value can be set to activate the timer more quickly. (If the set value is changed accidentally during operation, the timer might be activated. Therefore, turn the key protection input ON unless the set value is being changed.)•To avoid changing the output when changing the set value, it is recommended to begin changing the set value by entering a large number in the higher digit.IOperation with a Set Value of 0•Operation with a set value of 0 will vary depending on the output mode. For details, refer to Timing Charts.IOperating Environment•When using the Timer in an area with much electronic noise,separate the Timer, wiring, and the equipment which generates the input signals as far as possible from the noise sources. It is also recommended to shield the input signal wiring to prevent electronic interference.•Organic solvents (such as paint thinner), as well as very acidic or basic solutions might damage the outer casing of the Timer.IOther•When the Timer is installed in a control box and tests are con-ducted which may damage the Timer ’s internal circuitry (for ex-ample, a test measuring the maximum voltage difference between the control circuit and metal components), remove the Timer from the control box or short circuit the terminals.&DXWLRQThis product contains a lithium battery. Lithium batteries ex-plode if incinerated. Dispose of the Digital Timer as a non-com-bustible item.DisplayError Output status CorrectionSetCPU OFFPress RESET keyNo change MemorySet at the factoryA AIn the interest of product improvement, specifications are subject to change without notice.ALL DIMENSIONS SHOWN ARE IN MILLIMETERS.To convert millimeters into inches, multiply by 0.03937. T o convert grams into ounces, multiply by 0.03527.Cat. No. L035-E1-4B OMRON CorporationIndustrial Automation CompanyMeasuring and Supervisory Controls Department Shiokoji Horikawa, Shimogyo-ku Kyoto, 600-8530 JapanT el: (81)75-344-7108/Fax: (81)75-344-7189Printed in Japan 0401-1.5C。
数字电子计时器
数字电子计时器吴东城(常州工学院计算机信息工程学院10计一,江苏常州213002)摘要:该数字电子计时器是用数字电路技术实现时、分、秒计时的装置,具有计时及校时功能。
该数字电子计时器的时间周期为24小时,计时器显示时、分、秒,计时器的时间对应现实生活中的时钟的一秒。
根据日常生活中的观察,数字电子计时器设计成型后供扩展的方面很多——涉及到定时自动报警、按时自动打铃、定时广播、定时启闭路灯等。
因此,与机械式时钟相比具有更高的可视性和精确性,而且无机械装置,具有更长的使用寿命,所以研究数字钟及扩大其应用,有着非常现实和实际的意义。
数字电子计时器是一种典型的数字电路,其中包括了组合逻辑电路和时序电路。
目前,数字钟的功能越来越强,并且有多种专门的大规模集成电路可供选择。
但从知识储备的角度考虑,本设计是以中小规模集成电路设计数字钟的一种方法。
数字钟包括组合逻辑电路和时序电路关键词:计时器;计数器;校时;组合逻辑电路;时序逻辑电路;译码。
0 概述0.1课题的现状:由于该课题应用较为普遍,所以实现方法很多。
基于单片机原理实现,用数字电路实现,用EDA技术实现,还可用F201448技术工艺,当然,还可以通过编程实现。
0.2本课题设计的目的、意义:数字电子计时器是一种用数字电路技术实现时、分、秒计时的装置,与机械式计时器相比具有更高的准确性和直观性,企且无机械装置,具有更长的使用寿命,因此应该得到广泛使用。
本次课程设计的目的,就是为了了解数字电子计时器的原理,从而学会制作数字电子计时器,而且通过计时器的制作机一部了解各种在制作中用到的中小规模集成电路的作用及实用方法,且由于数字电子计时器包括组合逻辑电路和时序逻辑电路,通过它可以进一步学习和掌握两种电路的原理与使用方法。
0.3课题内容、要求、达到的性能指标:(1)根据计时器的方框图和指定器件,完成计时器的主体电路设计及实验;(2)利用异步时序电路的方法,设计一个24进制的时空电路,要求当计数器运行到23时59分59秒是,秒个位计数器在接受一个秒脉冲信号后,计数器自动显示为00时00分00秒,完成进制的计时要求;(3)具有校时、分、秒;(4)在实验板上安装、调试出课题所要求的计时器;(5)画出逻辑电路图,时序图,并写出报告。
多功能计时器(FMB01DW24)说明书

Product DescriptionMultifunction Multifunction timer with 7functions an d selectable time range from 0.05 sec-onds to 300 hours.48 x 48 mm for front panel mounting an d on 11-pin socket.•Time range 0.05 s to 300 h •Knob selection of time range •Knob adjustable time setting•Knob selection of operating mode (7 functions):Op -delay on operateRb -symmetrical recycler OFF first R -symmetrical recycler ON first Id -double interval Dr -delay on release In -intervalIo -interval on trigger open •Manual start•Gate and reset inputs•Repeatability: ±0.2% on full scale •Output: 8 A DPDT relay•48 x 48 mm housing for front panel mounting •11 pin socket•LED indication for relay status and power supply ONType SelectionMounting Output Plug Supply: 12 to 240 VAC/DC Front or socketDPDT11-pinFMB01DW24Time SpecificationsType FMB01TimersOutput SpecificationsFMB01Function and Time SettingLower left knob:Setting of functionOp-delay on operateRb-symmetrical recycler(OFF first)R-simmetrical recycler(On first)Id-double intervalDr-delay on releaseIn-intervalIo-interval on trigger open Lower right knob:Time unit selector0.1s(0.1 seconds)sec(seconds)10sec(10 seconds)min (minutes)10m (10 minutes)hrs(hours)10h(10 hours)Upper right knob:Time range selector12or 30Centre knob:Time setting on absolutescaleMode of OperationFunction OpDelay on operateThe time period begins as soon as the trigger contact is closed. At the end of the set elay time the relay operates and d oesn’t release until the power sup-ply is disconnected.The trigger contact is invalid while the timer is in opera-tion.Function RbSymmetrical recycler (OFF first)The time period begins as soon as the input contact is closed. The relay is OFF d uring the set d elay period, after this time it operates for the same time period. This sequence continues with equal OFF- and ON- time periods until power supply is interrupted.Function RSymmetrical recycler(ON first)The relay operates and thetime period begins as soonas the input contact isclosed. After the set d elayperiod the relay releases forthe same time period. Thissequence continues withequal ON- and OFF- timeperiods until power supply isinterrupted.Function IdDouble intervalThe relay operates and thetime period begins as soonas the trigger contact isclosed. The relay releases atthe end of this period orwhen the power supply isd isconnecte d. When thetrigger contact is openedthe relay operates again forthe set d elay period. If thetrigger contact is openedbefore the end of the firsttime period the second onebegins; if the trigger contactis closed before the end ofthe second time period therelay keeps ON and the firsttime period begins again.Function DrDelay on releaseThe relay operates as soonas the trigger contact isclose d. The time perio dbegins when the trigger con-tact is opened. The relayreleases at the end of theset d elay time or when thepower supply is disconnect-ed. The relay operates againwhen the input conctact isclosed again. If it is openedbefore the end of the d elaytime the relay keeps ON, anew time period begins assoon as the contact isclosed again.Function InIntevalThe relay operates and thetime period begins as soonas the trigger contact isclosed. The relay releases atthe end of this period orwhen the power supply isd isconnecte d. The relayoperates again when thetrigger contact is close dagain. If the trigger conctactis closed before the end ofthe d elay time, the d eviceresets and a new time peri-od starts.Function IoInteval on trigger openThe relay operates and thetime period begins as soonas the trigger contact isopened. The relay releasesat the end of this period orwhen the power supply isd isconnecte d. The relayoperates again when thetrigger contact is openedagain. If the trigger conctactis opened before the end ofthe d elay time, the d eviceresets and a new time peri-od starts.General SpecificationsFMB01Range and operation mode selectionOperating DiagramsFMB01Wiring DiagramsDimensionsOperating Diagrams (cont.)。
多功能数字电子钟设计

数字逻辑课程设计-多功能数字电子钟多功能数字钟的设计与仿真一.设计任务与要求设计任务:设计一个多功能数字钟。
要求:1.有“时”、“分”、“秒”(23小时59分59秒)显示且有校时功能。
(设计秒脉冲发生器)2.有整点报时功能。
(选:上下午、日期、闹钟等)3. 用中规模、小规模集成电路及模拟器件实现。
4. 供电方式: 5V直流电源二.设计目的、方案及原理1.设计目的(1)熟悉集成电路的引脚安排。
(2)掌握各芯片的逻辑功能及使用方法。
(3)了解面包板结构及其接线方法。
(4)了解多功能数字钟的组成及工作原理。
(5)熟悉多功能数字钟的设计与制作2.设计思路(1)设计数字钟的时、分、秒电路。
(2)设计可预置时间的校时电路。
(3)设计整点报时电路。
3.设计过程3.1.总体设计方案及其工作原理为:数字钟原理框图入图1所示,电路一般包括一下几个部分:振荡器、星期、小时、分钟、秒计数器、校时电路、报时电路。
数字钟实际上是一个对标准频率(1HZ)进行计数的计数电路。
由于计数的起始时间不可能与标准时间(如北京时间)一致,故需要在电路上加一个校时电路,同时标准的1HZ时间信号必须做到准确稳定。
通常使用石英晶体振荡器电路构成数字钟,但也可以用555定时器构成。
图1 系统框图数字钟计时的标准信号应该是频率相当稳定的1HZ秒脉冲,所以要设置标准时间源。
数字钟计时周期是24小时,因此必须设置24计数器,秒、分、时由数码管显示。
ﻫ为使数字钟走时与标准时间一致,校时电路是必不可少的。
设计中采用开关控制校时电路“时”“分”“秒”计数器进行校时操作。
3.2.各独立功能部件的设计(1)分、秒计时器(60进制),时计数器(24进制),星期计数器(7进制)如下图,图中蓝色线为高电平+5v,绿色为接地线,红色线为时钟脉冲。
获得秒脉冲信号后,可根据60秒为一分,60分为一小时,24时为一个计数周期的计数规则,分别确定秒、分、时的计数器。
由于秒和分的显示都为60进制,因此他们可有两级十进制计数器组成,其中秒和分的个位为十进数器,十位为六进制计数器,可利用两片74160集成电路来实现。
多功能AT89C2051倒计时器
多功能AT89C2051倒计时器摘要:倒计时器在生活非常有用,用单片机自制,不但电路简单,而且功能可根据需要自行设计。
由74系列、40系列小规模数字芯片设计的倒计时器非常多,但有显示不直观(无LED数码管);调整参数不灵活;计时精度低(采用RC振荡)等缺点。
在此向大家介绍如何用89C2051单片机自制倒计时器的方法。
一、功能介绍1.独立的三路倒计时。
均可独立设置启动、关闭。
2.范围:0~20小时,可任意设定。
关机后数据不丢失。
计时精度高:<0.1S3..独立的三路输出:a:第1路蜂鸣器输出:15Sb:第2路PNP晶体管输出:5Sc:第3路PNP晶体管输出:直致关机二、工作原理电路见上图整机由89c2051、三位LED数码管、K1-K4、R、T等元器件组成。
89C2051内部T1定时器完成100mS定时中断功能。
为了减少硬件,由89C2051的P1口直接输出LED的段码,BCD转换由软件完成。
位选码由P3.0,P3.1,P3.7输出。
键盘扫描与LED位选码的脚共用。
由于89C2051的灌入电流:20mA。
故直接驱动:蜂鸣器、PNP晶体管。
LED数码管采用共阴高亮型,LED1数码管要旋转180度。
因为要显示:“19:99”,而只有三位数码管,因此用第三位的数码管的小数点表示“1”。
三、软件编制(软件流程见图三)在T1中断程序中做一个软时钟,在定时处理程序不断查寻时间,并根据每路的启动状态,判别是否要减数。
每路倒计时到"0"后,均要判别其它两路是否已启动。
如果没有启动,则CPU进入掉电模式,电流<1.5uA,因此电路中无电源开关,再次启动,由K4(复位键)完成。
每路倒计数的初值、启动状态(是否开始倒计数),均可单独设定并存在89c2015的RAM中,只要不断电,数据不会改变。
四、操作说明电路中设有K1~K4四个开关:1.功能如下:K1:定时路数切换。
上电:LED显示第1路定时时间,按下k1,LED 显示第1路定时启动状态:【F】表示:关。
汇川h5u计时器指令
汇川h5u计时器指令全文共四篇示例,供读者参考第一篇示例:汇川H5U计时器是一种高性能、高精度的计时器设备,广泛应用于各种工业控制领域。
它具有强大的功能和灵活的配置方式,可以满足不同行业的计时需求。
本文将对汇川H5U计时器的指令进行详细介绍,帮助读者更好地了解和使用这款设备。
一、基本概念在介绍汇川H5U计时器的指令之前,首先需要了解一些基本概念:1. 计时器:计时器是一种用于计时的设备,可以精确地测量时间的流逝。
汇川H5U计时器是一种数字计时器,可以显示时间,并根据用户的设置进行计时操作。
2. 指令:在工业控制领域,指令是用于控制设备、执行特定操作的命令。
汇川H5U计时器的指令是用户通过编程设置计时器的工作方式、参数等。
二、指令种类汇川H5U计时器具有多种指令,包括以下几类:1. 启动指令:启动指令用于启动计时器的计时功能,使计时器开始工作。
4. 设置指令:设置指令用于设置计时器的工作参数,如计时时间、报警值、显示模式等。
5. 读取指令:读取指令用于读取计时器的当前状态和数值,以便进行监控和分析。
以上是汇川H5U计时器常用的几类指令,用户可以根据实际需求选择合适的指令进行编程操作。
三、指令编程示例现在以一个简单的计时器应用为例,演示如何使用指令编程汇川H5U计时器。
假设我们需要一个计时器,每隔10秒显示一次计时值,并在计时达到60秒时报警。
1. 设置计时器参数:首先设置计时器的计时时间为60秒,并设置报警值为60秒。
2. 编写程序:编写一个简单的程序,包括启动指令、读取指令、设置指令和停止指令。
具体程序如下:```启动计时器;循环执行以下操作:读取计时器数值;如果计时器数值为10的倍数,则显示计时值;如果计时器数值达到60秒,则触发报警;等待1秒;结束循环;停止计时器;```3. 运行程序:将程序上传至汇川H5U计时器,启动计时器,观察计时器的工作状态。
当计时器数值为10的倍数时,计时器会显示计时值;当计时器数值达到60秒时,计时器会触发报警。
多功能光电计时器操作说明简表与使用说明书

Changeover選擇時間
P1的擋光時程
P2的擋光時程
P1至P2的擋光時程
Changeover選擇速度
P1的擋光速度
P2的擋光速度
P1至P2的加速度
Collision
碰撞運動
P1或P2
Changeover選擇速度
顯示各光電門各來回1至3次擋光片之速度
Changeover選擇時間
顯示各光電門各來回1至3次擋光片之時間
3.Acceleration(加速度,a)測量
測量帶有凹形擋光片的滑行器通過相鄰兩個光電閘的速度,以及通過此兩光電閘間之段路程所需的時間,可連接2至4個光電閘。在此測量模態時,本計時器的顯示面版上會循環顯示下列數據:
1第一個光電管
×××××第一個光電管測量值(T1/V1)
2第二個光電管
×××××第二個光電管測量值(T2/V2)
多功能光電計時器操作說明簡表與使用說明書
編寫者:國立清華大學物理系戴明鳳,日期:97.02.22
圖A-1多功能光電計時器
一、儀器工作原理及特點
使用精密的紅外線光電感應器所製作的光電閘,搭配高速微處理運算器測量運動體的運動時間、速率和加速度,具特定實驗模組化的測量功能。本機採用國際流行的薄膜式按鍵開關面設計,並含微處理機單元及智能化的測量技術讀取、處理暨儲存數據。以微秒級為時基的時間測量裝置,可提供精確位數高達五位元的時間測量,並具有存儲功能。操作簡單,只需使用四個操作鍵即可完成各種不同的測量功能。可作為計時器、計數器、信號源和6V直流穩壓電源使用。本機除了具有一般計時器的功能外,並可用以測量運動物體的加速度、重力加速度、周期等物理量,可直接顯示物體的移動速率和加速度值。經常運用在大學院校普物實驗課程中有關運動的實驗中,如與氣墊導軌、斜槽軌道、自由落體和碰撞等各種運動實驗系統的儀器配合使用。
数字钟多功能课程设计
数字钟多功能课程设计一、课程目标知识目标:1. 让学生掌握数字钟的基本原理和组成,理解时钟的时、分、秒显示功能的实现。
2. 使学生了解和掌握数字钟多功能设计的相关知识,如闹钟、计时器、温度显示等。
3. 让学生掌握数字钟程序设计的步骤和方法,学会使用相关软件和编程语言进行程序编写。
技能目标:1. 培养学生动手实践能力,能够独立完成数字钟的搭建和程序设计。
2. 培养学生运用所学知识解决实际问题的能力,能够根据需求为数字钟增加新功能。
3. 提高学生的团队协作能力,学会在项目中进行有效沟通与分工。
情感态度价值观目标:1. 培养学生对电子科技的兴趣和热情,激发创新意识。
2. 培养学生严谨的科学态度,注重实验过程中的细节和精确性。
3. 培养学生珍惜时间、合理安排时间的观念,提高时间管理能力。
本课程针对中学生设计,结合学生年龄特点和知识水平,注重理论与实践相结合,以培养学生的动手实践能力和创新精神为核心。
课程目标明确、具体,可衡量,便于后续教学设计和评估。
在教学过程中,教师应关注学生的个体差异,给予不同层次的学生适当指导,使他们在课程中都能获得成长和收获。
二、教学内容1. 数字钟基本原理:介绍时钟的工作原理,数字显示技术,以及时、分、秒的计数关系。
教材章节:《电子技术》第三章第三节“数字显示技术”。
2. 数字钟的组成:分析数字钟的硬件组成,包括微控制器、时钟芯片、显示模块等。
教材章节:《电子技术》第三章第四节“数字时钟电路”。
3. 数字钟多功能设计:讲解闹钟、计时器、温度显示等功能的设计与实现。
教材章节:《电子技术》第四章“数字时钟应用实例”。
4. 程序设计方法:学习数字钟程序设计的步骤,使用编程软件和编程语言进行程序编写。
教材章节:《计算机编程》第二章“C语言基础”。
5. 实践操作:指导学生动手搭建数字钟电路,编写程序,实现基本功能及拓展功能。
教材章节:《电子技术实验》第五章“数字时钟设计与制作”。
6. 项目评估:评估学生完成项目的质量,包括功能实现、程序优化、团队协作等方面。
2025考研倒计时器

2025考研倒计时器概述2025年的考研正在逐渐逼近,对于许多准备参加考研的学生来说,时间的管理和规划变得尤为重要。
为了帮助学生们更好地管理时间和复习进程,开发了一款名为「2025考研倒计时器」的小工具。
这款倒计时器采用简洁的设计和多功能的设置,旨在提供便捷、高效的考研备考辅助工具。
功能特点1. 倒计时显示2025考研倒计时器以清晰的倒计时显示形式呈现在用户面前。
倒计时器将显示距离2025年考研的天数、小时、分钟和秒数,帮助学生们直观了解距离考研还有多长时间。
2. 多重倒计时设置该倒计时器支持用户创建多个倒计时任务,允许用户同时管理多个重要的时间节点。
用户可以根据自己的需求,自行设置每个倒计时任务的标题、日期和时间。
3. 闹钟提醒为了帮助学生们有效规划时间并提醒重要事件,2025考研倒计时器还提供闹钟提醒功能。
学生可以在倒计时器中设置多个闹钟,并选择提醒方式,例如声音提醒或震动提醒。
4. 备忘录这款倒计时器还提供备忘录功能,方便学生们记录考研备考中的重要事项。
用户可以在倒计时器中添加备忘录,以确保不会忘记学习任务、考试安排或其他备考事项。
5. 进度追踪为了帮助学生们更好地掌握备考进度,该倒计时器还提供进度追踪功能。
用户可以将备考科目或章节进行分类,并在每个分类下设置学习计划和进度。
倒计时器会根据用户设置的进度和计划,自动计算并显示备考进度的完成情况,帮助学生们及时调整学习进程。
使用指南1.下载和安装倒计时器应用程序。
2.打开应用程序,进入主界面。
3.创建新的倒计时任务:点击「添加任务」按钮,在弹出的界面中输入任务的标题、日期和时间,点击「确定」完成创建。
4.设置闹钟提醒:点击「添加闹钟」按钮,选择要提醒的任务和提醒方式,点击「确定」完成设置。
5.添加备忘录:点击「备忘录」按钮,在备忘录界面中点击「添加备忘录」按钮,输入备忘录内容,点击「保存」完成添加。
6.设置进度追踪:点击「进度」按钮,在进度界面中点击「添加分类」按钮,输入分类名称,点击「确定」完成创建分类。
多功能数字计时器实验报告.

多功能数字计时器实验报告姓名:***学号:************专业:信息对抗指导老师:***实验时间:2015年9月18日目录1.电路基础功能设计要求介绍2.电路原理简介3.单元电路设计3.1脉冲发生电路3.2计时电路3.3译码显示电路3.4清零电路3.5校分电路3.6报时电路4.总电路图5.拓展电路5.1启停电路5.2动态显示电路6.附录6.1元件清单6.2芯片引脚图和功能表7.实验感受与体会8.参考文献一、电路基础功能设计要求介绍设计制作一个0分00秒~9分59秒的多功能计时器,设计要求如下:a.设计一个脉冲发生电路,为计时器提供秒脉冲(1HZ),为报时电路提供驱动蜂鸣器的高低脉冲信号(1KHZ、2KHZ);b.设计计时电路:完成0分00秒~9分59秒的计时、译码、显示功能;c.设计清零电路:具有开机自动清零功能,并且在任何时候,按动清零开关,可以对计时器进行手动清零.d.设计校分电路:在任何时候,拨动校分开关,可进行快速校分.(校分隔秒)e.设计报时电路:使数字计时器从9分53秒开始报时,每隔一秒发一声,共发三声低音,一声高音;即9分53秒、9分55秒、9分57秒发低音(频率1kHz),9分59秒发高音(频率2kHz)f.系统级联.将以上电路进行级联完成计时器的所有功能.二、电路原理简介工作原理:由振荡器产生的稳定的高频脉冲信号,作为数字钟的时间基准,再经分频器输出标准秒脉冲.秒个位计数器记满10后向秒十位计数器进位,秒十位计满6后向分进位同时置零. 计数器的输出经译码器送显示器.记时出现误差时可以用校时电路进行校分.扩展电路必须在主体电路正常运行的情况下才能进行功能扩展。
数字计时器由计时电路、译码显示电路、脉冲发生电路、校分电路、清零电路和报时电路这几部分组成。
其原理框图如下:三、单元电路设计1.脉冲发生电路脉冲信号发生电路完成为计时电路提供计数脉冲的功能。
实验中采用32768Hz的石英- 4 - 晶体多谐振荡器作为脉冲信号源。
数字计时器
电工电子综合实验报告—数字计时器院系:电光学院专业:通信工程班级:07042201学号:0704220100姓名:* * *指导教师:李元浩时间:2009.09.17—2009.09.20目录1.设计电路功能要求(1)2.设计电路原理图(1)3.电路逻辑原理图及工作原理(2)4.各单元电路原理及逻辑设计4.1脉冲发生电路(2-3)4.2计时电路(3-4)4.3显示电路(4)4.4清零电路(5)4.5校分电路(5)4.6报时电路(6)5.电路安装与调试说明(6-7) 6.对电路的改进意见(7)7.收获体会及建议(7)8.设计参考资料(7)9.附录(8-10)1.设计电路功能要求本实验要求设计一个0分00秒-9分59秒的多功能数字计时器。
数字计时器是由脉冲发生电路,计时电路,译码显示电路,和控制电路等几部分组成。
其中控制电路由清零电路,校分电路,和报时电路组成。
该数字计时器可以在控制电路的作用下具有开机清零、手动清零、快速校分和整点报时功能。
①.设计一个脉冲发生电路,为计时器提供秒脉冲,为报时电路提供驱动蜂鸣器发声的脉冲信号;②.设计计时和显示电路,将分及秒的个位、十位分别在七段显示器上显示出来,从0分0秒开始,计到9分59秒,然后重新计数。
将分及秒的个位、十位分别在七段显示器上显示出来,七段显示器循环显示数字000~959;③.设计清零电路,实现手动及开机清零;④.设计校分电路,在校分开关控制下实现分校正;⑤.设计报时电路,使数字计时器实现在9分53秒、9分55秒、9分57秒低音(1KHz)报时,以及在9分59秒高音(2KHz)报时;2.设计电路原理图图2-1 电路原理图3.电路逻辑原理图及工作原理数字计时器的原理方框图如图3-1所示,该电路系统由脉冲发生电路、计时和显示电路、清零电路、校分电路和报时电路和其它附加电路等几部分组成的。
脉冲发生电路由振荡器和分频器组成,振荡器产生稳定的高频脉冲信号,作为数字钟的时间基准,再经分频器输出标准的秒脉冲,同时也可得到其他不同频率的脉冲。
多功能数字电子钟的方案设计书(郑思贺)
数字电子钟的设计一、概述数字钟是一个将“时”“分”“秒”显示于人的视觉器官的计时装置。
它的计时周期为24小时,显示满刻度为23时59分59秒,另外应有校时功能和报时功能。
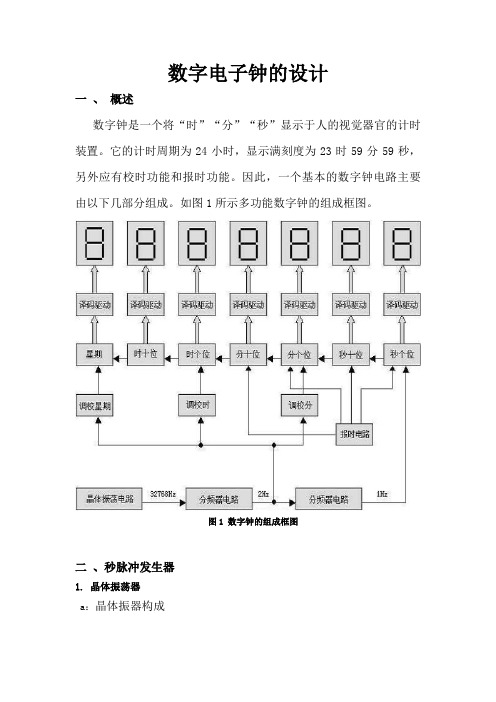
因此,一个基本的数字钟电路主要由以下几部分组成。
如图1所示多功能数字钟的组成框图。
图1 数字钟的组成框图二、秒脉冲发生器1. 晶体振荡器a:晶体振器构成晶体振荡器电路给数字电子钟提供一个频率稳定准确的32768Hz的方波信号,可保证数字钟的走时准确及稳定。
不管是指针式的电子钟还是数字显示的电子钟都使用了晶体振荡器电路。
如图2所示晶体振荡电路框图。
图2 晶体振荡电路框图b:晶体振荡器电路原理在电路中,非门U1与晶体、电容和电阻构成晶体振荡器电路,U2实现整形功能,将振荡器输出的近似于正弦波的波形转换为较理想的方波。
输出反馈电阻R1为非门提供偏置,使电路工作于放大区域,即非门的功能近似于一个高增益的反相放大器。
电容C1、C2与晶体构成一个谐振型网络,完成对振荡频率的控制功能,同时提供了一个180度相移,从而和非门构成一个正反馈网络,实现了振荡器的功能。
由于晶体具有较高的频率稳定性及准确性,从而保证了输出频率的稳定和准确。
晶体XTAL1的频率选为32768Hz。
其中C1的值取5~20 pF,C2为30pF。
C1作为校正电容可以对温度进行补偿,以提高频率准确度和稳定度。
由于电路的输入阻抗极高,因此反馈电阻R1可选为10MΩ。
较高的反馈电阻有利于提高振荡频率的稳定性。
2. 分频器电路分频器电路将32768Hz的高频方波信号经32768()次分频后得到1Hz的方波信号供秒计数器进行计数。
分频器实际上也就是计数器,为此电路输送一秒脉冲。
3. 秒脉冲发生器原理CD4060的10、11脚之间并接石英晶体和反馈电阻与其内部的反相器组成一个石英晶体振荡器。
电路产生的32768Hz的信号经过内部十四级分频后由3脚(Q14其分频系数为16384)输出脉冲频率为2Hz,再通过一个二分频器分频就得到了1Hz的时钟信号,也就是1S;CD4027为双JK触发器,其内部含有两个独立的JK触发器,其中16脚6脚(2J)5脚(2K)接电源,4脚(R2)7脚(S2)接地,3脚(CP2)输入2Hz脉冲信号,分频后的1Hz脉冲由1脚(Q2)输出。
多功能数字钟课程设计
摘要之青柳念文创作多功能数字钟是采取数字电路实现对时,分,秒,数字显示的计时装置,广泛用于个人家庭,车站,船埠,办公室等公共场合,成为人们日常生活中不成少的必须品,由于数字集成电路的发展和石英晶体振荡器的广泛应用,使得数字钟的精度远超出老式钟表原先的报时功能.诸如定时自动报警、按时自动打铃、时间程序自动节制、定时广播、自动起闭路灯、定时开关烘箱、通断动力设备、甚至各种定时电气的自动启用等,所有这些,都是以钟表数字化为基础的.因此,研究数字钟及其广大应用,有着非常现实的意义.数字电子钟由信号发生器“时、分、秒”计数器、译码器及显示器、校时电路、整点报时电路等组成.秒信号发生器是整个系统的时基信号,它直接决议计时系统的精度,一般用555或晶振电路构成的振荡器加分频起来实现.将尺度秒脉冲信号送入“秒计数器”,该计数器采取60进制计数器,每累计60秒发出一个“分脉冲”信号,该信号将作为“分计数器”的时钟脉冲.“分计数器”也60进制计数器,每累计60分,发出一个“时脉冲”信号,该信号将被送到“时计数器”.“时计数器”采取24进制计数,可以实现一天24h的积累计.译码显示电路将“时、分、秒”计数器的输出状态经七段显示译码器译码,通过六位LED显示器显示出来.整点报时电路是根据计时系统的输出状态发生一个脉冲信号,然后去触发音频发生器实现报时.校时电路是来对“时、分、秒”显示数字停止校对,调整.关键词多功能数字钟计数器译码器显示器校时电路目次摘要 (I)1 绪论 (1)1.1 项目研究的布景及意义 (1)1.2 多功能数字钟的现状和发展趋势 (1)2 设计总体方案 (2)2.1 简要说明 (2)2.2 任务要求 (2)2.3 基来历根基理 (2)3 单元电路 (3)3.1 振荡器的设计 (3) (4) (4) (5) (5)3.4 译码器和显示电路的设计 (6)3.5 校时电路的设计 (6)4单元电路设计 (7) (7) (7)4.2.1 60进制计数器的设计 (7)4.2.2 24进制计数器的设计 (8)4.3 译码及驱动显示电路 (9)4.4 校时电路的设计 (9)4.5 报时电路 (10) (11)5仿真成果及分析 (12) (12) (12) (13) (13)总结分析 (14)致谢 (15)参考文献 (16)附录1 (17)附录2 (18)1 绪论1.1 项目研究的布景及意义20世纪末,电子技术得到了飞速的发展,在其推动下,现代电子产品几乎渗透了社会的各个范畴,有力地推动了社会生产力的发展和社会信息化程度的提高,同时也使现代电子产品性能进一步提高,产品更新换代的节拍也越来越快.时间对人们来讲总是那末贵重,工作的繁忙性和复杂性容易使人忘记当前的时间.忘记了要做的事情,当事情不是很重要的时候,这种遗忘无伤大雅.但是,一旦重要事情,一时的耽误能够变成大祸.多功能数字钟是采取数字电路实现对时,分,秒,数字显示的计时装置,广泛用于个人家庭,车站,船埠,办公室等公共场合,成为人们日常生活中不成少的必须品,由于数字集成电路的发展和石英晶体振荡器的广泛应用,使得数字钟的精度远超出老式钟表原先的报时功能.诸如定时自动报警、按时自动打铃、时间程序自动节制、定时广播、自动起闭路灯、定时开关烘箱、通断动力设备、甚至各种定时电气的自动启用等,所有这些,都是以钟表数字化为基础的.因此,研究数字钟及其广大应用,有着非常现实的意义.1.2 多功能数字钟的现状和发展趋势单片机模块中最罕见的是数字钟,数字钟是一种用数字电路技术实现时、分、秒计时的装置,与机械式时钟相比具有更高的准确性和直观性,且无机械装置,具有更长的使用寿命,因此得到了广泛的使用.今朝,单片机正朝着高性能和多品种方向发展趋势将是进一步向着CMOS化、低功耗、小体积、大容量、高性能、低价格和外围电路内装化等几个方面发展.单片机应用的重要意义还在于,它从根本上改变了传统的节制系统设计思想和设计方法.从前必须由摹拟电路或数字电路实现的大部分功能,现在已能用单片机通过软件方法来实现了.这种软件代替硬件的节制技术也称为微节制技术,是传统节制技术的一次革命.在单片机技术日趋成熟的明天,其矫捷的硬件电路设计和软件的设计,让单片机得到了广泛的应用,几乎是从小的电子产品,到大的工业节制,单片机都起到了无足轻重的作用.单片机小的系统布局几乎是所有具有可编程硬件的一个缩影,可谓是“麻雀虽小,肝胆俱全”,单片机的学习和研究是对微机系统学习和研究的简捷途径.2 设计总体方案2.1 简要说明设计一个具有时分秒显示的数字钟.2.2 任务要求(1) 具有正常走时的基本功能;(2) 具有校时功能(只停止分、时的校时);(3) 具有整点报时功能;(4) 信号发生电路采取石英晶体构成的振荡器;(5) 列出步调,画出设计的逻辑电路图.(6) 电路停止仿真、修改,使仿真成果达到设计要求;(7) 装并测试电路的逻辑功能.2.3基来历根基理数字钟的原理框图如图2-1所示,是由555多谐振荡器、分频器、秒、分、时计数器、译码器、显示器和校时电路组成.555多谐振荡器发生的信号颠末分频器作为秒脉冲,秒脉冲送入计数器计数,计数成果通过“时”、“分”、“秒”译码器显示时间.图2-1 数字钟的原理框图3 单元电路3.1 振荡器的设计数字钟应具有尺度的时钟源,用它发生频率稳定的1Hz脉冲信号,称为秒脉冲,因此振荡器是计时器的核心.通常采取集成电路555定时器与RC组成的多谐振荡器.晶体振荡器给数字钟提供一个频率稳定准确的方波信号,一般输出为方波数字式晶体振荡器通常有两类:一类是用TTL门电路构成;另外一类是通过CMOS非门构成电路.这里我们采取555多谐振荡器.图3-1 1000Hz NE555多谐振荡器分频器的设计由NE555组成的多谐振荡器发生1KHz稳定的脉冲信号,但是时钟电路需要1Hz的秒脉冲信号,所以我们采取由3个74HC161组成的1000分频电路.图3-2 74HC161分频器3.3计数器的设计获得秒脉冲信号后,可根据60秒为1分,60分为1小时,24小时为一天的规律计数.因此,计数器由“秒”、“分”、“时”计数器电路组成,“秒”,“分”计数器为六十进制加法计数器,时计数器为二十四进制加法计数器.采取两片中规模集成电路74LS160组成六十进制加法计数器,可操纵74LS160异步清零端通过反馈归零的方法来实现,也可操纵74LS160同步置数端用置数法来实现.图3-3-1 六十进制加法计数器由两个74LS160和74LS00四2输入与非门组成二十四进制“时”计数器,个位与十位计数器均采取同步级联方式.选择十位计数器的输出端和个位计数器的输出端通过与非门节制两片计数器的清零端,可实现二十四进制递增计数.图3-3-2 二十四进制加法计数器译码器和显示电路的设计译码是将给定的代码停止翻译.计数器采取的码制分歧,译码电路也分歧.译码和显示电路是将“秒”、“分”、“时”计数器中每块集成电路的输出状态翻译成七段数码管能显示十进制数所要求的电信号,然后经数码管,把相应的数字显示出来.译码管有多个型号可以选择,如74LS248、74LS247等.图3-4 译码器显示电路3.5 校时电路的设计校时电路的作用是当计时器刚接通电源或走时出现误差时,实现对“时”、“分”、“秒”的校准.在电路中设有正常计时和校准位置.校时电路可以采取手动校时或自动校时.3.5.1 时、分时间校准电路3.5.2 秒时间校准电路图3-5 校时电路4单元电路设计图4-1 发生1Hz时间脉冲的仿真电路图秒、分计数器为60进制计数器.小时计数器为24进制计数器.实现这两种模数的计数器采取中规模集成计数器74LS160.4.2.1 60进制计数器的设计“秒”74LS160构成的60进制计数器.首先将两片74LS160设置成十进制加法计数器,将两片计数器并行进位则最大可实现100进制的计数器.现要设计一个60进制的计数器,可操纵“反馈清零”的方法实现.当计数器输出“0110、0000”时,通过门电路形成一置数脉冲,使计数器归零.图 4-2-1 60进制计数器电路图4.2.2 24进制计数器的设计同理应个位计数状态为“0100”,十位计数器状态为“0010”时,要求计数器归零.图 4-2-2 24进制计数器图4.3 译码及驱动显示电路译码电路的功能是将“秒”、“分”、“时”计数器的输出代码停止翻译,变成相应的数字.用于驱动LED七段数码管的译码器常常使用的有CD4511,CD4511是BCD-7段译码器,其输出是OC门输出高电平有效,专用于驱动LED七段共阴极显示数码管.由CD4511和LED七段共阴极数码管组成的一位数码显示电路如图 16 所示.若将“秒”、“分”、“时”计数器的每位输出分别接到相应七段译码器的输入端,即可停止分歧数字的显示.图 1-3译码及驱动显示电路图4.4 校时电路的设计数字种启动后,每当数字钟显示与实际时间不符进,需要根据尺度时间停止校时.校“秒”时,采取等待校时.校“分”、“时”的原理比较简单,采取加速校时.对校时电路的要求是 :1.在小时校正时不影响分和秒的正常计数 .2.在分校正时不影响秒和小时的正常计数 .如图所示,当开关打向下时,因为校正信号和0相与的输出为0,而开关的另外一端接高电平,正常输入信号可以顺利通过与或门,故校时电路处于正常计时状态;当开关打向上时,情况正好与上述相反,这时校时电路处于校时状态.与非门可选74LS00,非门则可用与非门2个输入端并接来代替节俭芯片.因此实际使用时,须对开关的状态停止消除抖动处理,图17为加2个0.01uF的电容.图 4-4 校时电路图4.5 报时电路根据要求,电路应在整点准时报时,当时间到达一个整小时时,电路会发生一次蜂鸣提醒.图 4-5 报时电路图图4-6 总电路图5仿真成果及分析图 2-1时钟成果仿真图星期电路原理和时分秒的计时电路原理相同,选用74LS160做计数器,CD4511做译码显示功能,这里星期电路兼具调整功能,下方开关打至高电平,星期电路会自动跳动直至准确后再拨动开关.图5-2 星期电路仿真图图5-3 手电电路图5.4测试成果分析经测试之后,电路可以实现设计要求,可以实现数字钟的基本功能,比方计数,如图22,同时多功能模块校时功能和报时功能都可使用,如图24.基于仿真成果可以认定,此次多功能数字钟的设计是成功的.数电课设即将竣事,一星期的课程设计给我留下了很深的印象,电路的设计比想象的要复杂一点,而且会不时的出现一些小问题,而我们处理一个个小问题的过程就是我们收获的过程,大体电路设计完毕后我们开端寻求扩大功能,包含报时电路,星期电路和应急用的小手电电路,都会让我为之兴奋,而仿真软件的应用也的确让我们任性了一把,比方因为原件选择的错误一直不克不及仿真..而在总体电路设计完毕后还要分模块为焊接做准备,也让我对统筹规划有了进一步的懂得.而电路的焊接就是对耐烦细心动手的考验了,在一个月黑风高的夜晚,终于我么完成了电路的焊接,,,很高兴在这个充满创意的数电课设上收获颇丰~~~感谢高教师的全力帮忙,感谢所有教师的支持与厚爱!当然还要感谢我的组员和我一起奋战在第一线!我们一起履历过失败,挫折,但是我们都降服掉了所有的坚苦,最后终于见到了辛勤尽力后的彩虹!感谢大家!参考文献[1] [2] 何立平易近. 单片机系统设计. 北京航空航天大学出版社[M].1993.[3] 姚行中,关林风. 微型计算机及外部设备常常使用芯片手册[M].清华大学出版社.1999[4] 康华光,电子技术基础(数字部分).高等教导出版社.[5] 杨旭雷,张浩. 基于RS-485总线的测控系统串行通信协议及软硬件实现[J].电气自动化. 2002(2).附录1 总电路图附录2 元件清单。
多功能数字秒表
摘要近年来随着科技的飞速发展,单片机的应用正在不断的走向深入。
本文阐述了基于单片机的数字电子秒表设计。
本设计主要特点是计时精度达到0.01s,具有多组数据记录功能,一键实现开始、暂停、清零功能。
解决了传统的由于计时精度不够造成的误差和不能记录多组数据局限性。
是各种体育竞赛的必备设备之一。
本设计的数字电子秒表系统采用AT89S52单片机为中心器件,利用其定时器/计数器定时和记数的原理,结合显示电路、LED数码管以及外部控制电路来设计计时器。
将软、硬件有机地结合起来,使得系统能够实现六位LED显示,显示时间为0~59分59秒99毫秒,计时精度为0.01秒,能正确地进行计时,同时能记录10组时间,并能用上下翻动键对计时时间进行查询。
其中软件系统采用C语言编写程序,包括显示程序,定时中断服务,延时程序等,硬件系统利用PROTEUS强大的功能来实现,简单切易于观察,在仿真中就可以观察到实际的工作状态。
关键词:单片机;数字电子秒表;仿真;LCDABSTRACTIn recent years, with the rapid development of science and technology, the application of SCM is unceasingly to the deep. This article elaborated the digital electronic stopwatch design based on single chip microcomputer. This design main characteristic is timing accuracy reached 0.01 s, has the function of multiple data record, a key to realize the start, pause, reset function. Solve the traditional due to timing error caused by the precision is not enough and can't record of data limitations. Is one of the necessary equipment of various sports competitions.The design of digital electronic stopwatch system USES AT89S52 single chip processor as the center, use the timer/counter timing and the principle of representation, combinedwith the display circuit, LED digital tube and external control circuit to design the timer. The software and hardware organically, enables the system to realize the six LED display, show time for 0 ~ 59 minutes 59 seconds 99 milliseconds, timing accuracy of 0.01 seconds, can correctly on time, at the same time can record 10 groups of time, and can turn up and down keys to inquires the clock time. Software using C language program, including display program, timer interrupt service, time delay procedures, hardware systems use PROTEUS powerful functions, simple and easy to observe, can be observed in the simulation of the actual working condition.Key words SCM; Digital electronic stopwatch; The simulation; LCD目录一、概述 (4)1、意义: (4)2、功能 (4)二、硬件电路设计及描述 (4)1、方案及设计要求: (4)2、仿真图、PCB板图、成品图 (6)3、芯片资料: (9)4、元件清单: (9)三、软件设计流程及描述 (10)1、程序流程图 (10)2、源程序代码 (10)四、测试 (22)五、总结 (23)参考文献 (23)致谢 (24)一、概述1、意义:时间是日常生活、体育竞技、工业、医学、航天等领域最常遇到的一个物理量。
多功能数字钟

多功能数字计时器设计——电子电工综合实验(二)实验报告专业:电气工程及其自动化院系:自动化学院目录一.设计目的-------------------------------- 2 二.设计要求 ------------------------------- 2 三.设计原理 ------------------------------- 2 1.系统的整体设计原理---------------------- 2 2.部分功能设计 ------------------------ 3(1)脉冲发生电路------------------- 3(2)计时电路----------------------- 3(3)报时电路----------------------- 5(4)校分电路----------------------- 6(5)清零电路----------------------- 6(6)整体电路----------------------- 7(7)附加电路(电路启停功能)------- 7四、遇到的问题与体会------------------------ 8 五.附录-------------------------------- 9 1.元器件清单----------------------------- 9 2.参考文献 ----------------------------- 12一、设计目的:1、掌握常见集成电路的工作原理和使用方法。
2、学会单元电路的设计方法。
二、设计要求:1.设计一个脉冲发生电路,为计时器提供秒脉冲,为报时电路提供驱动蜂鸣器的脉冲信号。
2.设计计时电路,完成0分00秒到59分59秒的计时功能。
3.设计报时电路,使数字计时器从59分53秒开始报时,每隔一秒发一声,共发三次低音,一声高音:即59分53秒、59分55秒、59分57秒发低音(频率为1kHz),59分59秒发高音(频率为2kHz)。
星巴克计时器闹钟冰箱贴说明书
星巴克计时器闹钟冰箱贴说明书星巴克计时器闹钟冰箱贴使用说明书1. 产品简介星巴克计时器闹钟冰箱贴是一款功能强大的电子计时器,外观设计时尚可爱,贴在冰箱上既方便使用,又能增添您的厨房或办公室的装饰风格。
2. 产品特点(1)多功能计时器:具备日常倒计时和计时功能,可满足您的各种需求,如煮饭、烘焙、运动计时等。
(2)大屏幕显示:清晰易读的液晶显示屏,数字清晰可见,方便老年人和视力有限的用户使用。
(3)三种定时模式:倒计时、计时和时钟模式,灵活应对不同的使用场景。
(4)报警提醒功能:倒计时结束或计时到达设定时间后,将发出清脆的提醒音,确保您不会错过重要时刻。
(5)磁性底座:配备强力磁性底座,可牢固吸附在冰箱等金属表面,不易掉落,方便携带和存放。
3. 使用方法(1)倒计时模式:a. 按下“倒计时”按钮,屏幕将显示默认倒计时时间,您可按照所需时间自行调整。
b. 按下“开始/暂停”按钮开始倒计时,屏幕上的数字将缓慢减少,直至倒计时结束。
c. 倒计时结束后,闹钟将自动发出提醒音,请按下任意按钮关闭。
(2)计时模式:a. 按下“计时”按钮,屏幕将显示“00:00”,表示计时从零开始。
b. 按下“开始/暂停”按钮开始计时,屏幕上的数字将逐渐增加,显示经过的时间。
c. 您可按下“停止”按钮结束计时,屏幕将冻结在当前时间。
(3)时钟模式:a. 按下“时钟”按钮,屏幕将显示当前的时间。
b. 您可按下“调整时间”按钮校准当前时间。
c. 时钟模式下,计时器功能将被禁用。
4. 注意事项(1)请勿将计时器暴露在高温、潮湿的环境中,以免损坏内部电子元件。
(2)使用时请避免强烈撞击或摔落,以保护屏幕和内部零件不受损坏。
(3)请勿在计时器上涂写或附加其他物品,以免影响正常使用。
(4)请勿将计时器水洗,只需用干布轻擦即可清洁表面。
(5)如长时间不使用,请取下电池,以免电池漏液损坏计时器。
本使用说明书详尽介绍了星巴克计时器闹钟冰箱贴的功能和使用方法,希望本产品能为您的生活带来便捷和趣味。
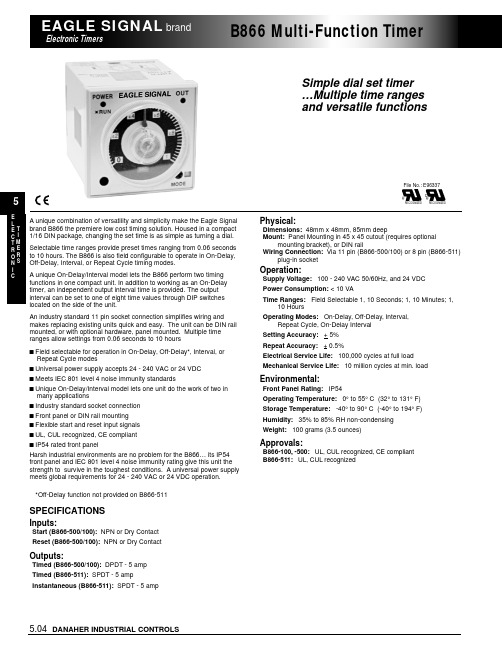
戴纳尔工业控制-鹰标信号电子计时器B866多功能计时器说明书
DANAHER INDUSTRIAL CONTROLS5.04Simple dial set timer …Multiple time ranges and versatile functionsA unique combination of versatility and simplicity make the Eagle Signal brand B866 the premiere low cost timing solution. Housed in a compact 1/16 DIN package, changing the set time is as simple as turning a dial.Selectable time ranges provide preset times ranging from 0.06 seconds to 10 hours. The B866 is also field configurable to operate in On-Delay,Off-Delay, Interval, or Repeat Cycle timing modes.A unique On-Delay/Interval model lets the B866 perform two timing functions in one compact unit. In addition to working as an On-Delay timer, an independent output interval time is provided. The output interval can be set to one of eight time values through DIP switches located on the side of the unit.An industry standard 11 pin socket connection simplifies wiring and makes replacing existing units quick and easy. The unit can be DIN rail mounted, or with optional hardware, panel mounted. Multiple time ranges allow settings from 0.06 seconds to 10 hourss Field selectable for operation in On-Delay, Off-Delay*, Interval, orRepeat Cycle modess Universal power supply accepts 24 - 240 VAC or 24 VDC s Meets IEC 801 level 4 noise immunity standardss Unique On-Delay/Interval model lets one unit do the work of two in many applicationss Industry standard socket connection s Front panel or DIN rail mounting s Flexible start and reset input signals s UL, CUL recognized, CE compliant s IP54 rated front panelHarsh industrial environments are no problem for the B866… its IP54front panel and IEC 801 level 4 noise immunity rating give this unit the strength to survive in the toughest conditions. A universal power supply meets global requirements for 24 - 240 VAC or 24 VDC operation.SPECIFICATIONSInputs:Start (B866-500/100): NPN or Dry Contact Reset (B866-500/100): NPN or Dry ContactOutputs:Timed (B866-500/100): DPDT - 5 amp Timed (B866-511): SPDT - 5 amp Instantaneous (B866-511): SPDT - 5 amp®®C *Off-Delay function not provided on B866-511Physical:Dimensions: 48mm x 48mm, 85mm deepMount: Panel Mounting in 45 x 45 cutout (requires optionalmounting bracket), or DIN railWiring Connection: Via 11 pin (B866-500/100) or 8 pin (B866-511)plug-in socketOperation:Supply Voltage: 100 - 240 VAC 50/60Hz, and 24 VDC Power Consumption: < 10 VATime Ranges: Field Selectable 1, 10 Seconds; 1, 10 Minutes; 1,10 Hours Operating Modes: On-Delay, Off-Delay, Interval,Repeat Cycle, On-Delay Interval Setting Accuracy: + 5%Repeat Accuracy: + 0.5%Electrical Service Life: 100,000 cycles at full load Mechanical Service Life: 10 million cycles at min. loadEnvironmental:Front Panel Rating: IP54Operating Temperature: 0° to 55° C (32° to 131° F)Storage Temperature: -40° to 90° C (-40° to 194° F)Humidity: 35% to 85% RH non-condensing Weight: 100 grams (3.5 ounces)Approvals:B866-100, -500: UL, CUL recognized, CE compliant B866-511: UL, CUL recognizedFile No.: E96337DANAHER INDUSTRIAL CONTROLS5.05ORDERING INFORMATIONOPERATING MODES。
- 1、下载文档前请自行甄别文档内容的完整性,平台不提供额外的编辑、内容补充、找答案等附加服务。
- 2、"仅部分预览"的文档,不可在线预览部分如存在完整性等问题,可反馈申请退款(可完整预览的文档不适用该条件!)。
- 3、如文档侵犯您的权益,请联系客服反馈,我们会尽快为您处理(人工客服工作时间:9:00-18:30)。
现代生活的人们越来越重视时间观念,可以说是时间和金钱基本上是等价的。
对于那些对时间把握非常准确和严格的人和事情来说,时间的误差会带来非常严重的后果,所以液晶显示器的时钟比指针式的时钟表现出了很大的优势。
单片机就是微控制器,是面向应用对象设计、突出控制功能的芯片。
单片机连接上复位电路、晶振、相关的接口电路,装载软件之后就可以组成单片机应用系统,把单片机应用系统运用的到各种各样的应用系统中,就形成了众多产品设备的智能核心。
本毕业设计就是用AT89C52单片机,涓细充电时钟芯片DS1302,数字化温度传感器DS18B20及液晶显示器LCD1602制作成电子万年历,该电子万年历可以实现实时显示年、月、日、时、分、秒;实时监测现场环境的温度(根据设定实现超温报警功能);电子闹钟三个功能。
关键词:时间显示,闹钟设置,环境温度采集,超温报警。
AbstractGrowing emphasis on modern life from the time the concept of time and money can be said to draw the equal sign. For those who are very strict and accurate grasp of time and things, time will not exactly bring a very big trouble, so as to control the display of digital clock than the clock pointer showed a big advantage. Single-chip microcontroller chip for the application object design, highlighting the control functions. Microcontroller connected to the crystal oscillator, reset circuit and the corresponding interface circuit, a microcomputer application system after loading the software. Embed it in all kinds of applications, to form the core of a wide range of products, equipment intelligent. The design is to use AT89C52 microcontroller, trickle charging clock chip DS1302 digital temperature sensor DS18B20 and LCD1602 LCD made to the electronic calendar, and this electronic calendar includes three major functions: real-time display year, month, day, hour, minutes, seconds ; the real-time monitoring of ambient temperature (based on the need to start the high-temperature alarm function); electronic alarm clock.Keywords: time display, alarm setting, ambient temperature acquisition, temperature alarm .第一章绪论 (4)1.1数字多功能计时器的研究背景 (4)1.2数字多功能计时器的国内外研究现状 (4)1.3数字多功能计时器的应用 (5)第二章整体方案 (6)2.1 设计任务 (6)2.2 设计要求 (6)2.3 整体方案框图 (6)第三章知识准备 (6)3.1 单片机AT89C52 (6)3.1.1 AT89C52特性介绍 (7)3.1.2 AT89C52引脚介绍 (7)3.2 实时时钟芯片DS1302 (10)3.2.1 DS1302特性介绍 (10)3.2.2 DS1302引脚介绍 (10)3.2.3 DS1302有关日历、时间的寄存器 (11)3.2.4 DS1302 控制字介绍 (12)3.2.5 DS1302 单字节读写时序介绍 (12)3.2.6 DS1302 操作指令介绍 (13)3.3 温度传感器DS18B20 (14)3.3.1 DS18B20 特性介绍 (14)3.3.2 DS18B20 引脚介绍 (15)3.3.3 DS18B20 内部工作原理介绍 (15)3.3.4 DS18B20 测温原理介绍 (16)3.3.5 DS18B20 电源接法介绍 (16)3.4 液晶显示屏LCD1602 (17)3.4.1 LCD1602特点介绍 (17)3.4.2 LCD1602引脚介绍 (17)3.4.3 LCD1602指令介绍 (18)3.4.3.1 LCD显示开关控制指令 (18)3.4.3.2 LCD输入模式设置指令 (19)3.4.3.3 LCD光标归位指令 (19)3.4.3.4 LCD设定显示屏或光标移动方向指令 (19)3.4.3.5功能设定指令 (20)3.4.3.6清屏指令 (20)3.4.3.7设定CGRAM地址指令 (20)3.4.3.8设定DDRAM地址指令 (20)3.4.3.9读取忙信号或AC地址指令 (21)3.4.3.10数据写入DDRAM或CGRAM指令 (21)3.4.3.11从CGRAM或DDRAM读出数据的指令 (21)第四章硬件设计 (21)4.1单片机主控制模块 (22)4.2 时钟电路模块 (22)4.3 实时温度采集模块 (23)4.4 按键设置模块 (24)4.5 蜂鸣器报警模块 (25)4.6 复位电路模块 (25)4.7 LCD液晶显示模块 (26)第五章软件设计 (27)5.1 软件设计总体说明 (27)5.2 软件设计流程图 (28)5.2.1 主程序流程图 (28)5.2.2 时间设置程序流程图 (28)第六章结论 (30)第七章致谢 (30)参考文献 (31)附录 (32)第1章绪论1.1数字多功能计时器的研究背景20世纪末,电力电子技术得到了快速的发展,在它地推动下,现代的电子产品及各种高科技产品几乎渗透到了各个社会领域,这种现象有力地推动了社会信息化程度的普及和综合科技水平的提高,最终实现社会生产力的发展,但产品更新换代的频率也越来越快,随着科技的发展,社会的进步和全球化竞争的激烈,人们对数字电子钟的要求也越来越高,传统的指针时钟已不能满足人们的日常需求。
数字式多功能电子钟在性能、样式、用途上都发生了巨大的改变,许多数字电子钟都已经具备温度检测、电子闹钟、电子秒表等各种各样的功能,同时单片机在多功能数字电子钟中的应用也是越来越普遍了。
多功能数字电子时钟除了具有时钟应该具有的功能外还可以包含对实时环境温度检测并报警的功能,温度是一项最基本的实时环境参数;在各行各业的生产及日常生活中,对温度的测量及控制一直都占据着非常重要的地位;现在,典型的温度检控系统主要由A/D转换电路、模拟式温度传感器和各种单片机应用系统组成;因为模拟式温度传感器最终输出的模拟信号必须由A/D转换电路转换为数字信号后才能输入到单片机应用系统中,进行读写的操作,所以硬件电路是相当复杂的,并且成本较高,但以DS18B20为代表的新型单线总线数字式温度传感器将温度测量和A/D转换合并在一起,这种传感器可以直接输出数字量,同时与单片机相连接的电路结构很简单,可以广泛应用于距离远并且有很多分布节点的场合,具有很强应用价值。
数字多功能电子时钟是利用数字电路实现对时、分、秒的数字显示,现在被广泛用于个人、家庭、办公室、车站、码头等场所,成为人们日常生活中不可缺少的电子产品,由于数字集成电路的发展和石英晶体振荡器的广泛应用,数字电子钟的精度远远超过老式钟表,给人们日常生产和生活带来了方便,并且扩展了钟表原先的报时功能,添加了定时报警、按时打铃、时间程序控制、定时广播、自动开关路灯、通断动力设备、甚至各种定时电器的自动启用等功能,所有的这些,都是以数字电子钟为基础的,因此,研究数字电子钟,扩大数字电子钟的应用,有着非常重要的意义。
1.2数字多功能计时器的国内外研究现状数字电子时钟,自从它发明的那天起,就成为人类的朋友,给人们的生活、学习、工作、娱乐带来极大的方便。
但随着时间的推移,科学技术的不断发展,生活节奏越来越快,竞争日益激烈,人们对时间计量的精度要求越来越高,应用越来越广。
可以说时间的准确已成为各行各业安全运行的基础,如果时间出现误差而不能及时校正,会造成一系列严重的后果和经济损失。
电子时钟的设计方法有多种,可用中小规模集成电路组成电子钟,也可以利用专用的电子钟芯片配以显示电路及其所需要的外围电路组成电子钟,还可以利用对单片机编程来实现电子钟。
其中,利用单片机实现的电子时钟具有硬件结构简单、编程灵活、便于功能扩展等特点。
由单片机作为数字钟的核心控制器,可以通过它的时钟信号实现计时功能,将其时间数据经单片机输出,利用显示器显示出来。
通过键盘可以进行定时、校时功能。
输出设备显示器可以用液晶显示技术或者数码管显示技术。
温度是一种最基本的环境参数,日常生活和工农业生产中经常要检测温度。
传统的方式是采用热电偶或热电阻,但是由于模拟温度传感器输出为模拟信号,必须经过A/D 转换环节获得数字信号后才能与单片机等微处理器接口,使得硬件电路结构复杂,制作成本较高。
近年来,美国DALLAS 公司生产的DSl8B20 为代表的新型单总线数字式温度传感器以其突出优点广泛使用于仓储管理、工农业生产制造、气象观测、科学研究以及日常生活中。
DSl8B20 集温度测量和A/D 转换于一体,直接输出数字量,传输距离远,可以很方便地实现多点测量,硬件电路结构简单,与单片机接口几乎不需要外围元件。
智能温度传感器(亦称数字温度传感器)是上世纪90年代中期问世的。
此类传感器是微电子技术、计算机技术和自动测试技术的结晶。
目前,国际上已开发出多种智能温度传感器。
智能温度传感器内部一般包含温度传感器、A/D转换器、信号处理器、存储器(或寄存器)和接口电路。
有的产品还带多路选择器、中央控制器、随机存取存储器和只读存储器。
