Brocade FWS 日常维护介绍 博科交换机配置命令
BROCADE博科光纤交换机的设置
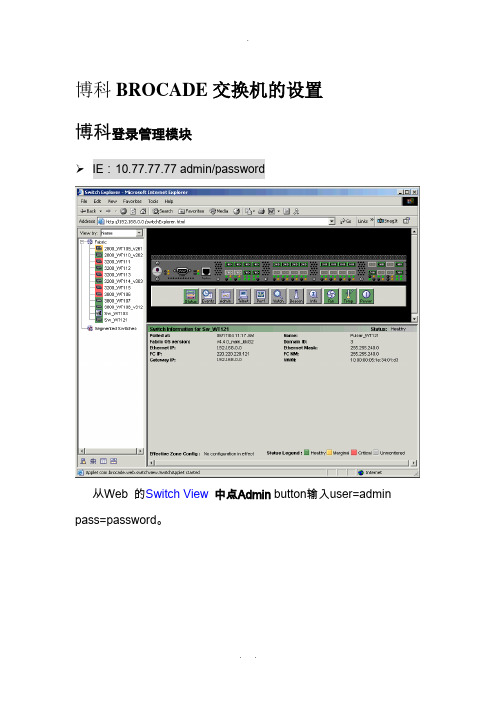
博科BROCADE交换机的设置博科登录管理模块➢IE:10.77.77.77 admin/password从Web 的Switch View中点Admin button输入user=admin pass=password。
Configuring IPClick the Network tab在配置IP同时,可配置Syslog的IP,用于记录系统的Log(Max支持6个IP记录系统Log)Firmware Download1.Click the Firmware tab.2.Click the Firmware Download radio button.3.Type the host IP address, user name, password, and fullyqualified path to the file name.Configuring a Switch1.Click the Swicth Table2.Switches can be identified by IP address, domain ID, WorldWide Name (WWN), 或通过命名来确定3.domain IDs一般是系统自动分配,但也可人工说明4.在这里可打印系统的配置信息View ReportRebooting the Switch1.Click the Firmware tab2.Click the Fastboot radio button.Configuring Ports(给Port 命名)1.可给每个Ports命名2.可给每个Ports端口设置Speed3.可设置Ports的Enable/Disable4.+Port(通过购买license)+SPFa)Install the Brocade Ports on Demand licensed product.b)+License Keyc)Enable the ports5.可改变Port口的距离(Long Distance)1)Click the Extended Fabric tab.1.在Configure中2.输入Host IP User Name File Name和Password后Apply下载到指定的Server上3.配置文件也可上传Config DownLoad To Switch(相同配置一次,下载后上传就可)下载traceDumpTrace TableZone1.为了方便管理和区分WinZone,UnixZone,将应用分为不同的Zone进行管理(将应用主机HBA卡和存贮的Port口绑在一起,以应用起名Alias)2.一个Alias下放一个应用主机HBA卡联接的Switch上的Port+存贮的一个Port构成一个Zone)Selecting the Zoning Method一般选择Port Zone类型,就是按Port划Zone +Zone➢给新命名的Zone+Add Member(+Port),到命名的Zone中(一般Min是两个Port,一个是存贮的,一个是主机的)➢这样不继的+Zone,到+完为止Create Config并将ZONE加入到CONFIG中把所有的Zone+到一个Config中,启动这个Config就完成了➢将Zone Member + 到这个Config中Save & Enable这CONFIGSwitch级联Enabling Long Distance Fabric Mode➢需要这个Brocade ExtendedFabrics licensese➢这是针对Port设置Long Distance(当然要有相应的License Key)级联1.修改两个交换机的IP和名字2.把两个交换机的域名改为不同。
Brocade交换机的日常维护命令
Brocade交换机的日常维护命令1、设备健康状态查询和日志信息收集登陆到Brocade交换机:一、串口线登陆1)交换机自带一个串口线。
将串口盖拿掉,将串口线连接上去2)连接串口线到笔记本/工作站上的串口。
3)关闭工作站上的串口通讯程序4)打开“超级终端”,配置如下:–传输速率: 9600bit/sec–数据位: 8–校验位: None–停止位: 1–流控制: None5)确认交换机已经完成POST6)当超级终端停止报告信息,按“Enter” 显示login 信息,login7) 默认用户:admin,默认密码:password。
二、网络连接登陆用Telnet工具通过IP 地址登陆。
默认用户:admin,默认密码:password。
健康查询/日志收集命令1)查看IP地址命令-ipaddrshowSW300-2:root> ipaddrshowSWITCHEthernet IP Address: 10.77.77.78Ethernet Subnetmask: 255.255.255.0Gateway IP Address: noneDHCP: Off2) 设置交换机IP地址博科交换机的默认IP地址是10.77.77.77,在命令行模式下可以通过ipaddrset命令对交换的IP地址进行设置和修改SW300-2:root>ipaddrsetEthernet IP Address [10.77.77.77]: #输入交换机需要设置的IP地址Ethernet Subnetmask [255.255.255.0]: #输入掩码Fibre Channel IP Address [none]:Fibre Channel Subnetmask [none]:Gateway IP Address [none]: # 输入网关DHCP [Off]: #是否开启DHCP3) 查看OS版本信息SW300-2:root> versionKernel: 2.6.14.2Fabric OS: v6.4.1aMade on: Tue Dec 14 03:02:28 2010Flash: Thu Jul 14 22:44:59 2011BootProm: 1.0.94) 查看交换机license授权信息SW300-2:root> licenseshowS9dRRbdQR9TAeSSV:Fabric licenseRyyzcQzS9QSF30dl:Full Ports on Demand license - additional 16 port upgrade licenseRyyzcQzS9QSz30dV:Second Ports on Demand license - additional 8 port upgrade license GXtBXMEYMZJKftgS4KSCMK79mJTPmRfYB7QrH:Enhanced Group Management licenseHMfmJ7gDrR4WM99rXRS7TMYEMfTEBZFfBADFG:8 Gig FC license4) 查看交换机状态SW300-2:root> switchshowswitchName: SW300-2switchType: 71.2switchState: OnlineswitchMode: NativeswitchRole: SubordinateswitchDomain: 2switchId: fffc02switchWwn: 10:00:00:05:33:89:b2:0azoning: ON (config)switchBeacon: OFFIndex Port Address Media Speed State Proto==============================================0 0 020000 id N8 Online FC F-Port 20:14:78:2b:cb:59:f7:891 1 020100 id N8 Online FC F-Port 20:24:78:2b:cb:59:f7:892 2 020200 id N8 Online FC F-Port 20:34:78:2b:cb:59:f7:893 3 020300 id N8 Online FC F-Port 20:44:78:2b:cb:59:f7:894 4 020400 id N8 Online FC F-Port 20:15:78:2b:cb:59:f7:895 5 020500 id N8 Online FC F-Port 20:25:78:2b:cb:59:f7:896 6 020600 id N8 Online FC F-Port 20:35:78:2b:cb:59:f7:897 7 020700 id N8 Online FC F-Port 20:45:78:2b:cb:59:f7:898 8 020800 id N8 Online FC F-Port 20:14:78:2b:cb:58:6d:3a9 9 020900 id N8 Online FC F-Port 20:24:78:2b:cb:58:6d:3a10 10 020a00 id N8 Online FC F-Port 20:34:78:2b:cb:58:6d:3a11 11 020b00 id N8 Online FC F-Port 20:44:78:2b:cb:58:6d:3a12 12 020c00 id N8 Online FC F-Port 20:15:78:2b:cb:58:6d:3a13 13 020d00 id N8 Online FC F-Port 20:25:78:2b:cb:58:6d:3a14 14 020e00 id N8 Online FC F-Port 20:35:78:2b:cb:58:6d:3a15 15 020f00 id N8 Online FC F-Port 20:45:78:2b:cb:58:6d:3a16 16 021000 id N8 No_Light FC17 17 021100 id N8 No_Light FC18 18 021200 id N8 No_Light FC19 19 021300 id N8 No_Light FC20 20 021400 id N8 No_Light FC21 21 021500 id N8 No_Light FC22 22 021600 id N8 No_Light FC23 23 021700 id N8 Online FC E-Port 10:00:00:05:1e:ef:98:d1 "SW300-1" (upstream)5) 查看设备健康状态(如:电源、温度、风扇等)SW300-2:root> switchstatusshowSwitch Health Report Report time: 12/15/2011 04:05:36 AM Switch Name: SW300-2IP address: 10.77.77.78SwitchState: HEALTHYDuration: 297:45Power supplies monitor HEALTHYTemperatures monitor HEALTHYFans monitor HEALTHYFlash monitor HEALTHYMarginal ports monitor HEALTHYFaulty ports monitor HEALTHYMissing SFPs monitor HEALTHYFabric Watch is not licensedDetailed port information is not included2、设备配置文件备份和恢复实施安装完Brocade交换机后、更改Brocade交换机配置、在SAN中添加或者更换交换机时、在升级Brocade交换机之前,都应该在一台PC机(安装了FTP服务)上创建每台交换机配置文件的备份。
博科Brocade交换机配置(学习资料)
设置博科Brocade交换机IP地址博科交换机的默认IP地址是10.77.77.77,在命令行模式下可以通过ipaddrset命令对交换机的IP地址进行设置和修改swd77:admin> ipaddrsetEthernet IP Address [10.77.77.77]: #输入交换机需要设置的IP地址Ethernet Subnetmask [255.255.255.0]: #输入掩码Fibre Channel IP Address [none]:Fibre Channel Subnetmask [none]:Gateway IP Address [none]: # 输入网关DHCP [Off]: #是否开启DHCPswd77:admin>一般情况下只需要设置Ethernet 的IP和掩码就可以了,这个IP地址主要是用来对交换机进行管理设置。
Brocade SAN交换机的几种管理方法为了对SAN网络进行管理,Brocade公司了丰富的管理工具,来适应不同场景下对SAN 网络的管理。
Telnet交换机管理的最基本方法,通过命令行的方式直接登录到交换机上,通过交换机上操作系统(Fabric OS)提供的命令对交换机作管理工作。
能完成对单台交换机管理的所有功能,对操作者对管理命令非常熟悉。
不适合非专业人士使用。
WEB TOOLS图形界面的管理工具,通过浏览器对交换机完成管理工作。
视觉效果比Telnet好很多,并且在性能监视时能提供多种视图。
能完成对单台交换机管理的大多数功能,适合大多数用户使用。
Fabric Manager对SAN网络中的交换机进行批量管理的工具。
能对SAN网络中的多台交换机,在一个管理站一次性的完成管理工作。
方便SAN网络的统一管理。
SNMP 网络管理的标准协议在Brocade交换机上运行有SNMP模块,让网络中的SNMP管理工作站对SAN网络完成管理工作。
通过管理工具,能完成对整个SAN网络的监视,但能修改的参数有限。
博科BROCADE交换机配置(详细)
与交换机交互,可以使用三种方式:串口以太网口光纤口缺省的串口参数是:9600,N,8,1缺省IP访问方式是:IP地址:10.77.77.77用户名:admin密码:password时区:Pacific time交换机名称:switch可使用ipAddrSet命令来重新设置交换机的IP地址。
在2000和3000系列交换机之中,只能同时支持一个Telnet进程。
Brocade的交换机可以使用命令行和图形界面方式进行管理。
代表性的CLI方法代表性的如:Telnet,HyperTerm和tip。
对于Fabric OS v4.1,SSH v2可以被使用。
如果Brocade Secure Fabric OS被设置有效,CLI 接口必须是Brocade Secure Telnet.Brocade API v2.1提供给用户扩展访问到交换机的方法;可以轻松的整合Brocade SAN Fabric 的智能到已经存在的管理应用中,或者快速的开发用户SAN的特殊功能。
该工具包可以通过Brocade Connect 站点获得。
Brocade Fabric Manager v4.0 是一个实时管理多台Brocade 光纤交换机的很好的一个工具,它提供了有效的配置、监控、动态资源分配管理。
Brocade Web Tool是一个直观简单的管理小型SAN网络的管理工具。
运行支持JRE的Web Browser上。
Brocade 提供基于SNMP的MIBs用来在交换机上读和配置公共设置。
串口管理:n一条串口连接电缆DB9 (female-to-female)n使用超级终端或UNIX终端n Windows: Hyper Terminaln UNIX: tipu Microsoft Windows® 环境之中–传输速率: 9600bit/sec–数据位: 8–校验位: None–停止位: 1–流控制: Noneu UNIX® 环境下, 输入以下命令# tip /dev/ttyb –9600u安装步骤1. 通过串口线将两者进行连接2. 确保交换机已经加电3. 通过ipAddrSet命令设置IP地址(注意: 命令是大小写敏感,但是全大写或全小写也可。
博科BROCADE交换机配置(详细)
与交换机交互,可以使用三种方式:串口以太网口光纤口缺省的串口参数是:9600,N,8,1缺省IP访问方式是:IP地址: 10.77。
77。
77用户名:admin密码:password时区: Pacific time交换机名称:switch可使用ipAddrSet命令来重新设置交换机的IP地址。
在2000和3000系列交换机之中,只能同时支持一个Telnet进程。
Brocade的交换机可以使用命令行和图形界面方式进行管理。
代表性的CLI方法代表性的如:Telnet,HyperTerm和tip。
对于Fabric OS v4。
1,SSH v2可以被使用。
如果Brocade Secure Fabric OS被设置有效,CLI 接口必须是Brocade Secure Telnet.Brocade API v2。
1提供给用户扩展访问到交换机的方法;可以轻松的整合Brocade SAN Fabric的智能到已经存在的管理应用中,或者快速的开发用户SAN的特殊功能。
该工具包可以通过Brocade Connect 站点获得。
Brocade Fabric Manager v4。
0 是一个实时管理多台Brocade 光纤交换机的很好的一个工具,它提供了有效的配置、监控、动态资源分配管理。
Brocade Web Tool是一个直观简单的管理小型SAN网络的管理工具。
运行支持JRE的Web Browser上。
Brocade 提供基于SNMP的MIBs用来在交换机上读和配置公共设置。
串口管理:n一条串口连接电缆DB9 (female-to-female)n使用超级终端或UNIX终端n Windows: Hyper Terminaln UNIX:tipu Microsoft Windows® 环境之中–传输速率:9600bit/sec–数据位:8–校验位:None–停止位: 1–流控制: Noneu UNIX® 环境下, 输入以下命令#tip /dev/ttyb –9600u安装步骤1. 通过串口线将两者进行连接2。
BROCADE博科光纤交换机的设置
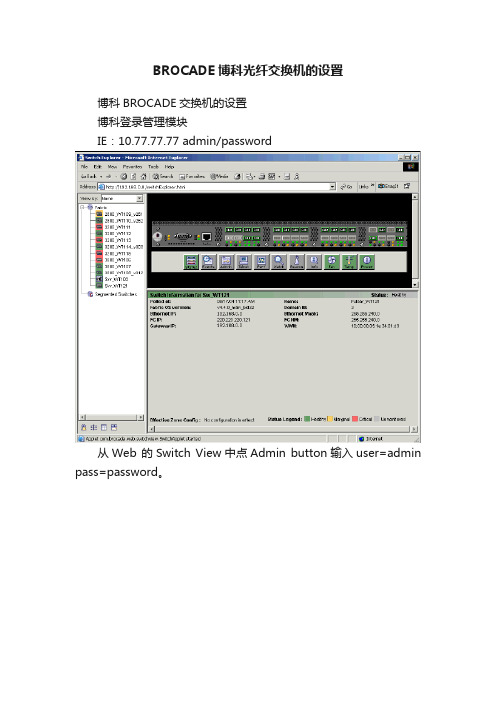
BROCADE博科光纤交换机的设置博科BROCADE交换机的设置博科登录管理模块IE:10.77.77.77 admin/password从Web 的Switch View中点Admin button输入user=admin pass=password。
Configuring IPClick the Network tab在配置IP同时,可配置Syslog的IP,用于记录系统的Log(Max 支持6个IP记录系统Log)Firmware Download1.Click the Firmware tab.2.Click the Firmware Download radio button.3.Type the host IP address, user name, password, and fullyqualified path to the file name.Configuring a Switch1.Click the Swicth T able2.Switches can be identified by IP address, domain ID, World Wide Name (WWN), 或通过命名来确定3.domain IDs一般是系统自动分配,但也可人工说明4.在这里可打印系统的配置信息View ReportRebooting the Switch1.Click the Firmware tab2.Click the Fastboot radio button.Configuring Ports(给Port 命名)1.可给每个Ports命名2.可给每个Ports端口设置Speed3.可设置Ports的Enable/Disable4.+Port(通过购买license)+SPFa)Install the Brocade Ports on Demand licensed product.b)+License Keyc)Enable the ports5.可改变Port口的距离(Long Distance)1)Click the Extended Fabric tab.下载Switch配置信息1.在Configure中2.输入Host IP User Name File Name和Password后Apply下载到指定的Server上3.配置文件也可上传Config DownLoad To Switch(相同配置一次,下载后上传就可)下载traceDumpTrace TableZone1.为了方便管理和区分WinZone,UnixZone,将应用分为不同的Zone进行管理(将应用主机HBA卡和存贮的Port口绑在一起,以应用起名Alias)2.一个Alias下放一个应用主机HBA卡联接的Switch上的Port+ 存贮的一个Port构成一个Zone)Selecting the Zoning Method一般选择Port Zone类型,就是按Port划Zone +Zone给新命名的Zone+Add Member(+Port),到命名的Zone中(一般Min 是两个Port,一个是存贮的,一个是主机的)这样不继的+Zone,到+完为止Create Config并将ZONE加入到CONFIG中把所有的Zone+到一个Config中,启动这个Config就完成了将Zone Member + 到这个Config中Save & Enable这CONFIGSwitch级联Enabling Long Distance Fabric Mode需要这个Brocade ExtendedFabrics licensese这是针对Port设置Long Distance(当然要有相应的License Key)级联1.修改两个交换机的IP和名字2.把两个交换机的域名改为不同。
Brocade(博科)光纤交换机初始配置向导
Brocade(博科)光纤交换机初始配置向导Brocade光纤交换机SW200E初始配置向导一.配置管理口IP地址将光纤交换机和管理机(这里以Win2k3为例)通过直连串口线(Female to Female)连接;将它们的网口都连接到以太网中(若无交换机,可采取直接连接)。
在管理机中,使用超级终端,登陆交换机,依次步骤见如下:默认取值即可:以用户名admin,密码password登陆:ipaddrset命令设置IP,ipaddrshow命令查看所设IP:二.使用交换机的Web Tools来管理交换机为了使用IE浏览器登陆交换机Web界面,需要在管理机上安装Java运行环境:配置管理机的IP与光纤交换机的管理IP地址在同一网段:IE浏览器中输入交换机IP地址:Web Tools主页:点击Name Server可以查看目前连接到交换机端口上的设备:如图可看出:存储设备的一个端口连接到端口0,而主机上的一块Qlogic HBA卡连接到端口7,它们的WWPN正如图中所示:三.配置交换机的ZONING以下内容,以某主机上的一块HBA卡和AX150上SPA的0端口作为连接到交换机的端口,划分ZONING,点击Zone Admin:输入用户名admin,密码password:EMC推荐使用WWN Zoning,View菜单中进行选择:1.首先定义zone中成员的别名,便于配置和管理。
选择Alias标签页(注意其中红色框,此处可新建,删除或重命名Alias),这里我们选择Create:设置主机HBA的Alias为“HBA1”:将“HBA1”与HBA卡的WWPN进行绑定,选中WWPN后,点击“Add Member >”:如下所示,WWPN已经到达右边框:同样方式创建存储端SPA上端口0的Alias:2.接着需要定义zone,选择Zone标签页(注意其中红色框,此处可新建,删除或重命名Zone),这里我们选择Create:创建zone1:对于zone1,将其上所定义的Alias,都加到zone1中,点击“Add Member >”即可:3.最后需要定义zone配置文件,选择Config标签页(注意其中红色框,此处可新建,删除或重命名Config),这里我们选择Create:新建config1配置文件:在此配置文件中,将其上所配置的zone1进行加入,点击“Add Member >”即可:此时需要将zone的配置文件生效,选择“Action”中的“Enable Config...”即可:选择config1文件,点击OK:四.查看交换机的License在如下的Admin界面,可以进行交换机端口,license信息和设置相关参数:。
BROCADE博科光纤交换机配置文档
博科Brocade 交换机配置与交换机交互,可以使用三种方式:串口以太网口光纤口缺省的串口参数是:9600,N,8,1缺省IP访问方式是:IP地址:10.77.77.77用户名:admin密码:password时区:Pacific time交换机名称:switch可使用ipAddrSet命令来重新设置交换机的IP地址。
在2000和3000系列交换机之中,只能同时支持一个Telnet进程。
Brocade的交换机可以使用命令行和图形界面方式进行管理。
代表性的CLI方法代表性的如:Telnet,HyperTerm 和tip。
对于Fabric OS v4.1,SSH v2可以被使用。
如果Brocade Secure Fabric OS被设置有效,CLI 接口必须是Brocade Secure Telnet.Brocade API v2.1提供给用户扩展访问到交换机的方法;可以轻松的整合Brocade SAN Fabric的智能到已经存在的管理应用中,或者快速的开发用户SAN的特殊功能。
该工具包可以通过Brocade Connect 站点获得。
Brocade Fabric Manager v4.0 是一个实时管理多台Brocade 光纤交换机的很好的一个工具,它提供了有效的配置、监控、动态资源分配管理。
Brocade Web Tool是一个直观简单的管理小型SAN网络的管理工具。
运行支持JRE的Web Browser上。
Brocade 提供基于SNMP的MIBs用来在交换机上读和配置公共设置。
串口管理:⏹一条串口连接电缆DB9 (female-to-female)⏹使用超级终端或UNIX终端⏹Windows: Hyper Terminal⏹UNIX: tip◆Microsoft Windows® 环境之中–传输速率: 9600bit/sec–数据位: 8–校验位: None–停止位: 1–流控制: None◆UNIX® 环境下, 输入以下命令# tip /dev/ttyb –9600◆安装步骤1. 通过串口线将两者进行连接2. 确保交换机已经加电3. 通过ipAddrSet命令设置IP地址(注意: 命令是大小写敏感,但是全大写或全小写也可。
BROCADE博科光纤交换机的配置手册

博科Brocade 200E配置所有Brocade 交换机均基于Brocade Fabric OS智能操作系统。
在配置交换机时,可以使用Brocade Web Tools 提供的字符命令界面,也可以使用Brocade Fabric Manager 图形界面管理程序。
在乌鲁木齐WAP局点中,一台计费(JF1)和一台统计(RP1)通过光纤交换机(Brocade SW200E)挂接磁阵(见图1)。
每台Dell服务器都有2块HBA卡连接光纤交换机,既可以冗余备份,又起到负载均衡的作用。
安装光纤交换机,主要分为以下几个步骤:1、安装光纤卡,连接光纤到交换机和磁阵。
把每台服务器的2块HBA卡分别连到2台光纤交换机。
2、在光纤交换机上给每个端口命名,好处就是容易分清楚各个端口连接的具体设备。
当然,也可以不命名。
3、划分zone,划分的思路是以发起的服务器为主,把到目的端的多条路径一起划分到一个zone 中。
以RP1为例,连接Switch OW1的2端口,到EMC磁阵有2条路径,分别通过端口0和端口1,所以就把端口0,1,2划分到一个zone中。
当然,也可以把每条路径都划为一个zone。
4、保存配置文件。
图1 光纤交换机连接图下面是通过图形界面配置光纤交换机的详细步骤:1.通过以太网端口登陆,起始。
在连接光纤交换机的电脑上配置同网段的地址,在IE中输入管理地址,就可以登陆。
注意:连接的电脑需要安装jre1.4以上,网页才能正常显示。
2.图形界面中,选择Admin,会弹出新的配置网页,见下图。
点击Switch窗口,输入机器光纤交换机的名字:WLMQ-PS-WAP-OW2,Domain ID 输入2,别的数字也可以,没有影响。
点击Network,可以修改管理ip地址等内容。
可以通过View Report查看所有的配置信息。
3.点击左侧窗口图标,弹出划分zone的窗口。
选择New Zone,输入Zone的名字,加入相应的端口。
博科交换机配置命令
光纤交换机常用操作命令,下面以博科(Brocade)的光纤交换机操作说明,IBM和HP的光纤交换机都是OEM博科的,操作命令类似。
uptime 显示交换机工作时间ipaddrshow 显示交换机IP地址信息licenseshow 显示当前交换机所添加的license信息switchshow 检查交换机信息及端口状态switchstatusshow 显示交换机的运行状态firmwareshow 显示微码版本fanshow 显示风扇运行状态tempshow 显示交换机当前温度信息psshow 显示电源运行状态slotshow 显示板卡运行状态hashshow 显示CP版卡HA状态,errdump 显示错误日志fabricshow 显示fabric信息及级联信息cfgshow 显示交换机配置信息porterrshow 显示交换机端口的错误统计chassisshow 显示外壳信息及序列号version 相看版本userconfig --show -a 查看登录帐号domainsshow 查看交换机的domain信息aliashow 查看别名级联互ping:fcping --number 10000 --length 2036 --interval 1 10:00:00:05:33:9f:06:28级联更改portcfglongdistance 0备份configupload ["host","user","file"[,"passwd"]]configuplocadProtocol (scp or ftp):ftphost:user name:filename:password:恢复switchdisable 停用交换机configdownloadProtocol (scp or ftp):ftpServer Name or IP Address [host]:User Name [user]:File Name [config.txt]:config.txt.........Do you want to continue [y/n]:yPassword:设置IPipaddrsetEthernet IP Address [10.77.77.77]:Ethernet Subnetmask [255.255.255.0]:Fibre Channel IP Address [none]:Fibre Channel Subnetmask [none]:Gataway IP Address []:DHCP [OZone配置示例:创建别名alicreate "member1","1,1;1,2;1,3"alicreate "member2","1,2;1,3;1,4"alicreate "member3","1,3;1,4;1,5"alishow划分zonezonecreate "zone1","member1;member2" zonecreate "zone2","1,1;1,7"zonecreate "zone2","member3;1,8"zoneshow将zone添加到配置中cfgcreate "conf1","zone1;zone2;zone3"cfgshow启用配置cfgenable conf1存储配置cfgsave删除cfgIBM_2005_H16:admin> cfgRemove "H16_cfg","vmtest" IBM_2005_H16:admin> cfgsaveIBM_2005_H16:admin> cfgenable H16_cfg删除zoneIBM_2005_H16:admin> zonedelete vmtest删除ali设置Domain ID 以admin用户登录交换机switch:admin> switchdisableswitch:admin>configure提示输入Domain ID时,输入新ID,继续配置其他参数或者Ctrl+D不改变其他参数Switch:admin>switchenable/link?url=uV9Lxd_f3f95t6MRYxmV6EqDdUwuwk7QzDuqieBCcH8djolAJL _bt_1OyYY60HjWlrwIL7mUN_egw7dZftXMyglKmbfx39SafBY43K9jXdC。
博科BROCADE交换机配置详细

与交换机交互,可以使用三种方式:串口以太网口光纤口缺省的串口参数是:9600,N,8,1缺省IP访问方式是:IP地址:用户名:admin密码:password时区:Pacific time交换机名称:switch可使用ipAddrSet命令来重新设置交换机的IP地址。
在2000和3000系列交换机之中,只能同时支持一个Telnet进程。
Brocade的交换机可以使用命令行和图形界面方式进行管理。
代表性的CLI方法代表性的如:Telnet,HyperTerm和tip。
对于Fabric OS v4.1,SSH v2可以被使用。
如果Brocade Secure Fabric OS被设置有效,CLI 接口必须是Brocade Secure Telnet.Brocade API v2.1提供给用户扩展访问到交换机的方法;可以轻松的整合Brocade SAN Fabric 的智能到已经存在的管理应用中,或者快速的开发用户SAN的特殊功能。
该工具包可以通过Brocade Connect 站点获得。
Brocade Fabric Manager v4.0 是一个实时管理多台Brocade 光纤交换机的很好的一个工具,它提供了有效的配置、监控、动态资源分配管理。
Brocade Web Tool是一个直观简单的管理小型SAN网络的管理工具。
运行支持JRE的Web Browser上。
Brocade 提供基于SNMP的MIBs用来在交换机上读和配置公共设置。
串口管理:n一条串口连接电缆DB9 (female-to-female)n使用超级终端或UNI*终端n Windows: Hyper Terminaln UNI*: tipu Microsoft Windows® 环境之中–传输速率: 9600bit/sec–数据位: 8–校验位: None–停止位: 1–流控制: Noneu UNI*® 环境下, 输入以下命令* tip /dev/ttyb –9600u安装步骤1. 通过串口线将两者进行连接2. 确保交换机已经加电3. 通过ipAddrSet命令设置IP地址(注意: 命令是大小写敏感,但是全大写或全小写也可。
BROCADE博科光纤交换机的配置手册

博科Brocade 200E配置所有Brocade 交换机均基于Brocade Fabric OS智能操作系统。
在配置交换机时,可以使用Brocade Web Tools 提供的字符命令界面,也可以使用Brocade Fabric Manager 图形界面管理程序.在乌鲁木齐W AP局点中,一台计费(JF1)和一台统计(RP1)通过光纤交换机(Brocade SW200E)挂接磁阵(见图1)。
每台Dell服务器都有2块HBA卡连接光纤交换机,既可以冗余备份,又起到负载均衡的作用.安装光纤交换机,主要分为以下几个步骤:1、安装光纤卡,连接光纤到交换机和磁阵。
把每台服务器的2块HBA卡分别连到2台光纤交换机。
2、在光纤交换机上给每个端口命名,好处就是容易分清楚各个端口连接的具体设备。
当然,也可以不命名。
3、划分zone,划分的思路是以发起的服务器为主,把到目的端的多条路径一起划分到一个zone中.以RP1为例,连接Switch OW1的2端口,到EMC磁阵有2条路径,分别通过端口0和端口1,所以就把端口0,1,2划分到一个zone中。
当然,也可以把每条路径都划为一个zone。
4、保存配置文件。
图1 光纤交换机连接图下面是通过图形界面配置光纤交换机的详细步骤:1.通过以太网端口登陆,起始默认管理地址是:10。
77。
77.77,用户名/密码:admin/password。
在连接光纤交换机的电脑上配置同网段的地址,在IE中输入管理地址,就可以登陆。
注意:连接的电脑需要安装jre1。
4以上,网页才能正常显示.2.图形界面中,选择Admin,会弹出新的配置网页,见下图。
点击Switch窗口,输入机器光纤交换机的名字:WLMQ—PS-WAP—OW2,Domain ID 输入2,别的数字也可以,没有影响。
点击Network,可以修改管理ip地址等内容。
可以通过View Report查看所有的配置信息.3.点击左侧窗口图标,弹出划分zone的窗口.选择New Zone,输入Zone的名字,加入相应的端口。
Brocade交换机的日常维护命令
Brocade交换机的日常维护命令1、设备健康状态查询和日志信息收集登陆到Brocade交换机:一、串口线登陆1)交换机自带一个串口线。
将串口盖拿掉,将串口线连接上去2)连接串口线到笔记本/工作站上的串口。
3)关闭工作站上的串口通讯程序4)打开“超级终端”,配置如下:–传输速率: 9600bit/sec–数据位: 8–校验位: None–停止位: 1–流控制: None5)确认交换机已经完成POST6)当超级终端停止报告信息,按“Enter”显示login 信息,login7) 默认用户:admin,默认密码:password。
二、网络连接登陆用Telnet工具通过IP 地址登陆。
默认用户:admin,默认密码:password。
健康查询/日志收集命令1)查看IP地址命令-ipaddrshowSW300-2:root>ipaddrshowSWITCHEthernet IP Address: 10.77.77.78Ethernet Subnetmask: 255.255.255.0Gateway IP Address: noneDHCP: Off2) 设置交换机IP地址博科交换机的默认IP地址是10.77.77.77,在命令行模式下可以通过ipaddrset命令对交换的IP地址进行设置和修改SW300-2:root>ipaddrsetEthernet IP Address [10.77.77.77]: #输入交换机需要设置的IP地址Ethernet Subnetmask [255.255.255.0]: #输入掩码Fibre Channel IP Address [none]:Fibre Channel Subnetmask [none]:Gateway IP Address [none]: # 输入网关DHCP [Off]: #是否开启DHCP3) 查看OS版本信息SW300-2:root> versionKernel: 2.6.14.2Fabric OS: v6.4.1aMade on: Tue Dec 14 03:02:28 2010Flash: Thu Jul 14 22:44:59 2011BootProm: 1.0.94) 查看交换机license授权信息SW300-2:root>licenseshowS9dRRbdQR9TAeSSV:Fabric licenseRyyzcQzS9QSF30dl:Full Ports on Demand license - additional 16 port upgrade licenseRyyzcQzS9QSz30dV:Second Ports on Demand license - additional 8 port upgrade license GXtBXMEYMZJKftgS4KSCMK79mJTPmRfYB7QrH:Enhanced Group Management licenseHMfmJ7gDrR4WM99rXRS7TMYEMfTEBZFfBADFG:8 Gig FC license4) 查看交换机状态SW300-2:root>switchshowswitchName: SW300-2switchType: 71.2switchState: OnlineswitchMode: NativeswitchRole: SubordinateswitchDomain: 2switchId: fffc02switchWwn: 10:00:00:05:33:89:b2:0azoning: ON (config)switchBeacon: OFFIndex Port Address Media Speed State Proto==============================================0 0 020000 id N8 Online FC F-Port 20:14:78:2b:cb:59:f7:891 1 020100 id N8 Online FC F-Port 20:24:78:2b:cb:59:f7:892 2 020200 id N8 Online FC F-Port 20:34:78:2b:cb:59:f7:893 3 020300 id N8 Online FC F-Port 20:44:78:2b:cb:59:f7:894 4 020400 id N8 Online FC F-Port 20:15:78:2b:cb:59:f7:895 5 020500 id N8 Online FC F-Port 20:25:78:2b:cb:59:f7:896 6 020600 id N8 Online FC F-Port 20:35:78:2b:cb:59:f7:897 7 020700 id N8 Online FC F-Port 20:45:78:2b:cb:59:f7:898 8 020800 id N8 Online FC F-Port 20:14:78:2b:cb:58:6d:3a9 9 020900 id N8 Online FC F-Port 20:24:78:2b:cb:58:6d:3a10 10 020a00 id N8 Online FC F-Port 20:34:78:2b:cb:58:6d:3a11 11 020b00 id N8 Online FC F-Port 20:44:78:2b:cb:58:6d:3a12 12 020c00 id N8 Online FC F-Port 20:15:78:2b:cb:58:6d:3a13 13 020d00 id N8 Online FC F-Port 20:25:78:2b:cb:58:6d:3a14 14 020e00 id N8 Online FC F-Port 20:35:78:2b:cb:58:6d:3a15 15 020f00 id N8 Online FC F-Port 20:45:78:2b:cb:58:6d:3a16 16 021000 id N8 No_Light FC17 17 021100 id N8 No_Light FC18 18 021200 id N8 No_Light FC19 19 021300 id N8 No_Light FC20 20 021400 id N8 No_Light FC21 21 021500 id N8 No_Light FC22 22 021600 id N8 No_Light FC23 23 021700 id N8 Online FC E-Port 10:00:00:05:1e:ef:98:d1 "SW300-" (upstream)5) 查看设备健康状态(如:电源、温度、风扇等)SW300-2:root>switchstatusshowSwitch Health Report Report time: 12/15/2011 04:05:36 AM Switch Name: SW300-2IP address: 10.77.77.78SwitchState: HEALTHYDuration: 297:45Power supplies monitor HEALTHYTemperatures monitor HEALTHYFans monitor HEALTHYFlash monitor HEALTHYMarginal ports monitor HEALTHYFaulty ports monitor HEALTHYMissing SFPs monitor HEALTHYFabric Watch is not licensedDetailed port information is not included2、设备配置文件备份和恢复实施安装完Brocade交换机后、更改Brocade交换机配置、在SAN中添加或者更换交换机时、在升级Brocade交换机之前,都应该在一台PC机(安装了FTP服务)上创建每台交换机配置文件的备份。
博科BROCADE交换机配置(详细)

与交换机交互,可以使用三种方式:串口以太网口光纤口缺省的串口参数是:9600,N,8,1缺省IP访问方式是:IP地址: 10.77。
77。
77用户名:admin密码:password时区: Pacific time交换机名称:switch可使用ipAddrSet命令来重新设置交换机的IP地址。
在2000和3000系列交换机之中,只能同时支持一个Telnet进程。
Brocade的交换机可以使用命令行和图形界面方式进行管理。
代表性的CLI方法代表性的如:Telnet,HyperTerm和tip。
对于Fabric OS v4。
1,SSH v2可以被使用。
如果Brocade Secure Fabric OS被设置有效,CLI 接口必须是Brocade Secure Telnet.Brocade API v2。
1提供给用户扩展访问到交换机的方法;可以轻松的整合Brocade SAN Fabric的智能到已经存在的管理应用中,或者快速的开发用户SAN的特殊功能。
该工具包可以通过Brocade Connect 站点获得。
Brocade Fabric Manager v4。
0 是一个实时管理多台Brocade 光纤交换机的很好的一个工具,它提供了有效的配置、监控、动态资源分配管理。
Brocade Web Tool是一个直观简单的管理小型SAN网络的管理工具。
运行支持JRE的Web Browser上。
Brocade 提供基于SNMP的MIBs用来在交换机上读和配置公共设置。
串口管理:n一条串口连接电缆DB9 (female-to-female)n使用超级终端或UNIX终端n Windows: Hyper Terminaln UNIX:tipu Microsoft Windows® 环境之中–传输速率:9600bit/sec–数据位:8–校验位:None–停止位: 1–流控制: Noneu UNIX® 环境下, 输入以下命令#tip /dev/ttyb –9600u安装步骤1. 通过串口线将两者进行连接2。
Brocade(博科)交换机重要命令
Brocade(博科)交换机重要命令一、改变admin帐号密码以用户名admin登录到SAN交换机,然后在输入命令:Passwd,再根据提示输入相应的用户名和密码,对话过程如下:switch:admin> passwdChanging password for adminEnter new password:Re-type new password:Password changed.Saving password to stable storage.Password saved to stable storage successfully.二、设置和查看管理IP地址设置交换机管理IP地址的命令为ipaddrset,以下对话将管理IP设置为182.1.10.10/255.255.0.0:Ethernet IP Address [192.168.166.148]:182.1.10.10Ethernet Subnetmask [255.255.255.0]:255.255.0.0Fibre Channel IP Address [none]:Fibre Channel Subnetmask [none]:Committing configuration...Done.OK.说明:Fibre Channel IP Address和Fibre Channel Subnetmask不需设置。
查看IP地址的命令为ipaddrshow。
三、设置交换机名命令switchname用于查看(不带参数时)和设置(带参数时)交换机名,以下对话先将交换机名设置为“MideaTsw”,然后查看交换机名:switch:admin> switchname MideaTswMideaTsw:admin> switchnameMideaTsw四、关于Zone的操作新建Zone建立新Zone的命令为zonecreate,以下命令建立名为cpdtestzone的Zone,并指定端口“1,0”和“50,14”作为其成员:MideaTsw:admin> zonecreate “cpdtestzone”, “1,0; 50,14”说明:“50,14”中50是交换机的Domain ID,14是交换机的端口号。
BROCADE博科光纤交换机配置文档

BROCADE博科光纤交换机配置文档博科Brocade 交换机配置与交换机交互,可以使用三种方式:串口以太网口光纤口缺省的串口参数是:9600,N,8,1缺省IP访问方式是:IP地址:10.77.77.77用户名:admin密码:password时区:Pacific time交换机名称:switch可使用ipAddrSet命令来重新设置交换机的IP地址。
在2000和3000系列交换机之中,只能同时支持一个Telnet进程。
Brocade的交换机可以使用命令行和图形界面方式进行管理。
代表性的CLI方法代表性的如:Telnet,HyperTerm和tip。
对于Fabric OS v4.1,SSH v2可以被使用。
如果Brocade Secure Fabric OS被设置有效,CLI 接口必须是Brocade Secure Telnet.Brocade API v2.1提供给用户扩展访问到交换机的方法;可以轻松的整合Brocade SAN Fabric的智能到已经存在的管理应用中,或者快速的开发用户SAN的特殊功能。
该工具包可以通过Brocade Connect 站点获得。
Brocade Fabric Manager v4.0 是一个实时管理多台Brocade 光纤交换机的很好的一个工具,它提供了有效的配置、监控、动态资源分配管理。
Brocade Web Tool是一个直观简单的管理小型SAN网络的管理工具。
运行支持JRE的Web Browser上。
Brocade 提供基于SNMP的MIBs用来在交换机上读和配置公共设置。
串口管理:一条串口连接电缆DB9 (female-to-female)使用超级终端或UNIX终端Windows: Hyper T erminalUNIX: tip◆Microsoft Windows? 环境之中–传输速率: 9600bit/sec–数据位: 8–校验位: None–停止位: 1–流控制: None◆UNIX? 环境下, 输入以下命令# tip /dev/ttyb –9600◆安装步骤1. 通过串口线将两者进行连接2. 确保交换机已经加电3. 通过ipAddrSet命令设置IP地址(注意: 命令是大小写敏感,但是全大写或全小写也可。
Brocade(博科)交换机重要命令
Brocade(博科)交换机重要命令Brocade(博科)交换机重要命令一、改变admin帐号密码以用户名admin登录到SAN交换机,然后在输入命令:Passwd,再根据提示输入相应的用户名和密码,对话过程如下:switch:admin> passwdChanging password for adminEnter new password:Re-type new password:Password changed.Saving password to stable storage.Password saved to stable storage successfully.二、设置和查看管理IP地址设置交换机管理IP地址的命令为ipaddrset,以下对话将管理IP 设置为182.1.10.10/255.255.0.0:Ethernet IP Address [192.168.166.148]:182.1.10.10Ethernet Subnetmask [255.255.255.0]:255.255.0.0Fibre Channel IP Address [none]:Fibre Channel Subnetmask [none]:Committing configuration...Done.OK.说明:Fibre Channel IP Address和Fibre Channel Subnetmask 不需设置。
查看IP地址的命令为ipaddrshow。
三、设置交换机名命令switchname用于查看(不带参数时)和设置(带参数时)交换机名,以下对话先将交换机名设置为“MideaTsw”,然后查看交换机名:switch:admin> switchname MideaTswMideaTsw:admin> switchnameMideaTsw四、关于Zone的操作新建Zone建立新Zone的命令为zonecreate,以下命令建立名为cpdtestzone的Zone,并指定端口“1,0”和“50,14”作为其成员:MideaTsw:admin> zonecreate “cpdtestzone”, “1,0; 50,14”说明:“50,14”中50是交换机的Domain ID,14是交换机的端口号。
- 1、下载文档前请自行甄别文档内容的完整性,平台不提供额外的编辑、内容补充、找答案等附加服务。
- 2、"仅部分预览"的文档,不可在线预览部分如存在完整性等问题,可反馈申请退款(可完整预览的文档不适用该条件!)。
- 3、如文档侵犯您的权益,请联系客服反馈,我们会尽快为您处理(人工客服工作时间:9:00-18:30)。
日常维护命令介绍© 2011 Brocade Communications Systems, Inc.10Console PortDB-9 male interface. VT-100 terminal - straight-through cable (female to female not a null-modem).The VT-100 configuration is: 9600 Baud 8 Data Bits Parity = None Stop Bits = 1 Flow Control = None For MODEM Cross-Over cable (typically a DB-9F to DB-25F cable)© 2011 Brocade Communications Systems, Inc.11Stackables Layout1 23 45 67 8Link / Act© 2011 Brocade Communications Systems, Inc.FDX 10012Command Line Interface (CLI) BasicsConfigure via character-based terminal/session Direct Connect to the Serial Port or Telnet to the System “?” at any prompt shows available commands SW-FI4802-PREM>? enable fastboot ping show stop-traceroute traceroute Enter Privileged mode Select fast-reload option Ping IP node Display system information Stop current TraceRoute TraceRoute to IP Node“?” At end of character string SW-FI4802-PREM> s? will list commands show Display system information that begin with stop-traceroute Stop current TraceRoute that string SW-FI4802-PREM> stop-traceroute ^? “^?” At the end of a character string will list <cr> the next string SW-FI4802-PREM> stop-traceroute <cr> parameter “^” means space <TAB> can be used for “?”Commands can be abbreviated© 2011 Brocade Communications Systems, Inc.13CLI Basics – Command TreeUser Level View basic information?ping <ip address>Verify connectivity (Ping command) User LevelPrivileged Level• Enter through the “enable” command • Can be password protected • View detailed information (Show) • Execute System-wide features (boot system)showenable <password>Privileged LevelConfiguration Level• Enter through the “configure terminal” command • Make global or local system changes (VLANs) • Save changes with “write memory”© 2011 Brocade Communications Systems, Inc.Configuration Level14CLI BasicsUser level:Privileged level:SW-FastIron# ?Access list Arp table Power supply/fan/temperature Configuration data in flash Print system default settings Flash memory contents Port status IP address setting System log MAC address table Gig port SX/LX/LHA/LHB Module type and status 802.1p tagged priority setting Configuration of the 4 QOS Relative utilization list Scheduled system reset Rmon status Current running config Snmp statistics Spanning tree status Packet statistics15SW-FastIron>? access-list enable Enter Privileged mode arp fastboot Fast-reload option chassis ping Ping IP node clock show Display system info configuration stop-traceroute Stop current TraceRoute default traceroute TraceRoute to IP Node flash SW-FastIron> enable interfaces Password: ip logging mac-address media module Different prompts indicate priority-mapping the level you are at: qos-profiles relative-utilization reload User = “>” rmon Privileged =“#” running-config Configuration = “(config)#” snmp span statistics© 2011 Brocade Communications Systems, Inc.CLI Basics - CONFIG commandsSW-FastIron> enable No password has been assigned yet... SW-FastIron# configure terminal SW-FastIron(config)# ?Notice the CONFIG prompt:Config LEVEL (contd) spanning-tree static-mac-address vlan tag-type ip-proto ip-subnet ipx-proto ipx-network atalk-proto decnet-proto netbios-proto other-proto web-management trunkConfig LEVEL SW-FastIron(config)#? end exit no show write aaa boot broadcast-limit chassis clock dhcp-gateway-list enable hostname interface ip ipx© 2011 Brocade Communications Systems, Inc.Config LEVEL (contd) l3-ip-switch l3-ipx-switch l3_test lock-address logging mac-age-time mac mirror-port telnet-server telnet-timeout server password-change radius-server rmon snmp-server sntp16CLI BasicsPrivilege level NetIron> enable {superuser password} NetIron#Executing system-wide commands Show Information Reload the systemCopy image files or configuration files Set the system clock CONFIG LevelBigIron# conf tConfigure the SystemBigIron(config)#(stands for “configure terminal”)Assign system IP address Setup the Interfaces Setup DNS information (DNS server, domain)© 2011 Brocade Communications Systems, Inc.Indicate IP address of Time Server (NTP) or RADIUS server17CLI BasicsInterface Level SW-ServerIron(config-if-1)# SW-ServerIron(config)# int e1 (e1 = ethernet port #1)Port parameters ( type “?” at prompt for options) SW-ServerIron(config-if-1)# ? enable port-name ipg100 phy-mode auto-gig Current Context is shown by prompt disable dhcp-gateway-list ip-policyqos-priorityspeed-duplex spanning-tree ipg1000macipg10monitorflow-controlSW-FastIron(config-if-e100-1)# (Interface #1) TurboIron(config-vif-1)# NetIron(config-vlan-3)# (Virtual Interface #1 - applies to routers only) (Virtual LAN #3) (Transparent Cache named “CacheFour”) (Virtual Server named “VIP1”) SW-ServerIron(config-tc-CacheFour)# SW-ServerIron(config-vs-VIP1)#© 2011 Brocade Communications Systems, Inc.18CLI BasicsMove back up the menu tree using “exit” SW-ServerIron(config-rs-c1)# exit SW-ServerIron(config)# exit SW-ServerIron# exit SW-ServerIron>Display the running-configUse “end” or Cntl-Z to return to “#” prompt SW-ServerIron# write terminalDisplay the saved startup-config Erase the Startup-ConfigSW-ServerIron# show running-config SW-ServerIron# show config SW-ServerIron# erase startup-configThe CLI supports {up / down arrow} for access to the last commands entered SW-ServerIron(config)# ping 10.1.1.1 Invalid input -> ping 10.1.1.1 Type ? for a list SW-ServerIron(config)#exit© 2011 Brocade Communications Systems, Inc.SW-ServerIron#In your terminal emulation program, press the “up” arrow19Identifying Software ImagesBrocade products run one of three types of flash images: Router Code Switch CodeBase Router Code View the Current Running ImageBigIron# BigIron# show version SW: Version 07.5.01T23 Copyright (c) 1996-2001 Brocade Networks, Inc. Compiled on Jun 04 2001 at 15:50:59 labeled as VM1R07501 (2852369 bytes) from Primary vm1r07501.bin HW: Chassis 4000 Router, SYSIF version 21© 2011 Brocade Communications Systems, Inc.20File ManagementTwo Image Storage Areas View the Flash: BigIron Router#sho flash Active management module: Code Flash Type: AMD 29F032B, Size: 64 * 65536 = 4194304, Unit: 2 Boot Flash Type: AMD 29F040, Size: 8 * 65536 = 524288 Compressed Pri Code size = 3485205, Version 07.5.01T53 (b2r07501.bin) Compressed Sec Code size = 3494253, Version 07.5.02T53 (b2r07502.bin) Maximum Code Image Size Supported: 3866112 (0x003afe00) Boot Image size = 149324, Version 07.02.01 (m2b07201.bin) Primary & SecondaryPrimary FlashBoot ImageSecondary Flash© 2011 Brocade Communications Systems, Inc.21File Management (continued)Specify where to boot from: Primary Flash TFTP Server Secondary Flash BootP ServerTFTP Server Image CodeManagement ModuleSystem Flash Primary Flash SecondaryWhere you enter the command also dictates when to loadRAM• PRIVILEGED level - IMMEDIATE reboot/reloadSW-FastIron# boot system flash secondary SW-FastIron# b s f s• CONFIG level - Load at next scheduled reboot orBigIron#(config)# boo sy f s BigIron#(config)# wri memabbreviated but unique command lineBigIron# reload at 06:00:00 01-19-04© 2011 Brocade Communications Systems, Inc.22File Copy commandsFrom/To TFTP Servers Exec Privileged Level: From/To Primary or Secondary FlashTFTP ServerManagement Module SystemFlash Primary Flash SecondaryCopies from the TFTP server the file “vm1r07501.bin ” and stores it to the secondary flash area. NetIron# copy flash tftp 192.22.33.44 vm1r07501.bin secondary • Copies the system image from the secondary flash area and stores it to the TFTP server as filename “vm1r07501.bin”. TurboIron# copy flash flash ? primary Copy secondary to primary secondary Copy primary to secondary TurboIron# copy flash flash primary • Copies the system image from the secondary flash area to the primary. SW-FastIron# copy running-config tftp 192.22.33.44 new.cfg • Copies from the current running config (not the stored config) and writes it to the TFTP server as filename “new.cfg”. NetIron# copy tftp flash 192.22.33.44 nib06007.bin boot • Copies the boot image from tftp server to the boot memory location of flash.(“boot” is a hidden parameter)NetIron# copy tftp flash 192.22.33.44 vm1r07501.bin secondaryRAM© 2011 Brocade Communications Systems, Inc.23Upgrading to 7.602 and BeyondTo upgrade a FI-4802 or a chassis from a pre07.6.01 release to release 07.6.02, do the following:TFTP ServerManagement Module SystemFlash Primary Flash SecondaryM2R07.6.0.2Boot CodeRAM1. Upgrade the boot code to version 07.6.02. 2. Upgrade the flash code to version 07.6.01 3. reload the system 4. Upgrade the flash code to version 07.6.02 5. reload the systemStep 1B2R07.6.0.2 Step 4Step 5 reloadImage CodeStep 3 reload B2R07.6.0.1 Step 2 B2R07.5.0.X24Upgrading directly from pre-7.601 to 7.602 is not possible due the required compression algorithm.© 2011 Brocade Communications Systems, Inc.M2R07.5.0.XWrite/Show Config commandsMost configuration changes take effect immediately. To make permanent (i.e., persistent after a re-boot) save the changes to FLASH:TurboIron# write memorySW-FastIron# write terminal orTerminalSW-FastIron# show running-configTo see the start-up configuration file:NetIron# show configurationNote: The running config and stored config (startup config) may or may not be the same. The running config is lost during a power © 2011 Brocade Communications Systems, Inc. cycle.reloadTo see the running configuration:Running Config write memoryRAMStartup ConfigFLASH25Switch and Router show commands:show version show stat show ip show interfaceShow Commands - Switch & RouterSoftware version and uptime Interface statistics Interf status (up or down etc.) IP info (address, mask etc.) MAC forwarding table Flash memory images Spanning tree infoshow spanshow mac-address show flash show vlanshow mac-address stat# of MACs learned per portshow telnet show trunk in show tech-support© 2011 Brocade Communications Systems, Inc.IP addr of active telnet sessionsConfigured VLANsShows technical details for assistance technical support.Config’d and active trunk groupswithtroubleshooting issues when working26Show Commands - Router onlyRouter-only show commands: NetIron# show arp NetIron# show ip interface NetIron# show ip cache NetIron# show ip ospf NetIron# show ip route NetIron# show ip traffic statistics NetIron# show ip dvmrp NetIron# show ipx cache NetIron# show ipx interface NetIron# show ipx routes NetIron# show ipx servers NetIron# show ipx traffic DVMRP information Summary of IPX information IPX interface information IPX route information IPX servers defined for the router IPX traffic statistics ARP cache ip interface information IP host/MAC table OSPF information IP routes and their status IP (ICMP, UDP, TCP, RIP) trafficMany of the above commands have several branches. An example isNetIron# show ip ospf neighbor© 2011 Brocade Communications Systems, Inc.Neighbor router information27Reference the manual for a complete list of all commands.Clear CommandsClearing forwarding and route tables Switch / Router clear commands:(SW-FastIron, TurboIron, BigIron) TurboIron# clear arp TurboIron# clear mac-address TurboIron# clear statistics NetIron# clear logging Router-only clear commands:(NetIron, TurboIron, BigIron) NetIron# clear ip route NetIron# clear ip cache NetIron# clear ipx route NetIron# clear ipx cache Clearing Individual Entries The mac <mac-addr> <mask> parameter clears only the entries that match the specified address and mask. The vlan <vlan-id> parameter clears only the entries that match the specified VLAN. clear mac-addressRemoves learned MAC address entries from the MAC address table. EXAMPLE:BigIron# clear mac-address © 2011 Brocade Communications Systems, Inc. ethernet 1/1Clears ARP table Clears the MAC forwarding tables Clears all statistic counters. Clears the system log Clears IP route tables. Clears IP host/MAC tables Clears IPX route tables. Clears IPX cache28Ping CommandHelpful when trying to verify connectivity Cannot be entered when in “configure” mode A few sample PING commands: SW-FastIron> ping 192.190.10.10 SW-FastIron# ping 192.190.10.10 count 100 SW-FastIron> ping 192.190.10.10 size 1200 SW-FastIron# ping 192.190.10.10 ttl 5 c 10 s 200 Issues 10 pings with a time to live of 5 and each ping is 200 bytes long Use “?” after the address for other options Syntax: ping <ip addr> | <hostname> [source <ip addr>] [count <num>] [timeout <msec>] [ttl <num>] [size <byte>] [quiet] [numeric] [no-fragment] [verify] [data <1-to-4 byte hex>] [brief]© 2011 Brocade Communications Systems, Inc.29User Access Control (Overview)Web BrowserIronViewLANConsole ConnectionSW-FI4802>enable En_password SW-FI4802#IP Add: 192.22.33.45TelnetTelnet 192.22.33.45 Telnet password:Tel_Passwd SW-FI4802>enable En_password SW-FI4802#Locally Defined Passwords •Enable Password (three levels) •Telnet Password •Web Password (SNMP Community String) •Username / Password lists© 2011 Brocade Communications Systems, Inc.30CLI Basics - PasswordsFactory Default = no Enable passwords Passwords can be up to 32 characters long Multiple levels of “Enable” password access Access depends on which password you useSuper User - Unlimited access, can change all parameters Configure Port - Change interface level parameters Read Only - View only, no changing allowedBigIron(config)# enable super-user-password SuPswd BigIron(config)# enable port-config-password PCPswd BigIron(config)# enable read-only-password ROPswd BigIron> enable PCPswd or BigIron> enable Password:If the system password is not yet set, the system warns you BigIron> enable No password has been assigned yet...© 2011 Brocade Communications Systems, Inc.31Password ExamplesDefining the Super-User (Enable) password Port Config (Enable) password accesses a limited set of commandsSW-ServerIron(config)#enable port-config-password PCPswd SW-ServerIron>enable PCPswd SW-ServerIron#conf t SW-ServerIron(config)#? end exit quit no show interface SW-ServerIron(config)#enable read-only-password ROPswd SW-ServerIron>enable ROPswd SW-ServerIron#? exit quit ping show telnet SW-ServerIron(config)#enable super-user-password SuPswd SW-ServerIron(config)#quit SW-ServerIron> enable SuPswdRead Only Password Limits user to Exec User and Exec Privileged levels© 2011 Brocade Communications Systems, Inc.32CLI Basics - Passwords, recoveringYou can recover from a forgotten password Have terminal session plugged into serial port, then:Reboot the system Within 2 seconds, enter ‘b’ to initiate the boot monitorBOOT MONITOR> boot system flash primary BOOT MONITOR> no password (cannot be abbreviated)Requires direct access to the Serial Port and a System ResetThis bypasses the system password check Reassign Super-User password & save configSW-FastIron(config)#write memory© 2011 Brocade Communications Systems, Inc.SW-FastIron> enable No password has been assigned yet… SW-FastIron#SW-FastIron(config)#enab super-user NewPassword(assigns a new password)33Also specify passwords for:Telnet Access Where Passwords can be changed fromoptions: <any|serial-port-only|telnet-only>SW-FastIron(config)#enable telnet password TelNetPswd SW-FastIron(config)#password-change serial-port-onlyCLI Basics - PasswordsUsernames / Password combinations(config)#username BigKahuna priv 0 password BKpswdSpecify Username, Password and Privilege Level A Super-User account (or Super-User enable password) must be set before you can create lower-access accounts Passwords are stored in Config File ENCRYPTED (default)or you can turn off encryption Privilege level: 0=Super-User, 4=Port-Config, 5=Read-onlyUsername Lists are applied with AAA commands© 2011 Brocade Communications Systems, Inc.(config)# no service password-encryption34Passwords - aaa authentication typesAuthentication for the following access typesSyntax:aaa authentication <snmp-server|webserver|enable|login> defaultaaa authentication {what type of access} default {how to validate}<method1>[<method2> <method2> <method3> <method4> <method5> <method6> <method7>]• aaa authentication snmp-server ...SNMP applications - IronView, HPOV, Spectrum, etc.• aaa authentication web-server ...Web Browser to Brocade Switches and Routers• aaa authentication enable ...“enable” command to gain Privileged and CONFIG level access• aaa authentication login ...TELNET access to the Brocade Switch/Router© 2011 Brocade Communications Systems, Inc.35Passwords - aaa authentication methodsAthentication methodsSyntax: aaa authentication <snmp-server|web-server|enable|login> defaultIf a validation method is NOT configured, use next method<method1> [<method2> <method2> <method3> <method4> <method5> <method6> <method7> ]• TACACS, TACACS+, RADIUSQuery a TACACS, TACACS+ or RADIUS server for username/password • local Use locally defined username/password combinations • line Use the TELNET access password • enable Use the “enable” passwords (super-user, port-config, read-only)© 2011 Brocade Communications Systems, Inc.36Remote Access ServerTACACS Server2. Password checkIP Add 192.23.33.453. Password VerifiedemptyTelnet password: Tel_Passwd1. Request for AccessIP Add: 192.22.33.45TelnetTelnet 192.22.33.45 Telnet password:Tel_Passwd SW-FI4802>enable En_password SW-FI4802#AAA Example Type of Access Validation Method Login 1. TACACS 2. Line Enable 1. TACACS 2. Local 3. Enable4. Access Granted© 2011 Brocade Communications Systems, Inc.37Passwords - aaa authentication examplesSyntax:aaa authentication {what type of access} default {how to validate}Examples•aaa authentication login default localFor TELNET access (“login”), use the locally defined usernames•aaa authentication enable default radius localTo gain privileged /CONFIG access (“enable” command), query a configured RADIUS server; if not configured, fallback to locally defined usernames•aaa authentication web default radius local enableThe Web Browser will first look at 1) RADIUS usernames, if not configured, 2) locally defined usernames, if not configured 3) use the “enable” super-user, port-config, and read-only passwords© 2011 Brocade Communications Systems, Inc.38SNMP ConfigurationSNMP required information:SW-FastIron(config)# ip address 192.22.33.45 255.255.255.0 SW-FastIron(config)# ip default-gateway 192.22.33.1 SW-FastIron(config)# snmp-server contact “Bill Clinton” SW-FastIron(config)# snmp-server location the_white_house SW-FastIron(config)# snmp-server host 192.22.33.55 public SW-FastIron(config)# snmp-server community notsafe ro SW-FastIron(config)# snmp-server community safe rwNote:The first two commands are valid for switches only. Routers would assign an IP address at the interface level, not at the global level.NetIron(config) interface ethernet 9 NetIron(config-if-9)# ip address 192.22.33.45 255.255.255.0© 2011 Brocade Communications Systems, Inc.39Web Browser GUI ConfigEnabled with web browserUsername & Password AccessUser Name PasswordRead Only get publicRead / Write set<user configured community string> Only one session can be Read/WriteMultiple Read-only sessions(passwordprotected access)Web Browser GUI Config -Passwords Web Browser Username/PasswordRead-only default Username/Password:Username : getPassword : publicMust set a password via the Command Line Interface (CLI)The default WEB GUI passwords are the SNMP Community names BigIron(config)# snmp-server community not_safe roBigIron(config)# snmp-server community safe rw Requires an IP address to “Web” toUse the Serial Port to configure IP addressSwitches -IP address applies to all ports by defaultRouters -IP address is specific to one port (or group of ports)Controlling AccessYou can restrict Web,Telnet and SNMP access to a single management address:BigIron(config)#web client 209.157.22.39BigIron(config)#snmp-client 209.157.22.14BigIron(config)#telnet client 209.157.22.26BigIron(config)#all-client 209.157.22.69 for all three types To disable Management completely:BigIron(config)#no web-managementBigIron(config)#no telnet serverBigIron(config)#no snmp-serverSearching and Filtering from the Command LinePipe “|” commands modify the output of show commands according to operatorSupports searching and filteringMatching uses regular expressions Examples:show int| begin3/5show int| include MTUshow int brief | exclude downOnly one pipe allowed per command Syntax: show command |Operator <matching string>Searching and Filtering at the More PromptEquivalents to the pipe commands operations can be done at the More promptAt the More prompt, enter a: /, + or -operator:/(slash) like “begin” operator+(plus) like “include” operator-(minus) like “exclude” operatorThen enter a regular expressionThe particular word, number, or Special Character to searchonPress Return/Enter to activate the command Syntax: <more prompt> operator<matching string>Regular ExpressionRegular Expressions contain special characters in the matching string to specify search patterns.Syntax: show command |Operator < special character in matching string>Some tips and matching examples:Regular characters match themselves123 matches 123Dot “.” matches any single character1.3 matches 123, 1A3, 1/3, etc.Caret “^” matches beginning of a line^123 matches lines that start with 123Dollar sign “$” matches the end of a line123$matches lines that end with 123Underscore “_” matches things at beginning or end of words, such as space, comma, parentheses, curly braces, beginning of line, or end of line, ex: _123_matches (123,456) but not 1234Grouping ExamplesBrackets “[]” are used to specify a range of values for a single character to be matched (a “character class”)[123]matches 1, 2, or 3[1-5]matches 1, 2, 3, 4, or 5Caret “^” as the first character inside brackets is used to invert the set of values[^1-3]matches any character other than1, 2, or 3Vertical bar “|” specifies alternative patterns123|456 will match 123or 456Parentheses group characters into a larger pattern Question mark “?” matches zero or one of the preceding pattern123?matches 12or 123(123)?matches nothing or 123To enter question mark instead of invoking help, press Ctrl-V first Asterisk “*” matches zero or more of the preceding pattern123*matches nothing, 123, 1233, 12333, etc.(123)*matches nothing, 123, 123123, 123123123, etc.Plus “+” matches one or more of the preceding patternOther attributes assigned to a port NetIron(config-if-8)# show interface briefPort Link State Duplex Speed Tag Priority MAC Trunk01 Down None None None No Normal 00e0.5200.0385 102 Down None None None No Normal 00e0.5200.0386 103 Down None None None No Normal 00e0.5200.0387 None 04 Down None None None No Normal 00e0.5200.0388 None Current Link State Up or Down Spanning Tree State Forward, Listen, etc.802.1q Tagged or not 05 Down None None None No Normal 00e0.5200.0389 None 06 Down None None None No Normal 00e0.5200.038a None 07 Down None None None No Normal 00e0.5200.038b None 08 Down None None None No Normal 00e0.5200.038c None 09 Up Listen Full 100M Yes Normal 00e0.5200.038d None 10 Up Forward Full 100M No Normal 00e0.5200.038e None 11 Down None None None No Normal 00e0.5200.038f None 12 Down None None None No Normal 00e0.5200.0390 None 13 Down None None None No Normal 00e0.5200.0391 None 14 Down None None None No Normal 00e0.5200.0392 None 15 Up Forward Full 100M No Normal 00e0.5200.0393 None 16 Down None None None No Normal 00e0.5200.0394 None17 Up Forward Full 1G No Normal 00e0.5200.0395 NoneCurrent Duplex StateFull or HalfNone = no link state Current Speed 10M, 100M, 1GQoS Priority, Normal, High Is this port part of a Trunk Group?(Trunk Group #)Specific attributes of each port SpeedAuto-negotiate (default)Forced to 10 or 100Mbps-Full Duplex/Half DuplexExamples:NetIron> enable passwordhereNetIron# config termNetIron(config)# interface e8NetIron(config-if-8)# speed-duplex 100-halfNetIron(config-if-8)# speed 10-fullNetIron(config-if-8)# speed autoNetIron(config-if-8)# interface e12NetIron(config-if-12)# speed 100-fullNetIron(config-if-12)# endNetIron# write memVLANsVirtual Local Area NetworkA subgroup within a local area networkCreates a broadcast domain Done through softwareTypes of VLANsLayer 2 port-based VLAN Layer 3 protocol VLANsIP Protocol VLANS IP sub-net VLANs IPv6 VLANsIPX network VLANs IPX sub-net VLANs AppleTalk DECNet NetBIOSOther - (not any of the above supported protocols)© 2011 Brocade Communications Systems, Inc.50VLAN Concept - Layer 2 Port BasedVLAN 1 Port 1, Port 2, Port 3, Port 4Port 1Port 2Port 3Port 5 Port 6© 2011 Brocade Communications Systems, Inc.51VLAN - 802.1q TaggingTagging allows multiple port based VLANs to span switches over a single physical linkVLAN 3 VLAN 2VLAN Tagging is not needed...…if the ports are grouped with dedicated uplinks for each VLAN between switches...empty…there’s no question where broadcast traffic goes from port to portVLAN 3© 2011 Brocade Communications Systems, Inc.VLAN 252VLAN - 802.1q Tagging (continued)VLAN 3 VLAN 2Tagging allows multiple port based VLANs to span switches over a single physical linkVLAN Tagging is needed... …with a single link between switches and multiple VLANs...…there needs to be a mechanism for having the traffic from VLAN2 only go to the VLAN2 ports on the other side.emptyVLAN 3© 2011 Brocade Communications Systems, Inc.VLAN 253VLAN - 802.1q Tagging (Packet Format)6 bytes Destination Address 6 bytes Destination AddressUntagged Packet Format6 bytes Source Address 6 bytes Source Address 2 bytes Type Field 2 bytes Length FieldUp to 1500 bytes Data Field Up to 1496 bytes Data Field4 bytes CRC 4 bytes CRCEthernet II IEEE 802.36 bytes Destination Address 6 bytes Destination Address802.1q Tagged Packet Format6 bytes Source Address 6 bytes Source Address2 bytes 4 bytes 2 bytesUp to 1500Up bytes to 1500 bytes 4 bytes Type 802.1q Type Data Data CRC Field Tag Field Field Field 2 bytes 4 bytes 2 bytesUp to 1496Up bytes to 1496 bytes 4 bytes Length 802.1q Length Data Data CRC Field Tag Field Field Field4 bytes CRC 4 bytes CRCEthernet II with 802.1q tagIEEE 802.3 with 802.1q tagOctet 1Tag Protocol Id (TPID)Octet 21 2 3 4 5 6 7 8 Octet 4 802.1p VLAN ID (12 bits) (3 bits)© 2011 Brocade Communications Systems, Inc.54。
