爱普生投影机EB-C260X介绍
可攜式投影機 V300X V260X V230X V260 V230 使用手冊说明书

型號
V300X/V260X/V230X/V260/V230
使用手冊
2011 年 1 月第一版
DLP 和 BrilliantColor 是 Texas Instruments (德州儀器有限公司)的商標。 IBM 爲 International Business Machines Corporation (國際商業機器公司)的商標或註冊商標。 Macintosh, Mac OS X 和 PowerBook 爲 Apple Inc. (蘋果公司)在美國和其他國家註冊的商標。 Microsoft、Windows、Windows Vista、Internet Explorer、 .NET Framework 和 PowerPoint 爲 Microsoft Corporation (微軟公司)在美國和/或其他國家的註冊商標或商標。 MicroSaver 爲 ACCO 品牌的一個分公司 Kensington Computer Products Group 的註冊商標。 Virtual Remote Tool (虛擬遙控工具)使用 WinI2C/DDC library, © Nicomsoft Ltd。 HDMI、HDMI 標誌和 High-Definition Multimedia Interface 爲 HDMI Licensing LLC.的商標或註冊商標。
切勿讓紙夾和紙屑等異物掉入投影機內。切勿試圖找回可能掉入投影機內的任何物品。切勿將鐵絲或者螺絲起子 等金屬物體插入投影機內。若發現有物體掉入投影機內部,須立即斷開電源,然後委託有維修資格的維修服務人 員取出物體。 切勿在投影機上面放置任何物體。 雷雨天不要觸摸電源插頭。此舉可能引起電擊或者火災。 投影機規定操作電源爲 200-240 伏特 50/60 赫茲交流電。在使用投影機之前,須確認所用電源是否符合本投影機 要求。 切勿在投影機啓動狀態下窺視鏡頭。此舉會導致眼睛嚴重受傷。
DLP投影机用户手册说明书

版权本出版物(包括所有照片、插图和软件)受国际版权法律的保护,保留所有权利。
未经作者书面同意,不得复制本手册及其包含的任何资料。
© 版权2022免责声明本文档中的信息如有变更,恕不另行通知。
制造商对于本文档中的内容不提供任何表述或担保,特别放弃对于适销性或特定用途适用性的任何隐含担保。
制造商保留修订本出版物和不定期更改本文档内容且无须向任何人通知此类修订或更改的权利。
商标Kensington 是 ACCO Brand Corporation 的美国注册商标,并已在其它国家(地区)注册或正在申请注册。
HDMI、HDMI标识、以及High-Definition Multimedia Interface是HDMI Licensing LLC在美国和其他国家(地区)的商标或注册商标。
MHL、HDMI标识、以及Mobile High-Definition Link是MHL licensing, LCC的商标或注册商标。
HDBaseT™和HDBaseT Alliance标志是HDBaseT Alliance的商标。
本手册中使用的所有其他产品名称分别是其各自所有者的资产,并得到公认。
版本:1DLP投影机 – 用户手册重要安全信息重要:强烈建议您在使用投影机之前仔细阅读此部分。
这些安全和使用说明可确保您安全地使用投影机许多年。
妥善保管本手册,以备日后参考。
使用的符号机器和本手册中使用的警告符号旨在提醒您危险情形。
本手册使用下面的样式来提醒您重要信息。
注意:在主题旁边提供主题的附加信息。
重要:提供不应忽视的附加信息。
小心:提醒您可能损坏机器的情形。
警告:提醒您可能损坏机器、造成危险环境或导致人员受伤的情形。
在整部手册中,OSD 菜单中的组件部分和项目以粗体显示,如此例所所示:“按遥控器上的Menu按钮打开主菜单。
”一般安全信息请勿打开机壳。
机器内没有用户可维修的部件。
如需维修,请与有资质的维修人员联系。
EPSON全线产品
W/O 多功能一体机
传真一体机
TX800FW
A3 打印机
广告/打样 广告 打样
SP1390
家庭照片
高负荷 商务办公
ME O 960FWD
EX3
照片影像
ME O 650FN
图纸/海报 图纸 海报
中/低负荷 商 低负荷 务办公
学习机
20
■ 家用 ■ 影像 ■ 商务办公
商用喷墨打印机特点
1.
健康节能环保 速度快 成本低 稳定 专业化
打印计时器
1968年世界第一台 1968年世界第一台 小型电子打印机 EPEP-101
4
技术创新的源头—东京奥运会
爱普生世界田径锦标赛官方合作伙伴
5
企业理念
客户优先、致力环保, 客户优先、致力环保, 尊重个性、发挥综合能力, 力争成为被全世界人们所信赖、 与社会共同发展、开放的公司。 我们充满自信, 为不断的挑战和创新而自豪!
大客户专属VIP服务 大客户专线:400-610-9977 免费上门安装维护 免费产品技术培训 免费巡检并提供报告
13
服务体系
连续多年荣获服务满意度金奖; 连续多年荣获服务满意度金奖; 2009年 2009年8月,爱普生荣获CCID颁发的 “针式打印 爱普生荣获CCID颁发的 CCID 喷墨打印机” 投影机” 机” “喷墨打印机” 和 “投影机” 服务满意 度金奖。 度金奖。
1.
稳定
1900KIIH三种连续纸进纸方式
2.
方便
1900KIIH半平推单页纸进纸方式
3.
不卡纸
19
喷墨打印机
A6/A4 打印机
¥3000 PM310 ¥2500 ME O 900WD ¥2000 R390 ME O 80W R270 ¥1500 R230 ¥1200 ¥1000 ME O 70 ME O 560W ME O 520 ¥700 ¥500 ¥300 ME O 360 ME 330 ME 33 ME 1+ ME O 620F CX9300F ME O 1100 ME O 700FW
投影仪操作手册说明书

教育超短焦互动首选爱普生CU610x测试

【IT168 评测】对于教育用户来说,投影机已经成为了教学的必备工具之一。
是否选择已经不是问题,而如何选择更为适用的产品,成为了当前的教育用户普遍关注的话题。
如一年一度的北京教育装备展上,我们看到很多教育机构,对于教育装备的采购,可谓一掷千金,但是钱花对地方没有,确实很难判断。
▲爱普生EB-CU610x反射式超短焦投影机 回到教育用户需求来说,他们对于投影机的需求往往存在以下几个方面。
第一,受制于一般教室空间的限制,短焦或者超短焦的投影设备,成为了他们的共同选择。
虽然,这类投影机价格不菲,但是受到需求的影响,销量也是巨大的。
第二,就是高流明需求。
传统的教室在施工时,往往更加青睐于采光充足的设计,但这对于投影设备的应用却是十分不利的,充足的光源对于投影投射的清晰度,有着重要的影响,所以采用高亮的设备,可以提高投影投射的清晰度,让坐在教室靠后的同学也能清晰看到教室前方的投影内容。
第三,防尘性能。
在长时间高效率的教室环境下使用,投影机的防尘性能就成为了采购者十分看重。
如果防尘处理不好,再长时间使用时,会给投影机的安全、寿命,带来许多致命隐患,所以防尘性能成为衡量教育行业投影设备的参考标准之一。
那么今天,小编就为大家带来一款爱普生EB-CU610X反射式超短焦投影机,该机不仅引入了实用的互动功能,反射式超短焦更可以满足教育用户的应用需求,下面就让我们简单了解一下该机。
【反射式超短焦的设计】 随着投影机技术的前行,爱普生也不断调整自己的产品策略。
在当前教育市场中,反射式超短焦投影机产品,正在成为教育用户的采购首选。
而爱普生EB-CU610X 就采用了超短焦的设计,这样的可以满足教室安装使用。
▲爱普生EB-CU610X反射式超短焦投影机 爱普生EB-CU610x的投射比达到了0.31,仅需要0.61米就可以投射出100英寸的画面,而吊装后机身后部与边缘贴合,安装也更加美观占用空间更少。
▲爱普生EB-CU610X反射式超短焦投影机 此外,该机还配备了光线感应器,当用户遮住感应器后,机器会进行报警提醒。
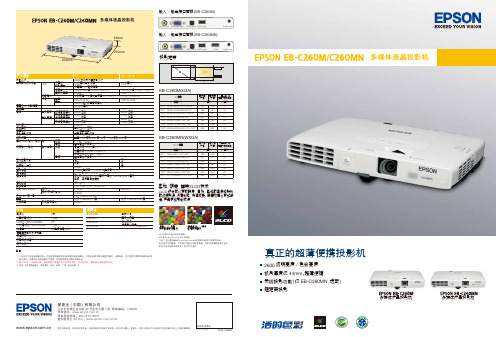
爱普生 EB-C260M C260MN 超薄便携投影机使用说明书
EVS101008BZ图片仅供参考,外观以实物为准。
本说明若有任何细节之更改,恕不另行通知。
爱普生(中国)有限公司在法律许可的范围内对以上内容有解释权。
爱普生(中国)有限公司北京市东城区金宝街89号金宝大厦7层 邮政编码:100005详情登陆: 服务导购热线:400-810-9977查询爱普生4S 中心:/4s经销商盖章处2012年4月版真正的超薄便携投影机EB-C260MN(WXGA)EB-C260M(XGA)(EB-C260M)输入/输出接口面板(EB-C260MN)输入/输出接口面板投影距离292mm210mm44mm附件3米1.8米3米1.8米AA 型碱性电池x2电源线计算机电缆线USB 线(EB-C260MN )USB 电缆线(EB-C260M )遥控器爱普生投影机软件光盘便携软包密码保护标签用户手册备用灯泡空气过滤器无线网卡快速无线连接USB KEY选配件ELPLP65ELPAF31ELPAP07ELPAP08Video InputUSB(Type B)USB(Type A)Computer InputAudio InputVideo Input USB(Type B)USB(Type A)Computer Input Audio InputHDMI 多媒体液晶投影机多媒体液晶投影机多媒体液晶投影机使用3LCD 液晶技术制造的投影机使用单片DLP 技术制造的投影机3LCD 技术可以获取明度、自然、柔和的图像和锐利的视频影像。
没有彩虹、色溢现象,眼睛观看也更加舒适,产品更加节能环保。
柔和、明亮、鲜艳3LCD 技术2600流明亮度/色彩亮度机身厚度仅44mm ,超薄便携无线投影功能(仅EB-C260MN,选配)短距离投影备注:*1 上述时间为非承诺保修时间。
灯泡亮度将随使用时间的增加而逐渐降低。
灯泡实际使用寿命受使用模式、环境条件、用户使用习惯等因素影响会有 很大差别。
投影机在低亮度模式下使用,灯泡使用寿命会得到有效延长。
爱普生四款教育投影机评测分析
爱普生四款教育投影机评测分析作者:来源:《中国教育技术装备》2013年第35期★爱普生EB-CS520Wi:一款功能全面的短焦教育投影机EB-CS520Wi投影机拥有1280×800 dpi的分辨率,具备无线模块(可选购),拥有3LCD 核心技术,白色亮度与色彩亮度等同为3000流明,这样决定了投射画面更加柔和清晰。
该机投射比达到0.48,投射80英寸画面仅需要0.83米,可以满足对投影距离有特殊需求的教育用户应用。
设计简洁,安装便捷外观圆润紧凑,镜头下半部分与白色机身融为一体;镜头的最大光圈为1.8,为提高光源利用率提供了坚实的基础;机身背后设计了可扩展的无线插槽,可以支持无线投影技术。
接口设计丰富合理接口部分设计在机器的背后,配备HDMI、双VGA、S-Video、USB、RJ45网络端口等;内置16 W大功率扬声器,可以满足教育用户使用各设备来连接;配备了可拆卸的防尘网,易于用户更换,便于用户动手清理,有利于延长使用寿命,确保设备安全稳定运行。
顶置式UHE灯泡采用自家生产超高压汞灯230 W的UHE灯泡,在标准模式下可以实现4000小时的长寿命。
其他细节配置控制按键设计在机器的顶部,方便用户使用;采用三支脚设计,用户可以根据实用环境做出最合理的调整。
测试总结通过对EB-CS520Wi投影机进行高清图片投射测试、高清影片投射测试、文档类投射测试,发现该机不仅具备较高亮度,还全面支持无线选配,方便教室安装使用。
此外,高压UHE汞灯设计不仅提高了灯泡的寿命,带给用户更高的性价比,还能有效降能耗。
★爱普生EB-CU610X:一款教育教学领域的主打机反射式超短焦的设计 EB-CU610X投影机的投射比达到0.31,即仅需要0.61米就可以投射出100英寸的画面;而吊装后机身后部与边缘贴合,安装也更加美观,占用空间更少。
此外,该机还配备了光线感应器,当用户遮住感应器后,机器会进行报警提醒。
这样的设计可以避免距离阻隔影响散热,大大提高该机的安全系数,降低学生眼睛受意外伤害的几率,设计更为实用。
政府采购办公设备型号及价格

序号 品目名称 1 规格型号 数量 单位 3 台 单价 4755元 总价(元) 14266
联想扬天A4600T 台式电脑 PDC E6700/2G DDR3/SATA 500G/SATA DVD/声卡/集成千兆网卡/ 台式电脑 集成高性能显卡/USB 光电鼠标/USB 浮岛式键盘/WIN7 HOME BASIC中文版/前置2口USB2.0/ 中小企业应用11版(for WIN7)180W 电源/三年有限保修及上门/在线顾问彩页/19LCD 富士施乐 DC 2056 CPS 黑白激光复印机①节能、环境标准认证情况:技能环保产品;②幅 面:A3;③输出速度:20张/每分钟;④复印/打印/扫描分辨率:600DPI;⑤输稿器:无; ⑥操作面板(显示屏):液晶中文显示;⑦扫描功能:有;⑧纸盒、内存、硬盘容量:容 复印机 纸(250+50)、256M内存、无硬盘;⑨详细:首张输出7.2秒,预热25秒,双面器,USB2.0 接口,电子分页,错位输出,扫描格式RAW、TIFF、PDF、XDW;⑩配置其他:可选购A3双面 自动送输器、网络打印、网络彩色扫描、G3传真、纸盒(500+1000);保修情况:1年或6 万张纸 爱普生EB-C260X投影仪①节能、环境标准认证:已获得(节能证书号:CQC10702050791,环 境证书号:CQC10702050793);②亮度:2600流明,③分辨率:1024*768,④对比度: 2000:1,⑤像素:786,432(1024*768)*3,⑦功能/详细配置:0.55英寸(250W,260W 为0.59英寸)多晶硅有源矩阵式TFT液晶显示板*3,LCD技术;直接开/关机设计(5秒快速 投影设备 开机,0秒关机),投影机灯泡200W UHB(E-TORL)灯泡,A/V Mute滑盖功能待机功耗仅 0.4W,方便用户使用;前排风设计,USB线连接投影,灯泡寿命4000小时(标准亮度模式) 1W喇叭,⑧投影方式:前投/吊顶,⑨其他:重量2.3kg 小巧请便,携带方便;⑩保修情 况:主机一年,灯泡半年 爱普生LQ-735K针式打印机①节能、环境标准认证情况:有节能认证②幅面:A4幅面③最大 打印宽度/最大打印厚度70-257mm/0.052-0.53mm④打印头:四亿次/针⑤打印速度:中午 针式打印 (6.7cpi),超高速:173汉字/秒 高速:115汉字/秒信函质量:57汉字/秒 英文 机 (10cpi):⑥色带:400万字符(信函质量)⑦功能/详细配置:1+6层拷贝功能,80列, 24针,并口和USB接口⑧打印方式:点阵打印⑨其他:平推票据针式打印机⑩保修:整机保 修三年 激光彩色 HP LaserJet CP 2025彩色激光打印机①有节能环保认证②A4幅面彩色激光③打印分辨率: 打印机 600*600dpi④128M内存⑤20PPM黑/20PPM彩⑦月打印负荷量40000页⑧单面⑨无保修 扫描仪 明基9800 PRO扫描仪①A4幅面②4800*9600dpi③48位色彩⑤5个跨界按键,全黑色,USB2.0 接口
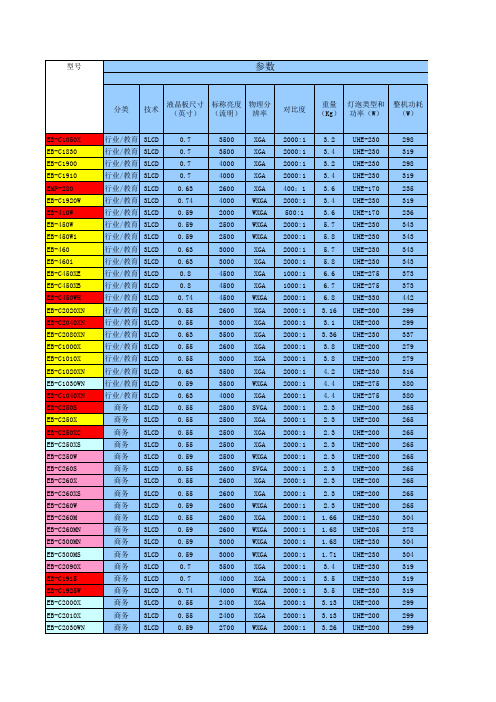
爱普生投影机全系列参数
2600 SVGA 2000:1 2.3 UHE-200
265
2600
XGA 2000:1 Biblioteka .3 UHE-200265
2600
XGA 2000:1 2.3 UHE-200
265
2600 WXGA 2000:1 2.3 UHE-200
265
2600
XGA 2000:1 1.66 UHE-230
304
270
5200
XGA 1000:1 6.6 UHE-330
442
5200
XGA 1000:1 6.7 UHE-330
442
5200
XGA 2000:1 6.8 UHE-330
442
4000 WUXGA 1000:1 6.8 UHE-275
393
4500 WUXGA 1500:1 6.8 UHE-330
型号
参数
分类
技术
液晶板尺寸 (英寸)
标称亮度 (流明)
物理分 辨率
对比度
重量 灯泡类型和 整机功耗 (Kg) 功率(W) (W)
EB-C1050X EB-C1830 EB-C1900 EB-C1910 EMP-280 EB-C1920W EB-410W EB-450W EB-450Wi EB-460 EB-460i EB-C450XE EB-C450XB EB-C450WH EB-C2020XN EB-C2040XN EB-C2080XN EB-C1000X EB-C1010X EB-C1020XN EB-C1030WN EB-C1040XN EB-C250S EB-C250X EB-C250XC EB-C250XS EB-C250W EB-C260S EB-C260X EB-C260XS EB-C260W EB-C260M EB-C260MN EB-C300MN EB-C300MS EB-C2090X EB-C1915 EB-C1925W EB-C2000X EB-C2010X EB-C2030WN
细节决定成败:六款投影机产品评测

细节决定成败:六款投影机产品评测
佚名
【期刊名称】《中小学信息技术教育》
【年(卷),期】2007(000)002
【摘要】优派ViewSonic PJ606投影机;澳视ATP-3180投影机;爱普生EMP-1715投影机;富可视InFocus IN26C投影机;NEC VT 695+教育投影机
【总页数】3页(P77-79)
【正文语种】中文
【中图分类】TN946.1
【相关文献】
1.细节决定成败,NEC新款投影机开拓教育采购新视野
2.细节决定成败还是战略决定成败
3.养猪成败之细节决定成败
4.“细节决定成败”在高职艺术专业班主任工作中的应用——《细节决定成败》读后感
5.细节决定成败,还是流程决定成败?
因版权原因,仅展示原文概要,查看原文内容请购买。
爱普生CP2000-XB SB和CP2000-ZX投影机安装M25电动镜头支架指南说明书

M25 Motorized Lens MountInstruction SheetINTRODUCTIONUse the following instructions to replace or upgrade existing non-motorized lens mounts on CP2000-XB/SB and CP2000-ZX models with the M25 Motorized Lens Mount, which incorporates stepper motors for horizontal/vertical offsets, zoom and focus.The entire procedure requires removal of the lamp (in CP2000-XB) some re-wiring between the Touch Panel Controller (TPC) and projector (in CP2000-XB/SB), adding a new lens boot (in CP2000-ZX), adding a zoom gear and stepper motor to the projection lens, installing the M25 Motor Control Box (MCB), and performing boresight alignment.This procedure should be completed by a qualified service technician. Depending on your projector model, it can take up to 2 hours to complete a full lens mount replacement and setup. IMPORTANT: Make sure your projector has been upgraded with the latest software to ensure the motorized lens mount will function properly. Main software v2.9 is required for CP2000-XB/SB, and v2.2 is required for CP2000-ZX projectors. Visit for the latest software downloads.KITS REQUIREDTo install a M25 Motorized Lens Mount:•108-127101-01M25 Motorized Lens Mount Kit for CP2000-ZX•108-340108-01 M25 Motorized Lens Mount Kit for CP2000-SB•108-341109-01 M25 Motorized Lens Mount Kit for CP2000-XBTo upgrade a non-motorized Lens Mount: (applies to CP2000-ZX (116-001113-xx), CP2000-SB(106-004116-xx), CP2000-XB(101-001113-xx)•108-128102-01 M25 Motor Upgrade Kit (includes 3 stepper motors and wiring to upgrade an existing non-motorized lens mount, choke assembly)TOOLS REQUIRED•#1, #2 Phillips screwdrivers, and small flathead screwdrivers•3 & 5 mm hex keys•13mm ratchet•wire cutters•Christie Protective Clothing Safety Kit P/N 598900-095 (required when accessing and removing the lamp)•Ruler (to measure distance between lens mount and projector front bezel)SAFETY WARNINGS AND GUIDELINESAlways power down and disconnect all power sources to the projector before servicing or cleaning.For CP2000-XB/SB: Wear authorized protective clothin g when ever the lamp door is open. Never attempt to remove the lamp directly after use. The lamp is under increased pressure when hot and may explode, causing personal injury and/or property damage.Refer to the product user man ual for complete lamp safety an d removal instructions.NOTICE: When adjusting the M25 Motorized Lens Mount on a projector that has a MotorizedAuxiliary Lens Mount (MALM), swing the MALM completely out of the way to ensure it does not collide with the lens as it is being adjusted.NOTICE: Always perform a Lens Reset (in software) after adjusting the Horizontal and Vertical offset knobs to bring the lens mount back to a zero position before proceeding with other adjustments.Failure to do so may limit the range of motion of the lens mount.INSTALLATION INSTRUCTIONSINSTALLING THE M25 MOTORIZED LENS MOUNT1.Remove the projection lens from the projector and set aside in an area where it cannot be damage.Refer to the User Manual for instructions.2.Remove the existing lens mount.a.If applicable, swing the MALM completely out of the way so it will not interfere with theinstallation of the new lens mount.b.Center the lens mount vertically and horizontally.c.Remove the 3 screws securing the lens mount to the front of the projector.d.For CP2000-XB/SB models, unwrap the aluminum tape securing the rubber boot to the lensmount. Note: Keep the tape for reuse with the new lens mount. Remove the lens mount.2 of 21M25 Motorized Lens Mount Instruction Sheet3.For CP2000-ZX models,e.Remove the six, M4 screws securing the rubber boot tothe front plate. Retain for the installation of the new lensboot.f.Remove the six copper fingers, then remove the rubberboot.g.Install the new rubber boot provided in the kit using theclamp ring and the six, M4 screws from Step 3.e. Do notremove the loops of tape from the lens boot as they arerequired when installing the new lens mount. (Figure1)h.Thread the extra length of tape provided in the kitthrough the loops of tape as shown in (Figure 2).This tape will seal off the overlap between the lensboot and lens mount (see Step 6.).4.For CP2000-XB/SB projectors manufactured before June 2009, upgrade wiring to the TPC. Referto Wiring Instructions for TPC, on page 7.5.For all projector models, install the MCB to the front of the projector. Refer to Installing the M25 Motor Control Box, on page 12. If you have a MALM installed, refer to Installing the M25 Motor Control Box with a MALM Present, on page 156.Install the new lens mount.e the neck strap provided with your projector to hold the new lens mount while you slide thelens boot cover over the lens mount.b.For CP2000-ZX, push the lens barrel as far forward on the lens boot as possible making surethe lens boot does not get wedged in between the lens barrel and the front plate. Reach yourhand inside the lens mount to adjust. (Figure 3)Figure 1 CP2000-ZX - NewLens Boot InstalledFigure 2 CP2000-ZX - Add extratape through loops4 of 21M25 Motorized Lens Mount Instruction Sheetc.Seal off the overlap between the lens boot and lens mountusing the tape on the lens boot for ZX and reusing thealuminum tape from the old lens boot for CP2000-XB/SBmodels.d.Secure the lens mount to the projector reusing thehardware from the old lens mount. IMPORTANT: Thedistance between the lens mount and projector frontplate must measure 20 mm for CP2000-ZX and 19 mmfor CP2000-XB/SB. The figure on the right has beenprovided in the event a ruler is not available duringinstallation. Cut out the portion applicable to yourmodel and do a quick measurement to ensure thecorrect distance is achieved.e.Install the Zoom motor assembly to the lens. Refer todescribed later in this document.7.Install the projection lens.8.Calibrate the lens and perform boresight alignment.Figure 3Note: This document may not print to scale on some printers. Use caution when using the ruler provided. If in doubt, try and locate an actual ruler.UPGRADING A NON-MOTORIZED LENS MOUNTThe following figure identifies all the parts and hardware required for upgrading a non-motorized lens mount. Note: Part numbers are subject to change .1.Remove the projection lens from the projector and set aside in an area where it cannot be damage.Refer to the User Manual for instructions.2.For CP2000-XB/SB projectors manufactured before June 2009, upgrade wiring to the TPC. Referto Wiring Instructions for TPC, on page 7.3.Install Focus and Offset motor assemblies:a.Remove the focus and offset adjustment knobs from the lens mount. Keep focus knobmounting hardware for later use.b.Insert an adapter shaft (Figure 5) into each of the vacant mountingholes from which the vertical and horizontal adjustment knobs wereremoved in the previous step. This adapter resizes the opening to allow for the installation of the offset motor assembly.c.Install the vertical and horizontal offset motor assemblies by threadingthe rod into the lens mount and then securing the bracket with 2, M6screws and washers.Figure 4 Motorized Lens Mount ExplodedFigure 56 of 21M25 Motorized Lens Mount Instruction Sheetd.Install a sensor flag to each vertical and horizontal offset motor assembly using two, M3screws with washers. (Figure 6) Do a visual inspection to ensure the sensor flag will movefreely through the sensor. Failure for the sensor flag to clear the sensor can result in damage tothe sensor.e.Install the focus motor assembly to the front of the lens mount reusing two, M4 screws withwashers that mounted the manual focus adjustment knob.f.Install the focus sensor assembly and the focus sensor flag to the front of the lens mount.Requires two, M3 screws and washer each. (Figure 7)Figure 6 Offset Sensor FlagFigure 8Figure 7g.Install a metal cover over each motor assembly securing it to the lens mount using two, M4screws and washers for each. (Figure 8, Figure 9)4.Install the MCB to the front of the projector. Refer to Installing the M25 Motor Control Box, on page 12 or Installing the M25 Motor Control Box with a MALM Present, on page 15.5.Connect harnesses from each stepper motor to their designated input port on the MCB. Inputs andharnesses are color coded for convenience.WIRING INSTRUCTIONS FOR TPCFor CP2000-XB and CP2000-SB models manufactured before June 2009, the TPC harness must be upgraded to support a serial link to the lens mount’s MCB. This must be done before installing the newlens mount. Remove the lamp before performing any projector re-wiring.CP2000-XB MODELSFigure 98 of 21M25 Motorized Lens Mount Instruction Sheet1.Disconnect the TPC harness from the projector’s rear connec-tor panel.2.Remove the two screws securing the TPC connector.3.Remove the projector belly pan.a.Remove the eight screws from both the leftand right sides of the belly pan (Figure 10),as well as the six screws along the back ofthe belly pan.4.Remove the lamp. Refer to the projector’s UserManual for safety and installation instructions.5.This step requires two people. One personmust carefully tilt the projector from the frontprojection head in order for the other person tohave the required clearance to remove the bellypan out from underneath the projector. Once thebelly pan is removed the wiring runningunderneath the projector can be accessed.6.Remove the TPC harness from the projector: Unlock allthe P-clips used to secure the wire bundles under theprojector (Figure 11).ing wire cutters, remove all tie-wraps from thewire bundles.c.Disconnect the TPC harness running underneath theprojector .d.Carefully, pull the TPC harness out through the TPCconnector opening on the rear connector panel.7.Disconnect the black Ethernet cable from the internalethernet hub. Carefully, pull the Ethernet cable through the TPC connector opening on the rear connection panel.Disconnect TP C harness andremove TPC connectorFigure 10 Remove Projector’s Belly PanFigure 11 Unlock P-Clips8.Remove the nut securing the ground wire to the backof the rear connector panel. (Figure 12)9.Insert the TPC harness assembly (001-100155-xx)through the TPC connector opening on the rearconnector panel. Note: This is a breakout cable thatincludes the TPC power cable, the Ethernet cable,ground wire and an RS232 cable.a.Connect the TPC power cable to the connectorunder the projector.b.Plug the Ethernet connector into the internalethernet hub.c.Secure the ground wire to the back of the rear connector panel.d.Secure the TPC connector to the rear connector panel.10.Secure each of the P-clips loosened in Step 6. Tie-wrap each of the wire bundles.11.Feed the TPC Cross RS232 harness (001-111029-xx) through the front of the projector, and overtop of the belly pan by the fold mirror access plate. Connect it to the loose RS232 connector on the TPC harness assembly installed in Step 9. above. The other RS232 end connects to the MotorControl Box (MCB).12.Remove and re-wire the TPC (Figure 13):a.Slide the TPC back cover off bysnapping it out of the two tabs at theback.b.Disconnect the LAN connector.ing a small flathead screwdriver,remove the two screws securing theterminal block.Figure 12 Remove Ground WireFigure 13 Upgrade TPC Wiring10 of 21M25 Motorized Lens Mount Instruction Sheetd.Remove the three screws securing the green, black and redwires in the terminal block. (Figure 14)e.Unsnap the ferrite from the wire bundle.f.Remove the TPC harness connector from the TPC.g.Feed the TPC Case harness assembly (001-100411-xx) throughthe opening in the TPC, then connect the RS232 end to theRS232 end of the TPC RS232 cable (001-111028-xx).h.Secure the TPC connector end to the TPC.i.Snap the ferrite around the new wire assembly.j.Connect the RS232 connector to COMM1.k.Connect the LAN.l.Insert the red, black and green wires into the terminal block andtighten the three screws.m.Tighten the two screws on the terminal block.13.Replace the TPC back cover. Re-mount the TPC to the projector.DO NOT reuse the existing power cable.14.Connect the TPC Rear Panel Harness Assembly (001-100132-xx) to the TPC and the projector’srear connector panel TPC port.Figure 14 RemoveTerminal Block WiresFigure 15 Remove TPCConnectorFigure 16 TPC Case and RS232 HarnessesFOR CP2000-SB MODELS1.Open pedestal door to access the Communications and Source Connection panel located on theunderside of the projection head, near the front.2.Disconnect the TPC harness from the internal Ethernet hub and 24V power supply.3.Feed the TPC harness through the hole in the rear of the pedestal. Remove the TPC.4.Re-wire the TPC (Same as Step 12. in CP2000-XB):a.Slide the TPC back cover off by snapping it out of the two tabs at the back.b.Disconnect the LAN connector.ing a small flathead screwdriver, remove the two screws securing the terminal block.d.Remove the three screws securing the green, black and red wires in the terminal block.e.Unsnap the ferrite from the wire bundle.f.Remove the TPC harness connector from the TPC.g.Feed the TPC Case harness assembly (001-100411-xx) through the opening in the TPC, thenconnect the RS232 end to the RS232 end of the TPC RS232 cable (001-111028-xx).h.Secure the TPC connector end to the TPC.i.Snap the ferrite around the new wire assembly.j.Connect the RS232 connector to COMM1.k.Connect the LAN.l.Insert the red, black and green wires into the terminal block and tighten the three screws.m.Tighten the two screws on the terminal block.5.Connect the TPC-to-Ethernet harness assembly (001-100371-xx) to the internal Ethernet hub, andthe TPC power supply in the pedestal. Connect ground. Route the TPC connector end through the hole in the rear of the pedestal.6.Replace the TPC back cover. Re-mount the TPC to the projector.7.Connect the TPC connector from the TPC-to-Ethernet harness assembly (Step 5) to the TPC.12 of 21M25 Motorized Lens Mount Instruction SheetINSTALLING THE M25 MOTOR CONTROL BOXThe Motor Control Box (MCB) is installed at the front of the projector using the same mounting holes traditionally reserved for the MALM. However, the MCB and MALM can simultaneously bemounted, if required. Refer to Installing the M25 Motor Control Box with a MALM Present, on page 15.The MCB is wired to the projector with an RS-232 harness.CP2000-XB/SB MODELS1.Mount the MCB assembly.ing the hardware provided,mount the MCB assembly tothe two far left mountingholes on the front panel. Thesemounting holes are also usedfor mounting the optionalMotorized Auxiliary LensMount. (Figure 17)2.Connect the harness from theprojector to the MCB COMMport.3.For CP2000-SB models only , connect the chokeassembly harness to the MCB power supply outputconnector. (Figure 18)4.Connect the power supply to MCB POWER 24VDC port.5.Connect the four lens mount motor harnesses to theMCB faceplate. For example, connect the harnessfrom the X-axis motor (labeled red) to the X (alsolabeled in red) on the MCB etc. Harnesses andmotors are color coded for easier installation. Note:No connection is made to the optional AUX port. Itis for future use.6.Connect a power cable from the MCB to a nearbywall outlet.Figure 17 MCB Assembly Installed (CP2000-XB shown)Figure 18 Add DC Common ModeChoke Assembly (CP2000-SB)7.For CP2000-SB models only, open the pedestal door and verify that a snap on ferrite clamp issecured around the ballast output leads. If the clamp is missing, install the one that has beenprovided in the kit. Install as shown in Figure 19.8.Secure a cable tie above and below the clamp. (Figure 19)CP2000-ZX MODELS1.Mount the MCB. (Figure 20)ing the hardware provided,mount the MCB assembly tothe two far left mountingholes on the front panel.These mounting holes are alsoused for mounting theoptional Motorized AuxiliaryLens Mount.Figure 19 Snap on Ferrite Clamp Installed (CP2000-SB)Figure 20 MCB Assembly Installed (CP2000-ZX shown)2.Connect one end of the RS232 harness (016-101699-xx) to the MCB COMM port and the otherend to the RS232 B port located on the Projector Control Module (PCM). Proper routing of thisharness is under the projector along the track in the base plate and then up through the openingnear the PCM.3.Connect the power supply to MCB POWER 24 VDC port.4.Connect the all lens mount motor harnesses to the MCB faceplate. For example, connect theharness from the X-axis motor (labeled red) to the X(also labeled in red)on the MCB etc.Harnesses and motors are color coded for easier installation. Note: The optional AUX port is forfuture use.5.Connect the line cord from the MCB to a nearby wall outlet.CONNECTION TO A PC (FOR ALL MODELS):If you require a connection to a PC, use a female-to-female DB9 null modem cable from your PC or laptop to the MCB COMM port.NOTE: Depending on the computer being used, you may Array need to manually wire transmit, receive and ground only. Inthis case, connect pin 5 on both DB9’s together, connect pin2 on the first end to pin3 on the other, pin 3 on the first endto pin 2 on the other.Figure 21 Null Modem Cable14 of 21M25 Motorized Lens Mount Instruction SheetINSTALLING THE M25 MOTOR CONTROL BOX WITH A MALM PRESENTUse the following instructions when installing the MCB with a MALM present. This applies to all models.1.Remove the 2 M6 x25 screws used to fasten the MALM assembly to the front of the projector.e the 2 M6x10 screws provided in the lens mount kit and fasten the MALM control box to thefront of the MCB assembly. (Figure 22-A)3.Reuse the 2 screws removed in Step 1 to fasten the control box assemblies and MALM to the frontof the projector. (Figure 22-B) Route the cables from the lens mount to the MCB over the MALM mounting arm. (Figure 23).Figure 22 Installing MCB with MALM presentFigure 23 Lens Mount Cable Routing withMALM16 of 21M25 Motorized Lens Mount Instruction SheetMOUNT ZOOM MOTOR ASSEMBLY TO LENSUse the following procedure to install the Zoom Motor Assembly (Figure 24) to the lens you will be using with the projector. This procedure applies to any of the available lenses for your projector model.1.Attach the zoom motor assembly to the lens. Ensure thecenter of the motor is aligned with the top of the lens(use UP label as reference) and that the adjustmentscrew on the clamp is positioned on the left side of theUP label (see Figure 24).2.Adjust the position of lens:•Position the following lenses against the front of themotor mount (see Figure 25):>1.6-2.4>1.8-3.0>2.15-3.6•Position the following lens against the back of the motormount (see Figure 26):>1.45-2.5For all other lenses, adjust the position of the lens so that a small gap is left between the lens zoomring and the motor mount to prevent rubbing and deterioration of the two components.Figure 24 Zoom Motorand ClampFigure 25e a 3 mm hex driver to tighten the clamp around the lens - Torque setting of 1 in-lb.recommended.4.Install the zoom gear ring andzoom gear spacer suited foryour lens type. Spacers snapinto the grooves on the ring.(Figure 27)•Use the small adapter withthe 1.8-3.0 lens.•Use the larger adapter withthe 1.45-2.05, and 2.15-3.6lenses.•No adapter required for otherlenses.Figure 26Figure 27 Zoom Ring and Zoom Gear Spacer18 of 21M25 Motorized Lens Mount Instruction Sheet5.Slide the zoom gear ring over the zoom ring on thelens. Tighten the screw on the zoom gear ring -Torque setting of 3 in-lb. recommended. DO NOTover-tighten this screw. (Figure 28)6.Looking down at the lens rotate the zoom ringclockwise until it stops (reaches the end of its rangeof motion).7.Line up the motor’s gear with the last few teeth onthe corresponding end of the lens ring gear.8.Rotate the zoom gear ring back and forth to ensure it runs smoothly and that the gear alwaysremains engaged with the zoom gear ring. The sensor flag should always remain in line with thering (Figure 29). Do a visual inspection to ensure the sensor flag will move freely through thesensor. Failure for the sensor flag to clear the sensor can result in damage to the sensor.Figure 28 Tighten Zoom Gear RingFigure 29 Engage Gear9.To prevent premature wear of the gear motor and zoom gear ring, check if there is a small gapbetween the teeth of these parts. If fine tuning is required, loosen the screw on the gear motor in small increments until a small gap between the teeth is evident.(Figure 30)10.Install the safety cover over the motor assembly (Figure 31).Note: The harness on the sensor may need to be carefully bentback a little to install the cover.11.Install the projection lens.12.Connect the harness from the lens into the M25 Motor ControlBox. This procedure varies for different projector models. Referto Installing the M25 Motor Control Box, on page 12.Figure 30 Fine Tuning Gear PositionFigure 31 Safety Cover20 of 21M25 Motorized Lens Mount Instruction SheetBASIC OPERATIONBefore you begin operating the projector with the new lens mount, it is important that you performsome basic optical alignment procedures to achieve optimized images on the screen. Refer to the User Manual for more information on lens control options. Updated User Manuals can be found at .1.If applicable, swing the MALM out of the way to ensure it does not collide with the projection lensas it is being adjusted.2.From the Advanced>Lens menu, select the lens type installed. This step is extremely important toallow the full range of motion for that lens. (Figure 32)3.From the Advanced>Lens menu, select ILS Installed (default). Select Calibrate , to electroni-cally calibrate the lens. (Figure 32)4.Once lens calibration is complete, display a “framing” test pattern or something equivalent withcrosshairs.5.Adjust boresight to ensure the lens and lens mount are precisely adjusted in relation to theprojector’s internal optics:a.Refer to the boresight instructions provided in the product User Manual. MotorizedVertical Offset MotorizedHorizontal Offset VerticalBoresightBoltHorizontalBoresightBolt Anchor BoltLock/UnlockLensFocus IMPORTANT! Horizontal and Vertical Offset knobs are for emergency use only. If the lens mount is adjusted using these knobs, perform a Lens Reset (in software) first to bring the lens mount back to a zero position before proceeding with other lens mount adjustments. Failure to do this may limit the range of motion of the lens mount.CP2000-XB/SB CP2000-ZXFigure 32 Advanced Lens Menu6.After boresight is complete, configure the lens for each channel as required. (Figure 33)Note:Auto ILS must be selected to over-write settings for the selected channel. With Auto ILS disabled,changes made to lens settings are temporary and will be lost once Auto ILS is selected again.CP2000-ZXFigure 33 Customizing Lens Settings for a Specific ChannelEMERGENCY STOPUnplug the line cord from the MCB to immediately disconnect power to the lens mount and haltfurther movement of the lens.M25 Motorized Lens Mount Instruction Sheet21 of 21 020-100309-03 (12-2009)。
爱普生投影机

类别名称投影机照片投影技术技术参数投影尺寸价格特点备注EB-S8LCD亮度:2500流明 对比度:2000:1 重量:2.3Kg 尺寸:(DWH)228-295-77mm 分辨率600*80030-350英寸4598元小巧轻便、携带方便EB-C260X LCD 亮度:2600流明 对比度:2000:1 尺寸:395*228*77 重量:2.3Kg30-300英寸4250EB-C260W LCD 对比度:2000:1 标准分辨率:1280×800 屏幕比例:16:10(兼容4:3)33-318英寸14800EB-C300MS LCD投影机亮度:3000流明对比度:2000:1 标准分辨率:1280×80014999EB-C250XS LCD投影机亮度:2500流明对比度:2000:1 标准分辨率:1024×7685167EB-C260XS LCD投影机亮度:2600流明对比度:2000:1 标准分辨率:1024×76813800EB-C300MN LCD投影机亮度:3000流明对比度:2000:1 标准分辨率:1280×80038800EMP-1710LCD 投影机亮度:2700流明对比度:400:1 标准分辨率:1024×76830-300英寸18800EB-260M LCD投影机亮度:2600流明标准分辨率:1024×768屏幕比例:4:3(兼容16:9)30-300英寸11110EB-1720LCD投影机亮度:3000流明对比度:2000:1 标准分辨率:1024×76830-300英寸14000EB-1735W LCD投影机亮度:3000流明对比度:2000:1 标准分辨率:1280×80030-300英寸19100EB-C260S LCD投影机亮度:2600流明对比度:2000:1 标准分辨率:800×60030-350英寸7388爱 普 生 /store/list/laser/templateCMS.asp?columnId=120&pg=&view=商务便携EB-1725LCD投影机亮度:3000流明对比度:2000:1 标准分辨率:1024×76830-300英寸15500EMP-1715LCD 投影机亮度:2700流明对比度:400:1 标准分辨率:1024×76830-300英寸9000EB-S7LCD投影机亮度:2300流明对比度:2000:1 标准分辨率:800×6004000EB-1730W LCD投影机亮度:3000流明对比度:2000:1 标准分辨率:1280×80030-300英寸15000EB-C260MN LCD投影机亮度:2600流明对比度:2000:1 标准分辨率:1280×80030-300英寸36800EB-1725LCD投影机亮度:3000流明对比度:2000:1 标准分辨率:1024×76830-300英寸15500EB-C340X LCD投影机亮度:3000流明对比度:3000:1 标准分辨率:1024×7684999EB-C2040XN LCD亮度:3200流明 对比度:2000:1 分辨率1024*768 尺寸(DWH)345*263*93重量:3.1Kg30-300英寸9999EB-C250S LCD 亮度:2500流明 对比度:2000:1 分辨率:800*60030-350英寸3999EB-450W LCD亮度:2500流明 对比度:2000:1 分辨率:1280*1080 屏幕比例:16:1059-97英寸46800EB-D290LCD 亮度:3000流明 对比度:500:130-300英寸6440EB-C2080XN LCD投影机亮度:3500流明对比度:2000:1 标准分辨率:1024×768 屏幕比例:4:3(兼容16:9)灯泡寿命:4000小时30-300英寸28000EB-460LCD投影机亮度:3000流明对比度:2000:1 标准分辨率:1024×76854800短焦EB-450Wi LCD投影机亮度:2500流明对比度:2000:1 标准分辨率:1280×80049800短焦EB-460i LCD 投影机亮度:3000流明 对比度:2000:1标准分辨率:1024×768 屏幕比例:4:3(兼容16:963-102英寸59800EB-C1915LCD 投影机亮度:4000流明 对比度:2000:1标准分辨率:1024×768 屏幕比例:4:3(兼容16:9)30-300英寸23500EB-C1910LCD 投影机亮度:4000流明对比度:2000:1 标准分辨率:1024×76830-300英寸20000EB-C2020XN LCD投影机亮度:2600流明 对比度:2000:1标准分辨率:1024×76830-300英寸19800EB-C1040XN LCD投影机亮度:4000流明对比度:2000:1 标准分辨率:1024×76830-300英寸13500EB-C2090X LCD 投影机亮度:3500流明 对比度:2000:1标准分辨率:1024×76830-300英寸13999EB-X8LCD 投影机亮度:2500流明 对比度:2000:1标准分辨率:1024×76830-300英寸5999EB-C450WU LCD 投影机亮度:4500流明 对比度:1500:1标准分辨率:1920×120030-300英寸13.25万EB-C1925W LCD 投影机亮度:4000流明 对比度:2000:1标准分辨率:1280×80030-300英寸66000EB-C2030WN LCD投影机亮度:2700流明 对比度:2000:1标准分辨率:1280×80033-318英寸7900EB-410W LCD投影机亮度:2000流明对比度:500:1 标准分辨率:1280×80053-116英寸24800短焦型EB-C250XC LCD 投影机亮度:2500流明 对比度:2000:1标准分辨率:1024×76830-300英寸5330EB-C730X LCD 明 对比度:2000:1标准分辨率:1024×76830-300英寸53000EMP-6010LCD投影机亮度:3000流明 对比度:600:1 标准分辨率:1024×76830-300英寸7500EB-C520XB LCD投影机亮度:5200流明对比度:1000:1 标准分辨率:1024×76830-300英寸38888EB-C2100XN LCD投影机亮度:3500流明 对比度:2000:1标准分辨率:1024×76830-300英寸14800EB-G5300LCD 投影机亮度:5000流明 对比度:1000:1标准分辨率:1024×76830-300英寸29999EB-C2060XN LCD投影机亮度:3000流明对比度:2000:1 标准分辨率:1024×76830-300英寸24800EB-C3010WN LCD投影机亮度:3000流明 对比度:2000:1标准分辨率:1280×80030-300英寸36800EB-C450WH LCD 投影机亮度:4500流明 对比度:2000:1标准分辨率:1280×80030-300英寸84000EB-824H LCD 投影机亮度:3000流明 对比度:2000:1标准分辨率:1024×76824800EB-C2050WN LCD投影机亮度:3200流明对比度:2000:1 标准分辨率:1280×80026800EB-C1000X LCD 投影机亮度:2600流明 对比度:2000:1标准分辨率:1024×76822800EB-G5200W LCD投影机亮度:4200流明 对比度:800:1 标准分辨率:1280×80031000EB-C3000X LCD投影机亮度:2600流明对比度:2000:1 标准分辨率:1024×76830800EB-C450XB LCD 投影机亮度:4500流明 对比度:1000:1标准分辨率:1024×76878000EB-C1920W LCD明 对比度:2000:1标准分辨率:1280×80064000EB-C2010X LCD 投影机亮度:2400流明 对比度:2000:1标准分辨率:1024×76814500EB-S62LCD 投影机亮度:2000流明 对比度:2000:1标准分辨率:800×6003880EMP-83H LCD投影机亮度:2200流明 对比度:400:1 标准分辨率:1024×7687000EB-C10SE LCD 投影机亮度:2600流明 对比度:3000:1标准分辨率:800×60023-350英寸8588EB-C50W LCD 投影机亮度:2600流明 对比度:3000:1标准分辨率:1280×80033-318英寸16500EB-C705W LCD 投影机亮度:2600流明 对比度:3000:1标准分辨率:1280×80033-318英寸11999EB-C735W LCD 投影机亮度:4000流明 对比度:2000:1标准分辨率:1280×80030-300英寸64000EB-C450XB LCD 投影机亮度:4500流明 对比度:1000:1标准分辨率:1024×76830-300英寸78000EB-G5150LCD 投影机亮度:4000流明 对比度:1000:1标准分辨率:1024×76830-300英寸29000EMP-1825LCD 投影机亮度:3500流明 对比度:500:1标准分辨率:1024×76830-300英寸21000EB-84H LCD 投影机亮度:2600流明 对比度:2000:1标准分辨率:1024×76830-300英寸19800EMP-1810LCD 投影机亮度:3500流明 对比度:500:1标准分辨率:1024×76830-300英寸15500教育会议EMP-6110LCD明 对比度:600:1标准分辨率:1024×76830-300英寸15500VS210LCD 投影机亮度:2600流明 投影机技术:LCD标准分辨率:800×600未上市VS350W LCD 投影机亮度:3500流明 标准分辨率:1280×800未上市Powerlite4100LCD投影机亮度:4500流明 标准分辨率:1024×768未上市Powerlite 4200W LCD投影机亮度:4500流明 标准分辨率:1280×800未上市EB-S8LCD 投影机亮度:2500流明 对比度:2000:1标准分辨率:800×6004598EB-95LCD 投影机亮度:2600流明 对比度:2000:1标准分辨率:1024×768未上市VS310LCD 投影机亮度:2600流明 标准分辨率:1024×768未上市VS315W LCD 投影机亮度:2600流明 标准分辨率:1280×800未上市EB-C30X LCD 投影机亮度:2800流明 对比度:3000:1标准分辨率:1024×76812000EB-C15S LCD 投影机亮度:2800流明 对比度:3000:1标准分辨率:800×6008999EH-TW5850C LCD投影机亮度:2000流明 标准分辨率:1920×108088000D6150LCD投影机亮度:3500流明 标准分辨率:1024×768未上市D6250LCD 未上市1850W LCD 投影机亮度:3700流明 标准分辨率:1280×800未上市VS410LCD 影机亮度:4000流明标准分辨率:1024×768未上市灯泡规格:E-TORLPowerliteProG5650WNL LCD投影机亮度:4500流明 标准分辨率:1280×800PowerlitePro G5950N LCD投影机亮度:5200流明 标准分辨率:1024×768D6155W LCD 投影机亮度:3500流明 标准分辨率:1280×1024未上市EB-96W LCD 投影机亮度:2700流明 对比度:2000:1标准分辨率:1024×768未上市EH-TW3850C LCD投影机亮度:2000流明 标准分辨率:1920×108036800PowerlitePro G5550NL LCD投影机亮度:4500流明 标准分辨率:1024×768未上市Powerlite4300LCD投影机亮度:5200流明 标准分辨率:1024×768未上市1880LCD 投影机亮度:4000流明 标准分辨率:1024×768未上市EB-C1010X LCD 投影机亮度:3000流明 对比度:2000:1标准分辨率:1024×76830-300英寸26800EB-C250W LCD 投影机亮度:2500流明 对比度:2000:1标准分辨率:1280×80033-318英寸6800EB-C1030WN LCD明 对比度:2000:1标准分辨率:1280×80030-300英寸38800EB-C2070WN LCD投影机亮度:3200流明 对比度:2000:1标准分辨率:1280×80029-280英寸27800EB-C1830LCD 投影机亮度:3500流明 对比度:2000:1标准分辨率:1024×76830-300英寸15000EMP-280LCD投影机亮度:2600流明 对比度:400:1 标准分辨率:1024×76830-300英寸5999EB-825H LCD 投影机亮度:3000流明 对比度:2000:1标准分辨率:1024×76830-300英寸29800EB-C1900LCD 投影机亮度:4000流明 对比度:2000:1标准分辨率:1024×76830-300英寸32000EMP-290LCD投影机亮度:3000流明 对比度:600:1 标准分辨率:1024×7686080EMP-C250X LCD投影机亮度:2500流明 标准分辨率:1024×768 屏幕比例:4:3(兼容16:9) 灯泡寿命:3000小时 重量:2.9kg4499EB-W8LCD 投影机亮度:2500流明 对比度:2000:1标准分辨率:1280×8009000EMP-1810LCD 投影机亮度:3500流明 对比度:500:1标准分辨率:1024×76815500EB-C1050X LCD 投影机亮度:3500流明 对比度:2000:1标准分辨率:1024×76842500EB-X7LCD 投影机亮度:2200流明 对比度:2000:1标准分辨率:1024×76830-300英寸4500EB-C1020XN LCD投影机亮度:3500流明 对比度:2000:1标准分辨率:1024×76830-300英寸10500EB-C2000X LCD 投影机亮度:2400流明 对比度:2000:1标准分辨率:1024×76830-300英寸13800EB-C520XH LCD明 对比度:2000:1标准分辨率:1024×76830-300英寸85000EB-C450XE LCD 投影机亮度:4500流明 对比度:1000:1标准分辨率:1024×76830-300英寸72000EB-1900LCD 投影机亮度:4000流明 对比度:2000:1标准分辨率:1024×76813500EB-C520XE LCD 投影机亮度:5200流明 对比度:1000:1标准分辨率:1024×76830-300英寸74000EB-Z8050W LCD 投影机亮度:7000流明 对比度:2000:1标准分辨率:1024×76830-300英寸33.5WEB-Z8000MU LCD投影机亮度:6000流明 对比度:5000:1标准分辨率:1920×120020WEH-R3000C RHTPS投影机亮度:1200流明 对比度:500000:1动态 标准分辨率:1920×108098000EH-TW3300C LCD亮度:1800流明、分辨率1920*1080 重量:7.5Kg 对比度:25000:130-300英寸13000EH-TW4500LCD 亮度:1600流明 对比度:200000:1 分辨率:1920*108030-300英寸31500EH-TW8000LCD 亮度:2400流明 对比度:200000:1 分辨率:1920*108030-300英寸68000EH-TW3700C LCD投影机亮度:2000流明对比度:50000:1 标准分辨率:1920×1080 屏幕比例:16:9(兼容4:3)30-300英寸29800EH-TW450LCD 投影机亮度:2500流明对比度:3000:1 标准分辨率:1280×80033-318英寸7999主流工程机powerlite 3010e LCD 3D投影机投影机亮度:2400流明对比度:20万:148000EH-TW3500LCD 投影机亮度:1800流明对比度:36000:1 标准分辨率:1920×108021000EH-TW6000LCD 投影机亮度:2200流明对比度:40000:1 标准分辨率:1920×108030-300英寸58000powerlite5010LCD投影机亮度:2400流明对比度:20万:1 标准分辨率:1920×1080580003D投影机powerlite3010LCD投影机亮度:2400流明对比度:20万:1 标准分辨率:1920×1080480003D投影机EH-DM2LCD 投影机亮度:1200流明对比度:300:1 标准分辨率:854×48030-300英寸6650EMP-TW700LCD 投影机亮度:1600流明对比度:10000:1 标准分辨率:1280×72030-300英寸10500EH-TW9000LCD投影机亮度:2400流明880003D投影机EH-TW5500LCD投影机亮度:1600流明对比度:200000:1 标准分辨率:1920×108098000powerlite6010LCD投影机亮度:2400流明对比度:20万:168000EH-DM3LCD投影机亮度:2000流明对比度:3000:1 标准分辨率:940×5406300GM-850HD LCD投影机亮度:2800流明对比度:3000:1 标准分辨率:1280×80033-318英寸未上市EH-R4000LCD 投影机亮度:1200流明对比度:100万:1 标准分辨率:1920×1080未上市家庭影院型EMP-MW811ST 3D投影机亮度:2500流明对比度:4600:1 屏幕比例:16:10(兼容4:3)318英寸未上市EH-TW6500C 3D投影机亮度:2200流明对比度:40000:1未上市EH-TW5800C 3D投影机亮度:2000流明对比度:20000:1未上市powerliteX9投影机亮度:2500流明对比度:2000:1 标准分辨率:1024×768未上市灯泡LED的powerlite6010LCD投影机亮度:2400流明投影机技术:LCD 对比度:20万:168000。
爱普生EB-C26XE
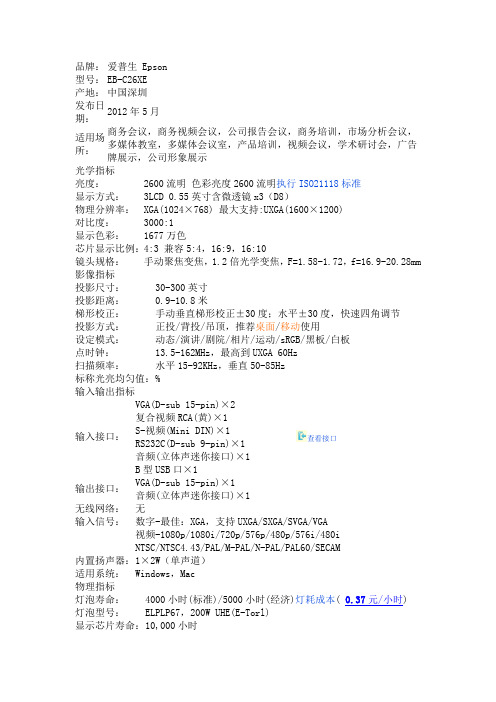
品牌:爱普生 Epson 型号:EB-C26XE产地:中国深圳发布日期:2012年5月适用场所:商务会议,商务视频会议,公司报告会议,商务培训,市场分析会议,多媒体教室,多媒体会议室,产品培训,视频会议,学术研讨会,广告牌展示,公司形象展示光学指标亮度:2600流明色彩亮度2600流明执行ISO21118标准显示方式:3LCD 0.55英寸含微透镜x3(D8)物理分辨率:XGA(1024×768) 最大支持:UXGA(1600×1200)对比度:3000:1显示色彩:1677万色芯片显示比例:4:3 兼容5:4,16:9,16:10镜头规格:手动聚焦变焦,1.2倍光学变焦,F=1.58-1.72,f=16.9-20.28mm 影像指标投影尺寸:30-300英寸投影距离:0.9-10.8米梯形校正:手动垂直梯形校正±30度;水平±30度,快速四角调节投影方式:正投/背投/吊顶,推荐桌面/移动使用设定模式:动态/演讲/剧院/相片/运动/sRGB/黑板/白板点时钟:13.5-162MHz,最高到UXGA 60Hz扫描频率:水平15-92KHz,垂直50-85Hz标称光亮均匀值:%输入输出指标输入接口:VGA(D-sub 15-pin)×2复合视频RCA(黄)×1S-视频(Mini DIN)×1RS232C(D-sub 9-pin)×1音频(立体声迷你接口)×1B型USB口×1查看接口输出接口:VGA(D-sub 15-pin)×1音频(立体声迷你接口)×1无线网络:无输入信号:数字-最佳:XGA,支持UXGA/SXGA/SVGA/VGA视频-1080p/1080i/720p/576p/480p/576i/480iNTSC/NTSC4.43/PAL/M-PAL/N-PAL/PAL60/SECAM内置扬声器:1×2W(单声道)适用系统:Windows,Mac物理指标灯泡寿命:4000小时(标准)/5000小时(经济)灯耗成本( 0.37元/小时) 灯泡型号:ELPLP67,200W UHE(E-Torl)显示芯片寿命:10,000小时整机功耗: 270W(标准)/223W(经济)/0.47W(待机); 100-240V ,50-60Hz 菜单语言: 支持中英文断电保护: 有工作噪音: 标准模式37dB ,经济模式29dB操作温度: 5℃-35℃安全认证: CCC/UL/CE/FCCB包装尺寸单机重量: 2.3Kg机器尺寸: 228×295×77mm(D×W×H )包装重量: 4.0Kg包装尺寸: 340×365×160mm(D×W×H )装箱清单: -Epson 投影仪WB-C26XE 整机1台-VGA 线1.8米1根-电源线1.8米1根-遥控器1个(带电池AA×2)-密码保护粘帖纸-说明书1份-保修卡保修期限整机: 整机保修2年灯泡: 灯泡保修半年保外维修: 视虎承接,维修后相同问题在90天内免费维护。
EPSON EB-C240X
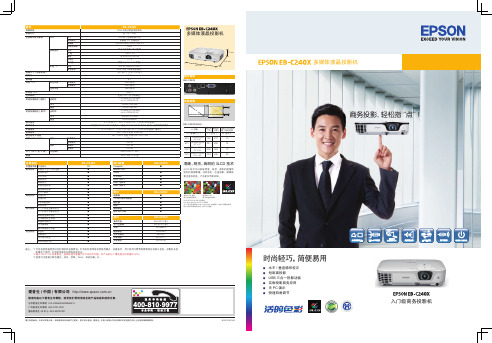
备注: *1 灯泡亮度将随使用时间的增加而逐渐降低。灯泡实际使用寿命受使用模式、环境条件、用户使用习惯等因素影响会有很大差别。投影机在亮 度模式下使用,灯泡使用寿命会得到有效延长。
*2 基于 ISO21118 标准制定,该标称值代表量产时产品的平均值,而产品的出厂最低值为标称值的 80%。 *3 亮度对比度基于颜色模式:动态,变焦:Wide,自动光圈:开。
图片仅供参考,外观以实物为准,本说明若有任何细节之更改,恕不另行通知,爱普生 ( 中国 ) 有限公司在法律许可的范围内对以上内容有最终解释权。
EVS111011AZ
多媒体液晶投影机
商务投影,轻松指“点”!
时尚轻巧,简便易用
■ 水平 / 垂直梯形校正 ■ 短距离投影 ■ USB 三合一投影功能 ■ 实物投影商务应用 ■ 无 PC 演示 ■ 快速四角调节
EB-C240X
2W ● ● ● ● ● ● ● ● ● ● ● ● ● ● ● ● ● ● ● ● ● ● ●
接口面板
Computer Monitor Out Video S-Video RCA(R/L) USB Type B USB Type a
附件
电源线 1.8 米计算机电缆线 遥控器 电池 便携软包 电子用户手册
尺寸 驱动模式 像素数 实际分辨率 类型 F- 值 聚焦 变焦比 镜头盖 类型 参考寿命
标准模式 经济模式
标准模式 经济模式 网络开 网络关
EB-C240X
RGB 光阀式液晶投影系统 前/后/吊顶
0.55 英寸含微透镜 (D8) 多晶硅 TFT 有源矩阵
786,432 dots (1024 x 768) x 3 XGA
水平 垂直
运行
待机
爱普生 EB-Z8000WUNL Z8050WNL 无线投影机用户手册说明书
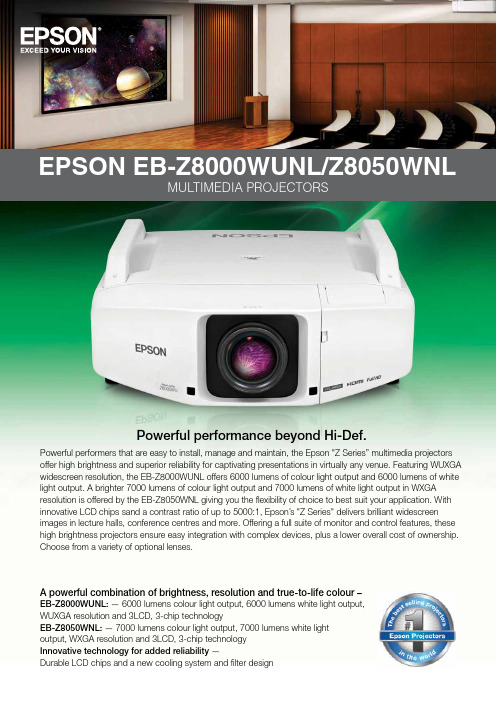
EPSON EB-Z8000WUNL/Z8050WNLPowerful performance beyond Hi-Def.Powerful performers that are easy to install, manage and maintain, the Epson "Z Series” multimedia projectors offer high brightness and superior reliability for captivating presentations in virtually any venue. Featuring WUXGA widescreen resolution, the EB-Z8000WUNL offers 6000 lumens of colour light output and 6000 lumens of white light output. A brighter 7000 lumens of colour light output and 7000 lumens of white light output in WXGA resolution is offered by the EB-Z8050WNL giving you the flexibility of choice to best suit your application. With innovative LCD chips sand a contrast ratio of up to 5000:1, Epson’s "Z Series" delivers brilliant widescreen images in lecture halls, conference centres and more. Offering a full suite of monitor and control features, these high brightness projectors ensure easy integration with complex devices, plus a lower overall cost of ownership. Choose from a variety of optional lenses.A powerful combination of brightness, resolution and true-to-life colour –EB-Z8000WUNL: — 6000 lumens colour light output, 6000 lumens white light output, WUXGA resolution and 3LCD, 3-chip technologyEB-Z8050WNL: — 7000 lumens colour light output, 7000 lumens white light output, WXGA resolution and 3LCD, 3-chip technology Innovative technology for added reliability —Durable LCD chips and a new cooling system and filter designMULTIMEDIA PROJECTORSMirror3LCD technologyFor more information on Epson’s environmental programs, go to 3LCD technology – for quality and colour that’s beyond amazingInnovative technology with proven reliability • 3 chips for vibrant, true–to–life colour • 25% less electricity required per lumen when compared to 1–chip DLP projectors **• Road-tested reliability from a company with over 20 years of experienceQuiet, reliable liquid cooling systemEpson’s innovative system uses liquid to cool the LCD chips directly. The liquid absorbs the heat and is then cooled by a peltier device, which is then cooled by a fan, thereby keeping the overall optical engine cool. This system design promotes greater reliability and enables stable operation in temperatures up to 45˚C. In addition, it offers quiet, unobtrusive operation and allows for off–axis installation orientations.C²Fine ® technology delivers blacker blacksC²Fine offers smooth, uniform imageswith exceptional contrast for better imagequality. Based on the new phase–compensation technology, light leakage is eliminated, allowing for the reproduction of blackerblacks. C²Fine technology is combined with an auto iris, which allows for a contrast ratio up to 5000:1.Eco features• Energy-efficient 3LCD technology • Designed to be recycled ***The best-selling projectors in the world.Epson offers a wide range of high-quality projectors to meet almost any need. Built with image quality and reliability in mind, Epson projectors enhance communication and inspire collaboration, while offering a low total cost of ownership. From projectors designed for educational settings to auditorium or boardroom–ready businessprojectors, Epson has the model made to meet the most demanding needs.LCD chipsRadiatorPeltier device(Reserve tank antifreeze liquid)PumpDescription/Product #ELPLS04Standard Zoom Lens V12H004S04ELPLW04Wide Zoom Lens V12H004W04ELPLM07Middle-throw Zoom Lens #2V12H004M07Throw ratio/Screen size Throw Ratio: 1.74 – 2.82:1Screen Sizes: 60" – 500"Zoom Ratio: 1 – 1.61:1Throw Ratio: 0.77:1Screen Sizes: 60" – 500"Throw Ratio: 1.31 – 1.80:1Screen Sizes: 60" – 500"Zoom Ratio: 1 – 1.37:1Throw Ratio: 2.68 – 4.1:1Screen Sizes: 60" – 500"Zoom Ratio: 1 – 1.5:1Throw Ratio: 3.92 – 5.97:1Screen Sizes: 60" – 500"Zoom Ratio: 1 – 1.5:1Throw Ratio: 5.83 – 8.18:1Screen Sizes: 60" – 500"Zoom Ratio: 1 – 1.39:1Focal length/F #Focal Length:36.00 mm – 57.35 mm F/#: 1.65 – 2.51Focal Length: 16.15 mm F/#: 1.85Focal Length:27.32 mm – 37.04 mm F/#: 1.8 – 2.26Focal Length:F/#: 1.81 – 2.4Focal Length:80.59 mm – 121.1 mm F/#: 1.81 – 2.34Focal Length:118.98 mm – 165.39 mm F/#: 1.8 – 2.45ELPLR04Rear-projection Wide Lens V12H004R04ELPLM06Middle-throw Zoom Lens #1V12H004M06Focal Length:55.43 mm – 83.3 mm ELPLL07V12H004L07Long-throw Zoom LensFocal Length:Off–axis, flexible installationThe Epson “Z Series” can be rotated 90 degrees upward or downward with an additional 30–degree tilt operation for off–axis positioning flexibility. As a result, it can be used for a wide range of applications, such as projecting on the ceiling or floor, or as part of a rear–projection system. Epson technology keeps the projector running without compromising performance or causing overheating.Epson lens shift technologyIn addition to added reliability and amazing colour performance, 3LCD’s industry–leading technology enables the projector to achieve a wide range of lens shift capabilities. This lens shift technology enables outstanding installation flexibility with an incredible range of + or – 70% on the vertical axis and + or – 20% on the horizontal axis. Users can operate the vertical lens shift function using the remote control, the projector control panel, or control commands.Lens not includedPrecision controlConvenient lens designWith it’s centered lens design, the Epson “Z Series” makes installation easy to plan. Positioning the ceiling mount, screen, and projector can be performed individually and independent of one another.Six powered lens optionsWith a 1.6 x standard lens, theEpson “Z Series” offers increased placement flexibility. For even greater flexibility, Epson offers a total of six lenses with varying ranges including short, wide, and rear, along with mid–to–long–throw lenses that allow users to choose the motorised lens most suited for their environment. A quick release leverallows for a quick, easy lens exchange. (Lens not included)Lens throw chartFloor projectionCeiling projectionWUXGA resolutionQuality and reliabilityBeyond Hi–DefWith WUXGA resolution (1920 x 1200), the EB–Z8000WUNL delivers high quality images and crisp, sharp text without any distortion or scaling, and it makes it easy to display more content. In fact, with the EB–Z8000WUNL, the display area can accommodate two independant, A4–sized windows, side by side, at the same time. You can also display HDTV content at it’s native resolution withLow cost of ownershipProtect your investment — long–life electrostatic air filterThe Epson “Z Series” filter is designed to protect the optical engine, lamp and electronics from small dust particles that can enter any projector. It has a recommended 10,000 hour filter cleaningschedule. The Epson electrostatic filter captures particles as small as 3 microns, due in part to it’s pleated, expanded design. With one air intake and one exhaust path, the Epson “Z Series” offers an efficient airflow system for optimum cooling of key components and a reduction in dust–related problems. Additionally, it has the capability to send an e–mail notification out through the Epson Monitor utility when an increase in temperature is detected, due to clogging.Powerful, large venue performanceThe EB-Z8000WUNL combines the brightness of 6000 lumens colour light output and 6000 lumens white light output* with the detail of widescreen WUXGA resolution. Surpassing 1080p Hi-Def performance, this projectordelivers captivating presentations and videos in virtually any venue. The EB-Z8050WNL boasts 7000 lumens colour light output and 7000 lumens white output in WXGA resolution. These amazing, flexible performers were engineered and designed for easy integration with installation features that even the most savvy professional installer would appreciate. Durable 3LCD chips and a contrast ratio of up to 5000:1, the Epson “Z Series” delivers brilliant widescreen images for presentation in lecture halls, auditoriums, conference centres and houses of worship. It also offers a full suite of monitor and control features that contribute to a low cost of ownership.Easy maintenance and monitoringWith convenient access to the lamps and filter, the Epson “Z Series” makes maintenance easier than ever, even if the projector is ceiling mounted. The lamp cover is located on the rear side panel and there are no screws, so the lid can be removed without any special tools. In addition to easy lamp and filter replacements, the Epson “Z Series” includes features that make it easy to monitor and control. With EMP Monitor, users can access advanced status functions over the LAN network.Easy access filterEasy Management® with Epson MonitorEasy MP® technology makes it easy to monitor and controlnetworked Epson projectors. You can use the utility while perform-ing help desk services and proactively manage your projector assets. Remotely power down your projector(s) to extend the lamp life and produce energy savings. The utility is packaged on a CD with the projector and can be used with a PC to check the status of a projector. It is also available online at .auUninterrupted operationWith a dual lamp (330w) system, the Epson “Z Series” eliminates the risk of interruption. If one lamp were to fail, operation would continue, using the other lamp. And, replacements are made easy with free and unobstructured access to the rear control panel.Powerful performanceQuality and reliability• Powerful combination of brightness, resolution and true–to–life colour• Core technology for added reliability• Digital connectivity for ultimate performance• Exceptional colour fidelity• Greater detail with blacker blacksPrecision control• Easier installation• Powered lens• Wide lens shift capabilities• Perfect for auditoriums and lecture hall venues • Direct On and Direct OffLow cost of ownership• Protect your investment• Easy monitor and control capabilities• Value–added features• Dual lamps with long lamp lifeAdvanced installation• Innovative cooling and filter system for venues with more demanding requirements – perfect for restaurants, gaming venues and sports venues that require dust protection and have a higher performance/usage requirement.• Off–axis installation for flexible placement – install the projector so that it’s facing up or down, for off–axis signage positioning.Control panelEPSON EB-Z8000WUNLProduct NameEB–Z8000WUNL Lens required EB–28050WNL Lens requiredSpecificationsProjection SystemHigh−aperture Epson 3−chip, 3LCD technologyProjection MethodsFront/rear/ceiling mountLCD Driving MethodEpson Poly−silicon TFT Active Matrix Pixel Number2,304,000 pixels x 3LCDsNative ResolutionEB–Z8000WUNL: WUXGA (1920 x 1200)EB–Z8050WNL: WXGA (1280 x 800)Aspect RatioEB–Z8000WUNL: Native 16:10EB–Z8050WNL: Native 16:9Pixel Arrangement Cross stripeProjection LensT ypePowered zoom/focusF–number1.65 –2.51 (Standard lens), lens not includedFocal Length36 mm – 57.35 mm (Standard lens)Zoom RatioOptical zoom 1.0 – 1.61 (Standard lens)Screen Throw Ratio Range 1.74" – 2.82" (Standard lens)Size (projected distance)60" – 500"Lens Shift (powered) Vertical: ±70%Horizontal: ±20%Keystone CorrectionVertical: −30 degrees to +30 degrees Horizontal: −20 degrees to +20 degrees Brightness (Normal Mode)*EB–Z8000WUNL:White light output: − 6000 lumens (ISO 21118 standard),Colour light output: −6000 lumens EB–Z8050WNL:White light output: − 7000 lumens Colour light output: −7000 lumens Contrast Ratio (Normal, Dynamic Mode)Up to 5000:1Brightness Uniformity (typical)90%Colour Reproduction 16.7 million coloursRemote ControlFeaturesBrightness, Contrast, Tint, Saturation, Sharpness, Input signal, Sync, Tracking, Position, Zoom, Focus, Lens Shift, Shutter,ID, source searchOperating AngleFrontRight/left ± 60 degreesUpper/lower -45 to +15 degreesRearRight/left ± 30 degreesUpper/lower -45 to +15 degreesOperating Distance15 mDisplay PerformanceNativeEB–Z8000WUNL: 1920 x 1200EB–Z8050WNL: 1280 x 800Resize 640 x 480800 x 6001280 x 10241400 x 10501600 x 1200Video I/0Display Performance NTSC: 560 lines PAL: 560 lines(depends on observation of the multi−burst pattern)InterfacesComputer/component video: D–sub HD 15 pin x 15BNC component x 1HDMI x 1DVI–D x 1Hardware remote jack x 1S–video: mini DIN x 1Composite video BNC x 1,LAN networking: RJ–45 x 1, 10/100Mb Serial: RS–232c x 1Monitor out: mini D–sub 15 pin x 1Other FeaturesAudio Output None Operating Temperature 32° to 113 °F (0 ° to 45 °C)Power Supply Voltage 100 – 240V ± 10%, 50/60 Hz AC Power Consumption877 W (Normal operation)734 W (ECO operation)0.5 W standby (network off)Fan Noise38 dB (Normal Mode)32 dB (ECO Mode)SecurityKensington ® − style lock provision, anchor (metal) bar for security lock or cable, handles attached to body for cable wrapInput SignalNTSC / NTSC4.43 / PAL / M–PAL / N–PAL / PAL60 / SECAMSDTV: 480i / 576i / 480p / 576p / 720p / 1080i / 1080p3D Y/C separartion, noise reduction motion compensatedInterlace progressive conversion (2 – 2, 3 – 2 film detection)Accessary Part NumbersLens Part NumbersStandard zoom lens (ELPLS04)Long throw zoom lens (ELPLL07)Middle–throw zoom lens 1 (ELPLM06Middle–throw zoom lens 2 (ELPLM07)Rear projection wide lens (ELPLR04)Wide zoom lens (ELPLW04)Mount Part NumbersFlush ceiling mount bracketMount bracket with extended pipe Replacement Lamp Part Numbers Single (ELPLP51)Dual lamp kit (lamp x 2) (ELPLP52)Projector Part Number EB−Z8000WUNL (lens not included)Replacement Air Filter Set Replacement Air Filter SetV12H004S04V12H004L07V12H004M06V12H004M07V12H004R04V12H004W04V12H003B25V12H003B26V13H010L51V13H010L52V11H266953V13H134A23WarrantyFour–year projector limited warranty, one year warrantyContents in BoxPower cable, computer cable, projector remote control, batteries, cable cover, user manual CD, Quick Setup Sheet, password protection sticker, monitor and control CDProduct CodeV11H266953V11H265953* Light output varies depending on mode (colour and white light output). White light output measured using ISO 21118 standard.** Data source: , Jan.2009. Average of 796 shipping models, for which manufacturers provided lumens and total power data, all resolutions and brightness levels.*** See our website for convenient and reasonable recycling options at .au/company/environment/index.asp**** Lamp life will vary depending upon mode selected, environmental conditions and usage. Lamp brightness decreases over time.Epson, C² FIne, Easy Management, EasyMP and Quick Corner are registered trademarks, Epson Exceed Your Vision is a registered logomark and Better Products for a Better Future is a trademark of Seiko Epson Corporation. PowerLite and PrivateLite are registered trademarks and Epson Connection is a service mark of Epson America, Inc. All other product and brand names are trademarks and/or registered trademarks of their respective companies. Epson disclaims any and all rights in these marks. CPD-31363 9/09Dual LampType300 W x 2 UHELamp Life****Up to 2500 hours (Normal Mode)Up to 3500 hours (ECO Mode)Dimensions (W x D x H)Including Feet (with standard lens)21.0" x 28.9" x 8.9"Excluding Feet, Lens 21.0" x 28.9" x 8.9"Weight22kg with standard lensEffective Scanning Frequency Range Pixel Clock13.5 MHz to 162 MHz (up to UXGA 60 Hz)Horizontal15 kHz to 80 kHzVertical24 Hz, 30 Hz, 50 Hz, 60 Hz (Digital)50 Hz to 85 Hz (Analog)。
办公自动化设备投影仪
影响较大,布局凌乱;如固定使用,可选择吊顶方式;如果空间较大,土
建时有统筹安排,则选择背投方式的整体效果最好;如空间较小,可选择
背投折射的方式。
•
3) 搞清显示环境
•
如房间面积较小,可选液晶投影仪;若对环境光要求不高,
显示面积特大或显示高分辨率图形信号,可选择LCD光阀投影仪;不必显
示高分辨率图形信号,而追求显示画面的均匀性和色彩的锐利性时,可
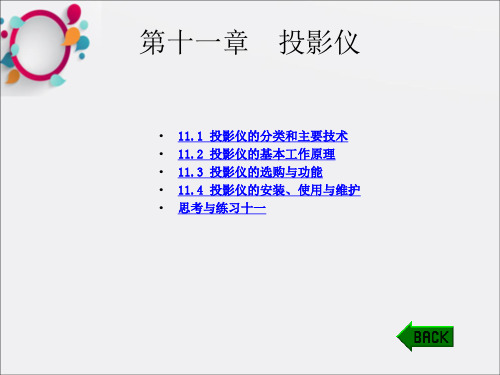
手动变焦 手动聚焦 1.2倍光学变焦 F=1.58-1.72 f=16.9-20.28mm 30-300英寸
• 投影仪的分类
•
(1) 从结构上划分,投影仪分为便携式、台式和立
式三种。
•
(2) 按照工作原理划分,
•
投影仪有CRT(阴极射线管)、
•
LCD(液晶和光阀)、
•
DLP投影仪
•
(3) 根据亮度划分,有1000流明以下、1000流明
CRT作为影像的来源,其缺点是系统体积庞大、重量重,且使用3个投影镜
头,会聚调整十分困难,需要专门的技术人员花费许多时间才能安装完成。
•
LCD投影仪正是可以避免CRT投影仪缺点的后起之秀。因为
LCD本身不发光,所以LCD投影仪用光源来照明LCD上的影像,再使用投影镜
头将影像投影出去。
•
按照LCD投影仪的主要结构划分,可分为使用单片彩色LCD的单
灯泡和UHP灯泡。
• 金属卤素灯泡的优点是价格便宜,缺点是半衰期短,一般使 用2000小时左右亮度就会降低到原先的一半左右。并且由于发热 高,对投影仪散热系统要求高,导致投影仪工作时的风扇噪音较 大。
•
UHE灯泡的优点是价格适中,在使用2000小时以前亮
1020x简介
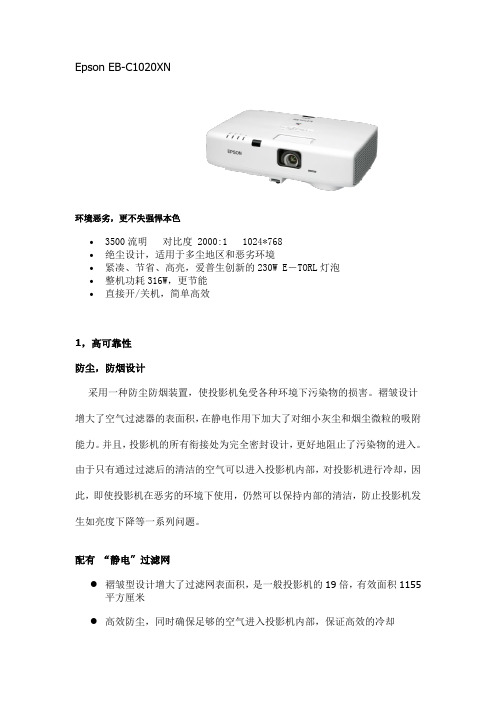
Epson EB-C1020XN环境恶劣,更不失强悍本色∙3500流明对比度 2000:1 1024*768∙绝尘设计,适用于多尘地区和恶劣环境∙紧凑、节省、高亮,爱普生创新的230W E-TORL灯泡∙整机功耗316W,更节能∙直接开/关机,简单高效1,高可靠性防尘,防烟设计采用一种防尘防烟装置,使投影机免受各种环境下污染物的损害。
褶皱设计增大了空气过滤器的表面积,在静电作用下加大了对细小灰尘和烟尘微粒的吸附能力。
并且,投影机的所有衔接处为完全密封设计,更好地阻止了污染物的进入。
由于只有通过过滤后的清洁的空气可以进入投影机内部,对投影机进行冷却,因此,即使投影机在恶劣的环境下使用,仍然可以保持内部的清洁,防止投影机发生如亮度下降等一系列问题。
配有“静电” 过滤网●褶皱型设计增大了过滤网表面积,是一般投影机的19倍,有效面积1155平方厘米●高效防尘,同时确保足够的空气进入投影机内部,保证高效的冷却高效吸附灰尘颗粒● 从“海绵”过滤网到“静电”过滤网● 静电过滤网一直带有静电,当带有正电或负电荷的灰尘颗粒接近过滤网时,不管颗粒的大小,都可以被静电过滤网吸附。
过滤网清洁简单方便● EB-C1020XN 空气过滤网清洁简单。
● 即时没有工具,也非常容易打开边盖,取出过滤网,进行清洁。
● 只要在桌脚轻磕过滤网几下,就可以去除灰尘,使用吸尘器可以进一步清洁。
用在EB-C1020XN一般投影机“静电”过滤网一般过滤网清洁无需额外的工具用于防尘的密封装置●全密封防尘设计(包括镜头)所有的缝隙都进行了密封,包括镜头,只有通过滤网后的洁净空气用于了投影机的冷却,这防止了投影机内部变脏。
●投影机聚焦及影像大小调节处划盖设计当投影机在开启时,可以通过打开划盖来调节投影机画面的大小和聚焦当调节完毕后,划盖可关闭,这样防止了灰尘从调节处进入机器内部,防止了投影机内部变脏。
镜头玻璃盖●排风百叶窗防尘…C1020XN 的最强大特征2,易于维护直接开机和关机,EPSON独特的设计可以真正实现0秒关机直接打开安装在固定位置的投影机●当打开教室电源开关时,EB-C1020XN直接开机功能可以使投影机自动开机。
爱普生EB—CU600Wi首测有力支持互动教学

爱普生EB—CU600Wi首测有力支持互动教学作者:来源:《中国教育技术装备》2013年第26期日前,爱普生推出EB-CU600Wi/CU610Xi等多款超短焦教育系列投影机,并进行了首测,该产品能将短距离与画面质量达到完美的平衡,可为互动教学提供更为有力技术支持平台。
据介绍,爱普生EB-CU600Wi超短焦投影机只需18.4厘米即可投影80英寸画面,该机采用3LCD显示技术,标称亮度为2600流明,对比度达到3000:1,标准分辨率为宽屏WXGA (1280×800)。
同时,该机的交互式投影功能也尤为出色,搭配随机配送的EIT V2软件和两支电子笔等配件,能够支持两个人同时进行书写或标注,师生互动更为精彩,教学演示更为高效。
爱普生EB-CU600Wi教育投影机显像性能测试(一)三原色测试爱普生EB-CU600Wi采用3LCD显示技术,经过实际测试,RGB三原色显示色彩自然,在红色与蓝色部分表现较为精准,绿色略有误差,但是这个小问题对图像的影响不大,而且可以通过图像设置来调校,显示效果完全可以满足教学演示应用的基本需求。
人像及丰富色彩画面投影效果测试根据测试结果来看,爱普生EB-CU600Wi画面整体效果不错,色彩整体表现比较平实,过渡自然,人脸的肤色过渡匀称。
不过在暗部细节上稍有瑕疵,但是对于教育用户而言完全可以胜任PPT演示等教学工作。
爱普生EB-CU600Wi教育投影机显像性能测试(二)流明度测试作为一款教育投影机实际流明也是投影机的重要指标,特别是流明目前许多厂商都有虚标的现象。
本次测试实际流明采用的仪器是照度仪,可直接测试光源的照度。
光源在单位时间、向周围空间辐射并引起视觉的能量,称为光通量,用Φ表示,单位为流明(Lm)。
单位面积上接受的光通量称为照度,用E表示,单位勒克司(Lx)。
换算公式为:E=Φ/S。
根据以上公式,我们只要测量出投影出的画面尺寸与照度,就可以直接换算出投影机的实际流明。
- 1、下载文档前请自行甄别文档内容的完整性,平台不提供额外的编辑、内容补充、找答案等附加服务。
- 2、"仅部分预览"的文档,不可在线预览部分如存在完整性等问题,可反馈申请退款(可完整预览的文档不适用该条件!)。
- 3、如文档侵犯您的权益,请联系客服反馈,我们会尽快为您处理(人工客服工作时间:9:00-18:30)。
深耕品牌 • 服务渠道 • 分享知识 • 创造价值
沈阳川海公司介绍
•
沈阳川海数字工程有限公司成立于1999年,是一家专业 提供产品销售、工程及售后服务的高新科技公司,目前公司拥 有员工50多人。公司多年来一直勤恳致力于多媒体投影系统产 品的应用及推广,并专业从事多媒体视讯会议及网络应用、大 屏幕投影拼接的方案规划、产品销售、安装调试、保修及投影 系统维护等业务。拥有资深的销售团队和雄厚的工程技术实力, 及多项多行业的多媒体信息化解决方案,并在多年的多媒体信 息系统建设过程中累积了丰富的行业经验,是值得信赖的专业 技术公司。
No.1(4)
中小型显示模块
移动电话用LCD 模块 移动电话用LCD 驱动芯片
No.1(5) No.1(5)
国际品牌优势
• EPSON(爱普生)投影机品牌技术优势
1、世界上第一块液晶板是由爱普生公司研制的。
2、世界上第一台LCD投影机是爱普生公司制造的。 3、爱普生投影机的投影色彩还原世界第一。 4、爱普生投影机的全国销量连续十年排名第一。 5、爱普生投影机专利技术数量第一。 6、爱普生投影机功能的人性化设计使用户更方便。 7、全世界液晶投影机的液晶板80%由爱普生公司提供。
世界第一块模拟石英 表
1969年
打印计时器
世界第一台小型电子打印机EP-101
1968年
关于爱普生
世界范围 喷墨打印机 彩色激光打印机 针式打印机 扫描仪 No.2(1) No.2(1) No.1(1) No.3(2)
打印机、扫描仪
液晶投影机
液晶投影机
No.1(3)
高温 Poly-Si TFT
液晶投影机用 高温 Poly-Si TFT
8、投影机全球占有率第一。
爱普生EB-C260X
技术参数
分辨率:1024*768 摄像镜头:手动变焦,1.2倍光学变焦 灯泡:使用寿命4000小时(标准亮度) 亮度:2600流明(标准) 对比度:2000:1
3LCD 技术
明亮,自然,柔和
3LCD 技术可以获取明亮,自然,柔 和的图像和锐利的视频影像。没有彩 虹,色溢现象。对眼睛观看更加舒适.
沈阳川海公司资质
企业建筑智能化工程叁级资质
沈阳川海公司资质
企业安防设施设计施工叁级资质
沈阳川海公司资质
企业安全生产许可证资质
沈阳川海公司资质
企业AAA级信用企业资质
公司业务范围
专业品牌投影机产品代理销售
投影机优势品牌:明基、爱普生、三菱品牌全系列投影产品 工程项目承接 背投拼接,网络音、视会议系统,监控系统,智能中央控制 系统集成等工程项目
产品更加节能环保。
产品特点
外观时尚,携带方便 前排风设计
无PC投影
快速开关机功能
谢谢
欢迎登陆川海网站:
专业维修服务
投机厂家授权技术服务维修中心
背投拼接项目重点维护
关于爱普生
名 称:精工爱普生株式会社 会 长:草间三郎 社 长:花冈清二 总公司:长野县诹访市,日本 创 建:1942年5月18日 资本金:532亿400万日元 分 布:全球117家公司,日本33家,海外84 家
关于爱普生
石英精密计时 器
