爱普生投影机CB_X29产品培训资料全
爱普生机器人软件编程操作培训-基础内容

1、程序操作
3)以太网通讯程序
1、程序操作
1、程序操作
1.13 矩阵使用程序(参看程序pallet_demo) 1)矩阵定义
1、程序操作
2)矩阵调用程序
1、程序操作
1.14 点文件操作及点位修改 1) 点位定义(一般用示教方式示教点位,直接指定时要注意点的属性,否则运动时容易撞机) P1 = XY(200, 100, -25, 0) '向点P1分配坐标 Pick = XY(300, 200, -45, 0) '向点pick位置分配坐标 P10 = Here '向当前位置分配某个点 P1=p2 ‘将点P2赋值给P1 2) 用点标签调用点位 For i = 0 To 10 Go pick Jump place Next i 3)用变量调用点位 For i = 0 To 10 Go P(i) Next i
1、程序操作
5、指定J1Flag和J2Flag点属性 在工作范围的某些点上,即使第一关节或第二关节旋转360 度,RS 系列也可以具有 相同的位置和方向。为了区分这些点,提供了J1Flag 和J2Flag 点的属性。这些标记 允许您为某个既定点的关节1 和关节2 指定一个位置范围。 若要在点分配语句中指定J1Flag,添加一个斜杠(/),其后是J1F0(-90<第一关节角 度<=270)或J1F1(-270<=第一关节角度<=-90 或270<第一关节角度<=450)。 P2 = XY (-175, -175, 0, 90) /J1F1 若要在点分配语句中指定J2Flag,添加一个斜杠 (/),其后是J2F0(-180<第二关节 角度<=180),J2F1(-360<第二关节角度<=-180 或180<第二关节角度<=360)。 P2 = XY (300, 175, 40, 90) /J2F1 J1Flag和J2Flag点属性 在机器人坐标系的原点,即使第一关节在旋转,RS 系列也可以具有相同的位置和方 向。为了区分这些点,提供了J1Ang 点的属性。 7)提取和设置点位 使用CX,CY,CZ,CU,CV,CW,CS 和CT 命令获得一个点的坐标,或对其进 行设置。 xcoord = CX(P1) P2 = XY(xcoord, 200, -20, 0) ycoord = CY(P*) ' 获取当前的Y位置坐标 CX(pick) = 25.5 CY(pick) = CY(pick) + 2.3
投影机技术原理及维护培训资料

投影机技术原理及维护培训资料一、投影机的技术原理投影机是一种通过光学投射技术将图像投射到屏幕或其他平面上的设备。
它主要由光源、镜头、显示系统和控制电路等部件组成,下面将介绍投影机的技术原理。
1.光源投影机的光源通常采用高亮度的白光灯或激光光源。
白光灯通常采用钠灯或金卤灯,它们能够提供充足的亮度和色彩鲜艳的光束。
激光光源则具有更高的亮度和更广的色域,但价格较高。
2.镜头镜头是投影机中至关重要的部件之一,它负责将光线聚焦并投射到屏幕上。
投影镜头通常采用复合透镜结构,通过调节镜头的焦距来实现对投影图像的放大和缩小。
3.显示系统显示系统是投影机中的核心部件,其主要负责将输入的视频信号或图像信号转化为可见的光学图像。
目前市面上常见的显示系统有液晶显示系统和DLP(数字微镜投影)显示系统。
-液晶显示系统:液晶显示系统通过液晶面板来调节光线的透过程度,从而显示出不同的颜色和亮度。
投影机中的光线首先经过液晶面板,然后再经过色轮等光学装置,最后显示在屏幕上。
-DLP显示系统:DLP显示系统是一种基于微镜阵列和数字信号处理技术的显示系统。
它的特点是投影亮度高、色彩鲜艳、对比度高、清晰度高、响应速度快等。
4.控制电路控制电路是投影机的重要组成部分,它负责接收用户的操作信号,并控制投影机的各项功能,如开关机、调整亮度、对焦等操作。
二、投影机的维护投影机的正常运行和稳定性是保证图像质量的关键。
以下是一些投影机的维护基本知识,有助于延长投影机的使用寿命和保持图像质量。
1.清洁投影机投影机使用过程中,灰尘会堆积在投影镜头和光源等关键部位,影响图像质量和散热效果。
因此,定期清洁投影机是必要的。
可使用柔软的刷子和专用的清洁工具轻轻刷去灰尘,并用干净的布擦拭。
2.适当使用投影机投影机的使用环境对其寿命和性能都有一定影响。
要尽量避免投影机在高温、潮湿或灰尘过多的环境下使用,避免投影机受到冲击或震动。
3.避免长时间不使用长时间不使用投影机会导致灰尘积累,造成光源和投影镜头等部位损坏。
2024年EPSON机器人视觉培训

EPSON机器人视觉培训EPSON视觉培训一、引言随着工业4.0的深入推进,视觉技术在工业自动化领域中的应用越来越广泛。
EPSON作为全球领先的工业制造商,其视觉系统具有高精度、高速度、高稳定性等特点,为我国制造业的转型升级提供了有力支持。
为了使广大用户更好地了解和掌握EPSON视觉技术,本文将对EPSON视觉培训进行详细介绍。
二、EPSON视觉系统简介1.高精度:EPSON视觉系统采用先进的图像处理算法,能够实现高精度的图像识别和定位。
2.高速度:EPSON视觉系统具有快速图像处理能力,能够满足高速生产线的需求。
3.高稳定性:EPSON视觉系统采用稳定的硬件平台和成熟的软件算法,确保系统长期稳定运行。
4.易于集成:EPSON视觉系统可以方便地与其他自动化设备集成,实现完整的自动化解决方案。
三、EPSON视觉培训内容1.视觉系统原理:介绍视觉系统的基本原理,包括图像传感器、光源、镜头等组成部分,以及图像处理的基本流程。
2.视觉系统硬件:介绍EPSON视觉系统的硬件组成,包括视觉传感器、图像处理单元、控制器等。
3.视觉系统软件:介绍EPSON视觉系统的软件组成,包括视觉处理软件、编程软件等。
4.视觉系统应用:通过实际案例,介绍EPSON视觉系统在工业自动化领域的应用,如组装、检测、搬运等。
5.视觉系统调试与优化:介绍视觉系统的调试方法和优化技巧,提高视觉系统的性能和稳定性。
6.视觉系统维护与故障排除:介绍视觉系统的日常维护方法和常见故障的排除方法。
四、EPSON视觉培训形式EPSON视觉培训采用理论教学与实践操作相结合的方式,具体包括:1.理论课程:通过PPT讲解、视频演示等形式,使学员掌握视觉系统的基本原理和操作方法。
2.实践操作:学员在培训讲师的指导下,进行视觉系统的实际操作,包括硬件连接、软件配置、程序编写等。
3.案例分析:通过分析实际案例,使学员了解视觉系统在不同场景下的应用方法。
4.互动交流:学员与培训讲师、其他学员进行互动交流,分享经验和心得。
Epson 投影仪用户指南.pdf_1701923015.0349765说明书
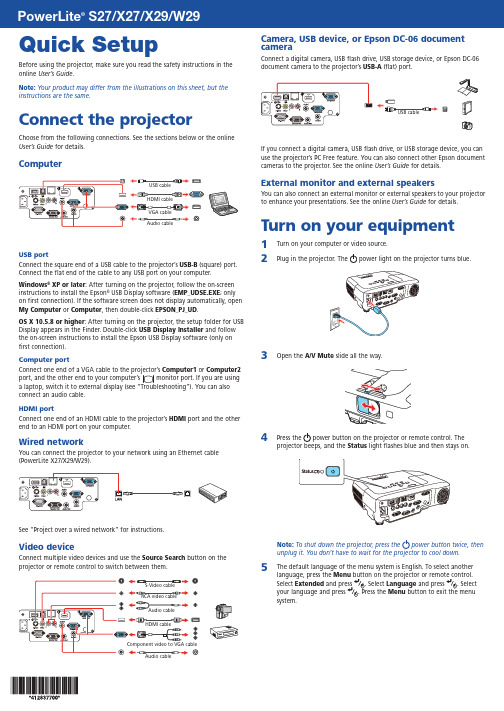
Quick SetupBefore using the projector, make sure you read the safety instructions in the online User’s Guide .Note: Your product may differ from the illustrations on this sheet, but the instructions are the same.Connect the projectorChoose from the following connections. See the sections below or the online User’s Guide for details.ComputerUSB portConnect the square end of a USB cable to the projector’s USB-B (square) port.Connect the flat end of the cable to any USB port on your computer.Windows ® XP or later : After turning on the projector, follow the on-screen instructions to install the Epson ® USB Display software (EMP_UDSE.EXE ; only on first connection). If the software screen does not display automatically, open My Computer or Computer , then double-click EPSON_PJ_UD .OS X 10.5.8 or higher : After turning on the projector, the setup folder for USB Display appears in the Finder. Double-click USB Display Installer and follow the on-screen instructions to install the Epson USB Display software (only onfirst connection).Computer portComputer1 or Computer2 connect an audio cable.HDMI portConnect one end of an HDMI cable to the projector’s HDMI port and the other end to an HDMI port on your computer.Wired networkYou can connect the projector to your network using an Ethernet cable(PowerLite X27/X29/W29).See “Project over a wired network” for instructions.Video deviceConnect multiple video devices and use the Source Searchbutton on theprojector or remote control to switch between them.Camera, USB device, or Epson DC-06 document cameraConnect a digital camera, USB flash drive, USB storage device, or Epson DC-06 document camera to the projector’s USB-A(flat) port.If you connect a digital camera, USB flash drive, or USB storage device, you can use the projector’s PC Free feature. You can also connect other Epson document cameras to the projector. See the online User’s Guide for details.External monitor and external speakersYou can also connect an external monitor or external speakers to your projector to enhance your presentations. See the online User’s Guide for details.Turn on your equipment1T urn on your computer or video source.2P lug in the projector. Thepower light on the projector turns blue.34 PNote: To shut down the projector, press the power button twice, then unplug it. You don’t have to wait for the projector to cool down.5 T he default language of the menu system is English. To select anotherlanguage, press the Menu button on the projector or remote control.Select Extended and press . Select Language and press . Select your language and press . Press the Menu button to exit the menusystem.Adjust the image1 I f you don’t see an image, press the Source Search button on theprojector or the remote control to select the image source.Note: If you still see a blank screen or have other display problems, seethe troubleshooting tips on the back of this sheet.2 T3 P owerLite X27/X29/W29: Turn the zoom ring to enlarge or reduce theimage.P owerLite S27: Press the Wide button to enlarge the image, or the Telebutton to reduce it.PowerLite4 Turn the focus ring to sharpen the image.5 I f your image looks like or , you may have placed the projectoroff to one side of the screen at an angle. Place the projector directly infront of the center of the screen, facing the screen squarely. If you can’tmove the projector, use the horizontal keystone slider to correct theimage.or ,Using the remote controlMake sure the batteries are installed as shown (two AA batteries)Choose which sourceto displayon and offmenusdisplay Get solutions tocommon problemsNavigate projectormenusFor more information on using the remote control, see the online User’sGuide.Project wirelesslyFollow the steps here to connect the projector over a wireless network. Youwill need the optional wireless LAN module (part number V12H418P12).1To install the wireless LAN module, first remove the screw as shown.2 C onnect the wireless LAN module to the USB-A (flat) port.3 T o configure your projector for wireless projection, do one of thefollowing:•I f you’re using the optional Quick Wireless Connection USBkey (Windows only, part number V12H005M09), press the LANbutton on the remote control. When you see SSID and IP addressinformation on the screen, remove the wireless LAN moduleand connect the key to the projector’s USB-A port. Look for thedisplayed message, remove the key, and connect it to a USB porton your computer. Follow the on-screen instructions to install thedriver, then reconnect the wireless LAN module to the projector’sUSB-A port. For details, see the online User’s Guide.•I f you’re not using the key, continue with the steps on the nextpage.4Attach the wireless LAN module cover and secure it using the screw youremoved.5 P ress the Menu button on the remote control, select theNetworkmenu, and press.6 Choose Network Configuration and press .7Select the Wireless LAN menu and press.8C hoose Connection Mode , press , select Quick (for a directconnection to a computer, tablet, or smartphone) or Advanced (for a connection to a router or access point), then press again. When you’re finished, press Esc to return to the Wireless LAN menu.9 I f you chose the Advanced connection mode, selectSSID , pressandenter your network name (SSID) on the screen that appears.• To select a number or character, use the arrow buttons on the remote control to highlight it, then press . • To switch between uppercase and lowercase letters, select CAPS and press .• To change the displayed symbols, select SYM1 or SYM2 and press .When you’re finished entering the SSID, select Finish and presss.10 I f you chose the Advanced connection mode, select IP Settings andpress.If your network assigns addresses automatically, turn on DHCP . If not, turn off DHCP and enter the projector’s IP Address , Subnet Mask , and Gateway Address , as needed.To enter numbers, use the arrow buttons on the remote control tohighlight a number, then press thebutton. When you’re finished entering an address, highlight Finish , then press . Press Esc .11 T o prevent the SSID and IP address from appearing on the networkstandby screen, set the SSID Display and IP Address Display settings to Off .12 W hen you’re finished selecting settings in the Wireless LAN menu, pressEsc .13 I f you are connecting the projector to a secure network, select theSecurity menu and press . Then select settings and press Esc whenyou’re finished.14 S elect Complete and press, then select Yes and press again tosave your settings.15 See “Install network software” for additional instructions.Project over a wirednetwork (PowerLite X27/X29/W29)Follow the steps here to configure your projector for your wired network using the projector’s menu system.1 Plug in and turn on the projector.2Press theMenu button on the remote control, select the Network menu, and press .3 Select Network Configuration and press.4Select the Basic menu and press.5S elect the Projector Name setting and enter a name (up to 16characters long) to identify your projector over the network.Use the displayed keyboard to enter characters. Press the arrow buttons on the remote control to highlight the characters and press to select them.Note: See the online User’s Guidefor information on adding passwords.6Select the Wired LAN menu and press .7Choose IP Settings and press .8 If your network assigns addresses automatically, turn on the DHCP setting. If not, turn off the DHCP setting and enter the projector’s IP Address , Subnet Mask , and Gateway Address , as needed. Then press Esc .9To prevent the IP address from appearing on the network standby screen, set the IP Address Display setting to Off .10 W hen you are finished, select Complete and press, then pressagain to save your settings.11 Press the Menu button to exit the menu system.12 See “Install network software” for additional instructions.Install network softwareComputerInstall the EasyMP ® Network Projection software on each computer that will project over the network. Use the CD labeled Epson Projector Software to install the program.For instructions on installing and using your network software, click the icon on your desktop to access the online EasyMP Network Projection Operation Guide (requires an Internet connection). If you don’t see the EasyMP Network Projection Guide icon, you can install it from the projector CD or go to the Epson website, as described on the right.To monitor and control your projector over the network, download and install the EasyMP Monitor software and manual from the Epson support web site. You can install a link to the downloads page from the projector CD or go to the Epson website, as described on the rightMobile deviceTo project from an iOS or Android™ device, download and install the Epson iProjection™ app. Visit /projectorapp (U.S.) or epson.ca/projectorapp (Canada) for more information.TroubleshootingIf you see a blank screen or the No signal message after turning on your computer or video device, check the following:• M ake sure the Status light on the projector is blue and not flashing, andthe A/V Mute slide is open.•P ress the Source Search button on the projector or the remote control to switch to the correct image source, if necessary.• I f you’re using a Windows laptop, press the function key on yourkeyboard that lets you display on an external monitor. It may be labeledCRT/LCD or have an icon such as . You may have to hold down the Fn key while pressing it (such as Fn + F7). Wait a moment for the display to appear.•I f you’re using a Mac laptop, open System Preferences and select Displays . Click the Arrangement tab, and select the Mirror Displays checkbox.Where to get helpManualFor more information about using the projector, click the icons on your desktop to access the online manuals (requires an Internet connection). If you don’t have icons to the manuals, you can install them from the projector CD or go to the Epson website, as described below.Telephone support servicesTo use the Epson ® PrivateLine ® Support service, call (800) 637-7661. This service is available for the duration of your warranty period. You may also speak with a support specialist by calling (562) 276-4394 (U.S.) or (905) 709-3839 (Canada). Support hours are 6 AM to 8 PM , Pacific Time, Monday through Friday, and 7 AM to 4 PM , Pacific Time, Saturday. Days and hours of support are subject to changewithout notice. Toll or long distance charges may apply.EPSON, EasyMP , and PowerLite are registered trademarks, Epson iProjection is a trademark, and EPSON Exceed Your Vision is a registered logomark of Seiko Epson Corporation. PrivateLine is a registered trademark of Epson America, Inc.OS X and Mac are trademarks of Apple Inc., registered in the U.S. and other countries.General Notice: Other product names used herein are for identification purposes only and may be trademarks of their respective owners. Epson disclaims any and all rights in those marks.This information is subject to change without notice.© 2014 Epson America, Inc., 11/14Printed in XXXXXXCPD-42075Internet supportVisit /support (U.S.) or epson.ca/support (Canada) for solutions to common problems. You can download utilities and documentation, get FAQs and troubleshooting advice, or e-mail Epson.RegistrationRegister today to get product updates and exclusive offers. You can use the CD included with your projector or register online at /webreg .Optional accessoriesFor a list of optional accessories, see the online User’s Guide .You can purchase screens or other accessories from an Epson authorizedreseller. To find the nearest reseller, call 800-GO-EPSON (800-463-7766). Or you can purchase online at (U.S. sales) or epson.ca (Canadian sales).。
爱普生高级培训资料

2015年8月
1
内容 一、移动向下相机应用 二、固定向上相机应用 三、固定向下相机应用
2
视觉应用案例(EPSON机械手跟其他品牌视觉配合)
一、 移动向下相机应用案例(相机安装在SCARA机械手第二臂上) 1) 准备一个类似下图所示针尖工具,装到治具上
2) 准备一个类似下图所示的MARK,将MARK贴到拍照区域平面 内
19
视觉应用案例(EPSON机械手跟其他品牌视觉配合)
9)运行“cal_camera_move”函数
选择“cal_camera_move”函数, 单击“开始”运行校准函数,如果 校准成功将打印校准结果,否
则要重新校准
如果校准结果的平均偏差及最 大偏差太大(一般在0.1以内) 说明校准有问题,要重新校准
⑤单击“示教”进入下图画面,使MARK移动视野中间,记下当前MARK 像素坐标(或在屏幕上标记此位置),确保U=0。
27
视觉应用案例(EPSON机械手跟其他品牌视觉配合)
⑥记下当前MARK像素坐标后,后单击“示教”,进入如下画面
28
视觉应用案例(EPSON机械手跟其他品牌视觉配合)
⑦单击“示教”进入如下画面,使U=180,Z保持不变,然后移动X、 Y,使MARK再次回到之前标记的像素坐标位置
14
视觉应用案例(EPSON机械手跟其他品牌视觉配合)
②移动机械手X、Y使针尖对准MARK,然后将该点保持到P0点(一定要在之 前示教的针尖工具“TOOL 1”下保存P0参考点) ③将TOOL切回TOOL 0,然后再示教九宫格九点(移动向下相机九宫格九点一 定要在TOOL 0下示教)如下图所示
选择默 认模式
③在“工具”画面单击“工具向导”,进入工具向导画面,选择移动 向下工具编号,如下图所示:
投影机培训资料

投影机主要品牌及产品线
随着科技的不断发展,投影机技术也在不断进步和创新。未来投影机将呈现出高亮度、高分辨率、多功能、智能化的趋势。
高亮度投影机可以在明亮的环境下保持画面清晰度,同时提高投影机的使用寿命;高分辨率则可以为用户带来更加细腻、真实的视觉体验;多功能则表现在无线连接、移动便携等方面,提高用户的使用便利性;而智能化则意味着投影机将具备更多的自动化和人工智能功能,如自动对焦、自动梯形校正等。
答
投影机按光源可以分为卤素灯、LED和激光三种,按显示技术则可分为DLP、LCD和SVGA等三种。
问
投影机使用中应注意哪些问题?
问
如何正确选购投影机?
答
使用投影机时,应注意避免直射阳光,远离热源和潮湿环境,定期清洁投影机过滤网等。
学员常见问题及解答
下一步学习建议
深入了解不同品牌和型号的投影机性能和特点
在投影机市场上,主要的品牌有EPSON、Panasonic、Samsung、LG、Sharp等,每个品牌都有其独特的产品线和竞争优势。
EPSON是著名的办公设备厂商,其投影机产品线丰富,以高清晰度、高亮度、高对比度等技术特点而著名;Panasonic则以其高质量的投影机和多功能性获得用户的青睐;Samsung和LG则以其卓越的性能和时尚的外观设计在市场上占据一席之地;Sharp则以其高性价比和良好的口碑在市场上受到广泛欢迎。
在近年来,投影机市场规模呈现出稳步增长的趋势,尤其在商业和教育领域,需求量较大。随着技术的不断进步和应用场景的多样化,未来投影机市场有望继续扩大。
据相关市场研究报告显示,全球投影机市场规模从2018年的15.4亿美元增长至2023年的22.5亿美元,年复合增长率达到8.2%。其中,商业和教育领域的应用占据了较大的市场份额,而随着无线连接、激光光源等新技术的应用,投影机在家庭娱乐、户外展示等领域也有着越来越广泛的应用。
爱普生初级培训资料

03
市场地位与荣誉
爱普生在全球市场的地位
成立于1942年,总部位于日本 ,是全球知名的打印机、投影
仪等电子产品制造商。
在全球打印机市场占有率为 30%以上,并拥有超过50%的
投影仪市场份额。
在全球范围内拥有超过70家分 支机构和120家认证维修中心。
爱普生在行业中的荣誉
多次荣获“全球最佳企业奖”、“全球最佳客户满意度奖”等国际知名奖项。 在《财富》杂志评选的“全球最受赞赏企业”中排名前50。
爱普生在全球的环保行动
减少碳排放
爱普生在全球范围内开展节能 减排行动,通过采用环保材料 、优化产品设计、提高生产效
率等措施,减少碳排放。
废弃物回收
爱普生在全球范围内开展废弃物 回收行动,鼓励员工和客户积极 参与,减少资源浪费。
绿色办公
爱普生在全球范围内提倡绿色办公 理念,通过采用节能设备、推行无 纸化办公等措施,减少能源消耗。
04
技术研发与创新
爱普生技术研发体系
技术研发的重要性
爱普生一直致力于技术研发与 创新,以提升产品性能、降低
成本、减少对环境的影响。
全球研发中心
爱普生在全球设立了多个研发中 心,这些中心分布在不同地域, 以便于覆盖全球市场和不同文化 背景。
技术人才
爱普生拥有一支高素质的技术团队 ,包括工程师、研究人员和技术专 家等,他们不断探索新技术、新应 用。
爱普生初级培训资料
xx年xx月xx日
目录
• 公司简介与背景 • 产品与解决方案 • 市场地位与荣誉 • 技术研发与创新 • 社会责任与可持续发展 • 服务与支持
01
公司简介与背景
爱普生公司历史
1942年
爱普生公司成立
投影仪培训资料
投影仪培训资料投影仪培训资料一、投影仪开机与关机1、连接:将笔记本电脑交流电源插头插入电源插座,将音箱插头插入笔记本电脑耳机插孔,将VGA线插入笔记本电脑VGA插孔。
2、开机●打开主电源开关(讲台下插座的开关电源)几秒钟后,投影机上电源指示灯显示为橙色,表示进入待机模式。
●开启笔记本电脑电源开关,进入教学课件界面。
●按下遥控器的ON/STANDBY按钮,投影机上ON、LAMP、FAN三个指示灯亮绿色,灯泡点亮。
2、关机●按下ON/STANDBY按钮。
画面上显示电源切断的确认提示,再按一次ON/STANDBY按钮。
注意:电源切断提示不久会消失。
提示一旦消失,该项操作即无效。
要关机仍需按下ON/STANDBY按钮两次。
●画面消失,但机内会继续冷却一段时间(3-5分钟),其后便进入待机状态。
冷却期间,LAMP指示灯会闪烁。
在这一状态下,不能重新开机。
LAMP指示灯熄灭后,冷却风扇仍会继续转动一段时间,以便将机内的余热散出。
投影机指示灯为橙色,则表示为待机模式,此时才可以将电源插头从电源插座上拔下或关闭主电源开关。
注意事项:如果在灯泡完全冷却之前关闭了电源或拔下了电源插头并要重新开机或插入,请稍等片刻(大约5分钟),让灯泡充分冷却后才可再操作。
如果灯泡过热,可能会点不亮,灯泡的寿命也会因此而缩短。
二、遥控器的使用1、按钮功能(1) ENTER按钮:接受所选的模式。
(2) MENU按钮:显示菜单。
(3) SET UP按钮:设定图像和模式。
(4) ON/STANDBY按钮:用于电源的接通/切断(待机)。
(5) ON指示灯:显示电源的接通/切断的状态。
(6) INPUT按钮:用于输入切换。
(7) RETURN按钮:返回前一个画面。
(8) 选择按钮:用菜单进行选择和调整等。
(9) LAMP指示灯:显示灯泡的模式。
(10) TEMP指示灯:机内温度过高时点亮。
(11) FAN指示灯:显示冷却风扇模式。
(12) 发信指示灯:在遥控器发信时点亮。
EPSON投影机培训讲座
EPSON (Bei Jing) Technology Service Co.,Ltd
6
LCD投影机的成像原理简介
光学系统和液晶板
镜头 棱镜 工艺先进,体积小 色彩清晰,亮度高 完美再现高清晰的画面
EPSON (Bei Jing) Technology Service Co.,Ltd
16
微镜简介
电极矩阵
电极矩阵
光源
光学透镜
液晶
EPSON (Bei Jing) Technology Service Co.,Ltd
17
微镜简介
微镜
EPSON (Bei Jing) Technology Service Co.,Ltd
46.9 53.7 63.0 75.7 48.4 56.5 60.0 68.7 80.5 48.4 64.0
VGA
VGA WVGA SVGA SVGA SVGA
SVGA SVGA SVGA SVGA XGA XGA XGA XGA XGA WXGA SXGA
EPSON (Bei Jing) Technology Service Co.,Ltd
偏振板(水平分量透过) 偏振板 (垂直分量透过)
EPSON (Bei Jing) Technology Service Co.,Ltd
9
防尘玻璃
TFT 底层 反面底层 投影镜头
灰尘
防尘玻璃 Defocus the dust on the panel
EPSON (Bei Jing) Technology Service Co.,Ltd
20
简单故障排除
爱普生投影机产品介绍PPT课件( 28张)

名称
亮度 技术 灯功率 功耗
EPSON
名称 亮度 技术 灯泡功率 功耗
G5300 5000 3lcd 275W 398W
EPSON G5100 4000 3LCD 210W 327W
EPSON
G5350 5000 3lcd 275W 398W
EPSON
G5150 4000 3lcd 210W 327W
只有第一次需要将USB Key插入到投影机。再 次使用只需将USB Key插入到PC就可.立即自动 开始投射。
04
投影机应用
USB连接功能
代替电脑线缆,使用USB线更便捷。
USB线连接后,投影自动开始。
新!
通过USB线可以同时传输声音, 再由投影机播放出来。
可用遥控器作为鼠标遥控和 翻页。
USB线插拔方便,更换容易
内置的镜头盖,没有镜头盖带来的 烦恼,如卡住,镜头盖丢失;
非常方便:使用白板,暂停休息;
EPSON EB-X6
04
大屏幕叠加、融合技术
投影机应用
04
投影机应用 大屏幕叠加、融合技术
多屏控制器
融合器
04
投影机应用 大屏幕叠加、融合技术
1.地域文化因历史悠久,富有人文内涵, 在今天 仍发挥 重要作 用,因而 颇受老 百姓喜 爱。 2.在当下,地域文化不仅丰富了人们的 精神生 活,而且 直接促 进了社 会生产 力的快 速发展 。 3.大力发展文化产业,形成地域与文化 、经济 互促式 发展模 式,需要 多个方 面的积 极参与 。 4.加强历史文物古迹保护、恢复还原 古景、 开发历 史人文 景观等 是彰显 地域文 化魅力 的重要 途径。 5.作为文化产业的重要载体和平台,“农 家乐” 等生态 休闲旅 游项目 利于改 变我国 山区落 后的经 济状况 。 6项,“取决于该城市对本地历史文化、 民间传 统艺术 等的挖 掘利用 程度” 不正确, 由第五 段内容 可知,切 实保护 历史文 物古迹, 深入挖 掘、开 发本地 历史文 化,只 是彰显 地域文 化特色 的有效 途径。 7善于抓住景物前面的修饰语及后面的 动词、 形容词 ,把握 景物特 征,从 特征中 捕捉背 后的情 感特征 。 8.本诗构思别致,主客对答,情节性 强,先 总起写 劝酒场 面,接 着两句 是客人 表白心 怀,于 是主人 再次劝 酒致辞 ,客人 最后再 作回应 。 9.古代以亲属关系的远近制定丧服的 轻重。 期,穿 一周年 孝服的 人;功 ,穿七 个月大 功服、 穿五个 月小功 服的亲 族。“外 无期功 强近之 亲”中 的“期功 ”指关 系比较 近的亲 属。
爱普生投影机CB_X29产品培训资料全

前面 后面
一、外观
2、设备接口
视频输入:VGA*2 ,HDMI(高清)*1 , RCA*1(莲花),S-Video*1
视频输出:VGA*1 音频输入:Stereo mini(3.5音频)*2, 2RCA x 1(莲花) 音频输出:Stereo mini(3.5音频)*1 USB:USB-A*1 ,USB-B*1 RJ45:RJ45(网口)*1 RS-232C:RS-232C(控制用接口)*1
二、主要参数
• 二、主要参数 • 1、流明度:3000流明 • 2、分辨率:XGA(1024*768) • 3、横纵比(长宽比):4:3(正屏) • 4、对比度:10000:1 • 5、灯泡寿命:正常模式5000小时 环保模式10000小时 • 6、屏幕调节:水平/垂直梯形校正
三、销售买点
• 三、销售买点 • 1、3LCD高色彩输出 CB-X29 基于3LCD 投影技术, 拥有3000 流明的亮度*1*2和10000:1 的高对比度 *1*2,并通过了国家数字音视频及多媒体产品质量监督检验中心严格的测试,能 够为每一位消费者提供真实可靠的色彩亮度数值。 • 2、功能接口全面升级,节能且无忧 投影机拥有非常丰富的接口,能够满足新型设备的连接需求,使用者可以根据自 己设定的安装方案,从HDMI、VGA、LAN 等接口中任选使用。同时,投影机更 可支持实物展台的连接使用。
四、周边配件
2、搭配设备 交互式电子白板 壁挂一体机
电脑 (台式电脑加分屏器)
@your name
知识回顾 Knowledge Review
放映结束 感谢各位的批评指导!
谢 谢!
让我们共同进步
四、周边配件
四、周边配件 1、投影幕布(4:3正屏幕布)
投影机培训的资料共42页文档

•
第一章 投影机的基础知识
投影机的概念(用途)
• 自由定义。 • 1)可接多种信号源的大画面输出设备。 • 2)会议室及舞台上把少量人数观赏的画面转为可供大量人数
观赏的画面的输出设备。 • 3)视音频会议系统中给人良好视觉效果的必不可少的硬件部
分。 • 4)家庭影院中给人绝佳视觉享受的大画面电影播放设备。 • 5)构成多媒体教室最主要的画面显示设备。
在生产过程中,直接改变原材料( 或毛坯 )形状 、尺寸 和性
能,使之变为成品的过程,称为工艺 过程。 它是生 产过程 的主要 部分。 例如毛 坯的铸 造、锻 造和焊 接;改 变材料 性能的 热处理[1];零 件的机 械加工 等,都 属于工 艺过程 。工艺 过程又 是由一 个或若 干个顺 序排列 的工序 组成的 。
• 超微便携型:一般指小于2公斤,800到2500流明,适合用于商务 • 出差和旅行人士,代表机型有EPSON的EMP-740。 •. • 会议室型:一般指2到10公斤,1000到3500流明,适合用于 • 教室,会议室.代表机型有EPSON的EMP-81。
• 安装集成型:重量最高可达40公斤,3000流明以上,拥有多种 • 输入输出接口,用于大型剧院\礼堂\大会议厅等.代表机型有 • EPSON 的EMP-8300
编辑本段加工余量
加工余量概述
为了加工出合格的零件,必须从毛坯上 切去的 那层金 属的厚 度,称 为加工 余量。 加工余 量又可 分为工 序余量 和总余 量。某 工序中 需要切 除的那 层金属 厚度, 称为该 工序的 加工余 量。从 毛坯到 成品总 共需要 切除的 余量, 称为总 余量, 等于相 应表面 各工序 余量之 和。 机床
的各种缺陷和误差,又不能补偿本工 序加工 时的装 夹误差 ,造成 废品。 其选取 原则是 在保证 质量的 前提下 ,使余 量尽可 能小。 一般说 来,越 是精加 工,工 序余量 越小。
- 1、下载文档前请自行甄别文档内容的完整性,平台不提供额外的编辑、内容补充、找答案等附加服务。
- 2、"仅部分预览"的文档,不可在线预览部分如存在完整性等问题,可反馈申请退款(可完整预览的文档不适用该条件!)。
- 3、如文档侵犯您的权益,请联系客服反馈,我们会尽快为您处理(人工客服工作时间:9:00-18:30)。
四、周边配件
四、周边配件 1、投
房间大小与幕布大小关系推荐
• 50平方选择100寸幕布,2500--3000流明投影机; • 80平方选择100寸幕布,3000---3500流明投影机; • 100---120平方,选择120寸幕布,3500---4000流明投影机
三、销售买点
• 3、水平梯形校正滑钮可支持侧面投 影功能
水平梯形校正功能可以使投影机无需正 对投影幕布或墙壁,从侧面也可以投影, 在有限的小会议室或是小客厅卧室等空 间内,摆放位置更灵活。
梯形校 正滑钮
三、销售买点
• 4、无线投影 无线投影(选配) 通过ELPAP10无线模块(选件)就可以轻松实现PC和 智能设备等的无线投影。适合会议中需要多人投影的 情况。 (同一网络中,有线网络连接投影机也可实现) • 5、双画面显示 支持双路输入信号实现单台投影机双画面同时并列显 示,并可根据需要对显示双画面的大小、音频源、信 号源等进行调整。
唐氏公司---产品培训 主讲:唐大鹏
爱普生投影机:CB-X29
爱普生投影机CB-X29
• 爱普生绿色教学系列投影机----CB-X29
爱普生投影机CB-X29
• 一、外观 • 二、主要参数 • 三、销售买点 • 四、周边配件
一、外观
• 一、外观 • 1、外观尺寸
外观尺寸: 长*宽*高 297 x 87 x 244 mm
二、主要参数
• 二、主要参数 • 1、流明度:3000流明 • 2、分辨率:XGA(1024*768) • 3、横纵比(长宽比):4:3(正屏) • 4、对比度:10000:1 • 5、灯泡寿命:正常模式5000小时 环保模式10000小时 • 6、屏幕调节:水平/垂直梯形校正
三、销售买点
• 三、销售买点 • 1、3LCD高色彩输出 CB-X29 基于3LCD 投影技术, 拥有3000 流明的亮度*1*2和10000:1 的高对比度 *1*2,并通过了国家数字音视频及多媒体产品质量监督检验中心严格的测试,能 够为每一位消费者提供真实可靠的色彩亮度数值。 • 2、功能接口全面升级,节能且无忧 投影机拥有非常丰富的接口,能够满足新型设备的连接需求,使用者可以根据自 己设定的安装方案,从HDMI、VGA、LAN 等接口中任选使用。同时,投影机更 可支持实物展台的连接使用。
四、周边配件
2、搭配设备 交互式电子白板 壁挂一体机
电脑 (台式电脑加分屏器)
@your name
知识回顾 Knowledge Review
前面 后面
一、外观
2、设备接口
视频输入:VGA*2 ,HDMI(高清)*1 , RCA*1(莲花),S-Video*1
视频输出:VGA*1 音频输入:Stereo mini(3.5音频)*2, 2RCA x 1(莲花) 音频输出:Stereo mini(3.5音频)*1 USB:USB-A*1 ,USB-B*1 RJ45:RJ45(网口)*1 RS-232C:RS-232C(控制用接口)*1
三、销售买点
• 6、多PC 投影功能 投影机拥有多PC投影功能,支持50个使用者进行连接,在设置会议主持人之后, 可以任选其中的1-4个信号源进行同屏显示。(用户通过爱普生官网下载Epson iProjection,连接无线网络信号,实现网络四画面功能。) • 7、自动开机,直接关机 菜单中提前预设可实现用户通过VGA 线进行投影时候,投影机可以检测到信号, 自动开机,提高课堂效率。 • 8、HDMI 高清接口 /USB 三合一投影 • 9、RJ45/RS-232C 接口