人脸识别REST API帮助文档_v1.04
人脸识别系统集成技术手册

人脸识别系统集成技术手册人脸识别系统是一种基于计算机视觉和模式识别技术的生物识别技术,该技术在人脸图像获取、特征提取、比对匹配等方面都有广泛应用。
本手册旨在介绍人脸识别系统的集成技术,帮助读者了解人脸识别系统的原理、应用场景、技术要点等,并提供一些实践案例和技术建议。
一、人脸识别系统的基本原理人脸识别系统的基本原理是:通过摄像头采集人脸图像,提取人脸特征,将特征与数据库中存储的模板进行比对匹配,从而识别出人脸身份信息。
该系统的关键技术包括人脸检测、人脸对齐、特征提取、特征匹配等。
1.1 人脸检测人脸检测是指将图片中的人脸区域提取出来的过程。
该技术通常使用Haar-like特征、LBP特征等进行人脸分类和检测。
在实际应用中,还需考虑光照、阴影、遮挡等因素对人脸检测的影响。
1.2 人脸对齐人脸对齐是指将图像中的人脸区域对齐,使得图像中的人脸具有相同的朝向、大小和位置。
该技术通常使用归一化处理、2D或3D变换等方法来实现。
1.3 特征提取特征提取是指从人脸图像中提取出人脸的相关特征,包括面部轮廓、颜色、纹理等。
该技术通常使用主成分分析(PCA)、线性判别分析(LDA)等算法来进行特征提取。
1.4 特征匹配特征匹配是指将提取出的人脸特征与数据库中存储的模板进行比对匹配的过程。
该技术通常使用欧几里得距离、相似性度量等方法来进行特征匹配。
二、人脸识别系统的应用场景人脸识别系统的应用场景非常广泛,包括以下几个方面:2.1 安防领域人脸识别系统可以应用在安防领域,如监控、门禁等场景,用于识别犯罪嫌疑人、认证门禁权限等。
2.2 金融领域人脸识别系统可以应用在金融领域,如身份认证、ATM机取款等场景,用于识别用户身份、提高用户体验等。
2.3 教育领域人脸识别系统可以应用在教育领域,如考试监控、签到等场景,用于提高考试安全性、提高签到效率等。
2.4 其他领域人脸识别系统还可以应用在其他领域,如零售、酒店等场景,用于提高服务体验、客户管理等。
人脸识别终端系统使用说明书

人脸识别产品使用说明2021-04目录第1章硬件说明................................................................................................................................1.1主板接口说明.......................................................................................................................1.2产品尾线接线说明...............................................................................................................第2章设备界面说明........................................................................................................................2.1界面概览...............................................................................................................................2.2进入管理界面.......................................................................................................................2.3基本参数...............................................................................................................................2.4识别参数...............................................................................................................................2.4.1测温功能....................................................................................................................2.4.2识别参数....................................................................................................................2.4.3人脸识别....................................................................................................................2.4.4身份证识别................................................................................................................2.4.5IC卡识别.....................................................................................................................2.5网络设置...............................................................................................................................2.6名单管理...............................................................................................................................2.6.1查询............................................................................................................................2.6.2添加名单....................................................................................................................2.6.3名单详情....................................................................................................................2.6.4删除名单....................................................................................................................2.7识别记录...............................................................................................................................2.7.1查找............................................................................................................................2.7.2识别详情....................................................................................................................2.7.3删除记录....................................................................................................................2.8外设配置...............................................................................................................................2.9平台设置...............................................................................................................................2.10系统维护.............................................................................................................................2.11系统信息.............................................................................................................................第1章硬件说明1.1主板接口说明1.2产品尾线接线说明第2章设备界面说明2.1界面概览设备端接入电源开机,系统会自动进入实时人脸识别界面⚫顶部区域:IP地址、设备日期、设备时间、红外成像视频;⚫中间区域:人脸识别区域、识别信息提示框;⚫底部区域:设备标语、底库人数、网络接入标识、身份证阅读器接入标识、测温模块接入标识、人员信息同步进度标识、mac地址。
人脸识别应用操作规程

人脸识别应用操作规程随着科技的快速发展,人脸识别技术逐渐应用于各个领域,如人脸解锁、人脸支付等。
为确保人脸识别应用的准确性和安全性,制定一套操作规程显得尤为重要。
本文将介绍人脸识别应用的操作规程,以确保用户能正确使用该技术。
一、前期准备1. 安装人脸识别应用:前往应用商店(App Store或Google Play)搜索并下载合法的人脸识别应用程序。
2. 注册账号:根据应用界面提示,输入必要的个人信息并保证其真实性。
3. 设置密码:设置强度足够的密码以保护账号安全。
二、录入人脸信息1. 启动应用程序:打开已安装的人脸识别应用程序。
2. 进行人脸录入:按照应用引导,选择“人脸录入”选项,并按照界面提示进行操作。
3. 调整环境:确保人脸录入过程中环境光线适宜,避免阴影或强光的干扰。
4. 摆正姿势:确保录入时头部垂直居中,保持自然表情和开启正常直视摄像头。
三、人脸识别操作1. 选择人脸识别功能:在应用主界面选择人脸识别功能。
2. 摆正姿势:对准摄像头,确保人脸完整地出现在摄像头扫描区域内。
3. 注视摄像头:保持正视摄像头的同时保持面部肌肉放松。
4. 等待识别结果:耐心等待识别结果出现,并避免频繁移动头部。
四、注意事项1. 考虑环境因素:尽量避免在强光或阴暗环境中使用人脸识别应用,以免影响识别准确性。
2. 更新人脸信息:如有需要,定期更新人脸信息,以适应自身面部特征等变化。
3. 安全用机:不要在他人身边使用人脸识别应用,以防他人非法盗取个人信息。
4. 密码保护:在设置应用程序密码时,选择足够复杂且不容易猜测的密码。
5. 避免盗用:尽量避免向他人展示人脸识别应用解锁的过程,以免被他人盗用。
五、故障排除1. 清洁镜头:如发现镜头有灰尘或污垢,请使用干净柔软的布轻轻擦拭。
2. 重新录入:若应用频繁识别失败,请尝试重新录入人脸信息。
3. 更新应用:及时更新应用程序版本,以确保享受到最新的优化和修复。
六、保密与隐私1. 注意信息共享:注意应用程序权限设置,仅授权必要的权限,避免不必要的信息泄露。
人脸识别系统软件使用手册

人脸识别系统软件使用手册一、概述本手册旨在提供关于人脸识别系统软件的使用指导,帮助用户正确地使用该软件,实现人脸识别技术的功能和应用。
该人脸识别系统软件具备先进的人脸检测和识别算法,能够快速、准确地识别人脸图像,广泛应用于安全监控、身份认证、人机交互等领域。
二、软件安装与配置1、软件下载:从官方网站或授权渠道下载最新版本的人脸识别系统软件。
2、软件安装:按照安装向导完成软件的安装过程。
3、配置参数:根据实际需求,设置软件的相关参数,如人脸检测阈值、识别算法等。
三、人脸库管理1、人脸库创建:通过软件创建空的或从已有数据导入的人脸库。
2、人脸图像添加:将待识别的人脸图像添加到人脸库中。
3、人脸标签添加:为每个添加到人脸库中的人脸图像添加相应的标签。
四、人脸检测与识别1、人脸检测:通过软件对输入的图像进行人脸检测,提取出人脸区域。
2、人脸对齐:对检测到的人脸区域进行对齐处理,以提高识别准确性。
3、人脸识别:将待识别的人脸图像与人脸库中已有的标签进行比对,找出最相似的标签。
五、使用技巧与注意事项1、保持人脸库中的人脸图像清晰、正面,以提高识别准确性。
2、避免在强光、阴暗、遮挡等不良环境下进行人脸识别。
3、定期更新软件和算法,以提高人脸识别性能和效率。
4、注意保护个人隐私,避免将未经授权的图像或视频用于人脸识别。
六、常见问题与解决方案1、软件无法安装:请检查系统环境是否满足软件要求,如操作系统版本、内存等。
2、人脸无法检测:请检查输入的图像是否清晰,是否存在人脸遮挡等问题。
3、人脸无法识别:请检查待识别的人脸图像是否与已有标签的图像相似度高。
4、软件运行缓慢:请尝试优化软件性能,如降低检测和识别算法的复杂度、减少人脸库中的人脸数量等。
5、软件崩溃或异常退出:请尝试重新启动软件,或技术支持获取帮助。
七、附录6、软件用户手册:提供更详细的人脸识别系统软件使用说明和技术细节。
7、软件更新日志:记录软件更新内容和修复的问题列表。
人脸识别REST API帮助文档_v1.04介绍
媒体云人脸识别REST API帮助文档V1.04发布日期:2013年12月30日百度开发者中心(版权所有,翻版必究)修订记录目录一、概述 (4)二、媒体云人脸识别REST API使用说明 (4)2.1 开启人脸识别服务 (4)2.2 开通媒体云人脸识别API权限 (7)2.3获取access_token步骤 (7)2.4 API请求方式说明 (9)三、媒体云人脸识别API列表 (10)3.1人脸检测 (10)3.1.1参数说明 (10)3.1.2具体示例 (11)四、媒体云人脸识别API错误码总表 (12)一、概述百度媒体云人脸识别服务依托百度世界领先的人脸识别算法,提供了(1)人脸及五官几何位置定位功能;(2)人脸图像的性别、表情等人脸属性分析功能。
人脸识别服务提供通过REST API的方式来使用人脸识别服务,本文档描述了使用人脸识别服务REST API的方法。
除了原生的REST(Representational State Transfer,即“表述性状态转移”)API之外,人脸识别服务还提供了ANDROID、IOS、WP7、JAVA及PHP多种平台的SDK来帮助开发者缩短开发周期,具体请参考“SDK”部分相关内容(开发者中心通用SDK)。
二、媒体云人脸识别REST API使用说明说明:开发者中心管理控制台可以通过开发者中心首页右上角“消息”旁边的已标记选项进入,如图1红框所示。
图 1管理控制台入口2.1 开启人脸识别服务使用媒体云人脸服务之前,您须按照本节描述的步骤来完成服务的开启,后台服务的注册。
通过开发者中心“管理控制台”,进入“我的应用列表”,创建应用。
(1)进入“管理控制台”图 2进入管理控制台(2)创建应用test,点击“创建应用”图 3 创建应用(3)填写应用名称”test”以及应用类型图 4填写创建应用信息(4)创建应用成功,点击左侧“媒体云”开启媒体云人脸识别服务图 5 申请使用人脸识别服务(5)填写使用场景和申请理由图 6 人脸服务申请信息填写(6)开启服务成功后,可以在控制台来使用人脸服务的统计分析功能。
Kairos面部识别API接口文档说明书
Package‘facerec’October13,2022Type PackageTitle An Interface for Face RecognitionVersion0.1.0Date2018-05-14URL https:///methodds/facerecBugReports https:///methodds/facerec/issuesDescription Provides an interface to the'Kairos'Face Recogni-tion API<https:///face-recognition-api>.The API detects faces in im-ages and returns estimates for demographics like gender,ethnicity and age.License MIT+file LICENSEEncoding UTF-8LazyData trueRoxygenNote6.0.1Imports magrittr(>=1.5.0),dplyr(>=0.7.0),httr(>=1.3.0),jsonlite(>=1.5.0),knitr(>=1.2.0),stringr(>=1.2.0),snakecase(>=0.9.0),rlangSuggests magick(>=1.9.0),ggplot2(>=2.2.0),purrr(>=0.2.0),rmarkdown(>=1.9.0)VignetteBuilder knitrNeedsCompilation noAuthor Carsten Schwemmer[aut,cre](<https:///0000-0001-9084-946X>) Maintainer Carsten Schwemmer<*********************>Repository CRANDate/Publication2018-05-1412:19:21UTCR topics documented:detect (2)enroll (3)12detect facerec_init (4)get_galleries (4)get_gallery_subjects (5)prep_image (6)recognize (6)remove_gallery (7)remove_subject (8)verify (9)view_subject (10)Index11 detect detect facesDescriptionDetect faces in an input image and return annotations from the’Kairos’API.Usagedetect(image,min_head_scale=0.015)Argumentsimage An image offile type’JPG’,’PNG’,or’BMP’.Can either be an url string or alocal image processed with prep_image.min_head_scale Set the ratio of the smallest face to look for in the input image.Accepts a valuebetween.015(1:64scale)and.5(1:2scale).ValueA data frame with annotations for each detected face.Examplesfacerec_init()#one imagefinn_image<- https:///wikipedia/en/2/2a/Finn-Force_Awakens_%282015%29.png faces<-detect(image=finn_image)#multiple imagessw_image<- https:///wikipedia/en/8/82/Leiadeathstar.jpgpadme_image<- https:///wikipedia/en/e/ee/Amidala.pngfaces<-c(finn_image,sw_image,padme_image)%>%enroll3 purrr::map(detect)%>%dplyr::bind_rows()enroll enroll facesDescriptionEnroll face in an input image to a gallery and assign a subject id.Usageenroll(image,subject_id,gallery,min_head_scale=0.015)Argumentsimage An image offile type’JPG’,’PNG’,or’BMP’.Can either be an url string or alocal image processed with prep_image.subject_id A string containing the id to assign for the person in the enrolled image.gallery A string containing the name of the gallery in which the image will be enrolled.min_head_scale Set the ratio of the smallest face to look for in the input image.Accepts a valuebetween.015(1:64scale)and.5(1:2scale).ValueA data frame with annotations for the enrolled image.Examplesfacerec_init()finn_image<- https:///wikipedia/en/2/2a/Finn-Force_Awakens_%282015%29.png finn_enroll<-enroll(image=finn_image,subject_id= finn ,gallery= starwars )4get_galleries facerec_init authorizationDescriptionInitializes the authorization credentials for the’Kairos’Face Recognition API.Needs to be called before using any other functions of facerec and requires kairos_id and kairos_key as environ-ment variables.Usagefacerec_init()Valuenothing.Examples##Not run:Sys.setenv(kairos_id="Your Kairos API id")Sys.setenv(kairos_key="Your Kairos API key")facerec_init()##End(Not run)get_galleries list galleriesDescriptionReturns identifiers for all galleries associated with a’Kairos’application.Usageget_galleries()ValueA vector of gallery id’s.get_gallery_subjects5 Examplesfacerec_init()#enrollfinn_image<- https:///wikipedia/en/2/2a/Finn-Force_Awakens_%282015%29.png first_gallery<-enroll(image=finn_image,subject_id= finn ,gallery= starwars )second_gallery<-enroll(image=finn_image,subject_id= finn ,gallery= more_starwars )#get_galleriesget_galleries()get_gallery_subjects get gallery subjectsDescriptionReturns all subject id’s associated with a gallery.Usageget_gallery_subjects(gallery)Argumentsgallery The gallery in which the subjects are enrolled.ValueA vector of subject id’sExamplesfacerec_init()#enrollfinn_image<- https:///wikipedia/en/2/2a/Finn-Force_Awakens_%282015%29.png finn_enroll<-enroll(image=finn_image,subject_id= finn ,gallery= starwars )#view subjectsget_gallery_subjects(gallery= starwars )6recognizeprep_image prepare local imageDescriptionPrepares a local image for an upload the’Kairos’API via detect,enroll,recognize and verify.Usageprep_image(img_file)Argumentsimg_file Path to an image offile type’JPG’,’PNG’,or’BMP’.ValueThe prepared image object.Examplesfacerec_init()#download example imagefinn_image<- https:///wikipedia/en/2/2a/Finn-Force_Awakens_%282015%29.png temp_img_path<-tempfile(fileext= .png )download.file(finn_image,temp_img_path,mode= wb ,quiet=TRUE)#prepare imagefinn_local<-prep_image(temp_img_path)#use prepared imagefaces<-detect(image=finn_local)recognize recognize faceDescriptionRecognize faces in an image and return the most likely matches from a gallery.remove_gallery7Usagerecognize(image,gallery,min_head_scale=0.015,threshold=0.6,max_num_results=10,show_candidate_images=TRUE)Argumentsimage An image offile type JPG,PNG,or BMP.Can either be an url string or a localimage processed with prep_image.gallery A string containing the name of the gallery in which the image will be enrolled.min_head_scale Set the ratio of the smallest face to look for in the input image.Accepts a valuebetween.015(1:64scale)and.5(1:2scale).threshold Likelihood(between0and1)used to determine a valid facial match.Defaultsto0.6.max_num_resultsThe maximum number of potential matches that are returned.Defaults to10.show_candidate_imagesWhether to return temporary URLs for each potential match.Defaults to TRUE.ValueA dataframe with the potential matches for the input image.The likelihood of matches is given incolumn confidence.Examplesfacerec_init()#enrollfinn_image<- https:///wikipedia/en/2/2a/Finn-Force_Awakens_%282015%29.png padme_image<- https:///wikipedia/en/e/ee/Amidala.pngfinn_face<-enroll(image=finn_image,subject_id= finn ,gallery= starwars )padme_face<-enroll(image=padme_image,subject_id= padme ,gallery= starwars )#recognizefinn_2<- https:///wikipedia/commons/b/b6/John_Boyega_by_Gage_Skidmore.jpg finn_rec<-recognize(image=finn_2,gallery= starwars )remove_gallery remove galleryDescriptionRemoves a gallery and all included subjects.8remove_subjectUsageremove_gallery(gallery)Argumentsgallery The name of the gallery to be removed.Valuenothing.Examplesfacerec_init()#enrollfinn_image<- https:///wikipedia/en/2/2a/Finn-Force_Awakens_%282015%29.png finn_enroll<-enroll(image=finn_image,subject_id= finn ,gallery= starwars )#remove galleryremove_gallery(gallery= starwars )remove_subject remove subjectDescriptionRemoves a subject from a gallery.Usageremove_subject(subject_id,gallery)Argumentssubject_id The subject id for the subject to be removed.gallery The name of the gallery in which the subject is enrolled.Valuenothing.verify9 Examplesfacerec_init()#enrollfinn_image<- https:///wikipedia/en/2/2a/Finn-Force_Awakens_%282015%29.png finn_enroll<-enroll(image=finn_image,subject_id= finn ,gallery= starwars )#remove subjectremove_subject(subject_id= finn ,gallery= starwars )verify verify faceDescriptionVerify whether face in an input image belongs to a subject in a gallery.Usageverify(image,subject_id,gallery)Argumentsimage An image offile type’JPG’,’PNG’,or’BMP’.Can either be an url string or alocal image processed with prep_image.subject_id A string containing the id for the person in the gallery to be verified.gallery A string containing the name of the gallery in which the subject will be verified.ValueA data frame with the verification annotations for the input image.The likelihood of a match isgiven in column confidence.Examplesfacerec_init()#enrollpadme_image<- https:///wikipedia/en/e/ee/Amidala.pngpadme_face<-enroll(image=padme_image,subject_id= padme ,gallery= starwars )10view_subject#verifyamidala_img<- https:///wikipedia/it/5/5e/Padm%C3%A9_Amidala.pngverified<-verify(image=amidala_img,subject_id= padme ,gallery= starwars )view_subject view subjectDescriptionReturns all face id’s for each image enrolled for a given subject in a gallery.Usageview_subject(subject_id,gallery)Argumentssubject_id The subject id for which to return all face id’s.gallery The gallery in which the subject is enrolled.ValueA dataframe with face id’s and enrollment timestamps associated with the input subject.Examplesfacerec_init()#enrollfinn_image<- https:///wikipedia/en/2/2a/Finn-Force_Awakens_%282015%29.png finn_enroll<-enroll(image=finn_image,subject_id= finn ,gallery= starwars )#view subjectview_subject(subject_id= finn ,gallery= starwars )Indexdetect,2,6enroll,3,6facerec_init,4get_galleries,4get_gallery_subjects,5prep_image,2,3,6,7,9recognize,6,6remove_gallery,7remove_subject,8verify,6,9view_subject,1011。
人脸识别文档
人脸识别介绍人脸识别是一种通过分析和识别人脸上的特征,来确定一个人的身份的技术。
它在现代生活中起着重要的作用,被广泛应用在各行各业中,如安全监控、人脸解锁、身份验证等等。
人脸识别技术的发展,极大地改变了人们的生活方式,并且在不断地进化和发展中。
工作原理人脸识别技术使用摄像头或图像采集设备捕捉到人脸图像后,经过一系列的图像处理和特征提取的算法来提取人脸上的特征点,例如眼睛的位置、嘴巴的形状等。
然后,这些提取到的特征点与预先存储在系统中的人脸特征库进行比对,以确定身份的准确性。
人脸识别技术的工作原理可以大致分为以下几个步骤: 1.图像采集:通过摄像头或图像采集设备获取人脸图像。
2. 预处理:对人脸图像进行预处理,包括图像尺寸调整、光照处理、质量控制等,以便于后续的特征提取和比对。
3. 特征提取:通过一系列算法,从人脸图像中提取出人脸的关键特征点,例如眼睛的位置、嘴巴的形状等。
4. 特征比对:将提取到的人脸特征与存储在系统中的人脸特征库进行比对,以确定身份的准确性。
5. 决策:根据比对结果,系统会给出一个决策结果,可以是认证通过或者认证失败。
应用领域人脸识别技术在现代生活中被广泛应用于各行各业,以下是一些主要的应用领域:安全监控人脸识别技术在安全监控领域扮演者重要的角色。
无论是在公共场所还是在企业内部,人脸识别技术可以通过实时监测和识别陌生人的身份来保护安全。
例如,在机场、车站等公共交通场所,可以利用人脸识别技术快速识别出潜在的恐怖分子或者犯罪嫌疑人。
人脸解锁人脸识别技术已经成为手机和电脑等设备中常见的解锁方式之一。
通过将用户的面部信息与设备中存储的人脸特征库进行比对,可以实现快速而安全的设备解锁。
身份验证人脸识别技术在身份验证方面也有广泛的应用。
例如,银行可以通过人脸识别技术来验证客户的身份,提高交易的安全性和便捷性。
另外,一些企业也使用人脸识别技术来进行员工的考勤和门禁管理。
社交媒体一些社交媒体平台也开始使用人脸识别技术。
人脸识别技术使用手册
人脸识别技术使用手册随着科技的发展,人脸识别技术逐渐走进了我们的生活,它被广泛应用于安全、支付、社交娱乐等领域。
对于普通用户来说,了解和正确使用人脸识别技术是至关重要的。
本文将为您提供一份人脸识别技术使用手册,帮助您更好地了解和应用这一技术。
一、人脸识别技术简介人脸识别技术是一种通过计算机系统对人脸图像进行分析和识别的技术。
它基于人脸的独特特征来进行身份认证和识别,主要通过测量图像中的面部表情、眼睛、鼻子、嘴巴等重要特征来实现。
目前,人脸识别技术已经达到了较高的准确性和稳定性,被广泛用于公共安全、金融支付、社交娱乐等场景。
二、人脸识别技术的应用1. 公共安全领域:人脸识别技术被广泛应用于视频监控系统,可以及时发现和追踪可疑人员,提高公共安全性。
2. 金融支付领域:通过人脸识别技术,用户可以使用自身的面部特征完成支付认证,提高支付安全性和便利性。
3. 社交娱乐领域:人脸识别技术在社交娱乐应用中可以识别用户的面部表情,实现虚拟变装、滤镜特效等功能,增加用户的趣味体验。
4. 出入管理领域:人脸识别技术可以应用于企事业单位的出入管理系统,提供便捷高效的身份认证方式。
三、正确使用人脸识别技术的方法和注意事项1. 设置合理的人脸图像:为了提高识别准确性,应该选择清晰、光线充足、正脸朝向的人脸图像。
避免使用戴帽子、墨镜等遮挡物的图像。
2. 注册多个角度和表情的人脸:为了增加识别的稳定性,建议您在注册时使用不同的角度和表情进行多次采集,以便系统能够更好地识别您的面部特征。
3. 防范隐私泄露风险:在使用人脸识别技术的场景中,注意保护个人隐私,避免将自己的面部图像分享给不可信的第三方或未经授权的应用。
4. 定期更新人脸模型:由于人脸特征可能随时间发生变化,推荐定期更新您的人脸模型,以保持识别的准确性。
四、人脸识别技术的前景和挑战人脸识别技术在未来将继续发展壮大。
随着计算机视觉、深度学习等领域的不断突破,人脸识别技术的识别准确性和速度将进一步提升。
FaceID人脸身份验证接入文档
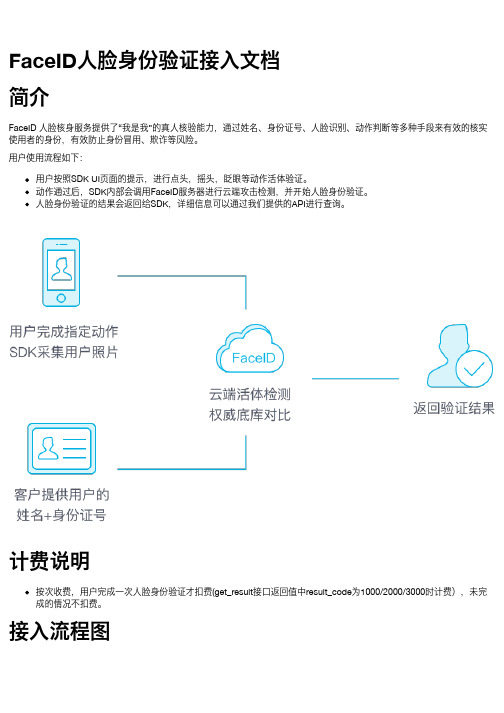
说明:1. 通过get biz token接口获取token2. 下载SDK,集成到客户的APPandroid SDK下载:/faceidopen/sdk/FaceIDZFAC_1.2.0A.zipiOS SDK下载:/faceidopen/sdk/FaceIDZFAC_1.2.0I.zip1. (可选) 通过get_result接口获取详情下面进行详细阐述第1步:使用get_biz_token获取biz_token调用地址POST https://fi/face/v2/sdk/get_biz_token签名方式参见阿里云文档:https:///document_detail/29490.html?spm=5176.730006-56956004-57124001-cmapi029634/A.content.10.O4CB1x参数必选/可选参数类型参数说明必选liveness_type string刷脸验证流程中的活体类型,当前只支持meglive(动作活体);必选idcard_name string姓名必选idcard_number string身份证号可选image_ref1string由客户提供的参照人脸照片可选image_ref2string由客户提供的参照人脸照片可选biz_no string客户业务流水号,建议设置为您的业务相关的流水串号并且唯一。
并会在return 时原封不动的返回给您的服务器,以帮助您确认对应业务的归属。
此字段不超过128字节可选liveness_timeout int超时时间,默认值为 60,表示用户进入活体识别流程后的超时时间,若未在规定时间完成操作,则本次活体失败可选liveness_action_count int动作活体时动作个数:默认3个动作;默认 3,∈ [1,3]可选security_level int表示对比对结果的严格程度限制,请根据您的场景,选择安全规则,越严格,准确性要求越高,通过率也会相应下降1:宽松(误识率为千分之一);2:标准(误识率为万分之一,默认值);3:严格(误识率为十万分之一);4:非常严格(误识率为百万分之一);可选force_compare int表示云端判断为假脸后,是否依然进行比对;0:默认值,云端判断为假脸,则直接返回结果,不执行比对,可以节省成本;1:云端判断为假脸后,依然进行比对可选multi_oriented_detection int对于image_ref1,image_ref2 参考照片,当检测不出人脸时,是否旋转90度、180度、270度后再检测人脸。
免费人脸识别APi
免费⼈脸识别APi今天对应⼀些免费的⼈脸识别的api 做了⼀下简单的对⽐,觉得百度开发出来的⼈脸识别接⼝还是最符合的我的要求,简单易⽤,容易上⼿。
据说百度的⼀些门禁也使⽤上了⼈脸识别的功能了,功能很强⼤,⽽且能识别出是实时⼈物还是图⽚。
对于⼀些初创公司来说,只要有机器学习的员⼯搭建⼀套⼈脸检测系统也不难,主要是这个训练和调优上花些时间,但是要⽤在互联⽹上供能多⼈使⽤,那对服务器的性能要求⼗分⾼,要⽤到GPU服务,在⽹上稍微看了⼀下,租⼀个⽉普遍最低价都是2.5k/⽉以上,⽽且是GPU ⾥的低配,相⽐之下,直接购买接⼝来的便宜多了,百度是按QPS计费,默认免费的2个QPS;⾸先,我们来看⼀下有哪些免费的⼈脸识别API吧!第⼆个:face++Face++.com 号称是⼀个提供免费⼈脸检测、⼈脸识别、⼈脸属性分析等服务的云端服务平台,但感觉免费是骗⼈的;听说在⼀场⿊马⼤赛中,赢得冠军。
所以在⼈脸识别技术上还是很⽜逼的⼀家公司。
有点恶⼼的是所谓的免费其实就是注册和试⽤。
价格上应该还是可以接受的;国内类似⽜逼的公司还有云从科技的⼈脸识别也是很⽜逼的还有很多其他的有限免费的api接⼝提供,可以⾃⼰慢慢去百度,如果想购买现有的接⼝,可以考虑知乎查到的内容:国际⼈脸识别评估集LFW榜, face++ 99.5% , 商汤 99.53% ,腾讯 99.65% , 百度 99.77%,中科奥森 99.77% , 中科云从 99.5%,颜鉴99.64%,北京飞搜科技 99.4% ,宇泛智能 99%这些都是基于国内的,也可以看看国外提供的api;⼈脸识别基本都可以⾼达99以上的识别率,也不⽤过分苛求了。
接下来以百度的⼈脸识别api为例做⼀下讲解:在这⾥会指导你怎么使⽤SDK,很简单:我⽤的是python:可以⼿动下载zip包也可以在线安装python的可以在线安装下载sdk库:pip install baidu-aip⼈脸识别⼀定要先注册后识别;我提供⼀个测试代码的压缩可供直接下载,这⾥就不再重复了以胡歌和杨洋作为训练分类总体效果特别好:测试集:检测结果other04.jpg的图⽚只有17左右的得分,很准确;(hege其实是huge(胡歌)的分类写错拼⾳了)。
Python人脸识别第三方库face_recognition接口说明文档

Python⼈脸识别第三⽅库face_recognition接⼝说明⽂档1. 查找图像中出现的⼈脸代码⽰例:#导⼊face_recognition模块import face_recognition#将jpg⽂件加载到numpy数组中image = face_recognition.load_image_file(“your_file.jpg”)#查找图⽚中⼈脸(上下左右)的位置,图像中可能有多个⼈脸#face_locations的值类似[(135,536,198,474),()]Face_locations = face_recognition.face_locations(image);# 使⽤CNN模型准确率⾼face_locations = face_recognition.face_locations(image, number_of_times_to_upsample=0, model="cnn")face_locations = face_recognition.face_locations(small_frame, model="cnn")2. 获取图像中⼈脸的眼睛、⿐⼦、嘴、下巴、眉⽑的位置和轮廓代码⽰例:import face_recognitionimage = face_recognition.load_image_file(“your_file.jpg”)#查找图⽚中⼈脸的所有⾯部特征(眉⽑,眼睛,⿐⼦,上下嘴唇,⾯部轮廓)#face_landmarks_list是个⼆维数组face_landmarks_list = face_recognition.face_landmarks(image)3. 识别图像中出现的⼈脸import face_recognitionknown_image = face_recognition.load_image_file(“biden.jpg”)unknown_imag = face_recognition.load_image_file(“unknown.jpg”)#获取每个图像⽂件中每个⾯部的⾯部编码#由于每个图像中可能有多个⼈脸,所以返回⼀个编码列表。
人脸识别操作说明书

人脸识别操作说明文档
1.登陆设备
设备IP、端口、登录名、密码都是由人脸识别系统设置,在控制客户端上进行登陆控制。
2.导入用户数据
用户数据的导入方式有两种:服务导入和文件导入。
①服务导入
登陆成功后,点击【从服务下发数据】从本公司ZYTK35服务上获取用户数据,连接配置在config中配置。
②文件导入
点击【批量导入】选择照片所在文件夹,导入的图片名需以卡号命名,大小必须<200KB。
【统计】第一项是排除图片异类后实际导入用户数量,上限为10000张;
第二项是人脸检索的数量。
【配置选项】可以对导入用户的基础配置进行修改。
3.删改用户数据
当从【从服务器下发数据】或者【文件导入】中【批量导入】完成后,可以选中一条用户数据进行删改。
在【用户查询】模块下可以进行根据卡号对单张用户的人脸照片进行更新删除。
批量处理用户操作中的【删除所有用户】所需时间较长,请耐心等待。
注意:在数据下发过程中、人脸照片导入时,有可能识别失败、未成功。
请等待人脸照片完全导入后,点击【获取用户信息】获取所有用户,再点击【人脸检索】进行检测人脸是否录入,完成后会自动列出一张名单,再手动单张删改。
android人脸识别API

摘要:通过两个主要的API,Android提供了一个直接在位图上进行脸部检测的方法,这两个API分别是android.media.FaceDetector和android.media.FaceDetector.Face,已经包含在Android官方API中。
通过两个主要的API,Android提供了一个直接在位图上进行脸部检测的方法,这两个API分别是android.media.FaceDetector和android.media.FaceDetector.Face,已经包含在Android官方API中。
本教程来自Developer网站,向大家介绍了这些API,同时提供教程中实例代码下载。
图片来源:Wikipedia所谓人脸检测就是指从一副图片或者一帧视频中标定出所有人脸的位置和尺寸。
人脸检测是人脸识别系统中的一个重要环节,也可以独立应用于视频监控。
在数字媒体日益普及的今天,利用人脸检测技术还可以帮助我们从海量图片数据中快速筛选出包含人脸的图片。
在目前的数码相机中,人脸检测可以用来完成自动对焦,即“脸部对焦”。
“脸部对焦”是在自动曝光和自动对焦发明后,二十年来最重要的一次摄影技术革新。
家用数码相机,占绝大多数的照片是以人为拍摄主体的,这就要求相机的自动曝光和对焦以人物为基准。
via 构建一个人脸检测的Android Activity你可以构建一个通用的Android Activity,我们扩展了基类ImageView,成为MyImageView,而我们需要进行检测的包含人脸的位图文件必须是565格式,API才能正常工作。
被检测出来的人脸需要一个置信测度(confidence measure),这个措施定义在android.media.FaceDetector.Face.CONFIDENCE_THRESHOLD。
最重要的方法实现在setFace(),它将FaceDetector对象实例化,同时调用findFaces,结果存放在faces里,人脸的中点转移到MyImageView。
脸部识别专家系统(windows端)使用手册说明书

FacePro专家系统(windows端)使用手册版权声明本文档版权归软铸国际有限公司所有,未经软铸国际有限公司所有书面许可,任何单位或个人不得以任何形式或任何手段复制或传播本文档的一部分或全部内容。
Copyright©2020Softfoundry International Pte Ltd.All Right ReservedThis document is proprietary to Softfoundry International Pte Ltd.,which regards information contained herein as its intellectual property.Under the copyright laws,no part of this document may be copied,translated,or reduced to any electronic medium or machine readable form,in whole or in part,without prior written consent of Softfoundry International Pte Ltd.目录1.简介 (1)1.1服务客户 (1)1.2实现场景 (1)1.3功能列表 (2)1.4终端要求 (3)1.5带宽要求 (3)2.安装登录 (3)2.1安装登录 (3)2.2主界面介绍 (4)2.3菜单说明 (5)2.4信息 (8)3.一对一呼叫 (10)4.专家控制功能 (11)4.1专家使用PC端 (11)4.1.1视频标识 (12)4.1.2截图标注 (13)5.多方专家指导会议 (14)5.1PC快速开启专家会议 (14)5.2PC端预约专家会议 (14)5.3参加会议 (16)5.3.1会议功能介绍 (18)5.3.2语音模式 (20)5.3.3主席控制功能 (20)5.3.4专家控制功能 (21)5.3.5会议信息 (22)5.3.6录制 (22)5.3.7屏幕分享功能 (22)5.3.8直播 (23)6.客户支持 (24)1.简介软铸通信之FacePro可视化专家系统,实现工业信息可视化落地,支持远程智能维运,解决企业经营中设备维修巡检、技术支持、车间实训,助力改进维保服务体系高效运作,提升效率、降低成本,通过实时高清视频协作,后方专家指导前端现场工程师操,完成相关操作;智能服务高效替代原有400电话及专家到现场支持,大量节省成本和时间,提升客户满意度。
人脸识别需求文档

人脸识别需求文档
1、需求说明
主要使用模块为:人脸添加、人脸修改、人脸删除、人脸比对。
2、部署环境
本系统为B/S架构,使用JAVA + JS +JSP 编写,系统部署在内网中,无法连接互联网。
当前系统已有摄像头,所有照片通过本系统摄像头采集。
3、流程图
4、详细说明
当前用户图片数量大约五万人,需要通过我们的业务系统,调用【人脸系统】,【人脸系统】进行添加、修改、删除、识别等人脸数据,并返回结果给业务系统。
我们的应用场景呢,是一共几十台PC机器,每个PC机器上有一个电脑摄像头。
我们希望你们提供一个B/S机构人脸系统,部署在服
务器之后,能够应用于所有网络内的PC机器上摄像头图片:
5、网络拓扑。
人脸识别应用开发技术手册
人脸识别应用开发技术手册一、概述人脸识别技术是基于人脸图像的模式识别技术,通过对人脸图像进行分析和比对,识别出人脸的身份信息。
近年来,随着计算机视觉和人工智能的快速发展,人脸识别技术应用越来越广泛。
本技术手册旨在介绍人脸识别应用开发的技术要点和注意事项,帮助开发人员和研究者快速掌握人脸识别应用开发的基本知识和技能。
二、人脸识别的原理人脸识别技术的基本原理是通过采集人脸图像,并对图像进行预处理、特征提取和匹配等步骤,来实现对人脸的唯一识别。
具体的流程如下:1. 人脸采集:通过摄像头或者其他设备采集人脸图像,保证图像的质量和清晰度。
2. 图像预处理:对采集到的人脸图像进行预处理,包括图像的灰度化、归一化、滤波、图像增强等,以提高识别的准确性。
3. 特征提取:通过特征提取算法,从预处理过的人脸图像中提取出一组特征向量,这些特征向量可以表达人脸的唯一特征。
4. 特征匹配:将提取到的特征向量与数据库中的特征向量进行比对,通过比对的结果可以确定人脸的身份信息。
5. 识别结果输出:根据匹配的结果,输出人脸的身份信息或者与数据库中的人脸进行对比,得出最相似的人脸。
三、人脸识别应用开发的技术要点要开发出高效可靠的人脸识别应用,需要注意以下几个技术要点:1. 数据集的准备:构建一个高质量的人脸图像数据库非常重要,要保证数据的多样性、真实性和充分性。
数据集的规模越大,识别的准确率越高。
2. 人脸检测与对齐:在识别之前,首先需要对人脸进行检测和对齐。
检测算法可以通过检测人脸的特征点来实现,对齐算法可以通过眼部对齐、嘴巴对齐等方式来实现。
3. 特征提取算法的选择:特征提取是人脸识别的核心环节,不同的特征提取算法会影响到识别的精度和速度。
常见的特征提取算法有Eigenfaces、Fisherfaces、LBPH等,开发者需根据自己的需求选择合适的算法。
4. 识别算法的优化:人脸识别算法的性能优化可以从多个方面进行,如使用快速的搜索算法、降低特征维度等,以提高识别的速度和准确性。
人脸识别技术使用方法和步骤详解

人脸识别技术使用方法和步骤详解人脸识别技术作为一种生物识别技术,近年来得到了广泛的应用和发展。
它利用计算机技术和图像处理算法,通过对人脸图像中的特征进行识别和比对,来实现对人脸的身份认证或者识别。
人脸识别技术的使用方法和步骤主要包括以下几个方面:1. 数据采集和预处理人脸识别的第一步是数据采集和预处理。
通常,需要收集一定数量的人脸图像作为样本,并使用摄像头或者照相机来采集这些图像。
为了保证识别的准确性,应该确保采集到的图像清晰、无遮挡、光线均匀,并且角度合适。
采集到的图像可以保存为图片文件或者视频流的形式。
2. 人脸检测在数据采集后,需要对图像进行人脸检测。
人脸检测是识别系统的第一步,它通过图像处理算法来寻找图像中的人脸区域。
常用的人脸检测算法包括Haar特征检测、HOG特征检测、深度学习等。
检测到的人脸可以用矩形框标注出来,作为后续步骤的输入。
3. 特征提取在人脸检测后,需要对检测到的人脸区域进行特征提取。
特征提取是将人脸区域转换成一组数值特征的过程,用于后续的比对分析。
常用的特征提取算法包括LBP特征提取、PCA 特征提取、CNN特征提取等。
提取得到的特征可以用来表示一个人脸的唯一性,并且通常具有一定的不变性。
4. 特征匹配和识别在特征提取后,需要进行特征匹配和识别。
特征匹配是将待识别的人脸特征与数据库中的已知特征进行对比和匹配,从而找到最接近的匹配结果。
匹配过程可以使用欧氏距离、相似度比较等方法来衡量。
一旦找到匹配结果,就可以判断待识别的人脸是属于已知的某个人。
5. 决策和应用在特征匹配和识别后,最终需要进行决策和应用。
决策过程可以根据匹配得分或者相似度来判断识别结果的可靠程度,以及是否能够满足预设的阈值要求。
当识别结果通过决策后,可以根据实际需求进行相应的应用。
例如,可以用于门禁系统的身份认证、社交媒体的人脸标注、视频监控的行为分析等。
总结起来,人脸识别技术的使用方法和步骤包括数据采集和预处理、人脸检测、特征提取、特征匹配和识别、决策和应用。
姓名解析和性别识别API用户指南说明书

T h e S o f t w a r e C o m p a n y , I n c . w w w .S o f t w a r e C o m p a n y .c o mN e t G e n d e r v4.4f o r.N E T IntroductionNetGender for .NET allows you to quickly and easily build name verification, parsing and gender determination into your custom applications. Accurately verify whether or not a particular field contains a valid individual or company name.Accept names free-form and let NetGender automatically split each name into its standard components: Prefix, First, Middle, Last and Suffix no matter what the original format. Using a 200,000+ first and last name dictionary in combination with a 10,000+ term company dictionary, the gender is determined with unmatched precision. Easily updated tables control the entire process.NetGender can process all styles of names including inverse, natural order, hyphenated and multi-part last names. Multiple names in the same field and companies can be easily separated providing you with powerful formatting control.With the help of the “N ame_Variants” property, you can easily identify obscure duplicate names such as “Bill”, Billy”, Will”, “Willy” and “William”.Benefits∙200,000+ First and Last Name Dictionary for Pinpoint Accuracy∙Quickly Identify Incomplete or Incorrect Names– before they enter your database ∙Automatic Name Style Identification– standardize lists of various formats∙Name Variants Property - invaluable for finding common duplicates∙Unlimited Processing Volume– no recurring update charges∙Free Upgrades for a full yearFeatures∙Accurately separate name elements: Prefix, First, Middle, Last, Suffix∙Proper-case conversion for more attractive data presentation∙User-updatable tables so your applications never go out-of-date∙Royalty-free runtime∙Designed for use with all .NET compatible programming languagesN e t G e n d e r v4.4f o r.N E T How NetGender Works NetGender for .NET starts by meticulously identifying each individual name element based on the Name_Style you’ve selected. Intuitive algorithms examine the results and a selection is made of the most complete and correct data. Next, the name elements are split according to Name_Style and the user-specified prefix/suffix abbreviations are applied. If not already coded by the gender-override table, the gender is now determined according to the 200,000+ name system gender table. The Name_Quality flag is then set to indicate how complete and correct the name is. Finally, the standardized name components are returned to your application along with a complete and cleansed composite name.N e t G e n d e r v4.4f o r.N E T Name Elements Name ElementsA Word About Gender CodingNot all gender identification systems are created the same. Most use a simple table of less than 20,000 first names. NetGender uses an extensive dictionary of more than 200,000 first and last names that were specially selected for their rich ethnic-diversity.NetGender also uses a unique gender percentage factor. This factor is based on the proportion of males to females for a particular name allowing you to set the point at which certain names will be returned with a neutral gender. See “Gender_Confidence” and “Gender_Percentage” properties.NetGender then applies the pre-programmed rules from a 10,000+ term company dictionary resulting in a high level of gender accuracy.This unique and powerful strategy produces unparalleled results.Name_InSyntax: Name_In = StringDescription:Set this property to the name string to be processed.When the “Parse” method is invoked, the Name_In string is standardized and formatted then placed into the Name_Out property. In addition, each element of the Name_In string is placed into the corresponding name component property.Name_Style (changed in v3.0+)Syntax: Name_Style = StringLiteralDescription:Set this property to the style that most closely matches the format of the Name_In string. In the examples below, F=First, M=Middle, L=Last, &=generic delimiter, (…)=optional element.FML John A Doe Names are in Natural Order FML&FM John A Doe & Jane A Never a Last Name in Name 2FML&FM(L) John A Doe & Jane A (Jones) Sometimes a Last Name in Name 2FML&FML John A Doe & Jane A Jones Always a Last Name in Name 1 & 2FM(L)&FML John A (Doe) & Jane A Jones Sometimes a Last Name in Name 1FM(L)&FM(L) John A (Doe) & Jane A (Jones) Sometimes a Last Name in Name 1 or 2FM&FML John A & Jane A Doe Never a Last Name in Name 1LFM Doe, John A Names are in Inverse OrderLFM&FM Doe, John A & Jane A Never a Last Name in Name 2LFM&FM(L) Doe, John A & Jane A (Jones) Sometimes a Last Name in Name 2LFM&(L)FM Doe, John A & (Jones)Jane A Sometimes a Last Name in Name 2LFM&LFM Doe, John A & Jones Jane A Always a Last Name in Name 1 & 2 VARIABLE Inconsistent & Unknown Names are mixed Natural & InverseSPLIT Anything & Everything Split at Name Connector onlyCOMPANY Sanford & Son Forces a company name check withoutsplitting at the name connectorThe input names can be separated by various delimiters such as: “c/o”, “&”, “dba”, “and”, “attn”, etc. The “&” above, generically represents these delimiters. The delimiters are user-defined. See “Updating User Control Tables” later in this guide.Parenthesis “(…)” indicate that this elem ent may or may not be present in all of the input name strings. If two individuals or a company and an individual co-exist in the input name string, you should choose one of the multi-name styles such as: FML&FML, FML&FM, etc. for best results.The closer the style matches your data the better the results. Use “Variable” when the name format is inconsistent or unknown.Name Style Examples - Natural OrderFML Use when there is only one name in the input string.Name is split into First, Middle, Last:Name_In:JOHN A DOEName_Out:John A DoeFML&FM Use when last name is never present in name two.Name two ALWAYS inherits its last name from Name one:Name_In:JANE A DOE & JOHN AName_Out: Jane A DoeName2_Out: John A DoeFML&FM(L) Use when last name is sometimes present in name two.Name two keeps its own last name if present:Name_In: JOHN A DOE & JANE A JONESName_Out: John A DoeName2_Out:Jane A JonesName two inherits its last name from Name one:Name_In: JOHN A DOE & JANE AName_Out: John A DoeName2_Out:Jane A DoeFML&FML Use when a full name is always present in name one & two.Name one & two ALWAYS keep their own last names:Name_In: JOHN DOE DBA THE SOFTWARE COMPANYName_Out: John DoeName2_Out:The Software CompanyFM(L)&FML Use when last name is sometimes present in name one.Name one keeps its own last name if present:Name_In: JOHN A DOE & JANE A JONESName_Out: John A DoeName2_Out:Jane A JonesName one inherits its last name from Name two:Name_In: JOHN A DOE & JANE AName_Out: John A DoeName2_Out:Jane A DoeName Style Examples - Natural Order (cont.)FM(L)&FM(L) Use when last name is sometimes present in name one or two.Name one and two keep their own last names if present:Name_In: JOHN A DOE & JANE A JONESName_Out: John A DoeName2_Out:Jane A JonesName one inherits its last name from Name two:Name_In: JOHN A & JANE A JONESName_Out: John A JonesName2_Out:Jane A JonesFM&FML Use when last name is never present in name one.Name one ALWAYS inherits its last name from Name two:Name_In: JANE A & JOHN DOEName_Out: Jane A DoeName2_Out:John DoeName Style Examples - Inverse OrderLFM Use when there is only one name in the input string.Name is split into First, Middle, Last:Name_In:DOE, JOHN AName_Out:John A DoeLFM&FM Use when last name is never present in name two.Name two ALWAYS inherits its last name from Name one:Name_In:DOE, JANE A & JOHN AName_Out: Jane A DoeName2_Out: John A DoeLFM&FM(L) Use when last name is sometimes present in name two.Name two keeps its own last name if present:Name_In: DOE, JOHN A & JANE A JONESName_Out: John A DoeName2_Out:Jane A JonesName two inherits its last name from Name one:Name_In: DOE, JOHN A & JANE AName_Out: John A DoeName2_Out:Jane A DoeLFM&(L)FM Use when last name is sometimes present in name two.Name two keeps its own last name if present:Name_In: DOE, JOHN A & JONES, JANE AName_Out: John A DoeName2_Out:Jane A JonesName two inherits its last name from Name one:Name_In: DOE, JOHN A & JANE AName_Out: John A DoeName2_Out:Jane A DoeLFM&LFM Use when a full name is always present in name one & two.Name one & two ALWAYS keep their own last names:Name_In: DOE, JOHN DBA THE SOFTWARE COMPANYName_Out: John DoeName2_Out:The Software CompanyName Style Examples - OtherVARIABLE Use when the format of the name(s) is inconsistent or unknown.Style is automatically determined based on the format, punctuation andgender lookup results. Name one is FML, Name two is LFM:Name_In:JOHN A DOE & JONES, JANE AName_Out:John A DoeName2_Out:Jane A JonesAlso, see Variable_Default propertySPLIT Use when you want to split name one & two at the [NameConnector] Filters are removed, no other formatting takes place.[NameConnector] of “c/o” was specified in the “NetGender.ref” file:Name_In:DOE JOHN A c/o THE SOFTWARE COMPANYName_Out:Doe John AName2_Out: The Software CompanyCOMPANY Use when company names also contain name connectors.Use “COMPANY” style to avoid confusion with company names that alsocontain Name Connectors. W hen [NameConnectors] such as “&” arespecified in the user-defined “NetGender.ref” file, certain company namessuch as Dewey Cheatum & Howell can sometimes be confused with acompound individual name such as John & Mary Smith. If this is the case,use the COMPANY style first to identify the field as a company.If an exact match on a company name is found in the “NetGender.ref” fileor certain company keywords such as “ABC” are found in the systemgender table, the Gender property is returned as “C” (company) and theName_Quality property is returned as “High”. A Name_Quality of“Medium” is returned when certain keywords such as “C LUB” are foundin the system gender table indicating that this could possibly be either acompany or individual.Variable_Default, Variable_Default2Syntax: Variable_Default = StringLiteralVariable_Default2 = StringLiteralDescription:Set this property to “FML” (natural order) or “LFM” (inverse order) to indicate a default output format. When ambiguous name components make it impossible to determine the name format, NetGender will default to this setting. This setting is only active when the Name_Style is set to “Variable”.Default is “FML”.Note:As an alternative to the “V ARIABLE” style, another very successful approach has been to try several different styles checking the Name_Quality and Gender properties after each parse. Start by calling the “Parse” method using “LFM” then “FML” styles. Next, try the “V ARIABLE” style and then try each other style in order down the line. Lastly, try “S PLIT” style and then the default ”LFM”, ”FML” and then “VARIABLE” again. After each parse check the Name_Quality and Gender properties and exit at the first sign of a good parse.Company_CheckSyntax: Company_Check = Boolean (True/False)Description:Set this property to Boolean (True/False) to indicate if an attempt should be made to identify the Name_In string as a company. Set Company_Check to False if your data has no company names. Default i s “False”.Name_Variant_Check (new v4.4+)(replaces obsolete “Nickname_Check” property)Syntax: Name_Variant_Check = Boolean (True/False)Description:Set this property to Boolean (True/False) to indicate if an attempt should be made to identify common name variants associated with Name and Name2. Set Name_Variant_Check to True if you want name variants returned in Name_Variants and Name2_Variants. Default is “False”.Gender_ConfidenceSyntax: Gender_Confidence = IntegerDescription:Set this property to a value between 51% and 100% representing the cutoff point below which a gender is considered neutral. Each name in the System Gender Table is encoded with a percentage from 51%to 100%based on the proportion of males to females for that particular name. After the name lookup, if a percentage is found that is below the “Gender_Confidence” level, NetGender will return a gender of Neutral for that name. A setting of 51% will force a gender of either Male or Female. Default is 70%.Neutral Gender Breakdown:Gender_Confidence # of Neutral % of Gender Table100%7,800 7.8%95%6,400 6.4%90%5,100 5.1%80%3,900 3.9%70%2,400 2.4%Default Setting60% 900 .9%51% 0 .0%Capitalization (new in v4.4+)(replaces obsolete “Output_Case” property)Syntax: Capitalization = StringLiteralDescription:Set this property to “Upper”, “Lower”, “Mixed” or “None” to indicate your capitalizat ion preference for the output name and its components. Use “None” when you want to retain the existing capitalization. Default is “None”.Reference_File_Path, Gender_File_Path(changed in v3.0+)Syntax: Reference_File_Path = StringGender_File_Path = StringDescription:Set this property to the full path and file name of the following system and user files: NetGender.ref is a user-defined file containing the tables for Prefix, Suffix, Filter and Connector identification as well as Gender and Name Variant Overrides.NetGender.gnd is a system file that contains the main Genderization Control Tables.A standard set of these files is supplied and installed in the NetGender installation folder under the names: “NetGender.ref” and “NetGender.gnd”. You can rename and relocate these files to any other folder as long as you provide the full path and file name information in each respective path string. Default path is first the folder of the invoking application: “AppDomain.CurrentDomain.BaseDirectory” then the NetGender installation folder.See “Updating User Control Tables” later in this guide for in formation on customizing this file. Static_Key_Name(new in v3.0+)Syntax: Static_Key_Name = StringDescription:Set this property to the name portion of the static key assignment or blank.Static_Key(new in v3.0+)Syntax: Static_Key = StringDescription:Set this property to the key portion of the static key assignment or blank.Name_Out, Name2_Out (read only)Syntax: String = Name_OutString = Name2_OutDescription:After invoking the “Parse” method, this property will contain the corrected name string, in natural order (FML), from the Name_In property.Name_Filtered_Data, Name2_Filtered_Data (read only)Syntax: String = Name_Filtered_DataString = Name2_Filtered_DataDescription:After invoking the “Parse” method, this property will contain all data that was filtered out before processing according to the “[NameFilter]” section of NetGender.ref file.See “Updating User Control Tables” later in this guide for instructions on customizing this file.Name_Quality, Name2_Quality (read only) (changed in v3.0+)Syntax: String = Name_QualityString = Name2_ QualityDescription:After invoking the “Parse” method, this property is set to “Low”, “Medium” or “High” to indicate how complete a name appears.Prefix, Prefix2 (read only)Syntax: String = PrefixString = Prefix2Description:After invoking the “Parse” method, this property is set to the name Prefix component of Name_In. Values will be valid prefixes (Mr, Mrs, etc.) or blank.First, First2(read only)Syntax: String = FirstString = First2Description:After invoking the “Parse” method, this property is set to the First Name component of Name_In. Value will be an individual’s first name or blank.Middle, Middle2 (read only)Syntax: String = MiddleString = Middle 2Description:After invoking the “Parse” method, this property is set to the Middle Name component of Name_In. Value will be an individual’s middle name or blank.Last, Last2 (read only)Syntax: String = LastString = Last2Description:After invoking the “Parse” method, this property is set to the Last Name component of Name_In. Value will be an individual’s last name or blank.Suffix, Suffix2 (read only)Syntax: String = SuffixString = Suffix2Description:After invoking the “Parse” method, this property is set to the Suffix component of Name_In. Values will be valid suffixes (Jr, Sr, Esq, etc.) or blank.Company, Company2 (read only)Syntax: String = CompanyString = Company2Description:After invoking the “Parse” method, this property is set to the Company component of Name_In. Values will be a company name or blank.Gender, Gender2 (read only)Syntax: String = GenderString = Gender2Description:After invoking the “Parse” method, this property is set to the Gender indicated by the “First”property. Values will be “M”(male), “F”(female), “N”(neutral), “C”(company) or “U”(unknown). See “Gender_Confidence” property.Gender_Percentage, Gender2_Percentage (read only) (new v4.4+) Syntax: Integer = Gender_PercentageInteger = Gender2_PercentageDescription:After invoking the “Parse” method, this property is set to the statistical gender percentage. Each name in the System Gender Table is encoded with a percentage from 51% to 100% based on the proportion of males to females for that particular name. For example, the name “Chris” returns a gender of “M” and a Gender_Percentage of 89%. This indicates that 89% of the persons with the name “Chris” are statistically male and 11% are female. See “Gender_Confidence”and “Gender” properties.Note: This property is only valid when the Gender property returns a value of “M” or “F”.Name_Variants, Name2_Variants (read only) (new v4.4+)(replaces obsolete “Nicknames” property)Syntax: String = Name_VariantsString = Name2_VariantsDescription:After invo king the “Parse” method, these properties are set to a list of common name variants associated with the names returned in First and First2. Values will be a list of one or more common name variants.Note: Name variants are only returned when Name_Variant_Check property is set to True and the Gender property returns a value of “M” or “F”.Accessing Individual Name Variants - VB Sample CodeDim i As Integer, Name As String, Gender As StringcbNameVariants.Items.Clear()For i = 1 To Len(_Variants) Step 17Name = Mid(_Variants, i, 16)Gender = Mid(_Variants, i + 16, 1)cbNameVariants.Items.Add(Name & " " & Gender)Next iReturn_Code(read only) (new in v3.0+)Syntax:String = Return_CodeDescription:After invoking the “Parse” method, this property is set to blank upon successful completion. Most exceptions occur on the first invocation. The most common ones are listed below. This property should be examined on each return from NetGender.Common Return Codes:G00 Gender File Wrong VersionG35Gender File Not Found (see “Gender_File_Path” property)R35Reference File Not Found (see “Reference_File_Path” property)S00Unrecognized Name Style (see “Name_Style property)T00Prefix/Suffix Table Limit Reached (1,024)T01Name Variant Override Table Limit Reached (256)T02 Gender Override Table Limit Reached (1,024)T03 Spelling Override Table Limit Reached (1,024)L00Evaluation Period ExpiredL01Static Key Validation Failed (see “Static_Key” property)L50 - L69Evaluation License ErrorN e t G e n d e r v4.4f o r.N E T Methods ClearSyntax:NetGender.ClearDescription:When this method is invoked, all properties are cleared with the exception of Static_Key, Static_Key_Name and Reference_File_Path.ParseSyntax:NetGender.ParseDescription:When this method is invoked, each element of the Name_In property will be inspected. Multiple names are separated, each name is gender coded and placed into the Name_Out property. Each individual element of the Name_In property will be placed into the appropriate name component property. And, if the Name_Variant_Check property is set to True, a list of common name variants is returned in Name_Variants and Name2_Variants. The Return_Code property is also set and should be checked after each invocation of the Parse method.See “Return_Code”property.N e t G e n d e r v4.4f o r.N E T Control Tables Updating User Control TablesNetGender.ref is a file containing the name standardization control tables. It is located by default in the “NetGender” installation folder. Use Notepad or a similar text editor to edit the contents. Detailed information on the format of the entries is contained within the file. This file can also be relocated. See “Reference_File_Path” property.NetGender allows you to specify which Prefixes and Suffixes are to be recognized as well as your preferred abbreviations.Extensive tables are included. Below are a few examples:[NamePrefix]M&M Mr. & Mrs.M/M Mr. & Mrs.[NameSuffix]PHD Ph.D.MANAGER Mgr.[NameConnector]&C/OGUARDIAN OF[NameFilter]ETALTRUST[CompanyOverride]C TED’S SHEDS[GenderOverride]M BILLY-JOEF BOBBY-SUEL FRUMP[NameVariantOverride]WOODY WOODIE WOODROW WOODFORD[SpellingOverride]diGenovaThe UPS StoreN e t G e n d e r v4.4f o r.N E T Installation Notes Deploying Your ApplicationsBe sure to include the following in your deployment package:NetGender.dll –usually placed in the application folder or Global Assembly Cache (GAC) NetGender.ref –usually placed in the application folder*NetGender.gnd –usually placed in the application folder**“Net Gender.ref” and “Net Gender.gnd”reference files can be placed anywhere on the target machine as long as the full path to them is specified in the “Reference_File_Path” and “Gender_File_Path” properties.In addition to the above, there is a common runtime that can be placed in the application folder or the Global Assembly Cache (GAC) of the target machine.Fujitsu.COBOL.dllEvaluation LicenseThe evaluation license is valid for a period of 30 days or up to 1,000 calls.****************************************************。
百度AI人脸检测

百度AI⼈脸检测 本⽂主要说⼀下百度AI的⼈脸检测⾸先进⼊百度AI官⽹登录帐号点击控制台进⼊控制台后点击左侧导航栏⼈脸识别右侧创建应⽤随便起个名字⽴即创建回到刚才的菜单点击管理应⽤点击管理应⽤可以看到你刚才创建的应⽤详情重点说明:注意下图中你创建的应⽤详情的关键数据第⼀个:API key 第⼆个:secret key这两个很重要是⽤来获取官⽹验证 access_token 没有这个你的⼈脸检测程序是⽆法执⾏的第三个是下⾯的API列表你⽤到的所有应⽤的访问接⼝的url 都在这⾥前期⼯作做好以后下⾯说下具体细节所谓⼈脸检测就是你把⼀张⼈物图⽚提交给百度⼈脸检测的API(接⼝) 百度AI会智能的帮你检测出这张⼈物照⽚⾥⾯⼈物的年龄颜值性别种族表情等⼀系列数据当然现在的AI 检测的真实性是相对的种族性别是⾮常准确的⾄于年龄颜值是否带眼睛表情脸型等其他数值都是相对准确这个很好理解就拿颜值来说怎么可能有⼀种算法能够绝对的衡量⼀个⼈的美与丑呢这个美丑都是相对的就算是数学家⽣物学家他也没有办法绝对衡量所以算法也就是相对的希望⼤家能够明⽩因为我申请到的是V3版本的⼈脸识别所以下⽂中的代码结构只适⽤于V3版本下⾯看⼀下我门需要完成的类因为我是⼀个springboot项⽬先说service层⼀共七个类全部都有⽤⼀会我会⼀个个附上代码和说明先说utils包下⾯的6个⼯具类第⼀个Auth这个就是获得官⽹认证 access_token的类以下是代码public class Auth {/*** 获取权限token**/public static String getAccessToken() {// 官⽹获取的 API Key 更新为你注册的String clientId = "xxxxxxxxxxx";// 官⽹获取的 Secret Key 更新为你注册的String clientSecret = "xxxxxxxxxxxxxxx ";return getAuth(clientId, clientSecret);}/*** 获取API访问token* 该token有效期30天,需要⾃⾏管理,当失效时需重新获取.** @param ak - 百度云官⽹获取的 API Key* @param sk - 百度云官⽹获取的 Securet Key**/public static String getAuth(String ak, String sk) {// 获取token地址String authHost = "https:///oauth/2.0/token?";String getAccessTokenUrl = authHost// 1. grant_type为固定参数+ "grant_type=client_credentials"// 2. 官⽹获取的 API Key+ "&client_id=" + ak// 3. 官⽹获取的 Secret Key+ "&client_secret=" + sk;try {URL realUrl = new URL(getAccessTokenUrl);// 打开和URL之间的连接HttpURLConnection connection = (HttpURLConnection) realUrl.openConnection();connection.setRequestMethod("GET");connection.connect();// 获取所有响应头字段Map<String, List<String>> map = connection.getHeaderFields();// 遍历所有的响应头字段for (String key : map.keySet()) {System.err.println(key + "--->" + map.get(key));}// 定义 BufferedReader输⼊流来读取URL的响应BufferedReader in = new BufferedReader(new InputStreamReader(connection.getInputStream()));String result = "";String line;while ((line = in.readLine()) != null) {result += line;}/*** 返回结果⽰例*/System.err.println("result:" + result);JSONObject jsonObject = new JSONObject(result);String access_token = jsonObject.getString("access_token");return access_token;} catch (Exception e) {System.err.printf("获取token失败!");e.printStackTrace(System.err);}return null;}public static void main(String[] args) {getAccessToken();}} 通过你创建应⽤的API key 和 secret key 可以得到access_token ⽽且说的很明⽩这个token的⽣命周期是30天所以我们在使⽤他的时候完全可以把这个token变成⼀个常量使⽤所以上⾯这个类的代码你只需要运⾏⼀次控制台输出token后复制⼀下再写⼀个类⽤来保存常量我创建的这个类就是utils包下的Constantconstantpublic class Constant {/* POST_URL参数* 你在百度AI官⽹控制台创建的应⽤⾥有相关接⼝的访问地址* ⾃⼰打开看上⽂中截图也有说明* 此处⽤到⼈脸检测那就把⼈脸检测的访问地址复制过来** */public static final String POST_URL = "";//官⽹认证的token public static final String ACCESS_TOKEN ="此处是你通过上⾯的类运⾏获得的access_token的值";}Base64Util public class Base64Util {private static final char last2byte = (char) Integer.parseInt("00000011", 2);private static final char last4byte = (char) Integer.parseInt("00001111", 2);private static final char last6byte = (char) Integer.parseInt("00111111", 2);private static final char lead6byte = (char) Integer.parseInt("11111100", 2);private static final char lead4byte = (char) Integer.parseInt("11110000", 2);private static final char lead2byte = (char) Integer.parseInt("11000000", 2);private static final char[] encodeTable = new char[]{'A', 'B', 'C', 'D', 'E', 'F', 'G', 'H', 'I', 'J', 'K', 'L', 'M', 'N', 'O', 'P', 'Q', 'R', 'S', 'T', 'U', 'V', 'W', 'X', 'Y', 'Z', 'a', 'b', 'c', 'd', 'e', 'f', 'g', 'h', 'i', 'j', 'k', 'l', 'm', 'n', 'o', 'p', 'q', 'r', 's', 't', 'u', 'v', 'w', 'x', 'y', 'z', '0', '1', '2', '3', '4 public Base64Util() {}//通过⽂件信息的字节数据转换成base64数据public static String encode(byte[] from) {StringBuilder to = new StringBuilder((int) ((double) from.length * 1.34D) + 3);int num = 0;char currentByte = 0;int i;for (i = 0; i < from.length; ++i) {for (num %= 8; num < 8; num += 6) {switch (num) {case 0:currentByte = (char) (from[i] & lead6byte);currentByte = (char) (currentByte >>> 2);case 1:case 3:case 5:default:break;case 2:currentByte = (char) (from[i] & last6byte);break;case 4:currentByte = (char) (from[i] & last4byte);currentByte = (char) (currentByte << 2);if (i + 1 < from.length) {currentByte = (char) (currentByte | (from[i + 1] & lead2byte) >>> 6);}break;case 6:currentByte = (char) (from[i] & last2byte);currentByte = (char) (currentByte << 4);if (i + 1 < from.length) {currentByte = (char) (currentByte | (from[i + 1] & lead4byte) >>> 4);}}to.append(encodeTable[currentByte]);}}if (to.length() % 4 != 0) {for (i = 4 - to.length() % 4; i > 0; --i) {to.append("=");}}return to.toString();}} 这个类其实就⼲⼀件事把你识别图⽚的字节信息转换成⼀个base64值不懂base64的可以百度⼀下很简单我在这⾥就不多费⼝⾆了希望理解那既然他是把图⽚信息的字节转换成base64 那么图⽚的信息怎么转换成字节呢⼤家都知道我们⾸先获得的⽂件信息不管是在服务器上还是前端给我们传送过来的其实都是⼀个file file其实是⼀个bolb对象⼤家可以理解成“流”信息所以我们要通过IO 把他解析成字节对象也就是byte对象那下⾯这个类就是⼲这个事情的 FileUtilpublic class FileUtil {/*** 读取⽂件内容,作为字符串返回*/public static String readFileAsString(String filePath) throws IOException {File file = new File(filePath);if (!file.exists()) {throw new FileNotFoundException(filePath);}if (file.length() > 1024 * 1024 * 1024) {throw new IOException("File is too large");}StringBuilder sb = new StringBuilder((int) (file.length()));// 创建字节输⼊流FileInputStream fis = new FileInputStream(filePath);// 创建⼀个长度为10240的Bufferbyte[] bbuf = new byte[10240];// ⽤于保存实际读取的字节数int hasRead = 0;while ( (hasRead = fis.read(bbuf)) > 0 ) {sb.append(new String(bbuf, 0, hasRead));}fis.close();return sb.toString();}/*** 根据⽂件路径读取byte[] 数组*/public static byte[] readFileByBytes(String filePath) throws IOException {File file = new File(filePath);if (!file.exists()) {throw new FileNotFoundException(filePath);} else {ByteArrayOutputStream bos = new ByteArrayOutputStream((int) file.length());BufferedInputStream in = null;try {in = new BufferedInputStream(new FileInputStream(file));short bufSize = 1024;byte[] buffer = new byte[bufSize];int len1;while (-1 != (len1 = in.read(buffer, 0, bufSize))) {bos.write(buffer, 0, len1);}byte[] var7 = bos.toByteArray();return var7;} finally {try {if (in != null) {in.close();}} catch (IOException var14) {var14.printStackTrace();}bos.close();}}}} 两个⽅法⼀个读取⽂件也就是你⽂件上传后在服务器的路径地址通过这个路径地址把⽂件转成string另⼀个⽅法转换成byte数组GsonUtil/*** Json⼯具类.gson是⾕歌提供的⼀个⼯具类很强⼤号称可以解决所有对象之间的转换*/public class GsonUtils {private static Gson gson = new GsonBuilder().create();//对象转jsonpublic static String toJson(Object value) {return gson.toJson(value);}//json对象转实体类public static <T> T fromJson(String json, Class<T> classOfT) throws JsonParseException {return gson.fromJson(json, classOfT);}//json对象转各种数据类型例如 map listpublic static <T> T fromJson(String json, Type typeOfT) throws JsonParseException {return (T) gson.fromJson(json, typeOfT);}} HttpUtil/*** http ⼯具类*/public class HttpUtil {public static String post(String requestUrl, String accessToken, String params)throws Exception {String contentType = "application/x-www-form-urlencoded";return HttpUtil.post(requestUrl, accessToken, contentType, params);}public static String post(String requestUrl, String accessToken, String contentType, String params)throws Exception {String encoding = "UTF-8";if (requestUrl.contains("nlp")) {encoding = "GBK";}return HttpUtil.post(requestUrl, accessToken, contentType, params, encoding);}public static String post(String requestUrl, String accessToken, String contentType, String params, String encoding)throws Exception {String url = requestUrl + "?access_token=" + accessToken;return HttpUtil.postGeneralUrl(url, contentType, params, encoding);}public static String postGeneralUrl(String generalUrl, String contentType, String params, String encoding)throws Exception {URL url = new URL(generalUrl);// 打开和URL之间的连接HttpURLConnection connection = (HttpURLConnection) url.openConnection();connection.setRequestMethod("POST");// 设置通⽤的请求属性connection.setRequestProperty("Content-Type", contentType);connection.setRequestProperty("Connection", "Keep-Alive");connection.setUseCaches(false);connection.setDoOutput(true);connection.setDoInput(true);// 得到请求的输出流对象DataOutputStream out = new DataOutputStream(connection.getOutputStream());out.write(params.getBytes(encoding));out.flush();// 建⽴实际的连接connection.connect();// 获取所有响应头字段Map<String, List<String>> headers = connection.getHeaderFields();// 遍历所有的响应头字段for (String key : headers.keySet()) {System.err.println(key + "--->" + headers.get(key));}// 定义 BufferedReader输⼊流来读取URL的响应BufferedReader in = null;in = new BufferedReader(new InputStreamReader(connection.getInputStream(), encoding));String result = "";String getLine;while ((getLine = in.readLine()) != null) {result += getLine;}in.close();System.err.println("result:" + result);return result;}} 这个类我就不多说了主要是⽤在提交请求的因为你是java程序你最终的⼈脸检测是通过百度AI提供的API进⾏检测的所以就意味着你⼀定会向百度提交http请求当然你还有附带相应的参数那就肯定是post请求了6个⼯具类说完下⾯说业务类这个业务类和我们平时写的service层的业务类还是有区别的因为他的⽅法必须是static 也就是单线程的也就意味着你不需要通过接⼝实现看代码FaceDetectpublic class FaceDetect {public static FaceDetectVo detect(String url,String imageUrl,String accessToken) {try {//通过图⽚路径把图⽚数据转成字节byte [] imageDate = FileUtil.readFileByBytes(imageUrl);//把字节转成base64格式String imageBase64 = Base64Util.encode(imageDate);Map<String, Object> map = new HashMap<>();/* image 参数图⽚的BASE64值上⾯我通过⼯具类“Base64Util”转好了* 官⽹给出的API中说image的参数还可以是其他两种* URL:图⽚的 URL地址( 可能由于⽹络等原因导致下载图⽚时间过长);* FACE_TOKEN: ⼈脸图⽚的唯⼀标识,调⽤⼈脸检测接⼝时,* 会为每个⼈脸图⽚赋予⼀个唯⼀的FACE_TOKEN,同⼀张图⽚多次检测得到的FACE_TOKEN是同⼀个。
人脸识别平台使用手册
演示平台使用手册V1.0.12015.11一、平台登陆互联网登陆:在网页浏览器的地址栏中输入:139.196.109.206/its/,确定后进入下图界面,使用申请的用户名和密码登陆。
二、主页登陆成功后,主页如下图所示:三、人脸搜索点击主页中这个图标进入人脸搜索界面:选择时间、地点、(事件类型、目标颜色、纹理)等进行人脸搜索。
在记录中可以查看详情,如果需要查找某人出行轨迹,可以点击收藏人脸,在左下角就会保存此人员信息,点击边上的放大镜进入人脸比对搜索。
四、人脸比对搜索点击主页中这个图标进入人脸比对搜索界面。
选择收藏人员、时间、地点、相似度等进行搜索。
每一次搜索之后可以把结果中正确的、不同角度的人脸加入收藏中,选中这个再次搜索,以提高搜索效率。
五、实时报警记录搜索点击主页中这个图标,可查看历史中的实时报警记录。
实时接收报警数据需要安装报警客户端。
六、实时人脸报警布控点击主页上的这个图标,进入人脸布控界面,增加想要布控的人员。
如下图:选择左边的人脸库,点击增加,然后添加想要布控的人员图片,保存即可。
实时报警客户端如下图所示:七、软件配置1、相机参数配置:网络设置如下图:设置相机和algo服务器ip地址在一个网段内。
编码设置如下图:帧率15,画质最好相机参数设置:主要设置曝光模式和自动曝光参考,参数如图所示。
2、algo参数设置:在algo安装文件夹下打开配置工具,如下图所示:设置注册服务器ip,现在相应的算法和相机类型,保存并退出。
3、算法参数设置:运行配置工具,参数如下所示,用户名和密码可以随意修改,用户类型高级模式。
打开人脸算法,如下图所示:根据演示场所修改检测区域的大小即可。
选择电子警察算法,根据演示环境调整车牌检测区域、有效视频触发区域、左右车道线等。
- 1、下载文档前请自行甄别文档内容的完整性,平台不提供额外的编辑、内容补充、找答案等附加服务。
- 2、"仅部分预览"的文档,不可在线预览部分如存在完整性等问题,可反馈申请退款(可完整预览的文档不适用该条件!)。
- 3、如文档侵犯您的权益,请联系客服反馈,我们会尽快为您处理(人工客服工作时间:9:00-18:30)。
媒体云人脸识别REST API帮助文档
V1.04
发布日期:2013年12月30日
百度开发者中心
(版权所有,翻版必究)
修订记录
目录
一、概述 (4)
二、媒体云人脸识别REST API使用说明 (4)
2.1 开启人脸识别服务 (4)
2.2 开通媒体云人脸识别API权限 (7)
2.3获取access_token步骤 (7)
2.4 API请求方式说明 (9)
三、媒体云人脸识别API列表 (10)
3.1人脸检测 (10)
3.1.1参数说明 (10)
3.1.2具体示例 (11)
四、媒体云人脸识别API错误码总表 (12)
一、概述
百度媒体云人脸识别服务依托百度世界领先的人脸识别算法,提供了(1)人脸及五官几何位置定位功能;(2)人脸图像的性别、表情等人脸属性分析功能。
人脸识别服务提供通过REST API的方式来使用人脸识别服务,本文档描述了使用人脸识别服务REST API的方法。
除了原生的REST(Representational State Transfer,即“表述性状态转移”)API之外,人脸识别服务还提供了ANDROID、IOS、WP7、JAVA及PHP多种平台的SDK来帮助开发者缩短开发周期,具体请参考“SDK”部分相关内容(开发者中心通用SDK)。
二、媒体云人脸识别REST API使用说明
说明:开发者中心管理控制台可以通过开发者中心首页右上角“消息”旁边的已标记选项进入,如图1红框所示。
图 1管理控制台入口
2.1 开启人脸识别服务
使用媒体云人脸服务之前,您须按照本节描述的步骤来完成服务的开启,后台服务的注册。
通过开发者中心“管理控制台”,进入“我的应用列表”,创建应用。
(1)进入“管理控制台”
图 2进入管理控制台(2)创建应用test,点击“创建应用”
图 3 创建应用(3)填写应用名称”test”以及应用类型
图 4填写创建应用信息
(4)创建应用成功,点击左侧“媒体云”开启媒体云人脸识别服务
图 5 申请使用人脸识别服务
(5)填写使用场景和申请理由
图 6 人脸服务申请信息填写
(6)开启服务成功后,可以在控制台来使用人脸服务的统计分析功能。
图7 人脸服务统计功能界面
2.2 开通媒体云人脸识别API权限
媒体云人脸识别 API所有REST API都首先需要获取Access Token。
Access Token是用户身份验证和授权的凭证。
详细信息请参考百度开发者中心帮助文档的OAuth介绍部分。
媒体云人脸识别采用的是Client Credentials授权方式,即采用应用公钥、密钥获取Acce ss Token,适用于任何带server类型应用,通过此授权方式获取Access Token仅可访问平台授权类的接口,详见Client Credentials授权说明。
2.3获取access_token步骤
(1)如果您已是百度用户,请您访问百度开发者中心并使用百度账号直接登录。
如果您还不是百度用户,请您先访问百度Passport,填写注册邮箱和密码并激活成为百度用户,然后访问百度开发者中心使用百度账号登录。
(2)您需要创建一个应用以获取API Key(client_id)和Secret Key(client_secret),申请方式见创建应用。
说明:目前创建应用入口如下截图红框所示:
图 8进入控制台
(3)创建应用之后,您可以从管理中心进入相应应用得到API Key(client_id)和Secret Key(client_secret)。
基本信息页
从管理控制台进入创建的应用,如下图所示,API Key(client_id)和Secret Key (client_secret)即显示于其中, ID即为应用id(appid)。
图 9
应用基本信息
(4) 根据百度
OAuth 的Client Credentials 授权方式获取access_token 。
百度OAuth 的Client
Credentials 和其他授权方式的说明见百度OAuth 介绍的“百度支持的OAuth 授权”部分。
其中,grant_type 的值固定为client_credentials ,client_id 即为(3)中截图所示的 API Key 的值,client_secret 即为(3)中截图所示的Secret Key 的值。
更为详细的介 绍请参见Client Credentials 授权说明。
响应如下所示,其中access_token 字段即为请求REST API 所需的令牌, access_token 有效期一般为一个月,开发者需要对access_token ,进行有效性判断,过期需重新申请access_token 。
2.4 API请求方式说明
◆目前人脸检测接口支持POST和GET方式。
◆媒体云人脸识别REST API的所有参数在传入时应当使用:UTF-8编码。
◆URL格式
◆参
1.GET请求:
说明:用HTTP GET 请求方式发送两个参数:access_token =xxxx和url =xxxx。
2.POST请求:
说明:用HTTP POST方式发送两个参数:access_token =xxxx和url= xxxx。
三、媒体云人脸识别API列表
3.1人脸检测
3.1.1参数说明
3.1.2具体示例
四、媒体云人脸识别API错误码总表。
