NI VeriStand 2010 Custom Device Developer's Guide
national instrument 的文件格式 -回复

national instrument 的文件格式-回复什么是国家仪器(National Instrument)的文件格式?National Instrument(NI)是一家全球领先的工程和科学解决方案提供商。
作为该公司的产品和服务的一部分,NI开发了一种用于测量、自动化和控制系统的软件开发工具——LabVIEW。
LabVIEW是一种以图形化方式编程的工具,允许工程师和科学家使用简单易懂的图标来组织和控制硬件设备。
为了使LabVIEW软件能够与其他软件和设备进行交互,NI开发了一些特定的文件格式。
NI的文件格式包括但不限于:1. *.vi 文件:这些文件是LabVIEW程序的主要文件格式。
每个VI(Virtual Instrument)文件对应一个LabVIEW程序模块,其中包含了图形化编程的代码和配置信息。
VI文件可以包含输入和输出的连接点,允许用户以模块化的方式开发和组织代码。
VI文件是LabVIEW的核心文件格式,通常用于保存和分享LabVIEW程序。
2. *.ctl 和*.ctt 文件:这些文件是控件和控制台文件。
*.ctl文件保存了自定义控件的定义,允许用户在LabVIEW中重复使用这些控件。
与之相对,*.ctt文件保存的是控制台界面的定义,用于创建LabVIEW的用户界面(UI)。
3. *.llb 文件:这些文件是LabVIEW库文件。
LabVIEW库文件可以包含多个VI文件,允许用户轻松地将共享和重复使用的VI组织成库。
库文件可以在不同的LabVIEW程序之间共享,提高代码的可维护性和开发效率。
4. *.lvproj 文件:这些文件是LabVIEW项目文件。
LabVIEW项目文件用于组织和管理多个VI文件和其他资源。
项目文件可以包含项目级别的设置和配置信息,例如编译选项、依赖关系和文件路径等。
使用项目文件,用户可以方便地管理LabVIEW程序和相关资源的开发和部署。
5. *.tdms 文件:这些文件是用于数据存储和传输的开放文件格式。
PG0703P_C02A 等产品的编程手册说明书
目录1. 远程控制概述 (1)1.1 如何远程控制 (1)1.2 通信协议 (3)1.3 远程控制功能 (5)2. SCPI简介 (10)2.1 命令格式 (10)2.2 符号说明 (10)2.3 参数类型 (11)2.4 命令缩写 (12)3. 模式共用命令 (13)3.1 IEEE公用命令子系统 (13)3.2 系统命令 (15)3.3 存储命令 (20)3.4 显示控制 (21)3.5 模式命令 (22)3.6 扫描命令 (22)4. 频谱分析模式 (24)4.1 仪器模式命令 (24)4.2 Initiate命令子系统 (24)4.3 Sense命令子系统 (25)4.4 Calculate命令系统 (43)4.5 Measurement命令系统 (58)4.6 触发 (72)4.7 TG (73)4.8 调制解调 (75)5. 矢量网络分析模式 (77)5.1 频率控制 (77)5.2 幅度控制 (78)5.3 带宽控制 (80)5.4 扫描控制 (80)5.5 TG (81)5.6 迹线 (81)5.7 光标 (85)6. 故障定点分析模式 (98)6.1 频率控制 (98)6.2 幅度控制 (99)6.3 扫描控制 (100)6.4 迹线 (101)6.5 光标 (102)6.6 测量 (105)7. 调制分析模式 (110)7.1 频率控制 (110)7.2 幅度控制 (111)7.3 带宽控制 (112)7.4 扫描控制 (113)7.5 迹线 (114)7.6 光标 (117)7.7 测量 (119)7.8 触发 (124)8. 实时频谱分析模式 (126)8.1 频率控制 (126)8.2 幅度控制 (129)8.3 带宽控制 (131)8.4 扫描控制 (132)8.5 迹线 (134)8.6 光标 (137)8.7 触发 (139)8.8 测量 (142)9. EMI测量 (145)9.1 频率控制 (145)9.2 幅度控制 (147)9.3 带宽控制 (150)9.4 扫描控制 (151)9.5 迹线 (153)9.6 光标 (155)9.7 限制 (159)10. 编程示例 (168)10.1 使用VISA的编程示例 (168)10.2Sockets/Telnet示例 (182)SIGLENT 1. 远程控制概述分析仪支持通过USB、LAN、GPIB-USB接口与计算机进行通信。
NI LabVIEW 1 安装指南说明书
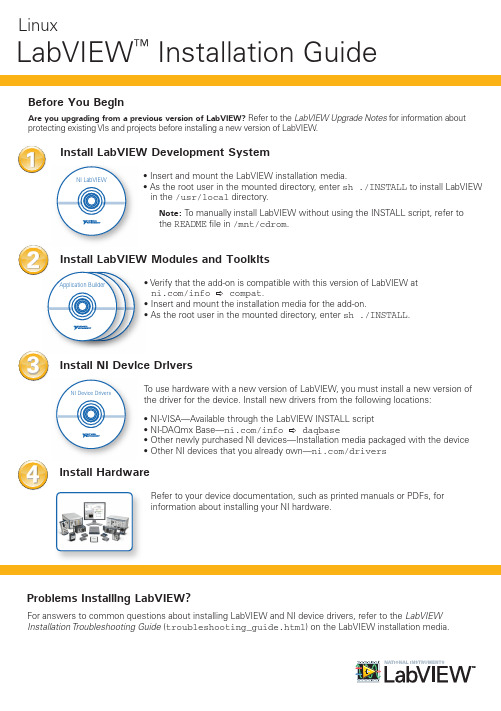
Linux LabVIEW ™ Installation Guide NI LabVIEW 1Install LabVIEW Development SystemBefore You Begin Application Builder 2Install LabVIEW Modules and Toolkits• NI-VISA—Available through the LabVIEW INSTALL script • NI-DAQmx Base—/info a daqbase • Other newly purchased NI devices—Installation media packaged with the device • Other NI devices that you already own—/driversNI Device Drivers 3Install NI Device Drivers4Refer to your device documentation, such as printed manuals or PDFs, for information about installing your NI hardware.Install Hardware• Insert and mount the LabVIEW installation media.• As the root user in the mounted directory, enter sh ./INSTALL to install LabVIEW in the /usr/local directory.Note: To manually install LabVIEW without using the INSTALL script, refer to the README file in /mnt/cdrom .To use hardware with a new version of LabVIEW, you must install a new version of the driver for the device. Install new drivers from the following locations:Problems Installing LabVIEW?For answers to common questions about installing LabVIEW and NI device drivers, refer to the LabVIEW Installation Troubleshooting Guide (troubleshooting_guide.html ) on the LabVIEW installation media.• Verify that the add-on is compatible with this version of LabVIEW at /info a compat .• Insert and mount the installation media for the add-on.• As the root user in the mounted directory, enter sh ./INSTALL .Are you upgrading from a previous version of LabVIEW? Refer to the LabVIEW Upgrade Notes for information about protecting existing VIs and projects before installing a new version of LabVIEW.LabVIEW modules and toolkits may have additional system requirements. To verify that your system meets the minimum requirements for the specific LabVIEW module or toolkit you want to install, refer to the readme file on the installation media for the module or toolkit.Additional System Requirements for LabVIEW Modules and ToolkitsThe following system requirements apply to the LabVIEW Full and Professional Development Systems.LinuxLabVIEW System Requirements©2012–2013 National InstrumentsAll rights reserved. Refer to the NI T rademarks and Logo Guidelines at /trademarks for more information on National Instruments trademarks. Other product and company names mentioned herein are trademarks or trade names of their respective companies. For patents covering National Instruments products/technology, refer to the appropriate location: Help»Patents in your software, the patents.txt file on your media, or the National Instruments Patent Notice at /patents . You can find information about end-user license agreements (EULAs) and third-party legal notices in the readme file for your NI product. Refer to the Export Compliance Information at /legal/export-compliance for the National Instruments global trade compliance policy and how to obtain relevant HTS codes, ECCNs, and other import/export data.Linux Run-Time Engine Development Environment ProcessorPentium III/Celeron 866 MHz or equivalent Pentium 4M or equivalent RAM256 MB 1 GB Screen Resolution 1024 x 768 Pixels1024 x 768 Pixels Operating System Linux kernel 2.2x, 2.4x, 2.6x, or 3x, and GNU C Library (glibc) Version 2.4.4 or later for the Intel x86 architectureRed Hat Enterprise Linux Desktop + Workstation 5 or later, open SUSE 12.1 or later, or Scientific Linux 6 or later Disk Space 115 MB 1.1 GB for the complete installation (excluding drivers)Color Palette N/A LabVIEW and the LabVIEW Help contain 16-bit color graphics. LabVIEW requires a minimum color palette setting of 16-bit color.Temporary Files Directory N/A LabVIEW uses a directory for storing temporary files. National Instruments recommends that you have several megabytes of disk space available for this temporary directory.Adobe Reader N/AY ou must have Adobe Reader installed to search PDF versions of all LabVIEW manuals.Note: National Instruments recommends that you use Firefox 3.6.26 or later to view the LabVIEW Help .375845B-01 Jun13。
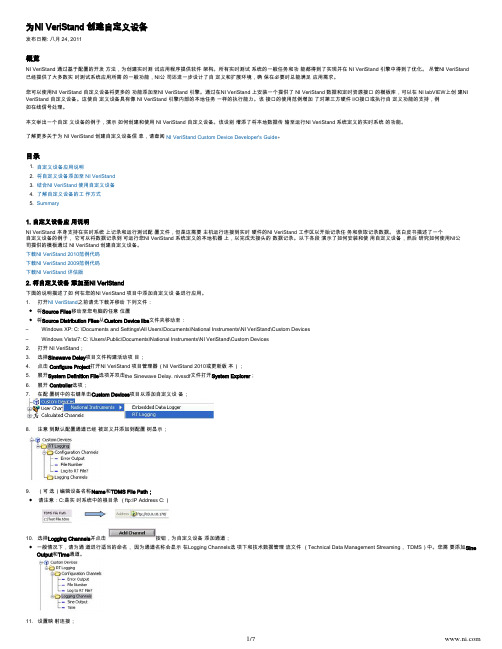
在NI VeriStand中如何创建第三方设备
1. 2. 3. 4. 5. 为NI VeriStand 创建自定义设备发布日期: 八月 24, 2011概览NI VeriStand 通过基于配置的开发 方法,为创建实时测 试应用程序提供软件 架构。
所有实时测试 系统的一般任务和功 能都得到了实现并在 NI VeriStand 引擎中得到了优化。
尽管NI VeriStand 已经提供了大多数实 时测试系统应用所需 的一般功能,NI公 司还进一步设计了自 定义和扩展环境,确 保在必要时总能满足 应用需求。
您可以使用NI VeriStand 自定义设备将更多的 功能添加至NI VeriStand 引擎。
通过在NI VeriStand 上安装一个提供了 NI VeriStand 数据和定时资源接口 的模板库,可以在 NI labVIEW上创 建NI VeriStand 自定义设备。
这使自 定义设备具有像 NI VeriStand 引擎内部的本地任务 一样的执行能力。
该 接口的使用范例增加 了对第三方硬件 I/O接口或执行自 定义功能的支持,例如在线信号处理。
本文举出一个自定 义设备的例子,演示 如何创建和使用 NI VeriStand 自定义设备。
该设别 增添了将本地数据传 输至运行NI VeriStand 系统定义的实时系统 的功能。
了解更多关于为 NI VeriStand 创建自定义设备信 息,请查阅。
NI VeriStand Custom Device Developer's Guide 目录自定义设备应用说明将自定义设备添加至 NI VeriStand结合NI VeriStand 使用自定义设备了解自定义设备的工 作方式Summary1. 自定义设备应 用说明NI VeriStand 本身支持在实时系统 上记录和运行测试配 置文件,但是这需要 主机运行连接到实时 硬件的NI VeriStand 工作区以开始记录任 务和获取记录数据。
NI_VeriStand使用手册簿
Real-Time Testing and SimulationSoftwareNI VeriStand 2010使用手册Document Version 1.0By 慕慕 316395914目录1.概述 (3)2.创建软件模型 (4)2.1.创建被控对象模型 (4)2.2.创建控制器模型 (9)3.创建MIL测试环境 (12)4.创建测试激励信号 (21)4.1.使用S TIMULUS P ROFILE E DITOR (21)4.2.使用TMDS F ILE V IEWER (27)5.VERISTAND高级功能 (29)5.1.使用U SER C HANNELS、P ROCEDURES、A LARMS (29)5.2.使用C ALCULATED C HANNELS (34)6.创建HIL测试系统 (40)6.1.添加实时目标机 (40)6.2.添加NI DAQ设备 (42)6.3.添加NI R系列设备 (44)6.4.添加NI故障注入模块 (45)6.5.添加NI C OMPACT RIO硬件 (48)6.6.添加NI XNET硬件 (49)6.7.添加TDK-L AMBDA可编程电源 (54)6.8.更改软硬件端口映射 (58)6.9.更改模型运行设置 (59)1.概述VeriStand 2010是美国 National Instruments公司专门针对HiL仿真测试系统而开发出的软件环境。
VeriStand 2010是一种基于配置的软件环境,它简单易用,无需编程就完成实时测试系统的创建,实现HiL测试中所需的各种功能。
NI VeriStand 2010能够配置模拟、数字和基于FPGA的硬件I/O接口;能够配置激励生成、记录数据、计算通道和事件警报;能够从NI LabVIEW和MathWorks Simulink®等建模环境中导入控制算法和仿真模型;能够利用操作界面实时在线监控运行任务并与之交互。
基于Veristand的飞机动力系统硬件在环测试平台设计

统硬件在环测试系统。 基于功能需求,该系统下位机采用搭载NI鄄LinuxRT系统的实时仿真
机,实现了硬件 资 源 配 置 和 信 号 传 输 ;上 位 机 以NI Veristand软 件 为 基 础 ,完 成 了 测 试 用 例
开发与管理、实时模型开发与调用、设备驱动管理等任务,最终实现了及动力系统的实时
测试平台的下位机硬件主要由 NI 公司的实时 仿真机组成,包括 PXIe 机箱、具有 NI鄄LinuxRT 操作 系统的实时控制器、DAQ 板卡、信号线等组成,完成 对 Simulink 动 力 系 统 模 型 的 运 行 、数 据 处 理 、数 据 传输等工作。
采用示波器对动力信号进行观测,判断信号是 否正确,能否正常输出。
1
VTAS
9.8
1
2
-K-
P(N)
TG Motor(kg)
图 4 简易动力系统实时模型图 Fig.4 Real鄄time model diagram of simple power system
在简易动力系统实时仿真模型中,主要规定了 真 空速和 PWM 脉宽 输入和推 力输出,分 别 对 应 硬 件板卡的模拟量输入通道和输出通道。 4.3 自动化测试用例开发
在线仿真模拟。 该系统为后续方便快捷完成地面功能试验测试,提高测试效率,提升测试
自动化水平提供了研究方向。
关 键 词 :Veristand;动 力 系 统 ;硬 件 在 环 ;地 面 功 能 试 验 ;测 试
中图分类号:TP391.9 文献标识码:A
文 章 编 号 :1001鄄9944(2024)05鄄0006鄄04
采用 NI Veristand 软件搭配 NI 实时仿真机,通 过导入简易动力系统模型快速搭建硬件在环测试 平台。 该平台能实现自动化测试用例开发使用、测 试功能模拟,方便快捷完成地面功能试验测试流 程,提升测试效率,提高飞机自动化和智能化测试 水 平 [7-8]。
NATIONAL INSTRUMENTS LabVIEW LabVIEW 2010 发行说明
LabVIEW发行说明™LabVIEW 2010发行说明包含LabVIEW安装说明和LabVIEW的操作系统要求。
如升级LabVIEW的前期版本,安装LabVIEW 2010前应阅读软件升级包中的LabVIEW升级说明。
如需转换前期版本的VI,在LabVIEW 2010中使用,必须阅读相关注意事项。
安装LabVIEW前,应阅读本文档的系统要求部分,然后按照安装LabVIEW 2010中的说明进行安装。
安装LabVIEW后,请阅读参考资料部分,了解LabVIEW入门知识。
目录系统要求 (2)安装LabVIEW 2010 (6)Windows (6)Mac OS X (7)Linux (8)安装LabVIEW附加软件 (9)安装应用程序生成器 (9)激活LabVIEW许可证(Windows) (9)试用LabVIEW、模块和工具包 (10)单用户许可证和批量许可证 (10)安装和配置硬件 (10)Windows (10)Mac OS X (10)Linux (11)参考资料 (11)LabVIEW快速参考指南 (11) (11)系统要求表1为运行LabVIEW 2010的操作系统要求。
表1LabVIEW 2010的系统要求系统平台磁盘空间和系统要求重要说明所有平台运行LabVIEW至少需要256 MB的内存。
NI建议使用1 GB或以上的内存。
运行LabVIEW至少需要1024 × 768像素的屏幕分辨率。
部署LabVIEW生成的应用程序时,LabVIEW运行引擎至少需要64 MB的内存,屏幕分辨率至少为800 × 600像素。
NI建议使用256 MB以上的内存且屏幕分辨率至少为1024 × 768像素。
LabVIEW和LabVIEW帮助包含16位彩色图形。
LabVIEW至少需要16位彩色配置。
如需搜索PDF格式的LabVIEW用户手册,必须安装Adobe Reader。
NI_VeriStand_2010_使用手册
Real-Time Testing and Simulation SoftwareNI VeriStand 2010使用手册Document Version 1.0By 慕慕316395914目录1.概述 (3)2.创建软件模型 (4)2.1.创建被控对象模型 (4)2.2.创建控制器模型 (9)3.创建MIL测试环境 (11)4.创建测试激励信号 (20)4.1.使用S TIMULUS P ROFILE E DITOR (20)4.2.使用TMDS F ILE V IEWER (26)5.VERISTAND高级功能 (28)5.1.使用U SER C HANNELS、P ROCEDURES、A LARMS (28)5.2.使用C ALCULATED C HANNELS (33)6.创建HIL测试系统 (39)6.1.添加实时目标机 (39)6.2.添加NI DAQ设备 (41)6.3.添加NI R系列设备 (43)6.4.添加NI故障注入模块 (44)6.5.添加NI C OMPACT RIO硬件 (47)6.6.添加NI XNET硬件 (48)6.7.添加TDK-L AMBDA可编程电源 (53)6.8.更改软硬件端口映射 (57)6.9.更改模型运行设置 (58)1.概述VeriStand 2010是美国National Instruments公司专门针对HiL仿真测试系统而开发出的软件环境。
VeriStand 2010是一种基于配置的软件环境,它简单易用,无需编程就完成实时测试系统的创建,实现HiL测试中所需的各种功能。
NI VeriStand 2010能够配置模拟、数字和基于FPGA的硬件I/O接口;能够配置激励生成、记录数据、计算通道和事件警报;能够从NI LabVIEW和MathWorks Simulink®等建模环境中导入控制算法和仿真模型;能够利用操作界面实时在线监控运行任务并与之交互。
NI VeriStand Model Framework用户指南说明书

INTRODUCTIONNI VeriStand Model Framework™The NI VeriStand software and the NI LabVIEW Model Interface Toolkit allow you to run simulations of your simulation models written in C and C++. To enable your models to interact with this NI software, you must design them to work with the NI VeriStand Model Framework, a group of files that provide entry points to your models.This guide describes the components of the NI VeriStand Model Framework, the process for creating model code that is compatible with the framework, and requirements for compiling your model with the framework.ContentsInteraction of Framework Code and Your Model Code (1)Installing the Model Framework (2)Components of the Model Framework (3)Components of Your Model Code (3)Overview: Model Creation and Compilation Process (4)Creating a model.h Header File (4)Adapting template.c to Serve as Your Model Code (5)Compiling Your Model with the NI VeriStand Model Framework (5)Where to Go Next (6)Interaction of Framework Code and Y our Model CodeWhen you run your test application, designed using NI VeriStand or the LabVIEW Model Interface Toolkit, the application executes functions defined in NI VeriStand Model Framework files. These functions then call functions in your model code, which convert user-defined data types, initialize your model, and take a time step.The following illustration shows how NI software, Model Framework code, and code in your model interact. In this illustration, your test application calls a function that the Model Framework exports. That function in turn calls a function in your model code.Figure 1. Interaction of NI Software, Framework Code, and Model CodeAs the model executes, the test application can interact with the model in the following ways:•Write data to model inports•Read data from model outports•Allow you to adjust model parameter values•Allow you to probe model signalsInstalling the Model FrameworkIn the NI VeriStand installer, the NI VeriStand Model Framework feature installs the Model Framework files on the host computer. If you cannot locate the files described in the next section of this document, run the NI VeriStand installer again and select the NI VeriStand Model Framework item from the list of features to install. You do not need to reinstall other NIsoftware to install the Model Framework.2||NI VeriStand Model Framework IntroductionNI VeriStand Model Framework Introduction |© National Instruments |3Components of the Model FrameworkThe following table describes the files in the Model Framework. These files describe how you must implement your model code.Components of Y our Model CodeYou typically create the following two files to implement your C/C++ model:•model.h —Contains the type definitions for your model parameters. This file must be named model.h and must include all the user-visible parameters in your model.•model.c —Contains your model code. Make a copy of template.c and modify the copy to ensure you maintain interdependent structures, such as headers, imported and exported symbols, and functions NI software recognizes, between your model code and ni_modelframework.c . You can name this .c file however you want.The next section of this document contains information about creating your model.h and .c files.FileDescription Installed Location ni_modelframework.h A header file that includes thefollowing components:•Type definitions that your model code can use to define properties of outward-facing components of your model, such as inports, outports, parameters, and signals.•Functions the NI VeriStand Model Framework exports to your compiled model.RootDrive :\VeriStand\version \ModelInterfacewhere RootDrive is the drive where NI software installs and version is the version number of NI VeriStand.ni_modelframework.c Implements the commoninterface between your test application and your model code.RootDrive :\VeriStand\version \ModelInterface\custom\srctemplate.c A template for your model code. Use this file to create code that maintains interdependent structures between your model and ni_modelframework.c .RootDrive :\VeriStand\version \ModelInterface\custom\examples4| |NI VeriStand Model Framework Introduction Overview: Model Creation and Compilation ProcessTo create a model written in C/C++ that NI software can load and execute via the Model Framework, you typically perform the following tasks:1.Create a model.h header file.2.Adapt template.c to serve as your model code.3.Create a makefile to compile your model code.The following sections contain high-level guidelines about the files you need to create and customize to prepare a model for use by NI software. However, these sections do not contain detailed instructions for creating and compiling a model using the Model Framework. For details about this process, refer to code comments inside the Model Framework files.Creating a model.h Header FileYou must create a header file named model.h for your model code. The model.h file contains the type definitions for model parameters and must include all the user-visible parameters in your model.The following code, copied from the model.h file in the engine model example atRootDrive :\VeriStand\version \ModelInterface\custom\examples\engine , provides an example of the model.h file you must create.Figure 2. Example model.h fileThe previous example contains definitions for both scalar and vector double parameters. For information about defining parameters whose data type is something other than double, refer to TO DO comments in the template.cfile installed by the Model Framework.NI VeriStand Model Framework Introduction |© National Instruments |5Adapting template.c to Serve as Y our Model Code The template.c file installed by the Model Framework serves as a starting point for your model code. You can save your C model file with any filename.Use the following guidelines to modify template.c to serve as your own model code:1.Refer to the contents of template.c for all the code you must customize, which is marked with TO DO comments. This file also contains information about how to instantiate and access parameters.2.Refer to the contents of ni_modelframework.h for the type definitions you must use to define properties of outward-facing components of your model, such as inports, outports, parameters, and piling Y our Model with the NI VeriStand Model FrameworkFor your model code to work with the NI VeriStand Model Framework, you must compile the model. To compile your model, create a makefile that is appropriate for the compiler you plan to use and the operating system on which the model will run. The following list describes the type of makefile to use and the corresponding output to generate:•Windows/NI ETS targets—Create a .mak makefile that generates a DLL. Refer to the National Instruments website at /info and enter the Info Code exjr6s for information about compiling a DLL for ETS targets.•VxWorks targets—Create a .mk makefile that generates a .out file. Refer to the National Instruments website at /info and enter the Info Code ex2xp2 for information about compiling a .out file for VxWorks targets.Note To determine which real-time operating system your RT target runs, refer to the National Instruments website at /info and enter the Info Code exxjax .Refer to the example .mak and .mk files installed in the RootDrive :\VeriStand\version \ModelInterface\custom\examples directory, where RootDrive is the drive where NI software installs and version is the version number of NI VeriStand, for examples of makefiles designed to compile models that work with the Model Framework.The following files must be present when you run a makefile to compile your model code:•ni_modelframework.h •ni_modelframework.c•model.h•model.c© 2009–2015 National Instruments. All rights reserved.372952C-01Aug15Refer to the NI Trademarks and Logo Guidelines at /trademarks for more information on National Instruments trademarks. Other product and company names mentioned herein are trademarks or trade names of their respective companies. For patents covering National Instruments products/technology, refer to the appropriate location: Help»Patents in your software, the patents.txt file on your media, or the National Instruments Patents Notice at /patents . You can find information about end-user license agreements (EULAs) and third-party legal notices in the readme file for your NI product. Refer to the Export Compliance Information at /legal/export-compliance for the National Instruments global trade compliance policy and how to obtain relevant HTS codes, ECCNs, and other import/export data. NI MAKES NO EXPRESS OR IMPLIED WARRANTIES AS TO THE ACCURACY OF THE INFORMATION CONTAINED HEREIN AND SHALL NOT BE LIABLE FOR ANY ERRORS. U.S. Government Customers: The data contained in this manual was developed at private expense and is subject to the applicable limited rights and restricted data rights as set forth in FAR 52.227-14, DFAR 252.227-7014, and DFAR 252.227-7015.Where to Go NextThe Model Framework installs several example models, including their .c and model.h files and makefiles. Refer to the RootDrive :\VeriStand\version \ModelInterface\custom\examples directory, where RootDrive is the drive where NI software installs and version is the version number of NI VeriStand, for examples of model code you can explore.Refer to the appropriate help system for the NI software you are using:•NI VeriStand Help —Available in NI VeriStand by selecting Help»Search the NI VeriStand Help . Browse to the Integrating and Executing Models section on the Contents tab for more information about simulating models in NI VeriStand.•Model Interface Toolkit Help —Available in LabVIEW by selecting Help»LabVIEW Help . Browse to the Toolkits»Model Interface Toolkit section on the Contents tab for more information about simulating models in LabVIEW with the Model Interface Toolkit.。
2010 NI产品指南
NI产品指南/china目录图形化系统设计软件概述2LabVIEW 4LabVIEW模块、工具包与驱动程序6LabWindows™/CVI 9Measurement Studio 10NI TestStand 11NI VeriStand 12DIAdem 13Multisim 13图形化系统设计硬件概述14数据采集与信号调理16PXI 25模块化仪器29NI工业自动化平台39快速原型及嵌入式平台48GPIB 51VXI 53NI ELVIS设计原型平台54培训、认证与定价培训与认证55院校与OEM折扣及GSA定价56大陆地区代理与CompactRIO分销商及增值服务商57 LabWindows标志的使用已得到Microsoft Corporation授权。
Windows是Microsoft Corporation在美国及其它国家的注册商标。
/china 2图形化系统设计软件概述在过去的20多年中,NI 一直为业界提供最先进的测量与自动化软件,不断推进虚拟仪器技术的发展。
近年来,NI 进一步把虚拟仪器技术的观念扩展到“图形化系统设计”的高度,为您提供集快速设计、原型开发以及发布系统于一体的统一开发平台。
目前,NI 提供应用开发环境(ADE )、分析与测试管理软件以及设备和仪器驱动程序,全方位满足您测试、控制以及设计的需求。
NI 提供各种系统管理软件,例如专用于测试管理的NI TestSt and ,专用于为离线数据分析及显示的D I Ad e m 。
对于图形化、交互式以及基于文本编程的解决方案,您可以使用应用开发环境(ADE ),例如NI LabVIEW 、LabWindows™/CVI 以及Measurement Studio for Microsoft Visual Studio 。
NI 还提供硬件驱动程序、灵活的高级API 以及配置管理器。
系统管理软件NI TestStand 、NI VeriStand 、NI Switch Executive 、DIAdemLabWindows ™/CVI LabVIEWMeasurement Studio for Visual Studio驱动程序与测量服务NI-DAQmx 、NI-VISA 、测量与自动化浏览器(MAX )数据采集和信号调理可编程自动化控制器仪器通信LabWindows 标志的使用已得到Microsoft Corporation 授权。
NI_VeriStand使用手册
Real-Time Testing and Simulation SoftwareNI VeriStand 2010使用手册Document Version 1.0By 慕慕316395914目录1.概述 (3)2.创建软件模型 (4)2.1.创建被控对象模型 (4)2.2.创建控制器模型 (9)3.创建MIL测试环境 (12)4.创建测试激励信号 (21)4.1.使用S TIMULUS P ROFILE E DITOR (21)4.2.使用TMDS F ILE V IEWER (27)5.VERISTAND高级功能 (29)5.1.使用U SER C HANNELS、P ROCEDURES、A LARMS (29)5.2.使用C ALCULATED C HANNELS (34)6.创建HIL测试系统 (40)6.1.添加实时目标机 (40)6.2.添加NI DAQ设备 (42)6.3.添加NI R系列设备 (44)6.4.添加NI故障注入模块 (45)6.5.添加NI C OMPACT RIO硬件 (48)6.6.添加NI XNET硬件 (49)6.7.添加TDK-L AMBDA可编程电源 (54)6.8.更改软硬件端口映射 (58)6.9.更改模型运行设置 (59)1.概述VeriStand 2010是美国National Instruments公司专门针对HiL仿真测试系统而开发出的软件环境。
VeriStand 2010是一种基于配置的软件环境,它简单易用,无需编程就完成实时测试系统的创建,实现HiL测试中所需的各种功能。
NI VeriStand 2010能够配置模拟、数字和基于FPGA的硬件I/O接口;能够配置激励生成、记录数据、计算通道和事件警报;能够从NI LabVIEW和MathWorks Simulink®等建模环境中导入控制算法和仿真模型;能够利用操作界面实时在线监控运行任务并与之交互。
NI ELVIS 设备标识更改指南说明书
Guide to Preparation for This CourseThroughout this course the NI ELVIS hardware platform is often referred toas Dev3 in the Device field on instruments and physical channel name. Thisnaming convention to identify the device is given to NI hardware and oftendefaults to Dev1. Be mindful of this; select the correct Device name thatcorresponds to your connected instrument when using NI ELVIS with SoftFront Panels, LabVIEW and Multisim.Here is a set of instructions to change the device identifier:1.Open Measurement & Automation Explorer (MAX).2.Under My System, expand Devices and Interfaces.3.Expand NI-DAQmx Devices.4.Select the device name referring to your NI ELVIS workstation andright-clicking the device and selecting Rename from menu.5.Type in the name that you would like, Dev3, Dev1 or MyELVIS forexample, press enter when complete.6.Close MAX.You have just renamed your device!A Word from the AuthorIn 2003, National Instruments introduced a new approach to designing,testing, and teaching electronic circuits. For the first time, you could takeadvantage of a complete suite of standard test instruments on your computerand directly interface these instruments to circuits built on a small teststation called the National Instruments Educational Laboratory VirtualInstrumentation Suite (NI ELVIS). Its small footprint and flexibility made ita popular choice for analog and digital circuit courses, a natural interface tomany fixed instruments, and an effective demonstration station in theclassroom.NI ELVIS II, together with its new driver software, NI ELVISmx, is evenbetter. It features a lighter weight, better control layout, more interfacingports, an integrated data acquisition device, and Hi-Speed USBconnectivity. This means that if you have NI ELVISmx software installed onmultiple computers, you can use your NI ELVIS II with your office desktop,your home computer, your laptop in the classroom, or even on a friend’scomputer.The purpose of this document is to introduce many of the new features ofNI ELVIS II and review some of the early features that have been improved.We have added new experiments and challenges and integrated NI Multisim © National Instruments Corporation vii Introduction to NI ELVISGuide to Preparation for This Courseintuitive circuit schematic and capture software into the NI ELVISenvironment. Now you can take your design from paper or the blackboardand simulate it within Multisim as a classic schematic diagram on theNI ELVIS or NI ELVIS II breadboard layout. Once the design is mature,you can build the real circuit on an NI ELVIS II protoboard and test it withthe same design tools (soft front panel [SFP] instruments) you used to honethe design. The best part is you can flip back and forth from the real circuitto the design circuit until you get it just right.Then you can use it for that special classroom demonstration, for thetechnician to build, or as a protoboard for production. You can do all of thiswith a laptop and the new NI ELVIS II system on a footprint about same sizeas your laptop.This is the way we should be teaching courses – with high-quality designtools and lots of hands-on activities. In the classroom, NI ELVIS brings thematerial alive. In the lab, NI ELVIS shifts the design paradigm from “whatif” to “let’s try it.”How You Can Use These LabsWe have designed these labs as a starting point for your own curriculumdesign, demonstrations in the classroom, and method to inspire students tobe imaginative and creative in their projects.Labs 1 through 5 introduce the main software (SFP) instruments featured inDC, transient, and AC measurements. Both analog and digital circuits areused. Lab 2, which incorporates a temperature sensor, makes a greatclassroom demonstration. Multisim is introduced as a design tool to helpstudents further understand the circuits used in these labs.Labs 6 through 10 take a small system approach to investigate magneticfields, infrared communications, RF communications, and motion. Here,Multisim is used as the design tool to simulate the small systems or toenhance the lab.Lab 11 features the design approach to circuits and interfacing. A designproblem is taken from a paper design and transferred into a virtual circuitwithin Multisim. Using the wide range of Multisim components (more than3,000), you can design just about any circuit. Once the design is complete,you can transfer it to NI ELVIS as the “real” design. Using the sameNI ELVIS II tools, you can hone your design by flipping back and forth fromthe real circuit to the virtual circuit using the same set of NI ELVISdiagnostic testing tools. Once the design is complete, it is ready forproduction.Introduction to NI ELVIS viii 。
什么是NI VeriStand

什么是NI VeriStandNI VeriStand 引擎是非可见执行机制,负责执行硬件I/O、模型、过程、预警和在系统定义文件中指定的其他测试系统任务。
引擎不但控制囫囵系统的定时,而且控制NI VeriStand 引擎和工作区的主机之间的通信。
NI VeriStand 引擎包括多个定时循环,其执行定时由硬件大事控制,精度为微妙。
确定性内存缓冲器在不同循环任务间提供通信,不会在引擎执行中引起数据颤动。
采纳多循环架构,NI VeriStand引擎自然利用了多核处理器并行处理能力的优势,提升了系统性能。
创建系统定义时,包括在高吞吐量、并行性和低延时、挨次结构间挑选的能力,可以配置各种不同的引擎执行设置。
此外,NI VeriStand引擎发布了各种系统参数,您可以在运行时拜访。
或者您可以用法NI 实时执行跟踪工具更细致地查看您的应用程序的执行。
引擎的实时I/O任务用法硬件定时,单点I/O结构,是仿真,控制,和逐点分析任务的抱负挑选。
然而,用法NI VeriStand定制设备可以添加对较高速率,缓冲信号生成和采集的支持,这些内容将会在下一节举行研究。
NI VeriStand引擎可以在NI PCI,NI 实时系统,还有NI CompactRIO 和具有128MB或更大的DRAM RIO接口上的单板RIO上运行。
实时系统使您能够结合同步I/O确定性地执行您的测试——这对于实现闭环控制或与真切组件交互的系统仿真应用程序来说是关键的能力。
然而,对于低性能系统需求或实现模型在环(MIL)或软件在环(SIL)的测试,您还可以在同一台计算机上将NI VeriStand 引擎作为您的用户界面加以运行。
自定义NI VerStandNI VeriStand通过用法基于配置的开发办法,为创建实时测试应用程序提供软件架构。
实时测试应用程序所需要的全部常见任务已经在NI VeriStand引擎内部举行了实现与优化。
然而,您还可以用法LabVIEW第1页共3页。
NUUO产品路标-2010

Value-add : IVS software
An add-on application for video analytics and compatible with all NUUO recorders, including PC based software, NVRmini, Hybrid standalone and up coming products
• •
* Recording, live view, playback and backup is taken into account when evaluating the throughput If the application is mainly required only recording, the throughput will be higher.
NVRmini
NV-4080S /4160S
• • 4080S: 65Mbps (8ch @1.3M, H.264, 10fps) 4016S: 55Mbps (16ch @1.3M, H.264, 10fps)
Hardware upgrade without price changed
Q1 2010
V3.0*
• • • • Emergency recording Manual recording Boosting record Multiple servers (web)
* In planning stage – not committed
IP+ Software
Q1 2010
Q2 2010
Product Roadmap
2010Q1 ~2011Q1
NVRmini SUPER
虚拟仪器

GPIB产品
01 简介
目录
02 LabVIEW
基本信息
根据概念创建者美国国家仪器公司(National Instruments)的定义,虚拟仪器(英语:Virtual instrumentation)技术就是利用高性能的模块化硬件,结合高效灵活的软件来完成各种测试、测量和自动化的 应用。灵活高效的软件能帮助您创建完全自定义的用户界面,模块化的硬件能方便地提供全方位的系统集成,标 准的软硬件平台能满足对同步和定时应用的需求。只有同时拥有高效的软件、模块化I/O硬件和用于集成的软硬 件平台这三大组成部分,才能充分发挥虚拟仪器技术性能高、扩展性强、开发时间少,以及出色的集成这四大优 势。
计时系统
LabVIEW使用1904年1月1日(Epoch参考日期)作为“零”(起始)时间。使用1904年1月1日作为起始时间 的软件还有苹果公司的Mac OS 9,Palm OS,MP4,Microsoft Excel(可选)。
谢谢观看
Hale Waihona Puke 简介简介根据概念创建者美国国家仪器公司(National Instruments)的定义,虚拟仪器(英语:Virtual instrumentation)技术就是利用高性能的模块化硬件,结合高效灵活的软件来完成各种测试、测量和自动化的 应用。灵活高效的软件能帮助您创建完全自定义的用户界面,模块化的硬件能方便地提供全方位的系统集成,标 准的软硬件平台能满足对同步和定时应用的需求。只有同时拥有高效的软件、模块化I/O硬件和用于集成的软硬 件平台这三大组成部分,才能充分发挥虚拟仪器技术性能高、扩展性强、开发时间少,以及出色的集成这四大优 势。
图形化的方法还允许非程序员通过拖放虚拟化形式的VI的方法来生成程序,控制他们已经熟悉的实验室设备。 在LabVIEW编程环境下,借助已经提供的大量例程和文档,可以很容易地创建小型应用程序。这是好的一方面, 另一方面,低估编写高质量的“G”语言所需的专业技能知识仍会带来一定的危险性。编写复杂的算法或大规模的 代码,有一点很重要,那就是程序员需要对LabVIEW特殊的语法具有广泛的了解,并且通晓LabVIEW内存管理的拓 扑结构。最先进的LabVIEW开发系统提供了创建独立应用程序的可能性。此外,还可以创建分布式应用,通过客 户机/服务器模式进行通信。由于G语言天生的并行性特性,这很容易实现。
TestStand与NI硬件设备的兼容性构建全面的测试解决方案

TestStand与NI硬件设备的兼容性构建全面的测试解决方案TestStand是一种广泛应用于测试自动化领域的软件平台,而NI (National Instruments)则提供了一系列的硬件设备,包括仪器、传感器和数据采集卡等。
TestStand与NI硬件设备的兼容性为构建全面的测试解决方案提供了便利和灵活性。
本文将针对TestStand与NI硬件设备的兼容性进行详细探讨,并介绍如何构建全面的测试解决方案。
一、TestStand与NI硬件设备的兼容性优势1.1 统一的测试平台:TestStand提供了一个统一的测试平台,可集成不同厂商的硬件设备,包括NI的硬件设备。
这使得工程师在使用TestStand时可以方便地选择和配置NI硬件设备,实现自动化测试的一体化管理。
1.2 丰富的硬件支持:NI公司提供了一系列的硬件设备,涵盖了各种测试需求。
无论是电子电路测试、机械性能测试还是数据采集等,都可以找到适合的NI硬件设备。
TestStand与NI硬件设备的兼容性使得工程师可以无缝集成这些设备,快速构建出全面的测试解决方案。
1.3 灵活的配置和定制:TestStand提供了灵活的配置和定制功能,可以满足各种测试需求。
与NI硬件设备兼容的TestStand可以根据具体的测试要求,选择合适的硬件设备,进行参数配置和定制功能,以满足不同产品的测试需求。
二、构建全面的测试解决方案的关键步骤2.1 确定测试需求:在使用TestStand构建全面的测试解决方案之前,首先需要明确测试的具体需求。
这包括要测试的产品类型、测试的参数和特性、测试的环境要求等。
通过明确测试需求,可以为后续的硬件选择和配置提供指导。
2.2 选择合适的NI硬件设备:根据测试需求,选择合适的NI硬件设备是构建全面的测试解决方案的关键步骤之一。
NI提供了多种硬件设备,如数字示波器、信号发生器、多功能数据采集卡等。
根据测试的具体参数和特性,选择合适的硬件设备,保证测试的准确性和稳定性。
NI LabVIEW软件着眼于业界领先的ARM微控制器
NI LabVIEW软件着眼于业界领先的ARM微控制器
佚名
【期刊名称】《世界仪表与自动化》
【年(卷),期】2008(012)006
【摘要】美国国家仪器(NI)中国有限公司近日与ARM公司共同发布了应用于ARM微处理器上的NI LabVIEW嵌入式模块。
它是LabVIEW图形化系统设计平台的延伸,直接适用ARM7TM、ARM9TM和CortexTM—M3微处理控制器系列产品。
【总页数】1页(P77)
【正文语种】中文
【中图分类】TP273
【相关文献】
1.德州仪器推出最新Stellaris ARM Cortex—M4F微控制器可提供领先的模拟集成、业界一流的低功耗及浮点性能 [J],
2.Silicon Laboratories扩大其领先业界的小型微控制器产品线——F41x微控制器内含高达32kB闪存、灵活的电源供应和丰富外设 [J],
3.NI LabVIEW软件着眼于ARM微控制器 [J],
4.ARM与英蓓特推出中国版RealView微控制器开发工具包加速基于ARM处理器的微控制器软件开发 [J],
5.NI LabVIEW软件着眼于业界领先的ARM微控制器新模块结合图形化系统设计平台与世界最流行的微控制器以简化嵌入式系统开发 [J],
因版权原因,仅展示原文概要,查看原文内容请购买。
NI软硬件产品率先支持全新的Windows Vista操作系统
NI软硬件产品率先支持全新的Windows Vista操作系统佚名
【期刊名称】《微计算机信息》
【年(卷),期】2007(023)006
【摘要】@@ 图形化系统设计的领先者美国国家仪器有限公司(National Instruments,简称NI)宣布其用于测试、控制和嵌入式系统开发的图形化设计平台NI LabVIEW,以及其他NI应用软件和设备驱动均提供与Windows Vista的兼容特性.
【总页数】1页(P315)
【正文语种】中文
【相关文献】
1.NI全新推出LabVIEW8.2.1版本,支持最新Windows Vista OS [J],
2.NI软硬件产品率先支持全新的Windows Vista操作系统 [J],
3.NI推出支持Camera Link和Windows 7的全新嵌入式视觉系统 [J],
4.丽台电视卡/盒全系列产品全面支持Windows Vista [J],
5.NI率先支持Windows Vista操作系统 [J],
因版权原因,仅展示原文概要,查看原文内容请购买。
NI总线接口软件产品增加对USB的支持
NI总线接口软件产品增加对USB的支持
佚名
【期刊名称】《国外电子测量技术》
【年(卷),期】2003(22)3
【总页数】1页(P52-52)
【关键词】美国国家仪器有限公司;总线接口软件;USB;NI-Device1.4;NI-VISA-Version3.o
【正文语种】中文
【中图分类】TP336;TP317
【相关文献】
1.NI扩展NI-XNET嵌入式网络平台,添加对LIN通信总线的支持 [J],
2.National Instruments总线接口软件产品增加对USB的支持 [J],
3.北京石竹科技发布新款USB接口多协议航电总线适配器CAV-Multi-USB [J],
4.NI总线接口软件产品增加对USB的支持 [J],
5.NI扩展NI—XNET嵌入式网络平台,添加对LIN通信总线的支持 [J],
因版权原因,仅展示原文概要,查看原文内容请购买。
- 1、下载文档前请自行甄别文档内容的完整性,平台不提供额外的编辑、内容补充、找答案等附加服务。
- 2、"仅部分预览"的文档,不可在线预览部分如存在完整性等问题,可反馈申请退款(可完整预览的文档不适用该条件!)。
- 3、如文档侵犯您的权益,请联系客服反馈,我们会尽快为您处理(人工客服工作时间:9:00-18:30)。
This is a beta version of the guide. Please post questions, comments and feedback on the NI Developer Zone.
Copyright © 2010 National Instruments Corporation. All rights reserved. Under the copyright laws, this publication may not be reproduced or transmitted in any form, electronic or mechanical, including photocopying, recording, storing in an information retrieval system, or translating, in whole or in part, without the prior written consent of National Instruments Corporation. National Instruments respects the intellectual property of others, and we ask our users to do the same. NI software is protected by copyright and other intellectual property laws. Where NI software may be used to reproduce software or other materials belonging to others, you may use NI software only to reproduce materials that you may reproduce in accordance with the terms of any applicable license or other legal restriction. Trademarks National Instruments, NI, , LabVIEW and VeriStand are trademarks of National Instruments Corporation. Refer to the Terms of Use section on /legal for more information about National Instruments trademarks. Other product and company names mentioned herein are trademarks or trade names of their respective companies. Patents For patents covering National Instruments products/technology, refer to the appropriate location: Help » Patents in your software, the patents.txt file on your media, or the National Instruments Patent Notice attom Device Developer’s Guide
© 2010 National Instruments
2 of 85
Conventions ............................................................................................................................... 6 Introduction ................................................................................................................................ 7 What is a Custom Device? ......................................................................................................... 7 Table of Directories and Aliases ............................................................................................. 8 Custom Device Framework .................................................................................................... 9 Configuration .....................................................................................................................10 Initialization VI ................................................................................................................11 Main Page ......................................................................................................................11 Engine ...............................................................................................................................12 Custom Code ........................................................................................................................12 Custom Device XML ..............................................................................................................12 When do you Need a Custom Device? .....................................................................................13 3rd Party Hardware ................................................................................................................15 Unsupported Measurement or Generation Mode ...................................................................15 Feature ..................................................................................................................................15 Custom Device Risk Analysis ....................................................................................................15 LabVIEW Application Development .......................................................................................15 LabVIEW Real-Time Application Development ......................................................................16 NI VeriStand Background ......................................................................................................16 Hardware Driver Development ..............................................................................................16 Testing ..................................................................................................................................17 Planning the Custom Device .....................................................................................................17 Channels ...............................................................................................................................18 Properties ..............................................................................................................................20 Custom Device Decimation ................................................................................................23 Hierarchy ...............................................................................................................................23 Pages ....................................................................................................................................27 Extra Pages .......................................................................................................................29 Page...............................................................................................................................30 GUID ..............................................................................................................................30 XML Declaration .............................................................................................................31 Build Specification ..........................................................................................................31 Type ......................................................................................................................................32 Asynchronous ....................................................................................................................33 Inline Hardware Interface ...................................................................................................36 Initialize ..........................................................................................................................36
