0.6%氧苦·内酯水剂防治小菜蛾田间药效试验
VV VLV 0.6 1kV电力电缆

1 1 1.2 1.2 1.4 1.4 1.6 1.6 1.8 2 2.2 2.4 2.6 绝缘厚度 mm 0.8 0.8 1 1 1 1 1.2 1.2 1.4 1.4 1.6 1.6 1.8 2 2.2 2.4 2.6 绝缘厚度
ቤተ መጻሕፍቲ ባይዱ
1.8 1.8 1.8 1.8 1.8 1.8 2 2.1 2.2 2.4 2.4 2.5 2.8
Ω /km 7.41 4.61 3.08 1.83 1.15 0.727 0.524 0.387 0.268 0.193 0.153 0.124 0.0991 0.0754 0.0601 0.047
Ω /km 12.1 7.41 4.61 3.02 1.91 1.2 0.868 0.641 0.443 0.32 0.253 0.206 0.164 0.125 0.1 0.0778
规格型号
KV/min 3.5 3.5 3.5 3.5 3.5 3.5 3.5 3.5 3.5 3.5 3.5 3.5 3.5 3.5 3.5 3.5 3.5 试验电压
VV VV VV VV VV VV VV VV VV VV VV VV VV VV VV VV VV
0.6/1kV 0.6/1kV 0.6/1kV 0.6/1kV 0.6/1kV 0.6/1kV 0.6/1kV 0.6/1kV 0.6/1kV 0.6/1kV 0.6/1kV 0.6/1kV 0.6/1kV 0.6/1kV 0.6/1kV 0.6/1kV 0.6/1kV
电力电缆VV、VLV
VV、VLV技术参数 VV、VLV、ZR-VV、ZR-VLV (0.6/1kV PVC绝缘PVC护套阻燃或非阻燃电力电缆) 导体标称直径 mm2 1×1.5 1×2.5 1×4 1×6 1×10 1×16 1×25 1×35 1×50 1×70 1×95 1×120 1×150 1×185 1×240 1×300 1×400 1×500 1×630 1×800 导体标称直径 mm2 2×1.5 2×2.5 2×4 2×6 绝缘厚度 mm 0.8 0.8 1 1 1 1 1.2 1.2 1.4 1.4 1.6 1.6 1.8 2 2.2 2.4 2.6 2.8 2.8 2.8 绝缘厚度 mm 0.8 0.8 1 1 电缆近似 护套厚度 外径 mm 1.4 1.4 1.4 1.4 1.4 1.4 1.4 1.4 1.4 1.4 1.5 1.5 1.6 1.7 1.8 1.9 2 2.1 2.2 2.4 mm 6.1 6.5 7.4 7.9 9.2 10.3 12 13.2 14.9 16.7 19.3 20.9 23.1 25.6 28.8 31.9 35.5 39.7 43.7 46.1 电缆近似重量 铜 Kg/km 50.7 63.5 87.7 111 166.6 133.3 344.9 449.8 590.5 807.3 1102 1349 1654 2060 2651 3323 4202 5359 6707 8064 铝 Kg/km 41.3 47.9 63 75.9 93 132.2 185.4 228.7 289.8 374.2 501.4 590.3 721.3 891.6 1114 1396 1742 2128 2605 3104 20℃导体电阻 20℃≤(Ω /km) 铜 Ω /km 12.1 7.41 4.61 3.08 1.83 1.15 0.727 0.524 0.387 0.268 0.193 0.153 0.124 0.0991 0.0754 0.0601 0.047 0.0366 0.0283 0.0221 铝 Ω /km 12.1 7.41 4.61 3.02 1.91 1.2 0.868 0.641 0.443 0.32 0.253 0.206 0.164 0.125 0.1 0.0778 0.0505 0.0469 0.0367 试验电压 KV/min 3.5 3.5 3.5 3.5 3.5 3.5 3.5 3.5 3.5 3.5 3.5 3.5 3.5 3.5 3.5 3.5 3.5 3.5 3.5 3.5 试验电压 铝 Ω /km 12.1 7.41 4.61 KV/min 3.5 3.5 3.5 3.5 规格型号 重量 kg/km 铜 VV VV VV VV VV VV VV VV VV VV VV VV VV VV VV VV VV VV VV VV 0.6/1kV 0.6/1kV 0.6/1kV 0.6/1kV 0.6/1kV 0.6/1kV 0.6/1kV 0.6/1kV 0.6/1kV 0.6/1kV 0.6/1kV 0.6/1kV 0.6/1kV 0.6/1kV 0.6/1kV 0.6/1kV 0.6/1kV 0.6/1kV 0.6/1kV 0.6/1kV 1×1.5 1×2.5 1×4 1×6 1×10 1×16 1×25 1×35 1×50 1×70 1×95 1×120 1×150 1×185 1×240 1×300 1×400 1×500 1×630 1×800 50.7 63.5 87.7 111 166.6 133.3 344.9 449.8 590.5 807.3 1102 1349 1654 2060 2651 3323 4202 5359 6707 8064 重量 kg/km 铜 VV VV VV VV 0.6/1kV 0.6/1kV 0.6/1kV 0.6/1kV 2×1.5 2×2.5 2×4 2×6 119 150 210 264
SD6835说明书_0.6

产品规格分类内置高压MOSFET 电流模式PWM+PFM 控制器系列描述SD6835是用于开关电源的内置高压MOSFET 外置采样电阻的电流模式PWM+PFM 控制器系列产品。
该电路待机功耗低,启动电流低。
在待机模式下,电路进入打嗝模式,从而有效地降低电路的待机功耗。
电路的开关中心频率为25~67KHz ,随负载而定。
抖动的开关频率,可以获得较低的EMI 。
内置峰值电流补偿电路,可以使不同交流电压输入时极限峰值电流一致。
内置极限输出功率补偿电路,可以使不同交流电压输入时极限输出功率平衡。
内置斜坡补偿电路,以适应更宽变压器应用。
上电时,峰值电流补偿最大,然后逐渐达到平衡,可以减小在上电过程中变压器的应力,防止变压器饱和。
还可以通过CS 端电阻调节极限峰值电流。
电路内部集成了各种异常状态保护功能。
包括欠压锁定,过压保护,过载保护,脉冲前沿消隐和温度保护功能。
在电路发生保护以后,电路可以不断自动重启,直到系统正常为止。
主要特点∗ 能源之星2.0标准 ∗ 低启动电流∗ 随负载而变的开关频率可以提高效率 ∗ 抖动的开关频率可以降低EMI ∗ 过压、过载、过温保护 ∗ 外置峰值电流采样电阻 ∗ 极限输出功率补偿 ∗ 斜坡补偿 ∗ 欠压锁定∗ 内部集成高压MOSFET ∗ 自动重启 ∗ 峰值电流补偿电路∗ 初始化峰值电流最大补偿,实现软启动功能 ∗ 打嗝模式 ∗逐周期限流应用∗ 开关电源典型输出功率能力内部框图注:1. 脉冲宽度由最大结温决定;2. L=51mH, T J=25°C(起始)。
电气参数(感应MOSFET部分,除非特殊说明, T=25°C)ambSD6835是用于离线式开关电源集成电路。
电路含有高压功率MOSFET,优化的栅驱动电路以及电流模式PWM+PFM控制器。
控制器包含有振荡频率发生器及各个保护功能。
振荡电路产生的频率抖动,可以降低EMI。
最大峰值电流补偿减小了电路启动时变压器的应力。
电力电缆型号名称大全

(VV、VLV)单芯无铠 聚氯乙烯绝缘聚氯乙烯护套电力电缆
(VV、VLV)2芯聚氯乙烯绝缘聚氯乙烯护套电力电缆
(VV22、VLV22) 2芯聚氯乙烯绝缘聚氯乙烯护套钢带铠装电力电缆
第 2 页 电缆类型
型号
VV-0.6/1kV 3× 6 VV-0.6/1kV 3× 10 VV-0.6/1kV 3× 16 VV-0.6/1kV 3× 25 VV-0.6/1kV 3× 35 VV-0.6/1kV 3× 50 VV-0.6/1kV 3× 70 VV-0.6/1kV 3× 95 VV-0.6/1kV 3× 120 VV-0.6/1kV 3× 150 VV-0.6/1kV 3× 185 VV-0.6/1kV 3× 240 VV22-0.6/1kV 3× 1.5 VV22-0.6/1kV 3× 2.5 VV22-0.6/1kV 3× 4 VV22-0.6/1kV 3× 6 VV22-0.6/1kV 3× 10 VV22-0.6/1kV 3× 16 VV22-0.6/1kV 3× 25 VV22-0.6/1kV 3*35 VV22-0.6/1kV 3× 50 VV22-0.6/1kV 3× 70 VV22-0.6/1kV 3× 95 VV22-0.6/1kV 3× 120 VV22-0.6/1kV 3× 150 VV22-0.6/1kV 3× 185 VV22-0.6/1kV 3× 240 VV-0.6/1kV 4× 1.5 VV-0.6/1kV 4× 2.5 VV-0.6/1kV 4*4 VV-0.6/1kV 4× 6 VV-0.6/1kV 4× 10 VV-0.6/1kV 4× 16 VV-0.6/1kV 4× 25 VV-0.6/1kV 4× 35 VV-0.6/1kV 4× 50 VV-0.6/1kV 4× 70 VV-0.6/1kV 4× 95 VV-0.6/1kV 4× 120 VV-0.6/1kV 4× 150 VV-0.6/1kV 4× 185 VV-0.6/1kV 4× 240 VV22-0.6/1kV 4× 1.5 VV22-0.6/1kV 4× 2.5 VV22-0.6/1kV 4*4 VV22-0.6/1kV 4× 6 VV22-0.6/1kV 4× 10 VV22-0.6/1kV 4× 16
金庸群侠传X0.6 全攻略(攻略来自于那些无私奉献的大神们)
金庸群侠传X0.6 全攻略(攻略来自于那些无私奉献的大神们)PS:除了主线外,最下方有支线剧情如果有细微差别请别介意有些是0.5就有的攻略未有人改正【雪山飞狐】涉及剧情人物:胡斐、阎基、田归农、程灵素涉及武功:胡家刀法、苗家剑法、天龙剑法、药王神掌、黑血神针涉及天赋:雪山飞狐、轻功大师、阴谋家、药王神篇(毒圣)首先,第一次主线剧情之前招到胡斐,去阎基处打赢阎基得两页刀法和天王保命丹,然后去苗人凤处打天龙门弟子,接下来去药王山庄招程灵素,这里出现支线(1)回阎基居杀阎基得七星海棠,后续是救苗人凤然后在衡阳寺庙里遇到田归农,选择不相信,胡斐单挑田归农,选择相信,田归农入队,第一种回苗人凤居2V2打苗人凤和胡一刀,打赢了胡斐完美变身,得10级胡刀和10级苗家剑,天赋雪山飞狐;第二种回苗人凤居打死苗人凤,胡斐田归农变身;(2)不杀阎基得七星海棠,又有分支,第一条,带阎基去苗人凤居,杀苗人凤,胡斐和阎基变身,得天赋阴谋家;第二条,招了阎基后去衡阳破庙找田归农,交代了当年的事,胡斐1V2,打赢得天龙宝剑,而后去苗人凤居回忆当年之战后胡斐变身;佛山镇打凤天南,衡阳破庙追杀,得黄金棒。
【连城诀】涉及剧情人物:狄云,血刀老祖,水笙涉及武功:连城剑法,血刀经连城诀分为两条线:第一条,血刀路线,非血刀门弟子,昆仑山洞(昆仑山左前)找到血刀老祖,打赢后选择不杀,然后去衡阳阴冷山洞打一次狄云,回血刀老祖对话,然后回去杀狄云,再回血刀老祖处,血刀老祖入队,得血刀,10级血刀经真本第二条,非血刀门弟子,找到血刀老祖,打赢后选择杀了,然后去唐诗山洞招狄云,回昆仑山洞遇水笙,前提是不能触发江陵拿连城宝藏的剧情,水笙入队,然后去江陵触发剧情,打赢梅念笙后狄云和水笙变身,得连城剑法精要。
【天龙八部】涉及剧情人物:段誉、乔峰、慕容复、阿朱、阿碧、木婉清、段正淳、阿紫涉及武功:六脉神剑、斗转星移、擒龙功、参合指、大金刚掌、凌波微步、北冥神功涉及天赋:段王爷的电眼、不老长春等涉及物品:王语嫣的读书笔记、神木王鼎、李延宗的项链这部剧情比较长,支线也很多先是去大理树林触发木婉清剧情,然后去无量山洞触发段誉剧情,接下来去大理镇南王府,打段正淳和四大家仆,可输,然后去苦逼的万劫谷,支线出现对于段誉要不要上木婉清这个问题。
ZDMS0.6-5S自动消防水炮安装说明书
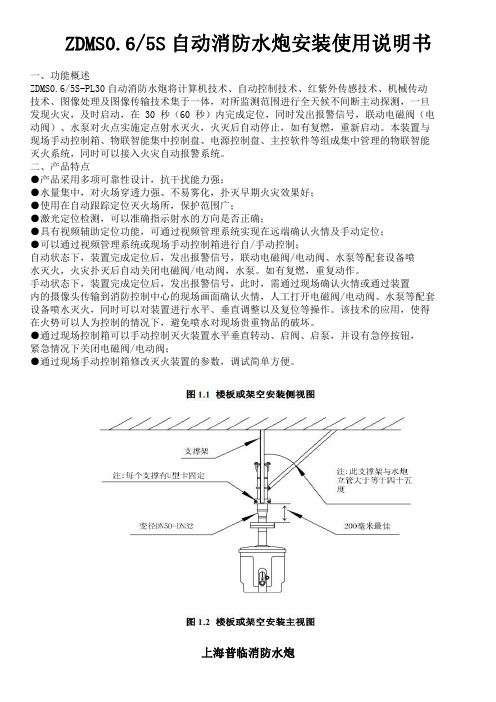
ZDMS0.6/5S自动消防水炮安装使用说明书一、功能概述ZDMS0.6/5S-PL30自动消防水炮将计算机技术、自动控制技术、红紫外传感技术、机械传动技术、图像处理及图像传输技术集于一体,对所监测范围进行全天候不间断主动探测,一旦发现火灾,及时启动,在30秒(60秒)内完成定位,同时发出报警信号,联动电磁阀(电动阀)、水泵对火点实施定点射水灭火,火灭后自动停止,如有复燃,重新启动。
本装置与现场手动控制箱、物联智能集中控制盘、电源控制盘、主控软件等组成集中管理的物联智能灭火系统,同时可以接入火灾自动报警系统。
二、产品特点●产品采用多项可靠性设计,抗干扰能力强;●水量集中,对火场穿透力强、不易雾化,扑灭早期火灾效果好;●使用在自动跟踪定位灭火场所,保护范围广;●激光定位检测,可以准确指示射水的方向是否正确;●具有视频辅助定位功能,可通过视频管理系统实现在远端确认火情及手动定位;●可以通过视频管理系统或现场手动控制箱进行自/手动控制;自动状态下,装置完成定位后,发出报警信号,联动电磁阀/电动阀、水泵等配套设备喷水灭火,火灾扑灭后自动关闭电磁阀/电动阀,水泵。
如有复燃,重复动作。
手动状态下,装置完成定位后,发出报警信号,此时,需通过现场确认火情或通过装置内的摄像头传输到消防控制中心的现场画面确认火情,人工打开电磁阀/电动阀、水泵等配套设备喷水灭火,同时可以对装置进行水平、垂直调整以及复位等操作。
该技术的应用,使得在火势可以人为控制的情况下,避免喷水对现场贵重物品的破坏。
●通过现场控制箱可以手动控制灭火装置水平垂直转动、启阀、启泵,并设有急停按钮,紧急情况下关闭电磁阀/电动阀;●通过现场手动控制箱修改灭火装置的参数,调试简单方便。
ZDMS0.6/5S-PL30自动消防水炮装置距离墙边及梁边应该有不小于100mm的间隙,保证其自由转动且不能遮挡探测和喷水.ZDMS0.6/5S-PL30自动消防水炮上半部分嵌入天花板时,应保证灭火装置周围有不小于50mm的间隙,保证其自由转动,不受阻碍二、安装步骤(1)灭火装置安装前应对系统管网试压,冲洗合格后进行;(2)安装灭火装置的上法兰到短立管下端,法兰端面用水平仪调成水平;(3)通过4个配套螺栓固定灭火装置;(4)ZDMS0.6/5S-PL30自动消防水炮已预留线束长度,保证灭火装置在转动范围内不受限制并略有余量;ZDMS0.6/5S-PL30自动消防水炮在安装时请预留500-600mm的线缆以保证水炮360度正常旋转(5)每台自动跟踪定位射流灭火装置安装完成、接线正确无误后,即可利用现场手动控制箱进行通电测试,通电能够自动定位(可以用打火机在距离灭火装置500mm处测试)、通过现场手动控制箱能够远程控制后方可拆除脚手架。
6折是不是乘以0.6
6折是不是乘以0.6折扣的计算公式:一个人购买了某品牌电脑,按照一折后再买,那么电脑应该打折多少钱?这种是不是你的错误?为什么呢?这样计算不太合理。
1折=0.56*12^12等于多少?这里的0.66是指用某一折除以6得到的,如果你想要购买某款电脑打折,那么计算公式应该怎么算呢?在我们日常生活中,经常看到折扣,其实就是打六折或者九折、十折。
1.这个计算公式是错误的,在这里说一次购买不能用一个折来计算。
比如1000元的电脑,那么在打折的时候应该打多少折呢?应该根据不同的价格来计算,如果你想买这款显示器,那么价格就是1500元,如果是想买电脑,那么价格就是1500+1000*5=2200元。
所以说打折扣的时候,不能用一个折来计算,更不能用减去6个除以6得出的数字。
但是要注意的是,打折的折扣并不是乘以6就是你买的价格。
如果你不想要这台电脑的话,那么折后的价格就已经低于官方价格了。
虽然说折扣幅度大但也会在其他方面有所优惠。
所以折扣计算公式本身需要根据实际情况来算。
2.折扣的计算公式不能乘以6,比如我们现在买一台电脑,买的是300元现金,我们要用60折,那么这个时候就需要在原来基础上再打折扣,因为1折后再购买的话,就变成了60*6=0.56元。
而现在是618,这款电脑的价格需要7300元,那就意味着打了6折再买300×12^12=608.58元。
这也就是说3位顾客花了400元购买一台电脑,那么他需要花费多少钱呢?很多人都会算一下这个数:588*6=0.56*60+318^60=680元。
其实这是一个很简单的公式,但是这个公式是没有意义的,如果我们购买了6折优惠的电脑是500元,那要买到1个2折就是180元,所以在上面的基础上再打6折后再买就变成了60*6=680+2*12^12=202.84了。
这位顾客买电脑的时候已经是499减到68了。
不应该乘以6吗?3.这是因为有0.66=0.6。
所以,如果买电脑,打折促销会是按一折计算。
千万别被银行忽悠了!信用卡分期实际年利率其实非常高!
千万别被银⾏忽悠了!信⽤卡分期实际年利率其实⾮常⾼!很多持卡⼈肯定接到过银⾏“邀请”你分期的电话,少的时候⼏个⽉接到⼀次,频繁的时候每个⽉都有⼏个电话,那你是否想过为什么银⾏这么积极的希望你账单分期?它所宣传的利息真的就是实际利息吗?是真的帮助你减轻还款压⼒,还是增加你的还款压⼒呢?今天就来教会⼤家信⽤卡账单分期的真实利率的算法!⾸先银⾏让你分期肯定是有利可图,⽼话说的好“天下熙熙皆为利来,天下攘攘皆为利往!”。
但是真实的利息并不是银⾏所宣传的⽉利息0.6%(每个银⾏根据分期时间分期利率有所不同,这⾥为了⽅便⼤家理解和计算,统⼀⽤⽉利息0.6%计算),⽽是你想象不到的⾼!所以分期从短期来看确实暂时解决了还款压⼒,但是实际上是增加了还款的负担,⽽且长此以往只会导致账单越还越多,接下来给⼤家详细介绍分期真实利息是如何计算的!这是⼀条分期短信,接近⼀万七千的信⽤卡账单,分⼗⼆个⽉还,⼀个⽉只需要还⼀千四百多,再多付⼀百多点的⼿续费就能解决你的燃眉之急,是不是超级贴⼼?分期成功还会增加信⽤积分还有精美礼品,只需要动动⼿指回复⼀下短信,就能马上办理,⼼动不⼼动!如果你直接办理了,恭喜你,银⾏离⾃⼰的⼩⽬标⼜近了⼀步。
⾔归正传,⽉费率真的是银⾏所宣传的仅为0.6%吗,是否可以⽤0.6%乘以12得出年利率为7.2%这样的结论?如果你是这么认为的,恭喜你,在银⾏眼中,你就是⼀只待宰的肥⽺,只待磨⼑霍霍向你⾛去。
如果这次分期成功,想必以后你也会在银⾏分期套路的漩涡⾥旋转跳跃不停歇了。
那到底实际利率是多少,⼜如何测算信⽤卡分期的真实利率呢?⾸先教⼤家⼀个相对⿇烦的计算⽅法————运⽤Excel,就可以解决这⼀问题。
⼀、信⽤卡分期利率的实际利率测算⽅法就信⽤卡账单分期的利率上是⼀种等额本息的还款⽅式,包括房贷,都是等额本息的还款⽅法。
(等额本息是在还款期内,每个⽉偿还同等数额的还款,包括本⾦和利息)我们根据上图短信⾥的⾦额为例⼦做测算,具体⽅法如下:第⼀步,打开Excel,在第⼀列的第⼀栏输⼊你想要分期的⾦额,我们输⼊16983.15元,在第⼆到第⼗三的栏⽬⾥⾯,输⼊每个⽉要还款的⾦额,也就是1415.26的本⾦加112.09的利息,共1527.35,不过要输⼊成负数,因为是你每个⽉在减少的。
0.6,1kV电力电缆

0.6/1kV交联聚乙烯绝缘电力电缆(1)发布:2008-8-2 0:22:07XLPE Insulated Power Cable产品标准 standard本产品按GB12706《额定电压35KV铜芯、铝芯塑料绝缘电力电缆》标准生产,同时还可根据用户需要按国际电工委员会推荐标准IEC、英国标准、德国标准及美国标准生产。
The product is manufactured according to the standard of GB12706、IEC.BS,DIN and ICEA upon request.适用范围 Applications本产品适用于工频额定电压64/1KV及以下配电网或工业装置中固定敷设之用。
The product is suitable for use in power distribution lines or fixed installations with rated power- frequency voltage up to and including 0.6/1Kv.使用特性 Operating characteridtles·工频额定UO/U为0.6/1KV。
Rated power –frequency voltage UO/U为0.6/1KV。
电缆导体允许长期最高工作温度为90℃。
Max.permissible continuous operating temperature of conductor:90℃.短路时(最长持续时间不超过5s)电缆导体的最高温度不超过250℃。
Max.short –circuit temperature of conductor shall not exceed 250℃(5s maximum duration ).电缆敷设时环境温度应不低于0℃。
The ambient temperature under installation should not below 0℃.电缆弯曲半径:不小于电缆外径的15倍。
0.6的产流系数-概述说明以及解释
0.6的产流系数-概述说明以及解释1.引言1.1 概述概述产流系数是水文学中一个重要的概念,用于描述降雨的一部分如何通过径流途径流进河流和湖泊等水体中。
它是指降雨过程中,最终以径流形式流入河流的比例,即降雨量与径流量之间的比值。
在水资源管理、水文预测和水灾风险评估等领域都具有重要的应用价值。
产流系数的计算可以通过实地观测和模型模拟等方法进行。
在实地观测中,常用的方法包括流量测量、雨量观测和土壤含水量监测等。
而在模型模拟中,常用的模型包括单位线模型、水动力模型和水文模型等。
产流系数不仅受降雨量的影响,还受到许多其他因素的综合影响,例如土壤类型、地形、植被覆盖和土地利用情况等。
这些因素会直接或间接地影响水分的入渗和径流过程,从而进一步影响产流系数的大小。
因此,准确地评估和预测产流系数对于合理利用水资源、开展水文预测和防洪工作具有重要意义。
本文将首先介绍产流系数的定义和计算方法,然后探讨影响产流系数的因素,并分析它们之间的关系。
最后,对产流系数的重要性进行总结,并展望未来的研究方向。
通过对产流系数的深入研究和理解,我们可以更好地认识水文过程,提高水资源管理和水文预测的准确性,为水灾防治提供科学依据。
1.2 文章结构文章结构部分:本文将按照以下几个方面来展开论述。
首先,在引言部分,我们将概述本文的背景和目的。
随后,在正文部分,我们将首先明确定义产流系数,并探讨它的作用和意义。
接着,我们将深入分析影响产流系数的因素,包括地形、土壤类型、降雨特征等。
最后,在结论部分,我们将总结产流系数的重要性,并展望未来可能的研究方向。
通过以上的结构安排,我们将有条不紊地阐述产流系数的相关内容,希望能够为读者提供一个清晰易懂的逻辑框架,使读者更好地理解和掌握这一主题。
1.3 目的本文的目的是分析和探讨0.6的产流系数在水文学和环境科学中的重要性和应用。
通过对产流系数的定义、影响因素及其研究方向的深入讨论,旨在增进人们对产流过程的认识,并为相关领域的研究者提供重要参考和指导。
2的0.6次方的计算方法

2的0.6次方的计算方法一、指数运算的基础。
1.1 首先呢,咱们得知道指数是个啥。
指数就像是一个小魔法数字,它能让底数这个小数字发生奇妙的变化。
比如说2的3次方,就是3个2相乘,2×2×2等于8,这个大家都比较熟悉啦。
1.2 但是呢,今天咱们遇到的不是这么简单的整数次方,而是2的0.6次方。
这就有点像咱们平常走惯了直路,突然遇到个有点弯弯曲曲的小道。
不过别怕,咱们有办法来解决它。
二、将小数指数转化。
2.1 这个0.6啊,可以把它看成是分数形式,0.6就是6/10,化简一下就是3/5。
那2的0.6次方呢,就可以写成2的3/5次方。
这就像是把一个有点奇怪的东西,给它换了个咱们比较好理解的模样。
2.2 那2的3/5次方又是什么意思呢?按照指数运算的规则,它就等于5次根号下2的3次方。
这就好比把一个大包裹拆分成几个小部分来处理。
咱们先把2的3次方算出来,2的3次方就是2×2×2等于8。
2.3 现在咱们就得到了5次根号下8。
这就像是在一个神秘的宝盒里找东西,这个宝盒就是5次根号,里面装着的宝贝是8。
三、计算5次根号下8。
3.1 这个5次根号下8呢,咱们可以这样想。
如果一个数的5次方等于8,那这个数就是5次根号下8。
咱们可以用试错法来大致估算一下。
1的5次方是1,2的5次方是32,那这个数肯定在1和2之间。
3.2 再精确一点的话,咱们可以用计算器来算一下,5次根号下8约等于1.5157。
这就像是经过一番摸索,终于找到了宝藏的确切位置。
虽然这个计算过程有点弯弯绕绕的,但是只要咱们一步一步来,就像爬楼梯一样,总能到达目的地。
这就叫“只要功夫深,铁杵磨成针”嘛。
在数学的世界里,不管遇到什么样的难题,只要咱们肯动脑筋,总能找到解决的办法,可不能一遇到有点难度的就“打退堂鼓”啊。
博世 BMP 0.6 - 2.2 RS 维修手册说明书
Service instructionsBMP 0.6 - 2.2 RSTable of contents1.Type identification (2)1.1Nameplate (2)1.2Type key (2)2.Torques and lubricants (3)3.Service tools (4)3.1Special tools (4)3.2Standard tools (4)3.3Torque tools (4)4.Dismantling and assembly (5)4.1General (5)4.2Dismantling (5)4.3Assembly (6)4.4Checking the wear parts (7)4.5Fault finding (8)5.Checking of motor and cable (9)5.1Exploded view (10)1. Type identificationThis section shows the type key, the nameplate and the codes that can appear in the variant code. Note: As codes can be combined, a code position may contain more than one code (letter).1.1 Nameplate1.2 Type key T M 0 2 9 3 5 7 2 4 0 4Fig. 1 NameplatePos.Description Pos.Description1Type designation6Pressure2Model7Liquid temperature 3Rated flow rate [m3/h]8Weight4Head9Country of origin 5SpeedExample BMP10,2R-A-P-G-BBVPPump rangeBMP = With standard motorBMPE= With external frequencyconverterMaximum flow rate [m3/h]Blank =All components in contact withthe pumped liquid are made ofstainless steel EN/DIN 1.4301 and PEEKN =Designed for demineralised water.All components in contact withthe pumped liquid are made ofstainless steel EN/DIN 1.4301 and PEEKR =All components in contact withthe pumped liquid are made ofstainless steel 1.4410 and PEEKCode for pump versionA = First generationCode for pipe connectionO = External threadG = Victaulic/PJECode for materialsI = Stainless steel (1.4301)G = Stainless steel (1.4401)Code for shaft sealB = Bellows (rubber)B= CarbonV=Al2O3P=NBR2. Torques and lubricantsThis section shows the screws and nuts that must be tightened to a certain torque and the lubricants to be used.Gardolube L 6034, part no. SV9995 (1 l).Rocol 22, part no. RM2924 (1 kg).Pos.ModelDescriptionNumberTorque [Nm]Lubricant17 Screw212 ± 1Gardolube L 603418BMP 1.8 -2.24BMP 0.6 -1.068 ± 138Air vent screw 2 4 ± 113O-ring1Rocol 22201Soapy water 211371391Rocol 223. Service toolsThe following drawings and tables show special, standard and torque tools for pump service.3.1 Special tools3.2 Standard tools3.3 Torque toolsABCDE F G HPos.Description For pos.Suppl. informationPart no.A Torpedo 8Included in the shaft seal tool kit96560410BPress ring15Pos.Description For pos.Suppl. informationPart no.C Hexagon key 17, 18, 38D Screwdriver Straight slotEPullerSV0335Pos.Description For pos.Suppl. information Part no.F Torque wrench 1-6 [Nm]SV04384-20 [Nm]SV0292G Ratchet insert tool F SV0295HHexagon socket driver4. Dismantling and assembly4.1 GeneralIf it is necessary to dismantle the pump, either because it is choked or damaged, please follow the instructions in the following sections.Position numbers of parts (digits) refer to drawings and parts lists; position numbers of tools (letters) refer to section.Before dismantling the pump:•Disconnect the electricity supply to the motor.•Close the isolating valves, if fitted, to avoid draining the system.•Remove the electric cable in accordance with local regulations.•Note the centre of gravity of the pump to prevent it from overturning. This is especially important in the case of long pumps.Before assembly:•Clean and check all parts.•Replace defective parts by new parts.•Order the necessary service kits.•Replace gaskets and O-rings when the pump is overhauled.During assembly:•Lubricate and tighten screws and nuts to correct torque as stated in section.4.2 DismantlingNote: The pump must only be dismantled in absolutely clean environment.4.2.1 Removing the coupling1.Remove the screws and the washers of the coupling.2.Pull the pump off the motor.3.Remove the coupling insert.4.Remove the screws of the coupling guard and remove the guard.5.Slacken the set screw of the pump coupling.6.Remove the coupling half with a puller.4.2.2 Removing the shaft seal1.Remove the key (pos. 23) and the screws (pos. 18).2.Remove the mounting flange (pos. 16).3.Remove the stationary shaft seal part (pos. 15) from the flange, see fig. 2.4.Remove the O-ring (pos. 39).5.Moisten the rotating shaft seal part (pos. 15) with soapy water, and remove it by means of two screwdrivers.Fig. 2 Stationary shaft seal part Fig. 3 Rotating shaft seal part4.2.3 Removing the pistons and valve plate 1.Remove the screws (pos. 17).2.Place the pump with the shaft downwards.3.Remove the pump housing (pos. 1).4.Remove the retainer plate (pos. 4) with the pistons (pos. 22).5.Remove the retainer guide (pos. 5), spring guide (pos. 26) and spring (pos. 7).6.Lift the cylinder barrel (pos. 8) with valve plate (pos. 9) out of the port flange (pos. 14).7.Remove the port plate (pos. 10) and the pin (pos. 11).8.Remove the pin (pos. 12) and O-ring (pos. 13).9.Place the cylinder barrel (pos. 8) with valve plate (pos. 9) on the table and twist them apart with a screwdriver.10.Remove the backup and O-rings (pos. 20 and 21) of the valve plate (pos. 9).4.3 Assembly4.3.1 InspectionCheck all wear parts before assembling the pump, see 4.4 Checking the wear parts .4.3.2 Fitting the pistons and valve plate1.Fit the O-ring (pos. 13) and lubricate it with Rocol 22.2.Fit the pins (pos. 11, 12 and 24) on the port flange (pos. 14).3.Fit the port plate (pos. 10).4.Fit the backup rings (pos. 20) and O-rings (pos. 21) on the valve plate (pos.9); one pair per piston. Moistenthem with soapy water, see fig. 4.5.Fit the valve plate (pos. 9) on the cylinder barrel (pos. 8). Press the parts together using your hands, seefig.5. There must be a gap of 1.5 to 2.5 mm.6.Put the cylinder barrel with valve plate together with the port part.7.Fit the spring guide (pos. 26), spring (pos. 7) and retainer guide (pos. 5).8.Fit the retainer plate (pos. 4) with the chamfered end against the barrel, and insert the pistons (pos. 22).9.Fit the pump housing (pos. 1). Note the position of the pin (pos. 24). 10.Turn the pump and press it together using your hand.11.Lubricate and fit the screws (pos. 17).4.3.3 Fitting the shaft seal1.Place the mounting flange (pos. 16) on the table with the turned down end upwards.2.Fit the stationary shaft seal part (pos. 15) with the rubber gasket downwards using the punch (B ).3.Fit the O-ring (pos. 39) on the mounting flange (pos. 16) and lubricate it with Rocol 22.4.Fit the thread bush (A ) on the shaft and moisten it with soapy water.5.Fit the rotating shaft seal part (pos. 15) with the seal face upwards using the punch (B ).6.Fit the mounting flange on the pump.7.Lubricate the screws (pos. 18) with Gardolube and fit them. Check that the shaft can be pressed 0.5 to 1 mmwith your hand.Fig. 4 Backup rings and O-rings Fig. 5Fitting the valve plate4.4 Checking the wear partsIf there are any steel wear particles, caused by plastic, which is worn of, then scrap the pump!Port plate and thrust plate:There must be no wear on whether port plate or thrust plate. This can be checked by laying a (hair) ruler upon the surface controlling the tightening land against the light.Pistons:Play in ball- and -socket joint must not exceed 0.1 mm.Thickness of slippers collar must not be below:BMP 0.6 - 1.0RS > 2.85 mm.BMP 1.8 - 2.2RS > 4.1 mm.The surface of the slippers must be plane and smooth (can be checked by hair ruler). If pistons are with wear layer (black colour), partial wear of this is acceptable.Cylinder barrel:The outer bearing surface must be without any bigger wear grooves(not critical).There must be no seizures and bigger scratches in the bushings, - and ensure that the pistons move freely in them!Housing with swash plate and bearing:The surface on the swash plate must be smooth without any bigger scratches. More than 0.1 mm wear in depth will reject the pump.The bearing must be without any bigger wear grooves (not critical).>2.85>4.14.5 Fault findingFault Possible cause RemedyThe pump stops during operation.No water supply.Low-pressure switch has cut out.The level switch has cut out.Check that the low-pressure switch functions normally and isadjusted correctly.Check that the minimum inlet pressure is correct. If not, check thefeed pump.Check the water level in the water tank.The fuses are blown.Check and replace the main fuses and/or fuses for control circuit,if necessary.The motor starter overload unit has tripped out.Reset the starter overload.The magnetic coil in the motor starter/contactor isdefective (not cutting in).Replace the coil. Check the coil voltage.The control circuit has cut out or is defective.Check the control circuit and the contacts in the monitoringdevices (low-pressure switch, level switch, etc.).The motor/supply cable is defective.Check motor and cableThe pump runs, but gives no water or develops any pressure.No or insufficient water supply at the pump suctionport.Check that the inlet pressure is at least 0 bar.The piping system or pump is choked up.Check the piping system and pump.The prefilter is clogged.Clean the prefilter.The pump is worn.Replace wear parts. Contact Grundfos Service. Wrong direction of rotation.Interchange two phases in the motor main connection.The pump runs at reduced capacity.The pump is partly blocked by impurities.Dismantle, clean and check the pump.Replace defective parts. Contact Grundfos Service. The pump is defective.Replace defective parts. Contact Grundfos Service. The prefilter is clogged.Clean the prefilter.The motor speed is too low.Check the electricity supply.Contact the electricity supply authorities, if necessary.If a frequency converter is used, adjust the speed.5. Checking of motor and cable1.Supply voltageT M 00 1372 3597Measure the current of each phase while the pump is operating at a constant discharge pressure (if possible at the capacity where the motor is most heavily loaded).The motor full-load current appears on the motornameplate.The difference between the current of the phase with the highest amp consumption and the one with the lowest amp consumption must not exceed 10% of the lowest amp consumption.If so, or if the current exceeds the full-load current, check the following possible faults:•Too high operating pressure which may overload the motor.•Too high speed which may overload the motor.•Damaged pump which may overload the motor.•The motor windings are short-circuited or partly disjointed.•Too high or too low supply voltage.•Poor connection in leads. Weak cables.Points 3 and 4: Measurement not needed if supply voltage and current consumption are normal.3.Winding resistanceT M 00 1373 3597Disconnect the phase leads in the terminal box.Measure the winding resistance as shown on the drawing.The highest value must not exceed the lowest value by more than 5%.If the deviation is higher, and the supply cable is OK, the motor should be overhauled.4.Insulation resistanceT M 00 1374 3597Disconnect the phase leads in the terminal box. Measure the insulation resistance from each phase to earth (frame).(Make sure that the earth connection is made carefully.) The insulation resistance for a new, cleaned or repaired motor must be approx. 10 M Ω measured to earth .For a given motor the critical insulation resistance (R crit ) can be calculated as follows:R crit= U N [kV] x 0.5 [M Ω/kV ].If the measured insulation resistance is lower than R crit , the motor must be overhauled.5.1 Exploded viewT M 032601 4605。
- 1、下载文档前请自行甄别文档内容的完整性,平台不提供额外的编辑、内容补充、找答案等附加服务。
- 2、"仅部分预览"的文档,不可在线预览部分如存在完整性等问题,可反馈申请退款(可完整预览的文档不适用该条件!)。
- 3、如文档侵犯您的权益,请联系客服反馈,我们会尽快为您处理(人工客服工作时间:9:00-18:30)。
[ 黄石 旺 , 4] 周向平 , 王兵万 , .两类烟草抑芽剂 田间抑芽效 等 果[ ] J .湖南农 业大学 学报 (自然科 学版 ) 05,1 2) ,20 3 ( :
1 6— 1 8 5 5 .
用对烤烟烟叶钾素和烟碱含量 的影响[ ] J .中国烟草学报 ,
2 0, 5 01 4: 1—5 . 7
[0 1 ]北京农 业 大学 .植 物生 理 学 [ .北京 :农业 出版社 , M]
1 8 9 0.
[ ] 卓净萍 . 6 几种烟草抑芽 剂筛选试 验 [ ] J .湖北植保 ,0 5 2K, w s 1 ]C lnW Ha k N著 .陈江华 , 国安译 .烤烟 生产 i S 杨 原 理[ ] J .烟草科技 , 9 6, 6 7 . 17 4: 7— 1 [2]洪其琨 .烟 草化学 抑芽剂 的进 展及应 用 [ ] 1 J .中 国烟草 ,
显著。
关键词 :. % 氧苦 ・ 06 内酯 ( 清源保 ) 水剂 ; 小菜蛾 ; 药效试验
中图 分 类 号 :4 3 4 ¥ 3 . 文献标识号 : A 文章 编 号 :0 1 44 ( 0 2 0 — 0 4— 2 10 — 9 2 2 1 ) 4 0 9 0
小 菜 蛾 ( ltl xl tl . 属 鳞 翅 目菜蛾 Puea y sl L ) l o ea 科, 是危 害十 字花科 蔬 菜 的害虫 之一 , 世 界性 害 是 虫 。近 年来 随着 蔬 菜 温 室 的发 展 , 菜 蛾 在 济 宁 小 地 区周 年都 会发 生 , 中尤 以春 夏季 发生量 大 , 其 对 十 字花科 蔬 菜生 产造 成很 大威 胁 。小 菜蛾 素 以对
(1 .济宁市农业科学研究 院, 山东 济宁 摘 2 20 ; .金 乡县农业局 , 7 10 2 山东 金乡 220 7 2 0)
要: 田间小 区试验结果表 明,. %氧苦 ・内酯 ( 06 清源保 ) 剂 80 1 0 水 0 、 0倍 液 防治 小菜蛾效 果最好 , 0
药后 1 天平均校正 防效 略低 于对 照药 剂 4 5 . %高效氯氰菊酯乳 油 l0 0倍液 , 0 但药后 3 7天平均 校正 防效则 、 高于对照药剂 , 平均校正 防效为 8 .0 一9 .9 , 12 % 6 8 % 差异显 著 ; 2 0倍 液处理 防效与 对照药 剂相 当 , 异不 10 差
量 和防治 效果 , 在 济 宁 市 农业 科 学 研 究 院 蔬 菜 特 试验 基地 进行 了 田间药 效试 验 。
1 3 1 试 验设 计 ..
试 验设 0 6 . %氧 苦 ・内酯 ( 清
源保 ) 剂 8 0 10 0 12 0倍液 ; 照药 剂 4 5 水 0 、 0 、 0 对 . %
[ ] 陈德鑫 ,王凤龙 , 9 杨清林 , .烟草抑芽剂的研 究进展与应 等
[ ] 邓海滨 , 5 陈永 明, 刘小平 , .几种抑芽剂对烤烟腋芽的控 等 制效果研究 [] J .广东农业科学 ,0 7 :8—2 . 2 0 ,1 1 0
用 [ ] 安徽农业科学 , 0 2 3 ( )7 2 76 J. 2 0 ,0 5 : — 9 . 9
18 9 2.4:2 —2 4 6.
[] 黄 7
华 .几种抑 芽剂对 烤烟腋芽 的控制效果 [ ] J .海峡科
学 , 0 9 1 :6— 8 2 0 ,2 6 6 .
[] 龙 8
文, 陈风雷 , 晓 燕 , .抑芽剂和生长调节 剂配合施 等
第 4期
江 金 春等 :. % 氧 苦 ・内酯水剂 防治小菜 蛾 田间药效 试验 06
高效 氯氰 菊酯乳 油 1 0 液及 清水 对照 , 5个 0倍 0 共
处理 , 随机区组排列 , 重复 3次 , 区面积 5m 。 小
收稿 日期 :0 1 1 1 2 1 —0—6 基金项 目: 山东省蔬菜产业技术体系资金项 目资助。 作者 简介 : 江金春( 9 9一) 男 , 16 , 高级农艺师 , 长期从事农业技术推广 和农 药试验工作。
菊 酯类 农药 都产 生 了不 同程 度 的抗 性 , 为此 我 们 引进 了一种 纯 植 物 源 农 药 . % 氧 苦 ・内酯 6
( 清源 保 ) 剂 , 防治 小 菜 蛾 。0 6 氧 苦 ・内 水 来 .%
供 试药 剂 :. % 氧 苦 ・内酯 ( 源 保 ) 剂 06 清 水 ( 北京 清 源 保 生 物 科 技 有 限 公 司生 产 ) 对 照 药 ; 剂 :. %高效 氯氰 菊酯 乳油 ( 45 市场 销售 ) 。
供试作 物 : 国 白玉 春萝 卜。 韩
防治 对象 : 小菜 蛾 。 1 3 试验 方法 .
酯 ( 源保 ) 剂 的生 产 采 用 传 统 的 中药 制 备 原 清 水 理 结合 现代 生 物 技术 , 野 生 于 内蒙 古 沙 漠边 缘 将 的苦参 、 乌头 、 黎芦 等多 种 中草药 加工 而成 的纯植 物源 药剂 , 大多数 农业 、 叶 的害虫有 良好 的防 对 茶 治效 果 。为 了 明确 该药 剂对 小菜 蛾 的最佳使 用剂
杀 虫剂 易产 生抗 性 而 著 称 , 菜 蛾对 有 机 磷 类 和 小
1 材 料 与 方 法
1 1 试验 地基 本情 况 .
试验 地地 势 平 坦 , 灌 方 便 , 壤 质 地 为 壤 排 土
土, 肥力 中等 , 培条件 一致 , 卜 势均 匀 。 栽 萝 长
12 供 试材 料 .
山 东 农 业 科 学 2 1 ,4 4 :4~ 5 0 2 4 ( ) 9 9
S ad n gi l rl c n e hn o gA r ut a S i cs c u e
06 .%氧 苦 ・ 内酯水剂 防治小菜蛾 田间药效试验
江金春 周银华 刘艳 芝。张金科 马 井玉h , , , ,