网络版安装STEP by Step
SourceAnywhereforVSS详细安装步骤
SourceAnywhereforVSS详细安装步骤for VSSDynamsoft SourceAnywhere for VSS Step by Step Setup GuideContentsIntroduction (3)The Guide (3)Server (3)1.Installation Process (3)2.Specify the IP address and port of the server (4)3.Add/Manage VSS databases (5)4.Add/Manage SourceAnywhere for VSS Users (6)5.Start/Stop SourceAnywhere for VSS Server service (7)Windows GUI Client (8)1.Installation Process (8)2.Connect to Server. (9)Visual Studio 6 and 2003 IDE Client (10)Visual Studio 2005/2008 IDE Client (11)IntroductionThis article is a quick step-by-step guide for new users of SourceAnywherefor VSS. This article will guide you from installation and configuring settings to being able to log into the server successfully.If you are having trouble getting SourceAnywhere for VSS to work properly and would like some assistance, please do not hesitate to contact us by:Phone: 1-877-605-5491 (toll free) or 604-605-5491Email: sawvss@/doc/62ee171c10a6f524ccbf850d.htmlLiveHelp: /doc/62ee171c10a6f524ccbf850d.html /support/livehelp.aspxFor more detailed information on how to configure SourceAnywhere for VSS, we recommend you refer to the help document that comes with the software.The GuideServer1.Installation ProcessInstall Visual SourceSafe Client.You need the VSS Automation component (APIs) to use SourceAnywhere for VSS Server.Installing the VSS Client also installs the VSS APIs.Note: VSS 6.0d (build 31222) or above is recommended as the backend ofSourceAnywhere for VSS.Install SourceAnywhere for VSS Server.Download link: /doc/62ee171c10a6f524ccbf850d.html /Downloads/SAW_TryIt.aspxRunning the setup is pretty straightforward and the setup wizard will guide you throughall the steps.2.Specify the IP address and port of the serverLog into SourceAnywhere for VSS Server as admin. The password of admin is the same as the one you specified in VSS. Go to "ServerInfo -> General Settings" to set or change the server IP and port.3.Add/Manage VSS databasesGo to "SourceAnywhere for VSS Server -> Databases" to add and manage your VSS databases.4.Add/Manage SourceAnywhere for VSS UsersGo to "SourceAnywhere for VSS Server -> Users" to add and manage users. The users should already exist in VSS. You can specify which VSS users are allowed to access your VSS databases from SourceAnywhere for VSS here. This does not add or remove users in VSS.5.Start/Stop SourceAnywhere for VSS Server serviceGo to SourceAnywhere for VSS Server -> ServerInfo -> Service ControlClick here for troubleshooting information if you find that the Start Service and Stop Servicebuttons are grayed out.Click here for troubleshooting information if your SourceAnywhere for VSS service cannot bestarted.After the above configurations are done, you can install and run the clients now. The following sections will demonstrate how to connect to the most commonly used clients: Windows GUIclient and Visual Studio IDE client.Windows GUI Client1.Installation ProcessDownload link: /doc/62ee171c10a6f524ccbf850d.html /Downloads/SAW_TryIt.aspxRunning the setup is pretty straightforward. Simply run the installation executable and the setup wizard will guide you through all the steps.2.Connect to Server.Start SourceAnywhere for VSS Client using the entry created under the Start menu. In the Connect to Server dialog box, enter the IP and port, which are configured inSourceAnywhere for VSS Server -> General Settings.In Login dialog box, enter the username and password of a SourceAnywhere for VSS user, and then select the VSS database to login.Please make sure the user is an existing SourceSafe user and is activated inSourceAnywhere for VSS Server Manager. The default passwords of the SourceAnywherefor VSS users are set in VSS Administrator Tool.If you get error message "Error connecting to : ", please click here.If you get error message "Error opening database" or "TheSourceSafe database does not exist. Please select anotherdatabase.", please click here.For error message "The client is not compatible with the server", please click here. Visual Studio 6 and 2003 IDE Client Running the installation package of SourceAnywhere for VSS GUI Client for Windows will also install the Visual Studio IDE integration. To enable SourceAnywhere for VSS IDE integration with Visual Studio 6and Visual Studio 2003, click Yes in response to the following dialog box during the installation of SourceAnywhere for VSS Client:Also, SourceAnywhere for VSS provides SCC Provider Manager that enables you to toggle between SourceAnywhere for VSS and other SCC providers as your current SCC provider when using Visual Studio 6 or 2003 IDE integration. SCC Provider Manager can be found under the program group of SourceAnywhere for VSS Client.After setting SourceAnywhere for VSS as the current SCC provider, you'll be prompted with the Login dialog box when you add projects to source control or open projects from source control.Visual Studio 2005/2008 IDE ClientAs mentioned in the above section, running SourceAnywhere for VSS Client installation package will install the Visual Studio IDE integration. To enable SourceAnywhere for VSS IDE integration with Visual Studio 2005/2008, please go to "Visual Studio Tools menu | Options | Source Control | Plug-in Selection | Current source control plug-in" and then select "Dynamsoft SourceAnywhere for VSS".。
VMware workspce step by step安装手册v1.0

文档编号:VMware workspceStep by step 安装手册版本1.0文档修订记录目录1文档使用说明2 2WORKSPCE组件功能说明2 3安装流程3 4安装工具要求3 4.1W ORKSPCE安装硬件要求3 4.2VM WARE软件要求3 4.3浏览器要求3 4.4安装介质3 5WORKSPCE安装前准备4 5.1V CENTER IP池配置4 5.2AD域配置5 5.3DNS配置6 5.4STMP服务器配置6 6WORKSPCE组件安装8 7VPOSTGRESQL数据库安装15 8WORKSPCE初始化配置16 9WORKSPCE应用配置21 9.1配置H ORIZON W ORKSPACE 数据模块21 9.2配置D ATA 模块24 9.3配置H ORIZON W ORKSPACE 应用模块26 9.4配置W EB程序简单发布29 9.5配置H ORIZON W ORKSPACE 桌面模块31 9.6V IEW环境中配置W ORKSPACE SSO登录371文档使用说明本文档适用于VMware workspce v1.5和workspce v1.8的安装。
本文中更多的涉及VMware workspce 软件的安装,对于workspce所需要的其他环境,本文中只对关键环节做了描述,其他环节需要使用者参考相关文档。
目前,本文档只作为北明软件公司内部人员使用的参考文档。
2Workspce组件功能说明3安装流程4安装工具要求4.1Workspce安装硬件要求4.2VMware软件要求Vcenter5.0 U2以上版本ESXI 5.0 U2以上版本4.3浏览器要求Mozilla Firefox (建议最新版)Google Chrome (建议最新版)4.4安装介质Horizon workspace OVA vPostgreSQL OVA5Workspce安装前准备5.1Vcenter IP池配置点击数据中心→选择加IPv4面内容配置完成后见左图所示样例。
CANoe入门Stepbystep系列(1、2、3)

CANoe是Vector公司的针对汽车电子行业的总线分析工具,现在我用CANoe7.6版本进行介绍,其他版本功能基本差不多。
硬件我使用的是CAN case XL.1,CANoe软件的安装很简单,先装驱动,再装软件。
安装完成,插上USB,连接硬件,这样在控制面板中,Vector Hardware 进行查看通过查看信息可知,CANcaseXL中的两个piggy,一个是251(高速CAN),一个是7269(LIN),另外常用的还有1054(低速CAN,或称容错CAN),因为CANcaseXL中只能支持两路通讯,这样piggy可以自由组合2,硬件连接正常,打开CANoe软件文案大全File->New Configuration 可以选择新建工程的模版,我们这里选择CAN_500kBaud.tcn,这样新建了波特率为500K CAN工程,可以File->Save Configuration,进行保存3,接下来就要使用CAN db++ Editor工具对总线网络节点,消息,信号,进行定义了。
点击工具栏的这个图标,或开始菜单中找这个工具启动启动后,File->Create Database,选择CANTemplate.dbc,选择目录及文件名,进行保存右键 Network nodes->New ,进行网络节点的定义,这里只需要填写Name即可,例如:Node_A文案大全然后添加Node_B,完成后如下图,这样在Network nodes目录下面添加出来两个节点节点添加完成后,下一步添加CAN消息,右键Messages->New,这是需要定义名称,ID,DLC等信息,如下:文案大全然后在Transmitters页面,点击Add按钮,添加Node_A为发送节点,意思就是说,此消息是从Node_A节点发送出来的文案大全其实还有一种方法就是,此时暂时不定义发送节点,然后直接以拖曳的方式拖曳到发送节点上,功能上是一样的有了消息,消息里携带的东西自然是信号咯,那么我们开始创建一个信号右键Signals->New,填写如下信息文案大全信号当然要放到消息中咯,切换到Messages页面,Add 我们刚刚建立的Message_A,当然和上面一样,采用拖曳的方式从Signal到Message中建立关联也是可以的。
打通VxWorks调试环境 Step by Step(X86)

打通VxWorks调试环境Step by Step1 引言1.1 编写目的概要说明如何建立使用Tornado开发、调试VxWorks的环境(X86版本)。
1.2 背景1.3 定义HOST:主机,运行Tornado集成环境,FTP Server,Target Server,以及编辑、build工程、下载目标文件的各种软件工具;TARGET:目标机,HOST产生的vxWorks映像运行的位置,对于X86版本来说也是一台PC;TORNADO:C:\Tornado,安装Tornado的路径;BSPNAME:C:\Tornado\target\config\pc486,BSP的路径,本例中我们选择pc486;PROJECT:C:\Tornado\proj\Project2,我们自己创建的工程的路径;BIN:C:\Tornado\host\x86-win32\bin,Tornado的可执行程序的路径;HOME:C:\Tornado\host\x86-win32\bin,FTP用户的根目录。
1.4 参考资料Tornado User’s G uide (Windows Version), 2.0, Edition 1VxWorks Programmer’s Guide, 5.4, Edition 12 总体描述2.1 硬件环境HOST与TARGET通过以太网互连,并且位于同一网段;同时,串口通过直连电缆(NULL Modem Cable)连接。
目标机配置有软盘驱动器,网卡为3com 3c905B.2.2 软件环境主机操作系统为Windows 2000简体中文专业版(SP3);安装Tornado Version 2.0和Win 2k 补丁。
(CD No. TDK-12835-ZC-01 & TDK-13127-ZC-00, T2 LM for x86)2.3 预览在VxWorks调试环境中,HOST与TARGET之间连接的方式有多种,比如串口和网络;引导TARGET的方式也有多种,当然对X86平台来说最简单的是软盘引导了。
宜家橱柜安装指南说明书

The step-by-step guide to installing your new kitchen rightThis brochure is your guide to preparing and installing your new kitchen. Inside you’ll find tips and ideas, clear steps to follow, and the tools you’ll need. Use this guide along with your assembly instructions to make sure your kitchen is installed correctly.You can do it yourself but you don’t have toOur kitchens are designed to be simple to install and assemble yourself, but we’re here to help as muchas you would like along the way. Whether you’d like a hand with delivery or a complete installation service, we’re happy to put together a service package that suits you. For more details, see the kitchen section of or contact your local IKEA store. Before you beginTake a look at this brochure to see what steps are involved in installing your new kitchen and organize what tools you’ll need.Once you’ve received your kitchen, double-check that all the parts have arrived. A good way to do this is by checking what packages you have at home against the order list. You should only dismantle your old kitchen when you have all your new parts and appliances. Your kitchen parts and countertop should be stored indoors, with normal room temperature and humidity levels. It’s helpful if you arrange your cabinets in the order you will be installing them. Use your shopping list and IKEA home planner drawing to help you. Remove your old kitchen making sure that electric, water and gas are off before you begin. Use a qualified, licensed professional to disconnect and connect your gas, water, and electricity.23The tools you’ll need depend on how much of yourkitchen you are doing yourself. See the assemblyinstructions for the tools you’ll need to use. It’s a goodidea to wear safety glasses when using power tools.Miter box and saw Fine-toothed handsawBar clampsElectric screwdriver/drill JigsawCircular saw LevelAwl Square Pencil Rubber mallet Claw Hammer Phillips screwdriver Flat screwdriver Hole cutter – for drilling the hole for the faucet in the sink.4Prepare your roomOnce you have removed your old kitchen, prepareyour room by making sure your walls and floorare even, and that your walls are suitable forsupporting your new kitchen. Now is also thetime to prime and paint your walls, put in tiles orchange your flooring.Marking cabinet positionsDraw a layout of your new kitchen directlyon the wall. Check that everything fits withthe measurements from your plan and yourelectricity, water, gas, and ventilation connectionsare where you want them. Also mark where toattach your new kitchen’s suspension rails.Prepare your space by making sure your corners are even and your walls and floor are squareand plumb. Use your square for the corners and a level for the walls and floor. Make sure younote the highest point of the floor and where the corners are not square.Check that your wall is strong enough tohang your suspension rail and cabinets.Depending on your wall material, it’s bestSet your suspension railWith the new IKEA kitchen system, your cabinets can be hung directly onto a suspension rail making them easier to install and easier to adjust.It’s important to make sure your suspension rail is straight and level, and to secure it with the right screw type for your wall.Marking the right height for your suspension rail Your base suspension rail needs to be hung 32 3/16" above your floor’s highest point (measure to the underside of the rail). You should allow 22 5/16" between the bottom of your wall cabinets and the bottom of your base rail when measuring for your upper rail.Fasten your rails, base rail first. Make sureyou’ve found suitable points in the wallwhere the rails can be fastened and that therails are level before drilling.If your wall is uneven use shims between the rail and the wall to make sure the rail is e a level to check that each rail is level.6Install your cabinetsIn most kitchens it’s best to install your wallcabinets first. This will allow you to move aroundwithout base cabinets in the way. One exceptionis if you are installing a single line kitchen with ahigh cabinet at one end. In this case install thehigh cabinet first.Before you begin, mark down all plumbing andother utilities. Some cabinets have ready-madeopenings for plumbing and utilities, but you canuse a jigsaw to create your own openings, ifneeded. Do this before fitting the cabinet in place.Be aware that these openings can affect how youcan arrange drawers in a cabinet.to the assembly instructions. Wait until laterbefore fitting drawers, doors, and internalfittings.corner. Hang all remaining cabinets in thesame way. If you’re installing a cornercarousel now is the time to place it in thecabinet.aligned with your plumbing.tightening the screws. Hang the remainingcabinets and connect them with the includedscrews. Wait to tighten the screws untilthe base cabinets are in place and you canensure alignment.previous cabinet by adjusting the legs.assembly instructions. Make sure to havethe legs attached in the order the cabinetswill be installed.installing. Remember to use the distance ring included with the legs.cover panel first.Filler piecesFiller pieces are used between yourcabinets and walls for a streamlinedappearance and to ensure there isenough room to fully open doors anddrawers. They are especially useful ifyour walls are not perfectly straight.If the wall is not level and flat, the filler piece must be cut to fit to the wall’s shape. To do this,you’ll need a filler piece, measuring tape, small block of wood about 1 1/4" thick and a pencil.Cut the filler piece so it’s the same height as the cabinet. Place the edge of the filler pieceagainst the wall. Hold the block of wood flat against the wall with the pencil against it. Keepthem pressed against the wall as you slide them down the length of the filler piece. Now youhave traced the shape of the wall onto the filler piece. Cut along your trace line.Place the newly cut edge of the filler piece against the wall, it should fit perfectly. Mark theedge of the cabinet on the top and bottom of the filler piece. Draw a straight line from theseCheck the wall with your level to see if it is straight. If the wall is even, measure between the wall and the cabinet and mark this distance at the top and bottom of the filler piece.To ensure the filler piece stays in place, first attach a support strip to the wall. Drill holes in the cabinet for the screws you’ll use to attach the cabinet and filler piece together.Put the filler piece into place. Put screws through the holes you have drilled. When all your filler pieces are in, caulk around each one with silicone for an airtight seal.8Install your worktop, sink, lighting, appliances, and kitchen island.With your cabinet frames in, it’s time to installyour countertop, sink, lighting, and appliances.Check that your countertop is the correct sizebefore fitting it in place. Now is also the time ifyou need to customize your countertop for a sinkor cooktop, see your assembly instructions forhelp.Once your countertop is in, you’re ready toget your water, gas, lighting and appliancesconnected. All water, gas, and electricityconnections must be done by qualified, licensedprofessionals according to valid local safetyregulations.All electrical connections must be made by aqualified, licensed electrician.straight-edge to your pre-cut countertopwhen you cut to customize the size. It’shelpful to use a pair of sawhorses.countertop apply polyurethane siliconeacross the sawn edges.Install your lighting and appliances.the assembly instructions.Measure your countertop. If you have a pre-cut countertop, now is the time to cut itto the right length.countertop in place. Trace the inside ofthe base cabinet onto the underside of thecountertop. This helps you align your sink.Turn your countertop over and trace theoutline of your sink onto masking tape.the assembly instructions.It’s helpful to drill a hole on the insidecorners of your outline before cutting, soyou can make a cleaner cut.9Customize your countertop for your cooktopin the same fashion as for your sink. Seeyour cooktop’s assembly instructions forhelp.Install the extractor hood. The extractor hoods from IKEA can be installed in two ways: either vented to the outside, called extraction, or used in recirculation mode fitted with a charcoal filter. Each installation option is described in the assembly instructions that come with the product.Saw the hole either in the back panel or in the top of the cabinet. See the assembly instructions.For safety and functionality reasons, follow precise measurements in the instructions forinstallation that come with the extractor hood/fan.Supporting brackets are used to fasten kitchen islands to the floor.Legs/toe kicks must then be fitted around the outside of the island.The kitchen island assembly kit is used to connect cabinets back toback, or for attaching a cover panel to the back of cabinets.10Install your shelves, drawers, doors, knobs, and handles.Now that the cabinet frames, countertops andappliances are in, attach the drawer slides intothe cabinets. Remember that the slides for innerand standard drawers are attached differently,see the assembly instructions for help.Once the slides are in, attach the drawers beforethe doors and shelves. Finish by adding knobsand handles as well as any other internalsolutions, like wire baskets.outer drawers. Outer drawer slides shouldbe attached to the outer row of holes in thecabinet.the inner drawer slides. The inner drawerslides are attached to the inner row of holesin the cabinet.assembly instructions.cabinets.width by adjusting the screws on the hingeplate.Now its time to attach a toe kick. Follow theassembly instructions for help.If using a ventilation grill, place it betweentwo pieces of toe kick.You’re done! Congratulations on your new kitchen!Caring for your cabinetsClean the doors, cabinet interiors, and wood surfaces with a soft, damp cloth. Only use cleaning products intended for these materials. Do not use products that contain ammonia, alcohol, bleach, or abrasives. Rinse with clean water, then dry with a clean, dry cloth. Make sure to clean up spills quickly.Keep your sink sparklingAfter each use, wipe the sink clean with a cloth or sponge damped in water or a non-abrasive scratch the stainless steel surface. The damp surface can be discolored if substances containing iron are allowed to remain on it.Long-lasting countertopsKeep your countertop in top condition by cleaning up spills quickly with water and a mild detergent. Be sure to keep them as dry as possible after use. For wood and solid wood countertops use BEHANDLA wood treatment oil. The oil protects the wood from marks, stains, and cracks, and prevents water from penetrating the surface.11Services and prices may vary, please see /services or your local IKEA store for details.ALL THE HELP YOU NEED TO MAKE YOUR DREAM KITCHEN A REALITYAt IKEA we believe everyone has the right to a new kitchen. Apart from offering a wide range of kitchens, we also offer a wide range of services, including measuring, planning, and installation. Everything you need to make getting your dream kitchen as easy as possible. And at your local IKEA store you’ll find our team of kitchen experts who are on hand to answer questions, give practical advice, and help you through the buying process.Save time and effort with professional installation. Kitchen Installation isprovided by an Independent Service Provider and is priced per cabinet.INSTALLATION SERVICEWe can arrange for an Independent Service Provider to deliver your newkitchen directly to your home or office. Prices are based on distance.DELIVERY SERVICEA professional Measurement Technician will visit you in your home toprovide all measurement services. A Kitchen Planner will then contact youto discuss the details of your kitchen plan, and start the planning process.Performed by an Independent Service Provider. The Measurement andPlanning fee is refunded to you when you purchase your IKEA kitchen.MEASUREMENT AND PLANNING SERVICE MEASUREMENT SERVICEAn experienced professional from an Independent Service Provider willcome to your home to assess the conditions and provide accuratemeasurements. This service is available to customers living in our servicearea. The Measurement fee is refunded to you when you purchase your IKEAkitchen.© Inter IKEA Systems B.V. 2015/August 2018。
STEP 完整安装过程
STEP7软件安装首先本人用的是版本此版本可在win7 64位系统中正确安装。
以前的版本包括只可以版本均无法再win7 64位系统正确安装,其中版本可以在win7 32位系统中正确安装。
(与是不同的,前者是最新的一版,解决了与win7 64位系统兼容问题)各种版本下载地址如下:(这里有各种西门子SIEMENS 软件)也可直接点击:或直接复制下面的迅雷地址:ed2,此时将检测系统是否安装了STEP7,如果没有安装将不能继续下一步骤,解决方法有两种:一.用CD_1\STEP7\Disk1里的直接安装二.修改CD_1里的文件文件用记事本打开后,找到[TERMS]行Term1=Registry%%\HKEY_LOCAL_MACHINE\SOFTWARE\SIEMENS\AUTSW\S TEP7\Version%%REGSZ%%=>%%%%TermMessage1%%1修改为;Term1=Registry%%\HKEY_LOCAL_MACHINE\SOFTWARE\SIEMENS\AUTSW\ STEP7\Version%%REGSZ%%=>%%%%TermMessage1%%1Term1=就是把检测注册表的那项用“;”注释掉,再建一个空的检测项就可以了。
显示系统条件不能满足:在注册表内“HKEY_LOCAL_MACHINE\System\CurrentControlSet\Control\Session Manager\ ”中删除注册表值“PendingFileRenameOperations”不要重新启动,继续安装软件。
我用的是第一种方法。
完成上述步骤后再次双击开始安装,如果出现“未找到SSF文件”如图说明你将安装文件放在了中文路径下的文件夹里了,西门子不识别中文路径。
将安装文件放到英文下的文件夹里就可以了(就是将文件夹的名称改成英文)。
解决上述问题后继续安装。
STEP7软件的安装过程安装过程中,有一些选项需要用户选择。
step7安装教程

step7安装教程Step 7 安装教程在进行任何安装之前,确保你已经完成了前六个步骤,包括选择正确的软件和准备安装所需的文件。
以下是一个简单的步骤教程,以帮助你顺利完成安装过程。
请按照以下步骤操作:1. 首先,打开你需要安装的软件包文件。
这通常是一个.exe或.msi文件,你可以从官方网站或其他可靠的来源下载。
2. 双击打开软件包文件。
你可能会看到一个弹出窗口,询问你是否要运行此文件。
点击“是”或“运行”,以继续安装过程。
3. 在安装向导窗口中,你将被要求接受软件许可协议。
请仔细阅读协议,并在同意之后点击“下一步”或“接受”按钮。
4. 接下来,你可能会被要求选择软件的安装位置。
默认情况下,软件将安装在C盘的“Program Files”文件夹中。
如果你希望将其安装到其他位置,请点击“浏览”按钮,并选择一个新的目录。
5. 点击“下一步”按钮,进入下一个步骤。
你可能会看到一些其他设置选项,例如创建桌面快捷方式或添加启动菜单项。
根据你的需求选择这些选项,然后点击“下一步”。
6. 现在,你将看到一个总结页面,显示安装过程中所做的选择。
仔细检查并确保一切都符合你的要求。
如果需要更改某些设置,点击“上一步”按钮返回对应的步骤进行修改。
7. 最后,点击“安装”按钮,开始安装软件。
这可能需要一些时间,具体取决于软件的大小和你的计算机性能。
8. 安装完成后,你可能会看到一个成功的安装消息。
点击“完成”按钮,关闭安装向导。
恭喜!你已经成功安装了你选择的软件。
现在你可以开始使用它了。
确保检查软件的安装位置,以便在需要时进行修改或卸载。
请注意,由于不同软件的安装过程可能会有所不同,上述步骤仅为常见的安装指南。
对于特定的软件,最好参考它们的官方文档或安装指南,以确保正确地进行安装。
希望这个教程对你有所帮助,祝你顺利完成软件安装!。
STEP7安装教程

STEP7安装教程步骤1:准备工作在开始安装之前,首先需要确保您的计算机符合安装要求。
STEP7要求运行在Windows操作系统上,支持的版本有Windows 7、Windows 8和Windows 10。
确保您的计算机已经安装了这些操作系统,并且具备足够的存储空间和内存。
步骤2:获取安装程序步骤3:运行安装程序找到之前保存的安装程序文件,双击运行它。
会弹出一个安装向导窗口,根据向导的指示逐步进行安装。
在向导中,您需要选择安装语言、安装路径和组件。
建议选择默认设置,以确保安装过程的顺利进行。
步骤4:激活许可证STEP7是一款商业软件,需要激活许可证才能正常使用。
在安装完成后,您将获得一个许可证文件或者许可证代码。
根据您的情况,选择其中一种方式进行激活。
如果您获得了许可证文件,将其保存在计算机的合适位置。
如果您获得了许可证代码,将其复制到剪贴板中。
步骤5:启动STEP7完成安装和许可证激活后,您可以在计算机上找到STEP7的快捷方式。
双击打开STEP7,它将会加载并显示出主界面。
在主界面中,您可以开始进行编程、配置和管理西门子自动化设备。
步骤6:连接设备在使用STEP7之前,您需要将计算机与您需要编程和配置的设备连接起来。
通过串口、以太网或者其他接口,将计算机与设备连接。
确保连接稳定并且工作正常。
在主界面的“连接”菜单下,您可以找到与设备连接的选项。
步骤7:开始编程和配置连接完成后,您可以开始使用STEP7进行编程和配置了。
根据您的需求,选择相应的功能模块和操作界面,进行相应的操作。
通过STEP7,您可以创建新的项目、编写程序、配置设备参数等。
ubuntu系统下RabbitMQ安装和配置详细步骤(step by step)

RabbitMQ安装需要安装较多的依赖包,之前如果安装过RabbitMQ-server必须要先彻底删除。
重装的ubuntu系统(ubuntu server)的开发环境几乎是裸的,再重新编译安装erlang需要一些关键库。
1. gcc/g++、make等开发工具Bash代码1.sudo apt-get install build-essential2. 其它Erlang用到的关键库Bash代码1.sudo apt-get install libncurses5-dev2.sudo apt-get install m43.sudo apt-get install libssl-dev3. 此外还有一些非关键库也可以装上,不然make也通不过Bash代码1.sudo apt-get install libc6 (Ubuntu 9.10以后自动带这个,所以不用再装了)2.sudo apt-get install unixodbc unixodbc-dev ODBC方式提供对传统关系数据库支持3.sudo apt-get install freeglut3-dev libwxgtk2.8-dev4. 安装JDK,需要这个编译JInterfacesudo apt-get install sun-java6-jdk安装后设置环境变量JAVA_HOME和PATH,并在/usr/bin中设置java和javac 的符号链接:Bash代码1.sudo ln -s /usr/local/jdk1.6.0_20/bin/java /usr/bin/java2.sudo ln -s /usr/local/jdk1.6.0_20/bin/javac /usr/bin/javac5. 在R13B03后,帮助文档的生成方式有了变化,要想自动生成帮助文件,需要安装xsltproc和Bash代码1.sudo apt-get install xsltproc2.sudo apt-get install fop6.然后下载安装ERLANG源代码(otp_src_R14B02.tar.gz)tar -xvf otp_src_R14B02.tar.gzcd otp_src_R14B02.tar.gzsudo ./configure --prefix=/otp/erlangsudo makesudo make install安装完毕,能够rm -fr otp_src_R14B02.tar.gz删除源代码然后改改/etc/profileexport PATH=/opt/erlang/bin:$PATHalias ls='ls -color=auto'alias ll='ll -lht'能够source /etc/profile一下,及时修改PATH7. 下载安装RabbitMQ-Server下载rabbitmq-server_2.4.1-1_all.deb软件包安装:dpkg –i rabbitmq-server_2.4.1-1_all.deb(有关dpkg安装软件的步骤和方法网上有很多)默认安装在ubuntu操作系统的/etc/lib8.使用和权限设置下面我们使用rabbitmqctl控制台命令(位于D:\rabbitmq\sbin>)来配置vhost,创建用户,密码,绑定权限等。
tessy安装流程以及使用

tessy安装流程以及使用英文回答:Installing and using Tessy can be a straightforward process. Here's a step-by-step guide to help you get started:1. Download Tessy: Go to the official Tessy website and download the installation package suitable for your operating system. Tessy is available for Windows, Linux, and macOS.2. Install Tessy: Once the download is complete, locate the installation package and run it. Follow the on-screen instructions to install Tessy on your computer. Make sure to choose the appropriate options during the installation process.3. Activate Tessy: After the installation is complete, you will need to activate Tessy using a valid license key.If you don't have a license key yet, you can request atrial version or purchase a license from the Tessy website. Enter the license key when prompted during the activation process.4. Set up your project: Once Tessy is installed and activated, you can start setting up your project. Tessy supports various programming languages, such as C, C++, and Ada. Create a new project or import an existing one into Tessy.5. Write test cases: In Tessy, you can write test cases to verify the functionality of your code. Test cases can be created manually or generated automatically based on code coverage analysis. Tessy provides a user-friendly interface to define test cases, set test inputs, and expected outputs.6. Execute tests: Once you have defined your test cases, you can execute them using Tessy. Tessy will run the tests and provide detailed reports on the test results, including pass/fail status and code coverage metrics. You can analyze the reports to identify any issues or areas of improvementin your code.7. Debug and fix issues: If any test cases fail orreveal issues in your code, you can use Tessy's debugging capabilities to identify and fix the problems. Tessy provides tools for step-by-step debugging, variable inspection, and code coverage analysis to assist you in the debugging process.8. Repeat the process: As you make changes to your code, you can repeat the testing process using Tessy to ensurethat your modifications do not introduce new issues.Tessy's automation features can help you streamline the testing process and save time.中文回答:Tessy的安装和使用过程非常简单。
简单的安装步骤英语作文

简单的安装步骤英语作文Title: A Step-by-Step Guide to Simple Installation Process。
Introduction:Installing software or setting up a device can sometimes seem daunting, but with clear, step-by-step instructions, it can be a breeze. In this guide, we'll walk through a simple installation process, breaking down each step into clear, easy-to-follow instructions.Step 1: Preparation。
Before diving into the installation process, it's essential to gather all the necessary tools and materials. This may include the software or device you're installing, any required cables or adapters, and any additional components. Ensure that you have everything on hand before proceeding to avoid interruptions during the installation.Step 2: Read the Instructions。
Many installation processes come with accompanying instructions or manuals. Take the time to carefully read through these materials before starting. Pay closeattention to any warnings, requirements, or special considerations mentioned. Understanding the installation process beforehand can prevent errors and ensure a smoother experience.Step 3: Check Compatibility。
pioneer简易操作手册
Pilot Pioneer简易操作(Step by Step)Pilot Pioneer测试总体流程安装软件与驱动运行软件新建工程导入地图配置设备导入基站设置测试模板保存工程连接设备/开始记录调用测试模板开始测试信令窗口Radio窗口Graph窗口TCP/IP Monitor窗口说明:1、初次使用软件可以按照此操作流程逐步完成;2、每一步骤都可以按住“Ctrl”键点击数据,自动跟踪到设置项目;3、对于第一次使用软件的工程师,可以参照下面过程完成Log收取(指针对Log收取时使用):安装软件及驱动→运行软件→新建工程→设置设备→设置测试模版→保存工程→连接设备/开始记录→调用测试模版→开始测试一、软件安装与驱动1、软件安装点击软件安装程序:Pilot Pioneer,显示如下:点击“下一步”:选择我同意,然后点击“下一步”:在此,可以选择软件安装路径,在上图的窗口中选择右侧的“浏览”按钮即可浏览。
然后点击“下一步”:点击“下一步”:点击“下一步”:选择“安装”:安装软件结束后,会自动弹出两个要安装的软件,分别为:“MSXML 4.0 SP2”和“WinPcap4.0.2”,这两个软件是每次安装Pilot Pioneer软件都要重新安装的。
完成以上的安装,前台测试软件Pilot Pioneer已经正常安装完毕,同时,软件安装包会自动安装软件机密锁的驱动。
软件安装成功之后,还需要一个软件权限文件“Pioneer.lcf”文件,这个文件一般在软件的安装光盘中,或可以和软件机密锁一起得到。
软件正常运行需要将“Pioneer.lcf”文件放到软件安装目录中。
如果软件安装在默认目录中,路径如下:C:\Program Files\DingLi\Pilot Pioneer3.6.1.33或见下图:如果软件的权限文件“Pioneer.lcf”文件和软件加密锁配对正常,就可以打开软件进行下面的应用了。
返回首页2、手机驱动的安装三星F400手机驱动的安装当新的三星F400插到电脑的USB端口时,电脑会提示安装硬件驱动程序。
安装Ubuntu系统

本文档内容来自Ubuntu之家!安装重点本文旨在为初学者提供一篇详细步骤(step-by-step) 的安装手册,但对老手或曾安装旧Ubuntu/Kubuntu/Xubuntu/Lubuntu 的朋友可能过份冗长。
所以这节列出安装的基本程序和要点,让有经验的用户可以立即安装Ubuntu/Kubuntu/Xubuntu/Lubuntu 11.10。
∙用BT 下载Ubuntu 11.10 桌面安装光盘ISO 档,并烧成光盘或U 盘。
∙Vista/7 使用者请先用Vista/7 提供的Disk Management Console缩小分割区。
∙如硬盘有一些重要的资料,请先备份。
∙用桌面安装光盘开机。
∙先选择『中文(繁体)』或『中文(简体)』作为安装语言,并按『安装Ubuntu』(Install Ubuntu)。
∙确认您计算机有不少于3GB 的磁盘空间安装Ubuntu,有接上电源(不是使用电池) 和有连接至因特网(使用有线较佳),并选取『安装此第三方软件』(Install this third-party software)让安装程序自动安装Flash 播放器和各专利音乐/影片格式的译码器等。
然后按『下一步』(Forward)。
∙因应您计算机的情况,选择安装Ubuntu 的方案:∙硬盘有超过3GB 未分割的空间可以安装Ubuntu/Kubuntu/Xubuntu/Lubuntu,可以选使用最大的连续可用空间(use the largest continuous free space)。
∙整个硬盘已被另一个仍需要运作操作系统(包括其他GNU/Linux 或Windows 98/ME/2000/XP) 佔用,可以选将Ubuntu 11.10 与作业系统安装在一起(Install Ubuntu 11.10 alongside OS)把Ubuntu/Kubuntu/Xubuntu/Lubuntu 和它们安装在同一硬盘,并让您在开机时选取启动那个(即所谓dual-boot)。
Haploview使用方法图解(Step-By-Step)

用搜狗浏览器下载下来的文件打不开,必须换IE浏览器打开网页再下载数据!我觉得Haploview最好的课件就是在他的官网,里面有一个“User Manual”:实验三、Browsers and Tools for Genetic Variants Analysis 4学时基础性主要内容: HapMap Generic Genome Browser, NCBI dbSNPs, Haploview教学要求:了解三者的主要内容,及主要功能。
HapMap phaseI,phaseII是全面的有关人类遗传变异数据库,NCBI dbSNP存储了所有的人类SNP数据,Haploview是通用的LD分析软件。
理解dbSNP所存储的所有人类SNP数据,质量并不是都很可靠的,因此dbSNP为每一个SNP专门设置了“Validation Status”信息。
掌握从HapMap和dbSNP中获取一段染色体片断相关的遗传变异信息。
重点:掌握从HapMap和dbSNP中获取一段染色体片断相关的遗传变异信息。
难点:如何使用Haploview工具进行LD分析。
其它教学环节:实验课刚开始,授课老师结合ppt,以人类BRCA2基因为例,讲授本次实验课的主要内容,并布置本次实验作业。
在实验过程中,授课老师提议同一个小组的学生一起讨论,有问题向授课老师或助教提问。
同时,学生可以在论坛中(专门为生物信息学试验课设计的)发表自己的见解、交流学习心得。
Haploview是一个进行单倍型分析的一个软件,该软件具有如下功能:1.连锁不平衡与单倍型分析2.单倍型人群频率估算与单倍型关系分析4.相互关系的排列测验5.可以从HapMap上直接下载基因型信息网址:下载:Windows版: Mac / Unix / Linux (安装:java -jar ) JAVA下载在安装该软件之前,必须先安装一个“JAVA”,Haploview必须在JAVA环境下才能运行。
西门子STEP V安装与使用

编写程序
演示如何使用编辑器编写 PLC程序,包括基本指令、 数据类型、程序结构等。
编译与下载
说明如何将编写好的程序 编译成可执行文件,并下 载到PLC中进行运行。
操作技巧分享
快捷键使用
介绍常用的快捷键操作, 提高编程效率。
调试技巧
分享一些实用的调试技巧, 如断点设置、变量监视等, 帮助快速定位和解决问题。
获取安装程序
从西门子官方网站或授权渠道下载 STEP V软件的安装程序,并保存到本 地计算机。
安装步骤详解
运行安装程序
01
双击下载的安装程序,开始安装向导。
选择安装语言
02
根据个人需求选择合适的安装语言。
阅读并同意软件许可协议
03
仔细阅读软件许可协议,确认无误后勾选“我接受许可协议”Βιβλιοθήκη 选项。安装步骤详解
使用技巧探讨
合理规划程序结构
在编写程序时,应根据控制需求和功能划分合理的程序结构,提高程 序的可读性和可维护性。
充分利用库函数
STEP V提供了丰富的库函数,用户应充分利用这些库函数,减少编程 工作量,提高编程效率。
善用调试工具
在程序调试过程中,应善于利用STEP V提供的调试工具,如单步执行、 断点设置、变量监视等,以便快速定位和解决问题。
程序无法下载到PLC
可能是由于PLC型号不匹配、程序语法错误或下载参数设置错误等 原因导致。
故障诊断方法
查看错误提示信息
软件通常会提供错误提示信息, 可以根据提示信息进行相应的处
理。
检查硬件连接
检查计算机与PLC之间的连接是否 正常,包括通讯接口、电缆等。
查看日志文件
软件会生成日志文件,记录软件运 行过程中的详细信息,可以通过查 看日志文件来定位故障原因。
Step 安装步骤
Step7 安装步骤
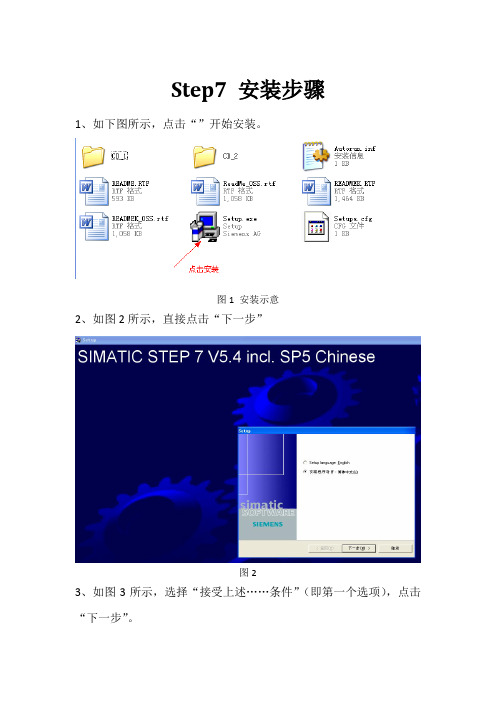
1、如下图所示,点击“”开始安装。
图1 安装示意
2、如图2所示,直接点击“下一步”
图2
3、如图3所示,选择“接受上述……条件”(即第一个选项),点击“下一步”。
图3
4、如图4所示,选择“□”前面有对勾的两个选项,然后点击“下一步”
图4
5、经过上述步骤后开始安装,如图5,直接点击“下一步”。
图5
6、如图6.,点击下一步
图6
7、如图7,输入相应的“用户名”和“组织”,点击“下一步”
图7
8、如图8所示,选择“典型的”,点击“更改”可以更改安装路径
图8
9、如图9所示,选择“否,以后再传送许可密匙”,“下一步”
图9
10、经过上述步骤,在后续安装过程中只需按照默认选择安装完成即可。
11、安装密匙
在上图中,点击该软件后出现该界面,点击左侧树中的“Required keys”,然后在右侧区域会蓝色背景显示需要安装的key,点击蓝色背景的选
项后,在界面上方,点击“install long”,即完成密匙的传送安装。
安装路径如下图可选择。
IPEVD 安装指南说明书

Step-by-step guide to setting up IPEVO document cameras with Microsoft TeamsTip:Some 3rd party software may default to a mirror image on your end while showing the correct orientation on the other end when you're using a document camera with it. This is a default setting of the 3rd party software. To get the image showing up in the correct orientation on your end, either use the native Mirror feature of the software or stream your live feed through the IPEVO Visualizer software and then share it via the screen sharing feature of the 3rd party software.Setting up IPEVO document cameras with Microsoft TeamsList of materials neededBefore you start, make sure you have the following on hand:An IPEVO document cameraA computerMicrosoft TeamsIPEVO Visualizer software (for screen sharing)Step-by-step guideHere are the steps to setting up your IPEVO document camera with Microsoft Teams.1. Plug in an IPEVO document camera to your computer via USB. Remember to turn it on if you’re using a VZ-R or VZ-X.2. Open Microsoft Teams on your computer and sign in with your username and password. Create an account if you don’t have one. Follow the steps outlined here to sign up for one.3. Click your profile picture, and click Settings in the drop-down list to open the settings page.4. On the settings page, click the Devices tab.5. Select your IPEVO document camera as the video source in Camera.6. If you’d like to access the built-in microphone of your IPEVO document camera, change your audio source in Microphone as well.7. As with other third-party software that sets their default image to be mirrored, you’ll see a mirrored image in your preview when you use your IPEVO document camera with Microsoft Teams. To get around this, simply use the Share function in Microsoft Teams.(1) Stop the Teams software from accessing your IPEVO document camera by switching the video source.(2) Download and run the free IPEVO Visualizer software to stream the live images of your IPEVO document camera. You can download IPEVO Visualizer here.(3) Go back to the Teams software, and click the Share function to start sharing your screen.(4) You may choose to share a selected window or the whole desktop.(5) Now the image you’re seeing will be in the correct orientation.8. Make use of IPEVO document cameras’ multi-joint stands and swiveling camera heads to capture your materials at the height, angle, and orientation that best fit your needs. If you’re using VZ-R or VZ-X, you can even adjust the images at your fingertips with the available tactile buttons!。
GibbsCAM试用版软件安装step by step
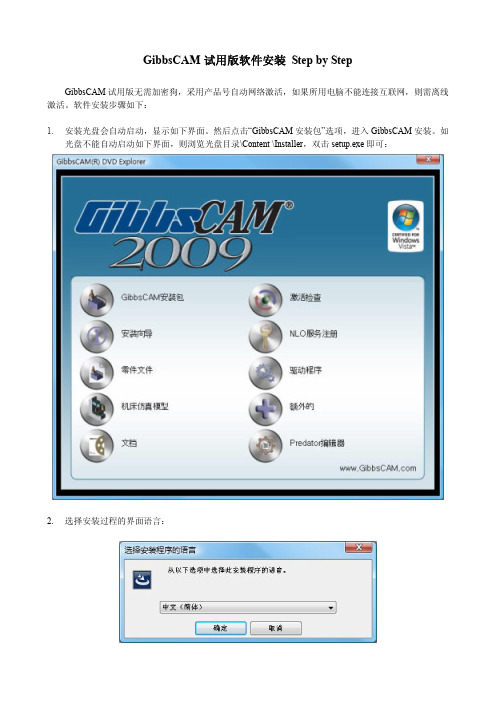
GibbsCAM试用版软件安装Step by StepGibbsCAM试用版无需加密狗,采用产品号自动网络激活,如果所用电脑不能连接互联网,则需离线激活。
软件安装步骤如下:1.安装光盘会自动启动,显示如下界面。
然后点击“GibbsCAM安装包”选项,进入GibbsCAM安装。
如光盘不能自动启动如下界面,则浏览光盘目录\Content \Installer,双击setup.exe即可:2.选择安装过程的界面语言:3.遇到提示, 点击下一步继续. 您需要同意GibbsCAM 2009 许可协议才能继续安装。
然后选择软件安装后的界面语言:4.选择无需硬件锁的安装类型:5.设置安装目录:6.选择你需要的CAD插件和其他三方功能:请注意在有些系统SolidWorks 插件不会自动的出现在SolidWorks 菜单下. 如果出现这种现象, 选择工具> 在菜单栏选择插件. 这将会打开一个对话框, 提供你可利用的插件. 选择GibbsCAM SolidWorks 插件项目并点击OK. 此项目就会出现在菜单目录下.7.安装。
完成后,点击桌面GibbsCAM快捷方式,进入口令激活步骤8.第一次启动GibbsCAM时,会弹出授权激活对话框:9.选择“运行注册工具”选项,进入产品号输入界面,填入Cimatron China发出的GibbsCAM试用产品密码:10.填入用户信息:11.下面根据GibbsCAM安装电脑能否连接互联网,情况会有所不同。
如果电脑能够直接连接互联网,则会弹出自动联网激活界面。
如果电脑不能联网,请跳到第13步。
12.点击“完成”按钮,显示许可文件成功调用界面,则可以启动GibbsCAM,开始激动旅程了:)13.如果电脑不能联网,则第11步会弹出保存注册信息文件(*.GLC)对话框:14.点击完成,保存注册信息文件(*.GLC),并把此文件发到cimatron@。
等候Cimatron China根据此信息文件生成许可文件,再发送给您。
Step by Step轻松玩转驱动程序安装

Step by Step轻松玩转驱动程序安装
博文
【期刊名称】《电脑知识与技术-经验技巧》
【年(卷),期】2006(000)012
【摘要】安装过操作系统的用户都知道,系统安装完毕后,首要任务就是安装各
种硬件的驱动程序,那么什么是驱动程序呢?驱动程序实际上是一段能让电脑与各种硬件设备通话的程序代码。
通过它,操作系统才能控制电脑上的硬件设备。
驱动程序就是连接系统和硬件之间的桥梁,它保证硬件设备的正常工作。
硬件设备众多,驱动安装方法也多样,下面将采用图文并茂的形式,带领大家轻松玩转驱动程序的安装!
【总页数】3页(P70-72)
【作者】博文
【作者单位】无
【正文语种】中文
【中图分类】TP307
【相关文献】
1.玩转Sonoma本本之系统、驱动程序安装篇 [J], Sky
2.step by step,轻松拒绝垃圾邮件 [J], 风雨彩虹
3.轻松外出烤肉去:WEBER-STEPHEN Q220 [J],
4.基于自适应Backstepping的分布式驱动电动汽车容错控制 [J], 朱燕;姚雪莲;贝绍轶;杨艺;丁东东
5.基于自适应Backstepping的分布式驱动电动汽车容错控制 [J], 朱燕;姚雪莲;贝绍轶;杨艺;丁东东
因版权原因,仅展示原文概要,查看原文内容请购买。
- 1、下载文档前请自行甄别文档内容的完整性,平台不提供额外的编辑、内容补充、找答案等附加服务。
- 2、"仅部分预览"的文档,不可在线预览部分如存在完整性等问题,可反馈申请退款(可完整预览的文档不适用该条件!)。
- 3、如文档侵犯您的权益,请联系客服反馈,我们会尽快为您处理(人工客服工作时间:9:00-18:30)。
网络版安装 STEP BY SETP
By Cimatron China
卢顺杰
服务器端安装
第一步修改授权文件
修改授权文件中的Server name 为当前服务器的网络名称(即从客户机网上邻居看到的服务器的名称
SERVER <Server name> HASPID=1234567890 2700
VENDOR cima-d
FEA TURE CORE cima-d 4 31-dec-2003 10 DUP_GROUP=H \ SIGN=0
第二步安装服务
安装光盘下的第三项注册服务器
或者从光盘目录CimatronE\LicenseServer下双击setup 安装
选择刚才已经修改过的授权文件,此处也可不选择
安装结果目录下产生三个文件如上图如果您选择了授权文件,授权文件也会自动拷贝到此目录中
第三步设置服务
1双击LMtools选择如图所示
2选择配置服务如下图
配置服务 1 2 选中使用服务 并在开机时启动服务两个按钮 3 保存服务
3启动服务
3
4观看服务状态
如果没有异常,状态应该没有显示正常下图为错误信息
5诊断错误
诊断结果
客户端第一步
正常安装Cimatron E
第二步
更新注册表清空授权文件选项
第三步
启动Cimatron E选择第一项指定授权服务
出现如下对话框
写入2700@server 其中的server 为在授权文件中改写的服务器的网络名称。
2700 为端口号,不需要修改。
如果网络连接没有问题启动成功
可以在服务器端安装Cimatron E 这样就可判断是网络原因导致安装不成功还是Cimatron 服务没有正确启动。
