利用JMF开发视音频应用代码参考
用JMF构建媒体播放器(1)
try { //准备一个要播放的视频文件的URL url = new URL("file:/d:/2.mpg"); } catch (MalformedURLException e) { e.printStackTrace(); } try { //通过调用Manager的createPlayer方法来创建一个Player的对象 //这个对象是媒体播放的核心控制对象 player = Manager.createPlayer(url); } catch (NoPlayerException e1) { e1.printStackTrace(); } catch (IOException e1) { e1.printStackTrace(); }
JMF(Java Media Frame ,rk)即Java媒体框架, 是sun公司推出的一个应用程序接口,可 以实现音频、视频信号的采集、存储、 和传输,支持压缩的媒体流及存储媒体 的同步、控制、处理和播放。JBuilder x是 Borland公司推出的可视化Java语言编程工 具,它提供了一个功能强大的集成开发 环境,可以方便地创建各种Java应用程和 小应用程
实例代码:
package com.bird.jmf; import java.awt.BorderLayout; import ponent; import java.awt.Dimension; import java.awt.Frame; import java.awt.Panel; import java.awt.event.WindowAdapter; import java.awt.event.WindowEvent; import java.io.IOException; import .MalformedURLException; import .URL; import javax.media.CannotRealizeException; import javax.media.ControllerEvent; import javax.media.ControllerListener; import javax.media.EndOfMediaEvent; import javax.media.Manager; import javax.media.MediaLocator; import javax.media.NoPlayerException; import javax.media.Player; import javax.media.PrefetchCompleteEvent; import javax.media.RealizeCompleteEvent; import javax.media.Time;
视频播放器的程序设计及代码示例

视频播放器的程序设计及代码示例一、介绍视频播放器是一种常用的应用程序,用于播放电影、电视剧、MV等各种类型的视频文件。
它可以提供良好的用户体验,具备快进、快退、调节音量、全屏播放等功能。
在本文中,将介绍视频播放器的程序设计原理,并给出一些示例代码来帮助读者更好地理解和实践。
二、程序设计原理1. 用户界面设计:视频播放器的用户界面需要简洁明了,并提供直观的操作按钮,如播放、暂停、停止、快进/快退、音量调节等。
可以使用图标、按钮、滑块等控件来实现,并合理布局,以便用户轻松地操作和控制播放器。
2. 视频解码与显示:视频播放器需要将视频文件进行解码,并实时将解码后的图像进行显示。
常见的视频解码算法有H.264、MPEG-2等。
可以使用像素缓冲区来存储解码后的图像数据,并使用界面库或图形库将图像数据显示在屏幕上。
3. 音频解码与播放:视频文件中通常包含音频轨道,视频播放器需要将音频数据解码并实时播放。
音频解码可以使用MP3、AAC等常见的音频解码算法。
播放音频可以使用操作系统提供的音频播放接口,如Windows下的DirectSound、Linux下的ALSA等。
4. 文件格式支持:视频播放器需要支持常见的视频文件格式,如MP4、AVI、MKV等。
这涉及到对不同格式文件的解析和支持,需要使用相应的解析库或者开源框架。
5. 视频控制功能:视频播放器除了基本的播放、暂停、停止功能外,还应该提供快进/快退、跳转指定位置、循环播放、调节音量和亮度等高级控制功能。
通过对用户操作的监测,可以实现这些功能,并更新界面以反映当前的播放状态。
三、代码示例以下是一个基于Java编写的简单视频播放器的代码示例,用于展示播放视频文件和基本的控制功能:```javaimport java.awt.*;import java.awt.event.*;import javax.swing.*;import java.io.File;import ponent.EmbeddedMediaPlayerComponent;import uk.co.caprica.vlcj.player.embedded.EmbeddedMediaPlayer;public class SimpleVideoPlayer {private JFrame frame;private JPanel playerPanel;private JButton playButton;private JButton pauseButton;private JButton stopButton;private EmbeddedMediaPlayer mediaPlayer;public SimpleVideoPlayer() {frame = new JFrame("Simple Video Player");frame.setDefaultCloseOperation(JFrame.EXIT_ON_CLOSE);frame.setSize(800, 600);playerPanel = new JPanel();frame.getContentPane().add(playerPanel, BorderLayout.CENTER);playButton = new JButton("Play");pauseButton = new JButton("Pause");stopButton = new JButton("Stop");playerPanel.add(playButton);playerPanel.add(pauseButton);playerPanel.add(stopButton);mediaPlayer = newEmbeddedMediaPlayerComponent().getMediaPlayer();playButton.addActionListener(new ActionListener() {public void actionPerformed(ActionEvent e) {mediaPlayer.play();}});pauseButton.addActionListener(new ActionListener() { public void actionPerformed(ActionEvent e) {mediaPlayer.pause();}});stopButton.addActionListener(new ActionListener() { public void actionPerformed(ActionEvent e) {mediaPlayer.stop();}});frame.setVisible(true);}public static void main(String[] args) {SwingUtilities.invokeLater(new Runnable() {public void run() {SimpleVideoPlayer player = new SimpleVideoPlayer();}});}}```这段代码使用了Java语言,基于VLCJ (VLC Java Bindings)库来实现视频播放器。
Java与音频处理利用Java实现音频处理技术
Java与音频处理利用Java实现音频处理技术Java与音频处理音频处理在现代多媒体技术中扮演着重要角色。
从音频编辑软件到语音识别系统,音频处理技术有着广泛的应用。
而Java作为一种强大的编程语言,也提供了丰富的库和工具,方便开发人员实现音频处理。
本文将介绍利用Java实现音频处理技术的方法和应用。
一、Java中的音频处理库Java提供了许多音频处理库,让开发者能够方便地对音频进行处理。
其中最常用的是Java Sound API和Java Media Framework(JMF)。
1. Java Sound APIJava Sound API是Java官方提供的标准API,用于实现音频处理功能。
它支持录制、播放、剪切、拼接等基本的音频处理操作。
开发者可以使用Java Sound API读取音频文件,提取音频数据,并对其进行各种处理。
通过该API,开发者可以实现音频格式转换、音频增益控制、音频特效等功能。
2. Java Media Framework(JMF)JMF是一个开放的多媒体框架,提供了处理音频、视频和其他媒体数据的功能。
它建立在Java Sound API的基础上,拓展了更多的媒体处理功能。
JMF支持各种音频格式的解码和编码,还提供了音频合成、混音、降噪等高级音频处理功能。
二、音频处理应用示例利用Java的音频处理库,我们可以实现多种有趣和实用的音频处理应用。
以下是几个示例:1. 音频剪切和拼接通过使用Java Sound API,我们可以将多个音频文件剪切成小片段,并将它们拼接成一个完整的音频文件。
这个功能在音频编辑软件中非常常见,例如将多个音频片段合并为一首歌曲。
2. 音频特效处理利用Java Sound API或JMF的特效处理功能,我们可以实现多种音频特效,如混响、回声、均衡器等。
这些音频特效可以应用于音乐制作、影视后期制作等领域。
3. 语音识别结合Java与其他语音识别库,如CMUSphinx或Google Cloud Speech API,我们可以实现自动语音识别(ASR)系统。
java操作音频视频文件参考资料
问题:想用Java开发一个类似于局域网内部可视会议这样的系统,但是不知道Java处理音频和视频使用什么包。
找不到相关的资料,烦请高手指教。
答案:参考java media framework(JMF),java的多媒体实现,见/products/java-media/jmf/index.js参考代码package com.redtroy;import javax.media.Player;import javax.media.CaptureDeviceInfo;import javax.media.MediaLocator;import javax.swing.*;import java.awt.*;import java.awt.image.*;import java.awt.event.*;import javax.media.control.FrameGrabbingControl;import javax.media.Buffer;import javax.media.util.BufferToImage;import javax.media.format.VideoFormat;import java.io.*;import com.sun.image.codec.jpeg.*;import javax.media.CaptureDeviceManager;import javax.media.Manager;import .*;import java.applet.*;//import javax.swing.im/*** <p> Title: </p>* <p> Description: </p>* <p> Copyright: Copyright (c) 2005 </p>* <p> Company: </p>* @author not attributable* @version 1.0*/public class Cameraextends JFrame {private static Player player = null;private CaptureDeviceInfo device = null;private MediaLocator locator = null;private Buffer buffer = null;private BufferToImage b2i = null;private Image image;private ImageIcon iicon = new ImageIcon();boolean proportion = true;String str1 = "vfw:Logitech USB Video Camera:0 ";String str2 = "vfw:Microsoft WDM Image Capture (Win32):0 ";JButton jButton1 = new JButton();JButton jButton2 = new JButton();Component component1;JLabel jLabel1 = new JLabel();public Camera() {super( "troy的摄像机(无保存功能) ");try {jbInit();}catch (Exception e) {e.printStackTrace();}}public Image resize(int width, int height, Image source, boolean flag) {this.proportion = flag;int new_w;int new_h;Toolkit tk = Toolkit.getDefaultToolkit();Applet app = new Applet();MediaTracker mt = new MediaTracker(app);Image img = source;try {mt.addImage(img, 0);mt.waitForID(0);}catch (Exception e) {e.printStackTrace();}if (img.getWidth(null) == -1) {System.out.println( " can 't read,retry! " + " <BR> ");return null;}else {if (this.proportion == true) { //判断是否是等比缩放.//为等比缩放计算输出的图片宽度及高度double rate1 = ( (double) img.getWidth(null)) / (double) wid th +0.1;double rate2 = ( (double) img.getHeight(null)) / (double) he ight +0.1;double rate = rate1 > rate2 ? rate1 : rate2;new_w = (int) ( ( (double) img.getWidth(null)) / rate);new_h = (int) ( ( (double) img.getHeight(null)) / rate); }else {new_w = width; //输出的图片宽度new_h = height; //输出的图片高度}}BufferedImage buffImg = new BufferedImage(new_w, new_h,BufferedImage.TYPE_INT_RGB);Graphics g = buffImg.createGraphics();g.setColor(Color.white);g.fillRect(0, 0, new_w, new_h);g.drawImage(img, 0, 0, new_w, new_h, null);g.dispose();try {OutputStream tempout = newFileOutputStream( "C:\\temp.jpg ");JPEGImageEncoder encoder = JPEGCodec.createJPEGEncoder(tempout);encoder.encode(buffImg);tempout.close();}catch (Exception e) {e.printStackTrace();}return tk.createImage( "C:\\temp.jpg ");}public static void main(String[] args) {Camera camera1 = new Camera();}private void jbInit() throws Exception {component1 = Box.createGlue();//=====================初始化设备===================//component1.addNotify();device = CaptureDeviceManager.getDevice(str2);locator = device.getLocator();try {player = Manager.createRealizedPlayer(locator);player.start();if ( (component1 = player.getVisualComponent()) != null) { this.getContentPane().add(component1, null);}}catch (Exception e) {e.printStackTrace();}jButton1.setBounds(new Rectangle(294, 28, 73, 25));jButton1.setText( "拍照 ");jButton1.addActionListener(new Camera_jButton1_actionAdapter(this));this.getContentPane().setLayout(null);jButton2.setBounds(new Rectangle(295, 82, 73, 25));jButton2.setText( "保存 ");jButton2.addActionListener(new Camera_jButton2_actionAdapter(this));component1.setBounds(new Rectangle(27, 23, 243, 235));jLabel1.setIconTextGap(4);jLabel1.setText( "空 ");jLabel1.setVerticalTextPosition(SwingConstants.CENTER);jLabel1.setBounds(new Rectangle(293, 139, 80, 95));this.getContentPane().add(jButton1, null);this.getContentPane().add(jButton2, null);this.getContentPane().add(jLabel1, null);this.setSize(400, 300);this.setVisible(true);}void jButton1_actionPerformed(ActionEvent e) {iicon = new ImageIcon();FrameGrabbingControl fgc = (FrameGrabbingControl) player.getControl("javax.media.control.FrameGrabbingControl ");buffer = fgc.grabFrame(); // 获取当前祯并存入Buffer类b2i = new BufferToImage( (VideoFormat) buffer.getFormat());image = b2i.createImage(buffer); // show the imageiicon = new ImageIcon();/* Toolkit tk = Toolkit.getDefaultToolkit();Applet app = new Applet();MediaTracker mt = new MediaTracker(app);*/iicon.setImage(this.resize(85, 95, image, true));jLabel1.setIcon(iicon);}void jButton2_actionPerformed(ActionEvent e) {JFileChooser filechooser = new JFileChooser();filechooser.setFileHidingEnabled(true);filechooser.setFileSelectionMode(JFileChooser.FILES_ONLY);int result = filechooser.showSaveDialog(null);if (result == JFileChooser.CANCEL_OPTION) {return;}File file = filechooser.getSelectedFile();if (file == null || file.getName().equals( " ")) {JOptionPane.showMessageDialog(null, "无效的文件名 ", "警告 ",JOptionPane.ERROR_ME SSAGE);}else {String s = file.getAbsolutePath();BufferedImage bi = (BufferedImage) createImage(image.getWidth(null), image.getHeight(null));Graphics2D g2 = bi.createGraphics();g2.drawImage(image, null, null);FileOutputStream out = null;try {out = new FileOutputStream(s);}catch (java.io.FileNotFoundException io) {System.out.println( "File Not Found ");}JPEGImageEncoder encoder = JPEGCodec.createJPEGEncoder(out); JPEGEncodeParam param = encoder.getDefaultJPEGEncodeParam(bi); param.setQuality(1f, false); //不压缩图像encoder.setJPEGEncodeParam(param);try {encoder.encode(bi);out.close();}catch (java.io.IOException io) {System.out.println( "IOException ");}}}}class Camera_jButton1_actionAdapterimplements java.awt.event.ActionListener {Camera adaptee;Camera_jButton1_actionAdapter(Camera adaptee) {this.adaptee = adaptee;}public void actionPerformed(ActionEvent e) {adaptee.jButton1_actionPerformed(e);}}class Camera_jButton2_actionAdapterimplements java.awt.event.ActionListener {Camera adaptee;Camera_jButton2_actionAdapter(Camera adaptee) {this.adaptee = adaptee;}public void actionPerformed(ActionEvent e) {adaptee.jButton2_actionPerformed(e);} }。
JMF_API_中文指导

JMF API 中文指导Time ModelManagersEvent ModelData ModelControlsUser Interface ComponentsExtensibilityPresentationPlayersProcessorsPresentation ControlsController EventsProcessingProcessing ControlsData OutputCaptureMedia Data Storage and TransmissionStorage ControlsExtensibilityImplementing Plug-InsImplementing MediaHandlers and DataSourcesGo Top--------------------------------------------------------------------------------Time Model關於TIME,可實作二個相關的interface:Clock Interface:定義了basic timing和同步時所需的資料,clock是使用TimeBase作為track 行進的時間(而time-base提供的資訊只有目前的時間,以system clock為主)Duration Interface:影片的開始到結束的時間(片長時間)為了維持track目前時間,Clock使用:以time來記錄以position來記錄以play back rate:rate=張數/ 秒數* 時間公式:MediaTime=MediaStartTime+Rate(TimeBaseTime-TimeBaseStartTime)位置絕對時間JMF time model--------------------------------------------------------------------------------Managers對於媒體的擷取、處理和播放時間性的媒體,JMF都有提供相關的API。
JMF使用指导

Java术语,意为Java媒体框架(JMF)。
该核心框架支持不同媒体(如:音频输出和视频输出)间的时钟同步。
它是一个标准的扩展框架,允许用户制作纯音频流和视频流。
JMF 提供的模型可大致分为七类* 数据源(Data source)* 截取设备(Capture Device,包括视频和音频截取设备)* 播放器(Player)* 处理器(Processor)* 数据池(DataSink)* 数据格式(Format)* 管理器(Manager)如何应用JMF捕获媒体数据可以从CaptureDeviceManager中获取捕获设备的信息。
CaptureDeviceManager是可在JMF中使用的全部捕获设备的注册中心。
可以通过调用CaptureDeviceManager的getDeviceList方法获取可用的捕获设备列表。
每个捕获设备都由CaptureDeviceInfo对象代表,要获取一个特定的设备只需要调用CaptureDeviceManager的getDevice(getDevicesList(null)获取所有设备)方法。
如何在网络发送流媒体数据在发送RTP数据流之前,需要应用Processor产生RTP编码的数据源。
通过构建一个SessionManager或者是DataSink来控制传输过程在发送RTP数据流之前,需要应用Processor产生RTP编码的数据源。
通过构建一个SessionManager 或者是DataSink来控制传输过程以下不再废话,直接代码:MediaLocator ml=new MediaLocator(string);//此处的string可以是一个视/音频文件,也可以是vfw://0类型的字符串直接从摄像头捕捉根据ml 我们可以创建DataSource或Processor/Player对像Player/processor对像可以用getVisualComponent方法获取播放面板,在此要注意Player/processor的状态改变等待:player.confige();While(player.getState()!=player.configed){}此处可对传输格式进行设置player. realize();While(player.getState()!=player. realized){}//用此方法可完成状态改变中的等待!在processor到Realized状态时getDataout()得到一个DataSource对像用MediaLocator ml1=new MediaLocator(datasource,url);此处String url= "rtp://224.144.251.104:49150/audio/1"//格式例子即为要发送到位置的IP。
JMF入门教程

controlHeight = control.getPreferredSize().height; f.add(control, BorderLayout.SOUTH); }
//设定 Frame 窗口的大小,使得满足视频文件的默认大小 f.setSize(videoWidth + insetWidth, videoHeight + controlHeight + insetHeight); f.validate();
JMF 入门(Java Media Framework)
JMF 是 SUN 推出的用来提供给 Java 开发者使用 Java 开发视频与音频播 放 程序的开发库,JMF 的推出已经有几年的历史了,目前最新的版本为 2.1.1e, 这里我们来讲述使用 Java 的 AWT 组件来开发一个视频播放器,采用 JMF 作为视 频的播放库,希望能够抛砖引玉,使得更多的人能够对 JMF 进行更加深入的研 究,并贡献出自己的研究所得。
}
完成上述代码,直接编译运行就可以了,是不是您的视频播放器开始工作了? 恭喜你,成功了!
在项目中添加一个类 JMFSample,代码和具体的解释如下:
package com.jmfsample2;
import java.awt.BorderLayout; import ponent; import java.awt.Dimension; import java.awt.Frame; import java.awt.Panel; import java.awt.event.WindowAdapter; import java.awt.event.WindowEvent; import java.io.IOException; import .MalformedURLException; import .URL;
使用Java进行音视频处理与流媒体传输
使用Java进行音视频处理与流媒体传输Java是一种广泛用于开发各种应用程序的编程语言。
在音视频处理和流媒体传输方面,Java也提供了一些强大的工具和库,使开发人员能够轻松处理音视频数据,并实现高效的流媒体传输。
一、音视频处理在音视频处理方面,Java提供了一些常用的库和工具,例如Java Media Framework(JMF)和Java Sound API等,它们可以帮助我们对音频和视频数据进行处理和编辑。
1. 音频处理Java Sound API是Java平台上用于处理音频的一套API,它提供了一些类和方法,用于读取、写入、混合和处理音频数据。
使用Java Sound API,我们可以实现音频播放、录制、编辑等功能。
以下是一个简单的示例代码,演示了如何使用Java Sound API播放音频文件:```javaimport javax.sound.sampled.*;public class AudioPlayer {public static void main(String[] args) {try {AudioInputStream audioInputStream =AudioSystem.getAudioInputStream(new File("audio.wav"));Clip clip = AudioSystem.getClip();clip.open(audioInputStream);clip.start();Thread.sleep(clip.getMicrosecondLength() / 1000);} catch (Exception e) {e.printStackTrace();}}}```2. 视频处理在视频处理方面,Java Media Framework(JMF)是一个功能强大的库,它提供了用于处理视频流、捕获视频和播放视频的API和工具。
jmf安装和制作音乐播放器
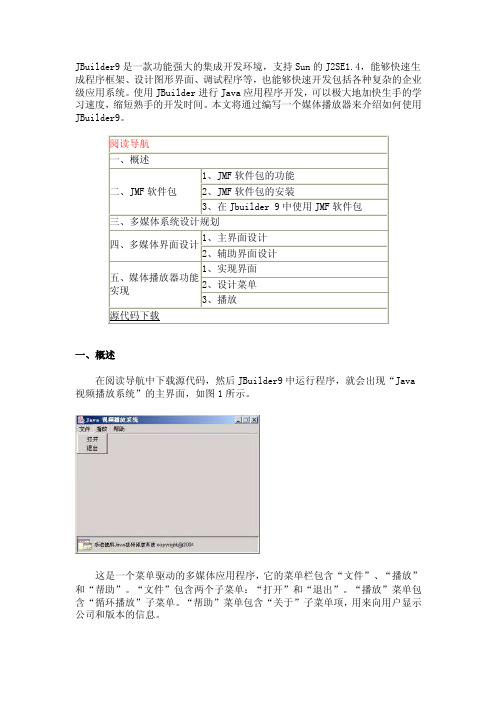
JBuilder9是一款功能强大的集成开发环境,支持Sun的J2SE1.4,能够快速生成程序框架、设计图形界面、调试程序等,也能够快速开发包括各种复杂的企业级应用系统。
使用JBuilder进行Java应用程序开发,可以极大地加快生手的学习速度,缩短熟手的开发时间。
本文将通过编写一个媒体播放器来介绍如何使用JBuilder9。
一、概述在阅读导航中下载源代码,然后JBuilder9中运行程序,就会出现“Java 视频播放系统”的主界面,如图1所示。
这是一个菜单驱动的多媒体应用程序,它的菜单栏包含“文件”、“播放”和“帮助”。
“文件”包含两个子菜单:“打开”和“退出”。
“播放”菜单包含“循环播放”子菜单。
“帮助”菜单包含“关于”子菜单项,用来向用户显示公司和版本的信息。
二、JMF软件包JMF实际上是一组Java类库,在Java的应用软件或者小程序中实现多媒体数据的播放和采集,它包括了各种媒体应用程序接口,目前通过Java开发多媒体软件主要使用JMF软件包。
1、JMF简介JMF2.1.1是对应Java2平台标准版(J2SE)的一种可选用的应用编程接口软件包,支持多种媒体格式,如:M-JPEG,H.263,MP3,RTP/RTSP,Rich Media Format(RMF)、Quicktime,Microsoft AVI和MPEG-1等。
此外,JMF 2.1.1还是一个开放的架构,开发人员灵活采用各种第三方控件,或采用自己定制的内插控件。
安装JMF2.1.1在硬件上有些要求,不过即使现在比较垃圾的配置也能够满足需要;系统要求在win95以上,JDK1.1.3以上。
2、JMF的安装步骤:在介绍完了JMF软件包之后,下面就要在Windows 2000平台上安装JMF 2.1.1e软件包了,步骤如下:(1)在SUN网站上下载JMF 2.1.1e软件包。
(2)运行JMF安装程序,解压JMF类库到一个目录下,比如D:\JMF2.1.1e。
音频播放器代码-代码大全

音频播放器代码-代码大全播放器样式和代码1.简易播放器一(手动) 主要音频格式:rm,ra,ram,mp3简易播放器(自动播放)代码,提取方法:右击,全选,复制<center><embed src="音频绝对地址" width=200 height=30 controls=ControlPanel loop=true autostart=true volume=100 type=audio/x-pn-realaudio-plugin Initfn=load-types mime-types=mime.types></center>2.简易播放器二(手动) 主要格式wma,mp3简易播放器二(自动播放)代码.提取方法:右击,全选,复制<center><EMBED style="FILTER: xray(); WIDTH: 200px; HEIGHT: 30px" src="音频绝对地址" type=audio/x-mpegurl volume="0" loop="-1" autostart="true" allowscriptaccess="never"></EMBED></center>3.多功能播放器(手动)各类格式音视频 (rm等除外)多功能播放器(自动播放)代码,提取方法:右击,全选,复制(如果是视频文件,请将以下代码里的值改为height=350)<center><OBJECT id=phx height=45 width=350 classid=clsid:6BF52A52-394A-11D3-B153-00C04F79FAA6><PARAM NAME="URL" VALUE="音视频绝对地址"><PARAM NAME="rate" VALUE="1"><PARAM NAME="balance" VALUE="0"><PARAM NAME="currentPosition" VALUE="0"><PARAM NAME="defaultFrame" VALUE=""><PARAM NAME="playCount" VALUE="1"><PARAM NAME="autoStart" VALUE="-1"><PARAM NAME="currentMarker" VALUE="0"><PARAM NAME="invokeURLs" VALUE="-1"><PARAM NAME="baseURL" VALUE=""><PARAM NAME="volume" VALUE="78"><PARAM NAME="mute" VALUE="0"><PARAM NAME="uiMode"VALUE="full"><PARAM NAME="stretchToFit" VALUE="0"><PARAM NAME="windowlessVideo" VALUE="0"><PARAM NAME="enabled" VALUE="-1"><PARAM NAME="enableContextMenu" VALUE="-1"><PARAM NAME="fullScreen" VALUE="0"><PARAM NAME="SAMIStyle" VALUE=""><PARAM NAME="SAMILang" VALUE=""><PARAM NAME="SAMIFilename" VALUE=""><PARAM NAME="captioningID" VALUE=""><PARAM NAME="enableErrorDialogs" VALUE="0"><PARAM NAME="_cx" VALUE="8811"><PARAM NAME="_cy" VALUE="1217"></OBJECT></CENTER>4.微软简易播放器(手动)音频格式:mp3,wma等微软播放器(自动播放)代码,提取方法:右击,全选,复制<P align=center><EMBED src="音频绝对地址" width=320 height=45 type=audio/mpeg autostart="0"></EMBED></P>5.标签型播放器(手动播放)音频格式 mp3,wma标签型播放器(自动播放)代码:代码提取方法:右击,全选,复制<DIV align=center><EMBED src="音频绝对地址" width=300 height=140 type=audio/x-ms-wma balance="true" showpositioncontrols="true" showtracker="true" showaudiocontrols="true" showcontrols="true" showstatusbar="true" showdisplay="true" displaysize="0" volume="100" autosize="false" autostart="true" animationatstart="false" transparentatstart="true"></div>注:1,以上显示的播放器均设置为手动播放,即:autostart="0".如需自动播放请设置autostart="true".2,以上各播放器代码里均设置为自动播放,即.autostart="true",如需手动播放请设置autostart="0"样式和代码1.简易播放器一(手动) 主要音频格式:rm,ra,ram,mp3简易播放器(自动播放)代码,提取方法:右击,全选,复制<center><embed src="音频绝对地址" width=200 height=30 controls=ControlPanel loop=true autostart=true volume=100 type=audio/x-pn-realaudio-plugin Initfn=load-types mime-types=mime.types></center>2.简易播放器二(手动) 主要格式wma,mp3简易播放器二(自动播放)代码.提取方法:右击,全选,复制<center><EMBED style="FILTER: xray(); WIDTH: 200px; HEIGHT: 30px" src="音频绝对地址" type=audio/x-mpegurl volume="0" loop="-1" autostart="true" allowscriptaccess="never"></EMBED></center>3.多功能播放器(手动)各类格式音视频 (rm等除外)多功能播放器(自动播放)代码,提取方法:右击,全选,复制(如果是视频文件,请将以下代码里的值改为height=350)<center><OBJECT id=phx height=45 width=350 classid=clsid:6BF52A52-394A-11D3-B153-00C04F79FAA6><PARAM NAME="URL" VALUE="音视频绝对地址"><PARAM NAME="rate" VALUE="1"><PARAM NAME="balance" VALUE="0"><PARAM NAME="currentPosition" VALUE="0"><PARAM NAME="defaultFrame" VALUE=""><PARAM NAME="playCount" VALUE="1"><PARAM NAME="autoStart" VALUE="-1"><PARAM NAME="currentMarker" VALUE="0"><PARAM NAME="invokeURLs" VALUE="-1"><PARAM NAME="baseURL" VALUE=""><PARAM NAME="volume" VALUE="78"><PARAM NAME="mute" VALUE="0"><PARAM NAME="uiMode" VALUE="full"><PARAM NAME="stretchToFit" VALUE="0"><PARAM NAME="windowlessVideo"VALUE="0"><PARAM NAME="enabled" VALUE="-1"><PARAM NAME="enableContextMenu" VALUE="-1"><PARAM NAME="fullScreen" VALUE="0"><PARAM NAME="SAMIStyle" VALUE=""><PARAM NAME="SAMILang" VALUE=""><PARAM NAME="SAMIFilename" VALUE=""><PARAM NAME="captioningID" VALUE=""><PARAM NAME="enableErrorDialogs" VALUE="0"><PARAM NAME="_cx" VALUE="8811"><PARAM NAME="_cy" VALUE="1217"></OBJECT></CENTER>4.微软简易播放器(手动)音频格式:mp3,wma等微软播放器(自动播放)代码,提取方法:右击,全选,复制<P align=center><EMBED src="音频绝对地址" width=320 height=45 type=audio/mpeg autostart="0"></EMBED></P>5.标签型播放器(手动播放)音频格式 mp3,wma标签型播放器(自动播放)代码:代码提取方法:右击,全选,复制<DIV align=center><EMBED src="音频绝对地址" width=300 height=140 type=audio/x-ms-wma balance="true" showpositioncontrols="true" showtracker="true" showaudiocontrols="true" showcontrols="true" showstatusbar="true" showdisplay="true" displaysize="0" volume="100" autosize="false" autostart="true" animationatstart="false" transparentatstart="true"></div>注:1,以上显示的播放器均设置为手动播放,即:autostart="0".如需自动播放请设置autostart="true".2,以上各播放器代码里均设置为自动播放,即.autostart="true",如需手动播放请设置autostart="0"。
基于JMF的多用户音视频通信系统的研究与实现
ss m i u so l n dadteavn gsiej snpr r ac l n ye . h rset t ersac oki g e ・ yt q et ni i e t n d at e no e om eaea a zd T ep pc o f u eerhw r s i n e n i s mp me e h a t yi f n l o ur f v
TH E RESN OF M ULTI US A - ER
AUDI VI UAL CoM M UNI O. S CATI oN YS S TEM AS B ED ON M F J
T ogi WuJ L hh i Z a gS iog uZ n j e i e nZ iu h n hyn
视 频通信软件 的开发 。首 先介 绍 了J MF的基本框架及其 R P支 持, T 然后 重点描述 了一种基于 J MF的多用 户音视 频通 信系统的设计 方案 , 并在 给 出其 原型系统具体实现 的基础上分析 了该 系统在性能上 的优势所在 。最后展 望 了下一步的研究工作。 关键 词 J MF 实时传输协议 多媒体通信 多播 即 时通 信
基于 J MF的多用户音视频通信 系统 的研究 与实现
涂宗勘 吴 杰 吕 张世永 智慧
( 复旦大学计算 机与信息技术 系 上 海 20 3 ) 04 3
摘 要
在 目前 It t 即时通信软件对 多用 户之 间的交互式 音视 频通信 支持 不足 的背景下 , 出使 用 J ne 上 m 提 MF以支持 多用 户音
维普资讯
第 2 第 7期 4卷
20 0 7年 7 月
计 算机 应 用与 软件
C mp t rAp l ain n ot r o u e p i t sa d S f c o wae
Java应用开发中的音频与视频处理技巧
Java应用开发中的音频与视频处理技巧在当今数字化时代,音频与视频处理已经成为了应用开发中的重要技术与需求。
无论是娱乐应用、教育应用还是企业应用,都需要使用到音频与视频技术,以提供更丰富的交互与用户体验。
本文将介绍一些在Java应用开发中常用的音频与视频处理技巧,供读者参考与学习。
一、音频处理技巧1. 音频格式转换在Java应用开发中,常常需要对不同格式的音频文件进行转换。
这时可以使用开源库Apache Commons IO提供的FileUtils类来进行文件操作,再结合开源库Tritonus的代码csutil,使用Java Sound API对音频文件进行读取与转换。
2. 音频剪辑与拼接在一些应用场景中,需要对音频文件进行剪辑与拼接,以满足特定需求。
通过Java Sound API提供的AudioFileFormat与AudioSystem类,可以实现对音频文件的读取、导出和处理。
通过控制音频文件的截取和合并,可以实现剪辑与拼接的效果。
3. 音频数据分析在音频处理中,经常需要对音频数据进行分析,如获取音频的频谱、声波图等信息。
可以使用Java Sound API提供的LineListener接口监听音频数据的采集过程,然后使用开源库JFreeChart生成频谱图、声波图等。
二、视频处理技巧1. 视频格式转换与音频类似,视频文件也有不同的格式。
在Java应用开发中,可以使用开源库Xuggler进行视频格式的转换。
通过使用Xuggler提供的工具类,可以将视频文件转换为不同的格式,以满足特定需求。
2. 视频剪辑与拼接在一些应用场景中,需要对视频文件进行剪辑与拼接,以提供更好的用户体验。
可以使用开源库FFmpeg进行视频的剪辑与拼接。
通过使用FFmpeg提供的命令行工具,可以实现对视频的截取和合并。
3. 视频数据处理与分析在视频处理中,经常需要对视频数据进行处理与分析,以实现特定的功能。
可以使用开源库JavaCV结合FFmpeg进行视频数据的处理与分析。
基于RTP实时传输协议的JMF多媒体传输源代码
基于RTP实时传输协议的JMF多媒体传输源代码import java.io.*;import java.awt.*;import .*;import java.awt.event.*;import java.util.Vector;import javax.media.*;import javax.media.rtp.*;import javax.media.rtp.event.*;import javax.media.rtp.rtcp.*;import javax.media.protocol.*;import javax.media.protocol.DataSource;import javax.media.format.AudioFormat;import javax.media.format.VideoFormat;import javax.media.Format;import javax.media.format.FormatChangeEvent;import javax.media.control.BufferControl;/*** AVReceive3 to receive RTP transmission using the RTPConnector.*/public class AVReceive3 implements ReceiveStreamListener, SessionListener, ControllerListener{String sessions[] = null;RTPManager mgrs[] = null;Vector playerWindows = null;boolean dataReceived = false;Object dataSync = new Object();public AVReceive3(String sessions[]) {this.sessions = sessions;}protected boolean initialize() {try {mgrs = new RTPManager[sessions.length];playerWindows = new Vector();SessionLabel session;// Open the RTP sessions.for (int i = 0; i < sessions.length; i++) {// Parse the session addresses.try {session = new SessionLabel(sessions[i]);} catch (IllegalArgumentException e) {System.err.println("Failed to parse the session address given: " + sess ions[i]);return false;}System.err.println(" - Open RTP session for: addr: " + session.addr + " po rt: " + session.port + " ttl: " + session.ttl);mgrs[i] = (RTPManager) RTPManager.newInstance();mgrs[i].addSessionListener(this);mgrs[i].addReceiveStreamListener(this);// Initialize the RTPManager with the RTPSocketAdaptermgrs[i].initialize(new RTPSocketAdapter(InetAddress.getByName(session.addr),session.port, session.ttl));// You can try out some other buffer size to see// if you can get better smoothness.BufferControl bc =(BufferControl)mgrs[i].getControl("javax.media.control.B ufferControl");if (bc != null)bc.setBufferLength(350);}} catch (Exception e){System.err.println("Cannot create the RTP Session: " + e.getMessage());return false;}// Wait for data to arrive before moving on.long then = System.currentTimeMillis();long waitingPeriod = 30000; // wait for a maximum of 30 secs.try{synchronized (dataSync) {while (!dataReceived &&System.currentTimeMillis() - then < waitingPeriod) {if (!dataReceived)System.err.println(" - Waiting for RTP data to arrive");dataSync.wait(1000);}}} catch (Exception e) {}if (!dataReceived) {System.err.println("No RTP data was received.");close();return false;}return true;}public boolean isDone() {return playerWindows.size() == 0;}/*** Close the players and the session managers.*/protected void close() {for (int i = 0; i < playerWindows.size(); i++) {try {((PlayerWindow)playerWindows.elementAt(i)).close();} catch (Exception e) {}}playerWindows.removeAllElements();// close the RTP session.for (int i = 0; i < mgrs.length; i++) {if (mgrs[i] != null) {mgrs[i].removeTargets( "Closing session from AVReceive3"); mgrs[i].dispose();mgrs[i] = null;}}}PlayerWindow find(Player p) {for (int i = 0; i < playerWindows.size(); i++) {PlayerWindow pw = (PlayerWindow)playerWindows.elementAt(i);if (pw.player == p)return pw;}return null;}PlayerWindow find(ReceiveStream strm) {for (int i = 0; i < playerWindows.size(); i++) {PlayerWindow pw = (PlayerWindow)playerWindows.elementAt(i);if (pw.stream == strm)return pw;}return null;}/*** SessionListener.*/public synchronized void update(SessionEvent evt) {if (evt instanceof NewParticipantEvent) {Participant p = ((NewParticipantEvent)evt).getParticipant();System.err.println(" - A new participant had just joined: " + p.getCNAME() );}}/*** ReceiveStreamListener*/public synchronized void update( ReceiveStreamEvent evt) { RTPManager mgr = (RTPManager)evt.getSource();Participant participant = evt.getParticipant(); // could be null.ReceiveStream stream = evt.getReceiveStream(); // could be null.if (evt instanceof RemotePayloadChangeEvent) {System.err.println(" - Received an RTPPayloadChangeEvent.");System.err.println("Sorry, cannot handle payload change.");System.exit(0);}else if (evt instanceof NewReceiveStreamEvent) {try {stream = ((NewReceiveStreamEvent)evt).getReceiveStream();DataSource ds = stream.getDataSource();// Find out the formats.RTPControl ctl = (RTPControl)ds.getControl("javax.media.rtp.RTPControl");if (ctl != null){System.err.println(" - Recevied new RTP stream: " + ctl.getFormat()); } elseSystem.err.println(" - Recevied new RTP stream");if (participant == null)System.err.println(" The sender of this stream had yet to be ident ified.");else {System.err.println(" The stream comes from: " + participant.getCNA ME());}// create a player by passing datasource to the Media ManagerPlayer p = javax.media.Manager.createPlayer(ds);if (p == null)return;p.addControllerListener(this);p.realize();PlayerWindow pw = new PlayerWindow(p, stream);playerWindows.addElement(pw);// Notify intialize() that a new stream had arrived.synchronized (dataSync) {dataReceived = true;dataSync.notifyAll();}} catch (Exception e) {System.err.println("NewReceiveStreamEvent exception " + e.getMessage());return;}}else if (evt instanceof StreamMappedEvent) {if (stream != null && stream.getDataSource() != null) {DataSource ds = stream.getDataSource();// Find out the formats.RTPControl ctl = (RTPControl)ds.getControl("javax.media.rtp.RTPControl"); System.err.println(" - The previously unidentified stream ");if (ctl != null)System.err.println(" " + ctl.getFormat());System.err.println(" had now been identified as sent by: " + participa nt.getCNAME());}}else if (evt instanceof ByeEvent) {System.err.println(" - Got \"bye\" from: " + participant.getCNAME());PlayerWindow pw = find(stream);if (pw != null) {pw.close();playerWindows.removeElement(pw);}}}/*** ControllerListener for the Players.*/public synchronized void controllerUpdate(ControllerEvent ce) {Player p = (Player)ce.getSourceController();if (p == null)return;// Get this when the internal players are realized.if (ce instanceof RealizeCompleteEvent) {PlayerWindow pw = find(p);if (pw == null) {// Some strange happened.System.err.println("Internal error!");System.exit(-1);}pw.initialize();pw.setVisible(true);p.start();}if (ce instanceof ControllerErrorEvent) {p.removeControllerListener(this);PlayerWindow pw = find(p);if (pw != null) {pw.close();playerWindows.removeElement(pw);}System.err.println("AVReceive3 internal error: " + ce);}}/*** A utility class to parse the session addresses.*/class SessionLabel {public String addr = null;public int port;public int ttl = 1;SessionLabel(String session) throws IllegalArgumentException {int off;String portStr = null, ttlStr = null;if (session != null && session.length() > 0) {while (session.length() > 1 && session.charAt(0) == '/') session = session.substring(1);// Now see if there's a addr specified.off = session.indexOf('/');if (off == -1) {if (!session.equals(""))addr = session;} else {addr = session.substring(0, off);session = session.substring(off + 1);// Now see if there's a port specifiedoff = session.indexOf('/');if (off == -1) {if (!session.equals(""))portStr = session;} else {portStr = session.substring(0, off); session = session.substring(off + 1);// Now see if there's a ttl specifiedoff = session.indexOf('/');if (off == -1) {if (!session.equals(""))ttlStr = session;} else {ttlStr = session.substring(0, off);}}}}if (addr == null)throw new IllegalArgumentException();if (portStr != null) {try {Integer integer = Integer.valueOf(portStr); if (integer != null)port = integer.intValue();} catch (Throwable t) {throw new IllegalArgumentException(); }} elsethrow new IllegalArgumentException();if (ttlStr != null) {try {Integer integer = Integer.valueOf(ttlStr);if (integer != null)ttl = integer.intValue();} catch (Throwable t) {throw new IllegalArgumentException();}}}}/*** GUI classes for the Player.*/class PlayerWindow extends Frame {Player player;ReceiveStream stream;PlayerWindow(Player p, ReceiveStream strm) { player = p;stream = strm;}public void initialize() {add(new PlayerPanel(player));}public void close() {player.close();setVisible(false);dispose();}public void addNotify() {super.addNotify();pack();}/*** GUI classes for the Player.*/class PlayerPanel extends Panel { Component vc, cc;PlayerPanel(Player p) {setLayout(new BorderLayout());if ((vc = p.getVisualComponent()) != null)add("Center", vc);if ((cc = p.getControlPanelComponent()) != null) add("South", cc);}public Dimension getPreferredSize() {int w = 0, h = 0;if (vc != null) {Dimension size = vc.getPreferredSize();w = size.width;h = size.height;}if (cc != null) {Dimension size = cc.getPreferredSize();if (w == 0)w = size.width;h += size.height;}if (w < 160)w = 160;return new Dimension(w, h);}public static void main(String argv[]) {if (argv.length == 0)prUsage();AVReceive3 avReceive = new AVReceive3(argv);if (!avReceive.initialize()) {System.err.println("Failed to initialize the sessions."); System.exit(-1);}// Check to see if AVReceive3 is done.try {while (!avReceive.isDone())Thread.sleep(1000);} catch (Exception e) {}System.err.println("Exiting AVReceive3");}static void prUsage() {System.err.println("Usage: AVReceive3 "); System.err.println(" : //");System.exit(0);}}// end of AVReceive3发送端代码:import java.awt.*;import java.io.*;import .InetAddress;import javax.media.*;import javax.media.protocol.*;import javax.media.protocol.DataSource;import javax.media.format.*;import javax.media.control.TrackControl;import javax.media.control.QualityControl;import javax.media.rtp.*;import javax.media.rtp.rtcp.*;import com.sun.media.rtp.*;public class AVTransmit3 {// Input MediaLocator// Can be a file or http or capture sourceprivate MediaLocator locator;private String ipAddress;private int portBase;private Processor processor = null;private RTPManager rtpMgrs[];private DataSource dataOutput = null;public AVTransmit3(MediaLocator locator,String ipAddress,String pb,Format format) {this.locator = locator;this.ipAddress = ipAddress;Integer integer = Integer.valueOf(pb);if (integer != null)this.portBase = integer.intValue();}/*** Starts the transmission. Returns null if transmission started ok. * Otherwise it returns a string with the reason why the setup failed. */public synchronized String start() {String result;// Create a processor for the specified media locator // and program it to output JPEG/RTPresult = createProcessor();if (result != null)return result;// Create an RTP session to transmit the output of the // processor to the specified IP address and port no. result = createTransmitter();if (result != null) {processor.close();processor = null;return result;}// Start the transmissionprocessor.start();return null;}/*** Stops the transmission if already started*/public void stop() {synchronized (this) {if (processor != null) {processor.stop();processor.close();processor = null;for (int i = 0; i < rtpMgrs.length; i++) {rtpMgrs[i].removeTargets( "Session ended."); rtpMgrs[i].dispose();}}}}private String createProcessor() {if (locator == null)return "Locator is null";DataSource ds;DataSource clone;try {ds = javax.media.Manager.createDataSource(locator);} catch (Exception e) {return "Couldn't create DataSource";}// Try to create a processor to handle the input media locator try {processor = javax.media.Manager.createProcessor(ds);} catch (NoProcessorException npe) {return "Couldn't create processor";} catch (IOException ioe) {return "IOException creating processor";}// Wait for it to configureboolean result = waitForState(processor, Processor.Configured);if (result == false)return "Couldn't configure processor";// Get the tracks from the processorTrackControl [] tracks = processor.getTrackControls();// Do we have atleast one track?if (tracks == null || tracks.length < 1)return "Couldn't find tracks in processor";// Set the output content descriptor to RAW_RTP// This will limit the supported formats reported from// Track.getSupportedFormats to only valid RTP formats.ContentDescriptor cd = new ContentDescriptor(ContentDescriptor.RAW_RTP); processor.setContentDescriptor(cd);Format supported[];Format chosen;boolean atLeastOneTrack = false;// Program the tracks.for (int i = 0; i < tracks.length; i++) {Format format = tracks[i].getFormat();if (tracks[i].isEnabled()) {supported = tracks[i].getSupportedFormats();// We've set the output content to the RAW_RTP.// So all the supported formats should work with RTP.// We'll just pick the first one.if (supported.length > 0) {if (supported[0] instanceof VideoFormat) {// For video formats, we should double check the// sizes since not all formats work in all sizes.chosen = checkForVideoSizes(tracks[i].getFormat(),supported[0]);} elsechosen = supported[0];tracks[i].setFormat(chosen);System.err.println("Track " + i + " is set to transmit as:");System.err.println(" " + chosen);atLeastOneTrack = true;} elsetracks[i].setEnabled(false);} elsetracks[i].setEnabled(false);}if (!atLeastOneTrack)return "Couldn't set any of the tracks to a valid RTP format";// Realize the processor. This will internally create a flow// graph and attempt to create an output datasource for JPEG/RTP // audio frames.result = waitForState(processor, Controller.Realized);if (result == false)return "Couldn't realize processor";// Set the JPEG quality to .5.setJPEGQuality(processor, 0.5f);// Get the output data source of the processordataOutput = processor.getDataOutput();return null;}/*** Use the RTPManager API to create sessions for each media * track of the processor.*/private String createTransmitter() {// Cheated. Should have checked the type.PushBufferDataSource pbds = (PushBufferDataSource)dataOutput;PushBufferStream pbss[] = pbds.getStreams();rtpMgrs = new RTPManager[pbss.length];SendStream sendStream;int port;SourceDescription srcDesList[];for (int i = 0; i < pbss.length; i++) {try {rtpMgrs[i] = RTPManager.newInstance();port = portBase + 2*i;// Initialize the RTPManager with the RTPSocketAdapterrtpMgrs[i].initialize(new RTPSocketAdapter(InetAddress.getByName(ipAddress),port));System.err.println( "Created RTP session: " + ipAddress + " " + port);sendStream = rtpMgrs[i].createSendStream(dataOutput, i);sendStream.start();} catch (Exception e) {return e.getMessage();}}return null;}/*** For JPEG and H263, we know that they only work for particular* sizes. So we'll perform extra checking here to make sure they* are of the right sizes.*/Format checkForVideoSizes(Format original, Format supported) {int width, height;Dimension size = ((VideoFormat)original).getSize(); Format jpegFmt = new Format(VideoFormat.JPEG_RTP); Format h263Fmt = new Format(VideoFormat.H263_RTP); if (supported.matches(jpegFmt)) {// For JPEG, make sure width and height are divisible by 8. width = (size.width % 8 == 0 ? size.width :(int)(size.width / 8) * 8);height = (size.height % 8 == 0 ? size.height :(int)(size.height / 8) * 8);} else if (supported.matches(h263Fmt)) {// For H.263, we only support some specific sizes.if (size.width < 128) {width = 128;height = 96;} else if (size.width < 176) {width = 176;height = 144;} else {width = 352;height = 288;}} else {// We don't know this particular format. We'll just// leave it alone then.return supported;}return (new VideoFormat(null,new Dimension(width, height),Format.NOT_SPECIFIED,null,Format.NOT_SPECIFIED)).intersects(supported);}/*** Setting the encoding quality to the specified value on the JPEG encoder. * 0.5 is a good default.*/void setJPEGQuality(Player p, float val) {Control cs[] = p.getControls();QualityControl qc = null;VideoFormat jpegFmt = new VideoFormat(VideoFormat.JPEG);// Loop through the controls to find the Quality control for // the JPEG encoder.for (int i = 0; i < cs.length; i++) {if (cs[i] instanceof QualityControl &&cs[i] instanceof Owned) {Object owner = ((Owned)cs[i]).getOwner();// Check to see if the owner is a Codec.// Then check for the output format.if (owner instanceof Codec) {Format fmts[] = ((Codec)owner).getSupportedOutputFormats(null);for (int j = 0; j < fmts.length; j++) {if (fmts[j].matches(jpegFmt)) {qc = (QualityControl)cs[i];qc.setQuality(val);System.err.println("- Setting quality to " +val + " on " + qc);break;}}}if (qc != null)break;}}}/************************************************************** ** * Convenience methods to handle processor's state changes.*************************************************************** */private Integer stateLock = new Integer(0);private boolean failed = false;Integer getStateLock() {return stateLock;}void setFailed() {failed = true;}private synchronized boolean waitForState(Processor p, int state) { p.addControllerListener(new StateListener());failed = false;// Call the required method on the processorif (state == Processor.Configured) {p.configure();} else if (state == Processor.Realized) {p.realize();}// Wait until we get an event that confirms the// success of the method, or a failure event.// See StateListener inner classwhile (p.getState() < state && !failed) {synchronized (getStateLock()) {try {getStateLock().wait();} catch (InterruptedException ie) {return false;}}}if (failed)return false;elsereturn true;}/************************************************************** *** Inner Classes*************************************************************** */ class StateListener implements ControllerListener { public void controllerUpdate(ControllerEvent ce) {// If there was an error during configure or// realize, the processor will be closedif (ce instanceof ControllerClosedEvent)setFailed();// All controller events, send a notification// to the waiting thread in waitForState method.if (ce instanceof ControllerEvent) {synchronized (getStateLock()) {getStateLock().notifyAll();}}}}/************************************************************** *** Sample Usage for AVTransmit3 class*************************************************************** */public static void main(String [] args) {// We need three parameters to do the transmission// For example,// java AVTransmit3 file:/C:/media/test.mov 129.130.131.132 42050。
如何实现音视频通讯的JMF技术
如何实现音视频通讯的JMF技术随着网络技术的发展,在网络上进行语音、视频进行通话交流、数据传输等即时通讯等功能成为了网络通信的热点。
佰锐科技的AnyChat音视频开发互动平台可以实现双方音视频通话、文字通信,数字传输等功能,那么如何通过应用编程接口为音视频的编解码、传输和播放提供整套的架构呢!这就需要使用JMF。
java media framework (JMF )为java 在多媒体领域的开发提供了便利的平台。
本文基于JMF 遵从RTP 协议对音/视频聊天进行了实现,解决了会话的管理和流媒体的发送、接收、播放等关键问题。
如今VoIP 已经成为一种经济高效的通讯方式。
不过只有语音方面的交互已经不能满足人们的需求。
只闻其声不见其人显得过于单调。
音/视频聊天在这种需求下应运而生。
音/视频聊天的关键是实时性和同步。
因此RTP(实时传输协议)就作为其底层传输协议的不二之选。
Sun公司所推出的java 凭借其面向对象、跨平台、安全、多线程等性能成为现今最流行的网络编程语言。
Sun在java 的基础上针对多媒体的播放与传输开发了JMF。
RTP与JMF 2. 1 RTP与RTCP RTP 是由IETF 的AVT 工作组针对流媒体开发的协议,它位于传输层之上但并不要求传输层协议使用UDP(用户数据报协议),不过迄今为止UDP 是最常用的RTP 的底层协议。
由于UDP 是面向无连接的不可靠协议,这使其更适于流媒体传输。
UDP 作为轻量级的传输协议并不保证传输质量但实现了高效的盲目传输。
QOS 由UDP 的上层协议RTP 实现。
针对UDP 的无连接传输所导致的误码、丢失、乱序问题,RTP 规定了其组成。
RTP 包由两部分组成:包头和负载。
包头中含有负载类型、序号、时间戳、同步源标识等。
负载存储了包头指定的流媒体数据。
RTCP (实时传输控制协议)为RTP 连接提供了QOS 信息并维持各个参与者的状态信息。
RTCP 共有五个组成部分:RR (接收端报文)、SR (发送端报文)、SDES (信源描述)、 BYE(结束报文)和AS(应用程序特定)。
Java媒体框架之JMF

Java媒体框架之JMF如果想要使⽤Java中的Swing播放⾳乐,视频,包括录⾳,截取录像等等,就要⽤到Java的媒体框架JMF。
Java媒体框架(JMF)使你能够编写出功能强⼤的多媒体程序,却不⽤关⼼底层复杂的实现细节。
JMF API的使⽤相对⽐较简单,但是能够满⾜⼏乎所有多媒体编程的需求。
在这篇⽂章中,我将向你介绍如何⽤很少的代码就编写出多媒体程序。
Java多媒体框架(JMF)中包含了许多⽤于处理多媒体的API。
它是⼀个相当复杂的系统,完全了解这个系统可能需要花上⼏周的时间,但是这篇⽂章将主要介绍JMF的⼏个核⼼接⼝和类,然后通过⼀个简单的例⼦向你展⽰如何利⽤该接⼝进⾏编程。
JMF⽬前的最新版本是2.1,Sun通过它向Java中引⼊处理多媒体的能⼒。
下⾯是JMF所⽀持的功能的⼀个概述:●可以在Java Applet和应⽤程序中播放各种媒体⽂件,例如AU、AVI、MIDI、MPEG、QuickTime和WAV等⽂件。
●可以播放从互联⽹上下载的媒体流。
●可以利⽤麦克风和摄像机⼀类的设备截取⾳频和视频,并保存成多媒体⽂件。
●处理多媒体⽂件,转换⽂件格式。
●向互联⽹上传⾳频和视频数据流。
●在互联⽹上⼴播⾳频和视频数据。
JMF的结构为了更好地说明JMF的结构,让我们⽤⽴体声⾳响做⼀个简单的⽐喻。
当你CD机播放CD唱⽚的时候,CD唱⽚向系统提供⾳乐信号。
这些数据是在录⾳棚中⽤麦克风和其他类似的设备记录下来的。
CD播放机将⾳乐信号传送到系统的⾳箱上。
在这个例⼦中,麦克风就是⼀个⾳频截取设备,CD唱⽚是数据源,⽽⾳箱是输出设备。
JMF的结构和⽴体声⾳响系统⾮常相似,在后⾯的⽂章中,你会遇到下⾯的这些术语:●数据源(Data source)●截取设备(Capture Device,包括视频和⾳频截取设备)●播放器(Player)●处理器(Processor)●数据格式(Format)●管理器(Manager)下⾯让我们来看⼀看这些术语到底代表什么意思。
Java JMF的使用
本文由西安白癜风医院 / 收集,转载请注明出处
JButton capture = new JButton("Capture Image"); capture.addActionListener(new ActionListener() { public void actionPerformed(ActionEvent arg0) { mediaPlayerCurrent.stop(); Buffer bufferFrame; BufferToImage bufferToImage; Image image; BufferedImage bi; controlGrabber = (FrameGrabbingControl) mediaPlayerCurrent .getControl("javax.media.control.FrameGrabbingControl"); bufferFrame = controlGrabber.grabFrame(); bufferToImage = new BufferToImage((VideoFormat) bufferFrame .getFormat()); image = bufferToImage.createImage(bufferFrame); File out = new File("capture" + (++captureCount) + ".png"); try { bi = toBufferedImage(image); ImageIO.write(bi, "png", out); } catch (IOException e1) { e1.printStackTrace(); } mediaPlayerCurrent.start(); } }); controlPanel.add(BorderLayout.CENTER, capture); JButton playStop = new JButton("stop"); // add(BorderLayout.SOUTH,playControtionListener() { // @Override public void actionPerformed(ActionEvent arg0) { mediaPlayerCurrent.stop(); } }); controlPanel.add(BorderLayout.EAST, playStop); JButton playStart = new JButton("start");
毕业设计(论文)-jmf语音视频聊天软件的实现[管理资料]
![毕业设计(论文)-jmf语音视频聊天软件的实现[管理资料]](https://img.taocdn.com/s3/m/aa358e94783e0912a3162a09.png)
摘要随着网络的不断发展,在网络上的语音视频通信成为研究和应用的热点之一。
要在网络上进行语音视频通信,便要解决音、视频信号的采集、回放、编解码以及数据的传输的问题。
本文将用Java的JMF解决这些问题。
JMF是Java的一种可选用的应用编程接口(API)软件包,它为音频和视频等媒体内容的采集、回放、传输和编码转换等提供了一个统一的架构。
JMF用RTP协议传输实时媒体信号。
RTP是针对Internet上多媒体数据流的一个传输协议。
RTP能在一对一或一对多的传输情况下工作,其目的是提供时间信息和实现流同步。
RTP建立在UDP上。
RTP只保证实时数据的传输,并不提供可靠的传送机制,也不提供流量控制或拥塞控制,它依靠RTCP提供这些服务。
RTP的一对多的传输,由IP组播实现。
IP组播是主机之间“一对一组”的通讯模式。
加入了同一个组的主机可以接收到此组内的所有数据,网络中的交换机和路由器只向有需求者复制并转发其所需数据。
IP组播能有效地节省网络和主机的资源,并且它允许在广域网上传输。
由于NAT的存在,令许多P2P应用无法应用于NAT背后的主机,语音视频通信也不例外。
根据NAT的原理,能用UDP打孔技术进行NAT 的穿透。
本文使用JMF完成语音视频聊天软件的实现。
该软件既能进行点对点的语音视频通信,也能进行多人语音视频通信,并用UDP打孔技术完成了对NAT的穿透,使该软件能在广域网上使用。
关键字:语音视频通信,JMF,RTP,组播,穿透NAT,UDP打孔技术ABSTRACTAlong with the constant development of the network, the voice and video communications on Internet is one of hot topic of research and application. In order to communication with voice and video on the network, it needs to solve sound and video signals’ collection, playback, codecs and data transmission problems. This paper uses the Java’s JMF to solve these problems. JMF is an available Application Programming Interface (API) package of Java. It provides a unified framework for audio and video media content collection, playback, data conversion and transmission.JMF uses RTP to transmit real-time media signal. RTP is a special transmission protocol for Internet multimedia data streams. RTP can in point-to-point or point-to-multi-point transmission mode, the aim is to provide time information and to achieve flow synchronization. RTP bases on UDP. RTP only guaranteed real-time data’s transmission. It does not provide reliable delivery mechanisms, flow control or congestion control. It relies on RTCP to provide these services.Point-to-multi-point transmission mode of RTP uses IP Multicast technology. IP Multicast is communication mode of hosts "one-to-one group". Computers join in a group can receive all the data from this group. Switches and routers only replicate and transmit the data to the computers who need the data. It can effectively to save network’s and computer’s resources, and it is allowed to transmit on the wide-area network.Due to the existence of NAT, many P2P applications can not be used to the computers behind NAT. Audio and video communication is no exception. According to the theory of NAT, we can use UDP hole punching technology to complete NAT penetration.This paper uses JMF to complete voice and video chatting software. The software not only can be used to do point-to-point voice and video communications, but also can be used to do many-to-many communications. The software uses UDP hole punching technology to complete NAT penetration so that it can be successfully applied on WAN.Keywords:voice and video communication, JMF, RTP, multicast, NAT penetration, UDP hole punching目录第一章概述 (1) (1) (2)第二章JMF基础 (4)关于JMF技术 (4)JMF模型 (4)JMF常用类 (5)事件模型 (11)第三章RTP、RTCP (16)流媒体 (16)实时传输协议RTP (17)实时传输控制协议RTCP (20)第四章组播技术 (22)概述 (22)单播/组播/广播通讯协议的特点及应用对比 (22)第五章穿透NAT (27)NAT的作用 (27)NAT的分类及工作原理 (28)NAT产生的问题 (31)穿透NAT——UDP打孔技术 (32)第六章基于JMF的语音聊天软件的实现 (34)编程和运行环境 (34)主要功能模块的设计与实现 (34)运行结果 (44)总结 (47)参考文献 (49)致谢 (51)第一章概述语音通信系统可分为以下几个模块,如图1-1所示。
- 1、下载文档前请自行甄别文档内容的完整性,平台不提供额外的编辑、内容补充、找答案等附加服务。
- 2、"仅部分预览"的文档,不可在线预览部分如存在完整性等问题,可反馈申请退款(可完整预览的文档不适用该条件!)。
- 3、如文档侵犯您的权益,请联系客服反馈,我们会尽快为您处理(人工客服工作时间:9:00-18:30)。
利用JMF开发视音频应用代码参考获取摄像头视频数据和麦克风音频数据基本步骤是首先获取视频、音频捕获设备的信息,然后再根据取得的设备信息确定设备的位置。
找到设备的位置以后,调用Manager的CreatePlayer方法创建Player,当Player开始播放的时候,就开始了捕获的过程。
有多种方法获得捕获设备信息,可以通过查询指定的格式,也可以查询特定的设备名字。
5.1.1获取音频数据程序代码片断说明:获取捕获设备Vector deviceList = CaptureDeviceManager.getDeviceList(newAudioFormat("linear", 44100, 16, 2)); //返回能支持这种格式的设备列表if (deviceList.size() > 0)di = (CaptureDeviceInfo)deviceList.firstElement();//di 是CaptureDeviceInfo对象,使用第一个支持这种格式采集的设备elseSystem.exit(-1);建立MediaLocatorMediaLocator=di.getLocator()创建Playertry{Player p = Manager.createPlayer(di.getLocator());}catch (IOException e) { }catch (NoPlayerException e) {}5.1.2捕获视频数据Vector list=CaptureDeviceManager.getDeviceList(null);//先把所有的捕获设备调出来devinfo=(CaptureDeviceInfo)list.elementAt(i);name=devinfo.getName();if(name.startsWith("vfw:"))webCamDeviceInfo=devinfo;//所有的视频捕获设备的名字都是以vfw开头的,所以取得捕获设备列表中以vfw 开头的设备名字就是视频捕获设备。
medialocator=webCamDeviceInfo.getLocator();//获取设备的medialocator地址try{Player p = Manager.createPlayer(medialocator);}catch (IOException e) { }catch (NoPlayerException e) {}//创建Player,当Play开始的时候,就开始了视频捕获的过程。
5.2 保存摄像头数据为视频文件首先是找到捕获设备,然后取的捕获设备的位置信息。
如果要保存所采集的数据,就要创建一个处理器。
然后将处理器的输出作为数据池的输入。
当启动数据池的时候,就可以把捕获的数据保存成文件了。
以部分代码为例说明如下过程。
获取捕获设备部分参见上一部分//创建ProcessormProcessor=Manager.createProcessor(MediaLocator)//设置Processor,输出类型为AVI格式mProcessor.setContentDescriptor(new FileTypeDescriptor(FileTypeDescriptor.AVI)); //取得Processor的输出DataSource source=p.getDataOutput();//建立一个保存文件位置的MediaLocatorMediaLocator dest=new MediaLoc ator(“file://test.avi”)//建立一个DataSinkDataSink filewriter=null;Try {Filewriter=Manager.createDataSink(source,dest)Filewriter.open()}//设置Processor控制生成文件的大小,只要调用Processor的StreamWriterControl StreamWriterControl swc = (StreamWriterControl) processor.getControl(“javax.media.control.StreamWriterControl”);//设置生成文件大小最大2MIf(swc!=null)Swc.setStreamSizeLimit(2000000)//设置完毕,可以启动Processor和DataSink来保存捕获数据了。
try {filewriter.start();}catch (IOException e){System.exit(-1);}5.3 捕获音频、视频数据为QuickTime格式的文件使用处理器模型来捕获实时的视频、音频数据并且将数据轨道进行编码、混合,最后保存为QuickTime 格式的文件。
首先构建一个处理器模型,设定好特定的数据轨道和输出内容格式。
然后使用这个处理器模型来创建一个处理器。
处理器会自动连接到符合文件格式要求的捕获设备。
具体实现参考以下代码://设定要输出的音频格式和视频格式Format formats[] = new Format[2];formats[0] = new AudioFormat(AudioFormat.IMA4);formats[1] = new VideoFormat(VideoFormat.CINEPAK);//设定要输出的文件类型为QuickTime格式FileTypeDescriptor outputType =new FileTypeDescriptor(FileTypeDescriptor.QUICKTIME);//创建ProcessorModel,参数为数据轨道输出格式和文件输出类型ProcessorModel mProcessorModel=new ProcessorModel(formats,outputType);//由ProcessorModel对象创建Processor对象try {mProcessor=Manager.createRealizedProcessor(mProcessorModel)}//获取Processor的输出DataSource source=mProcessor.getDataOutput()//建立一个记录保存文件的MediaLocatorMediaLocator dest=new MediaLocator(“file://test.mov”)//创建数据池DataSink filewriter=nullTry {Filewriter=Manager.createDataSink(source,dest);Filewriter.open();}catch(…)//开始保存数据文件,启动处理器try {filewriter.start();}catch(…)p.start();//当结束捕获视频时,停止处理器,并关掉它//当数据池接到EndOfStream事件时,停止保存文件。
5.4 发送实时媒体数据如果需要将媒体数据发送到网络,首先需要用Processor生成RTP编码的数据源,然后创建SessionManager或者DataSink来控制传输过程。
下面以实例来讲解从摄像头捕获视频,并且在网上传输的过程。
首先获取视频采集设备具体请参考5.1.2,取得了CaptureDeviceInfo对象为di第二步创建ProcessorProcessor p=Manager.createProcessor(di.getLocator());第三步设置Processor,使它能够生成RTP格式的编码processor.configure()//等待,直到processor的状态变成configured,设置输出格式为RAW_RTPprocessor.setContentDescriptor(new ContentDescriptor(ContentDescriptor.RAW_RTP));//列出所有的和数据轨道相关的控制器TrackControl track[]=processor.getTrackControls();boolean encodingOk = false;//遍历这些控制器,找到可以控制输出格式的控制器for (int i = 0; i < track.length; i++) {if (!encodingOk && track[i] instanceof FormatControl) {//找到了数据轨道的格式控制器之后,设置输出格式,输出格式输出为VideoFormat.JPEG_RTP>。
VideoFormat jpegFormat = new VideoFormat(VideoFormat.JPEG_RTP,new Dimension(w, h),Format.NOT_SPECIFIED,Format.byteArray,frameRate);tracks[i].setFormat(jpegFormat);//这时,准备工作已经做好,可以调用Processor的realize方法processor.realize()//当Processor进出realized状态以后,可以取得Processor的输出作为数据源processor.realize()DataSource ds=processor.getDataOutput();//可以把这个数据源作为参数传递给manager,通过manager创建一个RTP的数据池。
先设置一个发送数据流的多播目的网址String url=“rtp://127.0.0.1:49150/audio/1”MediaLocator mDest=new MediaLocator(url)//确定了数据源和发送地址,可以建立数据池DataSink了,建立成功后调用open()和start()方法,就可以在网上以多播方式发送捕获的内容了。
DataSink d=Manager.createDataSink(ds,m)d.open()d.start()5.5 接收实时视频数据接收网上传输的数据流时,首先要构建一个MediaLocator来描述RTP 进程,Manager为进程中的第一个数据流创建播放器,当从进程中检测到数据时,Player会发出RealizeComplete事件。
通过监听RealizeComplete事件,你可以确定是否有数据到了,还可以确定Player是否准备好播放数据了。
