wonderware ide 培训的手册文档第一章
wonderware培训教学提纲

w o n d e r w a r e培训Wonderware培训Wonderware公司推出旗舰级 InTouch软件,这是第一个基于微软Windows®操作系统的人机界面(HMI)。
Wonderware只能在windows环境下运行,支持32位及64位操作系统,但wonderware公司建议使用32位操作系统因为64位操作系统部是很稳定,系统容易崩溃带来不必要的损失。
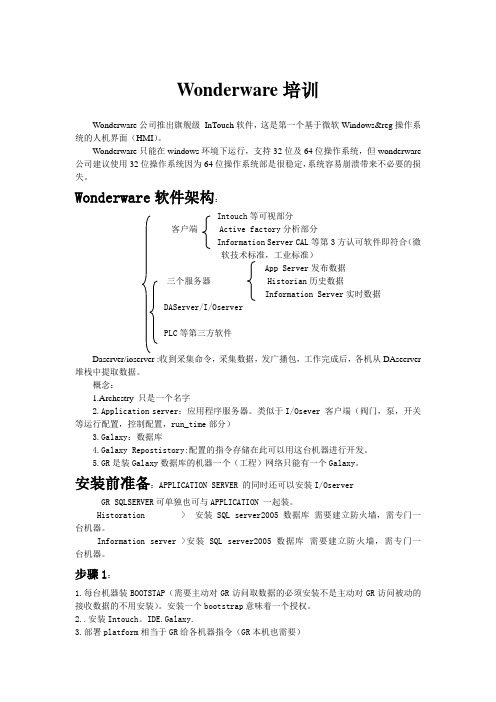
Wonderware软件架构:Intouch等可视部分客户端 Active factory分析部分Information Server CAL等第3方认可软件即符合(微软技术标准,工业标准) App Server发布数据三个服务器 Historian历史数据Information Server实时数据DAServer/I/OserverPLC等第三方软件Daserver/ioserver :收到采集命令,采集数据,发广播包,工作完成后,各机从DAseerver堆栈中提取数据。
概念:1.Archestry 只是一个名字2.Application server:应用程序服务器。
类似于I/Osever 客户端(阀门,泵,开关等运行配置,控制配置,run_time部分)3.Galaxy:数据库4.Galaxy Repostistory:配置的指令存储在此可以用这台机器进行开发。
5.GR是装Galaxy数据库的机器一个(工程)网络只能有一个Galaxy。
安装前准备:APPLICATION SERVER 的同时还可以安装I/OserverGR SQLSERVER可单独也可与APPLICATION 一起装。
Historation > 安装SQL server2005数据库需要建立防火墙,需专门一台机器。
Information server >安装SQL server2005数据库需要建立防火墙,需专门一台机器。
步骤1:1.每台机器装BOOTSTAP(需要主动对GR访问取数据的必须安装不是主动对GR 访问被动的接收数据的不用安装)。
Wonderware InTouch 7.11 中文版 入门手册
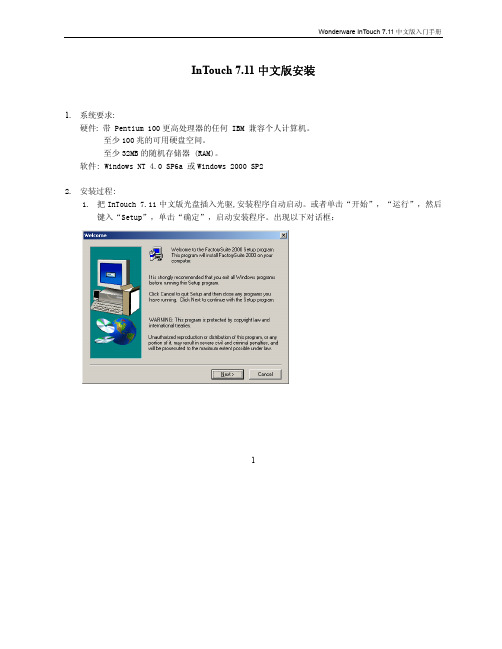
InTouch 7.11中文版安装1. 系统要求:硬件: 带 Pentium 100更高处理器的任何 IBM 兼容个人计算机。
至少100兆的可用硬盘空间。
至少32MB的随机存储器 (RAM)。
软件: Windows NT 4.0 SP6a 或Windows 2000 SP22. 安装过程:1. 把InTouch 7.11中文版光盘插入光驱,安装程序自动启动。
或者单击“开始”,“运行”,然后键入“Setup”,单击“确定”,启动安装程序。
出现以下对话框:12. 单击“Next”,接受授权协议,出现下一个对话框:3. 单击“Yes”,进入下一步,出现以下对话框:4. 输入用户名和公司名,单击“Next”,进入下一步,出现以下对话框:25. 检查输入的内容,如果正确无误,单击“Yes”,进入下一步,出现以下对话框:6. 单击“否”,出现以下对话框:37. 单击“InTouch”,启动InTouch安装。
8. 安装程序首先安装共用组件。
出现以下对话框:9. 如需要改变共用组件的安装路径,单击“Browse”,选择了安装路径后,单击“Next”,进入下一步,出现以下对话框:10. 在此输入你的计算机所在的域名(如不在域中,输入机器名),登录的用户名和密码。
单击“Next”,4进入下一步:11. 接着安装程序把共用组件安装到了计算机中,安装完成后,出现以下对话框:12. 单击“OK”,重新启动计算机(安装还没有完成,不要把InTouch 7.11的光盘从光驱中拿走),重新启动后,安装程序将自动继续运行。
13. 重新启动后, 安装程序自动运行, 经过一系列的自动安装过程后,弹出以下对话框:514. 在此对话框中,选择InTouch的安装目录,单击“下一步”继续安装,将出现以下对话框:15. 在此对话框中,选择你要安装到电脑中的InTouch部件,然后单击“下一步”,安装程序弹出以下对话框:16. 在此对话框中,选择InTouch配置,是完整的开发系统还是只有运行系统,或者安装FactoryFocus,选择好后,单击“下一步”继续,安装程序将弹出以下对话框:617. 此对话框中详细列出了将要安装到系统中的InTouch组件,如无误的话,单击“下一步”继续,否则按“上一步”重新选择。
wonderware-ide-培训的手册文档第一章

实验 1 –创建银河介绍在本实验中,您将创建银河,并使用 ArchestrA IDE 连接到它。
此银河将在类期间用于开发示例应用程序。
目标完成本实验后,您将能够:创建银河使用 ArchestrA IDE连接到加尔斧西创建银河在以下步骤中,您将创建一个银河并连接到它。
1.打开ArchestrA IDE(开始 |所有计划 |奇迹软件 |阿尔切斯特拉 IDE)"连接到银河"对话框显示,本地节点名称显示在GR 节点名称下拉列表中。
在此映像中,训练PC-ENG2是本地计算机名称。
2.单击"新建银河"按钮创建新的银河。
将出现"新建银河"对话框。
3.在"银河"名称字段中,输入训练银河。
4.在"银河类型"字段中,确认已选择"基础_应用程序_服务器.cab"。
5.单击"创建"。
将显示"创建银河"对话框并显示"银河"创建进度。
这将需要一些时间。
检查以确保未显示任何错误消息。
6.当创建银河进度显示100% 已完成时,单击"关闭"。
新创建的训练银河现在显示在Galaxy 名称下拉列表中。
7.单击"连接"。
"连接到银河"对话框将关闭,几秒钟后,ArchestrA IDE 将打开。
您将使用ArchestrA IDE 在本课程的其余部分中开发银河。
- 此页有意留空 -。
Wonderware 培训资料
Lab 2 – Identifying the Mixer
Course Description and Objectives
Course Description
The System Platform – Part 1 training course is a 4-day instructor-led course designed to give the knowledge necessary to develop and support applications with Wonderware Application Server.
System Platform
Clients
Microsoft Technologies & Industry Standards
Wonderware System Platform
InTouch
(Visualization)
Wonderware Clients
ActiveFactory
(Analysis Client)
?Leverage the .NET Framework for the Automation World
?Object-based application
?One global networked namespace
?Centralized configuration and security
?Multi-user development environment ?Component-based plant application model ?Self documenting
(完整word版)产品使用手册模板

{产品名称}产品使用手册Versio n:编号:WD PA PUM关于此文档{产品名称} (1)产品使用手册 (1)第1章简介 (3)1.1 目的和范围 (3)1.2 术语和缩略语 (3)1.3 参考资料 (3)第2章产品介绍 (4)2.1 产品背景 (4)2.2 产品定位 (4)2.3 版本说明 (4)2.4 运行环境 (4)第3章安装与部署 (5)3.1 服务端环境 (5)3.2 客户端环境 (5)3.3 安装步骤1 (5)3.4 安装步骤2 (5)第4章子系统1/模块1 (6)4.1 分解模块1 (6)4.1.1 下层分解模块1 (6)4.1.2 下层分解模块2 (6)4.2 分解模块2 (6)第5章常见问题与解答 (7)第1章简介1.1目的和范围说明文档描述的主要内容(一句话),文档编制的背景、针对的读者1.2术语和缩略语说明文档中涉及的业务术语和缩略语的含义,方便读者理解。
1.3参考资料第2章产品介绍2.1产品背景描述产品的研发过程2.2产品定位以尽量简洁的语言概述产品的主要功能和用途2.3版本说明描述产品的当前版本、历史版本、知识产权2.4运行环境描述产品支持的运行环境,需要的硬件和软件设施。
第3章安装与部署列出为运行本产品所需要的硬件环境和软件环境,支持软件注意标明版本号说明产品安装完成后,初始化过程中的全部操作命令以及表征安装工作完成的测试实例3.1服务端环境3.2客户端环境3.3安装步骤13.4安装步骤2第4章子系统1/模块1将每个子系统/功能模块按照功能逐层分解进行描述,建议拆分层次最好不要超过3层4.1分解模块14.1.1下层分解模块14.1.2下层分解模块24.2分解模块2第5章常见问题与解答。
Wonderware 培训资料PPT
▪ Multi-user development environment ▪ Component-based plant application model ▪ Self documenting
• Be able to troubleshoot applications in a standalone and networked environment.
Wonderware System Platform
Project Specific Work
Industry Packs Function Specific Modules
Course Objectives
• Understand the ArchestrA® technology and how it is applicable to the plant floor environment.
• Become familiar with developing objects and instances configuring applications using the Integrated Developing Environment.
ArchestrA
It provides a unified environment for visualization, plant history, device communications and automation application integration.
Application Server’s application, configuration information and project database.
System Platform
Wonderware经验文档系列1:软件和授权安装简单说明

******生产线自控集成集管控一体化系统软件和授权安装说明书航天(北京)工业设备有限公司软件和授权安装说明书目录1.计算机所需软件说明 (5)1.1 注意事项 (5)2.软件安装说明 (6)2.1 Galaxy Repository、IDE和IAS Bootstrap的安装 (6)2.1.1 软件封面 (6)2.1.2 安装步骤 (6)2.2 DAServer的安装 (10)2.2.1软件封面 (11)2.2.2 安装步骤 (11)2.3 Intouch View安装 (15)2.3.1 软件封面 (15)2.3.2 安装步骤 (15)2.4 WIS的安装 (21)2.4.1 软件封面 (21)2.4.2 安装步骤 (21)2.5 Historian Server的安装 (26)2.5.1 软件封面 (26)2.5.2 安装步骤 (26)3.授权安装说明 (37)2软件和授权安装说明书3.1 文件类型 (37)3.2文件种类 (38)3.2.1 Historian Server Standard Ed, - 100K Tag (38)3.2.2 InTouch For System Platform With ActiveFactory (39)3.2.3 Device Integration Servers (40)3.2.4 Development Studio Unlimited Unlim /60000 /500 (42)3.2.5 Application Server 50000 I/O (43)3.2.6 Info Server Standard Client Per Named Device,50 Pk (44)3.2.7 Information Server Portal (45)3.3 安装方法 (46)3.4 WIS(Wonderware Information Server)授权安装方法 (49)3软件和授权安装说明书前言本系列技术文档为项目实施中宝贵的经验总结,只希望同样使用这套系统或部署出现问题的同仁们提供一点小小的帮助,该系列文档初期定为六篇,如果时间允许的话会陆续编辑并上传。
wonderware ide 培训的手册文档第5章,共21章
Lab 5 –Connecting to the FieldIntroductionIn this lab,you will configure an instance of the $DDESuiteLinkClient template to connect to a device integration server using the SuiteLink protocol. You will then use Object Viewer to monitor the connection status of the instance in runtime.ObjectivesUpon completion of this lab, you will be able to:Configure a device integration objectMonitor the connection status of a device integration objectCreate a Connection to a Field DeviceIn the following steps, you will create an instance of the $gDDESuiteLinkClient template and configure it to connect to the PLC simulator.1.In the ArchestrA IDE,Template Toolbox,Global toolset, right-click $gDDESuiteLinkClient andselect New | Instance.2.Rename the instance PLCSim.3.Double-click PLCSim to open its configuration editor.4.On the General tab, configure the instance as follows:Server node:[check with your instructor] In this image, TrainingPC-IO2 is used.Server name:RTEngineCommunication Protocol:SuiteLink(default)5.At the top of the PLCSim pane, click the Topic tab.6.In the Available topics section,click the Add button.7.In the Topic field, enter Tagname and press Enter.8.In the Associated attributes for Tagname section, click the Import button.The Open dialog box appears.9.Navigate to the C:\Training folder, select the PLC Items List.csv file.Click Open.After a few seconds, the Associated attributes for Tagname section is populated with all of the items in the file.The Attribute column displays the aliases assigned to each of the corresponding Item Reference data points.10.Click the Save and close button to close the editor.The Check In dialog box appears.11.In the Comment field, enter Basic Configuration.12.Click OK.13.In the Model view, assign the PLCSim instance to the ControlSystem area.14.In the Deployment view, host the PLCSim instance in AppEngine1.15.Right-click on PLCSim and select Deploy.16.Keep the default options and click OK.17.When the Deploy progress displays 100% completed, click Close.View the Attributes in RuntimeYou will now return to Object Viewer to view the attribute values in runtime.18.In the Deployment view, right-click PLCSim and select View in Object Viewer.The Object Viewer window appears and refreshes.19.Right-click on the watch window and select Add Watch Window.20.Right-click on the watch window and select Rename Tab.21.Rename the tab PLCSim.22.In the details pane, add the following attributes to the watch window:ConnectionStatusReconnectScanStateScanStateCmd23.Add the ScanGroupList attribute to the watch window.The Array for PLCSim.ATTRIBUTE(ScanGroupList)dialog box appears.This appears because ScanGroupList is an array and requires an index to be entered. You will now configure the array to display the entire array dimension.24.In the Enter an array index field, enter-1.25.Click OK.Lab 5–Connecting to the Field 3-73Application Server 2012The ScanGroupList is now displayed in the watch window.The ConnectionStatus attribute displays the communication status between the topics configured in the device integration object and the topics in the Device Integration Server. The Reconnectattribute, when set to true, will attempt to reconnect to the Device Integration Server.26.Right-click on the watch window and select Save .3-74Module 3–Application Infrastructure-This page intentionally left blank -Invensys Learning Services。
wonderware培训
Wonderware培训Wonderware公司推出旗舰级InTouch软件,这是第一个基于微软Windows®操作系统的人机界面(HMI)。
Wonderware只能在windows环境下运行,支持32位及64位操作系统,但wonderware 公司建议使用32位操作系统因为64位操作系统部是很稳定,系统容易崩溃带来不必要的损失。
Wonderware软件架构:Intouch等可视部分客户端 Active factory分析部分Information Server CAL等第3方认可软件即符合(微软技术标准,工业标准)App Server发布数据三个服务器 Historian历史数据Information Server实时数据DAServer/I/OserverPLC等第三方软件Daserver/ioserver :收到采集命令,采集数据,发广播包,工作完成后,各机从DAseerver 堆栈中提取数据。
概念:1.Archestry 只是一个名字2.Application server:应用程序服务器。
类似于I/Osever 客户端(阀门,泵,开关等运行配置,控制配置,run_time部分)3.Galaxy:数据库4.Galaxy Repostistory:配置的指令存储在此可以用这台机器进行开发。
5.GR是装Galaxy数据库的机器一个(工程)网络只能有一个Galaxy。
安装前准备:APPLICATION SERVER 的同时还可以安装I/OserverGR SQLSERVER可单独也可与APPLICATION 一起装。
Historation > 安装SQL server2005数据库需要建立防火墙,需专门一台机器。
Information server >安装SQL server2005数据库需要建立防火墙,需专门一台机器。
步骤1:1.每台机器装BOOTSTAP(需要主动对GR访问取数据的必须安装不是主动对GR访问被动的接收数据的不用安装)。
Wonderware 培训资料学习资料

ArchestrA
It provides a unified environment for visualization, plant history, device communications and automation application integration.
Application Server’s application, configuration information and project database.
System Platform
Clients
Microsoft Technologies & Industry Standards
Wonderware System Platform
Project Specific Work
Industry Packs Function Specific Modules
Application Server Galaxy
Galaxy Repository
Single computer and software where the Galaxy database is located.
Wonderware Application Server
+++ Scan-based system. Highlights
Support Section 6: Application Planning
Lab 2 – Identifying the Mixer
Course Description and Objectives
Course Description
The System Platform – Part 1 training course is a 4-day instructor-led course designed to give the knowledge necessary to develop and support applications with Wonderware Application Server.
IO服务器Wonderwaer产品安装说明书V1.1
单位简称分发列表修改列表修订版本列表目录1.概述 (4)2. I/OSERVER FSGATEWAY 2.0的安装 (5)3. WONDERWARE INSQL 9.0 组件IDAS (11)4. WONDERWARE INSQL 9.0 SP2 (15)5.授权的安装 (17)1.概述本文件是I/O服务器Wonderwaer产品安装说明书的流程及具体方法,为了保证软件安装的正确性,未来工作的顺利进行和有效维护,以及便于工作人员之日常操作,特此做出如下的操作指引。
I/O服务器主要是12台服务器的2台一主一备,进行数据的采集。
操作员站的具体配置如下:操作系统:Windows 2008 Server应用软件:Wonderware InSql 9.0 组件IDAS和I/Oserver FSGateWay 2.02.I/OServer FSGateWay 2.0的安装FSGateWay 2.0是Wonderware I/O、DA Server的一个,根据该服务器的需要我们在该计算机只安装这一个软件即可。
下面介绍具体安装过程:步骤1:将Device Integration安装盘放入计算机中(或者是在计算机上找到Device Integration 的文件夹,点击安装运行),会自动弹出如下画面。
步骤2:如下图所示进行选择。
步骤3:点击右侧画面中的“FSGateway”,出现如下所示的提示画面。
步骤4:点击运行,出现如下所示的提示画面。
步骤5:点击运行,出现如下画面。
此过程是安装产品时的所需的必备组件列表,如果没有准备其中的一些产品或功能,它们所需的必备组件也可以不必安装,必备组件一旦安装将无法卸载。
点击对话框下方的安装必备组件按钮,开始安装必备组件。
完成后出现如下画面。
步骤6:点击运行,出现如下画面。
步骤7:点击下一步,出现如下画面。
步骤8:点击下一步,出现如下画面。
步骤9:进行用户账户及密码的设定,设置用户名及密码供节点及数据服务器间通讯使用。
Wonderware 培训资料(精选PPT)
System Platform
Clients
Microsoft Technologies & Industry Standards
Wonderware System Platform
Project Specific Work
Industry Packs Function Specific Modules
System Platform 3.1
Wonderware® System Platform 3.1
System Platform
Agenda
Contents
Module 1: Introduction Module 2: Application Infrastructure Module 3: Application Objects Module 4: Extending the Objects Module 5: Alarms and History Module 6: Security Module 7: Galaxy Maintenance Module 8: Device Integration Products Module 9: Multi-Node Applications
System Platform
Module 1: Introduction
Contents
Section 1: Course Introduction Section 2: Wonderware System Platform
Lab 1 – Creating a Galaxy Section 3: The ArchestrA IDE Section 4: Automation Objects Section 5: System Requirements, Licensing and
培训手册WonderwareApplicationServer
培训手册Wonderware ApplicationServer 3.1目录一、简介 (5)1.1 Wonderware系统平台 (5)Lab 1 创立 Galaxy (6)1.2 ArchestrA IDE (9)1.3 系统对象 (17)1.4 建模及规划 (18)Galaxy 项目开发流程 (18)Lab 2 搅拌器建模分辨 (19)二、平台应用构造 (22)2.1 模板 (22)Lab 3 创立一个模板 (22)2.2 开发模板 (27)Lab 4 创立部署模板 (27)2.3 运转环境 (35)Lab 5 怎样使用对象查察器 (35)2.4 连结现场数据 (41)Lab 6 连结现场数据 (41)三、平台应用对象 (49)3.1 模板与实例 (49)3.2 用户定义对象 (51)Lab 7 创立热互换器模板 (51)3.3 改变控制及衍生 (61)Lab 8 怎样改变控制及衍生 (61)3.4 模拟型设施对象 (64)Lab 9 创立仪表模板 (64)3.5 失散型设施对象 (66)Lab 10 创立阀、泵、电机模板 (66)3.6模板容器 (74)Lab11 创立 Mixer (74)四、扩展对象 (91)4.1 UDAs (91)4.2扩展属性 (91)Lab12配置电机速度属性 (91)4.3脚本简介 (96)Lab13用脚本增添自动连结至 DDE Suitelink Client (96)Lab14用脚本配置自动说明 (99)五、报警和历史 (105)5.1报警 (105)Lab15报警配置 (105)5.2历史 (117)Lab16历史配置 (117)六、安全 (122)6.1安全回首 (122)Lab17安全配置 (122)七、 Galaxy 保护 (142)7.1导出导入对象 (142)7.2经过 .csv 文件配置实例 (143)7.3系统管理控制( SMC) (144)7.4网络账户功能 (145)八、数据收集产品 (145)8.1IO Server (146)8.2DA Server (147)8.3DI Object (147)九、多节点开发 (148)9.1应用系统冗余 (148)Lab 18 配置应用冗余148 9.2 数据收集冗余 (150)Lab 19 配置 DI 对象冗余150 9.3 多节点应用 (153)Lab 20 变换到网络开发环境153一、简介1.1 Wonderware系统平台系统架构节点描绘安装组件Galaxy Repository GR 节点,一个 Galaxy 就有一个 GR 节点。
Wonderware培训
wonderware一、 wonderware是做什么的?wonderware主要提供工业中的MES (Manufacturing Execution System)制造(生产)执行系统的解决方案(solution)。
针对的行业包括钢铁、烟草、化工、能源、食品、水处理等。
二、:wonderware的产品体系架构。
1、wonderware主要包括那些软件?主要包括:intouch(数据采集和画面监视控制用),DI(device integration),InSQL(工业数据库软件),IAS(Industrial Application Server工业应用平台),incontrol(软PLC),I/Oserver(数据通讯软件),DT(停机分析软件),QI(质量分析软件),InBatch(批处理软件),intrack(跟踪软件),SCADAlarm(事件报警软件),ActiveFactoty(InSQL终端服务软件)等。
2、wonderware的架构特点?wonderware目前所有产品都是基于ArchestrA技术。
ArchestrA 是一种面向对象(工厂),基于.NET的软件技术架构。
三、wonderware的产品亮点。
简易的(容易安装和使用),高可靠性(通过冗余和备份确保数据安全),先进性(同microsoft合作的技术领先),高开放性(方便的数据访问,支持众多PLC),高扩展性,有效性,集成性(方便的数据交换和通讯,上千种的I/Oserver,有Tookit供用户开发IOserver,RPM快速协议开发工具)。
wonderware和microsoft是金牌合作伙伴,致力于将微软技术带入工业现场,被成为工业界的微软。
智能工厂,实时决策(powering intelligent plant decisions in real time).协助用户快速集成,掌握和运用实时信息,进行智能决策,提高企业效益。
wonderware ide 培训的手册文档第7章,共21章
Lab 15 –Logging AlarmsIntroductionIn this lab, you will configure and run the Alarm DB Logger Manager, which is used to store real-time alarms in a centralized database.ObjectivesUpon completion of this lab, you will be able to:Configure the Alarm DB Logger ManagerUse alarm queries to retrieve alarms and events from alarm providersConfigure and Start the Alarm DB Logger ManagerIn the following steps, you will configure the Alarm DB Logger and start sending alarms to the database.1.Start the Alarm DB Logger Manager(Start | All Programs | Wonderware | InTouch | Alarm DBLogger Manager.The Alarm DB Logger Manager dialog box appears.2.Click Settings.After a few moments, the Alarm DB Logger Manager –Configuration dialog box appears.The Server Name field should have the name of the node where your SQL database is located [the instructor will provide the server name]. In this image, the local node (default) will be used.The Database field should have the name of your SQL database [your instructor will provide the name of the database]. In this image, the default name of WWALMBD will be used.The User Info area should contain the SQL user name and password that is used to access the SQL server [your instructor will confirm the credentials that should be used]. In this image, sa will be used for the User Name.The Logging Mode area will be the default option of Detailed, so that every alarm and event will be recorded.3.Click Test Connection.The Error dialog box appears.This message is explaining that the connection was successful, but the database still needs to be created.4.Click OK.5.In the Alarm DB Logger Manager -Configuration dialog box, click Create.6.The Success dialog box appears.7.Click OK.8.In the Alarm DB Logger Manager -Configuration dialog box, click Next.The Alarm DB Logger Manager –Query Selection dialog box appears.9.Remove the contents of the existing default Alarm Query field.Configure the Alarm Query area as follows: [check with your instructor to verify your remote computer name]\\[your remote computer name]\Galaxy!ControlSystem\\[your remote computer name]\Galaxy!Packaging\\[your remote computer name]\Galaxy!Production\\[your remote computer name]\Galaxy!Receiving\\[your remote computer name]\Galaxy!ShippingIn this image, [your remote computer name] is displayed as TRAININGPC-REM2.10.Click Next.11.The Alarm DB Logger Manager –Advanced Setting dialog box is now displayed.12.Keep the default options and click Finish.This Alarm DB Logger Manager dialog box reappears.13.Click Start.The Smart Cache begins processing the alarms that have been queued up in the system and begins sending them to the database.The number decreases as the queued alarms are processed until the Smart Cache is Empty.14.Close the Alarm DB Logger Manager.The Alarm DB Logger Manager will continue to run in the background.View the Alarm History DataYou will now use the Microsoft SQL Server Management Studio to view the latest recorded alarms and events.15.Start Microsoft SQL Server Management Studio(Start | All Programs | Microsoft SQL Server2008 | SQL Server Management Studio).16.Keep the default settings and click Connect.17.In the Object Explorer pane, expand Databases | WWALMDB | Views.18.Right-click dbo.v_AlarmHistory and select Select Top 1000Rows.19.The data appears in the bottom-middle pane.20.In the Object Explorer pane, right click dbo.v_EventHistory and select Select Top 1000 Rows.The events logged from the previous lab are displayed here in the bottom-middle pane.21.Close the Microsoft SQL Server Management Studio.22.Close the Alarm DB Logger Manager window.。
(电子行业企业管理)鸿合多学科软件培训手册电子白板初级

(电子行业企业管理)鸿合多学科软件培训手册电子白板初级第一章硬件与软件的安装一、交互式环境的构成以交互式电子白板为核心的交互式教学环境的基本构成如下图所示。
交互式教学环境基本构成PC机通过VGA线将其上内容投射到交互式电子白板上,交互式电子白板通过PC的USB 接口与计算机相连,当用户在白板上进行操作时所有数据将会通过USB线传回到PC机中进行处理,这样就形成了一个以交互式电子白板为核心的互动反馈教学环境。
二、设备连接步骤白板安装完成后,就可以将PC机、投影机和白板连接在一起。
鸿合交互式电子白板通过专用的USB线与PC机USB接口相连实现数据的传输与白板的供电,步骤如下:步骤1:将USB线与白板相连。
步骤2:将USB的另一头接入所用电脑的某个USB口。
步骤3:将投影仪安装好,用VGA线把电脑和投影仪连接好。
步骤4:在电脑键盘上将画面切换到投影,将电脑桌面画面打到白板上。
步骤5:调整投影机,使得画面能打到近似满屏。
三、软件安装步骤软件安装步骤如下所示:1、将软件光盘放置到电脑光驱中,双击,出现如图所示的安装向导对话框。
图准备安装软件对话框2、单击按钮,进入许可证协议界面,阅读完毕后选择接受条款选项,单击按钮,如图所示。
图许可证协议界面3、在安装类型对话框中选择“完整安装”选项,单击按钮。
图安装类型对话框4、进入向导准备界面后,用户即可进入向导安装流程,如图所示。
图向导安装对话框5、用户单击按钮后,程序开始安装,用户可以查看其安装进度条如图1所示。
图安装进度对话框6、安装过程中,程序生成如图所示的对话框,单击按钮。
图安装状态对话框7、在如图所示的对话框中选择接受条款选项,单击按钮。
图接受条款对话框8、在如图所示的对话框中单击按钮,进入到软件安装流程。
图软件安装对话框9、单击按钮后,软件自动安装,安装结束后,单击按钮,会生成如图所示的安装对话框。
图软件安装对话框10、待程序安装完成后,会生成安装完成对话框,如图所示。
Watir学习手册
TIB自动化测试工作室/testware/简介 (2)Watir vs. SilkTest (3)watir vs. Selenium (4)Watir vs. Selenium vs. Sahi (5)Goodbye Selenium,Hello Watir (6)Watir and Selenium - Bret Pettichord (6)安装 (8)ruby1.9.1+watir1.6.5 (8)ruby1.8.6+watir1.6.5 (12)ruby1.8.6+watir1.5.2(成功!) (13)Fxri – Interactive Ruby Help & Console (14)帮助文档 (14)录制器 (15)WatirRecorder++ (15)testwise(iTest2) (15)Watir WebRecorder (16)GlobalWatch Script Recorder (16)中文问题 (16)基础使用 (17)HelloWorld (17)google测试例子 (18)link (18)检查点 (18)contains_text (18)assert (19)Rspec (21)命令行运行 (22)IE窗口处理 (23)JavaScript窗口处理 (23)整合AutoIt处理JavaScript弹出窗口 (24)获取IE浏览器版本和操作系统版本 (25)Watir可读取和与之交互的HTML页面元素 (27)高级使用 (28)用Watir测试Mercury Tours (28)Excel (33)Object Map(对象映射) (34)How do I create an application/object map? (35)创建Map类 (35)JavaScript (36)调用JavaScript脚本 (36)How do I trigger JavaScript events? (37)How do I interact with a JavaScript tree view? (37)Watir+XPath (38)Watir框架、扩展、工具 (38)数据驱动 (39)关键字驱动 (39)Rspec (39)WatirCraft (39)WET (40)360WebTester (41)简介Watir is a testing tool for automating browser-based tests of web applications. It is a Ruby library that works with Internet Explorer and Firefox./projects/wtr/目前最新版本是:watir1.6.5 November 10, 2009下载地址:/frs/?group_id=104&release_id=41300Watir简介"Watir" (发音与 water相近) 全写是 "Web Application Testing in Ruby"。
- 1、下载文档前请自行甄别文档内容的完整性,平台不提供额外的编辑、内容补充、找答案等附加服务。
- 2、"仅部分预览"的文档,不可在线预览部分如存在完整性等问题,可反馈申请退款(可完整预览的文档不适用该条件!)。
- 3、如文档侵犯您的权益,请联系客服反馈,我们会尽快为您处理(人工客服工作时间:9:00-18:30)。
Lab 1 –Creating the Galaxy
Introduction
In this lab, you will create the Galaxy and connect to it using the ArchestrA IDE. This Galaxy will be used during the class to develop the sample application.
Objectives
Upon completion of this lab, you will be able to:
Create a Galaxy
Connect to a Galaxy using the ArchestrA IDE
Create the Galaxy
In the following steps, you will create a Galaxy and connect to it.
1.Open the ArchestrA IDE(Start | All Programs | Wonderware | ArchestrA IDE).
The Connect To Galaxy dialog box appears with the local node name displayed in the GR node name drop-down list.In this image, TRAININGPC-ENG2is the local computer name.
2.Click the New Galaxy button to create a new Galaxy.
The New Galaxy dialog box appears.
3.In the Galaxy name field, enter TrainingGalaxy.
4.In the Galaxy type field, confirm Base_Application_Server.cab is selected.
5.Click Create.
The Create Galaxy dialog box appears and shows the Galaxy creation progress. This will take a few moments. Check to make sure that no error messages are displayed.
6.When the Create Galaxy progress displays 100% completed, click Close.
The newly created TrainingGalaxy now appears in the Galaxy name drop-down list.
7.Click Connect.
The Connect To Galaxy dialog box closes and, after a few seconds, the ArchestrA IDE opens.
You will use the ArchestrA IDE to develop the Galaxy throughout the remainder of this class.
-This page intentionally left blank -。
