升级说明书
软件升级的说明书

目录S870e软件升级说明书..............................错误!未定义书签。
目录. (1)第一章升级前软硬件准备 (2)1.1 软件准备工作 (2)1.1.1 升级工具软件 (2)1.1.2 升级数据线驱动程序 (2)第二章、驱动安装 (2)第三章升级步骤 (2)第四章升级完毕开机检验 (5)第一章升级前软硬件准备1.1 软件准备工作1.1.1 升级工具软件1.1.2 升级数据线驱动程序第二章、驱动安装本款手机用T卡升级,无需在电脑上安装驱动。
第三章升级步骤注意事项:1. 升级操作方法,分为自动升级和手动升级两种操作模式。
自动升级适用于待升级手机当前能够正常启动并进入设置菜单的场合;若无常启动并进入桌面的场合请使用手动升级(例如开机后停止在开机LOGO界面,进入系统后频繁提示进程错误)2. 由于升级过程开始时会首先进行恢复出厂设置的操作,请务必提前备份必要信息。
3. T 卡升级之前,请确认 T 卡已经插好,被手机识别。
4. 尽量选取1G以上的卡,小于1G的卡由于出厂时间久远,可能有兼容性的问题。
5. T 卡升级过程中,请确保电池电量充足。
为了保证电池不会松动脱落,请盖上盖板。
6. 固件版本升级包请勿解压,解压后无法使用!自动升级操作方法:(1)将固件版本升级包(.zip的压缩文件) 拷贝到Micro SD卡中。
(目录深度不限,但是建议目录深度不要过深,也尽量不要使用中文文件目录名,避免后续操作繁琐。
)(2)手机正常启动后,点击下方中央的主菜单键进入主菜单,并点击“设置”,(3)在“设置”菜单中,下翻到最底部,点击进入“关于手机”,(4)在“关于手机”界面中点击选择“系统更新”,(5)在弹出的升级类型选项框中选择“本地更新”,(6)选择“外部存储卡”,切换到文件管理器页面时,在列出的Micro SD卡中所有文件中点击固件版本升级包;(7)选择升级包后,系统会自动提示重启,点击“确定”后开始自动升级流程。
手机OTA升级操作指导说明书
手机OTA(增量包)本地包升级操作指导目录一确认手机系统版本 (2)二OTA升级操作手册 (3)(一)OTA升级(V0.6.5~V0.7.1)操作手册 (3)步骤一下载OTA升级包 (3)步骤二OTA升级(压缩包不需要解压) (3)步骤二升级成功后版本确认 (8)注意事项 (9)(二)OTA升级(V0.5.4~V0.6.5)操作手册 (10)步骤一下载OTA升级包 (10)步骤二OTA升级(压缩包不需要解压) (10)步骤二升级成功后版本确认 (15)一确认手机系统版本手机拨号键*#6776#下拉至最后查看OTA Version1.若版本号为PDEM10_11.D.01_001_202108022150,表示为最新版本,无需进行升级操作2.若版本号为PDEM10_11.D.01_001_202106121902,参考【OTA升级(V0.6.5~V0.7.1)操作手册】3.若版本号为PDEM10_11.D.01_001_202105101815,表示需要进行两次升级首先参考【OTA升级(V0.5.4~V0.6.5)操作手册】升级手机系统版本到PDEM10_11.D.01_001_202106121902再参考【OTA升级(V0.6.5~V0.7.1)操作手册】4.若版本号为PDEM30_11_A.01_001_202104081724,表示该版本不支持升级操作(如要升级请联系技术人员将手机寄回升级)二OTA升级操作手册(一)OTA升级(V0.6.5~V0.7.1)操作手册步骤一下载OTA升级包1.进入开发者网站V0.7.1版本,找到升级指导书下的OTA升级包链接下载注意:OTA升级包如上图(0.6.5-0.7.1ota.zip)仅支持V0.6.5升级到V0.7.1版本步骤二OTA升级(压缩包不需要解压)1.将OTA增量升级包使用adb push命令导入到手机根目录或新建一oplus_ota_local目录将OTA包导入到oplus_ota_local下:注意:1.OTA升级包不要解压直接将压缩包导入到手机;2.注意OTA包电脑端存放的路径不要有中文,否则容易导致导入的包不完整或出错;2.OTA包导入完成后,进入文件管理器中查看导入包的大小是否与电脑端一致,格式是否为zip格式,如下图:或3.手机连接电脑,执行adb命令:adb reboot recovery,手机进入recovery模式:4.选择语言后进入ColorOS恢复模式界面,选择安装升级文件:5.在安装升级文件界面点击从手机存储安装6.选择导入的OTA包,弹出确认弹框7.弹出确认弹框后,点击确定后进入升级过程:8.升级成功后弹出安装成功的提示弹框,点击重启,手机自动重启:步骤二升级成功后版本确认1.重启后,拨号键*#6776#确认手机系统版本是否升级成功若版本号为PDEM10_11.D.01_001_202108022150,则表示系统升级成功2.确认OppoXR版本是否升级成功手机-->设置-->应用管理-->应用列表-->OppoXR-->应用信息-->查看版本号若版本号为:版本OPPO_XR_202108021519,则表示OppoXR升级成功注意:OTA升级后若OppoXR版本不是OPPO_XR_202108021519,则OppoXR升级有问题。
HPE MSA存储系统升级指南说明书
HPE MSA STORAGE REASONS TO CALL GUIDECONTENTS1. Connect on a pain point (2)2. Motivate with what-if (2)3. Confirm the interest (2)4. Give the elevator pitch (2)5. Communicate the outcome (3)6. Qualify the opportunity (3)7. Ask for the meeting (3)Resources ......................................................................................................................................................................................................................................................................................................................................3Talking pointsCONFIDENTIAL | AUTHORIZED HPE PARTNER USE ONLY1. CONNECT ON A PAIN POINTa.Is your current HPE MSA (Gen3, 4, or 5) reaching or exceeding its intended service life, and is now time to upgrade?b.Is your existing HPE MSA (Gen3, 4, or 5) reaching its performance or capacity limitations?c.As an existing HPE MSA customer, do you want or need to take advantage of the new features of the HPE MSA Gen6 systems?d.Do you still have applications that are still utilizing direct-attached storage (DAS) but could be better utilized if they were usingshared storage serving multiple applications?e.Do you need to support the IT infrastructure at remote sites, branch offices, or departmental groups?f.Are you struggling with flat or declining IT budgets, yet need to provide more data services with less CAPEX?g.Do you have a growing or complex IT Infrastructure but do not have access to an in-house IT specialist?h.Do you need high-performance, easy-to-use shared storage, yet do not have a dedicated storage administrator?i.Are you happy with your current vendor support experience over the last 12 months?j.Are you getting the ideal data efficiency out of your storage? Do you wish you could store more data for less OPEX?2. MOTIVATE WITH WHAT-IFa.What if you could purchase a new HPE MSA Gen6 array with increased performance and improved data protection technology?b.What if you could purchase a hands-free storage array that any IT generalist could easily install, operate, repair, and upgrade?c.What if you can purchase a cost-effective, high performance (> 325K IOPS) hybrid storage array (SSDs + HDDs) starting atunder $12K?d.What if you could own a storage array that dynamically responds to changes in I/O in real time without intervention?e.What if your storage array provided improved data availability and could speed up rebuild times by more than 25X?f.What if you could eliminate idle/cold spares without risking availability?g.What if you could have access to a free health check tool that predicted failures before they happen, would check against bestpractices, and suggest simple-to-follow corrective actions?3. CONFIRM THE INTERESTWhat would be the impact to you and your business if you had a storage solution that could provide what we have discussed so far, and much more?4. GIVE THE ELEVATOR PITCHHewlett Packard Enterprise continues to invest in the HPE MSA storage platform. We are now on our 6th generation of HPE MSA storage systems. The HPE MSA storage family are flash-ready, hybrid storage systems designed to deliver hands-free, affordable application acceleration for small and remote office deployments. Don't let the low cost fool you. The HPE MSA gives you thecombination of simplicity, flexibility, and advanced features you may not expect in an entry-priced array. Start small and scale as needed with any combination of solid-state drives (SSDs), high-performance enterprise SAS HDDs, or lower-cost midline SAS HDDs. With the ability to deliver 325,000 IOPS, the new HPE MSA arrays are up to 45%1 faster than its prior generation with sizeable horsepower for even the most demanding workloads.5. COMMUNICATE THE OUTCOMEa.Built for speed: A new Gen6 RAID acceleration ASIC and controller architecture improve system performance by as much as 50% ascompared to HPE MSA Gen5. This improvement in IOPS and throughput help to lower system latencies enabling connected systems and users to experience better productivity.b.Automated performance tiering: Utilizing new HPE MSA Tiering v2.0 enhancements, hybrid storage configurations automaticallyrespond to I/O changes in real time to deliver up to 45% more workload application acceleration when compared HPE MSA Gen5.Automated Tiering v2.0 operates at the pool level, is always on, and is initiated by adding more than one drive type to the pool.c.Redefining RAID-based recovery for entry-level SAN storage: New HPE MSA DP+ data protection brings significant improvementsto traditional RAID technology including up to 25X faster rebuild performance2 (versus RAID 6), removal of idle drive spares, and configuration expansion at a more granular level (with as little as one drive per add).d.Intuitive user interface—no manuals needed: The HPE MSA Storage Management Utility (SMU v4) supports system configurationwith step-by-step guided workflows that help eliminate errors and dramatically improve the user experience.e.Simplified dashboard offers at-a-glance storage management: HPE MSA SMU v4 management enhancements allow user toquickly access important system information including alerts, capacity, performance, and activity.f.Avoid unplanned downtime with a few simple steps: The HPE MSA Health Check utility simplifies the tasks required toregularly check the health of your HPE MSA storage system. By simply uploading a log file from your HPE MSA array to thecloud-hosted HPE MSA Health Check utility, the application systematically checks for signs of noncompliance with multipleavailability-related best practices. Once completed, HPE MSA Health Check generates a report detailing your system’s healthand adherence to all best practices and known failure signatures. The report also provides detailed next-step guidance onsolving any issues.g.HPE ProLiant and HPE MSA—better together: The HPE MSA storage array has been designed for use with HPE ProLiant servers.With over 15 years of integrated selling, HPE MSA continues to serve as the entry-point for SAN storage supporting the entireportfolio of HPE ProLiant servers.6. QUALIFY THE OPPORTUNITYAssess the customer sense of urgency to solve the problem, if there’s budget planned, and when.a.Are you planning on a storage refresh in the next six months and are tired of disruptive upgrades?b.Are you due for a service renewal and may have to deal with escalating high support costs?c.Are you looking to streamline IT operations moving to an IT generalist model to support the stack?d.Are you deploying applications that have high requirements for performance/availability?7. ASK FOR THE MEETINGBased on our discussion today, I would like to set up another call with one of my storage experts to further discuss how HPE MSA Gen6 storage can address your IT infrastructure concerns.What date and time works best for you? Thanks, and have a great day.RESOURCES•HPE MSA Gen6 product page•HPE MSA Gen6 press release•HPE MSA Storage—Briefcase•Introducing HPE MSA Gen6 Storage: Hands-Free, High Performance, and Simpler than Ever•Introducing the HPE MSA Gen6 Storage Array | ChalkTalk•Competitive Analysis—HPE MSA Storage•Customer presentation with speaker notes—HPE MSA Gen6 Storage Arrays•FAQ—HPE MSA 1060 2060 2062 Storage•Solution brief—HPE MSA Gen6 Hybrid Storage•Technical Presentation—HPE MSA Gen6 Storage Arrays—Customer-facing•Technical Presentation—HPE MSA Gen6 Storage—Main Deck•HPE MSA 1060 Storage data sheet•HPE MSA 2060 Storage data sheet•HPE MSA 2062 Storage data sheet•SMB I.T. Solutions webpage© Copyright 2020 Hewlett Packard Enterprise Development LP. The information contained herein is subject to changewithout notice. The only warranties for Hewlett Packard Enterprise products and services are set forth in the express warrantystatements accompanying such products and services. Nothing herein should be construed as constituting an additional warranty.Hewlett Packard Enterprise shall not be liable for technical or editorial errors or omissions contained herein.。
浪潮英信服务器升级手册说明书

浪潮英信服务器升级手册文档版本发布日期尊敬的用户:版权所有浪潮电子信息产业股份有限公司。
未经事先书面同意,本文档的任何部分不得复制或以任何形式或任何方式修改、外传注:您购买的产品、服务或特性等应受浪潮集团商业合同和条款的约束。
本文档中描述的全部或部分产品、服务或特性可能不在您的购买或使用范围之内。
除非合同另有约定,浪潮集团对本文档内容不做任何明示或默示的声明或保证。
由于产品版本升级或其他原因,本文档内容会不定期进行更新。
除非另有约定,本文档仅作为使用指导,本文档中的所有陈述、信息和建议不构成任何明示或暗示的担保。
和“浪潮”是浪潮集团的注册商标。
是微软公司的注册商标。
、是公司的注册商标。
其他商标分别属于其相应的注册公司。
技术服务电话:地址:中国济南市浪潮路号浪潮电子信息产业股份有限公司邮编:变更记录增加因机型不同,界面及个别功能或有差异的说明新增款产品型号到表格产品型号列表目录概述文档用途目标读者适用范围升级前必读升级影响注意事项版本要求升级原理升级准备升级前检查获取升级包和文档检验软件包完整性升级固件升级概述通过升级更新过程步骤更新过程步骤更新过程步骤通过升级工具获取工具使用方法通过升级工具获取脚本升级工具升级术语缩略语概述文档用途描述了浪潮基板管理控制器()的升级流程和操作方法。
目标读者本手册主要适用于以下人员:●技术支持工程师●产品维护工程师●服务器管理用户建议由具备服务器知识的专业工程师参考本手册进行服务器运维操作。
适用范围本手册适用于以下产品:表格产品型号列表服务器浪潮英信服务器浪潮英信服务器浪潮英信服务器浪潮英信服务器浪潮英信服务器浪潮英信服务器浪潮英信服务器浪潮英信服务器浪潮英信服务器浪潮英信服务器浪潮英信服务器浪潮英信服务器浪潮英信服务器浪潮英信服务器服务器浪潮英信服务器浪潮英信服务器浪潮英信服务器因机型不同,界面及个别功能或有差异,请以实际使用机型展示效果为准。
升级前必读升级影响从低版本升级到高版本,工程师需认真阅读本章,了解升级可能对现有系统造成的影响。
说明书的产品升级

说明书的产品升级产品升级说明书尊敬的客户:感谢您一直以来对我们产品的支持与关注!为了提供更好的产品体验,我们决定对该产品进行升级。
本说明书将详细介绍产品升级的内容和使用方法,请仔细阅读,以确保您能够正确使用和维护我们的产品。
一、产品升级内容本次产品升级主要包括以下几个方面的改进:1. 功能增强:通过软件升级,我们针对产品功能进行了进一步优化和增强,提升了产品的性能和稳定性。
新增的功能将为您提供更多的选择和操作便利。
2. 安全性提升:我们对产品的安全性进行了全面升级,加强了数据加密和防护措施,以应对潜在的安全风险。
您可以放心使用我们的产品,确保您的数据安全。
3. 用户界面改进:根据用户的反馈和需求,我们对产品的用户界面进行了改进和优化,使其更加直观、友好,并提供更多的个性化设置选项,以满足用户的不同需求。
二、产品升级方法1. 软件升级:请您登录我们的官方网站或下载我们的应用程序,并按照指引进行软件升级。
在升级过程中,请确保您的设备与互联网连接稳定,以免出现意外中断引发的问题。
2. 数据备份:在进行产品升级之前,请务必备份您的重要数据,以防数据丢失或不兼容。
我们建议您将数据保存至外部存储设备或云存储中,以确保数据的安全性和完整性。
3. 升级指引:在升级过程中,请仔细阅读软件提供的升级指引,并按照步骤进行操作。
如有任何疑问或困惑,您可以查阅我们提供的技术支持文档或联系我们的客服团队寻求帮助。
三、注意事项1. 产品保修:产品升级不会影响您的产品保修期限和保修范围。
我们仍将为您提供高质量的售后服务和技术支持。
2. 兼容性说明:产品升级后,可能会影响与旧版本设备或软件的兼容性。
为了获得更好的使用体验,我们建议您尽快进行产品升级,并确保您的其他设备和软件也是最新版本。
四、联系我们如您在产品升级的过程中遇到任何问题或疑问,或者需要更多的帮助和支持,请随时联系我们的客服团队。
我们将竭诚为您提供满意的解答和服务。
再次感谢您对我们产品的支持!我们会不断努力提供更好的产品和服务,为您带来更愉快的使用体验。
汽车软件升级通用技术要求说明书
`ICS 43.020CCS T40中华人民共和国国家标准GB XXXXX—20XX汽车软件升级通用技术要求General technical requirements for software update of vehicles(点击此处添加与国际标准一致性程度的标识)(征求意见稿)在提交反馈意见时,请将您知道的相关专利连同支持性文件一并附上。
20XX -XX -XX 发布20XX -XX -XX实施目次前言 (II)1范围 (1)2规范性引用文件 (1)3术语和定义 (1)4软件升级管理体系要求 (2)5车辆要求 (3)6试验方法 (4)7车辆型式的变更和扩展 (5)8说明书 (6)9标准实施 (6)前言本文件按照GB/T1.1—2020《标准化工作导则第1部分:标准化文件的结构和起草规则》的规定起草。
本文件由中华人民共和国工业和信息化部提出并归口。
汽车软件升级通用技术要求1范围本文件规定了汽车软件升级的管理体系要求、车辆要求、试验方法、车辆型式的变更和扩展、说明书。
本文件适用于M类、N类汽车,其他车辆类型可参照执行。
2规范性引用文件本文件没有规范性引用文件。
3术语和定义下列术语和定义适用于本文件。
3.1软件software电子控制系统中由数字数据和指令组成的部分。
3.2软件升级software update将某版本的软件更新到新版本或更改配置参数的过程。
注:“软件升级”也称“软件更新”。
3.3软件识别码software identification number;SWIN由车辆制造商定义,用于表示与准入或认证相关系统中软件信息的专用标识符。
3.4软件升级管理体系software update management system;SUMS为完成软件升级而制定的一种规范组织的过程和程序的系统方法。
3.5在线升级over-the-air update通过无线方式而不是使用电缆或其他本地连接进行数据传输的软件升级。
锐捷意图网络指挥官 RG-INC-PRO 软件升级手册说明书
RG-INC锐捷意图网络指挥官软件升级手册文档版本V1.0归档日期2022-07-02copyright © 2022 锐捷网络版权声明copyright © 2022 锐捷网络保留对本文档及本声明的一切权利。
未得到锐捷网络的书面许可,任何单位和个人不得以任何方式或形式对本文档的部分或全部内容进行复制、摘录、备份、修改、传播、翻译成其他语言、将其部分或全部用于商业用途。
、和其他锐捷网络商标均为锐捷网络的商标。
本文档提及的其他所有商标或注册商标,由各自的所有人拥有。
免责声明您所购买的产品、服务或特性等应受商业合同和条款的约束,本文档中描述的部分或全部产品、服务或特性可能不在您的购买或使用范围之内。
除非合同另有约定,锐捷网络对本文档内容不做任何明示或默示的声明或保证。
由于产品版本升级或其他原因,本文档内容会不定期进行更新。
锐捷网络保留在没有任何通知或者提示的情况下对文档内容进行修改的权利。
本手册仅作为使用指导。
锐捷网络在编写本手册时已尽力保证其内容准确可靠,但并不确保手册内容完全没有错误或遗漏,本手册中的所有信息也不构成任何明示或暗示的担保。
前言读者对象本手册适合下列人员阅读●网络工程师●技术推广人员●网络管理员技术支持●锐捷网络官方网站:●锐捷网络官方网站服务与支持版块:/fw/●锐捷网络7*24h智能客服闪电兔:●锐捷网络7*24h技术服务热线:4008-111-000●锐捷网络售后服务工具——小锐云服:/special/fw/tool/xryf/●锐捷网络技术支持与反馈信箱:*********************.cn●锐捷网络文档支持与反馈信箱:**************.cn小锐云服APP 锐捷服务公众号本书约定1. 图形界面格式约定2. 各类标志本书还采用各种醒目标志来表示在操作过程中应该特别注意的地方,这些标志的意义如下:警告表示用户必须严格遵守的规则。
如果忽视此类信息,可能导致数据丢失或设备损坏。
网络安全设备升级配置说明书
网络安全设备升级配置说明书一、概述网络安全设备升级配置说明书旨在提供对网络安全设备升级的详细配置指导,以确保网络安全设备的稳定性和安全性。
本文将介绍升级配置的准备工作、操作步骤和注意事项,以便管理员能够按照指导顺利完成升级配置过程。
二、升级配置准备工作在进行网络安全设备升级配置之前,需要进行以下准备工作:1. 确定升级设备和版本:根据实际需求,选择需要升级的网络安全设备,并确定准备升级的版本。
2. 下载升级文件:从官方网站或授权渠道下载升级文件,并验证文件的完整性和真实性。
3. 备份配置文件:在进行升级配置之前,务必备份当前的设备配置文件,以防升级过程中的配置丢失或错误。
4. 网络连接准备:确保网络连接的稳定性和可靠性,保证在升级过程中不会出现网络中断等影响。
5. 设备电源和供电管理:为保证升级过程不中断,确保设备有稳定的电源供应,并合理管理设备的供电状态。
三、升级配置操作步骤以下是网络安全设备升级配置的详细操作步骤:1. 登录设备管理界面:使用管理员账户和密码登录网络安全设备的管理界面。
2. 导入升级文件:在管理界面中找到升级选项,选择导入之前下载好的升级文件,并进行文件验证。
3. 配置升级策略:根据实际需求,配置升级策略,包括升级时间、升级方式和升级范围等。
4. 开始升级:确认配置无误后,点击开始升级按钮,开始进行网络安全设备的升级操作。
5. 监控升级过程:在升级过程中,及时监控升级状态和进度,确保升级过程的顺利进行。
6. 验证升级结果:升级完成后,验证设备的升级结果,包括设备版本、功能是否正常等。
四、升级配置注意事项在进行网络安全设备的升级配置过程中,需要注意以下事项:1. 工作时间选择:最好在非高峰期进行设备升级,以避免影响正常业务的进行。
2. 多次备份:尽量多次备份设备配置文件,以确保在升级配置过程中不会因意外而导致配置的丢失。
3. 阅读升级文档:在进行设备升级之前,仔细阅读升级文档,了解升级过程中的特殊要求和操作步骤。
固件升级说明说明书
固件升级说明
准备:
•确保您的设备已充电 75% 以上。
•确保您的电脑已接入互联网。
•一张空 SD 卡
升级程序
1. 将固件下载到电脑
单击屏幕顶部的下载图标以将最新固件软件包下载到您的电脑上。
2. 将文件从电脑传输到设备
I.在电脑上,解压缩下载的 .zip 固件文件。
II.将解压缩文件从电脑复制并粘贴到 SD 卡的根目录。
III.关闭平板电脑并将 SD 卡插入平板电脑的 SD 卡插槽。
3. 升级固件
I.按住电源按钮,直到出现 Android 机器人图标。
II.固件升级进程自动开始。
升级进程由进度栏显示。
III.升级完成时,平板电脑将自动重启。
4. 确认成功升级
在设备的主屏幕上,请转到 [Settings](设置)> [About tablet](关于平板电脑)。
检查软件版本号
注意:
在升级过程中,请勿触摸屏幕或按任何按钮.
在升级过程中,请不要断开设备电源.。
iVMS-4200设备在线升级用户说明书

iVMS-4200 Device Online UpgradingUser InstructionMar, 2018COPYRIGHT © 2017 Hangzhou Hikvision Digital Technology Co., Ltd.ALL RIGHTS RESERVED.Any and all information, including, among others, wordings, pictures, graphs are the properties of Hangzhou Hikvision Digital Technology Co., Ltd. or its subsidiaries (hereinafter referred to as “Hikvision”). This user manual (hereinafter referred to be “the Manual”) cannot be reproduced, changed, translated, or distributed, partially or wholly, by any means, without the prior written permission of Hikvision. Unless otherwise stipulated, Hikvision does not make any warranties, guarantees or representations, express or implied, regarding the Manual.About This documentThis document provides instructions for device online upgrading, and provides information on how to securely configure and use the device.Contents1Summary (1)2Operation Procedure (1)3Security Suggestion (2)4Security Commitment (3)1SummaryIn order to assure the security of your devices in utmost and meet the best practices of information security requirement, we recommend that administrators should try to upgrade the device's firmware to the latest version. To facilitate the administrator to do so, we have added device online upgrading function into the surveillance client software iVMS-4200 V2.7.0.6. The Client will connect to upgrade server and detect the available firmware package automatically when connecting to the external network. Once matched, the upgrade package will be downloaded to the PC, and prompt the user to upgrade.2Operation Procedurea)Install and Run IVMS-4200 v2.7.0.6. The Client is available from Hikvisionofficial website, please click Here.b)Add the device to the Client in Device Management module, and the deviceinitial state is “Not Upgradeable”.c)The Client detects the available firmware package automatically. If there is anavailable package on upgrading server, the client will download it to PC, and then prompt the user to upgrade. Meanwhile, the user can check the current firmware version and the latest version of the device.d)Choose the device prepared to be upgraded, and click “upgrade” to start.e)The progress bar of the firmware upgrade allows you to view the real-timeupdate progress. The upgrading status will initially be”waiting”, and thenshows the real-time percentage by progress bar. Once finished, the statuswill turn to be “upgraded”.3Security SuggestionSecurity management is an important element in product security. In order to achieve information security, we should not only conduct necessary security design to ensure the product security, but also pay high attention to security management. Therefore, the following security recommendations are made to maintain device security:a) It is recommended that you do not disable the automatic upgrade function.You are advised to check whether there is new upgrade package or not. Ifthere is a new upgrade package, upgrade it immediately to keep the latestversion of the firmware of the device, so as to get the latest securitypatches.b) It is recommended to set a strong password for the device to avoid thedevice being in a high-risk state due to the weak password.c) It is recommended to make necessary security protection on the networkedge of the video surveillance system, such as deploying a firewall.4Security CommitmentHikvision is committed to using leading privacy and security technologies to help customers protect their personal information and to adopt a holistic approach to protect users' data.Hikvision applies a unified integrated security infrastructure throughout the video IOT application ecosystem, and has a professional security team providing supports for all Hikvision products. They provide security audits and tests for developing and publishing products, and also provide security training and proactively monitors reports of new security issues and threats.。
大众进口汽车地图升级说明书

一.前期准备:1.准备一张空的U盘,TYPE-C接口(容量32G及以上,需要先格式化),请参考图0。
图02.在U盘根目录下,创建一个空文件夹并重命名为BDB。
3.登录大众进口汽车官方网站下载新版本地图数据(根据需要可下载全国数据或区域数据)。
4.将下载的地图数据包拷贝至U盘BDB文件夹下(注意:不要修改下载的文件名),请参考图1。
图1二.操作流程:注意:在地图数据更新过程中,请务必保持系统开启状态,并且不要移除U盘。
1.将上述U盘连接到车机上。
2.主屏幕会将弹出一个对话框:“发现新版本地图。
是否现在查看?”,请参考图2。
a.如果点击“是”,直接进入地图更新页面,直接参考步骤7。
b.如果点击“否”,后续再升级,可以重新插拔U盘,或者按照下述操作流程。
图23.在车机的主界面,点击“导航”图标,启动导航软件,进入导航主界面,请参考图3。
4.在导航主界面,点击右侧“i”图标,请参考图4。
5.点击右下方的“导航设置”图标,请参考图5。
6.在导航设置页面,点击“地图更新”,请参考图6。
7.在地图更新页面,选择想要升级的省或市,请参考图7。
图78.点击页面“↓”下载,将会开始升级地图数据。
a.如果选择单个城市更新,请参考图8,单城市升级处理如下步骤9。
图89.单个城市升级结束之后,将弹出一个对话框,请参考图9。
●如果点击“立即”,导航软件将自动重新启动,在完成重新启动后,地图数据将被更新到最新的版本,请参考图10。
●如果点击“稍后”,在下一次车机启动之后,地图数据将被升级到最新版本。
图9b.如果选择多个城市更新,请参考图11,多城市升级处理如下步骤10。
10.点击“立即”,请参考图12。
图12。
银河麒麟桌面操作系统 v10 sp1-0521 升级补丁说明说明书
银河麒麟桌面操作系统V10SP1-0521升级补丁说明麒麟软件有限公司2021年10月新增特性及改进【授权激活】●修复离线激活时服务序列号和激活码无效的问题;●修复激活提示弹窗异常的问题;●修复设置特定字体大小,激活到期后关于界面内容显示不全的问题;●修复特定用户名无法打开授权弹窗的问题;【启动关机】●优化开机自动登录交互流程;●修复休眠唤醒后异常提示的问题;●修复开机过程中logo图标下方显示乱码的问题;●修复部分场景系统无法重启的问题;●修复系统进入睡眠状态后无法使用电源键唤醒的问题;●修复笔记本合盖开启后鼠键卡死的问题;●修复关机界面卡死无法关机的问题;【开始菜单】●新增支持键盘操作;●修复点击首个应用无响应的问题;●修复搜索“音乐”拼音错误的问题;●修复特定分辨率缩放时开始菜单位置异常的问题;【桌面环境】●修复其他位置复制文件到桌面时图标重叠的问题;【天气】●优化标题和搜索框间距;●修复“帮助”与用户手册未正确关联的问题;●修复搜索框输入空格自动关联上次搜索结果的问题;●修复链接邮箱地址响应异常的问题;●修复不同天气状态图标重复的问题;【电源】●修复插拔电源放电状态切换慢的问题;●修复休眠后电源唤醒异常的问题;【截图】●新增快捷键唤醒功能;●新增自动识别窗口框功能;●修复系统字体最大时截图选项界面显示遮挡的问题;【看图】●优化自适应窗口功能;●修复重复打开图片时,文件管理器不能置顶问题;●修复载入时闪退的问题;【影音】●优化视频播放流畅度;●优化笔记本字体显示;●修复音频调节提示没有汉化的问题;●修复视频播放结束时预览画面仍显示的问题;●修复进度条跳转异常的问题;●修复视频名称乱码的问题;【音乐】●新增“播放全部”功能;●优化界面显示;【扫描】●优化侧标栏剪裁功能;●修复一键美化失败的问题;●修复智能纠偏失败的问题;●修复文字识别失败的问题;●修复图片名称/格式修改后未生效的问题;●修复分辨率设置为600应用程序卡死的问题;【摄像头】●修复摄像头使用过程中切换用户,应用闪退的问题;●修复切换分辨率画面黑屏的问题;●修复切换分辨率后录制无声音的问题;●修复清华同方TL630台式机录制完成时应用闪退的问题;●修复龙芯架构笔记本使用摄像头显示未识别设备的问题;●修复默认保存路径错误的问题;【录音】●修复中文环境插入录音设备时提示未汉化的问题;【计算器】●修复输入一位数显示两位的问题;【录音】●优化录音时长的准确性;●修复删除录音存储文件后,录音应用文件列表未同步的问题;【文本编辑器】●优化汉化问题;【安装管理器】●修复中文环境卸载软件显示英文字符的问题;【蓝牙】●修复连接失败无提示的问题;●修复系统睡眠、注销、重启系统后提示蓝牙适配器缺失的问题;●修复特定场景窗口显示的文件名和文件大小异常的问题;【邮件客户端】●优化界面显示;●修复显示/隐藏代办事项单击无响应问题;●修复鼠标悬浮发送按钮时,邮件编辑窗口抖动的问题;●修复夜间模式显示问题;●修复部分窗口标题栏未汉化的问题;●修复账号删除后仍提示无法连接至账户问题;【侧边栏】●修复部分应用无通知图标的问题;●修复插拔鼠标时侧边栏会弹出消息的问题;●修复更新失败消息重复提示的问题;【文件管理器】●优化2K分辨率默认窗口缩放比例;●优化左侧导航布局,将“移动应用”和“共享数据”位置放在“收藏夹”下;●优化U盘弹出后,设备名称依然显示问题;●修复通过网站下载文档,会保存双份的问题;●修复格式化U盘提示界面未汉化的问题;●修复系统缩放比例为125%时通过看图打开文件管理器闪退的问题;●修复通过计算机图标进入文件管理器,点击后退时窗口闪退的问题;●修复U盘弹出异常的问题;●修复从手机存储复制2G以上文件到系统时进度条未变化的问题;●修复光盘图标在侧边栏和本地分区显示不一致问题;【搜索】●修复创建索引后搜索结果异常的问题;●修复偶现搜索不到桌面文件夹中文件的问题;●修复搜索未安装安卓应用无法自动调转软件商店下载的问题;【文件保护箱】●优化所有弹窗,并优化界面中中英文错误提示文案;●新增全局密钥重置所有保护箱密码功能;●优化重命名、修改密码等操作耗时长问题;●新增保护箱锁定时目录下文件占用情况提示和强制锁定操作;●修复最大字体下英文显示不全问题;●优化保护箱目录完整性保护问题;【安全中心】●首页展示各子模块功能状态●安全体检功能优化,全面扫描系统安全状态;●新增应用程序来源检查功能;●新增系统启动默认开启安全模式;●密码强度策略优化,改为推荐和自定义两种●应用程序防护配置易用性提升●修复病毒防护界面空白的问题;●修复安全体检过程中点击其他页面会中断体检的问题●修复防火墙关闭再打开后网络显示异常的问题;●修复病毒防护界面异常弹出的问题;●修复系统字体为16号时,页面显示异常问题;●修复系统语言为英语时,部分界面提示未英化的问题;【生物特征管理工具】●修复无法通过外接指纹设备登录系统的问题;●修复手动按下Q/Esc回到密码认证模式,认证失败重试时仍是指纹认证的问题;●新增人脸识别功能实现系统登录、解除锁屏;【系统设置】●修复能够搜索到不存在的设置项的问题;●修复输入法设置窗口被覆盖后,再次点击输入法设置窗口不置顶的问题;●修复打开插入鼠标时禁用触摸板,鼠标拔出时触摸板不能正常使用的问题;●修复无法正常切换系统语言的问题;●修复触摸屏菜单右边距过窄的问题;●优化二级目录间距;【网络连接】●修复终端能看到网卡,但是连接网络时提示“没有插入网卡”连接网络失败的问题;●修复连接双网卡“设置”中显示不全的问题;●修复输入WiFi密码时明文显示密码功能异常的问题;●修复英文环境下“加入网络”按钮名称显示不全的问题;●修复输入密码错误再次输入连接无反应的问题;●修复WiFi显示强度为0的问题;●修复WiFi连接前后强度显示不同的问题;●修复断开网络连接设置中,网络状态显示不正确的问题;●修复关闭飞行模式WiFi没有自动搜索的问题;●修复部分密码策略设置无效的问题;●修复特定型号台式机进入重启或注销进入系统提示没有无线网卡的问题;●新增有线网络开关;●新增WiFi忘记功能;【显示】●修复双屏模式显示异常的问题;●修复VGA线识别异常的问题;●修复打开设置-系统-显示器闪退的问题;●修复设置统一输出后,点击“应用”时闪退的问题;●修复亮度和色温调节不生效的问题;●修复热插拔后模式改变屏幕显示异常的问题;●修复接入双屏后无法切换主屏的问题;●修复部分情况统一输出模式不生效的问题;●修复VGA+HDMI4K双屏场景下,系统缩放比例过大导致VGA信号画面显示不全问题;●修复双屏时无法关闭主屏的问题;●修复特定缩放背景图片字体模糊的问题;●修复开机一段时间后再接入的显示器黑屏问题;●修复特定场景下主副屏异常切换的问题;●新增2K及以上分辨率设备可切换125%、150%、175%、200%缩放比例;【键盘鼠标】●修复大小写提示图标和键盘大小写状态相反的问题;●修复开机登录系统后鼠标偶现移动卡顿的问题;●修复显示弹窗大小的调节框不显示的问题;【更新】●修复点击更新设置面板卡死的问题;●修复特定场景更新界面自动计算系统空间异常的问题;●优化深色模式界面;【账户】●修复更改用户名时可改为已存在的用户名的问题;●修复国密算法对新建用户不生效的问题;【云账户】●修复云账户自动同步失败的问题;●修复云账户同步过程异常弹出登录界面的问题;●修复同步后图标异常的问题;●修复了登录云账户后注销系统,云账户显示未连接的问题;【无线投屏】●新增无线投屏功能;●修复插拔无线网卡后打开投屏手机无法搜索到设备的问题;●修复无线投屏重启后无线网络无法使用的问题;●修复打开投屏开关后关闭控制面板再次打开投屏开关仍为关闭状态的问题;●修复多媒体协商成功后无法在窗口界面操作关闭的问题;●修复特定场景接收端无提示及窗口弹出的问题;●修复设置-设备中概率性弹出“投屏无法使用”的问题;●修复接收端投屏成功后无法打开播放器显示发送端界面的问题;●修复移动设备投屏时电脑端不弹出PIN码验证的问题;【时间和日期】●优化时区弹窗圆角显示;●修复修改日期格式部分日期格式未与设置更改同步的问题;●修复修改时间日期服务器地址后,输入错误密码提示未汉化的问题;●修复日历跳转具体日期显示失败的问题;●修复不同用户时间设置不一致的问题;●新增支持多时区时间显示;●新增NTP服务器的设置入口;●新增日历界面日期格式与设置同步;【系统升级】●修复特定情况更新历史不显示更新失败记录的问题;●修复更新失败原因显示错误的问题;●修复控制面板连续多次点击检查更新按钮提示异常的问题;●新增按需更新机制;【任务栏】●修复系统缩放比例为175%时,声音网络等图标点击无反应的问题;●修复点击任务栏网络图标后输入法闪烁的问题;●修复清除按钮无效的问题;●修复首次切到新用户后系统激活通知显示不全的问题;●修复任务栏点击飞行模式图标无改变的问题;●优化任务栏关于麒麟与设置关于信息,合并内容显示一致;【系统监视器】●新增用户最近一次修改窗口尺寸的记忆保存功能;【日志查看器】●日志管理工具改名为日志查看器●UI改版,提升交互体验●增加对日志的详细解析●修复了日志加载时间慢的问题●规避了内存溢出的风险●增加右键刷新、复制功能●日志级别直观展示●新增崩溃日志查看●系统日志、启动日志、登录日志、应用日志的细分日志合并查看;【用户手册】●修复部分图标及详情页展示图缺失的问题;●优化更新部分应用介绍;●修复部分名称描述及图标与应用不匹配的问题;●修复备份还原详情页切换菜单目录显示异常的问题;●修复备份还原详情页中文模式下配图错误的问题;【服务与支持】●修复在线客服窗口无法发送常用格式文件的问题;●修复留言咨询窗口邮箱提交失败的问题;【软件商店】●修复在移动应用软件详情界面登录账号时软件商店闪退的问题;●修复麒麟语音助手无法通过软件商店打开的问题;●修复部分新增应用无法评分评论的问题;●修复深色模式下移动应用界面加载动画显示错误的问题;●修复磁盘空间不足时卸载应用导致软件商店闪退的问题;●修复切换主题后部分应用图标与主题不匹配的问题;●修复应用详情页多次评论后弹出的提示信息在登出用户后仍提示的问题;●修复验证码错误/过期提示信息不匹配的问题;●修复点击下载失败的错误码不能链接到用户手册中对应错误码解释的问题;●修复搜索未安装的安卓应用搜索失败的问题;【KMRE-移动应用运行环境】●修复特定字体安装器文本显示不全的问题;●新增支持ARM64架构;●修复初始化安卓环境窗口未适配圆角的问题;●修复KMRE安装时“安装中”文本显示异常的问题;●修复部分应用更新导致系统卡死的问题;●修复“喜马拉雅”观看直播闪退的问题;●修复“腾讯会议”更新后启动慢/闪退的问题;●修复“蜻蜓FM”后台播放无效的问题;●修复“百度贴吧”点击返回不能返回至桌面的问题;●修复“百度贴吧”操作响应时间长的问题;●修复“美团”界面提示信息不全、点击无反应的问题;●修复“手机天猫”搜索框抖动的问题;●修复“喜马拉雅”登录时短信验证码输错后无法删除的问题;●修复“驾校一点通”部分页面加载异常的问题;●修复“驾校一点通”页面滑动、跳转异常的问题;●修复部分应用中无法使用中文输入法的问题;●修复搜索框不能连续输入数字或字母的问题;●修复“微信”朋友圈界面内滑动鼠标部分内容显示异常的问题;●修复“斗鱼极速版”播放直播黑屏的问题;●修复“网上国网”找回密码功能异常的问题;●修复“QQ极速版”拍照时无法预览摄像头拍摄画面的问题;●修复企业微信视频通话切换摄像头变成镜像模式的问题;【终端】●修复特定情况下终端窗口拉伸后无法还原的问题;●修复使用终端命令无法打开备份还原工具的问题;●修复终端背景颜色设置后未生效的问题;【备份还原】●修复备份系统到格式化U盘失败的问题;●修复备份系统到U盘报错的问题;●修复使用U盘备份的数据无法还原的问题;●修复不能对管道文件进行备份的问题;●修复新建系统备份至本地路径出现异常的问题;●修复清理备份还原分区空间后备份还原异常的问题;●修复还原失败的窗口无关闭按钮的问题;●修复还原成功后操作日志不记录还原操作的问题;●修复特定情况下创建备份失败的问题;●修复grub界面备份时桌面麒麟备份还原工具无备份点的问题;●优化系统还原界面排版;【刻录】●修复删除刻录文件时麒麟刻录闪退的问题;●修复镜像文件刻录失败的问题;●修复刻录应用概率性卡死的问题;●修复特定情况下刻录应用打开后提示语未汉化的问题;●修复取消镜像刻录光盘无法弹出的问题;●优化刻录左侧标题栏界面;●修复更改系统字体大小时,麒麟刻录界面字体变化不统一的问题;●修复界面弹出位置不固定的问题;●修复刻录设置界面显示不全的问题;●修复刻录速度更改确认后无效仍显示为自动的问题;【归档管理器】●修复解压zip格式文件异常的问题;●优化系统深色模式下文件格式的下拉框样式;●修复打开加密分卷压缩文件异常的问题;【闹钟】●修复倒计时最后一秒时长不准确的问题;【工具箱】●修复电脑清理扫描界面与清理完成页面的缓存统计精度不一致的问题;【远程桌面】●修复创建一个新的连接后点击连接导致应用关闭的问题;【便签贴】●修复切换主题为夜间模式后文字颜色属性未同步更新的问题;【Gimp图像处理器】●优化下拉框显示;【火狐浏览器】●修复特定字体大小时界面显示问题;【奇安信浏览器】●修复使用时无法快捷键切换输入法的问题;内核升级和修复【内核改进】●新增Radeon Vega支持;●新增USB Type-C支持;●新增英特尔Cannonlake支持;●新增支持Wi-Fi6(802.11ax);●新增支持AMDGPU FreeSync;●新增AMD Navi GPU;●新增USB3.1SuperSpeedPlus(10Gbps)支持;●新增虚拟映射堆栈,以实现更安全可靠的堆栈处理;●新增new copy_file_range(2)系统调用支持,加速Copy offloading●新增OrangeFS文件系统支持;●新增cgroup namespaces支持;●新增"schedutil"frequency governor支持;●新增用于低功耗设备的Adiantum文件系统加密功能;●新增UDP GRO(generic receive offload)和MSG_ZEROCOPY支持;●新增在cgroupv2中支持cpuset资源控制器;●新增io_uring的高性能异步I/O支持;●新增pidfd功能支持:PID重用的安全信号传递●新增支持使用持久内存(persistent memory)作为RAM功能;●新增cgroups v2添加冷冻控制器(freezer controller)功能;●新增支持添加设备映射器灰尘目标(dust target);●新增数百万个新的IPv4地址;●新增内核锁定模式;●新增AMD Radeon Picasso+Raven2支持,使能Vega20;●优化异步I/O;●优化Ext4支持更大的扩展属性值;●优化安全策略:更严格的检查hardened usercopy的内存拷贝;●优化VMAP虚拟栈,提供更安全的保护;●优化ext4功能:支持更大数目目录;●优化PSI(pressure stall information),可更好地观察系统负载●优化TCP:支持切换到Early Departure Time模型;●优化fanotify以获得更好的文件系统监控;●优化Btrfs中可配置的Zstd压缩级别;●优化压力失速信息(Presure Stall Information)以更好地监控资源;●优化ext4中不区分大小写的名称的可选支持;●优化virtio-fs,更好的实现与虚拟化用户共享文件系统;●优化fs-verity,可用于检测文件修改;●优化blk-iocost,以进行更准确的cgroup I/O控制;●修复cifs/samba协议smb2_copychunk_range函数内存泄露问题;●修复rtl8822ce驱动wifi热点问题;●修复关闭受保护进程后,再打开其他程序,kill该程序时报不允许的操作的问题;●修复新建带密码的保护箱后,生成的.box_ecrypt.conf可被修改,可被替换的问题;●修复文件保护箱的目录可以删除的问题;●修复新四核设备由于固件错误配置多次GPIO注册而导致系统卡住的问题;●修复FT1500a输入reboot命令或点击重启按钮无法完成虚拟机系统重启的问题;●修复鲲鹏920上ahci设备将不可移动磁盘标记为可以用磁盘的问题;●修复系统启动关机时fbcon上的光标问题;●修复安全中心应用控制-内核模块警告测试-不弹授权框的问题;●修复安全中心将系统自带应用加入或删除进程防杀死列表,均不对当前已生成的进程生效的问题;●修复安全中心应用联网控制修改应用联网策略后,需要关闭该应用所有已打开的进程后再启动才生效的问题;●修复内核与核外同步服务,会频发发送/lib/systemd/systemd-journald进程相关的消息给核外,kysec状态为unknown的问题;●修复飞腾FT-2000/4和D2000平台i2c控制器实际输出频率与配置的不一致的问题;●修复L71-3a5000调整屏幕亮度没有生效的问题;●修复L71-3a5000笔记本合上盖子系统卡死的问题;●修复龙芯5000集显HDMI端口获取EDID失败的问题;●修复通过解释器执行脚本时,无法正确识别脚本的问题;●修复安全中心-网络保护-应用程序联网配置中软件商店和远程桌面客户端无法生效的问题;●修复检查文件执行权限时两次计算的文件hash值不匹配的问题;●修复清华同方超翔TL630机器做休眠操作和睡眠后,无法正常进入系统的问题;●修复龙芯平台,安全切换至strict模式之后,显示黑屏的问题;●修复realtek驱动崩溃问题,导致r8169网卡无法正常链接网络;●修复fuse文件系统下,潜在的死锁问题●修复由于安全阻止而导致docker无法正确执行的问题●修改对trusted filesystem的判断方法,直接通过超级块的安全数据来判断;●修复在龙芯机器上,偶发出现因为频繁添加防火墙阻止信息到notify列表中时导致死锁的问题;●修复龙芯3a4000芯片上,运行虚拟机无法启动的问题;●修复mips笔记本s3s4黑屏无法恢复的问题;●修复arm64平台无法识别SUNIX并口卡的问题;●修复由于docker无法正常运行导致kmre运行央视影音等应用的问题;●修复部分无线网卡,出现WiFi连接失败的问题;●修复在进行S1循环测试时,打开initcall_debug=1导致系统崩溃的问题;●修复启动elasticsearch空指针错误的问题;●修复dpkg安装包时,没有根据只读文件列表给文件打标记的问题;●修复本地网络应用不能连接本地网络的bug,比如ssh不能使用本地ip来连接等问题;●修复D2000/FT-2004设备在LTP大压力情况下,系统hung住的问题;●修复FT-2004GPIO中断问题,满足TPM驱动需求;●修复BIV版本内核在D2000上使用GT1010显卡无法显示的问题;●修复海光曙光D2000F300-G40机器安装成功后efi-rtc卡住的问题;●修复青松主板识别驱动在BIOS未定义设备时,加载驱动导致系统死机的问题;●修复海华wifi驱动rtl8822ce热点问题;●修复海华wifi驱动在LTP大压力情况下测试出现系统崩溃的问题;●修复Realtek网卡PHY驱动获取错误的网卡状态导致网络无法链接的问题;●修复用source命令执行标记为unknown的shell脚本在授权禁止之后不再弹窗的问题;●修复开启KYSEC情况下unixbench跑分,系统死机的问题;●修复kysec给kern.log、syslog、kysec.log文件设置只读标记,重启系统后,文件被篡改的问题;●修复联想新4核台式机i210光纤网卡做s3/s4网络不通的问题;●修复宝德Phytium,D2000/8跑S3脚本过程中出现低概率性磁盘丢失的问题;●修复qemu虚拟机环境下传递的声卡设备是ich6时声卡驱动无法加载的问题;●修复S3唤醒后机器在登录界面出现死机问题;●修复长城嘉翔一体机S3唤醒过程中出现了花屏现象;●修复使用龙心集显,且vbios version为0.1时,显示接口类型均为unknown的问题;●修复运行安卓兼容应用时,发生的空指针解引用及fput失败的问题;●修复在kysec不启用时,通过kysec_is_disabled函数判断存在错误的问题;●修复应用联网控制不能对脚本进行联网控制;●修复脚本在通过./执行时,不能被进程保护功能保护的问题;●修复加密保护箱的隐藏目录.data能被重命名成其他名字,导致加密保护箱被破坏的问题;●修复某些情况下,kysec获取系统环境变量为空而导致内核崩溃的问题;。
蓝牙模块固件升级说明书 - 中文
注意事项各机型的升级文件不同。
关于需要升级的机型,请参照<目标机型>·中的<连接的CD接收机>。
进行升级操作之前,请务必将汽车停在安全地点。
请保持发动机运行,·防止蓄电池耗尽。
升级操作时,不得关闭发动机或切断CD接收机的电源。
否则升级无·法正常完成,并且CD接收机将可能无法使用。
注: 请注意,诸如配对的手机、用户设定、语音标签等CD接收机的设定将因软件升级而被删除。
说明本文介绍了为了满足手机的要求对KCA-BT200蓝牙模块固件升级的·操作方法和注意事项。
如果在固件升级中发生错误,KCA-BT200蓝牙模块将可能无法使用。
·在对固件升级之前,请务必详细阅读以下操作方法和注意事项。
检查手机的固件请确认连接的手机型号是否列在[兼容的手机型号一览表]中。
如果目前可以正常使用手机,没有任何问题,则无需进行固件升级。
目标型号本升级程序适用于下列型号装置的固件升级。
KCA-BT200连接的CD接收机分组 E-1DNX210EX, DPX-MP2090U, DPX-MP2100, DPX-MP3110, DPX-MP3110S, DPX-MP4110, DPX-MP4110S, DPX-MP5100U, DPX-MP5110U, DPX-MP7090U, DPX302, DPX501, DPX501U, DPX502,DPX502U, DPX502UY, DPX701, DPX701U, KDC-MP2035, KDC-MP235, KDC-MP238, KDC-MP3035, KDC-MP335, KDC-MP338, KDC-MP4036AX, KDC-MP4039, KDC-MP408U, KDC-MP438U, KDC-MP439, KDC-MP5033U , KDC-MP5039U, KDC-MP532U, KDC-MP5539U, KDC-MP6036, KDC-MP632U, KDC-MP7090U, KDC-MP832U, KDC-W3537, KDC-W3537A, KDC-W3537AY, KDC-W3537G, KDC-W3537GY, KDC-W3541A, KDC-W3541AY, KDC-W3541G, KDC-W3541GY, KDC-W4037, KDC-W4037Y, KDC-W4041A, KDC-W4041G, KDC-W4041W, KDC-W4141AY, KDC-W4141GY, KDC-W4141WY, KDC-W5041UA, KDC-W5041UG, KDC-W5137, KDC-W5137Y, KDC-W5141U, KDC-W5141UAY, KDC-W5141UGY, KDC-W5534U, KDC-W5541U, KDC-W5641UY, KDC-W6534U, KDC-W7534U, KDC-W7534UY, KDC-X492, KDC-X590, KDC-X7533U, KDC-X890, KDC-X9533U, KDV-412, KDV-5234, KDV-MP6333, KDV-MP6433分组 E-2KDC-MP4036U, KDC-MP435U, KDC-MP436U, KDC-MP5036U, KDC-MP535U, KDC-W4537U, KDC-W4537UA, KDC-W4537UAY, KDC-W4537UG, KDC-W4537UGY, KDC-W4737U , KDC-W4737UY, KDC-W6537U, KDC-W6537UY, KDC-X491, KDC-X591分组 E-3KDC-MP635 , KDC-MP735U, KDC-W7037, KDC-W7037Y, KDC-W7537U, KDC-W7537UY, KDC-W9537U, KDC-W9537UY, KDC-X7006, KDC-X7006U, KDC-X791, KDC-X8006U, KDC-X891, KDC-X9006U, KDC-X991检查固件版本选择STANDBY1按下 [SRC] 按钮。
海康无线路由器升级指导 说明书
海康无线路由器升级指导近期,海康对路由器进行了全面升级,升级后稳定性及设备性能将会有一定提升。
目前升级的型号包括DS-3WR11-E、DS-3WR12-E、DS-3WR23-E。
DS-3WR11-E升级后软件版本号为V1.0.5_build200803,DS-3WR12-E升级后软件版本号为V1.0.3_build200803,DS-3WR23-E升级后软件版本号为V1.0.1_build200828。
主要升级内容包括:1)优化双频合一机制,提升终端连接稳定性;2)优化抗干扰能力算法,提升视频体验;3)优化自动频宽算法机制和自动信道优化,提升用户上网体验;4)优化flash保护机制,提升稳定;5)改善2.4G带机量算法,提升带机量;6)修复其他体验性问题;APP端联网升级(正常会直接提示升级):路由器连接外网(宽带拨号或连接光猫)情况下,进行以下操作。
1、手机连接所需升级路由器的无线网络,并“打开HIK-WIFI”APP(建议关闭移动网络)2、点击下方目录中的“工具箱”,找到系统升级按钮,等待升级完成。
3、将设备恢复出厂设置,重新设置上网WEB端联网升级(正常会直接提示升级):路由器连接外网(宽带拨号或连接光猫)情况下,进行以下操作。
1、登录路由器管理界面打开浏览器,输入路由器IP地址,http://hikvisionwifi.local/(也可输入默认IP:192.168.0.1)。
2、输入之前设置的登录密码(默认为WIFI密码),进入管理界面3、点击左边的系统管理界面,找到软件升级(在线升级),点击后等待升级完成4、将设备恢复出厂设置,重新设置上网升级常见问题1)默认地址无法访问时,如何确定路由器的IP地址?通过直连路由器的LAN口,电脑中win+R输入cmd打开命令提示符界面,窗口中输入ipconfig命令,查看默认网关地址,即为路由器登陆IP地址。
2)如何知道已经升级成功?登录路由器,点击系统管理,可对版本号进行核对。
Autodesk Vault 软件升级指南说明书
Vault GPS: Make All the Right Turns During Your Vault UpgradeIrvin Hayes Jr. – Autodesk, Inc.PL5843-P Upgrading your replicated Vault software environment to a new release of Vault software shouldn’t be an intimidating endeavor. Building an understanding of what actually happens when clicking the install button is crucial to having confidence in your upgrade plan. This class will cover existing and newly supported methods for upgrading your replicated Vault software installation, and you will leave armed with the knowledge of what is actually happening in the background with SQL so that you can proceed with confidence.Learning ObjectivesAt the end of this class, you will be able to:• Understand the importance and role that SQL plays in a Vault software upgrade• Understand the out-of-the-box procedure for Vault software upgrades of replicated environments• Understand the alternate snapshot procedure for Vault software upgrades of replicated environments• Learn how to set yourself up for a successful migrationAbout the SpeakerIrvin Hayes Jr. is a product manager for the data management group at Autodesk in Novi, Michigan. Irvin has worked at Autodesk for seven years starting in product support and as a user experience designer. Irvin is a Microsoft® Certified Professional, and has been working in the information technology field for more than 21 years.Table of ContentsLearning Objectives (1)About the Speaker (1)Introduction (3)What happens with a normal vault upgrade? (3)How it works (3)Understanding the obstacles (5)Planning to overcome the obstacles (6)Using Alternate Snapshots (8)How it works (8)Understanding the obstacles (12)Planning to overcome the obstacles (12)Setting yourself up for success (12)Closing (13)IntroductionUpgrading your replicated Vault software environment to a new release of Vault software shouldn’t be an intimidating endeavor. Building an understanding of what actually happens when clicking the install button is crucial to having confidence in your upgrade plan. This class will cover existing and newly supported methods for upgrading your replicated Vault software installation, and you will leave armed with the knowledge of what is actually happening in the background with SQL so that you can proceed with confidence.What happens with a normal vault upgrade?How it worksSome of the information in this section is taken from the Autodesk Vault Upgrade guide. Please refer to the guide for additional information as this class will not cover everything in the guide. As called out in the guide, the upgrade process for an Autodesk Vault environment is comprised of 5 steps:1. Validating a Backup2. Upgrading SQL3. Upgrading Vault Server4. Upgrading Clients5. Creating a BackupAutodesk recommends that every Vault upgrade starts with a validated backup. This validation will ensure that if the upgrade process fails, there is a backup that can be restored. It is also recommended that you have a test environment that is close to your production environment as possible. The reason for this is to allow you to better estimate how long the actual migration may take. You should add a buffer to the migration time so that you can report back your estimation of downtime to the reset of the business. Also, testing your backup and migration will help you identify potential pitfalls prior to executing the migration in the production environment.Prior to the upgrade, you may want the various business units to sign-off on the migration. Itis recommended to create a document containing the key features that the business uses. Testing workflows, customizations and integrations should all be done the test environment to make sure that everyone understands the changes and can be trained prior to upgrading the production server.Using the test environment provides a safe option to experience the migration process and discover unexpected hurdles. Although this process takes time it can, in the long run, save time and stress by avoiding impact to the production environment. You can use this environmentto create documentation that is necessary for a successful migration. This can come in handy in case something happens to any of the key players involved with the migration. This will be revisited later.Now let’s move on to the Upgrading Vault Server step. Before we can look at a replicated environment, we first must understand the single site environment. This single site environment is made up of the database (SQL), Autodesk Data Management Console (ADMS) and the Autodesk Vault File Store (AVFS).As called out in the Autodesk Vault Upgrade guide, you need to pay attention to how many releases you are skipping over in your migration. For example, if you are going from 2011 to 2015, you will need to go to some intermediate release. In the example, you would need togo from 2011 to 2013 followed by 2013 to 2015. Autodesk doesn’t allow you to migrate more than 2 releases apart. I would recommend getting to the appropriate service pack or hotfix level prior to opening up the ADMS Console during the migration process. Once you open the ADMS Console, the migration will begin. What is going on at this phase is that the databaseis being prepped for the current release. This involves updating stored procedures, tables and restructuring data where necessary.Now let’s look at a replicated environment. It does consist of the same pieces that a single environment entailed. However, it allows for multiple SQL locations which are known as Connected Workgroups. Believe it or not, upgrading a replicated environment isn’t that difficult. You must first upgrade the main Workgroup, also known as the Publisher Workgroup, by upgrading an ADMS machine within the workgroup. This starts the process of migrating the Publisher SQL databases. Once the SQL databases is properly updated, snapshot are created.A snapshot is a read-only view of a database at the time the snapshot was taken. This snapshot is then consumed by the SQL subscriber machines. Once the snapshot is consumed by the subscriber, the environment is now ready for use once all the ADMS / AVFS machines within that workgroup have been updated accordingly with the appropriate software release. It is best to upgrade all the ADMS machines in the subscriber workgroup first prior to moving onto the AVFS machines.Understanding the obstaclesWe recently worked closely with a customer to help them through a rather large migration process. Our goal was to help identify problems that may arise during the migration and also to ensure that the migration completed in a timely manner. In order to have success with this venture, we needed to collect various information from them. In particular, we needed the following:• Their databases• A detailed mapping of their network• Hardware specificationsOnce we had this information, we set up a lab environment close to what they have so that we can better understand the pitfalls. Along with us running a series of tests in our lab they were running similar tests in their lab. This was beneficial since it allowed us to compare notes and focus on various differences within the environment.This is a smaller example of their Vault environment.During our first couple migrations we noticed that there was considerable differences in the timings between the environments. This made us focus on the hardware. Since the migration process is very read/write intensive, we started to focus on the hard drives. We needed to look at what partitions the database were on and the type of RAID configuration. Another area of focus was on memory since SQL utilizations as much as it can (you can limit the amount within SQL itself). We monitored both of these activities use Performance Monitor to help us get a better understanding of what is going on. We also utilized a utility called Wireshark to get an understanding of how much data was going over the network. Upon investigating all avenues, it was determined that we were sending too much data over the network in terms of the snapshot. Remember the snapshot is the data that the publisher creates post migration and is updated from time to time based on the SQL schedule. There was obstacles with the hard drive and memory but they did not impact the total migration time as much as the network traffic did.Planning to overcome the obstaclesNow that we understand the obstacles of the migration we were able to come up with solutions to get around them.The main obstacle was the network. We were able to overcome this obstacle by using the “Alternate Snapshot” solution which will be discussed in the next section.The hard drive can be handled by purchasing additional partitions or reconfigure the existing partitions. If you are going to reconfigure the RAID partition, it is highly recommended copying all data off the entire drive to another location prior to beginning the operation. As mentioned in the previous section, a migration has intense read/write operations. If you are setup up a RAID configuration, you need to make sure that it can handle a lot of read/write operations. You will want to pull out SQL’s temp database and log files to a separate partition. The main database should be on a partition that can handle a lot of read/writes. You will want to have the log files on a separate partition as well. Once you are satisfied with your configuration, restore your data accordingly. NOTE: The file store is not impacted by a migration and if you are running it on the SQL machine as well you will want it on its’ own partition.Depending on your current system, you will want to have a sufficient amount of memory in the system. If more memory is determined to be needed, prior to the migration may be the best time to upgrade it. This way it can be fully utilized during the migration process itself. The memory / processor upgrades is something that the business unit will need to determine if it is worthwhile now or if the budget is even there for the upgrade.We found that having the issues documented prior to the migration made the actual migration run smoothly. If you are working with Autodesk or a reseller during your testing phase and have issues, they can help you solve this problems in the test environment prior to migrating the production environment. A documented process also allows the migration process to be executed by anyone on the team.NOTE: Please contact your reseller or Autodesk to make sure that whatever is being deleted can be deleted. Autodesk or the reseller may have to create a special script in order to make the migration run smoothly.Using Alternate SnapshotsHow it worksSince we determined that the network is a problem for the size of the database we need to migrate, we need to look at the Alternate Snapshot method. The point of this solution is to allow you to move the snapshot from the publisher to the subscribers in a manner that you find conducive to your environment. For example, you do not want to have a 500GB snapshot going over a network that has bandwidth of 1mbs with a 200ms latency. Here are the steps for using the alternate snapshot:1. Wait for the migration and snapshot to be created on the publisher. This can view thestatus by opening SQL Management Studio, launch the Replication Monitor and select the database that you want to see the status on. You should see a dialog as shown below.2. Immediately after the snapshot is created, turn off the SQL job on the remote SQLservers using the SQL Management Studio3. Move the snapshots to the subscriber location4. Modify the agent to point to the Alternate Snapshot location. At the end of the commandline remove “ -Continuous” and add “ -AltSnapshotFolder D:\VC_Replication_Share\” where “D:\VC_Replication_Share\” is the local path of the “unc” folder.5. Reinitialize the SubscriberSelect YES to this dialog.6. Restart the Job7. Wait until the snapshot consumption completes. The status of this can be viewed in the dialog above and when it shows that it is complete.8. Stop the SQL job9. Set the synchronization setting back to Continuous10. Start the SQL job11. Wait until replication to get into steady state. The replication status on a database will show “Waiting 60 second(s)”.12. At this point, your subscriber is ready for useUnderstanding the obstaclesThe reason why we are doing the Alternate Snapshot is that the network has some sort of issues with it whether it is bandwidth, latency or both. This obstacle will still be there. Other obstacles could be around the delivery method used to get the data to the subscribers. The data could arrive and be corrupt. Maybe you sent someone on a plane to the location and somehow the drive was wiped. We will need a plan to overcome these.Planning to overcome the obstaclesWays to get around this would be use multiple methods to assure that data will arrive in a timely manner. If you decide to go with a zip method, you would want to test that the zip is indeed working properly prior to sending it via a device.Setting yourself up for successBefore we do the migration we definitely want to remember that we need to have a goodsolid backup plan which includes a backup and several test iterations in a non-production environment. You will want to make sure that your backups are proper and indeed cover everything in your environment. You never know what could go wrong during the migration.To quote Jonathan Landeros of Inventor Tales, “Should the worst happen, have a backup plan that includes having a backup to restore, instead of slipping out the back door before anyone notices!”. I cannot iterate this enough that you want to run multiple migrations prior to the day of the actual migration. Write out a preliminary migration plan. Take notes during your test migrations. Combine your initial plan along with your notes to create robust document in which anyone can use in case the need arises.Remember, you are the expert of your environment. If you are doing the migration yourself or are getting outside resources to help out, it is best to make sure everyone is aware of the details of the environment. You will be the best to predict slowness at particular workgroups. This knowledge can be used during the testing phase of the migration. Again, your environment should be as close to the production environment as you can make it. You can set up network emulators and such to give you a better idea on what will go on during the migration day. Just remember that during this process there will be down time. Your system will be unavailableto the business units while it is executing. But, you can limit the down time and impact to the business by planning accordingly.Have a plan for migration day. Make sure you have the who, what, where, when & how’s allin order prior to that day. Make sure that the team involved in the migration is lined up. It is worth mentioning that you may want to have backup people ready to go in case something happens on the day of migration. They need to know where they are going to meet (online / at the office). They need to know when to start. This could be during business hours or off hours depending on what your plan yielded. Make sure that everyone understands what their role is during the migration. Who is updating what servers and when are they being updated. With a good predictable plan your team will know where they are at during the entire migration process. This will lead towards a smooth migration.ClosingNow that we know what to expect during a migration we can go forward and have a successful migration.。
RICOH GR DIGITALⅢ固件升级 说明书
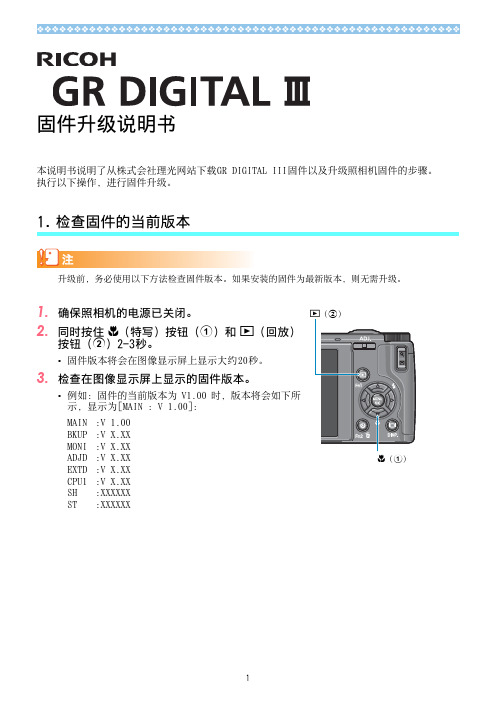
固件升级说明书本说明书说明了从株式会社理光网站下载GR DIGITAL III固件以及升级照相机固件的步骤。
执行以下操作,进行固件升级。
检查固件的当前版本1.CPU1:V X.XXSH:XXXXXXST:XXXXXX2.解压固件1.从株式会社理光网站下载固件。
2.双击下载的文件或者右键单击文件并选择[打开]。
•将会出现一个对话框。
3.单击[确定]。
•将会创建文件夹[GR DIGITAL 3 Update],而固件会被解压至文件夹[Firmware relX.XX (X.XX 为版本号)]。
检查[glaunch3](固件文件)和[glaunch8](调整值文件)是否在文件夹[Firmware relX.XX]中。
3.将固件复制到SD记忆卡上有两种方法可将固件复制到SD记忆卡上。
•在照相机上插入一张SD 记忆卡,用附带的USB 连接线连接照相机和电脑,然后将固件复制到SD 记忆卡上。
•使用卡片阅读器或卡片写入器将固件复制到SD记忆卡上(需要卡片阅读器或卡片写入器)。
通过USB连接线连接照相机和电脑来复制固件1.如果您的Windows PC上安装了DC 软件,请确认未启动DL-10。
2.如果正在使用DL-10,请在任务栏中使用右键单击DL-10,然后单击[退出]。
•如果任务栏中没有显示DL-10图标,则无需执行步骤2。
3.为照相机装上一个有足够电量的电池。
4.在照相机上插入SD记忆卡,并开启电源。
5.在显示的照相机设定菜单标签中选择[格式化〔存储卡〕],然后按下$按钮。
Windows操作系统Macintosh操作系统glaunch3glaunch8glaunch3glaunch86.选择[是],然后按下MENU/OK按钮。
•SD记忆卡被格式化。
对记录图像的存储卡进行格式化后,所有内容将会消失。
格式化存储卡前,将那些您不想删除的图像保存至您的电脑上。
7.关闭照相机,并用附带的USB连接线连接照相机和电脑。
杰理强制升级工具说明书
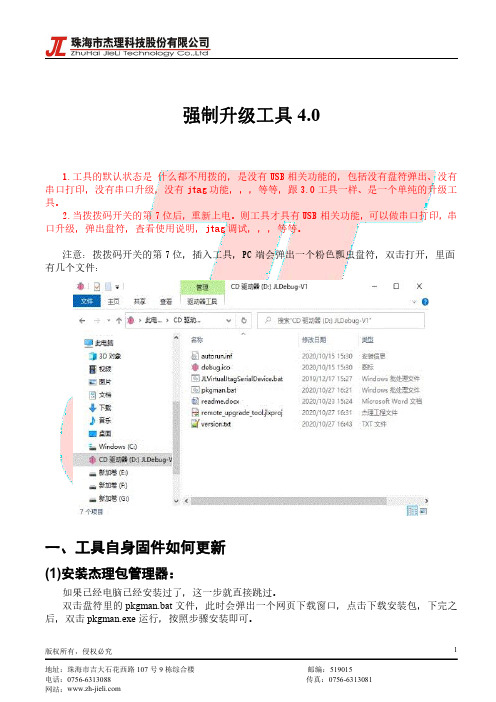
强制升级工具4.01.工具的默认状态是什么都不用拨的,是没有USB相关功能的,包括没有盘符弹出、没有串口打印,没有串口升级,没有jtag功能,,,等等,跟3.0工具一样、是一个单纯的升级工具。
2.当拨拨码开关的第7位后,重新上电。
则工具才具有USB相关功能,可以做串口打印,串口升级,弹出盘符,查看使用说明,jtag调试,,,等等。
注意:拨拨码开关的第7位,插入工具,PC端会弹出一个粉色瓢虫盘符,双击打开,里面有几个文件:一、工具自身固件如何更新(1)安装杰理包管理器:如果已经电脑已经安装过了,这一步就直接跳过。
双击盘符里的pkgman.bat文件,此时会弹出一个网页下载窗口,点击下载安装包,下完之后,双击pkgman.exe运行,按照步骤安装即可。
(2)远程固件升级操作:此时,双击盘符里的remote_upgrade_tool.jlxproj文件:先弹出一个小窗口,点击“检测更新”,确保是最新版本,如果不是最新版本,则按照更新提示,一步一步更新就行。
然后点击“打开远程升级工具”:此时弹出远程固件更新窗口,按照图中步骤,完成对强制升级工具自身固件的刷新:此时手头上至少要有两个强制升级工具,欲通过工具给工具下载程序,先进入升级模式:二、如何使用虚拟串口(1)下载虚拟串口驱动及安装:双击盘符里的JLVirtualJtagSerialDevice.bat文件,此时会弹出一个网页下载窗口,点击下载安装包,下完之后,双击serdrv.exe运行,按照步骤按照即可。
(2)新建虚拟串口:点击“添加新的虚拟串口”(3)绑定物理设备:新建成功后,左侧会多出一个虚拟串口。
点击后,右侧会显示其信息。
其中,新建的虚拟串口没有任何绑定的物理串口,其“绑定的唯一ID”是“NOT SET”。
插入物理设备后,右侧的“绑定的新设备”下拉框处会有显示对应在线的物理设备。
(4)显示绑定信息:选择想要绑定的物理设备的ID后,点击绑定。
绑定成功后,再次选择虚拟串口,这时候绑定的ID则显示了对应的设备ID了。
- 1、下载文档前请自行甄别文档内容的完整性,平台不提供额外的编辑、内容补充、找答案等附加服务。
- 2、"仅部分预览"的文档,不可在线预览部分如存在完整性等问题,可反馈申请退款(可完整预览的文档不适用该条件!)。
- 3、如文档侵犯您的权益,请联系客服反馈,我们会尽快为您处理(人工客服工作时间:9:00-18:30)。
升级说明书
本次升级首先在基础性能上再次实现了进一步的优化,
A,整体性能大幅提升,速度超过通达信等普通行情软件
B,推出全新公式平台。
C,支持所有分钟数据(包括1分钟数据)
D,由原来1分钟打包数据,拆分成详尽更为完整分笔数据,。
E,解决财务季度问题,实现历史财务数据可调用。
其它功能选项。
1,本次适当调整部分菜单选项。
2,增加短线交易监控平台。
3,完善和细化了大盘分析平台的部分功能和数据。
4,对主力监测平台进行部分调整,使得平台功能性更加锐利。
5,增加分论坛设置,有效提升和监督各地代理商的服务水平。
6,增加即时通讯功能,为更加贴心的客户服务系统的完善打下了良好的基础。
一,本次适当调整部分菜单选项,但功能不会发生变化,系统分为波段王版本的基础功能和其它版本的高级功能。
二,增加短线交易监控平台
为了满足客户的需求,本次我们升级了针对权证及个股的超短线交易预警系统,客户只需要设定好相应的操作周期,可以通过系统自动提示买入或卖出的警告。
本功能本向所有客户同时升级。
方法:点基础功能,短线交易预警。
将大盘分析的状态,操作方案,及注意事项进行分类。
3.1大盘机构持仓线取消。
增加横向样本统计指标,大盘分析指标的颜色控制实际上是根据市场上超跌反弹,短线突破
及中线控盘的个股数量确定是否是兰色区域,还是红色区域或者黄色区域。
同时有了横向样
本统计后,不仅我们可以知道大盘什么环境做什么样的股票,还可以反映不同大盘环境下,
赢利会实际比例。
如图:
四,主力监测平台调整
本次升级替换掉原来的机构持仓数据,增加主力状态指标,分别新增强庄控盘度,中线强势,短线上攻,中线超跌,短线超跌五个排序选项,以方便最快速地找到最适合行情的个股,实现对盘面变化过程中对个股的全面监控,可理解为对主力状态的全面临控指标。
中线上攻:即个股股价在潜龙飞天线之上的高度值,越大,则代表个股跑赢大势的强度为高,一般来讲机构介入的深度越强,此类为我们中线需要关注的个股。
短线上攻:当前市场领头上涨的个股,代表市场短期热点的方向,但注意一般当数值超过10时是临界点,要么连续突破向上,要么就是短期的顶部,因此对于短线追涨来讲要考虑到整个大盘的持续性,如果个股在短线超过10以上出现卖出信号要及时先离场。
快进快出。
强庄控盘:发现高控盘强庄的利器,牛市环境中可以找出机构或者主力深度重仓并且对于盘面具有超强操控能力的个股。
往往是牛市中的大龙头。
中线超跌:市场的领跌弱势品种,但一般如果达到10则往往中线超跌的极限,可以考虑到根据大盘去找短期低点博取超跌反弹机会。
该机会根据大盘中期底部来把握
短线超跌:市场短期的领跌品种,但一般如果达到10则往往短线超跌的极限,可以考虑到
根据大盘环境找到短期的低点博取超跌反弹机会。
该机会根据大盘短期底部来把握。
五,增加分论坛设置
各个客户除享受总部公共论坛及讲师交流区的论坛贴子外,主要服务选项由分区论坛中的各地讲师完成。
六,即时通讯功能。
方便客户快速地找到客服及讲师助理进入相关事宜沟通。
提升服务能力。
