Nginx RTMP 功能研究
Nginx-rtmp之ngx_rtmp_send.c文件分析

Nginx-rtmp之ngx_rtmp_send.c⽂件分析1. 简述1.1 RTMP 消息类型/* RTMP message types */#define NGX_RTMP_MSG_CHUNK_SIZE 1#define NGX_RTMP_MSG_ABORT 2#define NGX_RTMP_MSG_ACK 3#define NGX_RTMP_MSG_USER 4#define NGX_RTMP_MSG_ACK_SIZE 5#define NGX_RTMP_MSG_BANDWIDTH 6#define NGX_RTMP_MSG_EDGE 7#define NGX_RTMP_MSG_AUDIO 8#define NGX_RTMP_MSG_VIDEO 9#define NGX_RTMP_MSG_AMF3_META 15#define NGX_RTMP_MSG_AMF3_SHARED 16#define NGX_RTMP_MSG_AMF3_CMD 17#define NGX_RTMP_MSG_AMF_META 18#define NGX_RTMP_MSG_AMF_SHARED 19#define NGX_RTMP_MSG_AMF_CMD 20#define NGX_RTMP_MSG_AGGREGATE 22#define NGX_RTMP_MSG_MAX 221.2 RMTP control message types#define NGX_RTMP_USER_STREAM_BEGIN 0#define NGX_RTMP_USER_STREAM_EOF 1#define NGX_RTMP_USER_STREAM_DRY 2#define NGX_RTMP_USER_SET_BUFLEN 3#define NGX_RTMP_USER_RECORDED 4#define NGX_RTMP_USER_PING_REQUEST 6#define NGX_RTMP_USER_PING_RESPONSE 7#define NGX_RTMP_USER_UNKNOWN 8#define NGX_RTMP_USER_BUFFER_END 312. 源码分析2.1 ngx_rtmp_send_ack_size:发送 ack_size 包ngx_int_t ngx_rtmp_send_ack_size(ngx_rtmp_session_t *s, uint32_t ack_size){return ngx_rtmp_send_shared_packet(s,ngx_rtmp_create_ack_size(s, ack_size));}send ack_size == 50000002.2 ngx_rtmp_create_ack_sizengx_chain_t *ngx_rtmp_create_ack_size(ngx_rtmp_session_t *s, uint32_t ack_size){ngx_log_debug1(NGX_LOG_DEBUG_RTMP, s->connection->log, 0,"create: ack_size=%uD", ack_size);{NGX_RTMP_USER_START(s, NGX_RTMP_MSG_ACK_SIZE);NGX_RTMP_USER_OUT4(ack_size);NGX_RTMP_USER_END(s);}}2.2.1 NGX_RTMP_USER_START#define NGX_RTMP_USER_START(s, tp) \ngx_rtmp_header_t __h; \ngx_chain_t *__l; \ngx_buf_t *__b; \ngx_rtmp_core_srv_conf_t *__cscf; \\__cscf = ngx_rtmp_get_module_srv_conf( \s, ngx_rtmp_core_module); \/* 初始化 RTMP 消息的头部 */memset(&__h, 0, sizeof(__h)); \__h.type = tp; \/* csid 为 2 表明该chunk是控制信息和⼀些命令信息 */__h.csid = 2; \__l = ngx_rtmp_alloc_shared_buf(__cscf); \if (__l == NULL) { \return NULL; \} \__b = __l->buf;该宏主要是初始化 RTMP 消息头,并为 ngx_chain_t 结构体指针分配内存,⽤来存储将要发送的数据。
课题_nginx搭建rtmp协议流媒体服务器总结
nginx搭建rtmp协议流媒体服务器总结最近在ubuntu12.04上搭建了一个rtmp服务器,感觉还挺麻烦的,所以记录下。
大部分都是参考网络上的资料。
前提:在linux下某个目录中新建一个nginx目录。
然后进入该目录去下载搭建环境所需要的一些资源包。
此处在/root/ 目录下新建一个nginx目录即:/root/nginx/====================================1、安装依赖包:#yum -y install gcc glibc glibc-devel make nasm pkgconfig lib-devel openssl-devel expat-devel gettext-devel libtool mhash.x86_64 perl-Digest-SHA1.x86_642、安装相关工具包1). git# mkdir soft-source# cd soft-source# wget :///projects/git-snapshots/git/git-latest.tar.xz# xz -d git-latest.tar.xz# tar xzvf git-latest.tar# cd git-2014-06-27# autoconf# ./configure# make && make install# git --versiongit version 2.0.0.GIT# cd ..2). zlib# wget :///zlib-1.2.8.tar.gz# tar -zxvf zlib-1.2.8.tar.gz cd zlib-1.2.8# ./configure# make# make install# cd ..3). pcre# wget ://exim.mirror.fr/pcre/pcre-8.12.tar.gz# tar zxvf pcre-8.12.tar.gz# cd pcre-8.12# ./configure# make && make install# cd ..4). yadmiyadmi的作用是为flv文件添加关键帧,才能实现拖动播放# wget :///projects/yamdi/files/yamdi/1.4/yamdi-1.4.tar.gz/download# tar xzvf download# cd yamdi-1.4# make && make install# cd ..使用方法:# yamdi -i input.flv -o out.flv给input.flv文件添加关键帧,输出为out.flv文件5). OpenSSL# wget :///source/openssl-1.0.1c.tar.gz# tar -zxvf openssl-1.0.1c.tar.gz# ./config# make# make install3、安装ffmpeg及其依赖包:1). Yasm# wget :///projects/yasm/releases/yasm-1.2.0.tar.gz# tar xzvf yasm-1.2.0.tar.gz# cd yasm-1.2.0# ./configure# make# make install# cd ..2). x264# git clone git:///x264# cd x264# ./configure --enable-shared# make# make install# cd ..3). LAME# wget :///project/lame/lame/3.99/lame-3.99.5.tar.gz# tar xzvf lame-3.99.5.tar.gz# cd lame-3.99.5#./configure --enable-nasm# make# make install# cd ..4). libogg# wget :///releases/ogg/libogg-1.3.0.tar.gz# tar xzvf libogg-1.3.0.tar.gz# cd libogg-1.3.0# ./configure# make# make install# cd ..5). libvorbis# wget :///releases/vorbis/libvorbis-1.3.3.tar.gz# tar xzvf libvorbis-1.3.3.tar.gz# cd libvorbis-1.3.3# ./configure# make# make install# cd ..6). libvpx# git clone :///webm/libvpx.git# cd libvpx# ./configure --enable-shared# make# make install# cd ..7). FAAD2# wget :///project/faac/faad2-src/faad2-2.7/faad2-2.7.tar.gz # tar zxvf faad2-2.7.tar.gz# cd faad2-2.7# ./configure# make# make install# cd ..8). FAAC# wget :///project/faac/faac-src/faac-1.28/faac-1.28.tar.gz # tar zxvf faac-1.28.tar.gz# cd faac-1.28# ./configure# make# make install# cd ..注:编译时可能遇到一下错误:mpeg4ip.h:126: error: new declaration ‘char* strcasestr(const char*, const char*)’解决方法:从123行开始修改此文件mpeg4ip.h,到129行结束。
rtmp 模块 record 参数

rtmp 模块record 参数
RTMP模块中的record参数用于配置录制RTMP流的选项。
录制功能允许您将实时流保存为文件,以便以后回放或分发。
在Nginx的RTMP模块中,record参数通常有以下一些选项:
on/off:启用或禁用录制功能。
设置为on表示启用录制,设置为off表示禁用录制。
prefix:录制文件名的前缀。
您可以指定录制文件的前缀,录制文件的实际名称将在前缀之后加上时间戳。
suffix:录制文件名的后缀。
您可以指定录制文件的后缀,通常是文件扩展名,例如.mp4、.flv等。
unique:如果设置为on,录制文件名将包含唯一的随机字符串,以避免文件名冲突。
append:如果设置为on,新的录制数据将附加到现有的录制文件中,而不是覆盖它。
max_size:指定录制文件的最大大小。
一旦录制文件达到指定的最大大小,将停止录制新的数据。
max_files:指定录制文件的最大数量。
一旦达到最大数量,将删除最旧的录制文件以释放空间。
下面是一个RTMP模块record参数的示例配置:
record all; record_path /path/to/recordings; record_unique on; record_suffix .flv; record_max_size 1000M; record_max_files 10;
这个配置会录制所有的RTMP流,将录制文件保存在指定路径下,文件名以时间戳开头,以.flv结尾。
如果文件达到1GB大小,将停止录制新的数据,并且最多保留10个录制文件。
1。
基于Nginx的实验室直播系统研究与实现

基于Nginx的实验室直播系统研究与实现作者:张贵湖刘劲松来源:《电脑知识与技术》2020年第23期摘要:针对传统实验教学中实验室对上课人数有限制的问题,避免互联网直播平台对知识产权和隐私保护的诸多不足,利用RTMP流媒体技术,研究并实现一种基于Nginx的网络多媒体直播系统。
该直播系统除了可以使用计算机或手机终端进行直播和观看以外,还可以使用多个直播间对不同的课程进行同步直播。
该研究解决实验室空间上的限制,以及对实验教学的信息与网络化提供了有力的技术支撑。
关键词:Nginx;直播系统;RTMP;实验教学;流媒体中图分类号:TP393; ; ; 文献标识码:A文章编号:1009-3044(2020)23-0084-03Abstract: In view of the limitations of the number of classes in the traditional experimental teaching, the Internet live broadcast platform avoids many shortcomings of intellectual property rights and privacy protection. Using RTMP streaming media technology, a Nginx-based network multimedia live broadcast system is researched and implemented. In addition to the live broadcast and viewing using a computer or mobile terminal, the live broadcast system can also use multiple live broadcast rooms to simultaneously broadcast different courses. The study addresses the limitations oflaboratory space and provides strong technical support for experimental teaching information and networking.Key words: Nginx; live broadcast system; RTMP; experimental teaching; stream media1 背景随着网络技术的不断深入发展,网络直播也逐渐地被大众所接受,该技术也越来越多地被各高校应用到实验教学中。
Nginx RTMP 功能研究

Nginx RTMP 功能研究?Nginx-RTMP功能调研1.?RTMP协议介绍 (2)2.RTMP server.32.1当前的流媒体server.32.2Wowza功能 (3)3.Nginx-based RTMP server.53.1? Nginx rtmp 功能点 (5)3.2编译nginx rtmp模块 (6)3.3配置以及功能介绍 (6)3.4用nginx-rtmp-module搭建直播环境 (8)3.5Nginx rtmp对于HLS支持 (13)1. RTMP协议介绍RTMP(Real Time Messaging Protocol)实时消息传送协议是Adobe Systems公司为Flash播放器和服务器之间音频、视频和数据传输开发的私有协议。
它有三种变种:1)工作在TCP之上的明文协议,使用端口1935;2)RTMPT封装在HTTP请求之中,可穿越防火墙;3)RTMPS类似RTMPT,但使用的是HTTPS连接;RTMP协议就像一个用来装数据包的容器,这些数据可以是AMF格式的数据,也可以是FLV中的视/音频数据。
一个单一的连接可以通过不同的通道传输多路网络流。
这些通道中的包都是按照固定大小的包传输的。
? ? ? ? ? ? ? ? ? ? ? ? ? ? ? ? ? ? ? ? ? ?图1???RTMP交互图更多协议的细节可以参见《rtmp specification 1.0》2. RTMP server2.1当前的流媒体server现在主要有两种rtmp server,商业的和开源的。
商业的比开源的支持的功能多,个人根据需要选择吧? 商业的有FMS Wowza? 开源RTMP server? 1. ?red5 java ?有名? 2. ?crtmpserver c++ 支持多种rtmp协议,移动设备以及IPTV相关网络协议??Erlyvideo erlong 有开源和商业版本https///erlyvideo/erlyvideo h?3. ?aXeVideo haXe 一个实验性的,轻量级的服务器???4. FluorineFx .Net To be defined???5. nginx-rtmp c nginx模块支持rtmp和HLS?2.2 Wowza功能FMS是Adobe公司的产品,license非常昂贵。
【官方文档】Nginx模块Nginx-Rtmp-Module学习笔记(一)RTMP命令详解
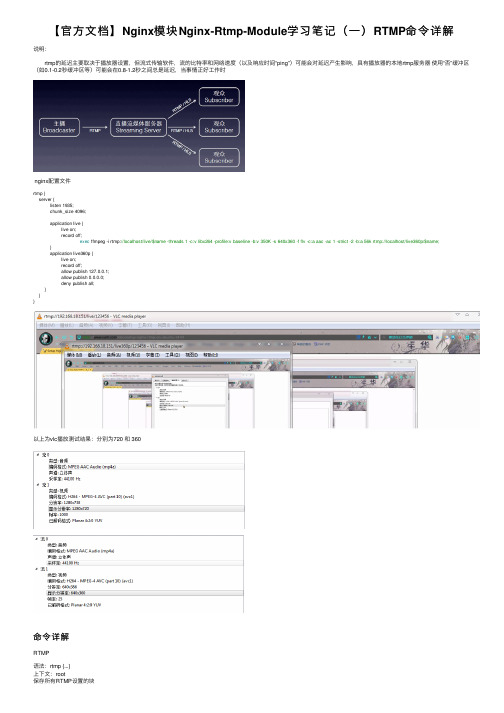
【官⽅⽂档】Nginx模块Nginx-Rtmp-Module学习笔记(⼀)RTMP命令详解说明: rtmp的延迟主要取决于播放器设置,但流式传输软件,流的⽐特率和⽹络速度(以及响应时间“ping”)可能会对延迟产⽣影响,具有播放器的本地rtmp服务器使⽤“否”缓冲区(如0.1-0.2秒缓冲区等)可能会在0.8-1.2秒之间总是延迟,当事情正好⼯作时nginx配置⽂件rtmp {server {listen 1935;chunk_size 4096;application live {live on;record off; exec ffmpeg -i rtmp://localhost/live/$name -threads 1 -c:v libx264 -profile:v baseline -b:v 350K -s 640x360 -f flv -c:a aac -ac 1 -strict -2 -b:a 56k rtmp://localhost/live360p/$name;}application live360p {live on;record off;allow publish 127.0.0.1;allow publish 0.0.0.0;deny publish all;}}}以上为vlc播放测试结果:分别为720 和 360命令详解RTMP语法:rtmp {...}上下⽂:root保存所有RTMP设置的块server语法:server {...}上下⽂:rtmp声明RTMP服务器实例rtmp {server {}}listen语法:listen(addr [:port] | port | unix:path)[bind] [ipv6only = on | off] [so_keepalive = on | off | keepidle:keepintvl:keepcnt | proxy_protocol]上下⽂:服务器将监听套接字添加到NGINX以接受RTMP连接server {listen 1935;}application语法:应⽤程序名称{...}上下⽂:服务器创建RTMP应⽤程序。
Nginx-rtmp-module流媒体服务器鉴权应用研究

2020年8月25日第4卷第16期现代信息科技Modern Information Technology Aug.2020Vol.4 No.16052020.8收稿日期:2020-07-03基金项目:江苏高校哲学社会科学研究一般项目(2019SJA0342)Nginx-rtmp-module流媒体服务器鉴权应用研究林旻(南京审计大学 实验中心(教育技术中心),江苏 南京 211815)摘 要:随着信息技术和通信技术的不断发展,直播教育成为高等教育中不可或缺的一环,文章是在南京审计大学实验中心原有的基于开源架构Nginx-rtmp-module 流媒体服务器的基础上,通过on_publish 和on_play 两个HTTP 回调通知模块来调用FLASK 编写的验证页面以达到流媒体服务器的推拉流鉴权功能的应用研究,解决了原Nginx-rtmp-module 的信息安全隐患,提高了直播教学平台的整体安全性。
关键词:Nginx ;rtmp-module ;Flask ;流媒体服务器;鉴权中图分类号:TP274;TN919.8 文献标识码:A 文章编号:2096-4706(2020)16-0005-04Research on Authentication Application of Nginx-rtmp-moduleStreaming Media ServerLIN Min(Experimental Center (Educational Technology Center ),Nanjing Audit University ,Nanjing 211815,China )Abstract :With the continuous development of information technology and communication technology ,live education has gradually become an indispensable part of higher education. This paper is based on the original Nginx-rtmp-module streaming media server based on the open source architecture of the Experimental Center of Nanjing Audit University. Through on_publish and on_play two HTTP callback notification modules to call the verification page written by FLASK to achieve the application research of the streaming media server ’s push-pull streaming authentication function ,solves the information security hidden danger of the original Nginx-rtmp-module ,and improves the overall security of the live teaching platform.Keywords :Nginx ;rtmp-module ;Flask ;streaming media server ;authentication0 引 言随着信息技术和5G 通信技术的高速发展,各类在线课程、直播课程成为解决我国有限的优质教育资源和巨大的教育需求间矛盾的一个重要方法。
NginxRTMP模块nginx-rtmp-module指令详解

NginxRTMP模块nginx-rtmp-module指令详解译序:截⾄ Jul 8th,2013 官⽅公布的最新 Nginx RTMP 模块 nginx-rtmp-module 指令详解。
指令Corertmp语法:rtmp { ... }上下⽂:根描述:保存所有 RTMP 配置的块。
server语法:server { ... }上下⽂:rtmp描述:声明⼀个 RTMP 实例。
rtmp {server {}}listen语法:listen (addr[:port]|port|unix:path) [bind] [ipv6only=on|off] [so_keepalive=on|off|keepidle:keepintvl:keepcnt]上下⽂:server描述:给 NGINX 添加⼀个监听端⼝以接收 RTMP 连接。
server {listen 1935;}application语法:application name { ... }上下⽂:server描述:创建⼀个 RTMP 应⽤。
application 名的模式并不类似于 http location。
server {listen 1935;application myapp {}}timeout语法:timeout value上下⽂:rtmp, server描述:Socket 超时。
这个值主要⽤于写数据时。
⼤多数情况下,RTMP 模块并不期望除 publisher 端⼝之外的其他端⼝处于活动状态。
如果你想要快速关掉 socket 可以⽤ keepalive 或者 RTMP ping 等。
timeout 默认值为 1 分钟。
timeout 60s;ping语法:ping value上下⽂:rtmp, server描述:RTMP ping 间隔。
零值的话将 ping 关掉。
RTMP ping 是⼀个⽤于检查活动连接的协议功能。
发送⼀个特殊的包到远程连接,然后在ping_timeout 指令指定的时间内期待⼀个回复。
nginx rtmp负载均衡原理

nginx rtmp负载均衡原理
nginx rtmp负载均衡原理是通过配置多个RTMP服务器作为后
端节点,在Nginx中使用rtmp{}块定义多个RTMP模块,然
后使用upstream{}块定义多个RTMP后端节点。
当客户端发
起RTMP推流或播放请求时,Nginx会根据定义的负载均衡算法将请求转发到不同的后端节点上。
Nginx提供了三种负载均衡算法:
1. round-robin:轮询方式,按照顺序依次将请求转发到各个后
端节点。
2. least_conn:最少连接方式,将请求转发到当前连接数最少
的后端节点。
3. ip_hash:基于客户端IP地址的哈希方式,将同一IP的请求
始终转发到同一后端节点。
当一个RTMP客户端发起推流请求时,Nginx会根据配置的负载均衡算法选择一个后端节点,将推流请求转发到该节点上。
同样,当RTMP客户端发起播放请求时,Nginx也会根据配置的负载均衡算法选择一个后端节点,将播放请求转发到该节点上。
这样可以将推流和播放请求按一定方式分发到不同的后端节点上,实现负载均衡的效果。
在RTMP负载均衡中,Nginx还可以使用健康检查功能来检测后端节点的健康状况,如果某个后端节点不可用或连接数过多,Nginx会自动将该节点从负载均衡池中剔除,确保负载均衡的
稳定性和可靠性。
推流的rtmpnginx配置

#
live on; #stream on live allow
#
allow publish all; # control access privilege
#
allow play all; # control access privilege
#
}
#
application hls {
#
live on;
#
hls on; #这个参数把直播服务器改造成实时回放服务器。
#
hls_path /home/data/video;
#切片视频文件存放位置。
#
wait_key on; #对视频切片进行保护,这样就不会产生马赛克了。
#
hls_fragment 1s; #每个视频切片的时长。
#
hls_playlist_length 60s; #总共可以回看的事件,这里设置的是1分钟。
默卿用了dockercompose了吗用了dockerstackservice的话做分布式服务比较方便但是如果都配置了的话就会你说的整站更新我也在学习中哈
推流的 rtmpnginx配置
#rtmp #{
# server {
#
listen 1935;
#
publish_time_fix on;
#
application yg {
#hBiblioteka s_continuous on; #连续模式。
#
hls_cleanup on; #对多余的切片进行删除。
#
hls_nested on; #嵌套模式。
#
}
#}
#}
Nginx-rtmp实现直播媒体实时流效果
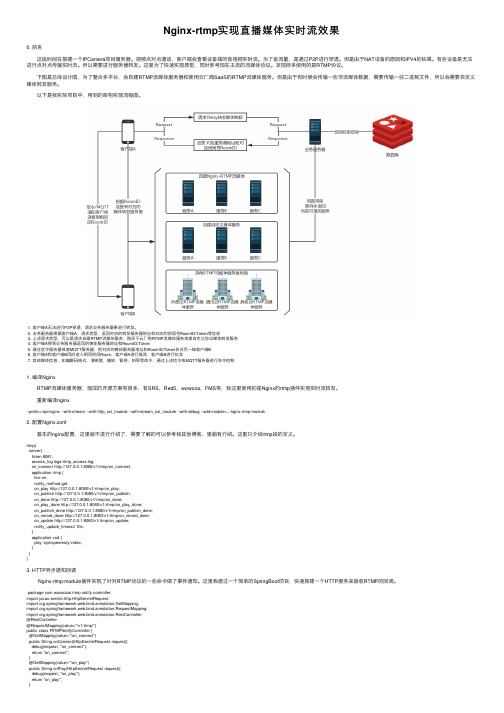
Nginx-rtmp实现直播媒体实时流效果0. 前⾔ 这段时间在搭建⼀个IPCamera项⽬服务器。
视频点对点通话,客户端会查看设备端的⾳视频实时流。
为了省流量,是通过P2P进⾏穿透。
但是由于NAT设备的原因和IPV4的枯竭。
有些设备是⽆法进⾏点对点传输实时流。
所以需要进⾏服务器转发。
这⾥为了快速实现原型,同时参考现在主流的流媒体协议。
发现很多使⽤的是RTMP协议。
下图是总体设计图,为了整合多平台,会⾃建RTMP流媒体服务器和使⽤云⼚商SaaS的RTMP流媒体服务。
但是由于有时候会传输⼀些⾮流媒体数据,需要传输⼀些⼆进制⽂件,所以会需要⾃定义媒体转发服务。
以下是我实际项⽬中,⽤到的架构实现流程图。
1. 客户端A⽆法进⾏P2P穿透,请求业务服务器要进⾏转发。
2. 业务服务器根据客户端A,请求类型,返回对应的转发服务器地址和对应的房间号RoomID/Token等信息3. 上述请求类型,可以是请求⾃建RTMP流媒体服务,购买于云⼚商RTMP流媒体服务或者⾃定义协议媒体转发服务4. 客户端A得到业务服务器返回的媒体服务器地址和RoomID/Token5. 通过信令服务器或者MQTT服务器,把对应的媒体服务器地址和RoomID/Token告诉另⼀端客户端B6. 客户端A和客户端B同时进⼊相同房间Room,客户端A进⾏推流,客户端B进⾏拉流7. 其他媒体信息,如编解码格式,清晰度,播放,暂停,拍照等命令,通过上述信令或MQTT服务器进⾏命令控制1. 编译Nginx RTMP流媒体服务器,现成的开源⽅案有很多,有SRS,Red5,wowoza,FMS等,我这⾥使⽤的是Nginx的rtmp插件实现实时流转发。
重新编译nginx--prefix=/opt/nginx --with-stream --with-http_ssl_module --with-stream_ssl_module --with-debug --add-module=../nginx-rtmp-module2. 配置Nginx.conf 基本的nginx配置,这⾥就不进⾏介绍了,需要了解的可以参考我其他博客,⾥⾯有介绍。
Nginx模块之————RTMP模块的在线统计功能stat数据流数据的获取(不同节点则获取。。。

Nginx模块之————RTMP模块的在线统计功能stat数据流数据的获取(不同节点则获取。
⼀、⽬前只有⼀个Live节点存在单节点获取⽅式如下:public function getStreamByIp($outerIP, $streamName){//查询录像模块的IP地址外⽹,根据这个可以查看到相应的流$url = $outerIP . "/rtmp/stat";$ch = curl_init();curl_setopt($ch, CURLOPT_URL, $url);curl_setopt($ch, CURLOPT_RETURNTRANSFER, 1);curl_setopt($ch, CURLOPT_HEADER, 0);$output = curl_exec($ch);curl_close($ch);//所有流的信息,解析Xml$outputs = $this->FromXml($output);// $streamInfo = $outputs['server']['application']['live']['stream'];$streamInfo = $outputs['server']['application']['live']['stream'];if (array_key_exists("name", $streamInfo)) {//判断该设备是否在这个数组中,真:获取这个设备的所有打流信息if ($streamName == $streamInfo['name']) {$totalInfo['status'] = 200;$totalInfo['message'] = 'The server is normal and is currently streaming';$totalInfo['dataList']['name'] = $streamInfo['name'];$totalInfo['dataList']['bw_in'] = $streamInfo['bw_in'];$totalInfo['dataList']['bw_out'] = $streamInfo['bw_out'];} else {$totalInfo['status'] = 500;$totalInfo['message'] = 'The server has a problem or is not currently streaming information 1';$totalInfo['dataList']['name'] = $streamName;$totalInfo['dataList']['bw_in'] = 0;$totalInfo['dataList']['bw_out'] = 0;}} else {//存放所有的设备号到⼀个数组中foreach ($streamInfo as$key => $val) {$deviceInfo[] = $val['name'];}//判断该设备是否在这个数组中,真:获取这个设备的所有打流信息if (in_array($streamName, $deviceInfo)) {$totalInfo['status'] = 200;$totalInfo['message'] = 'The server is normal and is currently streaming';foreach ($streamInfo as$val) {if ($val['name'] == $streamName) {$totalInfo['dataList']['name'] = $val['name'];$totalInfo['dataList']['bw_in'] = $val['bw_in'];$totalInfo['dataList']['bw_out'] = $val['bw_out'];}}} else {$totalInfo['status'] = 500;$totalInfo['message'] = 'The server has a problem or is not currently streaming information 2';$totalInfo['dataList']['name'] = $streamName;$totalInfo['dataList']['bw_in'] = 0;$totalInfo['dataList']['bw_out'] = 0;}}return$totalInfo;}⼆、⽬前有两个节点Live节点和Live2节点存在多节点获取⽅式如下:public function getStreamByIp($outerIP, $streamName){//查询录像模块的IP地址外⽹,根据这个可以查看到相应的流$url = $outerIP . "/rtmp/stat";$ch = curl_init();curl_setopt($ch, CURLOPT_URL, $url);curl_setopt($ch, CURLOPT_RETURNTRANSFER, 1);curl_setopt($ch, CURLOPT_HEADER, 0);$output = curl_exec($ch);curl_close($ch);//所有流的信息,解析Xml$outputs = $this->FromXml($output);$streamInfo = $outputs['server']['application'][0]['live']['stream']; //主要看这⾥哦这⾥获取的时候是⼀个⼆维数组if (array_key_exists("name", $streamInfo)) {//判断该设备是否在这个数组中,真:获取这个设备的所有打流信息if ($streamName == $streamInfo['name']) {$totalInfo['status'] = 200;$totalInfo['message'] = 'The server is normal and is currently streaming';$totalInfo['dataList']['name'] = $streamInfo['name'];$totalInfo['dataList']['bw_in'] = $streamInfo['bw_in'];$totalInfo['dataList']['bw_out'] = $streamInfo['bw_out'];} else {$totalInfo['status'] = 500;$totalInfo['message'] = 'The server has a problem or is not currently streaming information 1';$totalInfo['dataList']['name'] = $streamName;$totalInfo['dataList']['bw_in'] = 0;$totalInfo['dataList']['bw_out'] = 0;}} else {//存放所有的设备号到⼀个数组中foreach ($streamInfo as$key => $val) {$deviceInfo[] = $val['name'];}//判断该设备是否在这个数组中,真:获取这个设备的所有打流信息if (in_array($streamName, $deviceInfo)) {$totalInfo['status'] = 200;$totalInfo['message'] = 'The server is normal and is currently streaming';foreach ($streamInfo as$val) {if ($val['name'] == $streamName) {$totalInfo['dataList']['name'] = $val['name'];$totalInfo['dataList']['bw_in'] = $val['bw_in'];$totalInfo['dataList']['bw_out'] = $val['bw_out'];}}} else {$totalInfo['status'] = 500;$totalInfo['message'] = 'The server has a problem or is not currently streaming information 2';$totalInfo['dataList']['name'] = $streamName;$totalInfo['dataList']['bw_in'] = 0;$totalInfo['dataList']['bw_out'] = 0;}}return$totalInfo;}三、解析Xmlpublic function FromXml($xml){if (!$xml) {$totalInfo['status'] = 500;$totalInfo['message'] = '没有该设备的相应信息';$totalInfo['dataList'] = null;return$totalInfo;}//将XML转为array$values = json_decode(json_encode(simplexml_load_string($xml, 'SimpleXMLElement', LIBXML_NOCDATA)), true);return$values;}以上为在录像时候遇到问题,已经解决!。
Nginx+Rtmp实现rtmp和HLS直播流,同时实现时移(分段录制回放)功能
Nginx+Rtmp实现rtmp和HLS直播流,同时实现时移(分段录制回放)功能#!/bin/shif [ $(id -u) != "0" ]; thenecho "Error: Please use root role to install!"exit 1ficlearecho "========================================"echo ""echo "========================================"echo "======= nginx_rtmp one key sctipt ======"echo "========================================"echo ""echo "========================================"get_char(){SAVEDSTTY=`stty -g`stty -echostty cbreakdd if=/dev/tty bs=1 count=1 2> /dev/nullstty -rawstty echostty $SAVEDSTTY}echo ""#echo "Press any key to start...or Press Ctrl+c to cancel"#char=`get_char`echo "========================================"echo "Start install nginx_rtmp ..."echo "========================================"yum -y install gcc gcc-c++ autoconf automakeyum -y install zlib zlib-devel openssl openssl-devel pcre-develcur_dir=$(pwd)cd nginx-1.8.0echo "========================================"echo "configure start ..."echo "========================================"./configure \--prefix=/usr/local/nginx \--sbin-path=/usr/local/nginx/nginx \--conf-path=/usr/local/nginx/nginx.conf \--pid-path=/usr/local/nginx/nginx.pid \--error-log-path=/usr/local/nginx/logs/error.log \--add-module=../nginx-rtmp-module \--with-http_mp4_moduleecho "========================================"echo "make &install"echo "========================================"makemake installecho "========================================"echo "Setting start"echo "========================================"cd $cur_dir\cp nginx.conf /usr/local/nginx/\cp nginx-rtmp-module/stat.xsl /usr/local/nginx/html/\cp nginx /etc/rc.d/init.d/chmod +x /etc/rc.d/init.d/nginxchkconfig --add nginxchkconfig nginx onservice nginx startecho "Service Test:"echo "service nginx status"echo "Result:"service nginx status#cat > /etc/fstab <<EOF#tmpfs /usr/local/nginx/html/app tmpfs defaults,size=512M 0 0#EOF#mount -a#echo "tmpfs Test:"#df -hmount -t tmpfs -o size=512m tmpfs /usr/local/nginx/html/appecho "mount -t tmpfs -o size=512m tmpfs /usr/local/nginx/html/app" >> /etc/rc.d/rc.local echo "========================================"echo "Firewall config"echo "========================================"iptables -I INPUT -p tcp --dport 6080 -j ACCEPTiptables -I INPUT -p tcp --dport 5080 -j ACCEPTiptables -I INPUT -p tcp --dport 1935 -j ACCEPTservice iptables saveecho "========================================"echo "Install end."echo "========================================" nginx.conf#user nobody;worker_processes 1;#error_log logs/error.log;#error_log logs/error.log notice;error_log logs/error.log info;#pid logs/nginx.pid;worker_rlimit_nofile 51200;events {use epoll;worker_connections 1024;}rtmp_auto_push on;rtmp_auto_push_reconnect 1s;rtmp {server {listen 1935;chunk_size 4096;application live {live on;max_connections 1024;}application hls {live on;hls on;hls_path /usr/local/nginx/html/app;hls_fragment 3s;hls_playlist_length 30s;hls_sync 100ms;meta copy;recorder chunked {record all;#record_max_size 6200K;record_interval 10s;record_suffix -%Y-%m-%d-%H_%M_%S.flv;record_path /data/www/Upload/Rec/Chunked;}recorder all {record all;record_suffix -%Y-%m-%d-%H_%M_%S.flv;record_max_size 6200000K;record_path /data/www/Upload/Rec;}}application Upload {play /data/www/Upload;}}}http {include mime.types;default_type application/octet-stream;#log_format main '$remote_addr - $remote_user [$time_local] "$request" '# '$status $body_bytes_sent "$http_referer" '# '"$http_user_agent" "$http_x_forwarded_for"';#access_log logs/access.log main;sendfile on;#tcp_nopush on;#keepalive_timeout 0;keepalive_timeout 65;#gzip on;server {listen 5080;server_name localhost;#charset koi8-r;#access_log logs/host.access.log main;location / {root html;index index.html index.htm;}#error_page 404 /404.html;# redirect server error pages to the static page /50x.html#error_page 500 502 503 504 /50x.html;location = /50x.html {root html;}# proxy the PHP scripts to Apache listening on 127.0.0.1:80##location ~ \.php$ {# proxy_pass http://127.0.0.1;#}# pass the PHP scripts to FastCGI server listening on 127.0.0.1:9000 ##location ~ \.php$ {# root html;# fastcgi_pass 127.0.0.1:9000;# fastcgi_index index.php;# fastcgi_param SCRIPT_FILENAME /scripts$fastcgi_script_name; # include fastcgi_params;#}# deny access to .htaccess files, if Apache's document root# concurs with nginx's one##location ~ /\.ht {# deny all;#}location /hls {types {#application/vnd.apple.mpegurl m3u8;application/x-mpegurl m3u8;video/mp2t ts;}alias /usr/local/nginx/html/app;}location /stat {rtmp_stat all;rtmp_stat_stylesheet stat.xsl;}location /stat.xsl {root html;}}server {listen 6080;server_name localhost;location / {root /data/www/AVA.ResourcesPlatform.AdminUI;index index.html index.htm;mp4;mp4_buffer_size 1m;mp4_max_buffer_size 5m;#mp4_limit_rate on;#mp4_limit_rate_after 30s;limit_rate 1m; # about 2mbitlimit_rate_after 5m;}error_page 500 502 503 504 /50x.html;location = /50x.html {root html;}#location ~ \.mp4$ {#}}# another virtual host using mix of IP-, name-, and port-based configuration ##server {# listen 8000;# listen somename:8080;# server_name somename alias another.alias;# location / {# root html;# index index.html index.htm;# }#}# HTTPS server##server {# listen 443 ssl;# server_name localhost;# ssl_certificate cert.pem;# ssl_certificate_key cert.key;# ssl_session_cache shared:SSL:1m;# ssl_session_timeout 5m;# ssl_ciphers HIGH:!aNULL:!MD5;# ssl_prefer_server_ciphers on;# location / {# root html;# index index.html index.htm;# }#}}。
nginx使用nginx-rtmp-module模块实现直播间功能

注意:hls所在目录nginx的用户必须有写入权限。
2、obs软件配置录制流名称
在配置obs推送流URL的下方有一个设置”流名称”的地方,这里可以随意填写一个名称(我这里示例填入”test”)
rtmp { server { listen 1935; chunk_size 4096;
application live { live on; hls on; hls_path /usr/share/nginx/html/hls; hls_fragment 5s; } } }
http { server { listen 80; ..... location / {
增加rtmp协议配置
wujianjun@wujianjun-work ~/nginx-1.13.6 $ sudo vi /usr/local/nginx/conf/nginx.conf
在nginx.conf文件末尾增加以下rtmp协议的配置
rtmp { server { listen 1935; chunk_size 4096;
配置完成后,点击”开始推流” 启动支持网络流播放的视频播放器(演示使用vlc播放器) 配置网络流播放的地址,如下图:
当点击”播放”后,稍等几秒,即可看到播放器显示了obs捕获的图像了。
由迟。
http访问直播视频
1、更改nginx.conf中配置,增加hls配置(hls是在流媒体服务器中用来存放流媒体的文件夹),再次hls所在目录设置为http协议访问目录即可,更改后的配置如下:
这篇文章主要给大家介绍了关于利用ssl配置nginx反向代理的简单步骤文中通过示例代码介绍的非常详细对大家学习或者使用nginx具有一定的参考学习价值需要的朋友们下面来一起学习学习吧
nginx的rtmp搭建流媒体服务器实现直播流
nginx的rtmp搭建流媒体服务器实现直播流1.下载nginx rtmp module,然后安装(这⾥不做详细介绍)下载之后解压 unzip master.zip安装nginx2.安装成功后,配置rtmp模块rtmp { server { listen 1935; chunk_size 4000; application mylive { live on; record all; record_path /home/live_record; record_max_size 200M; hls on; hls_path /home/hls; hls_fragment 1s; hls_playlist_length 5; allow play all; } application live{ live on; }}重启 /usr/local/nginx/sbin/nginx -s reload直播推流地址:rtmp://192.168.0.83:1935/live/xxxx直播播放地址:rtmp://192.168.0.83:1935/live/xxxx利⽤obs直播软件进⾏推流:(播放路径填写的www,则拉取路径就是rtmp://192.168.0.83:1935/live/www)利⽤video.js进⾏直播观看:<!DOCTYPE html><html><head><title>123</title><link href="/css/video-js.css" rel="stylesheet"><script src="/js/video.min.js"></script></head><body><video id="my-player" class="video-js" controlspreload="auto" data-setup='{}' style="width: 780px;height: 500px;"><source src='rtmp://192.168.0.83:1935/live/www' type='rtmp/flv'/></video><script type="text/javascript">var player = videojs('my-player');var options = {};var player = videojs('my-player', options, function onPlayerReady() {videojs.log('Your player is ready!');// In this context, `this` is the player that was created by Video.js.this.play();// How about an event listener?this.on('ended', function() {videojs.log('Awww...over so soon?!');});});</script></body></html>只是做了⼀个简单的本地播放,后来到线上测试,发现这玩意对带宽要求⽐较⾼,我的渣渣服务器玩不过来更多的研究中......。
nginx-rtmp配置详解
nginx-rtmp配置详解•$name - 流的名字。
•$app - 应用名。
•$addr - 客户端地址。
•$flashver - 客户端 flash 版本。
•$swfurl - 客户端 swf url。
•$tcurl - 客户端 tc url。
•$pageurl - 客户端页面 url。
可以在 exec 指令中定义 Shell 格式的转向符用于写输出和接收输入。
支持如下•截断输出 >file。
•附加输出 >>file。
•重定向描述符类似于 1>&2•输入 <file。
以下 ffmpeg 调用将输入流转码为 HLS-ready 流(H264/AAC)。
运行这个示例,FFmpeg 须编译为支持 libx264 & libfaac。
**application src { live on; exec ffmpeg -i name -vcodec libx264 -vprofile baseline -g 10 -s300x200 -acodec libfaac -ar 44100 -ac 1 -f flv rtmp://localhost/hls/name2>>/var/log/ffmpeg-$name.log; }convert recorded file to mp4 format•off - 什么也不录制•all - 音频和视频(所有)•audio - 音频•video - 视频•keyframes - 只录制关键视频帧•manual - 用不自动启动录制,使用控制接口来启动/停止在单个记录指令中可以有任何兼容的组合键。
**record all;[python]1.!/usr/bin/python2.import fcntl, sys3.sys.stderr.close4.fcntl.lockf(open(sys.argv[1], "a"), fcntl.LOCK_EX,fcntl.LOCK_NB)record_interval 15m;** recorder 语法:recorder name {...} 上下文:application 描述:创建录制块。
基于Nginx搭建RTMPHLS视频直播服务器
基于Nginx搭建RTMPHLS视频直播服务器服务器环境服务器OS:CentOS Linux release 7.2.1511nginx版本:1.14.1nginx-rtmp-module:基于Nginx的开源流媒体服务器安装nginx + nginx-rtmp-module到nginx官网官网下载最新的源码包,到nginx-rtmp-module项目地址下载最新源码编译安装nginx,注意在参数里指定nginx-rtmp-module:1.# cd /software2.# rz nginx-1.14.1.tar.gz3.# tar xf nginx-1.14.1.tar.gz4.# git clone https:///arut/nginx-rtmp-module.git5.# cd nginx-1.14.16.# ./configure --prefix=/usr/local/nginx --user=nginx --group=nginx --with-http_ssl_module --with-http_stub_status_module --add-module=/soft/nginx-rtmp-module7.# make && make install/soft/nginx-rtmp-module 改为服务器存放的实际地址配置nginx虚拟主机在nginx.conf中添加rtmp服务配置:1.# vim /usr/local/nginx/conf/nginx.conf2.rtmp {3.server {4.listen 1935; #监听的端口5.chunk_size 4096;6.application hls {7.live on;8.hls on;9.hls_path /usr/local/nginx/html/hls; #视频流文件目录(自己创建)10.hls_fragment 3s;11.}12.}13.}参数说明1.rtmp 是协议名称2.server 说明内部中是服务器的相关配置3.listen 监听的端口,rtmp协议的默认端口为19354.application 访问的应用路径是hls5.live on 启用rtmp直播6.record off 不记录数据7.hls on 启用hls直播8.hls_path 切片保存位置9.hls_fragment 每个切片的长度配置直播,hls支持以及状态监控页面1.location /hls {2.types {3.application/vnd.apple.mpegurl m3u8;4.#或 application/x-mpegURL5.video/mp2t ts;6.}7.alias /usr/local/nginx/html/hls; #视频流文件目录(自己创建)8.expires -1;9.add_header Cache-Control no-cache;10.}11.location /stat {12.rtmp_stat all;13.rtmp_stat_stylesheet stat.xsl;14.}15.16.location /stat.xsl {17.root /usr/local/extend_module/nginx-rtmp-module/;18.}19.}20.}nginx最终配置1.worker_processes 1;2.3.events {4.worker_connections 1024;5.}6.7.8.http {9.include mime.types;10.default_type application/octet-stream;11.sendfile on;12.keepalive_timeout 65;13.server {14.listen 80;15.server_name localhost;16.location / {17.root html;18.index index.html index.htm;19.}20.error_page 500 502 503 504 /50x.html;21.location = /50x.html {22.root html;23.}24.25.location /hls {26.types {27.application/vnd.apple.mpegurl m3u8;28.#或 application/x-mpegURL29.video/mp2t ts;30.}31.alias /usr/local/nginx/html/hls; #视频流文件目录(自己创建)32.expires -1;33.add_header Cache-Control no-cache;34.}35.location /stat {36.rtmp_stat all;37.rtmp_stat_stylesheet stat.xsl;38.}39.40.location /stat.xsl {41.root /usr/local/extend_module/nginx-rtmp-module/;42.}43.44.}45.}46.rtmp {47.server {48.listen 1935;49.chunk_size 4096;50.51.application hls {52.live on;53.hls on;54.hls_path /usr/local/nginx/html/hls; #视频流文件目录(自己创建)55.hls_fragment 3s;56.}57.}58.}nginx常用操作1.# cp /usr/local/nginx/sbin/nginx /usr/local/bin/ #把nginx加入到环境变量里,不用输入全路径了2.# nginx #第一次启动3.# nginx -t #检查配置文件是否正确4.# nginx -s reload #平滑重启,修改配置文件后,不断服务重启5.# nginx -s stop #停止服务客户端推送直播推流端使用rtmp协议推流,端口为1935。
nginx 推流原理

nginx 推流原理
nginx 推流原理:Nginx 推流原理是指Nginx 服务器通过RTMP 协议从客户端接收视频流,并将其推送到其他客户端进行播放的过程。
具体步骤如下:
客户端向Nginx 服务器发送RTMP 协议的推流请求。
Nginx 服务器接收到推流请求后,会为该客户端创建一个RTMP 会话,并建立一个RTMP 连接。
客户端通过RTMP 协议将视频流发送给Nginx 服务器,Nginx 服务器将其保存在内存里。
Nginx 服务器通过RTMP 协议将视频流推送给其他客户端,这些客户端通过RTMP 协议接收视频流并进行播放。
当客户端停止推流时,Nginx 服务器会关闭该RTMP 连接,并释放相应的资源。
需要注意的是,Nginx 推流原理中,Nginx 服务器并不会对视频流进行处理或转码,它只是起到了中转作用。
因此,如果需要对视频流进行处理或转码,需要使用其他工具或服务。
- 1、下载文档前请自行甄别文档内容的完整性,平台不提供额外的编辑、内容补充、找答案等附加服务。
- 2、"仅部分预览"的文档,不可在线预览部分如存在完整性等问题,可反馈申请退款(可完整预览的文档不适用该条件!)。
- 3、如文档侵犯您的权益,请联系客服反馈,我们会尽快为您处理(人工客服工作时间:9:00-18:30)。
Nginx RTMP 功能研究Nginx-RTMP功能调研1.RTMP协议介绍 (2)2.RTMP server.32.1当前的流媒体server.32.2Wowza功能 (3)3.Nginx-based RTMP server.53.1 Nginx rtmp 功能点 (5)3.2编译nginx rtmp模块 (6)3.3配置以及功能介绍 (6)3.4用nginx-rtmp-module搭建直播环境 (8)3.5Nginx rtmp对于HLS支持 (13)1. RTMP协议介绍RTMP(Real Time Messaging Protocol)实时消息传送协议是Adobe Systems公司为Flash播放器和服务器之间音频、视频和数据传输开发的私有协议。
它有三种变种:1)工作在TCP之上的明文协议,使用端口1935;2)RTMPT封装在HTTP请求之中,可穿越防火墙;3)RTMPS类似RTMPT,但使用的是HTTPS连接;RTMP协议就像一个用来装数据包的容器,这些数据可以是AMF格式的数据,也可以是FLV中的视/音频数据。
一个单一的连接可以通过不同的通道传输多路网络流。
这些通道中的包都是按照固定大小的包传输的。
图1 RTMP交互图更多协议的细节可以参见《rtmp specification 1.0》2. RTMP server2.1当前的流媒体server现在主要有两种rtmp server,商业的和开源的。
商业的比开源的支持的功能多,个人根据需要选择吧商业的有FMS Wowza开源RTMP server1. red5 java 有名2. crtmpserver c++ 支持多种rtmp协议,移动设备以及IPTV相关网络协议/ Erlyvideo erlong 有开源和商业版本https///erlyvideo/erlyvideo h3. aXeVideo haXe 一个实验性的,轻量级的服务器/p/haxevideo/4. FluorineFx .Net To be defined http://www/5. nginx-rtmp c nginx模块支持rtmp和HLS https:///arut/nginx-rtmp-module2.2 Wowza功能FMS是Adobe公司的产品,license非常昂贵。
下面就wowza这个商业软件讲下流媒体Server,不仅仅是RTMP Server,在达到生产环境所需要的功能。
wowza最突出的特定是多终端适应性,这个在如今多媒体融合的网络环境下有很强的实用意义。
究其原理并无深入研究。
国内尚为视讯是其代理公司。
Wowza Media Server是一款高性能、多线程的流媒体服务器软件。
专为多种终端设备提供音视频内容播放服务,支持iOS、windows、Android、BlackMerry等系统的终端设备,以HTTP、RTSP/ RTP、RTMP传输协议的流播放,还支持利用机顶盒进行播放的IPTV。
通过对Wowza Media Server的深度定制开发,尚为网络视听管理系统实现了对网络音视频内容的采集、编码、编辑、转码、审核、播出与监控等完整的生命周期管理,突出了以下能力:1) 自动化内容收录对网络视频的录制,采用服务器端录制模式,满足从28Kbps到10Mbps码流范围的H.264编码流的自动化定时收录。
2) 快速在线编辑云计算架构设计,服务器端处理。
所有编辑任务都处在云端,对编辑机无要求,任务处理快捷简单。
对视频的处理包括切条、合并、去除广告、添加logo等操作。
支持同一素材多格式文件的一次性编辑处理,提高工作效率。
3) 云式转码采用云转码技术开发的音视频文件转码、实时流转码,实现了不同格式、码率、分辨率、帧数等参数的自由转换,满足不同终端的播放需求。
4) 多终端发布支持结合Wowza Media Server支持多协议多终端的特性,尚为网络视听系统一个平台即可支持多终端设备的视频访问,无论用任何设备都可访问所需的视频内容。
在对多终端内容统一管理的基础之上,还可实现了多终端视频的断点续播功能。
用户的播放在一个终端上播放暂停后,用户的信息、节目信息以及断点信息立刻传送给其它终端,实现了不同终端间的断点续播。
5) 稳定的安全保障全LINUX架构,保障系统的安全性。
自动支持负载均衡部署,可满足大并发用户的数据响应处理。
扩展性好,可随需增减流媒体服务器来变更系统承载的并发用户数。
除此之外,个人认为完善的DRM版权管理对于视频直播分发是非常重要的功能,服务器状态实时监控是对运营的高效稳定也有非常最要的功能。
3. Nginx-basedRTMP server3.1 Nginx rtmp 功能点1. 支持音视频直播2. 支持flv/mp4视频格式,输入可以是文件或者HTTP流3. 支持两种流的分发模式pushand pull4. 可以将直播流录制成flv文件5. H264/AAC编码6. 支持在线转码Onlinetranscoding with FFmpeg7. 支持HLS (HTTP LiveStreaming)需要libavformat (>= 8. 53.31.100) from ffmpeg ()8. HTTPcallbacks (publish/play/record/update etc)9. 支持外部程序(exec)10. HTTPcontrol module for recording audio/video and dropping clients11. 先进内存控制技术,可以在使用少量内存的情况下完成流畅的直播功能。
12 . 可以和以下协同工作。
FMS server(Wirecast, FMS, Wowza,)Player(JWPlayer, FlowPlayer, StrobeMediaPlayback,)外部程序(ffmpeg,avconv,rtmpdump,flvstreamer )13. Statistics in XML/XSL in machine- & human- readable form14. 支持跨平台Linux/FreeBSD/MacOS项目地址https:///arut/nginx-rtmp-modulenginx-rtmp-module Directiveshttps:///arut/nginx-rtmp-module/wiki/Directives总的来说Nginx-RTMP是个比较轻量的项目,可以满足直播的采集,编码和分发工作,该项目丰富的完善了nginx对视频的支持,特别的nginx-rtmp实现了对HLS的支持。
3.2 编译nginx rtmp模块编译安装,和其他nginx模块一样./configure--add-module=/path/to/nginx-rtmp-module对于HLS的支持,需要额外的一个模块 ../configure--add-module=/path/to/nginx-rtmp-module--add-module=/path/to/nginx-rt mp-module/hls3.3 配置以及功能介绍RTMP 直播的一般格式是rtmp:///app/name,其中app的名字对于application的名字,1. 下列是直播的配置,app是live。
application live {live on;}2. 配置支持访问控制,你可以指定允许发布的IP以及允许收看的IP:application live {live on;allow publish 127.0.0.1;deny publish all;allow play all;3. 支持Multi-worker streaming工作方式,需要指令rtmp_auto_push on支持,这样nginx有多个worker的情况下,可以将流分发到多个进程进行处理,充分利用服务器资源。
rtmp_auto_push on;rtmp {server {listen 1935;chunk_size 4000;# TV mode: one publisher, many subscribersapplication mytv {live on;}}4. 流转码的功能,下面的例子使用了exec这种使用外部程序ffmpeg的功能. Ffmpeg是一个强大的媒体处理工具,几乎可以做任意有关video/audio的处理。
更多ffmpeg与RTMP流媒体连接用法可以参考以下链接。
/viewthread.php?tid=15423# Transcoding (ffmpeg needed)application big {live on;# Multiple exec lines can be specified.exec /usr/bin/ffmpeg -re -irtmp://localhost:1935/$app/$name -vcodec flv -acodec copy -s 32x32 -f flv rtmp://localhost:1935/small/${name};}application small {live on;# Video with reduced resolution comes here from ffmpeg }5.Push和pull模式,用在多个server协助的情况下,输出流可以push,输入流可以pull。
application mypush {live on;# Every stream published here# is automatically pushed to# these two machinespush ;push :1934;}application mypull {live on;# Pull all streams from remote machine# and play locallypull rtmp://pageUrl=/index.html;}3.4 用nginx-rtmp-module搭建直播环境1. 需要准备视频源,这个可以使用ffmpeg模拟,或者通过FMS采集。
使用ffmpeg 比较方便,例如ffmpeg -re -i /root/test123.flv -f flvrtmp://192.168.100.135/myapp/test,这样一条命令就可以发布一个直播源。
2. 配置nginx-rtmp,完成相关功能配置,可以参考以上描述。
3. 搭建客户端测试环境,本文测试播放器使用的是jwplayerhttps:///arut/nginx-rtmp-module项目里面test目录下有相关的播放器设置和配置文件。
