HSRP实验
VRRP、HSRP和MSTP、SLA综合实验

SW1
SW3
pc1
Vlan10
vlan20
Vlan10
SW4 vlan20
pc2 192.168.20.100
一、 HSRP 和 VRRP 的配置
可以使用HSRP 这里先介绍HSRP 可以使用HSRP或者 HSRP或者 VRRP 来实现网关的冗余, 来实现网关的冗余, 这里先介绍HSRP的配置 HSRP的配置: 的配置:பைடு நூலகம்HSRP的配置如下 HSRP的配置如下: 的配置如下:
SW2
SW1
SW3
pc1
Vlan10
vlan20
Vlan10
SW4 vlan20
pc2 192.168.20.100
再看 R2 路由表:
很显然不管是去 vlan10 还是 vlan20 的数据都走 SW2 了,到底能不能行的通还得继续尝 试,我弱弱的估计这样应该会出问题的
果不其然,如我所料,PC2 可以通,但 PC1 无法 ping 通,问题出在哪了 原因很简单,因为上行 PC1 发出的数据包先交给 SW1,SW1 根据路由表中的提示将包 再交给 SW2,此时 SW2 一看源地址是 vlan10 网段的便果断的交还给 SW1 如此往复便出现 死循环了,自然就通不了了,但下行链路则不受影响,R2 将数据包交给 SW2,SW2 他也很
sw2 10.250 SW1
192.1.1.0/30 192.168.10.0 SW1 194.1.1.0/30 SW2
Vlan 10 ip:192.168.10.253 Vlan 20 ip:192.168.20.254 Vrrp 1 ip 192.168.10.250 Vrrp 1 priority 110 Vrrp 2 ip 192.168.20.250 Vrrp 2 priority 120 Vrrp2 preempt
实验六-HSRP与上行链路跟踪

一、实验目的1、组网要求企业总部局域网采用两台核心交换机组网来提高网络可靠性,为防止二层环路,需要全网运行STP;将SW1部署为跟网桥,SW2部署为备份跟网桥,并将接入PC的接口配置为portfast 端口;SW1—SW2之间使用链路捆绑进一步提高可靠性;同时,部署HSRP为内部vlan提供网关冗余。
本局域网有4个vlan,生产业务vlan10,办公业务vlan11,二层交换机网管vlan8;将SW1部署为vlan8/10/11的主网关,将SW2部署为vlan11的主网关;要求vlan10,vlan11的主网关跟踪上行链路。
2、测试HSRP主备网关倒换。
3、分析PC1 ping PC2的三层通信过程和二层通信过程。
二、实验拓扑三、实验内容1、基本信息配置SW1Switch>enable//进入全局模式Switch#config terminal//进入特权模式Switch(config)#hostname SW1//设置主机名SW1(config)#no ip domain lookup//禁用域名查找SW1(config)#enable password ip//设置进入特权模式密码SW1(config)#line console 0//连接到console线口SW1(config-line)#logging synchronous //自动换行SW1(config-line)#exec-t 0//超时为0SW1(config-line)#password ip//设置进入console线口的密码SW1(config-line)#login//进入console线口是需要进行认证SW1(config-line)#exit//退出console线口SW1(config)#line aux 0//进入线口SW1(config-line)#logging synchronous //自动换行SW1(config-line)#exec-t 0//超时为0SW1(config-line)#password bluefox//设置进入本线口的密码SW1(config-line)#login//设置进入线口是进行认证SW1(config-line)#exit//退出线口SW1(config)#line vty 04//进入线口SW1(config-line)#logging synchronous //自动换行SW1(config-line)#exec-t 0//超时为0SW1(config-line)#password bluefox//设置进入密码SW1(config-line)#login//设置进入是进行认证SW1(config-line)#exit//退出线口SW2Switch>enableSwitch#config terminalSwitch(config)#hostname SW2SW2(config)#no ip domain lookup SW2(config)#enable password ipSW2(config)#line console 0SW2(config-line)#logging synchronous SW2(config-line)#exec-t 0SW2(config-line)#password ipSW2(config-line)#loginSW2(config-line)#exitSW2(config)#line aux 0SW2(config-line)#logging synchronous SW2(config-line)#exec-t 0SW2(config-line)#password bluefox SW2(config-line)#loginSW2(config-line)#exitSW2(config)#line vty 04SW2(config-line)#logging synchronous SW2(config-line)#exec-t 0SW2(config-line)#password bluefox SW2(config-line)#loginSW2(config-line)#exitSW3SW3>enableSW3#config terminalSW3(config)#hostname SW3SW3(config)#no ip domain lookupSW3(config)#enable password ipSW3(config)#line console 0SW3(config-line)#logging synchronous SW3(config-line)#exec-t 0SW3(config-line)#password ipSW3(config-line)#loginSW3(config-line)#exitSW3(config)#line aux 0SW3(config-line)#logging synchronous SW3(config-line)#exec-t 0SW3(config-line)#password bluefox SW3(config-line)#loginSW3(config-line)#exitSW3(config)#line vty 04SW3(config-line)#logging synchronous SW3(config-line)#exec-t 0SW3(config-line)#password bluefox SW3(config-line)#loginSW3(config-line)#exitRT5Router>enableRouter#config terminalRouter(config)#hostname RT5RT5(config)#no ip domain lookupRT5(config)#enable password ipRT5(config)#line console 0RT5(config-line)#logging synchronous RT5(config-line)#exec-t 0RT5(config-line)#password ipRT5(config-line)#loginRT5(config-line)#exitRT5(config)#line aux 0RT5(config-line)#logging synchronous RT5(config-line)#exec-t 0RT5(config-line)#password bluefox RT5(config-line)#loginRT5(config-line)#exitRT5(config)#line vty 04RT5(config-line)#logging synchronous RT5(config-line)#exec-t 0RT5(config-line)#password bluefox RT5(config-line)#loginRT5(config-line)#exitRT6Router>enableRouter#config terminalRouter(config)#hostname RT6RT6(config)#no ip domain lookupRT6(config)#enable password ipRT6(config)#line console 0RT6(config-line)#logging synchronous RT6(config-line)#exec-t 0RT6(config-line)#password ipRT6(config-line)#loginRT6(config-line)#exitRT6(config)#line aux 0RT6(config-line)#logging synchronous RT6(config-line)#exec-t 0RT6(config-line)#password bluefox RT6(config-line)#loginRT6(config-line)#exitRT6(config)#line vty 04RT6(config-line)#logging synchronousRT6(config-line)#exec-t 0RT6(config-line)#password bluefoxRT6(config-line)#loginRT6(config-line)#exit2、创建vlanSW1SW1#vlan database//进入vlan database模式SW1(vlan)#vlan 8//创建vlan8SW1(vlan)#vlan 10//创建vlan10SW1(vlan)#vlan 11//创建vlan11SW1(vlan)#exit//退出vlan database模式、SW2SW2#vlan database//进入vlan database模式SW2(vlan)#vlan 8//创建vlan8SW2(vlan)#vlan 10//创建vlan10SW2(vlan)#vlan 11//创建vlan11SW2(vlan)#exit//退出vlan database模式SW3SW3#vlan database//进入vlan数据库SW3(vlan)#vlan 8//创建vlan8SW3(vlan)#vlan 10//创建vlan10SW3(vlan)#vlan 11//创建vlan11SW3(vlan)#exit//退出vlan database模式4、跟网桥配置SW1SW1(config)#spanning-tree vlan 8 priority 0 //配置sw1为vlan8的跟网桥SW1(config)#spanning-tree vlan 10 priority 0//配置sw1为vlan10的跟网桥SW1(config)#spanning-tree vlan 11 priority 0//配置sw1为vlan11 的跟网桥注:模拟器上不支持批量配置vlan跟网桥,只能一个一个配置SW2SW2(config)#spanning-tree vlan 8 priority 4096//配置sw2为vlan8的备份网桥SW2(config)#spanning-tree vlan 10 priority 4096//配置sw2为vlan10 的备份网桥SW2(config)#spanning-tree vlan 11 priority 4096//配置sw2为vlan11的备份网桥5、二层链路捆绑SW1SW1(config)#interface range fastEthernet 0/1 -2//进入端口1和2SW1(config-if-range)#switchport trunk encapsulation dot1q//设置trunk封装协议为dot1qSW1(config-if-range)#switchport mode trunk//端口为trunk模式SW1(config-if-range)#switchport trunk allowed vlan all//配置trunk允许所有vlan通过SW1(config-if-range)#channel-group 2 mode on//将端口1和2划分到通道组2中SW1(config-if-range)#exit//退出端口1和2SW2SW2(config)#interface range fastEthernet 0/1 -2//进入端口1 和2SW2(config-if-range)#switchport trunk encapsulation dot1q//配置trunk封装协议为dot1qSW2(config-if-range)#switchport mode trunk//配置端口为trunk接口SW2(config-if-range)#switchport trunk allowed vlan all//配置trunk允许所有vlan通过SW2(config-if-range)#channel-group 2 mode on//将接口1和2 划分到通道组2中SW2(config-if-range)#exit//退出接口6、二层接口配置SW1SW1(config)#interface fastEthernet 0/3//进入接口SW1(config-if)#switchport trunk encapsulation dot1qSW1(config-if)#switchport mode trunk//配置接口为trunk接口SW1(config-if)#switchport trunk allowed vlan all//配置trunk允许所有vlan通过SW1(config-if)#exit//退出端口SW2SW2(config)#interface fastEthernet 0/3//进入接口SW2(config-if)#switchport trunk encapsulation dot1q//配置trunk封装协议为dot1qSW2(config-if)#switchport mode trunk//配置接口为trunk接口SW2(config-if)#switchport trunk allowed vlan all//配置trunk允许所有vlan通过SW2(config-if)#exit//退出接口SW3SW3(config)#interface fastEthernet 0/10//进入接口SW3(config-if)#switchport mode access//配置接口为access接入模式SW3(config-if)#switchport access vlan 10//将接口划分到vlan10 中SW3(config-if)# spanning-tree portfast//设置接口为portfast模式,SW3(config-if)#exit//退出接口SW3(config)#interface fastEthernet 0/11//进入接口SW3(config-if)#switchport mode access//配置接口为access接入模式SW3(config-if)#switchport access vlan 11//将接口划分到vlan11中SW3(config-if)# spanning-tree portfast//设置接口为portfast模式SW3(config-if)#exit//退出接口SW3(config)#interface range fastEthernet 0/1 -2//进入接口1和2,此处为批量设置,因为两个接口的配置相同SW3(config-if-range)#switchport trunk encapsulation dot1qSW3(config-if-range)#switchport mode trunk//配置接口为trunk模式SW3(config-if-range)#switchport trunk allowed vlan all//配置trunk允许所有vlan通过SW3(config-if-range)#exit//退出接口1和27、二层设备网管地址配置SW3(config)#interface vlan 8//为sw3配置网管地址SW3(config-if)#ip address 192.168.8.132 255.255.255.128 //配置ip地址SW3(config-if)#no shutdown//启用端口SW3(config-if)#exit//退出8、三层接口配置SW1SW1(config)#interface vlan 8//配置vlan8的路由点SW1(config-if)#ip address 192.168.8.130 255.255.255.128 //配置ip地址SW1(config-if)#no shutdown//启用SW1(config-if)#exit//退出SW1(config)#interface vlan 10//配置vlan10的路由点SW1(config-if)#ip address 192.168.10.2 255.255.255.0//配置ip地址SW1(config-if)#no shutdown//启用SW1(config-if)#exit//退出SW1(config)#interface vlan 11//配置vlan11的路由点SW1(config-if)#ip address 192.168.11.2 255.255.255.0//配置ipSW1(config-if)#no shutdown//启用SW1(config-if)#exitSW2SW2(config)#interface vlan 8//配置vlan8的路由点SW2(config-if)#ip address 192.168.8.131 255.255.255.128 //配置ip地址SW2(config-if)#no shutdown//启用SW2(config-if)#exit//退出SW2(config)#interface vlan 10//配置vlan10的路由点SW2(config-if)#ip address 192.168.10.3 255.255.255.0//配置ip地址SW2(config-if)#no shutdown//启用SW2(config-if)#exit//退出SW2(config)#interface vlan 11//配置vlan11的路由点SW2(config-if)#ip address 192.168.11.3 255.255.255.0//配置ipSW2(config-if)#no shutdown//启用SW2(config-if)#exitSW1上行链路SW1(config)#interface fastEthernet 0/12//进入接口SW1(config-if)#no switchport//配置接口为三层接口SW1(config-if)#ip address 192.168.9.1 255.255.255.252 //为接口配置IP地址SW1(config-if)#no shutdown//打开接口SW1(config-if)#exit//退出接口RT5(config)#interface ethernet 0/0//进入接口RT5(config-if)#ip address 192.168.9.2 255.255.255.252 //配置IP地址RT5(config-if)#no shutdown//打开接口RT5(config-if)#exit//退出接口SW2上行链路SW2(config)#interface fastEthernet 0/12//进入接口SW2(config-if)#no switchport//配置接口为三层接口SW2(config-if)#ip address 192.168.9.5 255.255.255.252//配置IP地址SW2(config-if)#no shutdown//打开接口SW2(config-if)#exit//退出接口RT6(config)#interface ethernet 0/0//进入接口RT6(config-if)#ip address 192.168.9.6 255.255.255.252//配置IP地址RT6(config-if)#no shutdown//打开端口RT6(config-if)#exit//退出端口9、HSRP部署SW1上的HSRP配置SW1(config)#interface vlan 8SW1(config-if)#standby 8 ip 192.168.8.129//配置HSRP组8的虚IPSW1(config-if)#standby 8 priority 120//设置组8 的优先级SW1(config-if)#standby 8 preempt//配置组8的抢占SW1(config-if)#exitSW1(config)#interface vlan 10SW1(config-if)#standby 10 ip 192.168.10.1//配置组10 的虚IPSW1(config-if)#standby 10 priority 120//配置组10的优先级SW1(config-if)#standby 10 preempt配置组10的抢占SW1(config-if)#standby 10 track fastethernet 0/12 30//配置HSRP组10跟踪上连接口,上连接口DOWN时优先级减30 SW1(config-if)#exitSW1(config)#interface vlan 11SW1(config-if)#standby 11 ip 192.168.11.1//配置组11的虚IPSW1(config-if)#standby 11 preempt//配置组11的抢占SW1(config-if)#exitSW2上HSRP的配置SW2(config)#interface vlan 8SW2(config-if)#standby 8 ip 192.168.8.129//配置组8的虚IPSW2(config-if)#standby 8 preempt//配置组8的抢占SW2(config-if)#exitSW2(config)#interface vlan 10SW2(config-if)#standby 10 ip 192.168.10.1//配置组10的虚IPSW2(config-if)#standby 10 preempt//配置10的抢占SW2(config-if)#exitSW2(config)#interface vlan 11SW2(config-if)#standby 11 ip 192.168.11.1//配置组11的虚IPSW2(config-if)#standby 11 priority 120//配置组11的优先级SW2(config-if)#standby 11 preempt//配置组11的抢占SW2(config-if)#standby 11 track fastethernet 0/12 30//配置组11跟踪上连接口,上连接口down时优先级减30SW2(config-if)#exit注:不配置优先级时默认是10010、开启三层交换路由功能SW1(config)#ip routingSW2(config)#ip routing11、静态路由SW1(config)#ip route 192.168.9.4 255.255.255.252 192.168.10.3SW2(config)#ip route 192.168.9.0 255.255.255.252 192.168.10.2RT5(config)#ip route 0.0.0.0 0.0.0.0 192.168.9.1RT6(config)#ip route 0.0.0.0 0.0.0.0 192.168.9.5四、实验结果SW1#show standby briefP indicates configured to preempt.Interface Grp Prio P State Active Standby Virtual IPVl8 8 120 P Active local 192.168.8.131 192.168.8.129 Vl10 10 120 P Active local 192.168.10.3 192.168.10.1 Vl11 11 100 P Standby 192.168.11.3 local 192.168.11.1SW2#show standby briefP indicates configured to preempt.Interface Grp Prio P State Active Standby Virtual IPVl8 8 100 P Standby 192.168.8.130 local 192.168.8.129 Vl10 10 100 Standby 192.168.10.2 local 192.168.10.1 Vl11 11 120 P Active local 192.168.11.2 192.168.11.1Show running-config信息截取SW1interface Vlan8ip address 192.168.8.130 255.255.255.128standby 8 ip 192.168.8.129standby 8 priority 120standby 8 preempt!interface Vlan10ip address 192.168.10.2 255.255.255.0standby 10 ip 192.168.10.1standby 10 priority 120standby 10 preempt!interface Vlan11ip address 192.168.11.2 255.255.255.0standby 11 ip 192.168.11.1standby 11 preempt!SW2interface Vlan8ip address 192.168.8.131 255.255.255.128standby 8 ip 192.168.8.129standby 8 preempt!interface Vlan10ip address 192.168.10.3 255.255.255.0standby 10 ip 192.168.10.1standby 10 preempt!interface Vlan11ip address 192.168.11.3 255.255.255.0standby 11 ip 192.168.11.1standby 11 priority 120standby 11 preempt全网连通性测试PC1VPCS 1 >ping 192.168.8.132192.168.8.132 icmp_seq=1 timeout192.168.8.132 icmp_seq=2 time=35.000 ms 192.168.8.132 icmp_seq=3 time=44.000 ms 192.168.8.132 icmp_seq=4 time=13.000 ms 192.168.8.132 icmp_seq=5 time=49.000 msVPCS 1 >ping 192.168.11.100192.168.11.100 icmp_seq=1 time=11.000 ms 192.168.11.100 icmp_seq=2 time=10.000 ms 192.168.11.100 icmp_seq=3 time=45.000 ms 192.168.11.100 icmp_seq=4 time=10.000 ms 192.168.11.100 icmp_seq=5 time=10.000 msVPCS 1 >ping 192.168.9.2192.168.9.2 icmp_seq=1 time=51.000 ms 192.168.9.2 icmp_seq=2 time=14.000 ms 192.168.9.2 icmp_seq=3 time=21.000 ms 192.168.9.2 icmp_seq=4 time=43.000 ms 192.168.9.2 icmp_seq=5 time=13.000 msVPCS 1 >ping 192.168.9.6192.168.9.6 icmp_seq=1 time=59.000 ms 192.168.9.6 icmp_seq=2 time=12.000 ms 192.168.9.6 icmp_seq=3 time=17.000 ms 192.168.9.6 icmp_seq=4 time=15.000 ms 192.168.9.6 icmp_seq=5 time=19.000 ms PC2VPCS 2 >ping 192.168.10.100192.168.10.100 icmp_seq=1 timeout192.168.10.100 icmp_seq=2 time=14.000 ms 192.168.10.100 icmp_seq=3 time=11.000 ms 192.168.10.100 icmp_seq=4 time=10.000 ms 192.168.10.100 icmp_seq=5 time=46.000 msVPCS 2 >ping 192.168.8.132192.168.8.132 icmp_seq=1 timeout192.168.8.132 icmp_seq=2 timeout192.168.8.132 icmp_seq=3 timeout192.168.8.132 icmp_seq=4 time=21.000 ms192.168.8.132 icmp_seq=5 time=9.000 msVPCS 2 >ping 192.168.8.132192.168.8.132 icmp_seq=1 time=28.000 ms192.168.8.132 icmp_seq=2 time=10.000 ms192.168.8.132 icmp_seq=3 time=14.000 ms192.168.8.132 icmp_seq=4 time=9.000 ms192.168.8.132 icmp_seq=5 time=44.000 msVPCS 2 >ping 192.168.9.6192.168.9.6 icmp_seq=1 timeout192.168.9.6 icmp_seq=2 time=31.000 ms192.168.9.6 icmp_seq=3 time=18.000 ms192.168.9.6 icmp_seq=4 time=16.000 ms192.168.9.6 icmp_seq=5 time=18.000 msVPCS 2 >ping 192.168.9.2192.168.9.2 icmp_seq=1 timeout192.168.9.2 icmp_seq=2 timeout192.168.9.2 icmp_seq=3 time=22.000 ms192.168.9.2 icmp_seq=4 time=21.000 ms192.168.9.2 icmp_seq=5 time=88.000 msHSRP主备切换测试将SW1上的fa0/12shutdown后SW1#show standby briefP indicates configured to preempt.|Interface Grp Prio P State Active Standby Virtual IPVl8 8 120 P Active local 192.168.8.131 192.168.8.129 Vl10 10 90 P Standby 192.168.10.3 local 192.168.10.1 Vl11 11 100 P Standby 192.168.11.3 local 192.168.11.1SW2#show standby briefP indicates configured to preempt.|Interface Grp Prio P State Active Standby Virtual IPVl8 8 100 P Standby 192.168.8.130 local 192.168.8.129 Vl10 10 100 P Active local 192.168.10.2 192.168.10.1 Vl11 11 120 P Active local 192.168.11.2 192.168.11.1将SW2上的fa0/12shutdown后SW1#show standby briefP indicates configured to preempt.|Interface Grp Prio P State Active Standby Virtual IPVl8 8 120 P Active local 192.168.8.131 192.168.8.129Vl10 10 120 P Active local 192.168.10.3 192.168.10.1Vl11 11 100 P Active local 192.168.11.3 192.168.11.1SW2#show standby briefP indicates configured to preempt.|Interface Grp Prio P State Active Standby Virtual IPVl8 8 100 P Standby 192.168.8.130 local 192.168.8.129Vl10 10 100 P Standby 192.168.10.2 local 192.168.10.1Vl11 11 90 P Standby 192.168.11.2 local 192.168.11.1五、实验分析与心得简单分析PC1 ping PC2的通信过程:1、 PC1发送数据给网关SW1,因为它是vlan10 的主网关,SW3收到数据后,查MAC地址表从fa0/1端口发送出去;2、 SW1收到数据后,解封装,发现MAC地址是自己,但是目的ip不是自己,查路由表,重新封装数据,从fa0/3端口发送出去;3、SW3收到数据帧后,查MAC地址表,从fa0/11端口发送出去。
网络设备安装与调试chp28HSRP和VRRP_28.2HSRP高级配置实验指导
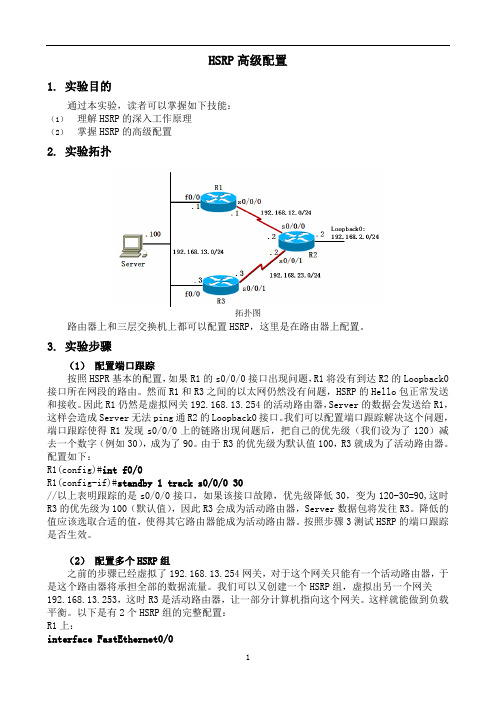
HSRP高级配置1. 实验目的通过本实验,读者可以掌握如下技能:(1)理解HSRP的深入工作原理(2)掌握HSRP的高级配置2. 实验拓扑拓扑图路由器上和三层交换机上都可以配置HSRP,这里是在路由器上配置。
3. 实验步骤(1)配置端口跟踪按照HSPR基本的配置,如果R1的s0/0/0接口出现问题,R1将没有到达R2的Loopback0接口所在网段的路由。
然而R1和R3之间的以太网仍然没有问题,HSRP的Hello包正常发送和接收。
因此R1仍然是虚拟网关192.168.13.254的活动路由器,Server的数据会发送给R1,这样会造成Server无法ping通R2的Loopback0接口。
我们可以配置端口跟踪解决这个问题,端口跟踪使得R1发现s0/0/0上的链路出现问题后,把自己的优先级(我们设为了120)减去一个数字(例如30),成为了90。
由于R3的优先级为默认值100,R3就成为了活动路由器。
配置如下:R1(config)#int f0/0R1(config-if)#standby 1 track s0/0/0 30//以上表明跟踪的是s0/0/0接口,如果该接口故障,优先级降低30,变为120-30=90,这时R3的优先级为100(默认值),因此R3会成为活动路由器,Server数据包将发往R3。
降低的值应该选取合适的值,使得其它路由器能成为活动路由器。
按照步骤3测试HSRP的端口跟踪是否生效。
(2)配置多个HSRP组之前的步骤已经虚拟了192.168.13.254网关,对于这个网关只能有一个活动路由器,于是这个路由器将承担全部的数据流量。
我们可以又创建一个HSRP组,虚拟出另一个网关192.168.13.253,这时R3是活动路由器,让一部分计算机指向这个网关。
这样就能做到负载平衡。
以下是有2个HSRP组的完整配置:R1上:interface FastEthernet0/0standby 1 ip 192.168.13.254standby 1 priority 120standby 1 preemptstandby 1 authentication md5 key-string ciscostandby 1 track Serial0/0/0 30standby 2 ip 192.168.13.253standby 2 preemptstandby 2 authentication md5 key-string ciscoR3上:interface FastEthernet0/0standby 1 ip 192.168.13.254standby 1 preemptstandby 1 authentication md5 key-string ciscostandby 2 ip 192.168.13.253standby 2 priority 120standby 2 preemptstandby 2 authentication md5 key-string ciscostandby 2 track Serial0/0/1 304. 实验调试R1#show standby briefP indicates configured to preempt.|Interface Grp Pri P State Active Standby Virtual IPFa0/0 1 120 P Active local 192.168.13.3 192.168.13.254 //以上表明R1的f0/0接口在HSRP组1中,当前是活动路由器,备份路由器为192.168.13.3,虚拟IP是192.168.13.254。
HRSP配置

1.1实验任务按照拓扑图配置HSRP组,配置路由器的活跃接口,HSRP虚拟路由器的IP、优先级、占先权和端口跟踪。
1.2实验环境和网络拓扑1.3完成标准(1)按照拓扑图要求连接路由器、交换机和PC,在交换机上配置HSRP组,PC之间完成连通性测试。
(2)关闭路由器任意一个接口或拔线,PC之间仍然能够连通。
2.详细操作步骤Step 1: 配置路由器的HSRP(1) 配置路由器R1和R2的HSRP组和各自的优先级、占先权及端口跟踪路由器R1配置如下:Router>enRouter#conf tEnter configuration commands, one per line. End with CNTL/Z. Router(config)#ho R1R1(config)#interface f0/0 //配置接口IPR1(config-if)#ip address 192.168.10.1 255.255.255.0R1(config-if)#no shut*Dec 12 20:16:19.683: %LINK-3-UPDOWN: Interface FastEthernet0/0, changed state to up*Dec 12 20:16:20.683: %LINEPROTO-5-UPDOWN: Line protocol on Interface FastEthernet0/0, changed state to upR1(config-if)#duplex fullR1(config-if)#standby 10 ip 192.168.10.10 //配置group 为10的HSRP地址R1(config-if)#standby 10 priority 200 //配置group为10的优先权200R1(config-if)#standby 10 preempt //配置group为10的占先权R1(config-if)#standby 10 track f1/1 100 //配置group为10的端口跟踪f1/1R1(config-if)#*Dec 12 20:17:27.427: %HSRP-6-STATECHANGE: FastEthernet0/0 Grp 10 state Standby-> Active //F0/0 group 10声明备份状态->活跃R1(config-if)#interface f1/1 //配置接口IPR1(config-if)#ip address 192.168.20.2 255.255.255.0R1(config-if)#no shut*Dec 12 20:18:00.423: %LINK-3-UPDOWN: Interface FastEthernet1/1, changed state to up*Dec 12 20:18:01.423: %LINEPROTO-5-UPDOWN: Line protocol on Interface FastEthernet1/1, changed state to upR1(config-if)#standby 20 ip 192.168.20.20 //配置group 为20的HSRP地址R1(config-if)#standby 20 priority 150 //配置group为20的优先权150R1(config-if)#standby 20 preempt //配置group为20的占先权//依据拓扑要求,此路由器只作为group20的备份路由器,此HSRP组有且仅有1台备份路由器,可以不用配置占先权,但实际网络中当活跃路由器停止工作后为防止备份路由器不能立即响应转换为活跃路由器,配置占先权将是转换过程更有保障!*Dec 12 20:18:48.139: %HSRP-6-STATECHANGE: FastEthernet1/1 Grp 20 state Standby-> Active //F1/1 group 20声明备份状态->活跃R1(config-if)#exitR1(config)#*Dec 12 20:20:27.231: %HSRP-6-STATECHANGE: FastEthernet1/1 Grp 20 state Active -> Speak //F1/1 group 20声明备份状态->发言路由器R2配置如下:Router>enRouter#conf tEnter configuration commands, one per line. End with CNTL/Z. Router(config)#ho R2R2(config)#interface f1/1 //配置接口IPR2(config-if)#ip address 192.168.20.1 255.255.255.0R2(config-if)#no shut*Dec 12 20:19:43.059: %LINK-3-UPDOWN: Interface FastEthernet1/1, changed state to up*Dec 12 20:19:44.059: %LINEPROTO-5-UPDOWN: Line protocol on Interface FastEthernet1/1, changed state to upR2(config-if)#standby 20 ip 192.168.20.20 //配置group 为20的HSRP地址R2(config-if)#standby 20 priority 200 //配置group为20的优先权200R2(config-if)#standby 20 preempt //配置group为20的占先权R2(config-if)#standby 20 track f0/0 150 //配置group为20的端口跟踪f1/1*Dec 12 20:20:27.047: %HSRP-6-STATECHANGE: FastEthernet1/1 Grp 20 state Standby-> Active //F1/1 group 20声明备份状态->活跃*Dec 12 20:20:39.143: %HSRP-6-STATECHANGE: FastEthernet1/1 Grp 20 state Active -> Speak //F1/1 group 20声明备份状态->发言R2(config-if)#interface f0/0 //配置接口IPR2(config-if)#ip address 192.168.10.2 255.255.255.0R2(config-if)#no shutR2(config-if)#*Dec 12 20:21:06.251: %HSRP-6-STATECHANGE: FastEthernet1/1 Grp 20 state Standby-> Active //F1/1 group 10声明备份状态->活跃R2(config-if)#*Dec 12 20:21:06.783: %LINK-3-UPDOWN: InterfaceFastEthernet0/0, changed state to up*Dec 12 20:21:07.783: %LINEPROTO-5-UPDOWN: Line protocol on Interface FastEthernet0/0, changed state to upR2(config-if)#standby 10 ip 192.168.10.10 //配置group 为10的HSRP地址R2(config-if)#standby 10 priority 150 //配置group为10的优先权150R2(config-if)#standby 10 preempt //配置group为10的占先权*Dec 12 20:21:48.511: %CDP-4-DUPLEX_MISMATCH: duplexmismatch discovered on FastEthernet0/0 (not full duplex), with SW1 FastEthernet0/2 (fullduplex).100R2(config-if)#duplex full*Dec 12 20:22:18.327: %LINEPROTO-5-UPDOWN: Line protocol on Interface FastEthernet1/1, changed state to down //F1/1接口状态断开*Dec 12 20:22:18.327: %HSRP-6-STATECHANGE: FastEthernet1/1 Grp 20 state Active -> Init //F1/1 group 20声明备份状态->初始*Dec 12 20:22:20.335: %LINK-3-UPDOWN: InterfaceFastEthernet1/1, changed state to up//F1/1 接口状态连接*Dec 12 20:22:21.335: %LINEPROTO-5-UPDOWN: Line protocol on Interface FastEthernet1/1, changed state to up*Dec 12 20:22:41.275: %HSRP-6-STATECHANGE: FastEthernet1/1 Grp 20 state Standby-> Active //F1/1 group 20声明备份状态->活跃R2(config-if)#exit(3)配置PC机的IP地址和网关//因使用Dynamips GUI模拟器无法虚拟PC,即用一个7200路由器模拟PC PC1配置如下:Router>enRouter#conf tEnter configuration commands, one per line. End with CNTL/Z.Router(config)#ho PC1PC1(config)#interface f0/0 //配置接口IPPC1(config-if)#ip address 192.168.10.11 255.255.255.0PC1(config-if)#no shutPC1(config-if)#duplex full*Dec 12 20:22:57.363: %LINK-3-UPDOWN: InterfaceFastEthernet0/0, changed state to up*Dec 12 20:22:58.363: %LINEPROTO-5-UPDOWN: Line protocol on Interface FastEthernet0/0, changed state to upPC1(config-if)#exitPC1(config)#ip route 0.0.0.0 0.0.0.0 192.168.10.10 //配置到虚拟路由器的默认路由PC2配置如下:Router>enRouter#conf tEnter configuration commands, one per line. End with CNTL/Z.Router(config)#ho PC2PC2(config)#interface f0/0 //配置接口IPPC2(config-if)#ip address 192.168.20.22 255.255.255.0PC2(config-if)#no shutPC2(config-if)#duplex full*Dec 12 20:23:24.759: %LINK-3-UPDOWN: InterfaceFastEthernet0/0, changed state to up*Dec 12 20:23:25.759: %LINEPROTO-5-UPDOWN: Line protocol on Interface FastEthernet0/0, changed state to upPC2(config-if)#exitPC2(config)#ip route 0.0.0.0 0.0.0.0 192.168.20.20 //配置到虚拟路由器的默认路由(4)验证HSRP配置和网络连通性路由器R1配置如下:R1(config)#do show standby brief //显示备份摘要信息P indicates configured to preempt.//P说明被设置为占先权|Interface Grp Prio P State Active StandbyVirtual IPFa0/0 10 200 P Active local 192.168.10.2192.168.10.10Fa1/1 20 150 P Standby 192.168.20.1 local192.168.20.20R1(config)#do show standby //显示备份信息FastEthernet0/0 - Group 10 //接口F0/0-Group10State is Active //状态为活跃2 state changes, last state change 00:08:03 //2次状态变化,最后张太变化8分33秒Virtual IP address is 192.168.10.10 //虚拟IP地址192.168.10.10Active virtual MAC address is 0000.0c07.ac0a //活跃虚拟MAC地址0000.0c07.ac0aLocal virtual MAC address is 0000.0c07.ac0a (default)//本地虚拟MAC地址0000.0c07.ac0a (默认)Hello time 3 sec, hold time 10 sec //握手间隔3秒,保持时间10秒Next hello sent in 2.792 secs //下次握手将在2.792秒后发送Preemption enabled //占先权开启Active router is local //活跃路由器是本地路由器Standby router is 192.168.10.2, priority 150 (expires in 9.672 sec) //备份路由器是192.168.10.2,优先权150(9.672秒后过期)Priority 200 (configured 200) //优先权200(配置为200)Track interface FastEthernet1/1 state Up decrement 100//跟踪端口F1/1 状态开启优先权减少两100IP redundancy name is "hsrp-Fa0/0-10" (default) //IP冗余名字”hsrp-Fa0/0-10”(默认)FastEthernet1/1 - Group 20State is Standby9 state changes, last state change 00:02:32Virtual IP address is 192.168.20.20Active virtual MAC address is 0000.0c07.ac14Local virtual MAC address is 0000.0c07.ac14 (default)Hello time 3 sec, hold time 10 secNext hello sent in 0.796 secsPreemption enabledActive router is 192.168.20.1, priority 200 (expires in 8.224 sec) Standby router is localPriority 150 (configured 150)Track interface FastEthernet0/0 state Up decrement 10IP redundancy name is "hsrp-Fa1/1-20" (default)路由器R2配置如下:R2(config)#do show standby briefP indicates configured to preempt.|Interface Grp Prio P State Active StandbyVirtual IPFa0/0 10 150 P Standby 192.168.10.1 local192.168.10.10Fa1/1 20 200 P Active local 192.168.20.2 192.168.20.20PC1连通性如下:PC1(config)#do ping 192.168.20.22//ping PC2Type escape sequence to abort.Sending 5, 100-byte ICMP Echos to 192.168.20.22, timeout is 2 seconds:....! //初次连接会丢包部分Success rate is 20 percent (1/5), round-trip min/avg/max =220/220/220 msPC1(config)#do ping 192.168.20.22Type escape sequence to abort.Sending 5, 100-byte ICMP Echos to 192.168.20.22, timeout is 2 seconds:!!!!! //再次连接完全正常Success rate is 100 percent (5/5), round-trip min/avg/max =184/282/336 msPC2连通性如下:PC2(config)#do ping 192.168.10.11//ping PC1Type escape sequence to abort.Sending 5, 100-byte ICMP Echos to 192.168.10.11, timeout is 2 seconds:!!!!! //连通性正常Success rate is 100 percent (5/5), round-trip min/avg/max =140/233/468 msStep 2: 断开任意一个路由器接口的网络连通性路由器R2配置如下:R2(config)#interface f1/1R2(config-if)#shutdown //关闭接口F1/1*Dec 12 20:26:49.067: %HSRP-6-STATECHANGE: FastEthernet1/1 Grp 20 state Active -> Init //F1/1 Group 20 状态活跃->初始*Dec 12 20:26:51.067: %LINK-5-CHANGED: Interface FastEthernet1/1, changed stateto administratively down //接口F1/1,转变状态到管理性关闭*Dec 12 20:26:52.067: %LINEPROTO-5-UPDOWN: Line protocol on Interface FastEthernet1/1, changed state to downR2(config-if)#exitR2(config)#do show standby briefP indicates configured to preempt.|Interface Grp Prio P State Active StandbyVirtual IPFa0/0 10 50 P Standby 192.168.10.1 local192.168.10.10Fa1/1 20 200 P Init unknown unknown192.168.20.20// Fa1/1 状态为初始,活跃未知,备份未知路由器R1配置如下:*Dec 12 20:26:57.407: %HSRP-6-STATECHANGE: FastEthernet1/1 Grp 20 state Standby-> Active //R1的F1/1 Group 20状态备份->活跃R1(config)#do show standby briefP indicates configured to preempt.|Interface Grp Prio P State Active StandbyVirtual IPFa0/0 10 200 P Active local 192.168.10.2 192.168.10.10Fa1/1 20 150 P Active local unknown192.168.20.20//Fa1/1 状态活跃活跃本地备份未知PC1连通性如下:PC1(config)#do ping 192.168.20.22//ping PC2Type escape sequence to abort.Sending 5, 100-byte ICMP Echos to 192.168.20.22, timeout is 2 seconds:!!!!! //连通性良好Success rate is 100 percent (5/5), round-trip min/avg/max =76/124/172 msPC2连通性如下:PC2(config)#do ping 192.168.10.11//ping PC1Type escape sequence to abort.Sending 5, 100-byte ICMP Echos to 192.168.10.11, timeout is 2seconds:!!!!! //连通性良好Success rate is 100 percent (5/5), round-trip min/avg/max =64/105/184 ms3.实验总结热备份路由协议HSRP (Hot Standby Router Protocol) Cisco平台特有技术,确保了当网络边缘设备或接入链路出现故障时,用户通信能迅速并透明地恢复,并以此为IP网络提供冗余性和一定的负载分担能力。
HSRP实验文档

HSRP热备份实验小组成员:赵鹏飞、李阳、张业萌、文秀柱袁泽龙、谭璐、刘鉴滢、马振昊一、需求分析 (3)1. 应用背景 (3)2. 用户需求 (3)二、设计分析 (4)1.实验分析 (4)2.规划后的新的拓扑图如下: (4)三、 IP规划 (4)四、使用技术 (5)1. 热备份简介 (5)2. 本协议的特点 (5)五、设备选型 (6)1.设备选购 (6)2.设备清单 (7)六、配置步骤 (7)1.RS1配置如下: (7)2.RS2配置如下: (8)3.检查是否配置成功 (8)4.测试结果 (9)七、综述方案特点 (11)一、需求分析1. 应用背景随着Internet的日益普及,人们对网络的依赖性也越来越强。
这同时对网络的稳定性提出了更高的要求,人们自然想到了基于设备的备份结构,就像在服务器中为提高数据的安全性而采用双硬盘结构一样。
路由器是整个网络的核心和心脏,如果路由器发生致命性的故障,将导致本地网络的瘫痪,如果是骨干路由器,影响的范围将更大,所造成的损失也是难以估计的。
因此,对路由器采用热备份是提高网络可靠性的必然选择。
在一个路由器或交换机完全不能工作的情况下,它的全部功能便被系统中的另一个备份路由器或交换机完全接管,直至出现问题的路由器或交换机恢复正常,这就是热备份路由协议(HotStandbyRouterProtocal),HSR PRFC2281技术要解决的问题。
2. 用户需求拓扑图如下:要求:正常情况下S1下连的所有PC通过RS1连接Internet,S2下连的所有PC通过RS2连接Internet.当链路出现故障时,PC通过所连的另一线路连接Intenet二、 设计分析1.实验分析首先将23\24端口激活为三层端口,然后配上相应IP,然后,Group 10虚拟IP 为192.168.1.3, Group 20虚拟IP 为192.168.2.3,并把各端口设为抢占模式.对于RS1,将24端口加入Group 10,优先级为20, 将23端口加入Group 20, 优先级为10,; 对于RS2,将24端口加入Group 20, 优先级为20,将23端口加入Group 10,优先级为10.2.规划后的新的拓扑图如下:三、 IP 规划设备 IP 端口 与S1连接的端口 与S2连接的端口RS1 192.168.1.1 24 24192.168.2.1 23 23 RS2 192.168.1.2 23 23192.168.2.2 24 24 四、使用技术使用热备份协议完成需求1. 热备份简介HSRP:热备份路由器协议(HSRP:Hot Standby Router Protocol)热备份路由器协议(HSRP)的设计目标是支持特定情况下IP 流量失败转移不会引起混乱、并允许主机使用单路由器,以及即使在实际第一跳路由器使用失败的情形下仍能维护路由器间的连通性。
HSRP实验过程及报告

目录HSRP实验过程及报告 (2)实验环境: (2)实验拓扑: (2)实验目的: (2)实验过程: (3)1 配置交换机 (3)2 测试HSRP (5)3测试HSRP跟踪 (8)实验总结: (10)HSRP实验过程及报告实验环境:DynamipsGUI模拟器模拟出4台cisco3640三层交换机。
两台开启HSRP协议,设备之间使用Ethernetchannel绑定的两条线路互联。
其余两台交换机分别连接到这两台交换机。
实验拓扑:实验拓扑如图1实验目的:熟悉HSRP协议,验证HSRP网关冗余特性,测试HSRP抢占过程及HSRP接口跟踪。
实验过程:1 配置交换机在交换机SW1配置F0/0.F0/1接口加入channel-group 1 并将port-channel 1 配置为trunk模式。
SW1(config)#int range f0/0 - 1SW1(config-if-range)#channel-group 1 mode onCreating a port-channel interface Port-channel1SW1(config-if-range)#*Mar 1 01:23:58.639: %EC-5-BUNDLE: Interface Fa0/0 joined port-channel Po1 *Mar 1 01:23:58.935: %EC-5-BUNDLE: Interface Fa0/1 joined port-channel Po1 SW1(config-if-range)#*Mar 1 01:24:01.415: %LINEPROTO-5-UPDOWN: Line protocol on Interface Port-channel1, changed state to upSW1(config-if-range)#exitSW1(config)#int port-channel 1SW1(config-if)#switchport mode trunkSW1(config-if)#endSW1#sh etherchannel suFlags: D - down P - in port-channelI - stand-alone s - suspendedR - Layer3 S - Layer2U - in useGroup Port-channel Ports-----+------------+-----------------------------------------------------------1 Po1(SU) Fa0/0(P) Fa0/1(P)在交换机SW2上同样的配置。
HSRP热备份
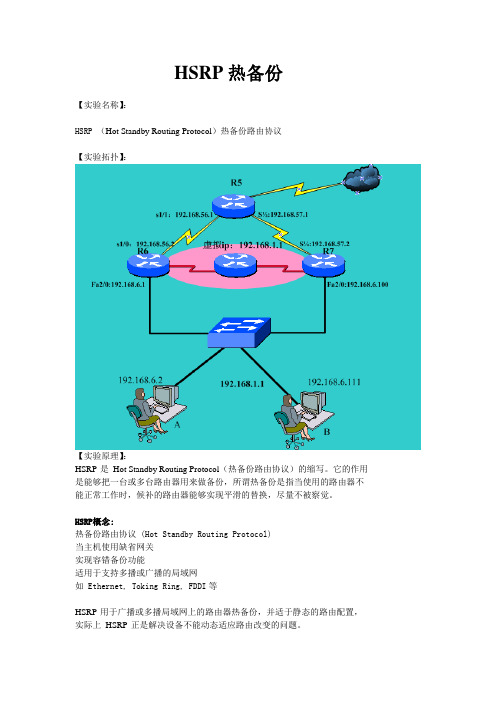
HSRP热备份【实验名称】:HSRP (Hot Standby Routing Protocol)热备份路由协议【实验拓扑】:【实验原理】:HSRP 是Hot Standby Routing Protocol(热备份路由协议)的缩写。
它的作用是能够把一台或多台路由器用来做备份,所谓热备份是指当使用的路由器不能正常工作时,候补的路由器能够实现平滑的替换,尽量不被察觉。
HSRP概念:热备份路由协议 (Hot Standby Routing Protocol)当主机使用缺省网关实现容错备份功能适用于支持多播或广播的局域网如 Ethernet, Toking Ring, FDDI等HSRP 用于广播或多播局域网上的路由器热备份,并适于静态的路由配置,实际上HSRP 正是解决设备不能动态适应路由改变的问题。
【实验步骤】:1.按拓扑图将网络搭建好,配置好三个路由的信息,在三个路由器上启用rip协议。
2.将客户机A(网关:192.168.6.1、192.168.7.1)与路由桥接,并检测是否联通。
3.使用HSRP 协议,开始R6与R7路由HSRP 协议的配置@:其中R7的优先级比R6的优先级高4.断开R7的fa2/0接口,这时R6的优先级高,用客户机B在去ping 192.168.56.1 追踪经过的路由,查看数据包走的是那条断开R7的fa2/0接口,这时R6的优先级高,用客户机B在去ping 192.168.56.1 追踪经过的路由,查看数据包走的是那条1.按拓扑图将网络搭建好,配置好三个路由的信息,在三个路由器上启用rip协议。
R5配置信息:Router>enableRouter#config tEnter configuration commands, one per line. End with CNTL/Z.Router(config)#hostname R5R5(config)#int s1/1R5(config-if)#ip add 192.168.56.1 255.255.255.0R5(config-if)#no shutR5(config-if)#exitR5(config)#int s1/2R5(config-if)#ip add 192.168.57.1 255.255.255.0R5(config-if)#no shutR5(config-if)#exitR5(config)#int lo5R5(config-if)#ip add 192.168.5.1 255.255.255.0R5(config-if)#no shutR5(config-if)#exitR5(config)#router ripR5(config-router)#net 192.168.56.0R5(config-router)#net 192.168.57.0R5(config-router)#net 192.168.5.0R5(config-router)#exitR5(config)#R6 配置信息:Router>enableRouter#config tEnter configuration commands, one per line. End with CNTL/Z.Router(config)#hostname R6R6(config)#int s1/0R6(config-if)#ip add 192.168.56.2 255.255.255.0R6(config-if)#no shutR6(config-if)#exitR6(config)#int fa2/0R6(config-if)#ip add 192.168.6.1 255.255.255.0R6(config-if)#no shutR6(config-if)#exitR6(config)#router ripR6(config-router)#net 192.168.56.0R6(config-router)#net 192.168.6.0R6(config-router)#endR6#R7配置信息:R7(config)#int s1/4R7(config-if)#ip add 192.168.57.2 255.255.255.0R7(config-if)#no shutR7(config-if)#int fa2/0R7(config-if)#ip add 192.168.6.100 255.255.255.0R7(config-if)#no shutR7(config-if)#exitR7(config)#router ripR7(config-router)#net 192.168.57.0R7(config-router)#net 192.168.6.0R7(config-router)#endR7#2.将客户机A(网关:192.168.6.1、)与路由桥接,并检测是否联通。
HSRP热备份

HSRP热备份【实验名称】:HSRP (Hot Standby Routing Protocol)热备份路由协议【实验拓扑】:【实验原理】:HSRP 是Hot Standby Routing Protocol(热备份路由协议)的缩写。
它的作用是能够把一台或多台路由器用来做备份,所谓热备份是指当使用的路由器不能正常工作时,候补的路由器能够实现平滑的替换,尽量不被察觉。
HSRP概念:热备份路由协议 (Hot Standby Routing Protocol)当主机使用缺省网关实现容错备份功能适用于支持多播或广播的局域网如 Ethernet, Toking Ring, FDDI等HSRP 用于广播或多播局域网上的路由器热备份,并适于静态的路由配置,实际上HSRP 正是解决设备不能动态适应路由改变的问题。
【实验步骤】:1.按拓扑图将网络搭建好,配置好三个路由的信息,在三个路由器上启用rip协议。
2.将客户机A(网关:192.168.6.1、192.168.7.1)与路由桥接,并检测是否联通。
3.使用HSRP 协议,开始R6与R7路由HSRP 协议的配置@:其中R7的优先级比R6的优先级高4.断开R7的fa2/0接口,这时R6的优先级高,用客户机B在去ping 192.168.56.1 追踪经过的路由,查看数据包走的是那条断开R7的fa2/0接口,这时R6的优先级高,用客户机B在去ping 192.168.56.1 追踪经过的路由,查看数据包走的是那条1.按拓扑图将网络搭建好,配置好三个路由的信息,在三个路由器上启用rip协议。
R5配置信息:Router>enableRouter#config tEnter configuration commands, one per line. End with CNTL/Z.Router(config)#hostname R5R5(config)#int s1/1R5(config-if)#ip add 192.168.56.1 255.255.255.0R5(config-if)#no shutR5(config-if)#exitR5(config)#int s1/2R5(config-if)#ip add 192.168.57.1 255.255.255.0R5(config-if)#no shutR5(config-if)#exitR5(config)#int lo5R5(config-if)#ip add 192.168.5.1 255.255.255.0R5(config-if)#no shutR5(config-if)#exitR5(config)#router ripR5(config-router)#net 192.168.56.0R5(config-router)#net 192.168.57.0R5(config-router)#net 192.168.5.0R5(config-router)#exitR5(config)#R6 配置信息:Router>enableRouter#config tEnter configuration commands, one per line. End with CNTL/Z.Router(config)#hostname R6R6(config)#int s1/0R6(config-if)#ip add 192.168.56.2 255.255.255.0R6(config-if)#no shutR6(config-if)#exitR6(config)#int fa2/0R6(config-if)#ip add 192.168.6.1 255.255.255.0R6(config-if)#no shutR6(config-if)#exitR6(config)#router ripR6(config-router)#net 192.168.56.0R6(config-router)#net 192.168.6.0R6(config-router)#endR6#R7配置信息:R7(config)#int s1/4R7(config-if)#ip add 192.168.57.2 255.255.255.0R7(config-if)#no shutR7(config-if)#int fa2/0R7(config-if)#ip add 192.168.6.100 255.255.255.0R7(config-if)#no shutR7(config-if)#exitR7(config)#router ripR7(config-router)#net 192.168.57.0R7(config-router)#net 192.168.6.0R7(config-router)#endR7#2.将客户机A(网关:192.168.6.1、)与路由桥接,并检测是否联通。
CCNPHSRP基本实验--罪恶的温柔
HSRP基本实验
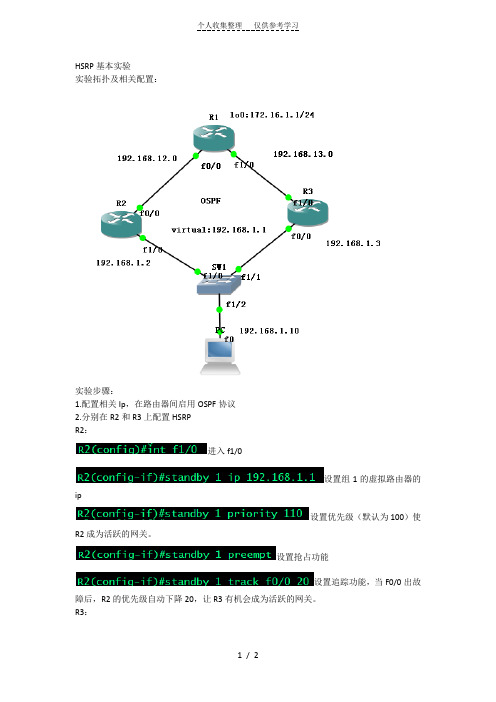
实验拓扑及相关配置:
实验步骤:
1.配置相关Ip,在路由器间启用OSPF协议
2.分别在R2和R3上配置HSRP
R2:
进入f1/0
设置组1的虚拟路由器的ip
设置优先级(默认为100)使R2成为活跃的网关。
设置抢占功能
设置追踪功能,当F0/0出故障后,R2的优先级自动下降20,让R3有机会成为活跃的网关。
R3:
3.将PC机的默认网关设置为虚拟路由器的IP。
从PC上ping R1可以通。
(第一个包因为要做ARP而丢失)。
用Traceroute可以看出此时是从R2走的。
接下来在PC上长ping R1 期间down掉R2的f0/0口,
在down掉R2后R3的状态由备用变为活跃状态:
观察ping的情况:
在R2 down掉后ping包出现一个U. ,U是R2的目标不可达,. 是R3在做ARP。
华为HSRP协议原理及配置
HSRP协议原理及配置8.1 实验目的:1. 熟悉HSRP协议原理;2. 掌握HSRP的配置;3. 熟悉HSRP的应用。
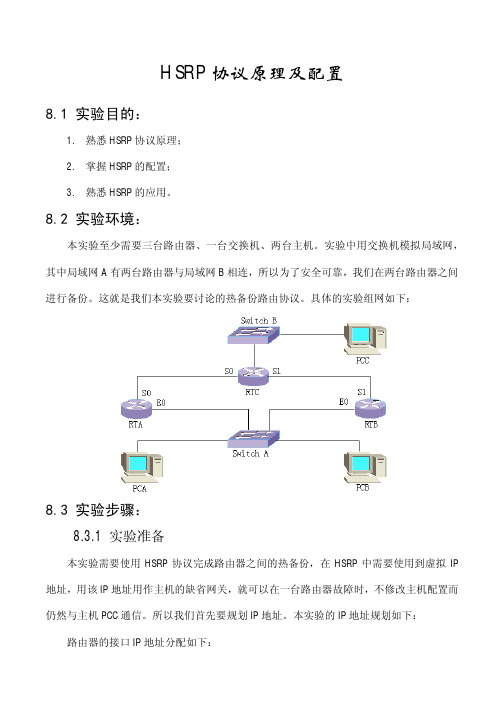
8.2 实验环境:本实验至少需要三台路由器、一台交换机、两台主机。
实验中用交换机模拟局域网,其中局域网A有两台路由器与局域网B相连,所以为了安全可靠,我们在两台路由器之间进行备份。
这就是我们本实验要讨论的热备份路由协议。
具体的实验组网如下:8.3 实验步骤:8.3.1 实验准备本实验需要使用HSRP协议完成路由器之间的热备份,在HSRP中需要使用到虚拟IP 地址,用该IP地址用作主机的缺省网关,就可以在一台路由器故障时,不修改主机配置而仍然与主机PCC通信。
所以我们首先要规划IP地址。
本实验的IP地址规划如下:路由器的接口IP地址分配如下:RTA RTB RTCE0 10.110.32.11/21 10.110.32.10/21 10.110.10.100/24S0 1.0.0.1/24 1.0.0.2S1 2.0.0.1/24 2.0.0.2各主机的IP地址分配如下:PCA PCB PCCIP 10.110.32.20 10.110.10.30 10.110.10.1Gateway 10.110.32.1 10.110.10.1 10.110.10.1008.3.2 单备份组配置本实验需要路由器RTA与RTB实现热备份,并且正常时以RTA为活动路由器,并且在RTA由故障状态恢复正常时能继续担当活动路由器。
根据实验要求和HSRP协议原理可以设定RTA的优先级较高(默认值为100),同时置抢占标志,即可满足要求。
具体实验配置步骤很简单,不再赘述,下面列出各路由器的配置信息供您参考:RTA(config-if-Ethernet0)#show running-configNow create configuration...Current configuration!version 1.5.6hostname RTA!interface Aux0async mode interactiveencapsulation ppp!interface Ethernet0speed autoduplex autono loopbackip address 10.110.32.11 255.255.248.0standby 1 ip 10.110.32.1 //创建备份组并设定虚拟IP地址standby 1 preempt //设定抢占标志standby 1 priority 120 //设定优先级ip rip version 2 mcast //设定RIP协议版本!interface Serial0encapsulation pppip address 1.0.0.1 255.255.255.0ip rip version 2 mcast!interface Serial1encapsulation ppp!exitrouter ripno auto-summary //取消自动聚合功能network all!endRTB(config-if-Serial1)#show running-configNow create configuration...Current configuration!version 1.5.6hostname RTB!interface Aux0async mode interactiveencapsulation ppp!interface Ethernet0speed autoduplex autono loopbackip address 10.110.32.10 255.255.248.0standby 1 ip 10.110.32.1standby 1 preemptip rip version 2 mcast!interface Serial0encapsulation ppp!interface Serial1encapsulation pppip address 2.0.0.1 255.255.255.0ip rip version 2 mcast!exitrouter ripno auto-summarynetwork all!endRTC(config-if-Serial1)#show running-config Now create configuration...Current configuration!version 1.5.6logging consolehostname RTC!interface Aux0async mode interactiveencapsulation ppp!interface Ethernet0speed autoduplex autono loopbackip address 10.110.10.100 255.255.255.0ip rip version 2 mcast!interface Serial0clock-select DTECLK1encapsulation pppip address 1.0.0.2 255.255.255.0ip rip version 2 mcast!interface Serial1clock-select DTECLK1encapsulation pppip address 2.0.0.2 255.255.255.0ip rip version 2 mcast!exitrouter ripno auto-summarynetwork all!end注意:在配置动态路由协议时,由于使用的是RIP协议,该协议默认版本version 1不支持可变长子网掩码,而实验中设定的IP地址又是A类地址。
HSRP基本实验及其测试
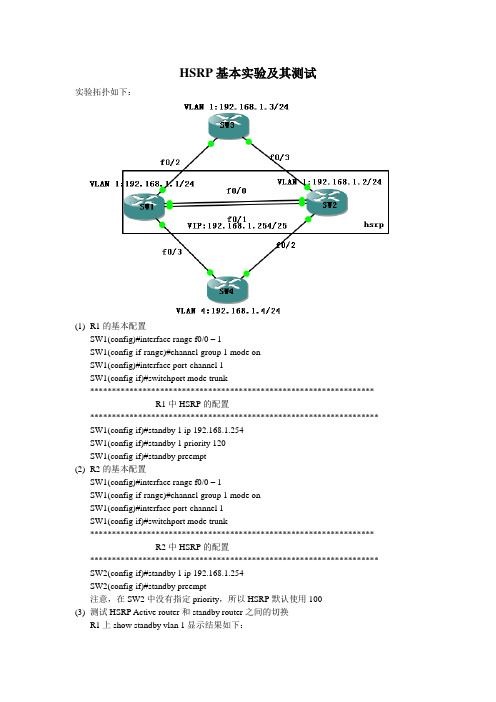
HSRP基本实验及其测试实验拓扑如下:(1)R1的基本配置SW1(config)#interface range f0/0 – 1SW1(config-if-range)#channel-group 1 mode onSW1(config)#interface port-channel 1SW1(config-if)#switchport mode trunk*****************************************************************R1中HSRP的配置****************************************************************** SW1(config-if)#standby 1 ip 192.168.1.254SW1(config-if)#standby 1 priority 120SW1(config-if)#standby preempt(2)R2的基本配置SW1(config)#interface range f0/0 – 1SW1(config-if-range)#channel-group 1 mode onSW1(config)#interface port-channel 1SW1(config-if)#switchport mode trunk*****************************************************************R2中HSRP的配置****************************************************************** SW2(config-if)#standby 1 ip 192.168.1.254SW2(config-if)#standby preempt注意,在SW2中没有指定priority,所以HSRP默认使用100(3)测试HSRP Active router和standby router之间的切换R1上show standby vlan 1显示结果如下:SW1#show standby vlan 1Vlan1 - Group 1State is Active2 state changes, last state change 00:07:18Virtual IP address is 192.168.1.254Active virtual MAC address is 0000.0c07.ac01Local virtual MAC address is 0000.0c07.ac01 (v1 default)Hello time 3 sec, hold time 10 secNext hello sent in 2.752 secsPreemption enabledActive router is localStandby router is 192.168.1.2, priority 100 (expires in 8.916 sec)Priority 120 (configured 120)IP redundancy name is "hsrp-Vl1-1" (default)SW2#show standby vlan 1Vlan1 - Group 1State is Standby1 state change, last state change 00:08:34Virtual IP address is 192.168.1.254Active virtual MAC address is 0000.0c07.ac01Local virtual MAC address is 0000.0c07.ac01 (v1 default)Hello time 3 sec, hold time 10 secNext hello sent in 1.396 secsPreemption enabledActive router is 192.168.1.1, priority 120 (expires in 9.372 sec)Standby router is localPriority 100 (default 100)IP redundancy name is "hsrp-Vl1-1" (default)******************************************************************************* 将SW1和SW3之间的链路中断,观察active router 和standby router的转换******************************************************************************* SW1(config)#interface vlan 1SW1(config-if)#shutdown*Mar 1 00:36:19.947: %HSRP-5-STATECHANGE: Vlan1 Grp 1 state Active -> Init Type escape sequence to abort.Sending 5, 100-byte ICMP Echos to 192.168.1.4, timeout is 2 seconds:!!!!!Success rate is 100 percent (5/5), round-trip min/avg/max = 24/58/84 ms这个结果说明,当avtive router SW1出现故障时,standby router SW2开始运行,而用户的服务不会中断;因为这个时候已经配置了抢占,所以SW2这个时候成了avtive router*Mar 1 00:36:19.747: %HSRP-5-STATECHANGE: Vlan1 Grp 1 state Standby -> Active@@@@@@@@@@@@@@@@@@@@@@@@@@@@@@@@@@@@@@@@@@ SW1(config)#interface vlan 1SW1(config-if)#no shutdown*Mar 1 00:40:14.063: %HSRP-5-STATECHANGE: Vlan1 Grp 1 state Listen -> Active可见,当SW1的故障恢复的时候,它又称为了avtive router,因为配置的时候配置了抢占。
HSRP实验指导书

HSRP实验实验6-1HSRP实验学习目标•了解网关冗余技术。
•配置HSRP实现对业务网关的冗余原理HSRP 是Cisco 的专有协议。
HSRP(Hot Standby Router Protocol)把多台路由器组成一个“热备份组”,形成一个虚拟路由器。
这个组内只有一个路由器是活动的(Active),并由它来转发数据包,如果活动路由器发生了故障,备份路由器将成为活动路由器。
从网络内的主机来看,网关并没有改变。
HSRP 路由器利用HELLO 包来互相监听各自的存在。
当路由器长时间没有接收到HELLO包,就认为活动路由器故障,备份路由器就会成为活动路由器。
HSRP 协议利用优先级决定哪个路由器成为活动路由器。
如果一个路由器的优先级比其它路由器的优先级高,则该路由器成为活动路由器。
路由器的缺省优先级是100。
一个组中,最多有一个活动路由器和一个备份路由器。
拓扑图图1拓扑操作步骤步骤一配置汇聚交换机HSRP1、将《VLAN间路由实验》中保存的拓扑打开,要求服务器区设备访问网络主走SW1,图书馆区设备访问网络主走SW2,交换机管理网段主走SW1。
步骤二配置服务器区域VLAN101 HSRP。
1、VLAN101 standby 10.X.0.13、在SW1上关闭F0/1接口验证HSRP切换过程4、在SW1上开启F0/1接口验证HSRP回切过程步骤三配置图书馆区域VLAN103 HSRP 1、VLAN103 standby 10.X.2.12、查看HSRP状态步骤四配置管理VLAN2 HSRP 1、VLAN2 standby 10.X.129.254步骤五设置二层交换机缺省网关及PC机IP参数1、设置SW3-SW6缺省网关(由于模拟器只支持HSRP配置,不支持具体功能,所以接入交换机网关配置为10.0.129.1,本应为standby IP)2、设置PC1 和PC3的IP地址等参数(由于模拟器只支持HSRP配置,不支持具体功能,所以PC1网关配置为10.0.0.251,所以PC3网关配置为10.0.2.252,本应为standby IP)步骤六保存配置1、全网设备保存配置,防止掉电配置丢失。
HSRP+PVST实验

SW-B
interface Vlan10 ip address 192.168.10.253 255.255.255.0 standby 10 ip 192.168.10.254 standby 10 priority 120 standby 10 preempt ! interface Vlan20 ip address 192.168.20.252 255.255.255.0 standby 20 ip 192.168.20.254 standby 20 priority 150 standby 20 preempt
实验分析
静态路由设计
来回路径一致 如何实现路由备份:利用Metric值
实验分析
静态路由设计
来回路径一致 如何实现路由备份:利用Metric值
实验配置
SW-A
interface Vlan10 ip address 192.168.10.252 255.255.255.0 standby 10 ip 192.168.10.254 standby 10 priority 150 standby 10 preempt ! interface Vlan20 ip address 192.168.20.253 255.255.255.0 standby 20 ip 192.168.20.254 standby 20 priority 120 standby 20 preempt
Interface Vl10 Vl20
SWSW-B#sh standby bri P | Grp Prio P 10 120 P 20 150 P indicates configured to preempt. State Standby Active Active Standby Virtual IP 192.168.10.252 local 192.168.10.254 192.168.20.253 192.16tandby bri P | Grp Prio P 10 150 P 20 120 P indicates configured to preempt. State Active Standby Active Standby Virtual IP local 192.168.10.253 192.168.10.254 192.168.20.252 local 192.168.20.254
HRSP

HSRP实验目的:1、理解HSRP的工作原理。
2、掌握HSRP配置方法.3、理解HSRP的抢占与跟踪作用。
实验拓扑图:实验步骤及要求:1、本实验可以使用三层交换机完成,也可以使用路由器完成,在使用路由器时需要注意IOS的版本,确认支持HSRP协议。
2、配置R1与R2路由器的接口IP地址:注意:在R1与R2上配置的环回口地址均为10.1.1.1/24主要是用于模拟某主机与R1和R2直连。
3、配置路由器PC1将与模拟成客户端,为了确保网关的冗余,因此将PC1的网关指向,即将通过HSRP协议虚拟出的虚拟网关地址:4、在PC1上使用ping命令测试当前是否可以到达10.1.1.1/24的主机:4、为了能够有效的确保网关的冗余,因此在R1与R2上配置HSRP协议,配置如下:5、当在R1上配置HSRP组后,IOS会提示如下信息:6、在R1或R2上查看HSRP组信息:7、HSRP组中的每台路由器均会带有一个优先级。
优先级会影响哪一台路由器成为ACTIVE路由器,用于响应客户端的ARP请求。
如果在HSRP刚启动,而且每台路由器的优先级均相同,则会优先选择接口IP较高的为ACTIVE路由器。
8、在PC1客户端,使用ping和traceroute命令跟踪路由:9、查看PC1的客户端的ARP缓存:10、使用扩展ping命令向10.1.1.1发送较多数据包,同时将R1的Fa0/0接口,手工置为down状态,观察HSRP的冗余:查看PC1上的扩展ping:从上面信息可以看出,由于R1的Fa0/0接口故障,导致PC1无法到达10.1.1.0/24的网络。
另外,由于R1的Fa0/0接口故障,R2将无法收到Active路由器发送的Hello数据包,因此,在R2默认的HSRP的保持时间10秒超时后,R2会立即将自己提升为Active路由器,通过如下的信息可以确认该结论:11、此时,再次在PC1上使用ping和traceroute命令确认路由和目标主机可达:12、通过以上上步骤,HSRP可以有效的保障网关的冗余,确保网络稳定。
HSRP实验详解及案例

热备份路由协议(HSRP)一、HSRP的相关概念HSRP(hot standby router protocol)是思科私有的一种协议,二、HSRP的配置1、配置为HSRP的成员switch(config-if)#standby group-number ip irtual-ip-addressgroup-number:默认组是0号,范围0~255irtual-ip-address:虚拟HSRP路由器的ip地址,即网段的网关地址。
例如:switch(config-if)#(no)standby 10 ip 192.168.1.2542、配置HSRP的优先级switch(config-if)#standby group-number priority priority-valuepriority-value:范围是0~255,默认值是100.例如:switch(config-if)#(no)standby 10 priority 2003、配置HSRP的占先权switch(config-if)#standby group-number preempt4、配置Hello消息的计时器switch(config-if)#standby group-number times hellotime holdtimehellotime:默认时间是3s,设置范围是1~255,holdtime:保持时间是hello时间的3倍,默认是10s。
例如:switch(config-if)#standby 10 times 2 85、配置HSRP的端口跟踪switch(config-if)#standby group-number track i nterface-type mod/num interface-priority interface-priority:当端口失效时,路由器的热备份优先级将降低的数值,默认为10.例如:switch(config-if)#standby 10 track fastEthernet 0/1 1006、查看HSRP状态switch#show standby [interface-type mod/num] [group-number] briefinterface-type mod/num:要显示的端口类型和序号。
HSRp与上行链路跟踪

HSRp与上行链路跟踪HSRP及上行链路跟踪一:实验目标(1):组网需求:企业总部局域网采用两台核心交换机组网来提高网络的可靠性,为防止二层环路,需要全网运行STP;将SW1部署为根网桥,SW2部署为备份根网桥,并将接入PC的接口配置为portfast端口,SW1-SW2之间使用链路捆绑进一步提高可靠性,同时,部署HSRP为内部vlan提供网关冗余。
本局域网有4个vlan,生产业务vlan11,服务器vlan12,二层网关vlan8,将SW1部署为vlan8/10/12的主网关,要求vlan10、vlan11的主网关跟踪上联端口。
(2)测试HSARP主备份网关之间的切换。
(3)分析PC1 ping PC2的三层通信过程和二层通信过程。
二:组网拓扑三:实验调测3.1基本信息配置3.11:SW1的基本信息配置Switch enable Switch#configure terminal Enter configuration commands,one per line.End with CNTL/Z.Switch(config)#hostname SW1 SW1(config)#no ip domain-lookupSW1(config)#line console 0SW1(config-line)#logging synchronous SW1(config-line)#no login SW1(config-line)#privi leve 15 SW1(config-line)#line vty 04SW1(config-line)#no login SW1(config-line)#privi leve 15 3.12:SW2基本信息配置3.13:SW3基本信息配置3.14:RT5基本信息配置3.15:RT6基本信息配置3.2:二层网络全局配置3.21:SW1的vlan配置SW1#vl da//进入vlan配置模式SW1(vlan)#vl 8VLAN 8added:Name:VLAN0008 SW1(vlan)#vl 10 VLAN 10 added:Name:VLAN0010 SW1(vlan)#vl 11 VLAN 11 added:Name:VLAN0011 SW1(vlan)#vl 12 VLAN 12 added:Name:VLAN0012 3.22:SW2的vlan配置3.23:SW3的vlan配置3.24:stp根网桥配置(将SW1配置为根网桥)SW1(config)#spa vl 8pri 0//手动将vlan8的网桥优先级设置为0 SW1(config)#spa vl 10 pri 0SW1(config)#spa vl 11 pri 0SW1(config)#spa vl 12 pri 03.25:stp备份根网桥配置(将SW2配置为备份根网桥)SW2(config)#spa vl 8pri 4096//手动将vlan8的网桥优先级设置为4096 SW2(config)#spa vl 10 pri 4096 SW2(config)#spa vl 11 pri 4096SW2(config)#spa vl 12 pri 4096 3.3:二层链路调测3.31:核心交换机SW1-SW2捆绑配置及调测SW1(config)#int ran fa 0/1-2//创建捆绑端口SW1(config-if-range)#swi tenc dSW1(config-if-range)#swi mo tSW1(config-if-range)#swi tall vl all SW1(config-if-range)#channel-group 2mo on//链路捆绑Creating aport-channel interface Port-channel2 W2(config)#int ran fa 0/1-2//创建捆绑端口SW2(config-if-range)#swi tenc dSW2(config-if-range)#swi mo tSW2(config-if-range)#swi tall vl all SW2(config-if-range)#chan2mo on//链路捆绑Creating aport-channel interface Port-channel2 3.32:SW1-SW3的trunk链路调试SW1(config)#int fa 0/3 SW1(config-if)#swi tenc d//封装802.1qSW1(config-if)#swi mo tSW1(config-if)#swi tall vl all SW1(config-if)#ex SW3(config)#int fa 0/1 SW3(config-if)#swi tenc dSW3(config-if)#swi mo tSW3(config-if)#swi tall vl all 3.33:SW2-SW3 trunk链路调试SW2(config)#int fa 0/3 SW2(config-if)#swi tenc dSW2(config-if)#swi mo tSW2(config-if)#swi tall vl all SW2(config-if)#ex SW3(config)#int fa 0/2 SW3(config-if)#swi tenc dSW3(config-if)#sw imo tSW3(config-if)#swi tall vl all 3.34:SW3 accee接口配置W3(config)#int fa 0/10 SW3(config-if)#swi mo acc SW3(config-if)#swi acc vl 10 SW3(config-if)#spa portf//配置为速端口,即当生成树变化时,可以绕过侦听和学习的时间直接进入转发状态SW3(config-if)#int fa 0/11 SW3(config-if)#swi mo acc SW3(config-if)#swi acc vl 11 SW3(config-if)#spa portf 3.4:二层设备网管地址配置3.41:SW3网管接口配置SW3(config-if)#int vl 8SW3(config-if)#ip add 192.168.8.132 255.255.255.128 SW3(config-if)#no shu SW3(config-if)#ex SW3(config)#ip de SW3(config)#ipdefault-g 192.168.8.129//配置默认网关3.5:三层接口配置3.51:SW1的三层接口配置SW1(config)#int vl 8SW1(config-if)#ip add 192.168.8.130 255.255.255.128 SW1(config-if)#no shu SW1(config-if)#ex SW1(config)#int vl 10 SW1(config-if)#ip add 192.168.10.2 255.255.255.0 SW1(config-if)#no shu SW1(config-if)#ex SW1(config)#int vl 11 SW1(config-if)#ip add 192.168.11.2255.255.255.0 SW1(config-if)#no shu SW1(config-if)#ex SW1(config)#int vl 12 SW1(config-if)#ip add 192.168.12.2 255.255.255.0 SW1(config-if)#no shu SW1(config-if)#ex SW2(config)#int vl 8SW2(config-if)#ip add 192.168.8.131 255.255.255.128 SW2(config-if)#no shu SW2(config-if)#ex SW2(config)#int vl 10 SW2(config-if)#ip add 192.168.10.3 255.255.255.0 SW2(config-if)#no shu SW2(config-if)#ex SW2(config)#int vl 11 SW2(config-if)#ip add 192.168.11.3255.255.255.0 SW2(config-if)#no shu SW2(config-if)#ex SW2(config)#int vl 12 SW2(config-if)#ip add 192.168.12.3 255.255.255.0 SW2(config-if)#no shu SW2(config-if)#ex 3.52:SW1的上行链路配置SW1(config)#int fa 0/12 SW1(config-if)#no swi//开启三层交换机的三层端口SW1(config-if)#ip add 192.168.9.1 255.255.255.252 SW1(config-if)#no shu SW1(config-if)#ex RT5(config)#int e0/0 RT5(config-if)#ip add 192.168.9.2 255.255.255.252 RT5(config-if)#no shu 3.53:SW2的上行链路配置SW2(config)#int fa 0/12 SW2(config-if)#no swi SW2(config-if)#ip add 192.168.9.5 255.255.255.252 SW2(config-if)#no shu SW2(config-if)#ex RT6(config)#int e0/0 RT6(config-if)#ip add 192.168.9.6RT6(config-if)#ip add 192.168.9.6 255.255.255.252 RT6(config-if)#no shu 3.54:SW1上的HSRP配置SW1(config)#int vl 8SW1(config-if)#stan 8ip 192.16 8.8.129//配置vlan8在HSRP组8中的虚拟IP地址SW1(config-if)#stan 8pri 120//配置vlan8在HSRP组8中的优先级为120 SW1(config-if)#stan 8pree//配置可以抢占SW1(config-if)#ex SW1(config)#int vl 10 SW1(config-if)#stan 10 ip 192.168.10.1//配置vlan10在HSRP组10中的SW1(config-if)#stan 10 pri 120//配置vlan8在HSRP组8中的优先级为120 SW1(config-if)#stan 10 pree//配置可以抢占SW1(config-if)#stan 10 tr fa 0/12 30//配置跟踪端口fa0/12,当fa0/12关闭时,vlan10在HSRP组10的优先级降低30 SW1(config)#int vl 11 SW1(config-if)#stan 11 ip 19 SW1(config-if)#stan 11 ip192.168.11.1 SW1(config-if)#stan 11 pree SW1(config-if)#exSW1(config)#int vl 12 SW1(config-if)#stan 12 ip 192.168.12.1SW1(config-if)#stan 12 ip 192.168.12.1 SW1(config-if)#stan 12 pri 120 SW1(config-if)#stan 12 pree SW1(config-if)#ex SW2(config)#int vl 8SW2(config-if)#stan 8ip 192.168.8.129 SW2(config-if)#stan 8pree SW2(config-if)#int vl 10 SW2(config-if)#stan 10 ip 192.168.10.1SW2(config-if)#stan 10 pree SW2(config-if)#int vl 11 SW2(config-if)#stan 11 ip 192.168.11.1 SW2(config-if)#stan 11 pri 120SW2(config-if)#stan 11 pree SW2(confi g-if)#stan 11 tr fa 0/12 30SW2(config-if)#ex SW2(config)#int vl 12 SW2(config-if)#stan 12 ip 192.168.12.1 SW2(config-if)#stan 12 pree SW2(config-if)#ex 3.55:配置静态路由SW1(config)#ip route 0.0.0.0 0.0.0.0 192.168.11.3//去往全网段的下一跳是192.168.11.3 SW2(config)#ip route 0.0.0.0 0.0.0.0 192.168.11.2 rt5(config)#ip route 0.0.0.0 0.0.0.0 192.168.9.1 rt6(config)#ip route 0.0.0.0 0.0.0.0 192.168.9.5 3.6:全网联通性测试Ping SW2的三层接口地址Ping SW1上的三层接口地址Ping 9网段Ping 8网段地址四:实验总结1:在本实验中,将SW1设为vlan 8、vlan10、vlan11、vlan12的根网桥是为了实验需要,实际工程应用中我们应该为了考虑负载均衡,根据实际情况配置根网桥。
VTP、STP、Port-channel、HSRP综合实验
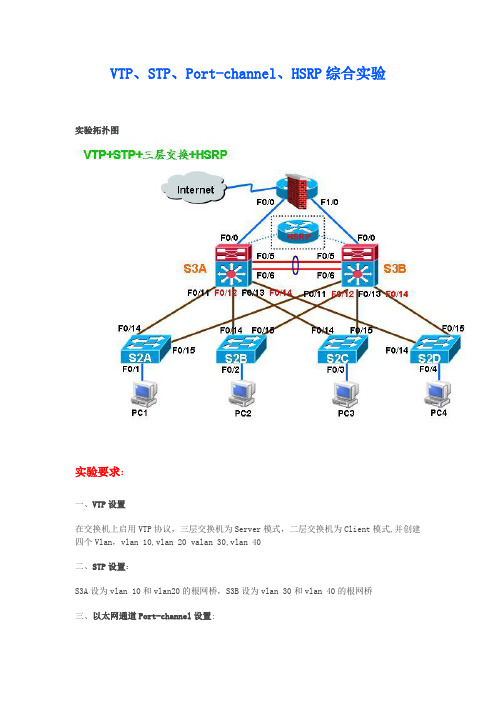
VTP、STP、Port-channel、HSRP综合实验实验拓扑图实验要求:一、VTP设置在交换机上启用VTP协议,三层交换机为Server模式,二层交换机为Client模式,并创建四个Vlan,vlan 10,vlan 20 valan 30,vlan 40二、STP设置:S3A设为vlan 10和vlan20的根网桥,S3B设为vlan 30和vlan 40的根网桥三、以太网通道Port-channel设置:S3A和S3B交换机上的端口f0/5-6加入channel-group 1成为Port-channel,并把Port-channel1设为trunk模式(注意以太通道配置好之后,要write保存三层交换机的配置,再reload重载IOS映像,这样以太通道才会发挥作用,否则不能正常工作,后面的实验效果就做不出来)四、HSRP热备份路由协议:在两台三层交换机上配置HSRP或VRRP协议,为了实现冗余备份和负载均衡,在S3A上,vlan 10和vlan 20为Active,vlan30和vlan 40为Standby;在S3B上,vlan 10和vlan 20为Standby,vlan 30和vlan 40为Active。
实验步骤:路由器:conf tint loopback 0ip add 3.3.3.3 255.255.255.0int f0/0ip add 1.1.1.1 255.255.255.0no shutint f1/0ip add 2.2.2.1 255.255.255.0no shutend(下面利用动态路由宣告网段)conf trouter ripversion 2no auto-summarynetwork 1.1.1.0network 2.2.2.0network 3.3.3.0endS3A:conf tip routing //开启三层交换功能int f0/0no switchport //关闭二层交换功能,开启三层交换功能ip add 1.1.1.2 255.255.255.0no shutdown //配置f0/0接口,实现与路由器的连接vtp domain xhvtp mode servervtp password 123vlan 10vlan 20vlan 30vlan 40exit //三层交换机支持在全局模式下直接配置VTP和VLANconf tint range f0/11 - 14switchport trunk encapsulation dot1qswitchport mode trunkint range f0/5-6switchport trunk encapsulation dot1qswitchport mode trunkexit//下面是做以太通道int port-channel 1int range f0/5-6channel-group 1 mode onendconf t(int range f0/5 – 6Channel-group 1 mode onInt port-channel 1Switchport trunk enc doSwitchport mode trunk))//下面是为各VLAN配置IP地址int vlan 10ip add 192.168.10.254 255.255.255.0 no shutint vlan 20ip add 192.168.20.254 255.255.255.0 no shutint vlan 30ip add 192.168.30.254 255.255.255.0 no shutint vlan 40ip add 192.168.40.254 255.255.255.0 no shutend//下面是用动态路由协议宣告网段conf trouter ripversion 2no auto-summarynet 1.1.1.0net 192.168.10.0net 192.168.20.0net 192.168.30.0net 192.168.40.0end//下面是做MST,多生成权协议,也可通过定义instance方式进行配置conf tspanning-tree vlan 10 root prispanning-tree vlan 20 root prispanning-tree vlan 30 root secspanning-tree vlan 40 root secend//下面是做HSRP,热备份路由协议,配置虚拟网关地址conf tint vlan 10standby 10 ip 192.168.10.1standby 10 pri 200standby 10 preempt ( standby 后的10是组)standby 10 track f0/0 50int vlan 20standby ip 192.168.20.1standby pri 200standby preemptstandby track f0/0 50int vlan 30standby ip 192.168.30.1standby pri 180standby preemptint vlan 40standby ip 192.168.40.1standby pri 180standby preemptendS3B:ip routing //开启三层交换功能int f0/0no switchport //关闭二层交换功能,开启三层交换功能ip add 2.2.2.2 255.255.255.0no shutdown //配置f0/0接口,实现与路由器的连接vtp domain xhvtp mode servervtp password 123exit //三层交换机支持在全局模式下直接配置VTP,来学习S3A的VLAN配置信息conf tint range f0/11 - 14switchport trunk encapsulation dot1qswitchport mode trunkint range f0/5-6switchport trunk encapsulation dot1qswitchport mode trunkexit//下面是做以太通道int port-channel 1int range f0/5-6channel-group 1 mode onend//下面是为各VLAN配置IP地址int vlan 10ip add 192.168.10.253 255.255.255.0no shutint vlan 20ip add 192.168.20.253 255.255.255.0no shutint vlan 30ip add 192.168.30.253 255.255.255.0no shutint vlan 40ip add 192.168.40.253 255.255.255.0no shutend//下面是用动态路由协议宣告网段conf trouter ripversion 2no auto-summarynet 2.2.2.0net 192.168.10.0net 192.168.20.0net 192.168.30.0net 192.168.40.0end//下面是做MST,多生成权协议,也可通过定义instance方式进行配置conf tspanning-tree vlan 10 root secspanning-tree vlan 20 root secspanning-tree vlan 30 root prispanning-tree vlan 40 root priend//下面是做HSRP,热备份路由协议,配置虚拟网关地址,这个与S3A的必须相同conf tint vlan 10standby 10 ip 192.168.10.1standby 10 pri 200standby 10 preempt standby 10 track f0/0 50 int vlan 20standby ip 192.168.20.1 standby pri 200 standby preemptstandby track f0/0 50int vlan 30standby ip 192.168.30.1 standby pri 180standby preemptint vlan 40standby ip 192.168.40.1 standby pri 180standby preemptendS2A:vlan datavtp domain xhvtp password 123vtp clientexitconf tint range f0/14 - 15sw mode trunkint f0/1switchport mode access switchport access vlan 10spanning-tree portfast exitspanning-tree uplinkfast endS2B:vtp domain xhvtp password 123vtp clientexitconf tint range f0/14 - 15sw mode trunkint f0/2switchport mode access switchport access vlan 20 spanning-tree portfastexitspanning-tree uplinkfast endS2C:vlan datavtp domain xhvtp password 123vtp clientexitconf tint range f0/14 - 15 switchport mode trunkint f0/3switchport mode accessswitchport access vlan 3 spanning-tree portfastexitspanning-tree uplinkfast endS2D:vtp domain xhvtp password 123vtp clientexitconf tint range f0/14 - 15sw mo trunint f0/4sw mo acsw ac vlan 4spanning-tree portfastexitspanning-tree uplinkfastend下面是让机配置:PC1ip 192.168.10.10 255.255.255.0 网关192.168.10.1 PC1ip 192.168.20.10 255.255.255.0 网关192.168.20.1 PC1ip 192.168.30.10 255.255.255.0 网关192.168.30.1 PC1ip 192.168.40.10 255.255.255.0 网关192.168.40.1配置完成之后,所有的实验要求都将出现效果tracert 3.3.3.3 也将追踪出真实的三层交换机的IP验证:将三层交换机1的F0/0口shutdown,pc1 ping pc4 ping得通pc1 ping 3.3.3.3 ping得通说明实验成功。
以太网通道、VTP、STP、HSRP和ACL综合实验

以太网通道、VTP、STP、HSRP和ACL综合实验一、实验拓扑图二、实验要求1.使用4台路由器模拟PC机。
2.SW1与SW2之间配置以太网通道。
3.在SW3、SW5、SW6上启用VTP。
SW3为server模式,SW5和SW6为client,VTP域名zhao,密码test,启用修剪。
4.配置SW4到SW1、SW2的热备份,实现VLAN负载均衡。
5.要求PC1和PC2的VLAN间不能互访,也不能访问其他VLAN(除特定服务器外)。
网络设备部不允许PC1和PC2所在网段ping,只有PC3和PC4可以ping。
三、实验配置SW1上的配置:全局配置模式下:ip routinginterface range f0/14 - 15switchport mode trunkchannel-group 1 mode oninterface f0/2switchport mode trunk特权模式下:vlan databasevlan 2vlan 50全局配置模式下:interface vlan 50ip address 10.255.1.1 255.255.255.0no shutdownstandby 50 ip 10.255.1.254standby 50 priority 150standby 50 preemptstandby 50 track f0/2 100interface vlan 2ip address 10.0.0.1 255.255.255.0no shutdownstandby 2 ip 10.0.0.254standby 2 preemptspanning-tree vlan 50 root primaryspanning-tree vlan 2 root secondaryinterface f0/1no switchportip address 10.255.0.50 255.255.255.252 no shutdownrouter ripversion 2no auto-summarynetwork 10.0.0.0network 10.255.0.48network 10.255.1.0SW2上的配置:全局配置模式下:ip routinginterface range f0/14 - 15switchport mode trunkchannel-group 1 mode oninterface f0/2switchport mode trunk特权模式下:vlan databasevlan 2vlan 50全局配置模式下:interface vlan 50no shutdownstandby 50 ip 10.255.1.254standby 50 preemptinterface vlan 2ip address 10.0.0.2 255.255.255.0no shutdownstandby 2 ip 10.0.0.254standby 2 priority 150standby 2 preemptstandby 2 track f0/2 100spanning-tree vlan 2 root primaryspanning-tree vlan 50 root secondaryinterface f0/1no switchportip address 10.255.0.54 255.255.255.252 no shutdownrouter ripversion 2no auto-summarynetwork 10.0.0.0network 10.255.0.52network 10.255.1.0SW3上的配置:全局配置模式下:ip routinginterface range f0/14 - 15switchport mode trunk特权模式下:vlan databasevtp domain zhaovtp password testvtp servervtp pruningvlan 550vlan 551全局配置模式下:interface vlan 550ip address 10.80.0.254 255.255.0.0no shutdowninterface vlan 551no shutdowninterface f0/1no switchportip address 10.255.0.49 255.255.255.252no shutdowninterface f0/2no switchportip address 10.255.0.53 255.255.255.252no shutdownrouter ripversion 2no auto-summarynetwork 10.80.0.0network 10.81.0.0network 10.255.0.52network 10.255.0.48access-list 100 deny icmp 10.80.0.0 0.0.255.255 any echoaccess-list 100 permit ip 10.80.0.0 0.0.255.255 host 10.0.0.10 access-list 101 deny icmp 10.81.0.0 0.0.255.255 any echoaccess-list 101 permit ip 10.81.0.0 0.0.255.255 host 10.0.0.10 interface vlan 550ip access-group 100 ininterface vlan 551ip access-group 101 inSW4上的配置:特权模式下:vlan databasevlan 2vlan 50全局配置模式下:interface range f0/1 - 2switchport mode trunkinterface f0/14switchport mode accessswitchport access vlan 50interface f0/15switchport mode accessswitchport access vlan 2SW5上的配置:特权模式下:vlan databasevtp domain zhaovtp password testvtp client全局配置模式下:interface f0/14switchport mode trunkinterface f0/1switchport mode accessswitchport access vlan 550SW6上的配置:特权模式下:vlan databasevtp domain zhaovtp password testvtp client全局配置模式下:interface f0/15switchport mode trunkinterface f0/1switchport mode accessswitchport access vlan 551interface vlan 1ip address 10.255.PC1(路由器R1模拟)上的配置:全局配置模式下:no ip routingip default-gateway 10.80.0.254 interface f0/0ip address 10.80.0.10 255.255.0.0 no shutdownPC2(路由器R2模拟)上的配置:全局配置模式下:no ip routingip default-gateway 10.81.0.254 interface f0/0ip address 10.81.0.10 255.255.0.0 no shutdownPC3(路由器R3模拟)上的配置:全局配置模式下:no ip routingip default-gateway 10.255.1.254 interface f0/0ip address 10.255.1.10 255.255.255.0 no shutdownPC4(路由器R4模拟)上的配置:全局配置模式下:no ip routingip default-gateway 10.0.0.10interface f0/0ip address 10.0.0.254 255.255.255.0 no shutdown。
什么是HSRP

什么是HSRP?如果路由器出现故障而导致企业无法接入互联网会发生什么?这就是为什么需要在网络中提供冗余的重要性。
下面我们将教你如何使用热备份路由器协议确保冗余。
如果路由器出现故障而导致企业无法接入互联网会发生什么?企业可以接受吗?或许可暂时逃脱处罚,但是你需要制定一个更好的计划,而不仅仅是简单的桌面呼叫支持。
这就是为什么需要在网络中提供冗余的重要性。
考虑为当前路由器增加一个可以立即接管的备份路由器。
企业需要的只是硬件,Cisco软件会完成其他事情。
让我们考察如何利用热备份路由器协议(HSRP)配置它。
什么是HSRP?HSRP是Cisco对冗余的私有协议。
它提供几乎100%的路由器可用性和冗余。
所以,如果某台路由器发生故障,备份路由器会接管主路由器的路由功能。
然而,Cisco还支持其他可用的行业协议。
一个行业标准是虚拟路由器冗余协议(VRRP)。
另一个HSRP的可替换选择是网关负载平衡协议(GLBP ),这是Cisco的另一个私有解决方案。
HSRP如何工作?在使用HSRP的时候,路由器既可以是主的也可以是备用的。
如果主路由器在一段时间内没有向备用路由器发送HELLO数据包,备用路由器假定主路由器已关闭,从而进行接管。
然后备用路由器假定对虚拟IP地址负责,并开始对虚拟IP地址指向的虚拟以太网MAC地址响应。
主和备用路由器交换HSRP HELLO包,所以相互知道对方在哪儿。
这些HELLO包使用多播224.0.0.2和UDP端口1985。
HSRP的最基本形式从IOS 10.0 开始可用,但是在IOS 11和12版本中有更新的特性发布。
什么决定活动路由器?首先,你可以配置一个优先数来决定它,然后它是由最高的IP地址决定。
缺省优先数是100;一个更高的优先数表示优先路由器。
当然,在建立路由器冗余的时候,并不限制于仅仅两台路由器。
实际上,可以建立一起工作的路由器组并且拥有多个“备用”路由器。
1、把路由器配置为HSRP备份组的成员,可以在接口配置模式下使用下面的命令:router(config-if)# standby group-number ip ip-address2、配置HSRP跟踪:router(config-if)# standy group-number track type-number interface-priority3、要显示HSRP路由器的状态:router# show standby type-number group brief用HSRP进行备份的一组路由器共用一个虚拟的MAC地址及虚拟IP地址,每个参与HSRP的局域端口有一个本端口的IP地址和MAC地址,每个路由器都有一个权值,权值最高的作为主路由器进行工作,其它的不工作,当主路由器瘫痪时,第二个权值最高的路由器将作为主路由器,依次类推。
- 1、下载文档前请自行甄别文档内容的完整性,平台不提供额外的编辑、内容补充、找答案等附加服务。
- 2、"仅部分预览"的文档,不可在线预览部分如存在完整性等问题,可反馈申请退款(可完整预览的文档不适用该条件!)。
- 3、如文档侵犯您的权益,请联系客服反馈,我们会尽快为您处理(人工客服工作时间:9:00-18:30)。
R1配置:
interface Loopback0
ip address 1.1.1.1 255.255.255.0 interface Serial0/0
ip address 192.168.2.2 255.255.255.0 interface Serial0/1
ip address 192.168.3.2 255.255.255.0 router eigrp 100
network 1.1.1.0 0.0.0.255
network 192.168.2.0
network 192.168.3.0
no auto-summary
SW1配置:
interface FastEthernet1/1
switchport mode trunk
interface FastEthernet1/2
switchport mode trunk
interface FastEthernet1/3
switchport access vlan 10
SW2配置:
interface Serial0/0
ip address 192.168.2.1 255.255.255.0 clock rate 2000000
interface FastEthernet1/1
switchport mode trunk
interface Vlan10
ip address 192.168.1.2 255.255.255.0 standby 1 ip 192.168.1.254 standby 1 priority 120
standby 1 preempt
standby 1 track Serial0/0 30
router eigrp 100
network 192.168.1.0
network 192.168.2.0
no auto-summary
SW3配置:
interface Serial0/0
ip address 192.168.3.1 255.255.255.0 clock rate 2000000
interface FastEthernet1/2
switchport mode trunk
interface Vlan10
ip address 192.168.1.3 255.255.255.0 standby 1 ip 192.168.1.253 standby 1 priority 100
standby 1 preempt
router eigrp 100
network 192.168.1.0
network 192.168.3.0
no auto-summary.
PC1配置:
interface FastEthernet0/0
ip address 192.168.1.1 255.255.255.0
ip default-gateway 192.168.1.254
实验结果:
第一种情况:当SW2的优先级高于SW1
所以当PC1 ping R1环回口是走SW1 --SW2---R1这条路径
第二种情况:当SW2 的F1/1的接口down时候,因为主备份交换机都有抢占的原因,所以就切换备份交换机:
所以当PC1 ping R1环回口是走SW1 –SW3--R1这条路径
第三种情况:
当SW2 的S0/0的接口down时候,因为主交换机有抢占和
跟踪,马上把优先级降低30就等于90,而在这时候由于备份的交换机的优先级比主交换机高的原因,所以就切换备份交换机
所以当PC1 ping R1环回口是走SW1 –SW3--R1这条路径。
