UpdateTool 升级工具使用说明
Download tool 使用说明
WG-Atlashnew 刷机工具使用说明
PC端软件升级工具及使用方法
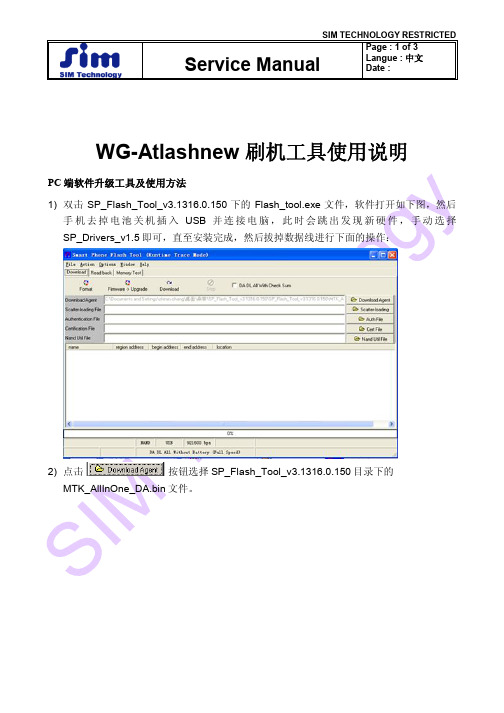
1) 双击SP_Flash_Tool_v3.1316.0.150下的Flash_tool.exe文件,软件打开如下图,然后
手机去掉电池关机插入USB并连接电脑,此时会跳出发现新硬件,手动选择SP_Drivers_v1.5即可,直至安装完成,然后拔掉数据线进行下面的操作:
2) 点击按钮选择SP_Flash_Tool_v3.1316.0.150目录下的
MTK_AllInOne_DA.bin文件。
3) 请将最新版的手机软件压缩包解压后,再点击按钮选择最新提供的手
机软件包内的MT6589_Android_scatter_emmc.txt文件。
4) 点击按钮后,将usb线插入手机(手机不需要开机,不需要插入电
池),手机自动进入升级软件状态,持续3分钟左右,升级完成后,会有如下提示,表明升级完成,可以把USB线拔出,升级全过程结束。
linux_upgrade_tool_v1.1_help
Linux 开发工具使用说明
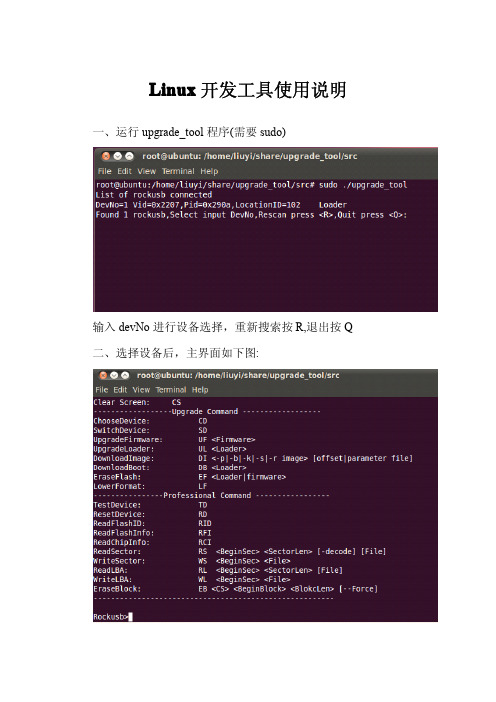
一、运行 upgrade_tool 程序(需要 sudo)
输入 devNo 进行设备选择,重新搜索按 R,退出按 Q 二、选择设备后,主界面如下图:
左侧是功能描述,右侧是命令语法。升级相关操作都在 upgrade command 列表下,忘记命令语法可以输入 H 进行查看,清屏输入 CS,退出按 Q. � CD 命令:选择设备,当执行的命令有包含设备重启操作时,需重 新选择设备,当改变操作设备时需重新选择 � SD 命令:msc 切换到 rockusb 升级模式。当切换执行成功后,需要 重新选择设备 � UF 命令:升级完整 update.img 固件,当执行成功后需要重新选择设 备 � UL 命令:升级 loader 功能,当执行成功后需要重新选择设备 � DI 命令:下载单独 image 镜像到指定扇区,例如升级 kernel.img 或 者 system.img 都可以直接使用此功能.例如下载 kernel.img:DI -k kernel.img parameter //如果之前通过 di 下载过 parameter, 则再下 载 kernel.img 时就可以不用指定最后的 parameter 参数 � DB 命令:下载 boot,在 maskrom 状态下,可以通过此功能,让 maskrom 设整个 nand flash � LF 命令:低格保留块后面区域,只有在 loader 模式下使用 注:DI、UF、UL、RD、SD、EF、LF、DB 和 RD 命令支持命令行方 式调用,例:sudo ./upgrade_tool uf update.img
Agile e6 Upgrade Tool 3.0 用户指南说明书

1
Agile e6.0
Chapter 2 Architecture and Basic Concepts
Architecture
The upgrade tool is implemented in Java. The tool accesses the databases directly using a JDBC connection. The configuration of all upgrade steps is stored in a set of xml control files. In addition SQL scripts are used for special steps. The log and error files are mainly in XML format. The user can execute the migration steps easily from the user interface of the Upgrade Tool.
软件和驱动版本更新工具的使用方法
软件和驱动版本更新工具的使用方法
细心的用户应该会发现,现在QHYCCD官网相机主页下载里多了一个叫做(更新工具)的软件。
它是做什么的呢?之前经常用户会向我们反映,你们的软件驱动会经常更新,我们每次要打开QHYCCD官网去找很麻烦,我们软件工程师在了解这一诉求后,一直在想办法让用户们能更简单便捷的检查和下载最新的驱动,这不这个软件诞生,应该可以很好的简化这个步骤。
此软件暂时支持(miniCam5F,miniCam5S,IC8300,QHY16200A,QHY695A,QHY90A,QHY5-II系列,QHY5-III系列,QHY174,QHY178,QHY224,QHY290)
下面我们看下他的用法:
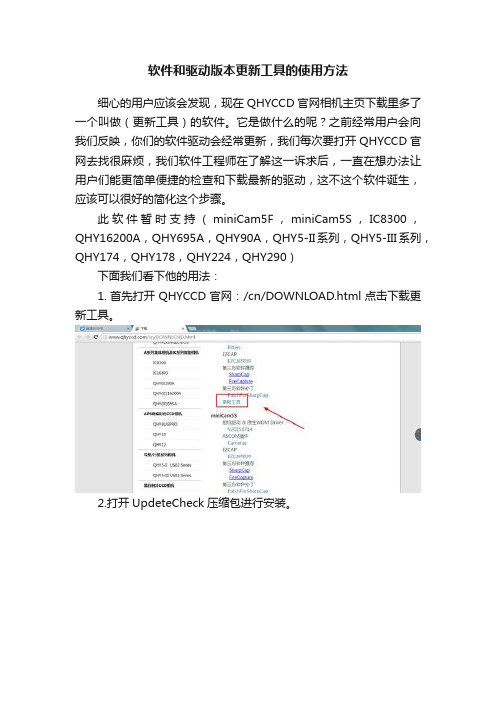
1.首先打开QHYCCD官网:/cn/DOWNLOAD.html点击下载更新工具。
2.打开UpdeteCheck压缩包进行安装。
3.注意要首先要先连接QHYCCD相机,然后打开软件。
4.点击检查更新。
5.看看那些需要更新,点击download
6.直接跳转到相应的下载页面,下载更新相应的软件和驱动就可以了。
工程升级工具使用说明

工程升级工具使用说明升级工具升级说明注意事项:1、升级工具支持将通用版本KV6.55工程升级至KV7.0。
2、安装升级工具前,请确保kv6.55已经安装。
3、在使用升级工具前,请确认要升级的KV6.55工程已经做好备份。
升级说明:组态王6.55工程如果想要升级至7.0,需借助工程升级工具。
工程升级后保证了原来老版本下的工程也不受影响。
具体升级过程主要分两部分:通过升级工具将kv6.55的工程转成中间文件。
通过7.0工程浏览器界面加载该中间文件。
通过升级工具将kv6.55的工程转成中间文件1、前提准备工作:1)、用户需要在kv6.55下安装升级工具,安装包UpdateTools 由亚控公司提供。
2)、首先关闭655工程管理器或开发系统,否则会弹出提示框,如下图所示:2、将kv6.55工程转为中间文件步骤一:双击运行UpgradeKvVersion.exe,弹出工程升级对话框,如下图所示:工程升级对话框步骤二:点击工具栏的“升级7.0”,弹出工程升级管理器界面,如下图所示:工程升级管理器步骤三:点击工具栏的“搜索工程”选择要升级的kv6.55工程,如下图所示:步骤四:点击“升级”按钮,并选择升级工程存放路径,如下图所示:步骤五:工程升级完成后,指定路径下生成了kv6.55的工程升级文件,如下图所示:通过7.0工程浏览器界面加载中间文件1、前提准备工作:1)、kv6.5的工程通过工程升级工具已经生成了中间文件。
2、开始升级步骤一:在7.0中新建工程,打开工程浏览器,点击“升级工程”,如下图所示:步骤二:提示用户升级会覆盖掉当前工程中的内容,如下图所示:后开始升级。
步骤四:升级完成后,显示“导入信息总结”框,如下图所示:。
UpdateTool 升级工具使用说明
UpdateTool升级工具使用说明
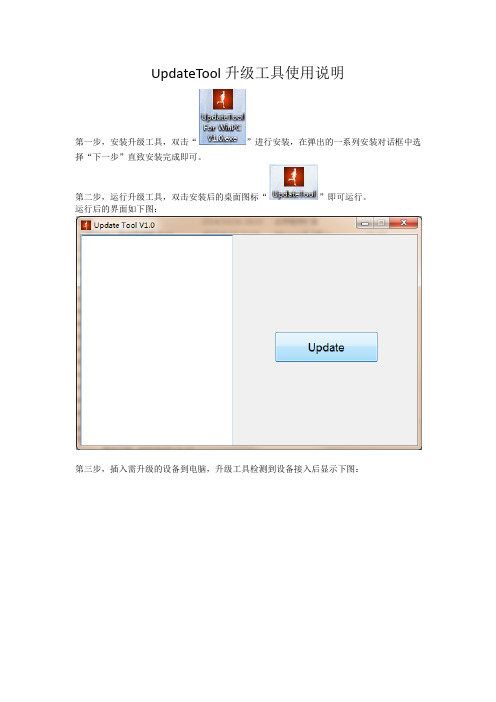
第一步,安装升级工具,双击“”进行安装,在弹出的一系列安装对话框中选择“下一步”直致安装完成即可。
第二步,运行升级工具,双击安装后的桌面图标“”即可运行。
运行后的界面如下图:
第三步,插入需升级的设备到电脑,升级工具检测到设备接入后显示下图:
注意:如果没有检测到设备信息,左侧为空白,请参考我们的驱动修复解决办法
第四步,选择升级的目标bin文件,通过点击上图中的“”按钮来选择目标bin文件的存放路径,选对路径,再选中文件双击,或者点击下图中的打开按钮即可进行升级。
双击或者点击打开后,升级工具显示
第五步,待升级工具提示升级成功后,拔掉设备,重新插入设备,确认是否已经升级到最新版本。
UPD USB TOOL烧录升级工具使用说明书

ShenZhen Ultra Power Display Electronics Co., Ltd深圳市超力显电子科技有限公司 QA-09-0001UPD USB TOOL 烧录升级工具使用说明书 1.文件目的叙述烧录升级板正确的使用方法,减小因为不当操作而产生的不良现像。
2.适用范围所有使用烧录升级板的人员。
3.资格与培训所有使用烧录升级板的人员必需通读并理解本说明书方可进行操作。
4.文件内容 4.1新版升级头外观说明指示灯USB 接口升级口J1DVIEDID UPDATE HDMI EDID UPDATE升级口和转接口 升级口升级口CON6升级口CON5ShenZhen Ultra Power Display Electronics Co., Ltd深圳市超力显电子科技有限公司 QA-09-0001J1: CON5/6:4.1.1 新烧录升级板型号:“USB TOOL 1004C”此标识在烧录升级板背面上方 4.1.2 新烧录升级板无电源插座。
4.1.3 指示灯为单灯绿色 4.2升级所需工具4.2.1 USB 连接线,一端公口,一端母口,线长按实际作业需要可自行决定。
用于联接电脑主机和 升级板。
4.2.2 适配线一条(按PCB 板调试口大小选择线头大小)。
4.2.4. 电脑一台,包含:主机,显示器,键盘和鼠标。
4.2.5 .ISP 烧写软件工具,软件工具英文版本。
4.3 操作前的准备工作 4.3.1 联接方法a. USB 连接线插上主机。
b. USB 升级板连接USB 连接线母口。
4.3.2 工具软件设置将我方所给的工具软件,放置在电脑D 盘的任一目录下即可。
4.3.3 程序文件设置将我方提供的将要烧写的文件存放于电脑D 盘的任一目录. 4.4.注意事项4.4.1. 新版烧录升级板只能烧写类型为BIN 的程序文件.(鼠标右键单击选择属性,可查看文件类型)4.4.2. 新版烧录升级板能用于MSTAR 全系列的MCU 驱动板.4.4.3. 新版烧录升级板只能烧写新的程序文件.同时,旧烧录升级板不能烧写新的程序文件.4.5.把程序HBIN 文件烧到烧录升级板中 4.5.1.硬件联接a.用USB 连接线将烧录升级板和主机联接起来.B 烧录工具显示绿灯 4.5.2.软件工具打开ShenZhen Ultra Power Display Electronics Co., Ltd深圳市超力显电子科技有限公司QA-09-0001a.打开电脑中软件工具的存放路径b.双击ISP_Tool.exe 如图:打开后软件工具介面如下:点击CONNECT 连接成功后再点击READ 读取读取ShenZhen Ultra Power Display Electronics Co., Ltd深圳市超力显电子科技有限公司 QA-09-0001连接成功并读取后将进入下一个界面。
MyUI刷机 M3工具使用说明
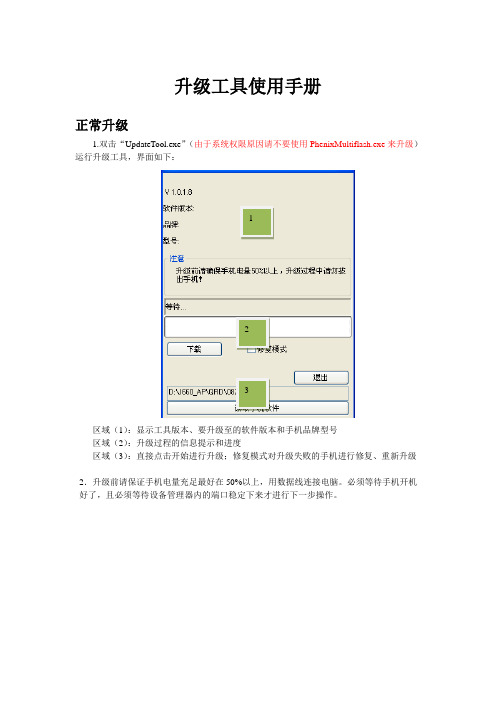
升级工具使用手册正常升级1.双击“UpdateTool.exe”(由于系统权限原因请不要使用PhenixMultiflash.exe来升级)运行升级工具,界面如下:123区域(1):显示工具版本、要升级至的软件版本和手机品牌型号区域(2):升级过程的信息提示和进度区域(3):直接点击开始进行升级;修复模式对升级失败的手机进行修复、重新升级2.升级前请保证手机电量充足最好在50%以上,用数据线连接电脑。
必须等待手机开机好了,且必须等待设备管理器内的端口稳定下来才进行下一步操作。
3、正常升级过程(1)点击“开始”按钮注意:开始刷机后请尽量平放手机不要移动以免USB数据线松动;刷机时如果系统弹出的“格式化磁盘”千万不能点确定,无视之或者点X关闭掉就好。
(2)工具首先备份用户的QCN文件(3)切换手机模式进行EMMC下载(5)手机升级部分完成,手机开机,导回用户QCN文件(6)完成升级时弹出提示框,点击OK,然后点击“停止”按钮选择即可。
修复模式1. 将手机连接到电脑,确认设备管理器中是否有“Diagnostics 9006”或者“Diagnostics 9008”端口。
对于没有任何端口的手机,断开手机与电脑的数据线连接,拔下电池让手机断电5秒,再装上电池。
接着按住音量上键+下键,再按power键,持续按住5秒。
再将手机连接到电脑上看看是否有“Diagnostics 9006”或者“Diagnostics 9008”端口。
2.确认有了“Diagnostics 9006”或者“Diagnostics 9008”端口之后,先将手机从电脑上拔下。
打开刷机工具,勾选“修复模式”,在弹出的文件选择对话框中找到软件包文件夹,选择刷机时自动备份文本文件(以手机IMEIi号命名的txt文件),点击“打开”。
3. 选好修复模式需要的txt文件后,先点击下载,再连接手机到电脑,之后修复模式刷机同正常升级类似,工具进度条会开始跑。
最新MTK升级工具操作指引详细说明

8
此时第一个端口驱动安装成功,如需要多个端口同时升级,重更换电脑 USB 端口,重复 上面动作:
Shenahen Ampere Technology Co., Ltd
9
D:驱动,端口安装完成后,点工具右下角“stop all”退出,选择已安装好的端口号,再点
“start all”启动工具:
Shenahen Ampere Technology Co., Ltd
Shenahen Ampere Technology Co., Ltd
7
当红色走完后,电脑会自动弹出新设备安装向导:
在其上可直接点击“下一步”或 → 从列表或指定位置安装 → 指定驱动目录下的文件夹 (工具包中的驱动文件夹)→点击下一步进行安装,驱动安装完成;工具自动进入下一价段 进度:
Shenahen Ampere Technology Co., Ltd
驱动文件夹 工具文件夹
2
打开工具文件夹:“XLS_SP-MultiPortDownload(UpgradeTool)_V3.1312.00.00_20130420”,向 下拉,找到 打开升级工具。 2) 工具打开后,先配置工具文件: 项, 双击图标
A:点击“ File”按钮选择第一个“ Open Download Agent File”,配置工具文件夹中的
文件;
Shenahen Ampere Technology Co., Ltd
B:点击”Factory database” 按钮选择第一个“ Setup data source file”,配置工具文件夹
中的 ;
3
C: 点击“Scatter File”按钮,选择升级软件包中的:MT6575_Android_scatter.txt 文件。
UpdataTool程序升级软件使用说明书

UpdataTool程序升级软件使用说明书前言:目前本司UpdataTool 程序升级软件仅适用于我司YX TW 08-1 、YX TW 10-1和YX TW 10-2这三款系统,我司这三款控制系统可提供在线远程升级远程升级程序的作用有以下几方面:(1)修复控制系统底层程序死机(由于用户操作不当,或者升级程序错误等)(2)当控制系统性能提升时,可以通过远程升级程序达到原有的系统性能提升(3)可修复原来旧程序可能存在的BUG一、远程升级方法1(用于能正常使用、通讯的情况下性能提升或修改BUG):(1)首先打开软件,即可看到以下界面:(2)点击右上角按钮,在弹出的对话框中,找到程序所在路径(注意看清楚文件名,每款系统的程序文件名不一样),选中然后打开,如下图(3)控制卡上电,然后波特率固定默认19200,选好串口COM(一般的电脑默认为COM1)(4)然后单击,若能升级,在软件的下方空白处会提示:XXX OK等字样,程序下载过程大概需要一分钟左右,等最后提示一句比较长的XXXX OK字样,证明程序就已经升级成功!若提示为:Data Sent Start Error ,Retrying!,则用发布软件检查是否能正常通讯上,或是串口,波特率是否选择好!若以上问题均排除还是无法升级,请采用方法2二、远程升级方法2(用于不能正常使通讯的情况,硬升程序,修复控制卡死机):(1)第一步与方法1相同(2)第二步与方法1相同(3)当操作了前两个步骤后,第三步波特率固定默认19200,选好串口COM(一般的电脑默认为COM1),然后单击(4)关闭控制卡电源,10秒钟后打开控制卡电源,当上电过程中,程序会自动下载到控制卡上,若能升级,在软件的下方空白处会提示:XXX OK等字样,程序下载过程大概需要一分钟左右,等最后提示一句比较长的XXXX OK字样,证明程序就已经升级成功!若提示为:Data Sent Start Error ,Retrying!请检查通讯线,反复试验几次都不成功,请返厂处理。
win10升级工具有哪些怎么用?
win10升级工具有哪些怎么用?
win升级工具有哪些怎么用?有不少的win7用户想要升级到win10,但是不知道如何下手,其实win10升级工具有很多,包括腾讯电脑管家win10升级助手,360win10升级助手,还有官方渠道的win10升级助手等等,那么win10升级工具怎么用呢?小编在下文为你介绍官方win10升级工具的使用方法。
微软官方win10升级工具的使用方法:
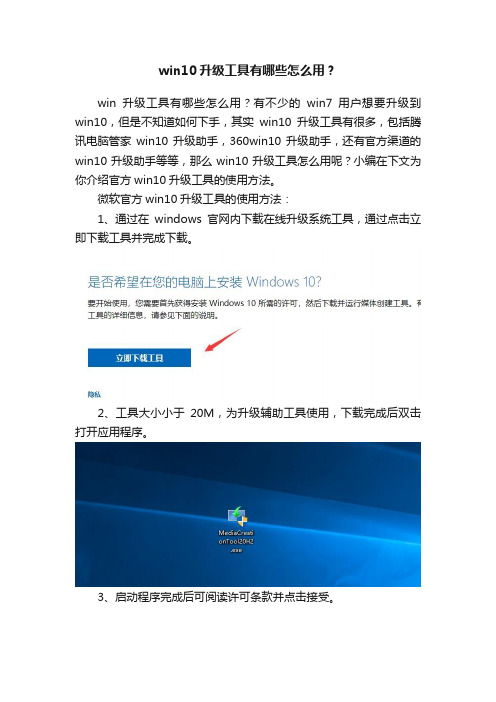
1、通过在windows官网内下载在线升级系统工具,通过点击立即下载工具并完成下载。
2、工具大小小于20M,为升级辅助工具使用,下载完成后双击打开应用程序。
3、启动程序完成后可阅读许可条款并点击接受。
4、正在进行准备工作请等待准备完成。
5、准备完成后默认选择立即升级这台电脑并点击下一步。
6、接着下载win10系统文件耐心等待并查看下载进度。
下载完成后,点击接受许可条款,然后系统会检测更新,默认勾选选择安装;安装过程中电脑会自动重启,重启后系统进一步安装。
最后跟随提示直至升级成功即可。
以上就是小编带来的win10升级工具有哪些怎么用的全部内容,希望可以提供帮助。
升级工具的使用
升级工具的使用
升级工具可以用来升级开机logo(.bmp、.jpg图像文件),也可升级新的程序(.bin文件);升级通过局域网内ip升级,也可进行远程升级。
一、升级工具的安装。
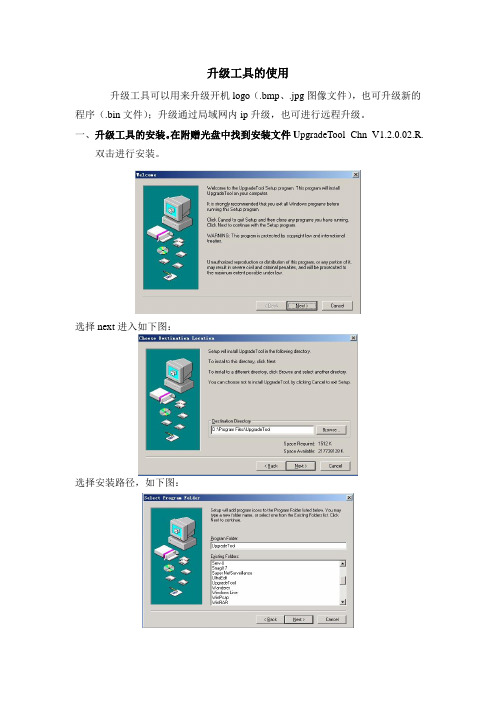
在附赠光盘中找到安装文件U pgradeTool_Chn_V1.2.0.02.R.
双击进行安装。
选择next进入如下图:
选择安装路径,如下图:
选择next等待安装,安装完成出现如下界面
点击close,完成安装
二、升级操作
步骤一、桌面找到快捷图标打开如图界面:
步骤二、选择升级文件,点击浏览找到需要升级的文件
找到后点击“打开”,显示如下
步骤三、添加设备
A、局域网内升级,点击“IP搜索”;
B、公网升级,点击添加设备,如下图
添加ip地址,设备的TCP端口号,用户名密码确定,信息正确会连接成功如下图:
步骤四:升级。
点击“升级”等待升级,完成后描述里提示“升级成功”,设备会自动重启;。
2022新UniUpdateTool_HelpManual

管理客户端升级工具使用说明1目的V3.5版本不兼容旧版本管理客户端的管理和升级,旧版本的管理客户端必须通过此工具升级。
2使用说明2.1适用范围本文档只适用于升级版本号小于V3.5的管理客户端。
2.2文件清单2.3运行环境升级工具运行环境要求如下:●操作系统:Windows XP SP2以上32位版本(含SP2)、Windows 7 32位版本。
●硬件方面:只能使用单网卡,如果有多张物理网卡或虚拟网卡,应该禁用多余的网卡。
●网络方面:升级工具和被升级的客户机直接能够双向通信(相互可ping通),需要开放一下端口访问权限。
1)升级工具—>客户机网络链路方向,开放TCP 8000、UDP 8000、TCP 8001、UDP8001端口,2)客户机—>升级工具网络链路方向,开放TCP 11022、TCP8011端口。
3)FTP数据下载端口,需要客户机和升级工具的两个链路方向,开放TCP 32768-61000端口。
2.4升级工具安装双击“UniUpdateTool.exe”安装包,按默认配置一直点击“下一步”,完成安装。
3升级步骤步骤1、拷贝管理客户端安装包UnionClient.exe至升级工具的cl earTool目录,如下图所示。
步骤2、以Administrator身份登录系统,双击运行桌面上的UniUpdateTool快捷图标(也可以从开始菜单或C:\Program Files\Cinfin\UniUpdateTool目录中启动该程序),进入升级工具运行界面步骤3、按如下图中标注的顺序依次操作:备注:●步骤1:输入搜索客户机的IP范围。
●步骤2:搜索步骤1中指定IP范围中需要升级的客户机的。
●步骤3:在搜索结果中选中,需要升级的客户机(选中复选框)。
●步骤4:配置升级后客户机的管理服务器地址(请填写正确的服务器IP和端口)。
●步骤5:选择升级包所在的目录,此处选择UnionClient.exe所在的目录(4.1章节所示目录)。
自动升级工具(AUT)发布说明 December 2012 v9.3.2说明书

Automated Upgrade ToolAUT Release Notesv9.3.2Part No. E28708-01December 2012Copyright and TrademarksCopyright © 1995, 2012, Oracle and/or its affiliates. All rights reserved.This software and related documentation are provided under a license agreement containing restrictions on use and disclosure and are protected by intellectual property laws. Except as expressly permitted in your license agreement or allowed by law, you may not use, copy, reproduce, translate, broadcast, modify, license, transmit, distribute, exhibit, perform, publish or display any part, in any form, or by any means. Reverse engineering, disassembly, or decompilation of this software, unless required by law for interoperability, is prohibited.The information contained herein is subject to change without notice and is not warranted to be error-free. If you find any errors, please report them to us in writing.If this software or related documentation is delivered to the U.S. Government or anyone licensing it on behalf of the U.S. Government, the following notice is applicable:U.S. GOVERNMENT RIGHTSPrograms, software, databases, and related documentation and technical data delivered to U.S. Government customers are "commercial computer software" or "commercial technical data" pursuant to the applicable Federal Acquisition Regulation and agency-specific supplemental regulations. As such, the use, duplication, disclosure, modification, and adaptation shall be subject to the restrictions and license terms set forth in the applicable Government contract, and, to the extent applicable by the terms of the Government contract, the additional rights set forth in FAR 52.227-19, Commercial Computer Software License (December 2007). Oracle USA, Inc., 500 Oracle Parkway, Redwood City, CA 94065.This software is developed for general use in a variety of information management applications. It is not developed or intended for use in any inherently dangerous applications, including applications which may create a risk of personal injury. If you use this software in dangerous applications, then you shall be responsible to take all appropriate fail-safe, backup, redundancy and other measures to ensure the safe use of this software. Oracle Corporation and its affiliates disclaim any liability for any damages caused by use of this software in dangerous applications.Oracle and Java are registered trademarks of Oracle Corporation and/or its affiliates. Other names may be trademarks of their respective owners.This software and documentation may provide access to or information on content, products and services from third parties. Oracle Corporation and its affiliates are not responsible for and expressly disclaim all warranties of any kind with respect to third party content, products and services. Oracle Corporation and its affiliates will not be responsible for any loss, costs, or damages incurred due to your access to or use of third party content, products or services. The RMW product includes software developed by the Visigoth Software Society.C ONTENTSCopyright and Trademarks (2)Chapter 1 Agile PLM Automated Upgrade Tool (1)Downloading the Software (1)Maintenance and Updates (2)Chapter 2 What's New (1)Supported Agile PLM Upgrade Paths (1)Merged Hotfixes (2)Supported Agile Advantage Upgrade Paths (3)Resolved Issues (3)Known Issues (3)Check Snap Material Views Utility Runs Twice (3)Existing Dashboards No Longer Work (3)Upgrade Criteria Contains All Is Changed to Contains Any (3)Markup Restrictions Not Retained on Upgrade (3)Performance Issue - Delete SQL for Notification fields (3)AUT Throws Error if Destination Version is 9.2 or 9.2.x (4)PrefaceOracle's Agile PLM documentation set includes Adobe® Acrobat PDF files. The Oracle Technology Network (OTN) Web site /technetwork/documentation/agile-085940.html contains the latest versions of the Agile PLM PDF files. You can view or download these manuals from the Web site, or you can ask your Agile administrator if there is an Agile PLM Documentation folder available on your network from which you can access the Agile PLM documentation (PDF) files.Note To read the PDF files, you must use the free Adobe Acrobat Reader version 9.0 or later.This program can be downloaded from the Adobe Web site .The Oracle Technology Network (OTN) Web site/technetwork/documentation/agile-085940.html can be accessed through Help > Manuals in both Agile Web Client and Agile Java Client. If you need additional assistance or information, please contact My Oracle Support (https://) for assistance.Note Before calling Oracle Support about a problem with an Agile PLM manual, please have the full part number, which is located on the title page.TTY Access to Oracle Support ServicesOracle provides dedicated Text Telephone (TTY) access to Oracle Support Services within the United States of America 24 hours a day, 7 days a week. For TTY support, call 800.446.2398. Outside the United States, call +1.407.458.2479.ReadmeAny last-minute information about Agile PLM can be found in the Readme file on the Oracle Technology Network (OTN) Web site /technetwork/documentation/agile-085940.html.Agile Training AidsGo to the Oracle University Web page/education/chooser/selectcountry_new.html for more information on Agile Training offerings.Accessibility of Code Examples in DocumentationScreen readers may not always correctly read the code examples in this document. The conventions for writing code require that closing braces should appear on an otherwise empty line; however, some screen readers may not always read a line of text that consists solely of a bracket or brace.This documentation may contain links to Web sites of other companies or organizations that Oracle does not own or control. Oracle neither evaluates nor makes any representations regarding the accessibility of these Web sites.Chapter 1 Agile PLM Automated Upgrade Tool This chapter includes the following:▪Downloading the Software (1)▪Maintenance and Updates (2)▪What's New (1)▪Resolved Issues (3)▪Known Issues (3)The Automated Upgrade Tool (AUT) upgrades your Agile PLM database using the inputs you provide in a property file. It completes the upgrade using your existing database as the source database, and the newly created database as the destination database. For detailed information on the upgrade process using the AUT, refer to the Agile PLM Database Upgrade Guide. Downloading the SoftwareThe Automated Upgrade Tool is distributed with each Agile major release and subsequent service pack releases. The software can be downloaded from Oracle Software Delivery Cloud, or My Oracle Support.To download the software from Oracle Software Delivery Cloud():1. On the Oracle Software Delivery Cloud Welcome page, choose your language and clickContinue.2. Enter required information on the Export Validation screen and click Continue.3. On the Search screen, select Oracle Agile Applications in the Select a Product Pack drop-down listbox. Select a platform value. Click Go.4. Links to applicable Agile release downloads display. Select the appropriate link. Click Continue.5. The Download screen displays release parts that can be downloaded, including customerguides. Click Download for the appropriate media pack.6. Extract the contents of the media pack. The Agile PLM Database Installer is included with theAgile PLM software.7. To download the database installer, navigate to the DB_Installer folder. DB installers for allplatforms are made available within the DB_Installer folder, regardless of the operating system on which you have chosen to install Agile PLM.8. To download the AUT software, navigate to the AUT folder within the Deployment_Tools folder.From the AUT folder, extract the contents of the AUT.zip file to your destination database server.After the AUT is extracted, all of the files are located in an AUT directory on the local drive. In this document, this directory is referred to as the AUT_HOME.AUT Release NotesTo download only the AUT software from My Oracle Support (https://):1. Log in to My Oracle Support.2. Under Patches & Updates, click Product or Family (Advanced Search).1. Select the Include all products in a family checkbox.2. Enter the following search parameters:▪Product : Oracle Agile Applications▪Release : Agile PLM Tools 9▪Platform : Select the appropriate platform, for example, Microsoft Windows (32-bit).3. Click Search.4. Links to Averify and AUT are displayed in the search results.5. Select the Patch ID and click Download.3. From the Patchset zip file, extract the contents of the AUT.zip file to your destination databaseserver. After the AUT is extracted, all of the files are located in an AUT directory on the local drive. In this document, this directory is referred to as the AUT_HOME.Maintenance and UpdatesBefore you upgrade your database, you should always make sure you are using the latest version of the AUT. Changes to scripts such as averify may occur after the initial version has been released. To ensure your database is correctly upgraded, always check the My Oracle Support (https://) web site for updates.Chapter 2 What's NewThis chapter includes the following:▪Supported Agile PLM Upgrade Paths (1)▪Supported Agile Advantage Upgrade Paths (3)This chapter introduces additional upgrade paths and enhancements in release 9.3.2. Supported Agile PLM Upgrade PathsUpgrade of your Agile PLM database to version 9.3.2 is supported from any of the earlier versions listed below:▫Agile 9.3.1.2▫Agile 9.3.1.1▫Agile 9.3.1▫Agile 9.3.0.2▫Agile 9.3.0.1▫Agile 9.3▫Agile 9.2.2.7▫Agile 9.2.2.6▫Agile 9.2.2.5▫Agile 9.2.2.4▫Agile 9.2.2.3▫Agile 9.2.2.2▫Agile 9.2.2.1▫Agile 9.2.2▫Agile 9.2.1.6▫Agile 9.2.1.5▫Agile 9.2.1.4▫Agile 9.2.1.3▫Agile 9.2.1.1▫Agile 9.2.1▫Agile 9.2.0.2AUT Release Notes▫Agile 9.2.0.1▫Agile 9.2▫Agile 9.1 SP1-SP4▫Agile 9.0 SP1-SP7▫Program Execution 8.5 SP2▫Product Service and Improvement 8.5 SP1-SP7▫Product Cost Management 8.5 SP1▫Product Collaboration 8.5 SP1-SP7Merged HotfixesUpgrade is supported from any of the hotfixes merged to 9.3.2 listed here: 9302HF1269302HF149931HF63931HF66931HF69931HF73931HF74931HF759311HF959311HF1069311HF1079311HF1179311HF1379311HF1389311HF1399311HF1539311HF1569311HF1629311HF1779311HF1789312HF49312HF69312HF7Chapter 2: Agile PLM Automated Upgrade Tool9312HF89312HF109312HF329312HF42Supported Agile Advantage Upgrade PathsUpgrade of your Agile Advantage (AA) database to version 9.3.2 is supported from the following version only:AA 2006Resolved IssuesThe list of service requests (SRs) resolved in this release is provided here for your reference. Known IssuesThe list of known issues as of this release is provided here for your reference, along with workarounds, if any.Check Snap Material Views Utility Runs TwiceWhen you upgrade with SourceEqualsDestination parameter set to FALSE, the Check Snap Material Views Utility runs twice.Existing Dashboards No Longer WorkWhen upgrading to Agile PLM 9.3.1.2, rows in CRITERIA, QUERY and SELECT_LIST tables associated with dashboard queries are deleted.Resolution: Do not delete dashboard query rows during the upgrade.Upgrade Criteria Contains All Is Changed to Contains AnyCorrect all schema change errors to fix this issue.Markup Restrictions Not Retained on UpgradeMarkup restrictions that were enforced through privileges are not retained when you upgrade. With the new security model implemented in 9.2.2.2, Markup is a subclass under the File Folders class and all markup privileges are automatically enabled. To prevent users from viewing or modifying the existing markups, you must disable blanket privileges at File Folders class level in Java Client and enable Markup privilege for relevant users only.Performance Issue - Delete SQL for Notification fieldsThe SQL script to clean up deleted notifications takes too long to run on very large databases.AUT Release NotesAUT Throws Error if Destination Version is 9.2 or 9.2.xIf you select 9.2, 9.2.1 or 9.2.2 as the destination version for the upgrade, the database upgrades successfully but Averify may not run, and the log file may report the following error "Source database version and selected upgrade destination versions are same. Please change thedest.version in aut.properties file."You can ignore the error as it does not affect the upgrade. Run Averify manually to check for other errors.。
UpdLive升级工具用户手册
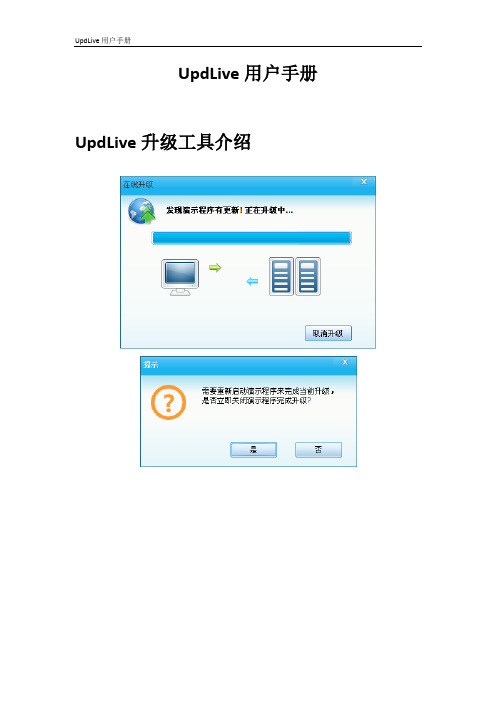
UpdLive用户手册UpdLive升级工具介绍UpdLive是一款供各种C/S 结构Windows应用程序升级更新服务的升级工具程序。
主要为您的软件集成稳定/高效的自动升级功能。
功能亮点:无需特别的服务器,普通的Web 服务即可,如IIS、Tomcat 等。
部署简单,有专业且操作简单的部署工具,最小下载,减少网络负载,需要升级那个文件就下载那个文件。
绝不下载多余的文件。
无论用户使用的是什么版本,统统直接升级到最新版本。
支持分区域部署,不同地区用户使用不同的程序,没问题,UpdLive可以解决。
支持强制升级,客户软件版本小于某个版本时需要强制升级到最新版本。
支持后台升级,不显示界面自动在后台下载升级文件,下载完成后提示用户升级。
支持文件压缩,减少用户下载流量。
支持资源文件升级。
文档、图片、视频等都有可以升级。
多任务式升级,允许多个应用同时升级。
多线程下载,并支持文件校验。
支持文件断点续传,节约下载流量,今天没有下载完,明天可以继续下载。
支持子模块的前后台可以自定义界面。
UpdLive 组成主要包括升级SDK、升级主程序、皮肤组件及皮肤构成。
升级SDK:updcmd.dll 提供了启动升级,检查是否需要升级(含是否需要强制升级)的方法。
升级主程序:UpdLive.exe 负责下载文件和复制文件等主要工作。
皮肤组件:SkinSE.dll 负责显示界面用的组件,必须和UpdLive.exe放在同一目录。
皮肤:Appskin目录存放的是界面显示配置文件及图片资源。
升级原理及过程原理图:服务器上的版本信息配置文件(comp.ini)格式:文件版本号的比较原理:对于客户端程序来说,我们一般需要升级的内容无非是一下几种:1.可执行程序EXE。
2.API函数库文件DLL。
3.COM组件库文件DLL或OCX,需要注册。
4.图片文件,一般用于界面美化。
5.配置参数文件6.报表模版文件7.数据库升级脚本8.Office文档DOC,XLS等9.本地网页HTML10.视频、动画文件对于以上文件内容在升级的时候,升级包我们归纳为两种::1、可执行程序EXE或动态库DLL,OCX。
Windows Update Clean Tool更新说明
2013-7-13
1:专为某些机器安装KB2821895后的超级残留BUG而准备
2:调整显示逻辑,当注册表的临时文件小于10MB时不显示(这个清理主要是为了当时的英伟达驱动BUG)
2013-7-8
1:修复每天多次启动都弹窗提示公告的问题
2:隐藏了282错误,以免让人误解
3:调整更新检测方式
还封装了一个系统有些上次提到的功能未实现,实在是抱歉~~~~
2013-6-12
1:增加未应用文件清理,适合自制内存OS
2:程序调整为静态链接,无需再用dll
3:修复日志文件不正常时的死锁问题
4:新增Windows临时目录清理
5:新增Windows下载目录清理(默认不删除)
6:新增保存状态文件清理(独享)
4:支持互联网自动检查更新
5:增强扫描时的安全性,如果发现目标文件未更新,立即跳过对他们的处理
6:谢谢网友反馈,增加了Windows报告的清理
2013-6-28
1:因为论坛为服务器提供商删除(他们说是滥用服务器资源,坑爹啊)做了一些调整
2:修复一个使用英文版操作系统的用户无法正常退出程序的问题
4:修复了一个日期的缺陷
5:为英文版做了部分显示改进
2013-7-3
1:裁剪程序体积
2:修正一处缓存异常错误(explorer缓存处理异常,而导致了显示不正确)
3:解决一个重复检测安全性问题(会导致程序性能下滑)
2013-6-30
1:修复未选择系统时按钮不为灰的问题
2:修复程序不解析<p>字段的问题以及不解析空格问题
4:新增多个清理项目,当然是一些临时文件而已,大家打开程序就可以看到啦
04ToolsUpdate_CTP结算工具升级操作手册
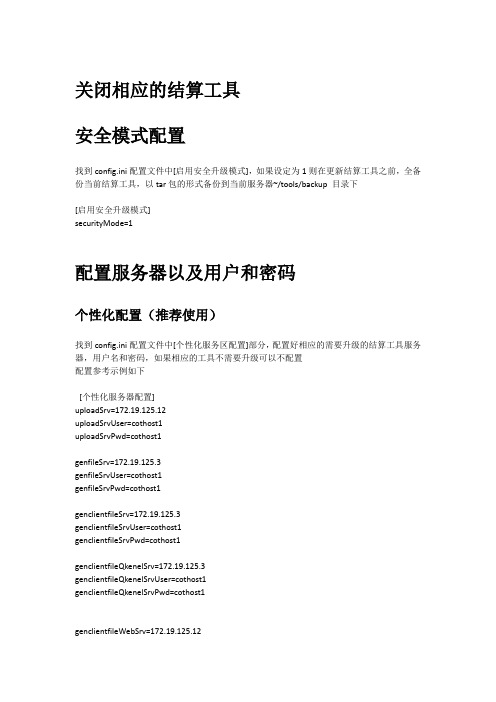
关闭相应的结算工具安全模式配置找到config.ini配置文件中[启用安全升级模式],如果设定为1则在更新结算工具之前,全备份当前结算工具,以tar包的形式备份到当前服务器~/tools/backup 目录下[启用安全升级模式]securityMode=1配置服务器以及用户和密码个性化配置(推荐使用)找到config.ini配置文件中[个性化服务区配置]部分,配置好相应的需要升级的结算工具服务器,用户名和密码,如果相应的工具不需要升级可以不配置配置参考示例如下[个性化服务器配置]uploadSrv=172.19.125.12uploadSrvUser=cothost1uploadSrvPwd=cothost1genfileSrv=172.19.125.3genfileSrvUser=cothost1genfileSrvPwd=cothost1genclientfileSrv=172.19.125.3genclientfileSrvUser=cothost1genclientfileSrvPwd=cothost1genclientfileQkenelSrv=172.19.125.3genclientfileQkenelSrvUser=cothost1genclientfileQkenelSrvPwd=cothost1genclientfileWebSrv=172.19.125.12genclientfileWebSrvUser=cothost1genclientfileWebPwd=cothost1gencffexfileSrv=172.19.125.4gencffexfileSrvUser=cothost2gencffexfileSrvPwd=cothost2backup_sett_dataSrv=172.19.124.18backup_sett_dataSrvUser=thost2backup_sett_dataSrvPwd=thost2oprdispatcherSrv=172.19.125.11oprdispatcherSrvUser=corisk1oprdispatcherSrvPwd=corisk1syncMergeSrv=172.19.124.18syncMergeSrvUser=thost2syncMergeSrvPwd=thost2mainapiSrv=172.19.125.4mainapiSrvUser=cothost2mainapiSrvPwd=cothost2通用配置如果不配置[个性化服务区配置]部分的属性,配置[通用服务器以及用户和密码配置]部分,升级工具保持兼容,具体的升级过程中会显示实际升级所使用的服务器,用户及密码默认的部署关系如下通用服务器配置示例如下:[通用服务器以及用户和密码配置]TradeConfig=172.19.125.11LinTradeUser=cothost2LinTradePWD=cothost2TradeOM1=172.19.125.4Web=172.19.125.11WebRootPWD=123456RiskConfig=172.19.125.11LinRiskUser=corisk1LinRiskPWD=corisk1打开结算工具升级开关设定此开关的目的是可以让客户一次性升级成功,也可以逐个设定要升级的结算工具,逐个手动升级,具体操作步骤如下找到config.ini配置文件中[组件配置]部分,如果相应的结算工具需要升级就设定为1,设定为0表示不升级示例配置如下:[组件配置]upload=0genfile=0genclientfile=0genclientfileQkenel=1genclientfileWeb=0gencffexfile=0backup_sett_data=0oprdispatcher=0syncMerge=0mainapi=0升级结算工具上述配置完成后,即可点击03ToolsUpdate.bat进行结算工具升级。
技嘉主板BIOS刷新升级工具中文简体用户指南
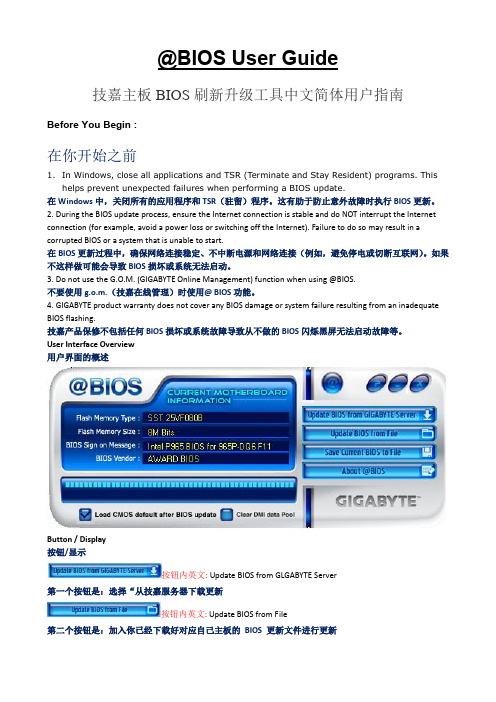
@BIOS User Guide技嘉主板BIOS刷新升级工具中文简体用户指南Before You Begin :在你开始之前1.In Windows, close all applications and TSR (Terminate and Stay Resident) programs. Thishelps prevent unexpected failures when performing a BIOS update.在Windows中,关闭所有的应用程序和TSR(驻留)程序。
这有助于防止意外故障时执行BIOS更新。
2. During the BIOS update process, ensure the Internet connection is stable and do NOT interrupt the Internet connection (for example, avoid a power loss or switching off the Internet). Failure to do so may result in a corrupted BIOS or a system that is unable to start.在BIOS更新过程中,确保网络连接稳定、不中断电源和网络连接(例如,避免停电或切断互联网)。
如果不这样做可能会导致BIOS损坏或系统无法启动。
3. Do not use the G.O.M. (GIGABYTE Online Management) function when using @BIOS.不要使用g.o.m.(技嘉在线管理)时使用@ BIOS功能。
4. GIGABYTE product warranty does not cover any BIOS damage or system failure resulting from an inadequate BIOS flashing.技嘉产品保修不包括任何BIOS损坏或系统故障导致从不做的BIOS闪烁黑屏无法启动故障等。
- 1、下载文档前请自行甄别文档内容的完整性,平台不提供额外的编辑、内容补充、找答案等附加服务。
- 2、"仅部分预览"的文档,不可在线预览部分如存在完整性等问题,可反馈申请退款(可完整预览的文档不适用该条件!)。
- 3、如文档侵犯您的权益,请联系客服反馈,我们会尽快为您处理(人工客服工作时间:9:00-18:30)。
UpdateTool升级工具使用说明
第一步,安装升级工具,双击“”进行安装,在弹出的一系列安装对话框中选择“下一步”直致安装完成即可。
第二步,运行升级工具,双击安装后的桌面图标“”即可运行。
运行后的界面如下图:
第三步,插入需升级的设备到电脑,升级工具检测到设备接入后显示下图:
注意:如果没有检测到设备信息,左侧为空白,请参考我们的驱动修复解决办法
第四步,选择升级的目标bin文件,通过点击上图中的“”按钮来选择目标bin文件的存放路径,选对路径,再选中文件双击,或者点击下图中的打开按钮即可进行升级。
双击或者点击打开后,升级工具显示
第五步,待升级工具提示升级成功后,拔掉设备,重新插入设备,确认是否已经升级到最新版本。