Arcgis10.0+SketchUp6.4pro结合SketchUp6ERSI插件快速创建虚拟的场景
ArcGIS与SketchUP交互
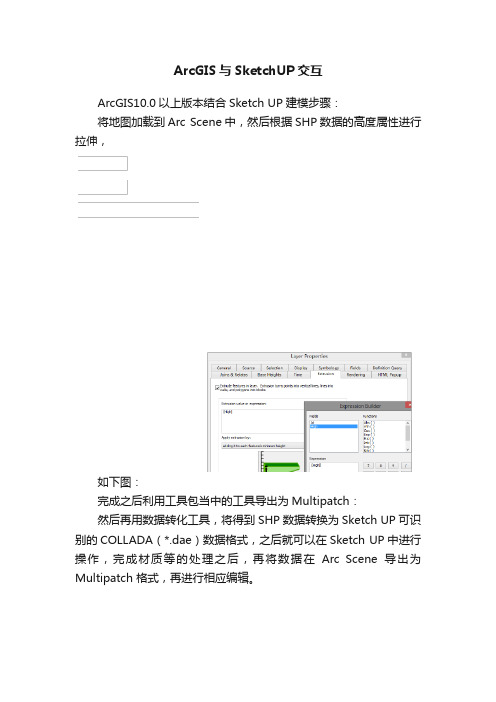
ArcGIS与SketchUP交互ArcGIS10.0以上版本结合Sketch UP建模步骤:将地图加载到Arc Scene中,然后根据SHP数据的高度属性进行拉伸,如下图:完成之后利用工具包当中的工具导出为Multipatch:然后再用数据转化工具,将得到SHP数据转换为Sketch UP可识别的COLLADA(*.dae)数据格式,之后就可以在Sketch UP中进行操作,完成材质等的处理之后,再将数据在Arc Scene导出为Multipatch 格式,再进行相应编辑。
导入Arc Scene时采用Arc toolbox提供的Import工具导入。
默认情况下,Data Interoperability T ools是不安装的,需要打开Arc Desktop 安装包选择Arc GIS Data Interoperability for desktop进行安装。
如下图:安装完成之后点击工具扩展,勾选Data Interoperability就可以使用了。
如下图:当然我们也可以对某个指定的要素编辑模型,下面有`些其他的方法:以style符号库导入。
如果对Arc Scene中的松树符号不满意,可以在Sketch up中建立一棵松树的模型,作为符号导入到Arc Scene中。
操作如下:在Arc Scene中,打开symbol selector 窗口,点击edit symbol 按钮,打开symbol property editor窗口,type下选择3D Marker Symbol,点击Import 按钮,把已经建立好的模型导入。
可以对模型的大小、长宽、位置等按比例或不按比例缩放。
注:1、64位下面ArcGIS的toolbox有问题,要在32下操作2、拉伸完成对保存的shp数据进行对象合并,不然转dae文件时会有多个dae文件生成。
(shp到dae文件是根据ID号生成的,如果不合并,就生成单个的模型文件)。
基于ArcEngine与SketchUp的GIS系统构建
使用 Se h p软件 进行 三维 建模并 为 G S系统 kt U c I 提 供三 维模 型时 , 其基础 数 据要 从 GS软件 来 ( 它 I 其
数据类型无法加入属性信息 )建模后还要将其导 出 , 到 GS软 件 中去 , I 因此 就 涉 及到 不 同 软 件 相 互 问 的 数据 转换 问题 , 该接 口可 由用户 自己编 程实 现 。 简 更
1 2 开发 流 程 .
量化 , 然后再导人到 Se h p kt U 软件中, c 其它数据源与 此类 似 。本 系统 以山 东 省 邹 城 市北 宿镇 规划 图 ( 栅 格地 图 ) 为原 始数据 , 建该 地 区三 维模 型 并 制作 规 构
划 G S系 统 I -
矢量化 前 , 根据 系统 的需求 分析 , 首先进入 到
l 开发环 境及 流程
1 1 开发 环境 。
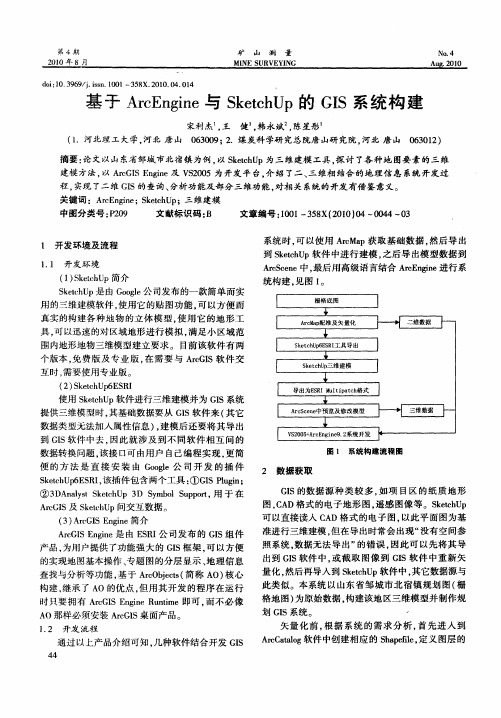
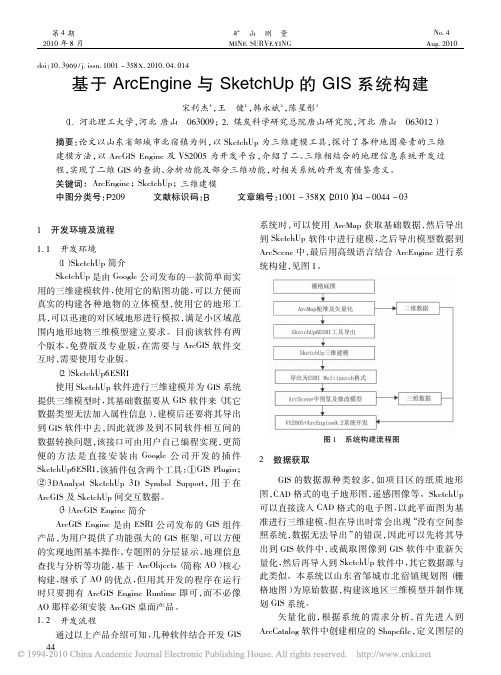
Accn 中。 r ee 最后用高级语言结合 Ae ni 进行系 S r ge E n 统构建 , 见图 l 。
( )kt U 1 S e h P简介 c
S e h P是 由 G ol 司发 布的一 款 简单 而 实 kt U c og e公 用 的三维建 模软 件 , 用 它 的贴 图功 能 。 以方便 而 使 可 真实 的构建 各 种 地 物 的立 体 模 型 , 用 它 的地 形 工 使 具 , 以迅速 的对 区域 地形 进 行模 拟 , 足 小 区域 范 可 满 围 内地 形地 物三 维模 型建 立要 求 。 目前 该 软 件有 两 个 版本 , 费 版及 专 业 版 , 需 要 与 Ac I 件 交 免 在 rGS软 互 时 , 要使用 专业 版 。 需
arcscene和sketchup总结
目录一、在arcscene里显示三维 (1)二、arcscene和sketchup结合 (3)2.1安装sketchup6 for arcgis插件 (4)2.2将ArcGIS数据导出到SketchUp (6)2.3在SketchUp编辑 (7)2.4可能会遇到的问题 (10)三、其他效果 (10)一、在arcscene里显示三维ArcScene是一个适合于展示三维场景的平台,可以在三维场景中漫游并与三维矢量与栅格数据进行交互。
ArcScene是基于OpenGL的,支持TIN数据显示。
显示场景时,ArcScene会将所有数据加载到场景中,矢量数据以矢量形式显示,栅格数据默认会降低分辨率来显示以提高效率。
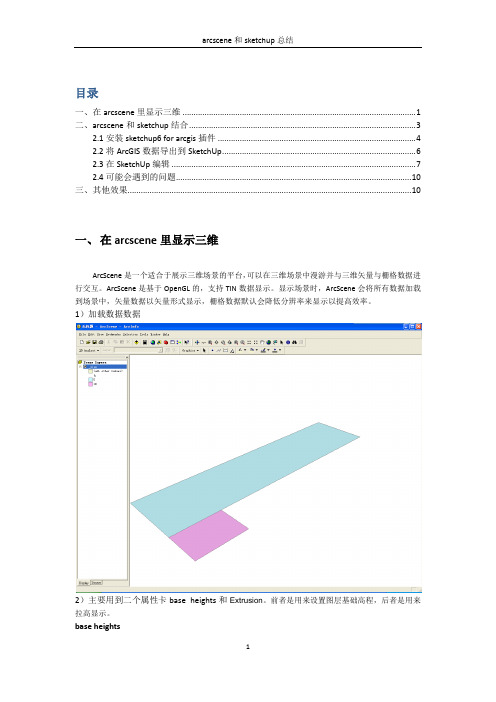
1)加载数据数据2)主要用到二个属性卡base heights和Extrusion。
前者是用来设置图层基础高程,后者是用来拉高显示。
base heightsExtrusion拉高度虽然ArcScene能够实现三维效果并且可以根据字段设置高度,但是这里的高度只是显示相当于符号化,并且效果不佳。
ArcGIS与Google的SketchUp软件结合是一个比较好的解决方案。
通过其插件实现ArcGIS 的交互。
制作出来的视觉效果很逼真,更为方便的是在sketchup可以很方便的拉到面要素得到立体效果。
二、arcscene和sketchup结合Sketchup介绍Google SketchUp 是一款可供您用于创建、修改及共享3D 模型的软件。
学起来比其它三维建模程序更容易,这就是为什么许多人已经使用它的原因。
可作出效果:Google SketchUp 平台支持DWG 和DXF 格式。
插件可将esri shapefile文件转为sketchup可接受的文件格式在sketchup编辑。
在sketchup中编辑完的可以通过arcgis可接受的Multipatch格式在arcscene中显示。
2.1安装sketchup6 for arcgis插件下载地址:/sketchup/gsu6/plugins/SketchUp6ESRI.exe在arcmap工具栏空白处右击,选择customize。
ArcGIS Desktop 10.6快速入门指南说明书

Quick Start GuidesTable of ContentsCore products and componentsArcGIS for Desktop . . . . . . . . . . . . . . . . . . . . . . . . . . . . . . . . . . . . . . . . . . . 3 ArcGIS Enterprise . . . . . . . . . . . . . . . . . . . . . . . . . . . . . . . . . . . . . . . . . . . . 4 ArcGIS Engine Developer Kit and ArcGIS Engine . . . . . . . . . . . . . . . . . . . . . . . . . . . . . . . . 6 ArcGIS License Manager . . . . . . . . . . . . . . . . . . . . . . . . . . . . . . . . . . . . . . . . . 8Getting started•ArcGIS Desktop includes many components. See What's included for a list of components.•Review the ArcGIS system requirements for the component.•Administrative privileges are required for installation.•Microsoft .NET Framework 4.5 or later is required.•Download and install the component. If upgrading, review Upgrading to ArcGIS 10.6.•Obtain your software authorization numbers and authorize the software. If using a Concurrent Use license, you will need ArcGIS License Manager 10.6, which can be used for all ArcGIS 10.x Concurrent Use licenses. See the ArcGIS License Manager quick start guide and the License Manager reference guide for more information.•See ArcGIS Desktop for access to additional resources, such as documentation and support.What's includedArcGIS Desktop10.6 includes the following components:•ArcGIS Desktop—Installation for Basic, Standard, and Advanced editions of ArcGIS Desktop, and optional ArcGIS extension products.•ArcGIS Desktop Background Geoprocessing (64 bit)—Installation for background geoprocessing in 64 bit.•ArcGIS License Manager (Windows and Linux)—This version is required to run ArcGIS Desktop10.6 and ArcGIS Engine 10.6 with Concurrent Use licensing. It also supports all other ArcGIS 10.x Concurrent Use releases.•ArcReader—Desktop mapping application that allows users to view, explore, and print maps and globes.•ArcGIS Tutorial Data for Desktop—Data used with ArcGIS Desktop tutorials.•ArcGIS Coordinate Systems Data—Contains the data files required for the GEOCON transformation method and vertical transformation files for the United States (VERTCON and GEOID12B) and the world (EGM2008).•DBMS Support Files—Client libraries and databases to be used to directly connect to geodatabases.The following developer tools are available:•ArcObjects SDK for Microsoft .NET Framework—Documentation and sample code for Microsoft .NET Framework developers customizing and extending ArcGIS Engine,ArcGIS Desktop, and ArcGIS Server.•ArcObjects SDK for Java—Documentation, tools, and sample code for Java Platform developers customizing and extending ArcGIS Engine,ArcGIS Desktop, and ArcGIS Server.Upgrading to ArcGIS 10.6•The ArcGIS 10.6 setup package is designed to detect and upgrade an existing installation of the same ArcGIS product. The settings for the installation location, license manager (for Concurrent Use), or authorization information (for Single Use) areretained in the upgrade. See the installation guide for more information on installation upgrades and new installations.•Existing ArcGIS 10.1–10.5.1 authorization numbers will work with ArcGIS 10.6.•ArcGIS 10.6 for Single Use—If ArcGIS 10.6 will be installed on a machine that is different from where an earlier ArcGIS 10.x product is currently installed and you want to use the existing ArcGIS 10.1–10.5.1 authorization number for ArcGIS 10.6, the earlier version of an ArcGIS 10.x product must first be deauthorized before authorizing ArcGIS 10.6.Obtaining software authorization numbersIf needed, your account's primary maintenance contact can obtain authorization numbers from My Esri. After signing in with your Esri Account, click My Organizations>Licensing>View Authorizations. Click a product name to obtain its authorization number.The license version on authorizations eligible for use with ArcGIS 10.6 will display as 10.1–10.6 under View Authorizations. For those outside the United States, contact your local distributor for information about your authorization numbers.Getting startedArcGIS Enterprise represents the evolution of Esri's GIS server technology into a complete GIS platform in your own infrastructure, supporting enterprises of any size. ArcGIS Enterprise provides a full Web GIS experience integrated with ArcGIS Online and ArcGIS Desktop. See the following prerequisites to get started:•ArcGIS Enterprise includes many components. See What's included for a list of components.•Review the system requirements for each component.•Administrative privileges are required for installation.•On Windows, Microsoft .NET Framework 4.5 is required for installing the ArcGIS Server .NET Extension Support feature. ArcGIS Web Adaptor for IIS also requires Microsoft .NET Framework 4.5. This version of Microsoft .NET Framework can be downloaded from Microsoft.•Download and install the component. If you're upgrading, review Upgrading to ArcGIS 10.6. For help, see the corresponding installation guide available with the download.•Obtain your software authorization numbers and authorize the software. If your Portal for ArcGIS organization will use a premium app, such as ArcGIS Pro or Drone2Map for ArcGIS, you will also need ArcGIS License Manager 10.6 to configure your premium app licenses to specify which members can use the software. See the Portal for ArcGIS Administrator Guide,License Manager Reference Guide, and the ArcGIS License Manager system requirements for more information.Visit ArcGIS Enterprise for access to additional resources such as documentation and support.What's includedArcGIS Enterprise 10.6 includes the following components:•ArcGIS Enterprise Builder—Provides a simple installation and configuration experience for a base ArcGIS Enterprise deployment on a single machine.•ArcGIS Server—Makes your geographic information available to others in your organization and, optionally, anyone with an Internet connection. It can be licensed in a variety of roles, depending on the capabilities you want to enable for your deployment.See ArcGIS Enterprise licensing for a complete listing of server licensing roles.•Portal for ArcGIS—Allows you to share maps, apps, and other geographic information with other people in your organization through a website.•ArcGIS Data Store—An application you can use to set up different types of data stores used by a Portal for ArcGIS hosting server.•ArcGIS Web Adaptor—Allows ArcGIS Server to integrate with your existing web server. It is compatible with IIS and Java EE servers such as WebSphere and WebLogic.ArcGIS GeoEvent Server—Enables real-time event-based data streams to be integrated as data sources in your enterprise GIS. Requires an ArcGIS GeoEvent Server license role.•ArcGIS License Manager (Windows and Linux)—This version is required to configure ArcGIS Pro or Drone2Map for ArcGIS licenses with your Portal for ArcGIS 10.6 organization.•ArcGIS Coordinate Systems Data— Contains the data files required for the GEOCON transformation method and vertical transformation files for the United States (VERTCON and GEOID12B) and the world (EGM2008).•DBMS Support Files—Client libraries and databases used to directly connect to geodatabases.The following developer tools are available:•ArcObjects SDK for the Microsoft .NET Framework—Documentation and sample code for Microsoft .NET Framework developers customizing and extending ArcGIS Engine, ArcGIS Desktop, and ArcGIS Server.•ArcObjects SDK for Java—Documentation, tools, and sample code for Java platform developers customizing and extending ArcGIS Engine, ArcGIS Desktop, and ArcGIS Server.Upgrading to ArcGIS 10.6•The ArcGIS 10.6 setup package is designed to detect and upgrade an existing installation of the same ArcGIS product. The settings for the installation location are retained in the upgrade. However, you will need to obtain a 10.6 software authorization number and reauthorize for use in 10.6. See the installation guide for more information on installation upgrades and newinstallations.•Existing ArcGIS Enterprise 10.5 - 10.5.1 authorization numbers will work with ArcGIS Enterprise 10.6 Prerelease but will not work for the final release of ArcGIS Enterprise 10.6.Obtaining software authorization numbersIf needed, your account's primary maintenance contact can obtain authorization numbers from My Esri. After signing in with your Esri Account, click My Organizations > Licensing > View Authorizations. Click a product name to obtain its authorization number.The license version on ArcGIS Enterprise authorizations eligible for use with ArcGIS 10.6 will display as 10.6 under View Authorizations. Customers in the United States need to contact Esri Telesales to order additional Named User License of Portal for ArcGIS. For those outside the United States, contact your local distributor for information about your authorization numbers.ArcGIS Engine Developer Kit 10.6 and ArcGIS Engine 10.6 quick start guideGetting started•ArcGIS Engine includes many components. See What's included for a list of ArcGIS Engine components.•Review the ArcGIS system requirements for the component.•Administrative privileges are required for installation.•On Windows, the Microsoft .NET Framework 4.5 or later is required for installing ArcGIS Engine.•Download and install the component. If upgrading, review Upgrading to ArcGIS 10.6.•Obtain your software authorization numbers and authorize the software. If using a Concurrent Use license, you will need ArcGIS License Manager 10.6, which can be used for all ArcGIS 10.x Concurrent Use licenses. See the ArcGIS License Manager quick start guide and the License Manager reference guide for more information.•See ArcGIS Desktop for access to additional resources, such as documentation and support.What's includedArcGIS Engine 10.6 includes the following components:•ArcGIS Engine—Component that supports the creation of GIS and mapping applications.•ArcGIS Engine Background Geoprocessing (64 bit)—Installation for background geoprocessing in 64 bit.•ArcGIS License Manager (Windows and Linux)—This version is required to run ArcGIS Desktop and ArcGIS Engine 10.6 with Concurrent Use licensing. It also supports all other ArcGIS 10.x Concurrent Use releases.•ArcGIS Coordinate Systems Data—Contains the data files required for the GEOCON transformation method and vertical transformation files for the United States (VERTCON and GEOID12B) and the world (EGM2008).•DBMS Support Files—Client libraries and databases to be used to directly connect to geodatabases.Developer tools are available with ArcGIS Engine Developer Kit 10.6:•ArcObjects SDK for Microsoft .NET Framework—Documentation and sample code for Microsoft .NET Framework developers customizing and extending ArcGIS Engine,ArcGIS Desktop, and ArcGIS Server.•ArcObjects SDK for Java—Documentation, tools, and sample code for Java Platform developers customizing and extending ArcGIS Engine,ArcGIS Desktop, and ArcGIS Server.Installing ArcGIS Engine and ArcObjects SDKs•Download and extract the ArcGIS Engine and ArcObjects packages.•Run the Setup.exe file, following the prompts to complete the installation for each product.•See Authorize ArcGIS Engine Developer Kit and ArcGIS Engine to complete the installation.Upgrading to ArcGIS 10.6•The ArcGIS 10.6 setup package is designed to detect and upgrade an existing installation of the same ArcGIS product. The settings for the installation location, License Manager (for Concurrent Use), or authorization information (for Single Use) are retained in the upgrade. See the installation guide for more information on installation upgrades and new installations.•Existing ArcGIS 10.1–10.5.1 authorization numbers will work with ArcGIS Engine Developer Kit 10.6 and ArcGIS Engine 10.6.•ArcGIS 10.6 for Single Use—If ArcGIS 10.6 will be installed on a machine that is different from where an earlier version of an ArcGIS 10.x product is currently installed, and you want to use the existing ArcGIS 10.1–10.5.1 authorization numbers for ArcGIS10.6, the earlier version of the ArcGIS 10.x product must first be deauthorized before authorizing ArcGIS 10.6.Obtaining software authorization numbersIf needed, your account's primary maintenance contact can obtain authorization numbers from My Esri. After signing in with your Esri Account, click My Organizations>Licensing>View Authorizations. Click a product name to obtain its authorization number.The license version on authorizations eligible for use with ArcGIS 10.6 will display as 10.1–10.6 under View Authorizations. For those outside the United States, contact your local distributor for information about your authorization numbers.Upgrading ArcGIS 10.0 licenses to 10.6For existing ArcGIS 10.0 users, automatic license upgrade functionality allows an easy license upgrade process. Instead of deauthorizing older licenses and authorizing the latest version, you can convert your existing 10.0 licenses to 10.6 using the one-step upgrade option.1.Uninstall the ArcGIS 10.0 product without deauthorizing your existing licenses.2.Install the ArcGIS 10.6 product.3.On completion of the ArcGIS Engine Developer Kit 10.6 installation, click Authorize. You will be prompted to upgrade your licenseif 10.0 licenses are already present. For ArcGIS Engine 10.6, you will need to launch ArcGIS Administrator. Follow the instructions to complete the upgrade process.Authorize ArcGIS Engine Developer Kit 10.6 and ArcGIS Engine 10.6Single Use•Recommended: Use an Internet connection to complete the authorization steps below.•If you do not have an Internet connection for the machine on which you intend to install the software, you can authorize the software via email.•If you want to facilitate the authorization process or authorize silently, a provisioning file generated from the Licensing portal on My Esri can be used.1.After the installation, open the ArcGIS Administrator wizard.2.Choose the desired Single Use product.•Choose the ArcGIS Engine (Single Use)option if you only need to run ArcGIS Engine applications.•Choose the ArcGIS Engine and ArcGIS Engine Developer Kit (Single Use)option if you need to develop and run ArcGIS Engine applications.3.Click Authorize Now.4.Choose the default option,I have installed my software and need to authorize it.5.Choose Authorize with Esri now using the Internet. If using a provisioning file, choose the option I have received anauthorization file from Esri and browse to the file.6.Enter your personal information where applicable.7.Enter your core product authorization number (ESUxxxxxxxxx). See the View Authorizations page on My Esri to obtain thisnumber if you do not have it available for use.8.Enter the authorization numbers for extensions, if applicable. For extensions not listed, manually type the extension name andthe authorization number.9.Click Finish after the authorization process is complete.10.Click OK to close the ArcGIS Administrator wizard. Your software is now ready for use.Authorizing additional extensions for ArcGIS Engine Single UseThis applies if you have already authorized your ArcGIS Engine 10.6 Single Use software and want to authorize additional extensions later. Follow the steps for Authorizing ArcGIS Engine Developer Kit and ArcGIS Engine Single Use, and at step 3, choose I have already authorized the software and need to authorize additional extensions. Step 6 will not be applicable. At step 7, you will be given the opportunity to enter your authorization numbers for the applicable extensions.Concurrent UseDefining the License Manager1.After completing the ArcGIS Engine installation, open the ArcGIS Administrator wizard.2.Choose ArcGIS Engine (Concurrent Use)in the ArcGIS Administrator wizard and specify the name of your license manager.3.Once you have set your license manager, click OK to close the ArcGIS Administrator wizard. Your software is now ready foruse.ArcGIS License Manager 10.6 quick start guideGetting started•Prior to installation, review the ArcGIS License Manager system requirements.•Administrative privileges are required for installing ArcGIS License Manager.•For help with the installation of ArcGIS License Manager, see the corresponding ArcGIS License Manager installation guide.•The License Manager reference guide is installed with ArcGIS License Manager 10.6. This can be accessed from Start> Programs>ArcGIS>License Manager>License Manager Reference Guide or from the ArcGIS help on the ArcGIS Desktop site.•For all of your Esri software support needs, such as help, forums, blogs, downloads, samples, and knowledge base articles, visit .Upgrading to ArcGIS 10.6The copy protection mechanism for ArcGIS Desktop 10.6 and ArcGIS Engine 10.6 Concurrent Use has been updated. This update requires that ArcGIS License Manager 10.6 be installed to support these products.The ArcGIS License Manager 10.6 setup package is designed to detect and upgrade an existing installation of the same product. The existing options file (if applicable) and authorized licenses are retained in the upgrade. Any specific ports present in the service.txt file before the upgrade must be manually reconfigured in the service.txt file following the upgrade to ArcGIS 10.6. See the ArcGIS License Manager reference guide for more information on installation upgrades and new installations.Existing ArcGIS 10.1–10.5.1 authorization numbers will work with ArcGIS 10.6.If ArcGIS License Manager 10.6 will be installed on a machine that is different from where an earlier version of ArcGIS License Manager 10.x is currently installed, and you want to use the authorization for ArcGIS License Manager 10.6, the earlier version of ArcGIS License Manager 10.x must first be deauthorized before authorizing the ArcGIS 10.6 installation.Obtaining software authorization numbersIf needed, your account's primary maintenance contact can obtain authorization numbers from My Esri. After signing in with your Esri Account, click My Organizations>Products>View Authorizations. Click a product name to obtain its authorization number.The license version on authorizations eligible for use with ArcGIS 10.6 will display as 10.1–10.6 under View Authorizations. For those outside the United States, contact your local distributor for information about your authorization numbers.。
基于SketchUp和ArcGIS对虚拟校园的设计与实现
第34卷第6期2009年11月测绘科学Science of Surveying and M app ingVol134No16Nov1作者简介:柴贵海(19812),男,河北张家口人,在读硕士,主要从事森林经理学、地理信息3D可视化研究。
E2mail:chaigh19810224@1261com收稿日期:2008204214通讯作者:廖邦洪教授E2mail:lbhongsicau@基于Sketc hUp和Ar c G I S对虚拟校园的设计与实现柴贵海①②,廖邦洪①,胡庭兴②(①四川农业大学都江堰分校,四川都江堰 611830;②四川农业大学林学与园艺学院,四川雅安 625014)【摘 要】以Aut oC AD精确绘制的2D数据为基础,利用ESR I公司A rcGI S912软件中相应的工具转入Aut oCAD数据,并把有关数据转化为shape文件后精确定义坐标,添加相应的属性数据后,利用A rcGI S与Sketch Up之间的Plugin工具把shape文件转入到Sketch Up中,然后在Sketch Up中对不同的建筑建立真实的三维立体模型,最后把三维模型输出为M ulit patch(31mdb)格式的数据,可进一步在A rcGI S中进行分析和管理,或者直接输出符合OGC K ML规范的文件,利用A rcEx p l orer等免费的3D地图浏览工具实现浏览。
实践证明,该方法在较小范围内实现效果良好,对大区域三维建模和数据管理有参考价值。
【关键词】A rcGI S;Sketch Up;虚拟校园;虚拟现实【中图分类号】P208;TP391 【文献标识码】A 【文章编号】100922307(2009)06202702031 引言虚拟现实技术[1](V irtual Reality)是一门新兴的科学技术,是许多相关学科领域交叉、集成的产物,它融合了数字图像处理、计算机图形学、多媒体技术、传感器技术等多个信息技术分支。
基于ArcEngine与SketchUp的GIS系统构建
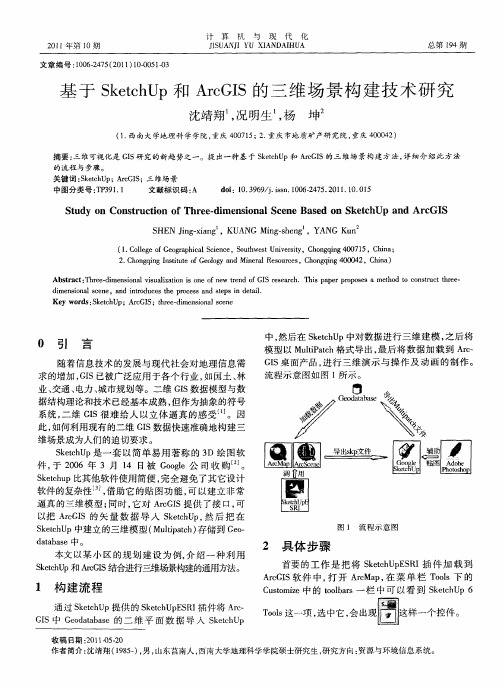
doi:10.3969/j.issn.1001-358X.2010.04.014基于ArcEngine与SketchUp的GIS系统构建宋利杰1,王健1,韩永斌2,陈星彤1(1.河北理工大学,河北唐山063009;2.煤炭科学研究总院唐山研究院,河北唐山063012)摘要:论文以山东省邹城市北宿镇为例,以SketchUp为三维建模工具,探讨了各种地图要素的三维建模方法,以ArcGIS Engine及VS2005为开发平台,介绍了二、三维相结合的地理信息系统开发过程,实现了二维GIS的查询、分析功能及部分三维功能,对相关系统的开发有借鉴意义。
关键词:ArcEngine;SketchUp;三维建模中图分类号:P209文献标识码:B文章编号:1001-358X(2010)04-0044-031开发环境及流程1.1开发环境(1)SketchUp简介SketchUp是由Google公司发布的一款简单而实用的三维建模软件,使用它的贴图功能,可以方便而真实的构建各种地物的立体模型,使用它的地形工具,可以迅速的对区域地形进行模拟,满足小区域范围内地形地物三维模型建立要求。
目前该软件有两个版本,免费版及专业版,在需要与ArcGIS软件交互时,需要使用专业版。
(2)SketchUp6ESRI使用SketchUp软件进行三维建模并为GIS系统提供三维模型时,其基础数据要从GIS软件来(其它数据类型无法加入属性信息),建模后还要将其导出到GIS软件中去,因此就涉及到不同软件相互间的数据转换问题,该接口可由用户自己编程实现,更简便的方法是直接安装由Google公司开发的插件SketchUp6ESRI,该插件包含两个工具:①GIS Plugin;②3DAnalyst SketchUp3D Symbol Support,用于在ArcGIS及SketchUp间交互数据。
(3)ArcGIS Engine简介ArcGIS Engine是由ESRI公司发布的GIS组件产品,为用户提供了功能强大的GIS框架,可以方便的实现地图基本操作、专题图的分层显示、地理信息查找与分析等功能,基于ArcObjects(简称AO)核心构建,继承了AO的优点,但用其开发的程序在运行时只要拥有ArcGIS Engine Runtime即可,而不必像AO那样必须安装ArcGIS桌面产品。
ArcGIS与SketchUp软件在园林设计中的联合应用——以威海环翠楼盆景园景观设计为例

目前我国的园林规划设计行业已普遍运用计算机软件技术进行辅助设计 , 但多被用来做一些基础性的设
计 制 图工作 ( 如绘 制平 、 立面图, 透视 图等 ) 。园林设 计场 地分 析 的优劣 对设 计 方案 影 响重 大 , 这又 在很 大 程度 上取决 于设 计者 的专 业经 验 和技能 , 缺乏 一套 更加科 学 和理性 的手 段与 方法 。 同时 , 设计 分 析方法 和设计 表 达 带有 很大 的 主观性 , 相关 数据 处理效 率 较低 , 很多 不具 备实 时 动态 的修 改 功 能 , 设 计 软件 无 法直 接 跟进 设 计 师 的思 维并 实 时出 图展示 出来 。大部 分设 计软 件 的建模 速度 都跟 不 上设 计 师 的思 路 , 设 计 师 能直 接 控 制 的环 节 太少 , 因此设计 方案 的准 确性 和效率 都 处于较 低层 次 。
1 . 2 地理 信 息 系统软件 A r c G I S
A r c G I S是 由美 国环境 系统 研究 所公 司 ( E n v i r o n m e n t S y s t e ms R e s e a r c h I n s t i t u t e , I n c .简 称 E S R I ) 开发 的一
风
_ 园 棘
d o i : 1 0 . 3 9 6 9 / j . i s s n . 1 0 0 0 — 8 1 0 1 . 2 0 1 3 . 0 2 . 0 3 5
A r c G I S与 S k e t c h U p软 件在 园林设 计 中的联 合应 用
sketchup与ArcGIS10的交互
sketchup与ArcGIS10的交互许多用户在 ArcGIS 9.2 时代习惯于使用 Sketchup 插件,但是,9.2版本已经结束了他的使命,进入了退休列表,已往的交互方法不再推荐。
在 ArcGIS 10 之后不再使用这个插件,而且给了其他的思路。
如下是官方说明中的原文:------------------------What is the recommended workflow between SketchUp and ArcGIS?The ArcGIS SketchUp plug-in is no longer supported at ArcGIS 10. The recommended workflow is now as follows:1.Digitize in your polygon.2.Extrude it by an attribute in 3D.3.Convert it to a multipatch using Layer 3D to Feature Class.4.Export it to COLLADA using MPatch to COLLADA.5.Import/Edit in SketchUp (e.g., textures, pitched roof, etc.).6.Then use the edit environment to replace the mpatch feature with the new SKP model.链接:-------------------翻译整理下,也就是说,先在ArcGIS Desktop(ArcScene 或ArcGlobe)环境中,将2D数据经过拉伸。
- 拉伸在图层属性中进行设置,可以根据固定值拉伸,也可以根据某一属性字段进行拉伸。
- 主要在于拉伸表达式的写法。
使用工具Layer 3D to Feature Class 转出,转到GBD 中,以Multipatch 的形式存储。
2008160232 傅维劼 ArcGIS+SketchUp三维建模论文

基于ArcGIS和Google SketchUp的城市三维建模技术——以湖南师范大学二里半校区为例傅维劼 2008160232(湖南师范大学资源与环境科学学院 08级地理信息系统)0 引言随着城市建设的加快, 城市规模急剧膨胀, 传统的城市管理模式急需变革。
在数字城市潮流的推动下, 中国数字城市的建设也在如火如荼的进行中,并渗入到城市管理的方方面面,利用数字虚拟城市进行城市的管理其效率更高、手法更丰富、区域更广泛。
截至 2008年初, 全国已有 30多个城市开展了数字城市地理空间框架建设的试点工作,并取得了初步成果。
我国编号为CJJ/T157-2010行业标准《城市三维建模技术规范》也于2010年11月17日由住房和城乡建设部发布,并将自2011年10月1日起实施。
数字城市的蓬勃发展,使得三维建模技术有了可喜的进步, 支持三维模型的软件也在不断增加,功能愈加强大。
常用的三维建模软件,国外的有3DS Max , Maya , Google SketchUp 等;三维模型场景展示软件, 如 ArcGlobe、SkyLine、GeoGlobe等;国内软件主要包括北京灵图软件技术有限公司的VRMap,适普软件有限公司的IMAGIS等[1]。
通常情况下, 用户会采用自己熟悉的建模软件进行三维建模, 不同的建模软件就会产生不同的三维数据格式, 即使支持某种通用的数据格式也未必会满足实际要求,需要通过格式转换或后处理才能满足实际需求。
通过对城市建筑三维可视化方法的研究,针对二、三维GIS平台的一致性,本文认为采用ArcGIS和Google SketchUp相结合的模式进行三维建模和可视化相对更加高效快捷。
下面以湖南师范大学二里半校区主要建筑的三维模型创建为例,阐述基于ArcGIS和Google SketchUp创建三维虚拟城市流程。
1 软件介绍本文三维建模主要使用 SketchUp 6 软件。
SketchUp 6 是由Google公司发布的一种方便易用且功能强大的三维建模软件,它比其他软件使用简便,借助它的贴图功能,可以建立非常逼真的三维模型,而且可以节省大量时间,尤其在大场景建模中,它的优越性表现的更加突出。
ArcGIS与SketchUp协作进行3D建模的详细步骤

本文共分为两部分,插件的安装和加载;插件的使用。
第一部分:插件的安装和加载在安装Google SketchUp Pro 6 GIS Plugin 之前,我们需要:1 ,安装arcgis9.2 的desktop2 ,安装google sketchup pro 6.03 ,从sketch up 的官方网站(/)下载plug-in 程序。
安装过程:双击"SketchUp6ESRI-005EN.exe" 开始安装,如下图所示选择接受协议,单击"next"下面这个对话框显示了将要安装的两个插件,分别为它们选择安装路径。
注意:第二个组件(3D Analyst SketchUp 3D Symbol Support )必须放到ArcGIS 程序的安装目录下。
单击install……finish ,完成安装如何将SketchUp 6 Tools 工具条添加到应用程序的界面上:启动一个ArcGIS 桌面程序,如 ArcMap 或者 ArcScene 。
(本文以ArcMap 为例)选择toolsàcustomize, 调出定制对话框(如下图)单击"Add From File" ,找到ArcGIS 的安装目录下的SketchUp6 文件夹。
(默认路径为C:\Program Files\ArcGIS\SketchUp6 )选择文件 FeaturesToSkp.dll 。
此时在customize 中的toolbars 一栏中可以看到SketchUp 6 Tools 这一项,选中它(如下图)这时界面上应该出现一个小工具条。
(如右所示)一、用ArcGIS和SketchUp进行3D建模的一般流程:在接着介绍具体操作步骤之前,简单地说明一下整体的工作流:1、使用ArcGIS Desktop序从GDB中加载数据;2、利用SketchUp 6 GIS Plug-in工具将所需的要素导出到SketchUp中;3、并在SketchUp中进行建模;4、将建好的模型导出成multipatch格式的数据。
Arcgis10.0+SketchUp6.4 pro结合SketchUp6ERSI插件快速创建虚拟场景
1、软件安装及配置步骤(1) 安装ArcGIS Desktop软件,如ArcInfo。
(过程略)(2) 安装草图大师Goolge SketchUp软件。
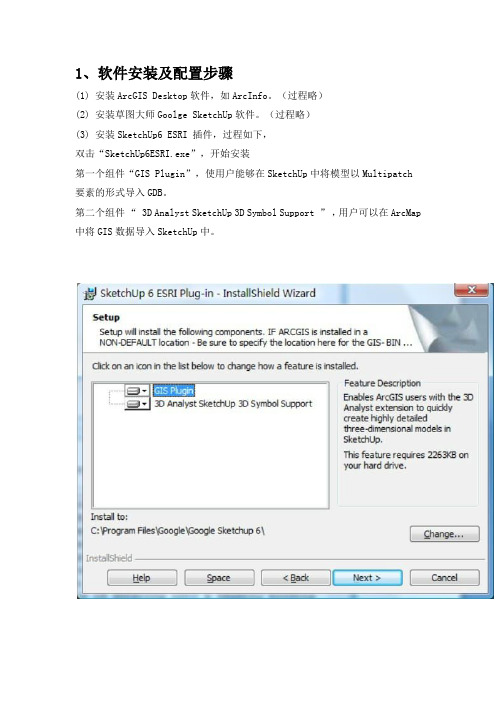
(过程略)(3) 安装SketchUp6 ESRI 插件,过程如下,双击“SketchUp6ESRI.exe”,开始安装第一个组件“GIS Plugin”,使用户能够在SketchUp中将模型以Multipatch 要素的形式导入GDB。
第二个组件“ 3D Analyst SketchUp 3D Symbol Support ”,用户可以在ArcMap 中将GIS数据导入SketchUp中。
(4) 在ArcGIS环境中激活SketchUp6 ESRI插件,过程如下,启动 ArcMap界面,在工具栏上右键,单击“Customize”点击“Add from file”,加载SketchUp插件安装后,为ArcGIS产品添加的动态库文件“FeaturesToSkp.dll”添加插件动态库后,在Toolbars项中可以找到SketchUp6的功能项选中“SketchUp 6 Tools”组件以后在桌面上会弹出组件的功能按钮2、流程概括(1)使用ArcGIS桌面,即ArcMap,加载矢量数据;(2)在ArcMap环境中,利用SketchUp插件工具,将所需要建模的区域导入SketchUp中。
(3)在SketchUp创建模型。
(4)在SketchUp中将模型转成ArcGIS的Multipatch模型要素文件并保存于Personal GeoDatabase(后面统称为PGDB)中。
环状建模流程图3、矢量数据建模样例使用北京地区平面坐标的SHP矢量。
Shp的属性字段中包含建筑物的高度值。
(1)在ArcMap中加载矢量数据,如下图(2)单击“Select Features”,在当前图上选择需要建模的矢量数据(3)点击之前添加的SketchUp插件“Export selected items to SketchUp 6”按钮,将弹出数据导出选项对话框,如下图系统将自动读出所选择矢量要素所在的FeatureClass,并且提供自动建模选项。
gis快速生成三维模型以及与sketchup的交互方法
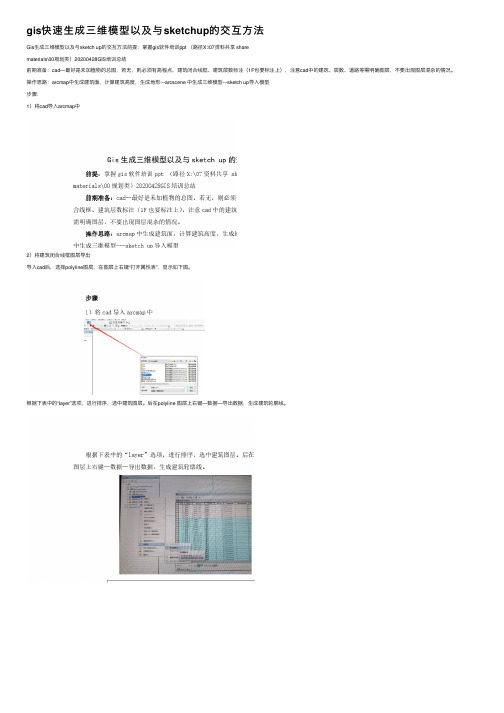
gis快速⽣成三维模型以及与sketchup的交互⽅法Gis⽣成三维模型以及与sketch up的交互⽅法前提:掌握gis软件培训ppt (路径X:\07资料共享 sharematerials\00规划类)20200428GIS培训总结前期准备:cad—最好是未加植物的总图,若⽆,则必须有⾼程点、建筑闭合线框、建筑层数标注(1F也要标注上),注意cad中的建筑、层数、道路等需明确图层,不要出现图层混杂的情况。
操作思路:arcmap中⽣成建筑⾯,计算建筑⾼度,⽣成地形---arcscene 中⽣成三维模型---sketch up导⼊模型步骤:1)将cad导⼊arcmap中2)将建筑闭合线框图层导出导⼊cad后,选择polyline图层,在图层上右键“打开属性表”,显⽰如下图。
根据下表中的“layer”选项,进⾏排序,选中建筑图层。
后在polyline 图层上右键—数据—导出数据,⽣成建筑轮廓线。
3)要素转⾯,将建筑轮廓线⽣成建筑底⾯数据管理⼯具—要素—要素转⾯—选择输⼊要素图层“建筑轮廓线”—选择保存位置—确定建议在命名新图层时,使⽤拼⾳或英⽂命名,保存图层的路径也尽量使⽤英⽂路径,减⼩软件报错的风险。
教程中为说明直观,将图层中⽂命名,以便理解。
4)处理层数在导⼊的cad 上,选择Annotation (注记)图层,右键打开属性表,会发现有两列是标注层数的。
这个图层的内容就是cad 中所有的⽂字,层数标注也属于⽂字,所以会出现在这个图层中。
将该图层导出:数据管理⼯具—要素—要素转点,输⼊要素选择annotation,输出位置选择⾃⼰想保存的位置。
在Text列上右键排序,选中带有层数的⾏,导出为⼀个新的图层。
得到层数图层。
可以根据箭头发现,有些建筑上是没有点的(点就是层数标注),这是因此cad中并未将1F的建筑标出,需要⼿动加上。
增加1F标注在注记点图层上右键---编辑要素—开始编辑在编辑器下拉箭头上—编辑窗⼝—创建要素在弹出的窗⼝上,点击“注记点”图层,即可以⽤⿏标添加点将点添加上后,可直接在属性表的Text列上增加层数“1F”,⼀层建筑全部添加完后,在编辑器下拉箭头中选择“保存编辑内容”,再选择“停⽌编辑”最后得到的即为带有层数的图层,如下图新加的层数5)空间连接得到带层数的建筑⾯分析⼯具—叠加分析—空间连接,按照下图操作得到带有层数的建筑⾯—“最终建筑图层”—在图层上右键编辑要素—开始编辑---在图层上右键打开属性表—选中Text图层—在左上⾓下拉⿊三⾓中选择“查找和替换”在替换窗⼝中,将F替换为“⽆”,“替换为”的地⽅不填写即可最终将Text列中的F去掉,以便计算建筑⾼度在“最终建筑图层”的属性表中,左上⾓下拉箭头下选择“添加字段”,字段命名为“hight”,类别选择“双精度”在“hight”字段上,右键选择“字段计算器”,公式如下:得到最终的建筑⾼度。
Sketchup与SketchupESRIplugin
Sketchup与SketchupESRIplugin
1、高版本就是兼容低版本(这个嘛大家都知道)对于SU的arcgis插件,目前我只发现su6for ESRI,有关资料显示该版本插件适应于ArcGIS9.2,事实上,同样适应于ArcGIS9.3
2、大家都知道这个插件分两步,一个是从Arcgis导入数据到su,另一个是从su导出esri multipatch(该数据类型不作具体介绍);在第一个步骤中,经常出现数据导到一半arcmap自动关掉,原因是:如果你的ARCGIS是装在C盘那没有啥大碍,但是如果装在其他盘,在你完成插件安装后会发现,在C盘同样有个ArcGIS的文件夹底下有个SU6的文件夹,将该文件夹底下的文件拷入你所装ARCgis文件夹下的SU6即可解决这个问题
3、导出为ESRI Multipatch,在有些版本的su中是没有这个选项的,需要的是Google Sketchup Pro6这个一定会有!。
SketchUp和ArcGIS三维建模(三)
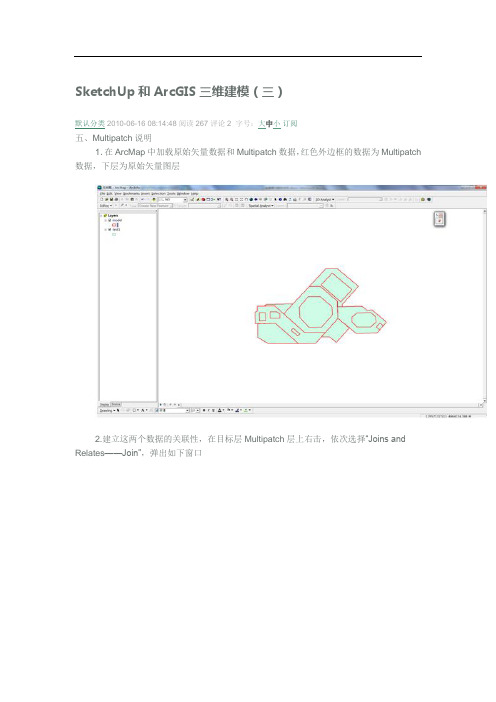
SketchUp和ArcGIS三维建模(三)默认分类 2010-06-16 08:14:48 阅读267 评论2字号:大中小订阅五、Multipatch说明1.在ArcMap中加载原始矢量数据和Multipatch数据,红色外边框的数据为Multipatch 数据,下层为原始矢量图层2.建立这两个数据的关联性,在目标层Multipatch层上右击,依次选择“Joins and Relates——Join”,弹出如下窗口上图中,“2”项为属性图层,“1”和“3”项中选择属性值能够匹配的关联字段。
点击“OK”后,查看关联结果如下这一操作的目的在于通过两个图层的公共字段,为目标层关联属性表,但值得注意的是,这个属性的关联仅仅是关系上的链接,并没有对实际数据作出改动。
3.此时,需要在Multipatch图层上右击,选择“Data——Export Data”,将模型重新输出一次即可单击OK,Multipatch模型要素图层就创建完毕了。
4.Multipatch模型的几个显示效果。
ArcCatalog的3D View预览ArcScene展示ArcGlobe展示常见问题SketchUp ESRI插件不可用安装了ArcGIS和SketchUp的插件后,在c:\program files\ArcGIS目录中会生成一些文件,将它们都复制到ArcGIS的目录后,由ArcGIS导出SketchUp的功能才能正常使用。
经测试,ArcGIS 9.3 也可以正常使用。
ArcGIS9.3桌面环境下建模过程SketchUp6ESRI插架是针对ArcGIS9.2定制的。
目前广大用户的ArcGIS版本几乎都是ArcGIS9.3或更高级版本。
该插件与ArcGIS9.3软件的兼容性和数据的兼容性成为用户关注的焦点。
下面将介绍,该插件在ArcGIS9.2与9.3这两个版本中使用的不同。
? ArcGIS9.3桌面创建的PGDB无法被ArcGIS9.2桌面支持。
基于ArcGIS和GoogleSketchUp的三维建模研究
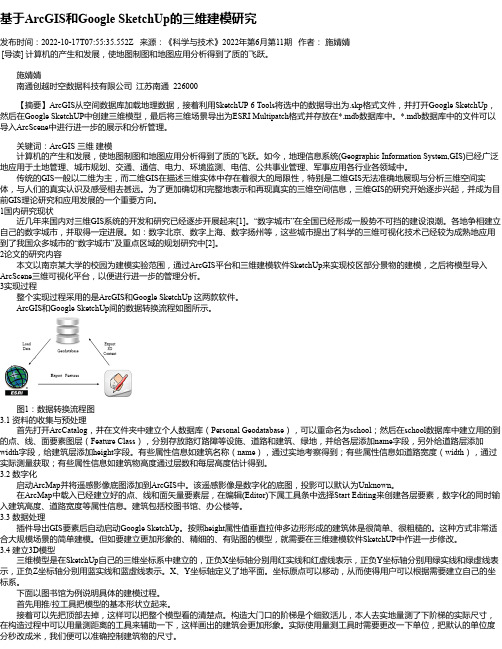
基于ArcGIS和Google SketchUp的三维建模研究发布时间:2022-10-17T07:55:35.552Z 来源:《科学与技术》2022年第6月第11期作者:施婧婧[导读] 计算机的产生和发展,使地图制图和地图应用分析得到了质的飞跃。
施婧婧南通创越时空数据科技有限公司江苏南通 226000【摘要】ArcGIS从空间数据库加载地理数据,接着利用SketchUP 6 Tools将选中的数据导出为.skp格式文件,并打开Google SketchUp,然后在Google SketchUP中创建三维模型,最后将三维场景导出为ESRI Multipatch格式并存放在*.mdb数据库中。
*.mdb数据库中的文件可以导入ArcScene中进行进一步的展示和分析管理。
关键词:ArcGIS 三维建模计算机的产生和发展,使地图制图和地图应用分析得到了质的飞跃。
如今,地理信息系统(Geographic Information System,GIS)已经广泛地应用于土地管理、城市规划、交通、通信、电力、环境监测、电信、公共事业管理、军事应用各行业各领域中。
传统的GIS一般以二维为主,而二维GIS在描述三维实体中存在着很大的局限性,特别是二维GIS无法准确地展现与分析三维空间实体,与人们的真实认识及感受相去甚远。
为了更加确切和完整地表示和再现真实的三维空间信息,三维GIS的研究开始逐步兴起,并成为目前GIS理论研究和应用发展的一个重要方向。
1国内研究现状近几年来国内对三维GIS系统的开发和研究已经逐步开展起来[1]。
“数字城市”在全国已经形成一股势不可挡的建设浪潮。
各地争相建立自己的数字城市,并取得一定进展。
如:数字北京、数字上海、数字扬州等,这些城市提出了科学的三维可视化技术己经较为成熟地应用到了我国众多城市的“数字城市”及重点区域的规划研究中[2]。
2论文的研究内容本文以南京某大学的校园为建模实验范围,通过ArcGIS平台和三维建模软件SketchUp来实现校区部分景物的建模,之后将模型导入ArcScene三维可视化平台,以便进行进一步的管理分析。
基于SketchUp和ArcGIS的三维场景构建技术研究
0 引 言
随着信 息 技术 的发 展 与现 代 社会 对 地理 信 息需 求 的增加 , I G S已被广泛 应 用 于各 个 行业 , 国 土 、 如 林 业、 交通 、 电力 、 市规划 等 。二 维 GS数据模 型 与数 城 I 据结 构理论 和技术 已经基本 成熟 , 但作 为抽 象 的符 号 系统, 二维 G S很难 给人 以 立 体 逼 真 的 感 受 … 。因 I
d t ae中。 a bs a
图 1 流 程 示 意 图
本文 以某 小 区 的 规 划 建 设 为 例 , 绍 一 种 利 用 介
2 具 体 步 骤
首要 的 工 作 是 把 将 S e h p S I插 件 加 载 到 kt U E R e Ac I 件 中 , 开 A c p, 菜 单 栏 T os下 的 rGS软 打 rMa 在 ol C s mi ut z 的 t las 栏 中可 以 看 到 S e h p6 o e中 o br 一 o kt U c
中 , 后在 S ecU 然 k t p中对 数据 进行 三 维 建模 , h 之后 将 模 型 以 Mu iac hP t h格式 导 出 , 后将 数 据 加 载 到 A c 最 r ~ GS桌面产 品 , 行 三 维 演示 与操 作 及 动 画 的 制 作 。 I 进
流 程示 意 图如图 1 所示 。
需要注意的是由于相机的限制数码相片往往对于大面积的拍摄出现不能全部拍摄或角度的不同而出现图像的变形等问题无法直接用于贴图这时就需要利用photoshop等图形处理软件对图像进行纠正处理以达到对相片的期望结果实现更好的三维显示效果
2 1 年第 1 01 0期
文 章 编 号 :0627 (0 1 1 -0 1 3 10 —4 5 2 1 )00 5 - 0
基于ArcGIS与SketchUp的景观规划快速表现技术
3 v s a ia i n t c n l g , a e n Ar GI n k t h , D iu l a i n i a d c p D iu l t e h o o z o y b s d o c S a d S e c Up 3 v s a i t ln s a e z o n p a n n a e n wi ey e tb ih d wh c o l r v f ce c n i lt c u a y ln i g h s e d l sa l e , ih c u d i b s mp o e e in y a d smu ae a c r c . i
筑 物精 确建 模 ,三维 效果 快速 展示 出图 ,视 频
输 出等 技术 难 点 。
1 软件选择 与系统环境 搭建
11 . 工具软 件 A c S 美 国 E R 公司推 出的 G S 件 rGI 是 SI I软
集, 主要包 括 了 A c p ArC tl 、 c cn rMa 、 c aa g ArS e e o
关键词:景观规划;A c I;S e h p rG S kt U c
中图分 类号 :78 6 ¥5 . 1 文 献标 识码 : B 文 章编 号 :0 4 74 (0 )2 08— 3 10- 73 2 1 0— 06 0 1
随着 社 会 经 济 发 展 以及 计 算 机 技 术 的不 断进步 ,在 景观 规划 设计 中,对森 林 公 园、湿 地 公 园、林相 改造 项 目等大 中尺 度地 形 的全景 展 现提 出了越来越 高的要 求 。 统 的手绘 效果 传 图 、计 算机 的二 维 效果 图效 率低 ,成 本高 ,表 现 准确 性不 足 。 利用 ArGI c S与 S e h p两种 kt U c
基于ArcGIS和Google+SketchUp的三维电子地图制作与发布

【关键词】ArcGIS;Google SketchUp;三维GIS;建模 0研究背景及意义
随着GIS在各行各业的普遍应用.人们的需求也加速了GIS行业 的发展.三维GIS目前是其中的一个重要发展趋势111。在三维GIS的实 现过程中.三维模型的构建是三维电子地图制作过程中最重要的环节 之一。 目前用于三维景观模型建立的主要方法有:基于摄影测量(航空 摄影测量和Lidar)的三维景观构建.其方法利用航测影像数据和三维 模和纹理配置。地形数据TIN导入SketchUp中进行地形建模。 最后,模型通过Esri插件导出到ArcGIS系统中进行三维可视化、 分析和管理。并通过Google Earth实现三维地形图的网络发布和网络 浏览(见图1)。
体系的发展过程中发现一个大的统一,旨在提升对西方体育理论与实践的理解。
【关键词】身体哲学;场域;辩证法
从心理学上说.西田纯粹体验直接的绝对肯定性可以称为一种迷 醉状态.其中我们可以发现与禅宗里“定”的体验有相似之处。后面我 们将要讨论到这种比较是否成立。在任何意义上.西田的行为直观理 论都可以解释成一种重新以身心原理来把握纯粹体验或境界的努力。 行为直观是行为和直观的综合体。需要进一步解释的是这种直观的含 义。由于西田的术语缺乏严格性和清晰性.所以就存在许多被误释的 可能。“行为直观”中的“直观”这个词便是一例。就我所能够指出的,西 田在两种不同的情形下都使用了这个词。第一次是“感官直观”.其英 文或德文译用的词源与日文不同。尤其是它们既涉及到与感觉器官紧 密相关的感知活动.又涉及到“直观理性”的意义。后者的这个概念需 要解释一下。然而.这里所说的实践并不意味着从作为意识主体的日 常自我的立场出发.或通过被称为“作用者”的活动与世界相关联。自 我深入到了明意识层以下.也就是深入到活动领域的以下部分,以及 把自我沉浸到暗意识层中.从而改变自身成为境界的自我。于是自我 就不可避免的被强烈扩张的人格中的统一力所激励.从隐蔽的领域中 浮现出来。这种发自内部的被动的(肉身化的)体验就是纯粹体验直接 的绝对肯定性以及对怀疑的抗拒性.它直接变成一项实践活动。这就 是说.倒退到自我的内在的本质里.同时也就是向着世界的迂回前进。 简而言之.通过胡塞尔的“悬置判断”来达到意识体验的直接的绝对肯
- 1、下载文档前请自行甄别文档内容的完整性,平台不提供额外的编辑、内容补充、找答案等附加服务。
- 2、"仅部分预览"的文档,不可在线预览部分如存在完整性等问题,可反馈申请退款(可完整预览的文档不适用该条件!)。
- 3、如文档侵犯您的权益,请联系客服反馈,我们会尽快为您处理(人工客服工作时间:9:00-18:30)。
1、软件安装及配置步骤
(1) 安装ArcGIS Desktop软件,如ArcInfo。
(过程略)
(2) 安装草图大师Goolge SketchUp软件。
(过程略)
(3) 安装SketchUp6 ESRI 插件,过程如下,
双击“SketchUp6ESRI.exe”,开始安装
第一个组件“GIS Plugin”,使用户能够在SketchUp中将模型以Multipatch 要素的形式导入GDB。
第二个组件“ 3D Analyst SketchUp 3D Symbol Support ”,用户可以在ArcMap 中将GIS数据导入SketchUp中。
(4) 在ArcGIS环境中激活SketchUp6 ESRI插件,过程如下,
启动 ArcMap界面,在工具栏上右键,单击“Customize”
点击“Add from file”,加载SketchUp插件安装后,为ArcGIS产品添加的动态库文件“FeaturesToSkp.dll”
添加插件动态库后,在Toolbars项中可以找到SketchUp6的功能项选中“SketchUp 6 Tools”组件以后
在桌面上会弹出组件的功能按钮
2、流程概括
(1)使用ArcGIS桌面,即ArcMap,加载矢量数据;
(2)在ArcMap环境中,利用SketchUp插件工具,将所需要建模的区域导入SketchUp中。
(3)在SketchUp创建模型。
(4)在SketchUp中将模型转成ArcGIS的Multipatch模型要素文件并保存于Personal GeoDatabase(后面统称为PGDB)中。
环状建模流程图
3、矢量数据建模样例
使用北京地区平面坐标的SHP矢量。
Shp的属性字段中包含建筑物的高度值。
(1)在ArcMap中加载矢量数据,如下图
(2)单击“Select Features”,在当前图上选择需要建模的矢量数据
(3)点击之前添加的SketchUp插件“Export selected items to SketchUp 6”
按钮,将弹出数据导出选项对话框,如下图
系统将自动读出所选择矢量要素所在的FeatureClass,并且提供自动建模选项。
Elevate by field:依据属性字段,设置建筑物高程。
Extrude by field:依据属性字段,设置建筑物高度。
Name Groupusing:为导出数据,选择分组名称。
Launch SketchUp on completion:操作结束后,模型自动在SketchUp运行程序中打开。
Filename:指定导出模型文件的路径和名称。
单击确定,导出结束,弹出成功导出的提示对话框,如下图
导出时候,原始的空间参考将被带入到SketchUp环境中。
同时,关联到SketchUp建模工具,将导出模型自动加载到建模空间内,如下图
(4)根据相关筑物图片,或者通用纹理。
按照现实的情况和比例关系进行调整,获得SketchUp模型的最终结果。
如下图所示。
(5)SketchUp导出3D模型
导航“文件”->“导出”->“三维模型”,在弹出的导出模型对话框中,选择文件类型为ESRI Multipatch(*.mdb),保存为ArcGIS的三维数据即Multipatch 格式。
或者要应用与其他平台,可以保存为3D文件通用的格式3ds。