航模遥控器说明书
FMS 3000mm FOX遥控飞机说明书

DETAILEDRIGIDFLAPS INSTALLEDSTRONG DURABLE EPOSTABLESMOOTH FLYING PERFORMANCE3000mm FOXManuel d’utilisationInstruction Manual Bedienungsanleitung 操作手册p wAs the user of this product, you are solely responsible for operating in a manner that does not endanger yourself and others or result in damage to the product or the property of others. This model is controlled by a radio signal subject to interference from many sources outside your control. This interference can cause momentary loss of control so it is advisable to always keep a safe distance in all directions around your model, as this margin will help avoid collisions or injury.Age Recommendation: Not for children under 14 years. This is not a toy.·Never operate your model with low transmitter batteries.·Always operate your model in an open area away from cars, traffic or people.·Avoid operating your model in the street where injury or damage can occur.·Never operate the model in populated areas for any reason.·Carefully follow the directions and warnings for this and any optional support equipment you use (chargers,rechargeablebattery packs, etc.)·Keep all chemicals, small parts and anything electrical out of the reach of children.·Moisture causes damage to electronics. Avoid water exposure to all equipment not specifically designed and protected for thispurpose.·Never lick or any place of any your model in your mouth as it could cause serious injury or even death.Lithium Polymer (Li-Po) Battery WarningCAUTION: Always follow the manufacturer’s instructions for safe use and disposal of batteries. Fire, propertydamage, or serious injury can result from the mishandling of Li-Po batteries.By handling, charging or using a Li-Po Battery you assume all risks associated with lithium batteries.If at any time the batteries begin to swell or balloon, discontinue use immediately!Always store the batteries at room temperature in a dry area to extend the life of the battery. Always transportor temporarily store the battery in a temperature range of 40-120F. Do not store the battery or model in a car or in direct sunlight. If stored in a hot car, the battery can be damaged or even catch fire.Never use a Ni-Mh Charger to charge Li-Po Batteries. Failure to charge the battery with a Li-Po compatible chargermay cause fire resulting in personal injury and property damage.Never discharge Li-Po Cells below 3V.Never leave charging batteries unattended.Never charge damaged batteries.Charging the Flight Battery WarningUse a battery charger that is designed to safely charge the Li-Po Battery. Read the charger instructions carefully before use. When charging the battery, make certain the battery is on a heat resistant surface. It is also highly recommended to place the Li-Po Battery inside a fire resistant charging bag readily available at hobby shops oronline.Main wing installationVertical stabilizer installationHorizontal stabilizer installationModel assembly1.Ensure the control horn faces down as shown. Carefully insert the horizontal stabilizer to the horizontal stabilizer slot until it is properly in place and you hear a click.Note: Align and connect the elevator servo plugs to the servo extensions located within the fuselage.1.Slide the Horizontal stabilizer spar into the fuselage. Align and install the vertical stabilizer over the spar and into the vertical stabilizer slot of the fuselage.2.Connect the elevator and rudder servos to their respective extensions in the fuselage.E N1.Align and slide the wing spar into the fuselage, then install both wings over the wing spar and into the wing slot of the fuselage.2.Secure both wings onto the fuselage using the snap lock.The wings are successfully secured when you hear a click.Notice: Ensure the snap lock is properly in place and the connectors on both sides are attached precisely and firmly.SicherheitsvorkehrungenAls Benutzer dieses Produkts sind Sie allein dafür verantwortlich dieses Produkt so zu betreiben, dass weder Sie selbst noch andere gefährdet oder Schäden am Produkt oder Eigentum anderer verursacht werden.Dieses Modell wird von einem Funksignal gesteuert, das von vielen Quellen außerhalb Ihrer Kontrolle gestört werden kann. Solche Störungen können zu einem vorübergehenden Kontrollverlust führen. Daher sollte immer einen Sicherheitsabstand zu Personen und Gebäuden eingehalten werden.Altersempfehlung: Nicht für Kinder unter 14 Jahren. Dies ist kein Spielzeug.· Betreiben Sie Ihr Modell niemals mit leeren Senderbatterien.· Betreiben Sie Ihr Modell immer in einem offenen Bereich, abseits von Gebäuden, Verkehr oder Personen.· Befolgen Sie die gesetzlichen Regelungen Ihres Landes zum Betrieb von ferngesteuerten Modellflugzeugen.· Befolgen Sie sorgfältig die Anweisungen und Warnungen für dieses und alle unterstützenden Geräte, die Sie verwenden (Ladegeräte, wiederaufladbare Akkus usw.).· Bewahren Sie alle Chemikalien, Kleinteile und elektrischen Geräte außerhalb der Reichweite von Kindern auf.· Feuchtigkeit verursacht Schäden an der Elektronik. Vermeiden Sie, dass die Produkte Wasser ausgesetzt werden, die nicht speziell für diesen Zweck entworfen und geschützt sind.· Nehmen Sie Teile des Produkts niemals in den Mund, da dies zu schweren Verletzungen oder sogar zum Todführen kann.Hinweise zu LiPo-AkkusVORSICHT: Befolgen Sie immer die Anweisungen des Herstellers zur sicheren Verwendung und Entsorgungvon Batterien. Durch falsche Handhabung von Li-Po-Batterien können Feuer, Sachschäden oder schwere Verletzungen verursacht werden.Seien Sie sich über alle Risiken klar, die mit dem Umgang von Lithium Polymer (LiPo) Akkus verbunden sind. Wenn die Akkus zu irgendeinem Zeitpunkt anschwellen oder aufblähen, verwenden Sie diese auf keinen Fall mehr!Um die Lebensdauer des Akkus zu verlängern sollten dieser bei Zimmertemperatur in einem trockenen Bereich gelagert werden. Bewahren Sie den Akku oder das Modell nicht in einem Auto oder in direktem Sonnenlicht auf. Wenn der Akku über einen längeren Zeitraum zu hohen Temperaturen ausgesetzt wird kann dieserbeschädigt werden oder sogar Feuer fangen.Verwenden Sie niemals ein NiMh-Ladegerät, um Li-Po-Akkus aufzuladen. Wenn der Akku nicht mit einemLi-Po-kompatiblen Ladegerät geladen wird, kann dies zu einem Brand führen, der zu Personen- und Sachschäden führen kann.Niemals Li-Po Zellen unter 3V entladen.Lassen Sie Akkus beim Laden niemals unbeaufsichtigt.Laden Sie niemals beschädigte Akkus auf.Aufladen des LiPo-Akkus: Verwenden Sie ein Ladegerät, das die Li-Po-Batterie sicher aufladen kann. LesenSie vor dem Gebrauch die Anweisungen des Ladegeräts sorgfältig durch. Achten Sie beim Laden des Akkus darauf, dass sich der Akku auf einer hitzebeständigen Oberfläche befindet. Es wird auch dringend empfohlen, den Li-Po Akku in einem feuerbeständigen LiPo-Koffer zu laden. LiPo Koffer finden Sie bei Ihrem Fachhändler oder im Internet.Montage des FlügelsMontage des SeitenleitwerksMontage des HöhenrudersMontage des ModellsStellen Sie sicher, dass das Ruderhorn wie abgebildet nach unten 1. Schieben Sie den Flächenverbinder wie abgebildet in den Rumpf und stecken dann die beiden Flügelhälften auf den Flächenverbinder bis zur Flügelaufnahme am Rumpf.2. Sichern Sie beiden Flügelhälften mit dem Schnappverschluss am Rumpf. Die Flügel sind erfolgreich gesichert, wenn Sie ein Klicken hören.Hinweis: Stellen Sie sicher, dass die Schnappverriegelung richtig sitzt und die Anschlüsse auf beiden Seiten exakt und fest angebracht sind.zeigt. Stecken Sie das Höhenleitwerk vorsichtig in die Öffnung des Seitenleitwerks bis ein klicken zu hören ist.Hinweis: Verbinden Sie die Servostecker im Rumpf.1. Schieben Sie das Verbindungsrohr in den Rumpf. Positionie-ren Sie nun das gesamte Heckleitwerk vorsichtig am Rumpf.2. Verbinden Sie die Höhen- und Seitenruderservostecker mit den entsprechenden Verlängerungskabeln im Rumpf.Consignes de sécurité et avertissementsEn tant qu’utilisateur de ce produit, vous êtes seul responsable de son utilisation, de manière à ne pas vous mettre en danger, et à ne pas mettre les autres en danger, et à ne pas endommager ce produit ou causer de dégâts à des tiers. Ce modèle est piloté par un signal radio qui peut être soumis à des interférences provenant de sources variées que vous ne contrôlez pas. Ces interférences peuvent causer une perte momentanée de contrôle, aussi est-il prudent de toujours garder une distance de sécurité dans toutes les directions, autour de votre modèle, cette marge vous aidant à éviter les collisions ou les blessures.Âge recommandé : Ce produit ne doit pas être utilisé par des enfants de moins de 14 ans. Ce n’est pas un jouet.• N’utilisez jamais votre modèle avec des piles faibles dans l’émetteur.• Utilisez toujours votre modèle dans un espace vaste, sans véhicules, sans circulation et sans personnes.• N’utilisez pas le modèle dans les rues, où vous pourriez occasionner des blessures ou des dégâts.• N‘utilisez jamais le modèle pour quelque raison que ce soit dans la rue ou dans des zones peuplées.• Suivez soigneusement les instructions et les conseils de ce manuel et ceux des équipements optionnels (chargeurs, accusrechargeables, etc.).• Tenez tous les produits chimiques, les petites pièces et tout composant électrique hors de portée des enfants.• L‘humidité peut causer des dégâts à l'électronique. Evitez d‘exposer à l‘eau les équipements non conçus spécialement à cet effet et spécialement protégés.• Ne léchez pas, et ne placez aucune partie du modèle dans votre bouche, car cela peut entraîner des blessures graves et même la mort.Avertissement concernant les accus Lithium Polymère (LiPo)Attention : Suivez toujours les instructions du fabricant pour utiliser les accus et vous en débarrasser. Un mauvais usage d'accus LiPo peut entraîner un incendie, des dégâts matériels ou des blessures graves.En manipulant, chargeant ou utilisant des accus LiPo, vous assumez tous les risques associés aux accus au Lithium.Si à n’importe quel moment, l’accu commence à gonfler, arrêtez immédiatement de l’utiliser !Charger ou décharger un accu gonflé peut entraîner un incendie.Stockez toujours les accus à température ambiante dans un espace sec pour augmenter la durée de vie de l’accu.Transportez ou stockez toujours les accus dans une plage de températures de 5 à 48 °C. Ne stockez pas les accusou le modèle dans une voiture ou directement à la chaleur du soleil. Un accu stocké dans une voiture chaude peutêtre endommagé et éventuellement prendre feu. N’utilisez jamais un chargeur pour accus NiMh. Ne pas charger avec un chargeur compatible LiPo peut entraîner un incendie, entraînant des blessures et des dégâts matériels.Ne déchargez jamais les éléments LiPo à moins de 3 V par élément.Ne laissez jamais une charge se faire sans surveillance.Ne chargez jamais un accu endommagé.Vous devez charger les accus LiPo uniquement avec un chargeur spécial LiPo. Lisez bien les instructions de votre chargeur avant usage. Quand vous chargez l’accu, vérifiez que l’accu est sur une surface ininflammable. Il est également conseillé de placer les accus LiPo dans un sac résistant au feu que vous trouverez facilement dans les magasins de modélisme ou sur les boutiques en ligne.Avant le montage, merci de contrôler le contenu du kit. Leschéma ci-dessous détaille le contenu du kit et lanumérotation. Si quelque élément est manquant ou défectueux, identifiez le nom ou le numéro de la pièce(reportez-vous à la liste des pièces de rechange page 18 de ce manuel), puis contactez votre magasin local ou contactez-nous : support@ .Contenu du kitIntroduction Contenu du kit Montage du modèle Mise en place de l'accu Diagramme de connexion Préparation du modèle au vol Montage des chapes Réglage des guignols et des palonniers de servos Centrage (C.G.) Avant de faire voler le modèle Pilotage du modèle Dépannage Liste de pièces de rechange Table des matières...........................................................21.......................................................21 ...............................................22 ............................................23........23 .............................. ..................................24 ...................25..........25...............................................25 ....................................26 ....................................... ..................................................26......................................................................27 (27)· ·····IntroductionSpécificitésMerci d'avoir acheté le FOX 3000 mm FMS. Avec son envergure impressionnante de trois mètres, le FOX est un des plus grands aéronefs RC en mousse produit au monde. Utilisant les dizaines d'années d'expérience de FMS dans la conception de modèles réduits, le Fox possède un profil d'aile ultra-efficace, ainsi qu'une motorisation brushless avec contrôleur 70 A procurant une puissance plus que suffisante pour réaliser des figures demandant beaucoup d'énergie.Fabriqué selon le nouveau concept FMS "Snap-together", le Fox se transporte et se monte facilement sur le terrain, sans besoin d'outils.Le Fox est équipé d'un moteur brushless Predator 4258, Kv 460,alimenté par un contrôleur 70 A et entraînant une hélice repliable 15 x 7,5". Cet ensemble couplé à un accu LiPo 6S donne au Fox 3000 mm des performances dans le plan vertical pratiquement illimitées, ce qui est très rare en matière de planeurs.De plus, les gouvernes sont pilotées par des servos de 23 g àfort couple, assurant une action précise et de la puissance pour les figures extrêmes.Boucles droites et inversées, renversements, tonneaux àfacettes et vol dos ne sont que quelques-unes des figures de voltige que le Fox 3000 mm peut réaliser. Le reste ne dépend que du pilote !Envergure : 3000 mm (118.11")Longueur hors tout : 1873 mm (73.73")Poids en ordre de vol : Environ 4700 g Format du moteur : Brushless 4258-KV460Charge alaire : 64.5 g/dm 2 (0.14oz/sq.in)Surface alaire : 74.4 dm 2 (1153.2 sq.in)Contrôleur brushless : 70 A Servos : 6 servos 23 grammesBatterie recommandée LiPo 6S 22.2V 5000 mAh 35CCaractéristiquesA : FuselageB : Trappe-Cabine E : Stabilisateur horizontal F : Jeu de clés d'aileC : Ensemble voilureD : Dérive 1. Grande envergure2. Puissant moteur 4258, contrôleur 70 A3. Servos 23 g à fort couple4. Assemblage par enclenchement (Snap-together) sans vis et sans colle5. Montage rapide (10 à 15 minutes)6. Démontage des ailes en 10 secondes, cellule facile àtransporter.7. Un accu LiPo 6S 5000 mAh permet des vols d'environ 30minutes.8. Volets fonctionnels 9. Hélice repliableF.E.A.B.D.C.本产品飞行由无线电遥控器控制,在飞行过程中可能会受到外界强信号源干扰而导致失控,甚至坠机。
JRXG8航模遥控器说明书

● 对于国外进口的产品等,如果使用了没有张贴上述 认证标签的无线电操控设备的话,将会违反电波法, 有可能会受到惩罚。
● 由 ( 财团法人 ) 日本无线电控制电波安全协会进行 安全使用无线电控制的普及教育。请使用张贴了记 载有该协会名称的认证标签的无线电操控设备。
与安全有关的标识与记号
本说明书中的下述标识,是表示错误使用时有可 能发生的危险的相关注意事项。 由于是涉及安全的重要内容,因此请务必遵守。
模型共通的功能
飞行模式ɾɾɾɾɾɾɾɾɾɾɾɾɾɾɾɾɾɾɾɾɾɾɾɾɾɾɾɾɾɾɾɾɾɾɾɾɾɾ
功能菜单的各项功能
双重转向率&指数 ʲ̧̙ˍ&91ʳʢ)&-*ɾ"$30ɾ(-*%ʣɾɾɾɾɾɾɾɾɾɾɾɾɾɾɾɾ 行程调节 ʲ53"7"%+ʳʢ)&-*ɾ"$30ɾ(-*%ʣɾɾɾɾɾɾɾɾɾɾɾɾɾɾɾɾ 辅助微调 ʲ46#53*.ʳʢ)&-*ɾ"$30ɾ(-*%ʣɾɾɾɾɾɾɾɾɾɾɾɾɾɾɾɾɾ 倒转开关 ʲ3&7&34&48ʳʢ)&-*ɾ"$30ɾ(-*%ʣɾɾɾɾɾɾɾɾɾɾɾɾɾɾɾ 伺服器速度 ʲ43741&&%ʳʢ)&-*ɾ"$30ɾ(-*%ʣɾɾɾɾɾɾɾɾɾɾɾɾɾɾɾɾ 油门曲线 ʲ5)30$637&ʳʢ)&-*ɾ"$30ʣɾɾɾɾɾɾɾɾɾɾɾɾɾɾɾɾɾɾɾɾ 螺距曲线 ʲ1*5$637&ʳʢ)&-*ʣɾɾɾɾɾɾɾɾɾɾɾɾɾɾɾɾɾɾɾɾɾɾɾɾɾɾɾɾ 尾翼曲线 ʲ5"*-$637&ʳʢ)&-*ʣɾɾɾɾɾɾɾɾɾɾɾɾɾɾɾɾɾɾɾɾɾɾɾɾɾɾɾ 陀螺仪灵敏度 ʲ(:304&/4ʳʢ)&-*ɾ"$30ʣɾɾɾɾɾɾɾɾɾɾɾɾɾɾɾɾɾɾɾɾɾ 调速器 ʲ(07&3/03ʳʢ)&-*ʣɾɾɾɾɾɾɾɾɾɾɾɾɾɾɾɾɾɾɾɾɾɾɾɾɾɾɾ 油门混控 ʲ.*9ˠ5)30ʳʢ)&-*ʣɾɾɾɾɾɾɾɾɾɾɾɾɾɾɾɾɾɾɾɾɾɾɾɾɾɾɾ 油门微调 ʲ5)3053*.ʳʢ)&-*ɾ"$30ʣɾɾɾɾɾɾɾɾɾɾɾɾɾɾɾɾɾɾɾɾɾ 油门保持 ʲ5)30)0-%ʳʢ)&-*ʣɾɾɾɾɾɾɾɾɾɾɾɾɾɾɾɾɾɾɾɾɾɾɾɾɾɾɾ 十字盘混控 ʲ48"4).*9ʳʢ)&-*ʣɾɾɾɾɾɾɾɾɾɾɾɾɾɾɾɾɾɾɾɾɾɾɾɾɾɾɾ 飞行模式延迟 ʲ'.%&-":ʳʢ)&-*ʣɾɾɾɾɾɾɾɾɾɾɾɾɾɾɾɾɾɾɾɾɾɾɾɾɾɾɾɾ 襟翼系统 ʲ'-"1ɹ4:4ʳʢ"$30ʣɾɾɾɾɾɾɾɾɾɾɾɾɾɾɾɾɾɾɾɾɾɾɾɾɾ 滚转特技 ʲ4/"130--ʳʢ"$30ʣ ɾɾɾɾɾɾɾɾɾɾɾɾɾɾɾɾɾɾɾɾɾɾɾɾɾ 副翼→襟翼混控 ʲ"*-&ˠ'-"1ʳʢ"$30ʣɾɾɾɾɾɾɾɾɾɾɾɾɾɾɾɾɾɾɾɾɾɾɾɾɾɾ
暴龙玩具遥控飞机k一821说明书

暴龙玩具遥控飞机k一821说明书一、遥控器各部位名称与安装说明1、将天线从遥控器上的小孔插入,轻轻按住并顺时针旋转,直到天线与天线座连接好为止,将拉杆天线拉长,飞机的遥控距离会更远。
2、以正确的方法给遥控器装上4节干电池,再装上电池盖,拧紧螺丝。
二、飞行前的环境。
1、请选择在室内宽敞处飞行,并请确认附近无障碍物、宠物及人,飞机的电源开关要至于关闭状态。
2、飞机飞行前请勿让飞机飞离视线,在国家有关部门发布无线电管制命令的期间、区域应按要求停止使用模型遥控。
飞行前请务必确认周围环境,禁止在机场半径5000米的区域内飞行。
勿让儿童单独玩耍,请在成人陪同下操作飞行。
室内请确认无其他使用相同频率的人在操作玩耍。
3.在温暖晴朗没风的天气飞行。
切勿在气温极端的天气飞行,切勿在温度过高的天气飞行,在过热和过冷的天气下飞行会影响飞行效果或损坏模型。
切勿在强风天气飞行,强风会对飞行造成局限或妨碍您对直升机飞行的控制,且在强风条件下,直升机极有可能会失踪或损坏。
三、安全防范模型发动后,请不要接触模型的高速旋转的部分(包括齿轮、主旋翼、尾翼等)他们能引起伤害。
四、动作微调说明1、慢慢升起油门摇杆,当直升机刚刚离开地面时,若直升机倾斜不同的方向,可使用微调修正动作。
(说明:电路板保护。
)当直升机在急剧生油门或飞机在飞行中与硬物相碰撞时,瞬间电流增大,超出接收板所承受的最大卡死电流而静入保护状态,无任何动作属正常现象,此时需重新按操作启动直升机。
在直升机电量不足时,直升机也会自动进入低电压保护状态,无任何动作属正常现象,此时需重新给电池充足电后,再继续飞行。
1、将充电器的电源插头插入指定电源座中,再将充电器与遥控装置配置的智能充电盒相连接,此时智能充电盒红色指示灯处于常亮状态,表示电源连接正常。
2、将飞机电池插入到智能充电盒的电池接口中,此时充电盒的绿色指示灯闪烁,表示正在充电中,充电1.5小时左右,绿色指示灯变为常亮,表示充电完成。
Futaba10C-10CH中文说明书(1)

2
目
简介.....................................5 支持与服务............................5 使用、出口和改装......................5 特殊标志的意义........................6 安全注意事项(操作前请务必阅读........6 对 10C 系统的简介.....................8 部件和技术特性.......................11 配件.................................12 发射机控制项和开关设置...............14 对镍镉电池进行充电...................18 操纵杆调整...........................19 调整显示屏的对比度...................19 改变模式.............................20 省电模式(只对 TM10 适用)............20 CP 卡的初始化和数据转换..............20 遥控设备的安装和范围检测.............21 飞行频率.............................26 发射机显示屏和按键...................27 警告和错误显示.......................28
滑翔机的功能菜单........................80 子目录...............................80 从基本的 4 通道滑翔机开始.............81 滑翔机的基础功能菜单.................83 模型类型(PARAMETER 子菜单).........83 电动机关闭 MOTOR CUT................84 滑翔机的高级功能菜单.................85 副翼/方向舵混控 AILE/RUDD............86 副翼,襟翼混控 AILE-FLAP(仅限于滑翔机 [2A+2F]).............................87 阻流板混控 SPOILER MIX................88 微调杆偏置 OFFSETs 附加飞行条件)......89 起飞延迟(仅限于滑翔机[1A+’F[)......90 翼型混控 CAMBER MIX.................90 翼型襟翼 CAMBER FLAP.................91 蝶式混控 BUTTERFLY...................92 通道 3 的功能选择(飞行条件/功能) ( CONDITION/FUNCTION) ...............93
遥控飞机新手入模全指南
遥控飞机新手入模全指南新手入模全指南我相信大多数男人或者说还不是男人的boy,初次进入这个论坛或者其它模型论坛,都被强烈的震撼了,原来心里一直蕴藏着的一个飞的梦想看起来实现并不难。
两个月前我就是如此。
我上班时一不小心来到这个论坛,心里那个激动啊简直就是无以言表,心里那是心急火燎的,恨不得马上就飞上天。
唉呀,我那童年的梦想啊!不过我得买设备啊,于是在论坛逛啊逛,需要什么设备?怎么尽快地做架飞机飞上天?然而越看越发晕。
什么是KV值?什么是2S、3S?啥叫8060桨?充电器怎么比电池都贵呢?以下文字只针对跟我一样的新新手,入魔不久的朋友。
不要一上来就在论坛问需要买些什么设备,KV值是越大越好呢,还是越小越好?老鸟们不是不愿回答,而是因为这些问题论坛中以前有很多贴子涉及到了,所以要学会潜水。
相信新手在买设备或做机前,看完这篇文章后会解答心中不少的疑问,也省去到处乱翻乱看,常常是看了这篇忘了那篇。
我也是新手,或许有很多问题表达不清楚,甚至于有错误,请大家指正。
一、遥控器二、锂聚合物电池三、飞机模型动力系统四、浆保护器五、设备的链接六、XXD30A电调七、电机电调链接方法八、模型英文名词注释九、电机,浆,电池,机型的关系十、如何制作遥控飞机模型十一、遥控直升机入门问答十二、给新手们的购机建议十三、亚拓450的组装/维修十四、帮新手扫盲,6通道直升机舵机连接方法设备篇飞机要上天,肯定需要不少的设备。
需要什么设备?必备的设备包括:发射机、接收(含晶体)、发动机(电动或者油动)、舵机、电调、电池,以上设备是缺一不可。
除了电子设备,还需要螺旋桨、舵角什么的,这里首先重点谈谈电子设备。
1、摇控设备航模用的遥控设备包括发射机,接收机和一对晶体。
发射的作用是发射信号,让我们在地面通过它可以遥控飞机飞行;接收机的作用则不言而喻,它是接收我们通过发射机发出的各种控制信号;晶体的作用是让发射和接收在同样的频率下工作,不至于与其它发射接收冲突。
2.4G遥控器使用说明

遥控器使用说明2012-05-15 11:56:08| 分类:默认分类| 标签:遥控器舵机航模电机|字号大中小订阅一.接收机安装:(建议在对完码后再安装到被控模型上)1.接收机尽可能远离发动机、电机、电调、电池或其它金属部件;2.接收机天线不被金属、碳纤维材料或其它导电屏蔽材料遮挡或覆盖,天线请勿弯折成90度指向。
3.在选好安装位置后,将接收机固定或绑扎在位置上,绑扎器材请勿使用金属材质或内含金属材质或有导电能力的材料。
4.将各被控设备及部件接入相应的通道口:注意3P信号线的方向必须正确。
二.配对使用说明1.初次使用时,请将遥控器的油门打在最低油门位置。
2.遥控器在使用时请将发射天线指向模型外部。
3.将接收机接上电源,并按接收机上的配件开关等待蓝灯闪烁;然后开遥控器的电源,接收机上的蓝灯由闪烁转为常亮了。
(如果对码不成功,请重复本步骤)。
4.接收机一次只能配对一个遥控器,重新配对会使接收机上一次的配对的遥控器失效。
5.若需要将已完成配对设置的接收机重新配对到其他的遥控器模组,则重复()所说明的操作步骤。
6.遥控器可以配对多个接收机,配对下一个接收时,遥控器需断电重开,然后再重复()所说明的操作步骤。
7.完成配对,你的遥控系统就可以正式投入使用。
每次使用时无需再进行配对,开机即用。
三. 安全及操作注意事项u 本遥控系统仅为民用遥控模型设计、制造,请确保该无线电控制设备不会用于载人飞行器及其它载人机器上。
u 无线电波在频段是以近似直线的模式传播,使用时请确保遥控器发射天线和被控制模型之间无遮挡,即保持可视。
为保证有效的控制,发射天线应朝向被控制模型,并确保接收机和发射机不被导电性质材料所遮盖。
u 遥控模型运动在世界各地的管理要求也不尽一致,因此,使用前请咨询当地管理机构,确保符合当地政府的相关法律法规,并在确保安全使用的情况下操作您的遥控模型。
u 本模组系统是遥控模型系统的一部分,装配和使用遥控模型还需要其它功能部件,请按照各设备部件的安装、操作规程要求严格执行。
FC-2009电动遥控飞机使用说明书
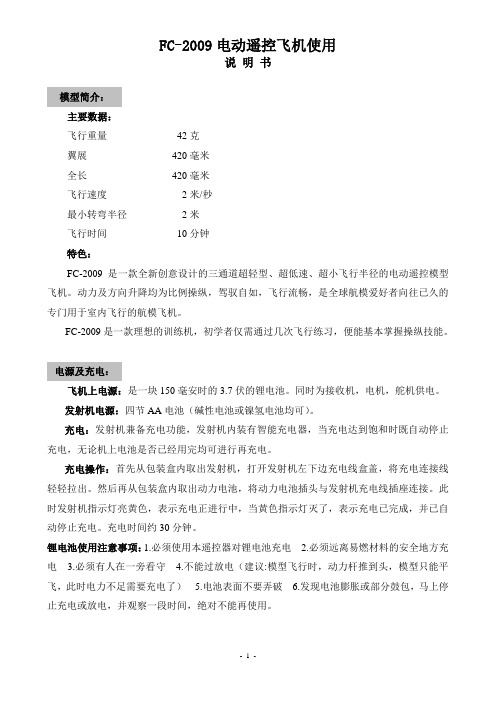
FC-2009电动遥控飞机使用说明书模型简介:主要数据:飞行重量42克翼展420毫米全长420毫米飞行速度2米/秒最小转弯半径2米飞行时间10分钟特色:FC-2009是一款全新创意设计的三通道超轻型、超低速、超小飞行半径的电动遥控模型飞机。
动力及方向升降均为比例操纵,驾驭自如,飞行流畅,是全球航模爱好者向往已久的专门用于室内飞行的航模飞机。
FC-2009是一款理想的训练机,初学者仅需通过几次飞行练习,便能基本掌握操纵技能。
电源及充电:飞机上电源:是一块150毫安时的3.7伏的锂电池。
同时为接收机,电机,舵机供电。
发射机电源:四节AA电池(碱性电池或镍氢电池均可)。
充电:发射机兼备充电功能,发射机内装有智能充电器,当充电达到饱和时既自动停止充电,无论机上电池是否已经用完均可进行再充电。
充电操作:首先从包装盒内取出发射机,打开发射机左下边充电线盒盖,将充电连接线轻轻拉出。
然后再从包装盒内取出动力电池,将动力电池插头与发射机充电线插座连接。
此时发射机指示灯亮黄色,表示充电正进行中,当黄色指示灯灭了,表示充电已完成,并已自动停止充电。
充电时间约30分钟。
锂电池使用注意事项:1.必须使用本遥控器对锂电池充电 2.必须远离易燃材料的安全地方充电 3.必须有人在一旁看守 4.不能过放电(建议:模型飞行时,动力杆推到头,模型只能平飞,此时电力不足需要充电了) 5.电池表面不要弄破 6.发现电池膨胀或部分鼓包,马上停止充电或放电,并观察一段时间,绝对不能再使用。
飞行提示:●初学者宜选择比较开阔,室内家具杂物较少的厅室进行试飞。
(宜大于30平方米的房间,再大些更好)。
●准备飞行首先应完成充电(注意:每次飞行前必须先进行充电)。
然后取出包装盒内的起落架,将起落架按装在机身的底部(底部有起落架按装孔)。
最后将发射机开关拨到ON(发射机红色指示灯亮):打开飞机上电池盒盖,轻轻的取出接插件,连接电池,将电池放入盒中,盖上盖子。
FUTABA10C航模遥控器简体中文使用说明
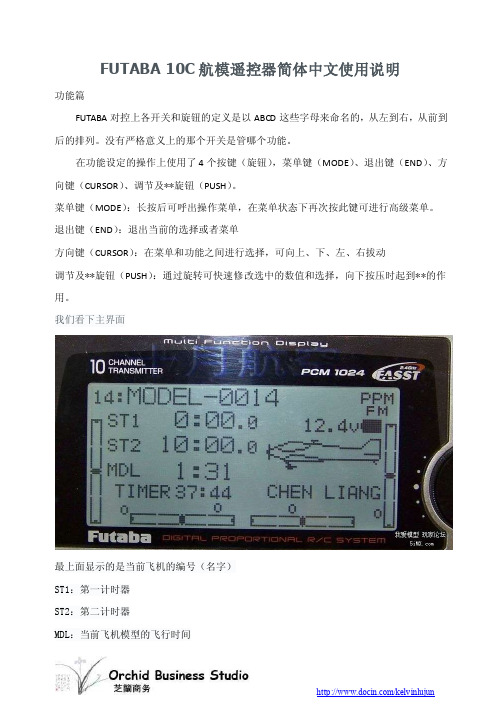
FUTABA 10C航模遥控器简体中文使用说明功能篇FUTABA对控上各开关和旋钮的定义是以ABCD这些字母来命名的,从左到右,从前到后的排列。
没有严格意义上的那个开关是管哪个功能。
在功能设定的操作上使用了4个按键(旋钮),菜单键(MODE)、退出键(END)、方向键(CURSOR)、调节及**旋钮(PUSH)。
菜单键(MODE):长按后可呼出操作菜单,在菜单状态下再次按此键可进行高级菜单。
退出键(END):退出当前的选择或者菜单方向键(CURSOR):在菜单和功能之间进行选择,可向上、下、左、右拔动调节及**旋钮(PUSH):通过旋转可快速修改选中的数值和选择,向下按压时起到**的作用。
我们看下主界面最上面显示的是当前飞机的编号(名字)ST1:第一计时器ST2:第二计时器MDL:当前飞机模型的飞行时间TIMER:开机总时间以上各时间都可以在主界面通过“方向键”选择后长按“PUSH”键来进行归零清除!在主界面的右下角可设定使用者的名字如果不进行设定的话就是默认的FUTABA字样。
右主界面的右上角显示的是当前信号发射的制式“PPM”或者是“PCM”,下方还有电池的容量。
接下来将详细介绍每个功能的使用,先从固定翼开始介绍。
普通功能菜单介绍我们先**主菜单,开机后长按“MODE”会有如下界面:如下图使用“CURSOR”键进行选择并向下翻动可**普通菜单的第二页,如图:我们将普通菜单下的各功能分列并解释一下:MODEL:模型选择/数据复制/模型命名D/R,EXP:大小舵及EXP曲线END POINT:舵机行程SUB-TRIM:舵机微调(电子中立点设定)REVERSE:正反舵TRIM:微调设定及微调清除THROTTLE CUT:熄火开关设置IDEL-DOWN:油门低速混控F/S:失控保护(在PPM模式下没有此选项)AUX-CH:通道自定义PARAMETER:参数设置TIMER:计时器TRAINER:教练功能LOGIC SW:逻辑开关SERVO:通道状态显示/测试固定翼普通功能分解MODEL:模型选择/数据复制/模型命名此项有三个功能分别是:模型选择(10C在不插扩展卡的情况下可记忆15个模型数据)、模型间的数据复制、对记忆模型的命名模型选择见下图使用“CURSOR”键移动到模型数据的编号上,如上图“14”转动“PUSH”进行选择会出现下图要求长按“PUSH”的提示。
航模遥控器说明书

航模遥控器说明书篇一:MC6遥控器说明书USER MANUAL6 Channel Transmitter(6通发射机)Channel 5(5通道)Channel 6(6通道)FHSSRudder Trim(方向微调)Throttle Trim(油门微调)Elevator Trim(升降微调)V-tail Elevon Mix OnV-tail Elevon Mix Off混控开关V-tail On( V尾混控)Aileron Trim(副翼微调)On/Off switch 电源开关Switches in upper positionReverses direction(通道反向) of channels1-4 Elevon Off(三角翼混控)Switches in lower positionNormal direction(通道正向) of channels 1-4(发射机和接收机需绑定。
如果工厂没有绑定好发射机和接收机或需买第二个接收机,请按下面的步骤操作)一、接收机的操作描述1、跟接收机绑定连接2、接收机通电,接上对频线。
接收机上的绿灯闪3、拿起发射机,在打开发射机开关前,确保油门微调在最低位置,其他微调在中间位置4、保持绑定开关在上面的位置,现在打开发射机开关5、(发射机绿灯开始闪,然后接收机的灯停止闪动)6、断开发射机上的绑定键)7、移动接收机上的绑定开关,接收机上的绿灯现在会亮起来,就代表已经绑定好二、发射机的操作描述1、一通道副翼,控制机体的横向动作,比如翻滚之类的,当副翼横向机动出现反方向的时候,可以调节调节遥控器1-4通道正反开关的第一通道,来实现反方向的纠正,副翼微调当机体横向偏航的时候,可以调节副翼微调来修正。
2、二通道升降,实现飞机的俯仰、爬升与下降,当爬升与下降的幅度较小,或者暂无无反应可以调节升降微调,当爬升与升降出现相反的反向,可以调节二通道正反开关来实现修正3、三通道油门,控制机体的升降。
AURORA 9CH 遥控器说明书中英文对照

7........What's New? 新特点 8........ Product Support 产品支持 9........ System Component Specifications 系统组件规格 9......... Glossary of Terms 术语表 10 Icon Identification 图标识别 11 Safety Information 安全须知
rudailrudderaileronmix方向舵副翼混控97aildiffailerondifferentialfeature副翼差动功能98ailflpaileronflapmix副翼襟翼混控99cambmixwingtrailingedgemix机翼后缘混控100flpconflapcontrolmix襟翼控制混控101vtailvtailmixfeature垂尾混控功能102ailevatrsplitelevatoraileroninclusionmix分体升降舵和副翼融合混控103elevonelevonflyingwingmix升降舵补助翼或飞翼混控104fuelmixfuelmixturecontroladjustment燃料混合控制调整105throcutthrottlecutposition油门截止位置106tcurvethrottlecurve油门曲线107idledownthrottleidledownposition油门idledown怠速下降位置108bflybutterflycrowmix蝴蝶或乌鸦混控109snaprollsnaprollfunctionacroonly快滚功能仅固定翼112motorglidermotorcontrolfeatureglidonly滑翔机电机控制功能仅滑翔机113launchlaunchmixglidonly发射混控仅滑翔机modelmenuhelispecificfunctions116
A3 Super 4 中文使用说明书

4中文使用说明书修订:2023-06-14感谢您购买和使用我们的产品。
A3 Super 4是一款专门为遥控固定翼模型飞机设计的高性能、功能强大的六轴陀螺仪和平衡仪产品。
为了让您更好地了解和使用本产品和安全飞行,请认真阅读本说明书并按说明书的要求进行相关设置。
注意事项遥控飞机模型不是玩具!螺旋桨高速旋转带来的潜在风险相当高,它们可能会导致严重的伤害,一切的使用要符合并遵守共同的安全规则和相关法规。
我们建议您在第一次使用我们的陀螺仪进行飞行时,寻求具有丰富飞行经验的玩家的指导和帮助!陀螺仪在通电后需要进行精确的陀螺仪校准,所以,在接通飞机电源后,请保持飞机静止,等待蓝灯闪烁若干秒完成校准后,才能开始飞行,如果在这个阶段陀螺仪检测到有轻微的移动,蓝灯会一直保持常亮,直至飞机不再移动才重新开始校准过程,尽管如此,开机初始化阶段只需要保持静止即可,并不需要将飞机水平放置;陀螺仪在通电后还需要进行摇杆中位校准,所以,通电前,先把发射机的所有摇杆放在中间位置,油门摇杆放在最低,打开发射机电源,然后再接通飞机电源,在初始化过程中不要移动任何摇杆直至初始化完成。
摇杆校准只针对副翼(副翼2)、升降(升降2)和方向通道;安装完成后请务必逐一检查副翼、升降、方向三个通道的陀螺仪修正方向是否正确!并且养成在每次起飞前都检查确认陀螺仪方向的习惯,错误的陀螺仪方向将会导致失控甚至坠机!安装陀螺仪后,由于舵机的修正动作明显增加,将导致工作电流增大,请务必确保UBEC或电调内置BEC能够提供足够的输出电流,否则可能造成电压不稳定,对飞行带来安全隐患。
为了获得更加稳定的电压,建议将配送的大电容插在陀螺仪或接收机的任意一个空闲的接口上。
安装方法注意事项• 切记不要用热熔胶或尼龙扎带等方式将陀螺仪硬性地安装在机身上!• 一次安装使用1块双面胶即可,太厚或太软的双面胶都有可能影响陀螺仪的性能;•陀螺仪是敏感部件,安装时应尽量在陀螺仪周围预留足够的空间,与其他电子设备或连接线保持足够的距离,避免挤压。
驰远电子(HISKY)航模遥控器H-6Q中英文说明书
1.3 Pre-flight checklist
(1) Ensure that the battery packs on both the transmitter and receiver/aircraft are fully charged prior to flight (2) Ensure that the throttle stick and the throttle trim are at their lowest positions prior to operation. (3) The transmitter must be turned on prior to powering on the aircraft .To end your flight, unplug the aircraft battery before turning the transmitter off. An incorrect order of connection or disconnection may cause the loss of control of your aircraft.
2.3 XY7000S receiver specifications
(1) Channels:7 (2) Frequency: 2.4GHz ISM frequency range (3) Modulation: PCM (4) Spread spectrum mode: FHSS (5) Operation voltage: 4.5-5.5V (6) Operation current: ≤30mA (7) Net weight: 11.5g (8) Product size: 41mm x 28mm x 14mm
H-6Q Instruction Manual 2.0 Features and specifications
SM2000航模遥控飞行模拟器,修改左右手油门

SM2000改左右手攻略
要点及注意事项:
1.改手柄:只要弹簧、摇臂和簧片换位,切勿将整个摇杆组件,做整体换位;禁止动电路。
2.设软件:运行软件后,记得更改“遥控器通道设置”。
所需工具:尖嘴镊子一把、小十字螺丝刀一把。
(工具)
熟练工费时:约2分钟每台。
改动手柄:
1.卸掉背面螺丝,掀开背板。
(簧片)
背板卸下后可以看见,左右摇杆组件完全相同,区别仅在弹簧与簧片的安装位置不同。
2.取下弹簧,再取下摇臂。
先用镊子夹住弹簧的弯钩子,提起弹簧,随后取下摇臂。
3.在另一侧相同位置挂上弹簧,再装好摇臂。
镊子夹住弹簧,挂住底端弯钩子,再将摇臂的根部与弹簧相挂。
再将摇臂的尖端钩子钩住塑料扣。
4.合上手柄后盖,拧上螺丝,塞入塑料堵头。
软件设置:
以PhoenixRC为例:进入“系统设置”-“遥控器通道设置”遥控器设置菜单里,设置为“SM2000 L<>R”的配置;如果该配置无法满足您的需求,您也可以点击右侧的“编辑配置文件”自行调整。
其他软件与此类似,均须修改通道设置。
TOPBAND ESC系列航模电调说明书_S02_60A80A

120感谢您选用TOPBAND ESC系列航模电调产品。
本产品使用不当可能造成损坏和人身伤害,使用前务必仔细阅读用户手册,并严格遵守操作规程。
本公司不承担由于使用此产品所引起的任何直接或间接责任。
同时,本公司有权在不经通知的情况下对产品外观、设计、性能和使用条件做进一步的变更。
一、功能特点:●采用高性能的微处理器,带来良好的电机兼容性和高效驱动能力●具有正常启动/软启动/超软启动3种启动模式,兼容固定翼飞机及直升机●可以设置油门范围,以兼容市面各种遥控接收设备●具备平滑、细腻的调速性能和优良的油门线性●最高支持转速:240,000转(2磁极),80,000转(6磁极),40,000转(12磁极)●具有低压保护;过温保护;油门信号丢失保护;系统自检功能●启动速度可设,可针对不同电机进行设定●起动动力可选择,以适应不同的起动要求●内置BEC功能●电调的参数可通过编程卡设置,方便、直观二、产品规格(表一)规格型号输入电压连续电流瞬态电流BEC输出编程卡支持重量(g)尺寸(mm)L*W*H60A ESC-60A 6~25V 60A 90A 5V/3A NO 7180A ESC-80A 6~25V 80A 120A 5V/3A NO 73三、接线图如上图所示,请按下列顺序连接ESC:1、将1所示的三芯插头插入接收机;2、将2所示的红、蓝、黑三根线与直流无刷电机连接好;3、将3所示的的黑线和电池包负极、红线与电池包正极连接好。
完成上述步骤后,即可听到音乐提示声,表示上电正常,会发出n次“滴”的短鸣声,表明电池自检到有n节电池,会发出1次“滴”的长鸣声,表明系统连接正常,进入待机工作状态。
四、首次使用初始最大油门位置为18500us,初始最小油门位置为1200us。
为了获得最佳的使用效果,请您在首次使用电调或更换遥控器后,进行油门行程的学习设定,步骤如下:1、按接线图连接除电池包外的接线;2、将油门扳到最大,打开发射机电源,连接电调电池包,上电,即可听到音乐提示声,之后会听到2次“滴”的短鸣声,记录油门最大行程;3、迅速将油门扳到最小,等待记录油门最小行程;4、会发出n次“滴”的短鸣声,表明电池自检到有n节电池,会发出1次“滴”的长鸣声,表明系统连接正常,进入待机工作状态。
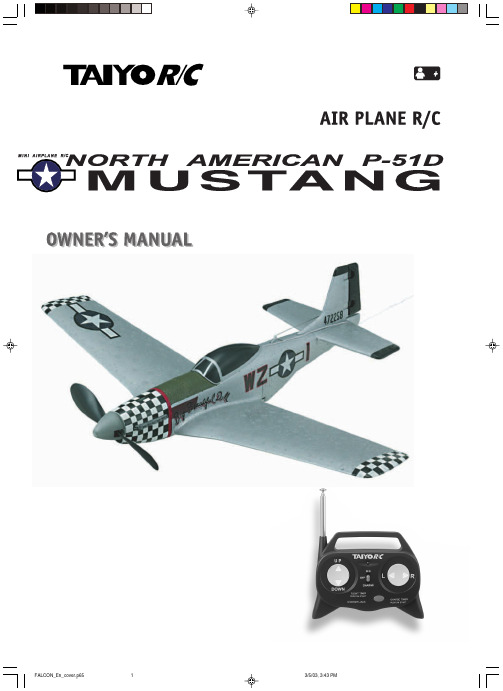
FALCON 遥控飞机说明书
8BEFORE USING THE PRODUCTThank you for purchasing this TAIYO product.Please read this owner’s manual thoroughly to get the most usefrom the plane and to learn how to operate it safely.Parents should read the following.If the 4.8V Ni-MH battery pack is used incorrectly, it may overheat, explode, or start a fire. Pay attention to the following items.•Be sure to follow the charging instructions in this manual.•Do not try to charge any battery pack other than the one sup-plied or an authorized 4.8V Ni-MH battery pack replacement.•After playing with the airplane, be sure to turn off the switch and remove the 4.8V Ni-MH battery pack.•If the battery pack is short-circuited, a large current will flow and this is a dangerous situation. Do not ever short-circuit the battery pack.•Never drop the battery pack into water, throw it in a fire or disassemble it.•Do not use, charge, or store the battery pack near a fire or in any place exposed to high temperatures or high humidity.•When using the 4.8V Ni-MH battery pack for the first time, be sure to charge it. Even if the 4.8V Ni-MH battery pack is not used, it will self-discharge over time. If the battery pack has not been used for about six months, be sure to charge the battery pack before using the product. Once the battery pack is charged, make sure to use it until it is completely dead be-fore recharging it.•Even if the battery pack has been charged correctly, if the fly-ing time is noticeably reduced, the 4.8V Ni-MH battery pack may have reached the limit of its useful life. Replace it with a new battery pack, and check the plane’s operation. (200 to 300 recharges should be possible.) If the external package of the 4.8V Ni-MH battery pack is damaged, do not use it.•The 4.8V Ni-MH battery pack and charger will become slightly warm during charging. This is not a problem. If the 4.8V Ni-MH battery pack is still warm after use, do not recharge it.•Do not recharge the battery pack within reach of infants or children.•Do not use, recharge, or leave the battery pack near a heater or in any place exposed to strong direct sunlight.•When you are not using the plane, remove the 4.8V Ni-MH battery packs from the airplane and the transmitter (charger).•Never use the transmitter (charger) as a DC power source for any other purpose. Never recharge the battery pack using any other charger.•Do not recharge the 4.8V Ni-MH battery pack once it is al-ready recharged. The battery pack may become very warm. Precautions when playing with the airplane:•The airplane should only be used in a wide-open area, under the supervision of an adult. Children should be at least 10 years old to operate the airplane.•Play with the airplane in a wide-open, safe location with no obstacles nearby.•Do not launch the airplane toward another person. Someone may be injured.•Never store the airplane in any place exposed to high tem-peratures, such as in a closed car in the summer. Do not put it in the front of a heater which blows hot air.•Do not fly the airplane on windy days or when there is lightning.•Never fly the airplane on the road, a railroad, near power lines, or any place where there are lots of people. Do not fly it in narrow or constricted areas.•If the airplane gets caught in a tree, on a building or in power lines, it is dangerous. Do not try to recover it. Notify the owner (if the airplane gets caught in power lines, contact the electric power company).•Warning ! : Do not touch the rotating propellers. Before re-placing the battery, turn off the slide switch.•If the airplane is broken or damaged, do not use it.•Do not use a combination of new and old batteries or different kinds of batteries in the transmitter (charger).Other precautions:•Never put any parts in the mouth. There is a danger of suffocation.•Sometimes the 4.8V Ni-MH battery pack may become warm. Pay special attention to this after using the airplane.•Do not point the transmitter (charger) antenna at people or animals. It may cause an accident. Do not bend the antenna.•Do not play with the transmitter roughly, hit it or swing it around.•Do not look steadily at the flashing LED on the transmitter. You may feel sick.Before flying the airplane, be sure to read the following.1.Airplane R/CThe airplane is different from driving an RC car. A safe and pleasant radio controlled flight may become dangerous if an inexperienced person flies the airplane or because of radio interference. Read this section, “Before flying the airplane, be sure to read the following”, and the “Owner’s manual” thor-oughly. Follow the rules for a safe and pleasant experience.2.Radio wavesThis airplane uses the frequency specified by the Japan Radio Wave Safety Association. The frequency used by this airplane is marked on the box. A ribbon is included that should be attached to the tip of the transmitter antenna. The ribbon color indicates the frequency used by the transmitter. When you play with the airplane, be sure to attach this ribbon to the antenna. The frequency used by this airplane cannot be changed by changing crystal. There is a likelihood that someone nearby may be using the same frequency. Since the radio waves can reach 200 m or more, you can interfere with each other and lose control of the airplane. If this happens, it is a dangerous situation. Before playing with the airplane, be sure to check the RC operation. To check, turn on the airplane switch. If the propellers start rotating without using the controls on the trans-mitter, there is someone nearby using the same frequency. If you see someone else with the same color ribbon as you have on your transmitter, he/she is using the same frequency as you. In this case, play with the plane at another location, at a differ-ent time, or talk to the other person and work out a method fortaking turns.2CONTENTSBEFORE USING THE PRODUCT (2)CONTENTS (3)PRODUCT DETAILS (4)TECHNICAL DATA (SPECIFICATIONS) (4)NAMES OF THE PARTS (5)Airplane body (assembled condition) (5)Transmitter (also used as a charger) (5)HOW TO ASSEMBLE THE AIRPLANE (6)I How to Install and Remove the Antenna (6)II How to Attach the Wind Check Ribbon (Frequency Indicator Ribbon) (6)III How to Install the Batteries (6)IV How to Charge the Specialized 4.8V Ni-MH Battery Pack (7)V How to Put the Battery Pack into the Airplane (8)WHERE TO FLY THE AIRPLANE (8)First, look for a good place for flying with the following features (8)Do not play with the airplane in the conditions shown below (9)HOW TO FLY THE AIRPLANE (9)Transmitter Functions (10)Lesson 1 :For a Person Flying the Airplane for the First Time (11)How to launch the airplane from your hand (11)Lesson 2 :After you have practiced launching the airplane as described in Lesson 1, try actually flying the plane (12)How to make a successful landing (14)Airplane Maintenance (Repairs)...........................................................................................................................143NAMES OF THE PARTS Airplane body (assembled condition)Transmitter (also used as a charger)56HOW TO ASSEMBLE THE AIRPLANE I How to Install and Remove the Antenna (1)To install the antenna, screw it into the transmitter body. To reduce the antenna length, push in the lowest segment first, then the next, etc. This will prevent the antenna from being broken.II How to Attach the Wind Check Ribbon (Frequency Indicator Ribbon)(1)Put the hook on the ribbon onto the tip of the antenna.III How to Install the Batteries •This transmitter (charger) uses eight AA size alkaline batteries (included).Rotate the catches on the upper left and right to unlock the cover. Then, remove the cover from the battery box.To replace the battery box cover, reverse the procedure.When the batteries in the transmitter (charger) are low, the LED power indicator lamp will grow dim. The distance that the transmitter can transmit will also be reduced, and the 4.8V Ni-MH battery pack will not be properly charged. Replace the LR6 as soon as there is any sign that they are dying.IV How to Charge the Specialized 4.8V Ni-MH Battery Pack(1)Plug the specialized 4.8V Ni-MH battery pack connector into the connector jack on the lower part of the transmitter.(2)Move the power switch to the [CHARGE] side, and press the [CHARGE TIMER] button. A beep will be heard. The LED powerindicator lamp will flash to tell you that charging has started.(3)When charging is complete, two beeps will be heard. Then, the LED power indicator lamp will light, to tell you that charging iscomplete. Unplug the battery pack connector from the transmitter body.78V How to Put the Battery Pack into the Airplane (1)Open the battery pack compartment cover.(2)Plug the battery pack connector into the connector in the battery pack compartment. Then, insert the battery pack into the compartment, and close the cover.WHERE TO FL Y THE AIRPLANEFirst, look for a good place for flying with the following features.Do not play with the airplane in the conditions shown below.HOW TO FL Y THE AIRPLANE(1)Turn on the switch on the airplane.(2)Turn on the switch on the transmitter.(3)Extend the transmitter antenna all the way out.(4)Check the direction and strength of the wind with the ribbon.When you turn on the switch on the airplane, the propellers will turn for a moment. Therefore, be sure to turn on the switch while standing behind the airplane. Even though the reception antenna may seem too long, do not cut it or coil it up.Even if the wind is weak on the ground, it may be stronger in the sky. The airplane may be carried away by strong winds in the sky. Therefore, fly the airplane in a place where there are no downwind obstacles (streams, swamps, etc.) to retrieving theWind* When the transmitter ribbon is flying out to the side, the wind is too strong. Stop flying the airplane.! CAUTION*Make sure that no one else is using the same frequency as you.*Fly the airplane in a wide-open place. Make sure that there are not any buildings or trees near you and that people are not standing near you.*Before flying the airplane, check the area around you.*While the airplane is flying, do not take your eyes off of it.*Any child who is not experienced at flying the airplane should have an adult present to help.Any place surrounded by roads, neara train line, high-voltage lines, etc.Any place where there are lots ofpeople or where houses are clusteredclose together.Strong windAny place wherethere aredowndraftsTurbulence9Transmitter Functions10Stay at least 150 m away from high buildings or trees.WindLaunching theairplane fromyour handCenter of an open space! CAUTIONIf you throw the airplane too strongly, it will climb too fast, stall and then crash. If you throw it too weakly, it will lose altitude and crash.High speedLesson 1For a Person Flying the Airplane for the First TimeFirst of all, repeat the practice shown in the following drawing, until you get used to the movements the airplane will make.(1)Point the airplane into the wind. Hold down the [UP] button on the transmitter to make the motor run at high speed.(2)While maintaining high speed, throw the plane straight forward. When the airplane has climbed to about 5 m, release the [UP] buttonto change to medium speed. Fly the plane in level flight. Then, press the [DOWN] button once to reduce the speed (to low) and the airplane will descend.(3)When the airplane has descended to about 2 m above the ground, press the [DOWN] button once again to stop the propellers. Theairplane will land.(4)If the airplane is turning to the right, press the [L] button to turn it to the left. If the airplane is turning to the left, press the [R] buttonto turn it to the right. Aim the airplane into the wind while landing and try to keep it flying straight.How to launch the airplane from your handRun into the wind and throw the airplane straight forward into the wind.(1)Hold the airplane near its center of gravity, over your head.(2)Use the [UP] button on the transmitter to run the motor at high speed, and keep the airplane horizontal. Run into the wind and when youfeel the airplane becoming light, release it gently.1112Lesson 2After you have practiced launching the airplane as described in Lesson 1, try actually flying the plane.(1)Launch the airplane straight into the wind and make it climb. When the airplane has climbed to the desired level, release the [UP]button to return to medium speed. The airplane will then fly level.(2)When the plane is high enough, try to start turning the airplane slowly.(3)To prevent the airplane being carried away by the wind, try to fly it into the wind, relative to your position.(4)When you hear two beeps from the flight timer, start to prepare for a landing right away.When a turning operation is performed,how does the airplane behave?The airplane will tilt and it will lose some altitude.*When a turn is complete, push the button to turn in the opposite direction. This will allow theairplane to stay level and fly stably.!CAUTIONBefore you become familiar with flying the airplane, do not try and make it climb at a steep angle. Be careful not to use too much rudder.*Press the button repeatedly.!CAUTIONDo not hold down the [R or L] button. Press either onerepeatedly, at short intervals.Wind!CAUTIONIf the battery pack is not charged properly,the airplane may not climb high enough.High speedHigh speedMedium speedStallCrash!CAUTIONIf you hold the [UP] button down too long,to keep the speed high, the nose of the airplane may go up and it will stall. This may cause the airplane to crash.13your turn well before the plane reaches the edge of the flying area.A cross wind(When starting a turn with a tail wind)Since the airplane response to a turn command using the [R or L] buttons is slow, a big turn will occur.Look at the movement of the airplane carefully.Correct the rudder position, as necessary, to al-low the airplane to fly straight into the wind. If the speed is increased too much, the plane will gain altitude too fast and stall.!CAUTIONBe careful not to allow the airplane to fly so far or high that you lose sight of it.Wind(4)Wind directionIf the altitude is too low,point the airplane back downwind to land it.4.When the plane is about 1 m above the ground, increase the speed a little, and lift the nose of the airplane a little, to make the belly level with the ground.5.Let the airplane coast a distance of several meters. When it touches the ground, the landing is complete.2.When the plane is low enough, turn the airplane and fly it downwind.1.While flying the airplane straight into the wind, gradually decrease the altitude (This is to prevent the airplane from being carried away by the wind).3.Then, turn the airplane once again and fly it into the wind. This should mean that the airplane is making anapproach and is ready to land.14H ow to make a successful landing(5) After landing the airplane, turn off the airplane switch and the transmitter (charger) switch, in that order.(6) Remove the battery pack from the airplane, and unplug the connector.Airplane Maintenance (Repairs)*If mud enter into the airplane or stuck to it near the tail assembly, the center of gravity of the airplane may change. Therefore, be sure to clean the plane as needed.*If the airplane is badly damaged, it may become unbalanced and cannot fly properly. Please have it repaired by customer service. (For more details, read the "About after-sales service " section.)*Daily maintenance extends the life of the airplane. If grass or mud is stuck on the airplane, be sure to remove it all. Check each section of the plane for looseness.*Since the airplane is made of EPP material that is difficult to break and is very flexible, some paints may peel off easily. Please note this possibility.*When you are through flying the airplane, be sure to col-lapse the transmitter antenna.Landing is completeSpeed up and keep the airplane level.Stop the propellers. Keep adjusting the left-and-right tilt of the airplane while it descends.1 mStop*Although the airplane may seem difficult to control the airplane at first, do not give up. Read the manual carefully and practice.(6)Power switchesA 408-EnglishDirection to Change the Propeller1. Pull the propeller cap while widening on left and right side.2. Take off nut by using pliers (Turn to right side), than take off washer. At last take the propeller off.3. Please be careful installing propeller, flat portion of the propeller is to face front of the airplane. Please refer to direction #1 and #2 for assembly. •@Other Maintenance* If the body of the airplane is broken, please use glue for "Styrofoam."* If the rudder hinge comes off, please use very thin double-sided tape to repair.* If the vertical rudder hinge is broken or lost, please use clear film from the package. Cut clear film into 8mmx18mm and use it to repair.* If the rudder horn comes off from the shock of landing or other, please use high viscosity type of glue to repair.Precautions, when Carrying Airplane* Do not carry on vertical tail, may come off.* Do not carry on main wing or horizontal tail, may change the shape of the wing. * Turn off the power switch. Propeller may spin.* Please carry on body.Note- The manufacturer is not responsible for any radio or TV interference caused by unauthorized modifications to this equipment. Such modifications could void the user's authority to operate the equipment.15。
OMPHOBBY M4 遥控直升机说明书

Thank you for choosing OMPHOBBY products.The M4 is the latest technology in rotary wing RC models, designed in Germany by Jonas Wackershauser. Please read this assembly manual carefully before assembling and flying your new M4 helicopter. We recommend that youkeep this manual for future reference.INSTRUCTION MANUAL revision 1遥控模型飞机、直升机属于高危险性商品,飞行时务必远离人群,人为组装不当或机件损坏,电子控制设备不良,以及操控上的不熟悉、都有可能导致飞行失控损伤等不可预期的意外,请飞行者务必注意飞行安全,并需了解自负疏忽所造成的任何意外之责任。
Fly only in safe areas, at a safe distance from other people. Do not operate R/C aircraft within the vicinity of homes or crowds of people. R/C aircraft may suffer accidents, failures,and crashes due to a variety of reasons including, but not limited to: Lack of maintenance, pilot error and radio interference. Pilots are responsible for their actions, as well as damage or injury occurring during the operation of their R/C aircraft models.SAFETY NOTES 安全注意事项模型商品属于需高操作技术且为消耗性之商品,如经拆装使用后,会造成不等情况零件损耗,任何使用情况所造成的商品不良或不满意,将无发于保固条件内更换新品或者退货,如遇有使用操作维修问题,本公司全球分公司或者代理商将提供技术指导,特价零件供应服务。
乐迪AT9 2.4G 9通道遥控器中文说明书pdf
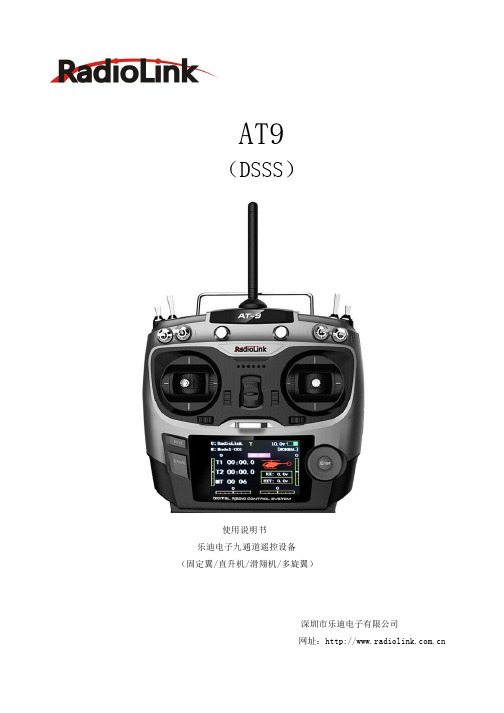
(DSSS)
使用说明书 乐迪电子九通道遥控设备 (固定翼/直升机/滑翔机/多旋翼)
深圳市乐迪电子有限公司 网址:
简介
感谢您购买深圳市乐迪电子有限公司生产的专业航模设备九通遥控器 AT9。AT9是迄今为止功能最完整的遥控设备,它 可遥控直升机、固定翼、滑翔机、多旋翼四大类所有机型的飞行器。通信系统采用抗干扰最强的 DSSS(直接序列扩频系统)。 尽管功能强大但人性化的菜单设计对初学者与熟练者均适用。为了您更好的使用遥控设备并保证安全飞行,请您仔细阅读使 用说明书,我们在编写说明书时尽力使用大家熟悉的名称和提法让初学者读起来轻松易懂。
2、终身维护 从购买之日起一年之外返修产品,由客户承担来回运费。 3、维修费用 保修期内产品如是人为因素造成的产品损坏或非保修期内产品,维修费用和来回运费由客户承担(维修 费本着不盈利原则,仅收取零配件材料费)。 4、维修时间 返修产品将于收到后15个工作日内,将维修好的产品寄回给客户,并附上维修报告。以上服务条款仅限 于中国大陆。
保修说明
十分感谢您选择乐迪产品,售后服务的宗旨从我们产品用户角度出发是保护我们用户的应有权益,为此我们确保每台遥 控器都经过电脑检测和老化测试。但难免到用户手上偶有不良品条款如下:
1、保修期 本产品自购买之日起,属于产品质量问题,一年内免费保修,返修时需要同时寄回您的保修卡和购买凭 证。
第二章 固定翼机的功能菜单............................................................................................................................................................... 12 2.1 发射机基本功能导
- 1、下载文档前请自行甄别文档内容的完整性,平台不提供额外的编辑、内容补充、找答案等附加服务。
- 2、"仅部分预览"的文档,不可在线预览部分如存在完整性等问题,可反馈申请退款(可完整预览的文档不适用该条件!)。
- 3、如文档侵犯您的权益,请联系客服反馈,我们会尽快为您处理(人工客服工作时间:9:00-18:30)。
航模遥控器说明书篇一:MC6遥控器说明书USER MANUAL6 Channel Transmitter(6通发射机)Channel 5(5通道)Channel 6(6通道)FHSSRudder Trim(方向微调)Throttle Trim(油门微调)Elevator Trim(升降微调)V-tail Elevon Mix OnV-tail Elevon Mix Off混控开关V-tail On( V尾混控)Aileron Trim(副翼微调)On/Off switch 电源开关Switches in upper positionReverses direction(通道反向) of channels1-4 Elevon Off(三角翼混控)Switches in lower positionNormal direction(通道正向) of channels 1-4(发射机和接收机需绑定。
如果工厂没有绑定好发射机和接收机或需买第二个接收机,请按下面的步骤操作)一、接收机的操作描述1、跟接收机绑定连接2、接收机通电,接上对频线。
接收机上的绿灯闪3、拿起发射机,在打开发射机开关前,确保油门微调在最低位置,其他微调在中间位置4、保持绑定开关在上面的位置,现在打开发射机开关5、(发射机绿灯开始闪,然后接收机的灯停止闪动)6、断开发射机上的绑定键)7、移动接收机上的绑定开关,接收机上的绿灯现在会亮起来,就代表已经绑定好二、发射机的操作描述1、一通道副翼,控制机体的横向动作,比如翻滚之类的,当副翼横向机动出现反方向的时候,可以调节调节遥控器1-4通道正反开关的第一通道,来实现反方向的纠正,副翼微调当机体横向偏航的时候,可以调节副翼微调来修正。
2、二通道升降,实现飞机的俯仰、爬升与下降,当爬升与下降的幅度较小,或者暂无无反应可以调节升降微调,当爬升与升降出现相反的反向,可以调节二通道正反开关来实现修正3、三通道油门,控制机体的升降。
油门微调调节升降的辅助功能,油门升降出现相反方向的时候,直接调节三通道正反开关来修正。
4、四通道垂尾方向,控制机体左右方向。
方向微调调节垂尾方向的摆动。
左右方向相反,直接调节四通道的正反开关 5、五通道为机体操作过程中的收放起落架6、六通道为襟翼开关。
襟翼主要通过改变气流方式来用于起飞降落增速减速,提高机动性7、三角翼混控,指在操作机体的遥控系统中,其中一个通道与另外一个通道在一定模式下共同动作。
8、混控开关,混控功能的开启与关闭。
篇二:FS-CT6CT6 配置说明书1、界面详细概述在软件最上方是实时显示Ct6发射机的每个通道的数据system option:A, user ----- 读取Ct6发射机里面用户的设定(Ct6能够保存4个不同用户的设定) B, setting ----- 设定当前使用的pc串口(注意,软件不支持大于xx9的串口) C, help ----- 公司信息D, save ----- 用户设定的参数保存到文件中去E, open ----- 将用户的参数设计文件下载到t6 System Setting:A, EndPoint ----- 舵机最大角度调整Ch1 – ch6 表示通道数最左边表示相应通道舵机正向转动的比例(范围从0 - 120)最右边表示相应通道舵机反向转动的比例(范围从0 - 120)选择ok,保存当前设定并退出设定,cansel, 不保存并退出设定B, reverse ----- 舵机转动方向的调整Ch1-ch6表示通道数右边的选项打上钩时,表示是舵机的转动方向反相。
选择ok,保存当前设定并退出设定,cansel, 不保存并退出设定C, subtrim ----- 记忆微调、Ch1-ch6表示通道数右边的数目表示当前通道的偏移大小选择ok,保存当前设定并退出设定,cansel, 不保存并退出设定D, DR ----- 大小动的设定DR能够调整ch1,ch2,ch4的动作大小,中间的方框表示相应通道的dr关闭时的动作比率最右边方框表示相应通道的dr开启时的动作比率选择ok,保存当前设定并退出设定,cansel, 不保存并退出设定注意: DR的设定必须和sw a 或者是 sw b 搭配使用,也就是说,当您设定好dr 的值后,必须在sw a 或者是 sw b的设定中选择DR。
E, stick ----- 左右手切换设定T6 包含四种操作模式Model1 ------ 右手:水平是副翼,上下是油门左手:水平是方向,上下是升降Model2 ------ 右手:水平是副翼,上下是升降左手:水平是方向,上下是油门Model3 ------ 右手:水平是方向,上下是油门左手:水平是副翼,上下是升降Model4 ------ 右手:水平是方向,上下是升降左手:水平是副翼,上下是油门选择ok,保存当前设定并退出设定,cansel, 不保存并退出设定F, thro cuv ----- 油门曲线设定Model : 选择需要设定的模式(NOR 正常模式, ID 特技模式)Ep0 – ep4 对应模式下的五点曲线的值退出设定注意1:如果sw a或者是sw b没有选择nor/id, 那么系统使用nor下的曲线。
如果是选择了nor/id, 那么,开关往后拨,表示是nor, 往前拨表示是id注意2:acro模式不包含这个功能G, Pith cuv ----- 螺距曲线设定Model : 选择需要设定的模式(NOR 正常模式, ID 特技模式)Ep0 – ep4 对应模式下的五点曲线的值选择ok,保存当前设定并退出设定,cansel, 不保存并退出设定注意1:如果sw a或者是sw b没有选择nor/id, 那么系统使用nor下的曲线。
如果是选择了nor/id, 那么,开关往后拨,表示是nor, 往前拨表示是id注意2:acro模式不包含这个功能H, Type ----- t6发射机的机型选择T6 包含三种机型选择,acro ---- 飞机模式Heli-120 直升机Heli -90 直升机Heli - 140直升机退出设定I: Afr ----- 直升机倾斜盘设定篇三:航模遥控器基础知识遥控器是利用高频无线电波实现遥远控制的技术简称遥控,早期的控制信号是单一的,随着技术的发展,现在航模飞机已经广泛的使用遥控控制飞机,出现了比例遥控方式和通道更多的设备.1.几个名词:什么是比例遥控?这是指受控模型的动作幅度(或速度)与操纵者扳(转)动发射机操纵杆的动作成比例关系。
例如扳动操纵舵角的操纵杆到一半角度,那么船或飞机的方向舵也会转动到最大舵角的一半。
什么是通道?通道也称Ch,简单地说就是指控制模型的一路相关机能。
例如前进和后退是一路;左右转向是一路;空模中的升降也是一路;还可以是一组控制其他动作的(如炮塔的左右;上下俯仰;鸣笛、亮灯等),但是各个通道应该可以同时独立工作,不能互相干扰。
2. 一套遥控设备的基本组成:包括发射机(分车模用枪式和空、海模用杆式等),接收机(有普通型和超小型之分),伺服机(也叫舵机,分类和详细介绍请参看本栏〈关于遥控伺服机的应用知识〉等文章)和电子调速器(即电调,分空模用单向电调和车、船用双向或带刹车的等),一般一个伺服机或电调就要占用一个通道。
另外还有给它们供电的电源和开关,电源大多使用充电电池或蓄电瓶,其中充电电池又有镍镉、镍氢、锂电池和聚合物锂电池等,综上所叙就组成了一套遥控设备。
3. 遥控设备在模型上的使用:一般车、船用的基本型为两通道,左边一个通道大多用于控制前进、后退(用电调的还可以变速);右边一个通道用来控制左右方向。
而对于飞机,就需要三、四个以至五、六个通道了:固定翼飞机还要控制水平尾翼(升降)的通道和控制付翼(作横滚等特技动作)的通道;直升机更要增加陀螺仪用的通道等等。
当然通道多了也就可以在车、船上增加一些趣味性的动作,例如亮灯、鸣笛,开炮、放鱼雷、火箭、导弹以及消防船水枪喷水,吊放救生小艇等等。
4.需要了解的几个问题:比例遥控设备根据电波收发形式又分为调幅(AM)、调频(FM)和脉冲编码(PCM)等等,它们的抗干扰能力也不一样,AM型最差,现在已经很少生产;FM型是用得比较多的一种;而PCM属于中高档型,抗干扰能力比较强,曾经有一次在南京中山陵水榭表演模型时,一对新婚夫妇的摄象机也来拍摄,结果用FM设备的模型无法正常工作,而用PCM设备的模型还可以完成,这就是高频谐波的同频干扰引起的。
为了防止同频干扰,遥控设备的使用频率是有一定的,这就好象广播电台,每个电台都有自己的发射频率,不然大家都一样就会出问题了。
根据国家信息产业部20XX(53)号文〈关于无线电模型遥控器使用频率的通知〉的规定,我国模型遥控器的使用频点为: 26MHz—27MHz 频段,海/车模为:(括号里是FUTABA、JR设备所配的飘带颜色) 26.975 MHz 27.125 MHz 26.995 MHz (茶色) 27.145 MHz (黄色) 27.025 MHz 27.175 MHz 27.045 MHz (红色)27.195 MHz (绿色) 27.075 MHz 27.225 MHz 27.095 MHz (橙色) 27.255 MHz (兰色)共12个频点。
40 MHz频段,海/车模为: 40.61 MHz 40.69 MHz 40.63 MHz 40.71 MHz 40.65 MHz 40.73 MHz 40.67 MHz 40.75 MHz 共8个频点。
空模为: 40.77 MHz 40.79 MHz 40.81 MHz 40.83 MHz 40.85 MHz 共5个频点。
72 MHz频段,空模为: 72.13 MHz 72.79 MHz 72.15 MHz 72.81 MHz 72.17 MHz 72.83 MHz 72.19 MHz 72.85 MHz 72.21 MHz 72.87 MHz 共10个频点。
对于遥控器的技术指标是:发射功率小于750mW。
5.无线电遥控设备在船模上的应用:(1).设备的选购:应该根据自己的需要和财力来考虑;有条件也可以“一步到位”,装备多通道、高档次的以便今后增加动作和用于其他方面。
一般的2-4通道也就够用了。
如果您是用在较小的模型上,可以买配有超小型接收机和微型伺服机的设备;用于帆船的则需要配置收索机或强力舵机(船体较大而且动力强劲的模型最好也用它);普通的动力模型可以配置一个电调和1-2个普通舵机,不过配电调要注意和您使用的电动机配合,一般动力电动机分有刷和无刷两类,它们使用的电调是不一样的;还有一点应该注意的是电调的工作电流必须大于电动机的最大电流,否则容易烧毁.最好是模型在水中时测试一下电动机的启动电流,再选择一个工作电流比它大的电调(电调的工作电流愈大,价格也愈贵,不过有条件还是尽量买大些的好),这样使用的时候会放心一点。