CS地图制作教程
CS起源地图制作教程:动态门制作1

起源里面的门挺多,卷闸门儿,平开门儿啊,自动
啥啥门啊
实现起来也是很方便的。
今天咱们就来讲一讲自动闸门制作^_^哈
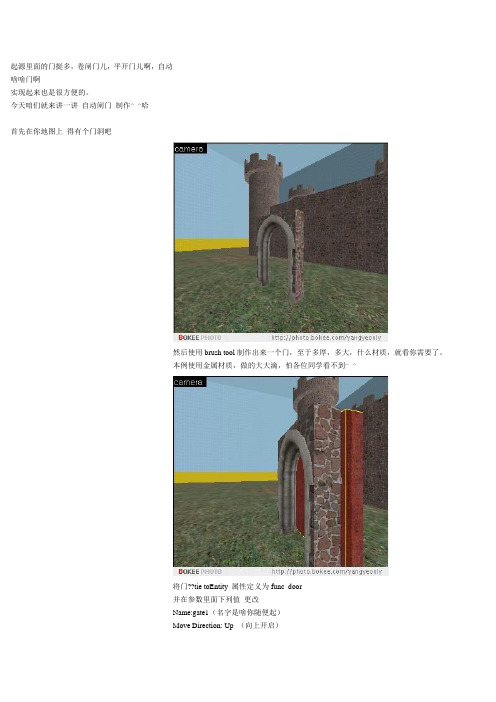
首先在你地图上得有个门洞吧
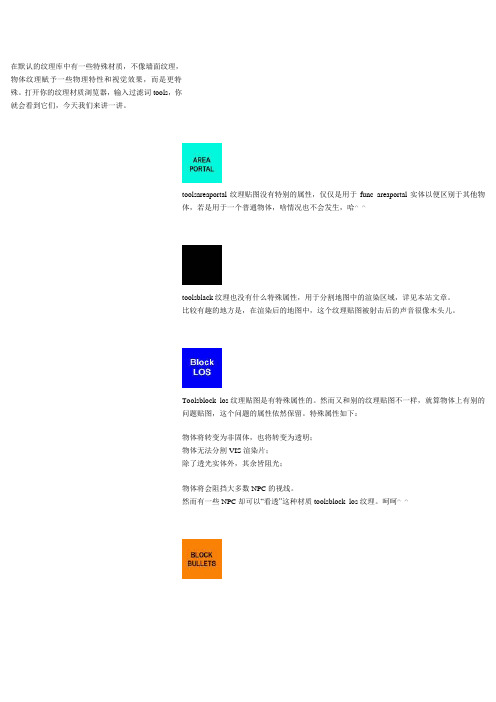
然后使用brush tool制作出来一个门,至于多厚,多大,什么材质,就看你需要了。
本例使用金属材质,做的大大滴,怕各位同学看不到^_^
将门??tie toEntity 属性定义为func_door
并在参数里面下列值更改
Name:gate1(名字是啥你随便起)
Move Direction: Up (向上开启)
Lip:2
里面的别的参数,你也可以试一试,比如开启的声音之类。
在门的两侧制作两个brush 且涂上nodraw材质
越薄越好,^_^哈
将这两个家伙也tie toEntity 属性定义为func_button
并在参数里面下列值更改
Parent:gate1(你定义的门的名字)
Flags:Don't Move, Damage Activates, Touch Activates and Use Activates output 中也要修改
好了。
搞定。
编译你的地图,加载
看看效果。
本例为了更好的说明,将门洞解剖开来。
看到了吧,在远处向门开枪,门也是开滴。
^_^哈
哪,就这样简单,怎么样优化效果,就看你怎样定义和摆放位置了。
下节,我们讲讲平开门。
CS起源地图制作教程:动态门制作2

昨天咱们说了自动闸门
今天讲一下平开门的设置,^_^哈
今天比较麻烦是剪切
其实这些东西都是相辅相成的,聪明的大家应该会举一反三的^_^
本例为了更好的说明,把墙单独拉出来。
哈
首先在做好的墙上使用clip tool 咔咔剪出来一个门洞,56×112宽高,
有的同学不知道标准尺寸,你可以用dev_measuredoor01这个材质来参照。
这样你也看到了,刚才标准材质上还有两个数值48×108,对,这个就是门的大小,刚才那个是带门洞。
才咔咔剪出来。
(注意你的参考线设置)
对于门来说,显然16太厚,拖到4个单位即可。
然后选中它,tie to Entity 将属性定义为func_door_rotating
注意上图有一个圆圈,本来是在中间的,俺拖到了门框上,这个就是旋转点。
func_door_rotating的属性定义也要注意了。
声音啊之类最好有,因为无声门挺怕怕,游戏中也听不到有人开门^_^哈
Delay Before Reset 4 (如果设置为-1,那么打开门就不会关闭了)Distance 110 (门开的角度)
flag也是要设置
Use Open 就是玩家点击“E”时,开启门拉^_^哈
别的参数,自己看去,哈
然后哪,为了真实好看,将门和门框涂上适合的材质
编译你的地图,加载。
看看效果吧
好了,这个就是平开门的制作。
CS起源地图制作教程:道具类型概述

道具类型概述注意:本篇文章中文译文来自MODchina,更详细资料,请访问其论坛。
在Source里道具这个词通常等于低面模型,有许多种不同的道具实体类型,每一种模型都有特定的功能,每一种模型都在特定的情况下适用,各自对于系统性能的消耗也不同。
下面是关卡设计师使用的主要道具模型种类的列表,以及他们所有的特点:道具类型深层详述这个部分讲述了不同道具类型的更多详细情况,下面的表格说明了道具类型不同之处的情形表格说明: 在关卡中的最多数量: 如果不想死机的话,你可以在一个关卡中使用的最大数目。
总是被渲染: 是否无论有多少面,都会被渲染。
碰撞检测: 道具类型是否能被其他物体碰撞的性能光照计算方式: 物体如何被灯光照射/产生阴影.是否投影: 是否产生静态lightmap阴影,或者产生动态dynamic projected阴影动力学计算:物体动力学计算和骨骼动画的属性prop_detail特性:∙可在一个关卡内放置10000个∙可以是 .MDLs 或sprites。
Sprites 比 .MDLs.渲染速度快∙通过给表面材质指定detail类型,编辑器会自动放置。
一般来说不是由关卡设计师手动来使用。
最不耗资源的方法,在低端机器上面甚至都不会被渲染。
.∙无法碰撞.∙照射的光线颜色是固定不变的(为了最优化资源).∙不会对光照贴图的计算产生影响.∙根据玩家距离自动衰减(淡出)(通过控制台命令来实现:cl_detaildist 以及cl_detailfade变量)∙在低配置电脑上可能无法渲染.∙调用的模型必须是静态道具的.qc 文件编译而成的∙不会让你的网络过载+ 内存使用极低∙不是一个真正意义的实体,没有输入输出∙没有动画.∙无法附在另一个实体上.∙从可视化的角度来说,它们就像是点模型prop_static特性:∙可在关卡中放置1000个.∙可在Hammer editor中放置.∙可与为它们设置碰撞和关联.∙可对光照贴图产生影响,可以产生静态光照贴图阴影∙对投射到上面的光线使用的是标准顶点着色方法。
[整理]Cs地图编辑图文教程.
![[整理]Cs地图编辑图文教程.](https://img.taocdn.com/s3/m/3bb7ddb2ec3a87c24028c4f7.png)
Cs地图编辑图文教程a、打开你的wc(或者叫valve hammer editor),选择文件--新建(Cs地图文件不能用中文名称、空格、括号等符号命名,否则会有运行不了或者编译错误的问题。
)b、首先,我们来确认一些设置,这些设置是做一个布局整齐的地图所必须的,如图c、还是设置,呵呵,这是个人的作图习惯设置,有人喜欢用一个视图作图,我就是。
有人喜欢用多视图作图,我们按照自己的习惯设置吧:到菜单的“工具--参数设置”,打开设置对话框选中的话,程序主界面将是这样的视图的手动切换方法:不选的话将是这样的选择工具说明选择单个或相邻的多目标:直接点击或框选目标,如图,左边为选中中间未选中。
呵呵,练练吧!拷贝物体:如图:把鼠标指针放到以选物体时指针形状会变为“十”字状,这时我们可以按住鼠标左改变物体大小:,把鼠标把鼠标指针放到以选物体边上的白色方点时,指针形状会改变形状(如图),这旋转物体:把鼠标指针放到以选物体时指针形状会变为“十”字状,单击鼠标左键,物体将会变成,这时我们可以参照上面的方法通过转动上面的白色圆点来旋转物体。
倾斜物体:把鼠标指针放到以选物体时指针形状会变为“十”字状,,这时我们可以参照上面的方法通过转动上面的白色方点来倾斜物体。
各种工具的说明选择工具放大镜照相机创造点实体的工具创造固体的工具纹理贴图工具应用当前纹理的工具印花纹理贴图工具裁剪工具顶点编辑用的工具只能从实体的中心点选择该实体。
设置的使用选择条件。
一试就知道允许用鼠标框选对象。
设置的使用选择条件。
一试就知道,例图的纹理名称)和图象(,例、我们在用工具创造固体的时候,都是用这个窗口显示的纹理来作为默认固体纹理的。
、是使用当前纹理的工具。
这个“当前”指的就是上面显示的纹理。
我们一般这样使用这个主要用途是把地图里所有左边显示的纹理:上面的框是和工具密切相关的。
我们用做固体的时候,可以做成不同的形状(呵呵,地图包含要素1、制作一个由固体组成的密闭空间2、放置双方玩家3、放置光线网格大小为32;“对齐到网格”功能开启1、打开你的wc,选择文件--新建2、到top视图,使用工具拖曳出一个方块,回车。
CS起源地图制作教程:购买区域(buy zones)的创建

使用固体工具,创建一个立方体,也就是在地图中可以购买武器的区域,并附上tool工具贴图中的trigger纹理贴图,整体高度一般比玩家模型高出16个单位。
好了,选择此立方体,然后右键单击,选择“tie to entity”,或者选择后敲击快捷键Ctrl+T。
然后在出现的窗体中选择func_buyzone。
这时,若是单击完成,那么CT或者T都可以在此区域购买武器。
有或是在“Team Number (int)” 选项中的“Keyvalues”选择“terrorist” 或者“Counter Terrorist.”,那么就可以单独定义一个组别的购买区域喽。
好啦,就这样简单。
呵呵。
注意trigger纹理贴图仅仅是为了区别其他物体哦。
呆蛙CS起源地图教案001:简单纹理制作

呆蛙CS起源地图教案001:简单纹理制作一:对象分析:和蛙一样是由CS地图转入制作CSS地图的初学者
二:教学目标:
1、知识目标:初步了解起源SDK纹理制作知识
2、技能目标:能够制作简单的纹理
3、情感目标:感受鸟语的可恶
三、教学重难点:
1、教学重点:制作简单的纹理
2、教学难点:克服鸟语
四、教学过程
1、准备好的要做成纹理的图片
例图:铁血十八星旗,PS画纹理的教程很多,想要什么自己找思密达
2、打开起源SDK
啊,全是鸟语!!!
找到TEXTURING中的VTF EDIT(.NET),打开它
(如果打不开,那么就去下一个.Net Framework 1.1,迅雷神马的地方很多)
(又是鸟语的界面)
单击File(文件),选择Import(导入)
找到自己要转换的图片,打开
然后会出现个框,这是对这纹理的属性进行设置,如果明白就设一下,如果不明白的话,直接点OK
然后你可以看到图片显示在了软件界面
好了,就这样,最后一步,把它保存下来。
在保存的时候,有一点要注意,一定要直接保存在CSS的纹理目录下(如果保存到别的目录再复制过去使用会出错)而且最好呢在这个目录下自己建立一个地图专属的文件夹,比如我就为我的一张地图建了个7X文件夹(便于管理)
就保存到自己建立的这文件夹中
好了,把HAMMER关了,再打开看看,有了吧
呆蛙BLOG:/diewar转载请注明出处。
CS地图制作方法

制作一个地图所需要的最基本的步骤有1、对World Craft进行正确的设置(做完这一步你就有半步踏进成功之门了) 2、把所有实体的用法弄明白3、了解一个地图要工作起来需要做些什么设置好World Craft是一个能让大多数人振作起来的步骤。
如果你不能编译一个地图,那你就不可能继续你的制作。
你除了调整一些设置之外,你还需要两个文件。
一个是WC要用的counter-strike.fdg。
里面包含了所有CS要使用的实体。
你不要说你喜欢一个没有购买区域、没有爆破点或者甚至连敌人都没有的地图吧。
如果你只想杀掉几个手无寸铁的人质来玩弄你的对手的话,CS并不适合你。
你可以在fileplanet上得到这个问题(这是对外国玩家说的。
fileplanet是一个外国著名的下载站点。
其实.fdg文件在CS目录下就有。
另一个文件是ZHLT,全称是Zoner的半条命编辑工具。
你可以在这里下载他们。
这个程序能把WC的文件编译成为CS能玩的地图格式。
就是把.map文件编译成能玩的.bsp文件。
ZHLT是用来代替半条命里附带的编译器的,因为他用起来更好些,文件也小些。
如果没有告诉你有这样一个好工具,你肯定又得为半条命那个破烂的编译程序而骂骂咧咧了。
你找到这两个文件后,把Counter-Strike.fdg解压到你的WC目录里(如C:program filesworldcraft)。
并且把ZHLT放到同一个目录。
完成后你的WC目录里应该多了5个文件:half-life_cs-expert.fdg, hlcsg.exe, hlbsp.exe, hlvis.exe, and hlrad.exe。
至此所有的重要文件已经就位了。
下一步你将要勇探鬼窝,用正确的设置来搞定他。
这只鬼的名字叫World Craft。
如果你搞不定它,你就得不到你最想要的东西——一幅制作精良的CS地图。
如果你的行动有任何失误,并且又霸王硬上弓的话,估计你会被它整的团团转,甚至导致——系统崩溃。
CS起源地图制作教程:特殊工具贴图的简介

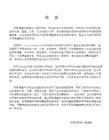
在默认的纹理库中有一些特殊材质,不像墙面纹理,物体纹理赋予一些物理特性和视觉效果,而是更特殊。
打开你的纹理材质浏览器,输入过滤词tools,你就会看到它们,今天我们来讲一讲。
toolsareaportal纹理贴图没有特别的属性,仅仅是用于func_areaportal实体以便区别于其他物体,若是用于一个普通物体,啥情况也不会发生,哈^_^toolsblack纹理也没有什么特殊属性,用于分割地图中的渲染区域,详见本站文章。
比较有趣的地方是,在渲染后的地图中,这个纹理贴图被射击后的声音很像木头儿。
Toolsblock_los纹理贴图是有特殊属性的。
然而又和别的纹理贴图不一样,就算物体上有别的问题贴图,这个问题的属性依然保留。
特殊属性如下:物体将转变为非固体,也将转变为透明;物体无法分割VIS渲染片;除了透光实体外,其余皆阻光;物体将会阻挡大多数NPC的视线。
然而有一些NPC却可以“看透”这种材质toolsblock_los纹理。
呵呵^_^toolsblockbullets纹理贴图,是可以阻挡子弹,箭,手雷甚至火箭穿过。
任何物体覆盖上这个纹理,依然保留原有物理特性,且此纹理不可见。
除了使用实体,别的固体均可被此纹理材质分割VIS渲染片。
被枪弹打中后,会有打到木头滴感觉。
^_^哈toolsclip纹理贴图不会切割VIS渲染片,可以安全滴用于实体。
使用此贴图的物体对于玩家和NPCs是固体,子弹和实体物体却可以穿过。
如果应用此贴图的物体使用普通的材质,那么这个实体就会为固体,且会切割VIS渲染片。
toolsblocklight纹理贴图,阻隔灯光穿过。
使用这种纹理贴图的均是非固体也不可见,但不会切割VIS渲染片。
此纹理贴图不可用于实体entity。
在默认的纹理库中有一些特殊材质,不像墙面纹理,物体纹理赋予一些物理特性和视觉效果,而是更特殊。
打开你的纹理材质浏览器,输入过滤词tools,你就会看到它们,今天我们来讲一讲。
简单地图制作

5、制作的时候没有提到固体实体的制作。我补充一下:固体实体的制作
收获不小吧!!是不小了,cs地图的各种元素制作方法你都学全了!
top视图
side视图
到此为止,我们的第三目标放置光线也搞好了,一个最简单的cs地图源文件做好了
11、保存一下吧。呵呵
12、按下 吧,我们开始编译地图。出来一个对话筐,照我的图设置吧(打打钩而已,很简单的),看图:
13、好了,点下“确定”
14、编译好了么?好啊,把地图名.bsp文件拷贝到你的cstrike/maps目录里面。然后按照平时建立游戏的方法玩去吧。
什么?编译好的地图文件找不到在那里?靠,你怎么设置的?去看看菜单的“工具--参数设置里面的编译程序标签的最后的设置项目吧”或看这里吧,你个不认真的猪!!!仔细的看!!靠!!!!
最后的总结:
通过这个地图的制作,我们应该已经掌握的地图制作技能是:
1、固体的制作
2、点实体的制作
3、基本地图工Leabharlann 的了解和运用4、确保固体在选中状态,到菜单的“工具--挖空”,出来一对话筐。是让你指定墙壁厚度的,默认是32。我们不用改,直接确定即可。结果这样(top视图)
补充:这是6个固体组成的一个群,我们如果需要编辑里面的单个固体,可以用 打破这个群,或者使用 忽略这个群。当然,现在是不需要这么做的。我是顺便提一下下而已。呵呵
现在,我们应该明白了,这个大方块里面被我们“挖空”了。里面变成了现在的6个小固体围成的一个密闭的空间了。我们的第一步:固体组成的密闭空间实现了
5、我们继续,确保在top视图,使用 工具,在你的视图里点一下,回车。然后把他放在适当的地图位置上。结果应该这样:
6、选中这个点实体,到菜单的“编辑--属性”出来一个对话框
CS起源地图制作教程:雷达视图制作

经过一系列升级,CSsource带来了一个全新的雷达视图,可以看到地图的概貌。
这算是与时俱进吧。
如果做完地图,有个光秃秃的雷达视图,本来就很菜的我们岂不是显得更菜?哈哈^_^。
本教程就给大家讲一讲雷达视图的制作。
准备工作开始哪,要知道我们用啥软件。
photoshop傻了吧,不会用的就不要看下去了^_^哈哈哈没啥没啥,就会基本操作即可。
只是我们还需要个插件,可以令PS(photoshop)输出vtf格式的文件。
VTF Plug-In俺给你们个下载地址,哈,怎么给PS装插件,自己google去,哈/index.php?c=154还有一个VTF Edit是个材质编辑器,今天的教程这个软件只是选用,也给大家个地址/index.php?p=40说到雷达视图,总得有一张地图全貌的俯视图好让我们进行编辑吧。
所以要在游戏中的地图上空拍张照。
然而有一些地图的房子多,房顶就多,看不到里面有啥,这个时候你需要另存一下,将房顶全部涂上nodraw材质以便看到室内。
而且可能一些道具要去掉,当然也要移去skybox。
^_^然后编译你的地图(提示:编译时可将VVIS设为fast,加快速度)首先进入游戏选项,将视频设置为最高效果(当然了,是你的显卡可以承受的最高),打开AA、AF。
分辨率设置为1280x1024(这个很重要哦)。
有的同学进入游戏后fps也许是个位数,但是只截取静态图,所以没啥。
加载地图吧准备拍照,这可是我们要编辑的主要图片,建议你拍摄好,以后的工作全基于此图片啦。
控制台输入命令,sv_cheats 1noclip在游戏中移动到可以看到地图全貌的视角(不必是严格的地图中央,对于如何校准坐标后面会提到^_^)再在控制台输入命令:hidepaneal allcl_drawhud 0r_skybox 0fog_override 1for_enable 0r_drawstaticprops 0 (可选,因为有的人物体太多,一般不需要,我就不用)net_graph 0 (如果你有用这个参数,现在就关闭它了)这样你的视图上就干干净净的,没了面板,没了上下的黑边儿,没了别的参数显示。
CS地图制作(CSmapmaking)

CS地图制作(CS map making)Hammer settingsOpen Hammer, select the menu [tool] options open dialog box (automatically popup for the first time).Select the [2D view] tab and hook [use the arrow keys to control the selected object / vertex] for easier handling later. Select [3D] View tab, the backup cache [] to the maximum shear drag. Select [map] tab, click [add] button to select the CS installation directory "Valve" directory under the file "halflife.wad". The same way, select the CS installation directory under the "cstrike" subdirectory under the "cstrike.wad" file. If you have any other map file please join (hint: in addition to the two documents if need not very best not to add, because must ensure the simultaneous release of map file) [] select game configuration tab, click Configure [Edit], in the pop-up [Edit] game configuration dialog box click [add] input "CStrike" followed by the [OK] [close]. [game configuration] select the card, click the game data file [add], select the Hammer installation directory under the"FDG\Counter-Strike" subdirectory under the "halflife-cs (Chinese).Fgd" file. Then click the game execution directory browsing [] choose the CS installation directory, click Browse to select CS Mod directory [] installation directory "cstrike" directory, click [] select game directory browsing the CS installation directory under the "valve" directory, click Browse to select the storage directory [RMF] (save the document directory such as "C:\My documents\RMF").Select [compiler] Select configuration card, select "CStrike",click the Game executable program [] Select browse the CS installation directory "HL.exe" (MOD version) or "CStrike.exe" (retail version), click the CSG compiler [] Select browse the ZHLT installation directory "hlcsg.exe", click on the BSP compiler [ZHLT] Select browse the installation directory, click the "hlbsp.exe" VIS compiler [] Select browse the ZHLT installation directory "hlvis.exe", click the RAD compiler [] Select browse the ZHLT installation directory "hlrad.exe", click Browse [last] button to select a compiler for temporary work directory.Tool description1, select toolsChoose a solid or entity in the four view, the first choice of objects must be selected according to the object selection frame or the center of the handle, when the first choice, can move objects, change the object size, when the second chosen can rotate the object, press the Shift key will be according to the standard of 15,30,45,60,75,90 angle rotation, when the third choice of selection for deformation processing.Press and hold the Ctrl button to choose to copy, press the Shift button and drag the mouse can.2 zoom toolsIn the top, front, side of the three view, click the left button to enlarge the view, right-click to reduce the view. If you have a 3D mouse, using the scroll wheel will have the same effect.3, camera toolsMulti angle observation in camera view. Left + drag = in situ rotation, right + drag = up and down translation, left + right + drag = before and after about translation.4, entity toolsCreate an entity in a map, you can select the type in the new column, or use the menu [Edit] property to make a change. In short, very useful, such as the addition of light sources, birth points, human particles, and so on. For more information, see WorldCraft 3.x Chinese help.5, block toolA solid tool; solids are the basis of all map elements.6, surface mapping toolEach surface of the solid is treated separately so that it has different materials. The use of this tool will pop up [] the surface mapping dialog box, displacement, zoom, rotation will affect the texture (hint: it is best to use [tools] [fixed] command map will map locked so as not to move the solid displacement map)7, apply the current mapThe selected texture in the map property column is paid to thesolid selected in the view8, plane mapping toolA tool for making an effect similar to a mine mark9. Cutting toolsThe cutting of a solid, such as cutting a quadrilateral into a triangle or pentagon. (personally, I think it's entirely possible to use 10 instead)10 vertex control toolsVertex editing of solid powerful, can make objects change very strange shapes, one is also very dangerous, because the compiler does not recognize the negative angle, we must ensure that no solid depression, this is very important, often a lot of mistakes are caused due to the vertex. When using the vertex control tool, select two neutral points (two adjacent yellow dots) and then press Ctrl+F to add an edge.11, path toolsUse when making active paths.The simplest map should contain a closed space, at least one birth point. Now let's start making a map that contains a box like space, sky, global light source, police birth point, bandit birth point. From here you can learn about the environment and process of map making.Open Hammer, execute [document] [new] [] in the top block selection tool and drag a rectangle, creating a solid press enter.Using the selection tool [] solid and adjust the other three views in the solid in size (hint: when the solid is selected again using the selection tool [] Click to rotate, but please note: three views -))In the properties toolbar click Browse [map] to select an appropriate map, press enter to confirm (hint: don't click [Select] button in the text box, the filter can enter a name to search map), with [tools] select solid, according to the current application [] button to replace the solid texture mapping. (settings for individual surface maps will be discussed later)Select the menu [tool] to empty the solid according to a certain thickness.Select a menu [tool] to break the combined solid into a single solid. When using the camera [tools] in the camera view and drag the mouse you can observe the scene from different angles (hint: Left Click = spin around, right shift up and down about =, + right click the left button = around pan). Use the select tool to select the top of the box, and then pay the map named SKY with the method mentioned above.Select [tools] in the new entity choice bar for"light_environment", and then in the top view of the "box"inside click and enter, create an entity with the sun, [] select selection tool and hold the sun in a view by the keyboard keys for the position adjustment. Finally, make sure the sun is inside the box.Create a info_player_start with the same method "(born police point)" info_player_deathmatch "(a party was not too high), to ensure that the location (or fall dead), can not touch the ground (or after birth will not move).Select the menu [map] [check the problem], and if there are no questions, you can compile it. If an error occurs, check that the above steps are correct and compile again.Select menu [file] [run], [running map] dialog box selected [do not run the game], [about to confirm], about a few minutes later, you can complete the compilation process.Exit Hammer, run CS, select [LAN games] [create a game], select the compiled map, and test it. Of course, this map doesn't have any function, but it's really a map made by myself.Surface mapRelative to the texture of the whole solid, we can also attach different textures to different surfaces of the solid. Use the surface texturing tool or the menu [tools] command to open the surface mapping dialog box, then you can use the camera tool to move the camera,Using the selection tool [] will have to deal with the choiceof surface (hint: hold down the Ctrl key can choose). Click [browse] to select a favorite texture, and click [apply] to see the effect (hint: [hide mask], you can remove the red mask to see the actual effect). If you are not satisfied with the default effect, you can set parameters such as zoom, shift, rotate, or you can click the left (middle) button to make a quick match.Replace mapWhen our map has been around for a while, it's not appropriate to find a map, so we can use the replacement mapping function. The pop-up dialog box click the map attribute replaces the textures on the toolbar [replacement], click the Browse button [target] will have to be replaced in the map (hint: hook select mapping dialog box the lower left corner of the display only used the map check box, can narrow the range, and then click Browse) to replace the [] will choose to use browse maps [OK]Display and hideSometimes we need to temporarily hide some objects, you can click Hide [hide] button, click [show all] button will recover hidden objects. We can also combine several objects so that we can display or hide them at the same time.Vertex editor[Edit] vertex selection tool, select the control points of white can edit vertex, select the control points of yellow can edit the frame, select a point and drag it to another point youcan delete a point, two yellow dots and choose the corresponding press "Ctrl+F" to add an edge. Refer to other instructionscarvingSometimes we need to use one object to punch through another object, and then we choose to carve the object, move it to the carved object, and select the tool [sculpture]. It is important to note that the objects used to engrave are larger in depth than those that are carved, and that it is recommended to conceal unwanted objects in order to avoid being affected.Making lightsNo lights, after entering the game will be dark, in front of us entity named "light_environment" represents the sun, it is the role of a global light source, all can see the "SKY" map of the place can be light. But in some places, such as the passage to the auxiliary light source, we have two kinds of methods to add the source: first, use [tools] add entities called "Light" or "Light_spot" entity where needed, and then use the [Edit] [properties] to set the source; two, the use of specific irradiance map. Represent a light solid and paste material, written under the name of the material, use "RADEditor" to create a new file, click [add] just write down the name of the input, set the source attribute (hint: brightness is generally about 10000, can be used in a wide range of more than 30000), save the file to map the *.rmf file directory. In Hammer, select the menu [file] [] [] in the mode of operation of experts "compile / run command" choose "$light_exe" on the right side of the tail parameter add"-lights $path\ just saved RAD file name can be. When compiling with HLCC, please refer to other instructions.Hollow outSome things, such as barbed wire, fences, ladders, handrails, etc., are all objects of this kind. They have part of the space that is hollowed out. We can give these objects a map with "{" heading names, and their blue parts will be transparent. Then select these objects, select the menu [tools], convert to entities, class, select func_wall, render mode, select solid, and transparency enter 255".Making laddersWe can climb the ladder. According to the method of making a hollow ladder model, and then make a slightly larger than the solid ladder model and gives a "AAATRIGGER" material, select just made "AAATRIGGER" into a solid, solid,"Class" selects "func_ladder"".Make grassUnlike the hollowing, the "class" selects "func_illusionary"".Make damaged objectsSelect the solid that you want to change, switch to an entity, select the class "func_breakable", "durability", and enter a number. The bigger the number, the stronger. "Materials" canchoose the appropriate type. Other properties can be set by preference. If it is glass, we can set "transparency" for a smaller value.Door makingSliding door: the model that makes a door, converts to an entity of "func_door" type. You can modify some of these properties to achieve different results.The revolving door: complex relative sliding door. Make a door model, then made a virtual pivot model (hint: runtime invisible, can draw a relatively rough, but must ensure that the door is located in the center position of the shaft model, and then give the door) "ORIGIN" and the name of the map, and the door and door, into the "func_door_rotating" the type of entity, and then the other attributes can be set.Making waterSelect the solid to be converted to"!" The texture that you start with is converted to a func_water entity.Map attribute[map] [map] attributes can be set up in the map of the relevant property, one of the most important "map title" "sky map" (hint: composition, background image from 6 different textures were *lf.tga, *rt.tga, *ft.tga, *bk.tga, *up.tga, *dn.tga, stored in the CS installation directory "cstrike\gfx \env" sub directory. The sky background map takes the common parts of itsfile name, such as "green", "city1", and so on------------------------------------Make different kinds of mapshostage rescueThe scene must be included in the "hostage_entity" (hostage born point) and "info_hostage_rescue" (the safety of the hostages (District) punctate entity type can be used with the "solid entity func_hostage_rescue" type).Bomb removalThe scene must contain "info_bomb_target" (hidden bomb points) types of dotted entities (which can be used with solid entities of "func_bomb_target" type).Protect VIPThe scene must contain "info_vip_start" (VIP birth point) types, point entities, and solid entities of the"func_vip_safetyzone" (VIP security zone) type.They are unique entities that cannot appear in one scene at once!Shareable entity"Func_buyzone" (a range of weapons), solid entities, and other entities.Compiling maps using HLCCSelect [file] in Hammer [export as MAP file] export a MAP format file. Open HLCC, [MAP] to the directory just export file directory, BSP directory] [to the CS installation directory "cstrike\bsp" subdirectory [] Tools Directory to the ZHLT installation directory [] half life to the CS installation directory directory. Hook [options] [support for ZHLT compilation tools]. Select [light RAD file] in parameter B, you can customize the light settings of the light source material. Click [compile] in the [file] to compile. Generally speaking, relatively large map takes a long time, I have a map here to take all the default parameters, it took nearly 4 hours to compile, khan. (1.2320MB RAM)Using custom mapsCreate a map package using another tool Wally (*.WAD) file, which contains the image file will be used to, as for image editing, you can use the PhotoShop image processing software and then copied to the Wally. It's important to note that each map has a name that determines the type and effect of the texture.Open the tab [tab] in Hammer, and then add this texture pack to use custom maps on the map.Decompile mapUse WinBSPC to open a map file *.BSP, then select [MAP] in the conversion settings, select the output path, and other defaults. Import the MAP file with Hammer. (Note: to make sure the map is correct, copy the original map package file, *.WAD file, to the cstrike subdirectory of the CS installation directory, and then add the collection of maps to the Hammer.)Attention problemsShould pay attention to making the map, design is the principle of "abandoning the complex simple, can simplify the objects to simplify, can omit as far as possible to omit the map; should not be too large, too large can be separated, the space is relatively independent, each other can use the channel connection (please refer to the original map with cs_dust); standing in a position of other objects can see better. In this way, the map can be compiled faster, less error prone, and the higher the FPS of the game, the better.Publish mapMap production, of course, to release, to ensure the normal operation of the map, you need to pack the following documents: a good map file (*.BSP), map file (*.WAD). If other resources are used, they must also be packaged together: graphical components (*.SPR), voice (*.WAV), model (*.MDL), background (*.TGA), and map descriptions (*.TXT). If the robot is still made, the road point file must also be packaged: (*.PWF) (*.PXP). Finally, write an installation instructions.Default path for related files:*.BSP = cstrike\maps*.WAD = cstrike*.SPR = cstrike\sprites*.WAV = cstrike\sound\ corresponding directory *.MDL = cstrike\models*.TGA = cstrike\gfx\env*.TXT = cstrike\maps*.PWF = cstrike\PODBot\WPTDefault*.PXP = cstrike\PODBot\WPTDefault。
CS起源地图制作教程:三种玻璃的制作方法

三种玻璃的制作方法今天我们来讲一讲三种玻璃的制作方法。
一、打不破滴玻璃制作首先使用brush tool作出来的立方体,四面贴上tools/toolsnodraw的纹理贴图,为玻璃效果的相对两面则用glass纹理贴图。
这里我们使用纹理贴图glass/glasswindowbreak070a。
为了不麻烦,一个个面的帖纹理,可以选中立方体直接先贴上纹理tools/toolsnodraw,然后使用工具Texture Application Tool,点选相对的两个面,贴上玻璃材质。
你可以在相机视窗(Camera view)中这样操作哦,连带上下左右的移动,好让你找到看不到的面。
然后将此立方体,拉成薄片,大约一个单位就可以了,^_^哈很薄很薄的,留下来的可一定要是glass 贴图的两面,要不,就啥都木有啦。
^_^记住了,玻璃现在是长方形,也是可以剪裁为各种形状以适应窗口。
二、可打破的玻璃开头,和上面一样,然后选择玻璃,按下按键CTRL-T,这样就可以将此玻璃转换为实体(Entities),这样我们就可以设置更多的属性。
(普通的物体,什么特殊属性都木有,只可以呆在一个地方,实体(Entities)可以移动,打破,甚至可以有掉下来的动作)。
在Class菜单中选择func_breakable。
这样就使其成为一个func_breakable实体,令其可以打破,或者更多有意思的功能。
在Strength选项中选择玻璃的生命值(health),就是收到多少力道后,会碎裂的值,越高越不容易打碎。
三、钢化玻璃要想有下图的玻璃破碎模式,就像钢化玻璃似的。
前边的步骤一样,首先将立方体,都贴上glass纹理贴图,仅留一个面贴上nodraw贴图,注意,就留一个面!在Class菜单中选择func_breakable_surf实体。
钢化玻璃破碎模式的玻璃就做成了。
^_^ 以上就是三种不同玻璃的做法。
CS地图制作

使用梯子我们可以进行攀登。首先按制作镂空的方法制作一个梯子模型,然后再制作一个比梯子模型稍大的固体并赋予“AAATRIGGER”材质,选择刚才制作的“AAATRIGGER”固体,转换为实体,“类”选择“func_ladder”。
制作草
与镂空不同的地方是“类”选择“func_illusionary”。
使用【选择工具】选择固体并在其它三个视图中调整固体的大小(提示:当固体被选中时再次使用【选择工具】单击则可进行旋转处理,不过请注意三个视图的关系:-))
在贴图属性栏上单击【浏览】选择一个合适的贴图,按回车确认(提示:不要单击【选择】按钮,在过滤文本框中可以输入名称用以搜索贴图),用【选择工具】选择固体,按【应用当前贴图】按钮可以给固体更换贴图。(单个表面贴图的设置将在后面讨论)
2、缩放工具
在顶、前、侧三个视图中单击左键放大视图,单击右键缩小视图。如果有3D鼠标那么使用滚轮会有相同的效果。
3、摄像机工具
在摄像机视图中进行多角度观察。左键+拖动=原地旋转,右键+拖动=上下左右平移,左键+右键+拖动=前后左右平移。
4、实体工具
建立地图中的实体,可以在新建栏选择类型或使用菜单【编辑】【属性】进行修改。总之非常有用,比如添加光源,出生点,人质点,等。更多参考请见 WorldCraft 3.x 中文帮助。
它们所特有的实体不能同时出现在一个场景中!
可共用实体
“func_buyzone”(购买武器的范围)类型的固体实体、其它实体。
使用HLCC编译地图
选择【编译程序】选择卡,配置选择“CStrike”,单击Game执行程序【浏览】选择 CS安装目录下的“HL.exe”(MOD版)或“CStrike.exe”(零售版),单击CSG编译程序【浏览】选择ZHLT安装目录下的 “hlcsg.exe”,单击BSP编译程序【浏览】选择ZHLT安装目录下的“hlbsp.exe”,单击VIS编译程序【浏览】选择ZHLT安装目录下的“hlvis.exe”,单击RAD编译程序【浏览】选择ZHLT安装目录下的“hlrad.exe”,单击最后一个【浏览】按钮选择一个编译程序的临时工作目录即可。
cs地图制作教程

如果你是一位CS高手,如果你很喜欢那些制作精妙的地图,你就一定想制作属于自己的CS地图。
而World Craft则是所有CS地图制作高手所使用的地图编辑器。
但无论如何你也不可能让一个制作得很#$@%&!的地图运行起来。
刚开始的时候我也碰到了这个问题——我在地图编辑方面还算是比较有经验的——我制作了不少Quake 1的地图,而且我认为两个游戏的地图制作起来应该没有什么差别(其实两个游戏使用的是基本相同的引擎——编者注)。
但在我从广度和深度两方面在网上狂搜出了不少制作地图的教程之后(可能你也有类似的不少教程吧),却发现虽然其中虽然有不少写的很不错的有关高级地图编制的教程,但却几乎没有一个是详细教导你如何制作出一个即使是最#$@%&!的地图的教程。
没有一个教程的标题是“起程——如何制作你的第一个最基本的地图”。
最终,在我不断玩弄这个软件几个月后,我终于得道了。
在制作了几个地图后,我实现了从制作Q1到CS地图的转变。
这时,一个想法从我脑子里蹦了出来。
世界上一定还有不少人和我有着相类似的境地吧:他们诅咒WC,因为他们根本不能用这个软件制作一个能运行的最简单的地图。
因此,我决心,我一定要写一篇教程,题目叫做:“起程——如何制作你的第一个最基本的地图”。
制作一个地图所需要的最基本的步骤有1、对World Craft进行正确的设置(做完这一步你就有半步踏进成功之门了)2、把所有实体的用法弄明白3、了解一个地图要工作起来需要做些什么设置好World Craft是一个能让大多数人振作起来的步骤。
如果你不能编译一个地图,那你就不可能继续你的制作。
你除了调整一些设置之外,你还需要两个文件。
一个是WC要用的counter-strike.fdg。
里面包含了所有CS要使用的实体。
你不要说你喜欢一个没有购买区域、没有爆破点或者甚至连敌人都没有的地图吧。
如果你只想杀掉几个手无寸铁的人质来玩弄你的对手的话,CS并不适合你。
CS作图

这些不是废话,看了你会受益非浅的软件:当然是指作地图的wc或vhe喽作用:制作地图源文件,rmf或map格式的文件编译:就是编译地图的软件,通过上面的设置我们已经知道了,编译软件分2类,即:q系列和zhlt系列(hl系列),他有4大程序csg、bsp、vis、rad组成。
对应q系列的是:qcsg、qbsp、qvis、qrad对应zhlt系列的是:hlcsg、hlbsp、hlvis、hlrad我们使用一个即可,当然我再次重申:强烈建议使用zhlt系列,和他比起来,q系列简直是垃圾各自的功能:CSG程序:统计地图的实体和使用的纹理BSP程序:生成没有任何灯光效果的地图(全亮),不过已经可以玩了VIS程序:预先优化地图的结构,使地图的运行速度加快(提高fps)RAD程序:处理地图的光源并生成完整的地图(光影效果)作用:把源文件(map格式)变成游戏可运行的地图文件(bsp格式)游戏:呵呵,当然是cs喽。
好了,我讲讲这3者的关系地图源文件和地图文件:wc或vhe是制作地图的软件,支持rmf和map格式的文件。
这个软件制作出来的地图是不能直接玩的,我们把他作出来的文件称为源文件,rmf是该软件自己自带的默认格式,他是不可以被编译程序编译的。
但是该软件提供可把rmf格式的源文件转化为map格式的功能。
我们可以通过软件菜单的:“文件--另存为” 或“文件--导出为.map格式” 得到map格式的源文件。
以便让编译程序编译。
重点:我们在wc设置里面已经了解到里面有关于编译程序的设置选项,如果大家认为编译程序是wc的一部分,那么大家错了,编译程序是独立的,只不过是wc集成调用了这些编译程序而已,我们可以使用wc编译地图,并不是wc本身的功能,只不过是他调用了编译程序编译而已。
所以,编译地图是可以脱离wc独立进行的。
这个概念是很重要的。
正因为这样催生了另一种程序:编译外壳类程序。
呵呵这里我要插几句了:有的朋友或许会问:你说rmf是不可以编译的,那为什么我用wc的时候,编辑的rmf是直接可以用wc集成的编译功能编译呢?也没有让我用map格式啊。
CS地图制作教程

C S地图制作教程-CAL-FENGHAI-(2020YEAR-YICAI)_JINGBIANCS地图制作此教程来自ML 工具包里面有他的空间链接有空的话去支持一下另外做了点点修改目的只是为了让新手看的更明白。
一.前言1.为了使每一个骨灰级的CSer都能够制作出自己喜欢CS地图,所以这里弄个教程提高效率。
2.此教程用来教新手制做出一张最简单的CS1.6地图3.整个制作流程:工具的下载——Hammer3.5的设置——map的制作——map的编译3.此教程仅适用于[M.L]_CS地图制作工具包08-01-18A4.地图的组成元素概念:固体、固体实体和点实体二.工具的下载做CS地图需要专门的工具,上面提供的是一个完善的工具包,快下载吧主要工具有:1.地图编辑器Hammer3.52.X-Man超级地图编译器3.反编译器Winbspc1.44.纹理制作工具Wally1.55B5.山体制作工具Gensurf (抽空换个中文版的)6.游戏数据文件CS16_X-man_1002gold.fgd三.Hammer3.5的设置1.把CS地图制作工具包08-01-18A文件夹解压到硬盘后,打开CS地图制作工具包08-01-18A文件夹...2.打开CS地图编辑器Hammer3.5,点击[工具]里的[参数设置]3.[常规设置]里[只使用一个视图来编辑地图]打“√”注:此项可以根据个人习惯,可打可不打,本人习惯打“√”,后面的内容默认为打“√”了的4.[2D 视图]里[仅点击中心点才能选择对象]打“√”注:此项在做复杂的地图时,要根据情况使用或不使用,后面的内容默认为打“√”了的5.[纹理]里增加自己做地图需要用到的纹理包,许多官方纹理包在CS\cstrike里可以找到注:cstrike.wad和halflife.wad两个纹理包是CS最主要的官方纹理包,常用纹理都在这两个里面。
cstrike.wad在CS\cstike里halflife.wad在CS\valve里注意:上图只是参考,究竟选什么wad文件,自己挑。
CS起源地图制作教程:动态风扇的制作

这一节,我们来讲一讲,如何制作转动的风扇。
首先,在你的地图中放入,一个实体prop_static,右键选择属性Properties(或者alt+enter),在"World Model" 找到模型models/props/de_prodigy/fanhousing.mdl并确定。
接着,创建一个实体prop_dynamic,在属性中再选择模型皮肤models/props/de_prodigy/fan.mdl.,并确定。
注意:这两个模型的设置要一致。
然后在fan这个模型属性单中"parent" 输入fanspin,并确定。
然后使用纹理tools/toolsorigin帖在一个小方片上,然后(Ctrl + T)选择func_rotating 并命名为"fanspin".在属性菜单中,你可以自己调整速度哦,例子我们使用100。
然后切换到Flags选择Start On.
好了,你现在可以渲染地图了。
看看效果。
哈
对,很多转动的物体,都可以使用这个方法来创建。
CS起源BOT路径制造

虽然这个游戏自动生成路径点文件(.nav),令你可以快速的和BOT玩儿,但是你会发现毫无乐趣,比如你下载了一个非官方新地图,或者自己做的,那么你会发现BOT就算是设置成专家级也是像傻子一样-_-!,甚至找不到北,从楼上摔下来,连梯子都不会用,所以,让我们自己做个好啦。
好了,开始准备编辑路径文件 .nav由于路径点要在游戏中进行调试编辑,所以你要自己建立服务器,并且将要绑定的命令输入控制台(console),当然如果你想要简单,可以自己建立config.cfg文件(这个文件包含了你的键盘自定义内容)。
在X:\Games\Steam\SteamApps\yoursteamID\counter-strike source\cstrike\cfg文件夹中,(注意哦,修改cfg文件,要注意备份,以便完成后还原cfg)。
好了,开启游戏,打开控制台(console),输入以下命令(如果你木有修改cfg文件):bind "1" nav_markbind "2" nav_connectbind "j" nav_jumpbind "p" nav_precisebind "Mouse1" nav_begin_areabind "Mouse2" nav_end_areabind "\" nav_splitbind "del" nav_deletebind "c" nav_crouchbind "n" nav_no_jumpbind "=" nav_disconnectbind "0" nav_make_sniping_spotbind "m" nav_merge好,准备编辑啦加载你想编辑路径点的地图,在控制台输入sv_cheats 1 、nav_quicksave 1。
CS起源地图制作教程:动态灯光制作

source引擎很有意思的地方就是物理状态模拟,布偶系统之类的,当然了,我也不是太懂。
^_^哈哈在见到的各种各样的地图中,动态的旗帜啊,电线啊会让你觉得环境更加的真实。
今天俺就说一下动态灯光的制作,^_^哈
首先是你已经做好地图,开始修饰阶段了。
首先使用实体工具
选择类型"prop_physics_multiplayer",选择适合的灯光模型,并命名。
(本例命名为light1)
然后哪,我们在灯模型顶端放置一个类型为"phys_ballsocket"的实体(entity),
在参数Entity 1 中输入light1。
这个就是灯的挂点。
接着,我们设置动态光源"light_dynamic" 实体(entity)在灯模型灯头中,参数Parent设置为light1。
角度设置为down。
别的参数啊颜色啊亮度啊你自己设置。
还要再设置一个"point_spotlight" 实体(entity)在灯模型的灯头中,参数Parent设置为light1。
角度设置为down。
"light_dynamic" 实体(entity)和"point_spotlight" 实体(entity)最终放在一个点。
好了,完成了,编译你的地图吧
下面看一下俺做的小范例地图中的效果。
摇曳的灯光。
呵呵,就这样完成了。
- 1、下载文档前请自行甄别文档内容的完整性,平台不提供额外的编辑、内容补充、找答案等附加服务。
- 2、"仅部分预览"的文档,不可在线预览部分如存在完整性等问题,可反馈申请退款(可完整预览的文档不适用该条件!)。
- 3、如文档侵犯您的权益,请联系客服反馈,我们会尽快为您处理(人工客服工作时间:9:00-18:30)。
CS地图制作
此教程来自ML 工具包里面有他的空间链接有空的话去支持一下另外做了点点修改目的只是为了让新手看的更明白。
一.前言
1.为了使每一个骨灰级的CSer都能够制作出自己喜欢CS地图,所以这里弄个教程提高效率。
2.此教程用来教新手制做出一张最简单的CS1.6地图
3.整个制作流程:工具的下载——Hammer3.5的设置——map的制作——map的编译
3.此教程仅适用于[M.L]_CS地图制作工具包08-01-18A
4.地图的组成元素概念:固体、固体实体和点实体
二.工具的下载
做CS地图需要专门的工具,上面提供的是一个完善的工具包,快下载吧
主要工具有:
1.地图编辑器Hammer3.5
2.X-Man超级地图编译器
3.反编译器Winbspc1.4
4.纹理制作工具Wally1.55B
5.山体制作工具Gensurf (抽空换个中文版的)
6.游戏数据文件CS16_X-man_1002gold.fgd
三.Hammer3.5的设置
1.把CS地图制作工具包08-01-18A文件夹解压到硬盘后,打开CS地图制作工具包08-01-18A文件夹...
2.打开CS地图编辑器Hammer
3.5,点击[工具]里的[参数设置]
3.[常规设置]里[只使用一个视图来编辑地图]打“√”
注:此项可以根据个人习惯,可打可不打,本人习惯打“√”,后面的内容默认为打“√”了的
4.[2D 视图]里[仅点击中心点才能选择对象]打“√”
注:此项在做复杂的地图时,要根据情况使用或不使用,后面的内容默认为打“√”了的
5.[纹理]里增加自己做地图需要用到的纹理包,许多官方纹理包在CS\cstrike里可以找到
注:cstrike.wad和halflife.wad两个纹理包是CS最主要的官方纹理包,常用纹理都在这两个里面。
cstrike.wad在CS\cstike 里halflife.wad在CS\valve里
注意:上图只是参考,究竟选什么wad文件,自己挑。
图中我选了官方纹理包cs_dust.wad和自制纹理包[M.L].wad。
特别提醒大家,使用的wad文件尽量都是放在同一文件夹下,否则在后面的编译中可能会出错。
你可以把wad文件都复制一份到同一文件夹内再进行增加。
其次使用的wad文件也尽量是在英文目录下,如果它们是在中文目录下的,后面的编译中也会出错
6.[游戏参数]里的[游戏数据文件]增加CS地图制作工具包08-01-18A\FGD\CS16_X-man_1002gold.fgd
7.其他设置不用管了,按[确定]保存以上设置
四.map的制作
1.新建一个map文件
2.选中[固体工具]在编辑窗口里用左键拖出一块方形
3.按回车键建立这个固体a
4.按后,点击固体a的中心来选中这个固体a
5.在这下拉菜单里选择视角,调整固体a各个面的厚度,不要窄了
注:什么叫“不要窄了”呢?就是说如果你要把厚度为60的固体挖出墙厚度为32的“房子”是没办法的,固体的厚度起码为64。
所以,窄了的话就会直接影响下面的6、7、8步骤
6.在选中固体a的状态下,点击[工具]里的[挖空]
7.就用默认值32吧,点[确定]
8.这时固体a变成了一个密闭的“房子”,“墙”的厚度为32
9.在这个下拉菜单里选[3D 纹理视图]
10.选中,鼠标左键按住编辑窗口中的某个位置来移动视角,右键可以上下左右移动,滚轴可以前进后退
11.找到“房子”
注:如果房子贴的是 aaatrigger 纹理或其他一些特殊的纹理,在编译时会导致出错
12.如果“房子”贴的不是你要的纹理,那么在[纹理组]的[浏览]里选一张纹理
13.选中“房子”后,按,纹理就被替换了
14.如步骤9再切换至2D视图。
按后,在“房子”里单击一下后,确认了放点实体的位置,再按回车键建立这个点实体,切换视角看一下,不要让这个点实体卡在“墙”中,或放在“房子”外了,一定要在2D视图多转换几次,这样才看得更清楚.
下图:回车后的顶视图
下图:侧视图
15.使用选中这个点实体,按右键,再点击[对象属性]
16.下拉菜单里选择 light ,里面的设置默认即可,关掉对话框。
这样,这张地图就有灯了
17.同样的方法,在房子里放点实体 info_player_deathmatch 和 info_player_start 各一个,它们分别是T和CT的出生点。
注意出生点之间不要接触、和其他固体也不要接触,都要保持一定的距离,否则在游戏中可能有人会被卡死;也不要放到“房子”外去了;放太高会摔死
18.这样,1V1的地图做好了,取名保存为map类型的文件,这里假设为cs1.map
注:文件名不支持汉字
五.地图的编译
1.打开X-Man超级地图编译器(在下载后解压的文件里),窗口应该显示如下
2.如果不是,就在[文件]—[打开设置]里选择CS地图制作工具包里的编译器设置存档.bcp
3.把刚才地图编辑器里所添加的纹理包在这里也都添加上去
注意:这个步骤做的就是选择打包非官方纹理进地图,[M.L].wad是自制纹理,所以需要打包进地图,否则别人将因 could not find [M.L].wad 而无法进入地图。
halflife.wad和cs_dust.wad等都是官方纹理包,所以不要打包
4.点击[设置]里的[设置]
5.把这4个 tool 的 path 设置都一一对应好,文件都在CS地图制作工具包\tools 文件夹里,点OK确定
6.这里找出cs1.map,按 Run 开始自动编译
7.编译时显示出来的许多数据都是编译过程的记录,也称编译报告,编译结束后它会说“按任意键继续”
8.好了,编译出来的 cs1.bsp 文件应该在放 cs1.map 的文件夹里了(如果不是,那是因为你做了本教程以外的设置),把它放入CS\cstike\maps里,运行CS看看吧!
编译失败的几个推测和解决方法:
1.CS地图所有实体或着点实体必须在一个完全封闭的固体空间内,如果只是看似封闭其实有裂缝的话,编译失败,当然更不能有实体或着点实体在外面
2.编译报告说Error:Could not find wad file话,请先确定是否在超级编译器中打勾了自制纹理包,然后注意:使用的wad文件尽量都是放在同一文件夹下,否则在编译中可能会出错。
你可以把wad文件都复制一份到同一文件夹内再进行增加。
其次使用的wad文件也尽量是在英文目录下,如果它们是在中文目录下的,编译中也会出错
3.地图和编译器的设置似乎没什么问题,但还是编译不成功:可以尝试保存设置关闭编译器后再用编译器编译一下
六.最后的话
1,在这里提醒一下大家,不要相信某人说什么做地图很难.其实做一张CS地图很简单,不要想得过于太复杂,只要你按照上面的方法做,就能够制作出一张简单的地图,只要能做出一张CS地图,你就一定可以做出更好,更完美的地图;注意:再次强调不要在制作过程中使用任何中文字,哪怕是路径也请你用英文.
很多英文你可能都不认识,没关系,一个个的自己去试就知道是什么意思,干什么的,有什么功能,而且你会很好的记住它.为什么要你去试?因为哪怕是一个英语过6级的人他都不可能全都认识游戏里面编译的词,我只能帮助你制作出你第一张简单的CS地图,要不要深入研究那是你的事.工具我已经提供给大家了,在上面有下载(简体中文版).
最后给那些爱上制作地图的CSer天书一本辅助你
2.再不会做暴你头!。
