电动床使用说明书
丝涟电动床说明书

丝涟电动床说明书摘要:一、丝涟电动床简介二、产品特点与优势1.智能调节功能2.人体工程学设计3.舒适性体验4.耐用性与安全性三、产品规格与参数四、使用与操作指南1.安装步骤2.操作方法3.维护与保养五、故障排除与售后服务正文:一、丝涟电动床简介丝涟电动床是一款集科技、人性化设计和高品质材料于一体的智能家具。
它采用先进的电动调节技术,为用户带来舒适的睡眠体验。
同时,丝涟电动床还具备多种功能,满足不同用户的需求。
二、产品特点与优势1.智能调节功能丝涟电动床搭载了智能调节系统,用户可以通过遥控器或手机APP轻松调整床头、床尾的角度,实现多种睡姿的切换。
此外,床垫的硬度也可以根据个人需求进行调节,为用户提供个性化的睡眠体验。
2.人体工程学设计丝涟电动床在设计过程中充分考虑了人体工程学原理,床垫采用S型曲线设计,贴合人体背部、腰部、腿部等部位,有效减轻压力,提高睡眠质量。
3.舒适性体验丝涟电动床选用高品质的材料,床垫具有良好的透气性,能够有效防止潮湿、异味,保持床垫清洁卫生。
同时,床头采用软质材料,为用户提供舒适的靠背,便于阅读、看电视或玩手机。
4.耐用性与安全性丝涟电动床采用高品质的金属材料,具有较强的抗压性和抗磨损性。
床架结构稳固,确保用户在使用过程中的安全。
此外,产品还配备了安全保护装置,如过载保护、漏电保护等,充分保障用户的人身安全。
三、产品规格与参数丝涟电动床分为多种型号,尺寸、颜色和配置可根据用户需求进行选择。
产品参数如下:1.床架尺寸:长180cm×宽150cm×高20cm(仅供参考,实际尺寸以购买为准)2.床垫材质:记忆棉、乳胶、弹簧等(可根据用户需求选择)3.电机功率:20W4.电压:220V四、使用与操作指南1.安装步骤(1)打开包装,取出所有零部件;(2)根据安装图纸,组装床架;(3)将电机与床架连接,接通电源;(4)测试电动床功能是否正常。
2.操作方法(1)使用遥控器或手机APP进行操作;(2)调整床头、床尾角度时,按下遥控器或APP上的对应按钮;(3)调整床垫硬度时,使用遥控器或APP进行设置。
电动起立床的使用说明

电动起立床的使用说明使用电动起立床可以提高生活质量和工作效率,让我们远离长时间坐着的问题。
下面是使用电动起立床的详细指南:第一步:准备工作1.确保床周围没有任何障碍物,确保您有足够的空间在起立过程中自由移动。
2.检查电源线和电线插头是否安全连接,以及电源开关是否在关闭状态。
第二步:调整高度1.旋转手柄或按下相应按钮以调整床的高度。
根据您的需要,可以选择提高或降低床的高度。
2.在调整高度过程中,您可以通过观察床的显示屏或按键面板上的指示来了解目前的高度情况。
3.确保床的高度调整到您最舒适的工作或休息位置。
第三步:起立和坐下1.当您想要起立时,按下起立按钮或拉动手柄,床会自动调整高度以帮助您站立。
2.当您想要坐下时,按下坐下按钮或推动手柄,床会自动调整高度以帮助您坐下。
3.在起立和坐下的过程中,请确保床的调整速度适中,以避免任何不适或突然的移动。
第四步:调整角度1.一些电动起立床提供可调节角度的功能,您可以根据需要调整床背部的角度。
2.通过按下或旋转相应按钮或手柄,您可以将床背部角度调整为正常坐姿或放松姿势。
第五步:使用记忆功能1.如果您的电动起立床配有记忆功能,您可以根据自己的需求保存所需的高度和角度设置。
2.在找到最佳高度和角度时,按下记忆按钮,系统将保存您的设置。
3.当您再次使用床时,按下相应的记忆按钮,床将自动调整到您之前保存的设置。
第六步:保养和安全1.定期清洁床的表面和机械部件,使用柔软的布擦拭,避免使用有害化学物质。
2.避免将床用于超过其最大承重量的物品或人员。
3.当您需要移动床时,确保床的电源已关闭,并小心地移动,以避免造成损坏或受伤。
注意事项:3.使用电动起立床时,请遵守相关的安全规定和警告,以确保您的安全和他人的安全。
使用电动起立床可以改善我们的工作效率和生活质量,帮助我们更好地适应不同的工作和休息场景。
通过遵循以上使用说明,您可以轻松地使用电动起立床,并充分享受它带来的好处。
电动医疗护理床使用说明书

Instrucción de la Cama médica eléctrica de cuidado De acuerdo con las valiosas experiencias de la atención del paciente y de rescatar que nos han ofrecido numerosos expertos y profesores de los principales hospitales,los investigadores de nuestra compañía han logrado diseñar y fabricar una nueva generación de producto para el cuidado de la salud: la eléctrica médica cama de cuidado.El producto mencionado tiene plenamente en cuenta las necesidades de los pacientes de alto nivel y de los cuidadores y cuenta con una variedad de funciones utiles para satisfacerlas. Dispone de la característica de ser práctico ,de forma hermosa , facíl de manejar y apto para la unidad de cuidados intensivos y la unidad para los funcionarios de alto nivel de los hospitales grandes y los medianos; también se adapta al hogar de ancianos y la familia. Lo siguiente son los modelos de la eléctrica médica cama de cuidado: DB-2、DB-2A、DB-3、DB-6、DB-8、DB-9、DB-11、DB-13、DB-14、DB-15 (unidad de cuidados intensivos)1、la teoría de la estructura :la eléctrica médica cama de cuidado estácompuesta por cabecera, contrapunto de la cama , chasis, tablero de la cama, televisión, contrlador, baradilla y rueda con freno,etc 2、índice de rendimiento:Los componentes de la placa de cama se pueden ser arbitrariamente ajustado a tres tipos de espacios: decúbito, semi-horizontal y el de pie curvado,además,todo el conjunto se puede alzar ,descender e inclinar,aquíestá el alcance de la regulación:1.tamaño:tamaño interior : 1950*1050mm tamaño exterior:2170*1200mm2.ángulo de inclinación de espalda :00- 7003.ángulo de inclinación de pierna :00- 35 0 altura de levantamiento :500-700mm5.ángulo de inclinación de conjunto :0°-1206. fuente de alimentación conectada :110V 60HZ7.Capacidad de carga segura200kg三、Instalación y uso:1、instalaciónAbre la embaraje , la tarjeta de cabecera debe ser puesta en la placa de cebecera ,cuelgala en el lado de pie de la cama,cuelga la placa del final de la cama ,que no cuenta con la tarjeta de cabecera,en el lado de espalda de la cama,también es necesario empujar la llave a la posición “off”,así que la cama está bien instalada.2、uso(1)cambio de la posición (la manera para usar la manija de control y la tecla de baranda es lo mismo)◆Si el paciente necesita una posición semi-horizontal, pulse la tecla de levantar la espalda en el controlador según las instrucciones marcadas en la superficie, la cama puede subir una posición arbitraria de 0 a 70 grados.◆Si se necesita curvar la pierna, pulse la tecla de levantar la pierna,así el lugar donde pone la pierna subirá una posición arbitraria de 0 a 35 grados.◆Si el paciente necesita una posición supina, pulse la tecla para levantar la cabeza o descender los pies,así la placa de la cama subirá una posición arbitraria de 0 a 12 grados.◆Si se necesita una subida o una baja del conjunto de la cama, pulse la tecla para levantar el conjunto de la cama,de este modo , la cama subirá una posición arbitraria según el anexo 1◆Si se quiere volver la cama a la posicón horizontal , pulse la teclapara levantar la cabeza, levantar los pies,descender la espalda y los pies respectivamente.⑦⑤③①⑧⑥④②La función de las teclas :①levantar la espalda;②descender la espalda;③levantar los pies;④descender los pies;⑤levantar el conjunto de la cama;⑥descender el conjunto de la cama;⑦levantar la cabeza y descender los pies;⑧levantar los pies y descender la cabeza(2)、uso de la barandillaA los ambos lados de la cama se instalan la barandilla de aleación de aluminio,de ABS y la hecha de tubo de acero.◆Cuando se usa la barandilla de aleación de aluminio,pulse la botón del lado de la barandilla y empujala subiendo a al fin,así la barandilla estará candada,y cuando no quiere usarla,retira la barandilla apretando la bottón de nuevo.◆Cuando se usa la barandilla de ABS,agarra el borde de la barandilla y elevalo subiendo hasta la sumidad,asíla barandilla estácandada automaticá,cuando no quiere usarla,tira la palanca amarilla que está debajo de la barandilla fuera.◆Cuando se usa la barandilla enchufada,apunta el lado con palanca roja al con ranura1y empuja la barandilla, asíla barandilla estácandada automaticá.El momento que quiera deshacerla,aprieta la palanca roja y la tira arriba con esfuerzo,así la barandilla está quitada.(3)uso de CPR para reiniciar de emergenciaHay dos botón de CPR en cada lado de la espalda de la cama, la espalda de la cama volverá a posición de plano pulsandola,este sistema está diseñado de estructura física,no tiene nada que ver con el fuente de alimentación四、ámbito de aplicación de la camaEs apto para la habitación de resucutación,la unidad de cuidados intensivos y la unidad para los funcionarios de alto nivelde los hospitales grandes y los medianos; también se adapta al hogar de ancianos y la familia.五、El efecto clínico:A juicio del hospital correspondiente, la respuesta es muy buena,quetrae comodidad a los pacientes y cuidadores。
电动车床使用说明书

电动车床使用说明书一、产品概述电动车床是一种便携式的车床工具,使用电动驱动系统,可以进行金属材料的车削加工。
本说明书将介绍电动车床的使用方法、注意事项以及维护保养等内容,旨在为用户提供详细的操作指南。
二、安全须知在使用电动车床之前,请务必仔细阅读以下安全须知,并严格按照要求操作:1. 使用前必须穿戴好个人防护设备,包括安全帽、眼镜、口罩等,并确保宽松的工作服袖口和袖子,以避免被绞盘丝线等夹住。
2. 在操作车床过程中,应将工作区域保持整洁,避免杂物堆积和人员混乱。
3. 使用电动车床时,禁止在工作区域内有其他人员接近,以免发生意外伤害。
4. 严禁在机器运行时触摸或调整旋转部件,以免发生夹伤事故。
5. 当发现车床故障或异常情况时,请立即切断电源,并向专业人员寻求帮助。
6. 使用电动车床时,应注意电源插座的使用安全,以免发生电气意外。
三、操作步骤在正式使用电动车床之前,请按照以下步骤进行准备并进行正确的操作:1. 确保电源插座连接良好,并按下电源开关,确保车床正常运转。
2. 将待加工的金属材料固定在车床工作台上,并调整好加工位置。
3. 打开主轴锁紧装置,根据工件的形状和尺寸需求,调整车床刀具。
4. 使用手柄或按钮启动车床主轴,确保车床工作平稳无异响。
5. 调整进给手柄,确定加工速度和深度,开始进行车削加工。
6. 在加工过程中,根据需要及时更换刀具,并保持工件表面的清洁。
四、注意事项1. 在操作电动车床时,切勿使用双手同时操作,以防夹伤。
2. 切勿将杂物或工具放置在车床工作台上,以免发生意外。
3. 在更换刀具或调整加工位置时,应先切断电源,并等待车床完全停止运转后再操作。
4. 需要调整车床刀具时,应使用调整工具,并确保刀具牢固安装。
5. 当发现车床加工出现异常声音或震动时,应立即停机检查,排除故障后方可继续使用。
五、维护保养为了保证电动车床的持续使用和性能稳定,需要进行定期的维护保养:1. 每次使用完毕后,应清洁车床表面和工作台,避免积累过多的金属屑和油污。
hillrom电动病床说明书解锁

hillrom电动病床说明书解锁Hillrom电动病床说明书1.产品介绍Hillrom电动病床是一种高质量、先进的医疗设备,用于提供舒适和安全的床铺环境给患者。
该病床采用先进的电动控制系统,使医护人员能够轻松地调整床的高度和位置,以满足患者的需要。
Hillrom电动病床配备了多种功能,包括调整床头和床尾的角度、支持患者转身的侧护栏、以及可供患者使用的遥控器等。
此外,该病床还具备稳定性和耐用性,能够适应各种医疗环境,提供长期的使用。
2.使用方法2.1调整床高度:使用遥控器上的按钮或病床上的控制面板,您可以轻松地调整床的高度。
按下“高”按钮,床的高度将增加;按下“低”按钮,床的高度将下降。
您可以根据患者的需要和医护人员的工作要求来进行调整。
2.2调整床头和床尾的角度:使用遥控器上的按钮或病床上的控制面板,您可以调整床头和床尾的角度。
按下相应的按钮,床头和床尾将升起或降下,以提供患者所需的角度。
您可以根据患者的舒适度和医疗需求进行调整。
2.3 使用侧护栏:Hillrom电动病床配备了可调节的侧护栏,用于支撑患者转身时的安全。
您可以轻松地将侧护栏调整为适当的高度,以确保患者的安全和舒适。
2.4 使用遥控器:Hillrom电动病床配备了一个方便的遥控器,患者可以使用它来控制床的高度和角度。
遥控器上有直观的按钮和指示灯,方便患者操作。
患者只需按下相应的按钮,床就会相应地进行调整。
3.安全警示使用Hillrom电动病床时,请务必遵循以下安全警示:3.1请确保病床连接到可靠的电源,以避免电力不足或电力冲击。
3.2在调整床的高度和角度时,请确保患者的四肢和身体部分没有被夹住或受伤的风险。
3.3在调整床高、床头和床尾角度时,应缓慢进行,以防止突然的移动对患者造成不适或受伤。
3.4在使用遥控器时,请将其放置在患者方便触及的位置,以方便患者控制床的高度和角度。
3.5请定期检查床的各个部件,如电路、开关、控制面板等,以确保其正常工作。
电动病床使用说明书

器械名称:电动病床
型号:JT-DDBC-01
规格:
器械备案号:
生产日期:
产品结构:
产品预期使用范围:
生产企业名称:
生产地址:
联系电话:
预期用途:用于运送转移患者。
1900×630×650mm
生产厂家:云南骏腾医疗设备有限公司
生产场所:云南省昆明市嵩明县嵩阳镇杨桥街
产品结构组成:
该产品由床面、支撑架、护栏、脚轮等组成。
3.经过检查各部位连接处是否固定,有无松动现象。
4.床面上防止利刃器具划割以保平整和柔韧性。
5.禁止超负荷使用。
6.禁止从前部上床,要从侧面上床。
贮存、运输
该产品应贮存贮存在相对湿度不超过80%,无腐蚀性气体和通风良好的室内。运输中应防雪、雨、不应用业和个人提供合同协议,策划案计划书,学习资料等等
产品标准:YJT-0006-2014
使用说明:
1.将病人放置在担架上,两人同时抬起担架,抬起时需保持担架平衡。
2.如需转运或者移动,将担架放置在支撑架上固定,移动担架车即可。
3.不使用时请将担架置于担架车支撑架上。
注意事项
1.背框、脚框升高或下降时检查支撑架带卡糟与支撑架杠是否卡牢。
2.支撑架与背框、脚框连接处螺丝是否松动。
打造全网一站式需求
7F06381700A2_CA-P电动床说明书
13 日常保养
………………………………………………………………… 60
14 长期保管
………………………………………………………………… 61
15 故障与处置 16 售后服务
………………………………………………………………… 62~63 ………………………………………………………………… 64
1
1 使用目的/各部分名称
■调节床板角度时,请注意患者的状态。
● 在患者活动时调节床板角度,有可能导致跌落而受伤。 ● 特别是无法保持自己体位的患者,请边支撑患者的身
体边操作,背和膝抬高的状态下,视线请不要离开患 者,否则有可能导致跌落或被护栏和床头板、床脚板 的间隙夹住而受伤。
从床上跌落,或者被夹在护栏床面板之间,有可能造 成伤害。
7 安装方法
1.角度计
………………………………………………………………… 19
2.床垫止滑器 ………………………………………………………………… 19
3.床头板/床脚板 ………………………………………………………………… 20
4.遥控器
………………………………………………………………… 21
8 电源连接 ……………………………………………………………………… 22
■请注意不要将头和颈伸入护栏和床垫的间隙中
●将头和颈伸入间隙中,可能会拔不出来而造成伤害。
■背部床板升起时,为避免被头侧护栏夹住请勿上下床。
●在背部床板动作时上下床,会使床失去平衡而翻倒、 跌落,有可能造成伤害。
■请勿将水等泼洒在上面
小心触电
● 请不要将水泼洒到马达、遥控器、护士控制面板的 电装品上,否则会导致故障发上。如果不慎泼到水 时,必须将电源插头从插座拔出,并与销售商店联 系。
家用电动床使用说明

家用电动床使用说明
1、马达必须按照头、尾安装,否则会影响电动效果;
2、电动床一般都会配相应的操作遥控,遥控里的每一个按键都会
有指示说明,在接通电源使用时,想要实现自己想要的功能就必须按照遥控指示操作,切不可几个按键同时按住,否则会造成电动马达反应不过来而损坏;
3、电动床程不同状态时的负载能力不一样,如果电动床超负荷运
转有可能会烧坏电动马达。
床尾最大负载180KG,床头最大负载90KG;
4、不能讲电动床长时间暴晒,否则面布容易褪色;
5、床体不能放置在过于潮湿之处,以防机械构建生锈,影响电动
床正常使用;
6、认为污渍可用洗涤剂清洗,使用前先在不显眼处小面积试用,
确保对面料无伤害的情况下方可使用。
电动锯床使用说明书

河北省邯郸市2019-2020学年中考第一次质量检测物理试题一、单选题(本大题共10小题,共30分)1.下列现象中,能表明分子在不停地做无规则运动的是A.濛濛细雨从空中下落B.擦黑板时,粉笔灰在空中飞舞C.水和酒精混合后体积变小D.炒菜时,满屋飘香D【解析】【详解】【详解】AB.雨和粉笔灰都不是分子,它们的运动属于机械运动,故AB错;C.水和酒精混合体积变小,说明分子间有空隙,不能表明分的运动,故C错;D.能闻到菜的香味,是由于分子的不停地夫规则运动引起的,故D正确;应选D.2.我国是严重缺水的国家。
水资源人均占有量是世界的25%,是世界上人均水资源最贫乏的国家之一。
了解地球的水循环知识,提高节水意识,培养良好的用水习惯,是我们每个公民的义务和责任。
关于地球的水循环,下列说法正确的是A.海水吸热,汽化成水蒸气B.水蒸气与冷空气接触,熔化成水滴C.小水滴遇到更冷的气流,凝华成小冰珠D.小冰珠在降落过程,液化成雨水A【解析】【详解】A.海水汽化成水蒸气,且汽化是吸热过程,故A符合题意;B.水蒸气与冷空气接触,液化成水滴,故B不符合题意;C.小水滴遇到更冷的气流,由液态变为固态,凝固成小冰珠,故C不符合题意;D.小冰珠在降落过程,由固态变为液态,熔化成雨水,故D不符合题意;【点睛】物质通常存在三种状态,物质由一种状态变为另一种状态的过程,叫物态变化,总共有六种变化过程,像这类的题目,只要记清楚物态变化过程即可正确解题。
3.如图所示,用不变的拉力F匀速拉动重为G的物体A,使物体A沿水平方向移动了一段距离s,在此过程中拉力F做的功为()A.Fs B.Gs C.2Fs D.(G+F)sC【解析】试题分析:由图可以看出,该滑轮组绳子的有效股数n=2,绳子自由端移动2s,已知拉力为F,由功的公式可以计算拉力所做的功.解:由题知:拉力为F,绳子自由端移动距离是2s;由功的公式得:W=2Fs.故选C.【点评】本题考查功的计算,做功的两个必要因素是:一是作用在物体上的力,一是物体在力的方向上移动的距离,本题中的难点是判断拉力方向上移动的距离.4.对下列现象理解错误的是()A.用吸管吸饮料利用了大气压B.旗杆顶部安装定滑轮可以省力C.拍打衣服上的灰尘利用了惯性D.静止在桌面上的书受到平衡力B【解析】旗杆顶部安装定滑轮不可以省力,但可以改变动力的方向.所以选B.5.调节手机的音量,是为了改变声音的A.响度B.音调C.频率D.音色A【解析】【详解】调节音量时,扬声器的振幅发生改变,所以发出声音的响度发生改变.6.将甲、乙两个完全相同的溢水杯放在水平桌面上,各自装满密度分别为ρ1、ρ2的液体,ρ1:ρ2=3:2.将重为G的物块轻轻放入甲溢水杯中,物块漂浮在液面上,并且有1/4的体积露出液面(如图甲所示).再将该物块轻轻放入乙溢水杯中,物块沉底,物块对乙溢水杯底的压力为F,则下列说法正确的是A.F:G=1:9B.物块在甲溢水杯中受到的浮力小于在乙溢水杯C.放入物块前后,甲杯对桌面压强变大D.放入物块前后,乙杯底部所受液体压强变大A【解析】A.因为物体A漂浮在甲容器中,所以F浮=G A,即ρ1V排g=134Vg Vgρρ=,由此可得ρ1:ρ=4:3,由题知,ρ1:ρ2=3:2.,而ρ1:ρ=4:3,所以1211392483ρρρρρρ===,物块A对乙溢水杯杯底的压力:F=G-ρ2Vg=G-881999Vg G G Gρ=-=,所以F:G=1:9,故A正确.B.A在甲中漂浮,浮力等于A的重力;在乙中下沉,浮力小于乙的重力,所以甲容器中A所受到的浮力大于乙容器中A所受到的浮力,故B错误.C.A在甲中漂浮,浮力等于A的重力等于排开液体的重力,故容器对桌面的压力不变,根据pFS=知,压强不变,故C错误.D.放入A后,乙容器内液体的深度不变,由p=ρ液gh得,液体对容器底的压强不变,故D错误.答案为A.7.在平直轨道上行驶的火车中,放在车厢内小桌上的苹果相对于下列哪个物体是运动的()A.这列火车的机车B.坐在车厢椅子上的乘客C.从旁边走过的列车员D.关着的车门C【解析】【详解】放在车厢内的小桌上的小苹果相对于这列火车的机车、坐在车厢椅子上的乘客以及关着的车门位置没有改变,所以相对于这些物体,苹果是静止的;苹果相对于从旁边走过的列车员位置是变化的,所以相对于列车员苹果是运动的.故C 符合题意为答案. 8.下列做法利用物态变化放热的是( )A .运输食品时,为了防止食品腐烂变质,常放些干冰B .北方的冬天,常在保存蔬菜的菜窖里放几桶水C .夏天,为了凉快,常在地面上洒水D .夏天,为了喝到冰凉的饮料,常在饮料中加冰块 B 【解析】 【详解】A .运输食品时,为了防止食品腐烂变质,人们常在运输箱放些干冰,利用了干冰升华吸热的特点,故A 不符合题意;B .北方的冬天,储存蔬菜的菜窖里常放几桶水,可防止菜被冻坏,利用了水结冰放热的特点,故B 符合题意;C .夏天,在地板上洒些水,感到凉爽.利用了水蒸发吸热的特点,故C 不符合题意;D .夏天,喝冰凉的饮料加上几个冰块,是因为冰块熔化吸热,故D 不符合题意; 故选B 。
电动床使用说明书

产品标准号:产品注册证号:生产许可证号:ABC-C型电动床使用说明书地址:电话:邮编:ABC-C型电动床属Ⅱ类医疗器械产品,由床脚、床身、床面、床头板、床尾板、电气部分等组成。
本产品采用220V交流电源供电,操作控制器便可使电动床的床面升降、折转。
可供医院普通病房、ICU病房或类似场所对患者进行诊断,治疗或监护时使用。
产品的安全性能和质量状况直接关系到人民的生命安全,我公司在产品开发过程中,便以GB9706.1-1995《医用电气设备第一部分:安全通用要求》作为设计的主要依据,并结合产品自身特点,将床脚、床身等承重部件采用坚固的材料制造,为适应患者要求,满足临床医护功能,本产品还设置了控制器,确保床面的升降、折转动作可靠,操作方便。
目录一、型式结构 (2)二、命名 (2)三、产品用途及设备上标志含义:....................... .......... .第2页四、主要技术参数.................................... (2)五、功能概要 (3)六、配件名称及功能 (3)七、使用方法 (3)八、电器符号说明 (3)九、清洗、消毒、预防性检查和保养 (4)十、注意事项 (4)十一、故障及排除措施 (5)十二、售后服务 (5)十三、包装、运输和贮存环境条件 (5)十四、电磁兼容表格 (6)一、型式结构ABC-C型电动床由床脚、床身、床面、床头板、床尾板、电气部分等组成。
可藉控制器来调节背板、腿板、床面升降及床面折翻角度的前倾和后倾。
二、命名ABC —□设计序号(以字母表示)产品代号(以字母ABC表示)三、产品用途及设备上标志含义:供临床各类病房承载护理患者用。
IPX4 外壳对有害进液防护程式度为防溅水表示B型应用部分保护接地5、进液防护:IPX46、非AP/APG型设备7、外形尺寸2200×900×500mm8、背板折转65°9、腿板折转35°10、床面高度范围500~750(mm)11、床面折翻角度:前倾12°12、床面折翻角度:后倾12°13、床面升降速度:≥300mm/min五、功能概要五功能电动床:a) 背板折转 b) 腿板折转 c) 床面升降 d)前倾 e)后倾背板上折、下折床面上升、下降腿板上折、下折床面前倾、后倾通过上述调节有助于患者身体姿势的正常调整及有规律地转换受压部位,可使患者感觉更加舒适,护理更加方便。
丝涟电动床说明书

丝涟电动床说明书一、产品概述丝涟电动床是一种高品质的床具产品,采用先进的电动技术,具备多种功能和调节模式,为用户提供舒适的睡眠和休息体验。
本说明书将详细介绍丝涟电动床的特点、使用方法以及注意事项,以帮助用户正确使用和保养产品。
二、产品特点1. 高品质材料:丝涟电动床采用优质的材料制造,床架坚固耐用,床面舒适柔软,能够有效支撑身体并提供舒适的睡眠环境。
2. 电动功能:丝涟电动床配备先进的电动系统,可通过遥控器实现床背、腿部和整体升降的调节,用户可以根据自身需求选择最合适的睡眠姿势。
3. 多功能按摩:丝涟电动床具备多种按摩模式,如揉捏、敲击、推拿等,能够舒缓身体疲劳,促进血液循环,提高睡眠质量。
4. 具备记忆功能:丝涟电动床具有记忆功能,可以根据用户的习惯记录并调整床面的角度,为用户提供个性化的睡眠体验。
5. 静音设计:丝涟电动床采用静音设计,电动调节过程中噪音小,不会影响用户的睡眠质量。
三、使用方法1. 开机与关机:将电源线插入床架底部的插座,按下遥控器上的电源按钮,床架即可开机。
关机时,长按电源按钮即可关闭床架。
2. 床背调节:通过遥控器上的背部调节按钮,用户可以调整床背的角度,以适应不同的休息和阅读需求。
3. 腿部调节:遥控器上的腿部调节按钮可以实现腿部高度的调节,用户可以根据自身需求提升或降低腿部的位置。
4. 整体升降:通过遥控器上的整体升降按钮,用户可以调整床架的整体高度,以适应不同的使用场景和身体需求。
5. 按摩功能:按摩功能可通过遥控器上的按摩按钮进行开启和关闭,用户可以选择不同的按摩模式和强度。
四、注意事项1. 使用过程中请确保电源线插头插紧,以免松动导致电源不稳定。
2. 使用遥控器时,请确保电池电量充足,遥控器与床架之间的信号距离不宜过远。
3. 使用按摩功能时,应根据个人情况选择适宜的按摩模式和强度,过度使用可能会对身体造成不适。
4. 长时间不使用时,建议断开电源,以免造成不必要的能源浪费。
医用电动床使用注意事项

医用电动床使用注意事项医用电动床是现代医院中常见的床铺设备,它为病患提供了更好的护理和舒适度。
然而,为确保安全和有效地使用医用电动床,人们需要了解一些使用注意事项和操作规范。
本文将介绍医用电动床的使用注意事项,以及相关的操作指南,以确保床铺的安全和保养。
一、放置和固定在使用医用电动床之前,要确保床铺放置在干燥、通风的空间中,并保持平稳稳固的地面。
床垫应该安装好并充满气,床铺的整体结构应该牢固且无松动。
二、电源和电缆医用电动床需要连接电源以实现正常工作。
在插拔电源线时,一定要确保电源已经关闭。
电缆应该放置在安全的位置,避免任何人员或其他物品绊倒或损坏电缆。
三、操作控制面板在使用医用电动床之前,要确保控制面板干净整洁,按钮、开关等部件完好无损。
了解每个按钮和开关的功能和作用,按照正确的方式操作。
在操作时,应尽量避免使用过大的力量,以防损坏控制面板。
四、调节床铺高度医用电动床通常可以调节高度,以适应不同的护理需求。
在调节床铺高度时,应先确保病患已经离开床铺,并确保周围没有任何阻碍物。
通过按下相应按钮或旋转手柄,慢慢调整床铺的高度,以避免突然移动或震动。
五、护栏和安全措施医用电动床通常配有护栏,以提供额外的安全保护。
在使用床铺时,要确保护栏处于正确的位置,并牢固固定。
在需要移动护栏时,请按照正确的方式进行操作,以避免夹伤手指或造成其他伤害。
六、床铺清洁和消毒为确保病患的卫生和床铺的持久使用,定期进行清洁和消毒是必要的。
在进行清洁和消毒之前,一定要先断开电源,并等待床铺完全干燥。
使用适当的清洁剂和方法,彻底清洁床铺的表面和细节部位。
七、维护保养定期进行床铺的维护保养,可以延长其使用寿命并确保其正常运行。
保持床铺干燥和清洁,检查床架和电机的运作是否正常,修复或更换磨损或损坏的零部件。
如果发现异常情况或故障,请及时联系专业维修人员进行修复。
结语正确使用和维护医用电动床对于保证病患的安全和舒适至关重要。
通过了解和遵守医用电动床的使用注意事项,如放置和固定床铺、处理电源和电缆、正确操作控制面板、调节床铺高度、使用护栏和进行床铺清洁和消毒等,可以确保床铺的稳定和功能的正常运行。
电动产床的使用流程卡

电动产床的使用流程卡概述本文档旨在介绍电动产床的使用流程,包括准备工作、床的操作方法和维护保养等内容。
电动产床是一种使用电动机驱动的床具,适用于医院、护理院和家庭等场所,方便患者或老人的起躺、调整姿势和移动等需求。
准备工作在使用电动产床之前,需要进行以下准备工作: 1. 清理床面:确保床面清洁整齐,没有杂物和污渍,以使患者或老人有舒适的休息环境。
2. 检查电源:确认电动产床的电源接口是否正常,并检查电源线是否损坏,确保安全使用。
3. 准备遥控器:将电动产床配备的遥控器准备好,确保遥控器的电池电量充足,并放置在便于患者或老人达到的位置。
床的操作方法电动产床一般配备了遥控器来实现操作,以下为电动产床的基本操作方法: 1.开关机:按下遥控器上的开关机按钮,启动或关闭电动产床。
启动后,床上会有指示灯亮起。
2. 调整高度:使用遥控器上的高度调节按钮,可以将床的高度调整到适合的位置。
避免床面过高或过低,造成不便或不舒适。
3. 调整躺卧角度:使用遥控器上的躺卧角度调节按钮,可以将床的躺卧角度调整到适合的姿势。
根据实际需求,可调整成平卧、半卧或坐起等不同角度。
4. 侧护栏操作:电动产床一般配备了侧护栏,可以提供侧面支撑和保护。
使用遥控器上的侧护栏操作按钮,可以将侧护栏升起或降下,方便患者或老人出入床铺。
5. 床的移动:某些型号的电动产床具备移动功能,使用遥控器上的移动按钮,可以将床移动到指定位置。
出于安全考虑,移动床时需要确保没有障碍物,并注意患者或老人的安全。
维护保养为了保证电动产床的正常使用和延长使用寿命,需要进行定期的维护保养工作:1. 清洁床面:定期清洁床面,可以使用湿布擦拭,避免污渍和细菌滋生。
2. 电源线检查:定期检查电源线是否有断裂或损坏,如有问题及时更换,以保证安全使用。
3. 遥控器维护:定期检查遥控器的电池电量,如有低电量提示,及时更换电池。
4. 润滑维护:床的调节机构需要定期进行润滑,以确保操作的灵活性和可靠性。
电子床床垫与控制杆说明书

See Note(s) A
See Note(s) B
See Note(s) B
1104345
7001M300 7001M305
Molded Grey
5310IVC
5890IVC
Plug with O-Ring
1115288
1117177
1121270
1116644
6 Pin White
NOTE: A - Junction Box Replacement Kit includes: Junction Box, Power Cord, and Adapter Cords. Adaptor Cords allow the use of
1104347-NLA 7001M297
See Note(s) C
1125307
1132750 5600M008
BAR600IVC
BAR5490IVC
Square 4 Pin White
7001M297 1106398-NLA
See Note(s) C
1125307
1132750 5600M008
NOTE: A - Junction Box Replacement Kit includes Junction Box, Power Cord, and Adapter Cords. Adapter Cords allow the use of
Hi/Lo Motor with Bracket
Foot Motor with Pull Tube
5409-7
52000M367 5880M067-N 5990M018-N 5880M068-N
5996-NLA Rectangular 7001M297
阿普丽电动摇床说明书

阿普丽电动摇床说明书电动摇篮是在传统摇篮的基础之上,添加智能控制系统,达到模拟人力推动摇篮效果的一种智能育婴摇篮。
具体工作原理是通过控制器的智能数据控制,来控制电动摇篮的摆幅,可根据宝宝不同的需要而进行手工或自动调整。
电动摇篮不仅可以使婴幼儿得到合理照顾,还可以减轻新爸爸新妈妈的育儿负担。
躺在电动摇篮里面,宝宝可以尽情地感受着被轻轻晃动的感觉,犹如在妈妈肚子里面熟悉的感觉,这样宝宝会感到很安心,能够安静地睡觉和开心地玩耍。
一、阿普丽电动摇篮使用说明1、特别要注意对晃动幅度与震动程度的合理把握。
2、科学的频率是低于48次/分钟,摆幅以5-25CM为宜,摆幅不宜太大,频率切忌猛烈。
3、要整体摇晃不要局部摇晃,因为大部分双手人为摇晃会局部摇晃,可以借助摇篮整体摇晃。
4、同时特别提醒很多带宝宝的父母或者长辈因为心情或者情绪的问题,影响双手摇的幅度、频率,不管心情多不好,都要保持匀速摇晃宝宝。
如果很难改变喂养宝宝的人摇的习惯,可以借助智能摇床或者摇篮。
5、一般不要选择手动摇篮,因为力度很难控制,导致频率和幅度都难控制。
6、宝宝哭闹的时候不要误以为摇得越快宝宝越舒服和享受,这样对宝宝的脑发育有影响。
7、个别家长逗宝宝开心,把宝宝向高处抛这些行为都是错误的。
二、阿普丽电动摇椅拆装方法1、先把底座装好,底座装的时候螺丝一定要拧紧。
2、然后把座布套在座驾上,同时把纽扣扣上,再把摇椅插入底座,插的时候要向下压,卡到底,压紧后就安装好了。
3、如果要装凉席在摇椅上的话,把摇椅上自带的卡扣穿过凉席,全部扣住后就行了。
4、接着装上枕头,再打开侧边的纽扣,装上遮阳棚,把遮阳棚撑开就能给宝宝使用了。
拆的方法就是和装的方法反着来就行,当然如果宝宝需要用的话,不需要用完就拆,等宝宝彻底不用了再拆就可以了。
三、阿普丽电动摇椅蓝牙连接方法1、首先进去手机的应用商城,在手机上下载APP。
2、开启摇椅的蓝牙功能,同时按音乐键和“-”键三秒,这时候会看到屏幕右上角显示蓝牙的标志。
GhostBed电动床使用说明书

OWNER’S MANUALInstallation & OperationSerial No.GB_V2_Manual.Safety & Warranty Warnings (01)Parts List (02)GhostBed Electronics Quick Reference Guide (03)Installa tion Guide (04)GhostBed Remote Control Ins tructions (07)Se tting Programmable P ositions and Pairing Remote (08)Special Func tion (09)Synchronizing Two Bases (10)Headboard Bracket Installa tion Guide (11)Tr oubleshooting (12)READ THE FOLLOWING INFORMATION CAREFULLY BEFORE USING THIS PRODUCTIf unable to understand warnings, cautions, and/or instructions, contact the dealer or technical personnelif applicable, before attempting to use the equipment. Otherwise, injury or damage may result.SAFETY WARNINGS:• Do not use bed outdoors.• Do not use bed near explosives.• Using bed with oxygen administering equipment other than the • When using nasal or masked type administering equipment, route and secure oxygen or air tubing properly to ensure that tubing does not become entangled or damaged during normal operation of the bed.• Use caution when having liquids in or around the bed to ensure no spilling occurs. In case of spillage, stand in a dry, clean area of the area around bed to dry thoroughly before using the electric controls again. Do not eat or drink hot liquids while operating the bed.• This appliance is not intended for use by persons (including children) with reduced physical, sensory or mental capabilities, or lack of experience and knowledge, unless they have been given supervision or instructions concerning use of the appliance by a person responsible for their safety.• Do not allow children or individuals with disabilities to operate the bed without adult supervision.• Do not allow any person or pet under the bed at any time.• During bed operation, make sure body is positioned within the bed when operating bed functions.WARRANTY WARNINGS:Do not open or tamper with control box, motors, or remote (with the exception of battery compartments). The warranty will be void if the internal workings of these components are tampered with.Product Rating:The motors are not designed to operate continuously for more than [2] minutes in an [18] minute time period or approximately 10% duty cycle. Attempting to circumvent or exceed this rating will shorten the life expectancy of the foundation and may void the warranty.Operating Information:• After power foundation assembly is completed, operate remote control to ensure proper functions.• Keep moving parts free of obstruction during bed operation (including sheets, clothing, tubing, wiring, and products using electric power cords).• Distribute body weight evenly over bed surface. Do not place entire weight on head or foot sections of the bed, during repositioning and entering or exiting bed.Hospital Use Disclaimer:This power foundation is designed for residential use only. It is not approved for hospital use and does not comply with hospital standards.Weight Limits:This product is not rated to support weights in excess of 750 pounds inclusive of the mattress and bedding. The bed will structurally support this weight, provided it is evenly distributed across the foundation. The power foundation is not designed to support or lift this amount in the head or foot sections alone. Exceeding this weight restriction could damage the bed and/or cause injury and willvoid the warranty.RADIO FREQUENCY: 2.4 GHzAttached tothebedframeAll electronics and components that need to be installed are located in boxes under the foundation orattached to the frame. Before discarding the packing materials, ensure that all the parts are accounted for.BBed Legs (6)CPower Supply (1)DPower Cord (1)FRetainer Bar (1)AAAA Batteries (2)ERemote Control (1)Sync cord ( TXL model only )GGHOSTBED WIRELESS OVERVIEWGhostBed Adjustable Power Base Electronics Quick Reference GuideFoot MotorUSB PortsHead Massage MotorHead MotorControl Box LED LightF o o t M a s sa g e M o t o r rRemoteMotorLED LightFoot MotorHead MotorControl BoxUSB PortsPower SupplyPower CordHead MassageFoot Massage MotorNote: For safety reasons, lifting of the adjustable bed frame must be performed by two (2) people; and theSTEP 1Lift the folded bed frame unit out of the shipping cartonSTEP 2Lower the head and foot frame pieces with their topside facing downward.STEP 3Using a pair of scissors (not included), cut the tiesto remove all accessory boxes and retainer bar frominside the unit.Attaching the bed legsRemove the six (6) bed legs from the accessory box. Hand tighten the legs by threading them clockwise into the pre-threaded holes on the bed frame.Installing the retainer barSTEP 1Turn the bed frame over carefully, top side up.STEP 2Insert the ends of the retainer bar into the quickconnect brackets located at the foot of the bed.Setting up the electronicsSTEP 1STEP 2Take out the power supply and the power cord from the accessory box.Connect the power cord from the control box to thepower supply.STEP 3Connect the power cord that was packaged with thepower supply to the power supply.STEP 4STEP 5Plug the power cord into a working electrical outlet.The LED lights under the base will flash for 10 seconds .Install the two (2) AAA batteries into the remote control.STEP 6Confirm the remote control works by pressing the lift buttons. Installation for single or independent operation of the bed frame is now complete.PAIRING REMOTEThe wireless power bed has a programmable feature that allows you to save custom positions. Please read all the instructions below before setting your custom presets on the remote.STEP 1STEP 3Adjust the head and foot to your desired position.To adjust the saved position, repeat steps 1 and 2 and the newposition will be saved.STEP 1them when needed.The original remote that comes in the box is already paired to the foundation. No further action is required. In the event that the remote is not paired with the foundation, follow the steps below.STEP 2Plug the power cord to the power source.button located on the side of the control box 2 times and then press the “PAIR” button located on the remote.Your adjustable bed frame comes with a power supply that, when powered with two new 9V batteries, supports the emergency power down feature.The batteries are not included and work for a single use only.If a power failure occurs while the head and/or foot sections are raised, do thefollowing:Emergency power downSTEP 1Install two (2) new 9V batteries in the batterycompartment of the power supply.STEP 2Press the flat position on the remote if there is nopower from the electrical outlet.If simultaneous operation of two foundations is desired, please read the instructions.STEP 1STE Light on Set Remote B operate both bases too.be able to operate both beds simultaneously.Note:been separated from the remote A. STEP 2Plug the synchronizing cable into 2 control boxes of 2 bases.simultaneous operated by Remote A.Base B Base AHeadboard brackets are an optional accessory and are not included.A 1/2'' (13 mm) socket and 1/2'' (13 mm) crescent wrench are necessary to complete installation.STEP 1STEP 3STEP 2The headboard bracket will have 2 long slots to accomodate anyframe type. Align the appropiate slots on the bracket with the holeson the bed. Use long bolts and nuts to secure the bracket. Makesure the bolts are tight. You may now connect your headboard to the attachment plates using the remaining short bolts and nuts to secure it to the brackets. The heads of the bolts will face outward. Use a 1/2" (13 mm) socket and 1/2" (13 mm) wrench to tighten the bolts.To put the T-Bracket and Headboard Bracket together, you will need (2) short bolts and (2) nuts. Slip the bolts through the holes from T-Bracket to Headboard Bracket with the head of bolt facing outward. Use 1/2'' (13mm) socket and 1/2'' (13mm) wrench to tighten the bolts.In the event that the power foundation fails to operate, assess the symptoms and possible solutionsprovided in the chart below.In the event that the power foundation fails to operate, assess the symptoms and possible solutionsprovided in the chart below.SYMPTOMS SOLUTIONSHead & Foot lift function has minor interference durling operation.A clicking noise is heard under the bed when raising or lowering.Check batteries in wireless remote control, replace with two (2) new AAA batteries if necessary.Make sure that you are following the duty cycle of the motors (do not operate more than two minutes over a 18-minute period, or approximately 10% duty cycle).Press the lift buttons squarely and accurately.Wireless remote control may be experiencing common Radio Frequency Interference from other radio transmitting devices. Wait several seconds, and then try pressing appropriate button again, See FCC Compliance Statement on page 1 of this guide.This is normal. The lift motor relays “click” when they are engaged. No action is required.。
Delta 1000超轻型半电动床1号所有者组装和操作手册说明书

Ultra Light Plus, Semi Electric BedItem # 15030Owner’s Assembly And Operating ManualAssembly InstructionsABCDEFGHIJKAssembly Instructions Cont.3. Connect the head spring by aligning with foot spring and swinging both ends away from each other. (Continued on next page)2. The lock collar comes pre-set from the factory. Ensure that it is 1/4” - 1/2” away from hanger bracket. If not, slide lock collar 1/4” from the foot side of the hanger bracket asshown.Tighten thumb screw.Note: The rail is marked full or semi asa guide.Thumb Screw1.Install drive shaft onto foot section.Continued4. With bed on side extend the shaft until itreaches the full length of bed.a. NOTE: The shaft adjustment holes aremarked to indicate the style (semi/full) of bed the shaft is being installed on.5. Optional: Insert lock pin through connectedsleep surface and secure with spring clip.5A. Connect head section and foot sectionby squeezing together and attachingwith spring links. Pull up the headsection and foot section to releasetension between the springs.HAND CONTROLThe Competitor bed comes with a hand control that will illuminate when the bed is plugged into a grounded or polarized wall outlet, or with 9V battery (sold separately) installed in the hand control. The hand control will illuminate as long as the wall or battery has power. With this battery installed, the motor can be operated to return the sleep surface to the horizontal position in the event of a power failure.NOTE: Before installing motor, plug handpendant cable into motor as shown6. Connect the 9V battery (sold separately) to the battery clip on the motor. It is stored in the recess under the motor cover. With this battery installed, the motor can be operated to return the sleep surface to the horizontal position in the event of a power failure.7. To install motor, remove locking caps on top ofthe motor.HAND CONTROLThe Competitor bed comes with a hand control that will illuminate when the bed is plugged into a grounded or polarized wall outlet, or with 9V battery (sold separately) installed in the hand control. The hand control willilluminate as long as the wall or battery has power. With this battery installed, the motor can be operated to return the sleep surface to the horizontal position in the event of a power failure.There are two methods for the installation of the motorMethod AThe motor is installed on the bed frame when the frame is standing on its side.Installation instructions can be found on pages 8-9.Method BThe motor is installed from underneath the bed frame (horizontal to the ground)Installation instructions can be found on pages 10-11.A2. Align the opening on the head end of themotor with the flange on the head section ofthe bed and insert the flange into the motorcompartment.A3. With the palm of your hand, snap the motorflush to the actuator bar.A4. Align the opening on the foot end of themotor with the flange on the foot section ofthe bed and insert the flange into the motorcompartment.Method AInstallation of the motor when bed frame is on its sideA1. Prior to installation, make sure that the 2 white motor blocks are in the retracted position.CORRECT INCORRECTA6. A fter the motor is installed, slide locking covers back on motor.A8. Attach the foot board and head board as shown.a. NOTE: The head section is higher than the foot section. However, they areinterchangeable with each other, with all other Drive and other manufacturershead and foot boards.A7.Install the casters by inserting the stem of the caster into the leg receptacle. It is recommended to install 1 locking caster and 1 non- locking caster on each bed end. The locking casters should beinstalled diagonally from each other.StemLeg ReceptacleEnd Method AGo To Page 12, Step 8Method A (Continued)A5. With the palm of your hand, snap the motor flush to the actuator bar.Method BInstallation of the motor from underneath the frameB2. Attach the foot board and head board as shown.a. NOTE: The head section is higher than the foot section. However, they areinterchangeable with each other, with all other Drive and other manufacturershead and foot boards.B1. Install the casters by inserting the stem of the caster into the leg receptacle. It is recommended to install 1 locking caster and 1 non- locking caster on each bed end. The locking casters should beinstalled diagonally from each other.StemLeg ReceptacleB3. Prior to installation, make sure that the 2 white motor blocks are in the retracted position.CORRECTINCORRECT11Assembly Instructions Cont.Method B ContinuedB4. With the motor orientated properly with the bed (head to head, foot to foot), align the motor with actuator bar and lift the head spring to the highest position. The motor will automatically be pulled towards the bed and lock onto the accuator. Once the head side of the motor is attached to the head section of the bed, return the head section to the flat position. Once flat, attach motor cover to the head section of the motor. Repeat for foot section.Note: Be sure the head section isattached first.End Method B12Assembly Instructions Cont.8. Install Hi/Low shaft to the foot section of the bed by inserting the spring loaded side of the shaft to the bottomreceptacle as shown.9. Install the head end of the shaft asshown.8A. Based on the bed end configuration, install the shaft into the proper port to ensure correct bed hi/low function.13 Assembly Instructions Cont.10. Release the spring loaded shaft onthe transition box at the foot end ofthe spring and insert the shaft into thetransition box on the footboard.Spring Loaded ShaftNOTE: Transition box is pre-set from factorybut if using a non-Drive head or foot board,and the shaft that extends from the crankhousing is too long or short, the transition boxcan be adjusted with a 6mm allen key.Crank Housing14Bed Rail Installation11.Attaching Bed Railsb. Full Rails• The foot and head section have color coded springs, labels and notches in the frame.• Install the cross brace between the blacksprings for proper rail placement.a. Half rails• The head section features labels on the frame marked, “Attach Half Rails Here” and black springs for proper placement.NOTE: USE DRIVE APPROVED RAILS ONLY1512. To raise the height of the bed, remove the crank that is attached to the bottom of thefoot board.13.Insert into the receptacle.14. Turn clockwise to raise the height of the bed, counter clockwise to lower the height of the bed. Re-attach the crank to the bracket on the bottom of the footboard when not in use.Height Adjustment16Optional Fixed Height Adjustment16. The four large pins are used if the height of the bed is to be locked at a set height. Set the height of the bed so that the hole in the leg is aligned with the hole in the bed end outer leg. Insert the pin through each of the four legs and install the spring clip on each.17. Before a mattress is laid on the bed, flip up the mattress guard to reduce themovement of the mattress.15. Optional fixed height adjustment withlock pins17 Storage18. Shown on Bed Storage Transporter with motorattached with storage strap Drive model # 15060.18Maintenance & Safety ChecksDrive recommends the following maintenance and cleaning procedures be conducted between users.ELECTRONICS• Check all controls to make sure all functions work properly.• Foot control• Head control• Hi/Lo• Check all cables for damaged or frayed wires.• Power cord• Pendant cord• Check to make sure all plugs are fully inserted or attached.• Check 9V battery on motor and replace annually.BED FRAME & SLEEPING SURFACE• Visually check all welds.• Head section• Foot section• Main Frame• Check joints between sleeping surface sections for loose fasteners.CLEANING• The metal parts of the bed are covered with a powder coating. Clean all coated parts with mild detergent and warm water. Periodically raise head and feet sections of the bed and remove dust from frame. Also, periodically remove mattress and clean mattress deck.LUBRICATION & MECHANICAL• Lightly grease all actuator screw threads with white lithium grease.• Lubricate all caster roller and swivel bearings with light machine oil.• Check all bolts and tighten as needed.WARRANTY• Lifetime warranty on welds.• 5 year warranty on frame.• 5 year warranty on motor.• 5 year on hand control.• 1 year warranty on all other parts and components.During the warranty period, defective items will be repaired or replaced at Drive’s option at no charge.19DECK HEIGHTDECK WIDTHELECTICAL• Motor is UL approved.WEIGHT• Normal operating conditions: 450 lbs evenly distributed.CONSTRUCTION• Frame: 11ga (.120) hot rolled steel (rolled formed).• Sleeping surface: Zine plated steel wire and coils.FINISH• Durable Powder Coating.Specifications80” MATTRESS REQUIREDBED HEIGHT (LOW POSITION) LENGTHBED HEIGHT(HIGH POSITION)2099 Seaview BoulevardPort Washington, NY 11050Phone: 516-998-4600T oll Free: 877.224.0946Fax: 516.998.4601。
Thera-PTM Bariatric 电动治疗床说明书
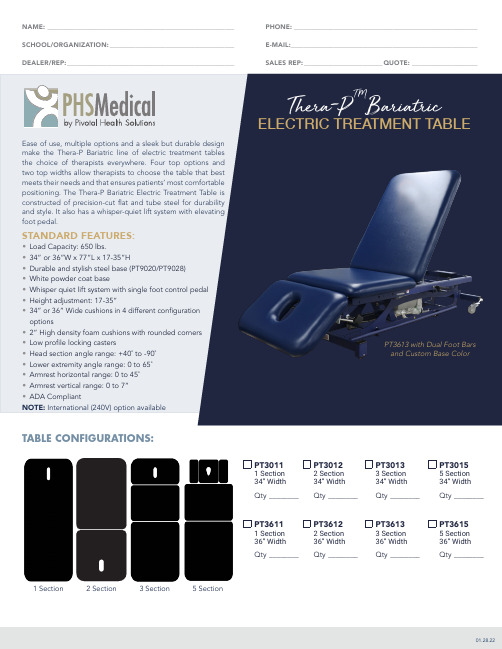
NAME: _________________________________________________________SCHOOL/ORGANIZATION: ______________________________________DEALER/REP: ___________________________________________________PHONE: ________________________________________________________E-MAIL:_________________________________________________________SALES REP: ________________________QUOTE: ____________________01.28.22make the Thera-P Bariatric line of electric treatment tables the choice of therapists everywhere. Four top options and two top widths allow therapists to choose the table that best meets their needs and that ensures patients’ most comfortable positioning. The Thera-P Bariatric Electric Treatment Table is constructed of precision-cut flat and tube steel for durability and style. It also has a whisper-quiet lift system with elevating TABLE CONFIGURATIONS:PT30133 Section 34” Width Qty ________PT30155 Section 34” Width Qty ________1 Section2 Section3 Section PT3613PT36155 Section 36” Width Qty ________PT3613 with Dual Foot Bars and Custom Base ColorSTANDARD BASE COLORS:OPTIONS:PT9021 - 650 lb Lifting Capacity S1077 - Dual Foot Control PedalS1135 - Manual Elevating Midsection (Only available onPT3013, PT3015, PT3613, & PT3615)S1078 - Dual Foot Bar Control S2078 - Dual Foot Bar Control with Front Foot Bar AdderPT10001 - Nose Hole Plug S1151 - BatteryS1152 - Battery with Extra Battery and Wall ChargerThera -PTMBariatricELECTRIC TREATMENT TABLECUSTOM BASE OPTIONS:S1178Table Base Graphics PT9020-CCPick Custom Base ColorS2000Custom Table Base Powder Coat Color and Table Base GraphicsCUSTOM BASE COLORS:Black Green Light Gray Forest Green Charcoal Purple Royal Blue Yellow Navy Blue Orange RedBurgundyBright BlueSTANDARD UPHOLSTERY CHOICES:Royal BlueAmerican Beauty Imperial Blue Lark Blue Ridge Burgundy Deep Violet Dove Forest Charcoal BlackMocha Mandarin OrangePuttyPT3011 or PT3611PT3012 or PT3612PT3013 or PT3613PT3015or PT3615Flat CushionLower Extremity Angle Ranges from0 to 65˚Lower Extremity Angle Ranges from 0 to 65˚Head Section Angle Ranges from+40˚to -90˚Head Section Angle Ranges from +40˚ to -90˚Each Armrest Horizontal Ranges from 0 to 45˚Each ArmrestVertical Ranges from0 to 7”Optional Elevating MidsectionOptional Elevating MidsectionLower Extremity Angle Ranges from0 to 65˚Dual Foot Control Pedal (x2) (S1077)Midsection (S1135)。
病床电动调节器安全使用手册
病床电动调节器安全使用手册1. 引言病床电动调节器是一种用于调整病床高度和角度的设备。
本手册旨在提供使用者正确操作电动调节器的指南,确保使用过程中的安全性和顺畅性。
2. 功能概述病床电动调节器通常包括以下功能:- 调整床的高度,以适应病人的需要和医护人员的工作要求;- 调整床的背角度、腿角度和整体角度,提供舒适的休息和治疗姿势。
3. 安装和使用前的准备在开始使用病床电动调节器之前,请确保完成以下准备工作:- 仔细阅读和理解电动调节器的用户手册;- 确保调节器的电源线正常连接,并接入可靠的电源插座;- 检查调节器的各个部件,确保没有损坏或松动的情况;- 熟悉调节器的各个按钮和控制面板,了解其功能和操作方法。
4. 安全使用指南4.1 调整床的高度- 在调整床的高度之前,确保病人已离开床面,以防夹伤或摔倒的危险;- 使用调节器按钮或控制面板上的高度调节功能,逐渐调整到所需的高度;- 调整完毕后,确保床的锁定装置已牢固锁定,避免意外移动或下降。
4.2 调整床的角度- 在调整床的角度之前,确保病人位于合适的姿势,并了解医生或护士的指示;- 使用调节器按钮或控制面板上的角度调节功能,逐渐调整到合适的角度;- 注意床面上是否有障碍物,避免夹伤或损坏调节器。
4.3 注意事项- 使用电动调节器时,避免将其暴露在水或液体中,以免发生电击或设备故障;- 避免过度调整床的高度和角度,以免造成病人的不适或安全隐患;- 定期检查电动调节器的电线和插头,确保其完好无损;- 遇到任何异常情况或故障,应立即停止使用,并寻求专业技术人员的帮助。
5. 维护保养- 定期清洁电动调节器的表面和控制面板,使用柔软的布进行擦拭;- 避免使用化学溶剂或腐蚀性物质清洁调节器;- 定期检查调节器的螺丝、螺母和连接件是否紧固,必要时进行维护和紧固。
6. 故障排除若在使用电动调节器时出现以下问题,请按照以下步骤进行故障排除:- 若电动调节器没有反应,请检查电源连接是否正常,并确保插头插入正确的插座;- 若电动调节器无法调整床的高度或角度,请检查锁定装置是否松动或损坏;- 若电动调节器发出异常声音或有异味,请立即停止使用,并联系售后服务。
- 1、下载文档前请自行甄别文档内容的完整性,平台不提供额外的编辑、内容补充、找答案等附加服务。
- 2、"仅部分预览"的文档,不可在线预览部分如存在完整性等问题,可反馈申请退款(可完整预览的文档不适用该条件!)。
- 3、如文档侵犯您的权益,请联系客服反馈,我们会尽快为您处理(人工客服工作时间:9:00-18:30)。
二、命名⋯⋯⋯⋯⋯⋯⋯⋯⋯⋯⋯⋯⋯⋯⋯⋯⋯⋯⋯⋯⋯⋯⋯⋯⋯⋯⋯.第2页
三、产品用途及设备上标志含义:.第2页
四、主要技术参数第2页
五、功能概要⋯⋯⋯⋯⋯⋯⋯⋯⋯⋯⋯⋯⋯⋯⋯⋯⋯⋯⋯ ⋯⋯⋯⋯⋯⋯.第3页
六、配件名称及功能⋯⋯⋯⋯⋯⋯⋯⋯⋯⋯⋯⋯⋯⋯⋯ ⋯⋯⋯⋯⋯⋯⋯.第3页
产品的安全性能和质量状况直接关系到人民的生命安全,我公司在产品开发过程中,便 以GB9706.1-1995《医用电气设备第一部分:安全通用要求》作为设计的主要依据,并结合 产品自身特点,将床脚、床身等承重部件采用坚固的材料制造,为适应患者要求,满足临床 医护功能,本产品还设置了控制器,确保床面的升降、折转动作可靠,操作方便。
产品标准号 :
产品注册证号 :
生产许可证号 :
ABC-C型电动床
使
用
说
明
书
地址:
电话:
邮编:
ABC-C型电动床属Ⅱ类医疗器械产品,由床脚、床身、床面、床头板、床尾板、电气部分等组成。本产品采用220V交流电源供电,操作控制器便可使电动床的床面升降、折转。可供医院普通病房、ICU病房或类似场所对患者进行诊断,治疗或监护时使用。
9、在非使用时,应注意拔掉电源。
10、本电动床应用部分已和接地端子相连,建议在抗静地面上使用。
11、建议尽量不要在强电场环境下使用。
12、电动床应放置于干燥处,以防电器控制部分受潮损坏。
13、应对内部电源定期检查及更换。
14、如果外部的保护导线在安装或其布线的完整性有疑问时,设备应由内部电源来运行
15、设备需要更换配件(部件)时,到本公司来购买,不是本公司的配件(部件) ,本公 司概不负责。
1、 工作电压:直流24V。标记 处 数 更改文件号 签字 日期
设 计杨永忠06.07标准化
2、输入功率:500VA。制 图 工 艺
校 对 批 准
3、熔断器型号及额定值:F3AL 25审0V,核5×20mm日期
4、工作制:间歇加载连续运行
5、进液防护:IPX4
6、非AP/APG型设备
7、外形尺寸2200×900×500mm
2、 严禁病患者或其它人员在电动床上踩踏,跳跃或多人同时承压在床上,以免造成床 身结构部件的损坏和人身伤害;
3、 医用床如带脚轮,应用脚轮的制动装置,将床身定位,然后再进行其它操作;4、按钮盒应保持清洁、干燥,以免损坏漏电,用后须挂回轨道上,切勿乱放。更不可随意 拆开。
5、电动床移动时须注意,打开脚轮的制动装置,将电源线或控制线挂在挂钩上,不要脚 踩电源线或控制线,以免插接线断裂或电线绝缘破坏,影响操纵。
16、出现故障时,应请专业人员维修。
17、设备到使用末期时不应随便丢弃,应送到垃圾专业处理部门处理。
七、使用方法⋯⋯⋯⋯⋯⋯⋯⋯⋯⋯⋯⋯⋯⋯⋯⋯⋯⋯⋯ ⋯⋯⋯⋯⋯⋯⋯第3页
八、电器符号说明⋯⋯⋯⋯⋯⋯⋯⋯⋯⋯⋯⋯⋯⋯⋯⋯⋯⋯⋯⋯⋯⋯⋯⋯⋯第3页
九、清洗、消毒、预防性检查和保养⋯⋯⋯⋯⋯⋯⋯⋯⋯⋯⋯⋯⋯⋯⋯⋯⋯.第4页 十、注意事项⋯⋯⋯⋯⋯⋯⋯⋯⋯⋯⋯⋯⋯⋯⋯⋯⋯⋯⋯⋯⋯⋯⋯⋯⋯⋯.第4页十一、故障及排除措施⋯⋯⋯⋯⋯⋯⋯⋯⋯⋯⋯⋯⋯⋯⋯⋯⋯⋯⋯⋯⋯⋯⋯第5页
6、在无人看管的情况下,为了减少患者在上、下床或躺在床上滚落而造成伤害的风险,应 该将床置于最低位。
7、当患者状况(例如由于药物或临床条件造成方向感迷失)可能导致患者卡住时,则在无 人看管的情况下床垫支O台应该置于平面位(除非医务人员为了专门或特殊的情况而另有要求)
8、电动床在操作出现故障时,患者应从床头背板下面按急退开关,停止工作,减少患者造 成伤害的风险。
通过上述调节有助于患者身体姿势的正常调整及有规律地转换受压部位,可使患者感觉 更加舒适,护理更加方便。
六、配件名称及功能
a)脚轮:脚轮对角均配有制动装置,在不要求床作出移动时,可防止在外力作用下床 身随意移动,按下制动装置,使床定位。
b)传动机构: 实现病床各种折转、升降功能。
c)床垫:内胆用5公分高密度海绵,外套用防水帆布制造,柔软舒适,美观耐用。 用户可根据需要选用一项或多项配件。
十二、售后服务⋯⋯⋯⋯⋯⋯⋯⋯⋯⋯⋯⋯⋯⋯⋯⋯⋯⋯⋯⋯⋯⋯⋯⋯⋯⋯第5页
十三、包装、运输和贮存环境条件⋯⋯⋯⋯⋯⋯⋯⋯⋯⋯⋯⋯⋯⋯⋯⋯⋯⋯第5页
十四、电磁兼容表格⋯⋯⋯⋯⋯⋯⋯⋯⋯⋯⋯⋯⋯⋯⋯⋯⋯⋯⋯⋯⋯⋯⋯⋯第6页
一、型式结构
ABC-C型电动床由床脚、床身、床面、床头板、床尾板、电气部分等组成。可藉控制器来调 节背板、腿板、床面升降及床面折翻角度的前倾和后倾。
二、命名
ABC— □
设计序号(以字母表示) 产品代号(以字母ABC表示)
三、产品用途及设备上标志含义:
供临床各类病房承载护理患者用。
四:+5℃ ~+40℃
b)相对湿度:≤85%
c)大气压力:70 kPa~106 kPa。
d)电源电压:交流220V;
e) 电源频率:50 Hz。 设备安全分类为Ⅰ类,带内部电源,防护类型为B型。
e)整床质量:110KG
七、使用方法
1)电动床如带脚轮,按下脚轮制动装置,可使床定位;
2)接通电源,背板折转、 腿板折转 、 床面升降
3)电动床各部位应经常保持清洁;
4)电动床安全载荷:170kg。
八、清洗、消毒、预防性检查和保养
1、清洗: 设备每次使用后(包括与患者接触部件)都应用洒精擦洗。
2、消毒: 设备每次使用后可采用戊二醛进行消毒。
8、背板折转65°
9、腿板折转35°
10、床面高度范围500~750(mm)
11、床面折翻角度:前倾12°
12、床面折翻角度:后倾12°
13、床面升降速度:≥ 300mm/min
五、功能概要
五功能电动床:
背板折转b)腿板折转c)床面升降d)前倾e)后倾
背板上折、下折
床面上升、下降
腿板上折、下折
床面前倾、后倾
3、预防性检查: 预防性检查必须每月进行一次,主要检查电源插头及手持操作器插头是否松动,紧固件是否 有松动,特别是前后倾升降杆与台面连接的螺栓是否松动。
4、保养: 设备必须每年保养一次,各转动部件必须有加足润滑油,台面上的滑动部件及滑轨必须涂凡 士林。联接螺丝应拧紧,不能松动。
5
九、注意事项:
1、电动床应放置于平整地面之上;
