序列拼接工具使用指南
利用SeqMan进行序列拼接
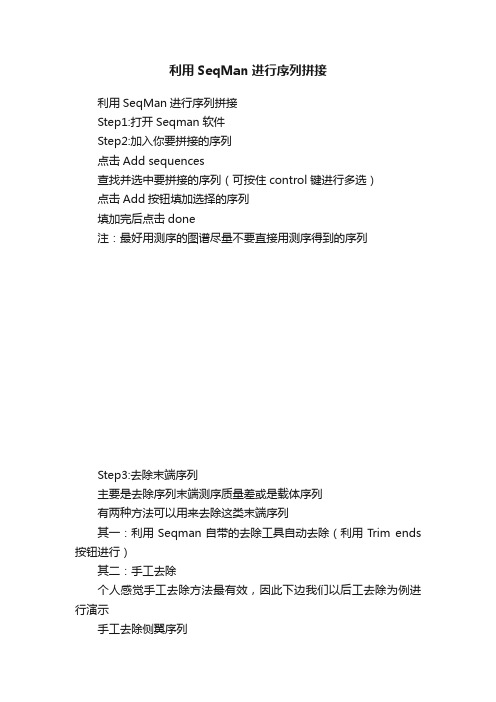
利用SeqMan进行序列拼接利用SeqMan进行序列拼接Step1:打开Seqman软件Step2:加入你要拼接的序列点击Add sequences查找并选中要拼接的序列(可按住control键进行多选)点击Add按钮填加选择的序列填加完后点击done注:最好用测序的图谱尽量不要直接用测序得到的序列Step3:去除末端序列主要是去除序列末端测序质量差或是载体序列有两种方法可以用来去除这类末端序列其一:利用Seqman自带的去除工具自动去除(利用Trim ends 按钮进行)其二:手工去除个人感觉手工去除方法最有效,因此下边我们以后工去除为例进行演示手工去除侧翼序列双击要去除侧翼序列的目标序列将鼠标放到测序图谱左边的一个黑色的竖线上,此时鼠标会变成一个有两个箭头的水平线按住左键拖动黑竖线,那么你就会发现侧翼序列的颜色变浅,这部分变浅的序列则就被去除,不再参加后面的拼接此步请将测序不准确或认为是载体的序列用这种方法去除。
测序准确的峰形图峰形规则,一般在序列的中部,如下图所示测序不准确的峰形图峰形较乱,很难判断是哪个碱基,一般位于序列两端,如下图所示Step4:进行序列拼接点击Assemble按钮在新出现窗口处点击拼接好的contig1在出现的Alignment of contig1 窗口中点击左三角显示序列的测序图谱点击菜单contig->strategy view可以观察序列拼接的宏观图Step5:查找拼接错误find conflict 点击菜单Edit点击Find Previous或Find Next查找接接中出现的错误还可以通过Seqman左下角的快捷按钮查找错误的拼接查找错误的拼接错误的拼接的类型类型1:两条序列的测序结果不一致并明显一条测序质量好而另一条质量差处理:直接将该处修改为正确的碱基类型2:两条序列的测序结果不一致并两条测序质量都比较差处理:重新测序或用新的合适引物重新测定类型3:两条序列的测序结果不一致并明显两条测序质量都好处理:测序过程出现问题,重新测定Step6:导出拼接的序列可选择合适的格式,导出拼接好的序列通过以上几步我们就能很快将几个测序片段进行拼接,大家可以拿着自己的序列试试!当然如果两个测序片段的拼接片段太短可能利用默认的参数不能完成拼接,大家可以试着修改一下拼接参数试试!如降低Match size及Minimum Match Percentage的值!修改参数命令。
高级剪辑技巧 在Adobe Premiere Pro中合并多个序列
高级剪辑技巧:在Adobe Premiere Pro中合并多个序列在视频编辑领域中,Adobe Premiere Pro被广泛使用,它提供了许多高级剪辑技巧,帮助用户更好地完成他们的项目。
在本教程中,我们将重点介绍如何在Adobe Premiere Pro中合并多个序列,以提高工作效率和视频质量。
首先,打开Adobe Premiere Pro软件并加载您的项目。
确保您已经创建了多个序列,每个序列都有不同的内容或场景。
您可以通过单击菜单栏中的“文件”按钮,然后选择“新建序列”来创建新的序列。
您还可以使用键盘快捷键Ctrl + N来快速创建一个新的序列。
接下来,选择您想要合并的第一个序列。
在项目窗口中选中该序列,并将其拖放到时间轴窗口中。
确保它与您的当前序列对齐。
然后,选择您要合并的第二个序列并重复上述操作。
将其拖放到时间轴窗口中,并确保它与第一个序列紧密对齐。
现在,您将在时间轴窗口中看到两个序列并排放置。
为了将它们合并成一个序列,您可以使用一个简单但强大的功能 - 剪辑合并工具。
这个工具可以帮助您将两个或多个序列合并成一个更大的序列,而不会改变原始序列的内容。
要使用剪辑合并工具,首先选择您要合并的第一个序列。
然后,在工具栏中选择剪辑合并工具(通常显示为两个Overlapping箭头)。
将剪辑合并工具拖放到第一个序列的末尾,并释放鼠标。
现在,您将看到一个新的合并序列出现在时间轴窗口中。
继续这个过程,选择您要合并的第二个序列,将剪辑合并工具拖到它的末尾并释放鼠标。
再次,您将看到一个新的合并序列在时间轴窗口中出现在前一个合并序列的末尾。
重复这个步骤,直到您将所有需要合并的序列都添加到时间轴窗口中。
最后,您将获得一个包含所有序列内容的大型合并序列。
通过合并序列,您可以将多个独立的序列组合成一个更大的序列,并且可以更轻松地在不同场景之间进行切换和编辑。
这对于制作长篇视频或复杂的项目非常有用。
另一个有用的技巧是在合并序列后,您可以对它们进行重新排序和调整。
基因序列拼接器软件 使用说明书(软件操作文档)
基因序列拼接器软件使用说明书(软件操作文档)1. 引言基因序列拼接器软件(MergeSeq)基于研究者测序获得或从核酸数5据库(如GenBank等)中批量下载的fasta格式存储的基因片段,按照使用者指定顺序,将同一物种不同基因片段拼接成由多基因组成的长序列,用于不同物种间的分子系统发育分析。
1.1编写目的本说明书为在Linux/UNIX环境下使用MergeSeq软件的用户编写。
10它将指引使用者按步骤搭建该软件的运行环境,明确输入文件的录入格式,熟悉运行参数的配置规则,理解软件运行时出现的状态信息并掌握获取输出fasta格式文件的方法。
1.2项目背景非模式生物(如蜘蛛等)构建分子系统发育树一般选取低速进化15(Slow-Evolving)且有种属特异性的基因片段进行分析。
为提高结果的置信度,一般采取多基因组合分析的方法(Dimitrov et al., 2016; Wheeler et al., 2016)。
但在实际操作中,将同一物种不同基因片段拼接在一起是一件十分费事且容易出错的重复性操作。
尤其当某一物种某个基因数据缺失时,20必须在拼接后的长序列中填充与同一基因其他对齐序列等长的占位符以保证结果为对齐。
本项目基于测序或下载获得的fasta格式基因序列片段,按照研究者指定的基因排列顺序,自动将同一物种不同基因片段拼接成多基因长序列,并保证结果对齐,可直接用于不同物种间的分子系统发育分析。
251.3 定义(专门术语的定义和缩写词的原意)fasta格式(fasta format):fasta格式是一种基于文本用于表示核酸序列或多肽序列的格式。
其中核酸或氨基酸均以单个字母来表示,且允许在序列前添加序列名及注释。
该格式已成为生物信息学领域常用的30标准文件格式。
2. 软件性能2.1.数据精确度本软件不涉及数字的计算和处理,输入、输出数据的格式均为35UTF-8编码的文本类型文件。
2.2.时间特性本软件对输入数据、输出数据的处理时间由基因片段长度和运行软件主机性能决定。
DNA star Seqman 使用说明 DNA序列拼接
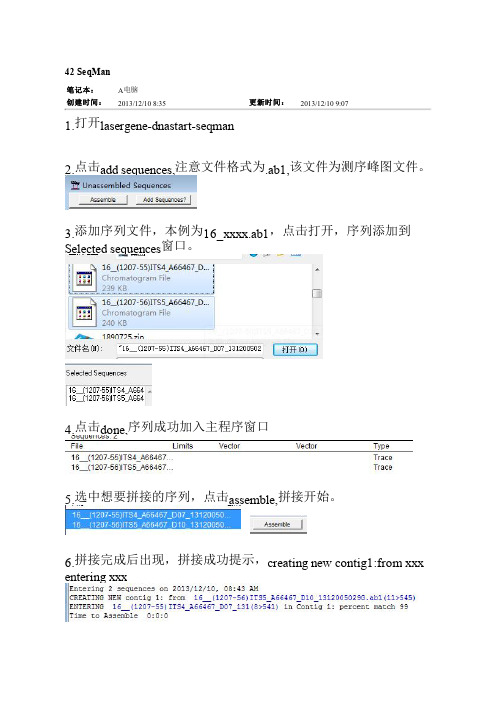
42 SeqMan笔记本:A电脑创建时间:2013/12/10 8:35更新时间:2013/12/10 9:071.打开lasergene-dnastart-seqman2.点击add sequences,注意文件格式为.ab1,该文件为测序峰图文件。
3.添加序列文件,本例为16_xxxx.ab1,点击打开,序列添加到Selected sequences窗口。
4.点击done,序列成功加入主程序窗口5.选中想要拼接的序列,点击assemble,拼接开始。
6.拼接完成后出现,拼接成功提示,creating new contig1:from xxx entering xxx7.点击窗口右上角,“-”最小化,将拼接提示最小化,回到主窗口。
8. 此时主窗口上方出现拼接好的contig1的信息,574bp,来源于两条序列。
9.双击contig1出现具体的拼接过程窗口。
10.点击16前的黑色三角符号,可以看到序列峰图(注意峰图非常重要,不同颜色代表不同碱基,峰型表示测序可信度)。
11.详细讲一下峰图:测序反应开始时和结束时的序列是读不准的(测序的原理决定)。
一个测序反应最多能测定500-800个碱基,且测序反应开始和结束的碱基读不准。
ITS45的长度在500bp左右,意味着单向测序末端会读不准。
采用双向测序,在R向峰分辨率极度降低时,F向正好处在分辨率最高的测序区域,所以这段序列程序会以F向测序结果为准。
seqman在序列拼接的同时,让测序峰图可见,让我们可以判断测序结果的可靠性。
12.接着说拼接完成后如何拷贝拼接好的序列,其实非常简单,选中顶上的consensus中的序列,全选,ctrl+C,拼接好的序列就复制到剪切板中了,可以粘贴到txt中使用。
seqman使用说明

修改参数命令
关于Seqman的简单介绍就到这里,另外由 于资料准备仓促,如有不完善或不准确的 地方,请大家指出,谢谢! 下期讲座预告 “轻松学用生物软件(3)”,具 体时间及内容将在螺旋课堂上做出预告, 欢迎大家参加!
手工去除侧翼序列
测序准确的峰形图
峰形规则,一般在序列的中部,如下图所示
测序不准确的峰形图
峰形较乱,很难判断是哪个碱基,一般位于序列两端, 如下图所示
轻松学用生物软件(2) 利用SeqMan进行序列拼接
主讲人:huaxing 2008年4月11日
螺旋课堂系列讲座
主要内容
大家好,首先感谢大家关注、支持螺旋网!今天 我们一起一步一步的学习利用Dnastar 6.0中的子 程序Seqman进行序列拼接,希望能对大家有所帮 助。 注意:Dnastar 6.0的安装程序及破解补丁大家可 以到螺旋网的“生物信息学及生物软件交流”版块 免费下载!
手工去除侧翼序列
1. 双击要去除侧翼序列的目标序列 2. 将鼠标放到测序图谱左边的一个黑色的竖线上,此时鼠标 会变成一个有两个箭头的水平线 3. 按住左键拖动黑竖线,那么你就会发现侧翼序列的颜色变 浅,这部分变浅的序列则就被去除,不再参加后面的拼接 4. 此步请将测序不准确或认为是载体的序列用这种方法去 除。
错误的拼接的类型
1. 两条序列的测序结果不一致并明显一条测序质量好而另 一条质量差 处理:直接将该处修改为正确的碱基 2. 3. 两条序列的测序结果不一致并两条测序质量都比较差 处理:重新测序或用新的合适引物重新测定 两条序列的测序结果不一致并明显两条测序质量都好 处理:测序过程出现问题,重新测定
利用Final Cut Pro实现视频序列镜头拼接
利用Final Cut Pro实现视频序列镜头拼接Final Cut Pro是一款功能强大的视频编辑软件,能够帮助用户实现视频序列镜头的拼接。
在本文中,我们将介绍一些使用Final Cut Pro进行视频序列镜头拼接的技巧和步骤。
首先,打开Final Cut Pro软件,并导入你想要拼接的视频序列镜头文件。
你可以通过点击菜单栏中的“文件”选项,然后选择“导入”来导入视频文件。
或者,你也可以直接拖拽文件到软件的项目库面板中。
当视频序列镜头文件成功导入后,你需要将这些镜头按照你想要的顺序进行排列。
你可以在项目库面板中选择一个镜头文件,然后拖动到时间轴面板中的合适位置。
依此类推,再将其他镜头文件按照顺序拖动到时间轴面板中。
在拖拽镜头文件到时间轴面板时,你可以通过放大或缩小时间轴面板来调整视频序列的时间轴。
这样做可以更精确地控制每个镜头的长度和位置。
如果你想要调整视频序列中单个镜头的持续时间,你可以将鼠标悬停在时间轴上的该镜头位置,然后用鼠标拖动调整该镜头的起始和结束点。
这样,你可以灵活地控制每个镜头的播放时间。
此外,Final Cut Pro还提供了一些过渡效果选项,可以让你在不同镜头之间添加流畅的过渡。
在时间轴面板中,你可以选择两个相邻的镜头,并使用菜单栏中的“编辑”选项来选择合适的过渡效果。
只需简单点击一下,过渡效果就会被添加到两个镜头之间。
当你完成了视频序列镜头的拼接后,你可以在导出之前对视频进行一些调整和编辑。
Final Cut Pro提供了许多强大的编辑工具,例如剪切、修剪、添加文本等,可以让你对视频进行更多个性化的处理。
最后,完成编辑后,你可以通过点击菜单栏中的“文件”选项,然后选择“导出”来导出你的视频。
Final Cut Pro为用户提供了多种导出选项,你可以根据需要选择合适的导出格式和参数。
综上所述,Final Cut Pro是一款功能强大的视频编辑软件,能够帮助用户实现视频序列镜头的拼接。
PCR序列拼接-CExpress使用说明

PCR序列拼接软件Contig Express使用简介由于一般测序方法的限制,测续结果一般只能到800bp左右,所以对于较长片段只能用不同引物测序后根据结果拼接,ContigExpress正式是一款非常实用的序列拼接软件。
Contig Express是著名的软件Vector NTI的组件之一。
经过一些简单的处理该组件可以被剥离出来独立运行,经我们试用效果良好。
Contig Express将每个PCR测序片断视为一个Contig,当您输入多个Contig后,它会自动寻找其中的公共序列,然后将他们拼接好后的结果已图形方式呈现给您。
完全免除您手工逐个片断Blast,然后肉眼找共同序列的苦恼。
Contig Express 9.1可以从论坛中下载。
2 - 向Contig Express中加入需要拼接的序列目前PCR测序的结果多以ABI和Fasta两种格式提供。
一般来说ABI结果是原始结果最为可信,因此我们最好向Contig Express中直接倒入ABI格式的原始数据。
倒入的方法是"Project---Add Fragments---From ABI file..."。
在接下来弹出的"Import Sequence From"对话框中选择测序公司发给您的ABI文件。
需要注意的是目前公司发给您的原始ABI文件多是"AB1"文件名。
Contig Express无法直接识别,因此有必要在文件类型中选择“All Files(*.*)"。
由于要拼接多个序列这时您可以配合Ctrl键进行多选。
3 - 用Contig Express进行序列拼接现在我们已经选好了要进行拼接的序列了,接下来的步骤就交给Contig Express让它为我们自动拼接了。
用鼠标配合Ctrl键选择要进行拼接的序列。
然后点击"Assemble---Assemble Selected Fragments"。
生物学软件seqman序列拼接步骤

测序后的序列为两种形式:abi,seq
abi:波峰图seq:atcg序列
seqman→file→new→skip→add sequences→选择一对引物的.seq和.abi 格式的文件双击(或者选中文件→add)→done→assemble→双击右侧的conting→看峰的好坏进行裁剪→contig→save consensus→single file→命名保存为.fas格式→file→close
mega比对
用mega打开所需比对的文件,如果要添加序列可以选中最下面一个基因序列的一个碱基,右键copy。
选中一个碱基→W→align DNA→OK→OK
→alignment→align by clustalw→OK→OK
将比对完的数据另存为mega格式
用mega打开该文件
点击TA
C:保守位点V:变异位点Pi:简约信息位点S:单个位点0 :0倍退化位点 2 :2倍退化位点 4 :4倍退化位点Statistics→nucleotide composition 核苷酸组成
Distance→compute pairmise distance…→OK→compute两两遗传距离。
seqman使用说明
seqman使用说明SeqMan使用说明1.概述1.1 背景信息在生物学研究中,序列比对和分析是常见的任务。
SeqMan是一款用于DNA和蛋白质序列分析的软件工具,可以帮助研究人员进行序列比对、剪切、组装和注释等操作。
1.2 目标读者本文档适用于对SeqMan软件感兴趣的研究人员和生物信息学初学者。
1.3 前提条件在使用SeqMan之前,您需要具备一定的生物学和分子生物学知识,并且熟悉基本的计算机操作。
2.安装和配置2.1 SeqMan软件您可以在[SeqMan官方网站]()上最新版本的SeqMan软件。
2.2 安装SeqMan按照的安装包进行安装,根据安装向导的提示进行操作。
2.3 配置SeqMan安装完成后,打开SeqMan软件。
在首次运行时,您需要进行一些配置操作,例如选择默认的比对算法、设置保存结果文件的路径等。
3.序列导入和处理3.1 导入序列文件在SeqMan中,您可以导入各种格式的序列文件,包括FASTA、GenBank、EMBL等。
选择导入菜单,然后选择您要导入的序列文件。
3.2 序列编辑和校正SeqMan提供丰富的序列编辑和校正功能,您可以进行碱基替换、插入、删除等操作,以修正或优化序列。
3.3 序列比对和组装SeqMan可以对导入的序列进行比对和组装操作,以便进行比对结果分析和序列拼接。
4.注释和分析4.1 注释工具介绍SeqMan提供了多种注释工具,包括基因预测、ORF查找、功能注释等。
您可以选择适当的注释工具进行分析。
4.2 序列特征分析SeqMan还提供了序列特征分析功能,可以帮助您查找和分析序列中的特征,如启动子、编码区域、结构域等。
5.结果输出和导出5.1 结果展示SeqMan将分析结果以图表、表格等形式展示,方便您查看和分析。
5.2 结果导出您可以将SeqMan的分析结果导出为各种格式的文件,方便进一步处理和分享。
6.附件本文档不包含附件,请参考SeqMan官方网站获取相关附件。
最新利用SeqMan进行序列拼接
Step5:修改拼接错误
3. 两条序列的测序结果不 一致并明显两条测序质量 都好
处理:测序过程出现 问题,重新测定
类型3
错误拼接的类型
Step6:导出拼接的序列
• 可选择合适的格式,导出拼接好的序列
1
3 2
• 通过以上几步我们就能很快将几个测序片 段进行拼接,大家可以拿着自己的序列试 试!
• „还可用左下角的快捷按钮查找错误的拼接
Step5:修改拼接错误
1. 两条序列的测 序结果不一致 并明显一条测 序质量好而另 一条质量差
处理:直接将该 处修改为正确的 碱基
错误拼接的类型
Step5:修改拼接错误
2. 两条序列的测序结果 不一致并两条测序质量 都比较差
处理:重新测序或用 新的合适引物重新测定
• SeqMan根据trace数据的质量和载体序列在 装配之前可以自动地进行末端修整。然而 有时候修改的程度难以掌握,下面我们将 用手工的方法找回修整过的末端。
手动修改
• 为了区分修整过 和没有修整过的 数据,我们给修 整过的数据加一 个有颜色的背景。 选择菜单 Project→Paramete rs→Editing Color 打开下面的对话 框。确定use consensus match color和use other color已被选中。
去除载体序列
• 单击 Scan All按钮,将出现一个report窗口。
• 现在载体栏显示:载体名字前都有一个检 测通过的标志,说明Janus 载体在全部14 序 列中都已经检测到了。
• 单击assemble按钮,进行序列拼接。
查看末端修整和载体序列去除细节报告
• 选择Project 菜单的Trim Report打开Trim report窗口。
sequencher4.5序列拼接软件使用说明
Tour Guide for Windows and Macintosh IntroductionSEQUENCHER has been developed to work with a wide range of sequencing applications. For example, SEQUENCHER can be used to:•Create assemblies for shotgun or EST sequencing projects•Edit contigs while viewing all relevant trace data•Assemble multiple sequences to a user-defined Reference Sequence•Detect and annotate polymorphisms•Align cDNAs to their genomic sequence using the Large Gap algorithm•Discover heterozygous peaks•Create difference reports for SNP discovery•Display restriction maps, ORF maps, protein translations•Automatically trim poor quality and vector sequencesMacintosh and PC SupportSEQUENCHER is available for both Macintosh and PC platforms. The demo CD provides software for both environments.Unlimited TrialWith the SEQUENCHER demo, you can use your own data and enjoy an unlimited evaluation period. The only functions not available are copying data to other applications, saving, exporting, printing, and reporting. Some sample data have been included to get you started, but once you have tried SEQUENCHER with the sample files, please try using your own data so you can see precisely what SEQUENCHER can do for you.What You Will Learn in This TutorialThe purpose of this tutorial is to guide you through SEQUENCHER‘s core assembly and editing functions. Additional application-specific tutorials are included on your CD in PDF format. In this tutorial, you will1.Install the SEQUENCHER demo2.Create a new project3.Import data4.Trim sequences5.Assemble a contig6.View contig assembly7.Edit assembled chromatograms8.Find heterozygotes9.Work with a Reference Sequence10.Translate sequences to amino acids11.Annotate a sequence12.Create a Variance Table and Report13.Create a Translated Variance Table14.What else can I do with SEQUENCHER?Once you have mastered these techniques, you will be ready to explore SEQUENCHER ’s other powerful features.Conventions Used in this GuideMenu items or keys that you are to select are in bold. The purple text provides step-by-step instructions for running through the tour guide and the black text provides additional information. Greater than symbols define menu > submenu commands.Before you startCheck that you have the appropriate hardware and disk space.Additional Requirements will vary with your project.MACINTOSH RECOMMENDED REQUIREMENTS:•10.3.9 and higher•512 MB RAM•150 MB hard disk spaceWINDOWS MINIMUM REQUIREMENTS:•Windows 2000 and higher•512 MB RAM•150 MB hard disk space1. Install SEQUENCHER Demo•Insert the demo CD into your machine.•Double-click on the Sequencher 4.9 Demo installer icon.The installer will create a Sequencher 4.9 Demo folder in your Applications (Mac) or Program Files > Gene Codes (Windows) folder.2. Create a New Project•Launch SEQUENCHER by double-clicking on the Sequencher Demo icon.On your Macintosh, this will be in the opened Sequencher Demo folder. On a PC there is a Sequencher Demo icon on your desktop.When SEQUENCHER is launched, a dialog will alert you that you are running in Demo Mode. After you hit the OK command button on the alert dialog,SEQUENCHER will present you with an empty Project window. This is where you import, manipulate, and display sequence fragments and assembled contigs.New Project Window3. Import Data•To import data, select Import > Folder of Sequences... from the File menu.•Browse to the Applications (Mac) or Program Files > Gene Codes (Windows) then Sequencher 4.9 Demo > Sample Data > Demo Sample Data > DemoSequences folder.•Click on the Choose (Mac) or OK (Windows) button at the bottom window.•When prompted to import the 9 files, select the Import All Files in Folder command button. The Project now contains the 9 sequences.Imported SequencesThese imported files, with their associated quality scores, are just one example of the wide variety of file types SEQUENCHER accepts for import. Note that the Quality column displays the % quality for each of the imported sequences—the percent of bases that are above the low quality threshold as set in the Confidence User Preference pane.4. Trim SequencesSEQUENCHER has tools that allow you to trim imported sequences based on several different criteria: ambiguous data, data that have low confidence scores, or data contaminated with vector sequence. The trimmed data are fully recoverable within the SEQUENCHER project. To trim the low confidence sequence:•From the menu bar, choose Select > Select All to highlight all sequences if they aren’t already highlighted.•From the menu bar, choose Sequence > Trim Ends... SEQUENCHER displays the Ends Trimming window for the default trimming parameters.SEQUENCHER recognizes poor quality sequence based on a number of criteria. The confidence score, provided in these samples, is one of the most sensitive. Increasing the stringency of the trim criteria further increases the quality of your data.•Select the Change Trim Criteria button.•Uncheck all but the three criteria checked below, and adjust the values of the two confidence trims to match.•Click OK to return to the overview for Ends Trimming.The Ends Trimming window displays how much poor quality data will be trimmed based on the defined criteria. You have the additional option to individually deselect a fragment for trimming on either the 5' or 3' end by removing the "X" from the appropriate box below the trim graphic.Ends Trimming•Click the Trim Checked Items button at the top of the window, and then click the Trim button when asked for confirmation.The data that you have removed are completely recoverable. SEQUENCHER always stores two copies of every imported Sequence, the original sequence and the data as you have edited it in SEQUENCHER.•Close the Ends Trimming window and return to the Project window by clicking on the close control in the upper corner of the window.5. Assemble a ContigSeveral alignment algorithms are provided with SEQUENCHER to accommodate the wide variety of assembly applications. For this example, you will use the Dirty Data algorithm because it is best suited for data that may include the occasional ambiguities or miss-calls generated by automated sequencers. The Assembly Strategies and the Assemble by Name tutorials in the Sequencher 4.9 Demo\Tutorials folder explain the other assembly options.•Click on the Assembly Parameters button at the top of the Project window.•Accept the defaults for the Assembly Algorithm, Minimum Match Percentage, and Minimum Overlap parameters. They should be Dirty Data, 85% and 20bases, respectively.•Optimize gap placement by selecting Use ReAligner and Prefer 3’ Gap Placement, if not already selected.•Select OK.Once you have returned to the Project window, you are ready to begin assembly.•All of the sequence fragments should be selected. If they are not, select them now using Select > Select All.•Click on the Assemble Automatically button at the top of the Project window.•Click Close to dismiss the dialog.6. View Contig AssemblyThe Contig User Preference defines sorting criteria for new assemblies. The default preference sorts the fragments according to position, 5' to 3', within the contig. SEQUENCHER provides a number of alternative sorting options.•Double-click on the Contig[0001] icon to open the contig Overview window.•Click on the Sort button, select the by Strand radio button, and click on OK to sort the fragments by strand.Contig Overview•Click on the Sort button, select the by Position radio button, and click OK to return to the original sorting order.The Overview contains three sections. The top section displays a schematic of how the fragments are assembled in this contig. The arrows indicate the direction of the fragment in relation to the assembly.SEQUENCHER provides a Selection Marquee that allows you to navigate from within the Overview into the Bases window.The next section provides coverage information. For instance, the consensus called around base 1206 has less coverage than the surrounding consensus bases.Below the coverage bar is the open reading frame map. Three bars marked with green flags and red lines, representing start and stop codons respectively.•Click and drag on the Selection Marquee in the Overview so that it selects the region around base 1,206..•Select the Bases button at the top of the window to open the Contig Editor and view the base sequences that assemble at this position.7. Edit Assembled ChromatogramsThe Contig Editor provides the tools for checking and editing sequences. It is divided into four quadrants. You can modify the appearance of the Contig Editor from the View menu and in your User Preferences.•Select View > Display Color Bases.•Under Window > User Preferences, change Display > Contig so the Font is Courier New and the Size is 18.•Close the User Preferences window.Contig EditorThe two upper panels show the individual fragment names to the left with their sequences to the right. The Agent Box contains descriptive information about your sequences and your selection. The lower right panel displays consensus information including ambiguities <+> and disagreements <•> if there are any. The blue shading describes the confidence, low, medium, and high, with the lighter shades defining higher confidence. Note that you may toggle off this shading by selecting View > Display Base Confidences.•To begin the editing process, move your selection to base one in the consensus. The Select menu provides several tools to navigate to areas of interest in the contig.•From the Select menu, choose the command Next Ambiguous Base. The Agent box reads "4 frag bases selected at consensus position 83," and "SelectNext Ambiguous Base = spacebar".You have now moved your position in the consensus to the position of the first ambiguous base. An ambiguous base in the consensus is any that includes: 1) A contributing fragment base that is not an A, C, G, or T, 2) Disagreements between other fragment bases, and 3) All fragment bases that contribute to the consensus have low quality scores. Position 83 is flagged, because the base called in three of the fragments is an "N".•To view the chromatograms at this position, while your selection is still on the ambiguous consensus position, select the Show Chromatograms button at thetop of the window.Assembled Trace WindowsEach chromatogram window displays the current version of the base calls in black and above a line that separates them from the original base calls. At the left of the trace window, SEQUENCHER provides tools that allow you to manipulate how the traces are displayed. The volume control bars allow you to adjust the chromatogram peak height. The A, C, G, and T buttons allow you to turn off the display of the signal from any or all of the bases. Additional controls to format the traces are available through the Window menu under User Preferences... Display pane.•The base call at position 83 is ambiguous in the forward direction, probably because the irregular spacing challenged the original base caller. To changethe "N" to "C", with your selection still on the consensus base, type "C". Your edit will correct the consensus and every sequence in the contig at thatposition.Note that SEQUENCHER displays the edited base call in a contrasting color. You are now ready to continue editing your sequence. You can move in your contig from one region of ambiguity to the next using SEQUENCHER ’s navigational tools.•From the Select menu, choose Next Ambiguous Base or use the spacebar to execute the previous Select command.SEQUENCHER jumps to the next ambiguity in the contig.8. Call Heterozygous basesThe next ambiguous base in the consensus is at position 126. One forward sequence calls a T and three forward sequences call a C. A quick look at the chromatogram, however, shows that the forward and the reverse sequences have both C and T peaks at position 126. This sequence is from a mixed population.•Raise the slider for the 1-Reverse sequence to amplify the signal.•Type "Y" in the consensus line at position 126.In SEQUENCHER, you can manually call each heterozygote one at a time, or you can use the Call Secondary Peaks... function to automatically find the heterozygous bases.•From the Sequence menu, select Call Secondary Peaks...•Change the Minimum lower peak height to 35%.•Click on the Only make changes that result in an ambiguity checkbox to turn it on.•Click OK.SEQUENCHER displays a dialog so that you can confirm the changes to 41 base calls.•Click Continue.•With your cursor still in the consensus, click the spacebar to select the next ambiguous base position.The next ambiguous base position is 320. At this position, you will find that all of the contributing sequences have bold magenta "R"s. The color indicates that the sequences have been edited, in this case automatically by the Call Secondary Peaks… function. The "R" is the IUPAC abbreviation for a mix of puRines, or "A or G". The "+" under the consensus line flags the ambiguous position.•Continue selecting and editing until all the ambiguities are resolved.Note that not all of the automatically called bases will be true heterozygotes nor will this function capture all heterozygotes, but it will find all bases that have secondary peaks that are at least 35% of the primary peak.•Close the Contig and Chromatogram windows by clicking on the close buttons in the corners of each.9. Translate Sequences to Amino AcidsThere are numerous potential applications for the Reference Sequence. The Reference Sequence facilitates comparative sequence alignments, defines base numbering, and boosts assembly speed. In this Tour Guide, we will use the Reference Sequence function to compare the assembled trace sequences to a known text sequence.• From the Project window, select File > Import > Sequencher Project… and navigate to the Demo Sample Data folder from which you imported the trace files. • Click on the file HepC Reference.SPF, then click on the Open button.The new sequence, AB049090, is now in your project. You can tell that this sequence is already a Reference, because it has an "R" in the icon, and "Ref:" precedes "DNA Fragment" in the Kind column. You can make any sequence a Reference Sequence in SEQUENCHER from the Sequence menu. You can also right click or Ctrl+click on the sequence name to invoke the context sensitive menu. The Reference Sequence tutorial provides more information on the Reference functions.You can use the same assembly parameters that we used for the autoseq fragments. Note that the current parameters are listed in the Project window just below the button bar.•Choose Select > Select All and click on the Assemble to Reference button.•Click Close to dismiss the Assembly Completed dialog.The Reference Sequence is now incorporated into Contig[0001].•Double-click on the Contig[0001] icon to display the contig Overview. Immediately you can see that the Reference contributes to the contig in a different manner than the non-Reference sequences. For example, the numbering of the sequence, as it appears on the coverage bar, is negative until the Reference begins to contribute. Note the white space at the 3’ end of the coverage bar indicates that the Reference does not contribute coverage at all. The blue bar in the Reference is a graphic representation of the CDS feature.When the data that extends beyond the Reference is not of interest, you can trim the contig sequences to the Reference.•From the Contig menu, select the Trim to Reference Sequence command. Contig[0001] now starts at base position 1. It is useful to view a Reference Sequence when editing a sample sequence. The Reference Sequence will guide you so you can critically examine the differences between the sample consensus and the Reference. Yet the Reference will not contribute to the consensus nor will the Reference be affected by edits in the consensus.10. Translate Sequences to Amino AcidsSEQUENCHER provides a variety of ways to display the translation of DNA sequence. For instance, you can display one or all three of the reading frames below the sequence while editing.•Drag the Selection Marquee in the Overview to the 5’ end of the contig.•Click on the Bases button.•Place your cursor on base position 1 in the consensus line and click on it.•Click on the [ • ] button in the lower right corner of the Contig Editor.SEQUENCHER displays the translated consensus.The first click changes the [ • ] to a [ 1 ], displaying the translation in the first reading frame. This button will toggle through each of the reading frames, followed by the display of all three and then concluding with the display of an [ r ] which displaysboth the Reference Sequence translation and the consensus translation in the Reference Frame.•Click on the upper translation button until it reaches a [ 1 ] to leave the translation in the first reading frame.•To toggle the display of the Reference Sequence translation, click on the lower translation button, with an R icon.Contig With Protein Translation of Consensus and Reference Sequence11. Annotate a SequenceSEQUENCHER provides for sequence annotation by allowing you to create a feature for a single base or a range of bases.•If your cursor is not in the consensus, select a base in the consensus.•From the menu bar, choose Select > Bases by Number….•In the Select Base dialog, enter 208 in both text boxes.•Click OK.At this position, the sample sequence has a Valine, GTG, and the Reference codes for a Methionine, ATG.•Choose Sequence > Mark Selection As Feature.•From the drop down Feature Key menu, choose variation.•In the Feature Name box, give your feature a brief name like "A-> G, Met-> Val".The default Feature Style for a variation is red and underlined, but you may choose any style you wish.•Click OK.•If the View > Display Features menu item is not checked, select it.•Turn off Display Color Bases from the View menu.The feature will now be displayed in both the Bases view and the Overview. Note that in the Overview, the red single base feature displays over the range of bases covered in the blue CDS feature.Feature in the Bases ViewFeature in the Overview12. Create a Variance Table and ReportAfter you have edited the sample sequence so that you are confident that the consensus base calls are correct, you can generate a comparison report of how the sample differs from the Reference.•Close the Contig Editor window.•With Contig[0001] selected, choose Contig > Compare Consensus to Reference.SEQUENCHER displays a table listing the differences between the consensus sequence that you edited and the Reference Sequence that you imported. Note that base 208 is still red and underlined.You can also modify the look of this table.•Click on the symbol that looks like an open elevator button in the bottom left corner to expand the width of the columns.•From the View menu, choose Colors As Backgrounds.This report lists the differences between the consensus of one contig and the Reference, but it is also possible to create this report for hundreds of contigs, when they share the same Reference.Variance TableThe Variance Table also acts as a link to the original data.•Double-click on the cell at base position 208.SEQUENCHER rearranges the windows and opens the Contig and Chromatogram Editors for that base position.•Use the arrow keys on your keyboard to navigate to bases of interest.•Create a new variation feature from the Variance Table at position 338 by selecting that cell in the Variance Table and then executing the Sequence >Mark Selection As Feature command.•Click OK.SEQUENCHER defaults to the variation feature key, because this was the last feature key used. The new feature name is "variation" and it is also red and underlined.•Click on the Reports button to open the Reports dialogYou have several reporting options available to you, so that you can share the contents of the Variance Table outside of SEQUENCHER. Reporting is disabled in the Demo, but you can view sample reports in SEQUENCHER help. The image below is the result of creating a Variance Table from the Row Selection for positions 153 – 338.13. Create a Translated Variance TableIn addition to the Variance Table, which displays the results of the comparison of DNA sequences, Sequencher provides a Translated Variance Table, which displays the differences in the translation of DNA sequences. The following directs you to create the translated "sister" table to the currently open Variance Table, but you can also create a Translated Variance Table directly from a contig by selecting sequence names in the contig or by selecting contigs in a Project window.•While you are still in the Review mode of this Variance Table, click on theTranslation button on the button bar of the Variance Table window.Sequencher opens the Translated Variance Table. It is configured in the same way as the Variance Table. Note that the positions of the other three windows also adjust to accommodate the new table.•The row of numbers in the left most reference column refer to both the first base of the codon, above, and amino acid, below, of the Reference Sequence.•Adjacent to the numbers are the corresponding Reference codon and its translation.•The sequences for comparison are in the columns to the right of the Reference.In this case, there is only one.•The pink header is to flag any comparison in which the entire length of the Reference is not covered by the sample sequence.14. What else can I do in Sequencher?You have now tried the basic capabilities of SEQUENCHER for assembly and alignment of DNA sequences. Continue to explore the power of SEQUENCHER using your own data. We invite you to explore the additional tutorials available as PDFs on the Demo CD.Thousands of laboratories around the world have made SEQUENCHER the desktop standard for DNA assembly and alignment. Once you have worked with SEQUENCHER, you will understand why.。
DNAstar中Seqman拼接序列使用方法
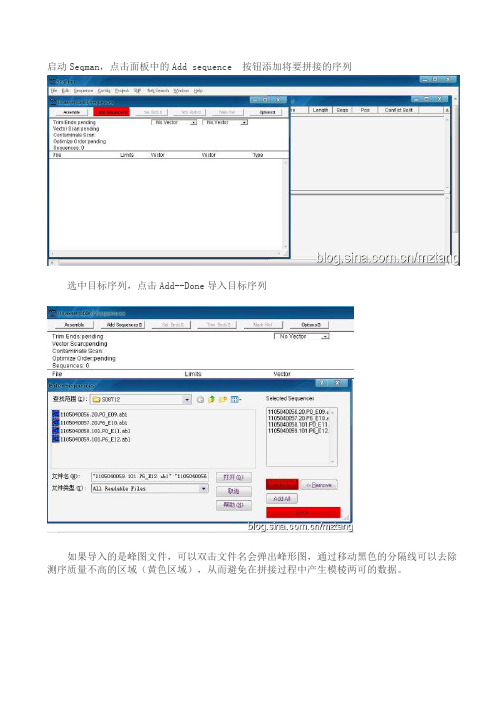
启动Seqman,点击面板中的Add sequence 按钮添加将要拼接的序列
选中目标序列,点击Add--Done导入目标序列
如果导入的是峰图文件,可以双击文件名会弹出峰形图,通过移动黑色的分隔线可以去除测序质量不高的区域(黄色区域),从而避免在拼接过程中产生模棱两可的数据。
数据修正后点击Assemble即拼接,运行结束后会弹出一个新对话框,如果能拼接上,则在Contig一栏有显示。
双击Contig可以看到拼接好的完整序列,以及两个峰图的重叠区域,如果两个峰图的重叠区域完全匹配,则表明拼接的结果可靠;如果两个峰图间有不同碱基,则需要比对两个峰图,选择峰图清晰的作为最终结果。
点击文件前面的三角形可以直接查看序列的峰形图
点击菜单栏的Contig--Save Consense--Single File 可以保存拼接好的序列。
megahit用法
megahit用法Megahit是一种功能强大的工具,用于从高通量测序数据中拼接细菌基因组和其他微生物组。
它可用于快速、准确地拼接、组装和分析大量的基因组数据。
本文将介绍Megahit的用法及其在微生物学研究中的重要性。
1. Megahit简介Megahit是一种基于De Bruijn图的高性能工具,用于将大规模的DNA测序片段重新组装成连续的序列。
它的主要功能是提高低质量数据的容错能力,并快速处理大型基因组数据。
Megahit使用了优化的算法和数据结构,因此比其他组装工具更快速、更准确。
2. Megahit的使用流程首先,将原始的测序数据进行质量过滤和预处理,去除低质量的片段和引物序列。
接下来,使用Megahit将过滤后的数据进行拼接和组装,生成连续的基因组序列。
最后,对组装结果进行评估和分析。
3. Megahit在微生物学研究中的重要性Megahit在微生物学研究中扮演着重要的角色。
它可以帮助研究人员更好地了解微生物组的组成和功能。
通过拼接和组装基因组序列,研究人员可以研究微生物的基因表达、代谢途径和遗传变异等方面的信息,进一步揭示微生物的生物学特性。
4. Megahit的优点和应用领域Megahit具有几个显著的优点。
首先,它能够处理大规模的基因组数据,适用于包括高通量测序数据在内的多种数据类型。
其次,Megahit具有高度的准确性和容错能力,能够处理带有噪声和错误的测序片段。
此外,Megahit还具有较快的运行速度和较低的内存占用。
Megahit在许多领域都有广泛的应用。
例如,在病原微生物研究中,Megahit可以快速分析基因组序列,并帮助科学家确定病原体的类型和抗药性。
此外,Megahit还可应用于环境微生物学、植物病理学和农业科学等领域的研究。
5. Megahit的未来发展趋势随着高通量测序技术的快速发展,Megahit及其他组装工具也在不断改进和演化。
未来,我们可以期待Megahit在处理大型基因组数据方面的性能进一步提高,以满足日益增长的研究需求。
序列拼接

DNAStar应用之SeqMan篇
新的拼接任务开始→所有程序→DNAstar →SeqMan
添加序列
打开保存序列的文件夹
选择序列
导入
整理一下末端
用鼠标拖动手
动更改末端
用鼠标点击更改
序列方向和形式选择载体
自动查找
看看结果拼接
点开测序图
6种阅读框
选择的序
列的位置NCBI查询所选择的序列
保存结果
打印成PDF文件也是一个不错的选择
Vecotr NTI Suite应用之Contig Express篇
运行VNTI 程序
Contig Express 程序窗口,可以设定参数,一般用默认值即可。
导入测序结果(文
件扩展名ab1改成
abi)相关软件
EditView for Macs;
Chroma for Windows]也可以用鼠标右键
导入后可以双击查看和编辑各个测序结果
选择序列,根据实际情况调整序列末端
选择序列拼接
双击查看结果
输出结果到剪贴板,注意最上面的像机按钮,直观吧。
Sequencher应用
开始→所有程序
导入序列选择序列
详细说明
此界面调整参数
拼接
双击查看结果
后记
——时间仓促,工具
栏一些细节没有涉及,抛
砖引玉而已。
输出结果
隔洋乡音渺,背井岁月长;
梦里双亲貌,犹是旧时光。
青萤。
SeqMan进行序列拼

宏基因组序列拼接
总结词
将多个微生物的测序数据拼接成更完整的基因组,用于 研究微生物群落结构和功能。
详细描述
在宏基因组研究中,由于测序数据来自多个微生物,需 要将这些数据拼接成更完整的基因组,以便更好地了解 微生物群落的结构和功能。这个过程需要解决不同微生 物基因组的拼接问题,以及可能的基因重排和倒位等结 构变异。宏基因组序列拼接有助于深入了解微生物群落 的生态学和进化,为环境科学、农业和医学等领域提供 有价值的信息。
保存的拼接结果可以用于后续的分析和实验验证。
04
序列拼接的质量控制
拼接准确率的评估
准确率
评估拼接序列与原始序列的一致性,计算拼接序列中正确碱基的比例。
错误率
计算拼接序列中错误碱基的比例,反映拼接过程中的误差水平。
拼接效率的评估
拼接时间
评估拼接过程所需的时间,分析拼接效率。
内存使用
评估拼接过程所需的时间,分析拼接效率。
质量控制的方法和标准
质量控制标准
设定拼接准确率、错误率和拼接效率等 质量控制标准,确保拼接结果的质量。
VS
质量控制方法
采用多种质量控制方法,如统计检验、可 视化分析和重复实验等,对拼接结果进行 全面评估和验证。
05
序列拼接的应用实例
基因组序列拼接
要点一
总结词
将测序得到的短读段(reads)拼接成长度更长的序列,用于 基因组组装。
序列编辑
SeqMan软件提供了丰富的编辑 功能,如删除、替换、添加等, 方便用户对序列进行修改和调整。
序列比对
SeqMan软件支持多种序列比对 算法,能够快速比对新旧序列或 不同来源的序列数据。
软件应用领域
基因组学
测序结果分析及序列拼接
3.2 测序结果分析(p60)
测序图谱分析
➢ 理想的测序图谱峰形尖锐,峰间距均匀,信噪比高,各种颜 色的峰高度均匀,基线平直。
数据的比对验证
考核操作题(二)
利用DNAman软件拼接“1.seq”、“2.seq”、“3.seq” 三个序列,要求如下(10分)。 新建一个word文档,报告三个序列拼接后cDNA总 长度及可能的基因名称 ,附上NCBI blast窗口图。
谢谢大家
二、利用DNAman软件拼接序列
1、启动DNA列及参数设置
1.点击 Add file
2. 点击 Assemble
3、拼接序列
点击 Show result
序列拼接效果图
点击 Export
4、导出结果
点击“是”
数据的保存
数据的比对验证
数据的比对验证
数 据 的 比 对 验 证
➢ 以ABI3730x进行测序,在反应良好时,30~800bp间的序列 为可信区。
1、测序反应良好的结果
2、测序出现杂峰的结果
3、测序出现套峰的结果
3.3 序列拼接实例分析
一、序列拼接软件
DNAman Vector NTI中的ContiExpress Lasergene中的SeqMan
PCR序列拼接-CExpress使用说明
PCR序列拼接-CExpress使用说明PCR序列拼接软件Contig Express使用简介由于一般测序方法的限制,测续结果一般只能到800bp左右,所以对于较长片段只能用不同引物测序后根据结果拼接,ContigExpress 正式是一款非常实用的序列拼接软件。
Contig Express是著名的软件Vector NTI的组件之一。
经过一些简单的处理该组件可以被剥离出来独立运行,经我们试用效果良好。
Contig Express将每个PCR测序片断视为一个Contig,当您输入多个Contig后,它会自动寻找其中的公共序列,然后将他们拼接好后的结果已图形方式呈现给您。
完全免除您手工逐个片断Blast,然后肉眼找共同序列的苦恼。
Contig Express 9.1可以从论坛中下载。
2 - 向Contig Express中加入需要拼接的序列目前PCR测序的结果多以ABI和Fasta两种格式提供。
一般来说ABI结果是原始结果最为可信,因此我们最好向Contig Express中直接倒入ABI格式的原始数据。
倒入的方法是"Project---Add Fragments---From ABI file..."。
在接下来弹出的"Import Sequence From"对话框中选择测序公司发给您的ABI文件。
需要注意的是目前公司发给您的原始ABI文件多是"AB1"文件名。
Contig Express无法直接识别,因此有必要在文件类型中选择“All Files(*.*)"。
由于要拼接多个序列这时您可以配合Ctrl 键进行多选。
3 - 用Contig Express进行序列拼接现在我们已经选好了要进行拼接的序列了,接下来的步骤就交给Contig Express让它为我们自动拼接了。
用鼠标配合Ctrl键选择要进行拼接的序列。
然后点击"Assemble---Assemble Selected Fragments"。
- 1、下载文档前请自行甄别文档内容的完整性,平台不提供额外的编辑、内容补充、找答案等附加服务。
- 2、"仅部分预览"的文档,不可在线预览部分如存在完整性等问题,可反馈申请退款(可完整预览的文档不适用该条件!)。
- 3、如文档侵犯您的权益,请联系客服反馈,我们会尽快为您处理(人工客服工作时间:9:00-18:30)。
序列拼接工具使用指南金唯智
A. 序列拼接工具在哪
B. 如何使用序列拼接工具-使用测序订单号拼接-上传.ab1文件拼接
序列拼接工具在哪?
登录金唯智订单系统 工具箱 序列拼接
如何使用序列拼接工具?
A.通过测序订单号拼接(推荐)
B.通过上传.ab1文件拼接
A. 使用测序订单号
①输入所需拼接的订单号(如有多份订单用“;”隔开)
②点击拼接就会出现拼接好的结果,根据需要下载对应格式的文件
B.通过上传ab1文件(测序结果)进行拼接
①点击上传ab1文件
②选中需拼接的样品,点击打开,系统即会自动进行拼接,结果同A中方法一致,下载操作。
