MyFME安装手册
MySQL 5.5安装和配置指南(为Windows) 产品名称和型号说明书
MySQL 5.5Installation and Configuration Guide(for Windows)Part number: 5998-1361Software version: iMC PLAT 5.1 (E0202)Document version: 5P103-20111222Legal and notice information© Copyright 2010-2011 Hewlett-Packard Development Company, L.P.No part of this documentation may be reproduced or transmitted in any form or by any means without prior written consent of Hewlett-Packard Development Company, L.P.The information contained herein is subject to change without notice.HEWLETT-PACKARD COMPANY MAKES NO WARRANTY OF ANY KIND WITH REGARD TO THIS MATERIAL, INCLUDING, BUT NOT LIMITED TO, THE IMPLIED WARRANTIES OF MERCHANTABILITY AND FITNESS FOR A PARTICULAR PURPOSE. Hewlett-Packard shall not be liable for errors contained herein or for incidental or consequential damages in connection with the furnishing, performance, or use of this material.The only warranties for HP products and services are set forth in the express warranty statements accompanying such products and services. Nothing herein should be construed as constituting an additional warranty. HP shall not be liable for technical or editorial errors or omissions contained herein.Support and other resourcesContacting HPFor worldwide technical support information, see the HP support website:/supportBefore contacting HP, collect the following information:•Product model names and numbers•Technical support registration number (if applicable)•Product serial numbers•Error messages•Operating system type and revision level•Detailed questionsSubscription serviceHP recommends that you register your product at the Subscriber's Choice for Business website:/go/wwalertsAfter registering, you will receive email notification of product enhancements, new driver versions, firmware updates, and other product resources.Related informationDocumentsTo find related documents, browse to the Manuals page of the HP Business Support Center website:/support/manuals•For related documentation, navigate to the Networking section, and select a networking category.•For a complete list of acronyms and their definitions, see HP A-Series Acronyms. Websites• •HP Networking /go/networking•HP manuals /support/manuals•HP download drivers and software /support/downloads•HP software depot ConventionsThis section describes the conventions used in this documentation set. GUI conventionsConvention DescriptionBoldface Window names, button names, field names, and menu items are in bold text. For example, the New User window appears; click OK.> Multi-level menus are separated by angle brackets. For example, File > Create > Folder./ Multi-level menus are separated by forward slashes. For example, [File/Create/Folder]. SymbolsConvention DescriptionNOTE An alert that contains additional or supplementary information.ContentsOverview (1)MySQL server installation (2)MySQL client installation (2)Configuration (7)Configuring the MySQL server instance (7)Creating a database user (15)Startup and Stop (16)Uninstallation (17)Removing the MySQL server instance (17)Uninstalling the MySQL server (19)FAQ (21)OverviewThis document describes how to install and configure the MySQL server when it is used with iMC, and the installation and configuration guidelines. This document is applicable to the MySQL 5.1 and MySQL5.5 editions. The installation is slightly different from that for other editions. This document takes theMySQL 5.5 edition for example.NOTE:Install the MySQL server and start the MySQL service before installing the iMC.MySQL server installationBefore installing the MySQL server, obtain the MySQL installation program that is applicable to the Windows operating system. This document takes mysql-5.5.5-win32.msi installation program for example. Double click the program to start the setup wizard.Figure 1MySQL server setup wizardClick Next.Figure 2 License agreement pageSelect I accept the terms in the License Agreement and click Next.Figure 3 Select a setup typeTo use the default installation path, select Typical or Complete.To customize the installed components and installation path, select Custom. In this example, select Typical and click Next.Figure 4Ready to install the MySQL serverClick Install to install the MySQL server to the host.Figure 5 Installation progressAfter the installation is complete, click Next.Figure 6 Installation is completeSelect Launch the MySQL Instance Configuration Wizard and click Finish.MySQL client installationIf an iMC server uses a separate database, you must install the MySQL client program on the iMC server.When you configure the database for iMC on the iMC deployment wizard, select Other server for Database location and enter the database server IP address.Before installing the MySQL client, obtain the MySQL installation program that is applicable to the Windows operating system. This document takes mysql-5.5.5-win32.msi installation program for example. Double click the program to start the setup wizard.Figure 7MySQL server setup wizardClick Next.Figure 8 License agreement pageSelect I accept the terms in the License Agreement and click Next. Figure 9 Select setup typeClick Customto customize installed components and installation path.Figure 10 Customize the installationSelect MySQL Server > Client Programs . To change the installation path, click Browse . Click Next.Figure 11 Ready to install the MySQL clientClick Install to install the MySQL client to the host. Figure 12 Installation progressAfter the installation is complete, click Next. Figure 13 Installation is completeDo not select Launch the MySQL Instance Configuration Wizard and click Finish.ConfigurationConfiguring the MySQL server instanceYou must configure the instance for the MySQL server but not for the MySQL client. You can continue to configure the MySQL server upon finishing the installation, or you can open the MySQL server configuration wizard by selecting Start > All Programs > MySQL 5.5 > MySQL Server Instance Configuration Wizard.Open the MySQL Server Instance Configuration Wizard page.Figure 14MySQL server instance configuration wizardClick Next.Figure 15 Select a configuration typeSelect Detailed Configuration and click Next. Figure 16 Select a server typeSelect Server Machine and click Next.Figure 17 Select the database usageSelect Transactional Database Only and click Next. Figure 18 Choose the directory for the databaseSet the directory for installing the database and click Next.Figure 19 Set the number of concurrent connections to the MySQL serverSelect Manual Setting and type 200 (recommended) for Concurrent connections . Click Next. Figure 20 Set the networking optionsSet the port number to 3306 and select Add firewall exception for this port . Click Next.Figure 21 Select the default character setSelect Manual Selected Default Character Set/Collation and set the character set according to the language of your operating system, for example, latin1 for English. Click Next. Figure 22 Set the Windows optionsSelect Install As Windows Service, and type a name for the service name, MySQL in this example. Select Include Bin Directory in Windows PATH, and click Next.Figure 23Set the security optionsSelect Modify Security Settings, set the root password, and select Enable root access from remote machines. Click Next.IMPORTANT:For iMC to correctly identify the root user password during installation, make sure that the password does not contain any of the following characters:` ' \ " ! ( ) & | \\ $ ; @ < > / ^ \t.If you do not want to change the password of the root user, create a user with root user privileges and make sure that the password does not contain any of the previous characters. For more information about creating a database user, see “Creating a database user.”Figure 24Ready to execute the settingsClick Execute to execute the MySQL server instance settings. Figure 25Configuration is completeClick Finish to complete the MySQL server instance configuration.Configure the privilege settings for the remote root user with the following commands:mysql –uroot –pmysqlgrant all privileges on *.* to root@’%’ identified by ‘mysql’ with grant option; mysql is the password for user root.Figure 26Configure the privilege settings for the remote root userThen configure the max_allowed_packet size.1.Open file my.ini in the MySQL installation path.Figure 27Configuration file path2.Add the max_allowed_packet parameter under [mysqld]. If the parameter already exists, youcan change its value.[mysqld]max_allowed_packet = 200M3.Save the changes and restart MySQL.Creating a database userYou can create new users rather than use the default user (root user) and grant them privileges to manage and operate the database.CAUTION:You can create a user on the MySQL server but not on the MySQL client.Creat a database user and grant privileges to the user with the following commands:mysql -uroot -pmysqlgrant all privileges on *.* to roottest@’%’ identified by ‘passwordtest’ with grant option;mysql is the password of the root user and passwordtest is the password of the new user roottest.Figure 28Add a database userStartup and StopOpen the Windows service management page on the MySQL server to start or stop the MySQL service.Figure 29Start or stop MySQL serviceUninstallationTo uninstall the MySQL server from the Windows operating system, remove the MySQL server instance first. You can uninstall the MySQL client from the Windows operating system directly. Removing the MySQL server instanceSelect Start > All Programs > MySQL 5.5 > MySQL Server Instance Configuration Wizard to enter the MySQL server instance configuration wizard page.Figure 30MySQL server instance configuration wizardClick Next.Figure 31 Select a maintenance optionSelect Remove Instance and click Next. Figure 32 Remove the instanceClick Execute to remove the instance.Figure 33Instance is removedUninstalling the MySQL serverSelect Control Panel > Add or Remove Programs to enter the Add or Remove Programs page where you can uninstall the MySQL server.Figure 34Uninstall the MySQL server from WindowsFAQGarbled Characters Appear in the Database TableCorrectly set the character set when you install the MySQL server. If not, garbled characters appear inthe database table. Table 1 describes the character sets for different languages. For instruction on howto set the character set, see Figure 21.Table 1Character sets for different languagesset Language CharacterEnglish latin1Japanese sjisHow can I update database passwords for iMC?The usernames and passwords used by the iMC modules are stored in cipher text in file\common\conf\ server-addr.xml in the installation path. You can use the pwdmgr.bat command toobtain passwords in clear text or update the latest passwords to the file.Usually, a user can use the database management tool to change the database password of a certainiMC module. To ensure communication between iMC and the database, use the pwdmgr.bat commandto update the corresponding password in file server-addr.xml. If iMC is deployed in distributed mode,you must update the password for every iMC server, as shown in Figure 35.Figure 35Update database passwords for iMCIn the preceding commands, dbpasswd represents the latest database password of the user imc_config,config_db represents the database name, and 192.168.20.107 represents the IP address of the database.To obtain the IP address and name of a MySQL database, view the settings of the corresponding user infile $IMCROOT/common/conf/server-addr.xml.21。
织梦安装说明
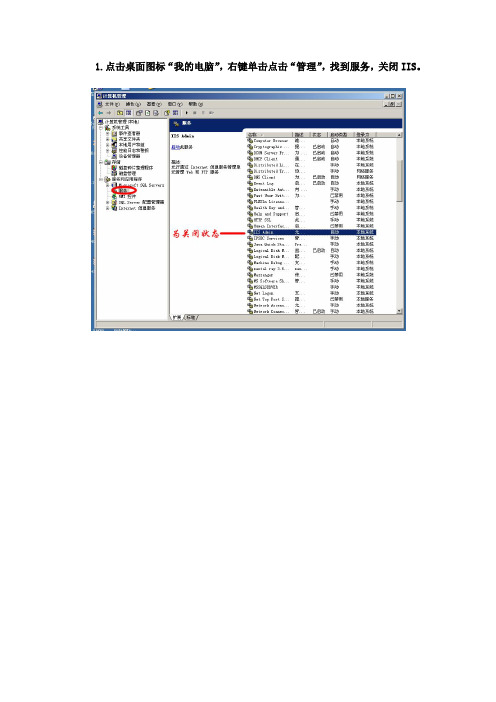
1.点击桌面图标“我的电脑”,右键单击点击“管理”,找到服务,关闭IIS。
2.安装织梦运行环境DedeAMPZ。
将DedeAMPZForDebug.zip解压,之后打开安装。
3.将DedeCMS-V5.7-GBK-SP1-Full.tar解压,打开uploads,将里面内容全部复制待用。
4.来到DedeAMPZ的安装环境下,打开DedeAMPZ找到站点根目录WebRoot。
打开WebRoot,删除Default文件夹中的内容,将第三步复制的内容粘贴在里面。
5.在浏览器中输入127.0.0.1/install,开始安装。
6.关于数据备份与还原。
数据备份与还原步骤一样,下面讲讲如何进行数据还原。
下图显示为站点根目录WebRoot下的Default。
此目录显示了织梦默认模板和用户自己建立的模板的位置。
即站点根目录WebRoot下的Default下的templets。
在浏览器中输入127.0.0.1/dede,输入用户名和密码(在安装织梦时设置的,如下图所示)用户名为admin,密码为admin。
登陆后显示如图所示。
找到“系统”在右上角有个“数据还原”。
点击即可进行数据还原操作。
待数据还原完之后修改两处(1)“系统”----“系统基本参数”中的“模板默认风格”为用户自己建立的模板文件夹名称。
(2)“生成”----“更新主页HTML”中的“选择主页模板”为用户自己建立的模板文件夹名称。
最后更新文档HTML,更新栏目HTML,更新主页HTML,更新系统缓存,一键更新网站。
即可,可以点击下图右上角处的“网站主页”进行预览,也可以在浏览器地址栏中输入127.0.0.1进行浏览。
mycmf内容管理框架系统用户手册v1.0

MyCMF内容管理框架系统用户手册V1.0版权申明未经版权所有者明确授权,禁止发行本文档及其被实质上修改的版本。
未经版权所有者事先授权,禁止发行、分发、运营、销售等方式传播、或使用基于MyCMF内容管理框架系统,衍生的软件产品,应用系统,网络平台等。
MyCMF唯一官方网址:MyCMF功能MyCMF全称:My Content Management Framework。
MyCMF是基于JAVA语言+MySQL数据库开发的内容管理框架系统。
软件开发者基于本框架系统,扩展开发应用系统,可大幅提高软件开发效率,降低开发和沟通成本。
MyCMF可用于开发任何类型网站、企业管理系统。
例如:门户系统,论坛系统,新闻系统,团购系统,威客系统,物流系统,商城系统,内容管理系统,工作流系统,博客系统,电子公告系统,手机网站,微信网站等等,只要是基于HTML、XML、WebService形式的网络应用系统都有MyCMF用武之地。
MyCMF用途在作者十多年软件开发、团队管理、项目顾问从业生涯中,一直探索着如何高效建设不同系统。
上百个各类项目的分析、实现,由一个个具体项目中抽丝剥茧,总结重复劳动部分,不断提炼,不断抽象化再凝聚。
从而提出核心理念PTN:(P)项目综合界面、(T)主题列表界面、(N)内容界面,是任何系统前端、后台都必须用到的。
一切需要循环输出的,都属于列表。
MyCMF内容管理框架系统的用途就是:通过灵活简单、易于传播、安全高效、可扩展的方式实现PTN的任意形态。
MyCMF特点MyCMF特点是:围绕PTN理念实现MyCMF内容管理框架的一系列法则。
MyCMF控制:模板、标签、配置、继承,四项核心规则。
通过MyCMF独有的PTN模板解析引擎,配合PTM配置解析引擎,无限聚合,实现任意形态界面、组件。
1)模板:由PTN模板解析引擎,解析模板标签,分为界面模板,和数据模板。
2)标签:为模版提供动态内容,可引用模版代码、配置信息、数据库内容等。
ApacheMySQLPHPSSL服务器之完全安装攻略
ApacheMySQLPHPSSL服务器之完全安装攻略目的我们的目标是安装一个承诺我们托管多个网站的web服务器,其中一些是针对电子商务的安全解决方案,而大部分网站是通过连接一个数据库服务器同时提取其数据的脚本驱动的。
为了那个任务所需的工具是:Apache-一个网站服务器Mod_SSL-一个安全套接字层(SSL)的模块OpenSSL-开放源代码工具箱(mod_ssl所需)RSARef-仅对美国用户MySQL-一个数据库服务器PHP-一种脚本语言“条条大路通罗马”……因此这只是专门多能达到我们要求的配置之一。
我选择如此的配置,是因为它是最简单和最快的一种。
选择Mod_SSL/OpenSSL的缘故是因为我有它的先前体会,是最快配置和最容易安装的一种。
为了彼此方便地与Apache 集成,我选择了PHP和MySQL。
记住,Perl能做到你想要做任何工作,然而,PHP 对任何想学习它地程序员来说简单同时容易。
期望你将在终止那个简单的指南后能成功地完成下列目标。
安装并设置MySQL数据库服务器o 明白如何样检查MySQL服务器的状态o 明白如何样使用命令行客户程序存取MySQL服务器o 明白如何样从web存取你的DB服务器安装并设置具备SSL的Apache网站服务器o 配置一个简单的虚拟网站o 明白如何样停止并启动服务器o 明白如何样做一些差不多的主机托管配置安装并配置服务器端脚本的PHP 4.0超文本预处理器o 明白如何样编写简单的php代码o 明白如何样使用php连接一个DBo 创建一个启用PHP地简单网站与一个数据库沟通制造一些样本证书用于Apache SSLo 明白如何样产生一个CSR文件o 明白如何样加密一个键码o 明白如何样签署你自己的证书本文将覆盖大量的信息。
本指南作为一个入门性地的指南,让你步入电子商务、网站脚本和安全套接字层 (SSL)的世界,目的是关心你建立由储备在数据库中的动态信息驱动的安全网站。
MySQL5.2.66安装手册

MySQL5.2.66安装手册文件变更记录说明本文档适用于mysql在windows系统中安装,使用的软件安装包:mysql-installer-community-5.6.22.0.msi可使用公司提供的,可自行前往官网下载,官网下载地址:/downloads/windows/installer/官网提供的版本包括:MySQL标准版(MySQL Standard Edition)MySQL企业版(MySQL Enterprise Edition)√MySQL社区版(MySQL Community Edition):开源免费选择mysql-installer-community-5.6.22.0.msi,点击下载。
该安装包适用于32bit 和64bit Windows操作系统。
1安装前准备1.1安装.Net framwork4.0确认系统中已经安装.Net framwork4.0,否则无法运行msi安装程序。
1.2安装Visual C++ 2013 Redist推荐使用公司提供的安装包Visual C++ Redistributable Packages for Visual Studio 2013_x64.exe进行安装。
亦可自行前往官网下载,下载地址:/zh-cn/download/details.aspx?id=40784根据系统位数选择对应的安装包运行exe文件,同意许可,点击“安装”,即可。
2安装MySQL1.双击安装包mysql-installer-community-5.6.22.0.msi,开始安装。
2.勾选同意条例,点击“next”。
3.选择自定义安装,点击“Custom”,点击next。
4.选择需要自定义安装的产品,这里必选的产品为:MySQL Server5.6.22和MySQL Workbench 6.2.4,根据系统选择64位。
5.修改默认安装路径。
选择其中一个产品,点击下方的“Advanced Options”,在打开的窗口中修改MySQL Server的默认安装路径Install Directory和数据存放路径Data Directory。
asterisk,mysql,freepbx完整安装手册
asterisk,mysql,freepbx完整安装手册1 Install Asterisk server1.1 Install CentOS 5.3Description :CentOS is an Enterprise-class Linux Distribution derived from sources freely provided to the public by a prominent North American Enterprise Linux vendor. CentOS conforms fully with the upstream vendors redistribution policy and aims to be 100% binary compatible.●Need install Web Server , Mail Server , MySQL Database , Development T ools●Enable W eb server, Mail server, MySql Database, Development tools.●Disable firewall, SElinux.●Config your network, make sure you can connect to the internet.1.2 Update your system#yum -y update1.3 Install dependencies and extra packages# yum install e2fsprogs-devel keyutils-libs-devel krb5-devel libogg libselinux-devel libsepol-devel libxml2-devel libtiff-devel gmp php-pear php-pear-DB php-gd php-mysqlphp-pdo kernel-devel ncurses-devel audiofile-devel libogg-devel openssl-devel mysql-devel zlib-devel perl-DateManip sendmail-cf1.4 Install lame-3.97Description :LAME is an educational tool to be used for learning about MP3 encoding. The goal of the LAME project is to use the opensource model to improve the psycho acoustics, noise shaping and speed of MP3. LAME is not for everyone - it is distributed as source code only and requires the ability to use a C compiler. However, many popular ripping and encoding programs include the LAME encoding engine.# cd /usr/src# wget /doc/945198382.html,/sourceforge/lame/l ame-3.97.tar.gz# tar zxvf lame-3.97.tar.gz# cd lame-3.97# ./configure# make# make install1.5 Install libpriDescription :libpri is a C implementation of the Primary Rate ISDN specification. It wasbased on the Bellcore specification SR-NWT-002343 for National ISDN. As ofMay 12, 2001, it has been tested work with NI-2, Nortel DMS-100, andLucent 5E Custom protocols on switches from Nortel and Lucent.# cd /usr/src# wget /doc/945198382.html,/pub/libpri/libpri-1.4-current.tar.gz# tar zxvf libpri-1.4-current.tar.gz# cd libpri-1.4.10/# make# make install1.6 Install mpg123The mpg123 is make for the “music on hold” module to up custom *.mp3 or *.wav file to PBX.#tar xvf mpg123-1.9.0.tar.bz2#./configure#make#make install1.7 Install Dahdi / Dahdi-toolsDescription :Dahdi is a short for ZAPata TELephony.This packet is the drive of the Digital Cards# cd /usr/src# download dahdi-linux-current.tar.gz dahdi-tools-current.tar.gz# tar zxvf dahdi-linux-2.2.0.2# cd zaptel-1.4.12.1# make# make install# cd .# . tar zxvf dahdi-tools-current.tar.gz# ./configure# make# make install# make config/etc/init.d/dahdi start# echo "/etc/init.d/dahdi start" >> /etc/rc.d/rc.local# dahdi_genconf //check the TDM400P board automatic#copy dahdi_channels.conf content to chan_dahdi.conf# dahdi_cfg –vv1.8 Install asterisk1.7.1 Install asterisk-1.6.1.4Description :Asterisk is the world's leading open source PBXi, telephony engine, and telephony applications toolkit. Offering flexibility unheard of in the world of proprietary communications, Asterisk empowers developers and integrators to create advanced communication solutions...for free.# cd /usr/src# useradd -c "Asterisk PBX" -d /var/lib/asterisk asterisk# mkdir /var/run/asterisk# mkdir /var/log/asterisk# chown -R asterisk:asterisk /var/run/asterisk# chown -R asterisk:asterisk /var/log/asterisk# chown -R asterisk:asterisk /var/lib/php/session/# sed -i "s/User apache/User asterisk/" /etc/httpd/conf/httpd.conf# sed -i "s/Group apache/Group asterisk/" /etc/httpd/conf/httpd.conf# sed -i "s/AllowOverride None/AllowOverride All/" /etc/httpd/conf/httpd.conf# download asterisk-1.6.1.4.tar.gz# tar zxvf asterisk/asterisk-1.6.1.4.tar.gz# cd asterisk-1.6.1.4# ./configure# make# make install# make samples# make config1.7.2 Install asterisk-addons-1.6.1.1Description :This package contains additional modules for Asterisk which are, for one reasonor another, not included in the normal base distribution. Many of thesemodules are experimental.# cd /usr/src# download asterisk-addons-1.6.1-current.tar.gz# tar zxvf asterisk-addons-1.6.1-current.tar.gz# cd asterisk-addons-1.6.1.1# ./configure# make# make install# make samples1.7.3 Install asterisk-soundsDescription :This packet is not for hardware dependency. It’s just the necessary packet (Include many sound file) for asterisk server.Download the packet asterisk-sounds-1.2.1.tar.gz# cd /usr/src# tar zxvf asterisk-sounds-1.2.1.tar.gz# cd asterisk-sounds-1.2.1# make install1.9 Install FreePBXDescription :FreePBX is for both developers and people searching for a Business Phone System (or a really fancy home one).# cd /usr/src# wget/doc/945198382.html,/sourceforge/ampo rtal/freepbx-2.3.1.tar.gz# tar zxvf freepbx-2.5.0.tar.gz# cd freepbx-2.5.0# service httpd start# service mysqld start# chkconfig httpd on# chkconfig mysqld on1.9.1 Config MySql# mysqladmin create asterisk# mysqladmin create asteriskcdrdb# mysql asterisk < SQL/newinstall.sql# mysql asteriskcdrdb < SQL/cdr_mysql_table.sql# mysql# GRANT ALL PRIVILEGES ON asteriskcdrdb.* TO asteriskuser@localhost IDENTIFIED BY 'occvoip';# GRANT ALL PRIVILEGES ON asterisk.* TO asteriskuser@localhost IDENTIFIED BY 'occvoip';# mysqladmin -u root password 'occvoip'1.9.2 Install freepbx# vi /etc/asterisk/asterisk.conf++++++++++++++++++++++++++++++++Modify [directories](!) ==> [directories]Modify /var/run ==> /var/run/asterisk++++++++++++++++++++++++++++++++# cd /usr/src/freepbx-2.5.0# ./start_asterisk start# ./install_amp --username=asteriskuser --password=occvoip# echo /usr/local/sbin/amportal start >> /etc/rc.localOpen browser to http://ipaddressofpbx#Click the FreePBX Administration to config the FreePBX. Then click Apply configuration changes.Download modules.: click Module Admin to download this modules:Feature codeVoicemailPhonebook Directory toolPhonebookSpeed dialDay night modeIVRFollow meRing groupCall ForwardCall WaitingCallbackConferencesDo-Not-Disturb (DND)Info ServicesannouncementMisc ApplicationsMisc DestinationsMusic on HoldPIN SetsParking lotAsterisk Info toolCustom Applications tool# reboot1.10 Open browser to http://ipaddressofpbxClick the FreePBX Administration to config the FreePBX.。
FRM-1 Relay Control Module 安装指南说明书

FRM-1 Relay Control ModuleBeFoRe InstallIngThis information is included as a quick reference installation guide. Refer to the appropriate Notifier control panel installation manual for detailed system information. If the modules will be installed in an existing operational sys-tem, inform the operator and local authority that the system will be tempo-rarily out of service. Disconnect power to the control panel before installing the modules.NOTICE: This manual should be left with the owner/user of this equipment.geneRal DesCRIptIonThe FRM-1 Relay Control Module is intended for use in intelligent, two-wire systems where the individual address of each module is selected using the built-in rotary switches. It allows a compatible control panel to switch discrete contacts by code command. The relay contains two isolated sets of Form-C contacts, which operate as a DPDT switch and are rated in accordance with the table in the manual. Circuit connections to the relay contacts are not su-pervised by the module. The module also has a panel controlled LED indi-cator. This module can be used to replace a CMX-2 module that has been configured for Form-C operation.CoMpatIBIlIty RequIReMentsT o ensure proper operation, this module shall be connected to a compatible Notifier system control panel (list available from Notifier).speCIFICatIonsNormal Operating Voltage: 15 to 32 VDC Maximum Current Draw: 6.5 mA (LED on)Average Operating Current: 230µA direct poll; 255µA group poll EOL Resistance: Not usedT emperature Range: 32˚F to 120˚F (0˚C to 49˚C)Humidity: 10% to 93% Non-condensingDimensions: 4.675˝ H x 4.275˝ W x 1.4˝ D (Mounts to a 4˝ square by 21/8˝ deep box.)Accessories:SMB500 Electrical Box; CB500 BarrierI56-3502-003InstallatIon anD MaIntenanCe InstRuCtIonsFIguRe 1. ContRols anD InDICatoRs:C1071-00MountIngThe FRM-1 mounts directly to 4-inch square electrical boxes (see Figure 2A). The box must have a minimum depth of 21/8 inches. Surface mounted electri-cal boxes (SMB500) are available from Notifier. The module can also mount to the DNR(W) duct housing.12 Clintonville Road Northford, CT 06472-1653Phone: 203.484.7161Relay ContaCt RatIngs:CuRRent RatIngMaXIMuM VoltageloaD DesCRIptIonapplICatIon 2 A 25 V AC PF = 0.35Non-coded 3 A 30 VDC Resistive Non-coded 2 A 30 VDC Resistive Coded 0.46 A 30 VDC (L/R = 20ms) Non-coded 0.7 A 70.7 V AC PF = 0.35Non-coded 0.9 A 125 VDC Resistive Non-coded 0.5 A 125 V AC PF = 0.75Non-coded 0.3 A125 V ACPF = 0.35Non-codedthe switch contacts are in their correct state, modules must be made to communicate with the panel before connecting circuits controlled by the module.FIguRe 3. Relay MoDule wIRIng DIagRaM:TO NEXT DEVICECONNECT MODULES TO LISTED COMPATIBLEMODULE DOES NOT SUPERVISE CONTROLLED CIRCUITSCONTROL PANELS ONLY*NOTE: ANY FAULT IN THE POWER SUPPLY IS LIMITED TO THAT ZONE AND DOES NOT RESULT IN A FAULT IN A SEPARATE ZONE.C0946-00FIguRe 2a. MoDule MountIng FIguRe 2B:wIth BaRRIeR:C1070-00wIRIngNOTE: All wiring must conform to applicable local codes, ordinances, and reg-ulations. When using control modules in nonpower limited applications, the CB500 Module Barrier must be used to meet UL requirements for the separa-tion of power-limited and nonpower-limited terminals and wiring. The barrier must be inserted into a 4˝ × 4˝ × 21/8˝ junction box, and the control module must be placed into the barrier and attached to the junction box (Figure 2A). The power-limited wiring must be placed into the isolated quadrant of the module barrier (Figure 2B).1.Install module wiring in accordance with the job drawings and appropri-ate wiring diagrams.2. Set the address on the module per job drawings.3. Secure module to electrical box (supplied by installer), see Figure 2A.Wire should be stripped to the appropriate length (recommended strip length is 1/4“ to 3/8”). Exposed conductor should be secured under the clamping plate and should not protrude beyond the terminal block area. Caution: Do not loop wire under terminals. Break wire run to provide supervision of connections.。
APC Symmetra PX 96K 160K 安装手册

敷设并连接电池断路器跳闸缆线 . . . . . . . . . . . . . . . . . . . . . . . 7 敷设并连接通讯缆线 . . . . . . . . . . . . . . . . . . . . . . . . . . . . . . . 8
不带 PDU-XR 的安装的输入和输出缆线 . . . . . . . . . . . . . . . . . . . . . . . 31
准备缆线 . . . . . . . . . . . . . . . . . . . . . . . . . . . . . . . . . . . . . 31 连接 UPS 内的缆线 . . . . . . . . . . . . . . . . . . . . . . . . . . . . . . 32 双市电安装 - 顶部或底部缆线接入 . . . . . . . . . . . . . . . . . . . . 33 单市电安装 - 顶部或底部缆线接入 . . . . . . . . . . . . . . . . . . . . 34
连接紧急断电 (EPO) 开关 . . . . . . . . . . . . . . . . . . . . . . . . . . 15 EPO 开关布线图表 . . . . . . . . . . . . . . . . . . . . . . . . . . . . . . 16
Symmetra PX 96 和 160 kW 400 V 安装手册
规格 ................................................................................. 35
Linux+Apache+MySQL+PHP+FrontPage完全安装手册
本文介绍如何安装Apache以支持MySQL、PHP4、FrontPage2000服务器扩展和虚拟主机功能,本文的安装步骤在Redhat 7.0和Mandrake 7.2上测试通过,所以应该适用于任何Linux发行,它也适用于任何形式的*nix系统,只要下载不同的软件包。
一. 需求1、一个基于Intel并安装了TCP/IP和libc6的Linux系统。
如果Apache或MySQL 已经安装好了,建议用软件包管理程序或手工删除它们。
2、需要安装的软件包,它包括:Apache 1.3.19、MySQL服务器、PHP4和FrontPage 2000扩展、Apache支持FrontPage 2000扩展的补丁、最新的gcc编译器及其相关库。
二. 准备安装1、下载软件包下载下列软件包到/download目录下。
Apache 1.3.19MySQL ServerPHP4FrontPage 2000 Extensions2、解压缩源代码将所有/download目录下的源代码包(除了frontpage要解压缩到/use/local目录下)解压缩:tar zxfv apache_1.3.19.tar.gztar zxfv fp40.linux.tar.gz -C /usr/localtar mysql-3.23.32.tar.gztar zxfv php-4.0.4pl1.tar.gz三. 安装MySQL第一步先要安装MySQL,因为要安装支持MySQL的PHP,然后安装支持PHP的Apache,下面是具体步骤。
1、设置用户和组首先,系统增加名为mysql的拥护和组。
groupadd mysqluseradd -g mysql mysql2、配置并构建MySQL进入目录/download/mysql-3.23.32并运行configure和make程序。
如果想把数据库存在非缺省目录/usr/local/mysql/var/,则为configure指定选项localstatedir=/your_path。
EMI扩展安装指南说明书

Emi User Guide1 InstallationNote: Please take a backup of your all Magento files and database before installing or updating any extension.1.Download the EMI extension .ZIP file.2.Extract the .ZIP file.3.Copy the app folder and paste it into your magento ROOT directory.4.Run upgrade command as specified : php bin/magento setup:upgrade5.Run compile command as specified : php bin/magento setup:di:compile6.Run deploy command as specified : php bin/magento setup:static-content:deploy -f7.Clear the cache either from the admin panel or command line php bin/magentocache:clean8.Now, you can see the Solwin menu in admin panel. Please go to EMI -> Configurationand select E nable t o Yes and save settings.NOTE: Make sure the installation is done from under the FTP administrator account. Otherwise make sure to set 775 permissions to the store root directory after the extension is deployed.Getting StartedA setup guide and general information to help youThis document covers the installation, set up, and use of this extension and provide answers and solutions to common problems and issues. We encourage you to read this document thoroughly if you are experiencing any difficulties.InformationThis Extension display custom EMI option in product view page in popup.This Magento 2 extension helps store owner to display custom EMI options for the products in Magento. This extension allows store owners to display EMI options like EMI tenure(months),bank interest rate(%), monthly installments and total money with specific banks on the product detail page. Store owner can set general terms and conditions that will display with EMI table. This extension comes with various configuration options to customize EMI table.Features●Allow the admin to display EMI options per product.●Admin can manage all bank details & terms and conditions from backend.●Display EMI Option link on view page with popup.●Display Bankwise Terms & Conditions.●Display General Terms & Conditions.●Auto EMI Calculation from admin.How To Use→ In frontend, Customers can see the EMI View Plans button on product view page.→ By Clicking on EMI View Plans button will display popup with EMI calculation bank wise and terms & conditions.→ By Clicking on EMI Details will display collapse with EMI calculation.Mobile View → By Clicking on EMI View Plans button will display popup with EMI calculation bank wise and terms & conditions.→ By Clicking on EMI Details will display collapse with EMI calculation.How To Configure→ In backend, Go to EMI >> Banks will display list of banks.→ Click on the Add New button to add new bank details.→ In backend, Go to EMI >> Month will display list of months.→ Click on the Add New button to add new month details.→ In backend, Go to EMI >> EMI will display list of banks ,months and interest.→ Click on the Add New button to add new interest details.Note:Once EMI records are added, Please clear the Cache .SupportIf you have any questions or requests, please contact us at info@. We are very happy to assist you!1.Website: h ttps://2.Blog: h ttps:///blog。
McAfeeLXSS安装与基本策略手册

McAfee LXSS安装与基本策略手册2018-08-291.部署Endpoint Security for Linux(ENSL)将Endpoint Security Platform、ENSL模块,签入至ePO平台。
1.1签入安装包打开ePO控制台,“菜单”>“主存储库”点击“签入包”“选择文件”找到带有“Endpoint Security Platform”的安装包,下一步安装签入完成Endpoint Security Platform安装包1.2签入ENS Platform扩展包点击“菜单”>“扩展包”,选择“安装扩展”选择扩展包,点击“打开”签入完成1.3签入防病毒安装包打开ePO控制台,“菜单”>“主存储库”点击“签入包”选择“ISecTP-10.5.1-1582-Release-ePO”的安装包,点击打开,下一步安装完成后1.4签入防病毒扩展包点击“菜单”>“扩展包”,选择“安装扩展”选择扩展包,点击“打开”1.5向客户端部署ENSL组件“系统树”——选择客户端所在的组,点击“分配的客户端任务”下拉菜单,选择“产品部署(McAfee Agent)”在左下角点击“操作”,选择“新建客户端任务分配”选择“McAfee Agent”>“产品部署”,点击“创建新任务”“计划”将计划类型设置为“立即运行”,点击保存。
2.策略配置2.1防病毒策略配置2.1.1设置白名单排除项1、点击“系统树”选择客户端所属组,点击“分配的策略”,点击产品下拉菜单选择“Endpoint Security Threat Prevention”,点击“按访问扫描”点击“显示高级”在排除项,点击“添加”输入例外路径,点击确定并在“系统树”修改“按需扫描”策略点击完全扫描,在排除项,点击“添加”输入例外路径,点击保存选择“快速扫描”,在排除项,点击“添加”输入例外路径,点击保存2.1.2定义扫描时间和扫描类型“系统树”选择用户组,点击“分配的客户端任务”,点击“操作”>“新建客户端任务分配”选择产品“Endpoint Security Threat Prevention”任务类型“自定义按需扫描”>“创建新任务”可以设置例外排除项,也可以自定义扫描位置和扫描级别。
美福2008操作系统安装手册
服务器安装安装系统环境安装Windows2008 64位操作系统。
安装TTS引擎1) 关闭数据执行保护,并重启机器。
2) 安装InterPhonic 6.0系统(6700-HASP HL版本.密码:PTLAWX-GXEPD6-W3AHED)。
3)音库安装小芮音库,位置TTS\音库\VocLib16K_xiaorui。
4)cy2008定制包安装,位置TTS\CY2008定制包。
2.拷贝小芮提示音库到相应目录:●拷贝TTS\提示音库\王如提示音\VptLib.be替换C:\Program Files\iFly InfoTek\InterPhonic 6.0\resource\cy2008目录下的VptLib.be文件●拷贝TTS\提示音库\王如提示音库\VptAudio\wangru至C:\Program Files\iFlyInfo Tek\InterPhonic 6.0\resource\cy2008\VptAudio目录下修改TTS安装目录bin\isp目录下ses.cfg和spi.cfg配置文件。
svc_only = false修改为svc_only = true3.设置ses服务为自启动并启动ses(Speech Engine Service)服务,至此TTS引擎及音库安装完成。
4. 安装所需软件1)安装IIS2)安装Dotnetfx35.exe,安装完成后运行命令:(%windir%\\Framework\v2.0.50727\aspnet_regiis –i)安装数据库(使用SQL安装程序完整安装,sa用户对应的密码iflytek!234)安装SQL2005数据库,在DataBase目录下:1)安装isay365_lan数据库●新建isay365_lan数据库●执行i say365_lan.sql,位置DataBase\isay365_lan.sql2)安装PsciManager数据库●新建PsciManager数据库●执行PsciManager.sql,位置DataBase\PsciManager.sql3)对isay365_lan数据库执行isay365_lan_Add.sql脚本如果有安装包,即可从此处安装直至完成.部署WEB网站1.分别对APP,Service,systemweb三个网站建立应用程序池,打开IIS右键‘应用程序池’—添加应用程序池-分别以网站命名2.对已经建立的三个应用程序池,进行设置,设置如下:右键硬件应用程序池名,选择高级设置,将‘启用32位应用程序’对应的值 False 修改为True,三个应用程序池分别都进行此设置3.建立网站在IIS中新建网站SystemWeb,网站端口80,路径指向WebSite\web\SystemWeb3.1.1新建虚拟目录ManagerWeb,指向WebSite\web\ManagerWeb3.1.2新建虚拟目录TransactFileService,指向WebSite\service\TransactFileService3.1.3新建虚拟目录ttsFile,指向WebSite\service\TTSWebService\ecl_ttswave\standard\PromisStudy,3.2 新建文件夹APP(建于WebSite同级目录),在IIS中新建网站APP,路径指向新建的APP文件夹,网站端口88。
MySQL安装手册
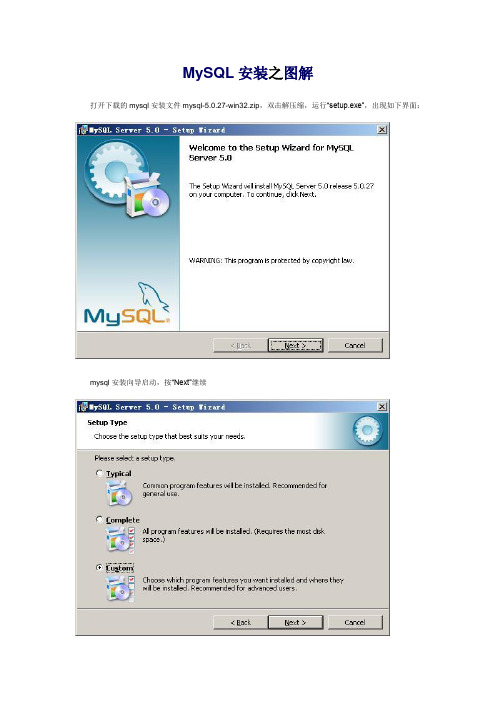
MySQL安装之图解打开下载的mysql安装文件mysql-5.0.27-win32.zip,双击解压缩,运行“setup.exe”,出现如下界面:mysql安装向导启动,按“Next”继续选择安装类型,有“Typical(默认)”、“Complete(完全)”、“Custom(用户自定义)”三个选项,我们选择“Custom”,有更多的选项,也方便熟悉安装过程在“Developer Components(开发者部分)”上左键单击,选择“This feature, and all subfeatures, will be installed on local hard drive.”,即“此部分,及下属子部分内容,全部安装在本地硬盘上”。
在上面的“MySQL Server(mysql服务器)”、“Client Programs(mysql客户端程序)”、“Documentation(文档)”也如此操作,以保证安装所有文件。
点选“Change...”,手动指定安装目录。
填上安装目录,例如“F:\Server\MySQL\MySQL Server 5.0”,也建议不要放在与操作系统同一分区,这样可以防止系统备份还原的时候,数据被清空。
按“OK”继续。
返回刚才的界面,按“Next”继续。
确认一下先前的设置,如果有误,按“Back”返回重做。
按“Install”开始安装。
正在安装中,请稍候,直到出现下面的界面这里是询问你是否要注册一个的账号,或是使用已有的账号登陆,一般不需要了,点选“Skip Sign-Up”,按“Next”略过此步骤。
现在软件安装完成了,出现上面的界面,这里有一个很好的功能,mysql配置向导,不用向以前一样,自己手动乱七八糟的配置my.ini了,将“Configure the Mysql Server now”前面的勾打上,点“Finish”结束软件的安装并启动mysql配置向导。
mysql配置向导启动界面,按“Next”继续。
瑞格尔标准和高级ECM电机编程套件安装手册说明书

Norman, OK 73069
035-23087-001-C-0115 Supersedes: 035-23087-001-B-0411
programming module and the module on the back of the EON motor/module. 3. Connect the power supply adapter to the programming module and a 110 volt power source.
ACCESSORY KIT INSTALLATION MANUAL
PROGRAMMING KIT FOR REGAL BELOIT STANDARD AND PREMIUM ECM MOTORS (S1-ECMKIT01)
GENERAL INFORAMTION This kit contains hardware to enable motors to be field programmed.
Connection cable from programming module to your PC
EON Motor Basic Component Connections; 1. Connect the white cable between the programming module
and your PC. 2. Connect the black EON programming harness between the
AC POWER
FIGURE 1: EON Programming Motor Connection
A0306-001
MySql5.5.8 for RHEL5 安装
深圳启翼科技有限公司
MySql5.5.8 for RHEL5 安装
版本号 1.0
公司: 深圳启翼科技有限公司 作者: Grellen Liu 日期: 2011-1-5
Page | 1
深圳启翼科技有限公司
文档修订版本
版本号 作者 日期 备注
1.0
Grellen Liu
2011-1- 5
Page | 2
深圳启翼科技有限公司
目录
MYSQL5.5.8 FOR RHEL5 安装 ............................................................................................................ 1 1. 安装前准备 .............................................................................................................................. 4 1.1. 1.2. 2. 软件 ......................................................................................................................................... 4 硬件 ......................................................................................................................................... 4
MySQL5.1.17免安装配置说明书
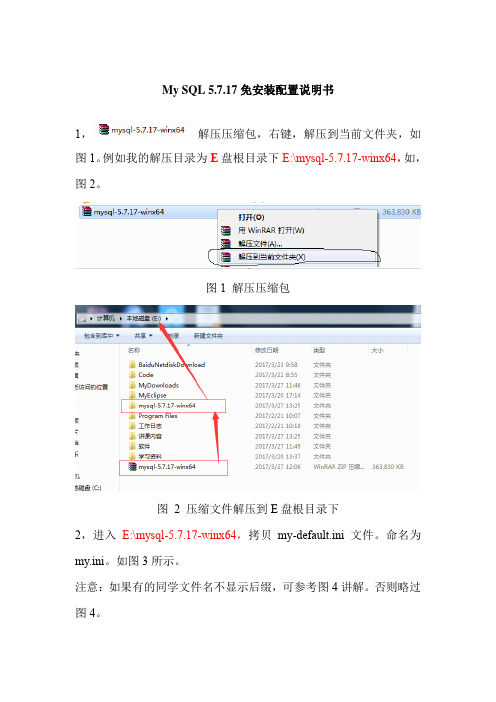
My SQL 5.7.17免安装配置说明书1,解压压缩包,右键,解压到当前文件夹,如图1。
例如我的解压目录为E盘根目录下E:\mysql-5.7.17-winx64,如,图2。
图1 解压压缩包图2 压缩文件解压到E盘根目录下2,进入E:\mysql-5.7.17-winx64,拷贝my-default.ini文件。
命名为my.ini。
如图3所示。
注意:如果有的同学文件名不显示后缀,可参考图4讲解。
否则略过图4。
图3 拷贝my-default.ini文件。
命名为my.ini图4 显示文件后缀名(隐藏已知文件类型的扩展名的对勾去掉) 打开my.ini文件,将下面的内容复制到最后,如图5所示。
注意红色标记的是的解压目录。
并将my.ini文件剪切到bin目录中,即E:\mysql-5.7.17-winx64\bin。
######################################################### [client]default-character-set=utf8[mysqld]#解压目录basedir = E:\mysql-5.7.17-winx64#解压目录datadir = E:\mysql-5.7.17-winx64\dataport = 3306default-character-set=utf8#########################################################图5 my.ini文件配置3,配置MySQL的环境变量右键单击我的电脑->属性->高级系统设置(高级)->环境变量点击系统变量下的新建按钮输入变量名:MYSQL_HOME输入变量值:E:\mysql-5.7.17-winx64#即为mysql的自定义解压目录,如图6所示。
图6 MYSQL_HOME环境变量命名选择系统变量中的Path点击编辑按钮在变量值中添加变量值:;%MYSQL_HOME%\bin;注意是在原有变量值后面加上这个变量,如果原有Path变量最后有;,则在Path后面追加%MYSQL_HOME%\bin;如图7所示。
mysql5全新安装手册

#作者:yzcdf本手册是在对colin兄及其它网友的经验总结而来,在此,对大家所做出的贡献表示感谢!闲话少叙,书归正传!我是在Windows XP SP2 环境安装的。
首先在站内地址:http://download.my /src/2006/0218/199.html下载到my sql-5.0.18-win32,如图1:图1双击该图标(先保证你的电脑上安装了WinRAR或者WinZIP等解压缩工具,压缩工具也可以在上面的页面中下载到),打开rar解压窗口,如图2图2你可以把文件解压都硬盘上,然后再安装。
也可以直接在窗口中,双击Setup.exe文件,开始my sql5.0的安装。
先是等待,它自己解压文件,直到出现下面的窗口,图3图3这里是安装欢迎程序,点击Next开始下一步安装。
默认是Typical,建议改成Custom,因为Typical模式不允许改变安装路径,只能安装在C盘。
下面会介绍Custom的安装方法,见图4。
图4到这一步需要选择组件及更改文件夹位置,组件就用默认的,位置可以选择Change来改变,见图5图5注意:安装my sql的路径中,不能含有中文!一切就绪,点击Install开始安装。
见图6。
图6开始安装过程,会出现安装进度条,见图7。
图7安装结束后,程序会提示是否要在my 上注册,我们选择跳过,即Skip Sign-Up然后点“Next”见图8图8安装结束,选择现在开始配置my sql服务器。
点击Finish继续。
图9。
图9配置开始,点击Next继续,见图1图10选择Detailed Configuration,见图11,点Next继续图11下面这个选项是选择my sql应用于何种类型,第一种是开发服务器,将只用尽量少的内存,第二种是普通WEB服务器,将使用中等数量内存,最后一种是这台服务器上面只跑my sql数据库,将占用全部的内存,我这里只是示例,就选择开发服务器,占用尽量少的内存,用户可根据自己的需求,选择其他选项,见图12,点Next继续图12下面是选择数据库用途,第一种是多功能用途,将把数据库优化成很好的innodb存储类型和高效率的myisam存储类型,第二种是只用于事务处理类型,最好的优化innodb,但同时也支持my isam,最后一种是非事务处理类型,适合于简单的应用,只有不支持事务的myisam类型是被支持的。
- 1、下载文档前请自行甄别文档内容的完整性,平台不提供额外的编辑、内容补充、找答案等附加服务。
- 2、"仅部分预览"的文档,不可在线预览部分如存在完整性等问题,可反馈申请退款(可完整预览的文档不适用该条件!)。
- 3、如文档侵犯您的权益,请联系客服反馈,我们会尽快为您处理(人工客服工作时间:9:00-18:30)。
6)
点击“下一步”进入“已做好安装程序的准备”界面;
6
7)
点击“安装” ,等待进度条完成后,弹出“InstallShield Wizard 完成”界面,点 击“完成”按钮完成 MyFME 的安装。
7
8)
安装完成后, 启动 FME 在 Reader 对话框中可查找到“MapGis File(v6.x)、 MapGis Database File (K9)、 SuperMap Database File”的数据格式。如下图所示:
3.
如何使用
MyFME 为 FME 扩展插件集,并没有相应的界面与快捷方式,当安装完成后,在开始菜单 当中可看到相应的目录(用户手册、软件许可等) 。 以 MyFME For MapGIS6x 为例,打开 FME Workbench ,在数据格式选择界面可看到 “MapGis File (v6.x)”数据格式,如下所示:
现在便可以使用 MapGIS 数据格式进行转换操作 (具体操作方法见: MyFME 用户手册) 。
8
4.
联系我们
Email:MyFMEDev@ Blog:/u/2097001694 QQ:1712200971 MSN:MyFMEDev@
安装手册
目 1. 2. 3. 4. 录 系统环境...............................................................................................................................3 安装指南...............................................................................................................................3 如何使用...............................................................................................................................8 联系我们...............................................................................................................................8
9
2
1.
系统环境
�
操作系统: Windows2008;Windows XP;Windows 2003;Windows 7;Windows Vista
�
FME 桌面版: FME2010 或 FME2011
�
MyFME For MapGIS6X 环境: 直接使用,无需安装其他环境。
�
MyFME For MapGISK9 环境: MapGIS K9 桌面版 。 需要 MapGIS K9 使用许可。
�
MyFME For SuperMap 环境: 需要 SuperMap 6R 使用许可。
2.
安装指南
安装 MyFME 之前,请先确保系统已安装 FME2010 或 FME2011。 注意:需要着重注意安装第 6 步, “目的地文件夹”的选择,此目录需要选择 FME 安装 目录(如:FME 安装到 D:\Program Files\FME 文件夹中,那么此位置应选择“D:\Program Files\FME” )
1)
双击“setup.exe”弹出如下界面:
3
2)
点击“下一步” ,进入“许可证协议”界面:
3)
在“许可证协议”界面,选择“我接受该许可证协议中的条款” ,点击“下一步” ,
4
进入“自述文件信息”界面:
4)
在“自述文件信息”界面当中直接点击“下一步” ,进入“用户信息”界面。
5
5)
在“用户信息”界面当中填写“用户姓名”和“单位”后,点击“下一步” ,进入 “目的地文件夹”界面(注意:在“目的地文件夹”界面中“将 MyFME 安装到” 的 目录需要手工“ 更改 ”与本机 FME 安装目录一致, 默认为系统 Program Files 目录。 ) :
