容错虚拟磁带库软件自行安装说明
手把手教你安装TS3310磁带库
手把手教你安装IBM TS3310磁带库(一)一、产品简述TS3310 磁带机性能强大、容量大并且可靠,能够满足磁带存储的巨大要求。
该磁带库模块化程度高且可伸缩性强,从基本磁带库5U控制模块,直到每个配置均是9U的附加扩展单元都在可伸缩范围内。
LTO3的磁带驱动器可以读写原始LTO2数据磁带盒并读取LTO1数据磁带盒。
TS3310磁带库包含磁带库控制模块,固定盒式磁带存储器(30个插槽)、I/O 站(6个插槽)、触摸显示屏、磁带盒处理自动装置以及最多两个LTO 3磁带机。
您可以将多达4个可选扩展模块添加到控制模块。
每个L9U扩展模块可以容纳最多4个LTO3磁带机和最多80个盒式磁带插槽,以及12个可配置I/O站插槽。
该磁带库支持带有LVD Ultra160 SCSI或本机交换光纤通道连接的LTO3磁带机,从而能够与许多开放式系统服务器连接。
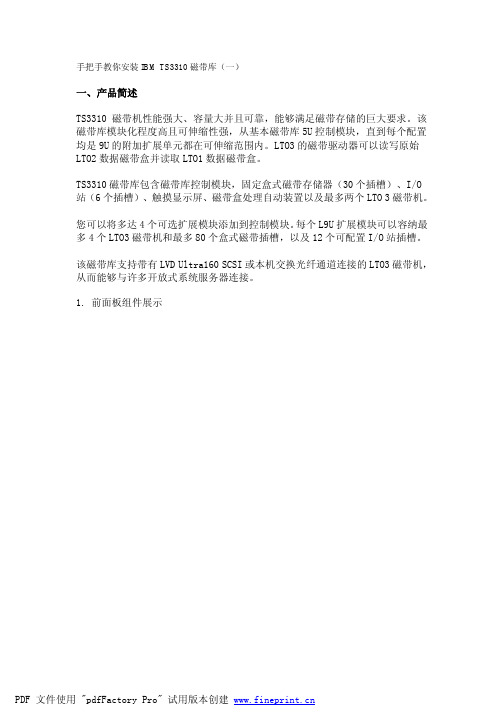
1. 前面板组件展示1 存取口2 电源按钮3 绿色供电(液晶指示灯)4 琥珀色操作员干预警报指示灯5 操作员面板(触摸式)6 5U控制模块7 I/O站8 9U扩展模块I/O站I/O站位于磁带库的前面板上,它将在不干扰正常磁带库操作的前提下实现磁带盒的导入和导出,一个控制模块I/O站的容量为6个磁带盒,一个9U扩展模块I/O站的容量为12个磁带盒。
注:此磁带库会读取条形码标签以确定每个插槽中的特定磁带盒,请确保磁带库中的所有磁带盒都有适当的条形码标签。
将I/O站插槽分配给逻辑磁带库时,只有该逻辑磁带库才能访问此插槽。
I/O站将由所有逻辑磁带库共享,但是I/O站插槽一次只能被一个逻辑磁带库占用。
2. 后面板组件展示1 控制模块(L5B)2 扩展模块(E9U)3 控制模块磁带机(显示FC磁带机)4 扩展模块磁带机5 电源控制器6 控制模块与扩展模块的连接线7 客户用网络端口(4端口提供)8 WEB方式管理磁带库接口(RJ45)3. 内部组件存储列(磁带盒位置)机器人系统(即机械臂)IBM网上特惠专营新品热销中!二、在机架中安装新磁带库机器到货后,首先打开包装并检验装运内容是否齐全,待完毕后就是上架的步骤,因为机器结构的设计所以注定了上机过程的谨慎与繁琐,下面详细的讲解下安装过程。
IBM TS磁带库操作指南

78
磁带库操作指南-AIX
主机配置-LTO带库与AIX服务器驱动安装
1. 软件要求 AIX 5.3.0.X. AIX 5L Version 5.3 on POWER-based servers 2. 硬件要求 光纤通道卡 3. IBM SAN Switch
79
磁带库操作指南-AIX
LTO+AIX基本配置步骤-安装驱动
75
磁带库操作指南-AIX
76 76
磁带库操作指南-AIX
主机配置-驱动下载
LTO所支持的设备驱动程序:
1. 使用浏览器
ftp:///storage/devdrvr
2. 使用IBM FTP 站点:
FTP 站点:
77
磁带库操作指南-Win
主机配置-LTO带库与win服务器驱动安装
73
磁带库操作指南-Win
主机配置-LTO带库与win服务器驱动安装
install_exclusive.exe: install_exclusive.exe should be used by applications (such as Tivoli Storage Manager) requiring the driver to issue automatic reserves on open and also preventing multiple open handles from a host to a drive to exist at the same time. Note: This option replaces the previous default installation of install.exe
注:smc0 机械臂(磁带库才有) rmt0 驱动器
VTL软件安装及配置指南
VTL软件安装及配置指南VTL(Virtual Tape Library)软件是一种虚拟磁带库软件,用于模拟磁带库的功能,可以将数据备份到磁带上。
本文将介绍VTL软件的安装和配置步骤,以帮助用户快速上手。
3.执行安装程序。
进入解压后的目录,找到安装程序,并以管理员身份运行。
根据安装程序的提示,选择合适的安装选项,如安装路径、开始菜单的快捷方式等。
4.确认安装完成。
安装过程中,会显示安装进度和完成信息。
待安装完成后,关闭安装程序。
完成了VTL软件的安装后,接下来需要进行相应的配置。
1.启动VTL软件。
在安装目录中找到启动程序,双击运行。
启动后,VTL软件的控制台界面会显示出来。
2.创建虚拟磁带库。
在控制台界面上,选择“设备管理”或类似的选项。
点击“新建”按钮,按照要求填写磁带库的名称、路径、容量等信息,并点击“确定”按钮保存配置。
3. 配置备份软件。
根据实际情况,选择合适的备份软件,如Veritas NetBackup、IBM Tivoli等,然后进入相应的配置界面。
4.添加磁带库。
在备份软件的配置界面上,找到“设备”或类似的选项,点击“添加”按钮。
选择虚拟磁带库,并填写相应的配置参数,如磁带库的名称、IP地址、端口号等。
5.测试备份操作。
完成磁带库的添加后,可以进行备份操作的测试。
根据备份软件的要求,选择相应的文件或目录,并进行备份操作。
在备份过程中,可以观察备份数据的传输速度、备份进度等信息。
6.验证备份数据。
备份完成后,可以对备份的数据进行验证,以确保备份的正确性。
选择备份软件的验证功能,按照要求对备份数据进行验证操作。
根据验证结果,可以判断备份操作的成功与否。
完成了配置后,就可以开始使用VTL软件进行备份操作了。
在实际操作中,还需要注意以下几点:1.定期进行备份操作。
为了保证数据的安全性,建议定期进行备份操作,避免数据的丢失或损坏。
2.注意备份数据的选择。
在进行备份操作时,应该选择重要的数据进行备份,如公司文件、数据库等,以免造成不必要的数据损失。
centos6.5+mhvtl+gui+iscsi-tgt虚拟磁带库的安装与应用

一.Mhvtl+mhvtl gui+iscsi1.安装:yum install lsscsi mt-st mtx zlib-devel sg3_utils zlib lzo-devel kernel-devel kernel-headers gcc接着创建vtl用户:#useradd vtl#passwd vtl#mkdir /opt/mhvtl# mkdir /etc/mhvtl# chown -Rf vtl:vtl /opt/mhvtl#chown -Rf vtl:vtl /etc/mhvtl(/etc/mhvtl为配置文件路径/opt/mhvtl为虚拟带库存储路径)2. 编译安装 MHVLT# tar -zxvf mhvtl-2013-03-22.tgz[rootcentos001 tool]# cd mhvtl-1.4[rootcentos001 mhvtl-1.4]# cd kernel[rootcentos001 kernel]# make;make install[rootcentos001 mhvtl-1.4]# make;make install如果未安装lzo和lzo-devel开发环境将收到如下报错:Note: Since mhvtl-1.3, both lzo and zlib are required to build vtltapeTypical error (missing lzo devel package) looks like:cc -Wall -Wshadow -g -O2 -D_LARGEFILE64_SOURCE -I../kernel -DMHVTL_VERSION=\"1.4.0\" -DMHVTL_DEBUG -DUSR=\"vtl\" -DMHVTL_HOME_PATH=\"/opt/mhvtl\" -DMHVTL_CONFIG_PATH=\"/etc/mhvtl\" -c -o vtltape.o vtltape.cvtltape.c:92 lzo/lzoconf.h: No such file or directoryvtltape.c:93:23: lzo/lzo1x.h: No such file or directoryvtltape.c: In function 'uncompress_lzo_block'[rootcentos001 mhvtl-1.4]# service mhvtl statusCould not locate library config file: /etc/mhvtl/library_contents.10Creating a default onePlease stop mhvtl & edit /etc/mhvtl/library_contents.10 to suit your requirementsCould not locate library config file: /etc/mhvtl/library_contents.30Creating a default onePlease stop mhvtl & edit /etc/mhvtl/library_contents.30 to suit your requirementsUsage: /etc/init.d/mhvtl {start|stop|shutdown}[rootcentos001 mhvtl-1.4]# service mhvtl startvtllibrary process PID is 1729vtllibrary process PID is 1733查看虚拟带库状态信息[rootcentos001 mhvtl-1.4]# lsscsi -g[1:0:0:0] cd/dvd NECVMWar VMware IDE CDR10 1.00 /dev/sr0 /dev/sg0 [2:0:0:0] disk VMware, VMware Virtual S 1.0 /dev/sda /dev/sg1 [3:0:0:0] mediumx STK L700 0104 /dev/sch0 /dev/sg10 [3:0:1:0] tape IBM ULT3580-TD5 0104 /dev/st0 /dev/sg2 [3:0:2:0] tape IBM ULT3580-TD5 0104 /dev/st1 /dev/sg3 [3:0:3:0] tape IBM ULT3580-TD4 0104 /dev/st2 /dev/sg4 [3:0:4:0] tape IBM ULT3580-TD4 0104 /dev/st3 /dev/sg5 [3:0:8:0] mediumx STK L80 0104 /dev/sch1 /dev/sg11 [3:0:9:0] tape STK T10000B 0104 /dev/st4 /dev/sg6 [3:0:10:0] tape STK T10000B 0104 /dev/st5 /dev/sg7 [3:0:11:0] tape STK T10000B 0104 /dev/st6 /dev/sg8 [3:0:12:0] tape STK T10000B 0104 /dev/st7 /dev/sg9 [rootcentos001 mhvtl-1.4]# lsscsi -l[1:0:0:0] cd/dvd NECVMWar VMware IDE CDR10 1.00 /dev/sr0state=running queue_depth=1 scsi_level=6 type=5 device_blocked=0 timeout=30 [2:0:0:0] disk VMware, VMware Virtual S 1.0 /dev/sdastate=running queue_depth=32 scsi_level=3 type=0 device_blocked=0 timeout=30 [3:0:0:0] mediumx STK L700 0104 /dev/sch0state=running queue_depth=32 scsi_level=6 type=8 device_blocked=0 timeout=0 [3:0:1:0] tape IBM ULT3580-TD5 0104 /dev/st0state=running queue_depth=32 scsi_level=6 type=1 device_blocked=0 timeout=900 [3:0:2:0] tape IBM ULT3580-TD5 0104 /dev/st1state=running queue_depth=32 scsi_level=6 type=1 device_blocked=0 timeout=900 [3:0:3:0] tape IBM ULT3580-TD4 0104 /dev/st2state=running queue_depth=32 scsi_level=6 type=1 device_blocked=0 timeout=900 [3:0:4:0] tape IBM ULT3580-TD4 0104 /dev/st3state=running queue_depth=32 scsi_level=6 type=1 device_blocked=0 timeout=900 [3:0:8:0] mediumx STK L80 0104 /dev/sch1state=running queue_depth=32 scsi_level=6 type=8 device_blocked=0 timeout=0 [3:0:9:0] tape STK T10000B 0104 /dev/st4state=running queue_depth=32 scsi_level=0 type=1 device_blocked=0 timeout=900 [3:0:10:0] tape STK T10000B 0104 /dev/st5state=running queue_depth=32 scsi_level=0 type=1 device_blocked=0 timeout=900 [3:0:11:0] tape STK T10000B 0104 /dev/st6state=running queue_depth=32 scsi_level=0 type=1 device_blocked=0 timeout=900 [3:0:12:0] tape STK T10000B 0104 /dev/st7state=running queue_depth=32 scsi_level=0 type=1 device_blocked=0 timeout=900 这里的/dev/sg10和/dev/sg11是机械手。
UDSAFE VTL中文使用指南

UDSAFE VTL中文使用指南UDSAFE® VTL中文使用指南UDSAFE VTL中文使用指南目录第一章UDSAFE VTL管理软件安装 (1)第二章UDSAFE VTL管理软件使用介绍 (7)3.1使用配置向导配置UDSAFE VTL (7)3.1.1登录到UDSAFE VTL (7)3.1.2 设置网络 (7)3.1.3 设置主机名称 (9)3.1.4 启用Fibre Channel (9)3.1.5 转换Targe模式 (9)3.1.6 为虚拟带库准备磁盘设备 (10)3.1.7 启用虚拟磁带库功能 (11)3.1.8 创建虚拟磁带库 (13)3.1.9 增加Client & 分配虚拟磁带库 (13)3.1.10 为虚拟磁带库系统准备物理磁带库/磁带机设备 (13)3.1.11 进入虚拟磁带库管理界面 (13)3.2UDSAFE VTL管理软件配置及使用 (14)3.2.1 注册UDSAFE VTL License信息 (14)3.2.2 添加/删除UDSAFE VTL Server管理帐户 (16)3.2.3 修改UDSAFE VTL 管理帐户密码 (17)3.2.4 保存“X-Ray”信息 (17)3.2.5 启用UDSAFE VTL iSCSI功能 (18)3.2.6 创建虚拟磁带库/磁带 (19)3.2.7 添加iSCSI Client (24)3.2.8 添加Fibre Channel Client (31)3.2.9 导入/导出磁带 (35)3.2.10 在介质服务器上配置iSCSI虚拟磁带库/磁带机设备 (38)3.2.11 在介质服务器上配置Fibre Channel虚拟磁带库/磁带机设备 (46)3.3UDSAFE VTL管理软件维护 (46)3.3.1保存/恢复UDSAFE VTL配置信息 (46)3.3.2 显示UDSAFE VTL基本配置信息 (49)3.3.3 显示UDSAFE VTL日志信息 (50)3.3.4 显示UDSAFE VTL进行运行状况............................... 错误!未定义书签。
虚拟磁带库(VTL)基本知识介绍
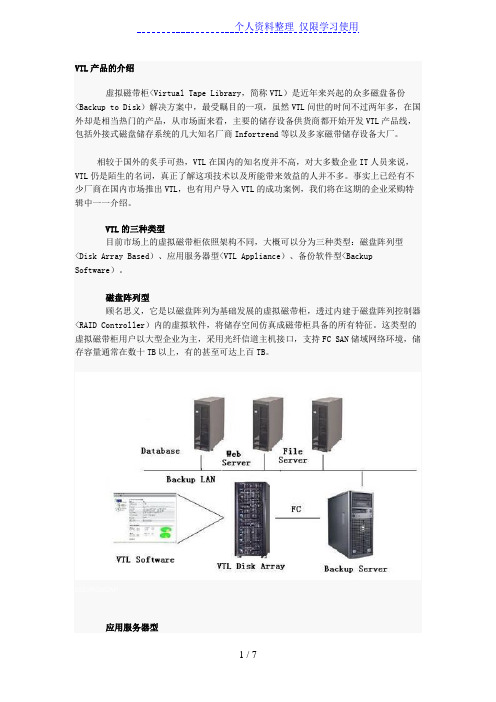
VTL产品的介绍虚拟磁带柜<Virtual Tape Library,简称VTL)是近年来兴起的众多磁盘备份<Backup to Disk)解决方案中,最受瞩目的一项,虽然VTL问世的时间不过两年多,在国外却是相当热门的产品,从市场面来看,主要的储存设备供货商都开始开发VTL产品线,包括外接式磁盘储存系统的几大知名厂商Infortrend等以及多家磁带储存设备大厂。
相较于国外的炙手可热,VTL在国内的知名度并不高,对大多数企业IT人员来说,VTL仍是陌生的名词,真正了解这项技术以及所能带来效益的人并不多。
事实上已经有不少厂商在国内市场推出VTL,也有用户导入VTL的成功案例,我们将在这期的企业采购特辑中一一介绍。
VTL的三种类型目前市场上的虚拟磁带柜依照架构不同,大概可以分为三种类型:磁盘阵列型<Disk Array Based)、应用服务器型<VTL Appliance)、备份软件型<Backup Software)。
磁盘阵列型顾名思义,它是以磁盘阵列为基础发展的虚拟磁带柜,透过内建于磁盘阵列控制器<RAID Controller)内的虚拟软件,将储存空间仿真成磁带柜具备的所有特征。
这类型的虚拟磁带柜用户以大型企业为主,采用光纤信道主机接口,支持FC SAN储域网络环境,储存容量通常在数十TB以上,有的甚至可达上百TB。
b5E2RGbCAP应用服务器型透过安装在PC服务器上的虚拟磁带软件,将服务器内的硬盘,或是可被服务器控制的外接磁盘阵列,做为存放备份数据的虚拟磁带空间。
由于软件架构在标准的x86平台和Linux操作系统上,成本相对较便宜,而且储存装置的限制较低,只要服务器支持,可以采用任何SCSI或光纤信道接口的磁盘阵列,与备份服务器端可以藉由SCSI、iSCSI或光纤信道等传输接口相连,部署应用上较有弹性。
这类型产品相当多,国外有Maxxan SVT 100、Diligent VTF Open,国内也有精业、耐特普罗等系统整合厂商推出软硬件合一的虚拟磁带柜。
VTL软件安装及配置指南
浪潮虚拟磁带库VTL1000软件安装指南仁硬件平台及软件要求硬件平台为AS500N,前两个盘位做RAID1,安装CentOS4. 0 Update2 X86_64 系统。
Raidl 大小为470000M安装CentOS时,具体的分区情况为:boot 239988M/ 222000MSwap 8000MCentOS必选包为Xwi ndows SystemGNOME Desttop Env i ronmentAppI ications:Ed itorsServers:Server Configuration ToolsMa i I ServerDNS Name ServerPostgre SQL DatabaseNetwork Server (iscsi-initiator 软件包)DeveI opmentDevelopment ToolsSystemAdministrator ToolsSystem Tools (sysstat 软件包)Campatibility Arch Support安装完CentOS后重新引导并进入系统!!设置系统root帐号的密码为root2.VTL软件安装将VTL4.0软件光盘放入光驱,挂载光盘#mount /dev/cdrom /mnt2.1.安装VTL软件默认的安装目录时/usr/local/vtl ,安装日志存放在/usr/local/vtl-archive 下,在此文件目录下,vtIinstall-26Jan08-222434.log 即为安装过程记录文档,如果需要查看安装过称,可以用命令#less vtlinstall-26Jan08-222434.log 查看。
#cd /mnt#sh vtlinstall当出现如下时,输入Y,并按回车继续安装。
出现输入L u n s数时,如图,键入16或是32,即设定磁盘划16或是32个k i n当出现如下图示时,默认选择回车继续,表示此文件系统只有一个。
Quantun i40 简易安装指南

光纤交换机状态 主机认到库体和驱动器 配合备份软件进行配置 是否需要安装 windows 下的驱动程序
Quantum Scalar i40
Page 3 Of 32
1 磁带库物理安装
1.1 安装前环境确认
Quantum Scalar i40
Page 4 Of 32
1.2 拆箱检查
Quantum Scalar i40
Page 2 Of 32
Байду номын сангаас
1 磁带库安装要点
带标 数据带标 清洗带标
磁带库上架及配置 导轨安装 磁带库上架 拆除机械臂固定装置 上电,看状态
设置时间、设置 IP 地址 用 web 访问 必要的时候升级 firmware 检查分区状态 建清洗槽位,修改分区大小 加磁带 需要重启带库
注意:取下来的机械臂固定装置要保存好以便将来运输磁带库设备使用。
1.3 配件箱资料清单
•Power cord(s) – one for each power supply •Scalar i40 and Scalar i80 Documentation and Training CD •Scalar i40 and Scalar i80 Quick Start Guide •China RoHS statement •System, Safety, and Regulatory Information Guide •2.5 mm Allen wrench (for installing the rail kit) •3 mm Allen wrench (for installing the rail kit)
•EMC CX500
•Rittal Cable Tester Rack Frame, square
NetStor VTL中文使用指南

中文使用指南
第一章
随着计算机用户对数据存储重要性认识的不断扩大、用户对存储设备功能、性能、可靠性要求的不断提高,存储市场的新理念、新产品也在不断涌现。在数据备份领域,随着数据量的不断攀升,备份系统对于备份设备的容量、备份速度、可靠性、性能价格比等要求越来越高,传统磁带库备份设备在诸多方面已经捉襟见肘,而与此同时磁盘介质随着容量的大幅提高、价格的大幅下跌,以PATA/SATA为主的磁盘备份系统已经渐渐在存储市场崭露头角。北京同有飞骥科技有限公司综合多年的数据存储备份技术及市场的经验积累、并结合先进的存储虚拟化技术,正式推出NetStor品牌的虚拟磁带库产品,通过NetStor品牌虚拟磁带库产品与NetStor磁盘阵列、存储服务器、物理磁带库产品以及合作伙伴的相关产品结合,同有飞骥将会为广大用户提供更为全面、灵活的解决方案。
StorageTek 9840, T9840B, T9940B
上述磁带库库体以及磁带驱动器已经被众多的备份软件厂商所支持,在全世界被应用在各种系统平台,NetStor虚拟磁带库对上述类型磁带库以及磁带驱动器进行了完全的仿真,因此NetStor虚拟磁带库通过调整所虚拟的磁带库以及磁带驱动器的类型从而具备更广泛的兼容性以及适应性。目前经过验证测试所支持的备份软件如下:
兼容性:
NetStor虚拟磁带库产品是通过虚拟化存储技术虚拟出物理磁带库库体、机械臂、磁带插槽、条码扫描仪以及磁带驱动器,目前可以虚拟出的物理磁带库有下述型号:
ADIC Scalar 100, 1000, i2000
HP ESL9000 Series
IBM3584 L32, 3494, 3590B11, 3590E11
支持对使用另外的虚拟磁带对某一盘虚拟磁带进行克隆;支持将一盘虚拟磁带导出到一盘同类型的物理磁带中,同时也支持使用一盘空白虚拟磁带对一盘物理磁带进行复制、克隆;
在Linux上进行虚拟磁带库安装
在Linux上进行虚拟磁带库安装在Linux上进行虚拟磁带库安装由于条件所限,没有磁带机硬件供自己练习,于是想到用软件模拟代替。
所幸网络上已经有了很多这样的例子:mhvtl 提供虚拟磁带库的功能,比虚拟一个单纯的磁带机更进一步。
以下是安装和实验的实地记录:一、安装 mhvtl:安装 mhvtl 之前,需要安装一些组件供使用:安装gcc:[root@fullcent ~]# yum install gcc安装mtx:[root@fullcent ~]# yum install mtx安装mt-st :[root@fullcent ~]# yum install mt-st安装 zlib-devel:[root@fullcent ~]# yum install zlib-devel安装 sg3 相关软件:[root@fullcent ~]# yum install sg3*……Running TransactionInstalling : sg3_utils-libs 1/5Installing : sg3_utils-libs 2/5Installing : sg3_utils 3/5Installing : sg3_utils-devel 4/5Installing : sg3_utils-devel 5/5Installed:sg3_utils.x86_64 0:1.25-5.el5 sg3_utils-devel.i386 0:1.25-5.el5 sg3_utils-devel.x86_64 0:1.25-5.el5 sg3_utils-libs.i386 0:1.25-5.el5sg3_utils-libs.x86_64 0:1.25-5.el5Complete![root@fullcent ~]#安装 lsscsi :[root@fullcent ~]# yum install lsscsi安装lzo :[root@fullcent soft]# wget /doc/e0ecb563a45177232f60a2d7.html/opensource/lzo/download/lzo-2.06.tar.gz[root@fullcent soft]# tar -zxvf lzo-2.06.tar.gz[root@fullcent soft]# cd lzo-2.06[*********************]#./configure[*********************]#make&&makeinstall安装 linux kernel :[root@fullcent ~]# yum install kernel-devel创建名为 vtl 的用户:[root@fullcent ~]# useradd vtl[root@fullcent ~]# passwd vtlChanging password for user vtl.New UNIX password:BAD PASSWORD: it is WAY too shortRetype new UNIX password:passwd: all authentication tokens updated successfully.[root@fullcent ~]#创建用于 mhvtl 的目录:[root@fullcent ~]# mkdir /opt/mhvtl[root@fullcent ~]# mkdir /etc/mhvtl[root@fullcent ~]# chown -Rf vtl:vtl /opt/mhvtl[root@fullcent ~]# chown -Rf vtl:vtl /etc/mhvtl[root@fullcent ~]#然后,开始下载 mhvtl 安装包:用如下的地址:https:///doc/e0ecb563a45177232f60a2d7.h tml /site/linuxvtl2/home#mhvtl-download进行解压缩:[root@fullcent soft]# tar -zxvf mhvtl-2013-01-31.tgz进入解压后的目录,进行安装:[**********************]#makedistclean[**********************]#cdkernel[root@fullcent kernel]# make[root@fullcent kernel]# make install[**********************]#cd../[**********************]#pwd/soft/mhvtl-1.4[**********************]#make[**********************]#makeinstall二、使用 mhvtl服务:安装完毕,启动服务:[**********************]#servicemhvtlCould not locate library config file: /etc/mhvtl/library_contents.10Creating a default onePlease stop mhvtl & edit /etc/mhvtl/library_contents.10 to suit your requirementsCould not locate library config file: /etc/mhvtl/library_contents.30Creating a default onePlease stop mhvtl & edit /etc/mhvtl/library_contents.30 to suit your requirementsUsage: /etc/init.d/mhvtl {start|stop|shutdown}可以看到,已经建立了两个配置文件:library_contents.10 和library_contents.30[**********************]#servicemhvtlstartvtllibrary process PID is 3827vtllibrary process PID is 3830[**********************]#ps-ef|grep3827vtl 3827 1 0 10:58 ? 00:00:00 vtllibrary -q 10 -vroot 4320 2944 0 10:58 pts/1 00:00:00 grep 3827[**********************]#ps-ef|grep3830vtl 3830 1 0 10:58 ? 00:00:00 vtllibrary -q 30 -vroot 4322 2944 0 10:58 pts/1 00:00:00 grep 3830[**********************]#对文件状况进行查看:[root@fullcent /]# ls /etc/mhvtl/device.conf library_contents.10 library_contents.30 mhvtl.conf[root@fullcent /]# ls /opt/mhvtl/CLN101L4 E01007L4 E01016L4 F01034L5 G03004TA G03013TA G03022TA G03031TACLN102L5 E01008L4 E01017L4 F01035L5 G03005TA G03014TA G03023TA G03032TACLN303TA E01009L4 E01018L4 F01036L5 G03006TA G03015TA G03024TA G03033TAE01001L4 E01010L4 E01019L4 F01037L5 G03007TA G03016TA G03025TA G03034TAE01002L4 E01011L4 E01020L4 F01038L5 G03008TA G03017TA G03026TA G03035TAE01003L4 E01012L4 F01030L5 F01039L5 G03009TA G03018TA G03027TA G03036TAE01004L4 E01013L4 F01031L5 G03001TA G03010TA G03019TA G03028TA G03037TAE01005L4 E01014L4 F01032L5 G03002TA G03011TA G03020TA G03029TA G03038TAE01006L4 E01015L4 F01033L5 G03003TA G03012TA G03021TA G03030TA G03039TA[root@fullcent /]#基本上,/etc/mhvtl 是放置配置文件的地方,/opt/mhvtl 是放置模拟磁带的文件的地方[root@fullcent /]# cat /etc/mhvtl/mhvtl.conf# Home directory for config file(s)MHVTL_CONFIG_PATH=/etc/mhvtl# Default media capacity (500 M)CAPACITY=500# Set default verbosity [0|1|2|3]VERBOSE=1# Set kernel module debuging [0|1]VTL_DEBUG=0[root@fullcent /]#用 lsscsi 命令查看 scsi 设备的状态:并且对比一下,mhvtl 服务启动前后,lsscsi的结果:这是磁带库启动中的状态:[root@fullcent /]# lsscsi -g[0:0:0:0] disk ATA VBOX HARDDISK 1.0 /dev/sda /dev/sg0[1:0:0:0] mediumx STK L700 0104 - /dev/sg9[1:0:1:0] tape IBM ULT3580-TD5 0104 /dev/st0 /dev/sg1[1:0:2:0] tape IBM ULT3580-TD5 0104 /dev/st1 /dev/sg2[1:0:3:0] tape IBM ULT3580-TD4 0104 /dev/st2 /dev/sg3[1:0:4:0] tape IBM ULT3580-TD4 0104 /dev/st3 /dev/sg4[1:0:8:0] mediumx STK L80 0104 - /dev/sg10[1:0:9:0] tape STK T10000B 0104 /dev/st4 /dev/sg5[1:0:10:0] tape STK T10000B 0104 /dev/st5 /dev/sg6[1:0:11:0] tape STK T10000B 0104 /dev/st6 /dev/sg7[1:0:12:0] tape STK T10000B 0104 /dev/st7 /dev/sg8[root@fullcent /]#[root@fullcent /]# lsscsi -l[0:0:0:0] disk ATA VBOX HARDDISK 1.0 /dev/sdastate=running queue_depth=31 scsi_level=6 type=0 device_blocked=0 timeout=60[1:0:0:0] mediumx STK L700 0104 -state=running queue_depth=32 scsi_level=6 type=8 device_blocked=0 timeout=0[1:0:1:0] tape IBM ULT3580-TD5 0104 /dev/st0state=running queue_depth=32 scsi_level=6 type=1 device_blocked=0 timeout=900[1:0:2:0] tape IBM ULT3580-TD5 0104 /dev/st1state=running queue_depth=32 scsi_level=6 type=1 device_blocked=0 timeout=900[1:0:3:0] tape IBM ULT3580-TD4 0104 /dev/st2state=running queue_depth=32 scsi_level=6 type=1 device_blocked=0 timeout=900[1:0:4:0] tape IBM ULT3580-TD4 0104 /dev/st3state=running queue_depth=32 scsi_level=6 type=1 device_blocked=0 timeout=900[1:0:8:0] mediumx STK L80 0104 -state=running queue_depth=32 scsi_level=6 type=8 device_blocked=0 timeout=0 [1:0:9:0] tape STK T10000B 0104 /dev/st4state=running queue_depth=32 scsi_level=6 type=1device_blocked=0 timeout=900 [1:0:10:0] tape STK T10000B 0104 /dev/st5state=running queue_depth=32 scsi_level=6 type=1 device_blocked=0 timeout=900 [1:0:11:0] tape STK T10000B 0104 /dev/st6state=running queue_depth=32 scsi_level=6 type=1 device_blocked=0 timeout=900 [1:0:12:0] tape STK T10000B 0104 /dev/st7state=running queue_depth=32 scsi_level=6 type=1 device_blocked=0 timeout=900 [root@fullcent /]#这是停止 mhvtl 后的状态:[root@fullcent mhvtl]# service mhvtl stopshutdown of mhvtlSending exit to 11Sending exit to 12Sending exit to 13Sending exit to 14Sending exit to 31Sending exit to 32Sending exit to 33Sending exit to 34Sending exit to 10Sending exit to 30[root@fullcent mhvtl]#[root@fullcent mhvtl]# lsscsi[0:0:0:0] disk ATA VBOX HARDDISK 1.0 /dev/sda[root@fullcent mhvtl]# lsscsi -g[0:0:0:0] disk ATA VBOX HARDDISK 1.0 /dev/sda /dev/sg0[root@fullcent mhvtl]# lsscsi -l[0:0:0:0] disk ATA VBOX HARDDISK 1.0 /dev/sdastate=running queue_depth=31 scsi_level=6 type=0 device_blocked=0 timeout=60[root@fullcent mhvtl]#由上面可以看到:/dev/sg1 - /dev/sg10 均由 mhvtl 模拟出来。
Stratus ftServer 容错服务器软件安装和配置手册
制定本手册目的指引用户如何安装和配置容错W系列服务器的系统软件对象本手册是专供安装配置ftServer W系列容错服务器的系统软件管理员使用。
修订信息本手册是修订版。
它不再支持W3300,W5600和W6600。
另外,本次修订还包括:·W4300和W4600的步骤细节,W系列新的型号。
·使用ProSet9.0版本代替原来的ProSet4.0版本。
·如果你从Stratus购买了Windows 2003 Server操作系统,还将获得恢复光盘。
执行IPL和Post-IPL过程1、假如操作系统出厂的时候就已经安装好,机器设备的后面就会贴有微软认证的标签。
这种情况下,我们仅仅执行Post-IPL过程2、假如操作系统出厂的时候没有安装,那么,我们就要执行IPL过程3、重装W系列的操作系统(比如说,系统硬盘出现问题,并在远处维修),我们要重新执行IPL过程。
IPL过程安装以下内容:1、Windows Server 2003对于W2300,系统支持Windows Server 2003标准版。
对于W4300和W4600,系统支持Windows Server 2003企业版。
2、ftServer W系列系统软件,包括硬件驱动,ftServer管理,ftServer管理控制台(ftSMC)和ftServer软件可用性管理(SAM)。
3、为VTM控制台提供Java2运行环境(JRE)。
4、Adobe Acrobat Reader软件。
5、为W系列定制的操作系统文件。
有关IPL的建议:1、假如操作系统已经安装,但没有正确运行,你无法判断是Windows操作系统的原因,还是ftServer系统软件的原因的话,重装IPL。
2、为实现容错,安装完后做DRD实现镜像功能。
这个操作既不属于IPL操作,也不属于Post-IPL操作。
3、不要试图单独作用Windows Server 2003软件光盘安装或重装操作系统。
虚拟磁带库(VTL)技术手册

虚拟磁带库(VTL)技术VTL技术越来越多的企业开始部署虚拟磁带库(VTL),将其作为主要的备份目标和恢复来源。
对于前端的备份服务器或应用服务器来说,VTL和磁带设备是完全一样的,前端完全不会知道后端的"磁带",实际上是VTL系统以磁盘仿真出来的空间,因此能相当程度地替代磁带的作用。
本手册中TechTarget中国的特约专家讨论了虚拟磁带库的基础知识,虚拟磁带库的利弊,以及虚拟磁带库与磁盘备份的区别,在企业购买虚拟磁带库方面给出了技巧性建议。
虚拟磁带库基础介绍VTL具有两大优点:管理方便、性能良好。
实现磁盘到磁盘直接备份需要标准共享磁盘阵列的所有配置步骤。
相比之下,如果你告诉VTL应该模拟多少虚拟磁带驱动器、多少虚拟盒式磁带,VTL软件就能自动实现配置,为虚拟磁带合理分配磁盘数。
我们就来深入了解虚拟磁带库的组成,利弊。
z了解企业虚拟磁带库z虚拟磁带控制器介绍z虚拟磁带库的利弊解析如何选择合适的虚拟磁带库一些主要的VTL产品之间存在很大差异。
一些产品只是软件而已,因此你可以购买软件,然后在常规的磁盘阵列中运行软件。
而另外一些供应商(Maxxan和Neartek公司)则出售VTL磁头,类似于文件磁头。
在我们选择合适的虚拟磁带库时要注意哪些问题呢?z购买VTL之前需考虑六个问题z一些主要VTL产品的特征如何管理虚拟磁带库随着磁带库成为近期数据恢复的首要备份目标,存储管理员正在使用一些新方法,充分利用磁带优势:大容量、低成本、可移动性。
磁盘是实现快速备份和恢复的最佳介质,但是对于需长期存储和保留的数据,磁带才是最优选择。
z如何管理虚拟磁带库z虚拟磁带库数据如何进行迁移z虚拟磁带库与重复数据删除技术z如何开发虚拟磁带库(VTL)数据保护策略。
磁带库安装使用手册V1.0

磁带库安装使用手册二零零三年六月版权声明©2003 深圳市华为技术服务有限公司版权所有,保留一切权利。
非经本公司书面许可,任何单位和个人不得擅自摘抄、复制本书的部分或全部,并不得以任何形式传播。
修订记录目录第一章磁带库设备简介 (4)第二章磁带库的安装与调试说明 (5)第三章标准磁带库的安装调试 (7)3.1. 磁带库F OR S UN SOLARIS安装 (7)3.2. 磁带库F OR HP UX安装 (8)3.3. 磁带库F OR IBM AIX安装 (9)第四章常见磁带库的安装调试 (11)4.1. D ELL 128T磁带库的安装 (11)4.2. IBM3583磁带库的安装 (11)4.3. STK L20磁带库的安装 (13)4.4. OVERLAND N EOSERIES磁带库的安装 (14)第一章磁带库设备简介随着电信、金融、保险等行业的迅速发展,需要进行备份归档的业务数据量也越来越大,简单的依靠磁带机手工备份数据已经越来越不适应这种需求的变化。
人们需要一种专用的设备帮助技术人员进行工作,它可以配合各种备份管理软件完成各种数据备份、存档、磁带管理及灾难恢复等工作,支持多驱动器同时工作及自动存取磁带,极大的提高工作效率;同时它还可以支持SCSI、FC等多种接口,支持多种软硬件平台,其数据处理能力及存储容量可以根据客户需求灵活配置,这就是磁带库。
磁带库正是在这种需求的驱动下应运而生的。
目前常用的磁带库一般由磁带驱动器、机械臂和磁带置放模组组成。
磁带驱动器的作用是在磁带上读写数据,类似于以前使用的磁带机;机械臂的作用是用来识别和存取、移动磁带;磁带置放模组的作用是用来储存磁带的。
一般磁带库中配置是一个机械臂、多个驱动器和磁带置放模组。
如下图1-1为一个磁带库的示意图图1-1 磁带库示意图第二章磁带库的安装与调试说明2.1.磁带库的电缆连接磁带库的安装过程比较简单,一般情况下只需将磁带库的驱动器和机械臂通过SCSI或光纤与备份服务器或光纤交换机连接起来,然后在不同的操作系统下使用相应的命令创建设备即可,如在IBM的AIX中需执行#cfgmgr命令。
Zerto 虚拟机容灾软件安装部署测试文档

Zerto 5.0安装部署测试文档目录1.Zerto虚拟复制技术22.Zerto系统架构33.测试准备工作33.1.测试环境要求33.2.测试环境调查43.3.安装配置信息54.ZVR软件安装65.ZVR部署65.1.部署VRA65.2.站点配对75.3.建立VPG保护组75.4.一对多复制86.容灾测试86.1.灾难恢复测试 Failover Test86.2.故障切换-Failover96.3.业务系统迁移-MOVE106.4.离线备份-Offsite backup106.5.从离线备份中恢复VPG116.6.从日志中恢复文件111.Zerto虚拟复制技术Zerto是一家专注于虚拟化容灾/业务连续性的软件公司,其旗舰产品Zerto Virtual Replication <ZVR>是一个基于虚拟机复制的软件解决方案,通过帮助组织机构达到分钟级的恢复时间目标〔RTO〕和秒级的恢复点目标〔RPO〕,而使企业的灾难恢复和业务连续性成为可能,同时只需要较低的成本费用。
有了Zerto,用户可以得到可靠的,接近实时的服务器复制,而花费仅仅是SAN阵列式复制成本的一小部分。
Zerto虚拟复制技术具有以下功能和特性:基于Hypervisor的复制——无关存储的复制跨Hypervisor的复制——实现微软Hyper-V到VMware的跨平台复制企业级的复制技术——实现秒级的RPO与分钟级的RTO连续数据保护——恢复到任意时间点的类 DVR 保护保护应用程序——跨虚拟机的统一恢复点,保护跨多虚拟机的应用离线备份——支持容灾数据的长期保留完整业务连续性与灾难恢复业务流程——自动化的故障转移、故障恢复和非破坏性隔离测试复制并恢复到公有云——支持容灾/迁移到AWS/Azure公有云JFLR<Journal File Level Restore>——支持Windows虚拟机文件级别的恢复一对多复制——允许一台虚拟机同时将数据复制到本地和多个远程场所2.Zerto系统架构Zerto完整的软件构架图如下:Zerto虚拟复制技术由以下2个关键组件组成:Zerto Virtual Manager—— Zerto虚拟管理器<ZVM> –ZVM可直接以插件形式嵌入到虚拟化管理控制台<例如VMware’s vCenter> ,并以可视化的形式嵌入整个虚拟化基础架构中。
NBU磁带库备份系统的安装步骤
软件安装软件安装主要包括MasterServer、MediaServer、软件的安装。
在备份系统中,选择hp做为MasterServer,同时充当MediaServer的角色。
为便于管理,确定MasterServer作备份系统的Global Database Host,用于存放所有的配置和备份信息。
下面逐一介绍每一种软件的安装过程,软件安装列表见附件三。
2.4.1 NetBackup DataCenter MasterServer Installition安装前作如下准备工作,在MediaServer安装时也要作同样的准备:·连接硬件所有MediaServer/MasterServer以及带库、磁带机均连接到一台SAN光纤交换机。
·硬件识别在安装软件之前,要保证系统能够识别磁带机和机械手(只需MasterServer识别机械手)#ioscan –fnC tape·系统空间安装MasterServer之前,确保系统空间大小:RAM ≥512Mb安装目录可用空间≥64Mb/tmp可用空间≥32Mb·系统配置在备份环境中每台主机都要修改/etc/hosts文件,提供hostname/ip的解析。
在MasterServer端的/etc/hosts文件中增加如下内容:安装步骤如下:step1: pfs_mountd &pfsd 6&pfs_mount -o xlat=unix /dev/dsk/c3t2d0 /cdromstep2:切换到光盘目录#cd /cdromstep3:执行安装脚本#./installVERITAS Installation ScriptCopyright 1993 - 2002 VERITAS Software Corporation, All Rights Reserved.Installation Options1 NetBackup2 NetBackup Client Software3 NetBackup Client Java Softwareq To quit from this scriptChoose an option [default: q]: 1/*选则1,安装Server,同时也安装mediaserver 软件The NetBackup and Media Manager software is built for use on hp hardware.Do you want to install NetBackup and Media Manager files? (y/n) [y] yNetBackup is normally installed in /usr/openv/netbackup.Is it OK to install in /usr/openv/netbackup? (y/n) [y] y/*确定Netbackup安装目录Media Manager is normally installed in /usr/openv/volmgr.Is it OK to install in /usr/openv/volmgr? (y/n) [y] y/*确定MediaManager安装目录The hp clients will be loaded.Do you want to load any other NetBackup clients onto the server? (y/n) [y] n/*确定是否安装其他client,server本身已包含client软件,所以选择“n”……Enter license key: /*输入NetBackup DataCenter Base license AJX6-OPWD-IC6K-3N36-383P-NCNP-PNNR-PPP:NetBackup DataCenter Base product with the following features enabled: Core Frozen Image ServicesOpen Transaction Managerhas been registered.All additional keys should be added at this time.Do you want to add additional license keys now? (y/n) [y] y /*输入其他相关license,也可在安装完软件后再输入其他licenseLicense Key Utility-------------------A) Add a License KeyD) Delete a License KeyF) List Active License KeysL) List Registered License KeysH) Helpq) Quit License Key UtilityEnter a letter:Installing NetBackup DataCenter version: 4.5GAIs backupserver the master server? (y/n) [y] y /*设置主机backupserver作masterserver Do you have any media (slave) servers? (y/n) [n] y/*设置其他主机作mediaserver Enter the fully qualified name of a media (slave) server (q to quit)? SUNV880_AEnter the fully qualified name of a media (slave) server (q to quit)? SUNV880_B Enter the fully qualified name of a media (slave) server (q to quit)? qChecking for a bpcd entry in /etc/inetd.conf: Adding bpcd entry.Original /etc/inetd.conf saved as /etc/inetd.conf.NBU_061103.10:25:08.Checking for a vnetd entry in /etc/inetd.conf: Adding vnetd entry.Checking for a vopied entry in /etc/inetd.conf: Adding vopied entry.Checking for a bpjava-msvc entry in /etc/inetd.conf: Adding bpjava-msvc entry.Checking /etc/services for the needed NetBackup and Media Manager services.Copying original /etc/services file to /etc/services.NBU_061103.10:31:32/etc/services to update NetBackup and Media Manager services./etc/services will be updated to add the following entries for NetBackup/Media Manager.bprd 13720/tcp bprdbpcd 13782/tcp bpcdbpdbm 13721/tcp bpdbmvnetd 13724/tcp vnetdvopied 13783/tcp vopiedbpjobd 13723/tcp bpjobdnbdbd 13784/tcp nbdbdvisd 9284/tcp visdbpjava-msvc 13722/tcp bpjava-msvcvmd 13701/tcp vmdacsd 13702/tcp acsdtl8cd 13705/tcp tl8cdtldcd 13711/tcp tldcdts8d 13709/tcp ts8dodld 13706/tcp odldtl4d 13713/tcp tl4dtsdd 13714/tcp tsddtshd 13715/tcp tshdtlmd 13716/tcp tlmdtlhcd 13717/tcp tlhcdlmfcd 13718/tcp lmfcdrsmd 13719/tcp rsmdTo change these entries modify the file /tmp/services.ov_edited.24848and enter <RETURN> when ready to continue:/etc/services has been updated to contain NetBackup and Media Manager services.To make NetBackup and Media Manager start up automatically when the system is restarted, the rc.veritas.aix script found in /usr/openv/netbackup/bin/goodies has been placed in the /etc directory, you must modify /etc/inittab to include it.……Enter which host will store global device information.(default: backupserver): backupserver /*设置masterserver 作全局设备信息中心To be able to install the client software the NetBackupprocesses need to be started. Do you want to start theNetBackup processes so client software can be installed? (y/n) [y] yStarting the NetBackup database manager process (bpdbm)./*启动bpdbm进程以装载client软件Do you want to create policy and schedule examples that you can view or usewhen you are configuring your own policies and schedules? (y/n) [y]n/*确定是否安装策略模板Client database indexing reduces the search time when restoringclient files, but it takes about 2% more disk space.Do you want to index the client database files? (y/n) [y] y/*确定是否采用client index 文件The default index level is 9 levels. Use the default? (y/n) [y] y /*确定 client index levelRunning index_clients process in background mode.Output from the process will be written to /tmp/index_clients.output.Do you want to start the Media Manager device daemon processes? (y/n) [y] y Starting the Media Manager device daemon processes./*确定是否启动MediaManager 进程Do you want to start the NetBackup bprd process sobackups and restores can be initiated? (y/n) [y] yStarting the NetBackup request daemon process (bprd)./*确定是否启动Netbackup 监听进程Done executing NB.instStep4 :确认安装成功#/usr/openv/netbackup/bin/goodies/bp.kill_all关闭所有已启动的NBU进程#/usr/openv/netbackup/bin/goodies/netbackup start启动NBU进程#/usr/openv/netbackup/bin/bpps –a查看NBU进程#/usr/openv/netbackup/bin/jnbSA&启动NBU的java管理界面至此,MasterServer软件安装完毕。
虚拟磁带控制系统命令和实用程序参考 MVS 软件版本 6.1说明书

Virtual Tape Control SystemCommand and Utility ReferenceMVS SoftwareVersion 6.1docs.sun update onlyOctober 2010, Revision ADSubmit comments about this document by clicking the Feedback [+] link at: Copyright © 2006, 2010, Oracle and/or its affiliates. All rights reserved.This software and related documentation are provided under a license agreement containing restrictions on use and disclosure and are protected by intellectual property laws. Except as expressly permitted in your license agreement or allowed by law, you may not use, copy, reproduce, translate, broadcast, modify, license, transmit, distribute, exhibit, perform, publish, or display any part, in any form, or by any means. Reverse engineering, disassembly, or decompilation of this software, unless required by law for interoperability, is prohibited.The information contained herein is subject to change without notice and is not warranted to be error-free. If you find any errors, please report them to us in writing.If this is software or related software documentation that is delivered to the U.S. Government or anyone licensing it on behalf of the U.S. Government, the following notice is applicable:U.S. GOVERNMENT RIGHTS Programs, software, databases, and related documentation and technical data delivered to U.S. Government customers are "commercial computer software" or "commercial technical data" pursuant to the applicable Federal Acquisition Regulation and agency-specific supplemental regulations. As such, the use, duplication, disclosure, modification, and adaptation shall be subject to the restrictions and license terms set forth in the applicable Government contract, and, to the extent applicable by the terms of the Government contract, the additional rights set forth in FAR 52.227-19, Commercial Computer Software License (December 2007). Oracle USA, Inc., 500 Oracle Parkway, Redwood City, CA 94065.This software or hardware is developed for general use in a variety of information management applications. It is not developed or intended for use in any inherently dangerous applications, including applications which may create a risk of personal injury. If you use this software or hardware in dangerous applications, then you shall be responsible to take all appropriate fail-safe, backup, redundancy, and other measures to ensure the safe use. Oracle Corporation and its affiliates disclaim any liability for any damages caused by use of this software or hardware in dangerous applications.Oracle is a registered trademark of Oracle Corporation and/or its affiliates. Oracle and Java are registered trademarks of Oracle and/or its affiliates. Other names may be trademarks of their respective owners.AMD, Opteron, the AMD logo, and the AMD Opteron logo are trademarks or registered trademarks of Advanced Micro Devices. Intel and Intel Xeon are trademarks or registered trademarks of Intel Corporation. All SPARC trademarks are used under license and are trademarks or registered trademarks of SPARC International, Inc. UNIX is a registered trademark licensed through X/Open Company, Ltd.This software or hardware and documentation may provide access to or information on content, products, and services from third parties. Oracle Corporation and its affiliates are not responsible for and expressly disclaim all warranties of any kind with respect to third-party content, products, and services. Oracle Corporation and its affiliates will not be responsible for any loss, costs, or damages incurred due to your access to or use of third-party content, products, or services.ii Command and Utility Reference • October 2010Revision AD • docs.sun update onlyAbout this BookVirtual Tape Control System 6.1.0 (VTCS 6.1.0, hereafter referred to as “VTCS”)is Revision A host software, which together the portions of NCS 6.1.0 that supportVTCS and the Virtual Tape Storage Subsystem (VTSS), comprises VirtualStorage Manager (VSM).AudienceThis reference provides VTCS and NCS reference information for StorageTek orcustomer personnel who are responsible for all VTCS tasks. Also see thefollowing:•VTCS Installation and Configuration Guide for information about installingand configuring VTCS.•VTCS Administrator’s Guide for information about VTCS administrationtasks.Contact Us!Oracle welcomes your feedback.Visit the Oracle Documentation site at and click onthe FEEDBACK link at the bottom right of the screen to access theOpinion Lab feedback system.PrerequisitesTo perform the tasks described in this guide, you should already understand thefollowing:iiiTo perform the tasks described in this guide, you should already understand thefollowing:•MVS operating system•JES2 or JES3•System Management Facility (SMF)•System Modification Program Extended (SMP)•Nearline Control Solution (NCS)•VTCS and VSMAbout the SoftwareThis guide applies to VTCS/MVS 6.1.0 and NCS/MVS 6.1.0 and above. VTCSexecutes in the native MVS environment.ivHow this Guide is OrganizedThis guide contains the following sections:•Chapter 1 “VTCS Utilities and Commands”•Chapter 3 “HSC Enhancements and Additions for VSM”•Chapter 4 “LibraryStation Enhancements and Additions for VSM”•Chapter 5 “MVS/CSC Enhancements and Additions for VSM”•Appendix A “VTCS SMF Record Format”•Appendix B “VTD Command Reference”•Appendix Appendix C. “NCS/VTCS Alphabetic V olsers”•Appendix Appendix D. “Using the HSC Significant Event NotificationFacility”•“Glossary”•“Index”What’s New in This Reference?Revision AD Revision AD contains technical updates and corrections.Revision AC Revision AC provides the enhancements described in Table 1.VTCS 6.1, Revision AB Revision AB resets the revisions of this book at the AB level, and incorporates all previous technical corrections and SPE updates.Table 1.Updates to Command and Utility Reference, Revision AC This enhancement......is described here......and requires the followingPTFsINVENTRYutility“INVENTRY” onpage 102L1H14NU for SWS6100,L1H14NT for SOS6100,L1H14NS for SMS6100 Display RTDOutput“Display RTDOutput” on page 62L1H14K5 for SWS6100MVCMAINTenhancements“MVCMAINT” onpage 117L1H14JJvviContentsAbout this Book . . . . . . . . . . . . . . . . . . . . . . . . . . . . . . . . . . . . . . . . . . . . . . . . . . . . . . . . . . . . iiiAudience . . . . . . . . . . . . . . . . . . . . . . . . . . . . . . . . . . . . . . . . . . . . . . . . . . . . . . . . . . . . . . . . . . . . . . iii Prerequisites. . . . . . . . . . . . . . . . . . . . . . . . . . . . . . . . . . . . . . . . . . . . . . . . . . . . . . . . . . . . . . . . . . . . iii About the Software . . . . . . . . . . . . . . . . . . . . . . . . . . . . . . . . . . . . . . . . . . . . . . . . . . . . . . . . . . . . . . iv How this Guide is Organized. . . . . . . . . . . . . . . . . . . . . . . . . . . . . . . . . . . . . . . . . . . . . . . . . . . . . . . .v What’s New in This Reference? . . . . . . . . . . . . . . . . . . . . . . . . . . . . . . . . . . . . . . . . . . . . . . . . . . . . .v Revision AD . . . . . . . . . . . . . . . . . . . . . . . . . . . . . . . . . . . . . . . . . . . . . . . . . . . . . . . . . . . . . . .vRevision AC. . . . . . . . . . . . . . . . . . . . . . . . . . . . . . . . . . . . . . . . . . . . . . . . . . . . . . . . . . . . . . . .vVTCS 6.1, Revision AB . . . . . . . . . . . . . . . . . . . . . . . . . . . . . . . . . . . . . . . . . . . . . . . . . . . . . .v Chapter 1. VTCS Utilities and Commands. . . . . . . . . . . . . . . . . . . . . . . . . . . . . . . . . . . . . . . .1Using VTCS Utilities. . . . . . . . . . . . . . . . . . . . . . . . . . . . . . . . . . . . . . . . . . . . . . . . . . . . . . . . . . . . . .2 Sample REXX Execs. . . . . . . . . . . . . . . . . . . . . . . . . . . . . . . . . . . . . . . . . . . . . . . . . . . . . . . . .3 Using VTCS Commands. . . . . . . . . . . . . . . . . . . . . . . . . . . . . . . . . . . . . . . . . . . . . . . . . . . . . . . . . . .4 AUDIT. . . . . . . . . . . . . . . . . . . . . . . . . . . . . . . . . . . . . . . . . . . . . . . . . . . . . . . . . . . . . . . . . . . . . . . . .5 Syntax . . . . . . . . . . . . . . . . . . . . . . . . . . . . . . . . . . . . . . . . . . . . . . . . . . . . . . . . . . . . . . . . . . . .5Parameters . . . . . . . . . . . . . . . . . . . . . . . . . . . . . . . . . . . . . . . . . . . . . . . . . . . . . . . . . . . . . . . . .5Interfaces . . . . . . . . . . . . . . . . . . . . . . . . . . . . . . . . . . . . . . . . . . . . . . . . . . . . . . . . . . . . . . . . . .6Usage. . . . . . . . . . . . . . . . . . . . . . . . . . . . . . . . . . . . . . . . . . . . . . . . . . . . . . . . . . . . . . . . . . . . .6JCL Requirements . . . . . . . . . . . . . . . . . . . . . . . . . . . . . . . . . . . . . . . . . . . . . . . . . . . . . . . . . . .6JCL Example . . . . . . . . . . . . . . . . . . . . . . . . . . . . . . . . . . . . . . . . . . . . . . . . . . . . . . . . . . . . . . .6Audit Report . . . . . . . . . . . . . . . . . . . . . . . . . . . . . . . . . . . . . . . . . . . . . . . . . . . . . . . . . . . . . . .7 CANCEL. . . . . . . . . . . . . . . . . . . . . . . . . . . . . . . . . . . . . . . . . . . . . . . . . . . . . . . . . . . . . . . . . . . . . .11 Syntax . . . . . . . . . . . . . . . . . . . . . . . . . . . . . . . . . . . . . . . . . . . . . . . . . . . . . . . . . . . . . . . . . . .11Parameters . . . . . . . . . . . . . . . . . . . . . . . . . . . . . . . . . . . . . . . . . . . . . . . . . . . . . . . . . . . . . . . .11Interfaces . . . . . . . . . . . . . . . . . . . . . . . . . . . . . . . . . . . . . . . . . . . . . . . . . . . . . . . . . . . . . . . . .11Usage. . . . . . . . . . . . . . . . . . . . . . . . . . . . . . . . . . . . . . . . . . . . . . . . . . . . . . . . . . . . . . . . . . . .12Command Example . . . . . . . . . . . . . . . . . . . . . . . . . . . . . . . . . . . . . . . . . . . . . . . . . . . . . . . . .12JCL Requirements . . . . . . . . . . . . . . . . . . . . . . . . . . . . . . . . . . . . . . . . . . . . . . . . . . . . . . . . . .12JCL Example . . . . . . . . . . . . . . . . . . . . . . . . . . . . . . . . . . . . . . . . . . . . . . . . . . . . . . . . . . . . . .12 CONFIG . . . . . . . . . . . . . . . . . . . . . . . . . . . . . . . . . . . . . . . . . . . . . . . . . . . . . . . . . . . . . . . . . . . . . .13 CONFIG Statement . . . . . . . . . . . . . . . . . . . . . . . . . . . . . . . . . . . . . . . . . . . . . . . . . . . . . . . . .13Interfaces . . . . . . . . . . . . . . . . . . . . . . . . . . . . . . . . . . . . . . . . . . . . . . . . . . . . . . . . . . . . . . . . .14GLOBAL Statement . . . . . . . . . . . . . . . . . . . . . . . . . . . . . . . . . . . . . . . . . . . . . . . . . . . . . . . .15RECLAIM Statement . . . . . . . . . . . . . . . . . . . . . . . . . . . . . . . . . . . . . . . . . . . . . . . . . . . . . . .19VTVVOL Statement . . . . . . . . . . . . . . . . . . . . . . . . . . . . . . . . . . . . . . . . . . . . . . . . . . . . . . . .20MVCVOL Statement. . . . . . . . . . . . . . . . . . . . . . . . . . . . . . . . . . . . . . . . . . . . . . . . . . . . . . . .21VTSS Statement. . . . . . . . . . . . . . . . . . . . . . . . . . . . . . . . . . . . . . . . . . . . . . . . . . . . . . . . . . . .22RTD Statement . . . . . . . . . . . . . . . . . . . . . . . . . . . . . . . . . . . . . . . . . . . . . . . . . . . . . . . . . . . .25viiVTD Statement. . . . . . . . . . . . . . . . . . . . . . . . . . . . . . . . . . . . . . . . . . . . . . . . . . . . . . . . . . . . 26CLUSTER Statement . . . . . . . . . . . . . . . . . . . . . . . . . . . . . . . . . . . . . . . . . . . . . . . . . . . . . . . 27CLINK Statement. . . . . . . . . . . . . . . . . . . . . . . . . . . . . . . . . . . . . . . . . . . . . . . . . . . . . . . . . . 28HOST Statement. . . . . . . . . . . . . . . . . . . . . . . . . . . . . . . . . . . . . . . . . . . . . . . . . . . . . . . . . . . 30Usage . . . . . . . . . . . . . . . . . . . . . . . . . . . . . . . . . . . . . . . . . . . . . . . . . . . . . . . . . . . . . . . . . . . 32JCL Requirements. . . . . . . . . . . . . . . . . . . . . . . . . . . . . . . . . . . . . . . . . . . . . . . . . . . . . . . . . . 34JCL Examples. . . . . . . . . . . . . . . . . . . . . . . . . . . . . . . . . . . . . . . . . . . . . . . . . . . . . . . . . . . . . 35 CONSolid. . . . . . . . . . . . . . . . . . . . . . . . . . . . . . . . . . . . . . . . . . . . . . . . . . . . . . . . . . . . . . . . . . . . . 40 Syntax . . . . . . . . . . . . . . . . . . . . . . . . . . . . . . . . . . . . . . . . . . . . . . . . . . . . . . . . . . . . . . . . . . 40Parameters. . . . . . . . . . . . . . . . . . . . . . . . . . . . . . . . . . . . . . . . . . . . . . . . . . . . . . . . . . . . . . . . 40Interfaces. . . . . . . . . . . . . . . . . . . . . . . . . . . . . . . . . . . . . . . . . . . . . . . . . . . . . . . . . . . . . . . . . 41Usage . . . . . . . . . . . . . . . . . . . . . . . . . . . . . . . . . . . . . . . . . . . . . . . . . . . . . . . . . . . . . . . . . . . 41JCL Requirements. . . . . . . . . . . . . . . . . . . . . . . . . . . . . . . . . . . . . . . . . . . . . . . . . . . . . . . . . . 42JCL Examples. . . . . . . . . . . . . . . . . . . . . . . . . . . . . . . . . . . . . . . . . . . . . . . . . . . . . . . . . . . . . 43Consolidation Reports. . . . . . . . . . . . . . . . . . . . . . . . . . . . . . . . . . . . . . . . . . . . . . . . . . . . . . . 44 DECOM . . . . . . . . . . . . . . . . . . . . . . . . . . . . . . . . . . . . . . . . . . . . . . . . . . . . . . . . . . . . . . . . . . . . . . 45 Syntax. . . . . . . . . . . . . . . . . . . . . . . . . . . . . . . . . . . . . . . . . . . . . . . . . . . . . . . . . . . . . . . . . . . 45Parameters. . . . . . . . . . . . . . . . . . . . . . . . . . . . . . . . . . . . . . . . . . . . . . . . . . . . . . . . . . . . . . . . 45Interfaces. . . . . . . . . . . . . . . . . . . . . . . . . . . . . . . . . . . . . . . . . . . . . . . . . . . . . . . . . . . . . . . . . 45Usage . . . . . . . . . . . . . . . . . . . . . . . . . . . . . . . . . . . . . . . . . . . . . . . . . . . . . . . . . . . . . . . . . . . 45JCL Requirements. . . . . . . . . . . . . . . . . . . . . . . . . . . . . . . . . . . . . . . . . . . . . . . . . . . . . . . . . . 45JCL Example. . . . . . . . . . . . . . . . . . . . . . . . . . . . . . . . . . . . . . . . . . . . . . . . . . . . . . . . . . . . . . 46DECOM Output . . . . . . . . . . . . . . . . . . . . . . . . . . . . . . . . . . . . . . . . . . . . . . . . . . . . . . . . . . . 46 DELETSCR . . . . . . . . . . . . . . . . . . . . . . . . . . . . . . . . . . . . . . . . . . . . . . . . . . . . . . . . . . . . . . . . . . . 48 Syntax. . . . . . . . . . . . . . . . . . . . . . . . . . . . . . . . . . . . . . . . . . . . . . . . . . . . . . . . . . . . . . . . . . . 48Parameters. . . . . . . . . . . . . . . . . . . . . . . . . . . . . . . . . . . . . . . . . . . . . . . . . . . . . . . . . . . . . . . . 48Interfaces. . . . . . . . . . . . . . . . . . . . . . . . . . . . . . . . . . . . . . . . . . . . . . . . . . . . . . . . . . . . . . . . . 49Optional and Required JCL . . . . . . . . . . . . . . . . . . . . . . . . . . . . . . . . . . . . . . . . . . . . . . . . . . 49DELETSCR Report . . . . . . . . . . . . . . . . . . . . . . . . . . . . . . . . . . . . . . . . . . . . . . . . . . . . . . . . 50 DISPLAY. . . . . . . . . . . . . . . . . . . . . . . . . . . . . . . . . . . . . . . . . . . . . . . . . . . . . . . . . . . . . . . . . . . . . 52 Syntax. . . . . . . . . . . . . . . . . . . . . . . . . . . . . . . . . . . . . . . . . . . . . . . . . . . . . . . . . . . . . . . . . . . 53Parameters. . . . . . . . . . . . . . . . . . . . . . . . . . . . . . . . . . . . . . . . . . . . . . . . . . . . . . . . . . . . . . . . 54Interfaces. . . . . . . . . . . . . . . . . . . . . . . . . . . . . . . . . . . . . . . . . . . . . . . . . . . . . . . . . . . . . . . . . 56Usage . . . . . . . . . . . . . . . . . . . . . . . . . . . . . . . . . . . . . . . . . . . . . . . . . . . . . . . . . . . . . . . . . . . 56Command Examples. . . . . . . . . . . . . . . . . . . . . . . . . . . . . . . . . . . . . . . . . . . . . . . . . . . . . . . . 57JCL Requirements. . . . . . . . . . . . . . . . . . . . . . . . . . . . . . . . . . . . . . . . . . . . . . . . . . . . . . . . . . 57JCL Examples. . . . . . . . . . . . . . . . . . . . . . . . . . . . . . . . . . . . . . . . . . . . . . . . . . . . . . . . . . . . . 58Output. . . . . . . . . . . . . . . . . . . . . . . . . . . . . . . . . . . . . . . . . . . . . . . . . . . . . . . . . . . . . . . . . . . 59 viiiEXPORT . . . . . . . . . . . . . . . . . . . . . . . . . . . . . . . . . . . . . . . . . . . . . . . . . . . . . . . . . . . . . . . . . . . . . .89 Syntax . . . . . . . . . . . . . . . . . . . . . . . . . . . . . . . . . . . . . . . . . . . . . . . . . . . . . . . . . . . . . . . . . . .89 Parameters . . . . . . . . . . . . . . . . . . . . . . . . . . . . . . . . . . . . . . . . . . . . . . . . . . . . . . . . . . . . . . . .90 Interfaces . . . . . . . . . . . . . . . . . . . . . . . . . . . . . . . . . . . . . . . . . . . . . . . . . . . . . . . . . . . . . . . . .90 Usage. . . . . . . . . . . . . . . . . . . . . . . . . . . . . . . . . . . . . . . . . . . . . . . . . . . . . . . . . . . . . . . . . . . .91 Optional and Required JCL. . . . . . . . . . . . . . . . . . . . . . . . . . . . . . . . . . . . . . . . . . . . . . . . . . .91 JCL Examples . . . . . . . . . . . . . . . . . . . . . . . . . . . . . . . . . . . . . . . . . . . . . . . . . . . . . . . . . . . . .92 IMPORT . . . . . . . . . . . . . . . . . . . . . . . . . . . . . . . . . . . . . . . . . . . . . . . . . . . . . . . . . . . . . . . . . . . . . .93 Syntax . . . . . . . . . . . . . . . . . . . . . . . . . . . . . . . . . . . . . . . . . . . . . . . . . . . . . . . . . . . . . . . . . . .93 Parameters . . . . . . . . . . . . . . . . . . . . . . . . . . . . . . . . . . . . . . . . . . . . . . . . . . . . . . . . . . . . . . . .94 Interfaces . . . . . . . . . . . . . . . . . . . . . . . . . . . . . . . . . . . . . . . . . . . . . . . . . . . . . . . . . . . . . . . . .95 Usage. . . . . . . . . . . . . . . . . . . . . . . . . . . . . . . . . . . . . . . . . . . . . . . . . . . . . . . . . . . . . . . . . . . .95 JCL Requirements . . . . . . . . . . . . . . . . . . . . . . . . . . . . . . . . . . . . . . . . . . . . . . . . . . . . . . . . . .98 JCL Examples . . . . . . . . . . . . . . . . . . . . . . . . . . . . . . . . . . . . . . . . . . . . . . . . . . . . . . . . . . . . .99 INVENTRY. . . . . . . . . . . . . . . . . . . . . . . . . . . . . . . . . . . . . . . . . . . . . . . . . . . . . . . . . . . . . . . . . . .102 Syntax . . . . . . . . . . . . . . . . . . . . . . . . . . . . . . . . . . . . . . . . . . . . . . . . . . . . . . . . . . . . . . . . . .102 Parameters . . . . . . . . . . . . . . . . . . . . . . . . . . . . . . . . . . . . . . . . . . . . . . . . . . . . . . . . . . . . . . .102 MERGMFST. . . . . . . . . . . . . . . . . . . . . . . . . . . . . . . . . . . . . . . . . . . . . . . . . . . . . . . . . . . . . . . . . .104 Syntax . . . . . . . . . . . . . . . . . . . . . . . . . . . . . . . . . . . . . . . . . . . . . . . . . . . . . . . . . . . . . . . . . .104 Parameters . . . . . . . . . . . . . . . . . . . . . . . . . . . . . . . . . . . . . . . . . . . . . . . . . . . . . . . . . . . . . . .104 Interfaces . . . . . . . . . . . . . . . . . . . . . . . . . . . . . . . . . . . . . . . . . . . . . . . . . . . . . . . . . . . . . . . .104 Usage. . . . . . . . . . . . . . . . . . . . . . . . . . . . . . . . . . . . . . . . . . . . . . . . . . . . . . . . . . . . . . . . . . .104 JCL Requirements . . . . . . . . . . . . . . . . . . . . . . . . . . . . . . . . . . . . . . . . . . . . . . . . . . . . . . . . .105 JCL Examples . . . . . . . . . . . . . . . . . . . . . . . . . . . . . . . . . . . . . . . . . . . . . . . . . . . . . . . . . . . .105 MIGRATE. . . . . . . . . . . . . . . . . . . . . . . . . . . . . . . . . . . . . . . . . . . . . . . . . . . . . . . . . . . . . . . . . . . .107 Syntax - Format 1 . . . . . . . . . . . . . . . . . . . . . . . . . . . . . . . . . . . . . . . . . . . . . . . . . . . . . . . . .107 Parameters -Format 1. . . . . . . . . . . . . . . . . . . . . . . . . . . . . . . . . . . . . . . . . . . . . . . . . . . . . . . . . . . . . . . . .107 Syntax - Format 2 . . . . . . . . . . . . . . . . . . . . . . . . . . . . . . . . . . . . . . . . . . . . . . . . . . . . . . . . .108 Parameters -Format 2. . . . . . . . . . . . . . . . . . . . . . . . . . . . . . . . . . . . . . . . . . . . . . . . . . . . . . . . . . . . . . . . .108 Interfaces . . . . . . . . . . . . . . . . . . . . . . . . . . . . . . . . . . . . . . . . . . . . . . . . . . . . . . . . . . . . . . . .109 Usage. . . . . . . . . . . . . . . . . . . . . . . . . . . . . . . . . . . . . . . . . . . . . . . . . . . . . . . . . . . . . . . . . . .109 Command Examples . . . . . . . . . . . . . . . . . . . . . . . . . . . . . . . . . . . . . . . . . . . . . . . . . . . . . . .109 JCL Requirements . . . . . . . . . . . . . . . . . . . . . . . . . . . . . . . . . . . . . . . . . . . . . . . . . . . . . . . . .109 JCL Examples . . . . . . . . . . . . . . . . . . . . . . . . . . . . . . . . . . . . . . . . . . . . . . . . . . . . . . . . . . . .110 MVCDEF. . . . . . . . . . . . . . . . . . . . . . . . . . . . . . . . . . . . . . . . . . . . . . . . . . . . . . . . . . . . . . . . . . . . .111 Syntax . . . . . . . . . . . . . . . . . . . . . . . . . . . . . . . . . . . . . . . . . . . . . . . . . . . . . . . . . . . . . . . . . .111 Parameters . . . . . . . . . . . . . . . . . . . . . . . . . . . . . . . . . . . . . . . . . . . . . . . . . . . . . . . . . . . . . . .111 Interfaces . . . . . . . . . . . . . . . . . . . . . . . . . . . . . . . . . . . . . . . . . . . . . . . . . . . . . . . . . . . . . . . .111 Usage. . . . . . . . . . . . . . . . . . . . . . . . . . . . . . . . . . . . . . . . . . . . . . . . . . . . . . . . . . . . . . . . . . .112 Example. . . . . . . . . . . . . . . . . . . . . . . . . . . . . . . . . . . . . . . . . . . . . . . . . . . . . . . . . . . . . . . . .112ixMVCDRAIN. . . . . . . . . . . . . . . . . . . . . . . . . . . . . . . . . . . . . . . . . . . . . . . . . . . . . . . . . . . . . . . . . . 113 Syntax. . . . . . . . . . . . . . . . . . . . . . . . . . . . . . . . . . . . . . . . . . . . . . . . . . . . . . . . . . . . . . . . . . 113Parameters. . . . . . . . . . . . . . . . . . . . . . . . . . . . . . . . . . . . . . . . . . . . . . . . . . . . . . . . . . . . . . . 113Interfaces. . . . . . . . . . . . . . . . . . . . . . . . . . . . . . . . . . . . . . . . . . . . . . . . . . . . . . . . . . . . . . . . 114Usage . . . . . . . . . . . . . . . . . . . . . . . . . . . . . . . . . . . . . . . . . . . . . . . . . . . . . . . . . . . . . . . . . . 115Command Example. . . . . . . . . . . . . . . . . . . . . . . . . . . . . . . . . . . . . . . . . . . . . . . . . . . . . . . . 115JCL Requirements. . . . . . . . . . . . . . . . . . . . . . . . . . . . . . . . . . . . . . . . . . . . . . . . . . . . . . . . . 115JCL Example. . . . . . . . . . . . . . . . . . . . . . . . . . . . . . . . . . . . . . . . . . . . . . . . . . . . . . . . . . . . . 116 MVCMAINT . . . . . . . . . . . . . . . . . . . . . . . . . . . . . . . . . . . . . . . . . . . . . . . . . . . . . . . . . . . . . . . . . 117 Syntax. . . . . . . . . . . . . . . . . . . . . . . . . . . . . . . . . . . . . . . . . . . . . . . . . . . . . . . . . . . . . . . . . . 117Parameters. . . . . . . . . . . . . . . . . . . . . . . . . . . . . . . . . . . . . . . . . . . . . . . . . . . . . . . . . . . . . . . 118Interfaces. . . . . . . . . . . . . . . . . . . . . . . . . . . . . . . . . . . . . . . . . . . . . . . . . . . . . . . . . . . . . . . . 120Usage . . . . . . . . . . . . . . . . . . . . . . . . . . . . . . . . . . . . . . . . . . . . . . . . . . . . . . . . . . . . . . . . . . 121JCL Requirements. . . . . . . . . . . . . . . . . . . . . . . . . . . . . . . . . . . . . . . . . . . . . . . . . . . . . . . . . 123JCL Examples. . . . . . . . . . . . . . . . . . . . . . . . . . . . . . . . . . . . . . . . . . . . . . . . . . . . . . . . . . . . 123MVCMAINT Reports. . . . . . . . . . . . . . . . . . . . . . . . . . . . . . . . . . . . . . . . . . . . . . . . . . . . . . 124 MVCPLRPT . . . . . . . . . . . . . . . . . . . . . . . . . . . . . . . . . . . . . . . . . . . . . . . . . . . . . . . . . . . . . . . . . 125 Syntax. . . . . . . . . . . . . . . . . . . . . . . . . . . . . . . . . . . . . . . . . . . . . . . . . . . . . . . . . . . . . . . . . . 125Parameters. . . . . . . . . . . . . . . . . . . . . . . . . . . . . . . . . . . . . . . . . . . . . . . . . . . . . . . . . . . . . . . 125Interfaces. . . . . . . . . . . . . . . . . . . . . . . . . . . . . . . . . . . . . . . . . . . . . . . . . . . . . . . . . . . . . . . . 125Usage . . . . . . . . . . . . . . . . . . . . . . . . . . . . . . . . . . . . . . . . . . . . . . . . . . . . . . . . . . . . . . . . . . 125JCL Requirements. . . . . . . . . . . . . . . . . . . . . . . . . . . . . . . . . . . . . . . . . . . . . . . . . . . . . . . . . 126JCL Example. . . . . . . . . . . . . . . . . . . . . . . . . . . . . . . . . . . . . . . . . . . . . . . . . . . . . . . . . . . . . 126Named MVC Pool Report. . . . . . . . . . . . . . . . . . . . . . . . . . . . . . . . . . . . . . . . . . . . . . . . . . . 127 MVCRPT . . . . . . . . . . . . . . . . . . . . . . . . . . . . . . . . . . . . . . . . . . . . . . . . . . . . . . . . . . . . . . . . . . . . 132 Syntax. . . . . . . . . . . . . . . . . . . . . . . . . . . . . . . . . . . . . . . . . . . . . . . . . . . . . . . . . . . . . . . . . . 132Parameters. . . . . . . . . . . . . . . . . . . . . . . . . . . . . . . . . . . . . . . . . . . . . . . . . . . . . . . . . . . . . . . 132Interfaces. . . . . . . . . . . . . . . . . . . . . . . . . . . . . . . . . . . . . . . . . . . . . . . . . . . . . . . . . . . . . . . . 133Usage . . . . . . . . . . . . . . . . . . . . . . . . . . . . . . . . . . . . . . . . . . . . . . . . . . . . . . . . . . . . . . . . . . 133JCL Requirements. . . . . . . . . . . . . . . . . . . . . . . . . . . . . . . . . . . . . . . . . . . . . . . . . . . . . . . . . 133JCL Examples. . . . . . . . . . . . . . . . . . . . . . . . . . . . . . . . . . . . . . . . . . . . . . . . . . . . . . . . . . . . 134MVC Reports . . . . . . . . . . . . . . . . . . . . . . . . . . . . . . . . . . . . . . . . . . . . . . . . . . . . . . . . . . . . 136Flat File Record Format . . . . . . . . . . . . . . . . . . . . . . . . . . . . . . . . . . . . . . . . . . . . . . . . . . . . 143 QUERY. . . . . . . . . . . . . . . . . . . . . . . . . . . . . . . . . . . . . . . . . . . . . . . . . . . . . . . . . . . . . . . . . . . . . . 145 RECALL. . . . . . . . . . . . . . . . . . . . . . . . . . . . . . . . . . . . . . . . . . . . . . . . . . . . . . . . . . . . . . . . . . . . . 146 Syntax. . . . . . . . . . . . . . . . . . . . . . . . . . . . . . . . . . . . . . . . . . . . . . . . . . . . . . . . . . . . . . . . . . 146Parameters. . . . . . . . . . . . . . . . . . . . . . . . . . . . . . . . . . . . . . . . . . . . . . . . . . . . . . . . . . . . . . . 146Interfaces. . . . . . . . . . . . . . . . . . . . . . . . . . . . . . . . . . . . . . . . . . . . . . . . . . . . . . . . . . . . . . . . 147 x。
i40磁带库安装步骤

Quantum I40/I80磁带库安装及维护实施方案一 Quantum Scalar i40 Library(FC接口)安装步骤1.磁带库安装前的准备工作(1)准备场地请用户决定磁带库的放置位置,是直接放置在地上,还是安装在机架上。
如果安装到机架上,请尽量安装到机架的底部,保证整个机架的稳定。
(2)准备电源Quantum Scalar i40的电源要求为220V/10A请用户尽早准备。
(3)准备管理接口Quantum Scalar i40磁带库管理接口是一个RJ45接口,用户可以通过浏览器对磁带库进行管理。
(4)管理工具用户及口令磁带库的用户为admin,口令为password2.具体安装步骤第一步验货,拆下外包装,并将磁带库放到指定位置,上机架有特殊套件。
第二步将磁带库固定,保持水平。
第三步将位于设备顶部的用于固定机械臂装置取出,机械手可以移动。
如下图所示:第四步将磁带机装入磁带库,磁带机槽位位置如下图所示:半高磁带机占1个槽位位置,全高磁带机需占用2个槽位位置第五步连接光纤到每个磁带机上,将光纤与光纤交换机进行连接,或直连到主机,将通信网线连接安装到指定位置。
第六步连接电缆,分别打开电源模块上开关和前面板开关。
上电进行自检测试,如果没有报错说明磁带库安装正常。
如果报错可以通过控制面板对磁带库进行检测。
第七步运行磁带库配置向导,特别注意需要指定磁带库IP地址和选定远程控制。
须注意:时区设置无法通过操作面板进行更改,只能通过远程管理页面修改。
I/E导入导出槽的设置为右侧抽屉的第一列。
第八步使用带有标签的磁带对磁带库进行检测,内容,1.磁带入库操作,通过面板将磁带防到磁带槽位上。
2.对磁带库进行自检测试。
3.做不同位置的移动磁带的操作。
第九步将所有磁带贴上标签,然后入库。
(磁带带标图示)第十步再次确认电缆连接和光纤连接。
第十一步到应用主机上确认主机与磁带库的连通性,确保在主机设备管理器中识别到磁带库设备。
归档中心软件快速搭建-虚拟-物理磁带库配置文档
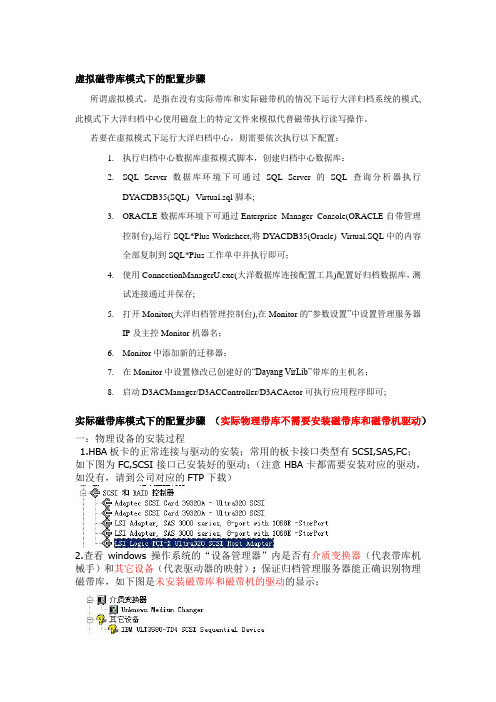
虚拟磁带库模式下的配置步骤所谓虚拟模式,是指在没有实际带库和实际磁带机的情况下运行大洋归档系统的模式,此模式下大洋归档中心使用磁盘上的特定文件来模拟代替磁带执行读写操作。
若要在虚拟模式下运行大洋归档中心,则需要依次执行以下配置:1.执行归档中心数据库虚拟模式脚本,创建归档中心数据库:2.SQL Server数据库环境下可通过SQL Server的SQL查询分析器执行DY ACDB35(SQL)_ Virtual.sql脚本;3.ORACLE数据库环境下可通过Enterprise Manager Console(ORACLE自带管理控制台),运行SQL*Plus Worksheet,将DY ACDB35(Oracle)_Virtual.SQL中的内容全部复制到SQL*Plus工作单中并执行即可;4.使用ConnectionManagerU.exe(大洋数据库连接配置工具)配置好归档数据库,测试连接通过并保存;5.打开Monitor(大洋归档管理控制台),在Monitor的“参数设置”中设置管理服务器IP及主控Monitor机器名;6.Monitor中添加新的迁移器;7.在Monitor中设置修改已创建好的“Dayang VirLib”带库的主机名;8.启动D3ACManager/D3ACController/D3ACActor可执行应用程序即可;实际磁带库模式下的配置步骤(实际物理带库不需要安装磁带库和磁带机驱动)一:物理设备的安装过程1.HBA板卡的正常连接与驱动的安装;常用的板卡接口类型有SCSI,SAS,FC;如下图为FC,SCSI接口已安装好的驱动;(注意HBA卡都需要安装对应的驱动,如没有,请到公司对应的FTP下载)2.查看windows操作系统的“设备管理器”内是否有介质变换器(代表带库机械手)和其它设备(代表驱动器的映射); 保证归档管理服务器能正确识别物理磁带库,如下图是未安装磁带库和磁带机的驱动的显示;注意:归档中心软件控制磁带库是不需要安装磁带库和磁带机驱动的,所以设备为?号的情况下也能正常控制磁带库;3. 已安装磁带库的磁带机的驱动显示为:介质变换器(代表带库机械手)和磁带驱动器(代表驱动器的映射);所谓实际模式,是指在有实际带库和实际磁带机或只有实际磁带机的情况下运行大洋归档系统的模式。
StarWind Virtual Storage Appliance 安装指南(KVM)说明书

One Stop Virtualization Shop StarWind®Virtual Storage Appliance Installation Guide with KVMAPRIL 2017TECHNICAL PAPERV 1.0Trademarks“StarWind”, “StarWind Software” and the StarWind and the StarWind Software logos are registered trademarks of StarWind Software. “StarWind LSFS” is a trademark of StarWind Software which may be registered in some jurisdictions. All other trademarks are owned by their respective owners.ChangesThe material in this document is for information only and is subject to change without notice. While reasonable efforts have been made in the preparation of this document to assure its accuracy, StarWind Software assumes no liability resulting from errors or omissions in this document, or from the use of the information contained herein. StarWind Software reserves the right to make changes in the product design without reservation and without notification to its users.Technical Support and ServicesIf you have questions about installing or using this software, check this and other documents first - you will find answers to most of your questions on the Technical Papers webpage or in StarWind Forum. If you need further assistance, please contact us.In 2016, Gartner named StarWind “Cool Vendor for Compute Platforms”.Gartner does not endorse any vendor, product or service depicted in its research publications, and does not advise technology users to select only those vendors with the highest ratings or other designation. Gartner research publications consist of the opinions of Gartner's research organization and should not be construed as statements of fact. Gartner disclaims all warranties, expressed or implied, with respect to this research, including any warranties of merchantability or fitness for a particular purpose.About StarWindStarWind is a pioneer in virtualization and a company that participated in the development of this technology from its earliest days. Now the company is among the leading vendors of software and hardware hyper-converged solutions. The company’s core product is the years-proven StarWind Virtual SAN, which allows SMB and ROBO to benefit from cost-efficient hyperconverged IT infrastructure. Having earned a reputation of reliability, StarWind created a hardware product line and is actively tapping into hyperconverged and storage appliances market. In 2016, Gartner named StarWind “Cool Vendor for Compute Platforms” following the success and popularity of StarWind HyperConverged Appliance. StarWind partners with world-known companies: Microsoft, VMware, Veeam, Intel, Dell, Mellanox, Citrix, Western Digital, etc.Copyright ©2009-2017 StarWind Software Inc.No part of this publication may be reproduced, stored in a retrieval system, or transmitted in any form or by any means, electronic, mechanical, photocopying, recording or otherwise, without the prior written consent of StarWind Software.ContentsIntroduction (4)Components (5)Virtual Machine requirements (5)Deployment quick steps (5)Contacts (18)IntroductionThis document describes the deployment and configuration process of the StarWind Virtual Storage Appliance with KVM.StarWind Linux-based VSA is a good opportunity for users who don’t want to change their current infrastructure, but rather quickly deploy StarWind and test its features and functionality. Right now we are releasing the new Linux version, compatible with all industry-standard hypervisors: Microsoft Hyper-V, VMware ESXi, Xen and KVM. It includes Web Management Console, so you can use any convenient HTML5-capable browser to check and configure your infrastructure.Additionally, StarWind Virtual Storage Appliance incorporates StarWind vCenter plugin in order to make it even more convenient for VMware users. StarWind VSA is easy to deploy and manage – a typical Linux administrator will install and maintain it without difficulty.A full set of up-to-date technical documentation can always be found here, or by pressing the Help button in the StarWind Management Console.For any technical inquiries please visit our online community, Frequently Asked Questions page, or use the support form to contact our technical support department.Components•StarWind Virtual Storage Appliance•Linux virtual machine with StarWind Virtual SAN installedVirtual Machine requirementsStarWind Virtual Storage Appliance VM requires having at least 4 virtual processors with 2 GHz reserved, at least 4 GB of RAM, 3 NIC ports dedicated as separate vSwitches for management, StarWind synchronization and iSCSI traffic to ensure the proper functioning of the VSA. Deployment quick steps1.Download zip archieve that contains StarWind Virtual Storage Appliance for KVM.https:///tmplink/StarWindVSA_KVM.zip2.Let’s configure Hypervisor first. We are going to configure CentOS 7.2 with KVM to workwith StarWind VSA.3.Install CentOS 7.2 minimal (first entry point in the list).4.When the installation is complete, log in to your server with the credentials you haveassigned to it.5.Install X Window using the following code:yum groupinstall "X Window System"6.Add Gnome Shell desktop with the following code:yum install gnome-classic-session gnome-terminal nautilus-open-terminalcontrol-center liberation-mono-fonts7.Run the following code to unlink the current launch target:unlink /etc/systemd/system/default.target8.Link in the graphical system running the following code:ln -sf /lib/systemd/system/graphical.target /etc/systemd/system/default.target 9.Install Virtualization packages and Virtual Machine Manager:yum groupinstall "Virtualization Host" -y; yum install virt-manager -y10.Reboot the host.11.Extract virtual machine files on the KVM host.12.Create a new VM using Virtual Machine Manager.13.Choose Import existing disk image option and click Forward.14.Provide the existing storage path of the virtual disk. Choose Linux OS with Red HatEnterptise Linux 7.3 Version. Click Forward.15.Choose Memory and CPU settings.16.Specify the VM name. Choose Network Selection and the interface for management.Configure it in Bridge mode and click Finish.17.Click Show virtual hardware details. Choose Virtual Disk and change Disk bus typeto IDE.18.Click Add Hardware on the Virtual hardware details page. Add networks for iSCSIand Synchronization traffic in Bridge mode.19.On the Virtual hardware details page click Add Hardware again. Click Storage,choose IDE bus type and Select or create custom storage. Click Manage.20.Choose Storage pool and click “+” to add a new volume.21.Specify the Volume name and choose the capacity.22.Click on the newly created Volume and click the Choose Volume button.23.Click Finish.24.Start StarWind VSA Virtual Machine.25.By default, StarWind VSA virtual machine obtains an IP address automatically via DHCP. Itis recommended to create a DHCP reservation and set a static IP address for this VM. In order to access StarWind VSA from the local network, the virtual machine must haveaccess to the network. In case you do not have a DHCP server, you can connect to the VM using KVM Virtual Machine Manager console and configure the static IP address manually.26.Now open a web browser and enter the IP address of the VM.27.Log in to the StarWind Virtual Storage Appliance using default credentials:Username: starwindPassword:starwind28.After the successful login, press ALT+CTRL+SHIFT combination.29.Navigate to Settings menu using pop-up sidebar:30.For security reasons, please, change the default password using the correspondingoption and press the Update Password button:31.Connect to the StarWind VSA via IP assigned to the VM by DHCP.32.Press X in the opened window.33.Browse to the Configuration tab and click VSA Storage.34.Click Scan Storages to see the recently attached Virtual Disk. Click Create Volume.35.Once the process is finished, you will see the created volume.36.The Default storage pool will be selected automatically. Click Advanced settings.37.Click VSA Network Settings. Configure NICs for Management, iSCSI and Synchronizationpurposes.38.Click Configure and assign the configuration needed for each NIC.39.Preconfiguration process finished. Now you can create StarWind devices and work withthem.For more information on how to work with StarWind devices, follow the link below:https:///resource-library?type=tpYou can find more information about deploying StarWind HyperConverged scenarios here: https:///starwind-virtual-san-hyper-converged-2-nodes-scenario-2-nodes-with-hyper-v-clusterhttps:///starwind-virtual-san-hyper-converged-2-node-cluster-vmware-vsphereContacts1-617-449-7717 1-617-507-5845 +44 20 3769 1857 (UK)+49 302 1788 849 (Germany) +33 097 7197 857 (France) +7 495 975 94 39 (Russian Federation and CIS) 1-866-790-2646Customer Support Portal:Support Forum:Sales: General Information: https:///support https:///forums ***********************************StarWind Software, Inc. 35 Village Rd., Suite 100, Middleton, MA 01949 USA ©2017, StarWind Software Inc. All rights reserved.。
- 1、下载文档前请自行甄别文档内容的完整性,平台不提供额外的编辑、内容补充、找答案等附加服务。
- 2、"仅部分预览"的文档,不可在线预览部分如存在完整性等问题,可反馈申请退款(可完整预览的文档不适用该条件!)。
- 3、如文档侵犯您的权益,请联系客服反馈,我们会尽快为您处理(人工客服工作时间:9:00-18:30)。
容错虚拟磁带库软件自行安装说明说明:容错公司提供的是虚拟磁带库软硬件一体产品,但会提供最新的测试版本软件供合作伙伴进行功能测试,测试版本并不保证在任何的硬件配置机器上能成功安装和配置,如需要高级支持,请联系容错技术人员(400-666-3436),安装配置步骤如下:一、安装CentOS 5.4 操作系统:1.下载CentOS 5.4 64位操作系统2.安装CentOS,安装时把系统全部安装在单独的硬盘上(准备用作系统的盘),其他都默认。
3.安装完成配置一下IP地址和主机名称。
二、安装RongCuo VTL System内核:4.先装libXp-1.0.0-8.1.el5.i386.rpm和mod_auth_pam-1.1.1-6.el5.x86_64.rpm# rpm -ihv libXp-1.0.0-8.1.el5.i386.rpm# rpm -ihv mod_auth_pam-1.1.1-6.el5.x86_64.rpm5.完成后再装kernel-2.6.29-rcbox.x86_64.rpm# rpm -ihv kernel-2.6.29-rcbox.x86_64.rpm6.装完kernel,执行post-ker-rcbox.sh脚本# ./post-ker-rcbox.sh7.重启机器# shutdown -h now三、安装RongCuo VTL软件:8.解压ftsvtl-b603-20110524.tar.gz# tar -vxzf ftsvtl-b603-20110524.tar.gz#./install.sh(全程默认安装)9.启动ftsvtl服务器:service ftsvtl start(或者重启机器)10.卸载ftsvtl:# /opt/ftsvtl/uninstall四、为Enable FC Target初始化VTL System环境:(修改的启动image为:/boot/initrd-2.6.29-rcbox.img)11.使系统启动时用RongCuo FC 驱动(含有Target)ql2300_fw.bin和ql2400_fw.bin驱动QLogic FC卡a.复制ql2300_fw.bin和ql2400_fw.bin到系统# cp ql2400_fw.bin /lib/firmware# cp ql2300_fw.bin /lib/firmwareb.删除或者改名系统自带的qla2xxx.ko和qla4xxx.ko# mv /lib/modules/2.6.29-rcbox/kernel/drivers/scsi/qla2xxx/qla2xxx.ko/lib/modules/2.6.29-rcbox/kernel/drivers/scsi/qla2xxx/qla2xxx_bk.ko# mv /lib/modules/2.6.29-rcbox/kernel/drivers/scsi/qla4xxx/qla4xxx.ko/lib/modules/2.6.29-rcbox/kernel/drivers/scsi/qla4xxx/qla4xxx_bk.ko12.修改启动时的image:/bootinitrd-2.6.29-rcbox.imgc.解压原有的image:# cd /boot# cp initrd-2.6.29-rcbox.img /tmp/initrd-2.6.29-rcbox.img.gz# cd /tmp# gunzip initrd-2.6.29-rcbox.img.gz# mkdir newinitrd# mv initrd-2.6.29-rcbox.img newinitrd# cd newinitrd# cpio -ivmd < initrd-2.6.29-rcbox.img# lsbin dev etc init initrd-2.6.29-rcbox.img lib proc sbin sys sysroot# rm -rf ./lib/qla2xxx.ko(内核中的initrd.img采用cpio压缩,不再是2.4内核使用的ext2格式,无法使用mount -o loop挂载。
需要使用gunzip解压缩,然后再使用利用cpio给img解包)d.生成新的initrd-2.6.29-rcbox.img文件:删除或者改名系统自带的qla2xxx.ko和qla4xxx.ko(如果有这些文件)# cd /tmp/newinitrd/lib# rm qla2xxx.ko (或rm qla4xxx.ko)# cd ...# mv initrd-2.6.29-rcbox.img ../initrd-2.6.29-rcbox_old.img# pwd/tmp/newinitrd# find . | cpio -c -o > ../initrd-2.6.29-rcbox.imge.压缩新的image文件:(此步骤可以不做,后果是img文件比较大)# gzip ../initrd-2.6.29-rcbox.img# cd ..# mv initrd-2.6.29-rcbox.img.gz initrd-2.6.29-rcbox.img************************************************************************注:没有压缩的initrd-2.6.29-rcbox.img文件大小************************************************************************ [root@vtl boot]# lltotal 46387-rw-r--r-- 1 root root 65937 Sep 3 2009 config-2.6.18-164.el5-rw-r--r-- 1 root root 74638 Jun 17 2010 config-2.6.29-rcboxdrwxr-xr-x 2 root root 1024 Dec 20 20:22 grub-rw------- 1 root root 3233151 Dec 20 17:03 initrd-2.6.18-164.el5.img-rw------- 1 root root 13165568 Dec 20 20:38 initrd-2.6.29-rcbox.imgdrwx------ 2 root root 12288 Dec 20 16:52 lost+found-rw-r--r-- 1 root root 80032 Mar 17 2009 message-rw-r--r-- 1 root root 108707 Sep 3 2009 symvers-2.6.18-164.el5.gz-rw-r--r-- 1 root root 1225101 Sep 3 2009 System.map-2.6.18-164.el5-rw-r--r-- 1 root root 1486509 Jun 17 2010 System.map-2.6.29-rcbox-rwxr-xr-x 1 root root 23685708 Jun 17 2010 vmlinux-2.6.29-rcbox.bz2-rw-r--r-- 1 root root 1932284 Sep 3 2009 vmlinuz-2.6.18-164.el5-rw-r--r-- 1 root root 2218384 Jun 17 2010 vmlinuz-2.6.29-rcbox************************************************************************ # rm -rf /boot/initrd-2.6.29-rcbox.img# cp initrd-2.6.29-rcbox.img /boot/# shutdown -h nowf.激活FC Target"Configuration"页面中,选择右边菜单"Configuration section"中"Setup FC HBA"—>在"Setup FC HBA"中下所列的FC HBA卡的Operations列,点”绿色勾”图标,等待几秒后,”Target Mode”列中显示”Enabled”,表示激活FC Target完成。
五、在RongCuo VTL System中配置虚拟带库(也可参考使用手册):13.用WEB登录VTL控制台web: https://<IPADDRESS>username: adminpassword: 12345614.添加存储到Storage Pool14.1"Storage"页面,"Storage Pools","Operations"中的"Edit"—>在"Eligible Disks"中选择Disk,点"Add Members"按钮。
(默认的Storage Pool是"ftsvtl")14.2如果有多个硬盘,可以先做成raid,再加入storage pool;"Storage"页面,"SoftwareRAID"—>在"Create a new RAID array"中选择RAID级别和Disk,之后重复9.1步骤。
15.创建Virtual Tape Library"VTL"页面,点"Virtual Tape Librarys","Create Virtual Tape Library"中指定VTL的名字,类型,槽位数,驱动器个数和IE Port个数信息—>点"Create"按钮。
16.创建磁带"VTL"页面,在"Virtual Tape Librarys"里刚才所建的VTL下"Tape","Create Tape"中指定磁带的大小,数目(数目不要超过该VTL的槽位数目)和类型—>点"Create"按钮。
六、在RongCuo VTL System中给客户端分配虚拟带库(iSCSI):17.创建客户端和分配VTL给iscsi initiator17.1"Client"页面,点"Client","Add Client"中为客户端指定名字(可以不同于客户端的主机名)—>点"Add"按钮。