Oracle EBS中发布WebService
EBS中发布WEBSERVICE接口的方法
在Oracle EBS二次开发中,PL/SQL程序是开发人员使用频率最高的开发语言,同时也是大家最容易掌握的工具之一了,而我们也很希望将自己编写的PL/SQL 程序发布为Web服务来提供给客户端程序使用,同时也可以实现和外围系统的集成,有了irep_parser这个工具,我们就可以将自己编写的PL/SQL 程序发布到Oracle Integration Repositoy中。
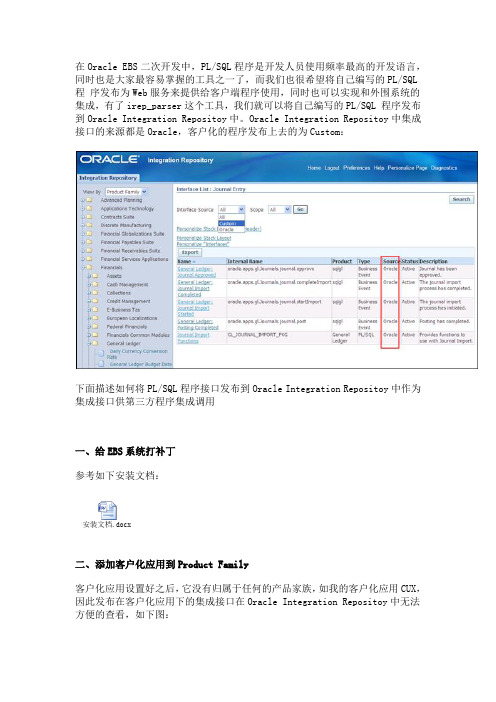
Oracle Integration Repositoy中集成接口的来源都是Oracle,客户化的程序发布上去的为Custom:下面描述如何将PL/SQL程序接口发布到Oracle Integration Repositoy中作为集成接口供第三方程序集成调用一、给EBS系统打补丁参考如下安装文档:安装文档.docx二、添加客户化应用到Product Family客户化应用设置好之后,它没有归属于任何的产品家族,如我的客户化应用CUX,因此发布在客户化应用下的集成接口在Oracle Integration Repositoy中无法方便的查看,如下图:如果客户化集成接口是组织到自己的应用下就需要先注册一个产品家族,下面将CUX Developer(CUX) 应用注册到CUX Developer(cux_pf)这个产品家族下作为例子进行演示:1,添加产品家族 CUX Developer(cux_pf)--添加产品家族begin-- Call the proceduread_pa_insert_package.insert_ad_pm_product_info(x_product_abbreviation => 'cux_pf',x_pseudo_product_flag => 'N',x_product_family_flag => 'Y',x_application_short_name => NULL,x_product_name => 'CUX Developer',x_product_family_abbreviation => NULL,x_product_family_name => NULL,x_aru_update_date => to_char(SYSDATE,'YYYY-MM-DD HH24:MI:SS'), x_currdate => to_char(SYSDATE,'YYYY-MM-DD HH24:MI:SS'),x_last_updated_by => -1,x_created_by => -1);COMMIT;end;2,注册CUX Developer(CUX)应用到产品家族中--注册CUX应用到产品家族中begin-- Call the proceduread_pa_insert_package.insert_ad_pm_product_info(x_product_abbreviation => 'cux',x_pseudo_product_flag => 'N',x_product_family_flag => 'N',x_application_short_name => 'CUX',x_product_name => 'CUX Developer',x_product_family_abbreviation => NULL,x_product_family_name => NULL,x_aru_update_date => to_char(SYSDATE,'YYYY-MM-DD HH24:MI:SS'),x_currdate => to_char(SYSDATE,'YYYY-MM-DDHH24:MI:SS'),x_last_updated_by => -1,x_created_by => -1);COMMIT;end;3,关联CUX Developer应用到产品家族CUX Developer下--关联CUX应用到产品家族CUX Developer下begin-- Call the proceduread_pa_insert_package.insert_ad_pm_prod_family_map(x_product_abbreviat ion => 'cux',x_product_family_abbreviation => 'cux_pf',x_aru_update_date => to_char(SYSDATE,'YYYY-MM-DD HH24:MI:SS'),x_currdate => to_char(SYSDATE,'YYYY-MM-DDHH24:MI:SS'),x_last_updated_by => -1,x_created_by => -1);COMMIT;end;执行完成后通过下面2条SQL验证是否添加成功,查出3条数据表示添加成功。
EBS中发布WEBSERVICE接口的方法

EBS中发布WEBSERVICE接口的方法发布Web服务接口是将现有的应用程序或功能暴露给其他应用程序或系统,通过网络进行交互的一种方式。
EBS(Enterprise Services Bus)是一种中间件架构,用于集成和连接多个应用程序和系统。
在EBS中发布Web服务接口,需要经过以下步骤:1. 明确需求和目标:在发布Web服务接口之前,需要明确需求和目标。
首先确定要暴露的应用程序或功能,以及可提供的服务、数据和操作。
同时,也需要考虑与其他系统的集成方式,包括数据格式、接口协议和安全性要求等。
2. 设计接口规范:根据需求和目标,设计Web服务接口的规范。
规范包括接口的名称、输入输出参数、数据格式、协议要求等。
可以使用标准的Web服务技术,如SOAP(Simple Object Access Protocol)、RESTful(Representational State Transfer)等。
此外,还可以考虑使用标准的数据交换格式,如XML(eXtensible Markup Language)、JSON (JavaScript Object Notation)等。
3. 实现接口代码:根据接口规范,实现接口代码。
可以使用不同的编程语言和开发框架,如Java、C#、NET等。
在实现接口代码时,需要注意处理输入参数、处理业务逻辑、生成输出结果等。
4.配置EBS框架:将实现的接口代码部署到EBS框架中。
配置EBS框架,以确保接口可以被其他应用程序或系统访问和调用。
配置包括网络端口、认证授权、安全性等。
5. 测试接口功能:在发布Web服务接口之前,需要进行功能测试。
测试接口的输入输出参数,验证接口的正确性和可靠性。
可以使用自动化测试工具,如SoapUI、Postman等。
6. 文档和API管理:编写接口的文档和说明,以便其他开发人员或系统管理员使用。
文档应包含接口的详细说明、参数的使用方法和示例代码。
webservice四种发布方式及客户端调用

WebService 四种发布方式总结Author:yczhang1.CXF方式CXF与spring搭建webservice是目前最流行的方式,但是传闻cxf与jdk1.5有些不兼容,我没有遇到过,我遇到的问题是cxf与was6.1.1不兼容,表现在cxf必须的jar包“wsdl4j-1.6.2.jar”报错,报的错为:ng.IncompatibleClassChangeError,明显的jar包不兼容问题,很是头痛,后来查找资料找到解决办法是,将上述jar包新建一个was共享库,可以解决,但是客户周经理不想用此种方式,因为需要修改was,于是改用了axis2方式,下文会介绍。
该问题在此处做个记录,以后使用cxf与was的时候需要注意!!!使用cxf+spring搭建WebService:第一步,添加jar包。
此处需要注意,不同环境(tomcat、was)jar也不一定相同,例如我本地cxf+spring只需要如下jar包:而泰康的was环境则需要如下jar包:明显的多了很多,原因应该是服务器jar包池的不同。
根据错误提示缺什么补什么就可以了,注意jar包勿重复。
第二步,配置web.xml文件,如下(重要的地方已标记):<context-param><param-name>contextConfigLocation</param-name><param-value>classpath:/applicationContext.xml</param-value> </context-param><listener><listener-class>org.springframework.web.context.ContextLoaderListener </listener-class></listener><!-- Character Encoding filter --><filter><filter-name>encodingFilter</filter-name><filter-class>org.springframework.web.filter.CharacterEncodingFil ter</filter-class><init-param><param-name>encoding</param-name><param-value>UTF-8</param-value></init-param></filter><filter-mapping><filter-name>encodingFilter</filter-name><url-pattern>/*</url-pattern></filter-mapping><servlet><servlet-name>CXFServlet</servlet-name><servlet-class>org.apache.cxf.transport.servlet.CXFServlet</servlet-c lass><load-on-startup>1</load-on-startup></servlet><servlet-mapping><servlet-name>CXFServlet</servlet-name><url-pattern>/webservice/*</url-pattern></servlet-mapping>上述标记的地方,第一处是spring配置文件路径;第二出是wsdl地址内容;第三步,编写接口类与实现类,注意注解接口类@WebServicepublic interface SendService {public boolean sendOA(@WebParam(name="param")String param);public boolean sendOrg(OrgEntity org);}实现类@WebService(endpointInterface="com.service.SendService",serviceName=" sendService")public class SendServiceImpl implements SendService{public boolean sendOA(String param) {System.out.println("-------sendOA---------param:"+param);if(param.equals("zhoujian")){return true;}return false;}public boolean sendOrg(OrgEntity org) {System.out.println("-------sendOrg--begin-------");return true;}}第四步,Spring配置文件“jaxws:client”该标签可以不必写,访问时可以手动拼接该url 第五步,发布,直接部署到服务器,访问:2.Xfire方式据说xfire方式已经很老了,但个人感觉,xfire方式很简单且容易配置,不知为啥过时了,也没感觉cxf、axis2哪里先进,我当时卡在cxf与was搞不定时想尝试xfire方式被周经理给拒绝了。
Oracle直接调用webservices
Oracle直接调用webservicesO racle直接调用web servicesOracle调用C#的WebServer实质上就是java调用C#的WebServerJA V A调用webservice,需要注意的地方:1. 服务器未能识别HTTP 标头SOAPAction 的值:症状一:Web Service + /doc/a315491386.html, 应用程序部署到服务器默认目录中,在IE中用http://<服务器地址>/<程序目录名>/<默认启动页面名>发生“服务器未能识别HTTP 标头SOAPAction 的值”错误。
症状二:在Java平台上调用.NET Web Service的服务时,出现"服务器未能识别HTTP 标头SOAPAction 的值"。
症状三:在Java平台下调用.NET WEB Service,出现数据时有时无。
解决对策:给.NET的WebService类(即.asmx文件下的类)添加属性[SoapDocumentService(RoutingStyle=SoapServiceRoutingStyle. RequestElement)]小知识:什么是SoapAction?它在WSDL中有何作用?SOAPAction HTTP request header被用来标识SOAP HTTP请求的目的地,其值是个URI地址。
SOAP发送并不限制格式、URI特征或其必须可解析,那么在这种情况下,发送一个HTTP SOAP请求时,其HTTP客户端必须使用/指明SOAPAction HTTP request header。
SOAPAction header的内容可以被用在服务端,诸如:防火墙适当的过滤基于HTTP的SOAP 请求消息等场景。
SOAPAction header的值为空串("")表示SOAP消息的目的地由HTTP请求的URI标识;无值则表示没有指定这条消息的目的地。
Oracle WebService Manager 12.1.2 REST客户端安全化指南说明书
Securing REST Clients using Oracle WebService Manager 12.1.2August 2013Step-by-Step Instruction GuideAuthor: Prakash YamunaOracle CorporationTable of Contents1 Getting Started (4)1.1 Pre-Requisites (4)1.2 Install Locations (4)1.3 Topology (4)1.4 Install & Topology Verification (4)1.4.1 Verify all Product Consoles are reachable (5)2 Usecase (5)3 Create “rest-saml-idprop” Application (7)3.1 Create “service” Project (8)3.2 Create “HelloWorldIdPropSample” POJO class (9)3.3 Add method “hello” to the POJO Class (10)3.4 Add Jersey Libraries via Project Properties (11)3.5 Create a RESTFul Service from the POJO Class (13)3.6 Using @Context and SecurityContext (16)3.7 Modify the Servlet name (17)3.8 Secure the REST service in JDeveloper (18)3.9 Create a Deployment Profile and WAR (19)3.10 Deploy the REST service “helloworld.war” to WLS using EM (22)3.11 Validate the REST service (25)4 Create REST client (28)4.1 Create a new “rest-client” Web project (28)4.2 Create “HelloWorld Servlet” (32)4.3 Create REST Client Proxy (35)4.4 Secure the REST Client Proxy (38)4.5 Modify the HelloWorldServlet to call the RESTful Client Proxy (41)4.6 Modifying the REST Client Security Policy (42)4.7 Secure the HelloWorldServlet web application (43)4.7.1 Select Authentication Mechanism (43)4.7.2 Add Security Constraints (44)4.7.3 Final “web.xml” for the HelloWorldServlet (45)4.7.4 Create weblogic.xml deployment descriptor (46)4.7.5 weblogic.xml for the HelloWorldServlet (48)4.8 Create Deployment Profile and WAR for the Client (49)5 Create users in weblogic using WLS Console (51)6 Create credentials in credential store to be used by REST Client (54)6.1 Create “oracle.wsm.security” CSF map (54)6.2 Create “weblogic-csf-key” under the oracle.wsm.security CSF map (55)6.3 Mapping newly created “testuser” in weblogic.xml (57)7 Deploy the client application to Weblogic using EM (57)8 Testing (60)1Getting Started1.1Pre-RequisitesThis How-To guide assumes that you have already downloaded and installed the followingproducts/components.∙Download and install FMW 12.1.2 – this includes Oracle WebService Manager 12.1.2.∙Download and install Database 11.2.0.3∙Download JDeveloper 12.1.2∙JDK7 is preinstalled1.2Install LocationsThis How-To does not provide installation instructions for the pre-requisite components.You can consult the following how-to for installing FMW 12.1.2:/technetwork/middleware/webservices-manager/owsm-installation-12c-1971739.pdfYou can also consult the appropriate Install guides. OWSM documentation can be found at:/middleware/1212/owsm/index.htmlThe components in this How-To are installed at the following locations:1.3TopologyThis How-To uses a single domain. The domain includes a single weblogic server. The steps provided in this How-To can vary based on Topology.∙Domain Name: base_domain∙Weblogic Server: AdminServer1.4Install & Topology VerificationStart the Admin ServerNavigate to: D:\oracle_12.1.2\user_projects\domains\base_domain\bin1.4.1Verify all Product Consoles are reachableGo to the product console URL and provide username as weblogic and password as appropriate to your installation.2UsecaseDescriptionThis How-To describes how to secure a JAX-RS REST service and client using OWSM 12.1.2.HelloWorldIdPropSample(REST service)ObjectiveThe main objective of this How-To:∙How to build a simple REST services using JAX-RS technology in JDeveloper∙How to secure a simple HelloWorld JAX-RS application using OWSM Policy in JDeveloper∙Deploy and Run the HelloWorld JAX-RS application to a Weblogic domain∙How to build a simple HelloWorld REST Client Proxy for the HelloWorld REST service using JAX-RS technology in JDeveloper∙How to secure the HelloWorld REST Client Proxy using OWSM Policy in JDeveloper∙Testing end to end.3Create “rest-saml-idprop” ApplicationThis application will contain two projects. One for the REST service and another for the REST Client.NOTE: Ignore the name of the sample (I plan to have another How To that describes identity propagation using SAML)Provide the necessary information for creating the Application as shown in the screenshot below.Click “Next”3.1Create “service” ProjectCreate a project called “service” in JDeveloper as show in the screenshot below. This project will be used to build the REST service.Click “Next”Click “Next”Click “Finish”3.2Create “HelloWorldIdPropSample” POJO class Create a POJO class under the “service” Project.Click “OK”3.3Add method “hello” to the POJO Class3.4Add Jersey Libraries via Project PropertiesWe will use APIs that require Jersey Libraries in the Project. Add these Libraries via the Project Properties. This can be achieved by right-clicking on the “service” project and clicking on the “Project Properties” menu item as shown in the screenshot below.Click on “Add Library” button in the screenshot above. This will pop up the “Add Library” dialog below.Click “OK”Click “OK”3.5Create a RESTFul Service from the POJO ClassYou can create a RESTFul Service by right clicking on the POJO Class and clicking on “Create RESTful Service” menu item as shown below.For the purposes of this How-To select the media type as text/plain by Clicking “Produces”.Click “OK”.Click “Next”Click “Finish”3.6Using @Context and SecurityContext**************************************************************************************NOTE: Modify the code to use the @Context annotation to get the authenticated user after creating a RESTful Service.Pay special attention to the import statements.import java.security.Principal;import javax.ws.rs.core.Context;import javax.ws.rs.core.SecurityContext;Also note that that the method “hello” has a Path annotation.WARNING: If you add the @Context parameter before creating the RESTful service – then you will not be able to use the “Create RESTFul Service” menu item as shown above to create a RESTful servic e. So the sequence described above is important.While you can add the @Path annotations, etc manually the “Create RESTful Service” converts the project to a Web Project and adds the web.xml deployment descriptor – which allows you to secure the RESTful Service.NOTE: There are other ways of programming this sample in JDeveloper. The sequence shown here is important only for this particular scenario.3.7Modify the Servlet nameWhen you create a RESTful service – Jdeveloper automatically modified the project to be a Web Project and adds web.xml. However the default servlet name is called “jersey”. Modify the servlet name and provide a more user friendly name as shown below.3.8Secure the REST service in JDeveloperYou can secure a REST service by right-clicking on “web.xml” and selecting the “Secure RESTful Application” menu item as shown below.You can search for a policy of a particular name in JDeveloper as shown below.Click “OK”Securing a RESTful Service will create a wsm-assembly.xml document as shown below.3.9Create a Deployment Profile and WARClick “OK”Click “OK”Click “Next”Click “Finish”3.10Deploy the REST service “helloworld.war” to WLS using EMClick “Webogic Domain->Deployments” from the RHS menu in the screenshot above.Click “Next”Click “Next”Click “Next”Click “Deploy”Click “Close”3.11Validate the REST serviceExpand the “helloworld” node in the LHS and click on the helloworld (AdminServer) instance as shown in the screenshot below. This will open up the Application Home page in EM. Select “Application Deployment->Web Services” menu item on the RHS as shown in the below screenshot.4Create REST client4.1Create a new “rest-client” Web projectCreate a new Project for the client as shown in the screenshot below.We will create “Web Project” since the client will act as a JEE Client.Click “OK”.Click “Next”Click “Next”Click “Next”Click “Next”Click “Next”Click “Finish”4.2Create “HelloWorld Servlet”Create a HTTPServlet which will act as the REST Client. You can create a Servlet by right-clicking on the project and selecting “New->HTTPServlet” from the context menu.Click “Next”Click “Next”Click “Next”Click “Finish”4.3Create REST Client ProxyYou can create a REST Client Proxy by right-clicking on the project and selecting “New->From Gallery” as shown below.Select the “Web Services” category from the “New Gallery” dialog on the Left Hand side. This will show all the options related to Web Services on the Right hand side. Select “Restful Client and Proxy” from RHS to create a REST client as shown in the screenshot below.Click “OK”Click “Next”To create a RESTful Proxy Client – you will need the WADL of the REST service.NOTE: Either you need to save the WADL of the service a priori or have the RESTful Service running in order to be able to provide the WADL url.Click “Next”By default JDeveloper generates a classname for the Proxy client. Provide a more user friendly name in this dialog as shown in the screenshot above.Click “Next”Select the OWSM policy you want to use to secure the client and click “Next”.IMPORTANT: Although JDeveloper provides you a policy selection dialog to select the OWSM policy in the REST Client Proxy creation wizard – there is a bug in JDeveloper - due to which the Policy is not added to the Client Proxy code. You will need to manually add the following lines of code show below.4.4Secure the REST Client ProxyPay special attention to the import statements in the code snippet above.import oracle.wsm.metadata.feature.AbstractPolicyFeature;import oracle.wsm.metadata.feature.PolicyReferenceFeature;import oracle.wsm.metadata.feature.PolicySetFeature;import oracle.wsm.metadata.feature.PropertyFeature;import oracle.wsm.security.util.SecurityConstants;import weblogic.jaxrs.api.client.Client;Few other things to note:∙The oracle/wss_http_token_client_policy – provides basic auth functionality and requires a username/password that needs to be sent to the client.∙For the username/password – we will store it in the credential store. The key to the entry will be called “weblogic-csf-key”under “oracle.wsm.security” CSF map.4.5Modify the HelloWorldServlet to call the RESTful Client ProxyFor purposes of brevity I have provided the code snippet for how to call the generated RESTful Proxy Client code above.4.6Modifying the REST Client Security PolicyOne can modify the OWSM client policy used to secure the client by right-clicking on the RESTful Client Proxy class and selecting “Secure RESTful Client” from the context menu as shown below.You can use the above dialog to make a different policy selection if required. In this case I did not modify the policy since I had already selected the correct policy.NOTE: Any changes you do in terms of selecting a different policy via this dialog will be effective and the corresponding code in the RESTful Proxy Client will be modified.4.7Secure the HelloWorldServlet web applicationOpen web.xml for the “rest-client” Project in JDeveloper and add an entry for the HelloWorldServlet as shown below.4.7.1Select Authentication MechanismSelect “HTTP Basic Authentication” mechanism.4.7.2Add Security Constraints4.7.3Final “web.xml” for the HelloWorldServlet4.7.4Create weblogic.xml deployment descriptor Right click on the project and select “New->From Gallery”.Click “OK”Click “Next”Click “Next”Click “Finish”4.7.5weblogic.xml for the HelloWorldServlet4.8Create Deployment Profile and WAR for the Client Click “OK”Click “OK”Click “Next”。
OracleEBS-WebService开发笔记

Configure
JDK1.6 安装JDK1.6,略
Tomcat5.5 1.解压Tomcat。
2.配置好JAVA环境变量。有两方法:
方法一:在系统环境变量,设置JAVA_HOME、CLASS_PATH变量。
在window的命令行,执行 SETX JAVA_HOME F:\ProgramFiles\WebServiceTools\Java\jdk1.6.0_25 /M SETX CLASSPATH .;%JAVA_HOME%\lib\tools.jar;%JAVA_HOME%\lib\dt.jar; /M SETX PATH "%JAVA_HOME%\bin;%PATH%;" /M
Web Service For R12
PLSQL Deploy WebService Create the Package Create the WebService Deploy the WebService
Integration Repository
Oracle XML Gateway
Other Notes
Concept XML SOAP WSDL UDDI REST Web Service
Web Service For Axis1.4
Download Configure
JDK1.6 Tomcat5.5 Axis1.4 Test a SOAP Endpoint Test a JWS Endpoint Axis1.4 for Development Instant Deployment Custom Deployment RMI Cancel Deployment Handle Chain Transfer Object WSDL2Java
EBS快速业务应用服务架构平台简介

多维数 据模型 支持
业务过 程分析
仪表盘 和丰富 决策图 表支持
EBS快速业务应用服务平台—知识管理
面向业务 和人员 的动态知 识管理
灵活的知 识搜集与
分类
知识管理
高效的全 文检索服
务
安全的知 识储存机
制
面向业务 的知识管 理和应用
EBS快速业务应用服务平台—数据交换
SDK支持 异步数据和流程交换 基于MAS的数据交换网络/适配器
EBS快速业务应用服务平台—业务模型基础
组织机构 业务授权 业务流程 业务表单 业务数据
手工业务系统
组织权限模型 业务流程模型 业务界面模型 业务概念模型 业务数据模型
EBS业务架构平台
业务模型
业务门户 Web页面 工作任务 业务功能 数据处理 委托代理
管理信息系统
EBS业务架构平台在业务管理软件领域中,采
终端桌面
PC Mobile
Ipad PDA
……
浏览器
IE Google
……
EBS业务建模是一种全新的业务配置、开发、应用和维护模式,实现业务快速配置、开发、应用和维护,灵活调 整、业务驱动、技术无关。
EBS业务建模是以业务描述而非代码为核心来构建信息系统,业务建模使信息系统成为一种技术无关的描述性资 源,在构建、发布和运行上具有技术无关性,EBS业务建模提供了真正高效的开发、维护、管理模式,使企业能够实 现随需而变、自我掌控。
EBS快速业务应用服务架构平台简介
目录
一、EBS业务平台构架简介 二、EBS业务平台架构能力 三、EBS Studio与业务建模 四、EBS部署和运行管理
EBS快速业务应用服务平台定位
基于Web的复杂业务 业务高度整合和协同 高效开发、灵活部署
调用OracleEBSWebservice常见的几个错误

调用OracleEBSWebservice常见的几个错误Fault from server : Missing wsse:Security in SOAP Header.Cause: This error is thrown by server if SOAP request does not contain a Web Service Security Header in SOAPHeader section of SOAPEnvelope.Resolution: Pass a valid Web Service Security Header, containing valid Username token, in SOAPHeader.(如果是SoapUI测试的话,也需要设置WSS-Password Type为PasswordText)Fault from server : Policy requires authentication token.Cause: This error is thrown by server when either Web Service Security Username Token in Security header is missing or is invalid.Resolution: Pass a valid Web Service Security Username Token in Security header.Fault from server : The security token could not be authenticated or authorizedCause: This error is thrown by server when username or(/and) password in Web Service Security Username T oken is invalid.Resolution: Pass valid oracle applications username and password in Web Service Security Username T oken.Fault from server : User not authorized to execute serviceCause: This error is thrown by server when user given in Web Service Security Username Token is not authorized to execute the Web Service function being invoked in SOAP Request.Resolution: Create grant at user, role or global level fromIntegration Repository UI to authorize the the user to execute Web Service function. Clear cache from Functional Administrator Responsibility.Fault from server : Responsibility key is not validCause: This error is thrown by server when Responsibility Key passed in Responsibility Header in SOAHeader is invalid.Resolution: Server expects a valid Responsibility Key in Responsibility Header in SOAHeader.Use this query to find valid Responsibility Keys for a particular user:-Select resp.RESPONSIBILITY_KEY, grp.SECURITY_GROUP_KEY, APP.APPLICATION_SHORT_NAMEFrom FND_USER_RESP_GROUPS furg, FND_USER usr, fnd_responsibility_vlresp,FND_SECURITY_GROUPS grp,FND_APPLICATION APPwhere er_id=er_idand furg.RESPONSIBILITY_ID=resp.RESPONSIBILITY_IDand furg.SECURITY_GROUP_ID=grp.SECURITY_GROUP_IDandfurg.RESPONSIBILITY_APPLICATION_ID=APP.APPLICATION_ID and er_name= <username>Fault from server: Responsibility Application Short name is not valid.Cause: This error is thrown by server when Application Short name in RespApplication Header in SOAHeader is invalid.Resolution: Server expects a valid Application short name in RespApplication Header in SOAHeader. Use query given above to find a valid Application short name.Fault from server: Security Group Key is not valid.Cause: This error is thrown by server when Security Group Key in SecurityGroup Header in SOAHeader is invalid.Resolution: Server expects a valid Security Group Key in SecurityGroup Header in SOAHeader. Use query given above to find a valid Security Group Key.Fault from server: NLS Language is not valid.Cause: This error is thrown by server when NLS Language in NLSLanguage Header in SOAHeader is invalid.Resolution: Server expects a valid NLSLanguage value in NLSLanguage Header in SOAHeader. Use the following query to find a valid NLSLanguage:S ELECT NLS_LANGUAGEFROM FND_LANGUAGESWHERE INSTALLED_FLAG in (‘B’,'I’);Fault from server: Service is not deployed.Cause: This error is thrown by server when invoked service is generated but not deployed.Resolution: Deploy this service from Integration Repository UI.Fault from server: Error occured while service was processing.Cause: This error is thrown by server when a internal error happens in Service Provider.Resolution: View SOAP Response via SOA Monitor UI. It has a error trace of the error happened in server. This should give afair idea of what went wrong.。
ebs 的webservice的职责
英文回答:The Webservice of EBS is entrusted with data access and interaction functions to enable other systems and applications to operate and interact with EBS systems in a web—based manner. This includes providing interfaces such as querying, adding, modifying, deleting data and supporting data import and export functions. These interfaces allow other systems to easily exchange and share data with the EBS system, thus enabling data connectivity. This is in line with the routes, guidelines and policies of our party, promotes information—sharing, resource integration, and improved efficiency and accessibility in data management, and is conducive to the process of information development in our country.EBS的webservice被赋予了数据访问和交互的职责,以促使其他系统和应用能够通过web方式对EBS系统进行数据操作和交互。
这包括提供查询、新增、修改、删除数据等接口,并支持数据的导入和导出功能。
这些接口使得其他系统能够便捷地与EBS系统进行数据交换和共享,从而实现数据的互联互通。
C# Webservice创建、发布、部署
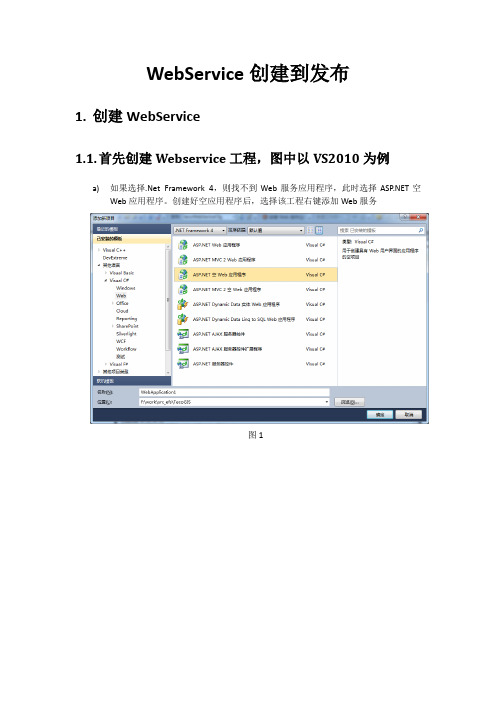
1.
1.1.
a)如果选择.Net Framework 4,则找不到Web服务应用程序,此时选择空Web应用程序。创建好空应用程序后,选择该工程右键添加Web服务
图1
图2
b)如果读者不想使用此方法,则选择.NET Framework 3.5、3.0、2.0,则会出现 Web服务应用程序
图1
图2
图3
2.
2.1.
2.2.
首先,安装配置IIS,这里不做介绍。
打开IIS管理器,选择网站->右键添加网站
注:(1)网站名称,随便输入,应用池选择,选择程序运行需要的.Net FrameWork版本
(2)物理路径,选择刚刚发布程序的路径
(3)绑定,修改端口,端口不能其他程序使用过,主机名,如果已经申请域名并且绑定了
1.2.
c)WebService1.asmx文件中的代码
namespaceWebApplication1
{
///<summary>
///WebService1的摘要Service(Namespace ="/")]// webservice命名空间
本机IP,则输入域名或主机名,如果没有此项不需要填写,发布完成后调用时直接用localhost或127.0.0.1或者本机IP(本机联网),如果是远程服务器,输入远程服务器IP
访问方式为:http://127.0.0.1:8008/TecoService.asmx或http://localhost:8008/TecoService.asmx
publicclassWebService1: System.Web.Services.WebService
Oracle直接调用web services
O racle直接调用web servicesOracle调用C#的WebServer实质上就是java调用C#的WebServerJA V A调用webservice,需要注意的地方:1. 服务器未能识别HTTP 标头SOAPAction 的值:症状一:Web Service + 应用程序部署到服务器默认目录中,在IE中用http://<服务器地址>/<程序目录名>/<默认启动页面名>发生“服务器未能识别HTTP 标头SOAPAction 的值”错误。
症状二:在Java平台上调用.NET Web Service的服务时,出现"服务器未能识别HTTP 标头SOAPAction 的值"。
症状三:在Java平台下调用.NET WEB Service,出现数据时有时无。
解决对策:给.NET的WebService类(即.asmx文件下的类)添加属性[SoapDocumentService(RoutingStyle=SoapServiceRoutingStyle.RequestElement)]小知识:什么是SoapAction?它在WSDL中有何作用?SOAPAction HTTP request header被用来标识SOAP HTTP请求的目的地,其值是个URI地址。
SOAP发送并不限制格式、URI特征或其必须可解析,那么在这种情况下,发送一个HTTP SOAP请求时,其HTTP客户端必须使用/指明SOAPAction HTTP request header。
SOAPAction header的内容可以被用在服务端,诸如:防火墙适当的过滤基于HTTP的SOAP 请求消息等场景。
SOAPAction header的值为空串("")表示SOAP消息的目的地由HTTP请求的URI标识;无值则表示没有指定这条消息的目的地。
发现本机Oracle 10g中含有UTL_DBWS包准备试一下下载文件:dbws-callout-utility-10131.ziploadjava导入jar时需加入绝对路径导入用户为Sys用户,其他普通用户导入时某些地方权限不足oralce官方提供的方法调试成功,但是在读取返回值l_return := l_xmltype_out.extract('//return/text()').getNumberVal();经过以xmltype类型插入数据库中结果为<HelloWorld1Response xmlns="/"><HelloWorld1Result>1</HelloWorld1Result></HelloWorld1Response>此模式不能被认为是有效的Xml格式,所以读取失败。
EBS中发布WEBSERVICE接口的方法
在Oracle EBS二次开发中,PL/SQL程序是开发人员使用频率最高的开发语言,同时也是大家最容易掌握的工具之一了,而我们也很希望将自己编写的PL/SQL 程序发布为Web服务来提供给客户端程序使用,同时也可以实现和外围系统的集成,有了irep_parser这个工具,我们就可以将自己编写的PL/SQL 程序发布到Oracle Integration Repositoy中。
Oracle Integration Repositoy中集成接口的来源都是Oracle,客户化的程序发布上去的为Custom:下面描述如何将PL/SQL程序接口发布到Oracle Integration Repositoy中作为集成接口供第三方程序集成调用一、给EBS系统打补丁参考如下安装文档:安装文档.docx二、添加客户化应用到Product Family客户化应用设置好之后,它没有归属于任何的产品家族,如我的客户化应用CUX,因此发布在客户化应用下的集成接口在Oracle Integration Repositoy中无法方便的查看,如下图:如果客户化集成接口是组织到自己的应用下就需要先注册一个产品家族,下面将CUX Developer(CUX) 应用注册到CUX Developer(cux_pf)这个产品家族下作为例子进行演示:1,添加产品家族 CUX Developer(cux_pf)--添加产品家族begin-- Call the proceduread_pa_insert_package.insert_ad_pm_product_info(x_product_abbreviation => 'cux_pf',x_pseudo_product_flag => 'N',x_product_family_flag => 'Y',x_application_short_name => NULL,x_product_name => 'CUX Developer',x_product_family_abbreviation => NULL,x_product_family_name => NULL,x_aru_update_date => to_char(SYSDATE,'YYYY-MM-DD HH24:MI:SS'), x_currdate => to_char(SYSDATE,'YYYY-MM-DD HH24:MI:SS'),x_last_updated_by => -1,x_created_by => -1);COMMIT;end;2,注册CUX Developer(CUX)应用到产品家族中--注册CUX应用到产品家族中begin-- Call the proceduread_pa_insert_package.insert_ad_pm_product_info(x_product_abbreviation => 'cux',x_pseudo_product_flag => 'N',x_product_family_flag => 'N',x_application_short_name => 'CUX',x_product_name => 'CUX Developer',x_product_family_abbreviation => NULL,x_product_family_name => NULL,x_aru_update_date => to_char(SYSDATE,'YYYY-MM-DD HH24:MI:SS'),x_currdate => to_char(SYSDATE,'YYYY-MM-DDHH24:MI:SS'),x_last_updated_by => -1,x_created_by => -1);COMMIT;end;3,关联CUX Developer应用到产品家族CUX Developer下--关联CUX应用到产品家族CUX Developer下begin-- Call the proceduread_pa_insert_package.insert_ad_pm_prod_family_map(x_product_abbreviat ion => 'cux',x_product_family_abbreviation => 'cux_pf',x_aru_update_date => to_char(SYSDATE,'YYYY-MM-DD HH24:MI:SS'),x_currdate => to_char(SYSDATE,'YYYY-MM-DDHH24:MI:SS'),x_last_updated_by => -1,x_created_by => -1);COMMIT;end;执行完成后通过下面2条SQL验证是否添加成功,查出3条数据表示添加成功。
Oracle实践之EBS Integrated SOA Gateway实施指南
O RACLE实践EBS I NTEGRATED SOA G ATEWAY 实施指南Author: Sail.Sun(孙帆)Creation Date: 11-Oct-2009Last Updated: 17-May-2011Document Ref: Oracle_Exp_035Version: 1.1Approvals:<Approver 1>Sail.Sun<Approver 2>Document ControlChange RecordReviewersDistributionNote To Holders:If you receive an electronic copy of this document and print it out, please write yourname on the equivalent of the cover page, for document control purposes.If you receive a hard copy of this document, please write your name on the frontcover, for document control purposes.ContentsDocument Control .................................................................................................................. i i 介绍 . (1)概述 (1)内容 (1)(一)Integrated SOA Gateway介绍 (2)(二)Integrated SOA Gateway配置 (6)(三)Integrated SOA Gateway应用 (19)(四)调用Integrated SOA Gateway发布的Web Service (36)(五)Integrated SOA Gateway负载均衡的应用 (71)(六)Integrated SOA Gateway性能测试 (77)(七)错误汇总 (79)(八)参考文档 (81)Open and Closed Issues for this Deliverable (82)Open Issues (82)Closed Issues (82)错误!未找到引用源。
Oracle数据库中的Web服务(ppt 34页)
JPub 生成的
Java 类
JDBC
SOAP 库
XML 分析器
数据库作为 Web 服务提供者
服务使用者
查找/定位 绑定/连接 调用服务/方法
连接、调用 SOAP
获取 WSDL 并绑定
Oracle 应用服务器
托管为 J2EE Web 服务
授权 打包和部署 描述和发布
Oracle 数据库
JDBC
服务实施 (PL/SQL、SQL、
Java …)
JPublisher 简化了 Web 服务
支持 Web 服务外调 – 对于给定的 WSDL,生成 Java 代理类、 PL/SQL 包装程序并加载数据库中的相应文件
支持 Web 服务内调
– 将 PL/SQL 程序包、Java 存储过程、SQL 查询或 DML 语 句作为 Web 服务提供
JDBC 行集 (RowSet) — 各种行集的关系
JDBCRowSet
EJB Servlet
CachedRowSet WebRowSet
FilteredRowSet
Web 服务
JDBC WebRowSet — 示例
//创建一个结果集以填充行集 stmt = conn.createStatement(); rs = stmt.executeQuery("select ..."); OracleWebRowSet wrs = new OracleWebRowSet();
优化的 Java 内存管理: 专用服务器
共享的内存
固定的 SGA
共享池
Java 池
进程内存 UGA
会话空间
PGA 新空间
旧空间
EAS-WebService开发指南
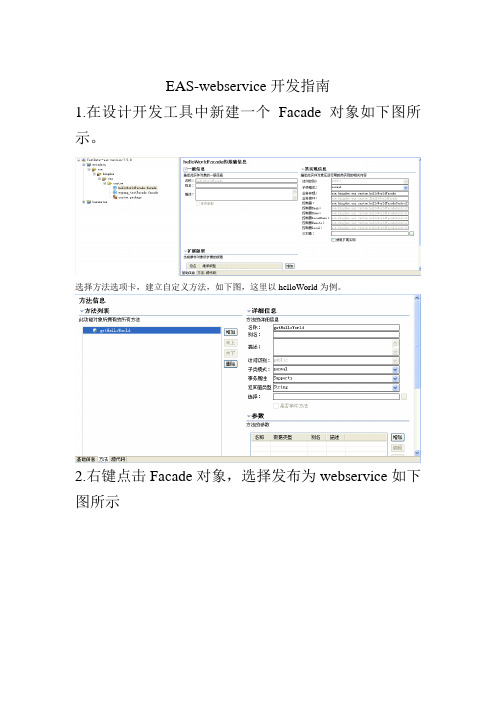
EAS-webservice开发指南1.在设计开发工具中新建一个Facade对象如下图所示。
选择方法选项卡,建立自定义方法,如下图,这里以helloWorld为例。
2.右键点击Facade对象,选择发布为webservice如下图所示在弹出框中选中方法,填写发布目录后点击“完成”按钮如下图此时会在制定路径下生成对应全路径的java类和wsdd描述文件(描述这个java类的相关信息)3.右键点击Facade选择发布(自动生成java代码)如下图所示切换BOS到java视图,刷新主目录,然后将webservice 发布目录中的java类拷贝到对应目录下,最后结果如图所示4.接下来开始写自己的业务逻辑,打开helloWorldFacadeControllerBean,在空白处右键,选择“源代码”->”覆盖/实现方法”此时会在弹出界面中看到先前定义的getHelloWorld方法,选中此方法,点击“确定”编写如下图所示代码5.到此为止已全部开发完成,接下来进行打包。
打包与一般的eas开发打包的区别在于多了一个server\deploy\eas.ear\web.war包,eas打包不在此文档中讲解,在web.war包的WEB-INF文件夹中包含一个classes目录,将编写的类及自动生成的所有相关类的全路径class拷贝到此目录下,然后将先前生成的webservice 发布目录中的helloWorldFacade.wsdd文件拷贝到WEB-INF目录下,并打开helloWorldFacade.wsdd文件,将内容复制到server-config.wsdd文件中6.将制作好的补丁包部署到服务器上,重启服务器7.打开浏览器,输入地址:http://server-ip:port/ormrpc/services,应该可以看到新建的Webservice,右键点击相应的wsdl,选择另存为…,扩展名改为wsdl,就可以下载客户端开发使用的wsdl 文件。
Oracle调用web
Oracle调用web--------------------------------------------------------------------------------1.用途简介为什么要在Oracle中访问WebService?在系统实现中,有时会有直接在数据库端利用触发器、存储过程等方式进行数据传递、分发的业务,而其中可能会涉及一些业务逻辑,为了处理这些业务逻辑,并简单起见,可以直接在触发器或存储过程中调用一些java类或WebService。
2. 准备工作1、首先保证Oracle为完全安装(本文均以10.2g);2、下载对应版本的UTL_DBWS(一个工具包dbws-callout-utility-10131.zip),解压后放到oracle安装目录下的<oracle_install_dir>/sqlj/lib中;3、在命令行中利用loadjava命令(一般安装完jdk或oracle之后就会有)将jar包导入oracle对应的用户中:loadjava -u user/pwd@dbinstance -r -v -f -genmissing dbwsclientws.jar dbwsclientdb102.jar若为SYS用户,命令为:loadjava -u sys/change_on_install -r -v -f -genmissing -s -grant public dbwsclientws.jar dbwsclientdb102.jar3. 步骤说明前面准备工作做好之后,如果未发现UTL_DBWS(可以在plsql中敲入sys.若未有utl_dbws显示,则需要进行初始化),需要运行之前下载的包中dbws-callout-utility-10131\sqlj\lib\ utl_dbws_body.sql及utl_dbws_decl.sql,这样准备工作基本就绪,下面是调用的步骤:1、编写sql函数并发布。
WebService 的创建及发布、部署
WebService 的创建,部署和使用WebService,即Web服务,能使得运行在不同机器上的不同应用无须借助,专门的第三方软件或硬件,就可相互交换数据或集成.第一次选择WebService,是为了替代数据库远程连接.我们都知道当SQL允许远程时,则要打开某一端口.但这一点在我们已经部署好的服务器上,却是不被允许的,于是就选择WebService来代替了.当然现在我们也可以选择WCF来完成.不过这不是我们今天的主题.WebService返回的数据为XML,这是我们都很熟悉的一种数据方式,大大方便了我们的工作当然,WebService给我们带来的好处远不止这些.我不想讲得更多.相信当你能够熟练运用WebService后,你会发现这是一把锋利的宝刃.对于初次接触WebServcie的人来说,长篇理论,不如一个实例来得更实际些,我们更看重的是到底如何能够创建一个WebService并且将其部署,和使用.下面我将逐步的完成一个加减乘除功能的WebServic.开发环境:VS2012IIS环境:WINSERVER2008R2 IIS7.5第一步:打开VS2012,新建空项目,注意选择.NET Framework的版本.这里我选择的是.NET Framework 4新建好项目后,在项目中添加一个WebService项打开这个文件,我们可以看到,代码如下[csharp]view plaincopyprint?ing System;ing System.Collections.Generic;ing System.Linq;ing System.Web;ing System.Web.Services;6.space CalculateService8.{9. /// <summary>10. /// WebService1 的摘要说明11. /// </summary>12.13.14. [WebService(Namespace = "/")]15. [WebServiceBinding(ConformsTo = WsiProfiles.BasicProfile1_1)]16. [ponentModel.ToolboxItem(false)]17. // 若要允许使用 AJAX 从脚本中调用此 Web 服务,请取消注释以下行。