User_Guide
USer Guide Version 1.3.6 客户评论扩展说明书

USER GUIDE Version 1.3.6Table of ContentsAbout the Extension4Feature List42.1 Add Testimonials on Customers Behalf52.2 Allow Customers to Submit Reviews Themselves52.3 Dedicated Page For Customer Testimonials52.4 Quick And Customizable Review Form52.5 Configure Display Settings For Each Testimonial52.6 Configure Customer Testimonials Email Notification Settings62.7 Choose Between Simple Layout And Detail Layout72.8 Disable Some Columns In The Magento Admin Grid72.9 Configure SEO Settings Of Testimonials Page7 Steps to Follow8How to Configure?94.1 General Settings94.1.1 General Configuration94.1.1.1 Enable Module94.1.1.2 Layout Type94.1.2 Simple Layout Settings94.1.3 Dashboard Settings104.1.4 Testimonials Settings114.1.5 Reply Settings124.1.6 Add Testimonials Settings134.1.7 Testimonials List144.1.8 Email Option144.1.9 Search Engine Optimization154.1.10 Footer Settings164.2 Manage Testimonials164.3 Manage Replies/Comments184.3.1 Comment Form194.4 Import Testimonials20Store FrontEnd215.1 Detail Layout215.1.1 Testimonial Page - Testimonial Form215.1.2 Testimonial Form - Slider215.1.3 Testimonial Form - Pop-up Window225.1.4 Testimonial Page - With Image235.1.5 Testimonial Page - Without Image245.1.6 Testimonial Page - Like/Dislike Option255.2 Simple Layout265.2.1 Testimonial Page - Customer Review26 Disclaimer261.About the ExtensionCustomer Reviews&Testimonials Magento2extension allows customers to submit a review and showcase testimonials on the store.Customer reviews give new visitors a reason to purchase from the store without hesitation.This user-friendly extension helps persuade new visitors to purchase products or services in the store by generating more trust through testimonials.This Magento2Customer Reviews& Testimonials extension provides a flexible configuration with different settings of the testimonials list.Adds credibility to your store by displaying consumer reviews on product pages as well as on a separate“Testimonials”page.Allow customers to submit a review or publish on behalf of them.Moreover,it allows the admin to upload an image and show it on the testimonials listing page.Make your reviews look real and attractive by choosing to display all the relevant information and formatting text.Manage testimonials on a handy ing these features testimonial pages become more trustworthy to other customers.2.Feature List●Add Testimonials on Customers Behalf●Allow Customers to Submit Reviews Themselves●Dedicated Page For Customer Testimonials●Quick And Customizable Review Form●Configure Display Settings For Each Testimonial●Configure Customer Testimonials Email Notification Settings●Choose Between Simple Layout And Detail Layout●Disable Some Columns In The Magento Admin Grid●Configure SEO Settings Of Testimonials Page2.1 Add Testimonials on Customers BehalfMagento2Testimonials extension allows you to add testimonials on behalf of your customers.It allows you to add customer reviews coming from online&offline sources such as email, fax, instore feedback forms, etc.2.2 Allow Customers to Submit Reviews ThemselvesWith Magento2customer reviews and testimonials extension,you can allow customers to submit testimonials themselves.It encourages your customers to contribute to the testimonials page by sharing their opinion and experience.2.3 Dedicated Page For Customer TestimonialsMagento2Testimonials extension creates a separate testimonials page to display the customer reviews altogether.It facilitates users in reading all the testimonials in one place and getting to know what your existing customers have to say about different products.You can customize the testimonials page with different layouts and design features for enhanced usability.2.4 Quick And Customizable Review FormCustomer Reviews&Testimonials extension creates a dedicated reviews section on your Magento2product page with a handy‘Write a Review’button that allows your customers to speak out about their experience.They are encouraged to share their valuable thoughts, feedback, and suggestions through quick review forms.●Allow Registered or Guest Users to submit reviews●Set admin approval mandatory for publishing testimonials2.5 Configure Display Settings For Each TestimonialMagento2Testimonials extension empowers you to add every minute detail to customer reviews to make more out of the website.●Enable Customers Review in Testimonial PageIncluding a customer's review on a testimonial page will help you convince your visitors to purchase your products.Additionally,you can display with or without images the reviews of your customers to your visitors.●Upload Customer Images to Gain TrustYou can add a custom image to testimonials to gain trust and credibility.The addition of images makes the testimonials look real and authentic.●Choose to Display Advantages & DisadvantagesBy enabling the‘Advantages’and‘Disadvantages’fields,you can allow customers to report the pros and cons of the purchased product that are displayed on the frontend in green and red colors, respectively.●Enable Dashboard For Customers ReviewsHaving the'Dashboard'fields enabled allows customers to leave reviews by clicking on the"write a review"button.Additionally,the dashboard displays ratings from customers and percentages of those ratings.●Display Comments and Like/Dislike ButtonReviews of customers appear on the testimonials page,which offers visitors the opportunity to view the reviews and to leave comments on any queries they may have.In addition to the ability to leave a positive or negative review,visitors can also click the like or dislike buttons or also visitor or customer can reply on those testimonials.2.6 Configure Customer Testimonials Email Notification SettingsYou can configure email notification settings to ensure flawless communication with your customers. Be informed when a customer submits a review.2.7 Choose Between Simple Layout And Detail LayoutYou can choose between a simple layout and a detailed layout depending upon how briefly or extensively you would like to display your reviews.●Simple Layout:If you prefer brevity,this layout type is for you which conciselydisplays the review with the reviewer’s name only.●Detail Layout:The detailed layout conveys more information about everytestimonial and displays the review,the reviewer’s name,image,ratings,review heading, reply from the store, comments, like/dislike button, etc.2.8 Disable Some Columns In The Magento Admin GridYou can also disable these columns if you need:Likes,Dislikes,Emails,and Store View and enable them back at any time.2.9 Configure SEO Settings Of Testimonials PageYou can configure the ON-page SEO of the dedicated testimonials page that showcases all the testimonials.Add a Meta title,description,and keywords,URL identifier,and URL Suffix to ensure the page appears in search engine result pages.3.Steps to FollowStep 1:Install the Extension - See the installation guideStep 2:Set the Configuration - Set the general configurationsStep3:Manage Testimonials-Manage the testimonial attributes according to the requirementStep4:Manage Replies/Comments-Manage the replies/comments according to the requirementStep 5:Import Testimonials - Import the testimonials in a CSV fileStep3.1:Add new Testimonial-Add and manage all the requirements in the testimonial formStep4.1:Manage replies/comment grid-Edit and delete all the comments/replies in a gridStep 5.1:Select File to Import - Upload a testimonial CSV File4.How to Configure?4.1 General SettingsOn the admin panel sidebar,go to FME EXTENSIONS and click Customer Review and Testimonials Configurations. Here you will find the following settings:4.1.1 General Configuration4.1.1.1 Enable ModuleSelect‘Yes’or‘No’to Enable/Disable the module4.1.1.2 Layout Type·Select any one layout type:●Detail Layout●Simple Layout4.1.2 Simple Layout Settings●Enable Pagination:Select ‘Yes’ or ‘No’ to Enable/Disable the pagination●Number of Testimonial Per Page:Specify the total number oftestimonials that you want to display on one page e.g. 7●Number of Character Per Testimonial:Specify the total number ofcharacters per testimonials e.g. 5004.1.3 Dashboard Settings●Enable Dashboard:Select‘Yes’or‘No’to Enable/Disable the dashboard●Main Header:Provide header for the testimonial page e.g.Customer Reviews●Button Name:Enter the name of the button e.g.Write a Review●Review Note:Enter a review note e.g.Share your thoughts with other customers4.1.4 Testimonials Settings●Enable Admin Response:Select‘Yes’or‘No’to Enable/Disable theadmin response●Response Heading:Enter a heading/title for the admin response e.g.Response from store●Enable Helpful Heading:Select‘Yes’or‘No’to Enable/Disable thehelpful heading●Helpful Heading:Enter helpful heading/title e.g.People found this helpful●Review Note:Enter a review note e.g.Was this review helpful?●Enable Reply:Select‘Yes’or‘No’to Enable/Disable the reply option●Show Comments:Select‘Yes’or‘No’to Show/Hide the comments●Show Advantages:Select‘Yes’or‘No’to Show/Hide the advantages●Show Dis-Advantages:Select‘Yes’or‘No’to Show/Hide thedis-advantages4.1.5 Reply Settings●Reply Label Option:Enter a title/label for the reply option e.g.LeaveComments●Button Option:Enter a title/label for the button option e.g.Add Comment4.1.6 Add Testimonials Settings●Customers Allowed:Select‘No’to dis-allow customers or specify heallowed customers who can publish testimonials:○Guests○Registered●Form Type:Select any of the following testimonials forms:○Pop Up○Sliding●Need Admin Approval For Testimonial:Select‘Yes’or‘No’to Enable/Disableapproval by admin once testimonials are submitted●Need Admin Approval For Comments:Select‘Yes’or‘No’to Enable/Disableapproval by admin once comments are submitted●Button Name:Enter a text for testimonials submission button e.g.AddTestimonials●Response Message:Enter a text for testimonial publishing message e.g.Testimonials Successfully Added4.1.7 Testimonials List●Page title:Enter title for testimonials listing page e.g.Testimonials●List Heading:Enter a heading for the testimonial listing page e.g.What OurCustomers Say!●Meta Keywords:Enter the meta keywords●Meta Description:Enter a meta description4.1.8 Email Option●Send Emails To Enter an email address where testimonial submissionsinformation will be delivered e.g.*************●Email Sender:Select email-sender from the following:○General Contact○Sales representative○Customer support○Custom Email 1○Custom Email 2●Email Template:Choose an email template.An email template is chosen basedon theme fallback when the "Default" option is selected.○Email Template (Default)○New Pickup Order○New Pickup Order For Guest●Email Subject:Enter the subject of the email for submissions4.1.9 Search Engine Optimization●SEO URL Identifier:Specify URL identifier●URL Suffix:Provide URL suffix e.g..html4.1.10 Footer Settings●Footer Title:Specify the title for the footer link4.2 Manage TestimonialsAt the back end go FME EXTENSIONS>Manage Testimonials.Here you will find the list of all testimonials in your store.You can also Edit the testimonials here as highlighted below. Click on the Add New Testimonial button to continue.Here you have to provide the following information:●Testimonial Summary:Enter a summary of the testimonial●Name:Enter the name of the company●Email:Enter an email address of the company●Advantage:Enter a few advantages of the company●Dis-Advantage:Enter a few disadvantages of the company●Status:Option to Enable/Disable the testimonial●Image:Upload an image with the testimonial●Store View:Specify which store view the testimonial will be displayed on ●Review:Enter reviews about the company●ADMIN AREA○Admin Comments:Enter admin comments to show on the frontend4.3 Manage Replies/CommentsAt the back end go FME EXTENSIONS>Manage Replies/Comments.Here you will find all the replies/comments in a grid.You can also Edit or Delete any of them here as highlighted below.4.3.1 Comment FormHere you need to edit the comment of the following information:●Testimonial ID:Displays the testimonial id of the customer●Contact Name:Displays contact details of the customer●Comment:Enter a reply message for your customers●Email:Enter the customer’s email address●Status:Set “Yes” or “No” to Enable/Disable the status●Posting Date:Enter the posting date of the comment4.4 Import TestimonialsAt the back end go FME EXTENSIONS>Import Testimonials.Here you will find the option to import testimonials in the CSV file.You can select the Choose File button and upload the file in CSV format and click on the import button.The sample file can also be downloaded from the import testimonial page.5.Store FrontEnd5.1 Detail Layout5.1.1 Testimonial Page - Testimonial FormOn the dashboard,users will find a testimonial form when they click"Write a Review". By filling those requirements, users can post their testimonial on the website.5.1.2 Testimonial Form - SliderWhen a customer clicks the"Write a Review"button,a testimonial form slides into view.5.1.3 Testimonial Form - Pop-up WindowWhen the "Write a Review" button is clicked, a pop-up window will appear with the testimonial form.5.1.4 Testimonial Page - With Image5.1.5 Testimonial Page - Without Image5.1.6 Testimonial Page - Like/Dislike Option5.2 Simple Layout5.2.1 Testimonial Page - Customer Review6.DisclaimerIt is highly recommended to back up your server files and database before installing this module.No responsibility will be taken for any adverse effects occurring during installation.It is recommended you install on a test server initially to carry out your own testing.。
猎鹰9号火箭用户指南falcon9 usersguide rev 2.0

4.
5.
Revision 2
© 2015 Space Exploration Technologies Corp. All rights reserved.
2
Falcon User’s Guide 5.2 Electrical Interfaces 5.2.1 Connectivity during Payload Processing and on Launch Pad 5.2.2 Falcon-to-Payload Command Interface 5.2.3 Timing Services Interface Compatibility Verification Requirements 37 37 39 40 40 41 41 41 43 44 46 47 47 48 48 48 49 50 51 53 53 53 54 57 58 58 59 59 60 60 60 61 61 61 61 61 61 62 6TABLE OF CONTENTS
1. Introduction 1.1 User’s Guide Purpose 1.2 Company Description 1.3 Falcon Program Overview 1.4 Falcon Launch Vehicle Safety 1.5 Falcon Reliability 1.6 Pricing Vehicles 2.1 2.2 2.3 2.4 2.5 Falcon 9 Vehicle Overview Structure and Propulsion Retention, Release and Separation Systems Avionics, and Guidance, Navigation and Control Coordinate Frame 5 5 5 6 6 7 9 10 10 10 12 12 12 14 14 14 15 16 16 16 16 17 17 18 18 18 19 19 21 23 26 27 30 31 32 32 34 34 34 36
userguide
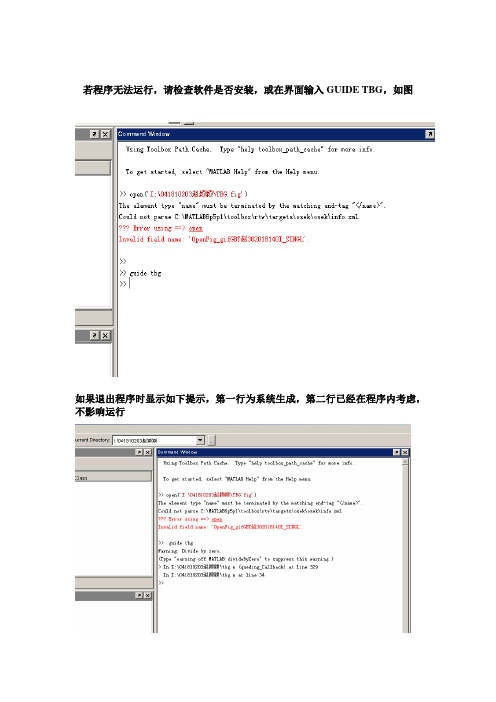
若程序无法运行,请检查软件是否安装,或在界面输入GUIDE TBG,如图
如果退出程序时显示如下提示,第一行为系统生成,第二行已经在程序内考虑,不影响运行
使用方法
在对话框中由用户填入:
1)计算必需的物理量(注意与给定的单位相符)
2)选择模型类别
3)选择简单力类型(注意为单选框)
4)在选择简单力类型(轴力、分布力、集中力、集中力偶、扭矩)中给出
力的大小、作用点(注意有正负区分,具体见下图)
5)选择是否在原有图形上叠加(此法可用于多个力作用于梁上的计算)
6)检查输入无误后按确定。
左侧图中显示轴力、剪力、弯矩、扭矩、端截
面转角、挠度等二维图形及杆件能量E。
7)在编辑菜单中退出程序或选择重复程序继续运行。
8)图面控件功能:六个图显示为轴力、剪力、扭矩、弯矩、端截面转角、
挠度,FILE菜单中有帮助help、重启reset、示例数据data(六组)、版权、背景音乐backgroudmuisc(3首肖邦原曲)、退出exit等功能
谢谢使用
------041810203
赵颖颖。
罗莫(ROHM)产品用户指南说明书
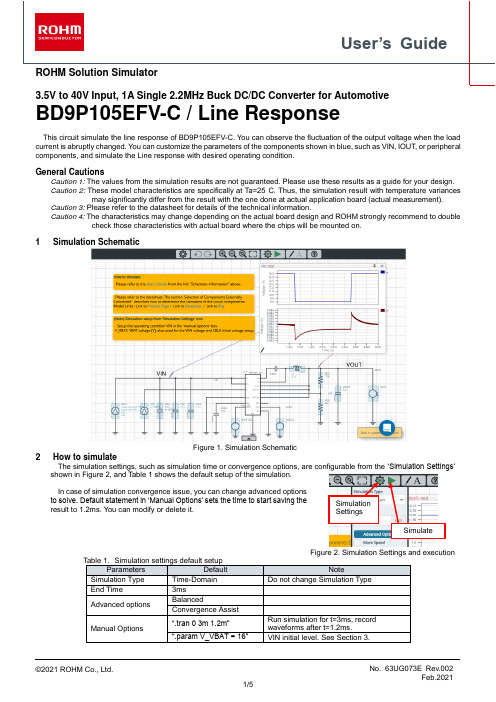
User’s GuideROHM Solution Simulator3.5V to 40V Input, 1A Single 2.2MHz Buck DC/DC Converter for AutomotiveBD9P105EFV-C / Line ResponseThis circuit simulate the line response of BD9P105EFV-C. You can observe the fluctuation of the output voltage when the load current is abruptly changed. You can customize the parameters of the components shown in blue, such as VIN, IOUT, or peripheral components, and simulate the Line response with desired operating condition.General CautionsCaution 1: The values from the simulation results are not guaranteed. Please use these results as a guide for your design. Caution 2: These model characteristics are specifically at Ta=25°C. Thus, the simulation result with temperature variancesmay significantly differ from the result with the one done at actual application board (actual measurement).Caution 3: Please refer to the datasheet for details of the technical information.Caution 4: The characteristics may change depending on the actual board design and ROHM strongly recommend to doublecheck those characteristics with actual board where the chips will be mounted on.1 Simulation SchematicFigure 1. Simulation Schematic2 How to simulateThe simulation settings, such as simulation time or convergence options, are configurable from the ‘Simulation Settings’ shown in Figure 2, and Table 1 shows the default setup of the simulation.In case of simulation convergence issue, you can change advanced options to solve. Default statement in ‘Manual Options’ sets the time to start saving the result to 1.2ms. You can modify or delete it.Figure 2. Simulation Settings and execution3 Simulation Conditions3.1 How to define VIN voltage (VBAT initial voltage and VEN setting)The VBAT initial voltage and the VEN voltage are set in the ‘Manual Options’ text box for parameter setting consistency.The voltage level of VBAT initial and VEN, and the initial voltage of CBLK refer to the variable V_VBAT. To define the voltage level, s et V_VBAT value in ‘.param’ sentence in the text box from ‘Simulation Settings’ > ‘Advanced Options’ as shown in Figure 3.‘Simulation Settings’Figure 3. Definition of VIN voltage.In order to secure the simulation stability those three parameters should be the same. So do not change those parameters respectively.3.2 VBAT parameter setupFigure 4 shows how the VBAT parameters correspond to the VIN stimulus waveform.(b) Magnified viewFigure 4.VIN parameters and its waveforms VOUT VOUT VIN VIN4 BD9P105EFV-C_Tran modelTable 3 and Table 4 shows the model terminal function implemented. Note that BD9P105EFV-C_Tran is the behavior model for its load/line response operation, and no protection circuits or the functions not related to the purpose are not implemented.(Note 3) This model is not compatible with the external synchronization function.(Note 4) Use the simulation results only as a design guide and the data reported herein is not a guaranteed value.4.1 Parameter TSSBD9P105EFV-C_Tran model has the property ‘TSS’, which is the soft start time described in page 7 of the datasheet.The product has 3ms (typical) of the startup time of the output voltage. You can short cut the soft start by changing TSS value. The default TSS value is set to 0.2ms in this simulation and you can modify the value in the property editor.Figure 5. TSS property of BD9P105EFV-C_Tran5 Peripheral Components5.1 Bill of MaterialTable 5 shows the list of components used in the simulation schematic. Each of the capacitor and inductor has the parameters of equivalent circuit shown below. The default value of equivalent components are set to zero except for the parallel resistance of L1. You can modify the values of each component.5.2 Capacitor Equivalent Circuits(a) Property editor (b) Equivalent circuitFigure 6. Capacitor property editor and equivalent circuit5.3 Inductor Equivalent Circuits(a) Property editor (b) Equivalent circuitFigure 7. Inductor property editor and equivalent circuitThe default value of PAR_RES is 6.6kohm.(Note 5) These parameters can take any positive value or zero in simulation but it does not guarantee the operation of the IC in any condition. Refer to the datasheet to determine adequate value of parameters.6 Link to the product information and tools6.1 Product webpage link: https:///products/power-management/switching-regulators/integrated-fet/buck-converters-synchronous/bd9p105efv-c-product6.2 Related documentsThe application notes are available from ‘Documentation’ tab of the product page.6.3 Design assist tools ar e available from ‘Tools’ tab of the product page.The Circuit constant calculation sheet is useful for deciding the application circuit constants.NoticeROHM Customer Support Systemhttps:///contact/Thank you for your accessing to ROHM product informations.More detail product informations and catalogs are available, please contact us.N o t e sThe information contained herein is subject to change without notice.Before you use our Products, please contact our sales representative and verify the latest specifica-tions :Although ROHM is continuously working to improve product reliability and quality, semicon-ductors can break down and malfunction due to various factors.Therefore, in order to prevent personal injury or fire arising from failure, please take safety measures such as complying with the derating characteristics, implementing redundant and fire prevention designs, and utilizing backups and fail-safe procedures. ROHM shall have no responsibility for any damages arising out of the use of our Poducts beyond the rating specified by ROHM.Examples of application circuits, circuit constants and any other information contained herein areprovided only to illustrate the standard usage and operations of the Products. The peripheral conditions must be taken into account when designing circuits for mass production.The technical information specified herein is intended only to show the typical functions of andexamples of application circuits for the Products. ROHM does not grant you, explicitly or implicitly, any license to use or exercise intellectual property or other rights held by ROHM or any other parties. ROHM shall have no responsibility whatsoever for any dispute arising out of the use of such technical information.The Products specified in this document are not designed to be radiation tolerant.For use of our Products in applications requiring a high degree of reliability (as exemplifiedbelow), please contact and consult with a ROHM representative : transportation equipment (i.e. cars, ships, trains), primary communication equipment, traffic lights, fire/crime prevention, safety equipment, medical systems, servers, solar cells, and power transmission systems.Do not use our Products in applications requiring extremely high reliability, such as aerospaceequipment, nuclear power control systems, and submarine repeaters.ROHM shall have no responsibility for any damages or injury arising from non-compliance withthe recommended usage conditions and specifications contained herein.ROHM has used reasonable care to ensur e the accuracy of the information contained in thisdocument. However, ROHM does not warrants that such information is error-free, and ROHM shall have no responsibility for any damages arising from any inaccuracy or misprint of such information.Please use the Products in accordance with any applicable environmental laws and regulations,such as the RoHS Directive. For more details, including RoHS compatibility, please contact a ROHM sales office. ROHM shall have no responsibility for any damages or losses resulting non-compliance with any applicable laws or regulations.W hen providing our Products and technologies contained in this document to other countries,you must abide by the procedures and provisions stipulated in all applicable export laws and regulations, including without limitation the US Export Administration Regulations and the Foreign Exchange and Foreign Trade Act.This document, in part or in whole, may not be reprinted or reproduced without prior consent ofROHM.1) 2)3)4)5)6)7)8)9)10)11)12)13)。
iPhone 用户指南说明书
Before using iPhone, review the iPhone User Guide at /guide/iphone. You can also download the guide from Apple Books (where available). Retain documentation for future reference.Safety and HandlingSee “Safety, handling, and support” in the iPhone User Guide. Exposure to Radio FrequencyOn iPhone, go to Settings > General > Legal & Regulatory > RF Exposure. Or go to /legal/rfexposure. Battery and ChargingAn iPhone battery should only be repaired by a trained technician to avoid battery damage, which could cause overheating, fire, or injury. Batteries should be recycled or disposed of separately from household waste and according to local environmental laws and guidelines. For information about Apple lithium-ion batteries and battery service and recycling, go to /batteries/service-and-recycling. For information about charging, see “Important safety information” in the iPhone User Guide.LasersThe proximity sensor contains one or more lasers. These laser systems may be disabled for safety reasons if the device is damaged or malfunctions. If you receive a notification on your iPhone that the laser system is disabled, you should always have it repaired by Apple or an authorized service provider. Improper repair, modification, or use of non-genuine Apple components in the laser systems may prevent the safety mechanisms from functioning properly, and could cause hazardous exposure and injury to eyesor skin.Hearing Aid Compatibility (HAC)—U.S. onlyiPhone is hearing aid compatible as determined by ANSIC63.19-2011. This standard has two ratings: M (for reduced radio-frequency interference to enable acoustic coupling) and T (for inductive coupling with hearing aids operating in telecoil mode) on a scale from 1-4, where 4 is most compatible. This iPhone is rated M3/T4. Note: the 2019 ANSI C63.19 standard does not use this rating system nor do any test standards exist for any wireless technologies that transmit above 6 GHz. Therefore, 5G NR mmWave frequency bands cannot be tested.Compulsory FCC statement: This phone has been tested and certified for use with hearing aids for some of the wireless technologies that it uses. However, there may be some newer wireless technologies used in this phone that have not been tested yet for use with hearing aids. It is important to try the different features of this phone thoroughly andin different locations, using your hearing aid or cochlear implant, to determine if you hear any interfering noise. Consult your service provider or the manufacturer of this phone for information on hearing aid compatibility. If you have questions about return or exchange policies, consult your service provider or phone retailer.Avoid Hearing DamageTo prevent possible hearing damage, do not listen at high volume levels for long periods. More information about sound and hearing is available online at /sound and in “Important safety information” in the iPhone User Guide.Medical Device InterferenceiPhone contains magnets as well as components and/or radios that may interfere with medical devices. See “Important safety information” in the iPhone User Guide. RegulatoryRegulatory certification information is available on-device. Go to Settings > General > Legal & Regulatory. Additional regulatory information is in “Safety, handling, and support” in the iPhone User Guide.FCC and ISED Canada ComplianceThis device complies with part 15 of the FCC Rules and ISED Canada licence-exempt RSS standard(s). Operation is subject to the following two conditions: (1) this device may not cause harmful interference, and (2) this device must accept any interference received, including interference that may cause undesired operation.EU / UK ComplianceApple Inc. hereby declares that this wireless device is in compliance with Directive 2014/53/EU and Radio Equipment Regulation 2017. A copy of the Declaration of Conformity is available at /euro/compliance. Apple’s EU representative is Apple Distribution International Ltd., Hollyhill Industrial Estate, Cork, Ireland. Apple’s UK representative is Apple UK Ltd., 2 Furzeground Way, Stockley Park, Middlesex, UB11 1BB.Use RestrictionThis device is restricted to indoor use when operating in the 5150 to 5350 MHz frequency range. This restriction applies in: AT, BE, BG, CH, CY, CZ, DE, DK, EE, EL, ES, FI, FR, HR, HU, IE, IS, IT, LI, LT, LU, LV, MT, NL, NO, PL, PT, RO, SE, SI, SK, TR, UA, UK(NI).Disposal and Recycling InformationThe symbol above means that according to local laws and regulations your product and/or its battery shall be disposed of separately from household waste. When this product reaches its end of life, take it to a collection point designated by local authorities. The separate collection and recycling of your product and/or its battery at the time of disposal will help conserve natural resources and ensure that it is recycled in a manner that protects human health and the environment. For information about Apple’s recycling program, recycling collection points, restricted substances, and other environmental initiatives, visit /environment. Class 1 Laser InformationThis device is classified as a Class 1 Laser product per IEC 60825-1 Ed. 3. This device complies with 21 CFR 1040.10 and 1040.11, except for conformance with IEC 60825-1 Ed. 3., as described in Laser Notice No. 56, dated May 8, 2019. Caution: This device contains one or more lasers. Use other than as described in the user guide, repair, or disassembly may cause damage, which could result in hazardousexposure to infrared laser emissions that are not visible. This equipment should be serviced by Apple or an authorized service provider.CLASS 1 LASER PRODUCTApple One-Year Limited Warranty SummaryApple warrants the included hardware product and accessories against defects in materials and workmanship for one year from the date of original retail purchase. Apple does not warrant against normal wear and tear, nor damage caused by accident or abuse. To obtain service, call Apple or visit an Apple Store or an Apple Authorized Service Provider—available service options are dependent on the country in which service is requested and may be restricted to the original country of sale. Call charges and international shipping charges may apply, depending on the location. Subject to the full terms and detailed information on obtaining service available at /legal/warranty and , if you submit a valid claim under this warranty, Apple will either repair, replace, or refund your hardware device at its own discretion. Warranty benefits are in addition to rights provided under local consumer laws.© 2022 Apple Inc. All rights reserved. Apple, the Apple logo, Apple Books, and iPhone are trademarks of Apple Inc., registered in the U.S. and other countries and regions. Apple Store is a service mark of Apple Inc., registered in the U.S. and other countries and regions. Printed in XXXX. 034-05519-A You may be required to furnish proof of purchase details when making a claim under this warranty.For Australian Consumers: Our goods come with guarantees that cannot be excluded under the Australian Consumer Law. You are entitled to a replacement or refund for a major failure and for compensation for any other reasonably foreseeable loss or damage. You are also entitled to have the goods repaired or replaced if the goods fail to be of acceptable quality and the failure does not amount to a major failure. Apple Pty Ltd, PO Box A2629, Sydney South, NSW 1235. Tel: 133-622.。
NXP NTM88应用库用户指南说明书
UM11589NTM88 Application Library User GuideRev. 1 — 22 March 2021User guideNTM88 Application Library User GuideNTM88 Application Library User Guide 1Introduction and usageThis document describes functions included in the application library for the NTM88series. The functions available in this library provide access to Free Running Counter(FRC). The library functions are to be used in addition and together with the existingTPMS firmware functions.The library version is compatible with all part numbers of the NTM88 family.2Library organizationThe library is provided as a library code file and a header file containing the functionprototypes. The files are listed below:•NTM88_AppLib_vxxx.lib - library code file•NTM88_AppLib_vxxx.h - functions prototypes header file3Description of library functionsThere are five functions to access the Free Running Counter (FRC):•NTM88_E_FRC_ENABLE(…) – enable FRC,•NTM88_E_FRC_CLEAR() – clear FRC,•NTM88_E_FRC_READ(…) – read FRC count,•NTM88_E_FRC_DISABLE() – disable FRC,•NTM88_E_FRC_CALIB(…) – calibrate FRC.The following sections provide detailed descriptions of the functions.3.1void TPMS_E_FRC_ENABLE (UINT8 u8ClrRes)Description: This function enables the Free Running Counter.Stack Usage: 2 bytesApprox. Duration: 1.3 msPower management: This function executes entirely in RUN.Resources: FRC.Input Parameters:•UINT8 u8ClrRes – clear or not the FRC counter:•0 – clear the FRC counter,•not 0 – FRC counter is not cleared.Returns: void.NTM88 Application Library User Guide3.2void TPMS_E_FRC_CLEAR (void)Description: This function clears the FRC counter register.Stack Usage: 0 bytesApprox. Duration: 9 µsPower management: This function executes entirely in RUN.Resources: FRC.Input Parameters: void.Output Parameters: void.3.3void TPMS_E_FRC_READ (UINT16 *pu16Count)Description: This function reads the FRC counter register.Stack Usage: 2 bytesApprox. Duration: 10 µsPower management: This function executes entirely in RUN.Resources: FRC.Input Parameters:•UINT16 *pu16Count - pointer to memory location to save the FRC count.Output Parameters: void.3.4void TPMS_E_FRC_DISABLE (void)Description: This function disables the Free Running Counter.Stack Usage: 0 bytesApprox. Duration: 1 msPower management: This function executes entirely in RUN.Resources: FRC.Input Parameters: void.Output Parameters: void.NTM88 Application Library User Guide3.5UINT8 TPMS_E_FRC_CALIB (UINT16 *pu16usPerPrdDescription: This function measures the number of micro seconds per LFO period,which corresponds to the time for the Free Running Counter to increment twice.Stack Usage: 18 bytesApprox. Duration: 8.2 msPower management: This function executes entirely in RUN.Resources: This function uses the FRC block, the timer module TPM1, and the 500 kHz reference clock generated by RF module. On entry, it expects that TPM1 module is inreset state in free-running timer counter mode with modulo counting disabled. Beforeexiting, function disables TPM1 and RF module, and keeps the FRC enabled.Input Parameters:•UINT16 *pu16usPerPrd - pointer to memory location to save number of micro seconds per LFO period.Output Parameters:•UINT8 u8Status - status/error flag:•0 – valid value returned in *pu16usPerPrd•not 0 – timeout, contents of *pu16usPerPrd is not valid.NTM88 Application Library User Guide 4Legal information4.1 DefinitionsDraft — A draft status on a document indicates that the content is still under internal review and subject to formal approval, which may resultin modifications or additions. NXP Semiconductors does not give any representations or warranties as to the accuracy or completeness of information included in a draft version of a document and shall have no liability for the consequences of use of such information.4.2 DisclaimersLimited warranty and liability — Information in this document is believed to be accurate and reliable. However, NXP Semiconductors does notgive any representations or warranties, expressed or implied, as to the accuracy or completeness of such information and shall have no liabilityfor the consequences of use of such information. NXP Semiconductors takes no responsibility for the content in this document if provided by an information source outside of NXP Semiconductors. In no event shall NXP Semiconductors be liable for any indirect, incidental, punitive, special or consequential damages (including - without limitation - lost profits, lost savings, business interruption, costs related to the removal or replacement of any products or rework charges) whether or not such damages are based on tort (including negligence), warranty, breach of contract or any other legal theory. Notwithstanding any damages that customer might incur for any reason whatsoever, NXP Semiconductors’ aggregate and cumulative liability towards customer for the products described herein shall be limited in accordance with the Terms and conditions of commercial sale of NXP Semiconductors.Right to make changes — NXP Semiconductors reserves the right to make changes to information published in this document, including without limitation specifications and product descriptions, at any time and without notice. This document supersedes and replaces all information supplied prior to the publication hereof.Suitability for use — NXP Semiconductors products are not designed, authorized or warranted to be suitable for use in life support, life-critical or safety-critical systems or equipment, nor in applications where failure or malfunction of an NXP Semiconductors product can reasonably be expected to result in personal injury, death or severe property or environmental damage. NXP Semiconductors and its suppliers accept no liability for inclusion and/or use of NXP Semiconductors products in such equipment or applications and therefore such inclusion and/or use is at the customer’s own risk.Applications — Applications that are described herein for any of these products are for illustrative purposes only. NXP Semiconductors makesno representation or warranty that such applications will be suitablefor the specified use without further testing or modification. Customersare responsible for the design and operation of their applications and products using NXP Semiconductors products, and NXP Semiconductors accepts no liability for any assistance with applications or customer product design. It is customer’s sole responsibility to determine whether the NXP Semiconductors product is suitable and fit for the customer’s applications and products planned, as well as for the planned application and use of customer’s third party customer(s). Customers should provide appropriate design and operating safeguards to minimize the risks associated withtheir applications and products. NXP Semiconductors does not accept any liability related to any default, damage, costs or problem which is basedon any weakness or default in the customer’s applications or products, or the application or use by customer’s third party customer(s). Customer is responsible for doing all necessary testing for the customer’s applications and products using NXP Semiconductors products in order to avoid a default of the applications and the products or of the application or use by customer’s third party customer(s). NXP does not accept any liability in this respect.Export control — This document as well as the item(s) described herein may be subject to export control regulations. Export might require a prior authorization from competent authorities.Evaluation products — This product is provided on an “as is” and “with all faults” basis for evaluation purposes only. NXP Semiconductors, its affiliates and their suppliers expressly disclaim all warranties, whether express, implied or statutory, including but not limited to the implied warranties ofnon-infringement, merchantability and fitness for a particular purpose. The entire risk as to the quality, or arising out of the use or performance, of this product remains with customer. In no event shall NXP Semiconductors, its affiliates or their suppliers be liable to customer for any special, indirect, consequential, punitive or incidental damages (including without limitation damages for loss of business, business interruption, loss of use, loss of data or information, and the like) arising out the use of or inability to usethe product, whether or not based on tort (including negligence), strict liability, breach of contract, breach of warranty or any other theory, even if advised of the possibility of such damages. Notwithstanding any damages that customer might incur for any reason whatsoever (including without limitation, all damages referenced above and all direct or general damages), the entire liability of NXP Semiconductors, its affiliates and their suppliers and customer’s exclusive remedy for all of the foregoing shall be limited to actual damages incurred by customer based on reasonable reliance up to the greater of the amount actually paid by customer for the product or five dollars (US$5.00). The foregoing limitations, exclusions and disclaimers shall apply to the maximum extent permitted by applicable law, even if any remedy fails of its essential purpose.Translations — A non-English (translated) version of a document is for reference only. The English version shall prevail in case of any discrepancy between the translated and English versions.Security — Customer understands that all NXP products may be subjectto unidentified or documented vulnerabilities. Customer is responsiblefor the design and operation of its applications and products throughout their lifecycles to reduce the effect of these vulnerabilities on customer’s applications and products. Customer’s responsibility also extends to other open and/or proprietary technologies supported by NXP products for usein customer’s applications. NXP accepts no liability for any vulnerability. Customer should regularly check security updates from NXP and follow up appropriately. Customer shall select products with security features that best meet rules, regulations, and standards of the intended application and make the ultimate design decisions regarding its products and is solely responsible for compliance with all legal, regulatory, and security related requirements concerning its products, regardless of any information or support that may be provided by NXP. NXP has a Product Security Incident Response Team (PSIRT)(************************)thatmanagestheinvestigation, reporting, and solution release to security vulnerabilities of NXP products.4.3 TrademarksNotice: All referenced brands, product names, service names and trademarks are the property of their respective owners.NXP — wordmark and logo are trademarks of NXP B.V.NTM88 Application Library User GuideContents1Introduction and usage (3)2Library organization (3)3Description of library functions (3)3.1void TPMS_E_FRC_ENABLE (UINT8u8ClrRes) (3)3.2void TPMS_E_FRC_CLEAR (void) (4)3.3void TPMS_E_FRC_READ (UINT16*pu16Count) (4)3.4void TPMS_E_FRC_DISABLE (void) (4)3.5UINT8 TPMS_E_FRC_CALIB (UINT16*pu16usPerPrd (5)4Legal information (6)Please be aware that important notices concerning this document and the product(s)described herein, have been included in section 'Legal information'.。
user_guide

《同一发网络传真系统使用指南》目录1.同一发传真服务平台功能概述: (3)2.同一发普通用户(虚拟管理员)使用指南: (3)2.1登录系统: (4)2.2发送传真: (4)2.3地址本管理及使用: (8)2.4取消待发任务或作业: (9)2.5查询及统计: (9)2.6归档查询: (11)2.7用户管理: (11)2.8用户设置: (13)3.同一发传真群发系统使用过程中,常见问题解答(FAQ): (14)1.同一发传真服务平台功能概述:同一发传真服务平台是一款智能化的传真服务平台,自推出市场以来,立即受到各类用户的欢迎,已主要用于物流,旅游,外贸等行业的各类企业。
本使用指南主要讲述使用同一发传真服务平台的普通用户的操作指南。
同一发采用目前业界最新的CTI(计算机电话集成)技术,Internet 网络技术,图像处理技术专业打造的增值业务平台。
使用同一发传真服务平台,可让各企事业单位及个人通过互联网WEB浏览器来访问同一发,用户无需打印,便可通过Internet网来收发传真,并且一次可同时递交上万份传真,每份传真都可以有一个清晰的结果,从而使申请了同一发服务的用户可象收发Email一样方便地收发传真,可在网络能通的任何地方,任何时间收发传真,极大地提高了企业的运营成本,工作效率。
同一发在使用界面上采用了OALLtLook收件箱、发件箱等思想,用户在客户端无需安装任何软件,便可通过IE浏览器使用同一发。
在界面上基本使用户沿用收发Email的习惯,用户可方便地象收发Email一样来收发传真。
为方便起见,本使用指南只讲述同一发的传真收发使用。
同一发传真服务平台普通用户分为两类: 1。
虚拟管理员(企业管理员):为了使申请同一发服务的企业能很好地管理其下面的员工使用同一发,防止员工滥用公司资源去使用同一发, 同一发传真服务平台具有虚拟管理员的功能,具有虚拟管理员角色的企业,可对下面的员工再分配子帐号,虚拟管理员可以通过对子帐号查询来清楚地了解各员工使用系统的情况;2。
CUPTI_Users_Guide

CUDA Tools SDK CUPTI User’s Guide
DA-05679-001_v01 | 4
within the callback. In this case we use the callbackSite member of the structure to detect that the callback is occurring on entry to cudaMemCpy, and we use the functionParams member to access the parameters that were passed to cudaMemCpy. To access the parameters we first cast functionParams to a structure type corresponding to the cudaMemCpy function. These parameter structures are contained in generated_cuda_runtime_api_meta.h, generated_cuda_meta.h, and a number of other files. When possible these files are included for you by cupti.h.
CUPTI Callback API
The CUPTI Callback API allows you to interject your own code at the entry and exit to each CUDA runtime and driver API call. Using the callback API, you associate a callback function with one or more CUDA API functions. When those CUDA functions are invoked in the application, your callback function is invoked as well. The following terminology is used by the callback API.
nRF Sniffer用户指南v2.0说明书

nRF SnifferUser Guide v2.0Copyright © 2017 Nordic Semiconductor ASA. All rights reserved.Reproduction in whole or in part is prohibited without the prior written permission of the copyright holder.1 IntroductionThe nRF Sniffer is a tool for debugging Bluetooth low energy (BLE) applications by detecting packets between a selected device and the device it is communicating with, even when the link is encrypted. When developing a BLE product, knowing what happens over-the-air between devices can help you isolate and solve any potential issues.By default, the Sniffer lists nearby BLE devices that are advertising, providing the Bluetooth Address and Address type, complete or shortened name, and RSSI.1.1Required hardwareTo set up the Sniffer you will need one of the following kits:•nRF51 Development Kit (PCA10028) v1.0 or later and a micro USB cable•nRF51 Dongle (PCA10031)•nRF52 Development Kit (PCA10040) and a micro USB cable1.2Required software•nRF Sniffer software v2.x or later available on the Sniffer product page under the downloadstab•Wireshark v2.4.2 or later available from /.Wireshark is a free software tool that captures wireless traffic and reproduces it in a readableformat.•An operating system that runs Wireshark v2.4.2 or later•Windows7or later•64 bit OS X 10.6 or later•Linux (check for version compatibility)•Segger J-Link v6.16c (which comes bundled with the nRF Sniffer v2.x software)available from https://•python v2.7.x available from https:///downloads/•pyserial v3.4 or later available from https:///pyserial/pyserial1.3Writing conventionsThis user guide follows a set of typographic rules that makes the document consistent and easy to read. The following writing conventions are used:•Commands are written in Lucida Console.•Pin names are written in Consolas.•File names and User Interface components are written in bold.•Internal cross references are italicized and written in semi-bold.2 Setting up the nRF SnifferSet up the Sniffer for the first time by performing the following steps:1.Install the software listed in Section 1.2 “Required software” on page2 before plugging in thehardware.2.Connect the hardware to a USB port.3.For Windows - Wait for the hardware drivers to be loaded before continuing. You can also clickSkip obtaining driver software from Windows Update to speed up the driver installationprocess.4.Place the hardware between the Peripheral and Central device. Now you’re ready to set up thesoftware.Figure 1 System overviewInstall nRF Sniffer1.For Windows - Go to Help > About Wireshark .2.Click on the Folders tab.3.Click on the location for Extcap path .4.Find and copy the nrf_sniffer_<version>_<hash> ZIP file to the folder associated with “Extcappath”.5.Unzip the ZIP's extcap content to the Wireshark Extcap path found in "About Wireshark” (shownhere as C:\Program Files\Wireshark\extcap ).6.For Windows - Verify that python is callable from the command line.7.For OS X and Linux - Verify that the nrf_sniffer.py file has the “x” permission. If the “x” permissionis missing add it using chmod +x nrf_sniffer.py .8.Close Wireshark.==C:>python --versionPython 2.7.x==Install firmware with SEGGER J-Link.1.Locate the J-Link software.•Windows-Use the jlink.exe program, usually in C:\Program Files (x86)\SEGGER\.•OS X and Linux - Use the jlinkexe program.2.Remove all hardware attached to the USB. Plug in one of the hardware boards and wait for thedrivers to install.3.Open a command window.4.In the command window, type jlink.exe (for Windows) or jlinkexe (for OS X and Linux) and hitEnter to run the program.5.Erase the contents by performing the following steps. Press Enter after each command.a.Type erase.b.Depending on the board you are using, type nRF51422_XXAC (for the nRF 51DK andDongle) or nRF52832_XXAA (for the nRF52 DK).c.Type s to specify the SWD interface.d.For Speed, type 1000.e.Type loadfile then <Path to Wireshark>\extcap\nrf_sniffer_<ver-sion>_<hash>\hex\sniffer_<board name>_<hash>.hexf.Type r to reset the board.g.Type g to run the board firmware.Figure 2 J-Link eraseFinalize the set up1.Verify that the Sniffer firmware is running correctly by checking that LED1 toggles each time apacket is received. At least one device must be advertising for the Sniffer to detect theadvertisements.2.Open Wireshark. You should see “nRF Sniffer on xxxxx” as one of the interfaces.3.Click View>Interface Toolbars>nRF Sniffer to enable the Sniffer interface.4.Click on the board to select it and then click the Wireshark icon to start capturing packets.Figure 3 Initial view - successful installation3 UsingSniffertheThe Wireshark capture screen is displayed when Wireshark is first launched. It includes the Wireshark interface for managing packets that are captured, the nRF Sniffer toolbar, and the hardware interfaces connected to the nRF Sniffer.To make the nRF Sniffer toolbar visible, click View>Interface Toolbars>nRF Sniffer.There are two ways to start sniffing:•Double click on the hardware interface (nRF Sniffer COM54 in Figure 4).•Select the hardware interface by clicking on it and then click the Wireshark icon on the topleft to start sniffing.Figure 4 Wireshark capture screenOnce the Sniffer is running, it reports advertisements and lists nearby devices in the Device List. The Sniffer may not pick up all connect requests and will not always pick up on a connection. In such cases, you need to reconnect and try sniffing again. If you aren’t seeing any activity in your Wireshark console, see Section 6 “Troubleshooting” on page15.The Sniffer has two modes of operation:1.Listens on all advertising channels to pick up as many packets as possible from as many devices aspossible. This is the default mode.2.Follows one particular device and tries to catch all packets sent to or from this particular device.This mode will catch all:•Advertisements and Scan Responses sent from the device•Scan Requests and Connect Requests sent to the device•Packets in the Connection sent between the two devices in the Connection3.1Sniffer commandsThe software interface has several commands to for controlling the Sniffer. Below you will find a list of commands and their description, along with some examples. Figure 5 Sniffer interfaceAll advertising devicesLists nearby devices. If this command is used while sniffing a device, it will stop sniffing that device. This means if the device is in a connection, the sniffer will lose that connection. To enable this option, click the Device list drop-down and select All advertising devices .PasskeyYour device asks you to provide your passkey. Type the 6 digit passkey in the passkey text field from Wireshark, followed by Enter . Then enter the passkey into the device. Passkey entry utilizes Just Works pairing, which is described in detail in “Just Works - sniffing an encrypted connection“ on page 13.Out of band key exchange (OOB)You are asked to provide the 16 byte Out-of-band (OOB) key in hexadecimal (starting with 0x, big endian format). This must be carried out before the device enters encryption. If the entered key is shorter than 16 bytes, it will be padded with zeros in front. OOB entry uses Out of Band pairing, which is described in detail in “Sniffing a connection between devices that are already paired“ on page 14.Advertising hop sequenceChange the order in which the Sniffer switches advertising channels when following a device. Define the order with comma separated channel numbers. For example: 37,38,39. Press Enter when done.This will sniff waiting for a packet on channel 37. After it receives a packet on channel 37 it will transition to sniffing on channel 38. When it receives a packet on channel 38, it will transition to sniffing on channel 39. When it receives a packet on channel 39, it will start sniffing on channel 37, and repeats the operation.Hardware interface Device list Passkey and OOB key Advertising hopsequence Access the online User GuideResets the user interface;RSSI filterApplies an RSSI filter on the packets being received. Only packets that match the filter are displayed. To set the capture filter in the Capture screen in Wireshark use the keyword "rssi".Example: rssi > -70. This will only display packets that have an RSSI greater than -70 dBm.Figure 6 RSSI filterCapturing from multiple hardware interfaces/boardsSelect all hardware interfaces in the Capture Screen in Wireshark and click Start Capturing Packets.Figure 7 Select multiple hardware interfacesInterface IDInterface Identifier used by Wireshark to identify the capture interfaces (frame.interface_id)BoardHardware identifier for the board running the nRF Sniffer firmware (nordic_ble.board_id)Figure 8 Data capture from multiple hardware interfaces4 Using WiresharkAll BLE packets detected by the Sniffer are passed to Wireshark where they are wrapped in a headercontaining useful meta-information not present in the BLE packet itself. Wireshark dissects the packets and separates the actual packet from the meta-information.Packet browsingWhen a packet is selected in the Packet List, the Details pane shows the breakdown of that packet. The bytes of the packet are shown in the Bytes pane. Click a value in Details to highlight it among the bytes, or click onFigure 9 Wireshark interface4.1Display filteringDisplay filters allow you to display a chosen packet subset. Most filters are based on the values of the packets, such as length or access address. The filter expressions use Boolean operators (&& || == != !). Some examples are given in Table 1.Display filter Descriptionbtle.length != 0 Displays only packets where the length field of the BLE packet is notzero, meaning it hides empty data packets.btle.advertising_address Displays only packets that have an advertising address (advertisingpackets).btle A protocol filter that displays all Bluetooth low energy packets. btatt, btsmp, btl2cap Protocol filters for ATT, SMP, and L2CAP packets respectively.Table 1 Display filtering4.1.1Wireshark TipsMore information can be found in the documentation on Wireshark’s website.•For help with constructing filters, click Expression.•Any field in the Packet Details pane can be made into a column by right clicking the value,and click Apply as column.Figure 10 Apply as column•You can apply a value as a filter. This can be useful if you want to see only operationsaffecting a particular handle, for example. To filter packets either having a specific value forsome field, do as follows:•Right click the value in the packet details, click Apply as Filter, and click Selected.•Saving a set of captured packets is useful if they need to be looked at later. To save a set ofcaptured packets do the following:•Click the Stop button to quit capturing packets.•Click File and select Save as to save all packets. Click File and select Export SpecifiedPackets to save a selection of packets.•The Restart button is used to restart a capture and to clear the packet list.actionssniffing5 CommonSniffing advertisements from all nearby devicesTo see advertisements from all nearby devices:1.Start the nRF Sniffer.2.Ensure “All advertising devices” is selected in the Device drop-down.Sniffing advertisement packets involving a single slave deviceTo see advertisement packets, scan requests, and scan responses to and from a single device:1.Start the Sniffer if not already running.2.In the Sniffer, choose the device from the Device drop-down list.Sniffing a connection involving a single slave deviceTo sniff a connection between a specific Peripheral device and a Central:1.Start the Sniffer if not already running.2.In the Sniffer, choose the device from the Device drop-down list.3.Connect the Central to the Peripheral.Just Works - sniffing an encrypted connectionTo sniff a connection encrypted with Just Works:1.Start the Sniffer if not already running.2.In the Sniffer, choose the device from the Device drop-down list.3.Initiate pairing between the devices if it does not happen automatically.The Sniffer willautomatically decrypt encrypted packets.Sniffing a connection between devices that are already pairedThe Sniffer needs to have sniffed the pairing procedure if the devices are already paired. If the sniffer board is reset, stored pairing information will be lost.To sniff a connection encrypted with passkey:1.Start the Sniffer if not already running.2.In the Sniffer, choose the device from the Device drop-down list.3.Initiate pairing between the devices if it does not happen automatically. A passkey will bedisplayed on either the Central or the Peripheral device.4.Type the 6 digit passkey from the passkey text field in Wireshark.5.Press Enter.6.Enter the passkey into the other device after entering it into the Sniffer.To sniff a connection encrypted with OOB:1.Start the Sniffer if not already running.2.In the Sniffer, choose the device from the Device drop-down list.3.Enter the OOB key into the Sniffer before the devices initiate pairing.•Type the OOB key in big-endian, hexadecimal format with a leading "0x".•Press Enter.4.Connect the Central to the Peripheral device.5.Initiate pairing between the devices if it does not happen automatically.6 TroubleshootingThe nRF sniffer is not listed in the Wireshark interface.1.See if the hardware has been enumerated on USB and the drivers are loaded.2.Check that the HEX file for the hardware has been flashed.3.Reset the hardware by unplugging the hardware, waiting 5 seconds, and plugging it back in.If it still doesn’t appear, verify the python script located in the extcap folder is able to run.For Windows:1.Run nrf_sniffer.bat --extcap-interfaces to list the interface.2.If this exits with a python error, verify that python.exe can be run from the command linec:>python.exe --version, where the Python version is the same as Section 1.2 “Required software” on page2.For OS X and Linux:1.Verify that the execute permission is present for the nrf_sniffer.py file.•ls -l nrf_sniffer.py2.If the "x" permission is missing:•chmod +x nrf_sniffer.py3.Run nrf_sniffer.py --extcap-interfaces to list the interface.I cannot see the extcap folder in Wireshark.1.Create the extcap folder as described in “Install nRF Sniffer“ on page 4.nRF Sniffer occasionally works and appears unstable.Make sure you are using the correct software versions as stated in Section 1.2 “Required software” on page2.Verify that the J-Link emulator version on the hardware is as stated in Section 1.2 “Required software” on page2. To verify:1.Open the JLinkConfig.exe in the install folder of the required J-Link version.2.The host firmware and the emulator firmware should have the same date.Upgrade the J-Link emulator version on the hardware.1.Download the J-Link software as mentioned in Section 1.2 “Required software” on page2.2.Unplug the hardware, wait 5 seconds.3.Plug in the hardware.4.For Windows:•Run jlink.exe from the folder where the J-Link software was installed.•A popup appears "A new firmware version is available.....Do you want to upgrade ...?”•Click yes.5.OS X/Linux•Type “jlinkexe”. The J-Link firmware updates automatically.Downgrade the J-Link emulator version on the hardware.For Windows:1.Ensure only one J-Link is connected to your computer.2.Run jlink.exe from the folder where the J-Link version was installed.3.In jlink type “exec invalidatefw”.4.Click yes when prompted.5.In jlink type “exit” to exit jlink.exe.6.Run jlink.exe from the folder where the J-Link version was installed (it is necessary to run it asecond time).7.Click yes to upgrade your firmware.8.You have now successfully downgraded the J-Link version on the emulator.For OS X and Linux:1.Ensure only one J-Link is connected to your computer.2.Run jlink.exe from the folder where the J-Link version was installed. (Install the older version ofJ-Link if required.)3.Run jlinkexe.4.In jlinkexe type "exec invalidatefw".5.In jlinkexe type "exit" to exit the jlinkexe.6.Run jlinkexe (this is required to be run for the second time). The J-Link firmware will be updatedautomatically to the installed version of J-Link.“nRF Sniffer on xxxxx” doesn’t show up as one of the interfaces when I open Wireshark.1.Click View in the Wireshark toolbar.2.Select Interface Toolbars then click nRF Sniffer.Liability disclaimerNordic Semiconductor ASA reserves the right to make changes without further notice to the product to improve reliability, function or design. Nordic Semiconductor ASA does not assume any liability arising out of the application or use of any product or circuits described herein.Life support applicationsNordic Semiconductor’s products are not designed for use in life support appliances, devices, or systems where malfunction of these products can reasonably be expected to result in personal injury. Nordic Semiconductor ASA customers using or selling these products for use in such applications do so at their own risk and agree to fully indemnify Nordic Semiconductor ASA for any damages resulting from such improper use or sale.Contact detailsFor your nearest distributor, please visit .Information regarding product updates, downloads, and technical support can be accessed through your My Page account on our homepage.Main office:Phone: +47 72 89 89 00Fax: +47 72 89 89 89Otto Nielsens veg 127052 Trondheim NorwayMailing address:Nordic Semiconductor P .O. Box 23367004 TrondheimNorwayRevision HistoryDate Version DescriptionNovember 2017 2.0nRF Sniffer updated to work more closely with Wireshark.Updated software to support the nRF52 DK.April 2017 1.4Updated content:•Removed reference to nRF52 Series in the Section 1.1 “Required hardware”on page2•Section 1.2 “Required software” on page2•Section 2 “Setting up the nRF Sniffer” on page3March 2017 1.3Updated content:•Section 1.1 “Required hardware” on page2•Section 1.2 “Required software” on page2•Chapter 2 “Setting up the nRF Sniffer” on page3July 2014 1.2Updated content:•Section 1.1 “Required hardware” on page2•Section 1.2 “Required software” on page2•Chapter 2 “Setting up the nRF Sniffer” on page3•Section 2.1 “Running the Sniffer” on page6•Chapter 3 “Using the Sniffer” on page7•Chapter 4 “Using Wireshark” on page11•Section 4.1.1 “Wireshark Tips” on page12•Chapter 6 “Troubleshooting” on page15April 2014 1.1Updated firmware, now supports all versions of PCA10000 and PCA10001.December 2013 1.0First release.。
guide的用法和搭配
guide的用法和搭配guide是名词,指的是一个人、一本书或一件事物,提供指引或引导他人的信息或方向。
它也可以作为动词使用,表示引导、指导或辅助。
以下是guide的常见用法和搭配:1. as a noun:- tour guide:导游- travel guide:旅行指南- user guide:用户指南- study guide:学习指南- guidebook:指南书- guide dog:导盲犬2. as a verb:- guide someone/something:引导某人/某物- guide someone through something:为某人指引一件事- guide someone to/through somewhere:引领某人去某地3. 搭配表达:- be guided by:按照...来引导或决定- guide someone along:引导某人前进- guide someone’s steps:引导某人的脚步- guide someone’s decision:指导某人的决策- guide s omeone’s way:引领某人的道路- guide someone in doing something:指导某人做某事例如:- The tour guide showed us around the historic city.(导游带领我们参观了这座历史名城。
)- I used a travel guide to plan my trip to Japan.(我使用了一本旅行指南来计划我的日本之行。
)- The teacher guided the students through the difficult math problems.(老师引导学生们解决了这些困难的数学题。
)- The company's mission statement guides their decision-making process.(公司的使命宣言指导着他们的决策过程。
UserGuide

6. 插入网线
7. 在PC端开启tftp服务器, 并且将MLO, u-boot.img, uImage, ubi.img拷贝到tftp根目录下
8. 在u-boot中运行以下命令:
-----
MLO:|
-----
nandecc hw 2
mw.b 0x82000000 0xff 0x20000 # 用0xff填充从0x82000000开始的0x20000个字节, 内存的物理启始地址为0x80000000
dhcp 0x82000000 192.168.16.188:MLO # 将192.168.1.102这个tftp服务器上的MLO文件下载到0x82000000其实的内存空间
nand write 0x82000000 0x280000 0x500000
mw.b 0x82000000 0xff 0x2800000
dhcp 0x82000000 192.168.16.188:ubi.img
nand write 0x82000000 0x780000 0x2800000
mw.b 0x82000000 0xff 0x2800000
nand erase 0x2f80000 0x2800000
dhcp 0x82000000 192.168.16.188:ubi.img
nand write 0x82000000 0x2f80000 0x2800000
-----
nand write 0x82000000 0x00000 0x20000
DELL P2314H 用户手册 用户指南 user‘s guide
即插即用功能 . . . . . . . . 通用串行总线(USB)接口 液晶显示器质量和像素政策 维护指南 . . . . . . . . . . .
. . . .
. . . .
. . . .
. . . .
. . . .
. . . .
. . . .
. . . .
. . . .
. . . .
. . . .
3
故障排除 . . . . . . . . . . . . . . . . . . . . . . . . . . . . . . . . . . . . . . . . . . . . . . . 48
自检 . . . . . . . . . . . . . . . . . 内置诊断 . . . . . . . . . . . . . . 常见问题 . . . . . . . . . . . . . . 产品特定问题 . . . . . . . . . . . 通用串行总线(USB)特定问题 . . . . . . . . . . . . . . . . . . . . . . . . . . . . . . . . . . . . . . . . . . . . . . . . . . . . . . . . . . . . . . . . . . . . . . . . . . . . . . . . . . . . . . . . . . . . . . . . . . . . . . . . . . . . . . . . . . . . 48 49 50 54 55
. . . .
. . . .
. . .
. . . .
. . . .
. . . .
. . . .
使用指南的英文单词
使用指南的英文单词英文回答:The term “user guide” can refer to a wide range of documents that provide instructions on how to use a particular product or service. User guides can be found for everything from software applications to household appliances to complex machinery.The purpose of a user guide is to help users understand how to operate a product or service safely and effectively. User guides typically include step-by-step instructions, diagrams, and troubleshooting tips. They may also provide information on the product's features, specifications, and warranty.User guides can be written in a variety of styles, depending on the intended audience. Some user guides are written in a technical style, while others are written in a more informal style. The length and complexity of a userguide will also vary depending on the product or service being described.User guides are an important resource for users of all types of products and services. By providing clear and concise instructions, user guides can help users get the most out of their products and avoid costly mistakes.中文回答:“使用指南”一词可以指各种提供如何使用特定产品或服务的说明的文件。
UserGuide
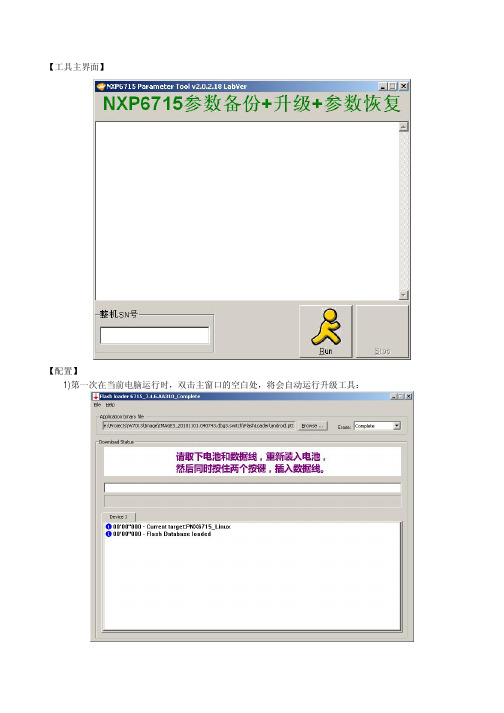
【工具主界面】
【配置】
1)第一次在当前电脑运行时,双击主窗口的空白处,将会自动运行升级工具:
2)点击Browse按钮,选择需要升级的手机软件包中的ptt文件:
3)配置完毕,关闭升级工具即可;
【操作步骤】
1)用扫枪扫描整机的SN号条码,点击Run按钮,开始备份;
2)此时将电池装入手机,插入USB数据线,工具将会自动检测手机连接;
3)待手机进入测试模式后,将备份锁网、射频、电池、SN号、蓝牙地址、IMEI号等参数;备份完毕,升级工具将自动运行;
4)如果该SN号对应的手机以前已经成功进行过备份,那么工具会跳过备份操作,直接开始升级过程;
5)请按照提示进行操作:拔下数据线和电池,重新装好电池,同时按住两个按键,插入数据线;
6)升级成功后,手机将会自动开机,并开始参数恢复过程:。
User Guide
User GuideTable of ContentsWrite:OutLoud To Go Toolbar. . . . . . . . . . . . . . . 3One-Click Access to Common Tasks. . . . . . . . . . . . . . . . . 3Text Navigation and Selection Buttons. . . . . . . . . . . . . . . 3Speech Buttons. . . . . . . . . . . . . . . . . . . . . . . . . . . . . . . . 4Tool Buttons. . . . . . . . . . . . . . . . . . . . . . . . . . . . . . . . . . 5Text Buttons. . . . . . . . . . . . . . . . . . . . . . . . . . . . . . . . . . 6Write:OutLoud To Go Menus. . . . . . . . . . . . . . . . 6File Menu. . . . . . . . . . . . . . . . . . . . . . . . . . . . . . . . . . . . 7Edit Menu. . . . . . . . . . . . . . . . . . . . . . . . . . . . . . . . . . . . 9Tools Menu. . . . . . . . . . . . . . . . . . . . . . . . . . . . . . . . . . 10Text Menu. . . . . . . . . . . . . . . . . . . . . . . . . . . . . . . . . . . 11Options Menu. . . . . . . . . . . . . . . . . . . . . . . . . . . . . . . 12Speech Menu. . . . . . . . . . . . . . . . . . . . . . . . . . . . . . . . 12Keyboard Shortcuts. . . . . . . . . . . . . . . . . . . . . . . 14Write:OutLoud®To Go TrademarksThe Don Johnston logo and Write:OutLoud are registered trademarks and TheLeader in Learning Intervention Resources is a trademark of Don JohnstonIncorporated.Dana is trademark and AlphaSmart is a registered trademark ofAlphaSmart, Inc.Macintosh is a registered trademark of Apple Computer, Inc.Windows is a registered trademark of Microsoft Corporation.Adobe and Reader are either registered trademarks or trademarks of AdobeSystems Incorporated in the United States and/or other countries.Graffiti is a registered trademark of Palm, Inc.All other product or corporate names are trademarks or registered trademarks oftheir respective companies and are used for explanation only and to the owner'sbenefit, without intent to infringe.Write:OutLoud To Go © Copyright 2004, Don Johnston Incorporated.All rights reserved.User Guide Write:OutLoud to Go © Copyright 2004Don Johnston Incorporated. All rights reserved.The Spelling portion of this product is based on Proximity Linguistic Technology.®THE PROXIMITY/FRANKLIN DATABASE © 1994, Franklin Electronic Publishers,Inc. All rights reserved, Proximity Technology Inc. Geographical Supplement© Copyright 1990/1994 Merriam-Webster® Inc./Franklin ElectronicPublishers, Inc. © Copyright 1994. All rights reserved, Proximity Technology Inc.THE PROXIMITY/FRANKLIN DATABASE © Copyright 1997, Franklin ElectronicPublishers, Inc. © Copyright 1998. All rights reserved, Proximity Technology Inc.Write:OutLoud To Go contains PrintBoy by Bachmann software.Published by:Don Johnston Incorporated26799 West Commerce DriveVolo, IL 60073800.999.4660 (USA/CANADA)847.740.0749Technical SupportSupport@800.889.5242 (USA/CANADA)Printed in the United States of America, September 2004Write:OutLoud To Go ToolbarWrite:OutLoud To Go is a talking word processor filled with features thatincrease its ease of use. Many functions can be carried out by simply clicking the toolbar at the top of the Write:OutLoud To Go screen, making importantword processing features immediately available without using pull-down menus.Writers click buttons to navigate through text, check spelling and more.One-Click Access to Common TasksWhen you activate Write:OutLoud To Go, you're ready to type and createdocuments immediately. For ease of use, the buttons on the toolbar are grouped according to tasks.Text Navigation and Selection ButtonsTools for text navigation and selection help writers quickly and efficientlymove through and review their writing.These self-explanatory tools are designed for ease of use by students. There are many more keyboard shortcuts for text navigation and selection listed in Keyboard Shortcuts at the end of this User Guide.BeginningTap Beginning to move your cursor to the beginning of the document.Use this to reread the work.MoveTap Move to move your cursor to the next sentence. Use this to quickly navigate through a document for reading and revising the work.3Write:OutLoud ®To Go© Don Johnston Incorporated USER GUIDENavigation Speech Tools Text AppearanceMoves cursor to the beginningMoves cursor tothe next sentence Selects the next sentence Moves cursor to the end of document Note:A sentence must end with a period,question mark or exclamationpoint in order for Write:OutLoud To Go to recognize it as a sentence.Write:OutLoud®To Go SelectTap Selectto highlight the next sentence. Use this to quickly select “chunks”of text for reading aloud or revising sentence-by-sentence.EndTap End to move directly to the end of the document. Use this to quickly getto the end of a document to add to existing work.Speech ButtonsSpeech feedback gives writers immediate auditory reinforcement of what they havejust typed, the opportunity to self-correct based on what they hear and motivatingauditory support during the revision process.SpeakTap Speak to hear the highlighted text or the sentence containing the cursor.Tap again to hear the next sentence spoken. Use this to read through thedocument sentence-by-sentence for more effective revision.Write:OutLoud To Go speaks highlighted text or, if no text is highlighted, speaksthe sentence containing the cursor.Select again and the next sentence is spoken. With this feature, you can movethrough your entire document sentence-by-sentence, speaking each sentence as you go.To speak specific words or sentences, highlight the text first, then tap Speak.To speak the entire document, choose Select All in the Edit menu and tap Speak.RepeatTap Repeat to hear again what was just spoken. Use this to repeat what wasjust heard to facilitate accurate proofreading and effective revision.StopTap Stop to stop the current speech. Use this to immediately interruptspeech during revision.© Don Johnston Incorporated USER GUIDE4Note:If your cursor is in the middle of a sentence,Select highlightswords from the cursor to the end of the sentence.Speak sentenceor selectionRepeatStop speakingNote:Sentences are spoken until sentence-ending punctuation or new paragraphsare encountered.5Write:OutLoud ®To GoWrite:OutLoud To Go includes many more speech options that you can turn on and off to meet writers' needs. SeeWrite:OutLoud To Go Menus,for more information.Tool Buttons Print One Tap Print One to print one copy of the current document. Use thisto bypass choosing any print settings.Check SpellingOften, struggling writers write very little text because of poor spelling or vocabulary. The Check Spelling Tool feature in Write:OutLoud To Go helps writers with editing for mechanics.Tap Check Spelling from anywhere in the document to begin the Franklin Spell Checker. Write:OutLoud To Go always checks the entire document for spelling errors.Write:OutLoud To Go displays the Spelling dialog when it finds a word that is not in either the regular Franklin or User dictionaries.The spell checker displays the sentence containing the unknown ormisspelled word (highlighted) along with suggested known orcorrect words.To hear the word in question spoken in context, tap the first .To hear suggested words, tap the second to speak the new word. To select the word suggested in the “Change To” box, tap . To select a word other than the one suggested in the “Change To” box,tap one of the alternate suggested words to select it. Then, tap . To leave the word in question as it is and search for the next word in question, tap .© Don Johnston Incorporated USER GUIDETo hear words in question and suggested words spelled out letter-by-letter,check the box next to Read Word Spelling.When you are finished with the spell checker and want to return to the document, tap .All spelling changes are in the document.Text ButtonsWrite:OutLoud To Go's Text buttons encourage writers to change the way their document looks. These tools give writers control over font size.Grow & Shrink TextTap Grow or Shrink to change the font size. Each time you tap Grow or Shrink , the font for all the text changes to the next available font size.Continue tapping until you get the size you want.Write:OutLoud To Go MenusThe Write:OutLoud To Go Menu Bar appears.To view a drop-down menu, tap the desired menu heading.To make a selection from a drop-down menu, tap the action you desire.Write:OutLoud ®To Go© Don Johnston IncorporatedUSER GUIDE 6Grow text size Shrink text size7Write:OutLoud®To GoFile MenuNewCreates a new document. The new document uses the current default settings.OpenOpens an existing document. Write:OutLoud To Go displays an Open dialog box. Choose a file.CloseCloses the current document.SaveSaves changes to document and allows you to continue working. If thedocument is untitled, the Save As window displays so you can give it a name. Save As…Saves document with a new name and allows you to continue working. The original document remains intact.© Don Johnston Incorporated USER GUIDEWrite:OutLoud®To Go Delete FileOpens a Delete File dialog box.Select the document to be deleted. Alert message appears to verify that you want to delete the selected document.Beam FileAllows you to beam files between the Dana™by AlphaSmart ®and a desktop or laptop computer or between Danas. You cannot beam the application.Print OnePrints one copy of the document without prompting for settings.PrintOpens the Print Dialog box.© Don Johnston Incorporated USER GUIDE8Note:Delete File will only delete the selected document file.It will not delete other Dana files (i.e. F1,F2,etc.).Type a title for your document Choose print specifications from theprint window and send documentto the printer Add a header to your document(see Header Dialog Box)9Write:OutLoud®To Go Header Dialog BoxAvailable as an option from the Print Dialog box. Allows you toadd a name, date and any other class information required inyour document into the heading.ExitExits the program.Edit MenuUndoCancels your last action. This item is unavailable if your last actioncannot be undone.CutRemoves selection from document. Cut may be used with Paste.CopyDuplicates selection. Copy may be used with Paste.PastePlaces cut or copied selection in your document at the cursor.ClearRemoves selection from document. Not used with Paste.Select AllHighlights all text in the document.© Don Johnston Incorporated USER GUIDEFind…Locates a specific word or group of words in text. Write:OutLoud To Go displays the Find dialog box.Go to Start of DocMoves the cursor to the top of the first page of the document. Works exactly like in the toolbar.Go to Next SentenceMoves the cursor to the beginning of the next sentence.Works exactly like in the toolbar.Select SentenceHighlights the next sentence. Works exactly like in the toolbar. If the cursor is at the end of a sentence, it highlights the whole next sentence. If the cursor is in a sentence, it highlights from the insertion point to the end of the sentence.Go to End of DocMoves the cursor to the bottom of the last page of the document. Works exactly like in the toolbar.Tools MenuCheck SpellingSelect Check Spelling from anywhere in the document to begin the Franklin Spell Checker. Works exactly like in the toolbar. Write:OutLoud ®To Go © Don Johnston Incorporated USER GUIDE10Stops speech Displays the sentence containingthe “found” word with the “found”word highlighted Type in the word to be found Finds the next instance of the wordReads the sentence that contains the“found” wordReads the word(s) to be foundCloses the dialog box and allows the userto continue working in the documentWrite:OutLoud®To GoCue Misspelling…When toggled on, displays the number of spelling errors in the right, topcorner of the application window. If an error is corrected or deleted, thecounter reflects the change.Text MenuThe Text menu lets you make changes to the font and size of text inyour document.FontChoose the font, style and size of text for your document.Grow SelectionIncreases the size of all words in the document.Works exactly like in the toolbar.Shrink SelectionDecreases the size of all words in the document.Works exactly like in the toolbar.Note:Multiple fonts cannot be used with a document.Write:OutLoud®To Go Options MenuShow/Hide ToolbarShows or hides the toolbar at the top of the Write:OutLoud To Godocument.Speech MenuSet Speech On/OffToggles all speech options On and Off. When turned off, theand are not active in the toolbar.Tap Set Speech On to activate your speech settings again.SpeakSpeaks text. Works exactly like in the toolbar.RepeatRepeats last spoken text. Works exactly like in the toolbar.Stop SpeechImmediately stops the current speech.Works exactly like in the toolbar.Speak LettersWhen checked, speaks each letter as it is typed. Tap Speak Lettersto uncheck.Speak WordsWhen checked, speaks each word as it is completed. A word must befollowed by a space, punctuation or a paragraph return beforeWrite:OutLoud To Go can speak it. Tap Speak Words to uncheck.Write:OutLoud®To Go Speak SentencesWhen checked, speaks each sentence as it is completed. A sentence mustbe followed by punctuation (period, exclamation point or question mark)before Write:OutLoud To Go can speak it. Choose Speak Sentences touncheck.Speak ParagraphsWhen checked, speaks each paragraph as it is completed. There mustbe a return for the paragraph to be spoken. Tap Speak Paragraphs touncheck.Word HighlightWhen checked, individual words are highlighted as they are spoken.Tap Word Highlight to uncheck.Voice SettingsAdjusts speed and voice volume.To increase voice volume, move the volume slide bar to the right.To decrease the voice volume, move the volume slide bar to the left.To increase the speed of the voice, slide the speed bar to the right.To decrease the speed of the voice, slide the speed bar to the left.Choose OK to accept any changes and return to the document.Choose Cancel to return to the document without any changes.Write:OutLoud®To Go Keyboard ShortcutsKeysFileNew CMD + NOpen CMD + OClose CMD + WSave CMD + SSave As CMD + HDelete CMD + JBeam File CMD + BPrint One CMD + IPrint CMD + PExit CMD + QEditUndo CMD + ZCut CMD + XCopy CMD + CPaste CMD + VClear CMD + USelect All CMD + AFind…CMD + FGo to Start of Doc CMD + (Go to Next Sentence CMD + #Select Sentence CMD + %Go to End of Doc CMD + )ToolsCheck Spelling CMD + GTextGrow Selection CMD + ]Shrink Selection CMD + [OptionsShow/Hide Toolbar CMD + ;Write:OutLoud®To Go SpeechSet Speech On CMD + DSpeak CMD + TRepeat CMD + RStop Speech CMD + .Speak Letters CMD + KSpeak Words CMD + ESpeak Sentences CMD + MSpeak Paragraphs CMD + \Word Highlight CMD + ,Voice Settings CMD + /WindowAbout CMD + YOtherSpell Checker DialogLearn CMD + LNext Word Alt + [Close window CMD + !Select Characters Beside and Above CMD + *Select Characters Beside and Below CMD + @Select Next Character CMD + >Select Previous Character CMD + <Write:OutLoud®To Go Limited WarrantyDon Johnston Incorporated warrants software for one year from date of purchase.This warranty is valid against manufacture defects and malfunctions not the result ofabuse or mishandling. Except for the above, Don Johnston makes no warranties,express or implied, including warranties as to the merchantability or as to the fitnessof this product for any particular purpose, and shall not be liable for any loss ordamage, directly or indirectly, arising from the use of this software product or forconsequential damages.Don Johnston Incorporated reserves the right to make any changes, additions orimprovements to software or documentation at any time without notice to anyperson or organization.The manuals and the software described in them are copyrighted, with all rightsreserved. Under the copyright laws, the manuals or the software may not be copied,in whole or in part, without written consent of Don Johnston, except in the normaluse of the software. The same proprietary and copyright notices must be affixed toany permitted copies as were affixed to the original. This exception does not allowextra copies to be made for others, whether or not sold, but all the materialpurchased (with all backup copies) may be sold, given, or loaned to another person.Under the law, copying includes translating into another language or format.You may use the software on any computer owned by you, but extra copies cannotbe made for this purpose.DON JOHNSTON INCORPORATED MAKES NO WARRANTIES, EXPRESS OR IMPLIED, INCLUDING WITHOUT LIMITATION THE IMPLIED WARRANTIES OF MERCHANTABILITY AND FITNESS FOR A PARTICULAR PURPOSE, REGARDING THE SOFTWARE. DON JOHNSTON'S LICENSOR(S) DOES NOT WARRANT, GUARANTEE OR MAKE ANY REPRESENTATIONS REGARDING THE USE OR THE RESULTSOF THE USE OF THE SOFTWARE IN TERMS OF ITS CORRECTNESS, ACCURACY, RELIABILITY, CURRENTNESS OR OTHERWISE. THE ENTIRE RISK AS TO THE RESULTS AND PERFORMANCE OF THE SOFTWARE IS ASSUMED BY YOU. THE EXCLUSION OF IMPLIED WARRANTIES IS NOT PERMITTED BY SOME JURISDICTIONS. THE ABOVE EXCLUSION MAY NOT APPLY TO YOU.IN NO EVENT WILL DON JOHNSTON'S LICENSOR(S) AND THEIR DIRECTORS, OFFICERS, EMPLOYEES OR AGENTS (COLLECTIVELY DON JOHNSTON'S LICENSOR) BE LIABLE TO YOU FOR ANY CONSEQUENTIAL, INCIDENTAL OR INDIRECT DAMAGES (INCLUDING DAMAGES FOR LOSS OF BUSINESS PROFITS, BUSINESS INTERRUPTION, LOSS OF BUSINESS INFORMATION, AND THE LIKE) ARISING OUT OF THE USE OR INABILITY TO USE THE SOFTWARE EVEN IF DON JOHNSTON'S LICENSOR HAS BEEN ADVISED OF THE POSSIBILITY OF SUCH DAMAGES. BECAUSE SOME JURISDICTIONS DO NOT ALLOW THE EXCLUSION OR LIMITATION OF LIABILITY FOR CONSEQUENTIAL OR INCIDENTAL DAMAGES, THE ABOVE LIMITATIONS MAY NOT APPLY TO YOU.Don Johnston's Licensor's liability to you for actual damages from any cause whatsoever, and regardlessof the form of the action (whether in contract, tort (including negligence), product liability or otherwise),will be limited to $50.。
区域地带用户指南说明书
Lions Clubs InternationalRegion Zone User GuideThis user guide is intended to help the District Governor and District the Governor Elect to assign clubs to a zone and optionally to assign zone(s) to regions and to assign region and zone chairpersons.This guide describes the steps to build a region and zone structure from the an “empty” structure. Special notes and background informationThroughout the guide we use the term “Region and Zone Structure” to mean the assignment of clubs to zones and optional the assignment of zones to regions.The assignment of clubs to zones and the appointment of zone chairpersons is recommended for all districts. Assigning the zones to regions and appointment of region chairpersons is optional. This guide describes both options.ContentsA. Creating the Region Zone Structure (2)1. Regions (2)2. Create a zone (2)3. Create a zone without a region. (3)4. Add clubs to the zone. (4)5. Assign a zone chairperson to the zone. (5)6. Assign the region chairperson. (6)7. Next steps (8)B. Editing the Region Zone Structure (8)1. Assign a club to a different zone (8)2. Assign a zone to a different region (9)3. Assign a different zone chairperson (10)4. Assign a different region chairperson (11)A. Creating the Region Zone Structure1. RegionsZones can be created without assigning the zone to a region. If the zone you are creating will not be assigned to a Region skip to section A3 (Create zone without a region).a)Click the Add Region link.b)Type the name you will assign to the new region.c)Click OK.2. Create a zone(This step assumes a region was created in step A1.)a)Click the Add Zone button that is associated with the region to add a zone.b)Type the name you will assign to the new zone.c)Click OK.The image below shows the Region (Region1) and the Zone (Zone1). Note the blue actionbuttons that are associated with Zone1 (Delete Zone, Edit Zone, etc.). Skip to Step 4 to add clubs to the zone.3. Create a zone without a region.Note the blank space where the region information would otherwise go.a)Click the Add Zones without Region button.b)Type the name you will assign to the zone.c)Click OK.The image below shows the Zone name (ZoneAlone1). Note the blue action buttons that are associated with ZoneAlone1 (Delete Zone, Edit Zone, etc.).4. Add clubs to the zone.The Manage Club button will display all of the clubs that have been assigned to the zone and also will display all of the clubs that have not yet been assigned to any zone.a)Click the Manage Clubs button associated with the zone.In this step you can add one or more clubs to the zone.b)Click the “Add” link of the club that you want to add to the zone. NOTE: Clicking the linkwill toggle between Add and Remove.c)Click OK to add the selected club(s).The image below shows the two clubs that were added to the Zone.5. Assign a zone chairperson to the zone.The Zone Chairperson’s name is displayed as “vacant”, until a chairperson has been assigned.a)To assign a chairperson to the zone, click the Assign Zone Chairperson button associatedwith the zone.A list of all members in the district will display in alphabetical order by first name.b)Use the scroll bar on the right to scroll up or down to locate the member name or typefirst name of the member in the search box. Click the member name to select themember.The image below shows the zone chairperson’s name is displayed on the Regions and Zones page.6. Assign the region chairperson.If not using regions, skip this step.The Region Chairperson’s name is displayed as “vacant”, until a chairperson has been assigned.a)To assign a chairperson to the region, click the Assign Region Chairperson buttonassociated with the Region.A list of all members in the district will display in alphabetical order by first name.b)Use the scroll bar on the right to scroll up or down to locate the member name or typefirst name of the member in the search box. Click the member name to select themember.The image below shows the zone chairperson’s name is displayed on the Regions and Zones page.7. Next stepsFrom this point you can continue to:a) Add more zones to the current region.b) Add more zones without a region.c) Add more regions.B. Editing the Region Zone Structure1. Assign a club to a different zoneA club can only be assigned to one zone. To assign a club to a different zone, the club must firstbe removed from the original zone.a)From the Regions and Zones page, scroll to the original zone. Click the Manage Clubsbutton associated with the zone.b)From the Manage Clubs page, click the Remove link associated with the club. Click the OKbutton.c)Once the club has been removed from the original zone, scroll to the new zone on theRegions and Zones page. Click the Manage Clubs button associated with the new zone.From the Manage Clubs page, click the Add link associated with the club. Click the OKbutton.2. Assign a zone to a different regionThe example below demonstrates reassigning Zone1 from Region1 to Region2.a)From the Regions and Zones page, scroll to the zone that will be reassigned. Click the EditZone button that corresponds to the zone being reassigned.b)From the Add Region Edit Zone page, click the Assign Zone to Region drop down arrow.Select the new region from the drop down list. Click the OK button.3. Assign a different zone chairpersonEach zone can only have one chairperson at a time. To assign a new chairperson, the original chairperson’s term must be ended.a)From the Regions and Zones page, click the End Zone Chairperson Term button associatedwith the Zone.b)Follow the instructions in step A5 to assign the new zone chairperson.4. Assign a different region chairpersonEach region can only have one chairperson at a time. To assign a new chairperson, the original chairperson’s term must be ended.a)From the Regions and Zones page, click the End Region Chairperson Term buttonassociated with the Region.b)C lick “End Term”.Note the Region Chairperson position is vacant.c)Follow the instructions in step A6 to assign the new region chairperson.。
Capex_Budget_User_Guidelines_for_CapexPlanner_User
I Plan – Capex Planner Capex Budget User Guidelines for Capex Planner UserDear Capex Planner User, this document is to support the User of the Capex Planner. The document contains guidance for the access and work in the Capex Planner and the setup of Wishlist/Capital items for the Hotel Budget Capital Plan in the Capex Planner. The first part explains the User PC setup requirements and initial User login in the Capex Planner (A). The second part explains the work options of the User for the Hotel Capital Planning process (B) and the CapexPlanner CP Access Overview Budget Tab sheet – User View (C).A) Capex Planner – User PC Setup requirements – User – 1st LoginFor User access to the Capex Planner it is necessary to have the Capex Planner Client installed on the PC. The Capex Planner Client is required to connect to the Capex Server with the Hotel Capex database. Capex Planner (Client) - First Start Start the Capex Planner via the Desktop iconBefore the first login – the Capex Planner at the User PC must be configured in “Settings” with the network IP of the Capex Server PC. If the default Server:127.0.0.1 is displayed the configuration is necessary.Capex_Budget_User_Guidelines_for_CapexPlanner_User.doc 1 of 6 26/07/2010Request the information for the correct network IP of the Hotel Capex Server from your CapexPlanner Administrator or your local IT. Click “Settings” in the Capex Planner Login screen and enter the Network IP of the Capex Server PC in the Server-IP input field.Click “OK” to return to the Capex Planner Login screen - The Login screen will indicate the Network IP.Use the Username and Password as provided from the CapexPlanner AdministratorCapex_Budget_User_Guidelines_for_CapexPlanner_User.doc 2 of 6 26/07/2010The first login will require the password resetPlease change your >>Password<<. Repeat your >>Password<<. Click the >>OK<< button<<.Password reset: In case you forgot the password contact your Hotel Capex Planner Administrator to reset it.After a successful login the Capex Planner Workflow page will opens:Capex_Budget_User_Guidelines_for_CapexPlanner_User.doc 3 of 6 26/07/2010B)Hotel Capital Planning process - User1. Establish Hotel Capital Plan Wishlist for Budget 2011 (see Capex Planner User Guide Section D - Chapter 2 – Page 41-46) -> Each User can add proposals for Capital items in the CP Access section. -> Capital items established from a User have to be reviewed and approved by the Administrator. A User can define the Capital items for his/her hotel resort in the hotel. >>Description<< is the input to define the Capex item. >>Section<< to select the Hotel section the item applies to. >>Type<< to specify the Type of the selected Hotel section Following fields must be entered: >>Unit of measure<< Select No., M^2 and Sft. >>Total no. needing work<< enter the Total No. needing work for the item. >>Notes/ Information<< Use this filed to specify details of the work required. >>Work type needed<< Define the required type of work over the drop down boxMinor works/redecorations Redecoration and partial replacement of FFE package Complete renovation of room including ceilings, walls and electrical/lighting installations. MAJOR PROJECT Should be used for any projects which go beyond complete renovation works. Examples of a Major Project could be: Alteration/Conversion of rooms, New Extension, Relocation of Kitchen, New Terrace Bar, a Swimming Pool. Best Practice: Use the Comment field to address questions or further information to the administrator for the review/approvalSOFT LITE SOFT HARDCapex_Budget_User_Guidelines_for_CapexPlanner_User.doc 4 of 6 26/07/2010Locked Wishlist The Administrator can lock the CP Access for Users to avoid any changes during the review process. In case there is no option to create a new or edit an exitsing item in the CP Access, pls. check the setting in the workflow page.Pls. contact your Hotel Capex Planner Administrator in case you need access to the CP Access. Reports The Capex Planner provides 4 separate report sections. Relevant for the Budgeting process are the Overview Reports (Project List and Journal) and the Budget Reports with the selection: `Summary´ or `Detailed phased´. A User can review new created items in the Journal Report (without approval). Only after approval from the Administrator a Capital item will be included in the Budget and available in the Budget reports.Capex_Budget_User_Guidelines_for_CapexPlanner_User.doc 5 of 6 26/07/2010C) CapexPlanner CP Access Overview Budget Tab sheet – User ViewMain page tabsFollowing tab sheets are available:Description Main Description of the item, be as specific as possibleSection Selection of the Hotel section related to the Capex item. In the drop down list there are all sections available, which are setup in the Hotel Structure.Type Selection of specific type of the selected section Minmize, extend or close windowBudget (selected tab sheet)Unit of Measure (mandatory fields)Notes/Information Field to specify the item purpose Work type needed Please click here for opening the monthly base. Budget data grid Split the “Total No. Needing work” in monthly or yearly inputs. If an Amount per unit is defined in the definition, this Amount per Unit is automatically filled from an input of a No. needing work in a month/year. Specify the work type needed to complete the workComment Section to enter additional information about the item..Can be used for communication between the Administrator and User during the review/approval processTotal no. Needing work (mandatory field) The system will check that the defined No. needing work matches with the entered numbers in the Financial Data grid. Green – Total no. needing work in Definition match with entered No. needing work in the Financial Budget data grid. Amount per Unit If amounts per unit are defined, than this amount will be used for calculation with any No. of WorkLegend: Base definition Item definition Financial data Background story Use the „Create“button to finalized your budget item or „Cancel” to leave edit section. Functionalitiesinput in the Financial Data grid.Total (incl. F, C) If amounts per unit are defined, than the Total will be calculated in the definition (excl. Inflation)Capex_Budget_User_Guidelines_for_CapexPlanner_User.doc6 of 626/07/2010。
- 1、下载文档前请自行甄别文档内容的完整性,平台不提供额外的编辑、内容补充、找答案等附加服务。
- 2、"仅部分预览"的文档,不可在线预览部分如存在完整性等问题,可反馈申请退款(可完整预览的文档不适用该条件!)。
- 3、如文档侵犯您的权益,请联系客服反馈,我们会尽快为您处理(人工客服工作时间:9:00-18:30)。
企业客户分类规则挖掘系统使用说明
(1)启动customer_classify.exe文件,首先弹出图1所示的“企业客户分类规则挖掘系统”的说明窗口,片刻后,系统自动弹出系统主界面,如图2所示。
(2)如图2所示,在系统主界面中有菜单和企业客户分类规则挖掘系统的功能简介。
菜单包括企业客户分类规则挖掘、查看数据、系统原理、使用说明和退出。
(3)请点击“查看数据”,系统将弹出“企业客户数据”窗口显示客户的原始数据,如图3所示。
(4)请点击“系统原理”菜单查看该系统的原理。
(5)请点击“使用说明”菜单查看如何使用该系统。
(6)请点击“企业客户分类规则挖掘”菜单,弹出图4所示的“企业客户分类规则挖掘”窗口。
图1 “企业客户分类规则挖掘系
统”的说明窗口
图2 系统主界面
图3 企业客户数据窗口
(7)在参数设置中已经输入各参数值,如种群大小为50,最大迭代数目为40,最小支持度阈值ms 为0.2,最小置信度阈值mc 为0.6,交叉概率为80%,变异概率为5%。
如图5所示。
用户可以自己修改各参数值。
(8
)点击遗传运算操作中的“编码”,右侧出现编码,运算状态显示为“请选择筛选种群的运算!”,如图6、7所示。
(9)点击遗传运算操作中的“筛选种群”,右侧将把不符合置信度和支持度的编码用“***”表示出来,运算状态显示为“当前尚未达到最大迭代次数,请继续进行交叉运算!”,如图8、9所示。
图4 “企业客户分类规则挖掘”窗口 图5 参数设置
图6 编码操作的结果 图7 编码操作的运算状态
(10)依次点击遗传运算操作中的“交叉”和“变异”,运算状态中分别显示“当前尚未达到最大迭代次数,请继续进行变异运算!”和“当前尚未达到最大迭代次数,遗传算法可以继续进行!”,如图10、11所示。
此时,“算法继续运行”按钮变为可用。
(11)点击“算法继续运行”按钮,出现如图12所示的对话框,点击“确定”按钮,运算状态中显示“算法运行大概需要2-3分钟,请耐心等候”,直到2-3分钟后“输出最优规则集”按钮变为可用。
(12)点击“输出最优规则集”按钮,根据遗传算法得到的最优规则集对话框显示出来,如图13所示。
图8筛选种群操作的结果 图9 筛选种群操作的运算状态 图10 交叉操作的运算状态 图11变异操作的运算状态 图12 算法运行提示
(13)如果想修改参数重新运行,首先点击“返回”按钮,返回到“企业客户分类规则挖掘”窗口。
然后点击“重置”按钮,对参数进行确认后,重复(7)—(12)的操作。
(14)点击“返回”按钮,返回到“客户分类系统”的主界面。
(15)点击主界面中的“退出”菜单,结束程序。
图13 输出最优规则。
