NetApp FAS系列安装配置说明
NetApp FAS2040 存储整合方案和配置清单

3
揭阳榕城区政府目前有多个业务系统(企业办公、财务、邮件、网站服务、文件服务等业务)运行在Window2000、Windows2003平台上,数据主要存储在服务器主机的内置硬盘或磁盘阵列中,随着业务的不断增长和关键业务系统的性能提升,目前基于分布式存储的存在一定的安全性、可用性及管理问题,揭阳榕城区政府希望把多台服务器系统的存储进行整合,进一步提高数据安全性、可用性和性能,提高整个系统维护效率和降低系统维护成本,避免数据管理的风险。目前有多个业务系统的数据存储要求,考虑未来的数据增量,可用数据量在1TB,考虑到存储系统投资成本和总体拥有成本的因素,揭阳榕城区政府希望用基于统一的网络存储架构来整合本次工程中的业务系统。
5.高性能
整个存储系统应该提供较高的文件读写速率,IO操作次数,非常短的响应时延;而不是只提供单个指标的高性能,从而在整体上提升性能。
5
数据存储是已经成为整个信息化建设的重要组成部分,需要提供多功能、多用途的存储资源整合、备份、容灾等能力。在设计一个复杂的存储系统解决方案时,用户往往会在采用何种网络结构上举棋不定。是采用光纤通道FCP SAN方式,是采用iSCSI SAN方式,还是采用NAS方式?这需要根据前端的业务类型、主机平台以及具体的应用需求,经过仔细的分析、评估之后才能够决定。
5.5SAN(FC SAN)与NAS(FS SAN)的融合10
6技术方案建议13
6.1方案总体设计13
6.1.1iSCSI整合方案15
NetApp-FAS系列安装配置说明
NETAPP FAS系列安装配置手册赞融电子上海分公司2003年11月修订控制1简介1.1说明本文简要说明了Network Appliance公司FAS系列存储产品配置过程。
本手册基于DataOntap 6.4.2P6操作系统1.2适用对象和前提本文是针对赞融电子的内部人员。
要求阅读者具有以下方面的专业能力:熟悉Unix操作系统;熟悉Windows操作系统;具有NETAPP FAS系统的基本知识.1.3参考资料Data ONTAP™ System Administrator’s GuideData ONTAP™ Software Setup Guide1.4术语表NFS:Network 网络文件系统CIFS:Common Internet 通用Internet文件系统NAS:Network Attached Storage 网络附加存储WAFL:Write Anywhere 随地写入文件格式2配置过程2.1检查Filer硬件安装2.2设置Filer使用计算机串口连接Filer背板上的Console口使用Windows附件中的超级终端建立连接,参数如下:每秒位数 9600,数据位 8,奇偶校验无,停止位 1,数据流控制无建立连接依次打开Disk Shelf和Filer电源使用setup命令配置Filerfas940> setupPlease enter the new hostname []: fas940Do you want to configure virtual network interfaces? [n]: yNumber of virtual interfaces to configure? [0] 3Name of virtual interface #1 []: vif1Is vif1 a single [s] or multi [m] virtual interface? [m] sNumber of links for vif1? [0] 2Name of link #1 for vif1 []: e5aName of link #2 for vif1 []: e5bName of virtual interface #2 []: vif2Is vif2 a single [s] or multi [m] virtual interface? [m] sNumber of links for vif2? [0] 2Name of link #1 for vif2 []: e9aName of link #2 for vif2 []: e9bName of virtual interface #3 []: vif3Is vif3 a single [s] or multi [m] virtual interface? [m] sNumber of links for vif3? [0] 2Name of link #1 for vif3 []: e11aName of link #2 for vif3 []: e11bPlease enter the IP address for Network Interface vif1 []: 165.204.224.173Please enter the netmask for Network Interface vif1 [255.255.0.0]: 255.255.254.0Please enter media type for vif1 {100tx-fd, tp-fd, 100tx, tp, auto (10/100/1000)} [auto]: Enter Please enter the IP address for Network Interface vif2 []: 165.204.224.174Please enter the netmask for Network Interface vif2 [255.255.0.0]: 255.255.254.0Please enter media type for vif2 {100tx-fd, tp-fd, 100tx, tp, auto (10/100/1000)} [auto]: Please enter the IP address for Network Interface vif3 []: 165.204.224.175Please enter the netmask for Network Interface vif3 [255.255.0.0]: 255.255.254.0Please enter media type for vif3 {100tx-fd, tp-fd, 100tx, tp, auto (10/100/1000)} [auto]: Please enter the IP address for Network Interface e0 []: 165.204.224.172Please enter the netmask for Network Interface e0 [255.255.0.0]: 255.255.254.0Please enter media type for e0 {100tx-fd, tp-fd, 100tx, tp, auto} [auto]:Would you like to continue setup through the web interface? [n]:Please enter the name or IP address of the default gateway: 165.204.224.254 The administration host is given root access to the filer's/etc files for system administration. To allow /etc root accessto all NFS clients enter RETURN below.Please enter the name or IP address of the administration host:Please enter timezone [GMT]: Asia/ShanghaiWhere is the filer located? []: Suzhou ChinaWhat language will be used for multi-protocol files (Type ? for list)?:zh.GBKSetting language on volume vol0The new language mappings will be available after rebootMon Sep 29 03:45:14 GMT [rc:ALERT]: Language on volume vol0 changed to zh.GBK Language set on volume vol0Do you want to run DNS resolver? [n]: yPlease enter DNS domain name []: You may enter up to 3 nameserversPlease enter the IP address for first nameserver []: 165.204.224.2Do you want another nameserver? [n]: yPlease enter the IP address for alternate nameserver []: 139.95.33.235Do you want another nameserver? [n]: EnterDo you want to run NIS client? [n]: EnterThis system will send event messages and weekly reportsto Network Appliance Technical Support. To disable this feature,enter "options autosupport.support.enable off" within 24 hours.Enabling Autosupport can significantly speed problem determinationand resolution should a problem occur on your system.For further information on Autosupport, please see:.Press the return key to continue.Now type 'reboot' for changes to take effect.fas940> Reboot重新启动Filer 之后,进行cifs setup 安装fas940> cifs setupEnable CIFS access to the filer by a Windows(tm) PCYour filer is currently only visible to PCs on the same net.Do you wish to make the system visible via WINS? [no]: yPlease enter next WINS IP address (or return to end list) []: 165.204.224.225Please enter next WINS IP address (or return to end list) []: 163.181.3.225Please enter next WINS IP address (or return to end list) []:CIFS requires local /etc/passwd and /etc/group files for multiprotocol.Default passwd be created containing 'root', 'pcuser',and 'nobody'.Enter the password for root []:Retype the password:This filer is currently licensed for CIFS only.The filer will be configured as a NTFS_only filer. It canbe changed to a Multiprotocol filer by reissuing the CIFS setup command.The default name of this filer will be 'FAS940'.Do you want to modify this name? [no]: EnterCIFS supports three types of user authentication:1. Windows Domain authentication.2. Windows Workgroup authentication using the filer's user accounts.3. /etc/passwd and/or NIS based authentication.What type of authentication will this filer use? [1]: 1The filer will use Windows Domain authentication.Enter the Windows Domain for the filer []:It is highly recommended that you create the local administratoraccount (FAS940\administrator) for this filer. This account enablesaccess to the filer from Windows when domain controllers are notaccessible.Create the FAS940\administrator account? [yes]: yesSet the password for FAS940\administrator:Retype the password:Mon Sep 29 11:53:46 CST [rc:info]: User <administrator> addedMon Sep 29 11:53:46 CST [rc:notice]: security style for /vol/vol0/ changed from unix to ntfs is a Windows 2000(tm) domain.In order to create this filer's domain account, you must supply thename and password of an administrator account with sufficient privilegeto add the filer to the domain.Please enter the Windows 2000 user []:Password for :CIFS - Logged in as .By default, setup creates the filer account in the ActiveDirectory container named 'Computers'. Alternatively, you caninstall the filer in an organizational unit (OU) by specifyingthe domain relative distinguished name of the OU, as in'ou=innerOU,ou=outerOU'.Active Directory container for filer account? [cn=computers]: EnterCIFS - Connecting to domain controller.Mon Sep 29 11:57:22 CST [rc:info]: Connection with DC \\SSUZDC2 establishedMon Sep 29 11:57:22 CST [nbns_timer:info]: All CIFS name registrations complete for local serverWelcome to the AMD () Windows 2000(tm) domain.CIFS local server is running.2.3创建volume通过Telnet或串口,用命令行方式创建卷vol create <volume name, such as ‘/vol/vol1’> [ -r <RAID Size> ] [ disks] 例,创建名为vol1的卷,RAID组最大为8,包含2块盘vol create /vol/vol1 –r 8 2使用vol status –r 命令观察初始化进程通过Web界面创建卷在浏览器中输入点击,根据提示输入用户名密码从右侧窗口Volume Add在New Volume Name栏中填写新建卷名vol1在Raid Group Size中填写RAID组的大小8 在Language中选择Simplified Chinese(GBK)选择Automatic Disk Selection在Number of Disks中填写Volume的磁盘数2点击Add2.4通过CIFS共享通过命令行cifs shares -add <share name> <path> e.g. cifs shares add vol1 /vol/vol1通过Web界面设置→CIFS→Shares→AddShare Name 填写 vol1Mount Point 填写 /vol/vol1点击Add2.5通过NFS共享通过命令行exportfs -o anon=0 /vol/vol1或者通过Web界面配置→NFS→Manage Exports→Insert Line 在Path中输入/vol/vol1Permission选择rwAnonymous UID填写0点击OK3使用介绍3.1Filer菜单3.1.1Show Status 显示Filer的整体状态,包括, Model, System ID,Version, Disks,Status 等信息3.1.2Manage Licenses 管理Filer 的license 如常用的CIFS, NFS, FCP,iSCSI,SnapRestore, SnapMirror, SnapVault, SyncMirror, MultiStore等,详情可参见或(中文网页)3.1.3Report 显示Filer目前配置及使用情况,如Uptime, Network Interfaces, DiskUsage, System Configuration 等信息3.1.4Syslog Messages 这里是系统的syslog messages 信息,里面会记录系统运行时产生的一些信息,特别是一些系统的报错信息,这些信息非常重要,对于发现各种问题有很大帮助,Netapp Technical Support 也需要这些信息,最好每天都查看一下这里的信息3.1.5Use Command Line 在这里可以使用自带的telnet 工具,方便你管理时使用Data Ontap系统的命令。
Nepp存储设备安装配置手册

N e p p存储设备安装配置手册This model paper was revised by the Standardization Office on December 10, 2020NetApp存储设备配置说明修改记录目录1编写目的编写本文档的目的在于详细地说明NetApp FAS存储系统的安装、配置以及常用命令的介绍和可靠性维护、故障检查与恢复的方法,便于开发、测试、用服和工程维护人员安装、使用和维护NetApp FAS存储系统存储系统。
2专业名词和缩略语3组网方式和环境介绍图 NetApp FAS存储系统组网结构NetApp FAS存储系统存储设备以NAS存储方式使用,通过万兆交换机与主机相连接。
4安装配置方法4.1NetApp硬件安装存储设备硬件的安装主要是各盘柜间线缆的连接、磁盘安装、盘柜上架、上电等,以上操作多由NetApp技术支持工程师完成。
使用存储设备随机携带的“DB-9 to RJ-45”转接线将FAS存储系统的CONSOLE端口和安装了WINDOWS操作系统的主机串口相连,在WINDOWS主机上安装SecureCRT软件,新建一个serial协议的连接,其中port参数根据所连接的是COM1还是COM2来进行选择,其余参数参考图所示,通过串口连接登录到FAS存储系统。
图4.2设备初始化和系统设定4.2.1设备初始化FAS存储系统上电以后,在secureCRT终端窗口中将出现类似以下内容的系统自检信息,当提示按CTRL+C 时按下此组合键,再在启动方式中选择(4a),重新初始化磁盘。
>NetApp Release Wed Sep 8 15:58:37 PDT 2004>Copyright (c) 1992-2009 Network Appliance, Inc.>Starting boot on Wed Dec 31 23:59:58 GMT 1969>Thu Jan 1 00:00:02 GMT [:info]: software ownership has been en abled for this system Thu Jan 1 00:00:03 GMT [:CRITICAL]: No disks were detected for the partner; this node will be unable to takeover correctly Thu Jan 1 00:00:03 GMT [:info]: Disk shelf count function ality is not supported on software based disk ownership configurations. Thu Jan 1 00:00:04 GMT [fmmbx_instanceWorke:info]: no mailbox instance on prima ry side>WARNING: 0 disks found!>>Storage Adapters found:>2 Fibre Channel Storage Adapters found!>0 Parallel SCSI Storage Adapters found!>1 ATA Adapters found!>>Target Adapters found:>0 Fibre Channel Target Adapters found!>0 iSCSI Target Adapters found!>1 Unknown Target Adapters found!>>WARNING: there do not appear to be any disks attached to the system.>>Check that disks have been assigned ownership to this>system (ID ) using the 'disk show' and 'disk assign' commands from maintenace mode.>>No root volume found.>Rebooting... (ctrl-c to bre‰Disk assign4.2.2系统设定根据磁盘个数以及空间大小,整个初始化的时间可能要持续1~2个小时左右,磁盘初始化完成以后,系统将出现以下提示信息对系统进行设定:Please enter the new hostname []: zxmvs1 ----- 主机名Do you want to configure virtual network interfaces [n]: y ----- 是否配置虚拟网卡Number of virtual interfaces to configure [0] 1 ----- 要虚拟网卡的个数Name of virtual interface #1 []: interface1 ----- 虚拟网卡的名称Is interface1 a single [s] or multi [m] virtual interface [m] ----- 配置trunk mode为-----single还是 multiple,single为双网卡互备,multiple可以实现负载均衡Number of links for interface1 [0] 2-----虚拟网卡所要绑定的连接数(实际网卡个数)Name of link #1 for interface1 []: e0a-----第一个实际网卡的名称Name of link #2 for interface1 []: e0b-----第二个实际网卡的名称Please enter the IP address for Network Interface interface1 []:-----虚拟网卡的IP地址Please enter the netmask for Network Interface interface1 []:-----子网掩码Should virtual interface interface1 take over a partner virtual interface during failover [n]: y ------当发生群集倒换时是否接管备用节点的虚拟网卡The clustered failover software is not yet licensed. To enable network failover, you should run the 'license' command forclustered failover.Please enter the partner virtual interface name to be taken over by interface1 []: interface0---------当发生群集倒换时接管备用节点的虚拟网卡名称Please enter media type for interface1 {100tx-fd, tp-fd, 100tx, tp, auto (10/100/1000)} [auto]:---------虚拟网卡的类型,选择auto Would you like to continue setup through the web interface [n]: y-----------是否希望通过web方式进行设定,选择 yPoint a web browser tocomplete setup. At any time, you can continue with the console setup.Please enter the name or IP address of the default gateway:----------默认网关 The administration host is given root access to the filer's/etc files for system administration. To allow /etc root accessto all NFS clients enter RETURN below.Please enter the name or IP address of the administration host:--------输入管理员主机的名称或者IP地址Where is the filer located []: 4A-------filer所在位置Do you want to run DNS resolver [n]:-----是否运行DNS服务器Do you want to run NIS client [n]:------是否运行NIS客户端This system will send event messages and weekly reports to Network Appliance Technical Support. To disable this feature, enter "options off" within 24 hours. Enabling Autosupport can significantly speed problem determination and resolution should a problem occur on your system. For further information on Autosupport, please see: the return key to continue.The root volume currently contains 2 disks; you may add more disks to it later using the "vol add" command. Now unpack the tar file provided on the tar floppies into the root directory of the filer. When you are done, type "download" to install the boot image on the hard disk and "reboot" to begin using the new image.4.3操作系统安装当系统初始化设置完成以后,如果需要更新FAS存储系统的操作系统还需要执行以下步骤:4.3.1注册现有系统的cifs服务,将操作系统文件上传至FAS存储系统1.参照4.4.2的说明注册cifs服务,执行以下命令设置cifs 配置参数zxmvs> cifs setupEnable CIFS access to the filer by a Windows(tm) PCYour filer is currently only visible to PCs on the same net.Do you wish to make the system visible via WINS [no]: yPlease enter next WINS IP address (or return to end list) []: CIFS requires local /etc/passwd and /etc/group files for multiprotocol.Default passwd file will be created containing 'root', 'pcuser',and 'nobody'.Enter the password for root []:Retype the password:This filer is currently licensed for CIFS only.The filer will be configured as a NTFS_only filer. It canbe changed to a Multiprotocol filer by reissuing the CIFS setup command.The default name of this filer will be 'ZXMVS'.Do you want to modify this name [no]:CIFS supports three types of user authentication:1. Windows Domain authentication.2. Windows Workgroup authentication using the filer's user accounts.3. /etc/passwd and/or NIS/LDAP based authentication.What type of authentication will this filer use [1]: 3The filer will use /etc/passwd and/or NIS/LDAP for authentication.The Filer will use clear text passwords.Win98 and NT clients require registry changes to access filer.This filer will be a member of the Workgroup 'WORKGROUP'.Do you want to modify this name [no]:CIFS local server is running.2.通过以下命令设置一个cifs共享服务zxmvs1> cifs shares –add root /vol/vol03.在windows主机上将FAS存储系统共享出来root卷磁盘空间(即vol/vol0)映射为一个本地盘符(假设为H)4.从NetApp的技术支持网站注册一个帐户(注册审核一般至少需要一个工作日,如果急需使用,请联系NetApp技术支持工程师提供),下载相应的操作系统版本到本地,双击执行后将出现图所示提示框,点击“确定”。
Netapp FAS2554安装配置手册

1
3
1
3
1
3
1
3
B Switched clustered
Microsoft Windows client
Runs the software to con gure your storage system
Download:
• System Setup Software: /NOW/public/system_setup/ • OnCommand System Manager: /NOW/cgi-bin/software/
Disconnect all supply power for complete isolation.
Disconnect all supply power for complete isolation.
Disconnect all supply power for complete isolation.
e0c-e0f —10 GbE Ethernet ports or 0c-0f — Fibre Channel ports (SFP dependent)
Remote/Node Management port (wrench icon)
Gigabit Ethernet ports (2)
Power supply LEDs
N
1
2
3
4
Disconnect all supply power for complete isolation.
2
3
4
2
N
4
2
N
TO DATA
TO MANAGEMENT
NETWORK SWITCH SUBNET
C Switchless clustered
NetAPP存储初始化配置详细操作笔记

NetApp ONTAP7.3.4存储初始化配置笔记Fas2020系统初始化2.1 软件系统介绍版本:Data ONTAP 7.3.4 Operating System文件系统: WAFL write anywhere file layout2.2 初始化磁盘使用提供的串口线缆连接设备Console口和笔记本串口,(如果没有事先准备RS232-USB转接头)准备好超级终端,波特率9600 ,无流控。
设备上电。
两分钟后,系统自检完成,出现:Starting boot on Mon Oct 14 07:54:14 GMT 2006(1) Normal boot.(2) Boot without /etc/rc.(3) Change password.(4) Initialize all disks.(5) Maintenance mode boot.(粗体字为本次设置)Selection (1-5)?4a选择4,初始化所有的磁盘;Zero disks and install a new file system? y选择y,确认将所有的磁盘零化,并且安装新的文件系统;This will erase all the data on the disks, are you sure? Y选择y,确认将删除磁盘上的所有数据;Zeroing disks takes about 750 minutes. .................................................................................................................................................................. .................................................................................................................................................................. .................................................................................................................................................................. .................................................................................................................................................................. .................................................................................................................................................................. .................................................................................................................................................................. ......................................................... ......................................................................................................... .................................................................................................................................................................. .................................................................................................................................................................. .................................................................................................................................................................. .................................................................................................................................................................. .................................................................................................................................................................. ......................................................... ......................................................................................................... .................................................................................................................................................................. .................................................................................................................................................................. .................................................................................................................................................................. .................................................................................................................................................................. .................................................................................................................................................................. ......................................................... ......................................................................................................... .................................................................................................................................................................. .................................................................................................................................................................. .................................................................................................................................................................. .................................................................................................................................................................. .................................................................................................................................................................. .................................................................................................................................................................. ................................................................................漫长的等待后disk zeroing complete 完成。
Netapp Vscan 安装配置指导书

华为数据中心N E T A P P存储安装配置指导书(------Netapp Vscan 安装配置手册------)©2005 Network ApplianceAll rights reserved一:Netapp Nas支持Symantec AntiVirus, Mcafee,趋势等杀毒软件的扫描杀毒以下是基于趋势杀毒软件在netapph上架构及安装应用和配置二:在netapp 的nas端操作如下1:fas270a> vscan on (把nas 对病毒扫描的服务开启)fas270a> vscan onWarning: CIFS clients will not be allowed to open files because there are no virus scanners registered with the filer. Are you sure? yesVirus scanning is enabledFas270a>useradin useradd nastest (建立nas用户并加入到域给于管理权限)fas270a> useradmin domainuser add \nastest -g "Administrators"SID = S-1-5-21-147214757-305610072-1517763936-180618Domain User <\nastest> successfully added to Administrators.三:在病毒服务器上安装趋势杀毒软件1:安装第一步点setup2:按提示操作第二步3:按提示操作4:输入nas 的ip地址和nas能够登录的用户名和密码; 另外设定趋势使用passwd5:agent 可以不安装 如果使用client 就要安装; 安装完成后 输入刚才设定的趋势密码进入趋势杀毒管理主界面6:主界面如下:扫描netapp nas三:nas 端的显示以上显示服务器端在访问扫描nas 端的文件系统, 安装配置成功!。
NetApp存储设备安装配置手册

NetApp存储设备配置说明修改记录目录1编写目的 (1)2专业名词和缩略语 (2)3组网方式和环境介绍 (3)4安装配置方法 (3)4.1N ET A PP硬件安装 (3)4.2设备初始化和系统设定 (4)4.2.1设备初始化 (4)4.2.2系统设定 (4)4.3操作系统安装 (6)4.3.1注册现有系统的cifs服务,将操作系统文件上传至FAS存储系统 (6)4.4应用配置 (8)4.4.1系统参数配置 (8)4.4.2注册需要使用的服务 (10)4.4.3创建一个卷并输出空间 (12)4.4.4创建一个Qtree并实施quota限制 (17)4.4.5配置autosupport (19)4.4.6配置snapshot策略及数据恢复方法 (19)4.4.7磁盘故障的数据恢复方法 (19)4.4.8配置Cluster (19)1 编写目的编写本文档的目的在于详细地说明NetApp FAS存储系统的安装、配置以及常用命令的介绍和可靠性维护、故障检查与恢复的方法,便于开发、测试、用服和工程维护人员安装、使用和维护NetApp FAS存储系统存储系统。
2 专业名词和缩略语3 组网方式和环境介绍NetAppFAS3240AESX ServerSWITCHESX Server图3.1 NetApp FAS存储系统组网结构NetApp FAS存储系统存储设备以NAS存储方式使用,通过万兆交换机与主机相连接。
4 安装配置方法4.1 NetApp硬件安装存储设备硬件的安装主要是各盘柜间线缆的连接、磁盘安装、盘柜上架、上电等,以上操作多由NetApp技术支持工程师完成。
使用存储设备随机携带的“DB-9 to RJ-45”转接线将FAS存储系统的CONSOLE端口和安装了WINDOWS操作系统的主机串口相连,在WINDOWS主机上安装SecureCRT软件,新建一个serial协议的连接,其中port参数根据所连接的是COM1还是COM2来进行选择,其余参数参考图4.1所示,通过串口连接登录到FAS存储系统。
NetApp操作手册
NetApp FAS系列存储器操作手册目录App存储系统 (3)2.系统基本维护指南 (5)2.1.进入管理界面 (5)2.2.系统基本信息 (6)2.3.系统LOG信息 (7)2.4.配置Autosupport (8)2.5.设置时区、时间和日期 (8)2.6.杂项设置 (9)2.7.停机及重新启动 (10)2.8.管理及创建卷 (11)2.9.管理及创建Qtree (12)2.10.磁盘配额 (13)2.11.SnapShot的配置和管理 (15)2.12.CIFS的相关信息 (17)2.13.CIFS共享 (19)2.14.启用home directory功能 (20)2.15.ISCSI连接Windows (21)2.16.网络端口的管理 (33)2.16.1.VIF Multiple方式绑定,对应Cisco 交换机端配置命令 (34)2.17.其他网络参数 (35)2.18.更改root用户密码 (36)2.19.系统实时状态监控 (37)附录一:磁盘更换步骤 (39)附录二:时间同步服务器的设置 (40)App存储系统NetApp 系统为各种不同平台上的用户提供了对全部企业数据的无缝访问。
NetApp全系列光纤网络存储系统在文件访问方面支持NFS 和CIFS,在块存储访问方面支持FCP 和iSCSI,确保您可以非常方便地将NetApp 存储系统集成到NAS 或SAN 环境中,并且保护原来的信息。
NetApp 的设计为专用访问环境中的应用程序服务器和服务器集群以及多用户环境中的用户提供了经过优化和整合的高性能数据访问方式。
NetApp 存储系统提供了经过实践考验的、超过99.998% 的数据可用性,减少了代价高昂的停机时间(无论是计划内的还是计划外的),最大限度地保障了对关键数据的访问。
它们在一个简单、易用的环境中实现了数据的可管理性、可扩展性、互操作性和可用性,从而降低了您的总拥有成本,加强了竞争优势。
NetApp系列设备基本操作配置手册

NetApp FAS系列基本操作配置目录App存储系统 (3)2.系统基本操作维护指南 (5)2.1. 存储初始化配置 (5)2.2. 进入管理界面 (7)2.3. 系统基本信息 (8)2.4. 系统LOG信息 (9)2.5. 配置Autosupport (10)2.6. 设置时区、时间和日期 (10)2.7. 杂项设置 (11)2.8. 停机及重新启动 (12)2.9. 管理创建AGGR及卷 (13)2.10. 管理及创建Qtree (15)2.11. 磁盘配额 (16)2.12. SnapShot的配置和管理 (18)2.13. CIFS的相关信息 (20)2.14. CIFS共享 (23)2.15. ISCSI配置 (25)2.16. FC SAN配置 (29)2.17. 网络端口的管理 (32)2.18. 其他网络参数 (33)2.19. 更改root用户密码 (35)2.20. 系统实时状态监控 (35)附录一:磁盘更换步骤 (37)附录二:时间同步服务器的设置 (38)App存储系统NetApp 系统为各种不同平台上的用户提供了对全部企业数据的无缝访问。
NetApp全系列光纤网络存储系统在文件访问方面支持NFS 和CIFS,在块存储访问方面支持FCP 和iSCSI,确保您可以非常方便地将NetApp 存储系统集成到NAS 或SAN 环境中,并且保护原来的信息。
NetApp 的设计为专用访问环境中的应用程序服务器和服务器集群以及多用户环境中的用户提供了经过优化和整合的高性能数据访问方式。
NetApp 存储系统提供了经过实践考验的、超过99.998% 的数据可用性,减少了代价高昂的停机时间(无论是计划内的还是计划外的),最大限度地保障了对关键数据的访问。
它们在一个简单、易用的环境中实现了数据的可管理性、可扩展性、互操作性和可用性,从而降低了您的总拥有成本,加强了竞争优势。
NetApp系列产品具备真正的“统一引擎”功能,使您可以同时支持文件级和块级数据访问—而以前需要有多个系统才能完成这些过程。
Netapp Vscan 安装配置指导书

Netapp Vscan 安装配置指导书华为数据中心N E T A P P存储安装配置指导书一:Netapp Nas支持Symantec AntiVirus, Mcafee,趋势等杀毒软件的扫描杀毒以下是基于趋势杀毒软件在netapph上架构及安装应用和配置二:在netapp 的nas端操作如下1:fas270a> vscan on (把nas 对病毒扫描的服务开启)fas270a> vscan onWarning: CIFS clients will not be allowed to open files because there are no virus scanners registered with the filer. Are you sure? yesVirus scanning is enabledFas270a>useradin useradd nastest (建立nas用户并加入到域给于管理权限)fas270a> useradmin domainuser add \nastest -g "Administrators" SID = S-1-5-21-147214757-305610072-1517763936-180 618Domain User <\nastest> successfully added to Administrators.三:在病毒服务器上安装趋势杀毒软件1:安装第一步点setup2:按提示操作第二步3:按提示操作4:输入nas 的ip地址和nas能够登录的用户名和密码; 另外设定趋势使用passwd5:agent可以不安装如果使用client就要安装; 安装完成后输入刚才设定的趋势密码进入趋势杀毒管理主界面6:主界面如下:扫描netapp nas三:nas 端的显示以上显示服务器端在访问扫描nas端的文件系统, 安装配置成功!。
NetApp-FAS系列安装配置说明
NetApp-FAS系列安装配置说明NETAPP FAS系列安装配置⼿册赞融电⼦上海分公司2003年11⽉修订控制1简介1.1说明本⽂简要说明了Network Appliance公司FAS系列存储产品配置过程。
本⼿册基于DataOntap 6.4.2P6操作系统1.2适⽤对象和前提本⽂是针对赞融电⼦的内部⼈员。
要求阅读者具有以下⽅⾯的专业能⼒:熟悉Unix操作系统;熟悉Windows操作系统;具有NETAPP FAS系统的基本知识.1.3参考资料Data ONTAP? System Administrator’s GuideData ONTAP? Software Setup Guide1.4术语表NFS:Network ⽹络⽂件系统CIFS:Common Internet 通⽤Internet⽂件系统NAS:Network Attached Storage ⽹络附加存储WAFL:Write Anywhere 随地写⼊⽂件格式2配置过程2.1检查Filer硬件安装2.2设置Filer使⽤计算机串⼝连接Filer背板上的Console⼝使⽤Windows附件中的超级终端建⽴连接,参数如下:每秒位数 9600,数据位 8,奇偶校验⽆,停⽌位 1,数据流控制⽆建⽴连接依次打开Disk Shelf和Filer电源使⽤setup命令配置Filerfas940> setupPlease enter the new hostname []: fas940Do you want to configure virtual network interfaces? [n]: yNumber of virtual interfaces to configure? [0] 3Name of virtual interface #1 []: vif1Is vif1 a single [s] or multi [m] virtual interface? [m] sNumber of links for vif1? [0] 2Name of link #1 for vif1 []: e5aName of link #2 for vif1 []: e5bName of virtual interface #2 []: vif2Is vif2 a single [s] or multi [m] virtual interface? [m] sNumber of links for vif2? [0] 2Name of link #1 for vif2 []: e9aName of link #2 for vif2 []: e9bName of virtual interface #3 []: vif3Is vif3 a single [s] or multi [m] virtual interface? [m] sNumber of links for vif3? [0] 2Name of link #1 for vif3 []: e11aName of link #2 for vif3 []: e11bPlease enter the IP address for Network Interface vif1 []: 165.204.224.173Please enter the netmask for Network Interface vif1 [255.255.0.0]: 255.255.254.0Please enter media type for vif1 {100tx-fd, tp-fd, 100tx, tp, auto (10/100/1000)} [auto]: Enter Please enter the IP address for Network Interface vif2 []: 165.204.224.174Please enter the netmask for Network Interface vif2 [255.255.0.0]: 255.255.254.0Please enter media type for vif2 {100tx-fd, tp-fd, 100tx, tp, auto (10/100/1000)} [auto]: Please enter the IP address for Network Interface vif3 []: 165.204.224.175Please enter the netmask for Network Interface vif3 [255.255.0.0]: 255.255.254.0Please enter media type for vif3 {100tx-fd, tp-fd, 100tx, tp, auto (10/100/1000)} [auto]: Please enter the IP address for Network Interface e0 []: 165.204.224.172Please enter the netmask for Network Interface e0 [255.255.0.0]: 255.255.254.0Please enter media type for e0 {100tx-fd, tp-fd, 100tx, tp, auto} [auto]:Would you like to continue setup through the web interface? [n]:Please enter the name or IP address of the default gateway: 165.204.224.254 The administration host is given root access to the filer's/etc files for system administration. To allow /etc root accessto all NFS clients enter RETURN below.Please enter the name or IP address of the administration host:Please enter timezone [GMT]: Asia/ShanghaiWhere is the filer located? []: Suzhou ChinaWhat language will be used for multi-protocol files (Type ? for list)?:zh.GBKSetting language on volume vol0The new language mappings will be available after rebootMon Sep 29 03:45:14 GMT [rc:ALERT]: Language on volume vol0 changed to zh.GBK Language set on volume vol0 Do you want to run DNS resolver? [n]: yPlease enter DNS domain name []: /doc/13ed3844f58a6529647d27284b73f242336c3134.html You may enter up to 3 nameserversPlease enter the IP address for first nameserver []: 165.204.224.2Do you want another nameserver? [n]: yPlease enter the IP address for alternate nameserver []: 139.95.33.235Do you want another nameserver? [n]: EnterDo you want to run NIS client? [n]: EnterThis system will send event messages and weekly reportsto Network Appliance Technical Support. To disable this feature,enter "options autosupport.support.enable off" within 24 hours.Enabling Autosupport can significantly speed problem determinationand resolution should a problem occur on your system.For further information on Autosupport, please see:.Press the return key to continue.Now type 'reboot' for changes to take effect.fas940> Reboot重新启动Filer 之后,进⾏cifs setup 安装fas940> cifs setupEnable CIFS access to the filer by a Windows(tm) PCYour filer is currently only visible to PCs on the same net.Do you wish to make the system visible via WINS? [no]: yPlease enter next WINS IP address (or return to end list) []: 165.204.224.225Please enter next WINS IP address (or return to end list) []: 163.181.3.225Please enter next WINS IP address (or return to end list) []:CIFS requires local /etc/passwd and /etc/group files for multiprotocol.Default passwd be created containing 'root', 'pcuser',and 'nobody'.Enter the password for root []:Retype the password:This filer is currently licensed for CIFS only.The filer will be configured as a NTFS_only filer. It canbe changed to a Multiprotocol filer by reissuing the CIFS setup command.The default name of this filer will be 'FAS940'.Do you want to modify this name? [no]: EnterCIFS supports three types of user authentication:1. Windows Domain authentication.2. Windows Workgroup authentication using the filer's user accounts.3. /etc/passwd and/or NIS based authentication.What type of authentication will this filer use? [1]: 1The filer will use Windows Domain authentication.Enter the Windows Domain for the filer []:/doc/13ed3844f58a6529647d27284b73f242336c3134.html It is highly recommended that you create the local administratoraccount (FAS940\administrator) for this filer. This account enablesaccess to the filer from Windows when domain controllers are notaccessible.Create the FAS940\administrator account? [yes]: yesSet the password for FAS940\administrator:Retype the password:Mon Sep 29 11:53:46 CST [rc:info]: User addedMon Sep 29 11:53:46 CST [rc:notice]: security style for /vol/vol0/ changed from unix to ntfs/doc/13ed3844f58a6529647d27284b73f242336c3134.html is a Windows 2000(tm) domain.In order to create this filer's domain account, you must supply thename and password of an administrator account with sufficient privilegeto add the filer to the /doc/13ed3844f58a6529647d27284b73f242336c3134.html domain.Please enter the Windows 2000 user []:Password for :CIFS - Logged in as .By default, setup creates the filer account in the ActiveDirectory container named 'Computers'. Alternatively, you caninstall the filer in an organizational unit (OU) by specifyingthe domain relative distinguished name of the OU, as in'ou=innerOU,ou=outerOU'.Active Directory container for filer account? [cn=computers]: EnterCIFS - Connecting to domain controller.Mon Sep 29 11:57:22 CST [rc:info]: Connection with DC \\SSUZDC2 establishedMon Sep 29 11:57:22 CST [nbns_timer:info]: All CIFS name registrations complete for local serverWelcome to the AMD (/doc/13ed3844f58a6529647d27284b73f242336c3134.html ) Windows 2000(tm) domain.CIFS local server is running.2.3创建volume通过Telnet或串⼝,⽤命令⾏⽅式创建卷vol create [ -r ] [ disks] 例,创建名为vol1的卷,RAID组最⼤为8,包含2块盘vol create /vol/vol1 –r 8 2使⽤vol status –r 命令观察初始化进程通过Web界⾯创建卷在浏览器中输⼊点击,根据提⽰输⼊⽤户名密码从右侧窗⼝Volume Add在New Volume Name栏中填写新建卷名vol1在Raid Group Size中填写RAID组的⼤⼩8 在Language中选择Simplified Chinese(GBK)选择Automatic Disk Selection在Number of Disks中填写Volume的磁盘数2点击Add2.4通过CIFS共享通过命令⾏cifs shares -add e.g. cifs shares add vol1 /vol/vol1通过Web界⾯设置→CIFS→Shares→AddShare Name 填写 vol1Mount Point 填写 /vol/vol1点击Add2.5通过NFS共享通过命令⾏exportfs -o anon=0 /vol/vol1或者通过Web界⾯配置→NFS→Manage Exports→Insert Line 在Path中输⼊/vol/vol1 Permission选择rwAnonymous UID填写0点击OK3使⽤介绍3.1Filer菜单3.1.1Show Status 显⽰Filer的整体状态,包括, Model, System ID,Version, Disks, Status 等信息3.1.2Manage Licenses 管理Filer 的license 如常⽤的CIFS, NFS, FCP,iSCSI,SnapRestore, SnapMirror, SnapVault, SyncMirror, MultiStore等,详情可参见或(中⽂⽹页)3.1.3Report 显⽰Filer⽬前配置及使⽤情况,如Uptime, Network Interfaces, DiskUsage, System Configuration 等信息3.1.4Syslog Messages 这⾥是系统的syslog messages 信息,⾥⾯会记录系统运⾏时产⽣的⼀些信息,特别是⼀些系统的报错信息,这些信息⾮常重要,对于发现各种问题有很⼤帮助,Netapp Technical Support 也需要这些信息,最好每天都查看⼀下这⾥的信息3.1.5Use Command Line 在这⾥可以使⽤⾃带的telnet ⼯具,⽅便你管理时使⽤Data Ontap系统的命令。
NetApp FAS2200系列产品介绍说明书
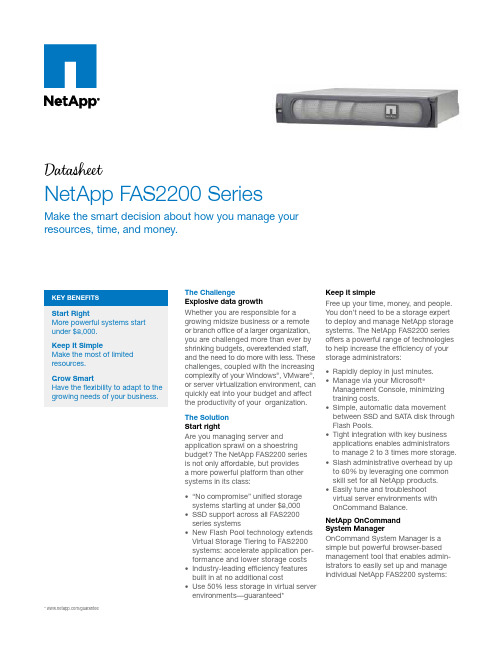
Dat sheetNetApp FAS2200 SeriesMake the smart decision about how you manage your resources, time, and money.Start RightMore powerful systems start under $8,000.Keep It SimpleMake the most of limited resources.Grow SmartHave the flexibility to adapt to the growing needs of your business.The ChallengeExplosive data growthWhether you are responsible for agrowing midsize business or a remoteor branch office of a larger organization,you are challenged more than ever byshrinking budgets, overextended staff,and the need to do more with less. Thesechallenges, coupled with the increasingcomplexity of your Windows®, VMware®,or server virtualization environment, canquickly eat into your budget and affectthe productivity of your organization.The SolutionStart rightAre you managing server andapplication sprawl on a shoestringbudget? The NetApp FAS2200 seriesis not only affordable, but providesa more powerful platform than othersystems in its class:• “No compromise” unified storagesystems starting at under $8,000• SSD support across all FAS2200series systems• New Flash Pool technology extendsVirtual Storage Tiering to FAS2200systems: accelerate application per-formance and lower storage costs• Industry-leading efficiency featuresbuilt in at no additional cost• Use 50% less storage in virtual serverenvironments—guaranteed*Keep it simpleFree up your time, money, and people.You don’t need to be a storage expertto deploy and manage NetApp storagesystems. The NetApp FAS2200 seriesoffers a powerful range of technologiesto help increase the efficiency of yourstorage administrators:• Rapidly deploy in just minutes.• Manage via your Microsoft®Management Console, minimizingtraining costs.• Simple, automatic data movementbetween SSD and SATA disk throughFlash Pools.• Tight integration with key businessapplications enables administratorsto manage 2 to 3 times more storage.• Slash administrative overhead by upto 60% by leveraging one commonskill set for all NetApp products.• Easily tune and troubleshootvirtual server environments withOnCommand Balance.NetApp OnCommandSystem ManagerOnCommand System Manager is asimple but powerful browser-basedmanagement tool that enables admin-istrators to easily set up and manageindividual NetApp FAS2200 systems:* /guarantee• Intuitive wizard and workflow-driven interface automate common storage tasks.• Flash Pool support —view, create, and manage Flash Pool environments. • Use a single interface for SAN and NAS environments.• Use System Manager across all NetApp storage systems—unlike competitive products that manage only one class of storage.Grow smartProtect your storage investment with systems that grow with your business needs:• Get a truly unified storage architecture. • Expand capacity and add functionality quickly and easily.• Seamlessly upgrade to other NetApp systems while using the same oper-ating system and software tools.• Get built-in investment protection with the ability to convert your FAS2240 system to an external disk shelf for upgrading to larger NetApp systems. Data ONTAP Software Simplified softwareNetApp FAS2200 systems use the Data ONTAP ® storage operating system, plus a common set of powerful, easy-to-usedata management and data protection software products. The scalable, unified software of NetApp systems provides a common software environment for both NAS and SAN, from entry-level systems through the largest data center systems.With NetApp software on the FAS2200 you can:• Enable each administrator to manage two to three times more storage • Protect your critical data• Reduce disk purchases by 50% or more through a superior set of storage efficiency features • Reduce provisioning time by up to 90%• Cut test and development time in half Included standard with every FAS2200 system is a set of powerful NetApp software products that deliver highly efficient storage, simple management tools, and high performance. In addi-tion, optional Extended-Value Software products offer advanced capabilities such as instant data recovery, instant cloning, data replication, disk-to-disk backup, and application-aware backup and recovery.Choosing the Right SystemNetApp offers two systems in the FAS2200 family to help you find the balance of price, performance, and features that best fits your needs.FAS2240Equipped for higher performance or capacity needs, the FAS2240 is a good fit for:• Midsize businesses or distributed sites of larger organizations• Windows application and virtual server consolidation with multiple workloads• Customers that require higher perfor-mance, I/O flexibility, and investment protection for future growth FAS2220Geared toward value-oriented deploy-ments, the FAS2220 is a good fit for:• Midsize businesses, remote offices, and local storage• Consolidating virtualized environ-ments with one to three Windows applications or general file-serving workloads• Customers that need a powerfulsystem at a competitive priceFigure 1) You don’t need to be an expert to configure your storage with the simple, easy-to-use NetApp System Manager Console.FAS2200 SERIES OVERVIEW FAS2240-2FAS2240-4FAS2220 Form Factor2U/24 Drive4U/24 Drive2U/12 Drive Dual Controllers Yes Yes YesMaximum Raw Capacity Maximum Disk Drives 374TB144432TB144180TB60Maximum Ethernet Ports888Onboard SAS Port444NetApp Flash Pool Support Yes Yes Yes8Gb FC Support Yes*Yes*No10Gbe Support Yes*Yes*NoRemote Management Yes Yes YesStorage Protocols FCP, iSCSI, NFS, CIFS FCP, iSCSI, NFS, CIFS iSCSI, NFS, CIFS All specifications are for dual-controller, active-active configurations.*Based on optional dual-port 10GbE or 8Gb FC mezzanine card and single slot per controller.Global SupportSupportEdge servicesNetApp Global Support delivers high availability for your enterprise data environment and helps you optimize your storage investments. Let NetApp mitigate support issues and drive operational best practices. NetApp’s innovative, proactive support means that you’ll have fewer and less-severe support cases. But if a problem arises, our award-winning technical centers and field support staff—delivering in over 100 countries—won’t rest until it’s solved.As an industry leader in innovation, NetApp Global Support provides tools and technology to enable business continuity. AutoSupport TM, NetApp’s suite of automation tools, is delivered as a service to help you proactively manage your systems and quickly resolve issues. AutoSupport functions as a “virtual staff” to protect critical data, save time, and reduce impact on your IT resources.About NetAppNetApp creates innovative storage and data management solutions that deliver outstanding cost efficiency and accelerate business breakthroughs. Discover our passion for helping companies around the world go further, faster at .Go further, faster© 2012 NetApp, Inc. All rights reserved. No portions of this document may be reproduced without prior written consent of NetApp, Inc.Specifications are subject to change without notice. NetApp, the NetApp logo, Go further, faster, AutoSupport, Data ONTAP , FlexClone, FlexShare, FlexVol, MultiStore, NearStore, OnCommand, RAID-DP , SnapManager, SnapMirror, SnapRestore, Snapshot, and SnapVault are trademarks or registered trademarks of NetApp, Inc. in the United States and/or other countries. Microsoft, SharePoint, SQL Server, and Windows are registered trademarks and Hyper-V is a trademark of Microsoft Corporation. Oracle is a registered trademark of Oracle Corporation. SAP is a registered trademark of SAP AG. VMware is a registered trademark of VMware, Inc. All other brands or products are trademarks or registered trademarks of their respective holders and should be treated as such. DS-3318-0412FAS2200 SERIES SOFTWAREIncluded SoftwareData ONTAP Essentials:Efficiency: FlexVol ®, deduplication, compression, and thin provisioning Availability: Multipath I/O and MultiStore ®Data Protection: RAID-DP ®, Snapshot ™, NearStore ®, and Open Systems SnapVault ®Performance: FlexShare ®Management: System Manager, Operations Manager, Protection Manager, and Provision ManagerData Protocols: All supported data protocol licenses are included.Extended-Value Software (optional)Software DescriptionSnapRestore: Software to restore Snapshot copies in seconds SnapMirror: Simple, efficient, and flexible disaster recoverySnapVault: Disk-to-disk backup software for complete backups and online archives to primary or secondary storage in minutes instead of hours or days FlexClone: Instant virtual copies of databases or virtual machinesSnapManager Suite: Application and virtual machine aware backup, recovery, and cloning (for Oracle ®, Exchange, SharePoint ®, SQL Server ®, SAP ®, virtual infrastructure, and Hyper-V ™)OnCommand Balance for NetApp: Advanced analytics for physical and virtual environments Complete Bundle: All of the Extended-Value Software together in a single bundle for all-inclusive convenience (Note: OnCommand Balance is not included in the Complete Bundle option)。
NetApp FAS2040产品说明
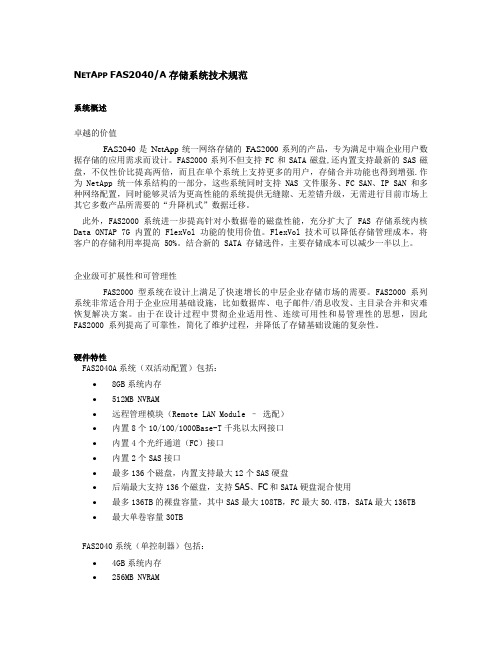
N ET A PP FAS2040/A存储系统技术规范系统概述卓越的价值FAS2040是NetApp统一网络存储的FAS2000系列的产品,专为满足中端企业用户数据存储的应用需求而设计。
FAS2000系列不但支持FC和SATA磁盘,还内置支持最新的SAS磁盘,不仅性价比提高两倍,而且在单个系统上支持更多的用户,存储合并功能也得到增强.作为 NetApp 统一体系结构的一部分,这些系统同时支持NAS文件服务、FC SAN、IP SAN 和多种网络配置,同时能够灵活为更高性能的系统提供无缝隙、无差错升级,无需进行目前市场上其它多数产品所需要的“升降机式”数据迁移。
此外,FAS2000 系统进一步提高针对小数据卷的磁盘性能,充分扩大了 FAS存储系统内核Data ONTAP 7G 内置的 FlexVol功能的使用价值。
FlexVol 技术可以降低存储管理成本,将客户的存储利用率提高 50%。
结合新的 SATA 存储选件,主要存储成本可以减少一半以上。
企业级可扩展性和可管理性FAS2000型系统在设计上满足了快速增长的中层企业存储市场的需要。
FAS2000 系列系统非常适合用于企业应用基础设施,比如数据库、电子邮件/消息收发、主目录合并和灾难恢复解决方案。
由于在设计过程中贯彻企业适用性、连续可用性和易管理性的思想,因此FAS2000 系列提高了可靠性,简化了维护过程,并降低了存储基础设施的复杂性。
硬件特性FAS2040A系统(双活动配置)包括:•8GB系统内存•512MB NVRAM•远程管理模块(Remote LAN Module –选配)•内置8个10/100/1000Base-T千兆以太网接口•内置4个光纤通道(FC)接口•内置2个SAS接口•最多136个磁盘,内置支持最大12个SAS硬盘•后端最大支持136个磁盘,支持SAS、FC和SATA硬盘混合使用•最多136TB的裸盘容量,其中SAS最大108TB,FC最大50.4TB,SATA最大136TB •最大单卷容量30TBFAS2040系统(单控制器)包括:•4GB系统内存•256MB NVRAM•远程管理模块(Remote LAN Module –选配)•内置4个10/100/1000Base-T千兆以太网接口•内置2个光纤通道(FC)接口•内置1个SAS接口•最多136个磁盘,内置支持最大12个SAS硬盘•后端最大支持136个磁盘,支持SAS、FC和SATA硬盘混合使用•最多136TB的裸盘容量,其中SAS最大108TB,FC最大50.4TB,SATA最大136TB •最大单卷容量30TBFAS2040控制器系统如下图所示:图 1:FAS2040外观图图2:FAS2040后视图SAN性能: 320000 IOPS;1600MB/s吞吐带宽NAS性能: 29000 OPS / ORT 1.52msFAS2040 系列产品技术规格技术亮点SAN 协议支持用于 SCSI (4/2/1Gb) 的 FCP(光纤通道协议);光纤网络存储和直连式存储;IP SAN (iSCSI)网络协议支持NFS V2/V3/V4(采用 UDP 或 TCP)、PCNFSD V1/V2 for (PC) NFS 客户端验证、Microsoft®CIFS、HTTP 1.0、HTTP 1.1 虚拟主机LUN 可达 1,024。
NetApp FAS9000系列存储规格指南
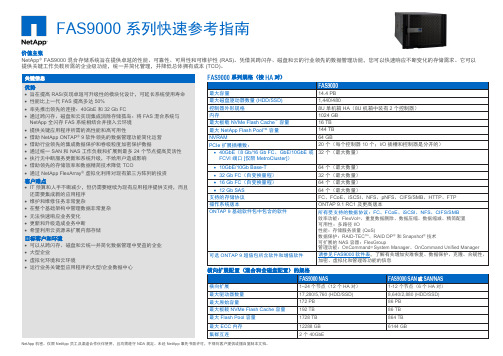
销售方向 • 业务关键型应用:数据库(Oracle、SQL Server 和 SAP)、EDA、
研发 • 大型企业 • 数据中心整合 • 技术计算 • 瞬息万变的虚拟化环境和云环境 • 文件服务和横向扩展 NAS • 主存储或二级存储 • 具有混合 HDD 存储容量和集群中有全闪存 FAS 节点的环境 • 可大规模扩展的 NAS 容器,特别适合 EDA、高新技术、石油天然气
NetApp 机密。仅限 NetApp 员工及渠道合作伙伴使用,且均需遵守 NDA 规定。未经 NetApp 事先书面许可,不得向客户提供或擅自复制本文档。
所售产品 所需组件 • NetApp FAS9000 • NetApp ONTAP 9 基础软件包软件
可选组件 • ONTAP 9 超值包,提供数据保护、灾难恢复和克隆功能 • 增值软件(OnCommand、SnapLock®、Volume Encryption、
FAS9000 系列规格(按 HA 对)
FAS9000
最大容量
最大磁盘驱动器数量 (HDD/SSD) 控制器外形规格
内存 最大板载 NVMe Flash Cache™ 容量 最大 NetApp Flash Pool™ 容量 NVRAM PCIe 扩展插槽数:
14.4 PB 1,440/480 8U 单机箱 HA(8U 机箱中装有 2 个控制器) 1024 GB 16 TB 144 TB 64 GB 20 个(每个控制器 10 个;I/O 插槽和控制器是分开的)
最大板载 NVMe Flash Cache 容量 最大 Flash Pool 容量
NetApp存储安装、配置和维护手册

文档信息本安装和维护手册为##X定制,为NetApp标准文档之补充.1作业规划步骤12配置步骤32.1设置磁盘归属,创建ROOT卷32.2检查并更新各部件的firmware系统版本152.3检查并更新存储操作系统版本192.4输入软件许可232.5执行SETUP进行初始化设置232.6调整ROOT卷的大小282.7配置VLAN292.8修改HOSTS文件302.9修改/etc/rc文件312.10配置AutoSupport服务332.11配置SSH342.12配置SNMP352.13配置NTP352.14配置MTA362.15配置IPspace362.16配置MultiStore362.17配置CIFS412.18配置ISCSI432.19配置FCP442.20配置NFS452.21配置重复数据删除462.22配置Snaprestore472.23容灾实现Snapmirror513日常维护543.1正常开关机54Page I3.2维护手段543.2.1Filerview 图形管理接口543.2.2命令行<CLI>543.3空间管理:Aggr, Volume和lun的介绍553.4常用命令基本应用553.5日常系统检查553.5.1目测553.5.2例行系统检查553.6autosupport功能简介和配置564故障处理流程584.1支持方式584.1.1NetApp on the web <NOW> site和服务584.1.2GSC< Global Support Center 全球支持中心>58 4.2案例开立流程584.3损坏部件更换流程591 作业规划步骤Page 12 配置步骤配置参数表2.1 设置磁盘归属,创建ROOT卷2.2 检查并更新各部件的firmware系统版本2.3 检查并更新存储操作系统版本2.4 输入软件许可使用license add ######X命令添加许可,全部输入后,使用license命令进行检查.鉴于许可的##性,此处不截屏日志.2.5 执行SETUP进行初始化设置2.6 调整ROOT卷的大小2.7 配置VLAN2.8 修改HOSTS文件2.9 修改/etc/rc文件2.10 配置AutoSupport服务2.11 配置SSH2.12 配置SNMP2.13 配置NTP2.14 配置MTA2.15 配置IPspace2.16 配置MultiStore2.17 配置CIFS2.18 配置ISCSI2.19 配置FCP2.20 配置NFS2.21 配置重复数据删除2.22 配置Snaprestore。
NetApp存储设备安装配置手册
NetApp存储设备配置说明修改记录目录1编写目的 (1)2专业名词和缩略语 (2)3组网方式和环境介绍 (3)4安装配置方法 (3)4.1N ET A PP硬件安装 (3)4.2设备初始化和系统设定 (4)4.2.1设备初始化 (4)4.2.2系统设定 (4)4.3操作系统安装 (6)4.3.1注册现有系统的cifs服务,将操作系统文件上传至FAS存储系统 (6)4.4应用配置 (8)4.4.1系统参数配置 (8)4.4.2注册需要使用的服务 (10)4.4.3创建一个卷并输出空间 (12)4.4.4创建一个Qtree并实施quota限制 (17)4.4.5配置autosupport (19)4.4.6配置snapshot策略及数据恢复方法 (19)4.4.7磁盘故障的数据恢复方法 (19)4.4.8配置Cluster (19)1 编写目的编写本文档的目的在于详细地说明NetApp FAS存储系统的安装、配置以及常用命令的介绍和可靠性维护、故障检查与恢复的方法,便于开发、测试、用服和工程维护人员安装、使用和维护NetApp FAS存储系统存储系统。
2 专业名词和缩略语3 组网方式和环境介绍NetAppFAS3240AESX ServerSWITCHESX Server图3.1 NetApp FAS存储系统组网结构NetApp FAS存储系统存储设备以NAS存储方式使用,通过万兆交换机与主机相连接。
4 安装配置方法4.1 NetApp硬件安装存储设备硬件的安装主要是各盘柜间线缆的连接、磁盘安装、盘柜上架、上电等,以上操作多由NetApp技术支持工程师完成。
使用存储设备随机携带的“DB-9 to RJ-45”转接线将FAS存储系统的CONSOLE端口和安装了WINDOWS操作系统的主机串口相连,在WINDOWS主机上安装SecureCRT软件,新建一个serial协议的连接,其中port参数根据所连接的是COM1还是COM2来进行选择,其余参数参考图4.1所示,通过串口连接登录到FAS存储系统。
Netapp存储基本安装配置指导书

华为数据中心N E T A P P存储基本安装配置指导书©2005 Network ApplianceAll rights reserved本文档介绍NetApp公司存储在华为数据中心安装,配置,测试功能的相关步骤及方法。
一、前言Network Appliance公司1992年成立于美国的Sunnyvale, 是一家跨国性高科技公司,专业从事网络存储设备和CDN设备的生产、开发及销售业务,现今在全球拥有超过100家分支机构,员工超过3,900余人。
公司是网络数据存储解决方案的市场领导者,其统一网络存储设备及网络缓存解决方案(NetCache)提供高效、简捷、可靠的数据存取。
自1992年成立至今,全球已安装了超过60000台,连续8年以每年营业额和利润翻番的速度高速增长,其销售和利润增长率均位居全美高科技企业前列。
1999及2000年度,网域存储技术公司连续两年被美国财富杂志(Fortune)评为美国100家增长速度最快公司中的第4位, 是有史以来纳斯达克(NASDAQ)100强和S&P500强中最年轻的公司,而我们的首席执行官Dan Warmenhoven先生也以其杰出的管理才能被美国商业周刊(Business Week)评为2000年度全球25名管理精英之一。
在2005年, 被全美评为最适合人工作的IT公司第5位。
NetApp的存储产品在维护管理上的简便性是世界公认的,其管理成本非常低,真正体现了Appliance的设计理念。
著名的研究机构INPUT的调查结果表明,NetApp的整体拥有成本在数据库的应用环境下,是众多厂商中最低的。
大约只有EMC的Symmetrics的25%。
而管理维护成本只有主机厂商的存储产品的管理维护成本的不到十分之一。
二、 NetApp存储安装如果安装一个全新的NetApp存储,首先将Console线连接到存储上,加电存储并进入存储console, 具体步骤如下所示:CFE version 1.2.0 based on Broadcom CFE: 1.0.35Copyright (C) 2000,2001,2002,2003 Broadcom Corporation.Portions Copyright (C) 2002,2003 Network Appliance Corporation.CPU type 0x1040102: 650MHzTotal memory: 0x40000000 bytes (1024MB)Starting AUTOBOOT press any key to abort...Loading: 0xffffffff80001000/21632 0xffffffff80006480/9820318 Entry at 0xffffffff80001000Starting program at 0xffffffff80001000Press CTRL-C for special boot menu ....................................................................................................................................... ....................................................................................................................................... ................Interconnect based upon M-VIA ERing SupportCopyright (c) 1998-2001 Berkeley Lab/research/FTG/viaThu Sep 1 02:09:51 GMT [cf.nm.nicTransitionUp:info]: Interconnect link 0 is UPThu Sep 1 02:09:51 GMT [cf.nm.nicTransitionDown:warning]: Interconnect link 0 is DOWNSpecial boot options menu will be available.ispfc: Fibre Channel adapter 0c appears to be unattached/disconnected.If adapter is in use, check cabling and if connected to diskshelves, also check seating of LRC cards.Thu Sep 1 02:10:16 GMT [fci.initialization.failed:error]: Initialization failed on Fibre Channel adapter 0c.NetApp Release 7.0.1R1: Wed May 18 23:02:49 PDT 2005Copyright (c) 1992-2005 Network Appliance, Inc.Starting boot on Thu Sep 1 02:09:50 GMT 2005Thu Sep 1 02:10:19 GMT [diskown.isEnabled:info]: software ownership has been enabled for this system(1) Normal boot.(2) Boot without /etc/rc.(3) Change password.(4) Assign ownership and initialize disks for root volume.(4a) Same as option 4, but create a flexible root volume.(5)Maintenance mode boot.Selection (1-5)? 4aZero disks and install a new file system? yThis will erase all the data on the disks, are you sure? yZeroing disks takes about 23 minutes..........................................................................................................................................................................................................................................................................................对于启动的菜单提示(1) Normal boot. ---- 正常启动, 效果如启动时候不输入“Ctrl+C”一样。
NetApp安装手册(oncommand systemmanager)-图形化操作篇

NetApp磁盘阵列安装手册目录一、磁盘阵列的系统安装 (3)1.1初始化磁盘阵列 (3)1.2输入license序列号 (7)二、 NetApp存储管理系统System Manager 安装及连接 (8)2.1System Manger 安装 (8)2.2控制器状态信息页面 (13)三、磁盘阵列的空间配置和分配 (14)3.1在aggr0中添加新的磁盘 (14)3.2 网络设置 (16)3.3 CIFS /AD 设置 (20)3.4创建新的Volume (23)3.5配置卷 (26)3.6消除Volume的快照预留空间 (28)3.7CIFS协议共享管理(针对虚拟桌面平台有效) (30)3.8创建NFS共享 (32)3.9Qtrees的管理 (33)3.10 Quotas的创建与管理 (34)3.11 磁盘的管理 (36)3.12创建LUN存储单元 (37)3.12.1开启FCP功能 (37)3.12.2创建一个Lun存储单元 (38)3.13 AutoSupport设置 (43)3.14 用户和用户组的管理 (45)3.15 控制器log日志 (46)3.16 cf状态检查 (47)四、NetApp日常运维知识 (47)4.1 开机顺序 (48)4.2 关机顺序 (48)4.3 性能检测 (48)4.3.1 目测 (48)4.3.2 硬件状态检查 (48)4.3.3 检查网络是否正常 (48)4.3.4. 检查CLUSTER 状态是否正常 (48)4.3.5 检查卷容量是否正常 (48)4.3.6 性能检查 (49)4.3.7 日志文件检查 (49)五日常操作示例 (49)5.1 vShpere平台增加新DataStore (49)5.1.1创建VOL (49)5.1.2创建Qtrees (50)5.1.3 创建LUN (50)5.1.4 VSC识别新增LUN (51)5.2备份及恢复 (54)5.2.1创建新备份策略 (54)5.2.2修改备份策略 (58)5.2.3 数据恢复 (59)六、 NetApp Support网站及Open Case (60)6.1NetApp Support网站 (60)6.2 Open Case (61)6.3 RMA (66)一、磁盘阵列的系统安装1.1初始化磁盘阵列NetApp FAS是NetApp产品中一款有双机头的磁盘阵列,在出厂时预先会安装好Data OnTap 操作系统,需要先在每个机头中配置好操作系统,才能正常使用。
- 1、下载文档前请自行甄别文档内容的完整性,平台不提供额外的编辑、内容补充、找答案等附加服务。
- 2、"仅部分预览"的文档,不可在线预览部分如存在完整性等问题,可反馈申请退款(可完整预览的文档不适用该条件!)。
- 3、如文档侵犯您的权益,请联系客服反馈,我们会尽快为您处理(人工客服工作时间:9:00-18:30)。
NETAPP FAS系列安装配置手册赞融电子上海分公司2003年11月修订控制1简介1.1说明本文简要说明了Network Appliance公司FAS系列存储产品配置过程。
本手册基于DataOntap 6.4.2P6操作系统1.2适用对象和前提本文是针对赞融电子的内部人员。
要求阅读者具有以下方面的专业能力:熟悉Unix操作系统;熟悉Windows操作系统;具有NETAPP FAS系统的基本知识.1.3参考资料Data ONTAP™ System Administrator’s GuideData ONTAP™ Software Setup Guide1.4术语表NFS:Network File System 网络文件系统CIFS:Common Internet File System 通用Internet文件系统NAS:Network Attached Storage 网络附加存储WAFL:Write Anywhere File Layout 随地写入文件格式2配置过程2.1检查Filer硬件安装2.2设置Filer使用计算机串口连接Filer背板上的Console口使用Windows附件中的超级终端建立连接,参数如下:每秒位数 9600,数据位 8,奇偶校验无,停止位 1,数据流控制无建立连接依次打开Disk Shelf和Filer电源使用setup命令配置Filerfas940> setupPlease enter the new hostname []: fas940Do you want to configure virtual network interfaces? [n]: yNumber of virtual interfaces to configure? [0] 3Name of virtual interface #1 []: vif1Is vif1 a single [s] or multi [m] virtual interface? [m] sNumber of links for vif1? [0] 2Name of link #1 for vif1 []: e5aName of link #2 for vif1 []: e5bName of virtual interface #2 []: vif2Is vif2 a single [s] or multi [m] virtual interface? [m] sNumber of links for vif2? [0] 2Name of link #1 for vif2 []: e9aName of link #2 for vif2 []: e9bName of virtual interface #3 []: vif3Is vif3 a single [s] or multi [m] virtual interface? [m] sNumber of links for vif3? [0] 2Name of link #1 for vif3 []: e11aName of link #2 for vif3 []: e11bPlease enter the IP address for Network Interface vif1 []: 165.204.224.173Please enter the netmask for Network Interface vif1 [255.255.0.0]: 255.255.254.0Please enter media type for vif1 {100tx-fd, tp-fd, 100tx, tp, auto (10/100/1000)} [auto]: Enter Please enter the IP address for Network Interface vif2 []: 165.204.224.174Please enter the netmask for Network Interface vif2 [255.255.0.0]: 255.255.254.0Please enter media type for vif2 {100tx-fd, tp-fd, 100tx, tp, auto (10/100/1000)} [auto]: Please enter the IP address for Network Interface vif3 []: 165.204.224.175Please enter the netmask for Network Interface vif3 [255.255.0.0]: 255.255.254.0Please enter media type for vif3 {100tx-fd, tp-fd, 100tx, tp, auto (10/100/1000)} [auto]: Please enter the IP address for Network Interface e0 []: 165.204.224.172Please enter the netmask for Network Interface e0 [255.255.0.0]: 255.255.254.0Please enter media type for e0 {100tx-fd, tp-fd, 100tx, tp, auto} [auto]:Would you like to continue setup through the web interface? [n]:Please enter the name or IP address of the default gateway: 165.204.224.254 The administration host is given root access to the filer's/etc files for system administration. To allow /etc root accessto all NFS clients enter RETURN below.Please enter the name or IP address of the administration host:Please enter timezone [GMT]: Asia/ShanghaiWhere is the filer located? []: Suzhou ChinaWhat language will be used for multi-protocol files (Type ? for list)?:zh.GBKSetting language on volume vol0The new language mappings will be available after rebootMon Sep 29 03:45:14 GMT [rc:ALERT]: Language on volume vol0 changed to zh.GBK Language set on volume vol0Do you want to run DNS resolver? [n]: yPlease enter DNS domain name []: You may enter up to 3 nameserversPlease enter the IP address for first nameserver []: 165.204.224.2Do you want another nameserver? [n]: yPlease enter the IP address for alternate nameserver []: 139.95.33.235Do you want another nameserver? [n]: EnterDo you want to run NIS client? [n]: EnterThis system will send event messages and weekly reportsto Network Appliance Technical Support. To disable this feature,enter "options autosupport.support.enable off" within 24 hours.Enabling Autosupport can significantly speed problem determinationand resolution should a problem occur on your system.For further information on Autosupport, please see:./autosupport/Press the return key to continue.Now type 'reboot' for changes to take effect.fas940> Reboot重新启动Filer 之后,进行cifs setup 安装fas940> cifs setupEnable CIFS access to the filer by a Windows(tm) PCYour filer is currently only visible to PCs on the same net.Do you wish to make the system visible via WINS? [no]: yPlease enter next WINS IP address (or return to end list) []: 165.204.224.225Please enter next WINS IP address (or return to end list) []: 163.181.3.225Please enter next WINS IP address (or return to end list) []:CIFS requires local /etc/passwd and /etc/group files for multiprotocol.Default passwd file will be created containing 'root', 'pcuser',and 'nobody'.Enter the password for root []:Retype the password:This filer is currently licensed for CIFS only.The filer will be configured as a NTFS_only filer. It canbe changed to a Multiprotocol filer by reissuing the CIFS setup command.The default name of this filer will be 'FAS940'.Do you want to modify this name? [no]: EnterCIFS supports three types of user authentication:1. Windows Domain authentication.2. Windows Workgroup authentication using the filer's user accounts.3. /etc/passwd and/or NIS based authentication.What type of authentication will this filer use? [1]: 1The filer will use Windows Domain authentication.Enter the Windows Domain for the filer []:It is highly recommended that you create the local administratoraccount (FAS940\administrator) for this filer. This account enablesaccess to the filer from Windows when domain controllers are notaccessible.Create the FAS940\administrator account? [yes]: yesSet the password for FAS940\administrator:Retype the password:Mon Sep 29 11:53:46 CST [rc:info]: User <administrator> addedMon Sep 29 11:53:46 CST [rc:notice]: security style for /vol/vol0/ changed from unix to ntfs is a Windows 2000(tm) domain.In order to create this filer's domain account, you must supply thename and password of an administrator account with sufficient privilegeto add the filer to the domain.PleaseentertheWindows2000user[*********************]:********************* ********************************:************************************.By default, setup creates the filer account in the ActiveDirectory container named 'Computers'. Alternatively, you caninstall the filer in an organizational unit (OU) by specifyingthe domain relative distinguished name of the OU, as in'ou=innerOU,ou=outerOU'.Active Directory container for filer account? [cn=computers]: EnterCIFS - Connecting to domain controller.Mon Sep 29 11:57:22 CST [rc:info]: Connection with DC \\SSUZDC2 establishedMon Sep 29 11:57:22 CST [nbns_timer:info]: All CIFS name registrations complete for local serverWelcome to the AMD () Windows 2000(tm) domain.CIFS local server is running.2.3创建volume通过Telnet或串口,用命令行方式创建卷vol create <volume name, such as ‘/vol/vol1’> [ -r <RAID Size> ] [ disks] 例,创建名为vol1的卷,RAID组最大为8,包含2块盘vol create /vol/vol1 –r 8 2使用vol status –r 命令观察初始化进程通过Web界面创建卷在浏览器中输入http://IP_Address/na_admin点击FilerView,根据提示输入用户名密码从右侧窗口Volume Add在New Volume Name栏中填写新建卷名vol1在Raid Group Size中填写RAID组的大小8 在Language中选择Simplified Chinese(GBK)选择Automatic Disk Selection在Number of Disks中填写Volume的磁盘数2点击Add2.4通过CIFS共享通过命令行cifs shares -add <share name> <path> e.g. cifs shares add vol1 /vol/vol1通过Web界面设置Filerview→CIFS→Shares→AddShare Name 填写 vol1Mount Point 填写 /vol/vol1点击Add2.5通过NFS共享通过命令行exportfs -o anon=0 /vol/vol1或者通过Web界面配置Filerview→NFS→Manage Exports→Insert Line 在Path中输入/vol/vol1Permission选择rwAnonymous UID填写0点击OK3FilerView 使用介绍3.1Filer菜单3.1.1Show Status 显示Filer的整体状态,包括Filername, Model, SystemID,Version, Disks, Status 等信息3.1.2Manage Licenses 管理Filer 的license 如常用的CIFS, NFS, FCP,iSCSI,SnapRestore, SnapMirror, SnapVault, SyncMirror, MultiStore等,详情可参见/products/filer/或/products/filer/(中文网页)3.1.3Report 显示Filer目前配置及使用情况,如Uptime, Network Interfaces, DiskUsage, System Configuration 等信息3.1.4Syslog Messages 这里是系统的syslog messages 信息,里面会记录系统运行时产生的一些信息,特别是一些系统的报错信息,这些信息非常重要,对于发现各种问题有很大帮助,Netapp Technical Support 也需要这些信息,最好每天都查看一下这里的信息3.1.5Use Command Line 在这里可以使用FilerView自带的telnet 工具,方便你管理时使用Data Ontap系统的命令。