爱普生V33扫描仪使用说明
HP ScanJet Pro 3000 s3 扫描仪说明书
Data sheet HP ScanJet Pro 3000 s3 Sheet-feed Scanner (L2753A)Manage projects and work ows quickly and con dently. Easily handle mixed media, and get one-pass duplex scanning with speeds up to 35 ppm/70 ipm. Scan to mobile devices for on-the-go control. Recommendedfor 3,500 pages per day.Fast scanning. Superb results. Every page.Produce scans at up to 35 ppm/70 ipm with two-sided scanning that captures both sides at once.Capture every page easily—even stacks of mixed media—with HP EveryPage and an ultrasonic sensor.Free up space for work. This HP ScanJet Pro is small and slim—a modern design perfect for the desktop.Handle paper from 11 lb. (40 gsm) to 110 lb. (413 gsm) weight and up to 8.5 x 122 inches (21.6 x 309.9 cm).Optimize work ows with one-touch scanningStreamline routine work with one-touch scanning—create one-button, custom settings for recurring scan jobs.Scan images directly into applications with included and full-featured TWAIN and ISIS®.Easily transfer scans into editable text, secure PDF les, and more le types,using built-in OCR.Quickly share or archive scans directly to popular cloud destinations with HP Scan software.Capture business documents like a proDe ne scan pro les for common document types, and scan to multiple destinations with HP Scan software.Scan directly to mobile devices with the HP JetAdvantage Capture App, and then edit and save les.Capture and organize documents, business cards, and other le types with feature-rich software.FootnotesScan speed measured at 300 dpi (black-and-white, grayscale, and color). Actual processing speeds may vary depending on scan resolution, network conditions, computer performance, and application software. Scanning from a mobile device requires the HP Wireless Adapter 100 (L2761A), which must be purchased separately, and the HP JetAdvantage Capture App. The app is available for mobile devices running Android™ version 4.0 and higher , and can be downloaded from the Google Play™ store. For more information, see /go/documentmanagement. Wireless performance is dependent on physical environment and distance from access point and may be limited during active VPN connections. Wi-Fi Direct® scanning requires the mobile device to be connected directly to the Wi-Fi® network of the scanner.Wi-Fi and Wi-Fi Direct are registered trademarks of Wi-Fi Alliance®. HP EveryPage is referred to as HP Precision Feed on HP ScanJet devices introduced prior to May 2013.12132123Data sheet | HP ScanJet Pro 3000 s3 Sheet-feed ScannerAccessories and servicesAccessories L2754A HP ScanJet Pro 3000 s3 Roller Replacement KitService and Support U9JR1E HP 3 year Exchange Hardware Support for ScanJet Pro 3xxxU9JR3E HP 3 year Return to Depot Hardware Support for ScanJet Pro 3xxx Technical speci cationsControl panel Scan button, Cancel button, Power button with a LED and a LED for Error indication.Scanner speci cationsScanner type Sheetfed; Scan technology: CMOS CIS; Scan input modes: One default scan mode on front-panel for HP scan in Win OS, HP Easy Scan/ICA in Mac OS and third parties applications via TWAIN,ISIS and WIA; Twain version: Windows: 32-bit and 64-bit TWAIN version 2.1; Mac: n/a; Colour scanning: Yes; Output resolution dpi settings: 75; 150; 200; 240; 300; 400; 500; 600; 1200 ppi; Imagescaling or enlargement range: Will not perform any arbitrary scalingScan Size ADF: Maximum 216 x 3100 mm; Minimum 50.8 x 74 mmScan speed Up to 35 ppm/70 ipmScan resolution Optical Up to 600 dpi (color and mono, Sheet-feed); Hardware: Up to 600 dpi (color and mono, Sheet-feed)Scan le format For text & images: PDF, JPEG, PNG, BMP, TIFF, Word, Excel, Text (.txt), Rich Text (rtf) and Searchable PDFScanner advanced featuresAuto-color detect, auto-crop, auto-exposure, auto orient, OCR, zonal OCR, zonal barcode, edge removal, background cleanup, remove hole, color drop out, straighten the page, scan to cloud, scan toemail, PDF security, misfeed detection advance setting, advanced misfeed detection, Citrix ReadyGrayscale levels/Bit depth256/24-bits external 48-bits internalDuty cycle Recommended for 3,500 pagesAuto document feeder capacity50 sheets of 75 g/m² paperConnectivity Standard USB 2.0 and USB 3.0 (SuperSpeed); Optional: USB 2.0 port for Wi-Fi accessoryMemory Standard 512 MBExternal I/O ports 1 x USB 3.0 and 1 x USB 2.0 portMedia handlingMedia typesCut Sheet Paper, Printed Paper (Laser and ink), Pre-Punched Paper, Bank Checks, Business Cards, Freight Bills, Carbonless forms, Previously stapled media with staple removed, Plastic cards (up to1.24mm)Media size (ADF)U.S.-Letter: 215.9 x 279.4 mm (8.5 x 11 in); U.S.-Legal: 215.9 x 355.6 mm (8.5 x 14 in); U.S.-Executive: 184.2 x 266.7 mm (7.25 x 10.5 in); ISO A4: 210 x 297 mm (8.3 x 11.7 in); JIS B5: 182 x 257 mm(7.2 x 10.1 in); ISO B5: 176 x 250 mm (7.0 x 9.9 in); ISO A5: 148 x 210 mm (5.8 x 8.3 in); ISO A6: 105 x 148 mm (5.8 x 4.1 in); ISO A7: 74 x 104 mm (2.9 x 4.1 in); ISO A8: 52 x 74 mm (2.0 x 2.9 in) Media weight (ADF)40 to 413 g/m²Compatible operating systems OS X El Capitan 10.11, Microsoft® Windows® 10, 8.1, 8, 7, XP: 32-bit or 64-bitMinimum system requirementsPC: Microsoft® Windows® 10, 8.1, 8, 7, XP: 32-bit or 64-bit, 2 GB available hard disk space, CD-ROM/DVD drive or Internet connection, USB port, Microsoft® Internet Explorer; Windows Vista®: (32-bitonly), 2 GB available hard disk space, CD-ROM/DVD drive or Internet connection, USB port, Microsoft® Internet Explorer 8; Windows® XP SP3 or higher (32-bit only): any Intel® Pentium® II, Celeron® or233 MHz compatible processor, 850 MB available hard disk space, CD-ROM/DVD drive or Internet connection, USB port, Microsoft® Internet Explorer 8Software included HP WIA scan driver, HP TWAIN scan driver (32-bit and 64-bit), HP Scan, HP Scanner Tools Utility, Nuance PaperPort (Win only), I.R.I.S Readiris, I.R.I.S Cardiris (Win only), EMC ISIS (Win only) Dimensions and weightProduct dimensions (W x D x H)Minimum: 310 x 198 x 190 mm; Maximum: 342 x 310 x 319 mmPackage dimensions (W x D x H)397 x 248 x 303 mmProduct weight 3.4 kgPackage weight 5.0 kgOperating environment Temperature: 10 to 35ºC Humidity: 15 to 80% RH (non-condensing)Storage Temperature: -40 to 60ºCPower Requirements: Input Voltage range: 90 - 264 VAC, Rated Frequency: 50 - 60HZ, Worldwide use; Consumption: 4.2 watts (ready), 0.7 watts (sleep), 0.1 watts (off), 0.1 watts (auto-off); ENERGY STAR: Yes Certi cationsIEC 60950-1:2005 +A1+A11+A12 and all applicable amendments; CSA/UL 60950-1, 2nd edition (2007); EN 60950-1:2006 +A11 +A1 +A12+A2; EAC safety; Canada cUL CoC; China CCC; European UnionCE; Kenya PVOC; Kuwait TER; Nigeria SON; Saudi Arabia SASO; South Africa NRCS; Taiwan BSMI; Ukraine safety approval Electromagnetic compatibility: Class B Emissions; CISPR 22:2008 (International);European Union EMC Directive 2014/30/EU, EN 55022:2010 (CE mark); China GB9254-2008 (CCC); Taiwan CNS13438:2006 (BSMI); USA CFR47 Part 15, Subpart B (FCC); ICES-003:2012 Issue 6 (Canada);Australia C-tick (includes New Zealand); KN 22 and Korea KCC; EAC EMC Certi cate; Ukraine EMC approval; EN 61000-3-2:2014 (harmonics); EN 61000-3-3:2013 ( icker); Immunity CISPR 24:2010, EN50024:2010 Energy Star; CECP; EPEAT-SilverWhat's in the box L2753A HP ScanJet Pro 3000 s3 Sheet-feed Scanner engine; Installation guide; Support yer; Warranty guide; 2CDs; Power cord; USB cable; Power AdapterWarranty 1 Year Limited Warranty (Return to HP/Dealer - Unit Exchange)Technical speci cations disclaimersWith input and output trays folded and covers closedPower requirements are based on the country/region where the scanner is sold. Do not convert operating voltages. This will damage the scanner and void the product warranty.Actual speeds may vary depending on scan resolution, connectivity type, computer performance and application software.© Copyright 2022 HP Development Company, L.P. The information contained herein is subject to change without notice. The only warranties for HP products and services are set forth in theexpress warranty statements accompanying such products and services. Nothing herein should be construed as constituting an additional warranty. HP shall not be liable for technical oreditorial errors or omissions contained herein.ap-en May 2022312123。
扫描仪的使用方法

扫描仪的使用方法扫描仪已经应用很广泛,现在的打印、复印、扫描、传真一体机更是促进这一趋势,那么你会用扫描仪吗?下面来看看正确的使用方法吧!扫描仪的使用方法和注意事项:1、检测感光元件:扫描一组水平细线(如头发丝或金属丝),然后在ACDSee 32中浏览,将比例设置为100%观察,如纵向有断线现象,说明感光元件排列不均匀或有坏块。
2、检测传动机构:扫描一张扫描仪幅面大小的图片,在ACDSee 32中浏览,将比例设置为100%观察,如横向有撕裂现象或能观察出的水平线,说明传动机构有机械故障。
3、检测分辨率:用扫描仪标称的分辨率(如300dpi、600dpi)扫描彩色照片,然后在ACDSee 32中浏览,将比例设置为l00%观察,不会观察到混杂色块为合格,否则分辨率不足。
4、检测灰度级:选择扫描仪标称的灰度级,扫描一张带有灯光的夜景照片,注意观察亮处和暗处之间的层次,灰度级高的扫描仪,对图像细节(特别是暗区)的表现较好。
5、检测色彩位数:选择扫描仪标称色彩位数,扫描一张色彩丰富的彩照,将显示器的显示模式设置为真彩色,与原稿比较一下,观察色彩是否饱满,有无偏色现象。
要注意的是:与原稿完全一致的情况是没有的,显示器有可能产生色偏,以致影响观察,扫描仪的感光系统也会产生一定的色偏。
大多数高、中档扫描仪均带有色彩校正软件,但仅有少数低档扫描仪才带有色彩校正软件,请先进行显示器、扫描仪的色彩校准,再进行检测。
6、OCR文字识别输入检测:扫描一张自带印刷稿,采用黑白二值、标称分辨率进行扫描,300dpi的扫描仪能对报纸上的5号字作出正确的识别,600dpi的扫描仪几乎能认清名片上的7号字。
使用和保养作为普通用户来说,不仅要购买一台质量过关、方便耐用的扫描仪产品,而且学会正确使用和进行简单的保养也是非常重要的。
1、一旦扫描仪通电后,千万不要热插拔SCSI、EPP接口的电缆,这样会损坏扫描仪或计算机,当然USB接口除外,因为它本身就支持热插拔。
扫描仪操作规程
扫描仪操作规程一、引言扫描仪是一种用于将纸质文档或者照片转换为数字格式的设备。
本操作规程旨在提供详细的操作指南,以确保用户正确、安全地使用扫描仪,并获得高质量的扫描结果。
二、安全注意事项1. 在使用扫描仪之前,请确保子细阅读并理解本操作规程,并遵循所有的安全操作指南。
2. 使用扫描仪时,请确保周围环境通风良好,避免灰尘或者其他杂质进入设备。
3. 在操作扫描仪时,请勿将手指或者其他物体插入扫描仪的进纸通道或者其他危(wei)险区域。
4. 当扫描仪处于工作状态时,请勿将杯具或者其他液体放置在设备上方,以防止液体溅入设备内部。
5. 在清洁扫描仪时,请确保设备已断电并拔掉电源插头。
三、准备工作1. 将扫描仪放置在平稳的桌面上,并确保设备与电源插座连接良好。
2. 打开扫描仪的电源开关,并等待设备启动完成。
3. 将待扫描的纸质文档或者照片整理好,确保没有折叠、撕裂或者污损。
四、扫描设置1. 打开计算机,并确保扫描仪与计算机连接良好。
2. 打开扫描软件或者应用程序,并选择相应的扫描选项。
3. 根据需要,选择扫描的文件格式(如PDF、JPEG等)和分辨率(通常以dpi 为单位)。
4. 针对不同类型的文档,可以选择不同的扫描模式,如黑白扫描、灰度扫描或者彩色扫描。
5. 根据需要,可以进行其他高级设置,如调整亮度、对照度、色采等参数。
五、扫描操作1. 将待扫描的纸质文档或者照片放置在扫描仪的进纸通道上,并调整好位置和角度。
2. 确保纸张与进纸通道对齐,并避免浮现歪斜或者卡纸的情况。
3. 在扫描软件上点击“开始扫描”或者类似按钮,开始扫描过程。
4. 在扫描过程中,可以观察扫描仪的运行状态,确保纸张正常进入和退出设备。
5. 扫描完成后,可以通过预览功能查看扫描结果,并进行必要的调整和编辑。
6. 确认扫描结果无误后,可以选择保存文件或者将其导出到其他应用程序进行进一步处理。
六、维护保养1. 在长期使用扫描仪后,应适当歇息并关闭设备,以防止过热或者其他故障。
爱普生V33扫描仪使用说明

爱普生V33扫描仪使用说明一、扫描仪部件指南A、扫描仪部件a. 扫描仪文稿盖a. 文稿垫(仅Perfection V330 Photo)b. 文稿台c. 扫描头(在文稿台里边)a. USB接口b. 直流电入口B、指示灯和按钮此扫描仪有四个按钮用于扫描操作。
状态指示灯指示扫描仪操作是否正常a. 电子邮件按钮d. PDF按钮c. 复印按钮d. 电源/启动按钮e. 状态指示灯状态指示灯位于电源/启动按钮和PDF按钮之间。
颜色指示灯状态含义绿色亮准备扫描图像。
闪烁正在初始化或正在扫描。
橙色闪烁发生错误。
有关详细信息,参见状态指示灯闪烁。
(无)灭扫描仪关闭。
按钮功能电源/启动按钮电源如果按下一次可打开扫描仪电源。
当扫描仪电源打开时,按下此按钮3秒钟可关闭扫描仪。
(当扫描软件正在运行时,您不能关闭扫描仪。
)启动Epson Scan启动。
复印Copy Utility启动。
E-mail Epson Scan自动扫描,然后出现传送文件的邮件窗口。
PDF 扫描至PDF窗口出现。
二、扫描仪部件指南A、将文稿和照片放在文稿台上1、打开扫描仪盖2、将原始文稿或照片面朝下放置在扫描仪文稿台上。
确保将文稿或照片放置在文稿台的右下角且与箭头标记对齐。
3、轻轻地合上文稿盖,以免移动原始文稿。
注意:扫描多张照片,请将每张照片与其相邻照片之间至少距离20 毫米(0.8 英寸)放置保持文稿台干净请勿将照片在文稿台上放置过长时间,因为它们可能会粘在玻璃上B、放置大或厚的文稿扫描大的或厚的文稿时,可完全的打开扫描仪的文稿盖,使其平放在扫描仪的旁边1、打开扫描仪盖2、向上笔直地拉出文稿盖3、向下放置文稿盖使其平放在扫描仪的旁边。
注意:当不使用文稿盖进行扫描时,请轻轻向下按住文稿使其平整完成扫描时,放下文稿盖的相反顺序重新安上文稿盖二、扫描原稿A、启动EPSON Scan1、使用扫描仪按钮a. 邮件按钮b. PDF按钮c. 复印按钮d. 电源/启动按钮可通过按下下面扫描仪上的按钮来启动扫描。
Epson WorkForce DS-30000 70ppm A3 扫描器数据手册说明书

WorkForceDS-30000DATASHEET / BROCHURECompact, 70ppm, heavy-duty A3 sheetfed scanner withadvanced paper protection and image enhancement technology.The WorkForce DS-30000 is Epson's first compact A3 desktop scanner.Designed for busy office environments, it features a high-capacity feeder, wide media scanning capabilities and a touchscreen front panel that puts users in control to scan up to 30,000 pages per dayThanks to Epson's new Complex Production Architecture, the DS-30000 has been engineered to the highest standards to meet the demands of busy departments.High in capacity and with a robust design, the Automatic Document Feeder (ADF) has the ability to scan the widest range of media in its class¹. Scan passports 2, passbooks, ID cards and large-format documents.Simplify scanning tasks, putting users in control with a 2.7" backlit touchscreen that can display pre-defined scan jobs and highlights machine cleaning and maintenance requirements with easy-to-follow, step-by-step instructions.The inbuilt advanced paper-protection sensors also prevent documents from being damaged and ultra-sonic sensors ensure all documents are scanned, maintaining data integrity.The DS-30000 comes with Document Capture Pro 3.0 software with inbuilt OCR functionality, supporting crisp, clear images. A wide range of drivers,including TWAIN, ISIS, WIA, SANE, and ICA allow for easy integration into most document management systems.For added flexibility and convenience, the optional A4 (DS-5500) and A3 (DS-50000) flatbed scanners enable scanning of books, bound, and other media.KEY FEATURESSpace savingCompact design without compromise on engineering quality Fast performanceUp to 70ppm/140ipm scanning at 200 or 300dpi colour Flexible scanningScan passports and bound media up to 6mm in thickness Control and securityAdvanced paper handing with paper-protection sensors High capacityHeavy duty 120-sheet document feeder (ADF)TECHNOLOGYScanner Type Sheetfed ScannerOptical Resolution (ADF)600 DPI x 600 DPI (Horizontal x Vertical)Optical Resolution50 DPI x 1,200 DPI (Horizontal x Vertical)Optical Resolution Main 600 DPI x Sub 600 DPIADF Minimum Document Size50.8 mm x 69 mm (Horizontal x Vertical)ADF Maximum Document Size304.8 mm x 5,588 mm (Horizontal x Vertical)Paper Formats A3, A4, A5, A8, A7, A6, Business cards, Postcard, Legal, B5, B6, B4, Tabloid, Plastic cards Scanning color depth Input: 10 Bits Color / 30 Bits Monochrome , Output: 8 Bits Color / 24 Bits Monochrome Ultrasonic Sensor YesCategory High Capacity, General OfficeSCANNEROptical Sensor CIS (Contact Image Sensor)Light Source ReadyScan LED technologyOutput Resolution600 DPISCAN SPEEDScanning Speed Monochrome: 70 pages/min - Color: 70 pages/min measured with Size: A4 , Resolution: 300dpi, Monochrome: 140 image/min - Color: 140 image/min measured with Size: A4 , Resolution:300 dpiPAPER / MEDIA HANDLINGPaper Setting Capacity120 SheetsPaper weight Auto loading: 27 - 413 g/m², Manual loading:27 - 413 g/m²Automatic Document FeederTypeSingle pass dual scanningReliability Daily Duty Cycle30,000 pagesPaper Tray Capacity120 Sheets StandardAutomatic Document Feed120 pagesDuplex Scan YesSCANNING FEATURESFeatures Advanced Colour Dropout / Enhance, Skip blank page, Punch holes removal, Automatic de-skew, RGB colour enhance, Auto-rotation, Text enhancement, Descreening, BarcodeRecognitionOutput formats BMP, JPEG, TIFF, multi-TIFF, PDF, searchable PDF, secure PDF, PDF/A,JPEG(Colour/Greyscale), PNG, docx, xlsx, pptxFile compression features TIFF Compression (JPEG(7) , CITT G4, LZW), PDF Compression, JPEG compressionAdvanced document integration Scan to Email, Scan to FTP, Scan to Microsoft SharePoint®, Scan to Print, Scan to Web folders, Scan to Network folders, Scan to USB, Computer (Epson Document Capture Pro), Microsoft SharePoint with Epson Document Capture ProImage Improvement Dust removal, Color correction, Unsharp Mask with Noise Reduction Scanning Volume40,000 Pages per dayCONNECTIVITYInterfaces USB - compatible with USB 2.0 specification, USB 3.0WHAT'S IN THE BOXAC AdaptorUSB 3.0 cableMain unitUser guideUser manual (CD)GENERALSupply Voltage AC 100 V - 240 VEnergy Use17 Watt (Operation), 9 Watt (Ready), 1.4 Watt (sleep mode), 0.1 Watt (Power off)Product dimensions371 x 208 x 219 mm (Width x Depth x Height)Product weight 5.8 kgDrivers TWAIN, WIA, ISIS (Web download), Epson Scan2 (TWAIN), ICA (Mac)Included Software Epson Document Capture (Mac only), Epson Document Capture Pro (Windows only), EpsonDocument Capture Pro Server (on free download), Epson Scan 2Compatible Operating Systems Mac OS 10.6+, Windows 10, Windows 7, Windows 8, Windows 8.1, Windows Server 2003, Windows Server 2008 (32/64bit), Windows Server 2012 R2, Windows Server 2016, Windows Vista, Windows XP SP3Sound Power Operation: 6.4 B (A)Noise Operation: 51 dB (A)Noise Level Operation: 64 dB (A)Supported Humidity Operation 15% - 80%, Storage 15% - 85% Supported Temperature Operation 5° C - 35° C, Storage 60° C - 25° C Options Roller Assembly KitLCD AND MEMORY CARDSPanel Type: Color, Touchscreen, Diagonal: 6.8 cmSCANOptical Resolution600 DPI x 600 DPI (Horizontal x Vertical)OTHERWarranty12 months Carry inOptional warranty extension available WHAT'S IN THE BOXAC AdaptorUSB 3.0 cableMain unitUser guideUser manual (CD)LOGISTICS INFORMATIONWorkForce DS-30000SKU B11B256401BYEAN code87159466765791. ¹When comparing against the market leader's ownwebsite – Epson has the capability to scan the widestrange of media through the Automatic Document Feeder(ADF). From 27-413gsm and bound media up to 6mm thickincluding passports. Up to raw A3 media (RA3) thatFor more information please contact:features a width of 305mm. 2To scan passports, theoptional passport carrier sheet is required at extra cost. Homeusers************Web: 。
扫描仪的使用方法

扫描仪的使用方法1 关于扫描仪扫描仪是一种用于将纸质文档转换为数字图像的计算机输入设备。
它的功能类似于一台复印机,只是操作更方便,且能够将文档转换成电脑可以读取和处理的图像数据。
扫描仪可以扫描文档,图片和照片等,还可以用来扫描硬币,识别颜色等。
扫描仪已经成为每个家庭和企业中必不可少的办公设备之一。
如何正确使用扫描仪?2 使用扫描仪的步骤1. 安装设备第一步,在使用扫描仪之前,需要先安装它。
有些扫描仪可以直接连接到电脑上,而有些则需要下载对应的驱动软件。
2. 连接扫描仪打开电脑,将扫描仪的插头插入指定的USB插口,然后将文档放到扫描仪上。
如果使用有线方式连接,需要打开扫描仪并将文档放入扫描仪扫描槽中,如果使用无线方式则只需将文档放入扫描仪扫描区域中即可。
3. 选择文档格式然后,打开系统文件或查看扫描仪软件,选择您需要保存文档的格式,如jpg,png,pdf或Word文件等。
4. 开始扫描最后,确保文件格式正确,然后按下扫描按钮开始扫描。
扫描完成后,可以将文件保存到电脑中指定的文件夹中。
3 注意事项1. 使用扫描仪扫描文件时,需要确保扫描环境良好,确保空气清洁,离扬声器等电磁设备较远,以确保准确扫描文档。
2. 如果文件过大,则可在文件上不同位置扫描多次,再使用相应软件合并扫描结果,以节省时间。
3. 黑白扫描的清晰度较高,最好不要使用彩色扫描,以节省存储空间。
4. 需预先做好文档的编辑处理,如移除背景色等,以节省扫描时间。
4 结论扫描仪是用于数字化处理文档、照片和图片的非常有用的计算机输入设备,正确使用扫描仪可以方便快捷地进行图文处理,但还要注意使用扫描仪时应严格遵循操作规范,体会出它的功能和实用性,以及节省时间和空间。
三维扫描仪使用说明
三维扫描仪使用说明一、产品概述二、产品组成1.扫描仪主体扫描仪主体是整个系统的核心组成部分,包括摄像头、激光器、光栅、电机、复位按钮等。
摄像头用于采集物体的图像信息,激光器用于产生扫描光束,光栅用于校正扫描的准确性。
2.扫描软件3.电脑电脑是连接扫描仪主体的终端设备,用于控制扫描仪的工作,并接收、存储和处理扫描数据。
三、使用指南1.安装将扫描仪主体放置在平稳的桌面上,连接电源线和电脑。
确保设备连接稳定,摄像头和激光器不受遮挡。
2.启动在电脑上安装好扫描软件后,双击软件图标启动。
系统会自动连接扫描仪主体并进行初始化。
3.预扫描准备在进行正式扫描前,需要进行预扫描准备。
选择合适的扫描对象,放置在扫描区域内。
调整扫描仪主体的位置和角度,保证整个物体能够完整地被扫描到。
4.扫描操作点击软件界面上的“扫描”按钮,扫描仪主体开始工作。
在扫描过程中,保持物体静止,尽量避免任何形式的震动和干扰。
根据软件的指引,适时调整扫描仪的位置,确保扫描到每一个细节。
5.扫描后处理6.存储和分享完成后处理后,可以将三维模型数据保存到电脑或者其他存储介质中。
用户还可以通过网络或其他传输方式,将模型数据分享给其他人员进行使用。
7.设备维护定期检查扫描仪主体的各个部件,保持清洁,并定期进行校准和维护。
保持设备处于干燥、通风良好的环境中,避免受潮和过于高温。
四、注意事项1.使用时注意安全,避免干扰和损坏设备。
2.在扫描过程中不要移动物体和设备,以免影响扫描效果。
3.请勿触碰激光器,以免对眼睛造成损伤。
4.操作前请仔细阅读使用说明,正确使用设备。
五、常见问题解答1.扫描结果不准确怎么办?可以检查扫描仪主体和物体是否稳定,以及光栅是否正确对准。
也可以尝试调整扫描仪的位置和角度,重新进行扫描。
2.扫描速度过慢怎么办?可以优化扫描软件的参数设置,适时调整扫描的精度和分辨率,或者更换更高性能的设备。
3.无法连接扫描仪怎么办?可以检查电源线和数据线是否连接稳定,以及电脑的USB接口是否正常工作。
Epson 扫描器产品信息指南说明书

EPSONP R O D U C T I N F O R M A T I O N G U I D EUPDATE FOR BUSINESS SYSTEM PRODUCTS7/09This package provides a scanner product section to be added to the Epson Business System Product Information Guide. The table of contents of this section is listed below.Epson CaptureOne Single FeedAccessories . . . . . . . . . . . . . . . . . . . . . . . . . . . . . . . . . . . . . . . . . . . . . . . . . . . . . . . . . . . . . . . . . . . . . . . . . 1 Connections . . . . . . . . . . . . . . . . . . . . . . . . . . . . . . . . . . . . . . . . . . . . . . . . . . . . . . . . . . . . . . . . . . . . . 1 Specifications . . . . . . . . . . . . . . . . . . . . . . . . . . . . . . . . . . . . . . . . . . . . . . . . . . . . . . . . . . . . . . . . . . . . . . . 1 Computer requirements . . . . . . . . . . . . . . . . . . . . . . . . . . . . . . . . . . . . . . . . . . . . . . . . . . . . . . . . . . . 1 Scanning specifications . . . . . . . . . . . . . . . . . . . . . . . . . . . . . . . . . . . . . . . . . . . . . . . . . . . . . . . . . . . 1 Paper specifications . . . . . . . . . . . . . . . . . . . . . . . . . . . . . . . . . . . . . . . . . . . . . . . . . . . . . . . . . . . . . . 1 MICR specifications . . . . . . . . . . . . . . . . . . . . . . . . . . . . . . . . . . . . . . . . . . . . . . . . . . . . . . . . . . . . . . . 1 Electronic endorsement . . . . . . . . . . . . . . . . . . . . . . . . . . . . . . . . . . . . . . . . . . . . . . . . . . . . . . . . . . . 2 Reliability . . . . . . . . . . . . . . . . . . . . . . . . . . . . . . . . . . . . . . . . . . . . . . . . . . . . . . . . . . . . . . . . . . . . . . . . . . . 2 Electrical Characteristics . . . . . . . . . . . . . . . . . . . . . . . . . . . . . . . . . . . . . . . . . . . . . . . . . . . . . . . . . . . . . . 2 Safety . . . . . . . . . . . . . . . . . . . . . . . . . . . . . . . . . . . . . . . . . . . . . . . . . . . . . . . . . . . . . . . . . . . . . . . . . . . . . . 2 Environmental Conditions . . . . . . . . . . . . . . . . . . . . . . . . . . . . . . . . . . . . . . . . . . . . . . . . . . . . . . . . . . . . . 2 DIP Switches . . . . . . . . . . . . . . . . . . . . . . . . . . . . . . . . . . . . . . . . . . . . . . . . . . . . . . . . . . . . . . . . . . . . . . . . 2 Lights and Switches . . . . . . . . . . . . . . . . . . . . . . . . . . . . . . . . . . . . . . . . . . . . . . . . . . . . . . . . . . . . . . . . . . 2 LEDs . . . . . . . . . . . . . . . . . . . . . . . . . . . . . . . . . . . . . . . . . . . . . . . . . . . . . . . . . . . . . . . . . . . . . . . . . . . . 2 Switches . . . . . . . . . . . . . . . . . . . . . . . . . . . . . . . . . . . . . . . . . . . . . . . . . . . . . . . . . . . . . . . . . . . . . . . . 2 Inserting a Check . . . . . . . . . . . . . . . . . . . . . . . . . . . . . . . . . . . . . . . . . . . . . . . . . . . . . . . . . . . . . . . . . . . . 2 Ejecting Checks . . . . . . . . . . . . . . . . . . . . . . . . . . . . . . . . . . . . . . . . . . . . . . . . . . . . . . . . . . . . . . . . . . . . . 3 Installing the Franking Cartridge . . . . . . . . . . . . . . . . . . . . . . . . . . . . . . . . . . . . . . . . . . . . . . . . . . . . . . . . 3 Single Pass Check Flow . . . . . . . . . . . . . . . . . . . . . . . . . . . . . . . . . . . . . . . . . . . . . . . . . . . . . . . . . . . . . . . 3 Cleaning the Scanner Glass . . . . . . . . . . . . . . . . . . . . . . . . . . . . . . . . . . . . . . . . . . . . . . . . . . . . . . . . . . . 4 Cleaning the MICR Unit . . . . . . . . . . . . . . . . . . . . . . . . . . . . . . . . . . . . . . . . . . . . . . . . . . . . . . . . . . . . . . . 4 Clearing a Paper Jam . . . . . . . . . . . . . . . . . . . . . . . . . . . . . . . . . . . . . . . . . . . . . . . . . . . . . . . . . . . . . . . . 4 Transporting the Scanner . . . . . . . . . . . . . . . . . . . . . . . . . . . . . . . . . . . . . . . . . . . . . . . . . . . . . . . . . . . . . . 4 Self-test . . . . . . . . . . . . . . . . . . . . . . . . . . . . . . . . . . . . . . . . . . . . . . . . . . . . . . . . . . . . . . . . . . . . . . . . . . . . . 4 Scanner Dimensions and Weight . . . . . . . . . . . . . . . . . . . . . . . . . . . . . . . . . . . . . . . . . . . . . . . . . . . . . . . 4 Error and Information Codes . . . . . . . . . . . . . . . . . . . . . . . . . . . . . . . . . . . . . . . . . . . . . . . . . . . . . . . . . . . 5 Status messages . . . . . . . . . . . . . . . . . . . . . . . . . . . . . . . . . . . . . . . . . . . . . . . . . . . . . . . . . . . . . . . . . . 5 Recoverable errors . . . . . . . . . . . . . . . . . . . . . . . . . . . . . . . . . . . . . . . . . . . . . . . . . . . . . . . . . . . . . . . 5 Unrecoverable errors . . . . . . . . . . . . . . . . . . . . . . . . . . . . . . . . . . . . . . . . . . . . . . . . . . . . . . . . . . . . . . 5 Sensors . . . . . . . . . . . . . . . . . . . . . . . . . . . . . . . . . . . . . . . . . . . . . . . . . . . . . . . . . . . . . . . . . . . . . . . . . . . . . 5 Related Documentation . . . . . . . . . . . . . . . . . . . . . . . . . . . . . . . . . . . . . . . . . . . . . . . . . . . . . . . . . . . . . . 57/09Epson CaptureOne Single Feed7/09Epson CaptureOne Single Feed - 1AccessoriesConnectionsSpecificationsComputer requirementsCPU Pentium 4 1.2 GHz or aboveMemory ≥ 256MB above minimum OS system requirementsHDD space ≥ 30MB free space with driver installed InterfaceUSB 2.0 high-speedWindows version 2000 Professional SP4XP Home Edition/ Professional SP2/SP3Vista (32-bit, 64-bit) Home Basic/ Home Premium/ Ultimate/ BusinessVista (32-bit, 64-bit) Home Basic/ Home Premium/ Ultimate/ Business with SP1.NET framework 1.1, 2.0, 3.0, or 3.5Supported development languagesWin32Visual C ++ 6.0, Visual Basic Visual C ++ .NET 2003,Visual C ++ 2005, Visual C #.NET 2003, Visual C # 2005,Visual Basic .NET 2003, Visual Basic 2005Scanning specificationsSingle passScans both sides of check, reads MICR, and performs franking in same pass.Scanner type CIS (contact image scanner)Resolution (dpi)200 x 200, 120 x 120, 100 x 100Graduation Grayscale:256 levelsBlack & white: 2 valuesData formats Grayscale:TIFF, JPEG, BMP, RAWBlack & white:TIFF (CCITT Group 4),BMPImage size 4.04 (W) x 10.59" (L) (maximum){102.6 x 269 mm}Image quality Complies with IQA (Image QualityAssurance) by FSTC (Financial Services Technology Consortium)Scanning speed 19.69 "/s {500 mm/s}Font recognition OCR A and OCR BOCR recognition ≥ 98% at 77°F (ANSI, excluding O and 0)Paper specificationsTypeNormal, single-ply only Size (H x L)2.68 ~ 4.72" x 4.72 ~ 9.25"{68 ~ 120 mm x 120 ~ 235 mm}Thickness 0.003 ~ 0.008" {0.075 ~ 0.2 mm}Weight 16 ~ 32 lb {60 ~ 120 g/m 2}SF capacity Holds 1 sheetMain pocket capacity (both 1- and 2-pocket models)Holds up to 100 sheetsSub pocket capacity (2-pocket model only)Holds up to 50 sheetsInstallation Must be horizontal (within a tilt of ± 5°)MICR specificationsMagnetic character typesE13B, CMC7 (Alphabetic not supported)MICR recognition rate≥ 98% at 77°F (E13B: ANSI)Errors of ≤ 1% (E13B: ANSI)Franking cartridge EFC-01 franking cartridgeInk color: redExpiration:18 months from production(at room temperature)Ink life:18,000 prints** Using Epson’s standard print pattern.Contents of the Utility & Documents CD TM-S1000 Single Feed Driver TM-S1000 Single Feed UtilityTM-S1000 Single Feed Utility User’s Manual TM-S1000 Single Feed User’s ManualConnector Description USB 2.0High-speed transmission at 480 Mbps [bps: bits per second]PowerAC Adapter C, 24 V ± 10%, supplied with CaptureOneUSB connectorPower supply connectorHook to secure USB cableEpson CaptureOne Single Feed Single Feed2 - Epson CaptureOne Single Feed 7/09Electronic endorsementCan paste recorded image data on the back image of a check.ReliabilityFranking cartridge life18,000 in Epson standard print patternFranking cartridge expiration date18 months after productionScanner life span 1 million sheets MTBF 180,000 hours MCBF 2,470,000 cyclesElectrical CharacteristicsPower supply Epson AC Adapter C supplied with scanner Supply voltage 24 V ± 10%Current consumption Operation 1.0 A, approximate Standby 0.2 A, approximateSafetyEMIFCC/ICES-003 Class ASafety standardsUL60950-1/CSA C22.2 No. 60950-1(Tested using Epson AC Adapter C.)Environmental ConditionsTemperatureOperating 50 to 104°F {10 to 40°C}StoragePacked–4 to 140°F {–20 to 60°C}(≤ 120 hours at –4 or 140°F)Humidity (no condensation)Operating 20 to 80% RH Storage5 to 85% RHDIP SwitchesTwo fixed DIP switches are located on the main board inside the bottom cover of the CaptureOne SF.Lights and SwitchesLEDsPOWEROn when CaptureOne SF power is on.ERROROff when CaptureOne SF is online.On when scanner is offline (and when scanner cover or franker cover are open)Flashes during an error, during initialization, or while waiting for document removal. (See “Error LED Codes” below.)DOCUMENTOn when scanner is ready to process the document in the SF or during document processing.Flashes when the scanner is waiting for document insertion.SwitchesPOWERTurns the CaptureOne on or off. A power switch cover is provided to prevent accidental turn off. If installed and a failure occurs, unplug scanner immediately.Inserting a Check1.Fully extend the pocket guide. Extend the SF guide fully, ifneeded. See the illustration below.SW FunctionONOFF1Internal use. Do not change.—Fixed to OFF 2Internal use. Do not change.Fixed to ON—POWERERROR DOCUMENTEpson CaptureOne Single Feed7/09Epson CaptureOne Single Feed - 32.You can insert 1 check into the SF to be fed automatically.3.Insert the check straight facing the outside, as shown below.Ejecting Checks1.When the checks are ejected, remove them.CAUTION :Do not overfill pockets with checks. Otherwise, a paperjam may occur.2-pocket model = main pocket: 100; sub pocket: 50.1-pocket model = main pocket: 100.Installing the Franking CartridgeCAUTION :Keep the franking cartridge out of reach of children.Do not disassemble the franking cartridge.Handle carefully because ink stains e only genuine Epson cartridges.Do not remove cartridge from packing until ready to e cartridge before expiration date printed on the box.Dispose of cartridge according to applicable regulations.1.Open the franker cover by pulling the lever forward.2.Remove used franking cartridge, if installed, as shownbelow. by holding the knob at the top of the cartridge.3.Carefully insert the new franking cartridge from the top,and push it firmly but gently until it clicks into place.4.Close the franker cover until it clicks into place.Single Pass Check FlowThe CaptureOne can perform 4 actions on a document in a single pass: scanning the image of both the face and back, reading magnetic characters, and franking.1.Insert a document into the feeder section.2.The scanner scans the images of the face and back.3.The scanner reads the magnetic characters on thedocument.4.The franking section prints a pattern.5.The document is fed to the outlet.Sub pocketMain pocketTwo-pocket modelKnobEpson CaptureOne Single Feed Single Feed4 - Epson CaptureOne Single Feed 7/09Cleaning the Scanner GlassClean the scanner glass if it gets dirty from ink or paper dust, or at least once every 6 months or 100,000 passes.1.Open the scanner cover as shown below.2.Lightly wipe the glass areas shown in the picture below witha soft dry cloth.CAUTION :To prevent spots or stains, do not use syntheticdetergent, benzine, water, or other liquids to clean. Never apply any liquid directly to the scanner glass.3.If the scanner glass is smeared with grease, oil, ink, etc.,wipe the glass with a cloth lightly dipped in alcohol.4.Close the scanner cover firmly until it clicks into place.Cleaning the MICR UnitDirt or dust on the MICR unit can increase errors in reading magnetic characters. Clean the MICR unit every 6 months or 100,000 passes. Use the TM-S1000 Utility in the Utility & Documents CD or your application to clean the MICR e KICTeam Waffletechnology ® cleaning cards or an equivalent commercial cleaning sheet.Note:For cleaning steps, see the TM-S1000 Utility User’s Manual.Do not use sticky cleaning sheets. They may cause a jam or machine failure.Dispose of used cleaning sheets properly. Do not reuse.Clearing a Paper JamOpen the scanner cover or franker cover to remove the jammed paper. See the illustration below.Transporting the ScannerFollow the steps below to transport the scanner.1.Turn off the scanner.2.Confirm that thePOWER LED is off.3.Remove the power supply connector.4.Store the pocket guide and the SF guide inside the scanner.5.Pack the scanner upright.Self-testThe self-test checks the following scanner functions:❏Model name ❏Serial number❏Control firmware version ❏Presence of franking cartridgeThe self-test is performed with Epson TM-S1000 Utility. See TM-S1000 Utility User’s Manual for details.Scanner Dimensions and Weight6.93 x 13.98 x 6.30" (H x W x D) {176 x 355 x 160 mm}8.6 lb {3.9 kg}Scanner glassMICR unitScanner coverEpson CaptureOne Single Feed7/09Epson CaptureOne Single Feed - 5Error and Information CodesRecoverable errorsUnrecoverable errorsSensorsRelated DocumentationEpson TM-S1000 Single Feed Specification Epson TM-S1000 Single Feed Service Manual Epson TM-S1000 Single Feed Parts Price ListEpson TM-S1000 Single Feed Technical Reference Guide Epson Franking Cartridge EFC-01 SpecificationERROR LED (Orange)Cause and SolutionMechanism position errorThis occurs when the SF, franking, or pocket switch board sensor detect an error during initialization of the scanner.The scanner can recover from this error if an instruction is sent from the driver or if the scanner is turned off, the error is cleared, and the scanner is turned back on.Paper jam errorOne of 5 things has happened:1.Paper has been detected during initialization.2.The paper length, middle, franking, or ejection sensor detected a paper-feed error.3.The SF failed to feed the sheet.4.The check was too short or too long.5.The cover was open during check feeding.Remove the jammed sheet, be sure the cover is closed, and send an instruction from the driver or turn the scanner off and back on again.Document read errorFor this error to occur, the user must select that this error stop reading under any of the following circumstances:1.Double-feeding was detected.2.Incorrect check paper insertion wasdetected.3.The scanner detected externalnoise.After the cause of the error is fixed, the scanner can recover from the error if it receives an instruction from the driver, if the scanner is turned off and back on, or if the franker cover is opened and the check is removed.ERROR LED (Orange)Cause and Required Action CPU execution errorThe CPU is trying to execute an order to an invalid address.Turn off power as soon as possible.Read/write orMemory overwrite errorA read/write check did not end normally or an error occured during a memory overwrite.Turn off power as soon as possible.Approx. 320 ms320 ms intervals320 ms intervalsApprox. 320 msApprox. 5120 msERROR LED (Orange)Cause and Required Action High voltage errorPower supply voltage is too high.Turn off power as soon as possible.Low voltage error Power supply voltage is too low.Turn off power as soon as possible.Communication device errorAn error has occured with a communication device.Turn off power as soon as possible.Drive circuit errorAn image scanner error has occurred.Turn off power as soon as possible.(A) SF sensor(B) Paper length sensor (C) Middle sensor (D) Franking sensor (E) Eject sensor(F) Main pocket nearly full sensor (G) Sub pocket nearly full sensor (H) Scanner cover open sensor(I) Franker cover open sensor (J) Franking cartridge sensor(K) Franking cartridge position sensor (L) Pocket switching board sensor (M) Hopper position sensor (N) Image scanner unit(O) MICR unit (P) Franking unitPaper feed directionPaper feed direction。
扫描仪的使用方法

扫描仪的使用方法
扫描仪是一种计算机外设设备,可以将纸质文档或图像转换成数字文档和图像,可以在电脑上保存、编辑和传播。
它的使用也非常广泛,在现代家庭、办公室和工厂等各个场所的计算机上都可以看到它的身影,可以说扫描仪是目前计算机技术中最重要的外设之一。
那么,如何使用扫描仪呢?
首先,在开始使用扫描仪之前,应该先准备好扫描仪和计算机,扫描仪应该和计算机相连接,使用扫描仪驱动程序。
扫描仪驱动程序是一种用于将扫描仪的数据转换为可以用于计算机的格式的软件。
描仪驱动程序一般带有联机说明书,可以根据说明书的提示完成驱动程序的安装。
其次,在开始使用之前,应该先熟悉扫描仪的功能以及其参数设置,有了熟悉的基础,才能更好地使用扫描仪。
比如常用的几种扫描仪有A4、A3、A2和A1等,有些还有多种模式可供选择,比如灰度测量、颜色测量、像素宽度等。
然后,需要选择扫描文件的格式,有jpg、png、gif和pdf等常用的格式。
当选定格式后,就可以打开扫描仪软件,把要扫描的文件置于扫描仪上,点击“扫描”按钮,即可完成扫描,这个过程中,需要确保扫描文件完整,清晰度高,不要有残缺或杂质。
在扫描完文件后,可以根据自己的需要,进行图像的处理和编辑,接下来,就可以保存文件并将其传输到电脑或其他设备,在这个过程中,文件一般可以压缩存储,这样可以节省存储空间,在传输的过程
中也能更加快捷。
最后,使用完扫描仪之后,应该将其断开与计算机的连接,并及时更换新的扫描仪驱动程序,以确保计算机安全。
以上就是扫描仪的使用方法。
从以上内容可以看出,使用扫描仪并不难,只要按照以上步骤准确操作,就可以完成转换文档或图像的任务,大大提高了工作效率。
爱普生V33扫描仪使用说明

爱普生V33扫描仪使用说明-CAL-FENGHAI.-(YICAI)-Company One1爱普生V33扫描仪使用说明一、扫描仪部件指南A、扫描仪部件a. 扫描仪文稿盖a. 文稿垫(仅Perfection V330 Photo)b. 文稿台c. 扫描头(在文稿台里边)a. USB接口b. 直流电入口B、指示灯和按钮此扫描仪有四个按钮用于扫描操作。
状态指示灯指示扫描仪操作是否正常a. 电子邮件按钮d. PDF按钮c. 复印按钮d. 电源/启动按钮e. 状态指示灯状态指示灯位于电源/启动按钮和PDF按钮之间。
颜色指示灯状态含义绿色亮准备扫描图像。
闪烁正在初始化或正在扫描。
橙色闪烁发生错误。
有关详细信息,参见状态指示灯闪烁。
(无)灭扫描仪关闭。
按钮功能电源/启动按钮电源如果按下一次可打开扫描仪电源。
当扫描仪电源打开时,按下此按钮3秒钟可关闭扫描仪。
(当扫描软件正在运行时,您不能关闭扫描仪。
)启动Epson Scan启动。
复印Copy Utility启动。
E-mail Epson Scan自动扫描,然后出现传送文件的邮件窗口。
PDF扫描至PDF窗口出现。
二、扫描仪部件指南A、将文稿和照片放在文稿台上1、打开扫描仪盖2、将原始文稿或照片面朝下放置在扫描仪文稿台上。
确保将文稿或照片放置在文稿台的右下角且与箭头标记对齐。
3、轻轻地合上文稿盖,以免移动原始文稿。
注意:扫描多张照片,请将每张照片与其相邻照片之间至少距离20 毫米英寸)放置保持文稿台干净请勿将照片在文稿台上放置过长时间,因为它们可能会粘在玻璃上B、放置大或厚的文稿扫描大的或厚的文稿时,可完全的打开扫描仪的文稿盖,使其平放在扫描仪的旁边1、打开扫描仪盖2、向上笔直地拉出文稿盖3、向下放置文稿盖使其平放在扫描仪的旁边。
注意:当不使用文稿盖进行扫描时,请轻轻向下按住文稿使其平整完成扫描时,放下文稿盖的相反顺序重新安上文稿盖二、扫描原稿A、启动EPSON Scan1、使用扫描仪按钮a. 邮件按钮b. PDF按钮c. 复印按钮d. 电源/启动按钮可通过按下下面扫描仪上的按钮来启动扫描。
扫描仪操作规程

扫描仪操作规程一、引言扫描仪是一种用于将纸质文件转换为数字格式的设备。
本操作规程旨在提供扫描仪的正确操作方法,以确保操作人员能够安全、高效地使用扫描仪。
二、安全注意事项1. 在使用扫描仪之前,操作人员应仔细阅读并理解本操作规程,并接受相关培训。
2. 在操作扫描仪时,应注意遵守以下安全规定:a. 不要将手指、手或其他物体放入扫描仪的进纸槽中。
b. 不要将水或其他液体溅到扫描仪上。
c. 不要在扫描仪上放置重物,以免损坏设备。
d. 不要使用损坏的电源线或插座。
e. 在清洁扫描仪时,应先关闭电源,并使用柔软的布进行擦拭。
三、扫描仪操作步骤1. 准备工作:a. 确保扫描仪已连接到电源,并处于正常工作状态。
b. 确保计算机已正确连接到扫描仪。
c. 打开相关扫描软件。
2. 文件准备:a. 将待扫描的纸质文件整理好,确保没有折痕或撕裂。
b. 检查文件的大小和类型,确保扫描仪能够支持。
3. 扫描设置:a. 打开扫描软件的设置选项,选择扫描仪的型号。
b. 根据需要,设置扫描的分辨率、色彩模式、文件格式等参数。
c. 确保设置的参数符合扫描要求。
4. 扫描操作:a. 将待扫描的文件放置在扫描仪的进纸槽中,调整好位置。
b. 在扫描软件中点击“扫描”按钮,开始扫描过程。
c. 观察扫描仪的工作状态,确保文件能够顺利被扫描。
d. 扫描完成后,保存文件到指定位置。
5. 扫描质量检查:a. 扫描完成后,打开扫描的文件,检查图像的清晰度、颜色准确性等。
b. 如有需要,可以进行图像处理,如裁剪、旋转、调整亮度等。
c. 确保扫描的文件符合要求,可以正常使用。
6. 关闭操作:a. 扫描完成后,关闭扫描软件。
b. 关闭扫描仪的电源,并拔掉电源线。
c. 清理扫描仪的进纸槽和外表面,保持设备的清洁。
四、故障排除在使用扫描仪的过程中,可能会遇到一些故障情况。
以下是常见故障及解决方法的示例:1. 扫描仪无法正常启动:a. 检查电源线是否插紧,并确保插座正常供电。
11营销331班第5组实训作业——Epson-Perfection-V33

Epson Perfection V33平板式彩色实物/影像扫描仪产品介绍制作人:11营销331第五组Epson Perfection V33平板式彩色实物/影像扫描仪14mm大景深,立体实物扫描,质感真实呈现4600万超微像素/平方英寸,细节完美表现48位rgb真色彩,实物影像真实还原0秒预热,低能耗,即开即扫epson perfection v33 作为全球首款推出超微实物/影像扫描仪。
14mm景深,4600万像素每平方英寸实物/影像扫描,48位rgb真色彩图像展现。
可将实物、照片、文档等各类资料真实色彩还原、清晰纹理完美呈现。
可以极大地满足日益飞速增长的电子商务网站实物影像展示需求。
大景深,尽展立体商品真实质感v33 采用超薄 ccd 感光元件,14mm大景深扫描,成像质量好,可将大小不同、形状各异的商品清晰扫描成图片,再现商品细微纹理、真实质感。
方便快速的四功能按键v33面板有4 个客户化按键,可以通过epson event manager进行自定义。
4 个按键分别设定了缺省任务:“扫描并保存”“扫描到pdf”“复印”“扫描到email”。
更强的文字识别功能,便于办公操作v33 随机附送 ocr 识别软件,可以轻松方便地将纸质的文件进行快速准确的识别,并保存成可供后期修改的word、excel、pdf等常用格式。
扫描a3大尺寸文档,无缝拼接,机身轻薄,外观时尚,支持windows 7 和 mac snow leopard操作系统随机软件epson scan和epson event manager支持 windows 7 和 mac snow leopard 操作系统。
主体品牌爱普生型号V33功能参数分辨率光学分辨率:4800dpi最大分辨率:12800dpi 扫描范围8.5″*11.7″扫描速度1.黑白(双向) 600dpi 2.9毫秒/线(速度优先扫描模式)2.全彩,600dpi3.5毫秒/线(速度优先扫描模式)3.全彩1200dpi 10.1毫秒/线(速度优先扫描模式)4.全彩4800dpi 21.8毫秒/线(速度优先扫描模式)接口USB 2.0 高速操作系统"Microsoft Windows XP (Home Edition / Professional / Professiona (此软件不支持从Windows Willennium Edition98或95升级的操作系规格尺寸430*280*40.8mm重量:2.8kg电源AC 220-240V电源频率:50/60Hz 特性特性光源:白色LED(无需预热)色彩位数:16bit扫描方式:实物、文稿固定,字车移动式扫描仪感光元件:矩阵CCD(12线微透镜)OD值:3.2 按键:4按键:开始,复印,e-mail,PDF(注:可编辑下载,若有不当之处,请指正,谢谢!)。
扫描仪的使用方法是什么
扫描仪的使用方法是什么扫描仪是一个能够把相片、印刷文件或手写文件等图像,或装饰品等小对象扫描、分析并化成数字图像的器材,那么,扫描仪的使用方法是什么?打开一体机扫描仪上盖,把要扫描的文件或图片面朝下压在下面在电脑里双击“我的电脑”,在我的电脑里点扫描仪图标(一体机安装好驱动以后就有这个图标了)在弹出的对话框中选择“扫描仪和照像机向导”,然后点击“确定”点击“下一步”,选择图片类型“彩色照片”,纸张来源“平板”,再点击“下一步”输入文件名,文件格式,保存位置,如我输入文件名“557”,文件格式“JPG”,保存位置“桌面”,点击“下一步”开始扫描,有进度条显示扫描完,选择“什么都不做,我处理完这些照片”,点击“下一步”,点击“完成”这时桌面上就有了一个“557.jpg”扫描图片,看看打开后的效果吧扫描仪工作原理扫描仪密度范围对扫描仪来说是非常重要的性能参数,密度范围又称像素深度,它代表扫描仪所能分辨的亮光和暗调的范围,通常滚筒扫描仪的密度范围大于3.5,而平面扫描仪的密度范围一般在2.4~3.5范围之间。
扫描仪是一种光、机、电一体化的高科技产品,它是将各种形式的图像信息输入计算机的重要工具,是继键盘和鼠标之后的第三代计算机输入设备。
扫描仪具有比键盘和鼠标更强的功能,从最原始的图片、照片、胶片到各类文稿资料都可用扫描仪输入到计算机中,进而实现对这些图像形式的信息的处理、管理、使用、存储、输出等,配合光学字符识别软件OCR(Optic Character Recognize)还能将扫描的文稿转换成计算机的文本形式。
扫描仪的工作原理如下:自然界的每一种物体都会吸收特定的光波,而没被吸收的光波就会反射出去。
扫描仪就是利用上述原理来完成对稿件的读取的。
扫描仪工作时发出的强光照射在稿件上,没有被吸收的光线将被反射到光学感应器上。
光感应器接收到这些信号后,将这些信号传送到模数(A/D)转换器,模数转换器再将其转换成计算机能读取的信号,然后通过驱动程序转换成显示器上能看到的正确图像。
扫描仪的使用方法及注意事项

扫描仪的使用方法及注意事项扫描仪的使用方法及注意事项一、扫描仪指标检测1.检测感光元件:扫描一组水平细线(如头发丝或金属丝),然后在ACDSee 32中浏览,将比例设置为100%观察,如纵向有断线现象,说明感光元件排列不均匀或有坏块。
2.检测传动机构:扫描一张扫描仪幅面大小的图片,在ACDSee 32中浏览,将比例设置为100%观察,如横向有撕裂现象或能观察出的水平线,说明传动机构有机械故障。
3.检测分辨率:用扫描仪标称的分辨率(如300dpi、600dpi)扫描彩色照片,然后在ACDSee 32中浏览,将比例设置为l00%观察,不会观察到混杂色块为合格,否则分辨率不足。
4.检测灰度级:选择扫描仪标称的灰度级,扫描一张带有灯光的夜景照片,注意观察亮处和暗处之间的层次,灰度级高的扫描仪,对图像细节(特别是暗区)的表现较好。
5.检测色彩位数:选择扫描仪标称色彩位数,扫描一张色彩丰富的彩照,将显示器的显示模式设置为真彩色,与原稿比较一下,观察色彩是否饱满,有无偏色现象。
要注意的是:与原稿完全一致的情况是没有的,显示器有可能产生色偏,以致影响观察,扫描仪的感光系统也会产生一定的色偏。
大多数高、中档扫描仪均带有色彩校正软件,但仅有少数低档扫描仪才带有色彩校正软件,请先进行显示器、扫描仪的色彩校准,再进行检测。
6.OCR文字识别输入检测:扫描一张自带印刷稿,采用黑白二值、标称分辨率进行扫描,300dpi的扫描仪能对报纸上的5号字作出正确的识别,600dpi的扫描仪几乎能认清名片上的7号字。
二、扫描仪日常使用和保养作为普通用户来说,不仅要购买一台质量过关、方便耐用的扫描仪产品,而且学会正确使用和进行简单的保养也是非常重要的。
1.一旦扫描仪通电后,千万不要热插拔SCSI、EPP接口的电缆,这样会损坏扫描仪或计算机,当然USB接口除外,因为它本身就支持热插拔。
2.扫描仪在工作时请不要中途切断电源,一般要等到扫描仪的镜组完全归位后,再切断电源,这对扫描仪电路芯片的正常工作是非常有意义的。
爱普生ddst打印机 扫描仪使用手册说明书

操作说明书打印机/扫描仪参考使用本设备前请仔细阅读本手册,并妥善保存以备今后参考。
为了安全正确使用,务必在使用设备之前阅读“复印参考”中的“安全信息”。
准备使用安装软件使用打印机功能使用TWAIN 扫描仪功能故障排除附录123456DDST Unit Type F简介本手册包含关于本设备操作和使用的详细说明和注意事项。
为了您的安全和利益,请在使用本设备前仔细阅读本手册。
为了便于参考,请将本手册存放在随手可取之处。
重要事项本手册的内容若有更改,恕不另行通知。
对于因操作和使用本设备而导致的直接、间接、特殊、偶然或必然损失,本公司概不负责。
切勿复印或打印法律禁止复制的任何项目。
地方法律通常禁止复印或打印下列项目:纸币、印花税票、债券、股票、银行汇票、支票、护照、驾驶执照。
上述列表仅供参考,未涵盖全部项目。
对其完整性或准确性,我们概不负责。
如果对于复印或打印某些项目的合法性有疑问,请与您的法律顾问联系。
注意:进行本手册中未明确说明的控制、调整或操作可能会受到危险的辐射。
本手册中采用两种尺寸单位。
本机采用公制。
商标Microsoft®、Windows®和Windows NT®是Microsoft Corporation在美国和/或其它国家的注册商标。
本手册涉及的其它产品名称只用作识别目的,有可能分别是相应公司的商标。
我们对这些标志没有任何或全部权利。
Windows操作系统的正规名称如下:• Windows® 98的产品名是Microsoft® Windows® 98• Windows® Me的产品名是Microsoft® Windows® Millennium Edition (Windows Me)• Windows® 2000的产品名如下:Microsoft® Windows® 2000 Advanced ServerMicrosoft® Windows® 2000 ServerMicrosoft® Windows® 2000 Professional• Windows® XP的产品名如下:Microsoft® Windows® XP ProfessionalMicrosoft® Windows® XP Home Edition• Windows Server TM 2003的产品名称如下:Microsoft® Windows Server TM 2003 Standard EditionMicrosoft® Windows Server TM 2003 Enterprise EditionMicrosoft® Windows Server TM 2003 Web Edition注:本手册中的某些图例可能与您所购买的设备略有不同。
三维扫描仪的使用方法

三维扫描仪的使用方法
三维扫描仪的使用方法
三维扫描仪使用方法
三维扫描仪是一种以网状光线为基础的测量技术,它可以获取物体的三维信息,为产品设计和检测提供可靠的数据。
它可以准确测量任何形状的物体,包括复杂的孔洞、缺陷和细微的细节。
三维扫描仪的使用非常简单,只需要安装好软件,将三维扫描仪放在测量物体的前面,然后按下扫描按钮,就可以获取准确的三维信息。
另外,你也可以通过软件设置扫描的参数,以获取更精确的数据,比如扫描速度、分辨率等。
在使用三维扫描仪时,应注意物体表面的平整度,以及物体扫描时的环境照明。
平整度越高,扫描数据越准确,而环境照明可以帮助三维扫描仪获取更多的细节信息。
三维扫描仪的使用非常方便,它的准确性和精确度已经得到了证实,因此越来越多的企业开始使用它来满足客户的需求。
它的使用不仅可以节省时间和金钱,还可以提高产品质量,增加技术水平,提高生产效率。
扫描仪操作流程
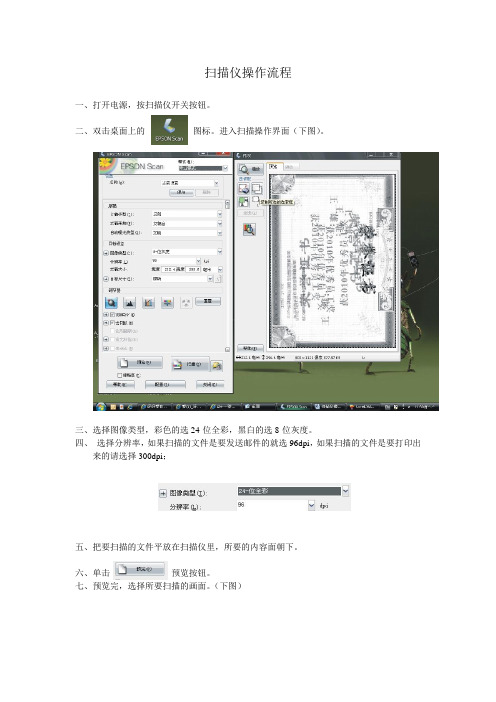
扫描仪操作流程
一、打开电源,按扫描仪开关按钮。
二、双击桌面上的图标。
进入扫描操作界面(下图)。
三、选择图像类型,彩色的选24-位全彩,黑白的选8-位灰度。
四、选择分辨率,如果扫描的文件是要发送邮件的就选96dpi,如果扫描的文件是要打印出
来的请选择300dpi;
五、把要扫描的文件平放在扫描仪里,所要的内容面朝下。
六、单击预览按钮。
七、预览完,选择所要扫描的画面。
(下图)
八、把USM锐化和去网纹钩上。
九、单击扫描按钮,出来文件保存设置界面(见下图)。
选择文件保存的位置,确定。
(完毕)。
Canon DS-30000 和 DS-32000 扫描仪使用说明书

DS-30000DS-32000>or > Document Capture Pro Epson Software Cliquez sur > Cliquez sur ou > Epson SoftwareEPSON is a registered trademark and EPSON Exceed Your Vision is a registered logomark of Seiko Epson Corporation.Mac is a trademark of Apple Inc., registered in the U.S. and other countries.Windows is a registered trademark of Microsoft Corporation in the United States and/or other countries.General Notice: Other product names used herein are for identification purposes only and may be trademarks of their respective owners. Epson disclaims any and all rights in those marks.This information is subject to change without notice.EPSON est une marque déposée et EPSON Exceed Your Vision est un logotype déposé de Seiko Epson Corporation.Mac est une marque de commerce d’Apple Inc., enregistrée aux États-Unis et dans d’autres pays.Windows est une marque déposée de Microsoft Corporation aux États-Unis et/ou dans d’autres pays.Avis général : Les autres noms de produit figurant dans le présent document ne sont cités qu’à des fins d’identification et peuvent être des marques de commerce de leurs propriétaires respectifs. Epson renonce à tous les droits associés à ces marques.L’information contenue dans le présent document peut être modifiée sans préavis.CPD-58202© 2019 Epson America, Inc., 10/19Aide pour le logiciel du scannerCliquez sur le bouton Aide ou ? sur l’écran du logiciel.Guide de l’utilisateurDouble-cliquez sur l’icôneGuide Epson DS-30000_DS-32000 sur le bureau (ou dans le dossier Applications/Epson Software/Guide sur un Mac).Soutien technique EpsonSoutien InternetVisitez www.epson.ca/support et effectuez une recherche de votre produit afin de télécharger des logiciels et des utilitaires, voir les manuels, consulter la FAQ et des conseils de dépannage et communiquer avec Epson.Parler à un représentant du soutienComposez le 905 709-3839, de 6 h à 20 h, heure duPacifique, du lundi au vendredi, et de 7 h à 16 h, heure du Pacifique, le samedi.Les heures et les jours de soutien sont modifiables sans préavis. Des frais d’interurbain peuvent s’appliquer.。
- 1、下载文档前请自行甄别文档内容的完整性,平台不提供额外的编辑、内容补充、找答案等附加服务。
- 2、"仅部分预览"的文档,不可在线预览部分如存在完整性等问题,可反馈申请退款(可完整预览的文档不适用该条件!)。
- 3、如文档侵犯您的权益,请联系客服反馈,我们会尽快为您处理(人工客服工作时间:9:00-18:30)。
爱普生V33扫描仪使用说明
一、扫描仪部件指南
A、扫描仪部件
a. 扫描仪文稿盖
a. 文稿垫(仅Perfection V330 Photo)
b. 文稿台
c. 扫描头(在文稿台里边)
a. USB接口
b. 直流电入口
B、指示灯和按钮
此扫描仪有四个按钮用于扫描操作。
状态指示灯指示扫描仪操作是否正常
a. 电子邮件按钮
d. PDF按钮
c. 复印按钮
d. 电源/启动按钮
e. 状态指示灯
状态指示灯位于电源/启动按钮和PDF按钮之间。
颜色指示灯状态含义
绿色亮准备扫描图像。
闪烁正在初始化或正在扫描。
橙色闪烁发生错误。
有关详细信息,参见状态指示灯闪烁。
(无)灭扫描仪关闭。
按钮功能
电源/启动按钮电源如果按下一次可打开扫描仪电源。
当扫描仪电源打开时,按下此按钮3秒钟可关闭扫描仪。
(当扫描软件正在运行时,您不能关闭扫描仪。
)
启动Epson Scan启动。
复印Copy Utility启动。
E-mail Epson Scan自动扫描,然后出现传送文件的邮件窗口。
PDF 扫描至PDF窗口出现。
二、扫描仪部件指南
A、将文稿和照片放在文稿台上
1、打开扫描仪盖
2、将原始文稿或照片面朝下放置在扫描仪文稿台上。
确保将文稿或照片放置在文稿台的右下角且与箭头标记对齐。
3、轻轻地合上文稿盖,以免移动原始文稿。
注意:扫描多张照片,请将每张照片与其相邻照片之间至少距离20 毫米(0.8 英寸)放置保持文稿台干净
请勿将照片在文稿台上放置过长时间,因为它们可能会粘在玻璃上
B、放置大或厚的文稿
扫描大的或厚的文稿时,可完全的打开扫描仪的文稿盖,使其平放在扫描仪的旁边
1、打开扫描仪盖
2、向上笔直地拉出文稿盖
3、向下放置文稿盖使其平放在扫描仪的旁边。
注意:当不使用文稿盖进行扫描时,请轻轻向下按住文稿使其平整完成扫描时,放下文稿盖的相反顺序重新安上文稿盖
二、扫描原稿
A、启动EPSON Scan
1、使用扫描仪按钮
a. 邮件按钮
b. PDF按钮
c. 复印按钮
d. 电源/启动按钮
可通过按下下面扫描仪上的按钮来启动扫描。
启动按钮可让您启动Epson Scan。
PDF按钮可让您扫描多页文稿并将其以PDF文件保存在计算机中
邮件按钮可让您扫描并将图像文件附加至电子邮件。
复印按钮可让您将连接到计算机的扫描仪作为复印机一样使用。
2、使用EPSON Scan
双击EPSON Scan图标,可启动Epson Scan
或选择开始按钮图像或开始> 所有程序或程序> EPSON>EPSON Scan> EPSON Scan
3、选择Epson Scan模式
全自动模式让您进行快速而又简便的扫描,而无需进行任何设置或预览您的图像。
当需要以100%尺寸扫描图像并且扫描之前不需预览时,全自动模式是较好的选择。
您可在全自动模式下进行色彩翻新或去杂点。
此模式是Epson Scan的默认设置。
A、将您的原始稿件放置在扫描仪文稿台上。
B、启动Epson Scan
C、从模式列表中选择全自动模式
注意:如果清除下一次扫描前显示此对话框复选框,Epson Scan立即启动扫描无需显示此屏幕。
要返回到此屏幕,在扫描时单击扫描对话框中的取消。
D、如果您想选择一个自定义分辨率,去杂点或色彩翻新,请单击自定义。
E、如果您想选择扫描图像的位置,名称和格式,单击文件保存设置
F、选择您的设置并单击确定
G、单击扫描。
Epson Scan就会在全自动模式下启动扫描
H、扫描的图像在文件保存设置窗口中按您选择的文件格式和位置保存。
如果您没有
在文件保存设置窗口中选择任何设置,它将以JPEG文件保存在Pictures或My
Pictures文件夹中
家庭模式可让您自定义一些扫描设置,并使用预览图像检查其效果。
当您想在扫描前想使用预览图像浏览原稿时,家庭模式是较好的选择。
可以定义扫描图像的尺寸,调整扫描区域,并调整一些图像设置,包括色彩翻新、去杂点或背光补偿。
A、将您的原始稿件放置在扫描仪文稿台上。
B、启动Epson Scan
.
C、在模式列表中选择家庭模式
D、选择您正扫描的原稿类型作为文稿类型设置
E、进行图像类型设置
F、在目标文件框中,单击您想用于扫描图像方式的按钮
G、单击预览可预览您的图像。
预览窗口出现并显示图像
H、如果需要选择扫描的图像尺寸作为目标尺寸设置。
您可以按原始尺寸来扫描您的
图像,或者可通过选择目标尺寸来缩小或放大其尺寸
I、按需要指定图像质量
.
J、单击扫描
K、您扫描的图像在文件保存设置窗口中按您选择的文件格式和位置保存。
如果您没有在文件保存设置窗口中选择任何设置,它将以JPEG文件保存在Pictures或
My Pictures文件夹中
办公模式让您可快速扫描装入在自动文稿送纸器中的多页文稿,并通过预览图像查看扫描效果。
A、将您的原始稿件放置在扫描仪文稿台上
B、启动Epson Scan
C、在模式列表中选择办公模式
D、进行图像类型设置
E、进行文稿来源设置
F、选择原始文稿的尺寸作为尺寸设置
G、为您的原稿选择一个合适的分辨率作为分辨率设置
H、单击预览可预览您的图像。
预览窗口出现并显示图像。
I、按需要指定图像质量
J、单击扫描
K、您扫描的图像在文件保存设置窗口中按您选择的文件格式和位置保存。
如果您没有在文件保存设置窗口中选择任何设置,它将以JPEG文件保存在Pictures或My
Pictures文件夹中
专业模式让您对扫描设置进行完全的控制,并可使用预览图像来查看扫描效果。
当在扫描之前想预览图像并进行广泛详细的校正时,专业模式最佳。
可以锐化,色彩校正,使用全部列出的工具增强图像,包括色彩翻新、去杂点和背光补偿。
A、将您的原始稿件放置在扫描仪文稿台上
B、启动Epson Scan
C、在模式列表中选择专业模式
D、选择您正扫描的原稿类型作为文稿类型设置
E、进行文稿来源设置
F、如果您选择反射稿作为文稿类型设置,选择照片或文稿作为自动曝光类型设置
如果您选择胶片作为文稿设置,选择正片,彩色负片或黑白负片作为胶片类型设置
G、进行图像类型设置
H、为您的原稿选择一个合适的分辨率作为分辨率设置
I、单击预览可预览您的图像。
预览窗口出现并显示图像
J、如果需要选择扫描的图像尺寸作为目标尺寸设置。
您可以按原始尺寸来扫描您的图像,或者可通过选择目标尺寸来缩小或放大其尺寸
K、按需要指定图像质量(调整颜色和图像)
当您已经预览您的图像并已调整扫描区域时,您可以根据需要更改图像质量。
Epson Scan可以提供有关改善色彩、锐化、对比度和影响图像质量的其它方面的各种设置。
在您进行调整前,确保单击需要调整的图像或选取框区域。
柱状图为单独调整亮度、阴影和gamma级别提供一个图形界面。
色调校正为单独调整色调级别提供一个图形界面。
图像调整调整所有图像的红、绿、蓝三种色彩的亮度和对比度和平衡度。
颜色图案为中等色调级别提供一个图形介面,如皮肤色调,但不影响图像上最亮和最暗的区域。
USM锐化对整张图像各区域块的边缘进行清晰。
去网纹去除出现在隐蔽阴影图像区域中的波纹(如:肤色网纹)图案。
色彩翻新自动翻新褪色照片的颜色。
背光补偿从较亮背景的照片中去除阴影。
去杂点自动去除原始文稿上的杂点痕迹。
文本增强扫描文稿时,增强文本的识别度。
通过从图像中分离文本以使黑白图像更清楚及文本识别更精确。
自动区域
分离
忽略颜色不扫描某种颜色。
您可从红、蓝、绿中选择。
色彩增强增强某一种颜色。
您可从红、蓝、绿中选择。
L、单击扫描
M、您扫描的图像在文件保存设置窗口中按您选择的文件格式和位置保存。
如果您没有在文件保存设置窗口中选择任何设置,它将以JPEG文件保存在Pictures或My
Pictures文件夹中
要更改扫描模式,请单击Epson Scan窗口右上角模式框中的箭头。
然后从出现的列表中选择您想使用的模式。
注意:当下次启动Epson Scan时,您之前选择的模式仍然有效。