海淘德国BA保镖网之可丽蓝电子排卵测试笔使用说明书
排卵试纸的用法如何使用排卵试纸

排卵试纸则是通过检测黄体生成激素LH的峰值水平,来预知是否排卵。
其具体用法你了解多少呢以下是由整理关于排卵试纸的用法的内容,希望大家喜欢!排卵试纸的用法1、一般正常月经周期是28天,下次月经来潮时往前推14天为排卵日,一般从排卵日第11天开始测试,一直测试6天。
但并不是每个女性均在月经中期排卵,测试6天期间可能都没有出现阳性结果。
部分女性有时受环境、情绪及劳累影响,可能会提前排卵。
2、收集尿液前2小时应减少水分摄入,因为稀释了的尿液样本会妨碍LH峰值的检测。
3、应观察和记录测试期间检测线色度的变化,若检测结果为阴性但是检测线色度开始下降,也可作为LH峰值。
4、试纸应在规定时间内观察反应结果,30分钟后无效。
有阴性检测结果,检测线的位置可能会出现一条浅浅的色带,隔一段时间后再观察。
5、使用前不能使试条受潮或触摸反应膜,罐装试条取出试条后请立即把罐盖盖紧。
试条应在有效期内使用,过期后请勿使用。
6、尿液中的HCG会干扰试纸的检测结果,因此排卵试纸不适用于怀孕的女性,如果持续几天均出现LH的高峰,应先检测是否怀孕。
7、目前,尚未见到一般常用药如感冒药、抗生素、止痛药等影响测试准确性的报告,但若注射或服用含有HCG等的药物则会影响。
使用排卵试纸的注意事项1本试剂仅供体外检测一次性使用。
2本试剂只有测试前才能打开密封的铝箔袋,打开原包装后应在1小时内尽快使用。
3不是每个妇女均在月经中期排卵,在测试5天期间可能没有出现阳性结果。
4应观察和记录测试期间检测线色度的变化,若检测结果为阴性但是检测线色度开始下降,出可作为LH峰值。
5尿液过稀导致尿液中LH浓度过低,其中的LH浓度缺乏代表性,故检测前不宜喝太多的水或其它饮料。
6本试纸应在规定时间内观察反应结果,30分钟后结果无效。
7使用前不能使试条受潮或触摸反应膜,罐装试条取出试条后请立即把罐盖盖紧。
8应在有效期内使用,过期后请勿使用。
9在开始检测之前要仔细阅读说明书,准确根据每个步骤去做;不要吃一些如激素类可能会影响到测试的结果的药等,当你避免了会干扰测试结果的情况时,验孕棒会准确。
验孕棒使用说明书图片

验孕棒使用说明书图片验孕棒使用说明书图片笔型:1人份盒、2人份盒【预期用途】定性检测人体尿液中的人绒毛膜促性腺激素(HCG),适用于妇女早期妊娠的辅助诊断。
【检测原理】本试纸系采用双抗体夹心法和胶体免疫层析法原理定性检测尿液中的HCG,以金标鼠抗α-HCG单克隆抗体作为指示标记物,在硝酸纤维素膜上的检测线处和控制线处分别包被鼠抗β-HCG单克隆抗体和羊抗鼠lgG多克隆抗体。
检测时,尿样在毛细效应下层析。
当妇女怀孕时,尿液中的HCG与胶体金交联的HCG单抗形成HCG一金标抗体复合物,在检测区(T)显紫红色的条带,结果试纸出现两第紫红条带,为妊娠诊断阳性。
反之只在控制区(C)出现一条紫红色条带,为妊娠诊断阴性。
控制区(C)内所呈现的紫红色条带是判定是否有足够尿样,层析过程是否是正常的标准,同时也是作为试纸的内控标准。
【主要组成成份】1、人绒毛膜促性腺激素(HCG)测定试练:每人份铝箔袋单独包装,内含1份测定试纸和1份干燥剂,其中测试试纸是由鼠抗α-HCG单克隆抗体,鼠抗β-HCG 单克隆抗体,羊抗鼠lgG多克隆抗体,硝酸纤维素膜,聚酯纤维素膜,塑料背衬组成2、使用说明书(1份盒)检测需要但未提供的材料:1、秒表2、尿杯【储存条件及有效期】储存条件:于4-30℃干燥阴凉处保存,切忌冷冻。
有效期为24个月。
测定试纸应在铝箔袋拆封后1小时内尽快使用;建议在周围温度高于30℃或高温条件下,尽可能做到即开即用【适用仪器】无【样本要求】1、燥、洁净的塑料或玻璃容器盛装尿液(不加防腐剂)2、立即检测,可将尿样冷藏(2-8℃)或冷冻(-20℃)保存,冷藏可保存48小时。
检测冷藏或冷冻的尿样应平衡至室温。
如果尿样呈可见的浑浊状,请离心或待其沉淀后再取上清液检测【检测方法】在进行检测前必须先完整阅读使用说明书,使用前将测定试纸和待测样本平衡至室温(20-30℃)。
1、撕开铝箔袋,取出验孕棒,应在1小时内尽快使用。
2、使用时拔下笔盖露出尿液吸棒。
排卵快诊试剂条操作说明书

22
23
24
25
26
27
28
29
30
31
[标本收集]: 尿液标本必须收集在一个干净,干燥的容器中。一天
之内的尿液均可检测,但通常不用晨尿;在连续几天的检 测过程中,每天均收集早上 10 点到晚上 8 点之间差不多 相同的时点的尿样为好。尿样出现混浊和沉淀时,请勿摇 动,取上清检测;或通过离心或过滤取上清检测。
[检测特性]:
精确度 我们使用自己的 LH 检测试剂条及其他市售的 LH 检
测试剂条检测了 150 例尿液标本,其中包括已确诊的 98 例阴性标本及 52 例阳性标本。结果显示:自己的 LH 检 测试剂条与其他市售的 LH 检测试剂条相比,检测结果符 合率为 100%(大于 99%)。
灵敏度 我 们 的 LH 检 测 试 剂 条 在 检 测 LH 浓 度 大 于
ቤተ መጻሕፍቲ ባይዱ
! [例如]
你的月经周期是 28 天,对照“表一”可知,后推天数是
11 天;上一次来潮是 5 号开始的,那么从 5 号开始往后数
11 天,即从 15 号可以开始检测了(参考“表二”)
表二
Sun
Mon
Tue
Wen
Thu
Fri
Sat
1
2
3
4
(5)
6
7
8
9
10
11
12
13
14
(15)
16
17
18
19
20
21
[存储及稳定性]: 原包装应存储于室温(4~30°C)。试剂条使用前必须
存放于包装袋袋内或装入密闭容器中。装在封口包装袋袋 内的试剂条在失效期前质量可靠。
测排卵试纸的用法

测排卵试纸的用法排卵试纸怎么用1、选择使用测排卵试纸的时间段对于月经周期规律的女性来说,排卵日一般在下次月经开始前14天左右,因此在排卵前2~3天及排卵后1~2天为易受孕期,这也就是需要使用测排卵试纸监测的阶段,一般需要连续使用5天。
2、不要使用晨尿进行测试检测的最佳时间是每天早10点~晚8点,尽量采用差不多同一时刻的尿液。
早晨的第一次尿液,因为经过一夜的积累,尿液中所含LH值并不能代表实际的数值,因此最好不用。
另外测试前2小时内不要摄入过多的水分,以免使尿液中的黄体生成激素受到稀释影响检测的结果。
3、在使用说明提示的时间内读取结果在使用时应该严格遵照使用说明,在规定时间内读取结果,超过规定时间,结果无效。
4、哪些因素会影响测试的结果一般的常用药物如感冒药、抗生素、止痛药等均不影响测试的准确性。
但妊娠、绝经期、服用激素、类固醇及避孕药物都会对测试的结果产生影响,因此在测试期内最好应避免出现类似的情况或服用类似的药物。
5、保留试纸或是试笔比对结果做完测试后最好不要将试纸或试笔马上扔掉,可以留下来和日后的测试经过进行比对。
或者是将测试结果详细记录下来,直至检测出LH峰值。
排卵试纸什么时候用一般建议在女性月经来潮第十天开始使用排卵试纸,每天使用一次来测试是否有排卵发生,并且检测的最佳时间是每天早10点-晚8点,尽量采用差不多同一时刻的尿液,其中以下午2点-2点30分这段时间最佳。
因为排卵日是在下次月经开始前14天左右,排卵日前5天和后4天连同排卵日在内共10天称为排卵期。
在排卵期使用排卵试纸测排卵,能发现是否排卵,如果有备孕计划的夫妻,可以在有排卵时同房,提高怀孕几率。
排卵试纸使用时间建议在月经来潮的第十天开始测,每天用排卵试纸测一次。
排卵试纸使用有强弱两种结果:1、若发现在逐渐转强,就增加测试的频率,建议每隔4小时测一次,尽量测到强阳,抓住强阳转弱的瞬间,因为排卵就发生在强阳转弱的时候。
2、若是发现快速转弱,则说明24小时之内可能将排卵。
可丽蓝验孕棒使用方法
可丽蓝验孕棒使用方法一、简介。
可丽蓝验孕棒是一种简单易用的验孕工具,它能够帮助女性在家中进行初步的怀孕检测。
使用方法简单,准确率高,因此备受广大女性的青睐。
接下来,我们将详细介绍可丽蓝验孕棒的使用方法,希望能够帮助到您。
二、使用步骤。
1. 购买验孕棒。
首先,您需要前往药店或者医院的药房购买可丽蓝验孕棒。
确保选择正规渠道购买,以保证产品的质量和准确性。
2. 选择合适的时间。
通常来说,怀孕的最佳检测时间是在预计月经来潮的第一天之后的7天左右。
如果您怀疑自己怀孕了,可以在这个时间段内进行测试。
3. 进行测试。
在测试当天,首先要准备一个干净的容器,用来收集尿液。
然后取出验孕棒,根据说明书上的指引,将验孕棒的吸头部分放入尿液中,浸泡几秒钟。
注意不要将验孕棒的显示窗口部分浸泡在尿液中。
4. 等待结果。
将验孕棒放置在水平的表面上,等待约3-5分钟。
在这段时间内,您可以做一些其他的事情来分散注意力,以免焦虑等待。
5. 读取结果。
在规定的时间内,验孕棒的显示窗口上会出现相应的结果。
通常有两种结果,一种是显示出两条线,表示怀孕呈阳性;另一种是只显示一条线,表示怀孕呈阴性。
如果出现两条线,那么您很有可能怀孕了,建议尽快前往医院进行确认。
三、注意事项。
1. 遵循说明书。
在使用可丽蓝验孕棒的过程中,一定要仔细阅读产品说明书,按照说明书上的指引进行操作。
不要随意更改使用方法,以免影响测试结果的准确性。
2. 注意保存。
验孕棒是一种敏感的检测工具,使用后要注意保存。
避免阳光直射和潮湿环境,以免影响产品的质量。
3. 结果仅供参考。
无论是阳性还是阴性的结果,都只能作为初步的参考。
如果怀孕呈阳性,建议尽快前往医院进行进一步的检查和确认;如果怀孕呈阴性,但仍有怀疑,可以在几天后再次进行测试。
四、结语。
通过上述介绍,相信您对可丽蓝验孕棒的使用方法有了更清晰的了解。
希望这篇文档能够帮助到您,祝愿您能够顺利得到自己想要的结果。
如果您有任何疑问或者需要进一步的帮助,可以咨询医生或者药师。
排卵监测试纸如何使用?
排卵监测试纸如何使用?一、选择适合的排卵监测试纸在购买排卵监测试纸之前,应该首先了解自己的排卵周期。
一般来说,女性的排卵周期为28天左右,但也有个体差异。
根据自己的经验和月经周期,可以选择适合自己的排卵监测试纸。
二、正确使用排卵监测试纸1. 选择测试时间:一般来说,排卵监测试纸的最佳使用时间是在月经周期的11到17天。
以月经开始的第一天为1天,第11天到第17天为最佳测试时间段。
2. 选择合适的时间:对于最佳测试时间段,最好是每天选择同一时间进行测试。
早晨的尿液通常是最浓缩的,所以建议在早晨进行测试。
3. 收集尿液:在使用排卵监测试纸之前,首先需要收集新鲜的尿液。
可以使用干净的容器或者直接将测试纸置于尿液中收集。
4. 测试纸的使用:将测试纸放入尿液中,一般来说,测试纸应该完全浸入尿液中,并保持10到15秒。
然后,将测试纸取出,并将其放置在干燥的地方等待结果。
5. 读取结果:根据排卵监测试纸上的说明,可以读取结果。
一般来说,测试纸上会有一个控制线和一个测试线,控制线表示测试是否有效,测试线表示是否排卵。
结果通常在5到10分钟内显示,而且通常是一个深色的线。
三、注意事项1. 遵循说明书:在使用排卵监测试纸之前,务必仔细阅读说明书,并按照说明书进行正确使用。
2. 多次测试:为了更准确地确定排卵日,可以进行多次测试。
每天进行测试,可以掌握排卵周期的变化。
3. 结合其他方法:排卵监测试纸是一种辅助工具,可以结合其他排卵监测方法,如测量基础体温、观察子宫颈黏液等,以提高排卵日的准确性。
4. 过度依赖:尽管排卵监测试纸可以提供一些有用的信息,但并不能完全准确预测排卵日。
不要过度依赖测试纸,要综合考虑其他因素。
总结:排卵监测试纸是一种简单方便的排卵监测工具,但需要注意正确的使用方法和时间选择。
通过正确的使用排卵监测试纸,可以更好地了解自己的排卵周期,提高怀孕的机会。
然而,使用排卵监测试纸只是一种辅助方法,应该结合其他排卵监测方法以提高准确性。
如何通过排卵笔检测排卵
本文部分内容仅供参考,不作为依据!谢谢。
如何通过排卵笔检测排卵
小编希望如何通过排卵笔检测排卵这篇文章对您有所帮助,如有必要请您下载收藏以便备查,接下来我们继续阅读。
文章导读:排卵笔检测排卵,要提前准备好足够的排卵测试笔,因为一旦发现发现检测线颜色逐渐转强,就要增加测的频率,最好每隔4小时测一次,抓住强阳转弱的瞬间,说明卵子要破壳而出了。
排卵测试笔(纸)原理:通过测量尿液中黄体生成激素(LH)的峰值水平,来判断排卵时间。
女性排卵前24~48小时内,尿液中的LH会出现高峰值(LH激增),此时用排卵测试笔自测,结果就会显示为阳性。
排卵测试笔(纸)使用方法:
结合月经周期、宫颈粘液等预测方法,在预计排卵期一周前开始用排卵试纸监测。
直到试纸上两条杠一样深或第二条杠比第一条杠还深,就为阳性,说明将在24~48小时内排卵。
使用排卵测试笔(纸)注意事项:
一般排卵测试笔包装上都有说明(须严格按照说明做,才能尽量减少误差)。
1、与早早孕试纸不同的是,不可使用晨尿,并尽量采用每天同一时刻的尿样,收集尿液前2小时应减少水分摄入,因稀释了的尿样也会妨碍LH峰值的检测。
2、要是月经周期比较规律,在经期前14天(也就是预计的排卵时间),这个时间的前三天加后三天,连续六天测定;要是月经不规律或者不正常,则一般在月经干净后第三天开始测。
海淘德国BA保镖网之可丽蓝测孕笔使用说明书格式

海淘德国BA保镖网之可丽蓝早早孕电子测孕笔使用说明簡單介紹Clearblue 可丽蓝建议您从预计的月经之日开始检测。
在怀孕早期,孕激素会迅速增加,Clearblue可丽蓝最早可在预计月经期来临之日的前4 天使用。
在采用怀孕早期样本的临床试验中,使用Clearblue可丽蓝获得的结果如下:62% 的女性提前4 天测到“怀孕”结果,77% 的女性提前3 天测到,91% 的女性提前2 天测到,98% 的女性提前1 天测到。
如果您提前测试后,测到“未怀孕”结果,这可能是孕激素水平不够高,检测不到。
当预计月经期来临时应重新测试。
该Clearblue怀孕测试将显示您是否怀孕,可靠性达到99%。
> 不但准确验孕,更可以告诉您已的怀孕周数> 结果在3分钟内可见> 快速且易于使用使用方法丨> 测试前,如果从预计月经期来临之日测试,您可在当天的任何时间测试以检测是否怀孕。
如果提前测试,为获得准确的怀孕时间的提示,您必须使用当天的晨尿。
在使用测试笔之前,避免饮用过多液体> 准备检测时,从铝箔袋中取出测试笔,取下蓝色笔帽。
取出后应立即使用> 进行测试,只需将吸水棒朝下置于尿流中停留5 秒。
注意不要把电子测试笔的其它部分弄湿。
或者您可以用一个干净、干燥容器收集尿液样本。
只需将吸水棒朝下置于尿液中20 秒> 取样后,请盖上笔帽,然后将Clearblue可丽蓝早早孕电子测试笔平放> 等待3分钟> 在使用Clearblue可丽蓝早早孕电子测试笔检测时,一个沙漏状“等待”符号将闪烁,显示测试正在进行中。
“等待”符号停止闪烁时,会出现检测结果> 读取测试结果,在3 分钟内,显示屏中将显示您的最终结果> “怀孕”结果可能会在怀孕时间之前出现。
请继续等待,在沙漏状符号停止闪烁时,查看提示的怀孕时间> 检测结果会在显示屏中持续显示24 小时左右類別:1 Stück製造商/品牌:Procter & Gamble GmbH商品编号/ PZN:01107875供貨商:物流狀態:有貨12,35 €¹而不是12,95 € UVP。
产品使用说明书

产品使用说明书1. 产品介绍1.1 产品名称1.2 产品型号1.3 产品功能1.4 产品外观1.5 产品配件2. 安全须知2.1 使用环境2.2 使用前的准备2.3 使用过程中的注意事项2.4 使用后的处理3. 产品操作指南3.1 开机与关机3.2 功能设置3.3 操作步骤3.4 常见问题解答4. 维护与保养4.1 清洁与消毒4.2 零部件更换4.3 保养注意事项5. 售后服务5.1 售后服务政策5.2 售后服务流程5.3 售后服务联系方式1. 产品介绍本产品是一款高性能、多功能的电子设备,旨在为用户提供便捷、高效的使用体验。
以下是对该产品的详细介绍:1.1 产品名称产品名称:XXXX该名称是根据产品的特性和功能而命名的,以准确地传达产品的用途和优势。
1.2 产品型号产品型号:XXXXX产品型号是为了区分不同版本和配置的产品而设定的标识,用户在购买和使用时需注意型号的准确性。
1.3 产品功能本产品具有多种功能,包括但不限于:- 功能一:XXXXXXXXX- 功能二:XXXXXXXXX用户可以根据自身需求,灵活地选择和使用产品的各项功能。
1.4 产品外观本产品采用精致、简约的外观设计,具有以下特点:- 外观一:XXXXXXXXX- 外观二:XXXXXXXXX- 外观三:XXXXXXXXX产品外观的设计旨在提升用户的审美体验,同时保证产品的实用性和易用性。
1.5 产品配件购买本产品时,用户将获得以下配件:- 配件一:XXXXXXXXX- 配件二:XXXXXXXXX- 配件三:XXXXXXXXX这些配件将为用户提供更全面、便捷的使用体验,用户在使用产品时请妥善保管和使用配件。
2. 安全须知为了保障用户的人身安全和产品的正常使用,用户在使用本产品前,请务必仔细阅读并遵守以下安全须知:2.1 使用环境本产品适用于以下使用环境:- 环境二:XXXXXXXXX- 环境三:XXXXXXXXX用户在使用产品时,请确保所处的环境符合以上要求,以避免因使用环境不当而导致的安全问题。
Baby-LIN产品指南说明书

Baby-LIN Product GuideProduct Guide V1.6Lipowsky Industrie-Elektronik GmbHRömerstraße57|64291Darmstadt|Germany Phone:+49(0)6151/93591-0|Fax:+49(0)6151/93591-28 Website:|E-Mail:****************1Imprint22Support information 33Introduction 34Use cases45LINWorks and workflow 46Products61ImprintAuthor Lipowsky Industrie-Elektronik GmbH Römerstraße5764291DarmstadtPhone+49(0)6151/93591-0Fax+49(0)6151/93591-28E-Mail****************Website CEO Andreas LipowskyCommercial register Darmstadt HRB5139VAT-ID DE111647423Quality Management DIN EN ISO9001:2015Title Product GuideVersion V1.5Date2021-09-20Valid for Baby-LIN-DeviceCopyright©2020,Lipowsky Industrie-Elektronik GmbH,DarmstadtThis publication is copyright protected.All rights reserved,including those to translation,performance,use of illustrations and tables,broadcasting, microfilming or reproduction by other means,or electronic storage of all material contained herein.All other brand names and trademarks used within this manual are unlimited subject to the applicable trademark laws and the ownership rights of their registered owners.The hardware,firmware,software and documents of the Baby-LIN-Device are subject to change without prior notice.Lipowsky Industrie-Elektronik GmbH thereby has no obligations.2Support informationIn case of any questions you can get technical support by e-mail or phone.We can use T eamViewer to give you direct support and help on your own PC.This way we are able to sort out problems fast and direct.We have sample code and application notes available,which will help you to make your job.Lipowsky Industrie-Elektronik GmbH realized many successful LIN and CAN related projects and therefor we can draw upon many years of experience in thesefields.We also provide turn key solutions for specific applications like EOL(End of Line)testers or programming stations.Lipowsky Industrie-Elektronik GmbH designs,produces and applies the Baby-LIN products,so you can always expect qualified and fast support.3IntroductionAny situation that requires communication with a LIN or CAN device is a potentialfield of application for a Baby-LIN product.It is a versatile tool that can be used in research laboratories,test departments and production(EOL applications).All Baby-LIN products allow for different operation modes to support typical use cases like:•Monitor and log all frames on the bus without the need for a SDF.If a SDF is available signal values can also be monitored.•Control the bus via the LINWorks software or customer specific applications by using the Baby-LIN-DLL.•Program and store free programmable command sequences in the Baby-LIN product to run it as a standalone device without the need for a PC.Thus you can run a bus driven ECU in a durability test or EOL applications without any PC connected.All Baby-LIN products are able to simulate different configurations of LIN-and CAN-Bus nodes.It is possible to simulate any number of nodes ranging from none to all.These are some typical configurations:•LIN-Bus:Simulate the LIN-Bus master to operate slave nodes.•LIN-Bus:Simulate any number of LIN-Bus slave nodes.•LIN-and CAN-Bus:Simulate all but one node and realize a residual bus simulation.•LIN-and CAN-Bus:Simulate all nodes and therefor the complete communication on the bus.•LIN-and CAN-Bus:Simulate no node to monitor the bus communication only.Simulations for the LIN-and CAN-Bus can be done simultaneously.The different Baby-LIN products mainly vary in the type and amount of interfaces and the possibilities to interact without a PC.The following guide is designed to help youfind the ideal Baby-LIN product for your use cases.4Use casesEach Baby-LIN product is designed to comply with certain requirements of typical use cases:No matter if you want a PC coupled device,a handheld device,a stand alone device without a PC or a PLC coupled device,there is always a Baby-LIN product for you.5LINWorks and workflowAll the different software components of the LINWorks suite are designed to support the customer during specific steps of the workflow.The worklfow starts with a LDF(for LIN-Bus)or DBC(for CAN-Bus)which will be embedded in a SDF using the Session Configurator.This SDF contains all the informations the Baby-LIN product needs.Depending on your device and use case you can transfer the SDF via Web-Interface,USB mass storage device,SDHC card or the Simple Menu.It is also the base for your custom application using the Baby-LIN-DLL.The purchase of a Baby-LIN product includes the license to download the LINWorks suite.This suite is a collection of PC software that supports you during the whole workflow.The LDFEdit allows the inspection,creation and edit of a LDFile(LIN Description File).The SessionConf allows the inspection,creation and edit of a SDFile(Session Description File)and features afile import for LDFiles(for LIN-Bus simulation)and DBCfiles.It defines everything needed for a complete simulation of each available bus,e.g.which nodes on each bus are available and which nodes should be simulated by the Baby-LIN product.Moreover it allows defining an application logic.This programming ability is available for each device out of the box.The SimpleMenu is used to establish a connection to the Baby-LIN product and upload SDFiles,change the device target configuration,control the bus and monitor the frames and signals on the bus.Even without a LDFile/DBCfile/SDFile the bus can be monitored and the frames can be logged.The Baby-LIN-DLL allows customers to create their own application and use all features of the Baby-LIN product like controlling and monitoring the LIN-and CAN-Bus interfaces.The Baby-LIN-DLL is a native C/C++DLL.A wrapper for∗∗.NET∗∗applications is also provided as LabViewfiles.Examples are available for all supported languages.The LogViewer can show and convert the logfiles of the Baby-LIN products as well as the SimpleMenu.The LINWorks software runs on32and64bit Windows versions.The Baby-LIN-DLL is also available as Linux version upon request.6ProductsBaby-LIN-II Baby-LIN-RC-II Baby-LIN-RM-III HARP-5Baby-LIN-MB-IIUSB2.0USB2.0USB2.0USB2.0SDHC cardEthernetRS-232web interface111111151CAN-HS1CAN-LS1CAN-HS1CAN-LS1CAN-HS120/16/6。
验孕棒可丽蓝使用方法

验孕棒可丽蓝使用方法验孕棒是一种用于检测孕妇是否怀孕的工具,也叫孕妇试纸。
其中一种常见的验孕棒是可丽蓝。
下面我将详细介绍可丽蓝验孕棒的使用方法。
首先,购买一个可丽蓝验孕棒。
你可以在药店或者一些大型的超市、网店购买到可丽蓝验孕棒。
一般来说,可丽蓝验孕棒的包装盒上会有一些说明书,你可以仔细阅读上面的说明。
同时,我也将详细解释可丽蓝验孕棒的使用方法。
1. 在使用可丽蓝验孕棒之前,首先需要收集尿液。
通常建议使用晨尿进行测试,因为晨尿中的妊娠激素浓度较高。
如果不是晨尿,也可以选择检测时尿液比较浓缩的时候进行测试。
2. 打开包装盒,取出可丽蓝验孕棒。
可丽蓝验孕棒上方有一个吸尿口,底部有一个用来显示结果的显示窗口。
3. 勾取足够的尿液,可以使用一个干净的杯子或者容器收集尿液,然后将验孕棒的吸尿口直接放入尿液中,注意不要让尿液超过指示线。
4. 吸取足够的尿液后,等待约10秒钟,让尿液被吸收。
5. 将验孕棒放在一个平坦的表面上,等待几分钟。
在等待的过程中,你可以看到可丽蓝验孕棒上的两个窗口中会显示出颜色。
6. 阅读结果。
可丽蓝验孕棒上的窗口通常有两个色带:一个是测试线(T)和一个是参考线(C)。
参考线(C)始终会显示,而测试线(T)的出现与否将决定你是否怀孕。
- 如果测试线(T)和参考线(C)都出现,或者测试线(T)的颜色相对较深,那么测试结果是怀孕。
- 如果只有参考线(C)出现,而测试线(T)没有出现,那么测试结果是未怀孕。
请注意,无论结果如何,都应该等待指定的时间才能读取结果,同时尽量避免超过特定的时间,因为这可能会导致结果不准确。
如果你长时间没有来月经,并且已经使用了可丽蓝验孕棒且显示结果为怀孕,那么你可以考虑去医院进行进一步的检查以确认怀孕。
同样地,如果你没有来月经,并且使用可丽蓝验孕棒测试显示结果为未怀孕,但是你仍然怀疑自己可能怀孕,那么你也可以去医院进行进一步检查。
总之,可丽蓝验孕棒是一种方便、快速、准确的工具,可以用于家庭中的怀孕检测。
排卵试纸使用方法
排卵试纸使用方法排卵试纸是一种用于检测女性排卵期的辅助工具,它通过检测尿液中的黄体酮水平来判断女性是否处于排卵期。
使用排卵试纸可以帮助女性更好地了解自己的生育周期,从而更好地控制怀孕。
下面将介绍排卵试纸的正确使用方法。
1.选择合适的时间。
排卵试纸通常建议在早上10点到下午3点之间进行测试,因为这段时间内的尿液浓度最适合进行检测。
另外,建议在排卵期前5天开始测试,以确保能够准确地掌握排卵期的情况。
2.准备工作。
在进行排卵试纸测试之前,首先需要准备一个干净的容器用于收集尿液。
确保容器干净卫生,以免影响测试结果。
另外,也需要准备好排卵试纸和计时器。
3.收集尿液。
在准备好容器后,女性需要蹲下或坐下,用容器收集新鲜的尿液。
尽量避免收集首次排尿的尿液,因为首次排尿的尿液中携带的激素浓度较低,可能会影响测试结果的准确性。
4.进行测试。
将排卵试纸的尿液收集端浸入收集好的尿液中,但不要超过标记线。
等待10-15秒后,将试纸取出并放置在一个干燥的平面上。
然后等待5-10分钟,直到出现测试结果。
5.解读结果。
排卵试纸的测试结果通常有两种情况,一种是显示出两条红线,一种是只显示出一条红线。
两条红线表示排卵期即将到来或正在进行中,这时候是受孕的最佳时机;而只显示一条红线则表示排卵期尚未到来,需要继续观察。
6.记录结果。
每次测试后,都需要将测试结果记录下来,以便于后续的比对和分析。
可以使用一个排卵日记来记录每次的测试结果,从而更好地掌握自己的生育周期。
排卵试纸的使用方法其实并不复杂,只需要按照正确的步骤进行操作,就能够得到准确的测试结果。
希望本文所介绍的排卵试纸使用方法能够对您有所帮助,祝愿您在掌握生育周期的同时,也能够更好地控制怀孕。
排卵检测试纸怎么使用
如对您有帮助,可购买打赏,谢谢
排卵检测试纸怎么使用
导语:排卵是女性想要怀孕的关键节点,没有排卵的女性是不可能怀孕的,所以,对于女性来说准确把握自己排卵的日期是相当重要的,只有排卵的规律能
排卵是女性想要怀孕的关键节点,没有排卵的女性是不可能怀孕的,所以,对于女性来说准确把握自己排卵的日期是相当重要的,只有排卵的规律能够准确无误的抓住才能让自己怀孕的历程更加轻松,而现在女性可以用排卵检测试纸来进行排卵的预测,下面就来看看排卵检测试纸怎么使用的介绍吧。
因为每月的排卵时间不同,造成月经的提前或滞后。
所以正常周期(28天)的女性一般从经期开始为第一天算12天开始测试,(30天的从14天开始测试,以此类推) 。
如果只见对照线,没有反映线,可以隔1~2天一测,一旦出现浅红色反映线,说明已经进入排卵期,但还没到排卵高峰期,则需每隔24小时一测(因为高峰只有1天,且这1天的前,后反映线都比对照线要浅,所以不坚持每天测容易错过排卵高峰,而让人误认为无排卵),直到反映线和对照线颜色相同或比对照线深,说明您将在24小时之内排卵,此时是怀宝宝的最佳时期。
(每个试纸的独立包装上都有详细说明和图解) 所以一个周期(经期~下一个经期前)一般连续测4~5天(每次用一条)就可以测出排卵高峰,每日测量上午10点至下午8点之间的尿液进行观察。
注意测试前不能喝酒及过多饮水。
从以上的介绍来看,排卵检测试纸是非常好使用的,关键是要看女性们的使用方法是不是按照说明书来使用的,正确的使用方法能够很快的测试出排卵的日期,所以,对于女性来说在使用排卵检测试纸的时候一定要先看看说明书,然后再使用。
预防疾病常识分享,对您有帮助可购买打赏。
可丽蓝验孕棒

可丽蓝验孕棒可丽蓝验孕棒是一种常用的家庭用品,它被广泛用于判断女性是否怀孕。
在现代社会中,不少夫妻都期望能够尽快获知是否怀孕的好消息,可丽蓝验孕棒就成为一种非常方便和准确的选择。
一、可丽蓝验孕棒的原理可丽蓝验孕棒主要是通过检测尿液中的人绒毛膜促性腺激素(hCG)来判断是否怀孕。
当女性成功受孕后,她们的体内会产生一种叫做hCG的激素。
这种激素在受孕后不久就开始逐渐增加,然后用尿液的形式排出体外。
可丽蓝验孕棒就是利用特殊的化学试剂,在被测尿液中,准确地检测出hCG。
当hCG的含量超过一定的阈值时,验孕棒上就会显示出阳性结果,表示怀孕;而当hCG的含量没有达到阈值时,验孕棒就会显示出阴性结果,表示未怀孕。
二、可丽蓝验孕棒的使用方法使用可丽蓝验孕棒非常简单,以下是一些基本的步骤:1. 收集尿液:首先,用一个干净的容器收集早上第一次排尿的尿液。
注意不要收集过多,一般10毫升左右即可。
2. 使用方法:将可丽蓝验孕棒的试纸部分迅速完全浸入收集到的尿液中,保持试纸在尿液中10秒左右。
3. 等待结果:将试纸取出,轻轻晃动一下,以去除多余的尿液,然后将它放在一个干燥的平面上等待5分钟左右。
4. 阅读结果:在规定的时间内,可以看到验孕棒上出现的结果。
一根浅粉色线代表阴性结果,即未怀孕;两根线,一根浅粉色线和一根鲜明的粉色线,代表阳性结果,即怀孕。
三、可丽蓝验孕棒的准确性可丽蓝验孕棒在正确使用的情况下,具有较高的准确性。
根据相关研究表明,可丽蓝验孕棒在怀孕后14天(即月经推迟后14天)的准确率达到超过99%。
而在怀孕后8天的准确率也可以达到超过95%。
这一准确性可以满足大多数人的需求。
然而,要注意的是,可丽蓝验孕棒并不能在怀孕的早期(如受孕后的一个星期)就能准确判断怀孕。
受孕后的早期,hCG的产量较低,可能无法被检测到。
因此,如果在早期使用可丽蓝验孕棒得出阴性结果,但仍然怀有怀孕的疑虑,建议等待一段时间后重新测试。
四、注意事项1. 使用合格的产品:确保所购买的可丽蓝验孕棒是正品,并在有效期内。
VetLine Babesia ELISA 产品说明书

VetLine BabesiaELISA RUO For Research Use OnlyEnglish (2)Bibliography / Literatur / Bibliographie / Bibliografia / Bibliografía/ Blibiografia (6)Abbreviations / Abkürzungen / Abréviations / Abbreviazioni / Abreviaciónes / Abreviaturas (6)Symbols Key / Symbolschlüssel / Explication des Symboles / Legenda / Símbolos / Tabela de símbolos (7)Summary of Test Procedure / Kurzanleitung Testdurchführung / Résumé de la procedure de test / Schema della procedura / Resumen de la técnica / Resumo do Procedimento de Teste (8)Product Number: BABVT0890 (96 Determinations)ENGLISH1.INTRODUCTION2.INTENDED USE3.PRINCIPLE OF THE ASSAYThe qualitative immunoenzymatic determination of specific antibodies is based on the ELISA (Enzyme-linked Immunosorbent Assay) technique.Microtiterplates are coated with specific antigens to bind corresponding antibodies of the sample. After washing the wells to remove all unbound sample material a horseradish peroxidase (HRP) labelled conjugate is added. This conjugate binds to the captured antibodies. In a second washing step unbound conjugate is removed. The immune complex formed by the bound conjugate is visualized by adding Tetramethylbenzidine (TMB) substrate which gives a blue reaction product.The intensity of this product is proportional to the amount of specific antibodies in the sample. Sulphuric acid is added to stop the reaction. This produces a yellow endpoint colour. Absorbance at 450/620 nm is read using an ELISA Microtiterplate reader.4.MATERIALS4.1.Reagents supplied▪Microtiterplate: 12 breakapart 8-well snap-off strips coated with Babesia antigens; in resealable aluminium foil.▪Sample Dilution Buffer:1 bottle containing 100 mL of phosphate buffer (10 mM) for sample dilution; pH 7.2 ± 0.2;coloured yellow; ready to use; white cap; ≤ 0.0015 % (v/v) CMIT/MIT (3:1).▪Stop Solution: 1 bottle containing 15 mL sulphuric acid, 0.2 mol/L; ready to use; red cap.▪Washing Buffer (20x conc.): 1 bottle containing 50 mL of a 20-fold concentrated phosphate buffer (0.2 M), pH .2 ± 0.2, for washing the wells; white cap.▪Conjugate:1 bottle containing 20 mL of peroxidase labelled Protein A/G; coloured yellow, ready to use; white cap;≤ 0.02 % (v/v) MIT.▪TMB Substrate Solution: 1 bottle containing 15 mL 3,3',5,5'-tetramethylbenzidine (TMB), < 0.1 %; ready to use;yellow cap.▪Positive Control: 1 vial containing 2 mL control; coloured yellow; ready to use; red cap; ≤ 0.02 % (v/v) MIT.▪Cut-off Control: 1 vial containing 3 mL control; coloured yellow; ready to use; green cap; ≤ 0.02 % (v/v) MIT.▪Negative Control: 1 vial containing 2 mL control; coloured yellow; ready to use; blue cap; ≤ 0.0015 % (v/v) CMIT/MIT (3:1).For hazard and precautionary statements see 12.1For potential hazardous substances please check the safety data sheet.4.2.Materials supplied▪ 1 Cover foil▪ 1 Instruction for use (IFU)▪ 1 Plate layout4.3.Materials and Equipment needed▪ELISA Microtiterplate reader, equipped for the measurement of absorbance at 450/620 nm▪Incubator 37 °C▪Manual or automatic equipment for rinsing Microtiterplate wells▪Pipettes to deliver volumes between 10 and 1000 µL▪Vortex tube mixer▪Distilled water▪Disposable tubes5.STABILITY AND STORAGEStore the kit at 2...8 °C. The opened reagents are stable up to the expiry date stated on the label when stored at 2...8 °C.6.REAGENT PREPARATIONIt is very important to bring all reagents and samples to room temperature (20…25 °C) and mix them before starting the test run!6.1.MicrotiterplateThe break-apart snap-off strips are coated with Babesia antigens. Immediately after removal of the strips, the remaining strips should be resealed in the aluminium foil along with the desiccant supplied and stored at 2...8 °C.6.2.Washing Buffer (20x conc.)Dilute Washing Buffer 1 + 19; e. g. 10 mL Washing Buffer + 190 mL distilled water. The diluted buffer is stable for 5 days at room temperature (20…25 °C).In case crystals appear in the concentrate, warm up the solution to 37 °C e.g. in a water bath. Mix well before dilution.6.3.TMB Substrate SolutionThe reagent is ready to use and has to be stored at 2...8 °C, away from the light. The solution should be colourless or could have a slight blue tinge. If the substrate turns into blue, it may have become contaminated and should be thrown away.7.SAMPLE COLLECTION AND PREPARATIONUse veterinary serum samples with this assay. If the assay is performed within 5 days after sample collection, the samples should be kept at 2...8 °C; otherwise they should be aliquoted and stored deep-frozen (-70…-20 °C). If samples are stored frozen, mix thawed samples well before testing. Avoid repeated freezing and thawing.Heat inactivation of samples is not recommended.7.1.Sample DilutionBefore assaying, all samples should be diluted 1+100 with Sample Dilution Buffer. Dispense 10 µL sample and 1 mL Sample Dilution Buffer into tubes to obtain a 1+100 dilution and thoroughly mix with a Vortex.8.ASSAY PROCEDUREPlease read the instruction for use carefully before performing the assay. Result reliability depends on strict adherence to the instruction for use as described. The following test procedure is only validated for manual procedure. If performing the test on ELISA automatic systems we recommend increasing the washing steps from three up to five and the volume of Washing Buffer from 300 µL to 350 µL to avoid washing effects. Pay attention to chapter 12. Prior to commencing the assay, the distribution and identification plan for all samples and standards/controls (duplicates recommended) should be carefully established on the plate layout supplied in the kit. Select the required number of microtiter strips or wells and insert them into the holder.Perform all assay steps in the order given and without any delays.A clean, disposable tip should be used for dispensing each standard/control and sample.Adjust the incubator to 37 ± 1 °C.1. Dispense 100 µL standards/controls and diluted samples into their respective wells. Leave well A1 for the SubstrateBlank.2. Cover wells with the foil supplied in the kit.3. Incubate for 1 hour ± 5 min at 37 ± 1 °C.4. When incubation has been completed, remove the foil, aspirate the content of the wells and wash each well three timeswith 300 µL of Washing Buffer. Avoid overflows from the reaction wells. The interval between washing and aspiration should be > 5 sec. At the end carefully remove remaining fluid by tapping strips on tissue paper prior to the next step!Note: Washing is important! Insufficient washing results in poor precision and false results.5. Dispense 100 µL Conjugate into all wells except for the Substrate Blank well A1.6. Incubate for 30 min at room temperature (20...25 °C). Do not expose to direct sunlight.7. Repeat step 4.8. Dispense 100 µL TMB Substrate Solution into all wells.9. Incubate for exactly 15 min at room temperature (20...25 °C) in the dark. A blue colour occurs due to an enzymaticreaction.10. Dispense 100 µL Stop Solution into all wells in the same order and at the same rate as for the TMB Substrate Solution,thereby a colour change from blue to yellow occurs.11. Measure the absorbance at 450/620 nm within 30 min after addition of the Stop Solution.8.1.MeasurementAdjust the ELISA Microtiterplate reader to zero using the Substrate Blank.If - due to technical reasons - the ELISA Microtiterplate reader cannot be adjusted to zero using the Substrate Blank, subtract its absorbance value from all other absorbance values measured in order to obtain reliable results!Measure the absorbance of all wells at 450 nm and record the absorbance values for each standard/control and sample in the plate layout.Bichromatic measurement using a reference wavelength of 620 nm is recommended.Where applicable calculate the mean absorbance values of all duplicates.9.RESULTS9.1.Run Validation CriteriaIn order for an assay to be considered valid, the following criteria must be met:▪Substrate Blank: Absorbance value < 0.100▪Negative Control: Absorbance value < 0.200 and < Cut-off▪Cut-off Control: Absorbance value 0.150 – 1.300▪Positive Control: Absorbance value > Cut-offIf these criteria are not met, the test is not valid and must be repeated.9.2.Calculation of ResultsThe Cut-off is the mean absorbance value of the Cut-off Control determinations.Example: Absorbance value Cut-off Control 0.44 + absorbance value Cut-off control 0.42 = 0.86 / 2 = 0.43Cut-off = 0.439.2.1. Results in Units [NTU]Sample (mean) absorbance value x 10 = [NovaTec Units = NTU]Cut-offExample: 1.591 x 10 = 37 NTU0.439.3.Interpretation of Results10.SPECIFIC PERFORMANCE CHARACTERISTICSFor further information about the specific performance characteristics please contact NovaTec Immundiagnostica GmbH.10.1.Precision10.2.Diagnostic Specificity10.3.Diagnostic Sensitivity10.4.InterferencesInterferences with hemolytic, lipemic or icteric samples are not observed up to a concentration of 10 mg/mL hemoglobin, 5 mg/mL triglycerides and 0.5 mg/mL bilirubin.10.5.Cross Reactivity11.LIMITATIONS OF THE PROCEDUREBacterial contamination or repeated freeze-thaw cycles of the sample may affect the absorbance values.12.PRECAUTIONS AND WARNINGS▪For research use only!▪All materials of human or animal origin should be regarded and handled as potentially infectious.▪All components of human origin used for the production of these reagents have been tested for anti-HIV antibodies, anti-HCV antibodies and HBsAg and have been found to be non-reactive.▪Do not interchange reagents or strips of different production lots.▪No reagents of other manufacturers should be used along with reagents of this test kit.▪Do not use reagents after expiry date stated on the label.▪Use only clean pipette tips, dispensers, and lab ware.▪Do not interchange screw caps of reagent vials to avoid cross-contamination.▪Close reagent vials tightly immediately after use to avoid evaporation and microbial contamination.▪After first opening and subsequent storage check conjugate and standard/control vials for microbial contamination prior to further use.▪To avoid cross-contamination and falsely elevated results pipette samples and dispense reagents without splashing accurately into the wells.▪The ELISA is only designed for qualified personnel who are familiar with good laboratory practice.12.1.Safety note for reagents containing hazardous substancesReagents may contain CMIT/MIT (3:1) or MIT (refer to 4.1)Therefore, the following hazard and precautionary statements apply.Warning H317 May cause an allergic skin reaction.P261 Avoid breathing sprayP280 Wear protective gloves/protective clothing.P302+P352 IF ON SKIN: Wash with plenty of soap and water.P333+P313 If skin irritation or rash occurs: Get medical advice/attention.P362+P364 Take off contaminated and Wash it before reuse.Further information can be found in the safety data sheet.12.2.Disposal ConsiderationsResidues of chemicals and preparations are generally considered as hazardous waste. The disposal of this kind of waste is regulated through national and regional laws and regulations. Contact your local authorities or waste management companies which will give advice on how to dispose hazardous waste.13.ORDERING INFORMATIONProd. No.: BABVT0890 VetLine Babesia ELISA (96 Determinations)BIBLIOGRAPHY / LITERATUR / BIBLIOGRAPHIE / BIBLIOGRAFIA / BIBLIOGRAFÍA/ BLIBIOGRAFIAABBREVIATIONS / ABKÜRZUNGEN / ABRÉVIATIONS / ABBREVIAZIONI / ABREVIACIÓNES / ABREVIATURASSYMBOLS KEY / SYMBOLSCHLÜSSEL / EXPLICATION DES SYMBOLES / LEGENDA / SIMBOLOS / TABELA DE SIMBOLOSLOTMTPSUMMARY OF TEST PROCEDURE / KURZANLEITUNG TESTDURCHFÜHRUNG / RÉSUMÉ DE LA PROCEDURE DE TEST / SCHEMA DELLA PROCEDURA / RESUMEN DE LA TÉCNICA / RESUMO DO PROCEDIMENTO DE TESTESCHEME OF THE ASSAYVetLine Babesia ELISATest PreparationAssay ProcedureNovaTec Immundiagnostica GmbHWaldstraße 23 A663128 Dietzenbach, GermanyTel.: +49 (0) 6074-48760 Fax: +49 (0) 6074-487629Email: *******************Internet: BABVT0890-engl-29042020-TL-RUO。
排卵笔+验孕笔
排卵笔使用方法(LH)
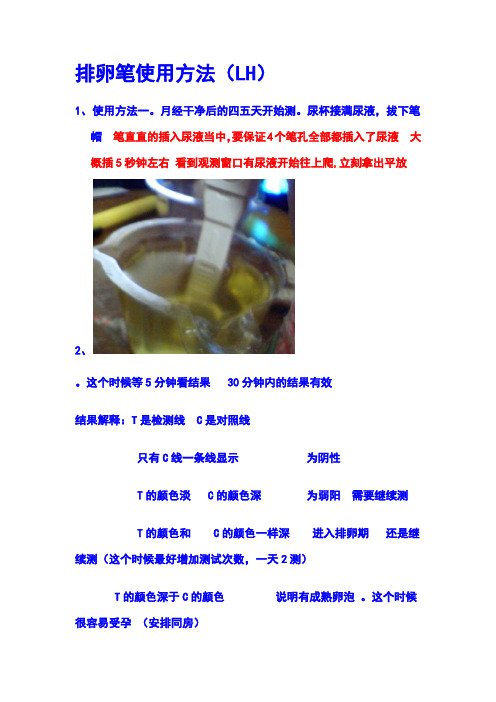
1、使用方法一。
月经干净后的四五天开始测。
尿杯接满尿液,拔下笔
帽笔直直的插入尿液当中,要保证4个笔孔全部都插入了尿液大概插5秒钟左右看到观测窗口有尿液开始往上爬,立刻拿出平放
2、。
这个时候等5分钟看结果 30分钟内的结果有效
结果解释:T是检测线 C是对照线
只有C线一条线显示为阴性
T的颜色淡 C的颜色深为弱阳需要继续测
T的颜色和 C的颜色一样深进入排卵期还是继续测(这个时候最好增加测试次数,一天2测)
T的颜色深于C的颜色说明有成熟卵泡。
这个时候很容易受孕(安排同房)
验孕笔使用方法
同房后的6-8天可以测了。
测试方法和排卵笔一样结果:两条线颜色一样深为阳性(怀孕)
只显示C 一条线为阴性(未孕)。
IntelliGender使用说明 中英文

IntelliGender’s Gender Prediction Test is an simple-to-use urine test that provides immediate gender results in the privacy and comfort of the home. In minutes, the IntelliGender Gender Prediction Test indicates your gender result based upon an easy to read color match. Green indicates boy and orange indicates girl!When can I use it?As early as 10 weeks into your pregnancy (8 weeks post- conception)! Most women find out the sex of their baby at their 20-week sonogram as long as Baby chooses to cooperate. IntelliGender bridges the curiosity gap between conception and sonogram.IntelliGender's Gender Prediction Test™ is a simple urine analysis similar to the pregnancy test you took a few weeks ago. It uses first morning urine and a proprietary mix of chemicals which reacts with a combination of hormones to indicate the gender of your baby. It can be performed as early as 10 weeks of pregnancy (six weeks from the first day of the missed period). It is an easy test to perform and provides quick results in-home so the news can be shared right away.IntelliGender reminds all pregnant moms that seeing an obstetrician early in the pregnancy is critical for the health of the mother and the baby and should follow the advice of their physician.You simply collect first morning urine and insert into the test vessel. Swirl rapidly in a circular motion, place the test on a flat white surface undisturbed for minutes. Below are examples of test results:IntelliGender 測試IntelliGender 测试是一个类似简单的尿液分析。
可丽蓝使用方法
可丽蓝使用方法可丽蓝是一种常见的美容产品,它可以有效地改善皮肤问题,让肌肤更加光滑细腻。
下面我将详细介绍可丽蓝的使用方法,希望对大家有所帮助。
首先,使用可丽蓝之前,需要先将脸部彻底清洁干净,确保没有化妆品和污垢残留在皮肤上。
可以选择温和的洁面乳进行清洁,然后用清水彻底冲洗干净,用毛巾轻轻拍干。
接着,取适量的可丽蓝产品,均匀涂抹在脸部肌肤上,可以轻轻按摩帮助吸收。
注意避开眼部和嘴唇周围的部位,以免引起不适。
使用可丽蓝的手法要轻柔,不要用力过度,以免对皮肤造成刺激。
在涂抹完可丽蓝后,可以适当按摩面部,帮助肌肤吸收产品。
按摩的力度要适中,以不伤害皮肤为准。
可以选择指腹轻轻打圈按摩,或者以指腹由下往上提拉按摩,都可以促进血液循环,增加肌肤的吸收能力。
使用可丽蓝的时间也需要掌握好,一般来说,建议在晚间使用,因为晚间是肌肤修复和更新的黄金时期,使用可丽蓝可以加速肌肤的修复和更新过程。
而白天使用可丽蓝可能会导致肌肤对紫外线的敏感度增加,不利于皮肤健康。
另外,使用可丽蓝的频率也需要适当控制,一般来说,每周使用1-2次即可,过于频繁的使用可能会对皮肤造成负担。
在使用可丽蓝的同时,也需要做好日常的防晒工作,避免肌肤受到紫外线的伤害。
最后,使用完可丽蓝后,还可以适当进行后续护理,可以选择保湿面膜或者保湿乳液进行补水保湿,帮助肌肤锁住水分,让肌肤更加水润有光泽。
总之,使用可丽蓝要注意清洁、手法轻柔、按摩促吸收、掌握好使用时间和频率,以及配合好后续护理,这样才能发挥出可丽蓝的最佳效果,让肌肤变得更加健康和美丽。
希望以上介绍对大家有所帮助,祝大家拥有健康美丽的肌肤!。
- 1、下载文档前请自行甄别文档内容的完整性,平台不提供额外的编辑、内容补充、找答案等附加服务。
- 2、"仅部分预览"的文档,不可在线预览部分如存在完整性等问题,可反馈申请退款(可完整预览的文档不适用该条件!)。
- 3、如文档侵犯您的权益,请联系客服反馈,我们会尽快为您处理(人工客服工作时间:9:00-18:30)。
海淘德国BA保镖网之可丽蓝电子排卵测试笔使用说明
簡單介紹
Clearblue 可丽蓝排卵测试笔可以测试两种关键激素,并且可以利用该测试笔了解到在你的生理周期中最适合怀孕的四天。
在女性生理周期中,最适合怀孕的时间只有几天,因此你怀孕的愿望应该在这几天内实现。
在该试验中,两个关键生育激素:促黄体激素和雌激素测量,以确定具有高和最大生育力的天数。
这使您可以安排和得到怀孕的机会越多。
由于采用了特殊的算法,测试调整到你的个人激素的配置文件,因此你很难错过你的最适怀孕期。
一个Clearblue笑脸出现在独特的数字显示屏上时,说明你最适合怀孕的时间到了,你的身体已经准备就绪。
使用方法丨
> 准备测试,用对齐的Ovulationsteststäbchen的测试夹具紫色箭头紫色箭头,运行试纸,直至其卡入到位
> 如果您有试纸正确插入时,Ovulationstesthalterung会自动开启
> 如果你使用的测试笔,有“新周期”符号闪烁,后立即显示“测试准备”符号,说明测试笔已经准备执行测试
> 将测试棒与吸收性测试条放在你的尿液流尖向下的位置,停放3秒;或将尿样放在干净干燥的容器内,浸入测试条的探针针尖对尿液中,停放15秒
> 在一分钟后开始闪烁“测试准备”图标,这表明,测试在运行
> 1分钟后闪烁的符号表示“测试就绪”表示该测试运行
> 等待5分钟,保持Ovulationsteststäbchen与测试点向下或平放在表面
> 5分钟后,结果显示在屏幕上。
一个空圆圈表示一个低生育率。
如果您在不是最适怀孕期有性交的话,受孕的概率低;闪烁的笑脸表示高生育能力,如果你在这一天有性交,说明怀孕的机会也较高。
固体明亮的笑脸显示了两个最适怀孕的时间。
如果你在这些时间有性交的话,怀孕的几率是最高的
類別:
10 Stück
製造商/品牌:
Procter & Gamble GmbH
商品编号/ PZN:
10131080
供貨商:
物流狀態:
有貨
29,99 €¹而不是34,99 € UVP價格包含增值稅和航運。
