CISCO交换机VTP配置参考实例
Cisco VTP中继协议配置实践

Cisco VTP中继协议配置实践1.VTP协议:VLAN中继协议,VTP,VLAN TRUNKING PROTOCOL,是CISCO专用协议,大多数交换机都支持该协议。
VTP负责在VTP域内同步VLAN信息,这样就不必在每个交换上配置相同的VLAN信息。
VTP还提供一种映射方案,以便通信流能跨越混合介质的骨干。
VTP 最重要的作用是,将进行变动时可能会出现在的配置不一致性降至最低。
不过,VTP也有一些缺点,这些缺点通常都与生成树协议有关。
知识点:VLAN中继协议(VTP)利用第2层中继帧,在一组交换机之间进行VLAN通信.VTP从一个中心控制点开始,维护整个企业网上VLAN的添加和重命名工作,确保配置的一致性。
2.设计思路及需求:1、Cisco C3560配置成为VTP server并设置VTP管理域名称CCTV2、Cisco C3560创建三个VLAN(VLAN10 VLAN20 VLAN 30)并配置每个VLAN动态获取IP3、Cisco C3650 分配三个端口fa 0/1-3 设置为trunk4、三台Cisco C2960配置成为VTP client5、C2960_01 分配fa 0/1-5给VLAN 10 ,并设置fa0/24端口为trunk6、C2960_02 分配fa 0/1-5给VLAN 20 ,并设置fa0/24端口为trunk7、C2960_03 分配fa 0/1-5给VLAN 30 ,并设置fa0/24端口为trunk3.网络拓扑图:4.配置(1)Cisco C3560配置如下:##设置VTP 域名名称及VTP ServerC3560>enableC3560#vlan databaseC3560(vlan)#vtp domain CCTVC3560(vlan)#vtp server##创建VLAN 10 VLAN 20 VLAN 30 C3560(vlan)#vlan 10 name VLAN10C3560(vlan)#vlan 20 name VLAN20C3560(vlan)#vlan 30 name VLAN30C3560(vlan)#exit##VLAN配置IP地址3560#configure terminalC3560(config)#interface vlan 10C3560(config-if)#ip address 192.168.10.1 255.255.255.0C3560(config-if)#exitC3560(config)#interface vlan 20C3560(config-if)#ip address 192.168.20.1 255.255.255.0C3560(config-if)#exitC3560(config)#interface vlan 30C3560(config-if)#ip address 192.168.30.1 255.255.255.0C3560(config-if)#exit##配置DCHPC3560(config)#service dhcpC3560(config)#ip dhcp pool vlan10_dhcpC3560(dhcp-config)#network 192.168.10.0 255.255.255.0C3560(dhcp-config)#default-router 192.168.10.1C3560(dhcp-config)#dns-server 114.114.114.114C3560(dhcp-config)#exitC3560(config)#ip dhcp excluded-address 192.168.10.1 192.168.10.10 C3560(config)#ip dhcp pool vlan20_dhcpC3560(dhcp-config)#network 192.168.20.0 255.255.255.0C3560(dhcp-config)#default-router 192.168.20.1C3560(dhcp-config)#dns-server 114.114.114.114C3560(dhcp-config)#exitC3560(config)#ip dhcp excluded-address 192.168.20.1 192.168.20.10 C3560(config)#ip dhcp pool vlan30_dhcpC3560(dhcp-config)#network 192.168.30.0 255.255.255.0C3560(dhcp-config)#default-router 192.168.30.1C3560(dhcp-config)#dns-server 114.114.114.114C3560(dhcp-config)#exitC3560(config)#ip dhcp excluded-address 192.168.30.1 192.168.30.10##设置三个端口fastEthernet 0/1-3为trunk知识点:VLAN的封装类型,目前有ISL和802.1q(dot1q)两种协议,ISL是思科私有的VLAN封装协议,思科部分交换机支持ISL协议,使用该协议能提高VLAN传输性能。
VTP的配置
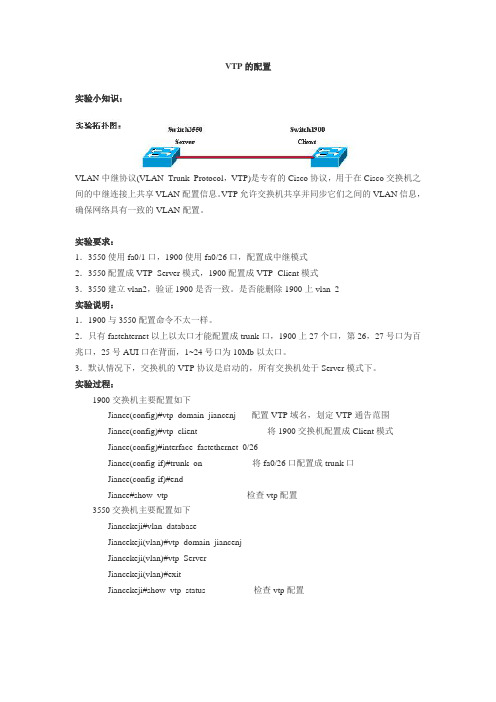
VTP的配置实验小知识:VLAN中继协议(VLAN Trunk Protocol,VTP)是专有的Cisco协议,用于在Cisco交换机之间的中继连接上共享VLAN配置信息。
VTP允许交换机共享并同步它们之间的VLAN信息,确保网络具有一致的VLAN配置。
实验要求:1.3550使用fa0/1口,1900使用fa0/26口,配置成中继模式2.3550配置成VTP Server模式,1900配置成VTP Client模式3.3550建立vlan2,验证1900是否一致。
是否能删除1900上vlan 2实验说明:1.1900与3550配置命令不太一样。
2.只有fastehternet以上以太口才能配置成trunk口,1900上27个口,第26,27号口为百兆口,25号AUI口在背面,1~24号口为10Mb以太口。
3.默认情况下,交换机的VTP协议是启动的,所有交换机处于Server模式下。
实验过程:1900交换机主要配置如下Jiance(config)#vtp domain jiancenj 配置VTP域名,划定VTP通告范围Jiance(config)#vtp client 将1900交换机配置成Client模式Jiance(config)#interface fastethernet 0/26Jiance(config-if)#trunk on 将fa0/26口配置成trunk口Jiance(config-if)#endJiance#show vtp 检查vtp配置3550交换机主要配置如下Jiancekeji#vlan databaseJiancekeji(vlan)#vtp domain jiancenjJiancekeji(vlan)#vtp ServerJiancekeji(vlan)#exitJiancekeji#show vtp status 检查vtp配置。
CISCO交换机配置实例

CISCO交换机配置实例(VTP、VLAN、TRUNK、channel)本文通过实例为大家介绍CISCO交换机的一些常用功能的配置方法,包括VTP 配置、VLAN划分、Trunk配置、channel通道配置、双工模式配置等。
掌握这些配置方法基本上可以满足CISCO交换机一般的日常维护要求了。
网络拓扑图:1、配置VTP, 设置domain为dgmobile, Sw1为server, 其它switch配置为client。
Sw1(config)# vtp mode severSw1(config)# vtp domain dgmobileSw2(config)# vtp mode client2、在Sw1建立三个vlan, 要求在其它Sw2上通过VTP可以看到同样的vlan。
vlan2:engineering,vlan6:marketing,vlan9:accouting.Sw1(config)# vlan 2Sw1(config-vlan)#name engineeringSw1(config)# vlan 6Sw1(config-vlan)#name marketingSw1(config)# vlan 9Sw1(config-vlan)#name accouting3、把sw2的端口5,8,13划入vlan2;端口3,4,9划入vlan6;端口6,7,16划入vlan9。
Sw2(config)#int range fa0/5 , fa0/8 , fa0/13Sw2(config-if-range)#switchport access vlan 2Sw2(config)#int range fa0/3 , fa0/4 , fa0/9Sw2(config-if-range)#switchport access vlan 6Sw2(config)#int range fa0/6 , fa0/7 , fa0/16Sw2(config-if-range)#switchport access vlan 94、Sw1和Sw2的23和24端口互连,配置交换机间的Trunk,用802.1q封装。
《计算机网络》实验指导书:VTP
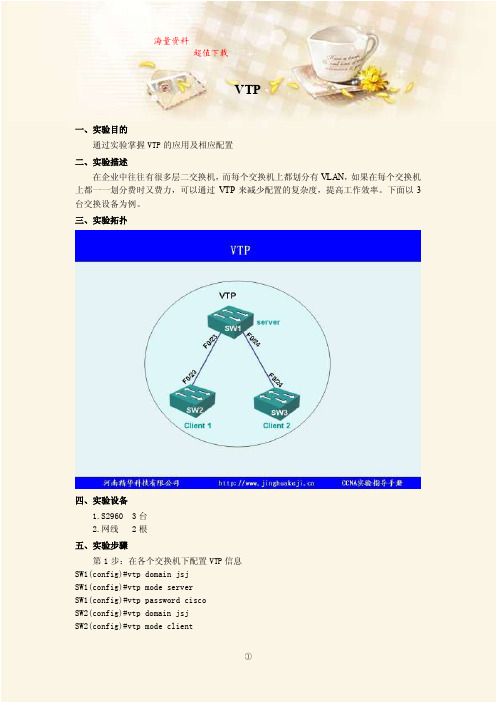
VTP一、实验目的通过实验掌握VTP的应用及相应配置二、实验描述在企业中往往有很多层二交换机,而每个交换机上都划分有VLAN,如果在每个交换机上都一一划分费时又费力,可以通过VTP来减少配置的复杂度,提高工作效率。
下面以3台交换设备为例。
三、实验拓扑四、实验设备1.S2960 3台2.网线 2根五、实验步骤第1步:在各个交换机下配置VTP信息SW1(config)#vtp domain jsjSW1(config)#vtp mode serverSW1(config)#vtp password ciscoSW2(config)#vtp domain jsjSW2(config)#vtp mode clientSW2(config)#vtp password ciscoSW3配置同SW2.验证配置:SW1#show vtp statusVTP Version : 2Configuration Revision : 0Maximum VLANs supported locally : 255Number of existing VLANs : 5VTP Operating Mode : ServerVTP Domain Name : jsjVTP Pruning Mode : DisabledVTP V2 Mode : DisabledVTP Traps Generation : DisabledMD5 digest : 0xC7 0x82 0xBE 0xA8 0xB4 0xAA 0xE7 0x4A Configuration last modified by 0.0.0.0 at 3-1-93 00:15:11Local updater ID is 0.0.0.0 (no valid interface found)SW2#sh vtp statusVTP Version : 2Configuration Revision : 0Maximum VLANs supported locally : 255Number of existing VLANs : 5VTP Operating Mode : ClientVTP Domain Name : jsjVTP Pruning Mode : DisabledVTP V2 Mode : DisabledVTP Traps Generation : DisabledMD5 digest : 0x27 0x43 0xA2 0xB8 0xC7 0xD4 0x31 0x1B Configuration last modified by 0.0.0.0 at 0-0-00 00:00:00第2步:把交换机与交换机相连的端口配置trunk.SW1(config)#int range f0/23 - 24SW1(config-if-range)#switchport mode trunkSW2(config)#int f0/23SW2(config-if)# switchport mode trunkSwitch(config)#int f0/24Switch(config-if)# switchport mode trunk第3步:在server交换机上增加两个VLANSW1(config)#vlan 2SW1(config-vlan)#exitSW1(config)#vlan 3SW1(config-vlan)#exit配置验证:SW1#sh vlanVLAN Name Status Ports---- -------------------------------- --------- ------------------------------- 1 default active Fa0/1, Fa0/2, Fa0/3, Fa0/4Fa0/5, Fa0/6, Fa0/7, Fa0/8Fa0/9, Fa0/10, Fa0/11, Fa0/12 Fa0/13, Fa0/14, Fa0/15, Fa0/16 Fa0/17, Fa0/18, Fa0/19, Fa0/20 Fa0/21, Fa0/22, Gig1/1, Gig1/22 VLAN0002 active3 VLAN0003 active1002 fddi-default active1003 token-ring-default active1004 fddinet-default active1005 trnet-default activeSW1#sh vtp staVTP Version : 2Configuration Revision : 2Maximum VLANs supported locally : 255Number of existing VLANs : 7VTP Operating Mode : ServerVTP Domain Name : jsjVTP Pruning Mode : DisabledVTP V2 Mode : DisabledVTP Traps Generation : DisabledMD5 digest : 0xD0 0xED 0x54 0x8A 0x49 0x9D 0xDE 0x9B Configuration last modified by 0.0.0.0 at 3-1-93 00:03:43Local updater ID is 0.0.0.0 (no valid interface found)第4步:在SW2和SW3上查看VLAN信息。
交换机上vtp的配置

任务3 在catalyst2950 交换机上配置vtp一、实验目的:掌握vtp的配置,深入了解vtp的工作原理,并掌握调试和检查方法。
二、背景描述:企业有采购部和销售部两个部门,采购部需要实时了解销售部的销售情况,以便做出合理的采购方案。
为了保持通信通畅,采购部与销售部在相同的vlan下。
三、实验拓扑结构:VTP网络拓扑图四、实验步骤:1.交换机Host name和Trunk配置Switch1>e nableSwitch1#config tSwitch1(co nfig)#host name SwitchA // SwitchA(co nfig)#i nterface faO/1SwitchA(c on fig-if)#switchport mode trunk // SwitchA(co nfig-if)#exitSwitch2>e nable更改switch1 为switchA 设置fa0/1为trunk模式更改switch2 为switchBSwitch2#config tSwitch2(co nfig)#host name SwitchB // SwitchB(config)#interface fa0/1SwitchB(config-if)#switchport mode trunk // SwitchB(config-if)#exitSwitchB(config)#interface fa0/2SwitchB(config-if)#switchport mode trunk // SwitchB(config-if)#exit 设置fa0/1 为trunk 模式设置fa0/2 为trunk 模式Switch3#config tSwitch3(config)#hostname SwitchCSwitchC(config)#interface fa0/1// 更改switch3 为switchCSwitchC(config-if)#switchport mode trunk SwitchC(config-if)#exit // 设置fa0/2 为trunk 模式Switch3>enable 2. 配置交换机的VTPSwitchA(config)#vtp domain Cisco // Change VTP domain from NULL to Cisco SwitchA(config)#vtp mode server // Device mode already VTP SERVER. 设置SwitchA 的域名为Cisco 设置vtp 为serverSwitchB(config)#vtp domain Cisco // 设置SwitchB 的域名为CiscoDomain name already ser to CiscoSwitchB(config)#vtp mode transparent // 设置vtp 为transparentSwitchC(config)#vtp domain Cisco // Change VTP domain from NULL to Cisco SwitchC(config)#vtp mode client // 设置SwitchC 的域名为Cisco 设置vtp 为client3. 验证VTPSwitchA# show vtp statusSwitchAt3haw vtp VTP VeraianCcnfiguration RevisionMaximum VLANs supported locally : 2S6:S :Server:Cisco:Di^abl&di Disabled:Disabled:0xA9 OxCB 0x52 0x12 0x94 0x71 0x£9 OxSCLocal updates ID is 0.0.0.0 ■:nc valid interface found)SwitchAtSwitchB# show vtp statusSwitchB^en^ble SuitchBtshow vtp VTF VersionCcnfiguraticn ReviHicnMaxinum VLANm supported locally Number cf exiating VLANm VTF Operaring - Mode VTF Domain Nans VTF Pruning Mede VTP V2 MadeVTP Tcaps Generation MD5 digestConfiguration last modified by SwitchB#|SwitchC# show vtp statusSwitch-C^shcw vtp srstus VTF VersionCcnfiguraticfi P.evisicnMaximuni VLAMs supperted locally Humber of existing '/LANs VTF Dperi^inj Mede VTF Domain Name VTF Pruning Me de VTP V2 Mede VTF Traps Generaticn MD5 digestConfiguraticn last modified by 0 SwirchC#| :0 :2S5 z S :Client:Cisco :Disabled :Disabled :Disabled:0xA9 0X C8 0K 52 0X 12 0X 94 0X 71 0x^9+ 0.0*0 at 0-0-00 00:00:00Ccnfiguraticn lasr modified by0.0.0.0ar 0-0-0000:00:00tTumbez of existing ^TANs VTP Opecoting Mede VTP Oqjnain VTP Pruning Mode VTP V2 Mede VTP Traps {Jeneration MDS digest:2SS :5Transparent :Cisco Disabled Dinabled Disabled0xA9 QxCB 0xS2 0x1: 094 0x71 QxZS QxSC4•配置交换机的vlan,并验证vtp各模式的特点(1) SwitchA交换机vlan的配置SwitchA# vlan database SwitchA(vlan)#vlan 2 // SwitchA(vlan)#vlan 3 //SwitchA(vlan)#exit(2) SwitchB 交换机 vlan 的配置 SwitchB# vlan databaseSwitchB(vlan)#vlan 4 // SwitchB(vlan)#vlan 5 //SwitchB(vlan)#exit6.在交换机 SwitchC 上 show vlan ,结果是 SwitchC 加入了 vlan2 , vlan3,如下图所示:5.配置交换机的 vtp 口令 (1) SwitchA 交换机 vtp 口令配置: SwitchA# config tSwitchA(config)#vtp password cisco SwitchA(config)#exit (2) SwitchB 交换机 vtp 口令配置: SwitchB# config t SwitchB(config)#vtp password cisco SwitchB(config)#exit (3) SwitchC 交换机 vtp 口令配置: SwitchC# config t SwitchC(config)#vtp password cisco SwitchC(config)#exit // 设置 vtp 密码为 cisco// 设置 vtp 密码为 cisco// 设置 vtp 密码为 cisco新建 vlan2 新建 vlan3新建 vlan4 新建 vlan5r VTP Client ?Physical Config ) CLIIOS Command Line Interfacen w 亠LT-riiZIM X JL-I H IT 丄■-Na.zDiz百七口P 口:rf■1d-ef eu.lt activeFaO/JL, Fa0/3p Fa0-/4r FaO/SFsOZ€, FaO/7.FaO/3FaO/10r Fa0/ll…. FaO/12,FaO/13FaO/14, FaO/l£p FaO/lfi,FaQ/17FaO/lB, FaO/13. FaO/20,F*O/22, Faa/23,. F*O/24FaO/2X z1^LAN0002active3VUUST0003ac t iiu p e1002 f dd.±—-daf aigrt/u-Tiaup1003c-a k*n-£ 丄ng— defaixl 匚A et/unaup10-0-4 f d.d.ina 七—da f at口JLt a iTt/11 Fl a up1005t me t - <le f au.1 匸aet/unsupT^pa SAID MTU Paxrenx; SfexnyTJo Brl-dgeNo Stp B■若旦Gtcd 冒Tran al Trans^ 1ono七10QQG1l&QQ—— -一一O02enet 100Q口21500= = =- = 00□■anst 10QQQ31B0Q- - -- - 00二1QQ2ra<ii laioaz15QQ- - -一一Q0■=Copy | PasteL. -J在SwitchA上新建vlan 6,发现SwitchC上的vlan与SwitchA实现同步更新: SwitchA# vla n database SwitchA(vlan)#vlan 6 // 新建vlan6SwitchA(co nfig)#exitSwitchC的show vlan结果如下图:。
思科Cisco交换机配置——VTP管理交换机的VLAN配置实验操作详解

思科Cisco交换机配置——VTP管理交换机的VLAN配置实验操作详解本⽂讲述了思科Cisco VTP管理交换机的VLAN配置。
分享给⼤家供⼤家参考,具体如下:⼀、实验⽬的:将S1配置成VTP-Server,S2配置成VTP-Transparent,S3配置成VTP-Client,S4配置成VTP-Client⼆、拓扑图如下三、具体步骤:(1)S1交换机的配置Switch>enable --进⼊特权模式Switch#config terminal --进⼊全局配置模式Enter configuration commands, one per line. End with CNTL/Z.Switch(config)#hostname S1 --修改交换机名为S1S1(config)#vtp domain test --创建test域Changing VTP domain name from NULL to testS1(config)#vtp mode server --设置S1为ServerDevice mode already VTP SERVER.S1(config)#vlan 7 --创建并进⼊vlan 7端⼝,并开启S1(config-vlan)#vlan 8 --创建并进⼊vlan 8 端⼝,并开启S1(config-vlan)#interface f0/1 --进⼊f0/1端⼝S1(config-if)#switchport mode trunk --将端⼝改为trunk模式S1(config-if)#%LINEPROTO-5-UPDOWN: Line protocol on Interface FastEthernet0/1, changed state to down%LINEPROTO-5-UPDOWN: Line protocol on Interface FastEthernet0/1, changed state to up(2)S2交换机的配置Switch#enable --进⼊特权模式Switch#config terminal --进⼊全局配置模式Enter configuration commands, one per line. End with CNTL/Z.Switch(config)#hostname S2 --修改交换机名为S2S2(config)#vtp mode transparent --将S2设置为TransparentDevice mode already VTP TRANSPARENT.S2(config)#interface range f0/1-2 --进⼊f0/1和f0/2端⼝S2(config-if)#switchport mode trunk --将端⼝改为trunk模式(3)S3交换机配置Switch#enable --进⼊特权模式Switch#config terminal --进⼊全局配置模式Enter configuration commands, one per line. End with CNTL/Z.Switch(config)#hostname S3 --修改交换机名为S3S3(config)#vtp mode client --将S3设置为ClientDevice mode already VTP CLIENT.S3(config)#interface range f0/1-2 --进⼊f0/1和f0/2端⼝S3(config-if)#switchport mode trunk --将端⼝改为trunk模式(4)S4交换机配置Switch#enable --进⼊特权模式Switch#config terminal --进⼊全局配置模式Enter configuration commands, one per line. End with CNTL/Z.Switch(config)#hostname S4 --将交换机名修改为S4S4(config)#vtp mode client --将S4设置为ClientDevice mode already VTP CLIENT.S4(config)#interface f0/1 --进⼊f0/1端⼝S4(config-if)#switchport mode trunk --将端⼝改为trunk模式四、验证,分别在各台交换机上查看VLAN(1)S1(2)S2解释:S2因为是隐藏模式,所以看不见vlan 7 和 vlan 8(3)S3解释:S3是客户端模式所以可以查看到vlan 7 和vlan 8(4)S4解释:S4因为是客户端模式,所以可以查看到vlan 7 和 vlan 8。
实验8 CISCO交换机VTP配置
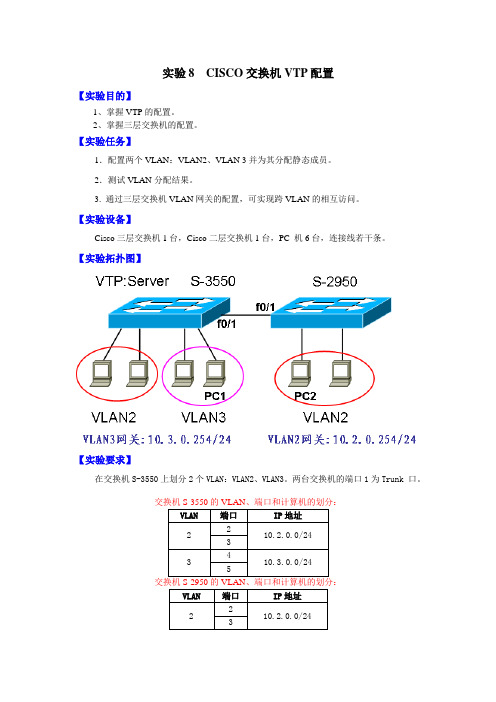
实验8 CISCO交换机VTP配置【实验目的】1、掌握VTP的配置。
2、掌握三层交换机的配置。
【实验任务】1.配置两个VLAN:VLAN2、VLAN 3并为其分配静态成员。
2.测试VLAN分配结果。
3. 通过三层交换机VLAN网关的配置,可实现跨VLAN的相互访问。
【实验设备】Cisco三层交换机1台,Cisco二层交换机1台,PC 机6台,连接线若干条。
【实验拓扑图】【实验要求】在交换机S-3550上划分2个VLAN:VLAN2、VLAN3。
两台交换机的端口1为Trunk 口。
交换机S-3550的VLAN、端口和计算机的划分:交换机S-2950的VLAN、端口和计算机的划分:【实验步骤】1、按照拓扑图把相应的设备连接好。
2、配置交换机S3550的VTP模式:Server模式、域名MYVTP、密码CISCO。
3、在交换机S3550上创建VLAN2、VLAN3。
4、把交换机S3550的端口2、3划分到VLAN2中。
5、把交换机S3550的端口4、5划分到VLAN3中。
6、查看S3550已经划分好的VLAN及相应的端口7、把交换机S3550端口1配置为主干道trunk模式8、配置交换机S2950的VTP模式:Client模式、域名MYVTP、密码CISCO9、查看S2950的VLAN划分情况10、把交换机S2950端口2、3划分到VLAN2中11、把交换机S2950端口1配置为主干道trunk模式12、配置各台PC机的IP地址、子网掩码(注意:同一VLAN的PC机必须处于同一个子网内)13、测试各台PC间的连通性(测试可得,同一VLAN的PC可以ping通,但不同VLAN的PC机不可以ping通)14、在交换机S3550上配置三层交换机,分别把VLAN2、VLAN3的网关(即VLAN的IP地址)设置为10.2.0.254/24、10.3.0.254/2415、配置各台PC机的网关(注意:处于哪一个VLAN内的PC机就必须配置其网关为对应VLAN的网关)16、再次测试各台PC间的连通性(测试可得,无论是相同VLAN或者不同VLAN的PC都可以ping通,即可以实现不同VLAN间的通信)。
VTP配置

VTP(VLAN Trunking Protocol)配置VTP domain:ccxx一.将各台交换机间链路设置中继S1(config)#int fa0/23S1(config-if)#switchport mode trunk%LINEPROTO-5-UPDOWN: Line protocol on Interface FastEthernet0/23, changed state to down %LINEPROTO-5-UPDOWN: Line protocol on Interface FastEthernet0/23, changed state to upS1(config-if)#exitS1(config)#S2(config)#interface range fastEthernet 0/23-24 选择多个端口S2(config-if-range)#switchport mode trunk 开启中继模式%LINEPROTO-5-UPDOWN: Line protocol on Interface FastEthernet0/24, changed state to down %LINEPROTO-5-UPDOWN: Line protocol on Interface FastEthernet0/24, changed state to upS2(config-if-range)#exitS2(config)#S3(config)#int f0/24S3(config-if)#switchport mode trunkS3(config-if)#exitS3(config)#二.设置三台交换机处于ccxx的VTP域,且密码为ciscoS1(config)#vtp domain ccxx 设置VTP域名为ccxx Changing VTP domain name from NULL to ccxxS1(config)#vtp password cisco 设置VTP密码为cisco Setting device VLAN database password to ciscoS1(config)#S2(config)#vtp domain ccxxDomain name already set to ccxx.S2(config)#vtp password ciscoSetting device VLAN database password to ciscoS2(config)#S3(config)#vtp domain ccxxDomain name already set to ccxx.S3(config)#vtp password ciscoPassword already set to ciscoS3(config)#三.设置S1为服务器模式,S2为透明模式,S3为客户端模式S1(config)#vtp mode server 设置S1为服务器模式Device mode already VTP SERVER.S1(config)#S2(config)#vtp mode transparent 设置S2为透明模式Setting device to VTP TRANSPARENT mode.S2(config)#S3(config)#vtp mode client 设置S3为客户模式Setting device to VTP CLIENT mode.S3(config)#四.在S1上创建人事部VLAN5和销售部VLAN10S1(config)#vlan 5S1(config-vlan)#name HRS1(config-vlan)#exitS1(config)#vlan 10S1(config-vlan)#name SalesS1(config-vlan)#exitS1(config)#五.查看S1的VLAN信息S1#show vlan briVLAN Name Status Ports---- -------------------------------- --------- -------------------------------1 default active Fa0/1, Fa0/2, Fa0/3, Fa0/4Fa0/5, Fa0/6, Fa0/7, Fa0/8Fa0/9, Fa0/10, Fa0/11, Fa0/12Fa0/13, Fa0/14, Fa0/15, Fa0/16Fa0/17, Fa0/18, Fa0/19, Fa0/20Fa0/21, Fa0/22, Fa0/245 HR active10 Sales active1002 fddi-default active1003 token-ring-default active1004 fddinet-default active1005 trnet-default active六.查看S2的VLAN信息S2#show vlan briVLAN Name Status Ports---- -------------------------------- --------- -------------------------------1 default active Fa0/1, Fa0/2, Fa0/3, Fa0/4Fa0/5, Fa0/6, Fa0/7, Fa0/8Fa0/9, Fa0/10, Fa0/11, Fa0/12Fa0/13, Fa0/14, Fa0/15, Fa0/16Fa0/17, Fa0/18, Fa0/19, Fa0/20Fa0/21, Fa0/221002 fddi-default active1003 token-ring-default active1004 fddinet-default active1005 trnet-default active由于S2是透明模式,所以不和其它域中交换机同步VLAN信息。
配置VTP、VLAN和VLAN Trunk

本实验需要以下设备;●Cisco Catalyst 2950系列交换机2台,型号不限;●交叉线序网线1条;●1台终端服务器,如Cisco 2509路由器,及用于反向Telnet的相应电缆;●1台带有超级终端程序的PC机,以及Console电缆及转接器。
3.线缆连接及配置说明如图A-2所示,用交叉网线把C2950A交换机的FastEthernetO/24端口和C2 950B交换机的FastEthernet0/24端口连接起来。
4.实验配置及监测结果电缆连接完成后,给所有设备加电,开始进行实验。
监测清单A-4记录了本实验的操作。
监测清单A-4 配置VTP、VLAN和VLAN Trunk第1段:配置C2950交换机的VTP和VLANC2950#conftEnter configuration commands,one per line.End with CNTL/Z.(1)在2950系列交换机上配置VTP和VLAN的方法有两种,本实验演示的是使用vlandatabase命令的一种;另一种是在全局配置模式下发出配置命令,格式与vlan database方式相似。
(2)首先使用vlan database命令进入VLAN配置模式。
在VLAN配置模式下,可以设置VTP的一系列属性,如vtp?命令所示,也可以对VLAN进行定义。
(3)把C2950A交换机设置成VTP Server模式(缺省配置),VTP域名为Test。
(4)定义V10、V11、V12和V13等4个VLAN。
(5)show vtp status命令显示了VTP相关的配置和状态信息,我们应主要关注VTP模式、域名,VLAN数量等信息。
(6)show vtp counters命令列出了VTP的统计信息,表明各种VTP相关包的收发情况,因为C2950A交换机与C2950B交换机没有进行VTP信息的传输,所以各项数值均为0。
(7)在接口配置模式下的switchportmode access命令设置对应端口为静态VLAN访问模式。
VTP技术实验配置(超详细_原创)

VTP 的配置实验目的: 了解熟悉vtp 的配置命令 熟悉VTP 配置步骤及过程实验内容:1.求证两台server 模式之间修订号改变随之的变化2.求证两台server 模式 一台transparnet 模式修改修订号之间他们的变化命令:1.创建VTP 域Swith(config)#vtp domain domain_name2.配置交换机的VTP 模式Swith(config)#vtp mode server | client | transparent一.两台server 模式之间修订号修改之间的变化实验拓扑:1. 构建物理拓扑图如上 //注意选用的是交叉线,所对应的端口号2. 创建switch7,switch8的trunk 链路Switch7switch7(config)#int f0/1switch7(config-if)#switchport mode trunkswitch7(config-if)#switchport trunk enswitch7(config-if)#switchport trunk encapsulation dot1q switch7(config-if)#no shudown switch8switch8(config)#int f0/1switch8(config-if)#switchport mode trunkswitch8(config-if)#switchport trunk encapsulation dot1q switch8(config-if)#no shutdown3. 创建域和模式Switch7switch7(config)#vtp domain zichunliSwitch7Switch8F0/1Switch7Switch8server server F0/1trunkswitch7(config)#vtp mode serverSwitch8Switch8(config)#vtp domain zichunliSwitch8(config)#vtp mode server4.在switch7里面创建valn 10,vlan 20switch7(config)#vlan 10switch7(config)#vlan 205.在switch8里面创建vlan 30Switch8(config)#vlan 30实验测试:1.当switch7里创建vlan 10,vlan 20 ,查看switch8 VTP和vlan状态情况结果显示switch8#show vtp statusVTP V ersion : 2Configuration Revision : 2 //修订号学习switch7修订号Maximum VLANs supported locally : 1005Number of existing VLANs : 7VTP Operating Mode : ServerVTP Domain Name : zichunliVTP Pruning Mode : DisabledVTP V2 Mode : DisabledVTP Traps Generation : DisabledMD5 digest : 0x50 0x30 0x57 0x39 0xE6 0xCB 0x30 0x6BConfiguration last modified by 0.0.0.0 at 3-1-93 01:35:52Local updater ID is 0.0.0.0 (no valid interface found)switch8#show vlan brieVLAN Name Status Ports---- -------------------------------- --------- -------------------------------1 default active Fa0/2, Fa0/3, Fa0/4, Fa0/5Fa0/6, Fa0/7, Fa0/8, Fa0/9Fa0/10, Fa0/11, Fa0/12, Fa0/13Fa0/14, Fa0/15, Fa0/16, Fa0/17Fa0/18, Fa0/19, Fa0/20, Fa0/21Fa0/22, Fa0/23, Fa0/24, Gi0/1Gi0/210 VLAN0010 active //学习到sw7的vlan 1020 VLAN0020 active //学习到sw7的vlan 201002 fddi-default act/unsup1003 token-ring-default act/unsup1004 fddinet-default act/unsup1005 trnet-default act/unsup2.当switch8创建vlan 30时Switch7#show vlan brieVLAN Name Status Ports---- -------------------------------- --------- -------------------------------1 default active Fa0/2, Fa0/3, Fa0/4, Fa0/5Fa0/6, Fa0/7, Fa0/8, Fa0/9Fa0/10, Fa0/11, Fa0/12, Fa0/13Fa0/14, Fa0/15, Fa0/16, Fa0/17Fa0/18, Fa0/19, Fa0/20, Fa0/21Fa0/22, Fa0/23, Fa0/24, Gi0/1Gi0/210 VLAN0010 active20 VLAN0020 active30 VLAN0030 active //switch7 自动学习switch8所创建的vlan301002 fddi-default act/unsup1003 token-ring-default act/unsup1004 fddinet-default act/unsup1005 trnet-default act/unsupswitch7#show vtp statusVTP V ersion : 2Configuration Revision : 3 .//switch7自动学习到switch8的修订号Maximum VLANs supported locally : 1005Number of existing VLANs : 8VTP Operating Mode : ServerVTP Domain Name : zichunliVTP Pruning Mode : DisabledVTP V2 Mode : DisabledVTP Traps Generation : DisabledMD5 digest : 0x50 0x30 0x57 0x39 0xE6 0xCB 0x30 0x6BConfiguration last modified by 0.0.0.0 at 3-1-93 01:35:52小结: 当两台配置vtp为server模式时,修订号变化决定哪台为老大.他们能相互学习.二.两台server 模式加一台transparent 模式修订号修改之间的变化一.实验拓扑:二.基本配置:1.trunk 链路的创建 Switch1:switch1(config)#int f0/1switch1(config-if)#switchport trunk encapsulation dot1qswitch1(config-if)#switchport mode trunk //配置switch1的f0/1为trunk 链路 switch1(config-if)#no shutdownSwitch2:switch2(config)#int f0/1switch2(config-if)#switchport trunk encapsulation dot1qswitch2(config-if)#switchport mode trunk //配置switch2的f0/1为trunk 链路 switch2(config-if)#no shut switch2(config-if)#*Mar 1 00:04:45.135: %DTP-5-TRUNKPORTON: Port Fa0/1 has become dot1q trunk switch2(config-if)#exitswitch2(config)#int f0/2switch2(config-if)#switchport trunk encapsulation dot1qswitch2(config-if)#switchport mode trunk //配置switch2的f0/2为trunk 链路 switch2(config-if)#no shut*Mar 1 00:05:17.003: %DTP-5-TRUNKPORTON: Port Fa0/2 has become dot1q trunkdwo% Invalid input detected at '^' marker. switch2(config-if)#no shutdownswitch3:switch3(config)#int f0/1switch3(config-if)#switchport trunk encapsulation dot1qswitch3(config-if)#switchport mode trunk //配置switch3的f0/1为trunk 链路 switch3(config-if)#no shutdownserver transparent Switch2 Switch3 trunk F0/1server Switch1trunkF0/1 F0/1 F0/22.创建vtp域,模式switch1:switch1#vlan database //在模拟器上是这个格式switch1(vlan)#vtp domain zi //创建域名为”zi”switch1(vlan)#vtp server //模式为”server”switch2:switch2#vlan databaseswitch2(vlan)#vtp domain zi //创建域名为”zi”switch2(vlan)#vtp transparent //模式为” transparent ”switch3:switch3#vlan databaseswitch3(vlan)#vtp domain zi //创建域名为”zi”switch3(vlan)#vtp server //模式为”server”实验测试:(1).swithc1创建vlan 10,vlan 20 查看switch3是否能学到Step1: switch1 创建vlan 10 ,vlan 20switch1#vlan dataswitch1(vlan)#vlan 10VLAN 10 added:Name: VLAN0010switch1(vlan)#exitswitch1#vlan dataswitch1(vlan)#vlan 20VLAN 20 added:Name: VLAN0020switch1(vlan)#exitAPPLY completed.Exiting....Step2.:查看switch3是否能学到switch3#show vlan-swVLAN Name Status Ports---- -------------------------------- --------- -------------------------------1 default active Fa0/0, Fa0/2, Fa0/3, Fa0/4Fa0/5, Fa0/6, Fa0/7, Fa0/8Fa0/9, Fa0/10, Fa0/11, Fa0/12Fa0/13, Fa0/14, Fa0/1510 VLAN0010 active //学到switch1的vlan 1020 VLAN0020 active //学到switch1的vlan 101002 fddi-default active1003 token-ring-default active1004 fddinet-default active1005 trnet-default activeVLAN Type SAID MTU Parent RingNo BridgeNo Stp BrdgMode Trans1 Trans2---- ----- ---------- ----- ------ ------ -------- ---- -------- ------ ------1 enet 100001 1500 - - - - - 1002 100310 enet 100010 1500 - - - - - 0 020 enet 100020 1500 - - - - - 0 01002 fddi 101002 1500 - 0 - - - 1 10031003 tr 101003 1500 1005 0 - - srb 1 10021004 fdnet 101004 1500 - - 1 ibm - 0 01005 trnet 101005 1500 - - 1 ibm - 0 0switch3#show vtp staVTP V ersion : 2Configuration Revision : 2 //修订号变为2学到switch1了Maximum VLANs supported locally : 256Number of existing VLANs : 7 //vlan 自动加到7VTP Operating Mode : ClientVTP Domain Name : ziVTP Pruning Mode : DisabledVTP V2 Mode : DisabledVTP Traps Generation : DisabledMD5 digest : 0x6C 0x7B 0xA9 0xFA 0x83 0x95 0x05 0xD4Configuration last modified by 0.0.0.0 at 3-1-02 00:25:20小结:当中间配置为”transparent”模式的时候,并不影响switch3学习到switch1的vlan ,验证transparent 模式仍会转为vtp通告.switch1和switch3之间还是会随着哪个的修订号版高的变化而变化(2)当switch3域名改”wu”(与前两个不同)时,在switch1添加vlan 30,验证switch3是否能够学到.Step1: 修改switch3的域名switch3:switch3#vlan databaseswitch3(vlan)#vtp domain wustep2:在switch1中添加vlan 30switch1#vlan dataswitch1(vlan)#vlan 30VLAN 30 added:Name: VLAN0030switch1(vlan)#exitstep3:查看switch3是否能够学到switch1里添加的vlan30VLAN Name Status Ports---- -------------------------------- --------- -------------------------------1 default active Fa0/0, Fa0/2, Fa0/3, Fa0/4Fa0/5, Fa0/6, Fa0/7, Fa0/8Fa0/9, Fa0/10, Fa0/11, Fa0/12Fa0/13, Fa0/14, Fa0/1510 VLAN0010 active20 VLAN0020 active1002 fddi-default active1003 token-ring-default active1004 fddinet-default active1005 trnet-default activeVLAN Type SAID MTU Parent RingNo BridgeNo Stp BrdgMode Trans1 Trans2 ---- ----- ---------- ----- ------ ------ -------- ---- -------- ------ ------1 enet 100001 1500 - - - - - 1002 100310 enet 100010 1500 - - - - - 0 020 enet 100020 1500 - - - - - 0 01002 fddi 101002 1500 - 0 - - - 1 1003 1003 tr 101003 1500 1005 0 - - srb 1 1002 1004 fdnet 101004 1500 - - 1 ibm - 0 01005 trnet 101005 1500 - - 1 ibm - 0 0switch3#show vtp staVTP V ersion : 2Configuration Revision : 2 //修订号为2未学到switch1Maximum VLANs supported locally : 256Number of existing VLANs : 7 //vlan 也没有增加VTP Operating Mode : ClientVTP Domain Name : ziVTP Pruning Mode : DisabledVTP V2 Mode : DisabledVTP Traps Generation : DisabledMD5 digest : 0x6C 0x7B 0xA9 0xFA 0x83 0x95 0x05 0xD4 Configuration last modified by 0.0.0.0 at 3-1-02 00:25:20小结: 当域名不同时.vtp的各个模式之间是不能相互学习.如果要配置使他们能相互学习,前提是vtp的域名必须相同.总结: 1.vtp是一个cisco专有的技术,能够帮助管理员自动完成vlan 的创建,删除和同步等工作.2.Vtp分为三个模式服务模式,客户模式,透明模式3.vtp是基于vlan的一种技术,vtp在vlan.dat的vlan数据库存储vlan配置,当配置时会直接覆盖vlan.dat4.vtp通告分汇总通告(确定领导地位) 子集通告请求通告5.vtp技术核心本质”修订号”。
实验一、交换机配置STP与VTP

实验一、交换机配置STP与VTP环境:三台交换机,形成一个全互连结构,sw3为2950,sw1和sw2为2900xl;要求:设置sw3为VTP server,设置sw1和sw2为VTP client,域名为cisco,密码为:cisco,在server创建vlan 10(name:aa)和vlan20(name:bb);设置sw3为vlan1的根桥,sw1为vlan10的根桥,sw2为vlan20的根桥;初始化配置:查看vlan信息◊Sw#show vlanSw#Delete vlan.dat 用此命令将vlan删除◊查看一下NVRAM是否保存了配置◊Sw#show startup-configSw#erase 清空配置文件◊startup-config重新启动交换机◊Sw#reloadsw>enablesw#config terminalsw(config)#hostname sw1sw1(config)#no ip domain-lookup 关闭域名查找◊sw1(config)#line console 0sw1(config-line)#logging synchronous 命令输入达到同步◊sw1(config-line)#exec-timeout 0 0 设置永不超时◊sw1(config-line)#exit步骤一、配置VTPsw3的配置:在sw3上启用vtp◊sw3(config)#vtp mode server serverDevice mode already VTP SERVER.sw3(config)#vtp domain cisco 设置域名◊Changing VTP domain name from NULL to ciscosw3(config)#vtp password 设置密码◊ciscoSetting device VLAN database password to ciscosw1的配置:进入vlan数据库◊sw1#vlan databasesw1(vlan)#vtp 启用VTP client模式◊clientSetting device to VTP CLIENT mode.sw1(vlan)#vtp 作用到cisco域中◊domain ciscoChanging VTP domain name from NULL to cisco设置密码与server端相同◊sw1(vlan)#vtp password ciscoSetting device VLAN database password to cisco.使配置生效◊sw1(vlan)#exitIn CLIENT state, no apply attempted.Exiting....sw2的配置:sw2#vlan databasesw2(vlan)#vtp clientSetting device to VTP CLIENT mode.sw2(vlan)#vtp domain ciscoChanging VTP domain name from NULL to ciscosw2(vlan)#vtp password ciscoSetting device VLAN database password to cisco.sw2(vlan)#exitsw2#步骤二、启用干道端口sw3的配置:sw3(config)#interface fa0/23sw3(config-if)#switchport mode trunk 启用trunk端口◊sw3(config-if)#interface fa0/24sw3(config-if)#switchport mode trunksw1的配置:sw1(config)#interface fa0/23sw1(config-if)#switchport trunk encapsulation dot1q 封装干道协议◊sw1(config-if)#switchport mode trunk 启用trunk模式◊sw1(config-if)#sw1(config)#interface fa0/24sw1(config-if)#switchport trunk encapsulation dot1qsw1(config-if)#switchport mode trunksw2的配置:sw2(config)#interface fa0/23sw2(config-if)#switchport trunk encapsulation dot1qsw2(config-if)#switchport mode trunksw2(config)#interface fa0/24sw2(config-if)#switchport trunk encapsulation dot1qsw2(config-if)#switchport mode trunk步骤三、测试vtp状态及创建vlansw3的状态:显示vtp状态◊sw3#show vtp statusVTP Version : 2配置修订号◊Configuration Revision : 0Maximum VLANs supported locally : 254Number of existing VLANs : 5VTP Operating Mode : server vtp模式◊vtp域名◊VTP Domain Name : ciscoVTP Pruning Mode : DisabledVTP V2 Mode : DisabledVTP Traps Generation : DisabledMD5 digest : 0x3F 0x17 0xC8 0xB8 0x5A 0xE3 0x01 0x66 Configuration last modified by 0.0.0.0 at 0-0-00 00:00:00创建vlan:sw3(config)#vlan 10 创建VLAN10◊命名为aa◊sw3(config-vlan)#name aasw3(config-vlan)#exit 应用配置◊创建VLAN20◊sw3(config)#vlan 20sw3(config-vlan)#name bb 命名为bb◊sw3(config-vlan)#exitsw3(config)#sw3的状态:在sw3显示vtp的状态◊sw3#show vtp statusVTP Version : 2server的修订号◊Configuration Revision : 2Maximum VLANs supported locally : 254vlan也已经增加◊Number of existing VLANs : 7VTP Operating Mode : serverVTP Domain Name : ciscoVTP Pruning Mode : DisabledVTP V2 Mode : DisabledVTP Traps Generation : DisabledMD5 digest : 0x98 0x31 0xCF 0xA0 0xA7 0x17 0x73 0x66 Configuration last modified by 0.0.0.0 at 3-1-93 00:52:05sw2的状态:sw2#show vtp statusVTP Version : 2已经同步了server◊Configuration Revision : 2Maximum VLANs supported locally : 254Number of existing VLANs : 7VTP Operating Mode : ClientVTP Domain Name : ciscoVTP Pruning Mode : DisabledVTP V2 Mode : DisabledVTP Traps Generation : DisabledMD5 digest : 0x98 0x31 0xCF 0xA0 0xA7 0x17 0x73 0x66 Configuration last modified by 0.0.0.0 at 3-1-93 00:52:05sw1的vlan信息:显示vlan信息◊sw1#show vlanVLAN Name Status Ports---- -------------------------------- --------- -------------------------------1 default active Fa0/1, Fa0/2, Fa0/3, Fa0/4,Fa0/5, Fa0/6, Fa0/7, Fa0/8,Fa0/9, Fa0/10, Fa0/11, Fa0/12,Fa0/13, Fa0/14, Fa0/15, Fa0/16,Fa0/17, Fa0/18, Fa0/19, Fa0/20,Fa0/21, Fa0/22, Fa0/23, Fa0/24已经同步了vlan的信息◊10 aa active20 bb active步骤四、配置PVSTsw3(config)#spanning-tree vlan 1 root primary 设置为vlan1的根桥◊Sw1(config)#spanning-tree vlan 10 priority 4096 设置为vlan10的根桥◊Sw2(config)#spanning-tree vlan 20 priority 4096 设置为vlan20的根桥◊步骤五、显示STP的信息sw1的生成树信息:sw1#show spanning-tree brief 显示每VLAN生成树信息◊VLAN1Spanning tree enabled protocol IEEEROOT ID Priority 24577非vlan1的根桥◊Address 0007.eb06.1740Hello Time 2 sec Max Age 20 sec Forward Delay 15 secBridge ID Priority 32768Address 0030.803d.f640Hello Time 2 sec Max Age 20 sec Forward Delay 15 secVLAN10Spanning tree enabled protocol IEEEROOT ID Priority 4096为vlan10的根桥◊Address 0030.803d.f641This bridge is the rootHello Time 2 sec Max Age 20 sec Forward Delay 15 secBridge ID Priority 4096Address 0030.803d.f641Hello Time 2 sec Max Age 20 sec Forward Delay 15 secVLAN20Spanning tree enabled protocol IEEEROOT ID Priority 4096Address 00b0.645f.34c2 非vlan20的根桥◊Hello Time 2 sec Max Age 20 sec Forward Delay 15 secBridge ID Priority 32768Address 0030.803d.f642Hello Time 2 sec Max Age 20 sec Forward Delay 15 secsw2的生成树信息:sw2#show spanning-tree briefVLAN1Spanning tree enabled protocol IEEE 非vlan1的根桥◊ROOT ID Priority 24577Address 0007.eb06.1740Hello Time 2 sec Max Age 20 sec Forward Delay 15 secBridge ID Priority 32768Address 00b0.645f.34c0Hello Time 2 sec Max Age 20 sec Forward Delay 15 secVLAN10Spanning tree enabled protocol IEEEROOT ID 非vlan10的根桥◊Priority 4096Address 0030.803d.f641Hello Time 2 sec Max Age 20 sec Forward Delay 15 sec Bridge ID Priority 32768Address 00b0.645f.34c1Hello Time 2 sec Max Age 20 sec Forward Delay 15 sec VLAN20Spanning tree enabled protocol IEEEROOT ID 为vlan20的根桥◊Priority 4096Address 00b0.645f.34c2This bridge is the rootHello Time 2 sec Max Age 20 sec Forward Delay 15 sec Bridge ID Priority 4096Address 00b0.645f.34c2Hello Time 2 sec Max Age 20 sec Forward Delay 15 sec sw3的生成树信息:sw3#show spanning-treeVLAN0001Spanning tree enabled protocol ieeeRoot ID 为vlan1的根桥◊Priority 24577Address 0007.eb06.1740This bridge is the rootHello Time 2 sec Max Age 20 sec Forward Delay 15 sec Bridge ID Priority 24577 (priority 24576 sys-id-ext 1) Address 0007.eb06.1740Hello Time 2 sec Max Age 20 sec Forward Delay 15 sec Aging Time 300VLAN0010Spanning tree enabled protocol ieeeRoot 非vlan10的根桥◊ID Priority 4096Address 0030.803d.f641Cost 19Port 24 (FastEthernet0/24)Hello Time 2 sec Max Age 20 sec Forward Delay 15 sec Bridge ID Priority 32779 (priority 32768 sys-id-ext 11) Address 0007.eb06.1740Hello Time 2 sec Max Age 20 sec Forward Delay 15 sec Aging Time 300VLAN0020Spanning tree enabled protocol ieeeRoot ID 非v◊Priority 4096 lan20的根桥Address 00b0.645f.34c2Cost 19Port 23 (FastEthernet0/23)Hello Time 2 sec Max Age 20 sec Forward Delay 15 sec Bridge ID Priority 32780 (priority 32768 sys-id-ext 12) Address 0007.eb06.1740Hello Time 2 sec Max Age 20 sec Forward Delay 15 sec Aging Time 300Interface Role Sts Cost Prio.Nbr Type---------------- ---- --- --------- -------- -------------------------------- Fa0/23 Root FWD 19 128.23 P2pFa0/24 Altn BLK 19 128.24 P2p步骤六、显示当前配置结果Sw1的配置结果:sw1#show running-config!hostname sw1!spanning-tree vlan 10 priority 4096!no ip domain-lookup!interface FastEthernet0/23switchport trunk encapsulation dot1qswitchport mode trunk!interface FastEthernet0/24switchport trunk encapsulation dot1qswitchport mode trunk!endsw2的配置结果:sw2#show running-confighostname sw2!spanning-tree vlan 20 priority 4096!no ip domain-lookup!interface FastEthernet0/23switchport trunk encapsulation dot1qswitchport mode trunk!interface FastEthernet0/24switchport trunk encapsulation dot1qswitchport mode trunk!endsw3的配置结果:sw3#show running-config!hostname sw3!no ip domain-lookup!spanning-tree vlan 1 priority 24576 !interface FastEthernet0/23 switchport mode trunk!interface FastEthernet0/24 switchport mode trunk!End。
实验 4.4.2:VTP 配置练习

实验 4.4.2:VTP 配置练习拓扑图地址表设备(主机)名接口 IP 地址 子网掩码 默认网关S1 VLAN 99 172.31.99.11 255.255.255.0 不适用 S2 VLAN 99 172.31.99.12 255.255.255.0 不适用 S3 VLAN 99 172.31.99.13 255.255.255.0 不适用PC1 网卡 172.31.10.1 255.255.255.0 PC2 网卡 172.31.20.1 255.255.255.0 PC3 网卡 172.31.30.1 255.255.255.0 PC4 网卡 172.31.10.2 255.255.255.0 PC5 网卡 172.31.20.2 255.255.255.0 PC6网卡172.31.30.2 255.255.255.0端口分配(交换机 2 和 3)端口分配网络Fa0/1 – 0/5 802.1q 中继Fa0/11 – 0/17 VLAN 10 – Engineering 172.31.10.0 /24Fa0/18 – 0/24 VLAN 20 – Sales 172.31.20.0 /24Fa0/6 – 0/10 VLAN 30 – Administration 172.31.30.0 /24无VLAN 99 – Network Mgmt 172.31.99.0 /24学习目标完成本实验后,您将能够:•根据拓扑图进行网络布线。
•删除交换机启动配置并将交换机重新加载到默认状态。
•执行交换机上的基本配置任务。
•在所有交换机上配置 VLAN 中继协议 (VTP)。
•对交换机间连接启用中继。
•检验中继配置。
•修改 VTP 模式并观察产生的影响。
•在 VTP 服务器上创建 VLAN,并将此 VLAN 信息分发给网络中的交换机。
•说明 VTP 透明模式、服务器模式和客户端模式之间的工作差异。
•为 VLAN 分配交换机端口。
VTP三层交换机配置

实验时间2012年08月30日16时~17时实验人Ly.实验名称VTP三层交换机配置实验目的熟悉配置VLAN划分及VTP三层交换机路由转发。
实现不同Vlan不同交换机之间的互相通信实验拓扑三层交换机:一台:(Sw0)Cisco 2960三台(Sw1、Sw2、Sw3)PC 6台(PC1、PC2、PC3、PC4、PC5、PC6)VLan 2 财务部(PC1、PC3)VLan3 销售部(PC2、PC5)VLan4 生产部(PC4、PC6)实验步骤一.首先配置Sw0(三层交换机)1.配置VTP命令详解:1).将Sw0 VTP 模式设置为Server2).启用VTP管理域域名为Ly3).配置VTP 域管理密码为Ash_Y2.配置Vlan组(查看vlan配置情况)3.配置Vlan IP地址:Vlan2 (财务) 192.168.1.254/24Vlan3 (销售) 192.168.2.254/24Vlan2 (生产) 192.168.3.254/24(三层交换机Vlan组IP都是254只演示Vlan2 IP配置,其他一样.)4.配置端口Trunk端口连接Sw0 f0/1-----Sw1 f0/10Sw0 f0/2-----Sw2 f0/10Sw0 f0/3-----Sw3 f0/10开启Sw0 Trunk:5.开启Sw1、Sw2、Sw3 的VTP及Trunk’Sw1 Sw2、Sw3配置方法相同,就不一一演示,只演示Sw1的配置1).开启Sw1 Trunk2).开启Sw1 VTP ’注意,要与Sw0的VTP配置完全一样3)Sw1、Sw2、Sw3完成以上配置后即可获得Vlan同步信息二.配置二层交换机1.,将PC划入Vlan组财务部IP:192.168.1.0/24 (PC1、PC3)销售部IP:192.168.2.0/24 (PC2、PC5)生产部IP:192.168.3.0/24 (PC4、PC6)__________________________________________________________________________________ Sw1端口连接Sw1 F0/11--------PC1 (财务部IP:192.168.1.1/24)Sw1 F0/12--------PC2(销售部IP:192.168.2.1/24)查看Vlan信息表:Sw2端口连接Sw1 F0/11--------PC3 (财务部IP:192.168.1.2/24)Sw1 F0/13--------PC4 (生产部IP:192.168.3.1/24)Sw3端口连接Sw1 F0/12--------PC5 (销售部IP:192.168.2.2/24)Sw1 F0/12--------PC6 (生产部IP:192.168.3.2/24)__________________________________________________________________________________ 2.配置Sw1,Sw2,Sw3之间的TrunkSw1 F0/1=========Sw2 F0/1 Trunk 通道:Vlan 2F0/2=========Sw2 F0/2 Trunk 通道:Vlan 3Sw2 F0/3=========Sw3 F0/3 Trunk 通道:Vlan3F0/4=========Sw3 F0/4 Trunk 通道:Vlan 4到此,所有二层交换机及三层交换机的配置已经全部完成,接下来测试配置结果1.测试同Vlan互Ping1).财务Pc1(192.168.1.1/24)及Pc3 (192.168.1.2/24)通信测试2).销售Pc2(192.168.2.1/24)及Pc5 (192.168.2.2/24)通信测试2).销售Pc4(192.168.3.1/24)及Pc6 (192.168.3.2/24)通信测试2.测试跨Vlan互Ping首先将各Vlan的Pc添加网关(在此就不演示了)Vlan2 网关:192.168.1.254/24 (PC1 、Pc3)Vlan3 网关:192.168.2.254/24(Pc2、Pc5)Vlan4 网关:192.168.3.254/24(Pc4、Pc6)实验结束:)。
思科交换机的VLAN、TRUNK、VTP配置教程
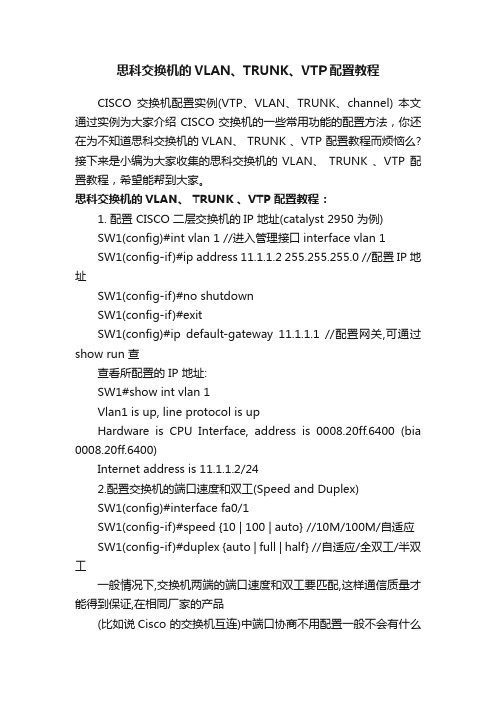
思科交换机的VLAN、TRUNK、VTP配置教程CISCO交换机配置实例(VTP、VLAN、TRUNK、channel) 本文通过实例为大家介绍CISCO交换机的一些常用功能的配置方法,你还在为不知道思科交换机的VLAN、 TRUNK 、VTP 配置教程而烦恼么?接下来是小编为大家收集的思科交换机的VLAN、TRUNK 、VTP 配置教程,希望能帮到大家。
思科交换机的VLAN、 TRUNK 、VTP 配置教程:1. 配置 CISCO 二层交换机的IP 地址(catalyst 2950 为例)SW1(config)#int vlan 1 //进入管理接口interface vlan 1SW1(config-if)#ip address 11.1.1.2 255.255.255.0 //配置IP 地址SW1(config-if)#no shutdownSW1(config-if)#exitSW1(config)#ip default-gateway 11.1.1.1 //配置网关,可通过show run 查查看所配置的 IP 地址:SW1#show int vlan 1Vlan1 is up, line protocol is upHardware is CPU Interface, address is 0008.20ff.6400 (bia 0008.20ff.6400)Internet address is 11.1.1.2/242.配置交换机的端口速度和双工(Speed and Duplex)SW1(config)#interface fa0/1SW1(config-if)#speed {10 | 100 | auto} //10M/100M/自适应SW1(config-if)#duplex {auto | full | half} //自适应/全双工/半双工一般情况下,交换机两端的端口速度和双工要匹配,这样通信质量才能得到保证,在相同厂家的产品(比如说Cisco 的交换机互连)中端口协商不用配置一般不会有什么问题,可以通过show interface 查看端口的速度和双工。
CISCO交换机VTP配置参考实例

CISCO交换机VTP配置参考实例作者: 佚名, 出处:IT专家网论坛,责任编辑: 白志飞,2009-12-02 07:01在配置VTP之前,首先要明白几点:在配置VTP之前,首先要明白几点:1、Vtp实现单点访问控制vlan信息的作用。
是CISCO私有协议。
2、Vtp工作在OSI参考模型第二层,组播地址:01-00-0c-cc-cc-cc。
3、Vtp 使用条件:交换机直连、同域(domain),同密(Password),拥有中继端口(trunk)。
4、Vtp 模式:Vtp Server :交换机默认为Server模式,在域中至少有一台交换机处于此模式。
Client、Transparent 此模式在VTP 不同版本表现是不同的。
5、Vtp 消息类型:每300秒发送一次,当网络拓扑发生变化时也会发送。
汇总通告:包含目前的VTP域名与配置修改编号。
配置修改编号的范围(0~2^32 - 1)。
子集通告:包含vlan 配置的详细信息。
通告请求:发送前提为,1、交换机重起后 2 、VTP 域名发生变化后3 、交换机接受到修改配置编号比自己高的汇总通告。
6、交换机修改配置编号重设为0的方法:a、更改交换机的域名b、将交换机的模式该为透明模式后再该为其他的模式。
7、Vtp 修剪在服务器上打vtp pruning 可减少不必要的广播。
如图,交换机Switch0的f0/1、f0/2、f0/3分别与三台子交换机相连,在这里我们把Switch0做为Vtp Server,剩下三台做为Vtp Client来配置整个网络,三台交换机f0/24分别与三台PC相连,依次为Vlan10、Vlan20、Vlan30。
具体命令如下:Switch0配置Switch#configSwitch(config)#int range f0/1-3Switch(config-if-range)#switchport mode trunkSwitch(config-if-range)#endSwitch#vlan databaseSwitch(vlan)#vtp domain qqgzsSwitch(vlan)#vtp password qqgzsSwitch(vlan)#vlan 10Switch(vlan)#vlan 20Switch(vlan)#vlan 30Switch1配置:Switch(config)#int f0/1Switch(config-if)#switchport mode trunk Switch(config-if)#endSwitch#vlan databaseSwitch(vlan)#vtp domain qqgzsSwitch(vlan)#vtp password qqgzsSwitch(vlan)#vtp clientSwitch(vlan)#exitSwitch#configSwitch(config)#int f0/24Switch(config-if)#switchport access vlan 10 Switch2与Switch3配置类似,在这里不再多说。
思科设备交换机(switch)vtp学习功能的配置

在SwA上进行配置如下(配置服务器端):SwA>enableSwA#vlan databaseSwA(vlan)#SwA(vlan)#vlan 2 name TztA //创建vlan 2 名称为TztAVLAN 2 added:Name: TztASwA(vlan)#vlan 3 name TztB //创建vlan 3 名称为TztBVLAN 3 added:Name: TztBSwA(vlan)#vtp domain //进入vtp配置模式,并配置vtp域名Changing VTP domain name from NULL to SwA(vlan)#vtp password 123 //配置vtp服务器端密码,此密码用于客户端核对Setting device VLAN database password to 123SwA(vlan)#vtp server //配置成vtp服务器端,默认也是开启的Device mode already VTP SERVER.SwA(vlan)#exitAPPLY completed.Exiting....SwA#show vlan //查看vlan配置情况,如下:SwA#show vlanVLAN Name Status Ports---- -------------------------------- --------- -------------------------------1 default active Fa0/2, Fa0/4, Fa0/5, Fa0/6Fa0/7, Fa0/8, Fa0/9, Fa0/11Fa0/12, Fa0/13, Fa0/14, Fa0/15Fa0/16, Fa0/17, Fa0/18, Fa0/19Fa0/20, Fa0/21, Fa0/22, Fa0/23Fa0/24, Gig1/1, Gig1/22 TztA active3 TztB active1002 fddi-default act/unsup1003 token-ring-default act/unsup1004 fddinet-default act/unsup1005 trnet-default act/unsupVLAN Type SAID MTU Parent RingNo BridgeNo Stp BrdgMode Trans1 Trans2---- ----- ---------- ----- ------ ------ -------- ---- -------- ------ ------1 enet 100001 1500 - - - - - 0 02 enet 100002 1500 - - - - - 0 03 enet 100003 1500 - - - - - 0 01002 fddi 101002 1500 - - - - - 0 0--More—在SwB上进行配置如下(配置客户端):Switch#vlan database% Warning: It is recommended to configure VLAN from config mode,as VLAN database mode is being deprecated. Please consult userdocumentation for configuring VTP/VLAN in config mode.Switch(vlan)#vtp domain Domain name already set to .Switch(vlan)#vtp password 123Setting device VLAN database password to 123Switch(vlan)#vtp clientSetting device to VTP CLIENT mode.Switch(vlan)#exitAPPLY completed.Exiting....Switch#show vlan //显示SwB的vlan配置情况,可以看见,我并没有配置TztA和TztB在SwB上,但是这里已经有了这两个vlan,这就是vtp的功能VLAN Name Status Ports---- -------------------------------- --------- -------------------------------1 default active Fa0/1, Fa0/3, Fa0/5, Fa0/6Fa0/7, Fa0/8, Fa0/9, Fa0/11Fa0/12, Fa0/13, Fa0/14, Fa0/15Fa0/16, Fa0/17, Fa0/18, Fa0/19Fa0/20, Fa0/21, Fa0/22, Fa0/23Fa0/24, Gig1/1, Gig1/22 TztA active3 TztB active1002 fddi-default act/unsup1003 token-ring-default act/unsup1004 fddinet-default act/unsup1005 trnet-default act/unsupVLAN Type SAID MTU Parent RingNo BridgeNo Stp BrdgMode Trans1 Trans2 ---- ----- ---------- ----- ------ ------ -------- ---- -------- ------ ------1 enet 100001 1500 - - - - - 0 02 enet 100002 1500 - - - - - 0 03 enet 100003 1500 - - - - - 0 0 1002 fddi 101002 1500 - - - - - 0 0Switch#//接下来若要实现交换机之间互访,设置交换机成trunk模式即可。
实验04 交换机的VTP配置

实验4 交换机的VTP配置实验目的:掌握交换机的VTP配置方法;理解交换机VTP的工作原理;实验工具:Cisco Packet Tracer模拟器实验内容:Part I.按图4.1所示网络拓扑。
其中PC1、PC3属于VLAN1,PC2、PC4属于VLAN2,配置交换机VTP,使得VLAN之间能够通信。
图4.1实验步骤:(1) 按图4.1所示连接网络,并修改各交换机名字。
(2) 配置各PC的IP地址、子网掩码和网关;(3) 设置各交换机相连端口的模式为trunk。
(复制配置命令)1.SW1(config-if)#int range fa0/10 - fa0/11SW1(config-if-range)#sw mode trunk2.Switch>Switch>enSwitch#conf tEnter configuration commands, one per line. End with CNTL/Z.Switch(config)#hosSwitch(config)#hostname SW2SW2(config)#end%SYS-5-CONFIG_I: Configured from console by consoleSW2#%LINEPROTO-5-UPDOWN: Line protocol on Interface FastEthernet0/10, changed state to down%LINEPROTO-5-UPDOWN: Line protocol on Interface FastEthernet0/10, changed state to upSW2#conf tEnter configuration commands, one per line. End with CNTL/Z.SW2(config)#int fa0/10SW2(config-if)#sw mode trunk3.Switch>enSwitch#conf tEnter configuration commands, one per line. End with CNTL/Z.Switch(config)#hosSwitch(config)#hostname SW3SW3(config)#end%SYS-5-CONFIG_I: Configured from console by consoleSW3#conf tEnter configuration commands, one per line. End with CNTL/Z.SW3(config)#int fa0/11SW3(config-if)#sw mode trunk(3) 在交换机SW2上创建vlan2并将fa0/2端口划分到vlan 2中。
手把手教你VTP的实验CISCO

实验VTP一、实验目的1):本实验的目的是通过配置以拓朴图,让我们对VTP的工作原理有更深的认识。
2):掌握VTP配置方法,对VTP在网络上的应用有更深的了解。
二、实验要求:1):知道什么是VTP2):知道如何配置VTP三、实验内容:1、通过拓朴图来研究VTP2、我们可以通过配置VTP服务,让VLAN同步。
四、实验步聚实验拓朴如图实现以下实验:1).把SW2配置成VTP serverSW2#vlan dataSW2(vlan)#vtp serverSW2(vlan)#vtp domain ciscoSW2(vlan)#vlan 2SW2(vlan)#vlan 3SW2(vlan)#vlan 4SW2(vlan)#vlan 5SW2(vlan)#vlan 6SW2(vlan)#vlan 7SW2(vlan)#vlan 8SW2(vlan)#vlan 9SW2(vlan)#vlan 10SW2(vlan)#vlan 11SW2(vlan)#vlan 122).把SW1和SW3配置成VTP clientSW1#vlan dataSW1(vlan)#vtp clientSW1(vlan)#vtp domain ciscoSW3#vlan dataSW3(vlan)#vtp clientSW3vlan)#vtp domain cisco3).分别把SW1、SW2和SW3的trunk启动SW1(config)#int f0/1SW1(config-if)#switchport mode trunkSW2(config)#int f0/1SW2(config-if)#switchport mode trunkSW2(config)#int f0/15SW2(config-if)#switchport mode trunkSW3(config)#int f0/15SW3(config-if)#switchport mode trunkSW1#sh vlan-switchSW3#sh vlan-switch3).分别把SW1、SW2和SW3的端口加入对应的VLAN中SW1(config)#int rang fa0/2 -3SW1(config-if)#switch mode accessSW1(config-if)#switch access vlan 2SW1(config)#int fa0/5SW1(config-if)#switch mode accessSW1(config-if)#switch access vlan 5SW1(config)#int rang fa0/7 -8SW1(config-if)#switch mode accessSW1(config-if)#switch access vlan 7SW2(config)#int fa0/5SW2(config-if)#switch mode accessSW2(config-if)#switch access vlan 5SW2(config)#int fa0/8SW2(config-if)#switch mode accessSW2(config-if)#switch access vlan 8SW2(config)#int fa0/9SW2(config-if)#switch mode accessSW2(config-if)#switch access vlan 9SW2(config)#int fa0/10SW2(config-if)#switch mode accessSW2(config-if)#switch access vlan 10SW3(config)#int rang fa0/2 -3SW3(config-if)#switch mode accessSW3(config-if)#switch access vlan 2SW3(config)#int fa0/4SW3(config-if)#switch mode accessSW3(config-if)#switch access vlan 4SW3(config)#int fa0/12SW3(config-if)#switch mode accessSW3(config-if)#switch access vlan12SW3(config)#int fa0/9SW3(config-if)#switch mode accessSW3(config-if)#switch access vlan 9SW3(config)#int fa0/6SW3(config-if)#switch mode accessSW3(config-if)#switch access vlan64)查看VLANSW1#sh vlan-switch briVLAN Name Status Ports---- -------------------------------- --------- -------------------------------1 default active Fa0/0, Fa0/4, Fa0/6, Fa0/9Fa0/10, Fa0/12, Fa0/13, Fa0/14Fa0/152 VLAN0002 active Fa0/2, Fa0/33 VLAN0003 active4 VLAN0004 active5 VLAN0005 active Fa0/56 VLAN0006 active7 VLAN0007 active Fa0/7, Fa0/88 VLAN0008 active9 VLAN0009 active10 VLAN0010 active11 VLAN0011 active Fa0/1112 VLAN0012 activeSW2#sh vlan-switch briVLAN Name Status Ports---- -------------------------------- --------- -------------------------------1 default active Fa0/0, Fa0/2, Fa0/3, Fa0/4Fa0/6, Fa0/7, Fa0/11, Fa0/12Fa0/13, Fa0/142 VLAN0002 active3 VLAN0003 active4 VLAN0004 active5 VLAN0005 active Fa0/56 VLAN0006 active7 VLAN0007 active8 VLAN0008 active Fa0/89 VLAN0009 active Fa0/910 VLAN0010 active Fa0/1011 VLAN0011 active12 VLAN0012 activeSW3#sh vlan-switch briVLAN Name Status Ports---- -------------------------------- --------- -------------------------------1 default active Fa0/0, Fa0/1, Fa0/5, Fa0/7Fa0/8, Fa0/10, Fa0/11, Fa0/13Fa0/142 VLAN0002 active Fa0/2, Fa0/33 VLAN0003 active4 VLAN0004 active Fa0/45 VLAN0005 active6 VLAN0006 active Fa0/67 VLAN0007 active8 VLAN0008 active9 VLAN0009 active Fa0/910 VLAN0010 active11 VLAN0011 active12 VLAN0012 active Fa0/12。
VTP配置 实验报告
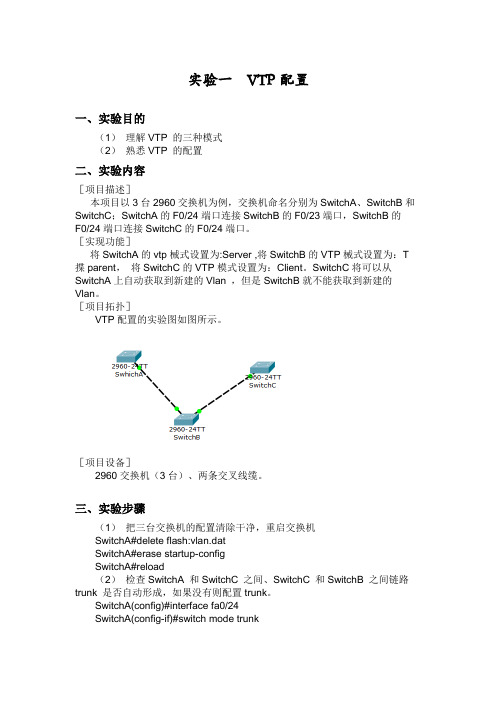
实验一VTP配置一、实验目的(1)理解VTP 的三种模式(2)熟悉VTP 的配置二、实验内容[项目描述]本项目以3台2960交换机为例,交换机命名分别为SwitchA、SwitchB和SwitchC;SwitchA的F0/24端口连接SwitchB的F0/23端口,SwitchB的F0/24端口连接SwitchC的F0/24端口。
[实现功能]将SwitchA的vtp械式设置为:Server ,将SwitchB的VTP械式设置为:T 揲parent,将SwitchC的VTP模式设置为:Client。
SwitchC将可以从SwitchA上自动获取到新建的Vlan ,但是SwitchB就不能获取到新建的Vlan。
[项目拓扑]VTP配置的实验图如图所示。
[项目设备]2960交换机(3台)、两条交叉线缆。
三、实验步骤(1)把三台交换机的配置清除干净,重启交换机SwitchA#delete flash:vlan.datSwitchA#erase startup-configSwitchA#reload(2)检查SwitchA 和SwitchC 之间、SwitchC 和SwitchB 之间链路trunk 是否自动形成,如果没有则配置trunk。
SwitchA(config)#interface fa0/24SwitchA(config-if)#switch mode trunkSwitchB(config)#interface rage fa0/23 - fa0/24 SwitchB(config-if)#switch mode trunkSwitchC(config)#interface fa0/24 SwitchC(config-if)#switch mode trunk(3)配置SwitchA 为VTP serverSwitchA(config)#vtp mode server //配置SwitchA 为VTP server,实际上这是默认值SwitchA(config)#vtp domain CISCO //配置VTP 域名为:CISCOSwitchA(config)#vtp password cisco //配置VTP 的密码。
思科VTP配置和VLAN间路由

5、按照图示配置路由器的F0/0、F0/1的IP地址,并启用这两个端口
6、想一想交换机与路由器相连的两个端口应该怎么设置?为什么?
7、要让PCA和PCB通信,必须分别把PCA,PCB的网关设为什么?
网络拓扑图如下:
1、按上图连好线。(假设PCA接入交换机的F0/5,PCB接入交换机的F0/10,路由器的F0/0接入交换机的F0/1,设备原有的配置。
3、设置PCA的IP为192.168.1.5/24;设置PCB的IP为192.168.2.5/24
2、清空交机上的配置。
3、相看交换机的初始VTP状态:
域名为空,模式为服务器。
4、设置SWA为VTP SERVER模式,域名为ABC,密码为123。
5、在SWA上配置VLAN 10,20
6、设置SWB的VTP模式为CLIENT,域名为ABC,密码为123。
7、查看SWB上的VLAN
可以看到在SWA上生成的VLAN 10,20已经传播到SWB上。
封装dot1q vlan 10
[Router-Ethernet0.1]vlan-type dot1q vid 10
其余命令类同思科。
在交换机上生成VLAN 10,VLAN 20,把F0/5划入VLAN 10,把F0/10划入VLAN 20。
下面重点讲解路由器子接口的配置
4、在路由器上的物理接口F0/0上生成子接口F0/0.1
Router(config)#interface f0/0.1
在f0/0/.1上封装VLAN 10
Router(config-subif)#encapsulation dot1q 10
- 1、下载文档前请自行甄别文档内容的完整性,平台不提供额外的编辑、内容补充、找答案等附加服务。
- 2、"仅部分预览"的文档,不可在线预览部分如存在完整性等问题,可反馈申请退款(可完整预览的文档不适用该条件!)。
- 3、如文档侵犯您的权益,请联系客服反馈,我们会尽快为您处理(人工客服工作时间:9:00-18:30)。
在配置VTP之前,首先要明白几点:
1、Vtp实现单点访问控制vlan信息的作用。是CISCO私有协议。
2、Vtp工作在OSI参考模型第二层,组播地址:01-00-0c-cc-cc-cc。
3、Vtp使用条件:交换机直连、同域(domain),同密(Password),拥有中继端口(trunk)。
Switch(config-if)#end
Switch#vlan database
Switch(vlan)#vtp domain qqgzs
Switch(vlan)#vtp password qqgzs
Switch(vlan)#vtp client
Switch(vlan)#exit
Switch#config
4、Vtp模式:Vtp Server :交换机默认为Server模式,在域中至少有一台交换机处于此模式。Client、Transparent此模式在VTP不同版本表现是不同的。
5、Vtp消息类型:每300秒发送一次,当网络拓扑发生变化时也会发送。
汇总通告:包含目前的VTP域名与配置修改编号。配置修改编号的范围(0~2^32 - 1)。
如图,交换机Switch0的f0/1、f0/2、f0/3分别与三台子交换机相连,在这里我们把Switch0做为Vtp Server,剩下三台做为Vtp Client来配置整个网络,三台交换机f0/24分别与三台PC相连,依次为Vlan10、Vlan20、Vlan30。
具体命令如下:
Switch0配置
Configuration Revision : 3
Maximum VLANs supported locally : 255
Number of existing VLANs : 8
VTP Operating Mode : Client
VTP Domain Name : qqgzs
VTP Pruning Mode : Disabled
Switch(vlan)#vtp password qqgzs
Switch(vlan)#vlan 10
Switch(vlan)#vlan 20
Switch(vlan)#vlan 30
Switch1配置:
Switch(config)#int f0/1
Switch(config-if)#switchport mode trunk
Switch#config
Switch(config)#int range f0/1-3
Switch(config-if-range)#switchport mode trunk
Switch(config-if-raபைடு நூலகம்ge)#end
Switch#vlan database
Switch(vlan)#vtp domain qqgzs
Switch(config)#int f0/24
Switch(config-if)#switchport access vlan 10
Switch2与Switch3配置类似,在这里不再多说。
在Switch1上显示VTP信息如下:
Switch#show vtp status
VTP Version : 2
子集通告:包含vlan配置的详细信息。
通告请求:发送前提为,1、交换机重起后2、VTP域名发生变化后3、交换机接受到修改配置编号比自己高的汇总通告。
6、交换机修改配置编号重设为0的方法:
a、更改交换机的域名b、将交换机的模式该为透明模式后再该为其他的模式。
7、Vtp修剪在服务器上打vtp pruning可减少不必要的广播。
注:在Packet Tracer 5.2上做本实验时发现无法启动Vtp修剪功能,Vtp修剪可在全局模式下启动,命令为:
Switch(config)#vtp pruning
也可以在指定的接口中修剪掉某一Vlan
Switch(config-if)#switchport trunk pruning vlan?
VTP V2 Mode : Disabled
VTP Traps Generation : Disabled
MD5 digest : 0xC8 0x7E 0x84 0x35 0x1D 0x0A 0x11 0xDA
Configuration last modified by 0.0.0.0 at 3-1-93 00:51:56
